

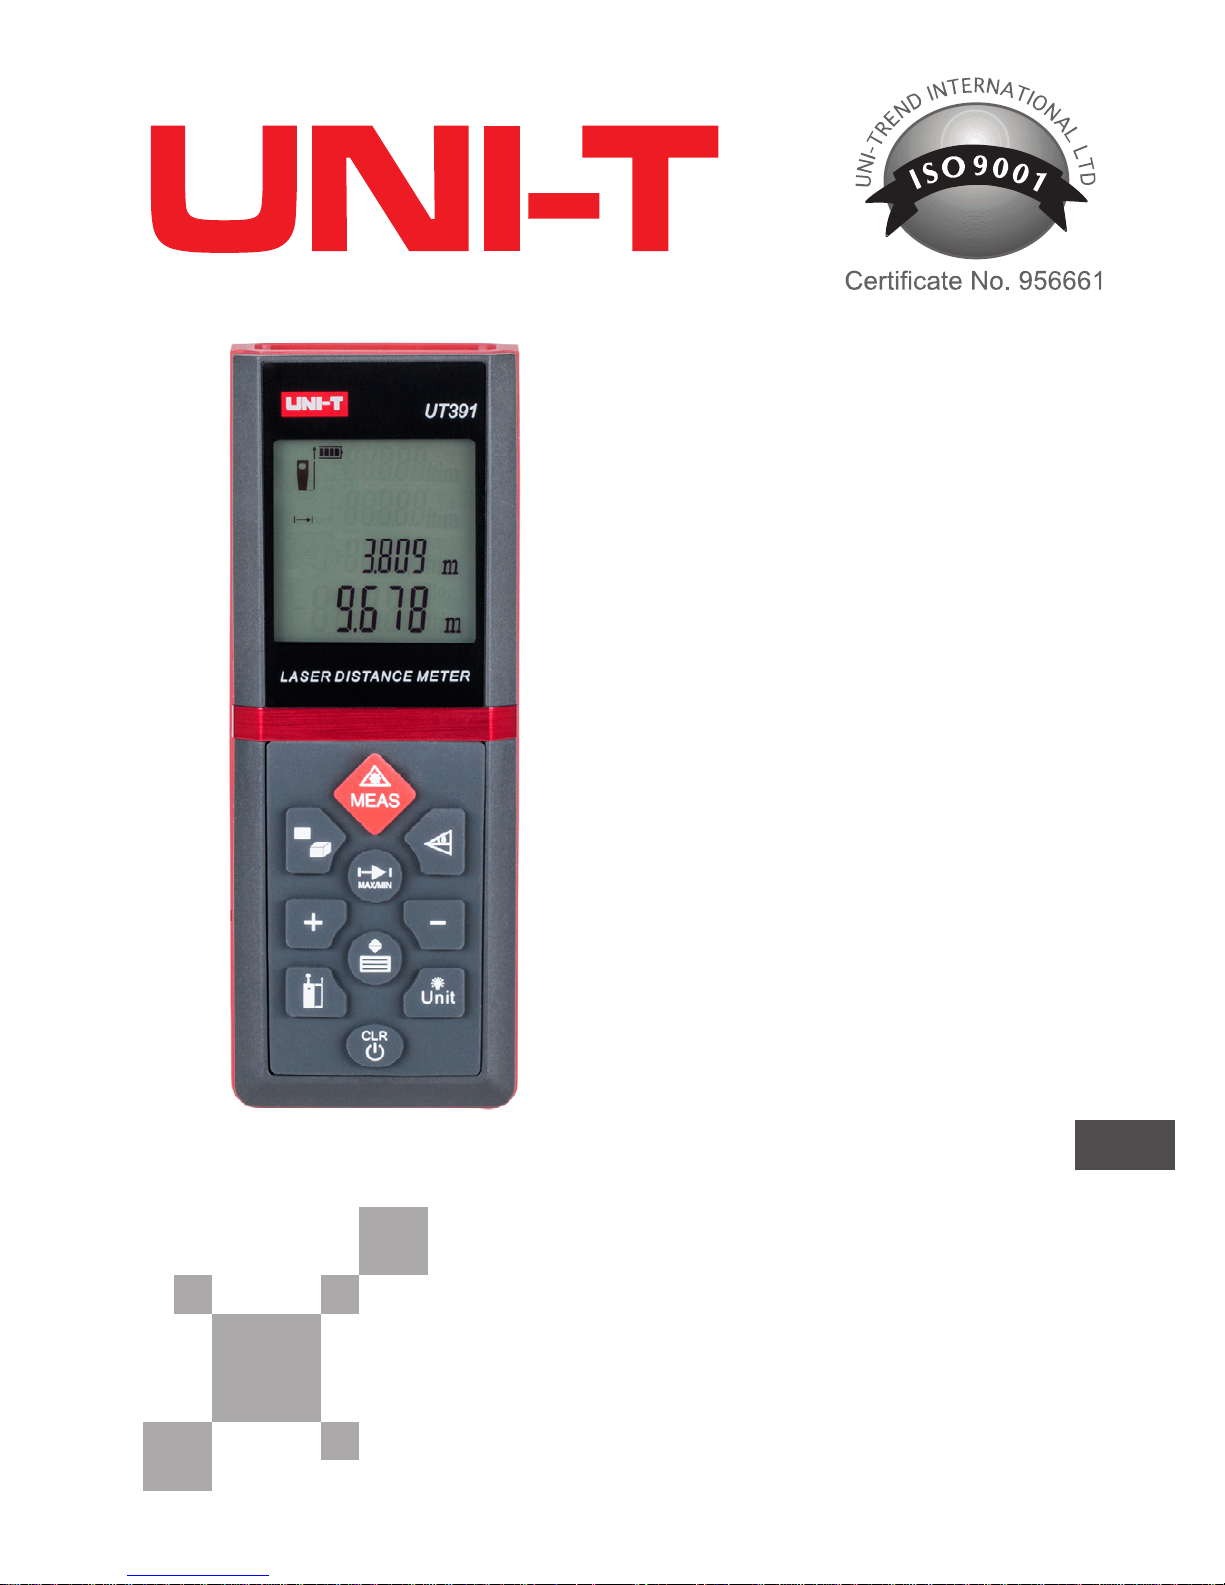
Page 1
Instrukcja obsługi
PL
Manual de utilizare
RO
Owner’s manual
EN
Bedienungsanleitung
DE
Laser
distance
meter
MIE0149
Page 2

Page 3

3
Bedienungsanleitung
DE
EINLEITUNG
MIE0149 ist ein Messgerät mit hoher Präzision und Multi-Funktions-Abstandsmessung. Es misst Distanz, Fläche, Volumen und
Pythagoras Gesetz. MIE0149 ist leicht, einfach zu bedienen und
zuverlässige Messungen, können sicherstellen, dass Ihre Messungen genauer, einfacher und schneller sind.
INHALT
1. Multimeter
2. Bedienungsanleitung
3. AAA Batterien 2×1,5V
4. Tragetasche
5. Mini Schraubendreher
SICHERHEITSANWEISUNGEN
Zulässige Nutzung
• Entfernungsmessung.
• Rechenfunktionen, z.B. Flächen und Volumen.
• Indirekte Messungen mit Pythagoras.
Unzulässige Nutzung
• Verwendung des Produktes ohne Anleitungen.
• Verwendung außerhalb der angegebenen Grenzwerte.
• Deaktivierung von Sicherheitseinrichtungen und Entfernen von
Hinweis- und Warnschildern.
• Eröffnung des Produktes mit Werkzeugen (Schraubenzieher,
usw.), soweit nicht ausdrücklich für bestimmte Fälle erlaubt.
• Durchführung von Umbauten oder Veränderungen des Produkts.
• Verwendung von Zubehör anderer Hersteller, ohne die ausdrückliche Zustimmung von UNI-T.
Page 4

Bedienungsanleitung
4
DE
• Direktes Zielen in die Sonne oder Blendung.
• Absichtliche Blendung Dritter, ebenso im dunklen, Ungenügende
Absicherung des Messstandortes (z.B. bei der Messung auf den
Straßen, Baustellen, usw.).
WARNUNG: Der direkte Blick in den Strahl mit op-
tischen Hilfsmitteln (wie z.B. Ferngläser, Fernrohre)
kann gefährlich sein.
Laser Klasse II Produkt.
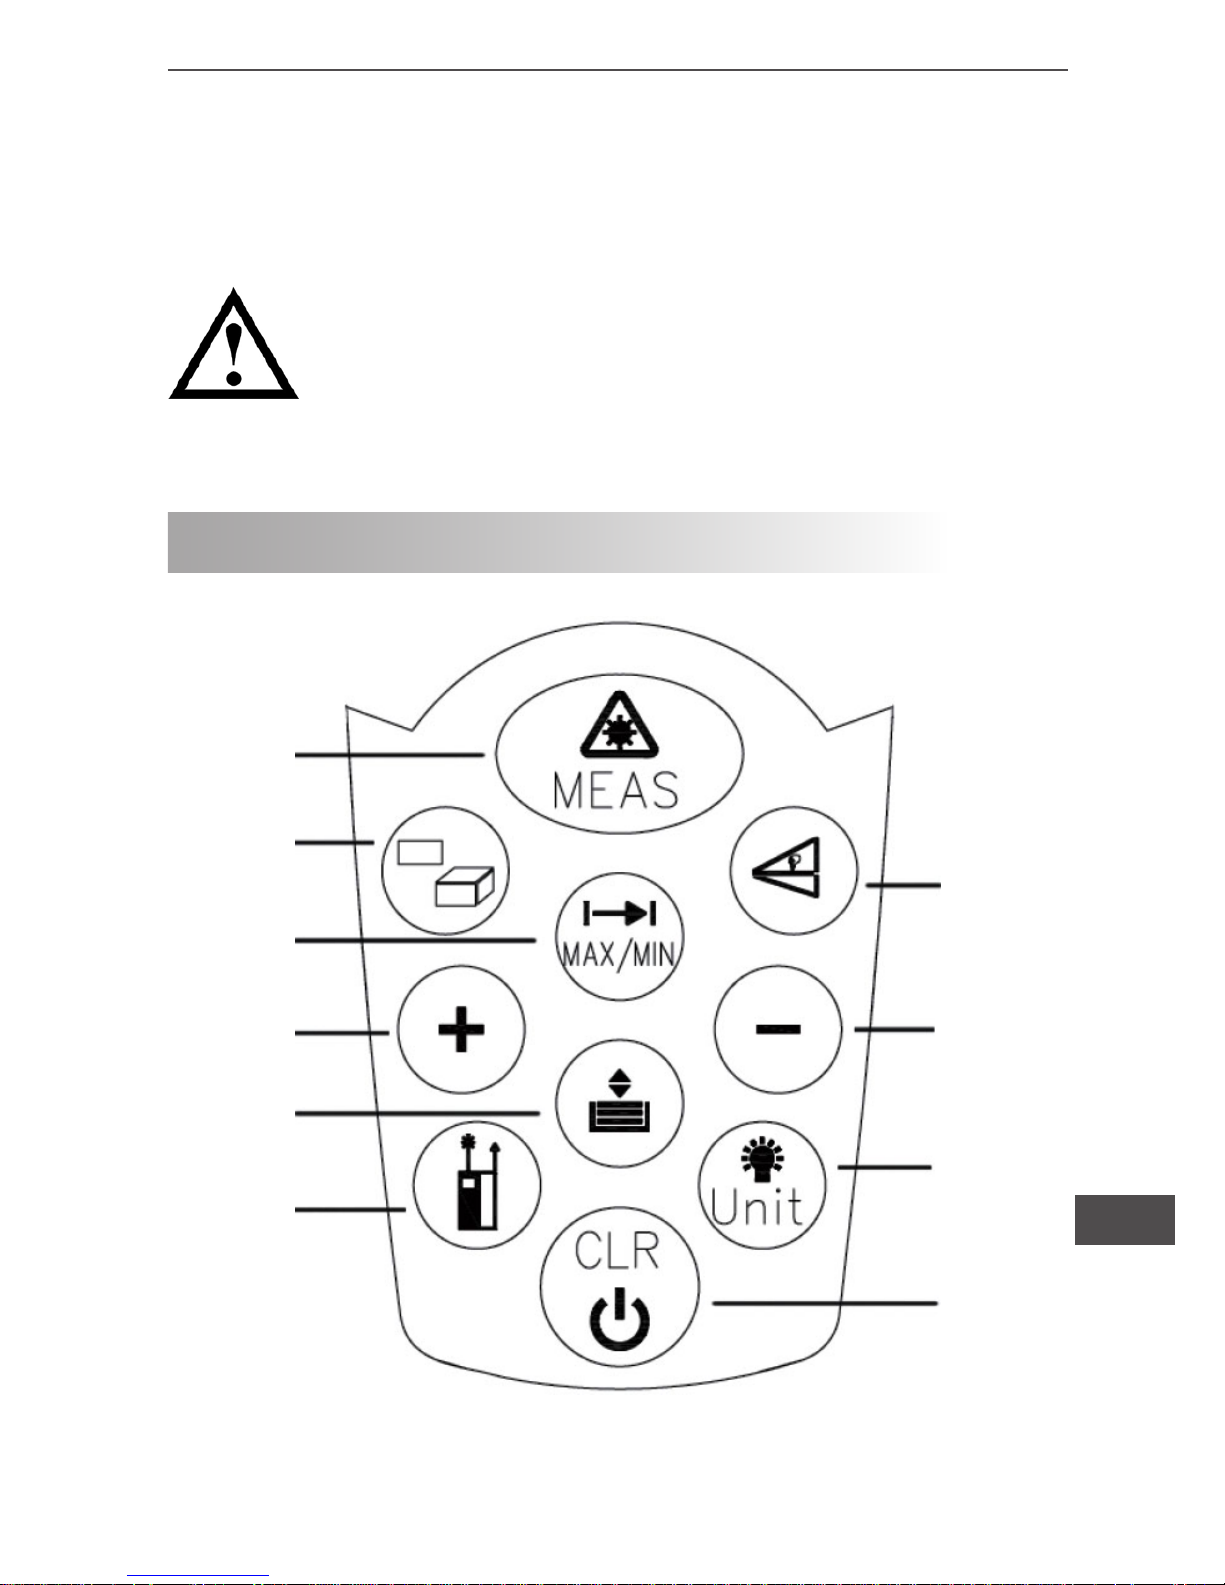
TASTATURAUFBAU DES MESSGERÄTES
3
6
9
10
8
7
5
4
2
1
Page 5
5
Bedienungsanleitung
DE
1. Taste ON / MEAS (Ein/Messung)
2. Taste Fläche/ Volumen
3. Taste Indirekte Messung
4. Taste kontinuierliche Messung
5. Taste Plus (+)
6. Taste Minus (-)
7. Taste Speichern
8. Taste Referenzniveau
9. Taste Beleuchtung
10. Taste Löschen/Aus
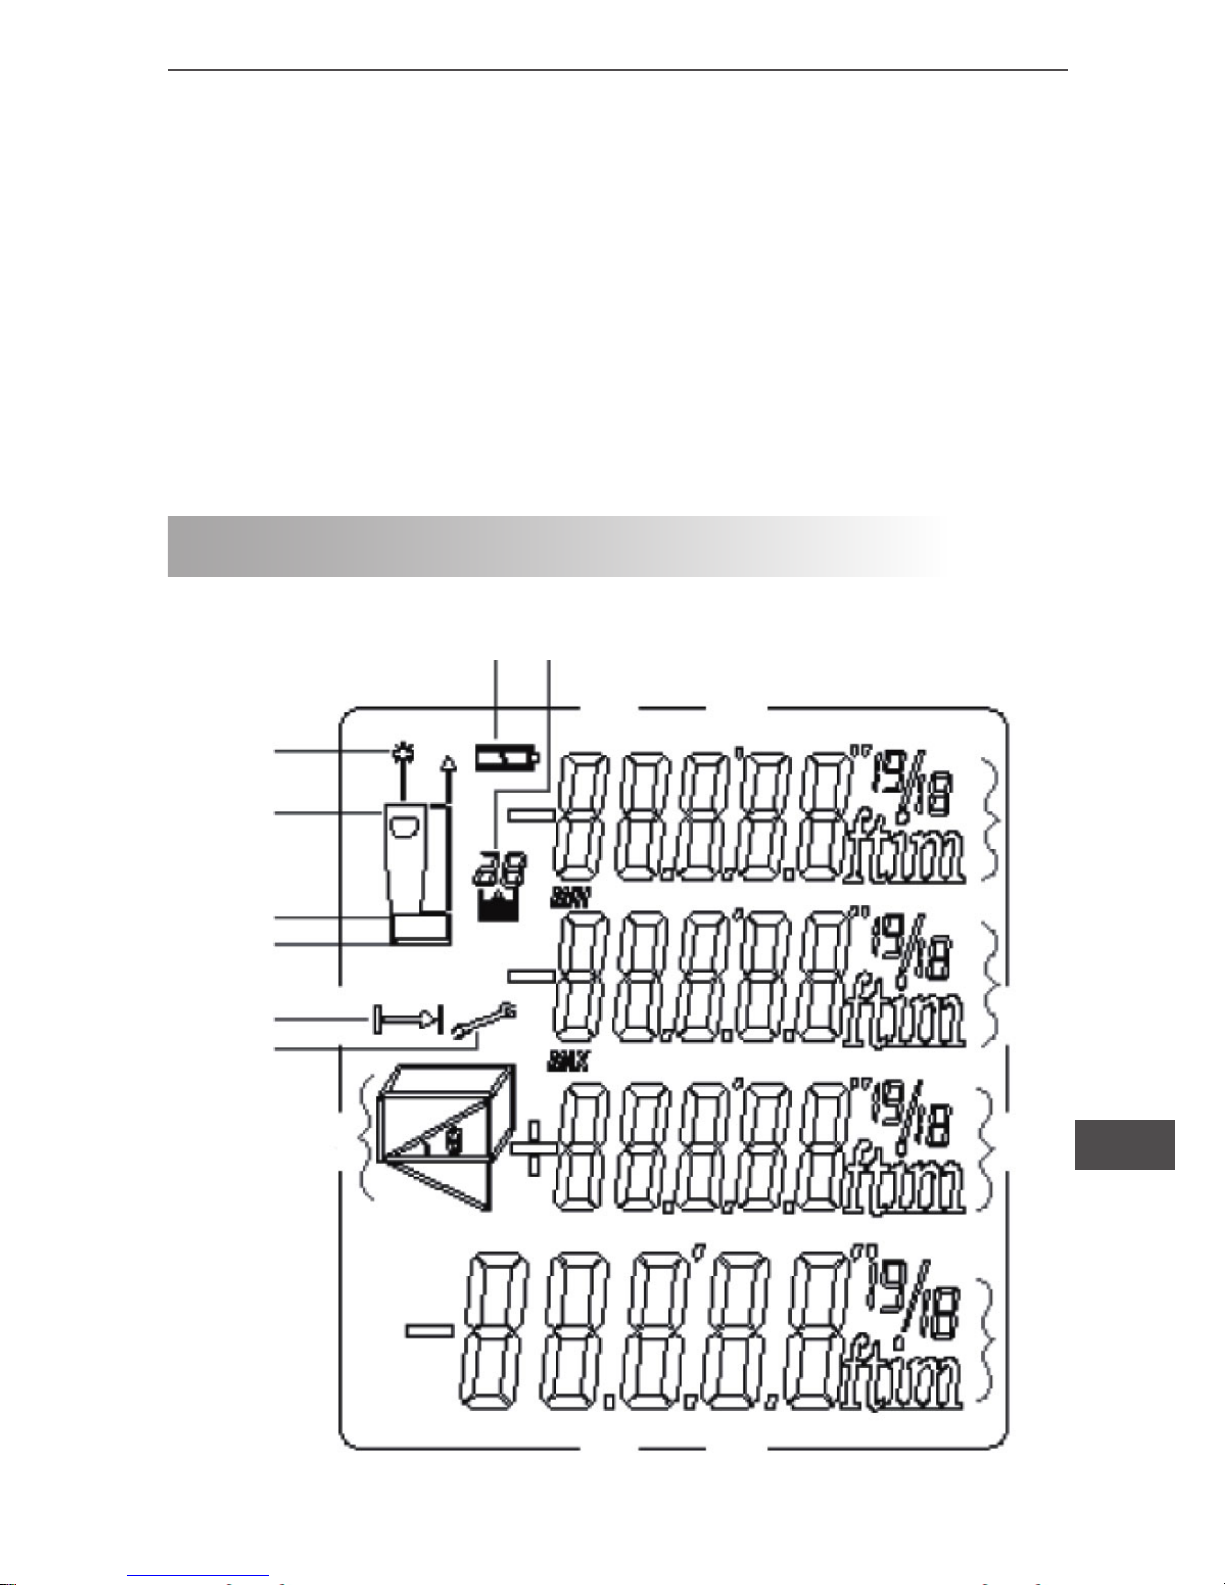
LCD DISPLAY
1
2
3
4
5
6,7,8,9
10
11
12
13
14
15
Page 6

Bedienungsanleitung
6
DE
EINSTELLEN UND BEDIENEN DES MESSGERÄTES
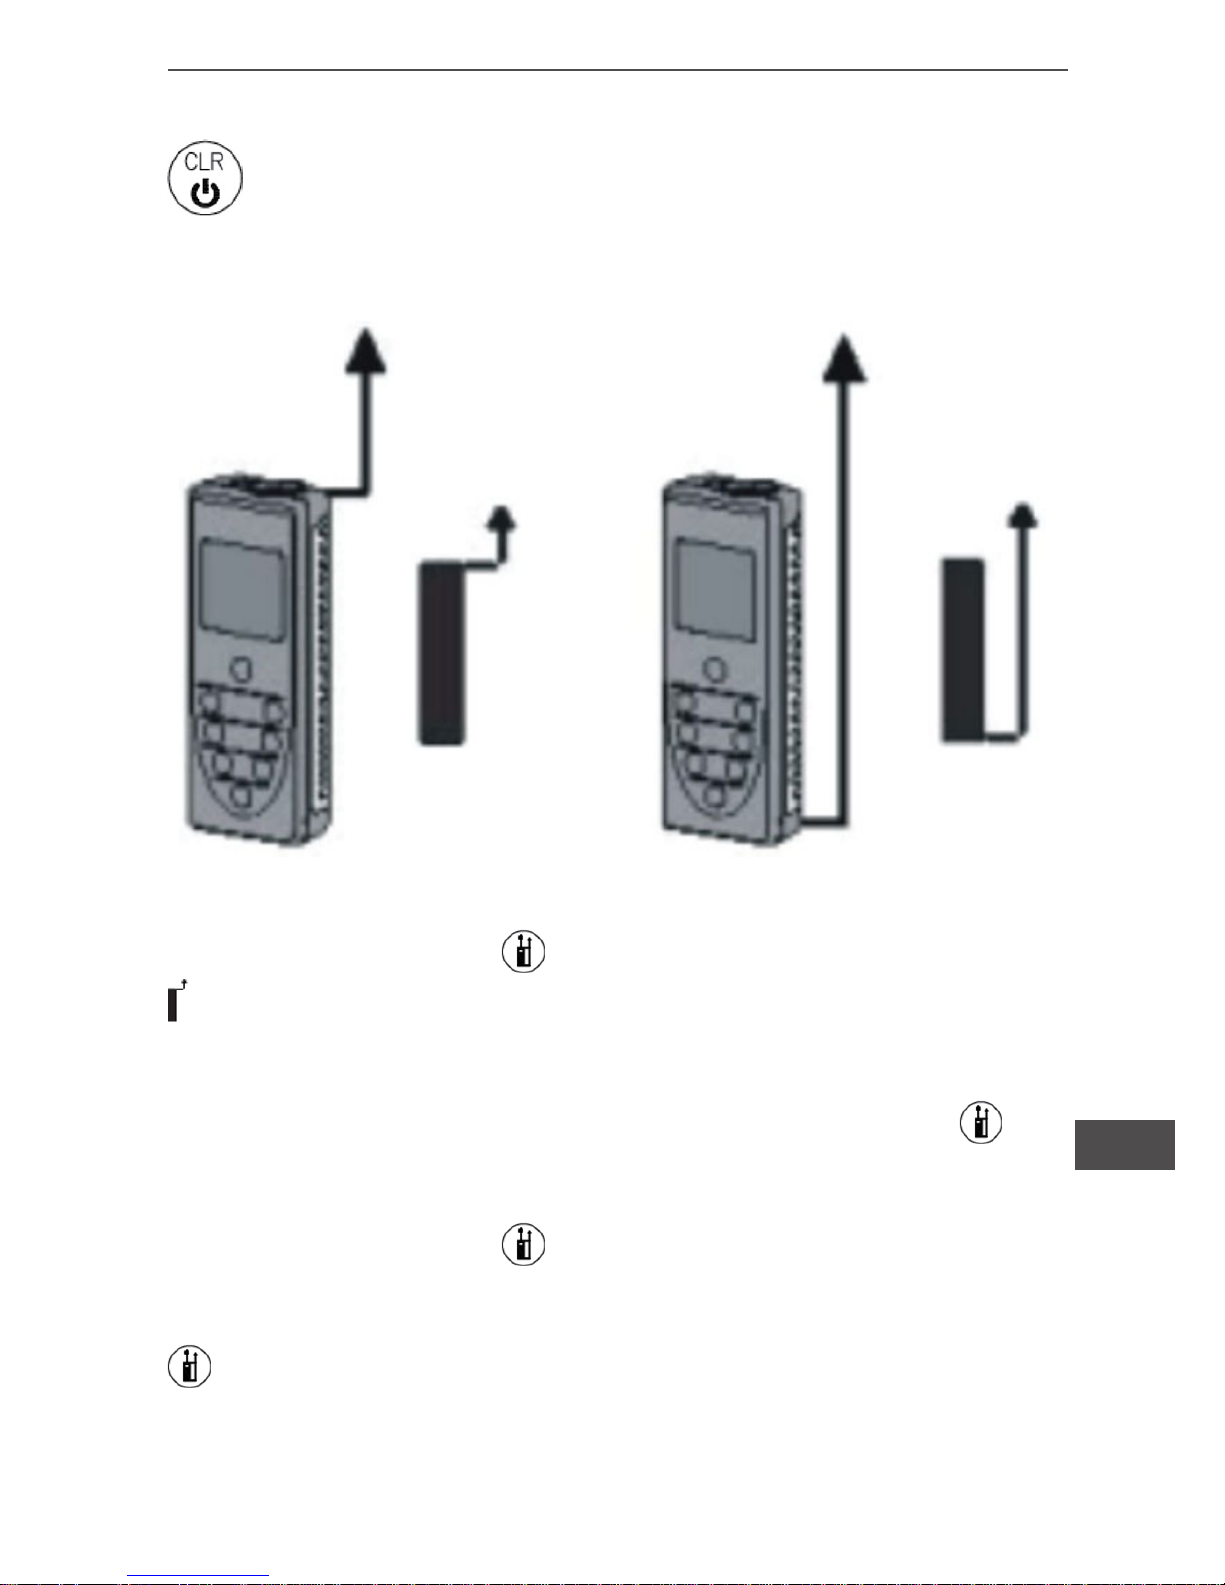
Ein- und Ausschalten
Schaltet gerät und Laser ein.
Langes drücken der Taste schaltet das Gerät aus.
Das Gerät schaltet sich automatisch aus nach drei Minuten Inaktivität.
1. Laser aktiv
2. Referenzniveau (Front)
3. Referenzniveau (Rückwärts)
4. Entfernungsmessung
5. Instrument Fehlerwarnung
6,7,8,9. Variable Messungsfunktionen
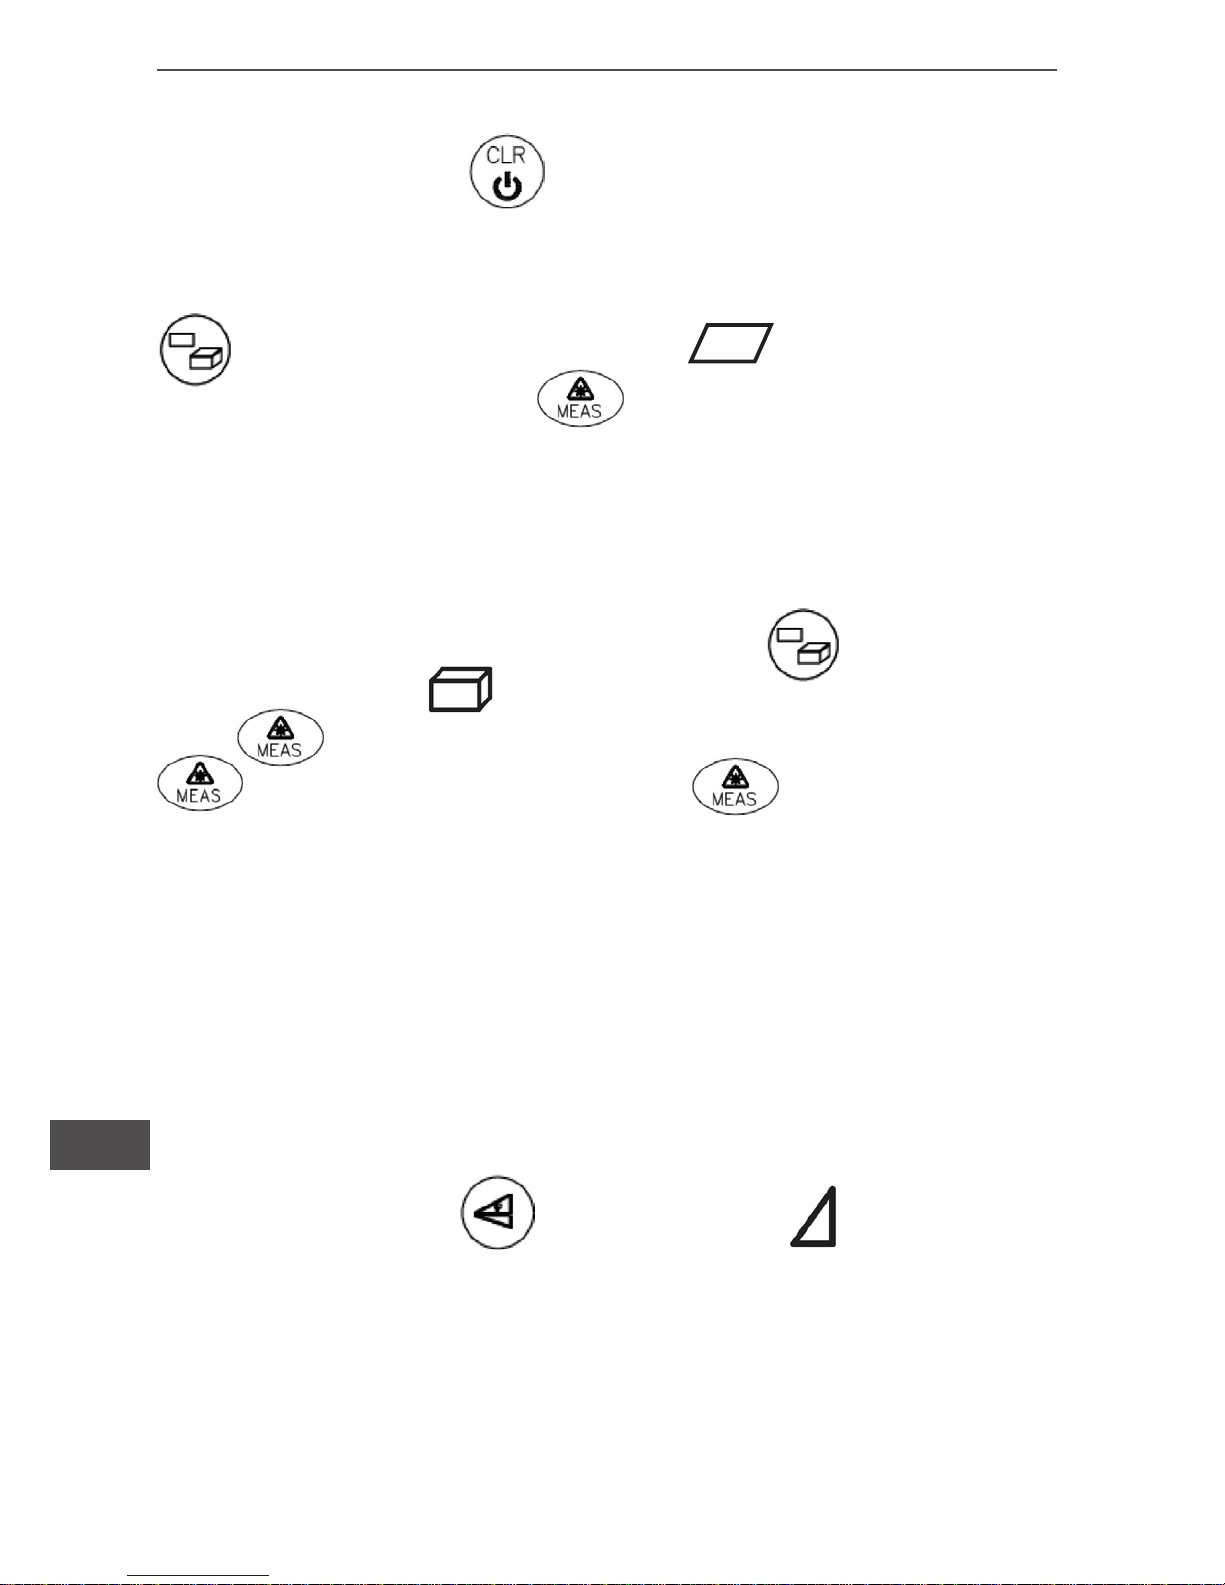
Flächenmessung
Volumenmessung
Indirekt (2-mal) Messung
Indirekt (3-mal) Messung
10. Batteriestatus
11. Geschichtsspeicher, Aufrufen von Werten
12. Anzeigelinie Erster Wert, Minimalwert
13. Anzeigelinie Zweiter Wert, Maximalwert
14. Anzeigelinie dritter Wert
15. Ergebnislinie für letzte Messung oder Rechenergebnis
Page 7
7
Bedienungsanleitung
DE
Taste LÖSCHEN (CLEAR)
Die letzte Aktion wird abgebrochen oder die angezeigten
Daten werden gelöscht.
Einstellen des Referenzniveaus
Die Standard-Referenzniveau-Einstellung ist von der Rückseite
des Gerätes.
Drücken Sie diese Taste
, um die Auswahl von der Vorderkante
, einzustellen, ein spezieller Piep-Ton, ertönt wenn die Referenzniveau-Einstellung geändert wird. Nach einem Neustart, kehrt die
Referenzniveau-Einstellung automatisch auf die Standardeinstel-
lung (hintere Messebene) zurück. Drücken Sie diese Taste
erneut, um die nächste Auswahl Referenzniveau-Einstellung von
der Hinteren Kante einzustellen.
Drücken Sie diese Taste
um die hintere ReferenzniveauEinstellung erneut auszuwählen. In einem Wort, um die Referenzniveau-Einstellung auszuwählen, drücken Sie wiederholt die Taste
bis der gewünschte Referenzniveau-Einstellung im Display
angezeigt wird. Jedes Mal nach dem Einschalten bendet sich der
hintere Rand des Messwerkzeugs voreingestellten als Referen-
zniveau.
Page 8
Bedienungsanleitung
8
DE
Kontinuierliche Messung & Max und Mini-Messung
Die Funktion kontinuierliche Messung (Tracking) wird verwendet
zur Übertragung der Messungen, z.B. aus Bauplänen. Im kon-
tinuierlichen Messmodus kann das Messwerkzeug nahe dem Ziel
bewegt werden, wobei der gemessene Wert etwa alle 0,5 Sekunden aktualisiert wird. Die entsprechenden dynamischen maximalen
und minimalen Werte werden in der ersten und der zweiten Zeile
angezeigt. Als ein Beispiel kann sich der Benutzer von einer Wand
Displaybeleuchtung
Drücken Sie die Taste, die Beleuchtung kann Ein- oder
Ausgeschaltet werden. Benutzer kann die Beleuchtung einschalten
wenn Er/Sie in dunklen Situationen benden. Der Messwert ist klar
sichtbar im LCD-Display.
Einstellen der Messeinheit für Entfernungsmessung
Langes drücken der Taste zum Wechsel zur nächsten
Messeinheit m, ft. in, ft/in dann um weiterzumachen drücken Sie
die Taste zur Auswahl der nächsten Messeinheit.
MESSUNG
Einzelne Entfernungsmessung
Drücken Sie die Taste um den Laser einzuschalten.
Nochmaliges drücken um die Messung zu beginnen. Der gemessene Wert wird sogleich angezeigt.
Page 9

9
Bedienungsanleitung
DE
in die gewünschte Entfernung bewegen, während der tatsächliche Abstand
kontinuierlich abgelesen werden kann.
Für die kontinuierliche Messung,
drücken Sie die Taste
Die Funk-
tion kontinuierliche Messung (Tracking)
wird verwendet zur Übertragung der
Messungen, z.B. aus Bauplänen. Im
kontinuierlichen Messmodus kann das
Messwerkzeug nahe dem Ziel bewegt
werden, wobei der gemessene Wert
etwa alle 0,5 Sekunden aktualisiert wird.
Die entsprechenden dynamischen maximalen und minimalen Werte werden
in der ersten und der zweiten Zeile
Funktionen
Die nächste Messung wird zur vorherigen hinzugefügt, dan-
ach drücken sie die Taste
, der zweite Messwert wird
angezeigt und das Ergebnis wird automatisch angezeigt.
Die nächste Messung wird von der vorherigen subtrahiert,
danach drücken Sie die Taste
, das Ergebnis wird in der
Ergebnislinie angezeigt, mit dem vorherigen Messergebnis in der
zweiten Linie.
angezeigt. Als ein Beispiel kann sich der Benutzer von einer Wand
in die gewünschte Entfernung bewegen, während der tatsächliche
Abstand kontinuierlich abgelesen werden kann. Für die kontinuierli-
che Messung,
um die Funktion zu beenden. Die Funktion
wird nach 5 Minuten kontinuierliche Messung beendet. Mit dieser
Funktion können Kunden den maximalen und minimalen Abstand
von einem bestimmten Punkt messen.
Page 10
Bedienungsanleitung
10
DE
Wiederholen Sie obige Schritte, das Gerät wird die Werte hinzufü-
gen oder subtrahieren.
Der letzte Schritt wird abgebrochen.
Fläche
Einmaliges drücken, das Symbol erscheint im Dis-
play. Drücken Sie die Taste
um die zweite Längenmessung
(z.B. Breite) vorzunehmen. Nach der zweiten Messung wird die
Fläche automatisch berechnet und in der Ergebnislinie angezeigt.
Die letzte Messung wird in der zweiten Linie angezeigt.
Volumen
Für Volumenmessung, drücken Sie die Taste zweimal, bis
die Flächenanzeige
im Display erscheint. Drücken Sie die
Taste
um die Länge zu messen. Drücken Sie diese Taste
für Breite. Drücken Sie die Taste um die Höhe zu
messen. Nach der dritten Messung wird das Volumen automatisch
berechnet und angezeigt. Die letzte individuelle Messung wird
nicht angezeigt.
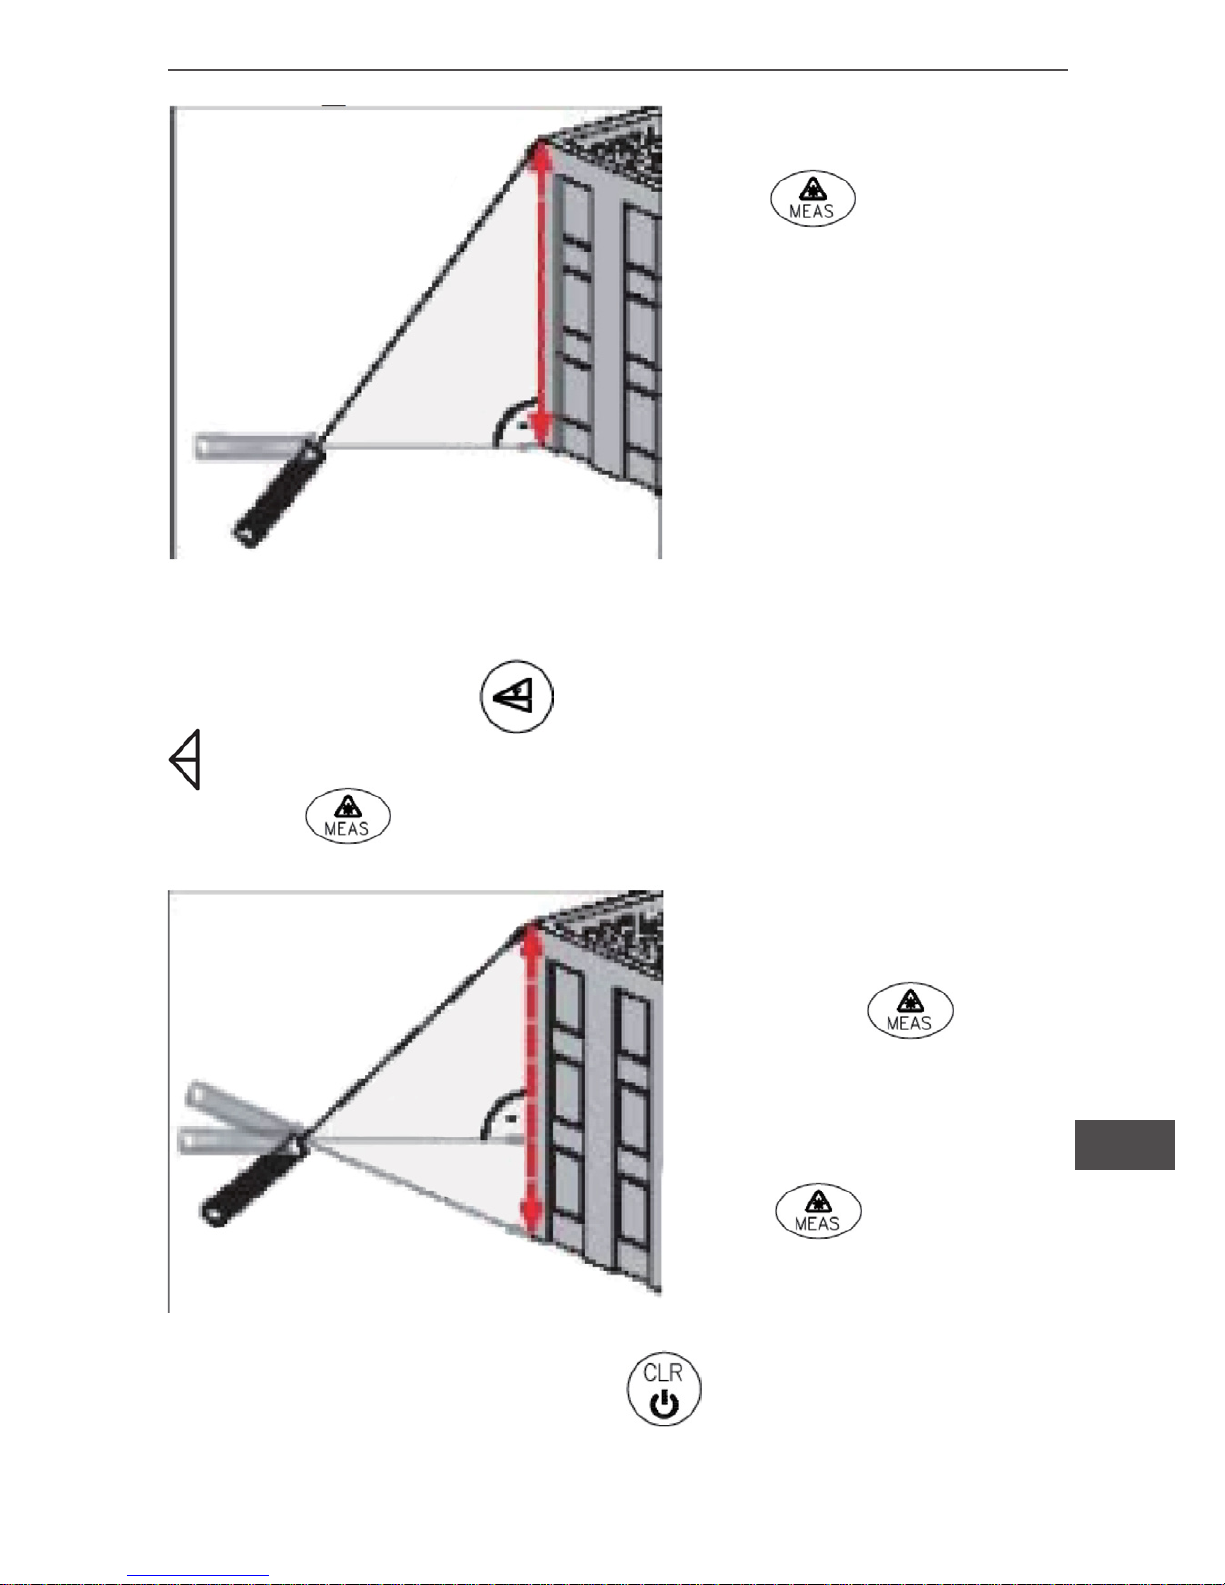
Indirekte Messungen
Beim messen von Höhen, die das Messen von zwei oder drei Messungen benötigen, befolgen Sie die nächsten Schritte:
Benutzen von 2 Messungen
Drücken Sie die Taste
, das Display zeigt . Zielen Sie
auf den oberen Punkt (1) und beginnen die Messung. Nach der
ersten Messung wird der Wert übernommen. Halten Sie das Gerät
so horizontal wie möglich.
Page 11
11
Bedienungsanleitung
DE
Zielen Sie auf den unteren
Punkt (2), drücken Sie die
Taste
, die zweite
Länge wird gemessen und
übernommen. Inzwischen
wird die Höhe von (1) und
(2) berechnet und in der
Ergebnislinie angezeigt.
1
2
1
Benutzen von 3 Messungen
Drücken Sie die Taste
zweimal, im Display wird das Symbol
angezeigt. Zielen Sie auf den oberen Punkt (1) und drücken
die Taste
zum Beginn der Messung. Nach der ersten Mes-
sung wird der Wert übernommen. Halten Sie das Gerät so
2
3
horizontal wie möglich.
Zielen Sie auf den mittleren Punkt (2), drücken
Sie die Taste
,die
zweite Länge wird gemessen und übernommen.
Zielen Sie auf den unteren
Punkt (3), drücken Sie die
Taste
, die dritte
Länge wird gemessen und
übernommen. Inzwischen
wird die Höhe von (1) und (3) berechnet und in der Ergebnislinie
angezeigt. Drücken Sie die Taste
, dass Gerät kehrt zur
Einzelmessungsfunktion zurück.
Page 12
Bedienungsanleitung
12
DE
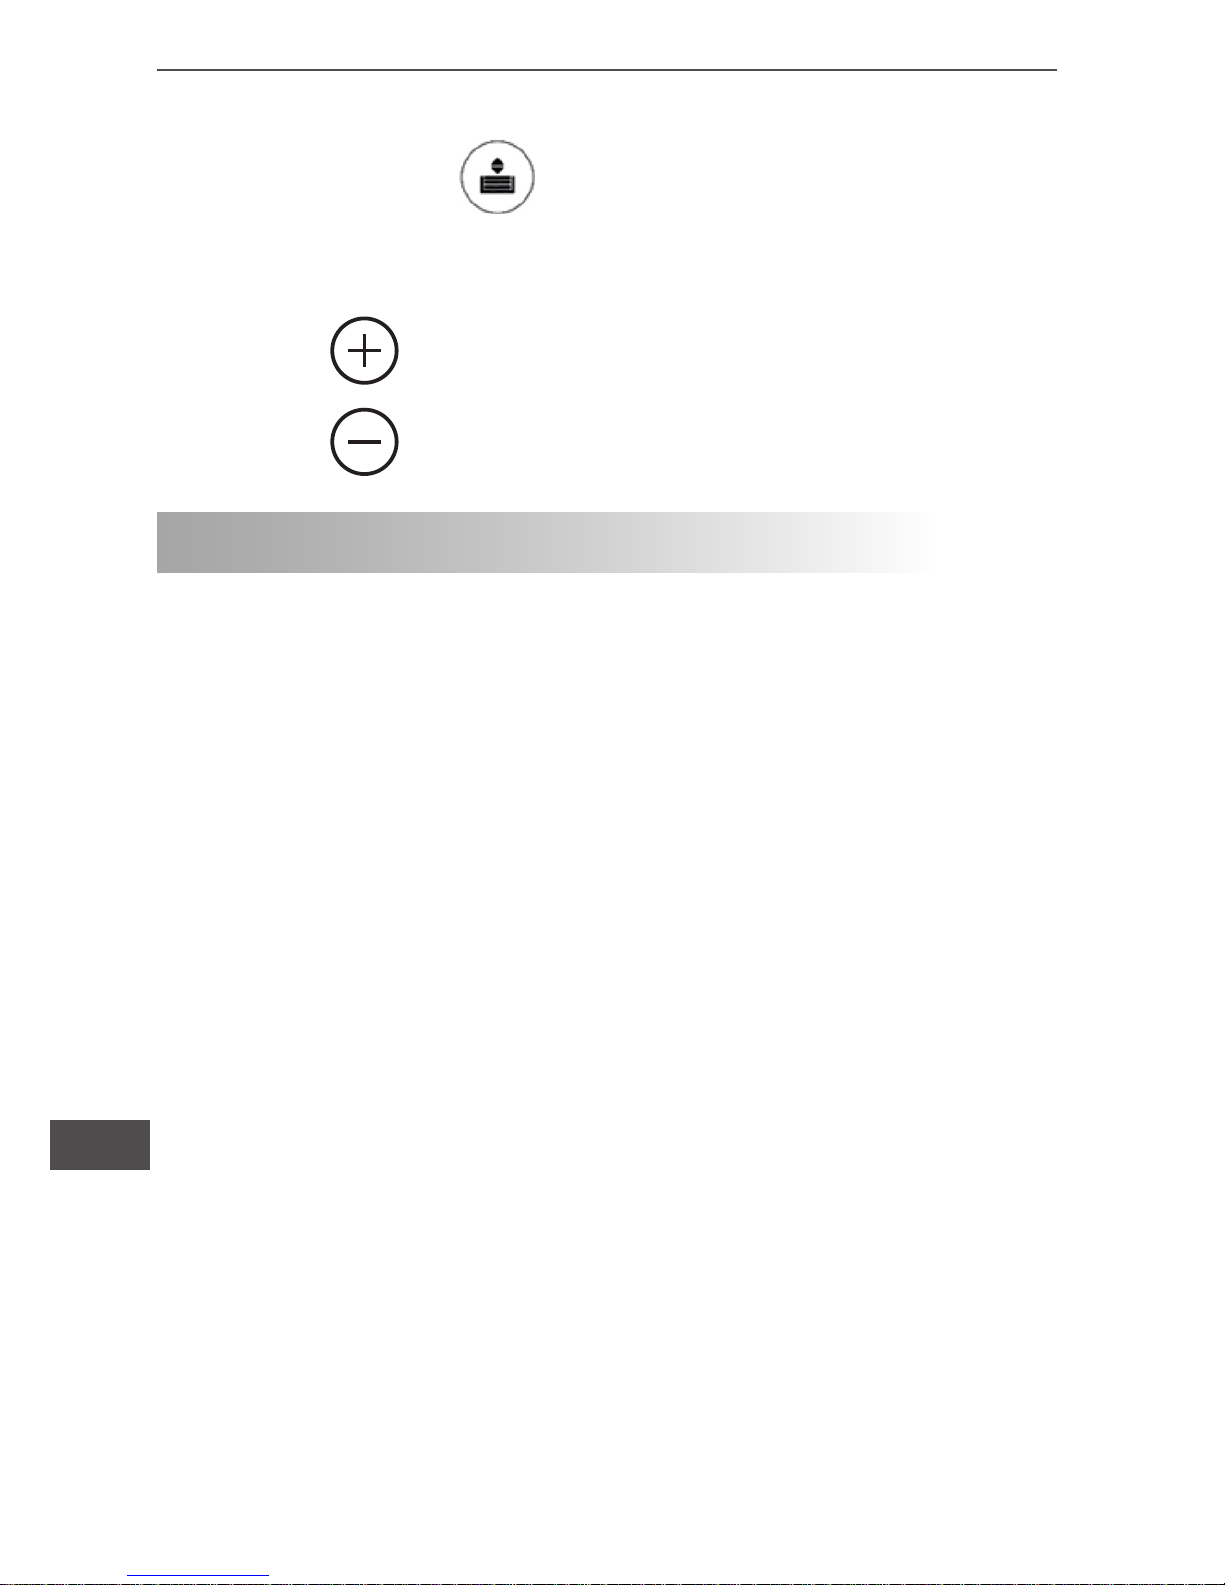
Speicherung der Geschichte
Drücken Sie die Taste der nächste Wert der 20 vorherigen
Aufzeichnungen (Messungen oder berechnete Ergebnisse) werden
in der verkehrten Reihenfolge angezeigt.
Drücken Sie
für die nächsten 20 Aufzeichnungen.
Drücken Sie
für die vorherigen 20 Aufzeichnungen.
TECHNISCHE DATEN
Allgemeine Daten
Entfernungsmessung 0.1m ~ 60m (4 in ~197 ft)
Messgeschwindigkeit 3-Mal/s
Batterietyp 2 x AAA (1.5V)
Battery life bis zu 3.000 Messungen
Batterie-Lebenszeit drei Streifen: Voll, Mittel, Schwach
Abmessungen 116 x 49 x 28 mm
Gewicht 100g (Inklusive Batterien)
Laser Type 635nm, <1mW
Laser Klasse Klasse II
IP 54
Automatische Abschaltung nach 3 min
Automatische Laserabschaltung nach 0,5 min
Umgebungsbedingungen
Höhe 2000m
Betriebstemperatur 0°C bis +40°C (+32°F bis +104°F)
Lagertemperatur -10 °C bis +60°C (14°F bis +140°F)
Folgende Normen
• EN61326-1 EMC
• EN60825-1 Lasersicherheit
Die Spezikationen können ohne Ankündigung geändert werden.
Page 13

13
Bedienungsanleitung
DE
WARTUNG
Warnung: während dem Austausch der Batterie oder Mes-
sen, bewahren Sie den empndlichen Spiegel von Kratzern oder
Schmutz, um Beschädigung des Spiegels oder die Beeinussung
der Messgenauigkeit zu vermeiden und ersetzte Batterie nicht
auaden um Explosion und Unfälle zu vermeiden!
Batterieinstallation und ersetzen
Wenn das Symbol dauerhaft im Display blinkt, Batterie sofort
ersetzen. Benutzen Sie nur Alkali- Batterien.
Befolgen Sie die nächsten Schritte:
• Schraube aufschrauben, Batteriefachdeckel entfernen.
• Batterien in den zwei Fächern einlegen unter Beachtung der kor-
rekten Polarität.
• Schließen Sie das Batteriefach und befestigen die Schraube.
Hinweis: Entfernen Sie die Batterien wenn das Gerät für einen
längerem Zeitraum nicht benutzt wird, um die Gefahr der Beschä-
digung oder Korrosion zu vermeiden.
Page 14

Owner’s manual
14
EN
PRODUCT INTRODUCTION
MIE0149 is a meter with high-precision and multi-function distance
measurement. It can measure distance, area, volume and Pythag-
orean Laws. MIE0149 which is light, easy to use and reliable to
measure, can make sure your measurement more accuracy, easier
and faster.
CONTENTS
1. Mainframe
2. User manual
3. AAA battery 2×1.5V
4. Carrying case
5. Mini screwdriver
SAFETY INSTRUCTION
Permitted use
• Measuring distances.
• Computing functions, e. g. areas and volumes.
• Indirect Measuring with Pythagorean.
Prohibited use
• Using the instrument without instruction.
• Using outside the stated limits.
• Deactivation of safety systems and removal of explanatory and
hazard labels.
• Opening of the equipment by using tools (screwdrivers, etc.), as
far as not specically permitted for certain cases.
• Carrying out modication or conversion of the product.
• Use of accessories from other manufacturers without the express
approval of UNI-T.
Page 15
15
Owner’s manual
EN
• Aiming directly into the sun or glare.
• Deliberate dazzling of third parties; also in the dark Inadequate
safeguards at the surveying site (e.g. when measuring on roads,
construction sites,etc.).
WARNING: Looking directly into the beam with optical
aids (e.g. binoculars, telescopes) can be hazardous.
Laser Class II products.
METER STRUCTURE KEYPAD
3
6
9
10
8
7
5
4
2
1
Page 16

Owner’s manual
16
EN
1. ON / MEAS (On/measuring) button
2. Area / volume button
3. Indirect measurement button
4. Continuous measurement button
5. Plus (+) button
6. Minus (-) button
7. Storage button
8. Reference level button
9. Illuminating button
10. Clear/off button
LCD DISPLAY
1
2
3
4
5
6,7,8,9
10
11
12
13
14
15
Page 17

17
Owner’s manual
EN
SETTING AND OPERATION OF METER
Switching on and off
Switches on the instrument and laser.
Press this button to longer to switch off the instrument.
The instrument switches off automatically after three minutes of
inactivity.
1. Laser active
2. Reference level (front)
3. Reference level (rear)
4. Distance measurement
5. Instrument error warning
6,7,8,9. Variable measuring functions
Area measurement
Volume measurement
Indirect (2 times) measurement
Indirect (3 times ) measurement
10. Battery status
11. Historical memory, call up values
12. First value display line, minimum value
13. Second value display line, maximum value
14. Third value display line
15. Summary line for last measure or calculation result
Page 18

Owner’s manual
18
EN
CLEAR button
The last action is cancelled or the data display is cleared.
Reference level setting
The default reference setting is from the rear of the instrument.
Press this button
to take the selection from the front edge ,
A special beep sounds whenever the reference setting is changed.
After a re-startup the reference returns automatically to the default
setting (rear reference). Press this button
again to take the next
selection from end piece edge.
Press this button
to set the rear reference again. In a word,
to select the reference level, push button
repeatedly until the
required reference level is indicated in the display. Each time after
switching on, the rear edge of the measuring tool is preset as the
reference level.
Page 19

19
Owner’s manual
EN
Display illumination
Click illumination button of the display can be switched on or
off, User can trigger the function when he/she is in darkness situa-
tion. The value is clear viable on the LCD.
Distance unit setting for instrument
Click the button longer change the next type of unit, m, ft. in,
ft/in then to continue click the button for the next unit selection.
MEASURING
Single distance measurement
Press to activate the laser. Press again to trigger the
distance measurement. The measured value is displayed immediately.
Page 20

Owner’s manual
20
EN
Continuous measurement & Max and Min measurement
The continuous measurement
function (tracking) is used for the
transferring of measurements, e.g.,
from construction plans. In continuous measurement mode, the measuring tool can be moved close to
the target, whereby the measured
value is updated approx. every 0.5
seconds. The corresponding dy-
namically maximum and minimum
values are displayed in the rst and
second line.
As an example, the user can move
from a wall to the required distance,
while the actual distance can be
read continuously. For continuous
measurement, press
button
until the indicator for continuous
measurement appears in the dis-
play. And press it again or press
to stop the function.
The function is terminated after 5 minutes’ continuous measure-
ment. With this function, customers can measure the max and min
distance from a certain point.
Functions
The next measurement is added to the previous one, then
press the button
, the second measured value is shown and
the result is shown automatically.
The next measurement is subtracted from the previous
one. Then press the button
, the result is shown in the sum-
mary line with the previous value in the second line.
Page 21

21
Owner’s manual
EN
Operate the above steps repeatedly, the meter will add or reduce
cumulatively.
The last step is cancelled.
Area
Press once. The symbol appears in the display.
Press
again to take the second length measurement (e.g.
width). After taking the second measurement, the area/surface is
automatically calculated and displayed in the summary line. The
last individual measured value is indicated at the second line in the
display.
Volume
For volume measurements, push button twice until the
indicator for volume measurement appears in the display. After-
wards, press this button
to measure the length. Press this
button
for width. Press button to take the height,
After taking the third measurement, the volume is automatically
calculated and displayed. The last individual measured value is not
displayed.
Indirect measurement
When measuring heights that require the measurement of two or
three measurements ,as following step:
Using 2 measurements
Press this button
, the display shows. Aim at the upper
point (1) and trigger the measurement. After the rst measurement,
the value is adopted.
Page 22

Owner’s manual
22
EN
Keep the instrument as
horizontal as possible.
Aim at the lower point (2),
press this button
the second distance is
measured and adopted.
Meanwhile, the height of (1)
and (2) are displayed in the
summary line.
1
2
1
Using 3 measurements
Press this button
twice, the display shows the symbol .
Aim Aim at the upper point (1) and press the button
to
trigger the measurement. After the rst measurement, the value is
adopted. Keep the instrument as horizontal as possible.
2
3
Aim at the upper point (2)
and press the button
. The value is measured
and adopted. Aim at the
lower point (3) and press
the button
to trigger
the measurement. Mean-
while, the height of (1) and
(3) will be shown in sum-
mary line. Press the button
, the meter will return
to single measurement
status.
Page 23

23
Owner’s manual
EN
Historical storage
Continue press the next value of previous 20 records (measurements or calculated results) are shown in the reverse order.
Press
to retrieve the next value of 20 records.
Press
then retrieve the previous value of 20 records.
TECHNICAL SPECIFICATIONS
General characteristics
Measurement distance 0.1m ~ 60m (4 in ~197 ft)
Measurement speed 3 times/s
Battery type 2 x AAA (1.5V)
Battery life up to 3.000 measurements
Battery indicator three states: full, medium, low
Dimension 116 x 49 x 28 mm
Weight 100g (Including batteries)
Laser type 635nm, <1mW
Laser class Class II
IP 54
Auto power off after 3 min
Auto laser switch-off after 0.5 min
Environmental requirements
Altitude 2000m
Operating temperature 0°C to +40°C (+32°F to +104°F)
Storage Temperature -10 °C to +60°C (14°F to +140°F)
Following standards
• EN61326-1 EMC
• EN60825-1 Laser Safety
Specications are subject to change without notice.
Page 24

Owner’s manual
24
EN
MAINTENANCE
Warning: during replacing battery or measuring, keep the
sensitive mirror from scratch or dirt to avoid damaging the mirror
or inuencing the measuring precision; and do not charge the
replaced battery to avoid explosion and safety accident!
Battery installation and replacement
When the symbol ashes permanently in the display replace the
battery immediately. Use alkaline batteries only. As following steps:
• Turn of the screw, remove battery compartment lid.
• Insert batteries in the two space respectively, observing correct
polarity.
• Close the battery compartment again, and x the screw for reliability.
Note: Remove the batteries before any long period of non-use to
avoid the danger of corrosion.
Page 25

25
Instrukcja obsługi
PL
WSTĘP
MIE0149 jest wielofunkcyjnym miernikiem do pomiaru odległości,
charakteryzującym się dużą dokładnością. Umożliwia pomiar odległości, pola powierzchni, objętości oraz długości obliczanej z twierdzenia Pitagorasa. MIE0149 jest lekki, łatwy w obsłudze i niezawodny co zapewnia szybkie i dokładne pomiary. Miernik dodatkowo posiada bardzo przydatną funkcję pamięci ostatnich 20 pomiarów.
ZAWARTOŚĆ ZESTAWU
1. Miernik
2. Instrukcja obsługi
3. 2 baterie AAA (1.5V)
4. Etui na miernik
5. Mini śrubokręt
INSTRUKCJE BEZPIECZEŃSTWA
Zastosowanie
• Pomiar odległości.
• Pomiar pola powierzchni i objętości.
• Funkcje dodawania, odejmowania, wyliczanie długości z twier-
dzenia Pitagorasa itp.
Zabronione jest
• Używanie miernika niezgodnie z jego przeznaczeniem.
• Używanie miernika w warunkach niezgodnych ze specykacją.
• Usuwanie z miernika oznaczeń i naklejek dotyczących bezpieczeństwa.
• Zdejmowanie obudowy miernika (nie dotyczy wymiany baterii).
• Własne modykacje miernika.
• Używanie akcesoriów nie zalecanych przez producenta.
Page 26

Instrukcja obsługi
26
PL
• Celowanie laserem w elementy odblaskowe.
• Celowe oślepianie osób trzecich.
UWAGA: Zabronione jest bezpośrednie patrzenie na
wiązkę lasera. Laser klasy II.
OPIS PRZYCISKÓW
3
6
9
10
8
7
5
4
2
1
Page 27

27
Instrukcja obsługi
PL
1. Przycisk włączenia miernika / pomiaru
2. Przycisk pomiaru pola powierzchni / objętości
3. Przycisk pomiaru długości z twierdzenia Pitagorasa
4. Przycisk pomiaru ciągłego
5. Przycisk dodawania (+)
6. Przycisk odejmowania (-)
7. Przycisk pamięci ostatnich 20 wyników
8. Przycisk zmiany miejsca odniesienia
9. Przycisk podświetlenia / zmiany jednostki pomiaru
10. Przycisk usunięcia wyników pomiaru / wyłączenia
WYŚWIETLACZ LCD
1
2
3
4
5
6,7,8,9
10
11
12
13
14
15
Page 28

Instrukcja obsługi
28
PL
1. Aktywność lasera
2. Miejsce odniesienia (góra miernika)
3. Miejsce odniesienia (dół miernika)
4. Pomiar odległości
5. Błąd
6,7,8,9. Funkcje pomiarowe
Pole powierzchni
Objętość
Pomiar długości z twierdzenia Pitagorasa (2 punkty)
Pomiar długości z twierdzenia Pitagorasa (3 punkty)
10. Stan naładowania baterii
11. Numer pomiaru w pamięci ostatnich 20 pomiarów
12. Pierwsza zmierzona wartość / wartość minimalna
13. Druga zmierzona wartość / wartość maksymalna
14. Trzecia zmierzona wartość
15. Wynik pomiaru / wynik obliczeń z dokonanych pomiarów
FUNKCJE I USTAWIENIA
Włączenie / wyłączenie miernika
- naciśnięcie przycisku spowoduje włączenie miernika.
- naciśnięcie i przytrzymanie przycisku spowoduje wyłącze-
nie miernika.
Miernik zostanie automatycznie wyłączony po trzech minutach
bezczynności.
Page 29

29
Instrukcja obsługi
PL
Czyszczenie wyników pomiaru
- naciśnięcie przycisku spowoduje anulowanie ostatniej akcji
lub wyczyszczenie wyniku pomiaru.
Miejsce odniesienia
Domyślnym miejscem odniesienia jest dół miernika.
Istnieje możliwość zmiany miejsca odniesienia na górę (przód)
miernika. Aby zmienić miejsce odniesienia, należy nacisnąć przy-
cisk
. Aktualne miejsce odniesienia oznaczone jest na wyświe-
tlaczu odpowiednią ikoną.
Po ponownym włączeniu urządzenia automatycznie ustawione zo-
stanie miejsce odniesienia na dole miernika.
Page 30

Instrukcja obsługi
30
PL
Podświetlenie wyświetlacza
Aby włączyć / wyłączyć podświetlenie wyświetlacza, należy naci-
snąć przycisk
.
Jednostka pomiaru
Aby zmienić jednostkę pomiaru, należy nacisnąć i przytrzymać
przycisk
. Możliwe ustawienia: m (metry), ft (stopy), in (cale),
ft/in.
POMIARY
Pomiar odległości
Aby zmierzyć odległość, należy włączyć miernik, wycelować na żądany punkt i nacisnąć przycisk
. Wynik pomiaru zostanie wy-
świetlony na ekranie.
Page 31

31
Instrukcja obsługi
PL
Pomiar ciągły & wartość Max i Min
W niektórych przypadkach może
zajść konieczność przeprowadzenia pomiaru ciągłego. W tym trybie,
urządzenie pomiarowe może być
przesuwane w pobliżu celu, przy
czym wartość mierzona jest aktualizowana co ok. 0,5 sekundy. Minimalna i maksymalna wartość jest
wyświetlana odpowiednio w wierszu pierwszym i drugim.
Na przykład, użytkownik może poruszać się od ściany do wymaganej
odległości, a rzeczywista odległość
będzie odczytywana w sposób ciągły. Aby uruchomić pomiar ciągły,
należy nacisnąć przycisk
.
Funkcja dodawania / odejmowania wyników
- umożliwia dodanie wyniku drugiego pomiaru do pierwszego.
- umożliwia odjęcie wyniku drugiego pomiaru do pierwszego.
Zarówno operację dodawania jak i odejmowania można wykony-
wać kilkakrotnie. Naciśnięcie przycisku
powoduje usunięcie
ostatniego kroku.
Aby wyłączyć funkcję pomiaru ciągłego, należy nacisnąć przycisk
.
Page 32

Instrukcja obsługi
32
PL
Pomiar pola powierzchni
Aby dokonać pomiaru pola powierzchni, należy nacisnąć przycisk
. Na wyświetlaczu pojawi się symbol .
Następnie należy nacisnąć przycisk
aby dokonać pomiaru
pierwszego boku. Naciskając ponownie przycisk
, należy dokonać pomiaru drugiego boku. Wynik automatycznie ukaże się na
wyświetlaczu.
Pomiar objętości
Aby dokonać pomiaru objętości, należy dwukrotnie nacisnąć przy-
cisk
. Na wyświetlaczu pojawi się symbol .
Następnie naciskając przycisk
, należy dokonać pomiaru 3
długości, które posłużą do wyliczenia objętości. Wynik automatycznie ukaże się na wyświetlaczu.
Pomiar długości z twierdzenia Pitagorasa
Zdarza się, że nie ma możliwości bezpośredniego pomiaru danej
długości. W takiej sytuacji przydatna może okazać się funkcja pomiaru długości, wykorzystująca twierdzenie Pitagorasa. Pomiaru
można dokonać oznaczając 2 lub 3 punkty:
Użycie 2 punktów
Aby dokonać pomiaru, należy nacisnąć przycisk
, na wyświe-
tlaczu pojawi się symbol
. Naciskając przycisk , należy
dokonać pomiaru pierwszego punktu (1).
Page 33

33
Instrukcja obsługi
PL
Następnie należy ponownie
nacisnąć przycisk
aby dokonać pomiaru drugiego punktu (2). Zmierzona
wartość zostanie wyświetlo-
na na ekranie.
Uwaga: kolejność pomiarów
przedstawiona jest na rysunku po lewej stronie.
1
2
1
Użycie 3 punktów
Aby dokonać pomiaru, należy nacisnąć przycisk
, na wyświe-
tlaczu pojawi się symbol
.
Naciskając przycisk
należy dokonać pomiaru pierwszego
punktu (1).
2
3
Następnie należy ponownie nacisnąć przycisk
aby dokonać pomiaru drugiego punktu (2) i kolejno
trzeciego (3).
Uwaga: kolejność pomiarów
przedstawiona jest na rysunku po lewej stronie.
Page 34

Instrukcja obsługi
34
PL
Lista poprzednich pomiarów
Aby wyświetlić listę poprzednich pomiarów, należy nacisnąć przy-
cisk
(urządzenie przechowuje w pamięci ostatnie 20 wyni-
ków i obliczeń).
- przejście do następnego wyniku w pamięci.
- przejście do poprzedniego wyniku w pamięci.
SPECYFIKACJA TECHNICZNA
Informacje ogólne
Zasięg 0.1m ~ 60m (4 in ~197 ft)
Częstotliwość pomiaru ok 3 razy/s
Typ baterii 2 x AAA (1.5V)
Żywotność baterii do 3.000 pomiarów
Wskaźnik naład. baterii trzy poziomy: pełny / średni / niski
Wymiary 116 x 49 x 28 mm
Waga 100g (wraz z bateriami)
Typ lasera 635nm, <1mW
Klasa lasera klasa II
IP 54
Automatyczne wyłączenie po 3 minutach bezczynności
Automatyczne wył. lasera po 0.5 min
Warunki środowiskowe
Wysokość 2000m
Temperatura pracy 0°C do +40°C (+32°F do +104°F)
Temperatura przechowywania -10 °C do +60°C (14°F do +140°F)
Standardy
• EN61326-1 EMC
• EN60825-1 Laser Safety
Specykacja urządzenia może ulec zmianie bez powiadomienia.
Page 35

35
Instrukcja obsługi
PL
KONSERWACJA
Uwaga: zarówno podczas pomiarów jak i wymiany baterii,
należy uważać aby lustro miernika nie zostało porysowane / zabrudzone. Może to mieć negatywny wpływ na dokładność pomiarów.
Wymiana baterii
Jeżeli na wyświetlaczu ukaże się ikona niskiego stanu naładowania
baterii
, należy wymienić baterie na nowe. Niedopuszczalne jest
ładowanie zużytych baterii i ich ponowna instalacja. Należy używać
wyłącznie baterii alkalicznych. Aby wymienić baterie należy:
• Odkręcić śrubkę zabezpieczającą i zdjąć pokrywę baterii.
• Włożyć 2 nowe baterie zgodnie z oznaczoną polaryzacją.
• Założyć pokrywę baterii i przykręcić śrubkę zabezpieczającą.
Uwaga: Jeżeli miernik nie będzie używany przez dłuższy okres
czasu, należy wyjąć z niego baterie zasilające.
Page 36

Manual de utilizare
36
RO
INTRODUCERE
MIE0149 este un multimetru de inalta precizie si este destinat masuratorilor de distante. Poate masura distanta, suprafata, volumul
si poate calcula formulele lui Pitagora. MIE0149 care este usor,
facil de utilizat si abil, asigura acuratetea masuratorilor, acestea
putand efectuate mai usor si mai repede.
CONTINUT PACHET
1. Multimetru
2. Manual de utilizare
3. 2 baterii AAA ×1,5V
4. Cutie pentru transport
5. Mini surubelnita
INSTRUCTIUNI PRIVIND SIGURANTA
Utilizarea este permisa in cazul
• Masurarii distantelor.
• Functii aritmetice, ex: suprafete si volume.
• Masurari indirecte cu formulele lui Pitagora.
Utilizarea este interzisa in cazul
• Utilizarii produsului fara instructiuni.
• Utilizarea in afara limitelor specicate.
• Dezactivarea sistemelor de siguranta si indepartarea etichetelor
explicative sau a avertismentelor
• Deschiderea produsului folosind unelte (surubelnite, etc)
• Efectuarea de modicari sau transformari ale produsului.
• Utilizarea de accesorii de la alti producatori, fara acordul explicit
al UNI-T.
Page 37

37
Manual de utilizare
RO
• Expunerea aparatului direct in bataia soarelui
• Lumina orbitoare indreptata intentionat catre terti, precum si in
efectuarea de masuratori topograce in intuneric (de exemplu, la
masurarea de drumuri, santiere de constructii, etc).
AVERTISMENT: Privitul direct in raza laser cu dispozi-
tive optice (binoclu, de exemplu, telescoape) poate
periculos.
Produse laser Clasa II.
TASTE FUNCTIONALE
3
6
9
10
8
7
5
4
2
1
Page 38

Manual de utilizare
38
RO
1. Tasta ON / MEAS (Pornit/Masurare)
2. Tasta Suprafata/ Volum
3. Tasta Masurari indirecte
4. Tasta Masuratori continue
5. Tasta Plus (+)
6. Tasta Minus (-)
7. Tasta Salvare
8. Tasta Nivel de referinta
9. Tasta Iluminare
10. Tasta Stergere/oprit
ECRAN LCD
1
2
3
4
5
6,7,8,9
10
11
12
13
14
15
Page 39

39
Manual de utilizare
RO
SETAREA SI FUNCTIONAREA MULTIMETRULUI
Pornire si oprire
Pornirea instrumentului si a laserului.
Apasati lung acest buton pentru a opri instrumentul.
Instrumentul se opreste automat dupa trei minute de inactivitate.
1. Laser activ
2. Nivel de referinta (Fata)
3. Nivel de referinta (Spate)
4. Masurare distanta
5. Avertizare eroare instrument
6,7,8,9. Functii variabile de masurare
Masurare suprafata
Masurare volum
Masurare indirecta (2-ori)
Masurare indirecta (3-ori)
10. Starea bateriei
11. Istoric memorare, reapelare valori memorate
12. Prima linie de asare, valoare minima
13. A doua linie de asare, valoare maxima
14. A treia linie de asare
15. Linie pentru ultima masurare sau rezultatul calculului
Page 40

Manual de utilizare
40
RO
Buton STERGERE (CLEAR)
Ultima actiune este anulata sau datele asate sunt sterse.
Setarea nivelului de referinta
Setarea standard a nivelului de referinta se face din partea din
spate a dispozitivului.
Apasati tasta
, pentru a regla intervalul din marginea din fata
, un semnal sonor se va auzi atunci cand setarea de referinta se
modica. Dupa un restart, setarea revine automat la setarea implicita (referinta in spate). Apasati aceasta tasta
din nou, pentru
a efectua urmatoarea selectare de la marginea de jos.
Apasati aceasta tasta
, pentru a seta referinta din spate din nou.
Intr-un cuvant, pentru a selecta nivelul de referinta, apasati butonul
, in mod repetat pana cand nivelul dorit de referinta este asat
pe ecran. De ecare data dupa pornire, marginea din spate a
aparatului de masura este presetata ca nivel de referinta.
Page 41

41
Manual de utilizare
RO
Iluminare ecran
Apasati butonul, luminile pot PORNITE sau OPRITE.
Utilizatorul pot activa lumina de fundal atunci cand el / ea este in
incaperi intunecate.Valoarea masurata este vizibila clar pe ecranul
LCD.
Setarea unitatii de masura pentru masurarea
distantei
Apasati lung butonul pentru a trece la urmatoarea unitate
de masura m, ft.in, ft / in, apoi pentru a continua, apasati butonul
pentru a selecta unitatea de masura urmatoare.
MASURARE
Masurare pe o singura distanta
Apasati tasta pentru a activa laserul. Apasati inca o data
pentru a activa masurarea distantei.Valoarea masurata este asata
imediat.
Page 42

Manual de utilizare
42
RO
Masurare continua & Masurarea valorilor maxime
si minime
Functia de masurare continua
(urmarire) este utilizata pentru
transferarea masuratorilor, de ex-
emplu, din planurile de constructie.
Pe modul de masurare continua,
instrumentul de masurare poate
mutat mai aproape de tinta, caz in
care valoarea masurata este actu-
alizata la intervale de aproximativ
0,5 secunde.Valorile dinamice
maxime si minime corespunzatoare
sunt asate in prima linie si a doua.
Ca un exemplu, utilizatorul poate
trece de la un perete la distanta
dorita, in timp ce distanta reala
poate citita in mod continuu.Pentru o masurare continua, apasati
tasta
, pana cand indicatorul
pentru masurari continue apare
pe ecran. Apasati inca o data sau apasati
, pentru a iesi din
aceasta functie.Functia se opreste dupa 5 minute de masurare
continua. Aceasta caracteristica permite clientilor sa masoare
distanta maxima si minima dintr-un anumit punct.
Functii
Masurarea urmatoare se adauga la cea anterioara, apoi
apasati butonul
, a doua valoare masurata este asata si
rezultatul este asat in mod automat.
Urmatoarea masuratoare este scazuta din precedenta, apoi
apasati butonul
, rezultatul este asat in linia de rezultat cu
valoarea anterioara in linia a doua.
Page 43

43
Manual de utilizare
RO
Repetati pasii de mai sus, unitatea va adauga sau scadea valorile.
Ultimul pas este anulat.
Suprafata
Apasati o data, simbolul apare pe ecran. Apasati tasta
inca o data pentru a efectua prima masuratoarea
(ex: lungimea). Dupa a doua masuratoare, zona/suprafata este
calculata automat si asata in linia de rezultat.Ultima masurare
este asata pe a doua linie.
Volum
Pentru masurarea volumului, apasati butonul pentru
masurarea volumului apare pe asaj. Apasati apoi tasta
pentru a masura lungimea. Apasati acest buton
pentru a
masura latimea. Apasati butonul
pentru a masura inaltimea.
Dupa efectuarea celei de a treia masuratori, volumul este calculat
automat si asat.Ultima masuratoare individuala nu este asata.
Masuratori indirecte
Atunci cand sunt masurate inaltimi care necesita efectuarea a
doua sau trei masuratori, urmati urmatorii pasi
Utilizarea a doua masuratori
Apasati tasta
, pe ecran va aparea simbolul . Orientati
aparatul spre punctul de sus (1) si activati masurarea. Dupa prima
masuratoare valoarea este memorata.
Page 44

Manual de utilizare
44
RO
Tineti aparatul cat mai
orizontal posibil. Indreptati
la punctul inferior (2), apa-
sati butonul
, a doua
distanta este masurata si
adoptata. Intre timp, inal-
timea (1) si (2) se aseaza
in linia de rezultat.
1
2
1
Utilizarea a trei masuratori
Apasati butonul
de doua ori, pe asaj va aparea simbolul
.Orientati aparatul spre punctul de sus (1) si apasati butonul
pentru a activa masurarea. Dupa prima masuratoare valo-
area este memorata. Tineti aparatul cat mai orizontal posibil.
2
3
Indreptati la punctul de
sus (2), si apasati butonul
, valoarea este ma-
surata si stocata. Indrep-
tati la punctul inferior (3),
apasati tasta
, pentru
a activa masuratoarea. Intre
timp, inaltimea (1) si (3) este
asata in linia de rezultat.
Apasati butonul
,
multimetrul va reveni la o
singura masurare.
Page 45

45
Manual de utilizare
RO
Stocare valori
Apasati butonul , urmatoarea valoare din ultimele 20 de in-
registrari (masuratori sau rezultate calculate) sunt asate in ordine
inversa.
Apasati butonul
pentru a extrage urmatoarele 20 de inregis-
trari.
Apasati butonul
pentru a extrage ultimele 20 de inregistrari
anterioare.
SPECIFICATII TEHNICE
Caracteristici generale
Distanta de masurare 0.1m ~ 60m (4 in ~197 ft)
Viteza de masurare 3 ori /s
Tipul bateriei 2 x AAA (1.5V)
Durata de viata a bateriei pana la 3.000 de masuratori
Indicator baterie trei stari de functionare: incarcata,
mediu, descarcata
Dimensiuni 116 x 49 x 28 mm
Greutate 100g (cu baterii incluse)
Tipul laserului 635nm, <1mW
Clasa laser Clasa II
IP 54
Oprire automata dupa 3 min
Oprire automata a laserului dupa 0.5 min
Conditii de mediu
Altitudine 2000m
Temperatura de operare 0°C la +40°C (+32°F la +104°F)
Temperatura de depozitare -10 °C la +60°C (14°F la +140°F)
Urmatoarele standarde
• EN61326-1 EMC
• EN60825-1 Siguranta laser
Specicatiile sunt supuse schimbarilor fara noticare prealabila.
Page 46

Manual de utilizare
46
RO
INTRETINERE
Avertisment: in timpul inlocuirii bateriei sau efectuarii masuratorii, feriti oglinda de zgarieturi sau de murdarie, pentru a evita
deteriorarea acesteia sau inuentarea preciziei de masurare, si nu
incarcati bateria, pentru a evita explozia si de accidentele!
Instalarea si inlocuirea bateriei
Cand simbolul apare intermitent pe ecran, inlocuiti imediat bateria. Folositi doar baterii alcaline.
Urmati pasii de mai jos:
• Rotiti surubul, scoateti capacul compartimentului pentru baterie.
• Introduceti bateriile in spatiul corespunzator, cu respectarea
polaritatii.
• Inchideti compartimentul bateriei din nou, si xati surubul pentru
abilitate.
Nota: Scoateti bateriile inainte de orice perioada lunga de neutilizare, pentru a evita pericolul de coroziune.
Page 47

Page 48

www.uni-t.eu
 Loading...