


UniTracer
September 2017
[Electronic locking device for container]
FOR UniTracer L-100
USER MANUAL
This guide explains the device UniTracer L-100.
Version 1
www.unisem.co.kr | iot@unisem.co.kr | +82.31.724.2548

Table of Contents
1. Precautions concerning pre-service .......................................................................................................................... 3
1.1 Precautions .................................................................................................................................................................. 3
1.2 Device package configuration .......................................................................................................................... 3
1.4 Device installation and sealing method ..................................................................................................... 6
1.5 How to unseal and retrieve the device ....................................................................................................... 8
2. How to use the device ...................................................................................................................................................... 9
2.1 Device operating process .................................................................................................................................... 9
2.2 Insertion of the USIM ......................................................................................................................................... 10
2.3 Check battery remaining volume ................................................................................................................ 11
3. Device maintenance ........................................................................................................................................................ 12
3.1 Wire replacement method ............................................................................................................................... 12
3.2 USIM replacement method ............................................................................................................................. 12
3.3 How to deal with battery charging/discharging and replacement.......................................... 12
3.4 Device reset method ........................................................................................................................................... 12
3.5 APN and NFC setting method ....................................................................................................................... 13
4. Trouble Shooting ............................................................................................................................................................... 20
4.1 Device debugging method .............................................................................................................................. 20
4.3 Log data analysis method ................................................................................................................................ 33
5. Device FAQ ........................................................................................................................................................................... 35
www.unisem.co.kr | iot@unisem.co.kr | +82.31.724.2548
1. Precautions concerning pre-service
1.1 Precautions
- The battery should be used after full charging. The device connects a 5V 2A adapter to the
USB port using the included USB cable.
- The USIM card should be prepared for local use or roaming in accordance with the purpose
of use.
- Once inserted, it is imperative that the insertion of caution is checked again, because it cannot
be withdrawn again.
- To use an NFC card, you must register the NFC card ID in the L-100 device.
- This device can be operated in at least one Member State of EU without infringing applicable
requirements on the use of radio spectrum.
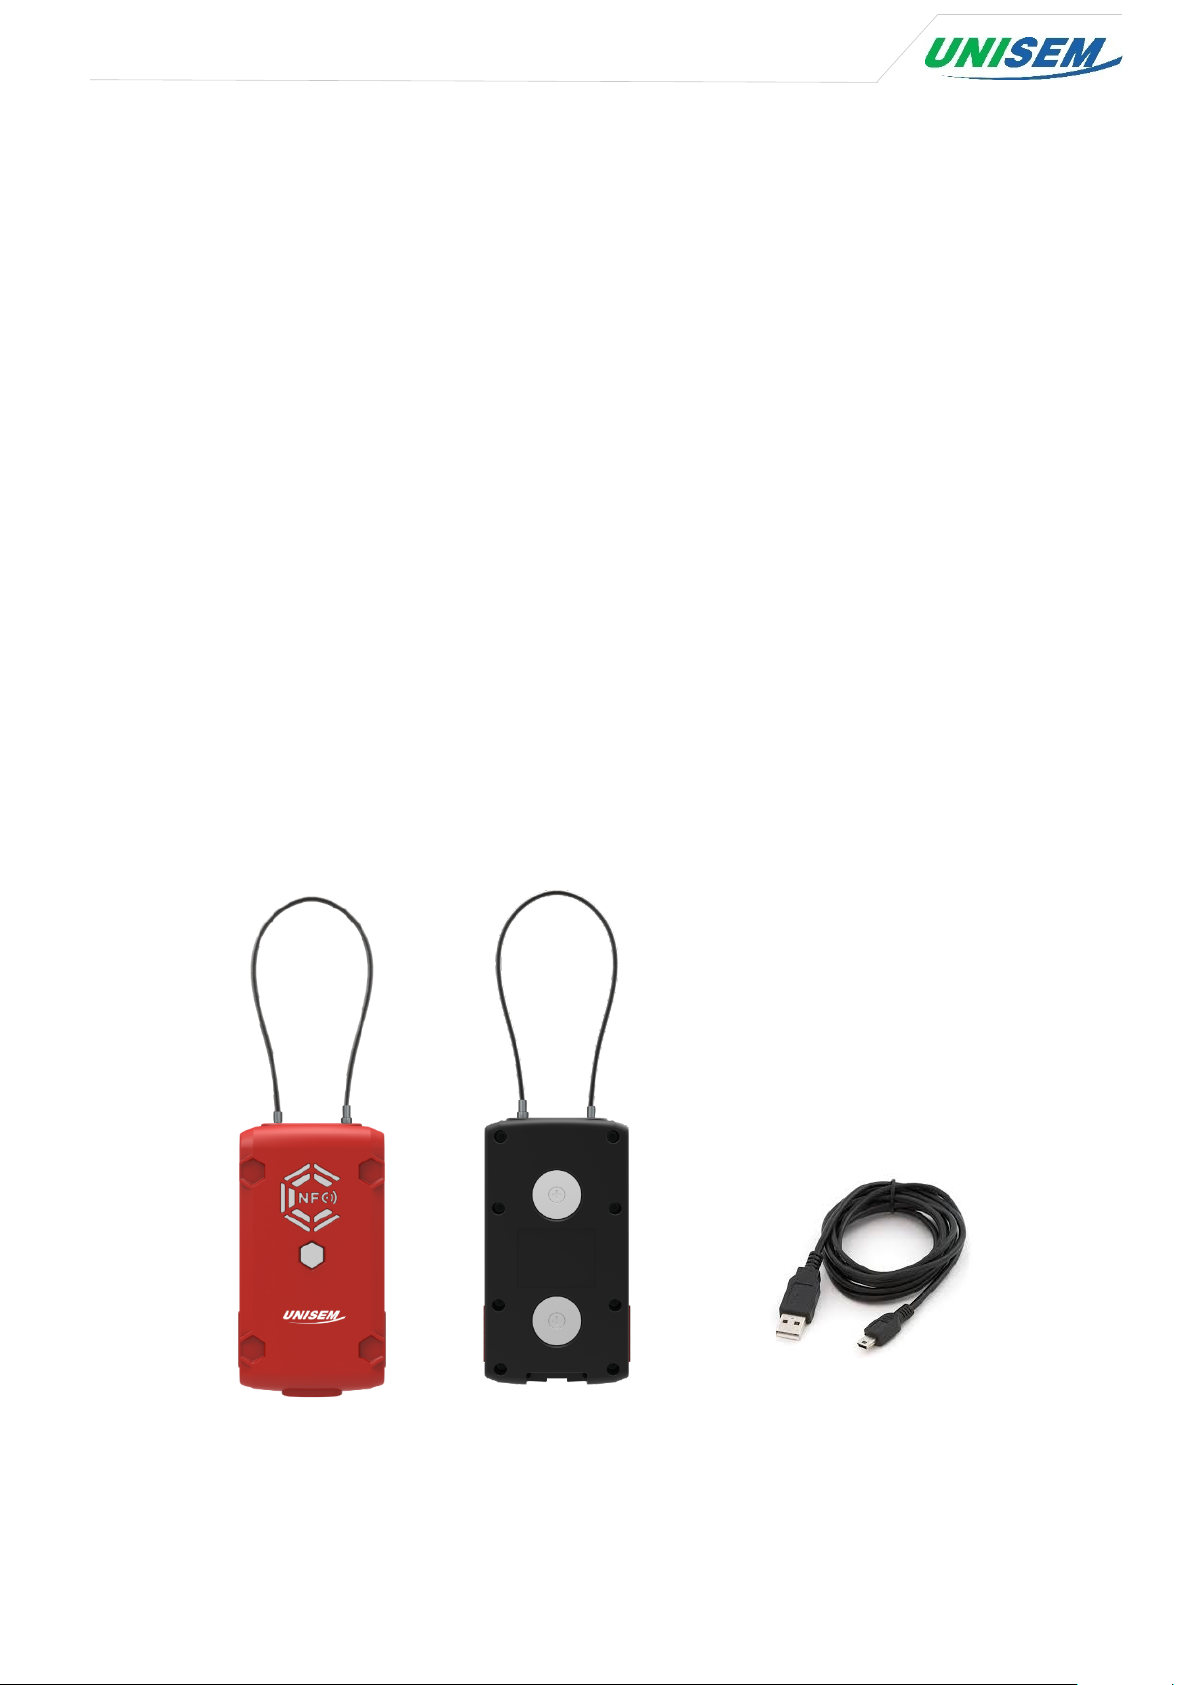
1.2 Device package configuration
UniTracer L-100 Mini B type USB cable
www.unisem.co.kr | iot@unisem.co.kr | +82.31.724.2548

- UniTracer L-100 Specification
Item Specifications
Model UniTracer L-100
Temperature -30~+80℃
Humidity 0~99%
Electrical Usage
3.78VDC
CPU 32Bit MPU
Data Storage 1Mbit EEPROM x 2
792 Times(33 days)
Data Transmission
(24 Collections per day, every hour)
Lithium-Ion
Battery Capacity
6,000mAh(Rechargeable)
Open/Close of door, Location,
Sensor
Detect cutting
GPS GPS
Certifications KC/CE/IP66
1.5Kg
Weight
(Inclusive 500g battery)
Size 75(W) x 140(H) x 40(D)mm
Lock Method Sensor Wire Seal
Identification NFC(ISO 14443 Type A)
Diagnostic Port USB Port
DC Power Input 5V/2A
GSM UL Frequency Band
GSM DL Frequency Band
WCDMA UL Frequency Band
WCDMA DL Frequency Band
NFC transmit / receive
frequency range
GPS receive
frequency range
GSM 900 : 880.2 ~ 914.8MHz
DCS 1800 : 1710.2 ~ 1784.8MHz
GSM 900 : 925.2 ~ 959.8MHz
DCS 1800 : 1805.2 ~ 1879.8MHz
1Band : 1922.4 ~ 1977.6 MHz
8Band : 882.4 ~ 912.6 MHz
1Band : 2112.4 ~ 2167.6 MHz
8Band : 927.4 ~ 957.6 MHz
13.56 MHz
1559MHz ~ 1610MHz
www.unisem.co.kr | iot@unisem.co.kr | +82.31.724.2548

1.3 Component parts of the device
② Left Wire Segment
①Lock Wire Cable
③ Right Wire Segment
④NFC Antenna
⑤Operation Switch
⑥USIM Port
⑧Reset Switch
⑦mini B type USB
Port
www.unisem.co.kr | iot@unisem.co.kr | +82.31.724.2548

Blinking green light for GPS
Blinking blue light for WCDMA/GSM
No. Part Name Description Remarks
1 Lock Wire Cable 30cm, 100cm optional
2 Left Wire Segment The left wire segment is fixed.
3 Right Wire Segment You can hold and open and close the right
wire segment.
4 NFC Antenna Where to tag the NFC card
5 Operation Switch -
communication
-
communication
6 USIM Port Port that inserts USIM card
7 mini B type USB Port Port that charges the device and analyzes
the device log
8 Reset Switch Switch to reset the device
1.4 Device installation and sealing method
- With the wire open, wire the device to the container lock and fasten the device.
- When connecting the wire to the device, be sure to push it all the way to prevent the connection
failure.
- Confirm the lock by touching the NFC card registered in the NFC antenna section within
5 seconds after wire tightening.
- Attach the magnet on the back of the L-100 to the flat surface (steel material) of the container
and tighten the device to the container.
- When attaching the L-100 to a container, etc., be sure to install the L-100 in the following
direction to obtain optimal GPS reception.
www.unisem.co.kr | iot@unisem.co.kr | +82.31.724.2548
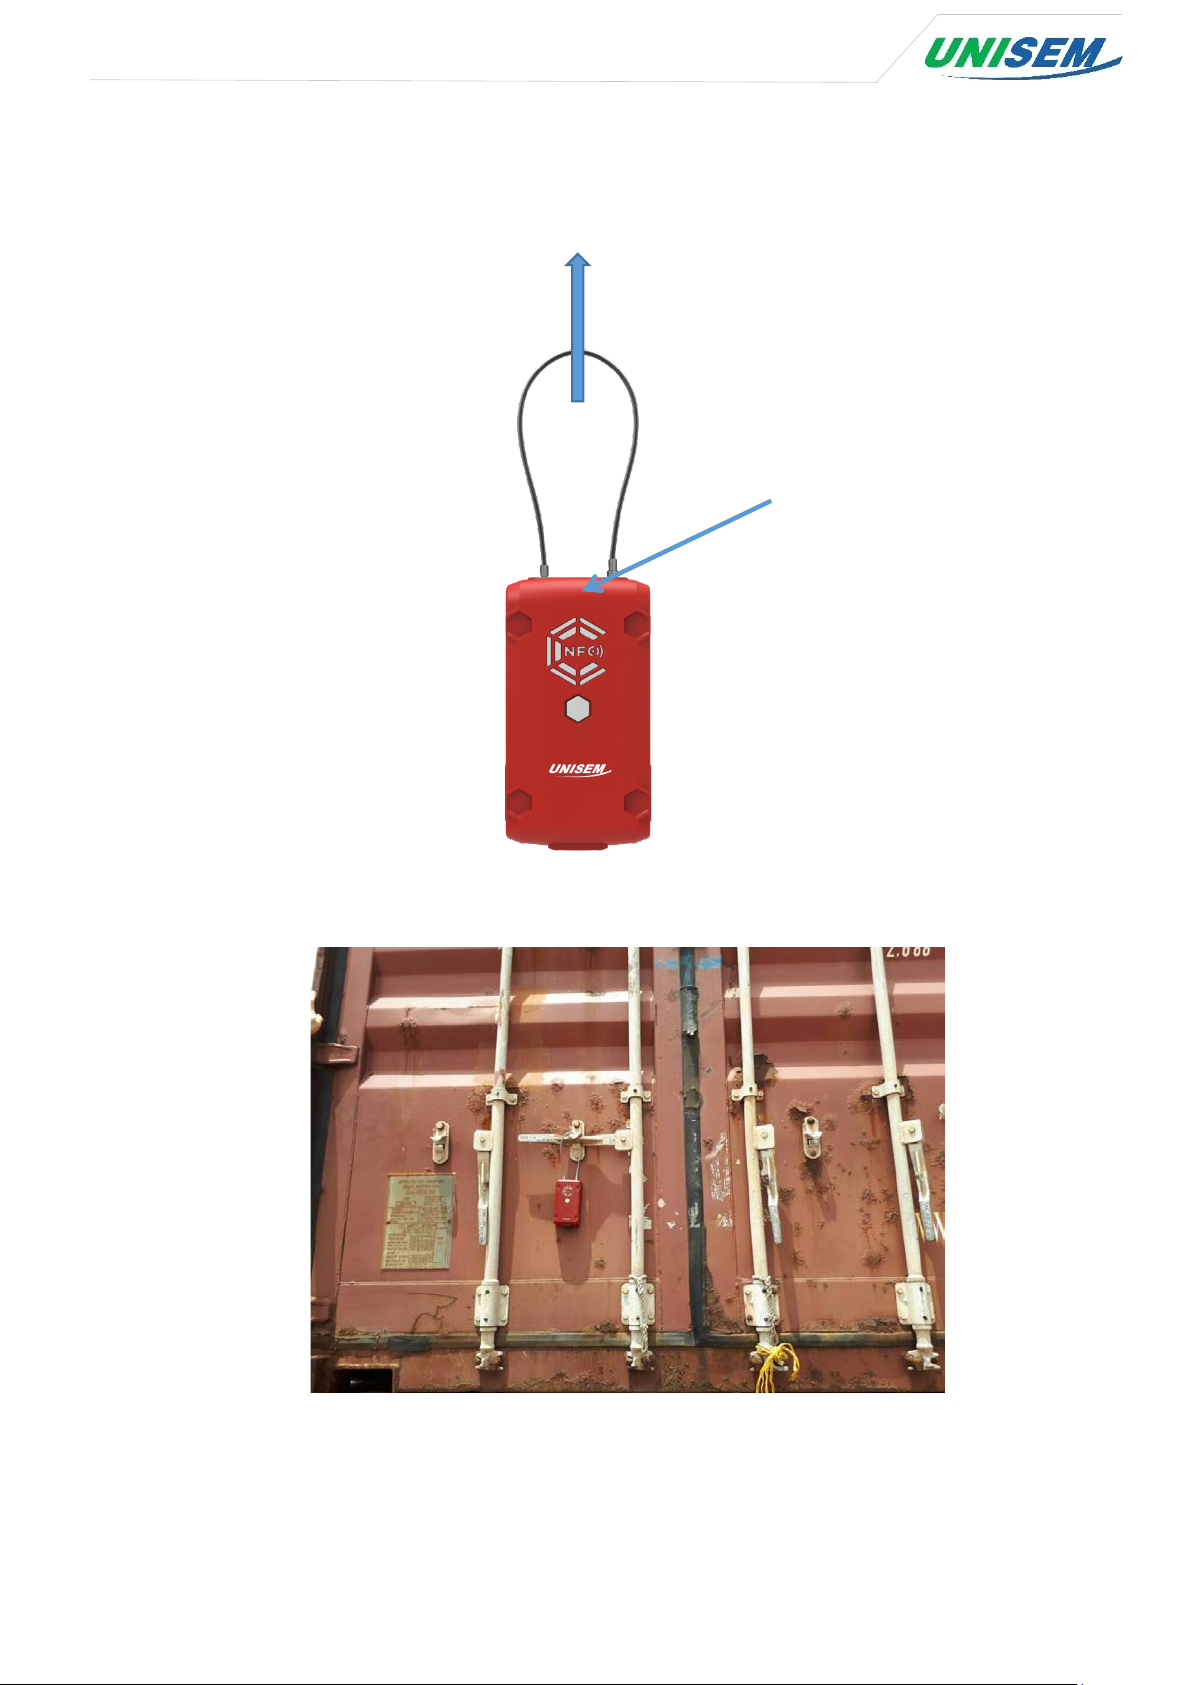
Skyward
GPS Antenna
- GPS reception rate is the best
when the GPS antenna is pointing
in the sky.
<Figure. Device installation Position>
<Figure. actual device installation example>
www.unisem.co.kr | iot@unisem.co.kr | +82.31.724.2548
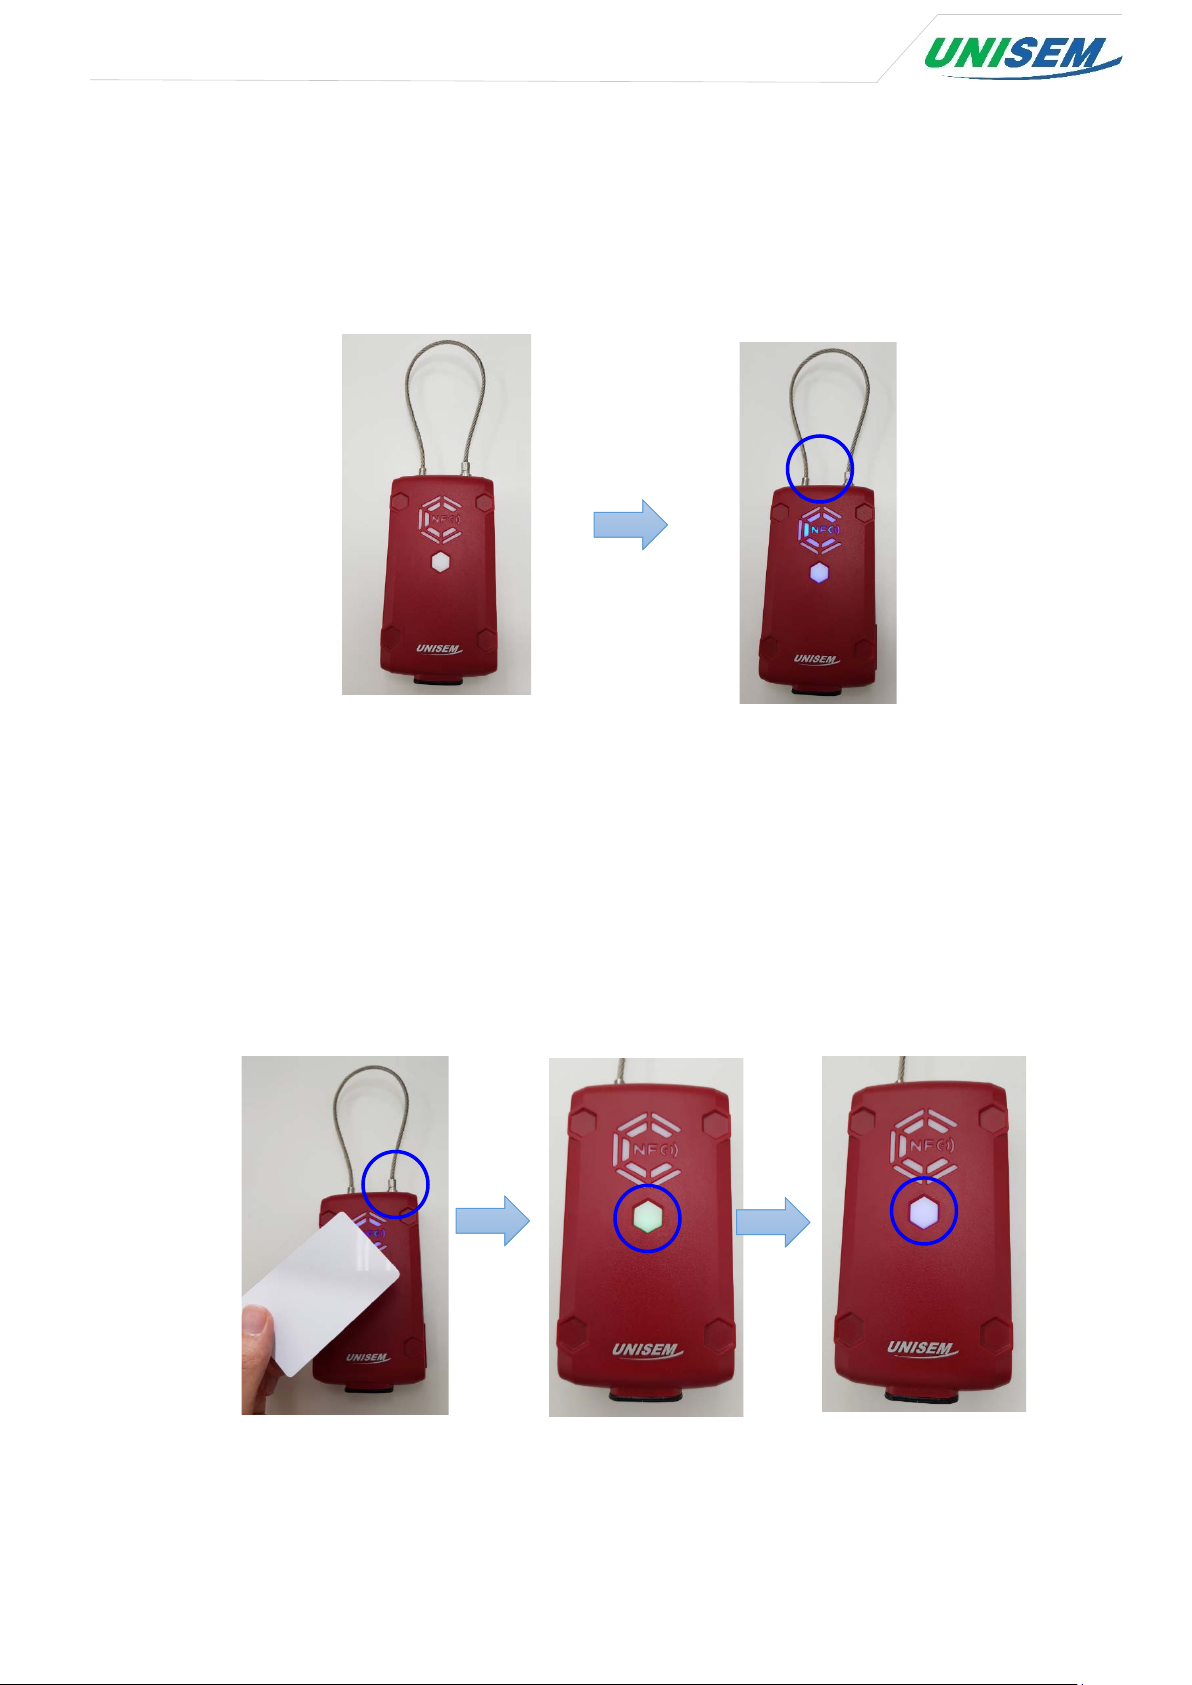
1.5 How to unseal and retrieve the device
1) The operation switch is not lit when the device is operating. At this time, when the
operation switch is pressed, the NFC antenna lights in blue. (The light is kept in blue for 5
seconds.)
2) Attach the registered NFC card before the blue light on the NFC antenna turns off. (The
blue light is on for 5 seconds.) When the touch is completed, the buzzer sounds and the
NFC antenna turns off. At this time, pull the right wire segment after press it slightly inwards.
When the wire is disconnected, a green light blinks to receive the GPS(to send the device's
open signal). When the green light is off, a blue light will come on for the data
communication. The blue light turns off when data transmission is completed.
www.unisem.co.kr | iot@unisem.co.kr | +82.31.724.2548

3) Device retrieve method
- Hold the eSeal device with the magnet attached to the container with both hands firmly and
remove it safely.
- Retrieve the device with opened wire device.
2. How to use the device
2.1 Device operating process
1) When the wire is tightened, the NFC card authentication is performed first.
- The LED of the NFC antenna flashes together with a beep for 5 seconds.
- The registered NFC card should be touched to the NFC tag within 5 seconds.
- If the NFC card is authenticated, the alarm is stopped and the LED flashes.
※ In order to use NFC card, NFC card ID must be registered in L-100 device.
(Refer to '3.5 APN and NFC setting method’.)
2) When the NFC card authentication is completed, GPS is received. (Takes up to 180 seconds)
- At this time, the Operation switch flashes green.
- When the GPS reception is complete, the green light turns off.
Once the GPS reception is complete, access the communication network. (Up to 300 seconds).
3)
- At this time, the Operation switch flashes blue.
- When the device is connected to the network and the data transmission is finished, the
blue light turns off.
4) After the Operation switch light is blinking, the device waits until the next operation.
www.unisem.co.kr | iot@unisem.co.kr | +82.31.724.2548

2.2 Insertion of the USIM
Open the water-proof cover and insert it into the following directions.
(Once engaged, ensure that the correct tightening is achieved and the correct orientation
is achieved.)
<Figure. Device USIM insertion direction>
< Figure. Actual device USIM insertion example>
www.unisem.co.kr | iot@unisem.co.kr | +82.31.724.2548
2.3 Check battery remaining volume
Under the operation of the Operation switch, the battery power level notification (LED Color)
is like
the Blue light is High level, the Green light is Middle level, the Red light is Low level.
- How to check the remaining battery level is as follows.
1) You can check the remaining battery level by viewing the debugging data of the device.
e.g.) II 2017/08/18 04:56:48 BSU(0:0:1) SM(0) BAT(4350)
In the above debugging data, the BAT(4350) is the remaining battery power.
Here, the battery means 4350 is 4.35V.
※ Refer to '4.1 Device debugging method' for details.
2) You can check the remaining battery level by viewing the log of the equipment.
e.g.) 17/08/25 06:55:40, 1, 0, A, 37 24.088240 N, 127 06.467960 E, 4236, 0xD0 0x76 0x5
th
- Meaning: August 25
status), 37 24.088240 N(latitude), 127 06.467960 E(longitude), 4236(battery value), D0-76-
58-7E(NFC key value)
In the above log, the battery value is 4236 and the value is 4.236V.
※ Refer to '4.2 Log data analysis method' for details.
2017 6:55:40(Date), 1(event code), 0(open status), A(GPS reception
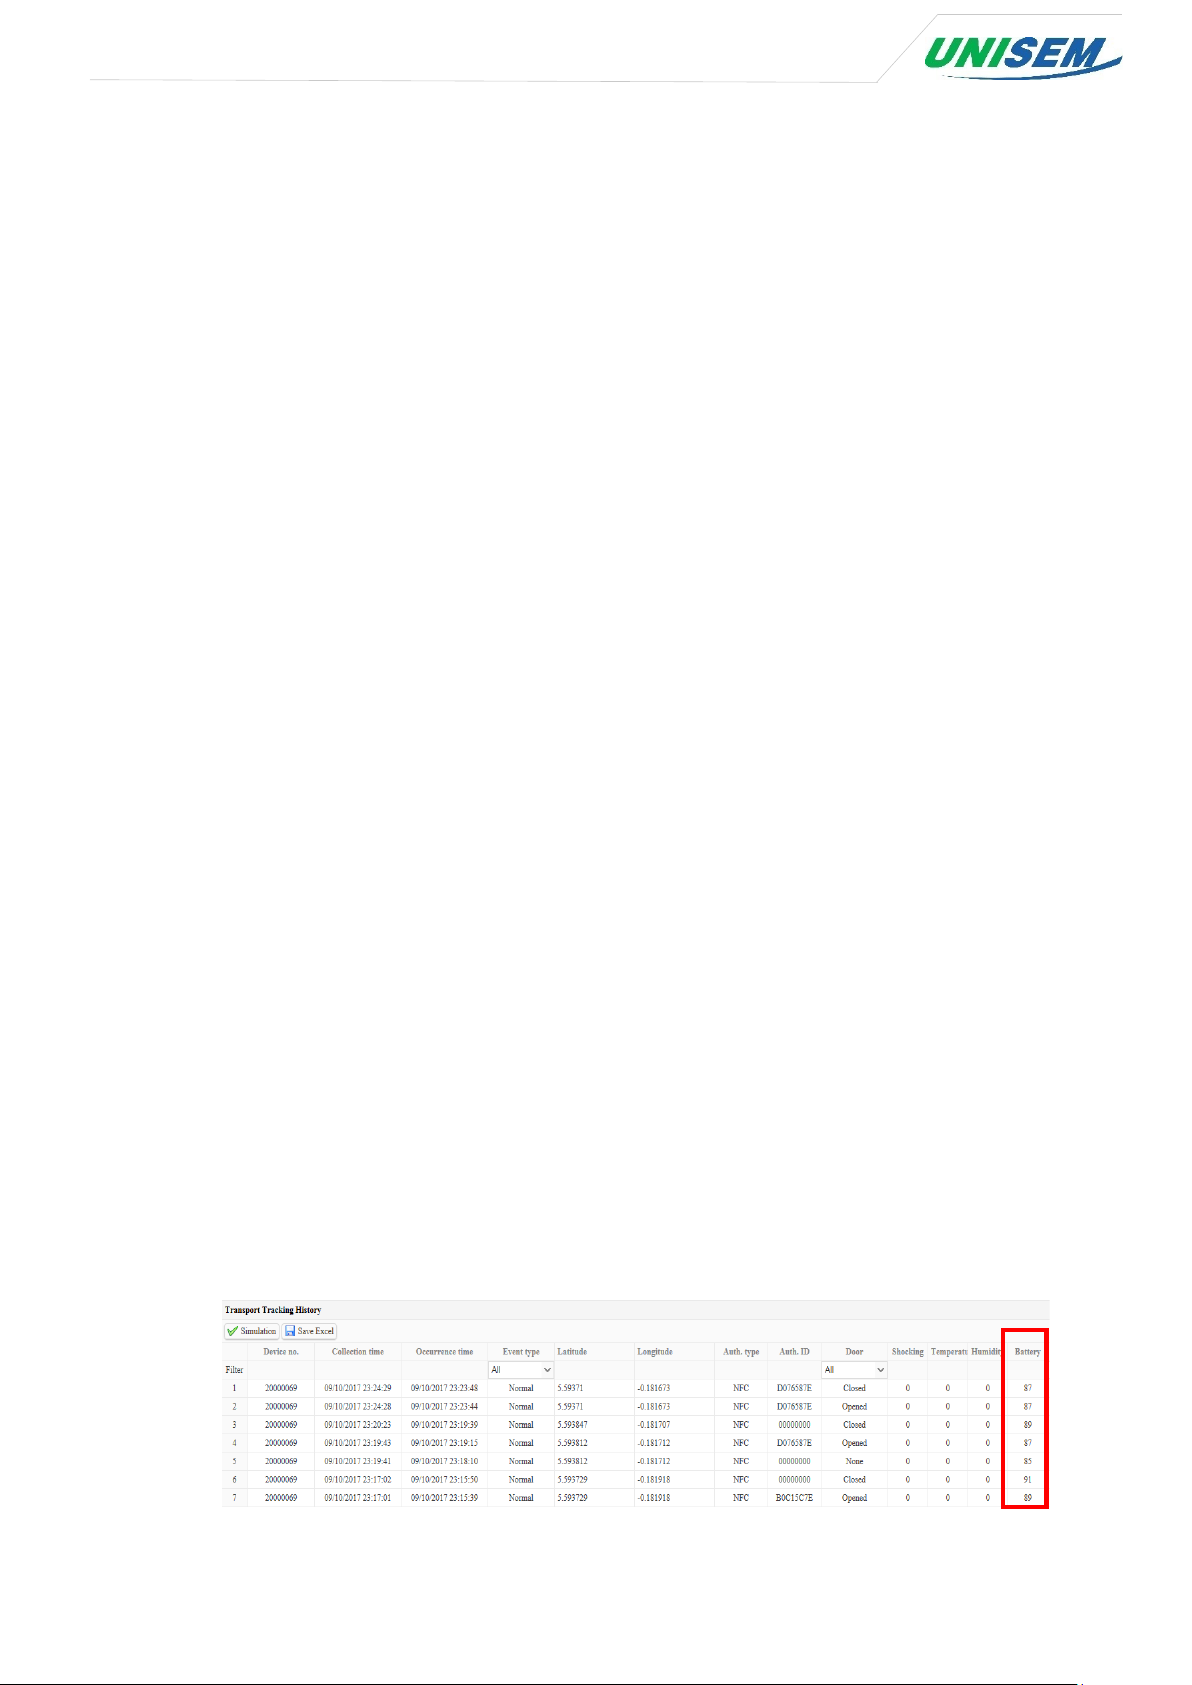
3) You can check the remaining battery level in the tracking monitoring system.
You can check the remaining battery level in 'Battery' item in 'Transport history' - 'Tracking
' by accessing the tracking monitoring system.
Here, the remaining battery level is displayed in %.
www.unisem.co.kr | iot@unisem.co.kr | +82.31.724.2548

3. Device maintenance
3.1 Wire replacement method
- If the wire breaks and the wire needs to be replaced, refer to the Technical Maintenance
Document, which describes how to replace the wire.
3.2 USIM replacement method
Once inserted, it is imperative that the insertion of caution is checked again, because it
cannot be withdrawn again.
If the USIM is incorrectly inserted or the USIM is defective, refer to the Technical
Maintenance Document that describes how to replace the USIM.
3.3 How to deal with battery charging/discharging and replacement
- Battery charging can be charged by plugging the mini B USB cable underneath the device.
The charging input voltage uses 5 V 2A.
- If the battery is discharged and the wire cannot be released, connect a portable external
battery to the USB port of the device and release the wire.
- The battery is cut off at 3.6V to enter sleep mode and will not operate the equipment.
- If the battery is completely discharged or the battery is defective, refer to the Technical
Maintenance Document for replacement of the battery.
3.4 Device reset method
- Press the Operation switch on the device and press the Reset switch when no light flickers.
(When the remaining battery power is normal)
- When upgrading the firmware of the device, press the reset switch after completing the
file transfer.
※ Refer to UniTracer L-100 Firmware upgrade manual.
www.unisem.co.kr | iot@unisem.co.kr | +82.31.724.2548

- Change the settings such as APN and NFC registration and press the reset switch.
Reset Switch
3.5 APN and NFC setting method
Input the commands by the PuTTY Program.
1) The device’s wire is opened by NFC generally.
2) The device receives GPS signal and wait until transmitting ‘Open’ event.
3) After ‘Open’ event is sent, the device will be changed to ‘setting mode’.
4) The USB cable(A to Mini-B type) connects to PC.
5) After Serial COM port is recognized, COM port connects to ‘115200’ Speed.
(Checking the COM port can be found in Device Manager on your PC.)
6) After the device closes, the device is working normally again.
www.unisem.co.kr | iot@unisem.co.kr | +82.31.724.2548

How to use the PuTTY Program
Install the PuTTY progam to use the PuTTY.
Download the program from
http://www.chiark.greenend.org.uk/~sgtatham/putty/latest.html
Download the MSI 64-bit file(putty-64bit-0.68-installer.msi).
www.unisem.co.kr | iot@unisem.co.kr | +82.31.724.2548

www.unisem.co.kr | iot@unisem.co.kr | +82.31.724.2548

www.unisem.co.kr | iot@unisem.co.kr | +82.31.724.2548

The screen is shown like screen after run the PuTTY program.
Select the ‘Serial’ (the Blue circle), set your PC COM port number in the Serial line.
You can identify the COM port number in the Device Manager in your PC.
www.unisem.co.kr | iot@unisem.co.kr | +82.31.724.2548

If the Serial Port is not recognized, download the driver program by this link and then install it.
http://www.st.com/en/development-tools/stsw-stm32102.html
tools/stsw-stm32102.html
Set ‘Com3’ (It depends on your PC com port number.) on Speed line, ‘115200’ on Speed and
press ‘Open’ button then connect.
1) APN setting method
- After connection, set the APN the command as below. Be sure to enter save after setting.
$ set apn [arg2]
$ save
The arg2 is the character string.
http://www.st.com/en/development-
ex) $ set apn allwayson.ktfwing.co.kr
$ save
2) NFC setting method
- After connection, set the NFC command as below. Be sure to enter ‘save’ after setting.
$ set nfc [arg2] [arg3]
10 units of NFC can be registered per device. Each NFC ID can be registered as numerical
number from 0 to 9.
The ‘arg2’ is the index of the registered NFC ID.
www.unisem.co.kr | iot@unisem.co.kr | +82.31.724.2548

If there is input in ‘arg3’, ‘arg3’ is 32bit 16 hexadecimal value.
If there is no input in ‘arg3’, device will read the value of NFC key.
Must enter ‘save’ after registering a NFC key.
If the NFC key value is ‘0’, it recognizes as unregistered status.
If there is no NFC key registered, any NFC can be used for authentication
ex) When registering with NFC card at ‘0’ index
$ set nfc 0
After entering the command, NFC card will be touched on the NFC antenna.
$ save
ex) When registering with NFC key value ‘4f3d1122’ at ‘3’ index
$ set nfc 3 4f3d1122
$ save
ex) Delete the NFC key value at ‘3’ index
$ set nfc 3 0
$ save
www.unisem.co.kr | iot@unisem.co.kr | +82.31.724.2548

4. Trouble Shooting
- If the device does not transmit normal data, trouble shooting can be done through debugging
method and log analysis method below.
- When debugging the device, if gsmSeq = 7 stops, check that the USIM is installed because it is
the result of missing or improperly inserted USIM.
- When debugging the device, if gsmSeq = 14 stops, the network connection cannot be made.
Check with the telecommunication company to check whether the USIM is registered or not, and
try again.
4.1 Device debugging method
The debugging messages are a message for easy identification of the cause when the device is
performing erratic behavior.
II 2017/08/18 04:56:48 BSU(0:0:1) SM(0) BAT(4350) The line is printed every second when the
II 2017/08/18 04:56:49 BSU(0:0:1) SM(0) BAT(4350) Because USB is connected, it stays on without
II 2017/08/18 04:56:50 BSU(0:0:1) SM(0) BAT(4350)
II 2017/08/18 04:56:51 BSU(0:0:1) SM(0) BAT(4350) BAT (4350) means a battery value of 4.35 volts.
II 2017/08/18 04:56:52 BSU(0:0:1) SM(0) BAT(4350)
II 2017/08/18 04:56:53 BSU(0:0:1) SM(0) BAT(4350)
The following are the meanings of the debugging messages.
device is operating.
entering the sleep-state.
PN532Begin: PN532 Begin .... Ready for NFC
SAMConfig: SAMConfig
writeCommand: [PN532] PN532 Wakeup Power on NFC
writeCommand: [PN532] Write: readAckFrame: [PN532] Ack: readAckFrame: OK
readResponse: [PN532] Read: readResponse: length0 = 0x02, length1 = 0xFE
www.unisem.co.kr | iot@unisem.co.kr | +82.31.724.2548

readResponse: OK
writeCommand: [PN532] Write: readAckFrame: [PN532] Ack: readAckFrame: OK
readResponse: [PN532] Read: readResponse: length0 = 0x06, length1 = 0xFA
readResponse: OK
main: Found chip PN5 : 838927879 Awareness of NFC chip
writeCommand: [PN532] Write: readAckFrame: [PN532] Ack: readAckFrame: OK
readResponse: [PN532] Read: readResponse: length0 = 0x0C, length1 = 0xF4
readResponse: OK
readPassiveTargetID: ATQA: 0x04
readPassiveTargetID: SAK : 0x08
main: Found an ISO14443A card Card recognition in ISO 14443
main: UID Length: 4
main: UID Value: PN532End: PN532 End ....
II 2017/08/18 04:56:54 BSU(0:0:1) SM(0) BAT(4346)
II 2017/08/18 04:56:55 BSU(0:0:1) SM(0) BAT(4347)
main: [Event] Unlock Event Unlock Occurrence
LogPrint: TIME = 17/08/18 04:56:56 LogPrint is the ease of viewing logs to
be stored.
LogPrint: GPS = V, 41 14.925740 N, 069 23.448850 E
LogPrint: BAT = 4350
LogPrint: NFC = 0x6E 0xD7 0x7E 0xF1
LogPrint: EventCode = 0x01
LogPrint: DoorState = 0x00
LogPrint: rssi = 0x00
gpsBegin: Enable
II 2017/08/18 04:56:56 BSU(0:0:1) SM(1) BAT(4266)
www.unisem.co.kr | iot@unisem.co.kr | +82.31.724.2548

II 2017/08/18 04:56:57 BSU(0:0:1) SM(1) BAT(4285)
II 2017/08/18 04:56:58 BSU(0:0:1) SM(1) BAT(4290)
II 2017/08/18 04:56:59 BSU(0:0:1) SM(1) BAT(4336)
main: [Event] Lock Event Lock occurred
LogPrint: TIME = 17/08/18 04:56:59
LogPrint: GPS = V, 41 14.925740 N, 069 23.448850 E
LogPrint: BAT = 4350
LogPrint: NFC = 0x00 0x00 0x00 0x00
LogPrint: EventCode = 0x02
LogPrint: DoorState = 0x01
LogPrint: rssi = 0x00
II 2017/08/18 04:57:00 BSU(0:0:1) SM(0) BAT(4344)
II 2017/08/18 04:57:01 BSU(0:0:1) SM(0) BAT(4347)
II 2017/08/18 04:57:02 BSU(0:0:1) SM(0) BAT(4344)
II 2017/08/18 04:57:03 BSU(0:0:1) SM(0) BAT(4333)
gpsStateMachine: RTC : 17 08 18 04:57:04+00:00 GPS is received and the time is calibrated.
gpsStateMachine: GPS : 17 08 18 04:57:03+00:00
gpsEnd: Disable Turning off GPS
LogEnqueue: addr = 0x00004700
EepWriteForLog: d0 = 0x47, d1 = 0x00, devAddr = 0x00A0
EepWriteForLog: Success
LogEnqueue: addr = 0x00004720 Save the log with the GPS value
EepWriteForLog: d0 = 0x47, d1 = 0x20, devAddr = 0x00A0
EepWriteForLog: Success Log save successful.
GSM GSM_START: Start GSM operation
GSM GSM_SendCMD: gsmSeq = 0
www.unisem.co.kr | iot@unisem.co.kr | +82.31.724.2548

GSM GSM_SendCMD: SEND CMD [0] : AT SEND CMD sends commands to GSM modules.
II 2017/08/18 04:57:05 BSU(0:0:1) SM(0) BAT(4350)
GSM GSM_ProcessFin: <== GSM : AT <== The expression of GSM is verbatim output
from the module.
GSM GSM_ProcessFin: <== GSM : OK
GSM GSM_SendCMD: gsmSeq = 1
GSM GSM_SendCMD: SEND CMD [0] : ATE0
GSM GSM_ProcessFin: <== GSM : ATE0
GSM GSM_ProcessFin: <== GSM : OK
GSM GSM_SendCMD: gsmSeq = 2
GSM GSM_SendCMD: SEND CMD [0] : AT+CMEE=2
GSM GSM_ProcessFin: <== GSM : OK
GSM GSM_SendCMD: gsmSeq = 3
GSM GSM_SendCMD: SEND CMD [0] : AT+CGMI
GSM GSM_ProcessFin: <== GSM : u-blox
GSM GSM_ProcessFin: <== GSM : OK
GSM GSM_SendCMD: gsmSeq = 4
GSM GSM_SendCMD: SEND CMD [0] : AT+CGMM
GSM GSM_ProcessFin: <== GSM : SARA-G350
GSM GSM_ProcessFin: <== GSM : OK
GSM GSM_SendCMD: gsmSeq = 5
GSM GSM_SendCMD: SEND CMD [0] : AT+CGMR
GSM GSM_ProcessFin: <== GSM : 08.90
GSM GSM_ProcessFin: <== GSM : OK
GSM GSM_SendCMD: gsmSeq = 6
GSM GSM_SendCMD: SEND CMD [0] : AT+CGSN
www.unisem.co.kr | iot@unisem.co.kr | +82.31.724.2548

GSM GSM_ProcessFin: <== GSM : 359315071697709
GSM GSM_ProcessFin: <== GSM : OK
GSM GSM_SendCMD: gsmSeq = 7
GSM GSM_SendCMD: SEND CMD [0] : AT+CIMI
GSM GSM_ProcessFin: <== GSM : +CME ERROR: operation not allowed
GSM GSM_Process: ERROR 0
II 2017/08/18 04:57:06 BSU(0:0:1) SM(0) BAT(4326)
II 2017/08/18 04:57:07 BSU(0:0:1) SM(0) BAT(4327)
II 2017/08/18 04:57:08 BSU(0:0:1) SM(0) BAT(4326)
GSM GSM_Process: Retry
GSM GSM_SendCMD: gsmSeq = 7
GSM GSM_SendCMD: SEND CMD [0] : Retry(2) : AT+CIMI Get IMSI information from SIM.
GSM GSM_ProcessFin: <== GSM : 204043257078809 SIM must be inserted correctly.
GSM GSM_ProcessFin: <== GSM : OK
GSM GSM_SendCMD: gsmSeq = 8
GSM GSM_SendCMD: SEND CMD [0] : AT+CLCK="SC",2 Recognize SIM and set to Query
state mode
GSM GSM_ProcessFin: <== GSM : +CLCK: 0
GSM GSM_ProcessFin: <== GSM : OK
GSM GSM_SendCMD: gsmSeq = 9
GSM GSM_SendCMD: SEND CMD [0] : AT+CPIN?
GSM GSM_ProcessFin: <== GSM : +CPIN: READY
GSM GSM_ProcessFin: <== GSM : OK
GSM GSM_SendCMD: gsmSeq = 10
GSM GSM_SendCMD: SEND CMD [0] : AT+UPSV?
GSM GSM_ProcessFin: <== GSM : +UPSV: 0
www.unisem.co.kr | iot@unisem.co.kr | +82.31.724.2548

GSM GSM_ProcessFin: <== GSM : OK
GSM GSM_SendCMD: gsmSeq = 11
GSM GSM_SendCMD: SEND CMD [0] : AT+CTZU=1
GSM GSM_ProcessFin: <== GSM : OK
GSM GSM_SendCMD: gsmSeq = 12
GSM GSM_SendCMD: SEND CMD [0] : AT+COPS?
GSM GSM_ProcessFin: <== GSM : +COPS: 0
GSM GSM_ProcessFin: <== GSM : OK
GSM GSM_SendCMD: gsmSeq = 13
GSM GSM_SendCMD: SEND CMD [0] : AT+CREG=2 Attempt to register with Network
GSM GSM_ProcessFin: <== GSM : OK
GSM GSM_SendCMD: gsmSeq = 14
GSM GSM_SendCMD: SEND CMD [0] : AT+CREG? Requesting Network Registration
Results to Modules
GSM GSM_ProcessFin: <== GSM : +CREG: 2,0
GSM ResATCREGq: CREGq D : +CREG: 2,0 The CREG response is 2, 0, 0 not
registered for network
GSM GSM_ProcessFin: <== GSM : OK
GSM ResATCREGq: CREGq D : OK
GSM GSM_Process: ERROR 0
II 2017/08/18 04:57:09 BSU(0:0:1) SM(0) BAT(4327)
II 2017/08/18 04:57:10 BSU(0:0:1) SM(0) BAT(4326)
II 2017/08/18 04:57:11 BSU(0:0:1) SM(0) BAT(4328)
GSM GSM_Process: Retry
GSM GSM_SendCMD: gsmSeq = 14
GSM GSM_SendCMD: SEND CMD [0] : Retry(99) : AT+CREG? Attempt to Retry
www.unisem.co.kr | iot@unisem.co.kr | +82.31.724.2548

GSM GSM_ProcessFin: <== GSM : +CREG: 2,0
GSM ResATCREGq: CREGq D : +CREG: 2,0
GSM GSM_ProcessFin: <== GSM : OK
GSM ResATCREGq: CREGq D : OK
GSM GSM_Process: ERROR 0
II 2017/08/18 04:57:12 BSU(0:0:1) SM(0) BAT(4327)
II 2017/08/18 04:57:13 BSU(0:0:1) SM(0) BAT(4323)
II 2017/08/18 04:57:14 BSU(0:0:1) SM(0) BAT(4326)
GSM GSM_Process: Retry
GSM GSM_SendCMD: gsmSeq = 14
GSM GSM_SendCMD: SEND CMD [0] : Retry(98) : AT+CREG? Try again with the specified
number of times
GSM GSM_ProcessFin: <== GSM : +CREG: 2,0
GSM ResATCREGq: CREGq D : +CREG: 2,0
GSM GSM_ProcessFin: <== GSM : OK
GSM ResATCREGq: CREGq D : OK
GSM GSM_Process: ERROR 0
II 2017/08/18 04:57:15 BSU(0:0:1) SM(0) BAT(4327)
II 2017/08/18 04:57:16 BSU(0:0:1) SM(0) BAT(4327)
II 2017/08/18 04:57:17 BSU(0:0:1) SM(0) BAT(4327)
GSM GSM_Process: Retry
GSM GSM_SendCMD: gsmSeq = 14
GSM GSM_SendCMD: SEND CMD [0] : Retry(97) : AT+CREG?
GSM GSM_ProcessFin: <== GSM : +CREG: 2,0
GSM ResATCREGq: CREGq D : +CREG: 2,0
GSM GSM_ProcessFin: <== GSM : OK
www.unisem.co.kr | iot@unisem.co.kr | +82.31.724.2548

GSM ResATCREGq: CREGq D : OK
GSM GSM_Process: ERROR 0
II 2017/08/18 04:57:18 BSU(0:0:1) SM(0) BAT(4327)
GSM GSM_ProcessFin: <== GSM : +CREG: 5,"05E3","CA05"
II 2017/08/18 04:57:19 BSU(0:0:1) SM(0) BAT(4324)
II 2017/08/18 04:57:20 BSU(0:0:1) SM(0) BAT(4327)
GSM GSM_Process: Retry
GSM GSM_SendCMD: gsmSeq = 14
GSM GSM_SendCMD: SEND CMD [0] : Retry(96) : AT+CREG?
GSM GSM_ProcessFin: <== GSM : +CREG: 2,5,"05E3","CA05" CREG 2, 5 is connected
with roaming.
GSM ResATCREGq: CREGq D : +CREG: 2,5,"05E3","CA05" 1 is connected to home
network
GSM GSM_ProcessFin: <== GSM : OK
GSM ResATCREGq: CREGq D : OK
GSM GSM_SendCMD: gsmSeq = 15
GSM GSM_SendCMD: SEND CMD [0] : AT+CREG=0
GSM GSM_ProcessFin: <== GSM : OK
GSM GSM_SendCMD: gsmSeq = 16
GSM GSM_SendCMD: SEND CMD [0] : AT+CCLK?
GSM GSM_ProcessFin: <== GSM : +CCLK: "04/01/01,00:00:15+00"
GSM GSM_ProcessFin: <== GSM : OK
GSM GSM_SendCMD: gsmSeq = 17
GSM GSM_SendCMD: SEND CMD [0] : AT+CSQ Receiving sensitivity
II 2017/08/18 04:57:21 BSU(0:0:1) SM(0) BAT(4350)
GSM GSM_ProcessFin: <== GSM : +CSQ: 25,99 RSSI: 25 , Quality : 99
www.unisem.co.kr | iot@unisem.co.kr | +82.31.724.2548

GSM GSM_ProcessFin: <== GSM : OK
GSM GSM_SendCMD: gsmSeq = 18
GSM GSM_SendCMD: SEND CMD [0] : AT+UPSD=0,1,"internet.gdsp" APN Registration
GSM GSM_ProcessFin: <== GSM : OK
GSM GSM_SendCMD: gsmSeq = 19
GSM GSM_SendCMD: SEND CMD [0] : AT+UPSD=0,2,"ttt" ID Registration
GSM GSM_ProcessFin: <== GSM : OK
GSM GSM_SendCMD: gsmSeq = 20
GSM GSM_SendCMD: SEND CMD [0] : AT+UPSD=0,3,"mmm" PW Registration
GSM GSM_ProcessFin: <== GSM : OK
GSM GSM_SendCMD: gsmSeq = 21
GSM GSM_SendCMD: SEND CMD [0] : AT+UPSD=0,6,0
GSM GSM_ProcessFin: <== GSM : OK
GSM GSM_SendCMD: gsmSeq = 22
GSM GSM_SendCMD: SEND CMD [0] : AT+UPSDA=0,3
II 2017/08/18 04:57:22 BSU(0:0:1) SM(0) BAT(4326)
GSM GSM_ProcessFin: <== GSM : OK
GSM GSM_SendCMD: gsmSeq = 23
GSM GSM_SendCMD: SEND CMD [0] : AT+UPSND=0,8
GSM GSM_ProcessFin: <== GSM : +UPSND: 0,8,1
GSM GSM_ProcessFin: <== GSM : OK
GSM GSM_SendCMD: gsmSeq = 24
GSM GSM_SendCMD: SEND CMD [0] : AT+USOCR=6
GSM GSM_ProcessFin: <== GSM : +USOCR: 0
GSM GSM_ProcessFin: <== GSM : OK
GSM GSM_SendCMD: gsmSeq = 25
www.unisem.co.kr | iot@unisem.co.kr | +82.31.724.2548

GSM GSM_SendCMD: SEND CMD [0] : AT+USOCO=0,"116.123.165.131",13000 Connect to Server
II 2017/08/18 04:57:23 BSU(0:0:1) SM(0) BAT(4327)
GSM GSM_ProcessFin: <== GSM : OK
LogPickUnsend: addr = 0x00004700
EepReadForLog: Success
main: Send Log
LogPrint: TIME = 17/08/18 04:56:56
LogPrint: GPS = A, 41 13.906110 N, 069 22.551380 E
LogPrint: BAT = 4350
LogPrint: NFC = 0x6E 0xD7 0x7E 0xF1
LogPrint: EventCode = 0x01
LogPrint: DoorState = 0x00
LogPrint: rssi = 0x00
LogDequeueUnsendNoData: head = 570, tail = 0, tailUnsend = 569
GSM GSM_SendCMD: gsmSeq = 27
GSM GSM_SendCMD: SEND CMD [0] : AT+USOWR=0,44 Send 44 bytes to server
GSM ResUSOWR_Cont: SEND Data [0] : 44
GSM GSM_ProcessFin: <== GSM : +USOWR: 0,44
GSM GSM_ProcessFin: <== GSM : OK
LogPickUnsend: addr = 0x00004720
EepReadForLog: Success
main: Send Log
LogPrint: TIME = 17/08/18 04:56:59
LogPrint: GPS = A, 41 13.906110 N, 069 22.551380 E
LogPrint: BAT = 4350
LogPrint: NFC = 0x00 0x00 0x00 0x00
www.unisem.co.kr | iot@unisem.co.kr | +82.31.724.2548

LogPrint: EventCode = 0x02
LogPrint: DoorState = 0x01
LogPrint: rssi = 0x00
LogDequeueUnsendNoData: head = 570, tail = 0, tailUnsend = 570
GSM GSM_SendCMD: gsmSeq = 27
GSM GSM_SendCMD: SEND CMD [0] : AT+USOWR=0,44
II 2017/08/18 04:57:24 BSU(0:0:1) SM(0) BAT(4350)
GSM ResUSOWR_Cont: SEND Data [0] : 44
GSM GSM_ProcessFin: <== GSM : +USOWR: 0,44
GSM GSM_ProcessFin: <== GSM : OK
GSM GSM_END: END !!
GSM GSM_SendCMD: gsmSeq = 28
GSM GSM_SendCMD: SEND CMD [0] : AT+USOCL=0 Disconnecting from server
GSM GSM_ProcessFin: <== GSM : OK
GSM GSM_SendCMD: gsmSeq = 29
GSM GSM_SendCMD: SEND CMD [0] : AT+CPWROFF Module Power Off
II 2017/08/18 04:57:25 BSU(0:0:1) SM(0) BAT(4325)
II 2017/08/18 04:57:26 BSU(0:0:1) SM(0) BAT(4325)
GSM GSM_ProcessFin: <== GSM : OK
II 2017/08/18 04:57:27 BSU(0:0:1) SM(0) BAT(4350)
II 2017/08/18 04:57:28 BSU(0:0:1) SM(0) BAT(4350)
II 2017/08/18 04:57:29 BSU(0:0:1) SM(0) BAT(4350)
II 2017/08/18 04:57:30 BSU(0:0:1) SM(0) BAT(4350)
II 2017/08/18 05:02:57 BSU(0:0:1) SM(0) BAT(4350)
II 2017/08/18 05:02:58 BSU(0:0:1) SM(0) BAT(4350)
II 2017/08/18 05:02:59 BSU(0:0:1) SM(0) BAT(4350)
www.unisem.co.kr | iot@unisem.co.kr | +82.31.724.2548

II 2017/08/18 05:03:00 BSU(0:0:1) SM(0) BAT(4350)
GPSNotiCheck: [Event] NotiGPS GPS events happen according
to the preset period
gpsBegin: Enable
LogPrint: TIME = 17/08/18 05:03:00
LogPrint: GPS = V, 41 13.906110 N, 069 22.551380 E
LogPrint: BAT = 4241
LogPrint: NFC = 0x00 0x00 0x00 0x00
LogPrint: EventCode = 0x00
LogPrint: DoorState = 0x01
LogPrint: rssi = 0x00
II 2017/08/18 05:03:01 BSU(0:0:1) SM(0) BAT(4344)
II 2017/08/18 05:03:02 BSU(0:0:1) SM(0) BAT(4335)
II 2017/08/18 05:03:03 BSU(0:0:1) SM(0) BAT(4328)
II 2017/08/18 05:03:04 BSU(0:0:1) SM(0) BAT(4340)
II 2017/08/18 05:03:05 BSU(0:0:1) SM(0) BAT(4337)
II 2017/08/18 05:03:06 BSU(0:0:1) SM(0) BAT(4343)
II 2017/08/18 05:03:07 BSU(0:0:1) SM(0) BAT(4340)
II 2017/08/18 05:03:08 BSU(0:0:1) SM(0) BAT(4335)
gpsStateMachine: RTC : 17 08 18 05:03:08+00:00
gpsStateMachine: GPS : 17 08 18 05:03:07+00:00
gpsEnd: Disable
LogEnqueue: addr = 0x00004740
EepWriteForLog: d0 = 0x47, d1 = 0x40, devAddr = 0x00A0
EepWriteForLog: Success
GSM GSM_START: Start
www.unisem.co.kr | iot@unisem.co.kr | +82.31.724.2548

GSM GSM_SendCMD: gsmSeq = 0
GSM GSM_SendCMD: SEND CMD [0] : AT
GSM GSM_ProcessFin: <== GSM : AT
GSM GSM_ProcessFin: <== GSM : OK
GSM GSM_SendCMD: gsmSeq = 1
www.unisem.co.kr | iot@unisem.co.kr | +82.31.724.2548

4.3 Log data analysis method
1) The device’s wire is opened by NFC generally.
2) Wait until the device receives GPS signal and transmits ‘Open’ event.
3) After ‘Open’ event is sent, the device will be changed to ‘setting mode’.
4) The USB cable(A to Mini-B type) connects to PC.
5) After Serial COM port is recognized, COM port connects to ‘115200’ Speed.
Log Type
The log is expressed in a format separated by ', '.
Date, event code, open status, GPS reception status, latitude, longitude, battery value, NFC Key
value
Date
Date is shown as Year/Month/Day Hour: Minute: Second
Event code
Open 1
Close 2
Cut 3
Shocking 4
Broken 5
Open status
- ‘0’ means open.
- ‘1’ mean close.
GPS signal status
- ‘V’ means that transmission is successful.
- ‘A’ means that transmission is fail.
Latitude & Longitude
DD mm.mmmmm type
www.unisem.co.kr | iot@unisem.co.kr | +82.31.724.2548

Battery value
mV measure
NFC key value
The NFC ID is displayed as HEXA.
Date, event code, open status, GPS reception status, latitude, longitude, battery value, NFC Key
Sample
17/08/25 06:55:40, 1, 0, A, 37 24.088240 N, 127 06.467960 E, 4236, 0xD0 0x76 0x5
th
- Meaning: August 25
37 24.088240 N(latitude), 127 06.467960 E(longitude), 4236(battery value), D0-76-58-7E(NFC key
value)
2017 6:55:40(Date), 1(event code), 0(open status), A(GPS reception status),
www.unisem.co.kr | iot@unisem.co.kr | +82.31.724.2548

5. Device FAQ
1) How to set up the NFC card for sealing?
- In the initial device setting, there is no registered NFC, so door opening/closing is
possible with all NFC cards (ISO14443 Type A).
- Up to 10 NFC cards are available, and NFC card settings can be done by the procedure
below.
① Connect your L-100 device to your PC using a mini B type USB cable.
www.unisem.co.kr | iot@unisem.co.kr | +82.31.724.2548

② Execute Emulator SW (PuTTY.exe) and enter the device setup window.
(Emulator SW can be downloaded from the internet.)
① Enter COM number
- COM number can be checked
in the PC's Device Manager.
② Enter Speed 115200
③ Enter the command to register the NFC card.
$ set nfc 0
( Register the NFC card at position 0)
③ Choose the ‘Serial’ among the
Connection type and click ‘Open’ at
the bottom
www.unisem.co.kr | iot@unisem.co.kr | +82.31.724.2548

④ Press ENTER and then load the NFC card that you want to register on the NFC tag
section of the device.
⑤ The card will be registered normally with a beep sound.
- To check the information of the registered card, enter ‘show info’ in Emulator SW and
press ENTER.
www.unisem.co.kr | iot@unisem.co.kr | +82.31.724.2548

⑥ Typ e ‘save’ and press Enter to save the changes and exit the setup window.
2) What should I do if I cannot seal and unseal with an NFC card?
- If you use an unregistered NFC card after registering the NFC card user in the device, the
seal cannot be released. Please use the registered card to unlock the seal.
- If the battery is discharged and the power is not turned on, the seal cannot be released
even by using the NFC card.
- After connecting a portable external battery (External battery for general mobile phone
is also available) to the USB port of the L-100, you can unseal it with the NFC card.
www.unisem.co.kr | iot@unisem.co.kr | +82.31.724.2548

3) How do I unseal eSeal if I lose the NFC card?
- If the registered NFC card is lost, the normal unsealing is not possible. If you are forced
to release the eSeal, you can delete all of the information on the NFC card from the
registered NFC card on the Emulator SW. And if you know the information of a lost card,
you can delete the key value of the lost card and re-register another NFC card. However, if
you delete all the information from the NFC card registered on the device, please note that
the other NFC card you have already registered is not available on the device.
※ Refer to the user manual for how to register / release NFC card in Emulator SW.
4) How to insert and replace the eSeal's SIM card?
- By default, the SIM card cannot be replaced after insertion.
This is to prevent the device from releasing the SIM card and preventing the sending of
the normal position signal during operation.
If replacement is required, please contact the manufacturer of the device.
5) How to insert and replace the eSeal's SIM card?
- When connection to the mobile communication network is not possible, follow the steps
below.
① If the data of the SIM being used is exhausted and cannot be used.
② Using abnormal SIM.
③ If the telecommunication company does not normally open.
④ When using SIM that does not support roaming service when traveling between
countries.
⑤ When communication enters the shadow area and communication is not made
temporarily.
※ Please contact your SIM provider except for ⑤ case.
www.unisem.co.kr | iot@unisem.co.kr | +82.31.724.2548

6) How to confirm that GPS signal of eSeal device is received normally?
- The green button on the front panel will blink while the GPS receiver is receiving GPS
signals.
If the GPS signal is not detected properly, the green light flashes for 3 minutes and the
blue light flashes. In this case, the GPS signal is not normally detected.
If the GPS signal is received normally, the green light will turn off within 3 minutes (Normally
10 ~ 60 seconds) and the blue light will flash
7) How do I view the debugging messages of the eSeal devices?
- You can check the debugging message by pressing enter after inputting ‘show debug’
in Emulator SW.
※ For details on how to check the Debugging Message, refer to the user manual.
8) How to check the log data of eSeal device?
- You can check the log by pressing enter after inputting ‘show log’ in Emulator SW.
※ For details on how to check the Log Data, refer to the user manual.
9) What is the battery capacity and usage cycle?
- The L-100 uses a Lithium-Ion battery with a capacity of 6,000 mAh.
If the device is setting like as every 10 minutes of the GPS reception cycle and every one
hour of the data transmission cycle, it can be used for approximately 33 days under normal
running.
www.unisem.co.kr | iot@unisem.co.kr | +82.31.724.2548

10) How do I unseal if the battery is discharged?
- To unseal the battery, you can disconnect the battery by connecting a portable external
battery to the USB port of the device.
11) How to check if the battery is charged up to 100%?
- When the battery is fully charged, it takes about 8 hours. And the front button light will
turn blue when fully charged. (Input voltage 5V / 2A standard)
12) What should I do if I cannot open the NFC card with a red light when I put
the NFC card in the device that has been shut down?
- In this case, it is impossible to unseal the battery because the battery is discharged. Please
connect the portable external battery to the USB port of L-100 to unseal.
13) How to shut down your device when you're finished the transportation?
- When the transport is completed, if you open the wire of the equipment and unseal it,
the device will automatically shut down after the last event signal transmission.
www.unisem.co.kr | iot@unisem.co.kr | +82.31.724.2548

FCC
Part 15.19
This device comply with part15 of FCC rules. Operation is subject to the following two conditions:
• This device may not cause harmful interference.
• This device & its accessories must accept any interference received, including interference that
may cause undesired operation.
Part 15.105
This equipment has been tested and found to comply with the limits for a Class B digital device,
pursuant to part 15 of the FCC Rules. These limits are designed to provide reasonable protection
against harmful interference in a residential installation. This equipment generates, uses and can
radiate radio frequency energy and, if not installed and used in accordance with the instructions,
may cause harmful interference to radio communications. However, there is no guarantee that
interference will not occur in a particular installation. If this equipment does cause harmful
interference to radio or television reception, which can be determined by turning the equipment
off and on, the user is encouraged to try to correct the interference by one or more of the
following measures:
Reorient or relocate the receiving antenna.
Increase the separation between the equipment and receiver.
Connect the equipment into an outlet on a circuit different from that to which the receiver is
connected.
Consult the dealer or an experienced radio/TV technician for help.
Part15.21
Changes or modifications not expressly approved by the manufacturer (or party responsible) for
compliance could void the user’s authority to operate the equipment
Body effects
This equipment should be installed and operated with greater than 20 cm between the
radiator and your body.
www.unisem.co.kr | iot@unisem.co.kr | +82.31.724.2548
 Loading...