


Instructions Manual
Ballistic, Razor
& Rev Force 1
Hockey sledge

Instructions for Use
Contents Page
1 General Information
1.1 Forward………………………………………………….2
1.2 Intended Use……………………………………………2
1.3 Liability…………………………………………………..2
1.4 CE Conformity…………………………………………..2
2 Safety Instructions
2.1 Explanation of Symbols…………………………………3
2.2 General Safety Information……………………………..3
General Safety Cont’d….……………………………….4
General Safety Cont’d…………………………………..5
3 Delivery……………………………………………………………6
4 Final Assembly (Preparation for use)
4.1 Required Tools……………………………………………6
4.1 Razor / G Force Assembly………………………………7
4.2 Ballistic Assembly………………………………………..8
4.3 Rev Force 1 / Goalie…………………………………….9
5 Maintenance and Care
5.1 Regular Maintenance…………………………………..10
5.2 Care………………………………………………………10
1

1 General Information
1.1 Foreward
Thank you for purchasing our product. At Unique Inventions our Hockey Sledges are built
according to the rules of the IPC (International Paralympic Committee). Please remember to
take the IPC rules into account in the course of personal adjustments.
1.2 Intended Use
Our sledges at Unique Inventions are sports equipment designed exclusively for sledge hockey.
1.3 Liability
The manufacturer’s warranty applies only if the device has been used under the conditions and
for the purposes described. We recommend that the device be used and maintained according
to the instructions for use.
The manufacturer is not responsible for damages caused by components and spare parts not
approved by the manufacturer.
We request that photographs be emailed to us of the parts that have proven faulty. After review
we will decide if it is indeed a manufacturers defect / the result of regular wear and tear or
misuse.
1.4 CE Conformity
All of our models of sledges are not subject to CE certification according to the applicable laws
since it is purely a piece of sports equipment and not a medical device.
2

Safety Instructions
2.1 Explanation of Symbols
Warnings regarding possible risks of accident or injury
Warnings regarding possible technical damage
Information regarding operation.
2.2 General Safety Information
Danger as a result of incorrect assembly or settings
!
CAUTION
NOTICE
INFORMATION
INFORMATION
Please read the instructions for use first. Before using the product, familiarize
yourself with the handling and function of the product and practice handling it. You
may compromise your safety if you do not observe these instructions.
INFORMATION
Unique Inventions sledges are designed to absorb the forces generated during sledge
hockey. They comply with IPC rules and are suitable for use according to international
standards. Nevertheless, the possibility of injuries when participating in sports cannot be
excluded. These risks can be minimized by wearing suitable protective clothing, playing by
the rules and always being attentive while playing.
Risk of tipping due to incorrect balance settings. In case of extreme settings, the sledge
may tip backwards. Extreme settings are only recommended for experienced players.
Danger due to loose / damaged skate blades. If the blade system or the skate blades are
not firmly attached, the sledge may tip over sideways. Before use, ensure the blade system
and blades are firmly installed.
!
CAUTION
3

Danger when boarding
Danger while playing
!
CAUTION
Risk of injury due to incorrect boarding. An assistant should always be present when
boarding and exiting. The sledge always has to be in a stable position for boarding.
!
CAUTION
Risk of pinching on the seatbelt. When adjusting the belt, avoid reaching into the
pinch region of the belt closures with your hands.
!
CAUTION
Risk of crushing due to tipping. If the sledge tips during boarding, the user may experience
crushing of the hands. The sledge must always be in a stable position for boarding.
!
CAUTION
Risk of accidents for inexperienced users. User this product without experience can lead
to falls or other dangerous situations. Therefore, you must practice in training situations first.
Learn the effects of shifts in the centre of gravity on the behaviour of the sledge.
!
CAUTION
Risk of hand injuries. In order to avoid hand injuries, never reach under the sledge
with your hands since cuts may otherwise be incurred.
4
Warning against damage to Unique Inventions Sledges
5
!
CAUTION
Risk of serious facial injuries. Never play without protective clothing. Ensure that a
full face helmet is always worn during sledge hockey.
!
CAUTION
Risk of leg or residual lim injuries. Securely holding the legs / residual limbs in place in
required in order to prevent injuries while playing. Use foot strap provided with sledge.
Risk of damage caused by overload. The maximum allowable user weight with
protective equipment is 250 lbs. Anything over this weight we must be made aware so we
reinforce parts as necessary.
NOTICE

3 Delivery
Our sledges are partially assembled upon delivery.
Unpack the the contents and examine them for completeness.
The following items are included with all models of sledges
4 Final Assembly
Our sledges must be carefully assembled by a knowledgeable adult.
4.1 Required Tools:
Tools required for final assembly and regular maintenance:
2 - 7/16” Wrench
(For tightening seat frame and blade holder)
1/2” Wrench (For U Bolt)
2 - 3/16” Allen Wrench (To remove skate blades)
3/8” Wrench & 5/32” Allen Wrench (For standard Nose)
6
Quantity Description
•
Bucket with seat frame attached (Adjustable riser if ordered as an option)
•
Seat belts attached to the bucket
•
Foam padding on bottom and back of seat
PLEASE NOTE:
Ratchet strap seatbelt system and Over Amour leg cover is only on the Razor and Ballistic sledges. All
other styles of sledges come with the standard cam lock seat belts.
Main frame includes the following items:
•
Complete Blade system with Skate Blades attached
•
2 side tubes
•
1 nose (includes U Bolt skag, foot support strap, 1”x36” velcro foot strap)
PLEASE NOTE:
The frame stiffener comes with the Razor sledge only
The plastic skag comes with the Razor and Ballistic sledges only.
1
1
7
Assembly Instructions
Unique Inventions Inc. est 1984
559 Chamberlain St.
Peterborough, ON CANADA
www.uniqueinventionsinc.com
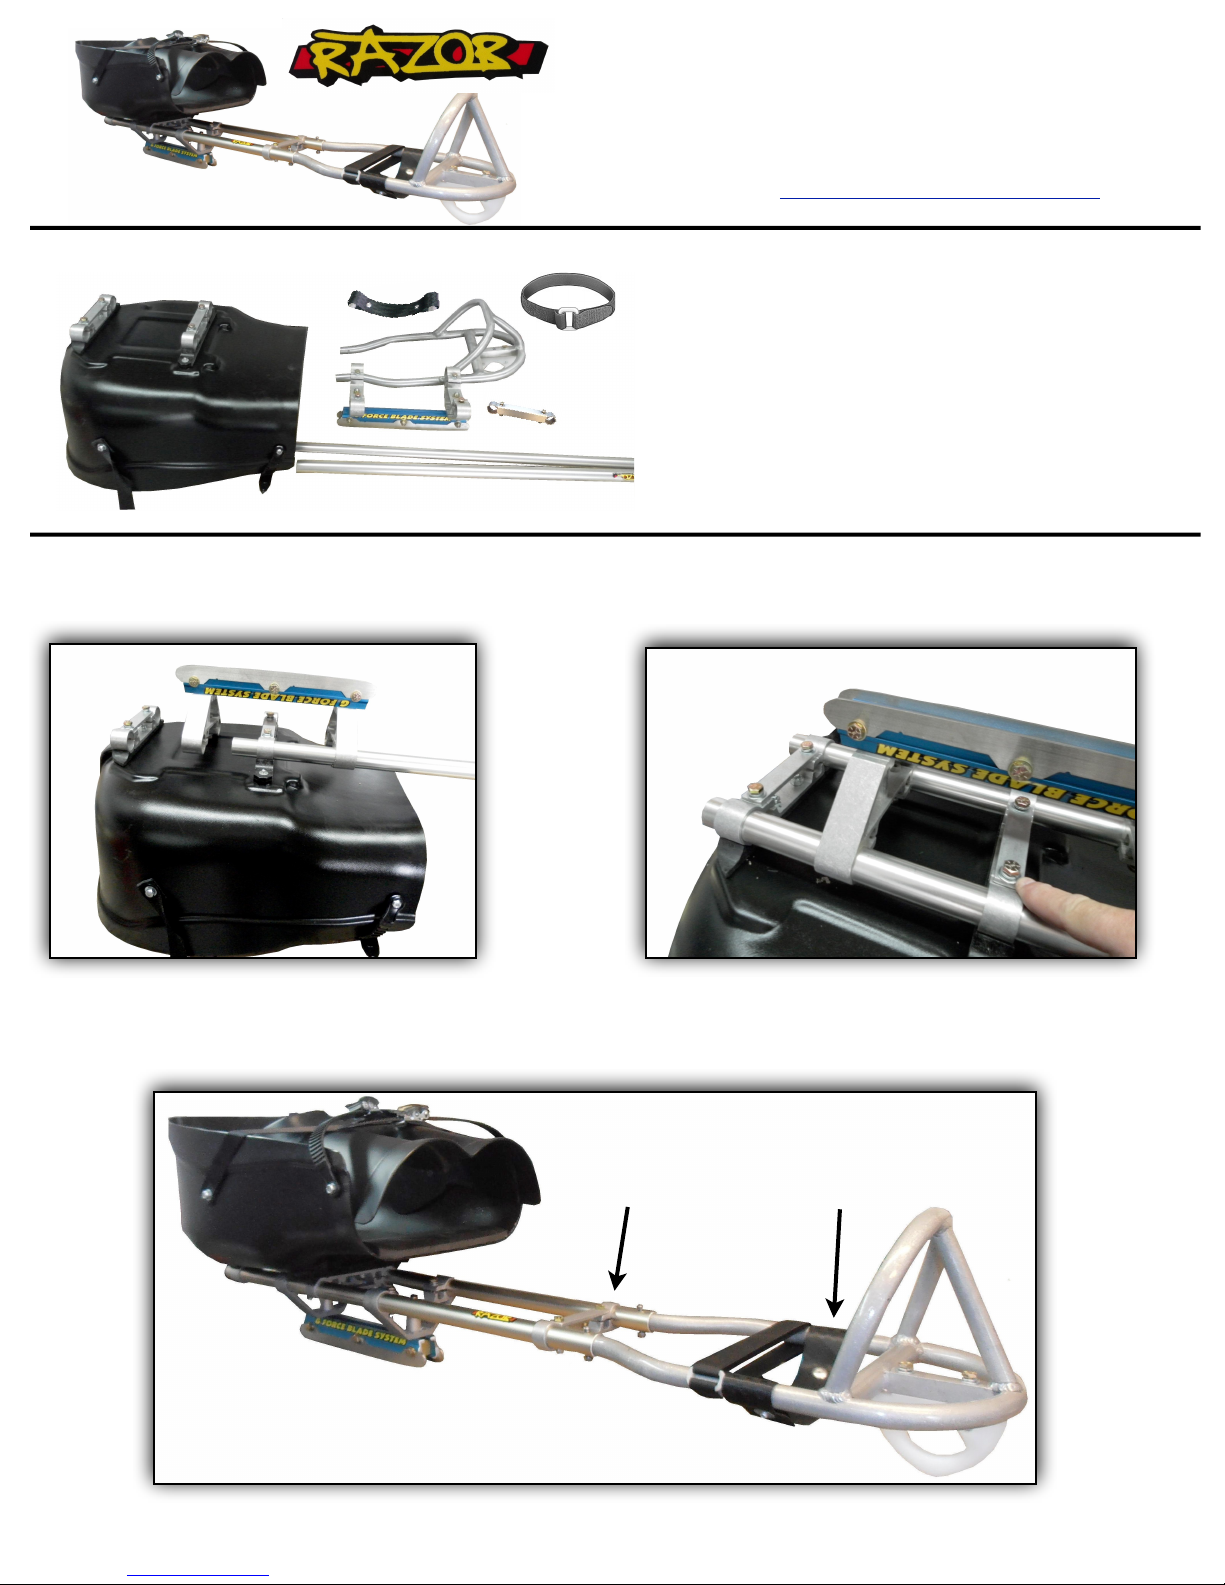
Items Packed in Box
1.
Bucket with frame attached & Over Armour
2.
Blade system
3.
Side Tubes
4.
Nose with foot support strap & velcro strap
5.
Frame Stiffener
6.
Plastic Skag
Tools Required
7/16” Wrench (Qty 2) 3/16” Allen Wrench (Qty 2)
3/8” Wrench 5/32” Allen Wrench
1/2” Wrench
1
234
5
6
1. Place blade system on bucket as shown. Be sure
Blade System is in front of seat frame / adjustable riser!
Insert side tubes. They are marked left and right
2. Tighten seat frame (All 4 bolts) If your
sledge came with an adjustable riser
tighten all 4 bolts on the riser.
Frame Stiffener
3.
Slide frame stiffener onto side tubes. Slide foot support onto nose piece
and then insert nose piece into side tubes. Secure with bolts provided.
Once your balance point is found tighten the blade holders.
Foot Support Strap
8
Assembly Instructions
Unique Inventions Inc. est 1984
559 Chamberlain St.
Peterborough, ON CANADA
www.uniqueinventionsinc.com
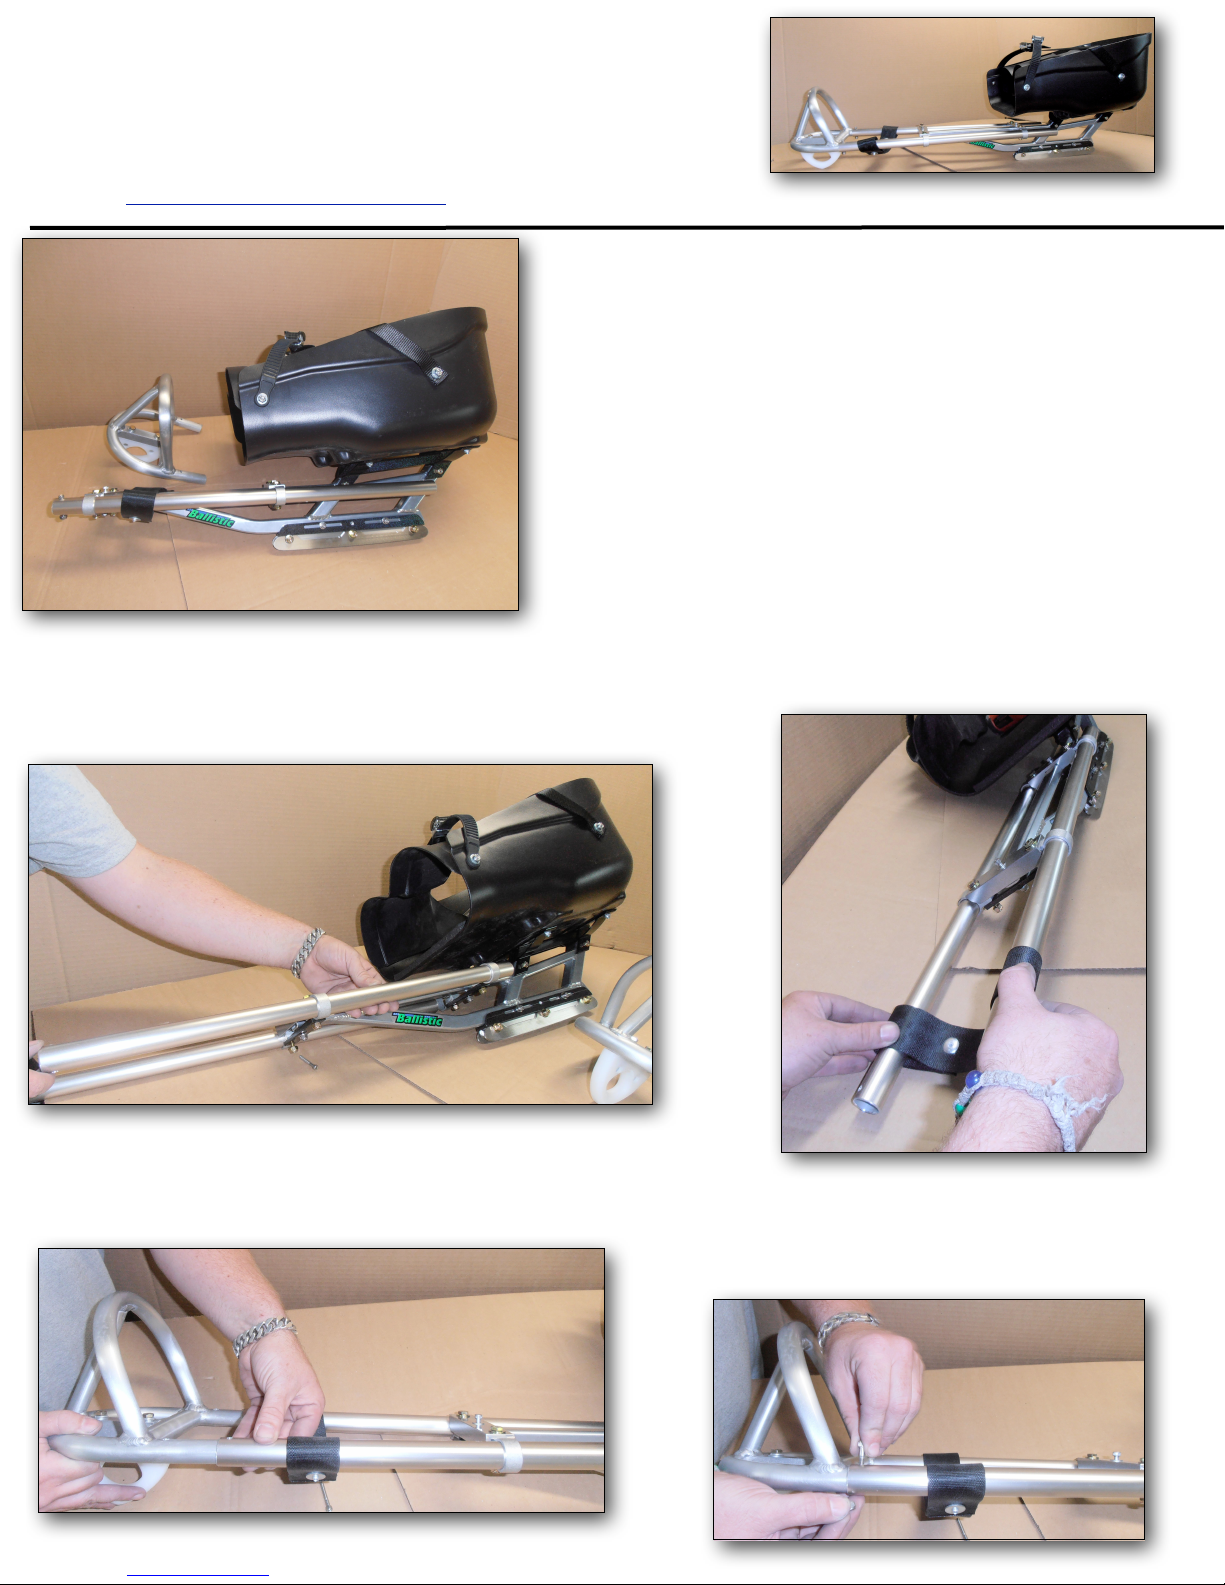
Out of the Box Assembly
You will receive the following items:
1 . Bucket (Seat Belts & Over Armour) attached to Frame
2.
Ballistic Frame / Side Tubes / Frame Stiffener / Foot Strap
3. Nose with Plastic Skag
Tools Required
7/16” Wrench
3/8” Wrench
5/32” Allan wrench
The Ballistic
1
2
3
1.
Slide side tubes out and remove foot support
strap. Re-insert side tubes.
2. Slide Foot support on.
3.
Slide nose piece into side tubes.
4.
Secure nose with bolts provided and then
tighten all the bots on the sled.
10
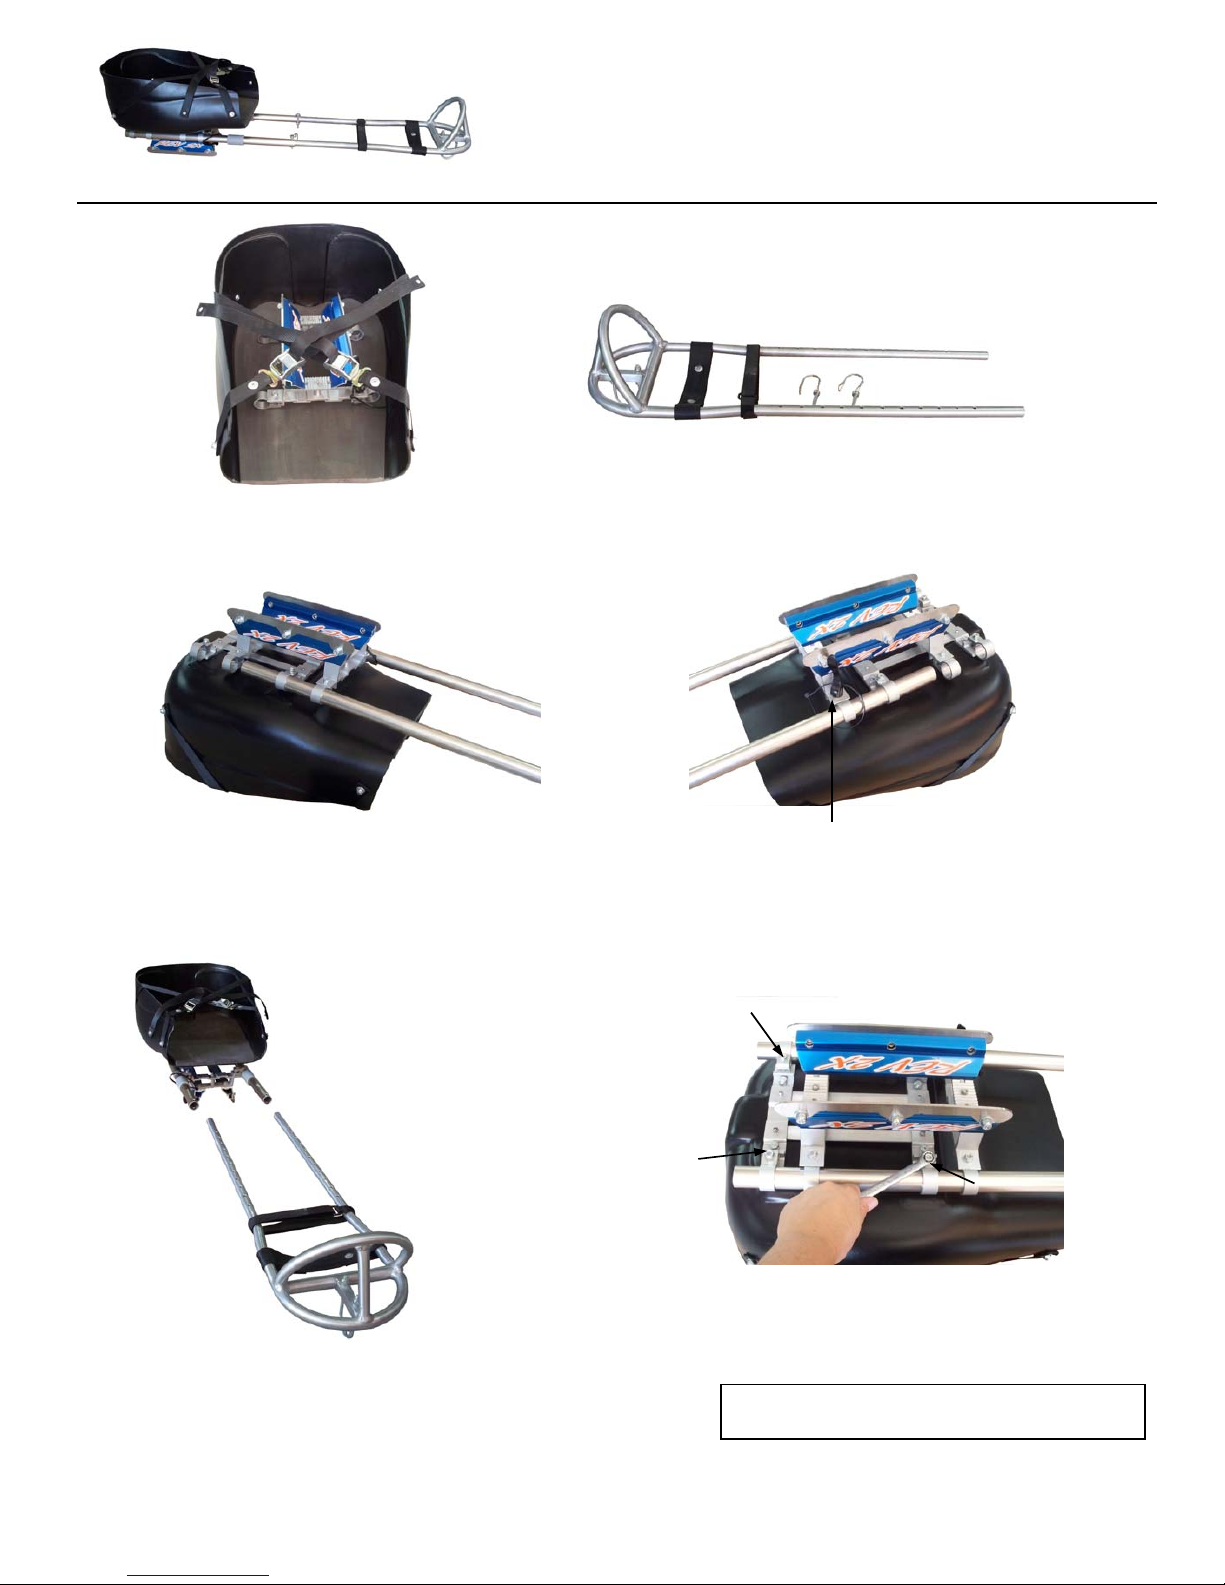
Tighten 4 seat frame bolts.
Be careful not to over tighten!
On side with Lever, open lever, slide tube
through tie strap. (The tie strap will prevent
lever from coming off and getting lost.)
DO NOT cut tie strap, it stays on.
Unique Inventions Inc.
559 Chamberlain St.
Peterborough, ON CANADA
www.uniqueinventionsinc.com
Assembly Instructions
Rev 2X
Out of the Box Bucket &
Blade assembly
1.
Telescoping nose option
2.
Place Blade assembly on bucket as shown and
slide frame tubes in.Frame tubes are marked left
and right. If you are receiving more than one sled
they will have numbers on them.
3.
Once you have installed the frame
tubes Slide the nose in and install pins
this aligns the tube holes to the tele-
scoping nose holes
Now tighten the bolts on the seat
frame. See next picture.
4.
5.
NOT TO BE USED AS A SNOW SLED
Tools Required:
7/16” Wrench (Qty 2) ~ For tightening seat frame and blade holder
1/2” Wrench ~ For U Bolt
3/16” Allen Wrench (Qty 2) ~ For Removing skate blades
If you have a standard nose (not telescoping) you will also need:
3/8” Wrench
5/32” Allen Wrench
Applicable for Rev Force 1
& Goalie Sledges

5 Maintenance and Care
5.1 Regular Maintenance
Like an piece of sports equipment, our sledges require regular maintenance.
All pats of the sledge must be inspected prior to each use. In particular, ensure all bolts and
nuts are tight.
5.2 Care
Unique Inventions hockey sledges are made of high quality corrosion resistant materials. After
use, you should wipe all aluminum parts of the sledge with an absorbent cloth.
In particular, the inner bucket should be cleaned regularly. Perspiration and humidity can
reduce the lifespan of the foam insert. Regular cleaning is also essential for hygiene reasons.
11
!
CAUTION
Risk of injury due to damaged / loose components. Damaged parts and loose bolt
connections represent a hazard to the user and fellow players. The frame and mounting
parts must be inspected for damage.
Damage to components. Do not use caustic or aggressive cleaning agents. Otherwise,
damage to the material surfaces may result
NOTICE
 Loading...