

Page 1
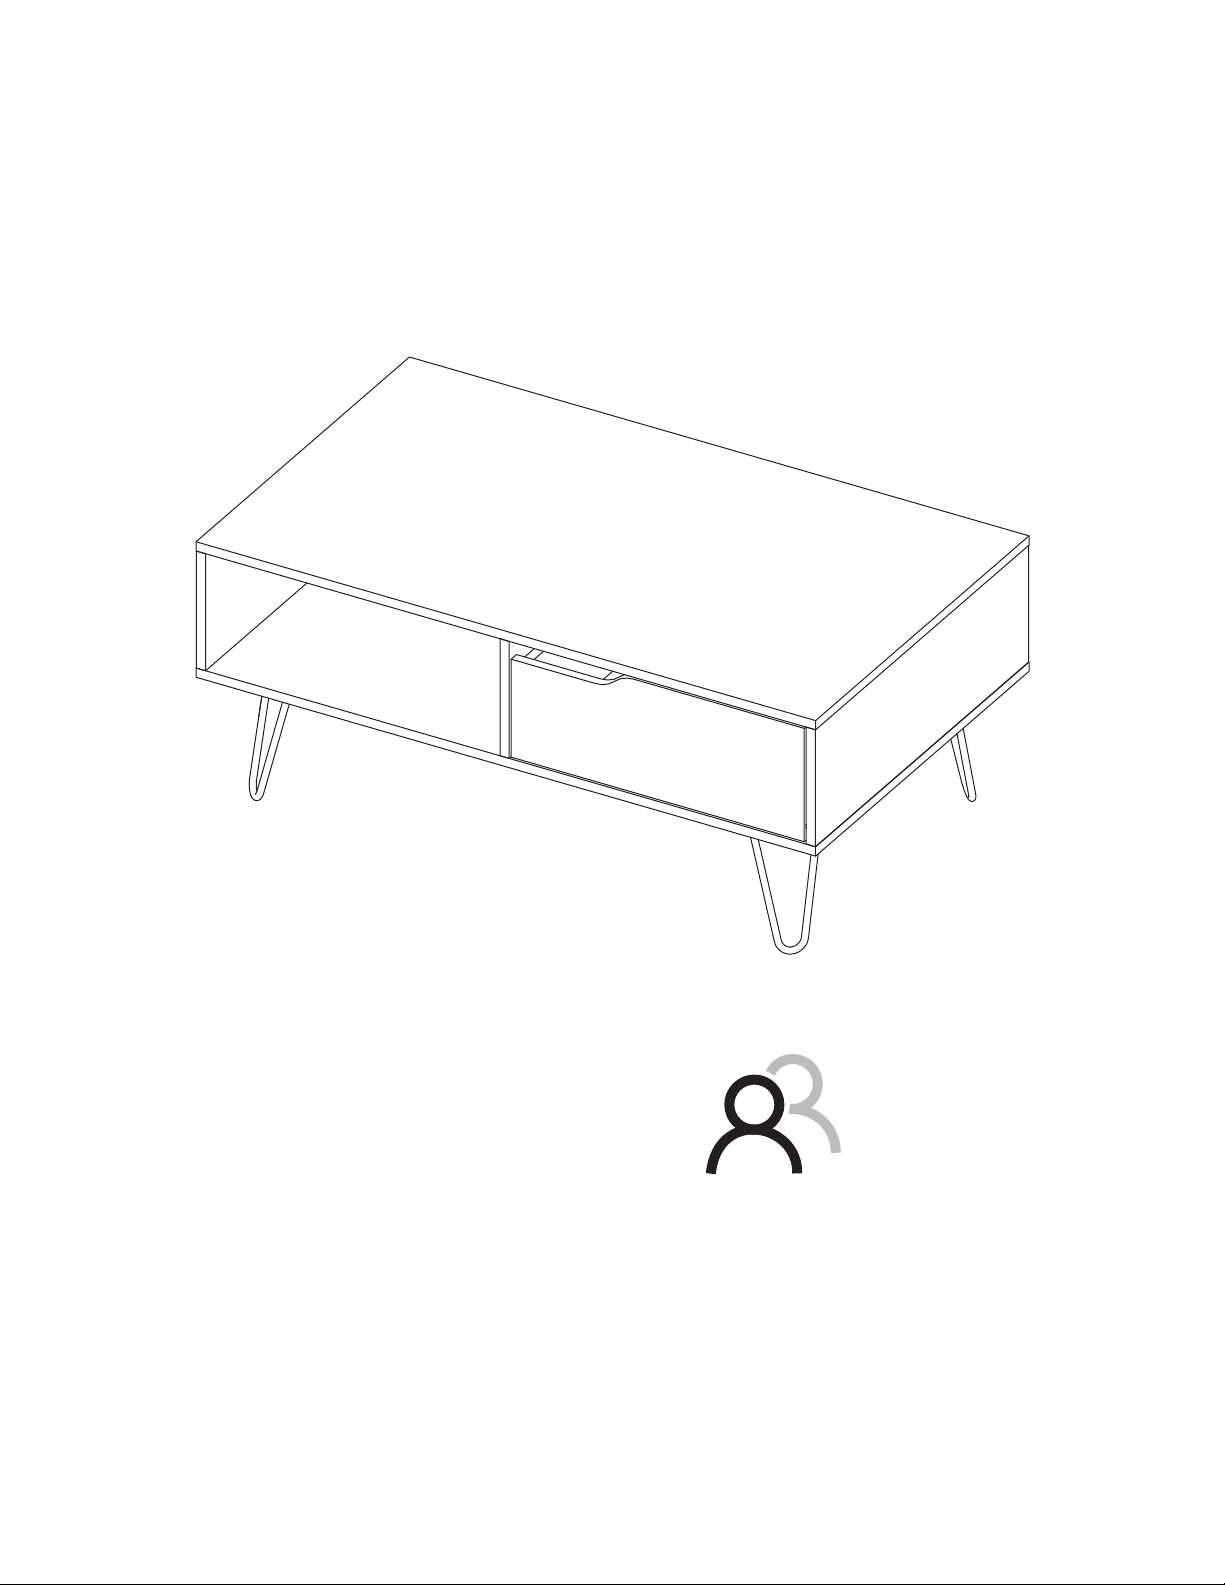
ASSEMBLY INSTRUCTIONS
INSTRUCCIONES DE ENSAMBLE
Height: 16,54 in
Width: 39,61 in
Depth: 23,62 in
Alto: 42 cm
Ancho: 100,6 cm
Fondo: 60 cm
2 PEOPLE ASSEMBLY RECOMMENDED
SE RECOMIENDA EL ARMADO ENTRE
2 PERSONAS
COFFEE TABLE
Mesa de Centro
Page 2

!
IMPORTANT RECOMMENDATIONS / RECOMENDACIONES IMPORTANTES
-The cabinet MUST be used exclusively indoors, do not expose to direct sun. / El mueble debe ser usado únicamente en
interiores, no exponer al sol directo.
-Do NOT overload the cabinet (see suggested loads), . / Do not hit or hammer the cabinet (just when indicated) NO
sobrecargar el mueble (ver las cargas sugeridas). No golpear ni martillar el mueble (solo cuando se indique).
-Do not drag, lift and move between two people. / No arrastre el mueble, levántelo entre dos personas.
-All timber surfaces will change color over time. New furniture will initially vary in shade from items that have been
previously purchased. / Toda superficie de madera cambia de color con el tiempo. Al principio, el tono de los muebles
nuevos puede variar al tono de los muebles que se compraron anteriormente.
-Spray polishes are best avoided as they contain silicones which may spoil the furniture's surface by building up over
time. Do not paint the cabinet. / Recomendamos evitar los pulidores en aerosol ya que contienen siliconas que, con el
tiempo, pueden deteriorar la supericie de los muebles. No pintar el mueble.
-Make sure all surfaces are protected from heat and liquids by mats and coasters. Wipe up spills immediately and ensure
that a mat or pad is placed under paper if you are writing. / Asegúrese de proteger las superficies del calor y los líquidos
utilizando esteras y posavasos. Limpie los derrames inmediatamente y, si va a escribir, asegúrese de colocar un tapete o
almohadilla debajo del papel.
-Our furniture will endure most temperatures in the home but it is best to avoid placing furniture next to heat sources such
as radiators or fires. Be particularly careful with solid wood as the lack of humidity caused by central heating can cause
damage such as warping. / Nuestros muebles pueden soportar la mayoría de las temperaturas en el hogar, pero
recomendamos evitar colocarlos cerca de fuentes de calor tales como radiadores o fuego. Tenga especial cuidado con la
madera maciza, ya que la falta de humedad ocasionada por la calefacción central puede causar daños, tales como la
deformación.
-Visible screws and bolts must be checked regularly and tightened (if necessary) shortly after purchase. / Luego de la
compra, revise regularmente los tornillos y los pernos visibles y ajústelos (de ser necesario).
-Felt knobs are recommended fitted underneath the legs or bases if the furniture is to be placed on a wooden or parquet
floor or surface. / Se recomienda instalar perillas de fieltro debajo de las patas o bases si los muebles se colocarán en un
piso o superficie de madera o parquet.
MAINTENANCE / MANTENIMIENTO
-When cleaning is needed, use a damp cloth followed by a dry cloth. Remove liquid spills immediately from the frame and
mechanism parts. Clean metallic hardware with a dry cloth. / Cuando se necesite limpiar, use un paño húmedo seguido
de un paño seco. Retire los derrames de líquidos inmediatamente de la estructura y las partes del mecanismo. Limpiar
los herrajes metálicos con un paño seco.
WARNING/
ADVERTENCIA
Page 2
Never allow children to climb or manipulate the cabinet, furniture tip over can cause serious
!
injuries or death. / Nunca permita que los niños escalen o manipulen el mueble, la caída de este
puede provocar lesiones graves o la muerte.
Page 3
INDEX
ÍNDICE
Assembly Hardware
Assembly Parts
Suggested Loads
Assembly Recommendations
Assembly Steps
Warranty
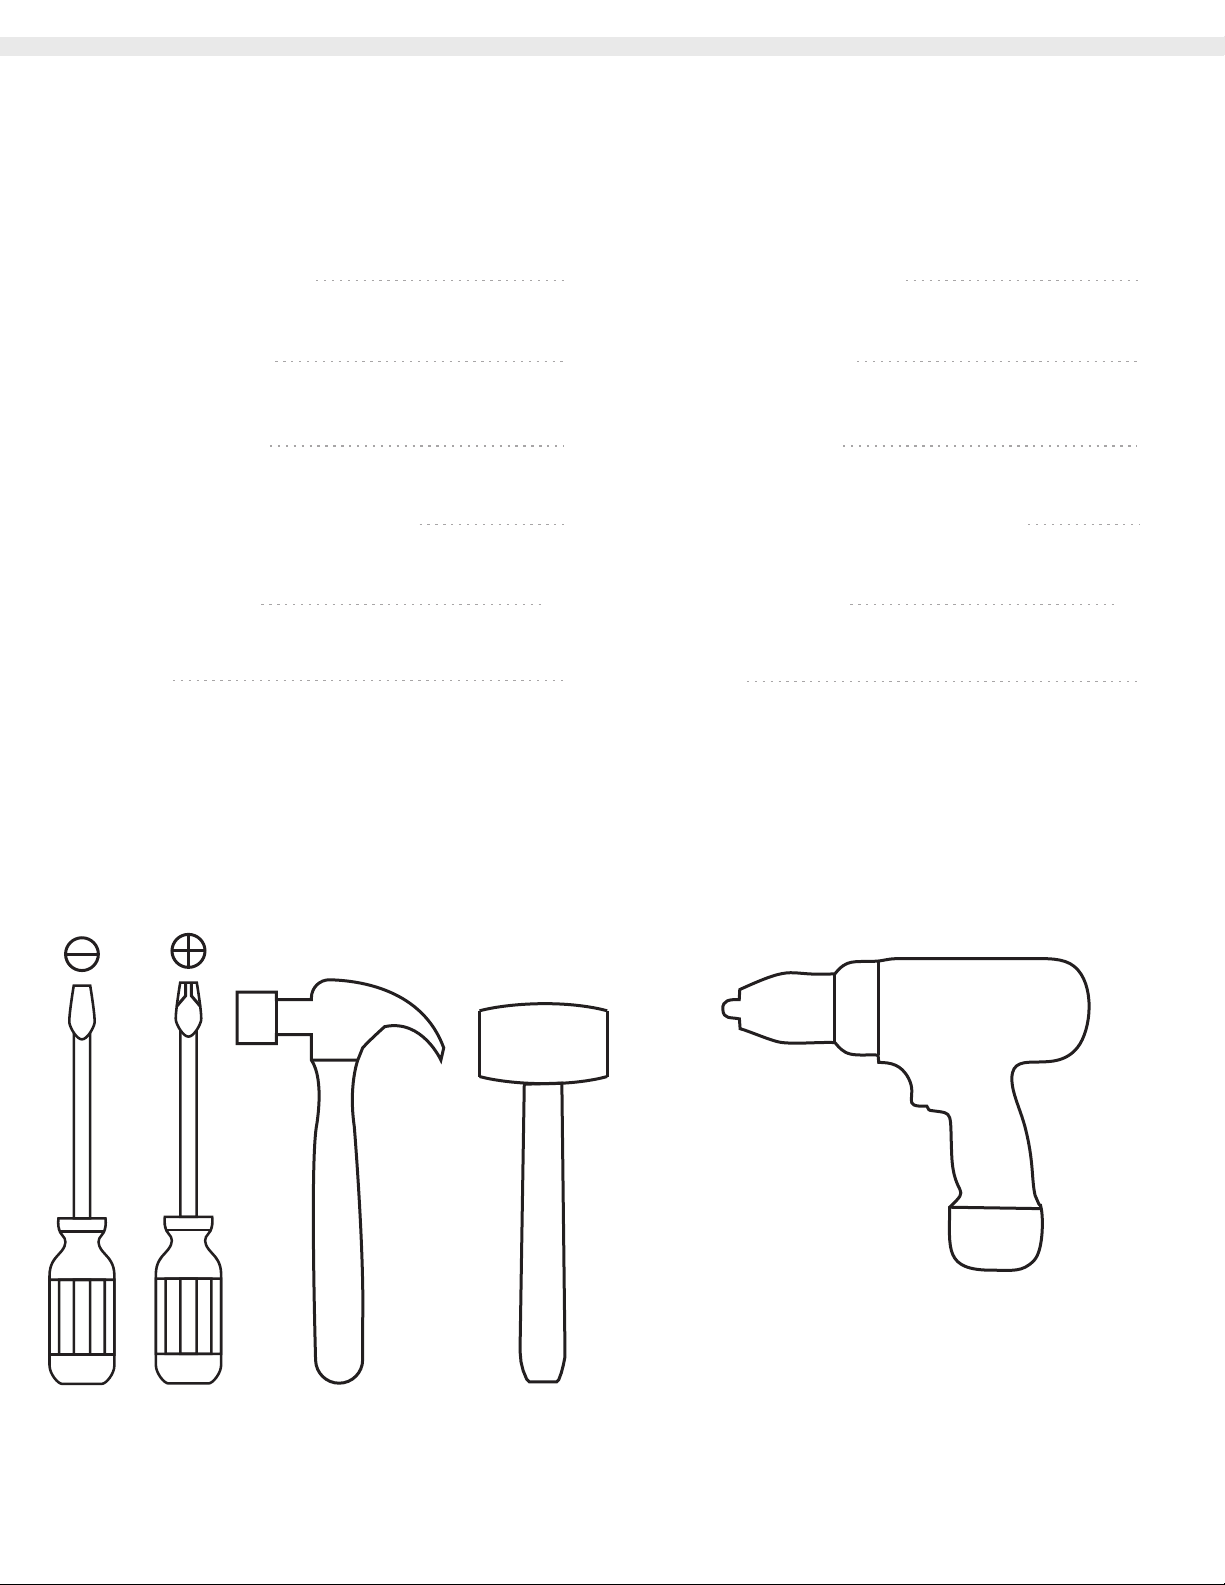
REQUIRED TOOLS*
4
5
6
6
7-15
16
Herrajes para Armado
Piezas de Armado
Cargas Sugeridas
Recomendaciones de Ensamble
Pasos de Armado
Garantía
SUGGESTED TOOLS*
4
5
6
6
7-15
16
HERRAMIENTAS NECESARIAS*
HERRAMIENTAS SUGERIDAS*
Drill / electric screwdriver
Taladro/ destornillador eléctrico
*Not included, and not shown actual size.
Page 3
*No incluidas y no se muestran en tamaño real.
Page 4
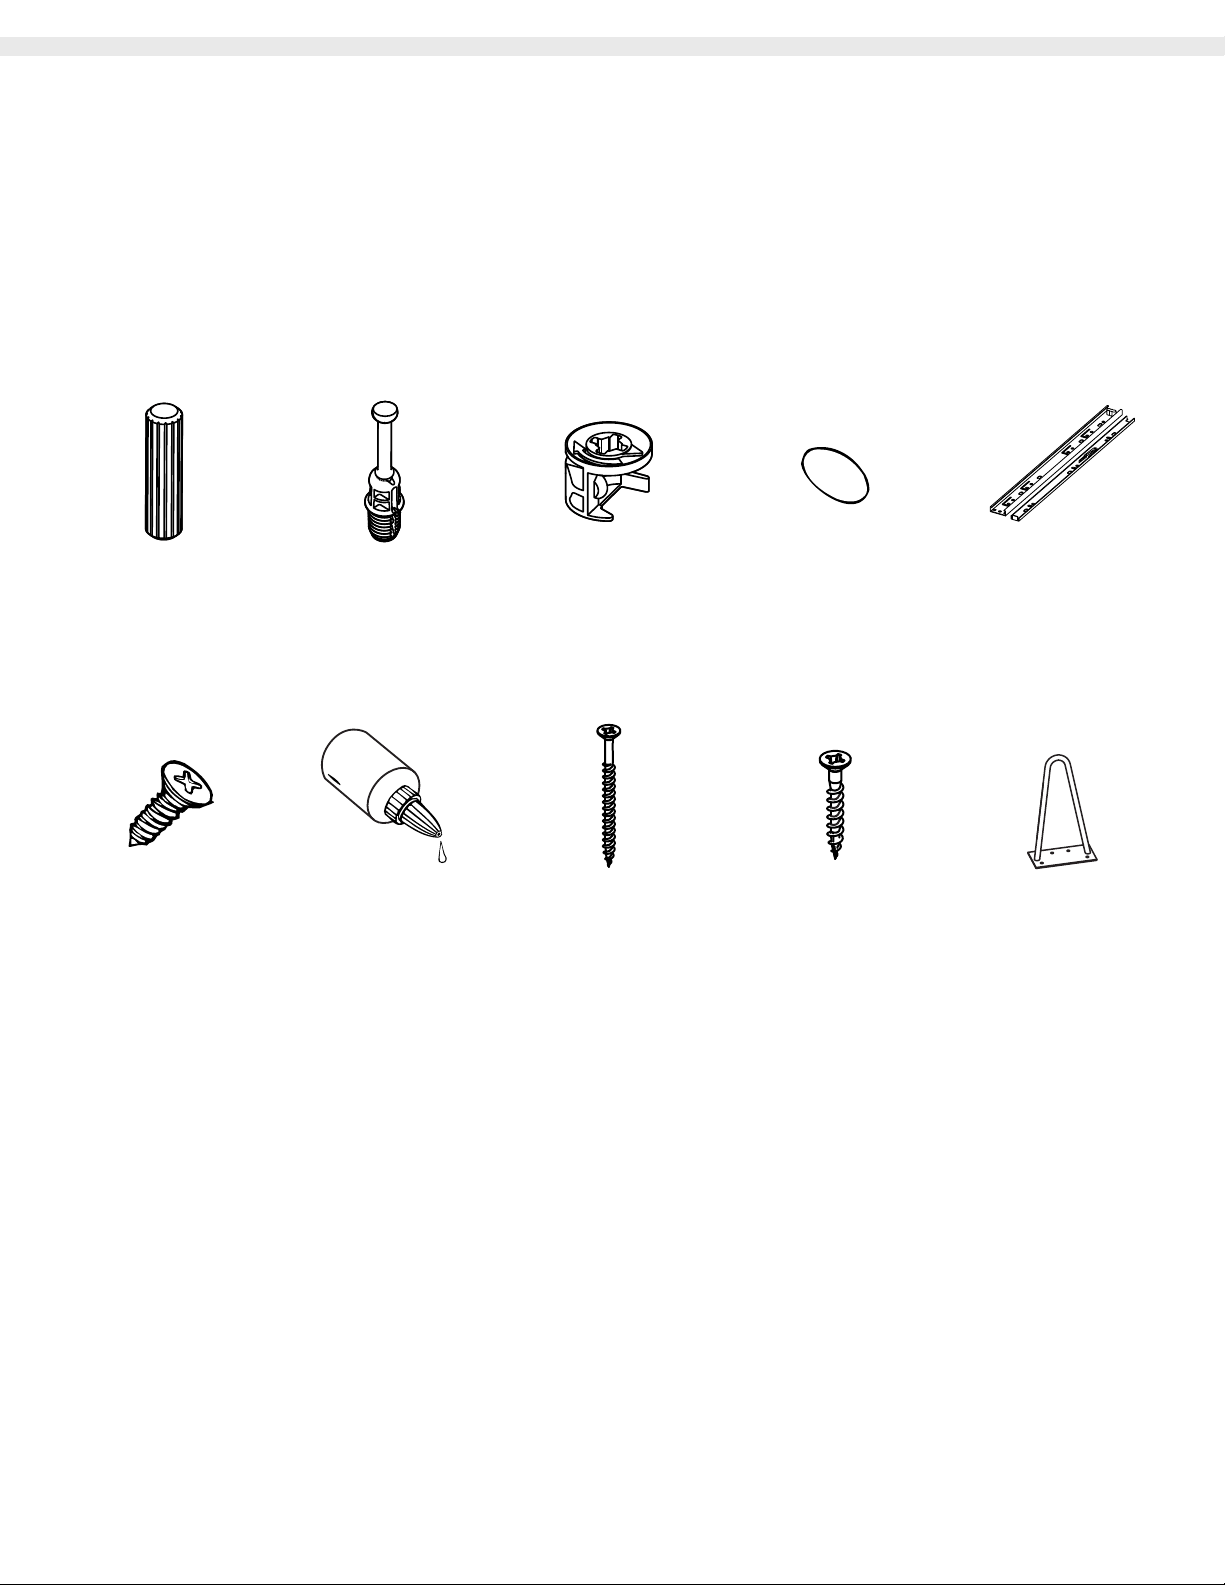
ASSEMBLY HARDWARE HERRAJES PARA ARMADO
Please check that the hardware content is correct.
If any item is missing, please call to our customer
service line.
x20
Wood Dowel
Tarugo
x12
Spreading Bolt
Perno Minifix
Minifix Cams
Compruebe que el contenido de los herrajes sea
el correcto. En caso de que falte alguna pieza, por
favor llame a nuestra línea de atención al cliente.
x12
Minifix
x12
Cover Caps
Tapa Adhesiva
Minifix
Full Extension
Drawer Slides
(Screw Included)
Riel Ext. Total
(Incluye Tornillos)
x1
x24
Flat Head Screw
Tornillo Lámina
x1
Glue
Pegante
Hardware items are NOT shown actual size.
x4
2" Drywall Screw
Tornillo de
Ensamble 2"
Los herrajes no se muestran en el tamaño real.
x6
1" Drywall Screw
Tornillo de
Ensamble 1"
x4
Steel Legs
Patas de Acero
Page 4
Page 5
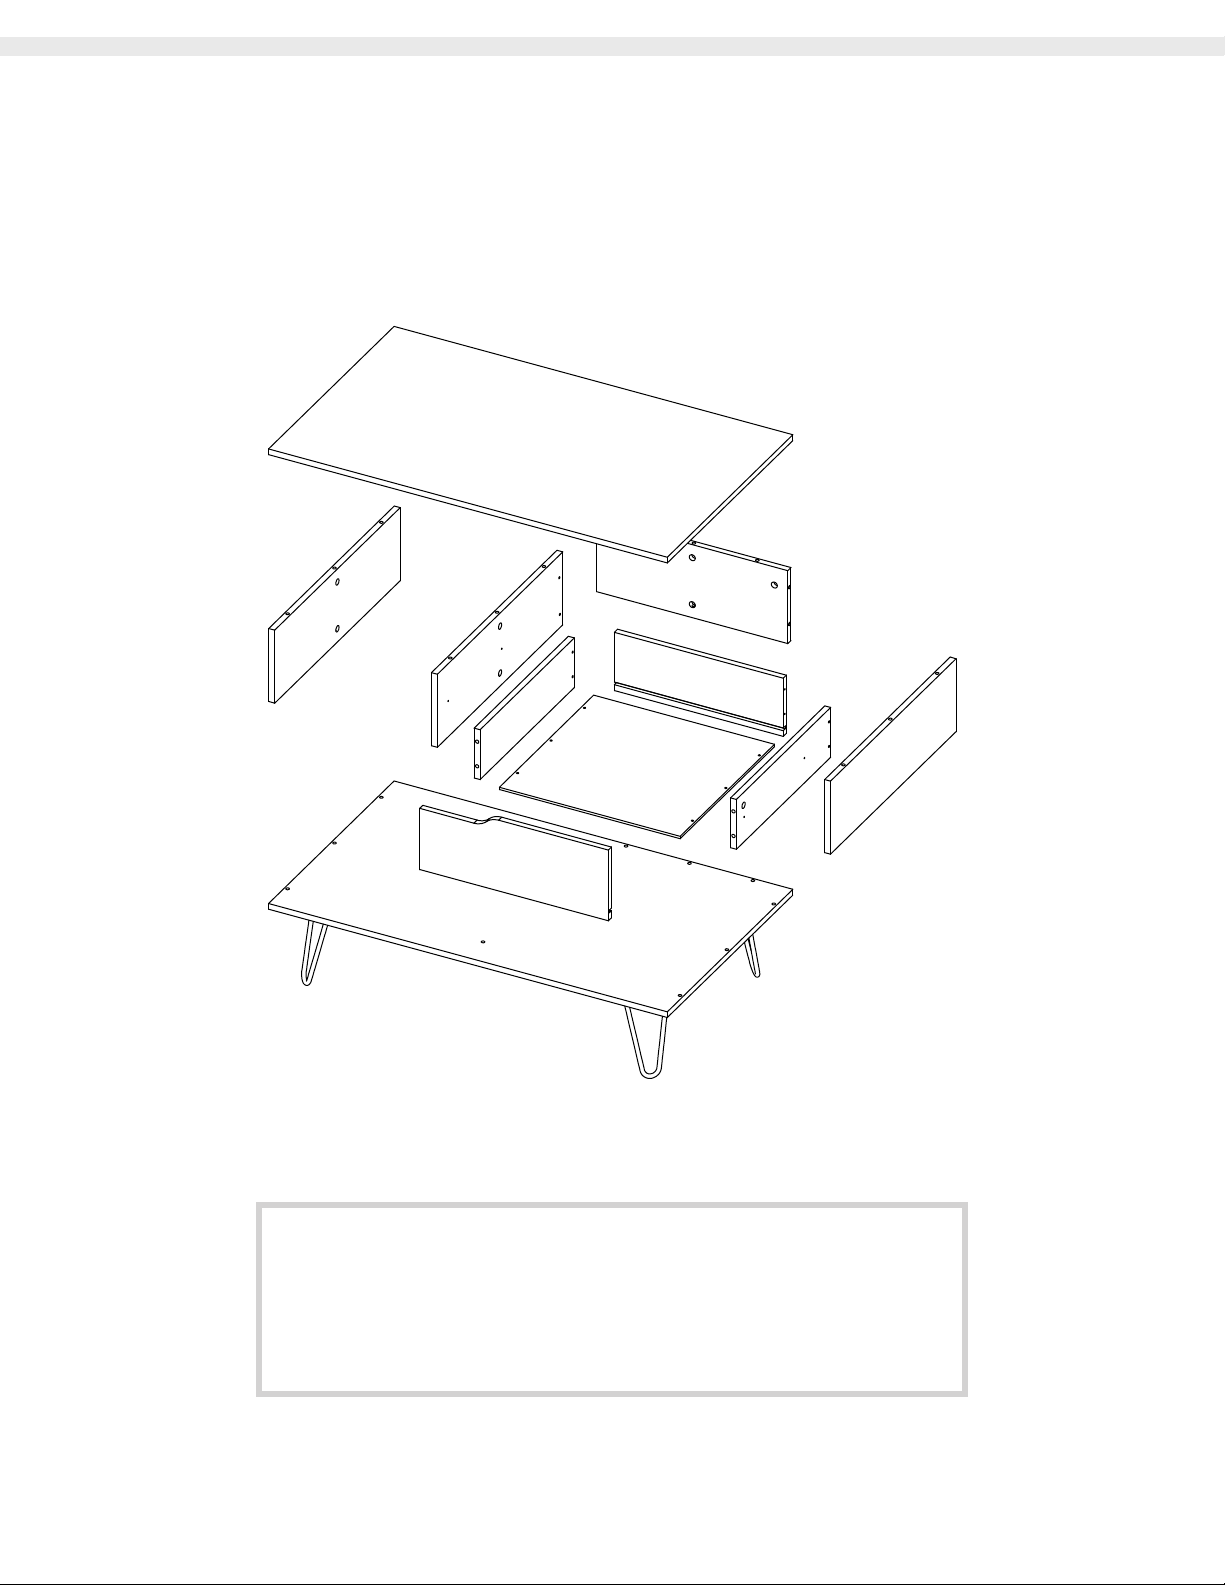
ASSEMBLY PARTS PIEZAS DE ARMADO
B
F
C
E
A - x1
K
H
J
E - x1
G
D
I
A
I - x1
Page 5
B - x1
C - x1
D - x1
F - x1
G - x1
H - x1
J - x1
K - x1
Page 6
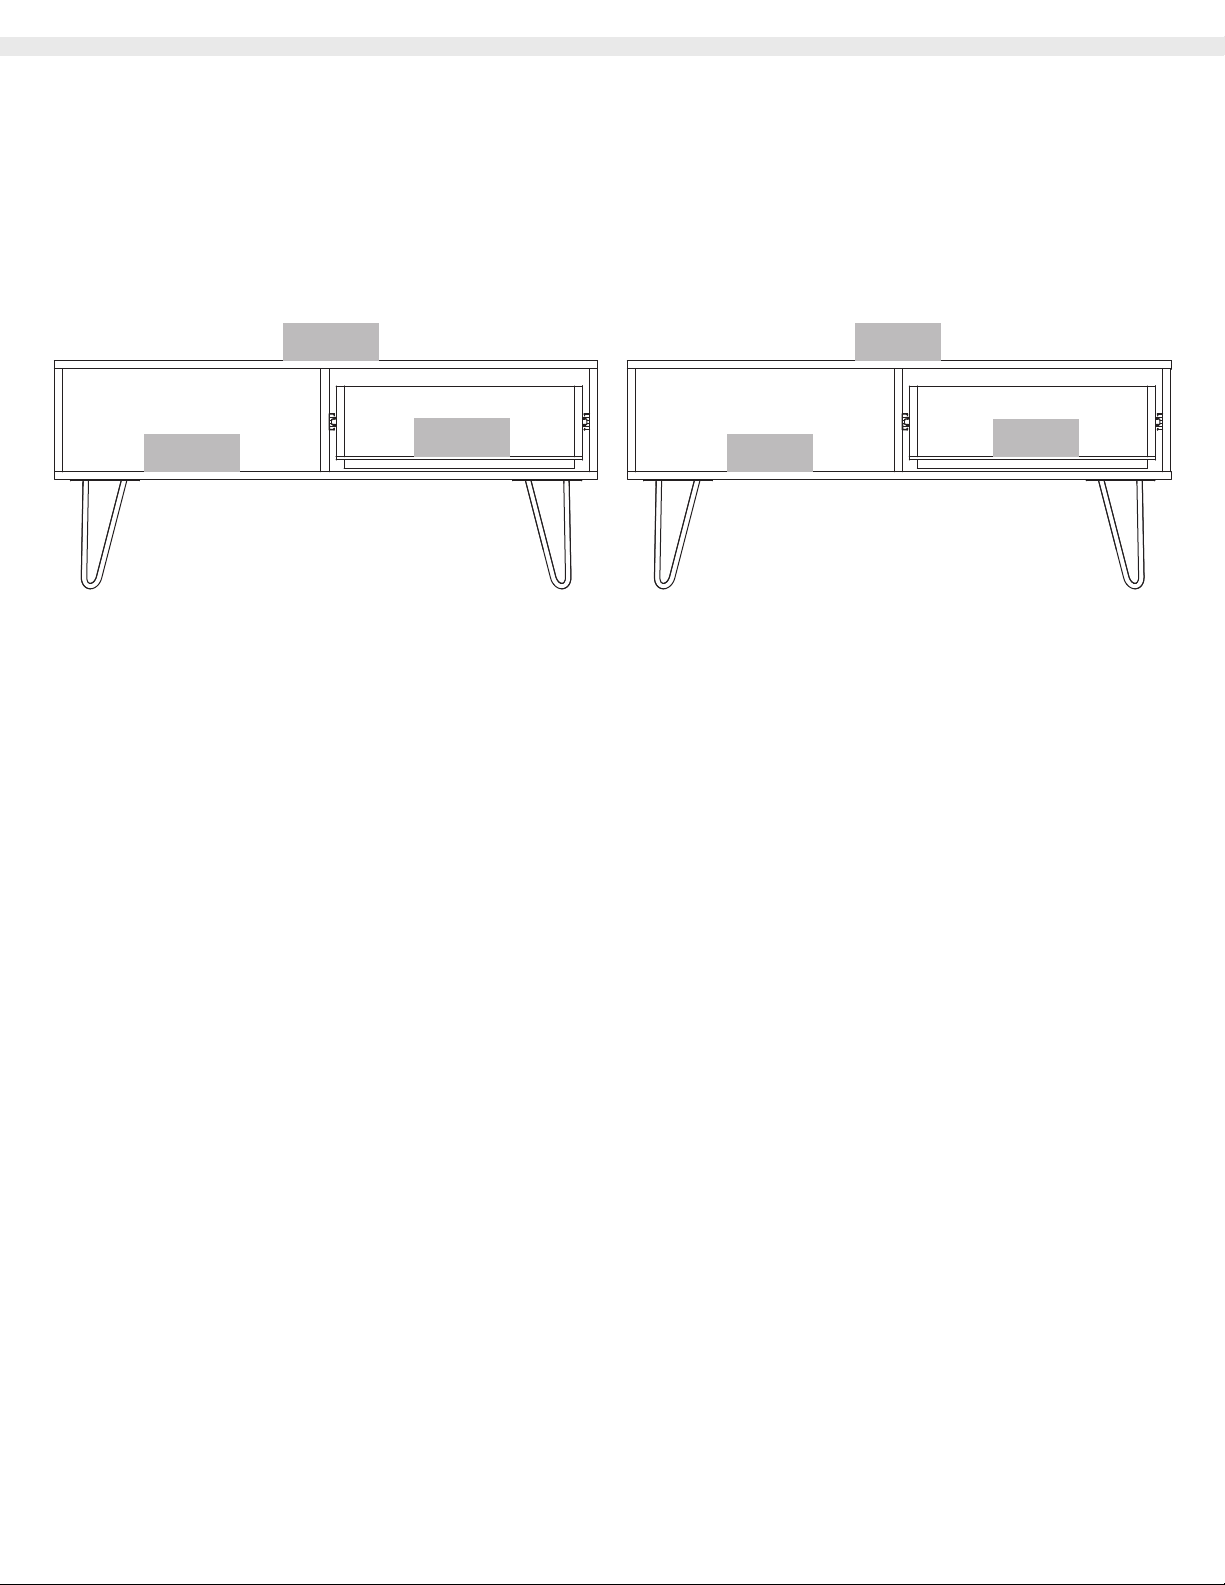
MAX SUGGESTED LOADS
CARGAS MÁXIMAS SUGERIDAS
22 Lb.
33 Lb.
ASSEMBLY
17,6 Lb.
15 Kg.
10 Kg.
8 Kg.
RECOMENDACIONES
RECOMMENDATIONS
Two people are recommended to assemble
the product.
Assemble the cabinet on a flat, smooth
surface, preferably on a carpeted floor
or the carton box of the product.
Carefully read the assembly instructions
and identify every wood and hardware
part before start assemblying the cabinet.
DE ENSAMBLE
Ensamble el mueble entre dos personas.
Ensamble el mueble sobre una superficie
plana y lisa, preferiblemente sobre un
tapete o el cartón de la caja
Lea cuidadosamente las instrucciones e
identifique todas las piezas y herrajes
antes de empezar a armar el mueble.
Page 6
Page 7
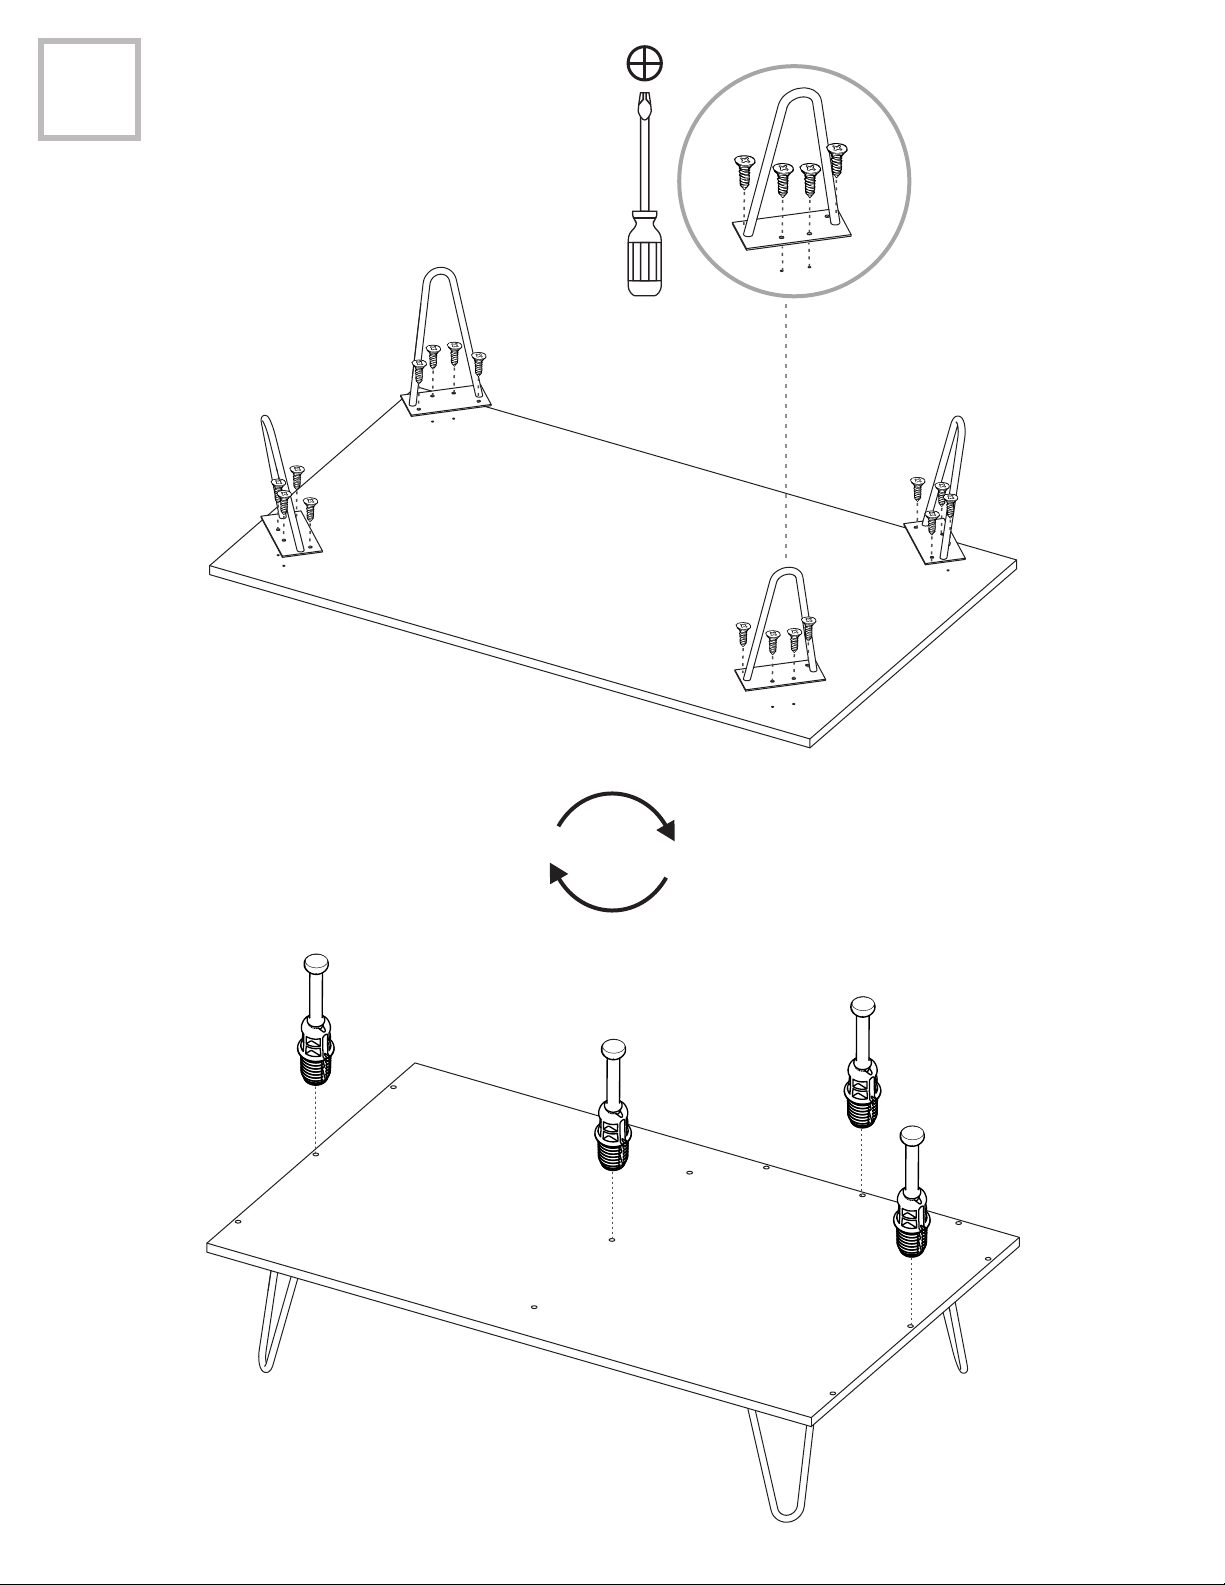
1
A
A
Rotate
Voltear
Page 7
Page 8
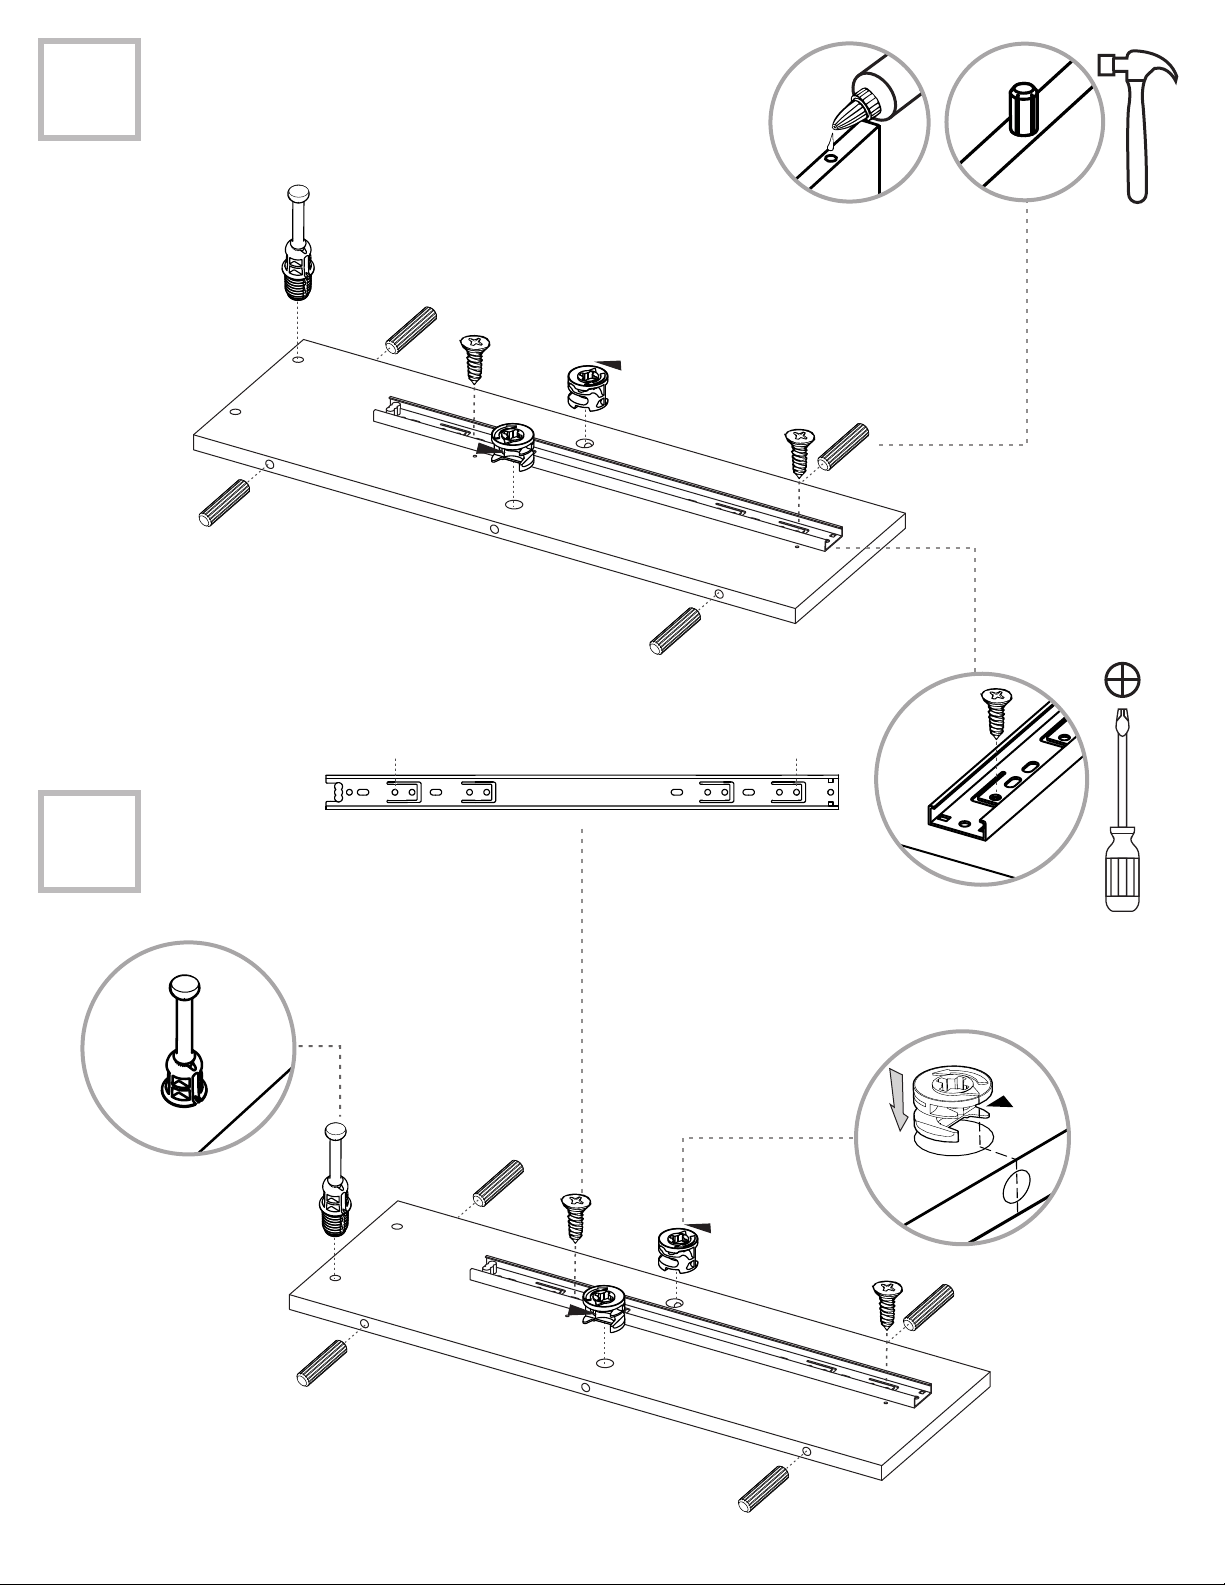
2
F
r
o
nt/
F
r
e
n
te
D
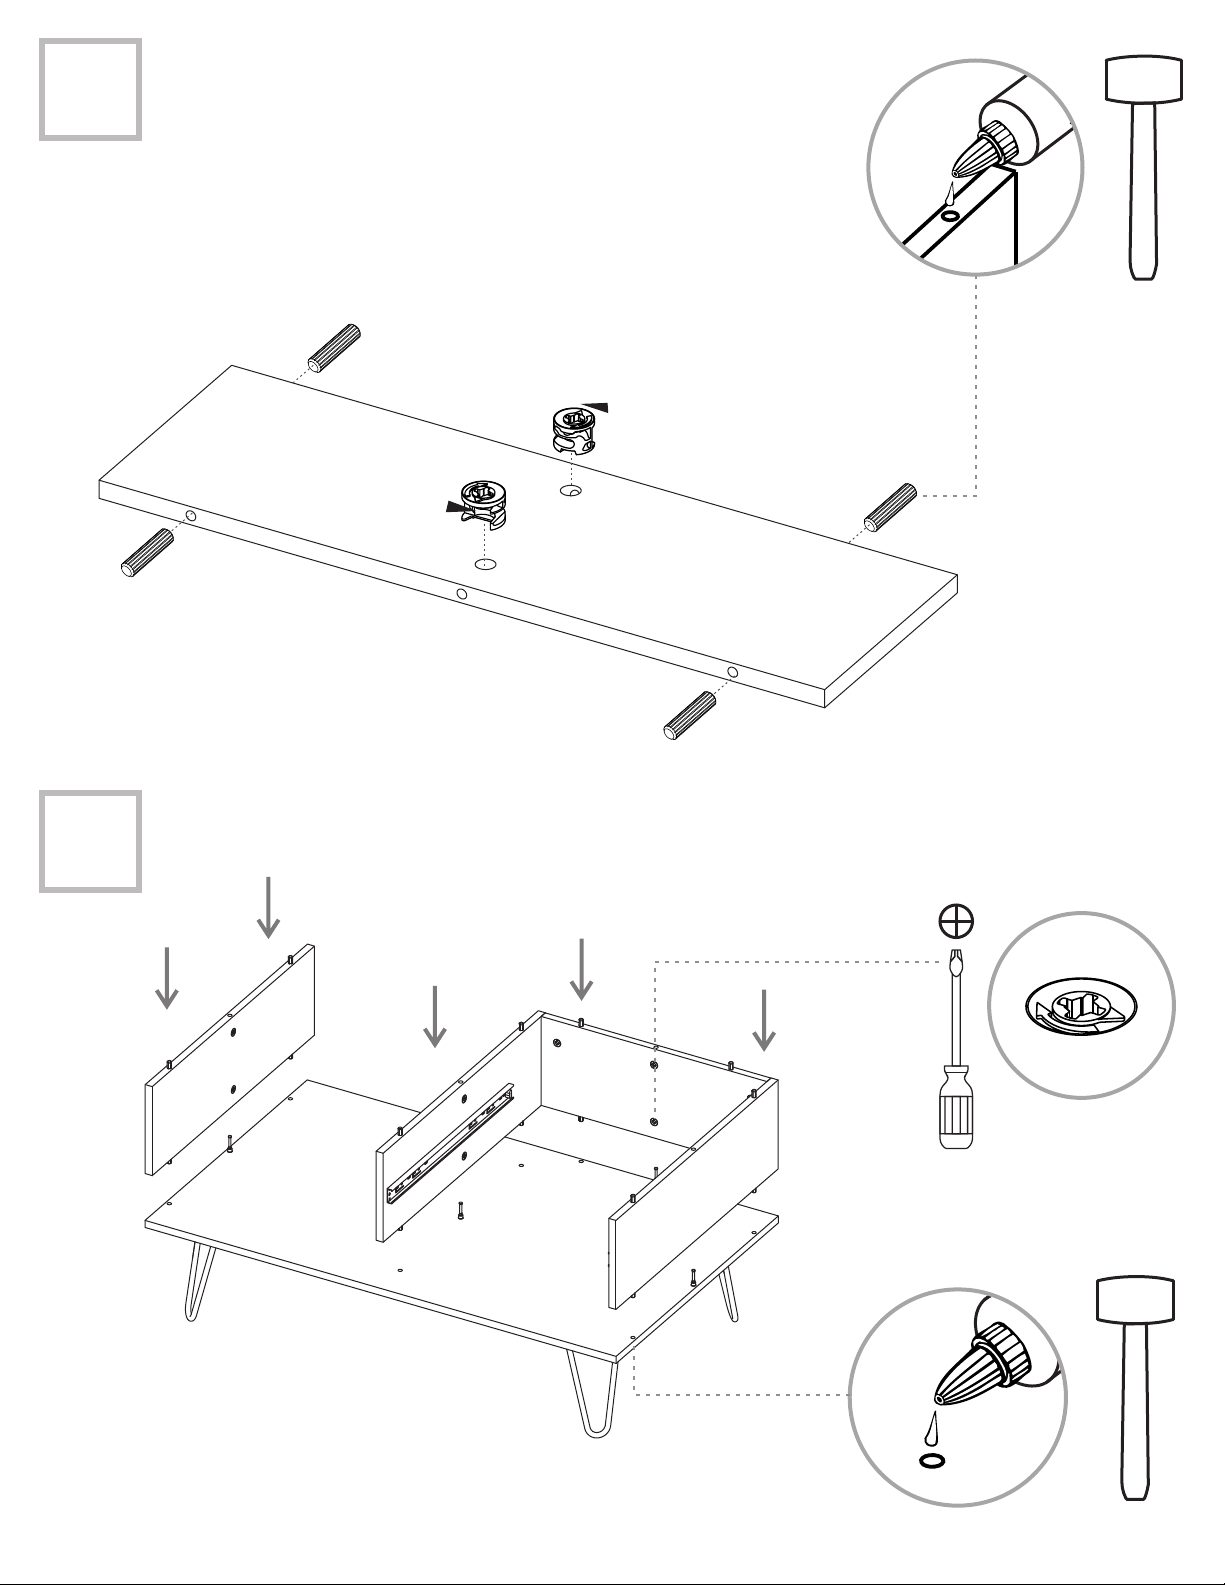
Gently hit to adjust.
Repeat this process in the
following steps.
Golpee suavemente para ajustar.
Repita este procedimiento
en los pasos siguientes.
1
2
3
212
E
Page 8
Page 9
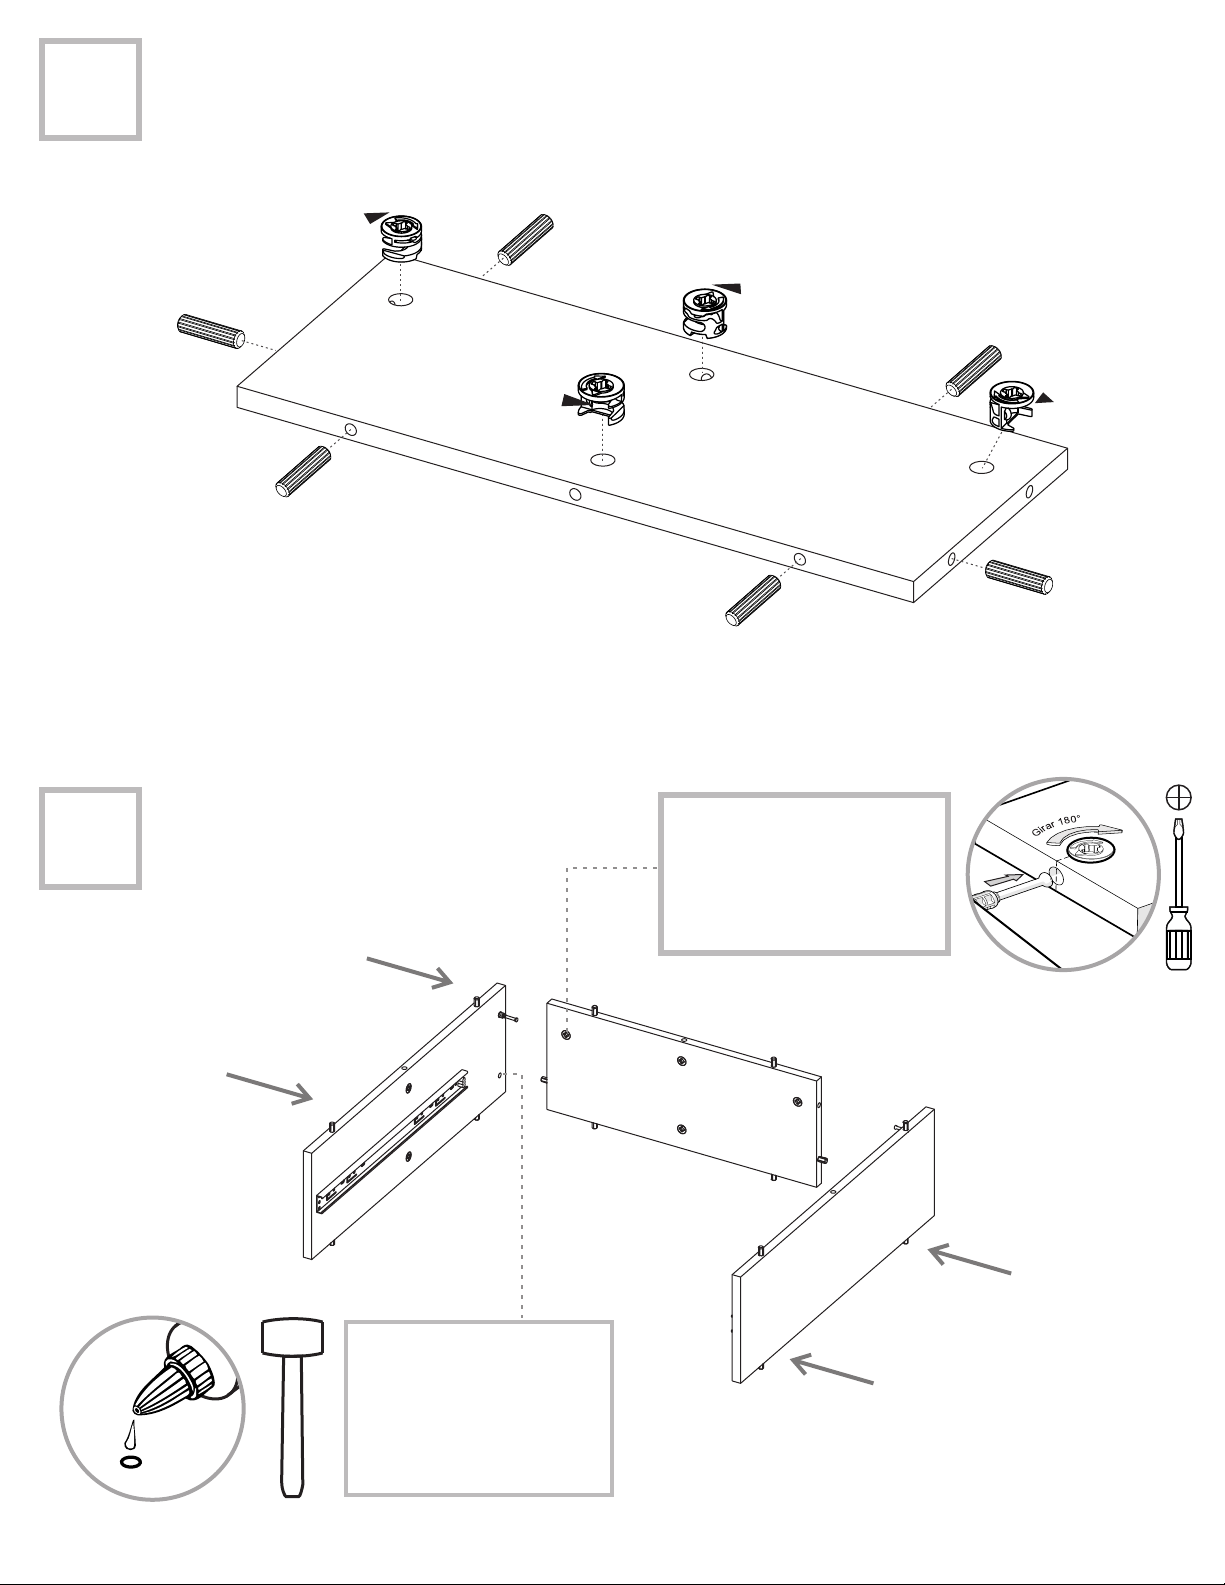
4
2
1
F
Turn minifix cams to
the right to tighten.
/ Rotate 180°
5
Gire las cajas minifix
hacia la derecha para
apretar las piezas.
E
F
D
Gently hit the pieces
with a rubber hammer
to adjust the joint.
1
2
Golpee suavemente la
pieza con un martillo de
goma para ajustar
el ensamble.
Page 9
Page 10
6
1
2
C
7
C
E
A
F
D
1
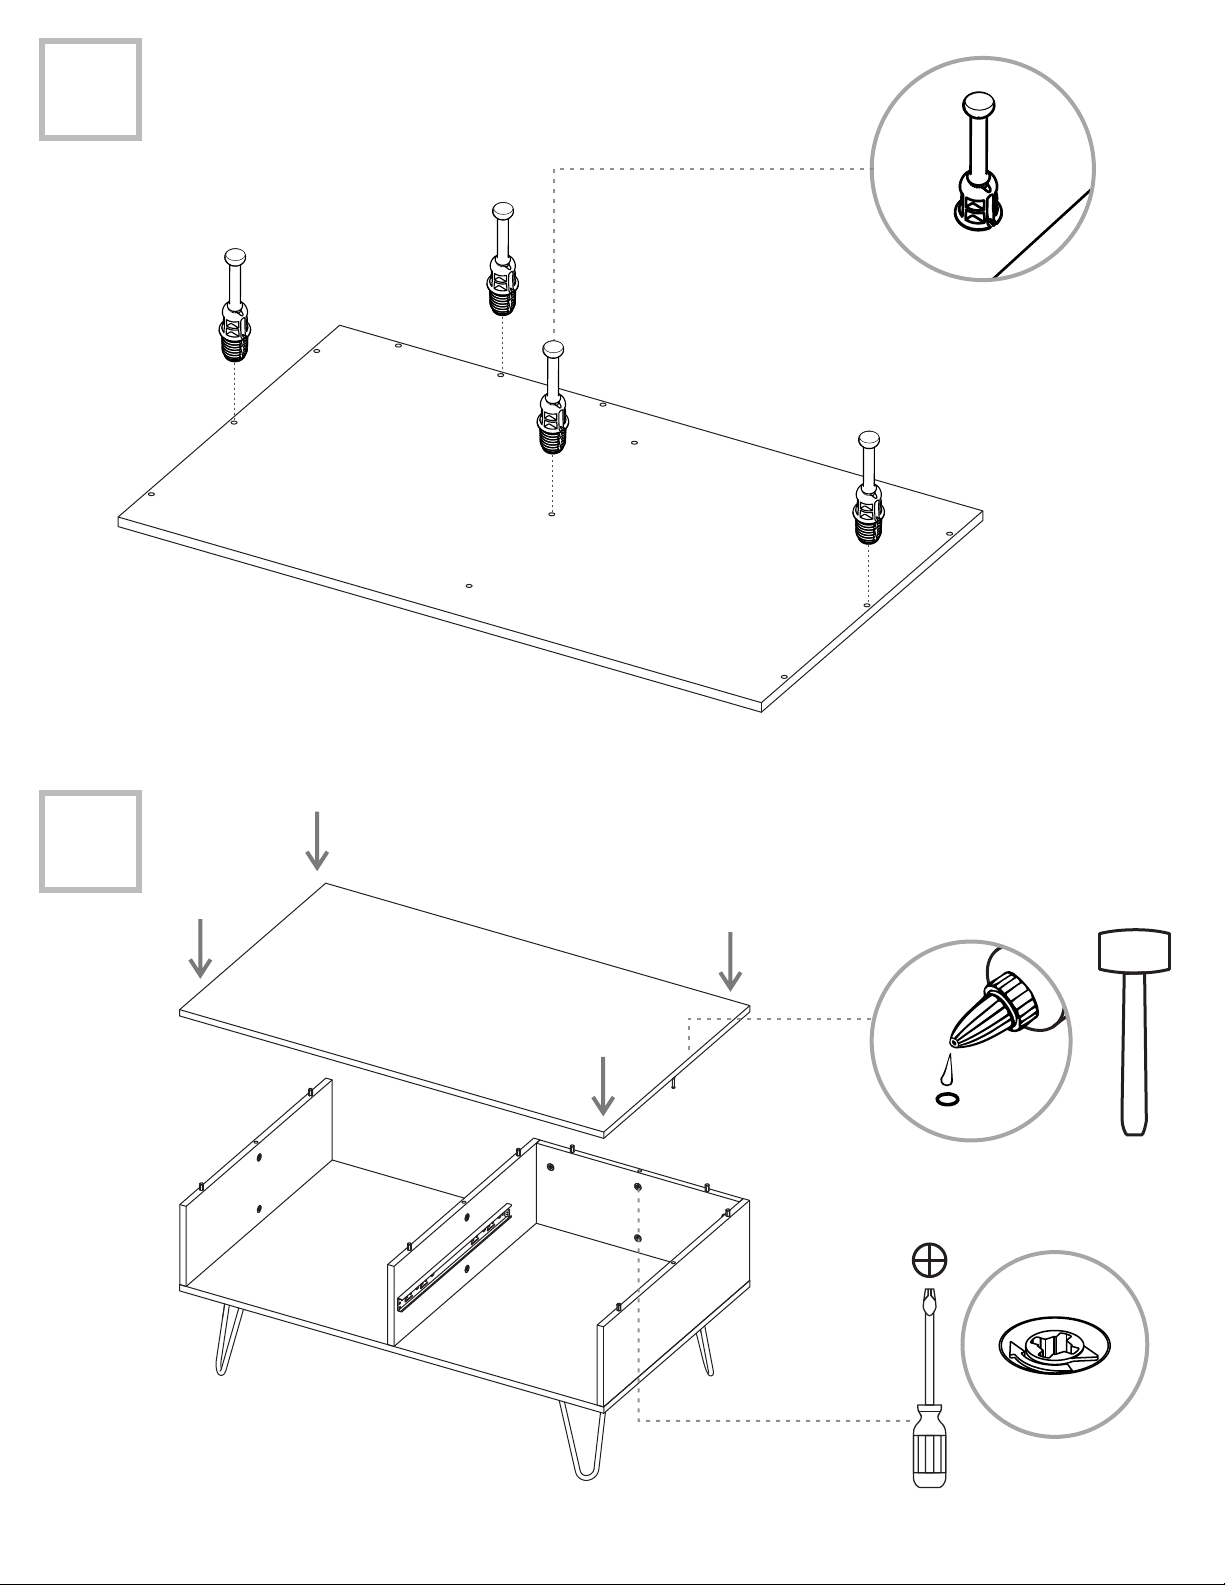
Rotate to tighten.
Gire para apretar.
2
Page 10
Page 11
8
B
9
C
B
E
A
F
D
1
2
Page 11
Rotate to tighten.
Gire para apretar.
Page 12
10
F
r
on
t
/
Fr
e
nte
H
11
8
1
I
Page 12
Page 13
12
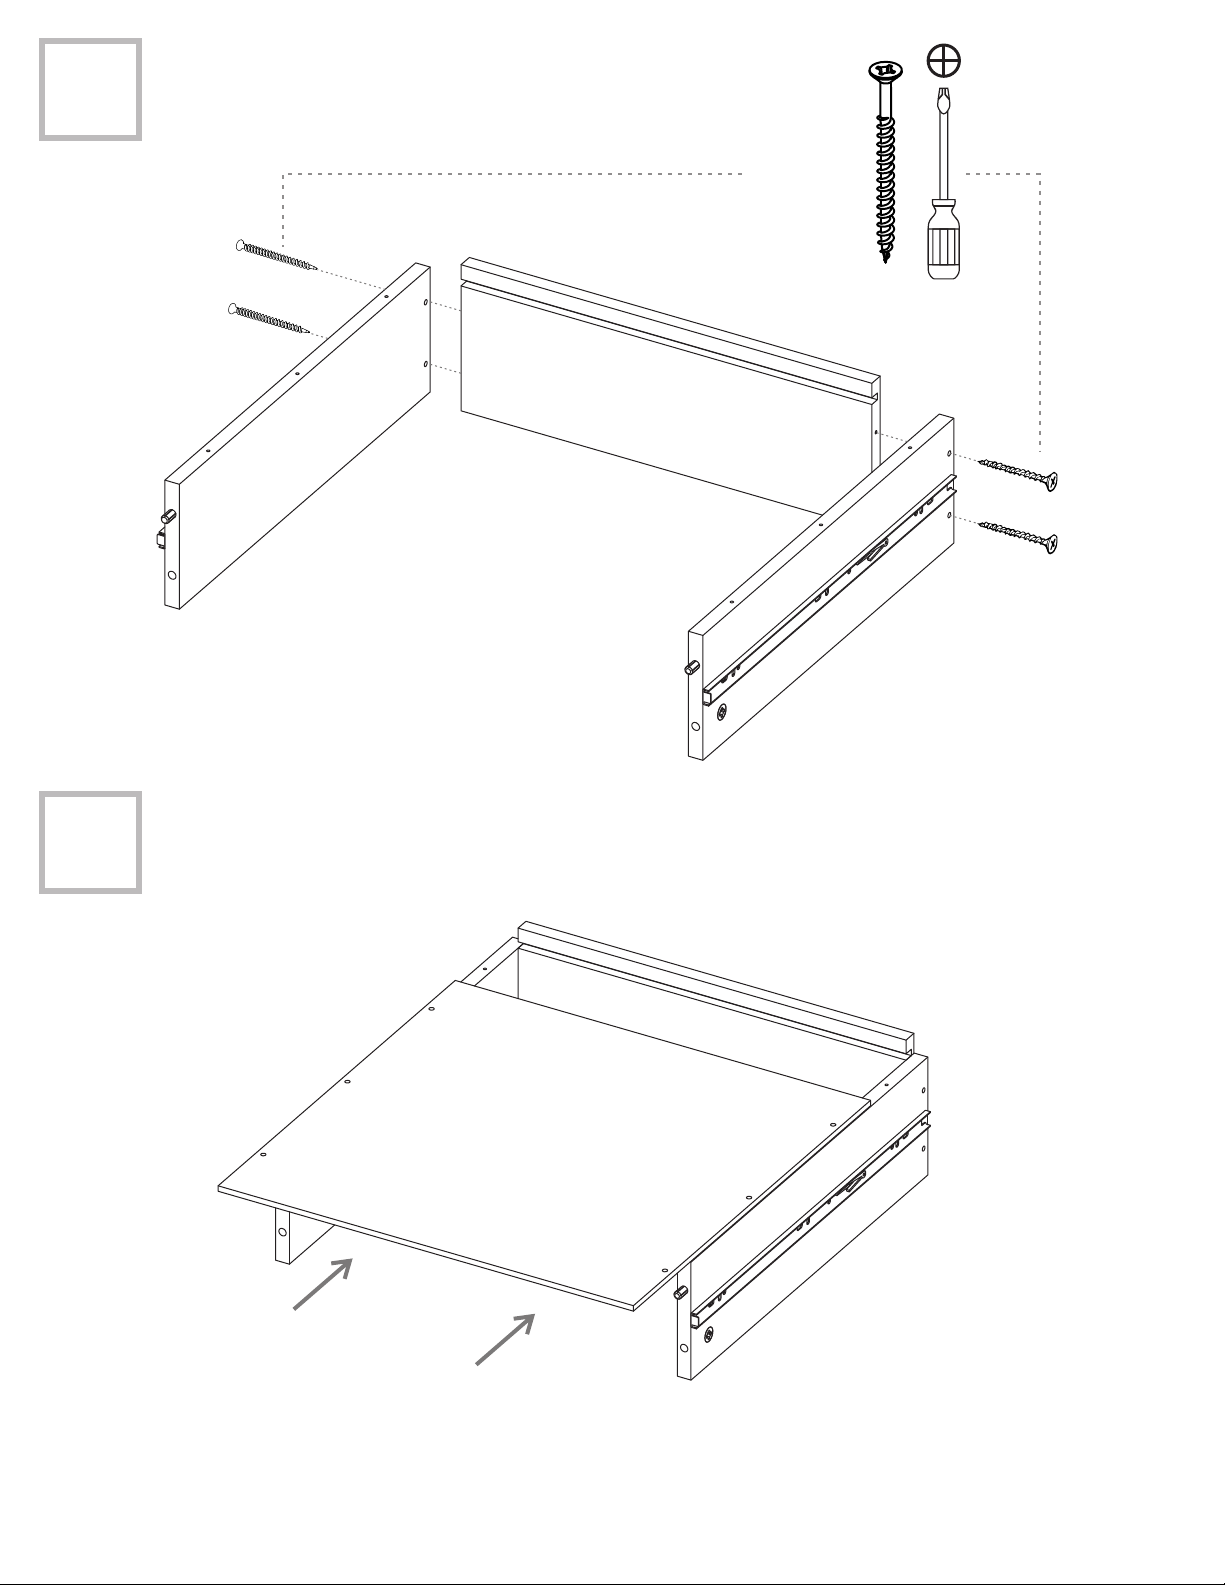
2" Drywall
Screw
Tornillo de
Ensamble 2"
13
I
G
H
Page 13
G
J
H
Page 14
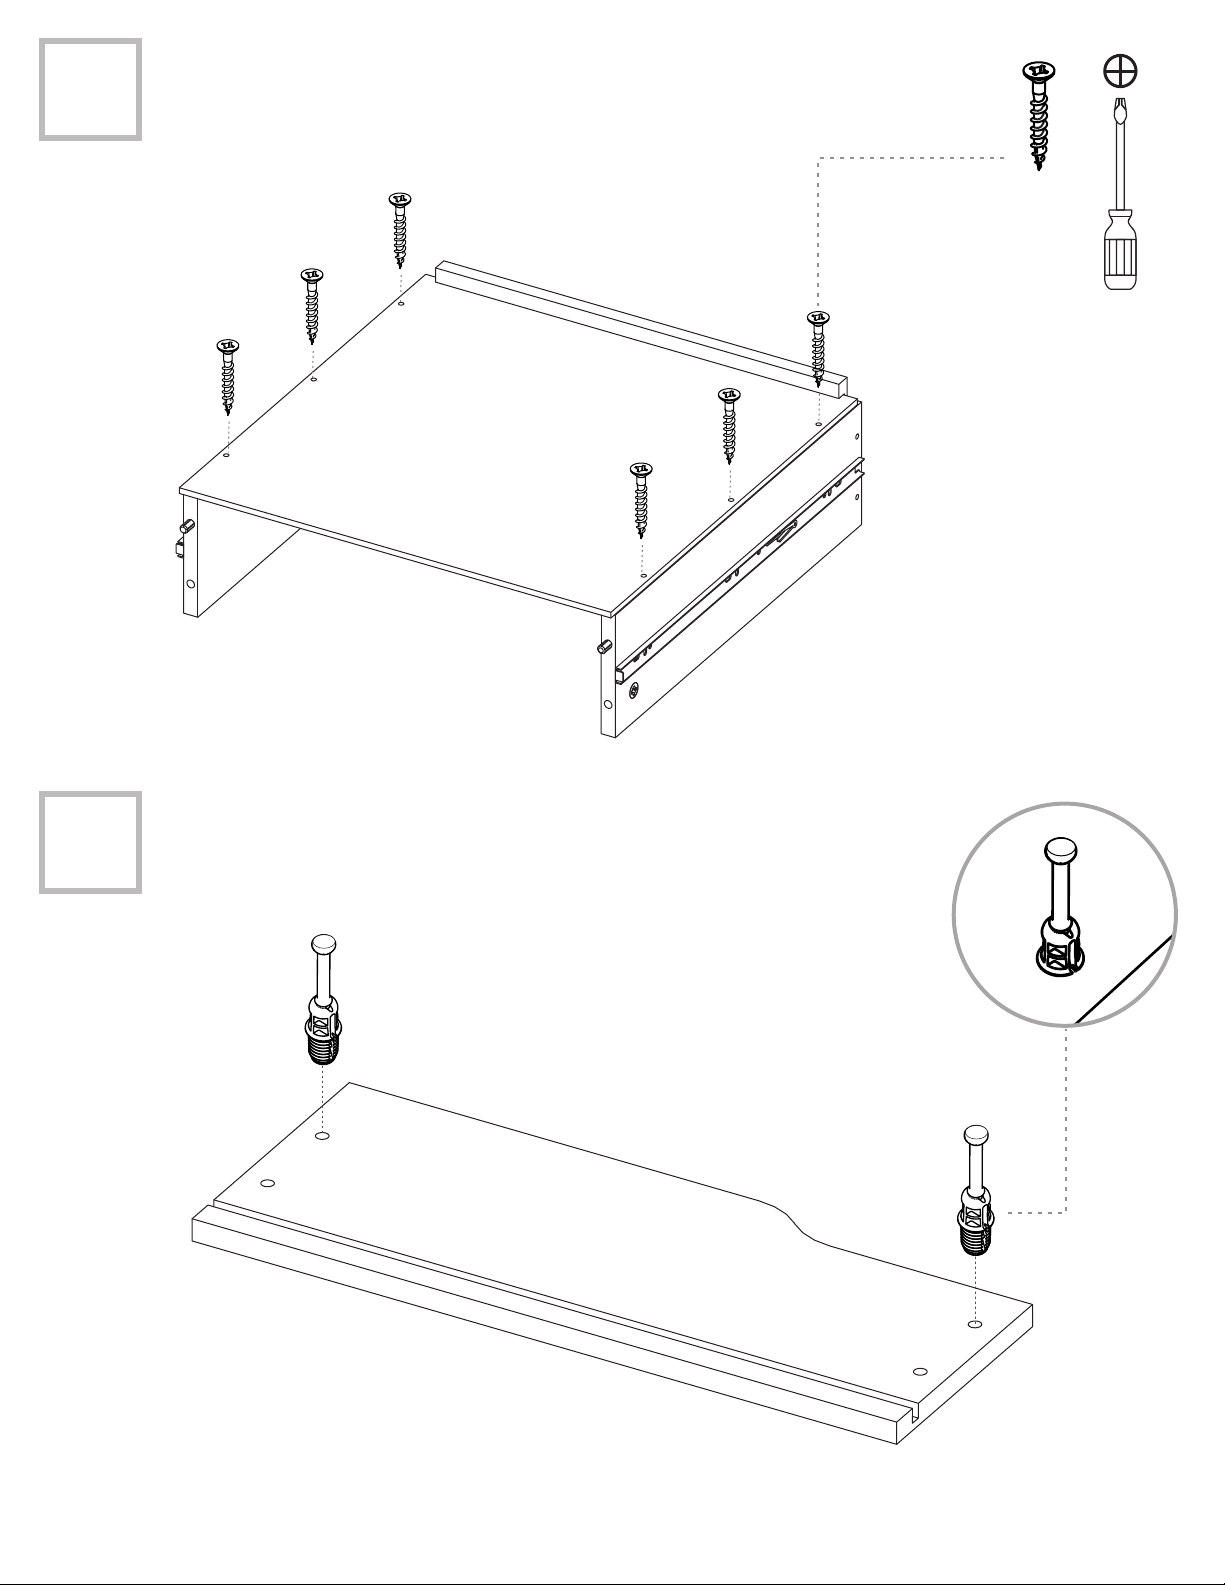
14
1" Drywall
Screw
Tornillo de
Ensamble 1"
J
I
H
15
K
Page 14
Page 15
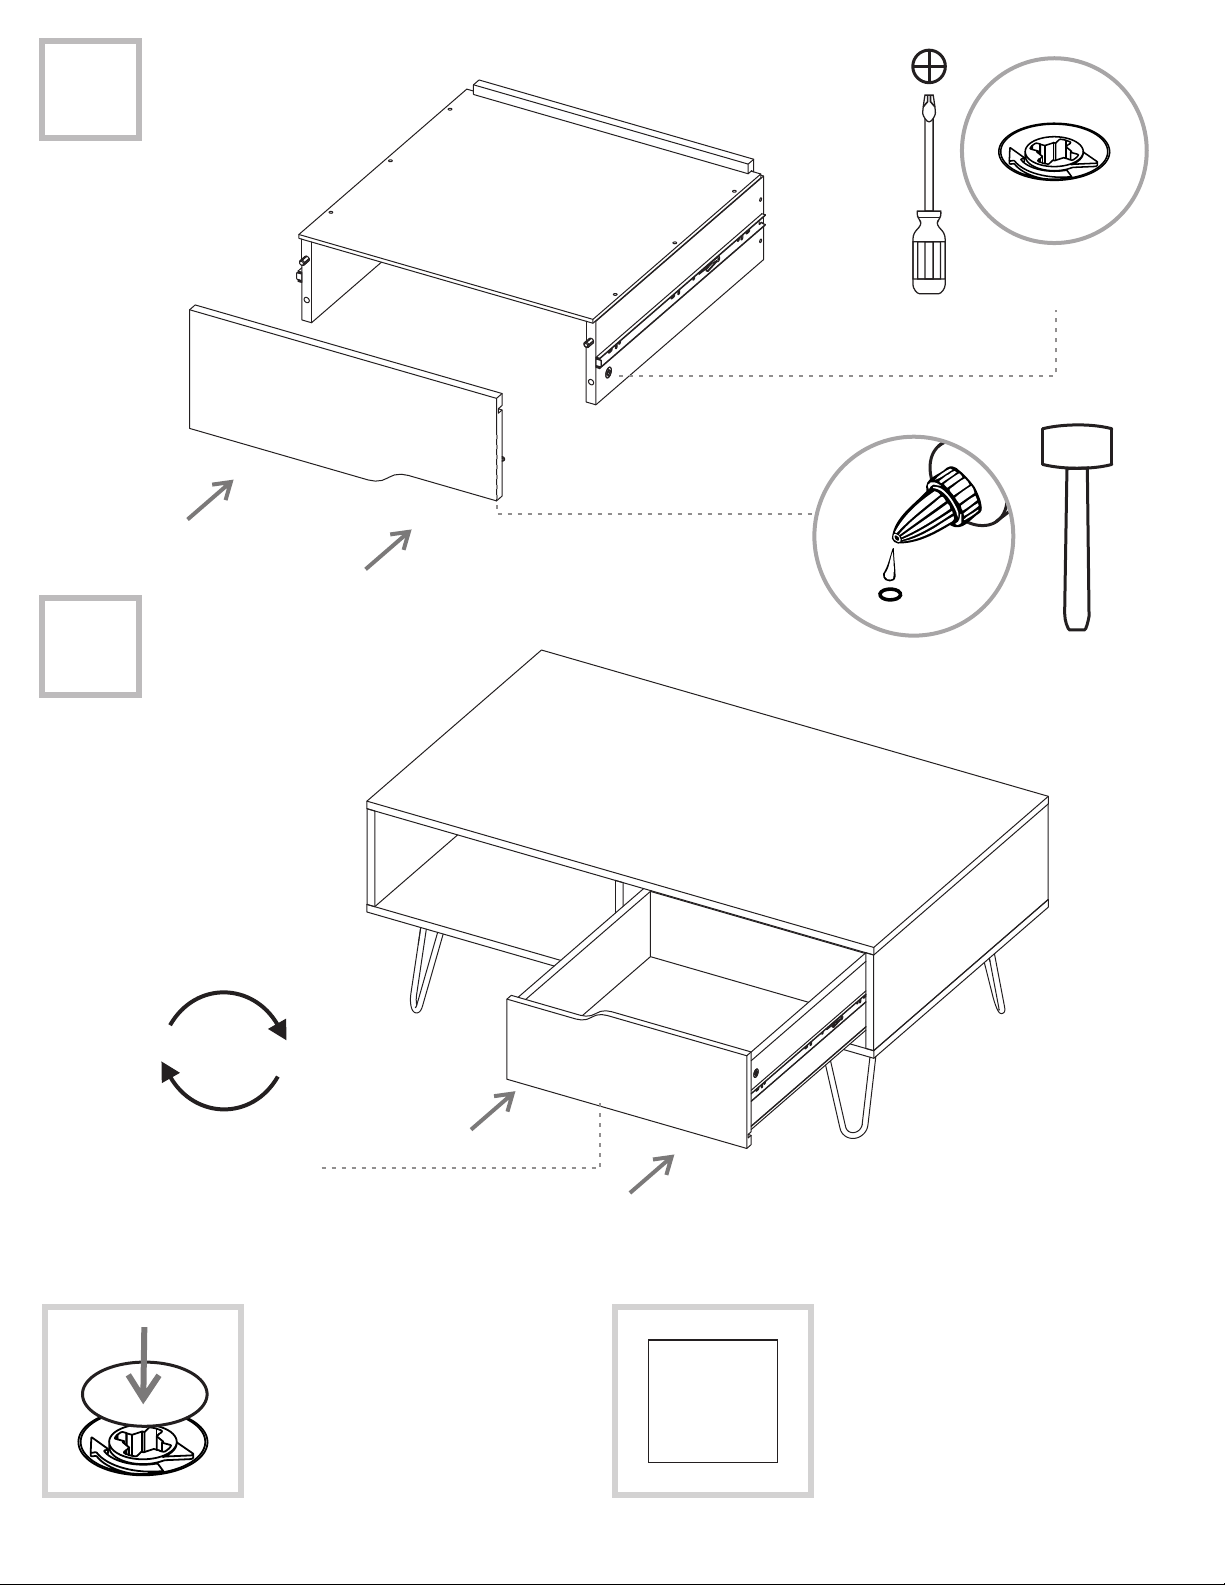
16
J
17
K
HI
1
Rotate to tighten.
Gire para apretar.
2
B
Rotate
Voltear
Slide the drawer
inside the cabinet
Deslice el cajón
dentro del mueble
After you finish the adjustment
of the cams, cover them with
the cover caps.
Después de ajustar todas las
cajas minifix, cúbralas con las
tapas adhesivas.
C
A
H
K
G
J
A
D
I
After you finish assembling the
cabinet, take off the adhesive
letters.
Al terminar de armar, desprenda
las letras adhesivas.
Page 15
Page 16

WARRANTY POLICY
PÓLIZA DE GARANTÍA
Welcome to the Family
We are committed to your satisfaction by offering you a competitive warranty to ensure all
our products are free from defects, in material and workmanship, to the original purchaser
for a period of one year from the date of your purchase.
How It Works
We are happy to furnish a replacement at no cost to you in the case we determine a
component to be defective. While our warranty applies to conditions of normal use,
it does not apply to defects or damage resulting from intentional or accidental damage,
outdoor use, negligence, or unreasonable use.
Here to Help
Please immediately report any defect by calling us or send an email to our customer
service. Have your receipt and order number handy for our team of customer service
professionals that will be eager to assist you.
Page 16
 Loading...