

Page 1

1
Catalog
3.1 Key function ................................................................................................................... 6
3.2 Start up and shut down ............................................................................................... 6
3.3 Screen opening and closing ....................................................................................... 7
3.9 Use skill ..................................................................................................................... 14
4 Basic Settings ....................................................................................................................... 14
4.2 Bluetooth ..................................................................................................................... 15
4.3 SIM card ......................................................................................................................... 16
4.12 Users ............................................................................................................................. 24
4.13 Security ....................................................................................................................... 24
4.16 Date and Time ............................................................................................................. 26
5 Multimedia ......................................................................................................................... 29
5.1 music ............................................................................................................................... 29
5.2 video ............................................................................................................................... 30
5.4 camera ........................................................................................................................... 32
5.5 radio station ............................................................................................................... 33
6 Communication function ..................................................................................................... 34
6.1 Telephone ....................................................................................................................... 34
6.2 SMS ................................................................................................................................. 35
6.3 Address book ............................................................................................................... 35
7 Internet ................................................................................................................................... 36
7.1 Browsers ....................................................................................................................... 36
7.2 e - mail ....................................................................................................................... 36
8 Fingerprint ....................................................................................................................... 38
9 Other Applications ................................................................................................................. 39
9.1 calculator ..................................................................................................................... 39
9.2 file manager ................................................................................................................. 39
9.3 Recorder ......................................................................................................................... 41
10 Installation of the program ............................................................................................. 42
10.1 Installation ............................................................................................................... 42
10.2 Unload ........................................................................................................................... 42
10.3 Renewal approach ....................................................................................................... 42
11 Difficult and troubleshooting ......................................................................................... 43
Page 2

2
1 Introduction
1.1 Thanks
Thank you very much for choosing this product.BH502. It is a 5 inch mobile
terminal intelligent machine. The main chip is MTK6735. This chip adopts
Cortex-A53*4 architecture, the main frequency 1.3GHz, based on Android6.0 or
above operation system, it can expand the third party application easily.
The built-in optical fingerprint, and one dimensional (2D, optional), 4G/3G,
WIFI, BT, GPS, NFC, voice calls and other functions, to achieve the fingerprint
reading / validation / comparison function, quickly confirm the identity and
online payment; MA (Er Weima) built in one-dimensional scanning function, can
be effective for one-dimensional (Mary Er Weima) scanning recognition, bar
code of goods or other forms of goods quick recognition; wireless communication
and wireless network function, built-in high precision of surfing the Internet
whenever and wherever possible; GPS module can be loaded through the navigation
map software; built-in NFC function, support 13.56MHz core Close range
non-contact recognition; built-in camera and photography.
This manual introduces the various functions, skills and matters needing
attention of the mobile terminal intelligent machine. Please read the manual
carefully before using the mobile terminal intelligent machine.
1.2 Matters of attention
Maintenance and care
Please keep the equipment dry. Please don't let the device, battery, charger
contact with water and water vapor, or use wet hand to operate equipment or
charger, so as not to cause short circuit of equipment, and people will be
electrifying because of corrosion failure.
Do not cause the equipment, battery and charger to be strongly impacted or
vibrate, so as to avoid the failure of equipment, batteries and chargers.
Do not place the equipment, batteries and chargers in high or low temperature
areas, otherwise the equipment, battery and charger may be caused by failure.
Do not hit, throw, needled the mobile terminal smart machine and avoid falling,
squeezing, and bending the machine.
Please do not dismantle the equipment and accessories without authorization,
otherwise the equipment and accessories will not be within the warranty of the
company.
Page 3

3
1.3 Safety instructions
Before using the mobile terminal intelligent machine, please read the
information in this section, and let your children understand this
information. For more detailed information, please refer to the safety
instructions and matters needing attention.
Do not use a mobile terminal smart machine in driving the car, so as not to prevent
safe driving.
In the medical site, please comply with the regulations or regulations. Close
the mobile terminal smart machine in the area close to the medical equipment.
Please close the mobile terminal smart machine or open the aircraft mode when
boarding, so as to prevent the radio signal from interfering with the aircraft
control signal.
Please close the mobile terminal smart machine or open the aircraft mode when
boarding, so as to prevent the radio signal from interfering with the aircraft
control signal.
Close the mobile terminal smart machine in the vicinity of a high precision
electronic device, otherwise it may cause a failure of the electronic device.
Please do not dismantle the mobile terminal smart machine and accessories
without authorization. Only the authorized organization can repair the machine.
Please move the mobile terminal smart machine away from the magnetic device,
and the radiation of the mobile terminal smart machine will erase the information
stored on the magnetic device.
Do not use a mobile terminal smart machine at a high temperature, where there
is a flammable gas (such as a gas station).
Please put the mobile terminal smart machine and accessories in a place where
children can't touch them. Do not let children use it without supervision.
When using this mobile terminal, please abide by the relevant laws and
regulations, and respect the privacy and legal rights of other people.
Please strictly observe the instructions in this manual when using the USB data
line, otherwise you may damage your mobile terminal smart machine or personal
computer.
Do not use the mobile terminal smart machine in the wet environment such as the
bathroom, and avoid the liquid soaked or flushed by liquid.
Page 4

4
2 Mobile terminal smart machine
introduction
2.1 Introduction of mobile terminal intelligent
machine accessories
Container loading list
Your mobile terminal package contains the following items:
Mobile terminal smart machine
AC adapter
USB connection line
earphone
leather sheath
user's manual
Three package vouchers
work certificate;product qualification certificate
2.2 The use and preparation of mobile terminal smart
machine
Battery charge
The battery is first charged before the first mobile terminal smart machine
is used.
Use the power adapter to charge the mobile terminal smart machine.
Page 5
5
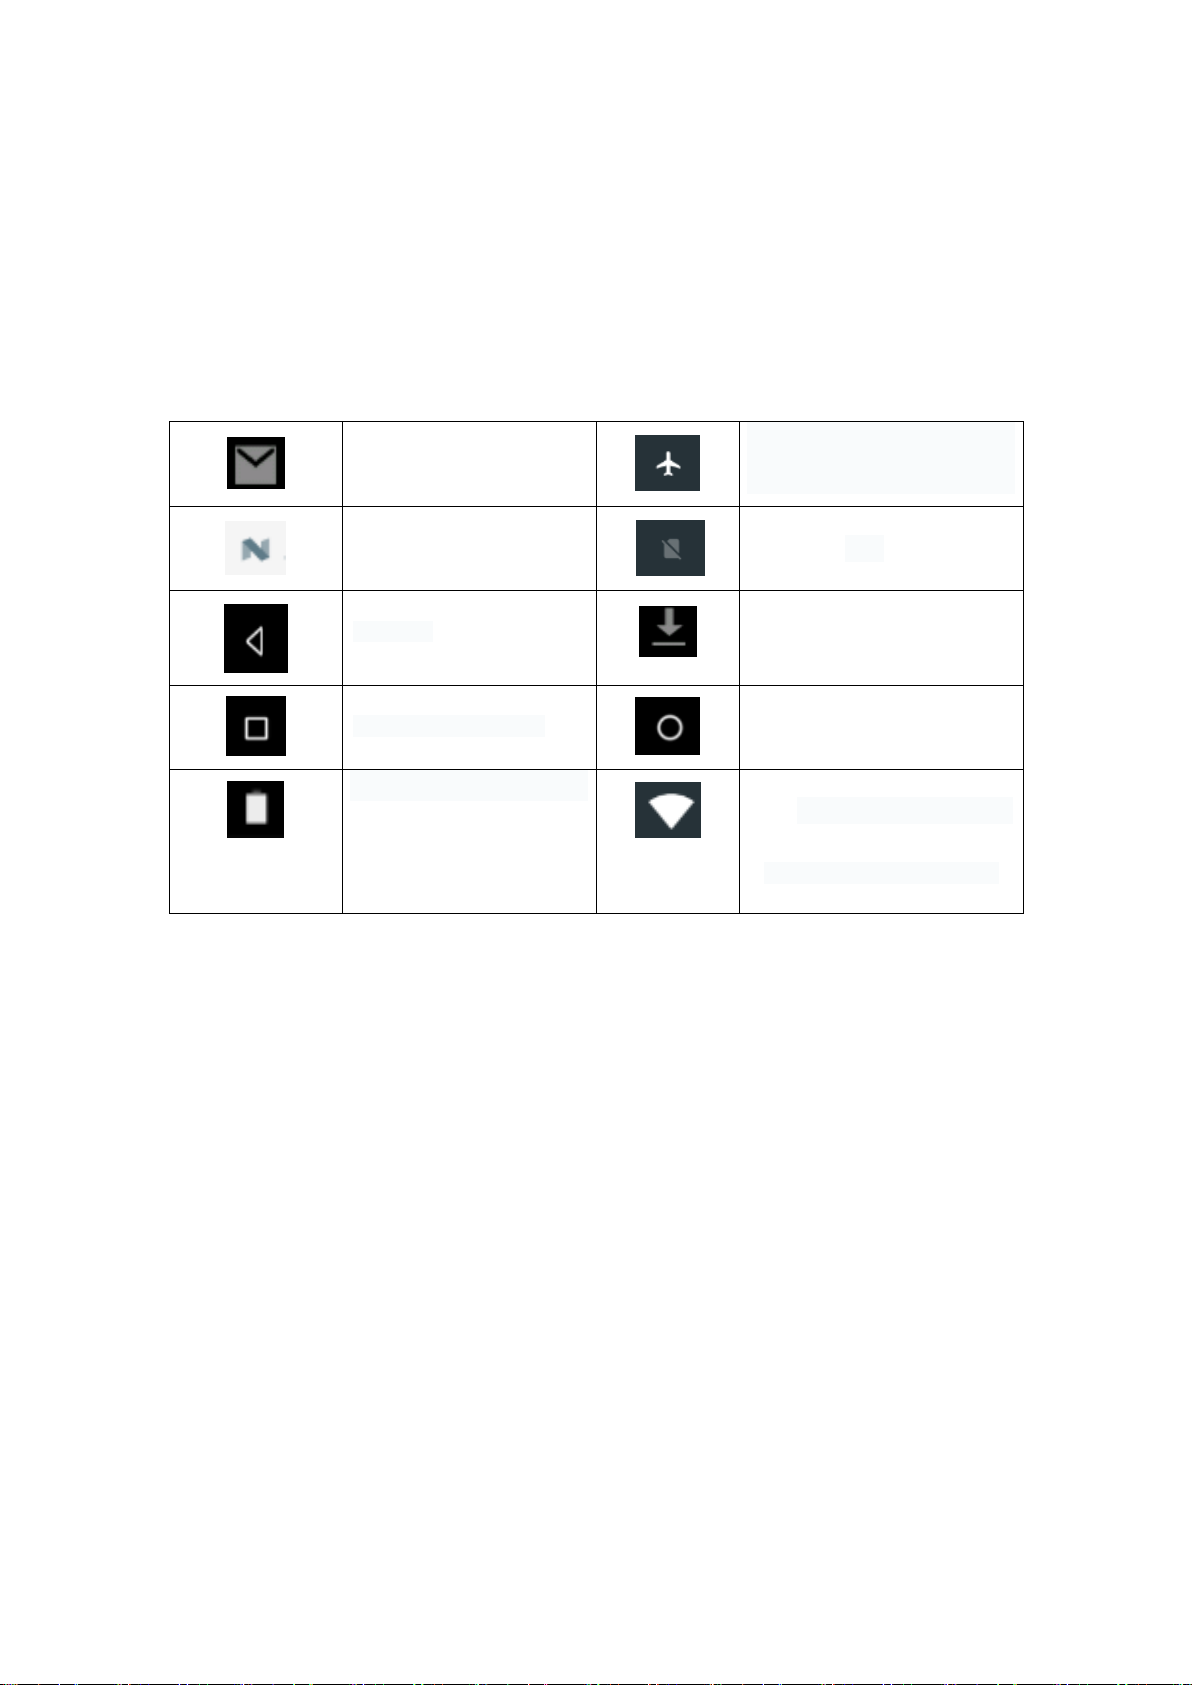
2.3 Mobile terminal intelligent machine state and notification
Notification diagram
When your notification panel when prompted, please click on the column frame
and hand slide on the screen to open the notification list. Click to view options,
see detailed information. After you can click on the message box to slide up to close
the window. The following information is the status bar icon graphic:
New Emails
Airplane mode
USB Connection
SIM card state
return key
loading
View the use of history
Home Key,
battery capacity
WIFIThe service is connected
and the network is available
Notification panel
The notification will report the receipt of new mail, open WIFI and the ongoing
activities, and you can open the notification panel to see the specific information.
Opening notification panel
When a new notification is shown in the notification bar, click the notice board
to open the notice panel.
Page 6
6
3 Fast Introduction
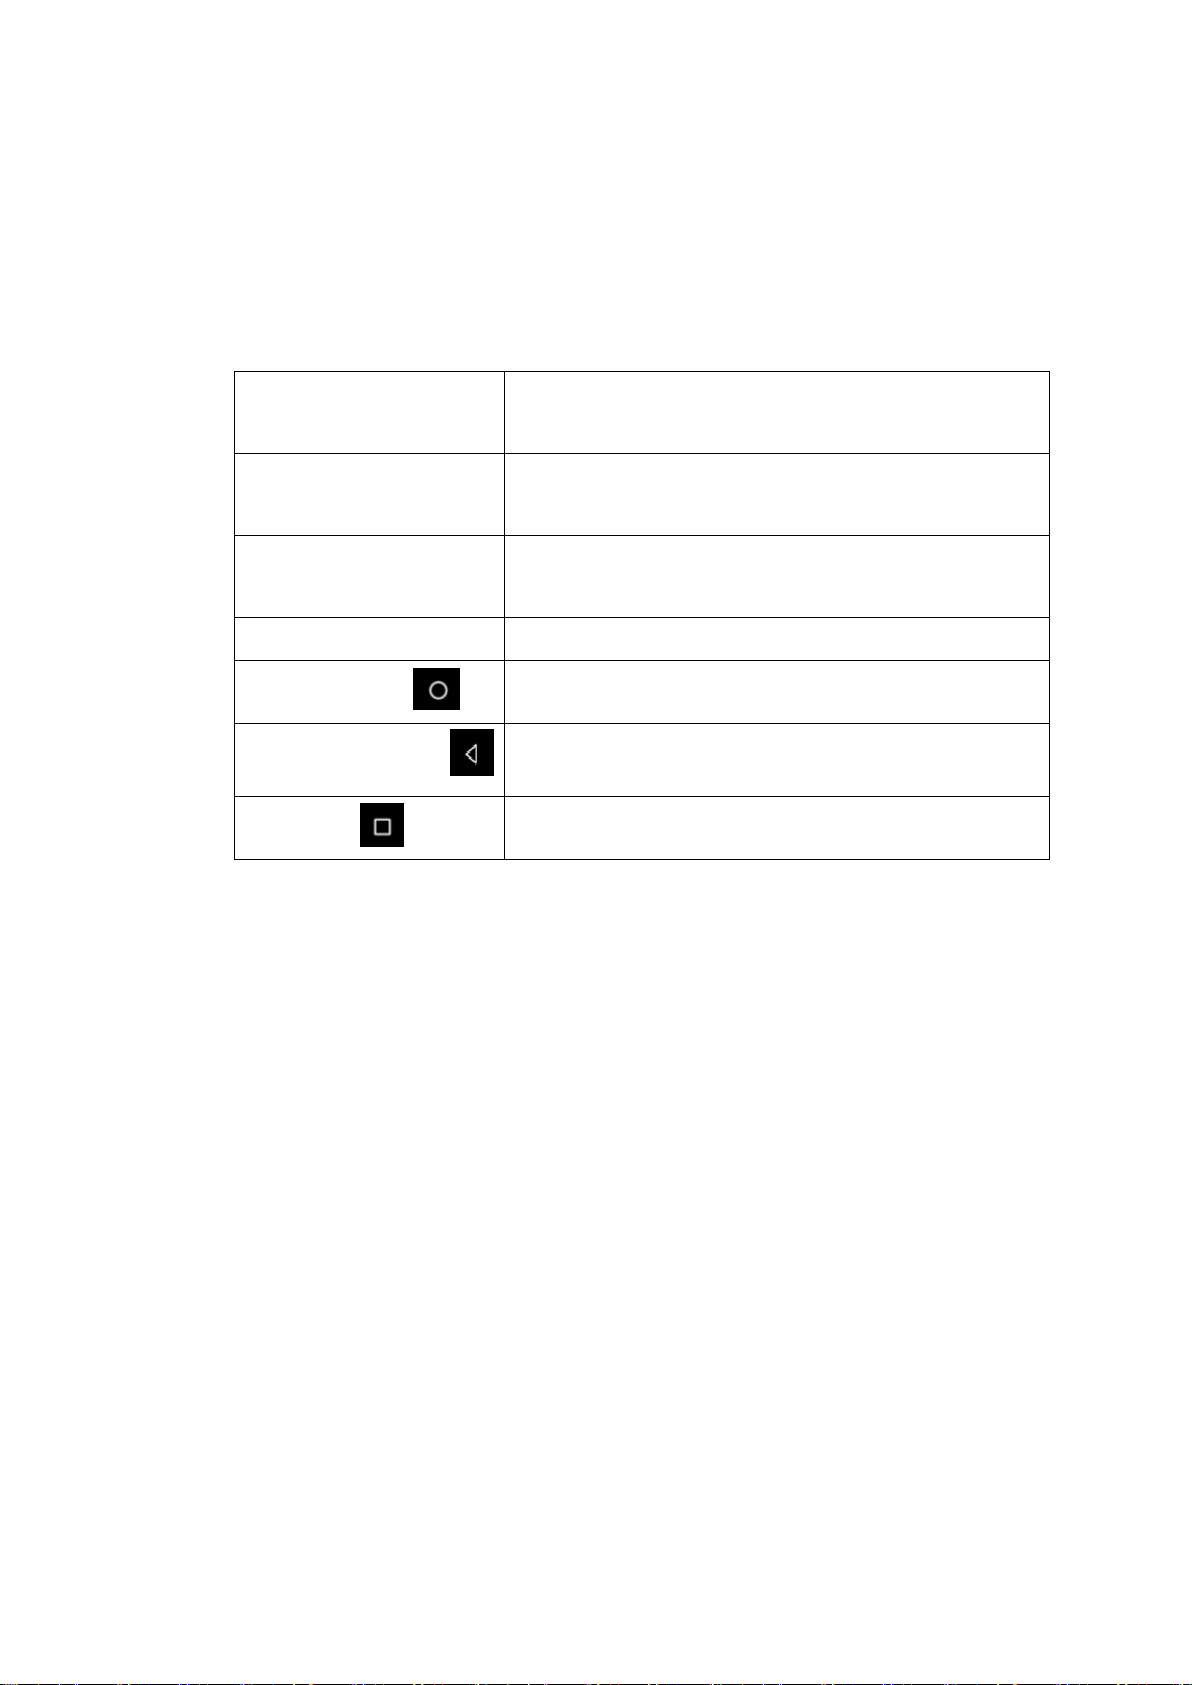
3.1 Key function
Key function description:
Power key (power)
Short dormancy / wake-up function, long press
function
Volume + key (up)
Volume Up
Volume key (down)
Reduction key (Reset)
Reduction key (Reset)
Reset the shutdown
HOME key(home)
Click at any interface to return to the main interface
return key (back)
Any interface click this button to return to the upper
level directory
Setting key
Click, short press the history of the display user
3.2 Start up and shut down
start up
When the POWER key is 3 seconds long, you can see the boot screen. After the system
is opened, enter the screen lock state, please unlock.
Shut down
1. When the POWER key is long, the shutdown option will be popped.
2. The shutdown options include mute mode, flight mode, restart and shutdown.
3. Turn off the machine.
4. When the machine is dead or inoperable, press the Reset key to turn off the
machine.
Page 7
7
3.3 Screen opening and closing
The screen will be closed automatically when the screen is idle
1. When the screen is idle for a period of time, the screen will be automatically
closed to save battery power.
2. When the screen is open, press the POWER key, and the screen can be shut down
immediately.
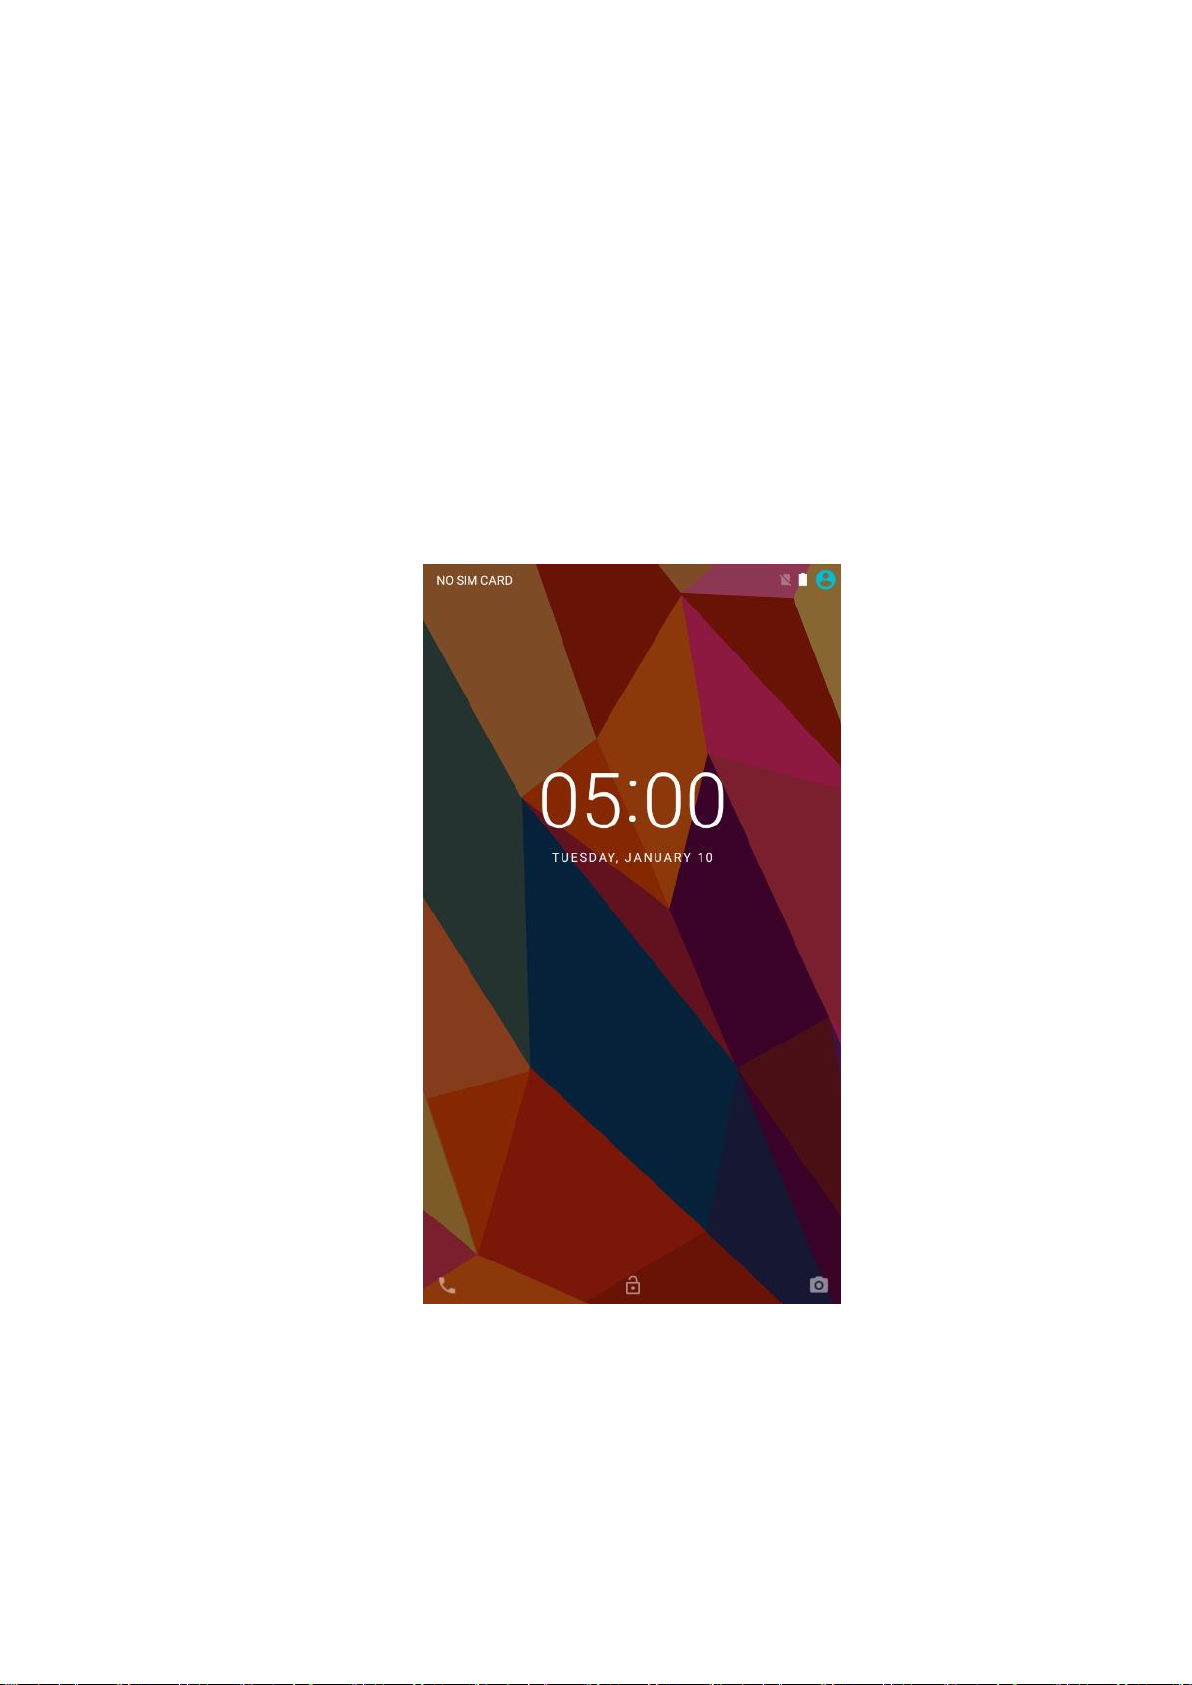
Screen off state then start up
If the screen is in the closed state, you can click on the POWER key to open the
screen. After opening, it will enter the lock state. Click on the small lock on the
screen, appear as shown in Figure 3.1, slide upward, explain the screen just unlock.
Figure 3.1
Page 8

8
3.4 Use of touch screen
Operation mode in mobile terminal smart machine
There are many ways to browse the main screens, menus, and applications on your
mobile terminal smart machine.
Select
When you want to use a screen keyboard, you want to select an application and other
items on the home page interface, just use your finger touch point.
press on
The option to open a project (such as a text box or a link in a web page), or a shortcut
on the home page interface Mode and main program menu move, as long as you hold the
project.
Fast sliding or sliding
Fast sliding or slipping indicates a quick vertical or horizontal drag of a finger
on a picture.
Drag
Before you start dragging, you must hold the finger with a certain pressure until
you reach the desired position.You can't loosen your fingers before you set it up.
Revolve
For most of the pictures, as long as the lateral movement of the mobile terminal
intelligent machine can automatically turn the screen direction from side to side, for
example, input text, music interface and so on.
Page 9
9
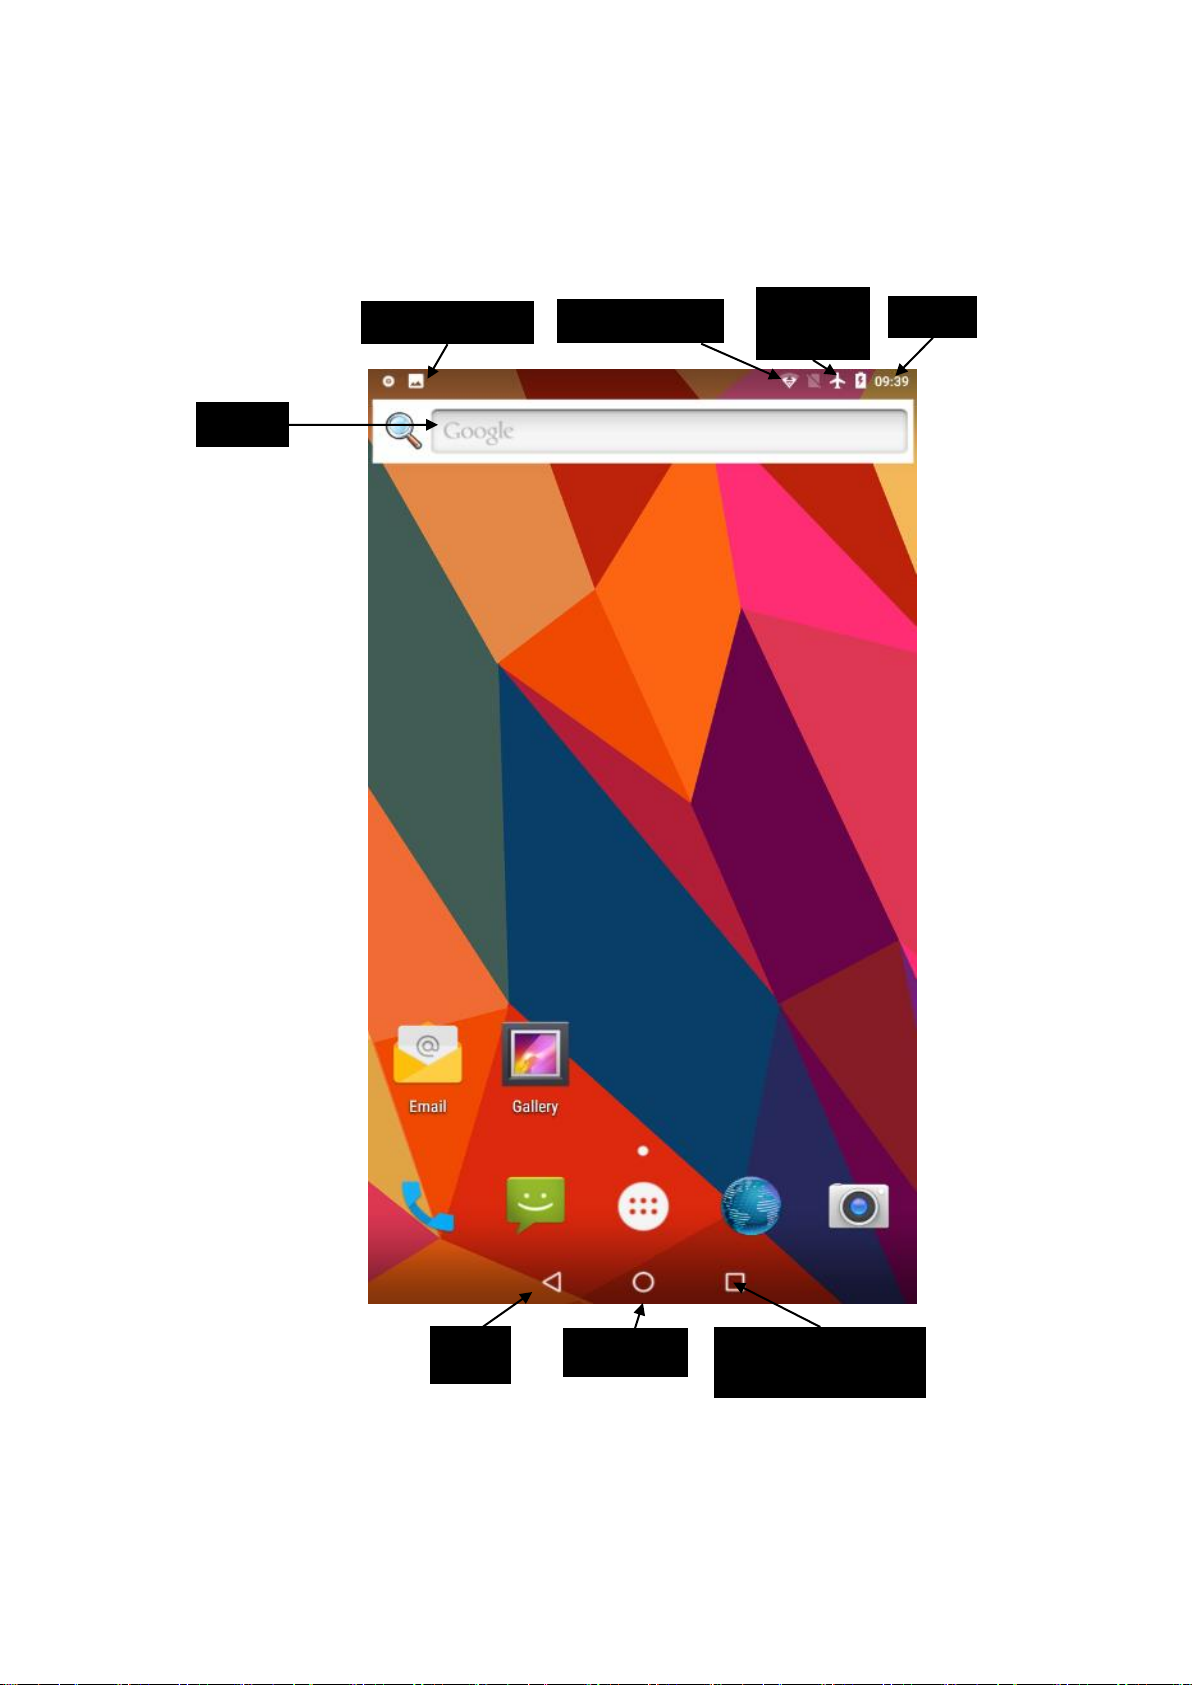
3.5 Home page interface
The home page interface, like Figure 3.2, is in the blank of the main screen,
and you can use the application, shortcut, and custom wallpaper for your homepage.
Figure 3.2
Pool
power
Time
prompt
Notification Bar
Home key
retur
Short press view
recently used
search
Page 10
10
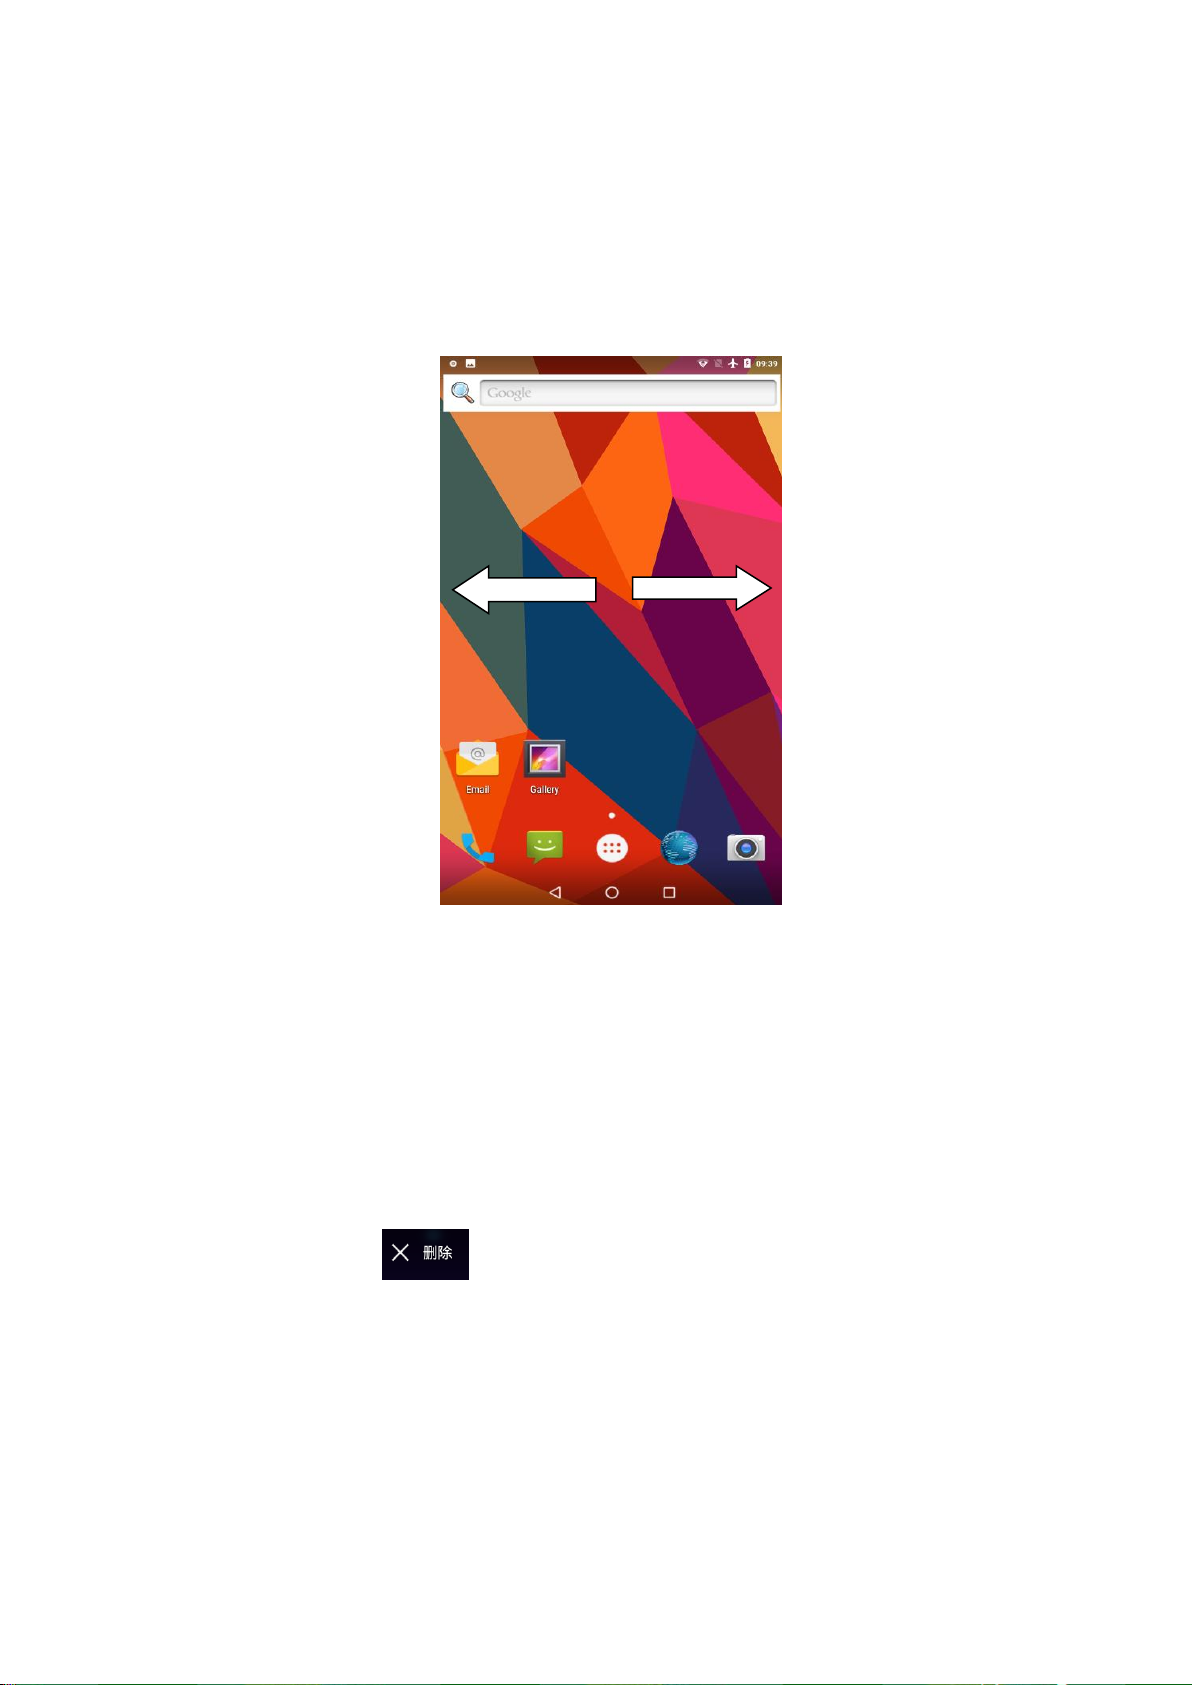
Extensible main page interface
The homepage interface will extend to the outside of the screen width, in order
to provide more space for a shortcut, so you can place new gadgets. Press the home
interface blank, and then quickly with a finger sliding around to jump to extend
to the outside of the screen left or right. There are more than 2 home interface
extension screen as shown in figure 3-2.1..
Figure 3-2.1
Fast icon management for desktop applications
The operation steps are as follows:
1.Put together an icon, drag it to an icon and superimpose a number of icons.
2.Then click on the icons that stack a lot of shortcuts, and you can expand
all the application icons that you overlay before.
Delete the icons on the desktop
1. The icons to be deleted are displayed on the top of the
screen. Icon.
2.Drag the icon to the top of the delete icon, and when the icon is red, the
pine hand can be deleted.
Replace the desktop wallpaper
1.On the home page, the wallpaper can be set up when the window is popped ou
at a blank of the main screen.
2.Select the picture library or the wallpaper library to select the picture.
Page 11
11
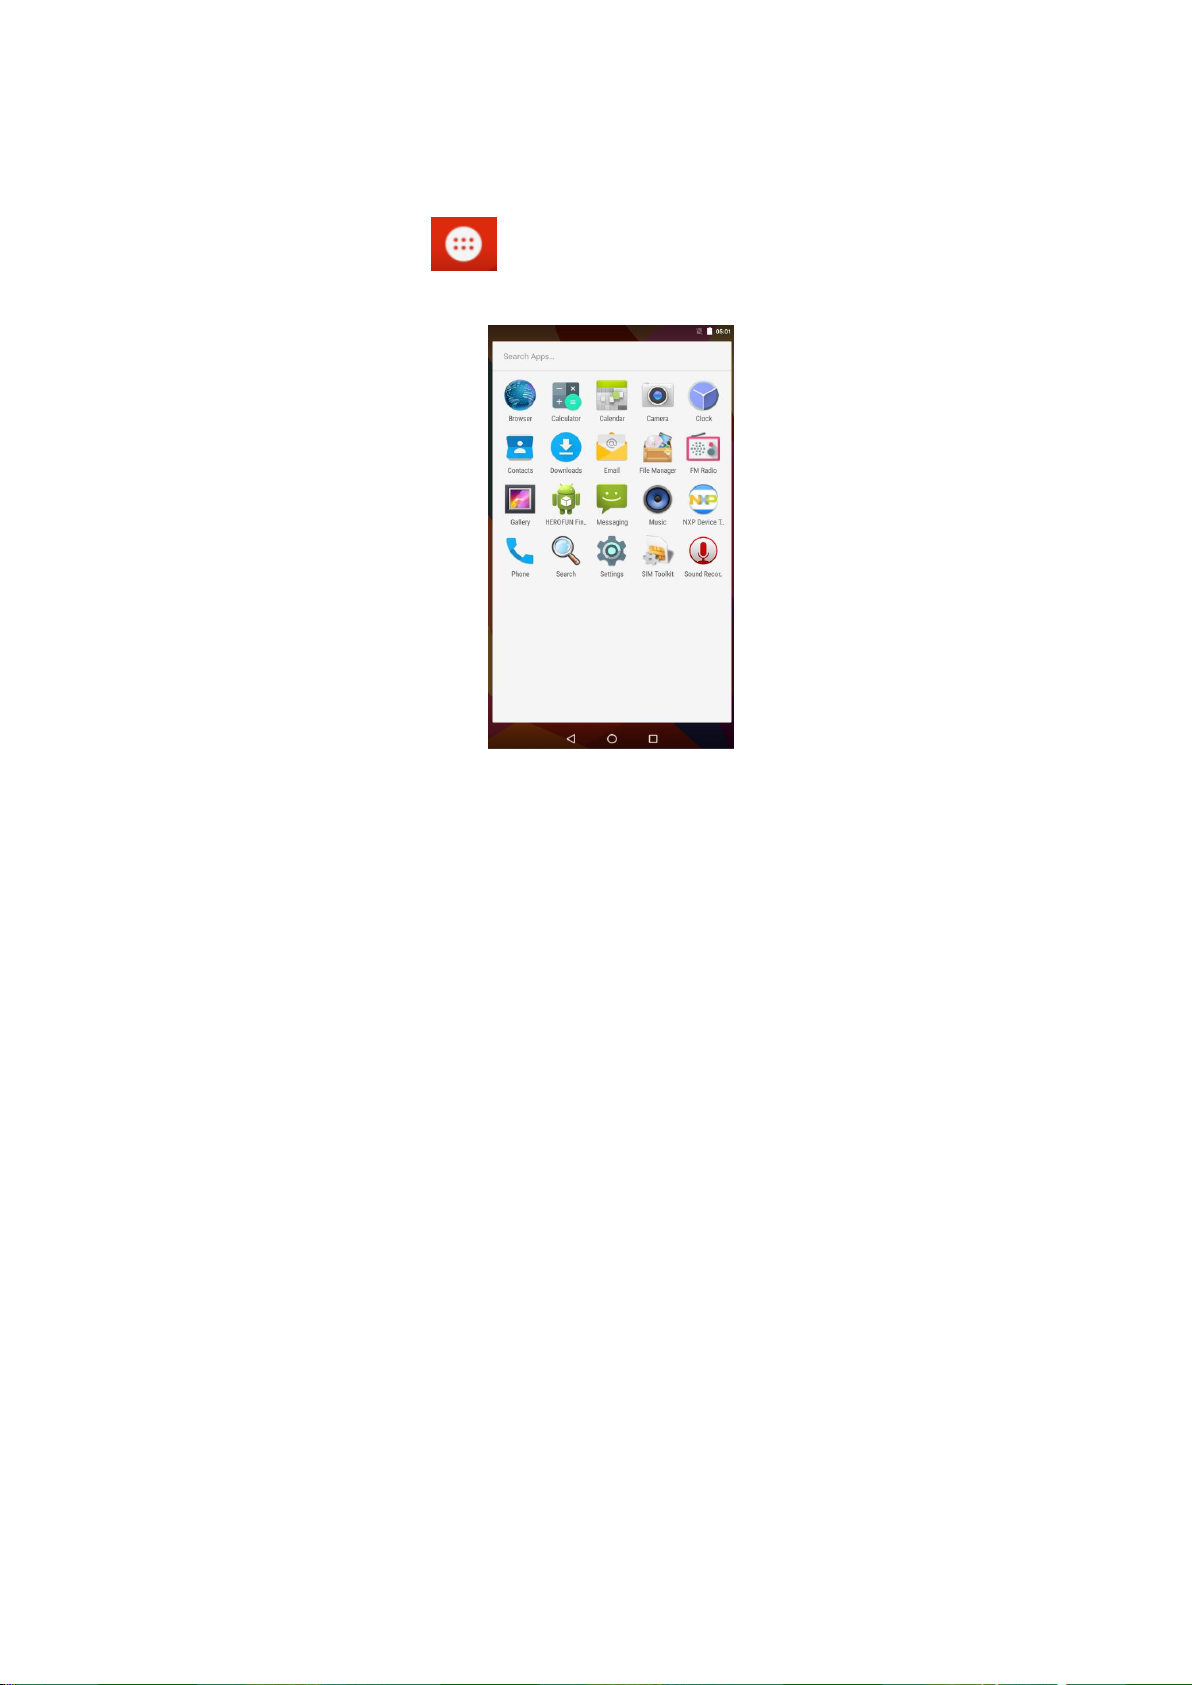
3.6 Access applications
Click in figure 3. 2 Button, enter the main menu interface like figure 3.3;
select the application to be accessed.
Figure 3.3
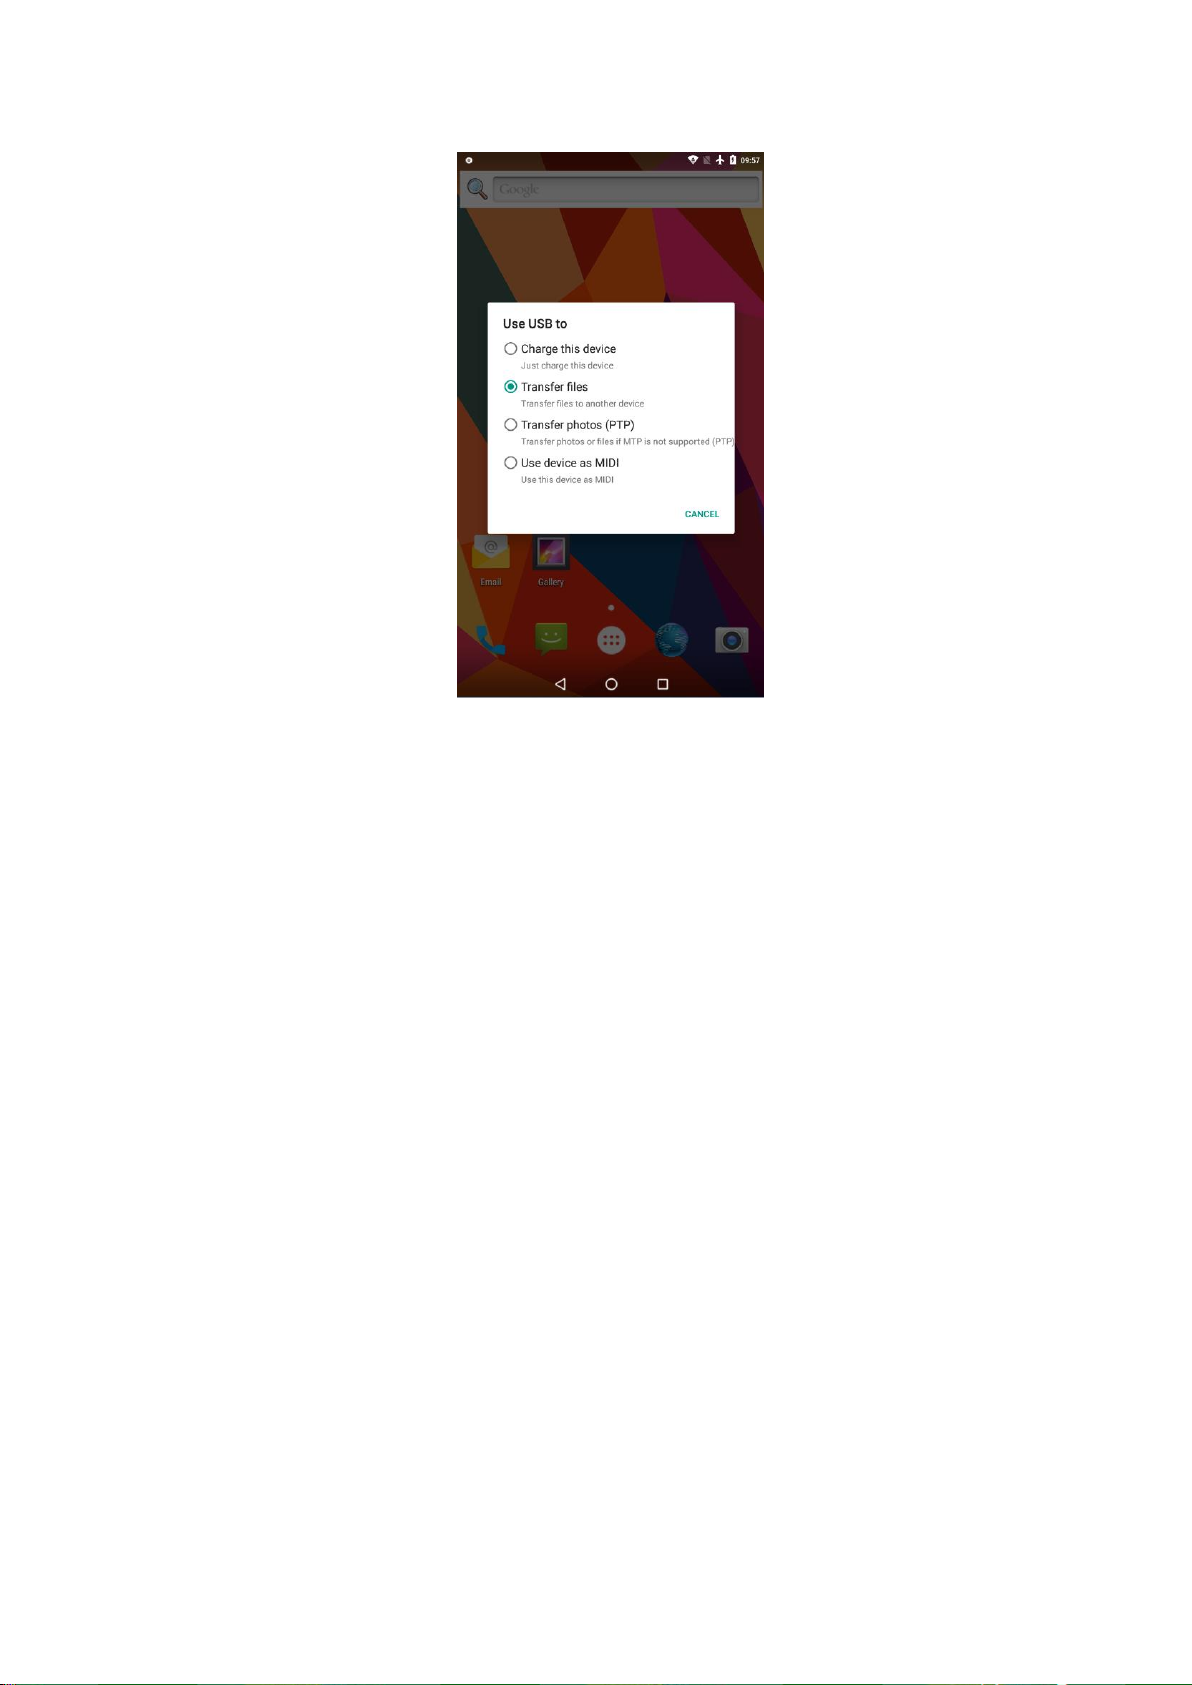
3.7 USB connection
USB connection settings
Before transferring the file, you must first set up your USB connection settings
for your mobile terminal smart machine:
1. Use the USB transmission line to connect the mobile terminal smart machine
to the computer, the notification bar will appear notification.
2. Open the notice panel, how to open the panel, please check the 2.3 chapter
of the mobile terminal smart machine status and notification.
3. In the notification panel, click the USB connection, and then click the
transfer file (Figure 3.4).
Page 12
12
Figure 3.4
Copy the file to the storage card
1. Use USB cable to connect the mobile terminal smart machine to the computer.
2. After setting up the USB connection, the connection is successfully connected
with the computer.
3. Open your computer on my computer and look at the content of "X".
4. Find the file you want to copy and copy it to "X".
5. After the copy is finished, it can be pulled out directly.
3.8 Input text
Use the on-screen keyboard
When you start a program or select a text edit box that needs to enter a text or
number, a screen keyboard appears. The keyboard has the following input method:
1. Android keyboard
2. Google Pinyin
Select the input method you want to use
1.Click to set the application.
2.Select the language and the input method.
3.In the text setting area, all the installed input methods for your mobile
terminal
4.Hook up after you need the input method.
Page 13
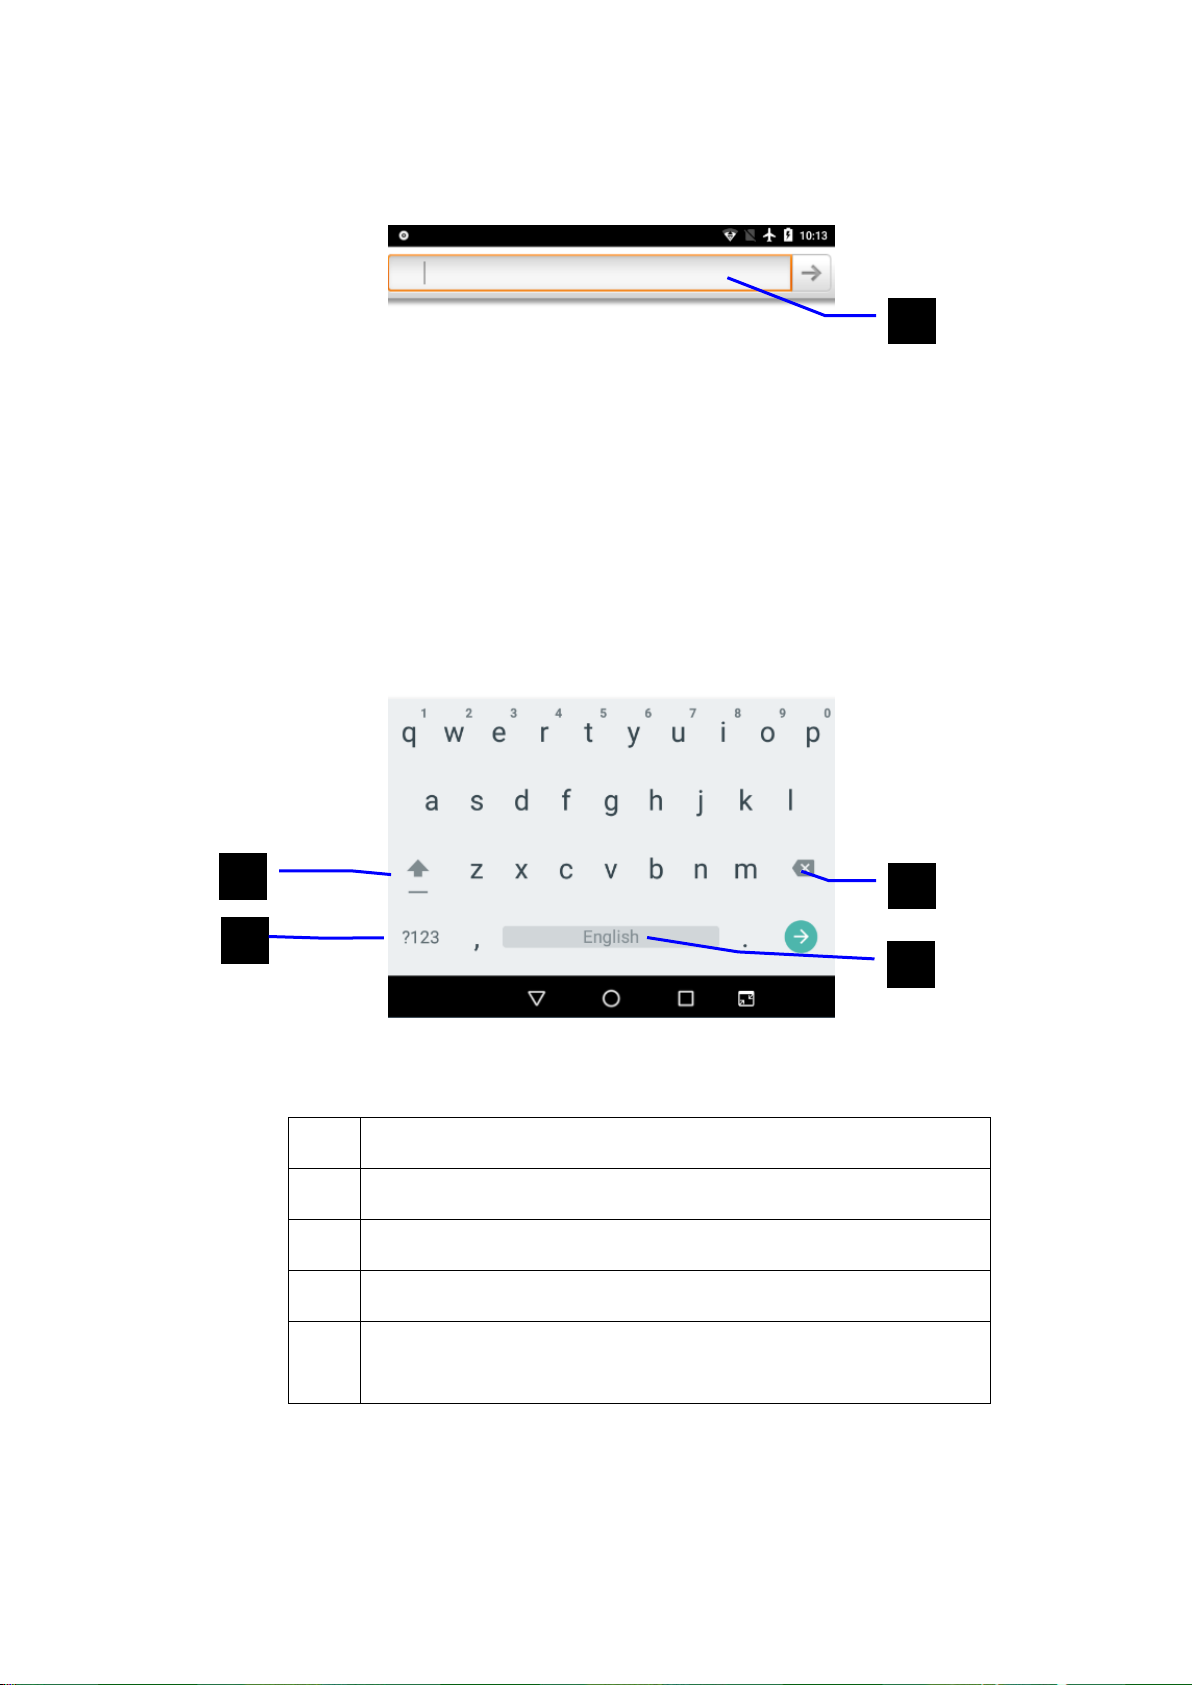
13
Use and switch input method
Figure 3.5
1
Switch input case
2
Switch text input mode
3
Point selection can be inserted into space
4
Point selection input can be executed
5
Delete the characters on the left of the cursor. Click and
hold down all the characters on the left of the cursor
①②③⑤④
Page 14
14
3.9 Use skill
Entry into the window widget interface
In the application on the screen above the "widget" or on the screen with the
left hand row will switch to the widget interface. Long press any widget can
generate a shortcut on the desktop, behind the shortcut icon on the desktop,
you can quickly enter the corresponding application.
Create an application shortcut icon on the desktop
In the application or the widget interface, press any icon will automatically switch
to the desktop icon, hold not to put, can be placed anywhere on the desktop.
Hint: the system may ask you to make more choices before activating the widget. If
you drag and drop the target location without space, the widget will not be added to
the main screen.
4 Basic Settings
4.1 Wireless and network
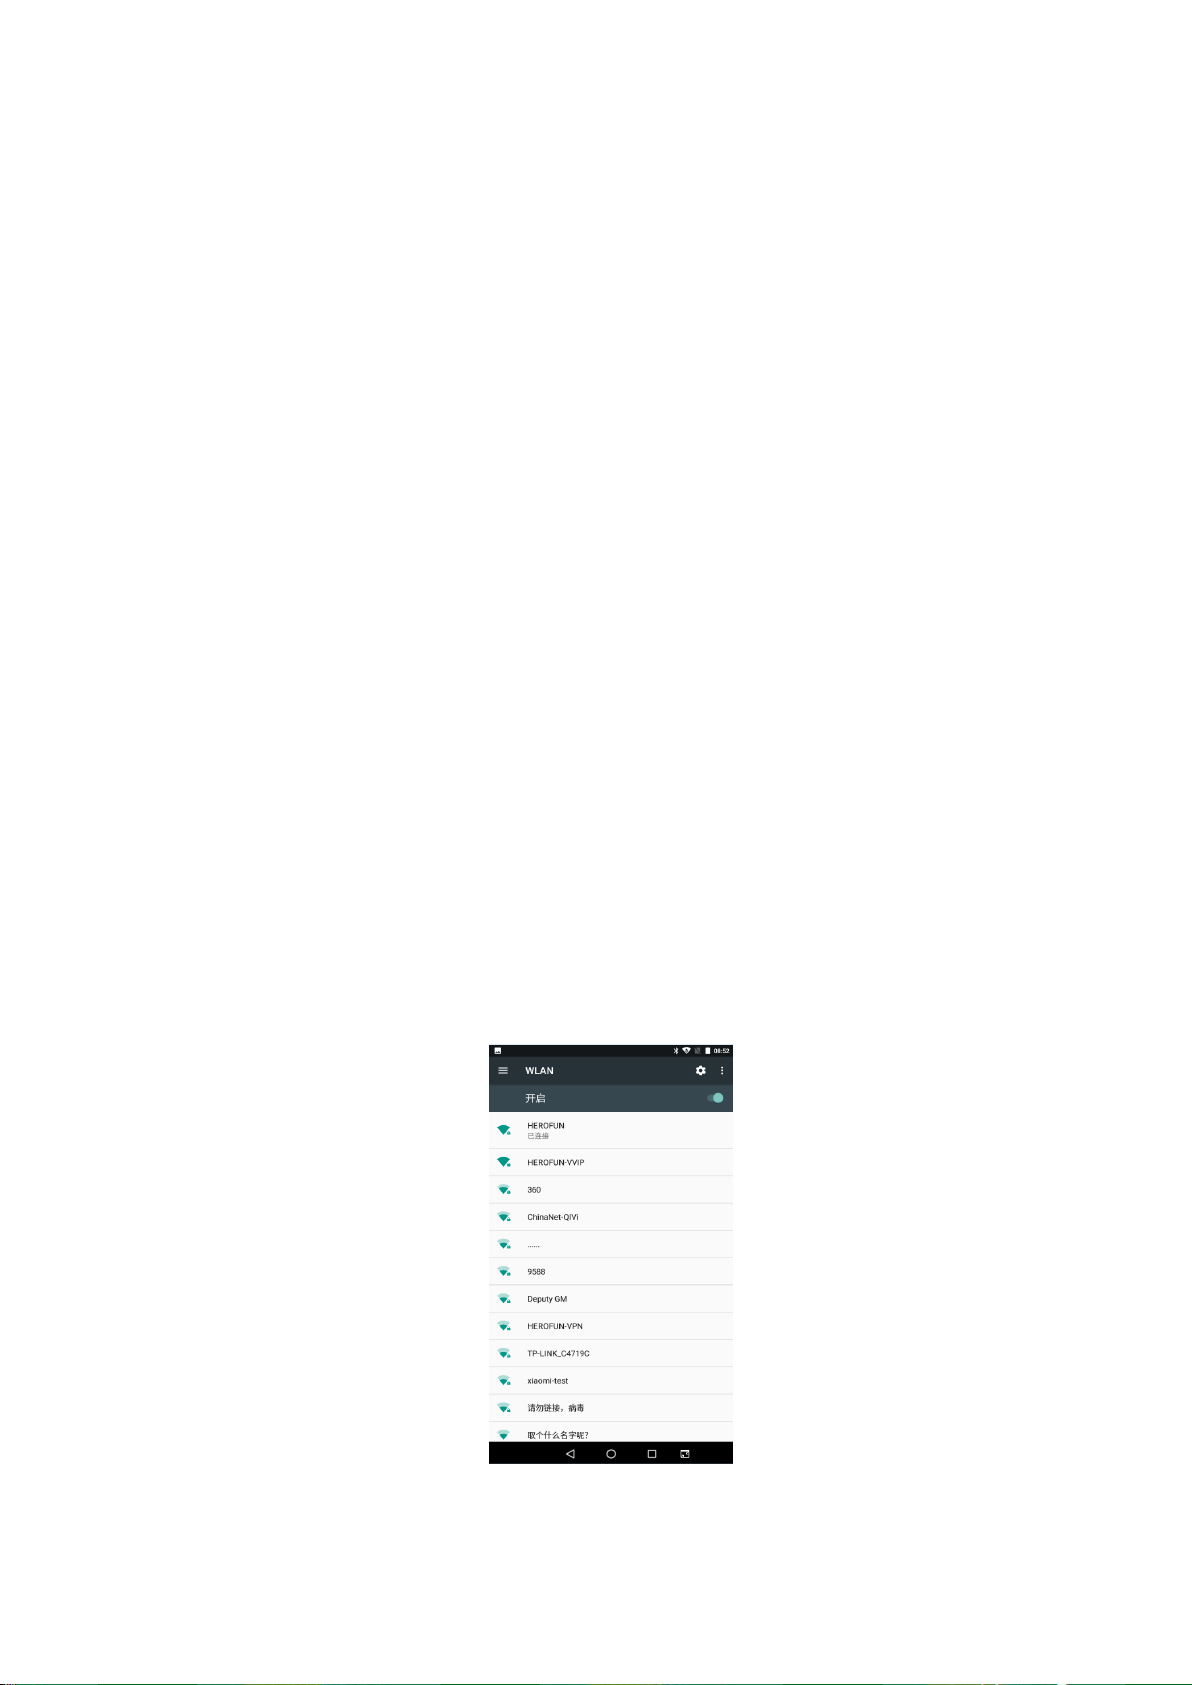
Building a WiFi connection
1. Select the application program at the main menu interface
2. Click the WLAN, open the WiFi, and the mobile terminal intelligent opportunity
automatically scan the available Wi-Fi wireless network. Figure 4.1
3. Select the Wi-Fi network that you want to connect to, if the encryption will
pop up the input password window, enter the corresponding password, and click
the connection.
Figure 4.1
Page 15
15
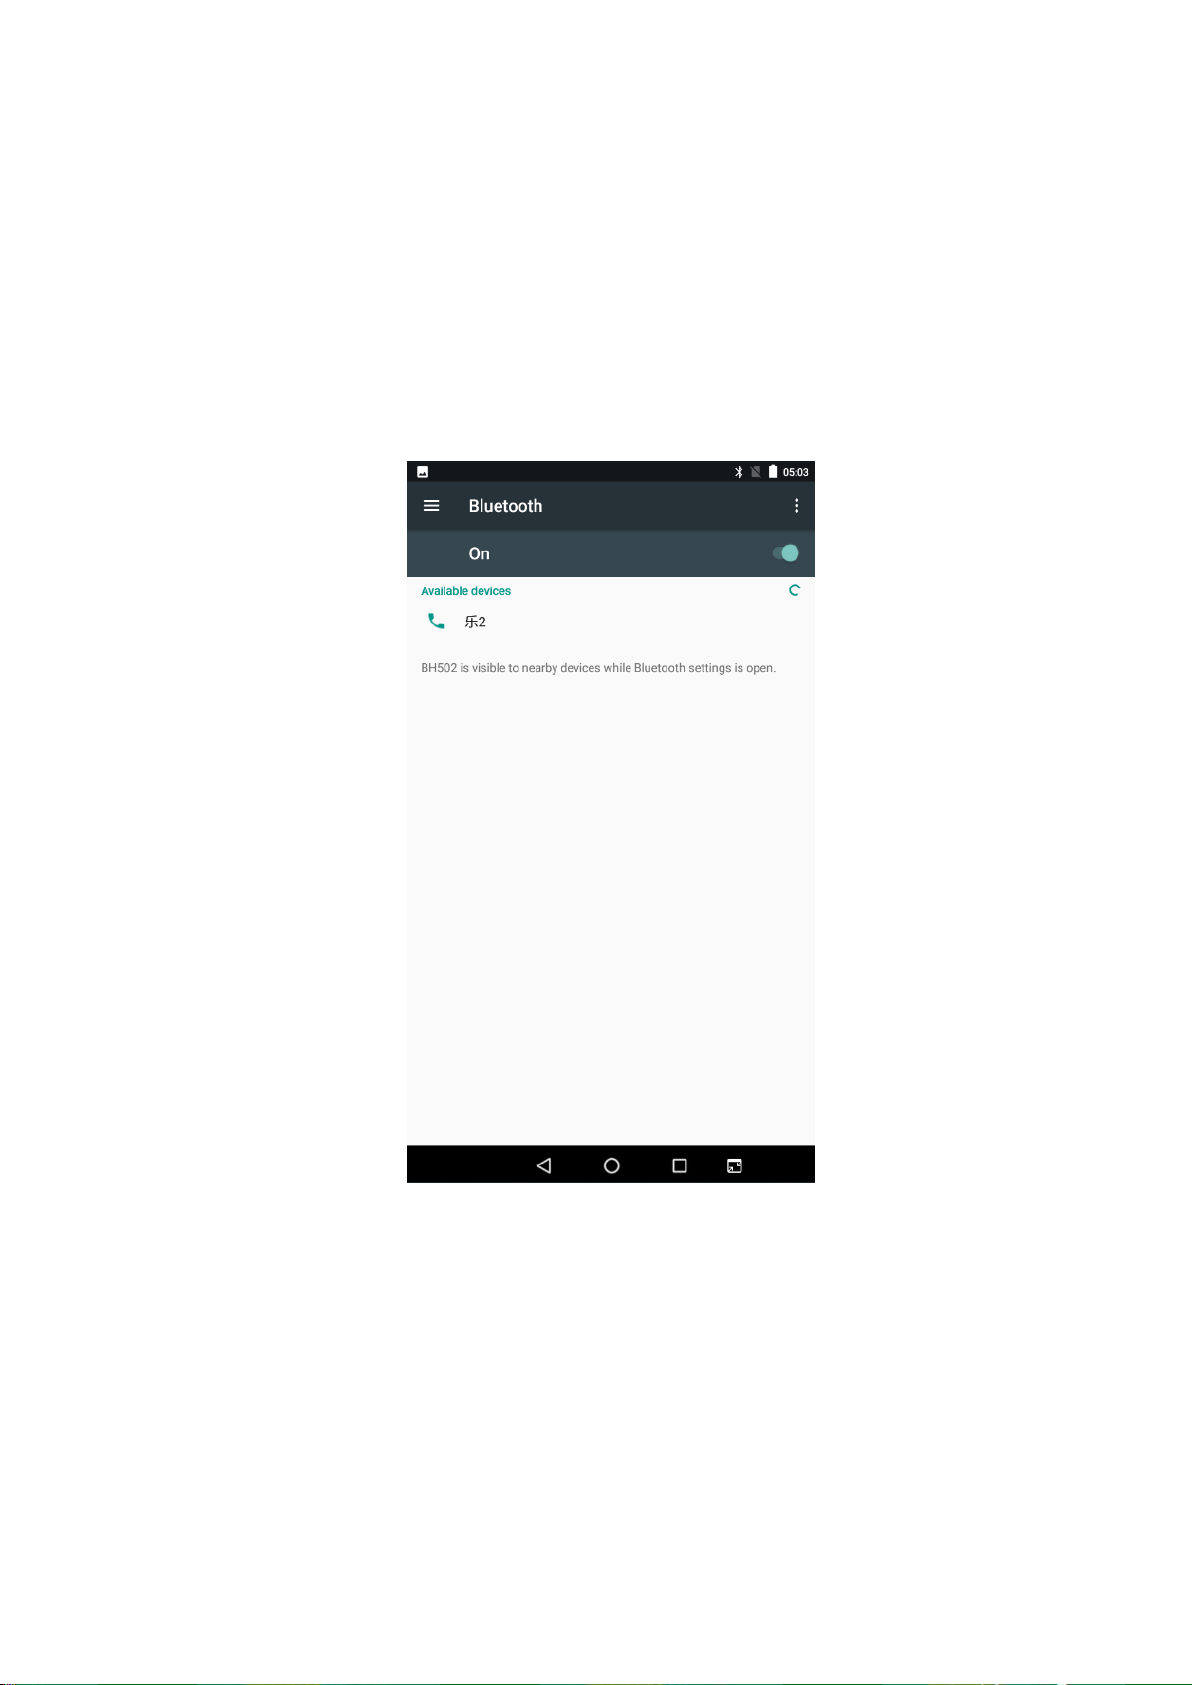
4.2 Bluetooth
Application of Bluetooth function
1. select the application program at the main menu interface
Choose Bluetooth at
2. turn on Bluetooth
3. select the right upper corner search device and the mobile terminal smart machine
will automatically search the nearby Bluetooth device. For example, Figure 4.2
Figure 4.2
4. click on the Bluetooth device, will automatically pop up the matching request
window, enter the corresponding password, and the corresponding match, can match the
success of the match.
Page 16

16
4.3 SIM card
SIM settings
1. Select the application program at the main menu interface.
2. Choose SIM card.
3. Set up SIM card 1, SIM card 2 open or close.
4. Preferred SIM card settings: SIM card 1, SIM card 2., such as figure 4.3
Figure 4.3
4.4 Flow usage
1. Select the application program at the main menu interface.
2. Point out the use of flow.
3. You can see the flow state that you have used.
4. Click on the flow saving program and open all program traffic control. Figure
4.4
Page 17
17
Figure 4.4
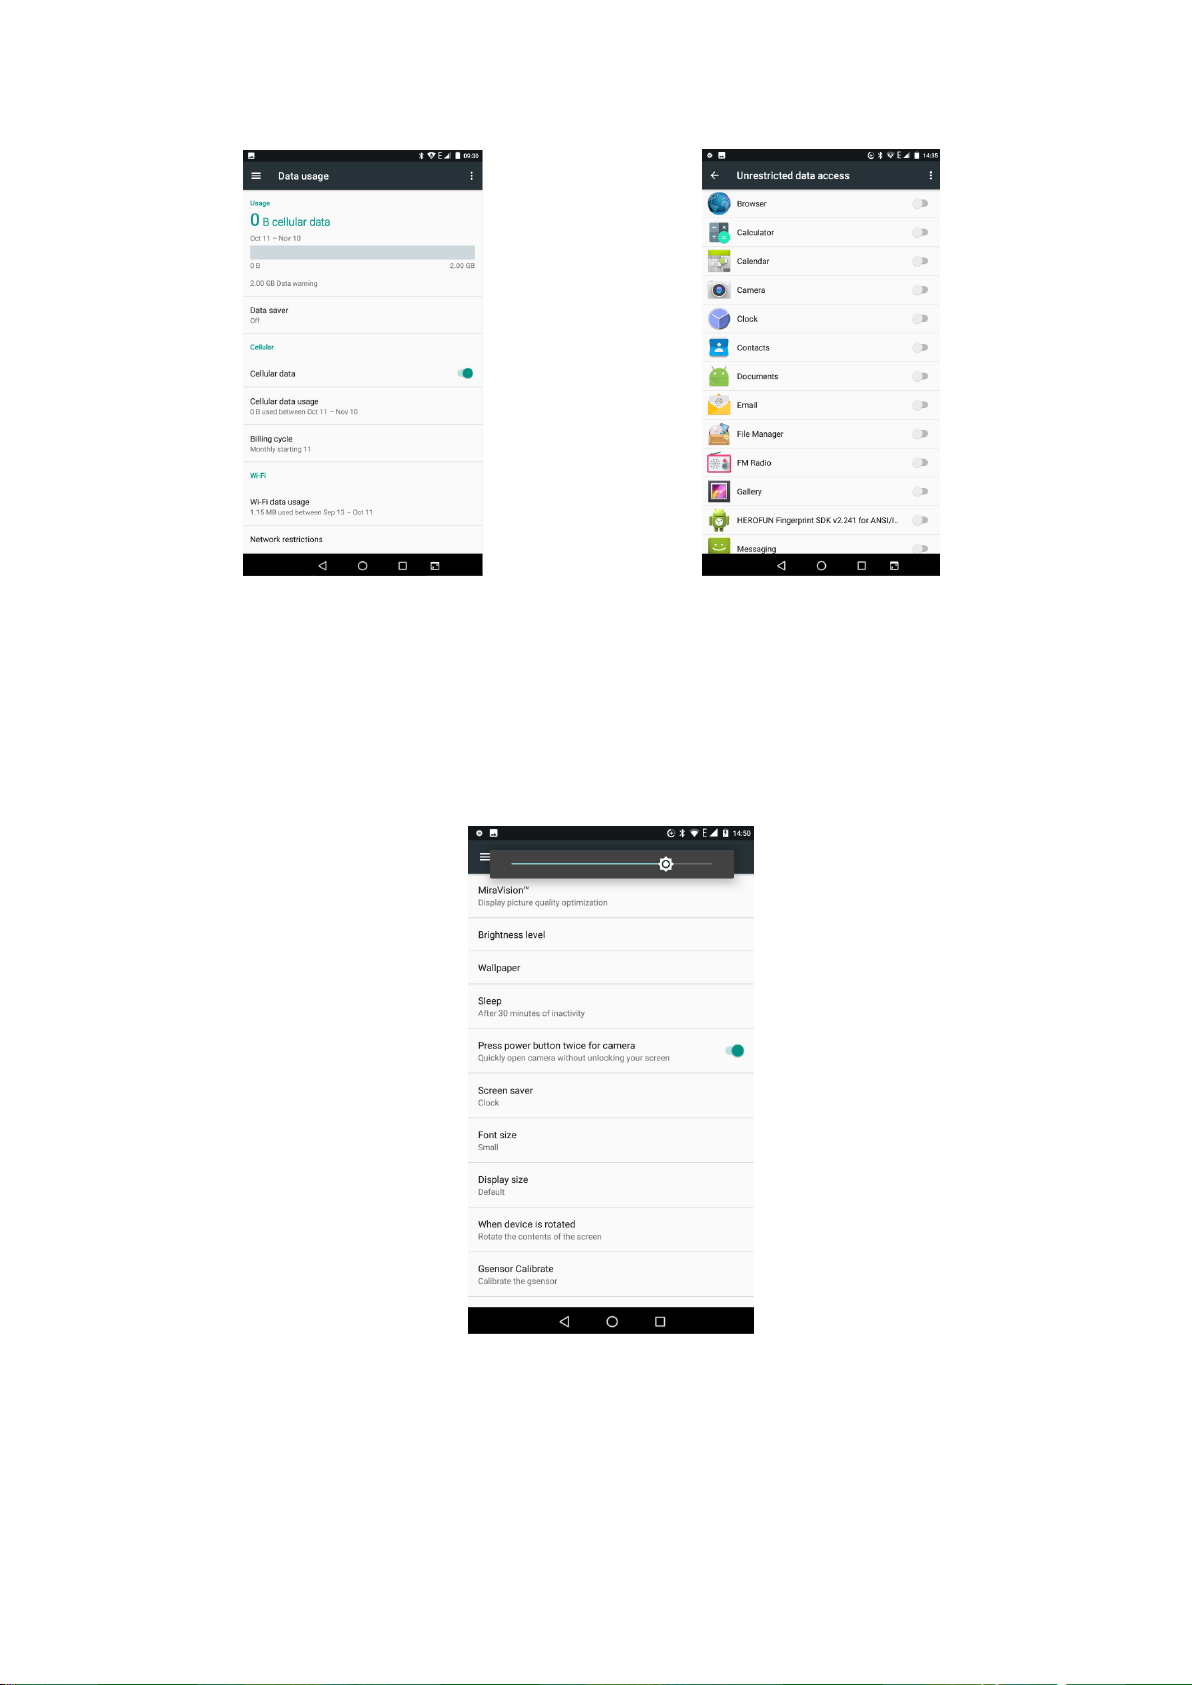
4.5 Display settings
1. select the application program at the main menu interface
2. point selection shows that the luminance is selected to adjust the brightness.
For example, figure 4.5
Figure 4.5
3. Select the wallpaper at 3., and set the wallpaper. For example, figure 4.6
Page 18
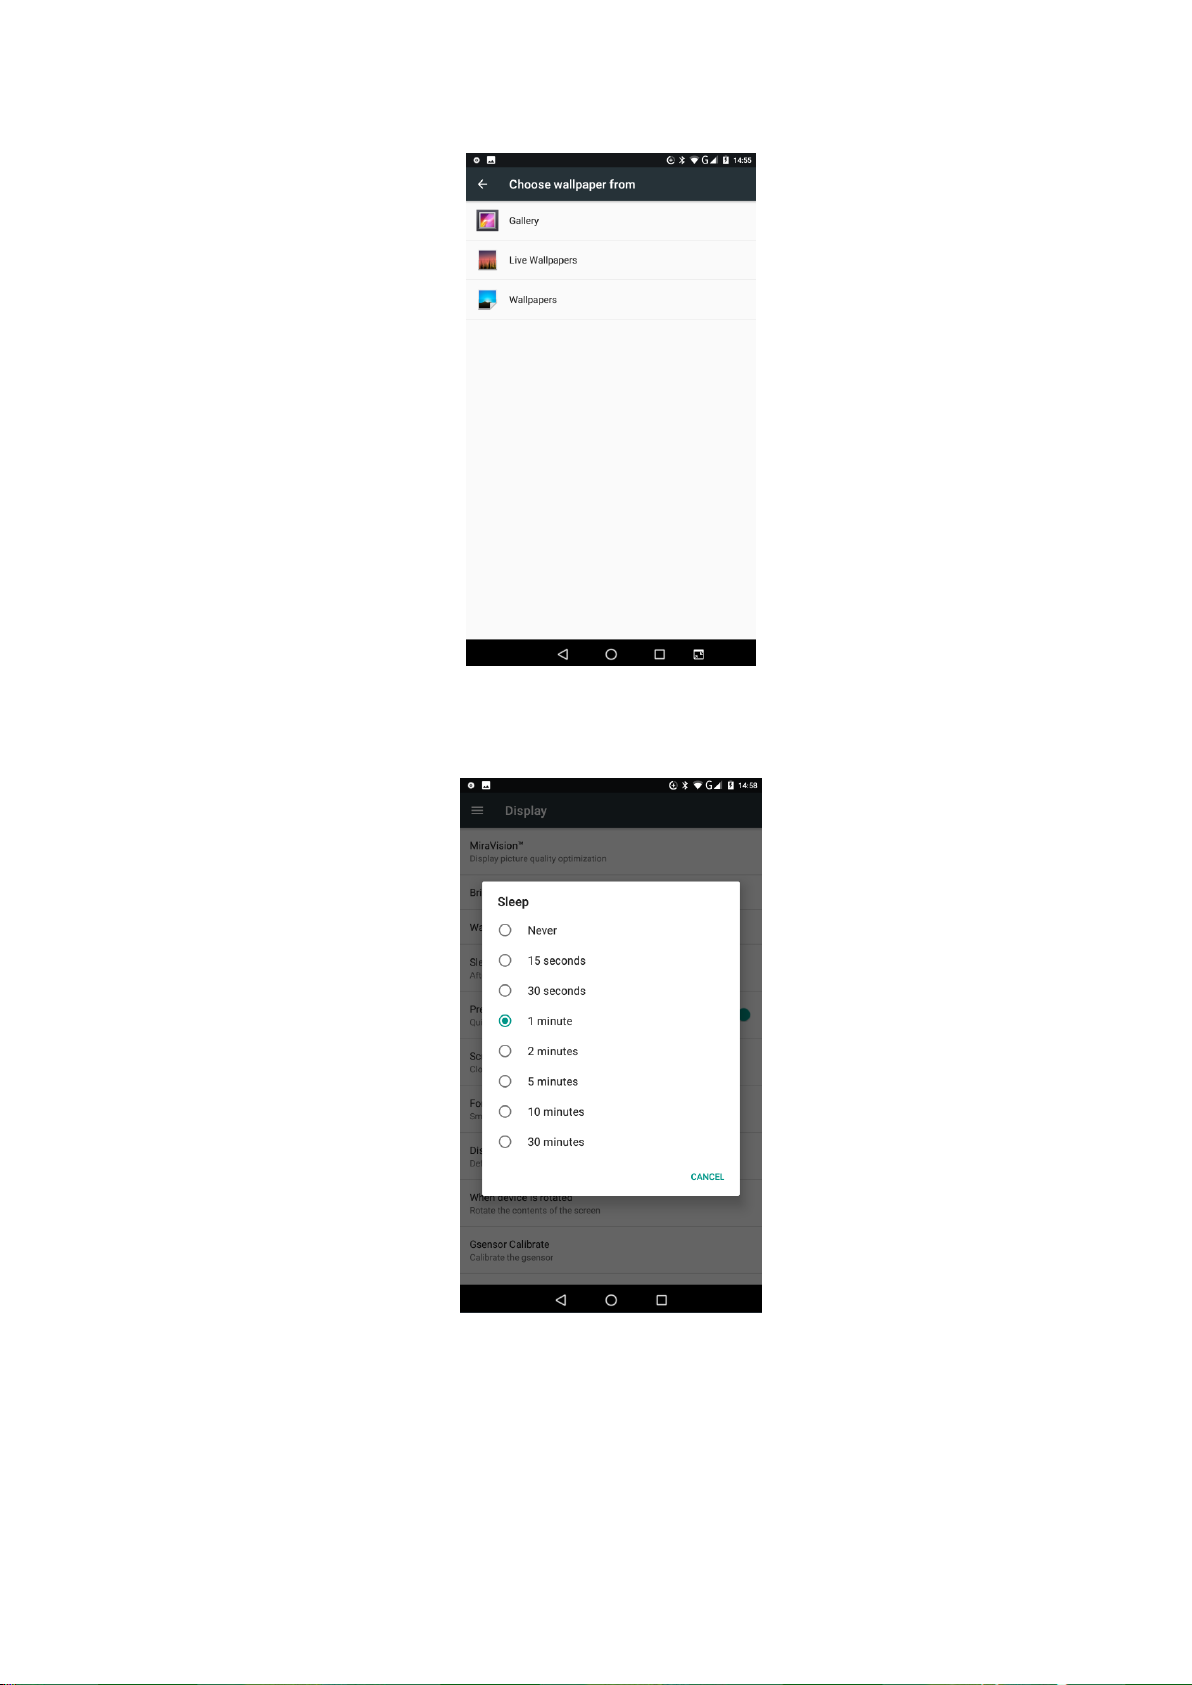
18
Figure 4.6
4. choose dormancy and set the dormancy time. For example, figure 4.7
Figure 4.7
5.The size of the font is selected at 5., and the font size is set. For example,
figure 4.8
Page 19

19
Figure 4.8
6. point selection shows the size, and the display size settings. For
example, figure 4.9
Figure 4.9
Page 20

20
4.6 Notification settings
1. select the setup program in the application list
2. notifications, enter notifications to all applications for application
notification settings, such as figure 4.10
Figure 4.10
4.7 Sound setting
1. Select the setup program in the application list
2. Select sound and make sound settings, as in Figure 4.11
图 4.11
Page 21

21
4.8 Management applications
1. Select the setup program in the application list
2. Select an application item that can manage and delete an installed application after
entry (as in Figure 4.12)
Figure 4.12
4.9 SD card and MID storage
View SD cards and POS machines to store available space
1. Enter the setup application.
2. Point selection storage
3. See the space available for the SD card.
4. Look at the internal storage space of the MID machine.
Page 22

22
Safe removal of SD cards
1.Click to set the application.
2.Click the store.
3.The SD card can be safely removed at this time.
Figure 4.13
Note: the safe removal of SD cards can effectively protect the SD card and increase
the service life of the SD card.
4.10 Battery
1. select the setup program in the list of applications.
2. Choose the battery at
3. check the battery usage and set up the power saving mode, such as figure 4.14
Page 23

23
Figure 4.14
4.11 Memory
1. select the setup program in the list of applications
2. points to choose memory
3. view memory usage. For example, figure 4.15
Figure 4.15
Page 24

24
4.12 Users
1. select the setup program in the list of applications.
2. Select the user a
3. select the owner and set the user name. For example, figure 4.15
Figure 4.15
4.13 Security
1. select the setup program in the list of applications.
2. It's safe at 2..
3. point selection screen locking method, select the screen lock mode: slide,
pattern, PIN code, password. For example, figure 4.16
Page 25

25
Figure 4.16
4.14 Language and input method
1. select the setup program in the list of applications.
2. Select the language and input method at 2. points.
3. Select the language at 3. and set the language, such as figure 4.17
Figure 4.17
Page 26
26
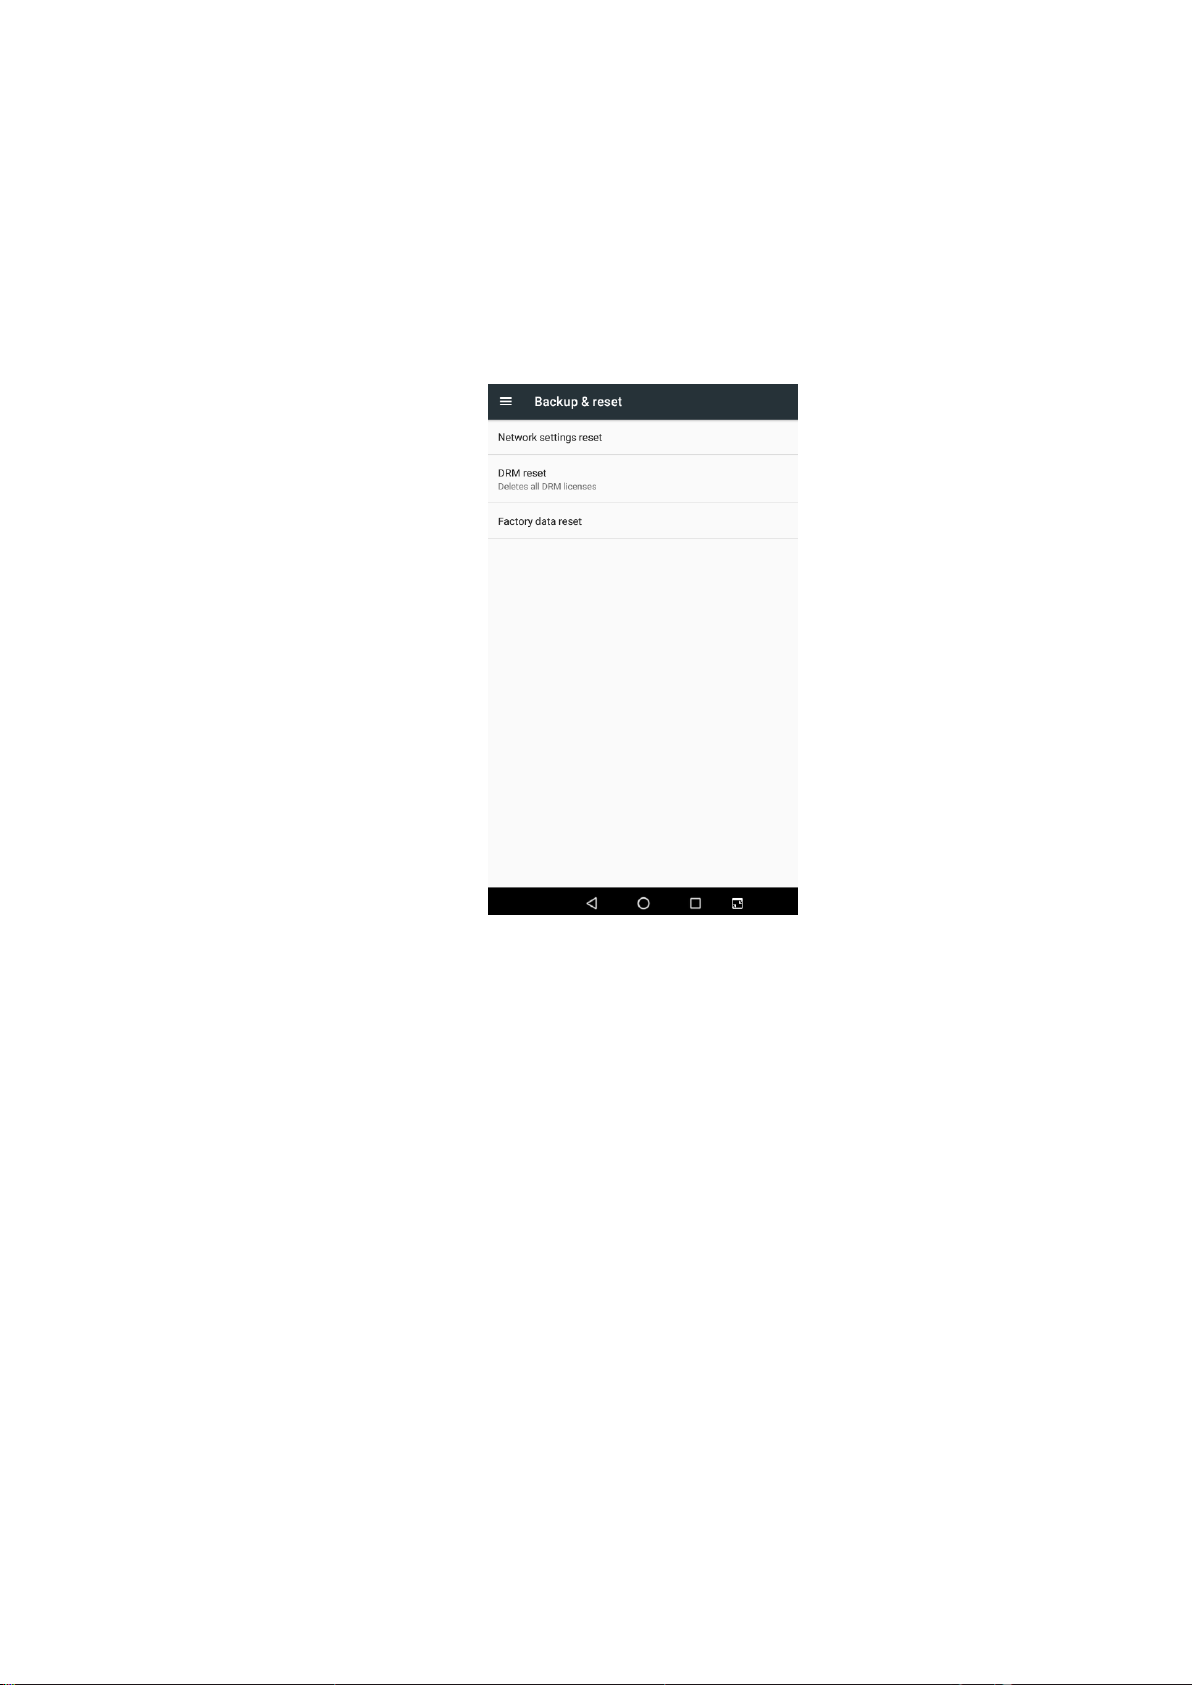
4.15 Backup and reset
1. select the setup program in the list of applications.
2. Select backup and reset at
3. points to restore the factory settings, to restore the factory settings, such
as figure 4.18
Figure 4.18
4.16 Date and Time
According to presupposition, the system automatically uses the date, time zone
and time provided by the network.
Manually adjust the date, time, and time zone
1. Click to set the application.
2. Scroll down the screen and select the date and time.
3. Close the automatic date and time.
4. Turn off the automatic time zone
5. Select the time zone, then select the time zone in the list. Scroll down the
list to see more time zones
6. Select the set date, then select the corresponding date, month and year, select
the completion of the selection.
7. Select the time to set up. Then select the corresponding hours and minutes,
Page 27

27
select the completion of the selection.
8. Select the switch between 24 hour grid, 12 hour or 24 hour system. The selected
time format will also be applied to the time format of the alarm clock display.
Figure 4.19
Note: if you automatically use the time provided by the network, you can't set the
date, time, and time zone on your own.
4.17 Barrier free
1. Click to set the application
2. There is no obstacle to the selection.
3. The related functions can be set, such as figure 4.20.
Figure 4.20
Page 28

28
4.18 Timing Switchgear
1. Enter the setup application
2. Point selection timing switchboard option
3. For example, figure 4.21
Figure 4.21
4.19 About mobile terminal smart machine
View the state of the mobile terminal smart machine
1. Enter the setup application.
2. Select the mobile terminal smart machine. Can see the status message, model,
version number, and other information. For example, figure 4.22
Figure 4.22
Page 29

29
5 Multimedia
5.1 music
Enter the music player: click on the music on the main menu or the desktop
interface The icon goes into music playback and can be played in the list of
favorite music, such as Figure 5.1:
Figure 5.1
Figure 5.2
Drag play progress bar to adjust the speed of audio playback
The music player button operation is shown in Figure 5.2
album
Pause / play
next
previous
artist
song title
shuffle
loop
Page 30

30
5.2 video
Entering the picture: selection in the main menu Application, select
the video to play to play, such as Figure 5.3
Figure 5.3
Page 31

31
5.3 Library
Picture library application can automatically search photos and video files
stored on SD card. And picture library will classify these pictures and video files
in folders. You can use picture library application to view and edit photos, take
photos as desktop and view pictures.
View image
1. On the main interface, select the library application.
2. Enter the library, click the folder you want to see, and look at
the pictures contained in it.
3. Select the picture you want to see, and the system will
automatically view it in full screen mode.
4. When you look at the picture, you can zoom in and down, put two
fingers on the screen, and then separate your fingers (close your
finger to show down) or double click the screen.
Technique: when you browse the picture, you can slide the picture to the
left or right, and switch the picture to browse.
Edit and set pictures
When looking at a picture in full screen mode, press the menu key to
display the menu options, and you can choose the options you need to
edit and set up pictures.
1. Slide Show
2. Open a picture, use the virtual button to click the menu button,
and display the menu options.
Prune
1. Click the menu button to display the menu options.
2. Then the cutting shears are selected, and the related areas are
selected to adjust the cutters.
3. The point selection cutter is towed inside and outside the center
to adjust the cutting size.
4. When you adjust the size you want, click the cut.
5. If you give up the cut, click the cancel to go back to the picture
browse.
Edit
1. Click the menu button to display the menu options.
2. Click on the editor.
3. The luminance, style, color, and effect settings can be
performed in the pop-up options.
Page 32

32
4. Click save.
5. If you give up the editor, click the return key, in the pop-up
dialog box, choose not to go back to the picture browse.
5.4 camera
Under the main menu or desktop, click Application icon, into the camera
Camera operation button, such as figure 5.5
Figure 5.5
Flash setting
Video Mode
Look at
photos and
Photograph
Page 33

33
5.5 radio station
Main Menu Enter the radio main interface:
Reception
Figure 5.6
Search channel: click the play key in the radio, click search, the channel
will be automatically searched, the search channel will be saved to the
channel list
Collection channel: click on the main interface You can
collect this channel, which will be saved to the channel list
Collection button
On the first
channel
The next channel
Current
frequency
SETUP MENU
Page 34

34
6 Communication function
6.1 Telephone
1. select dialing Application, enter the dial-up interface.
2. operate according to Figure 6.1
Figure 6.1
dial
Dialing area
Page 35

35
6.2 SMS
1 Enter the main menu interface, choose application
2 Choose to write a new information map 6.2
Figure 6.2
6.3 Address book
Selection in the main menu interface Application, enter the address book
program. For example, figure 6.4
Figure 6.4
Direct input
Add receiver
Send message
Write message
Page 36
36
7 Internet
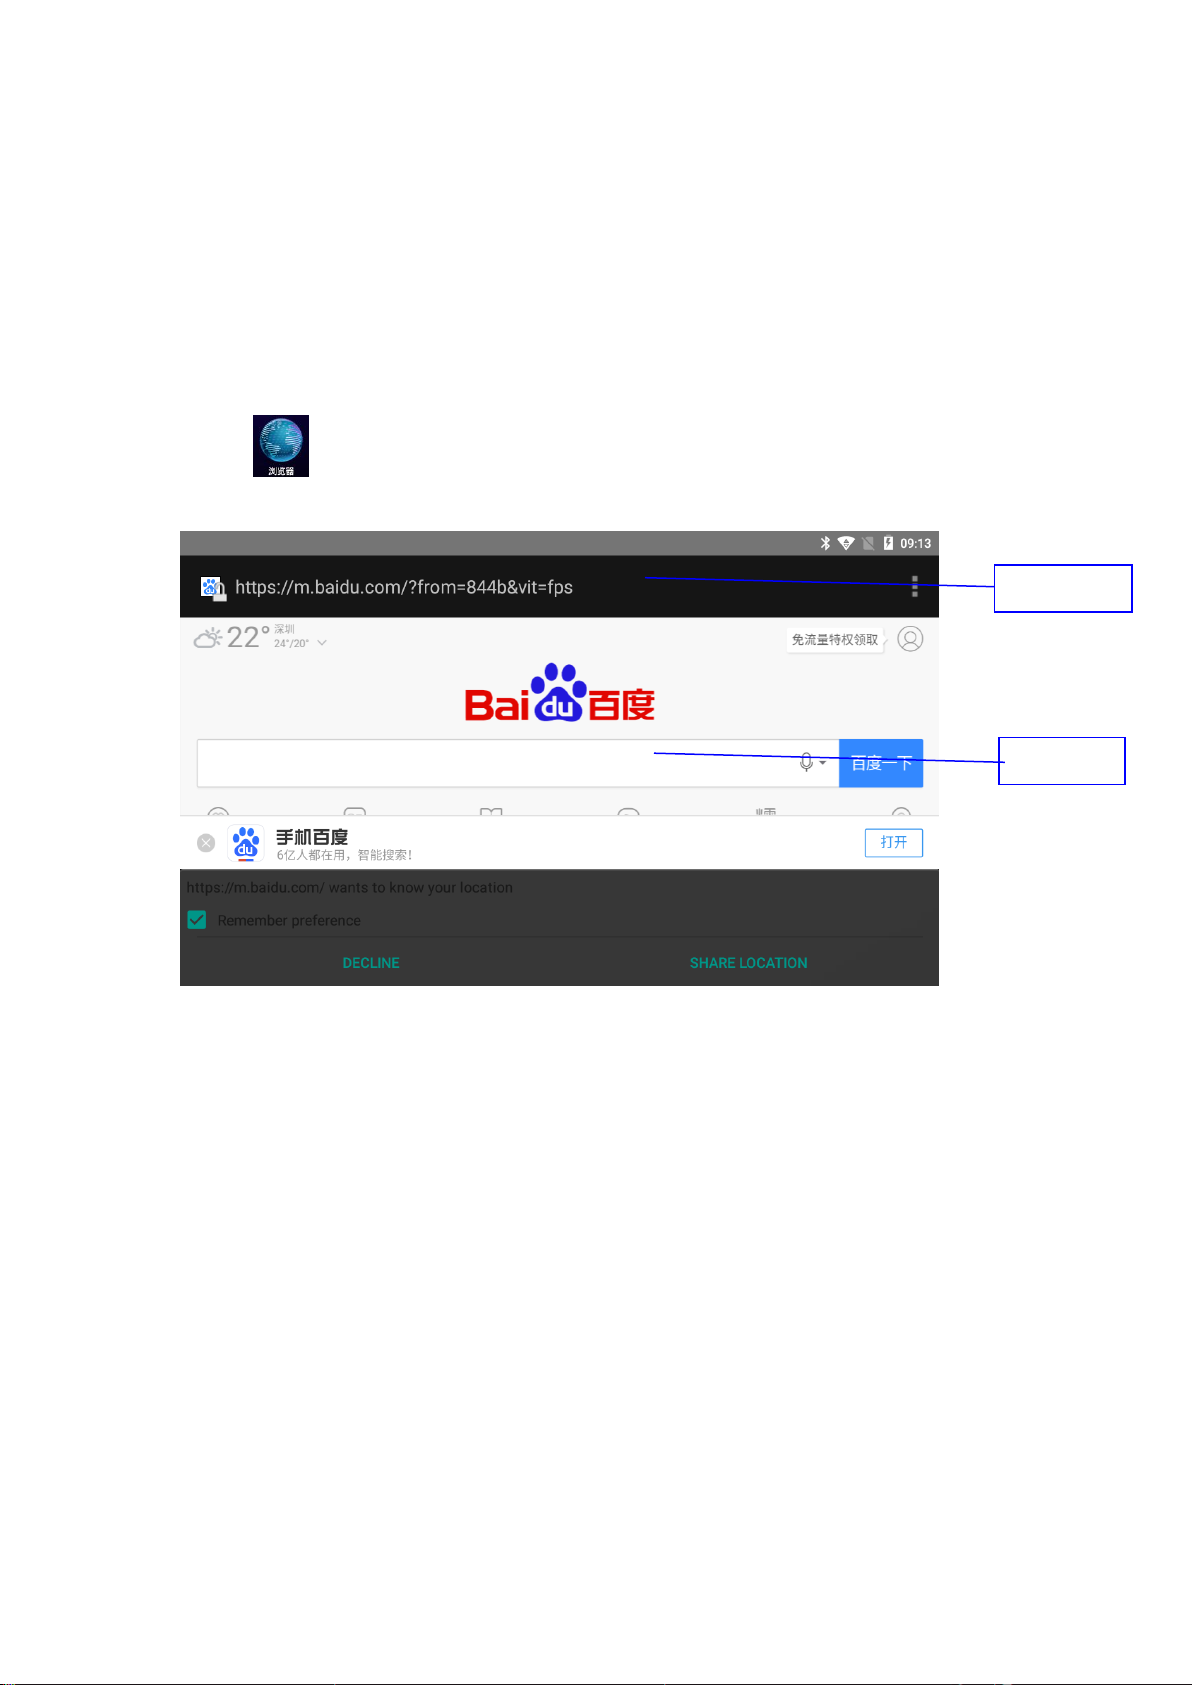
7.1 Browsers
In the case of WiFi or the normal connection of the mobile network (see Section
4.1 for wireless and network settings), click on the browser of the main menu or
desktop Enter the IE interface. For example, Figure 7.1
Figure 7.1
7.2 e - mail
The e-mail application is accompanied by the e-mail settings wizard, which can add
the external POP3 or IMAP e-mail accounts of the common Web e-mail service providers,
such as Yahoo, Gmail and 163, as shown in Figure 7.2.
address
Search bar
Page 37

37
Figure 7.2
a. mailbox setting
1. Select After the icon, the mailbox setting wizard will help you to
set up the icon.
2. Enter the email address and password of your mailbox account.
3. Click the next button to check whether the mailbox server is available.
4. Enter the name of the account and display the name of the email, and
then click the name to complete.
5. If the mailbox is available, it will automatically enter your inbox.
b. delete mailbox accounts
You can delete a good POP3 or IMAP mailbox account from your MID.
1. Select
2. Enter your inbox
3. Press the menu key (menu).
4. Select the settings.
5. Right drop-down select Delete account
6. The point selection can be removed.
c. sends E-mail information
1. Select Show your inbox.
2. Click the inbox to automatically refresh the mail, and click to read.
Page 38

38
3. Press the menu button and pop up the menu.
4. Point to the right upper corner Get into the new mail interface.
5. Enter the email address of the recipient in the addressee.
6. Input topics and information content.
7. Add attachments to the selection.
8. Select the attachments you want to send (such as pictures, video, etc.).
9. Send out e-mail after the point selection is sent.
8 Fingerprint application
8 Fingerprint
1 Selection at the main menu Application, entry into the fingerprint application
test
2 Click OpenDevice to open fingerprints
3 Click Video to read the fingerprint, the fingerprint light is on, the
finger is placed in the fingerprint area, and the admission is completed by
clicking Stop, such as figure 8.1
Figure 8.1
Page 39

39
9 Other Applications
9.1 calculator
1. Select .
2. Enter the basic panel of the calculator.
3. Calculate the panel number or operator on the counter.
Figure 9.1
9.2 file manager
The file manager has to TF card files or folders to copy, cut, delete, rename
and other operations,
You can also share files, install APK and other functions
Under the main menu or desktop, click the file management icon Enter the
file manager
Page 40

40
Figure 9.2
a、 A, copy, cut, delete, rename or so on folders or files: choose a folder
or file, enter the map interface with this folder or file, and you can do related
operations on files or folders.
Figure 9.3
External SD
native memory
Page 41

41
b、share the file: select a file, press this file, select the "share" item in
the pop-up list, and choose the way you share it according to the pop-up list.
Figure 9.4
c、Install the APK file: select the file with the suffix.Apk in the file manager,
pop up the installer, and install the third party software according to the prompt
d、 new folder: select the directory you want to create a new folder, click
right key,Select the new folder and complete the new folder according to the
prompt
9.3 Recorder
Under the main menu or desktop, click the recording Icon Enter the
recording interface and click the recording key Start recording.Click
stop Stop the recording.to hit the Play button Play the just
recording. The system automatically prompts the use of this recording or
give up, please manually select.Play recording: select the audio player
to play the recording, first in the resource manager to select a single
file according to the root directory, click to play.
Figure 9.6
Page 42

42
10 Installation of the program
10.1 Installation
Install third party applications
You can get the third party application suitable for Android system
on the Internet, and you can install it on the mobile terminal intelligent machine
on your own. Copy the application to the SD card and insert it into the machine.
1. Select the "file manager" application and select the application
that needs to be installed.
2. Hold down the application you need to install.
3. Pop-up installation options, click to install apk.
4. Run according to the installation wizard.
Note: the search for the third party programs for the system on the
Internet is a.Apk suffix.
10.2 Unload
uninstallation of application
1. On the home page, select the set bitmap.
2. Select the application list of all the applications installed in
the system.
3. Select the APK you want to uninstall, and click the uninstall.
4. The point selection determines to complete the uninstall.
10.3 Renewal approach
Update the application of the Android system
1. Download the latest application through a specified web site.
2. Download through the Android system related software forum on the
Internet.
Page 43

43
11 Difficult and troubleshooting
1. Mobile terminal smart machine is slow for the first time
When the mobile terminal smart system is upgraded, the pre installed
application needs to be installed for the first time. It will be about 2-3 minutes,
and then the startup will be faster.
2. Mobile terminal smartphones cannot connect to WIFI
Ensure that the wireless routing of the network services is
working properly.
Ensure that the distance between the mobile terminal agent and
the wireless routing is maintained, and there is no wall or other
barriers between them.
Make sure that the input username and password are correct.
3.Mobile terminal smart machine feels hot
When using multiple applications at one time, or when the screen
opens up to the brightest and is charging, it may be hot. This is
normal.
4. Unable to set up e - mail or register applications
Make sure that your network connection is normal and can be
connected to the Internet.
Ensure that the email setting is correct.
Make sure your system time is consistent with the local time.
5. the abnormal condition of the system can not operate normally
When you install some third party applications, it may cause the
system to fail to run normally. You can reset the system by pressing the reset button
(next to the power interface).
6. can't open a web page
Keep the distance between the routing and mobile terminal smart
machines within the effective distance
Please restart WIFI and try again
7. mobile terminal smart machines sometimes run slowly
This is a normal phenomenon. Please finish some tasks that are not
needed at the end of advanced task management, and uninstall some third party
applications to release more system resources.
Page 44
44
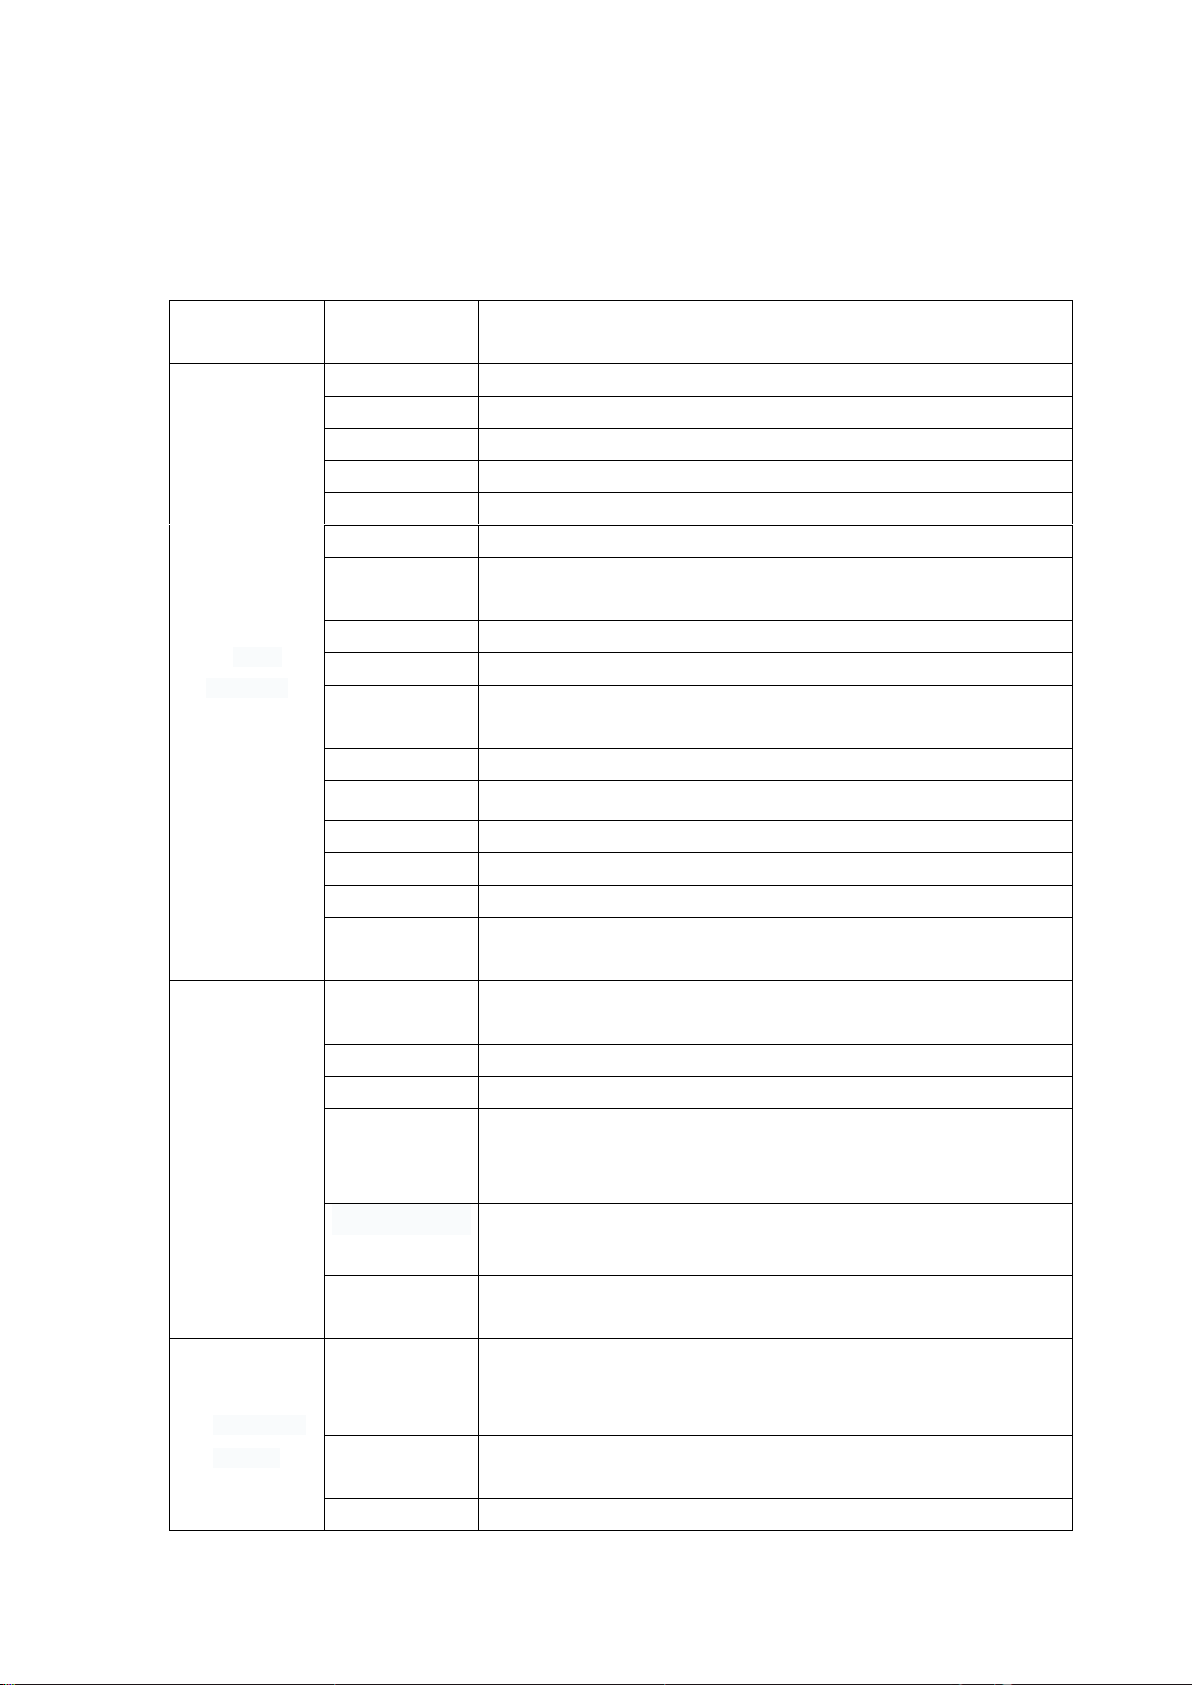
Appendix 1
Product Parameter
Classificati
on
content
describe
Basic
parameter
machine type
BH502
CPU model
MTK 8321/6737
CPU frequency
1.3GHz
DDR-RAM
1GB(open end 2GB)
DDR-ROM
8GB(open end 16GB)
T- FLASH
32G maximum support value
operating
system (OS)
Android 7.0
network mode
GSM,WCDMA,LTE
data service
GPRS/EDGE
Support band
LTE B1/B3/B7/B20/B38/B40/B41
WCDMA2100/850 GSM850/900/1800/1900;
camera
Camera 5 million
USB interface
Micro USB 、USB 2.0
battery
4000mAh/6000mAh
AC adapter
Output voltage DC 5V, current 2A
Memory card:
MicroSD card, maximum support for 32G
home screen
5 inch high definition TFT display, resolution 720*1280
IPS
Basic
function
GPS
navigation
Precise positioning of the built-in GPS satellite signal
receive
fingerprint
Optical fingerprint
NFC
13.56MHz band
Bluetooth
Built-in Bluetooth module, supporting FTP file
transmission, and sharing all kinds of interesting files
at close range
G-sensor
Achieve screen switching and support a variety of games
by gravity induction
FM sound
FM voice, can bring you the choice of various channels
anytime and anywhere
Application
program
Video
playback
Support 3GP, MP4, and other formats to support maximum
resolution 1080P
Music
Built-in music player, support MP3/AAC/AMR/WAV and other
formats
game
Support the installation of the Android platform third
Page 45

45
party games
typewriting
Android keyboard
Acdsee
Support JPG, BMP, PNG, GIF and other format picture
browsing
OFFICE
software
Support Office (word, excel reading and editing) to
support PDF browsing
FCC WARNING
This device complies with part 15 of the FCC Rules. Operation is subject to the condition that
this device does not cause harmful interference
Any changes or modifications not expressly approved by the party responsible for
compliance
could void the user's authority to operate the equipment.
NOTE: This equipment has been tested and found to comply with the limits for a Class B
digital device, pursuant to Part 15 of the FCC Rules. These limits are designed to provide
reasonable protection against harmful interference in a residential installation. This
equipment generates, uses and can radiate radio frequency energy and, if not installed and
used in accordance with the instructions, may cause harmful interference to radio
communications. However, there is no guarantee that interference will not occur in a
particular installation.
If this equipment does cause harmful interference to radio or television reception,
which can be determined by turning the equipment off and on, the user is
encouraged to try to correct the interference by one or more of the following
measures:
-- Reorient or relocate the receiving antenna.
-- Increase the separation between the equipment and receiver.
-- Connect the equipment into an outlet on a circuit different
from that to which the receiver is connected.
-- Consult the dealer or an experienced radio/TV technician for help.
Specific Absorption Rate (SAR) information:
This Mobile Phone meets the government's requirements for exposure to radio waves. The
guidelines are based on standards that were developed by independent scientific
organizations through periodic and thorough evaluation of scientific studies. The standards
include a substantial safety margin designed to assure the safety of all persons regardless of
age or health.
FCC RF Exposure Information and Statement The SAR limit of USA (FCC) is 1.6 W/kg averaged
over one gram of tissue. Device types: UBio Tablet5 (FCC ID: XX2-UBIO-TABLET5) has also
been tested against this SAR limit. The highest SAR value reported under this standard
during product certification is 0.940W/kg when properly worn on the body .This device was
tested for typical body-worn operations with the back of the handset kept 5mm from the
body. To maintain compliance with FCC RF exposure requirements, use accessories that
maintain a 5mm separation distance between the user's body and the back of the handset.
Page 46

46
The use of belt clips, holsters and similar accessories should not contain metallic
components in its assembly. The use of accessories that do not satisfy these requirements
may not comply with FCC RF exposure requirements, and should be avoided.
Body-worn Operation
This device was tested for typical body-worn operations. To comply with RF exposure
requirements, a minimum separation distance of 5mm must be maintained between the
user’s body and the handset, including the antenna. Third-party belt-clips, holsters, and
similar accessories used by this device should not contain any metallic components.
Body-worn accessories that do not meet these requirements may not comply with RF
exposure requirements and should be avoided. Use only the supplied or an approved
antenna.
Manufacturer's Name: SHENZHEN HEROFUN BIO-TECH.,LTD
Sample Description:UBio Tablet5
Trade Mark: UNION COMMUNITY
Model number: UBio Tablet5
Operating Temperature: ‐10° C to 40° C
This product is a fixed location. To comply with RF exposure requirements, a minimum
separation distance of 5cm must be maintained between the user’s
body and the device, including the antenna. Use only the supplied or an approved antenna.
This device in compliance with the essential requirements and other relevant provisions of
Directive 2014/53/EU. All essential radio test suites have been carried out.
1. CAUTION : RISK OF EXPLOSION IF BATTERY IS REPLACED BY AN INCORRECT TYPE. DISPOSE OF
USED BATTERIES ACCORDING TO THE INSTRUCTIONS
2. The device complies with RF specifications when the device used at 5cm from your body
Page 47

47
NB RF specification:
Function
Operation Frequency
Max RF
Outputpower
(dBm)
Limit
(dBm)
BT
2402-2480MHz
2.560
20
2.4G WIFI
16.02
20
5G WIFI
5150 ~5250 MHz,
5725 ~5850 MHz
15.83
23
GSM 900
880.2-914.8MHz
32.48
37±3
GSM 1800
1710.2-1784.8MHz
28.99
24±3
WCDMA Band I
1922.4-1977.6MHz
21.87
24+1.7/-3.7
WCDMA Band VIII
882.4-912.6MHz
21.52
24+1.7/-3.7
TDD Band I
1920 MHz to 1980MHz
23.04
23±2.7
TDD Band III
1710 MHz to 1785 MHz
21.77
23±2.7
TDD Band VII
2500 MHz to 2570 MHz
21.50
23±2.7
FDD Band XX
832 MHz to 862 MHz
23.79
23±2.7
TDD Band XXXVIII
2 570 MHz to 2 620 MHz
22.07
23±2.7
TDD Band XL
2300 MHz to 2400 MHz
21.70
23±2.7
TDD Band XLI
2496 to 2690MHz
24.86
23±2.7
GPS
1.57542GHz
/ / FM
87.5-108MHz
/
/
2412~2472 MHz
2422~2462 MHz
 Loading...