

Page 1
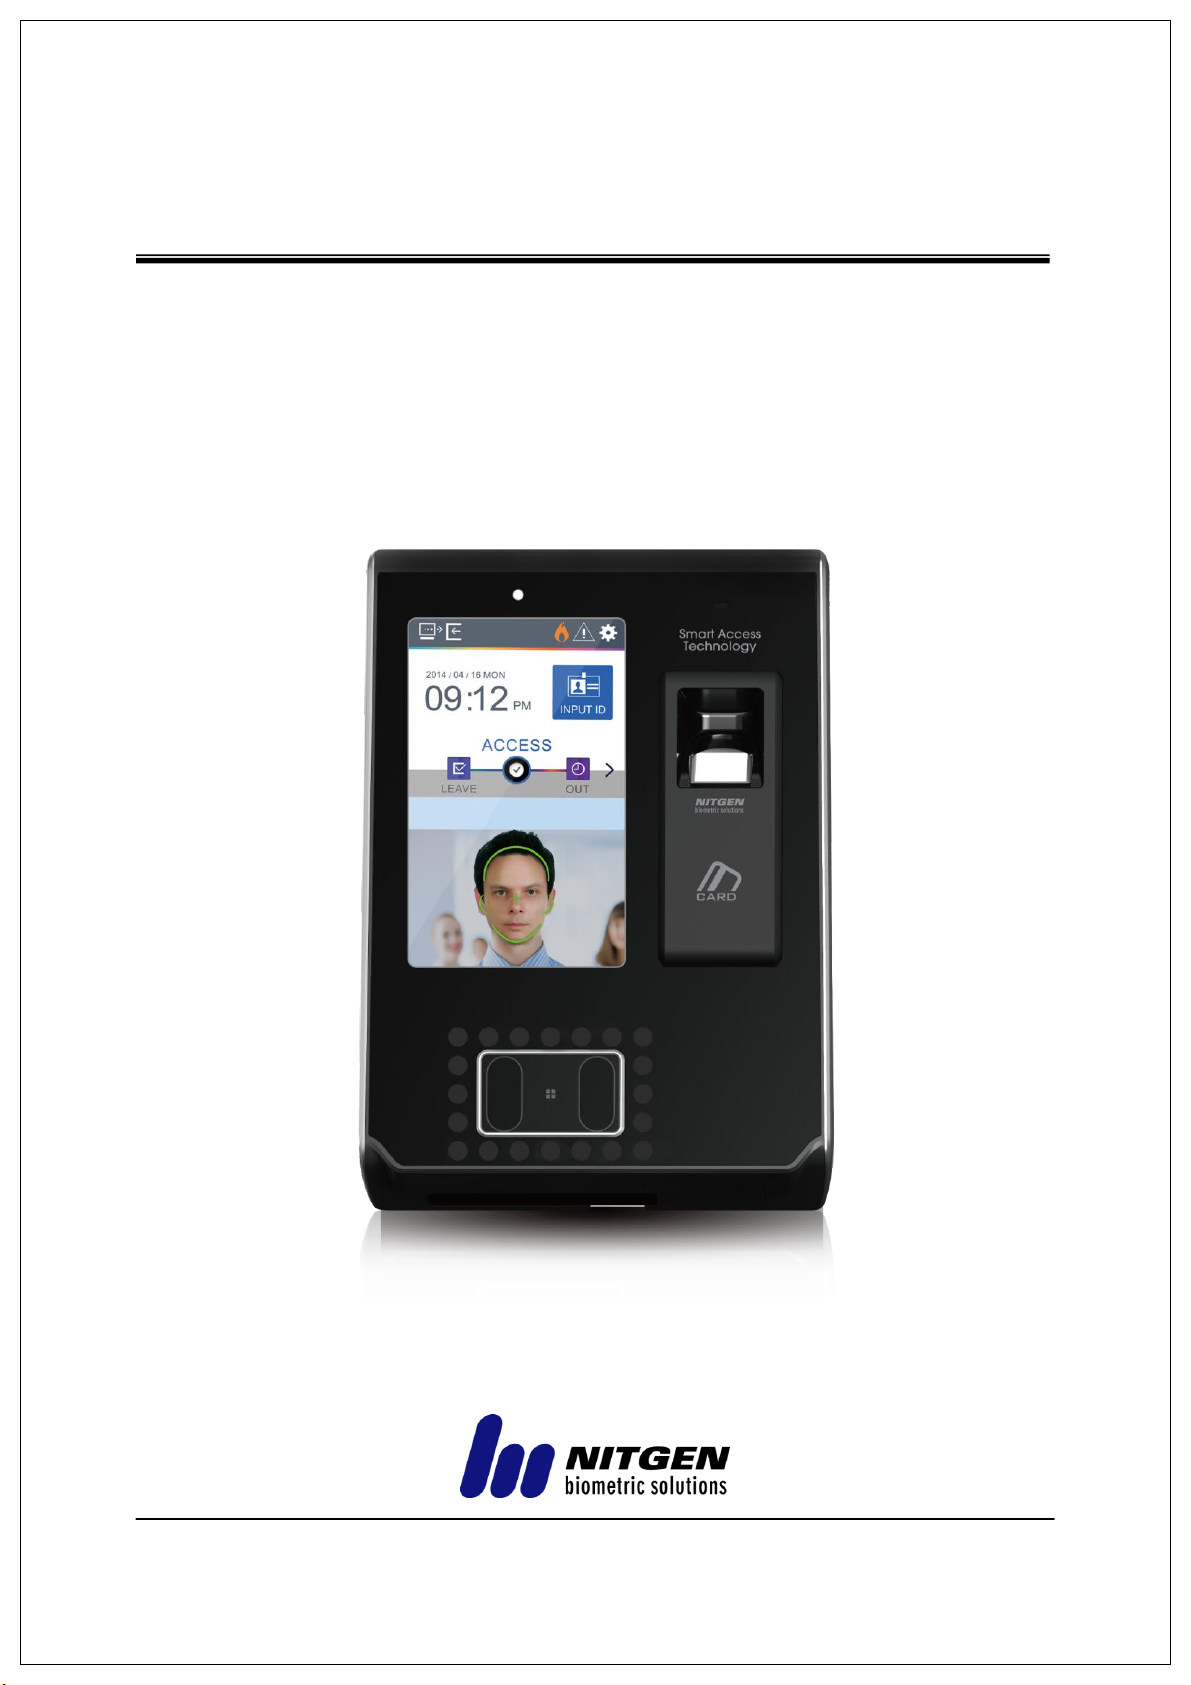
eNBioAccess-T9 .User guide
Version Eng-1.27
Copyright 2015 By NITGEN Co., LTD.
Page 2

eNBioAccess-T9 user guide 2
Version
Date
Description
Firmware Version
1.00
2015-04-02
Initial Release
0.0.2.1.00-000.04
1.01
2015-04-15
Edited issue list checking after 1.00 version test
result
0.0.2.1.01-000.04
1.02
2015-05-15
Edited issue list checking after 1.01 version test
result
x.x.x.1.02-000.04
1.08
2015-06-12
Edited issue list checking after 1.05 version test
result
x.x.x.1.08-000.04
1.09
2015-06-24
Changed 1 to 1, 1 to N default value image of
system-fingerprint setting
x.x.x.1.09-000.04
1.12
2015-07-17
Changed page No of the contents
x.x.x.1.12-000.04
1.15
2015-10-07
Added max value for user name in page 25
x.x.x.1.15-000.04
1.18
2016-04-27
Added Wiegand setting, revision in temperature
specification
x.x.x.1.18-000.04
1.22
2016-05-12
Face enrollment sensitivity issue
x.x.x.1.22-000.04
1.23
2016-05-17
Revision in text and images
x.x.x.1.23-000.04
1.25
2016-05-27
Added explanation for user search
x.x.x.1.25-000.04
1.26
2016-07-04
Added face recognition On/Off, F key mode,
operation mode
x.x.x.1.26-000.04
1.27
2016-07-12
Added screensaver setting value. Modify IR LED
operation
x.x.x.1.27-000.04
<Revison History>
NITGEN Co,. Ltd / #1208 ,641-4, Munjeong-dong, Songpa-gu, Seoul, Korea (138-050)
Tel: 02-6488-3232, Fax: 02-6488-3099, E-Mail: [email protected]
Page 3

eNBioAccess-T9 user guide 3
<Terminology>
Admin, Administrator
- A user can enter terminal menu mode. Administrator means a person who can
register/modify/delete user and can change the setting of terminal.
- If there is no a registered administrator for the terminal, anybody can access to
terminal menu and change the setting. Hence, it is recommended that more than 1
person is registered as an administrator
- Since the administrator has authorization to change important configuration details of
the fingerprint recognition device, great care is needed for registration and operation.
1 to 1 Verification
- method to authenticate fingerprint after user ID or card input
- Compare only fingerprint of a registered user in user ID or card.
1 to N Identification
- Method to find the relevant user using only fingerprint.
- Method to find same fingerprint with the input fingerprint among the registered
fingerprints without inputting user ID or card. Hence, it is called as 1 to N identification.
Authentication level
- Authentication level is a level which is used for fingerprint verification. It is displayed in
1~9 of steps according to match degree of fingerprint. Match degree between two
fingerprints must be higher than setting authentication level to succeed authentication.
- The higher authentication level, the higher security. However, relatively high match rate
is needed. Therefore, probability of authentication failure becomes high during selfauthentication.
- 1 to 1 verification level: authentication level used for 1 to 1 Verification.
- 1 to N identification level: authentication level used for 1 to N Identification.
Authentication Method
- Various types of authentication methods made of combination of each of Face (face)
authentication, FP (fingerprint) authentication, RF (card) authentication.
Ex) Face or FP: Use face or fingerprint for authentication.
LFD (Live Finger Detection): function to prevent fake fingerprint
- The function is to make to input only real fingerprints and to prevent input of fake
fingerprints made of rubber, paper, film or silicon.
NITGEN Co,. Ltd / #1208 ,641-4, Munjeong-dong, Songpa-gu, Seoul, Korea (138-050)
Tel: 02-6488-3232, Fax: 02-6488-3099, E-Mail: [email protected]
Page 4

eNBioAccess-T9 user guide 4
Table of Contents
<Revison History> .................................................................................................... 2
<Terminology> .......................................................................................................... 3
Table of Contents .................................................................................................... 4
1. Checking before use ............................................................................................ 6
1.1. Safety precautions ................................................................................................. 6
1.2. Name of each part of the terminal ......................................................................... 9
1.3. Screen information during operation ................................................................. 10
1.3.1. Icon information ............................................................................................ 10
1.3.2. Message information ................................................................ .................... 11
1.4. Voice information during operation .................................................................... 13
1.5. Buzzer sound information during operation ...................................................... 14
1.6. Correct face registration and authentication method ....................................... 14
1.7. How to register and input correct fingerprint .................................................... 15
2. Introduction ........................................................................................................ 17
2.1. Features ................................................................................................................ 17
2.2. Configuration diagram ......................................................................................... 18
2.2.1. Exclusive usage (access) ............................................................................. 18
2.2.2. Connection with PC server (access, time & attendance and drinking water
management) ......................................................................................................... 18
2.3. Product specification ........................................................................................... 19
3. Configuration ...................................................................................................... 20
3.1. Check points before configuration ..................................................................... 20
3.1.1. Entering menu .............................................................................................. 20
3.1.2. Administrator authentication.......................................................................... 20
3.1.3. Method to enter menu without administrator authorization ............................ 21
3.1.4. Saving setting value ..................................................................................... 21
3.2. Menu configuration .............................................................................................. 22
3.3. User management ................................................................................................ 24
3.3.1. Adding .......................................................................................................... 26
3.3.1.1. Registering picture ................................................................ ................ 27
3.3.1.2. Registering name ................................................................ .................. 27
3.3.1.3. Registering fingerprint ........................................................................... 28
3.3.1.4. Registering face .................................................................................... 30
3.3.1.5. Registering password ............................................................................ 32
3.3.1.6. Registering card .................................................................................... 32
3.3.1.7. Authentication option ............................................................................. 33
3.3.1.8. Authentication method ........................................................................... 33
3.3.1.9. Saving ................................................................................................... 34
3.3.2. Deleting ........................................................................................................ 35
3.3.3. Changing ...................................................................................................... 37
3.3.4. Deleting All ................................................................................................... 38
3.3.5. Searching ..................................................................................................... 38
3.4. Network setting .................................................................................................... 40
3.5. Operation mode ................................................................................................... 41
3.5.1. Operation mode ............................................................................................ 41
3.6. System .................................................................................................................. 43
3.6.1. System ......................................................................................................... 43
3.6.2. Fingerprint recognition .................................................................................. 43
3.6.3. Face recognition ........................................................................................... 45
3.6.4. Setting current time ...................................................................................... 45
3.6.6. Database ...................................................................................................... 46
NITGEN Co,. Ltd / #1208 ,641-4, Munjeong-dong, Songpa-gu, Seoul, Korea (138-050)
Tel: 02-6488-3232, Fax: 02-6488-3099, E-Mail: [email protected]
Page 5

eNBioAccess-T9 user guide 5
3.6.6.1. Deleting all users ................................................................................... 47
3.6.6.2. Setting delete ........................................................................................ 48
3.6.6.3. Log data delete ..................................................................................... 48
3.6.6.4. Image log delete .................................................................................... 48
3.6.6.5. Deleting all ................................................................ ............................ 49
3.7. Terminal setting ................................................................................................... 49
3.7.1. Sound ........................................................................................................... 49
3.7.2. Terminal option ............................................................................................. 50
3.7.3. Input setting ................................ ................................ .................................. 51
3.7.4. Lock setting .................................................................................................. 53
3.7.5. External terminal setup ................................................................................. 54
3.8. Screen setting ...................................................................................................... 55
3.8.1. Theme .......................................................................................................... 55
3.8.2. Camera......................................................................................................... 55
3.8.3. Language ..................................................................................................... 56
3.8.4. LCD option ................................................................................................... 56
3.8.5. Message time setting .................................................................................... 57
3.9. Terminal information ............................................................................................ 58
3.9.1. System information ................................ ................................ ....................... 58
3.9.2. Terminal information ..................................................................................... 58
3.9.3. Network information ...................................................................................... 59
3.9.4. User information ........................................................................................... 60
3.9.5. Log information ............................................................................................. 60
3.9.6. About ............................................................................................................ 61
3.10. SD card ............................................................................................................... 62
4. How to use terminal ........................................................................................... 65
4.1. Converting authentication mode ........................................................................ 65
4.2. ID input ................................................................................................................. 66
4.3. Authentication ...................................................................................................... 67
4.3.1. Face authentication ...................................................................................... 67
4.3.2. Fingerprint verification .................................................................................. 67
4.3.3. Card authentication ...................................................................................... 68
4.3.4. Password authentication ............................................................................... 68
4.3.5. Multi authentication ....................................................................................... 69
NITGEN Co,. Ltd / #1208 ,641-4, Munjeong-dong, Songpa-gu, Seoul, Korea (138-050)
Tel: 02-6488-3232, Fax: 02-6488-3099, E-Mail: [email protected]
Page 6
eNBioAccess-T9 user guide 6
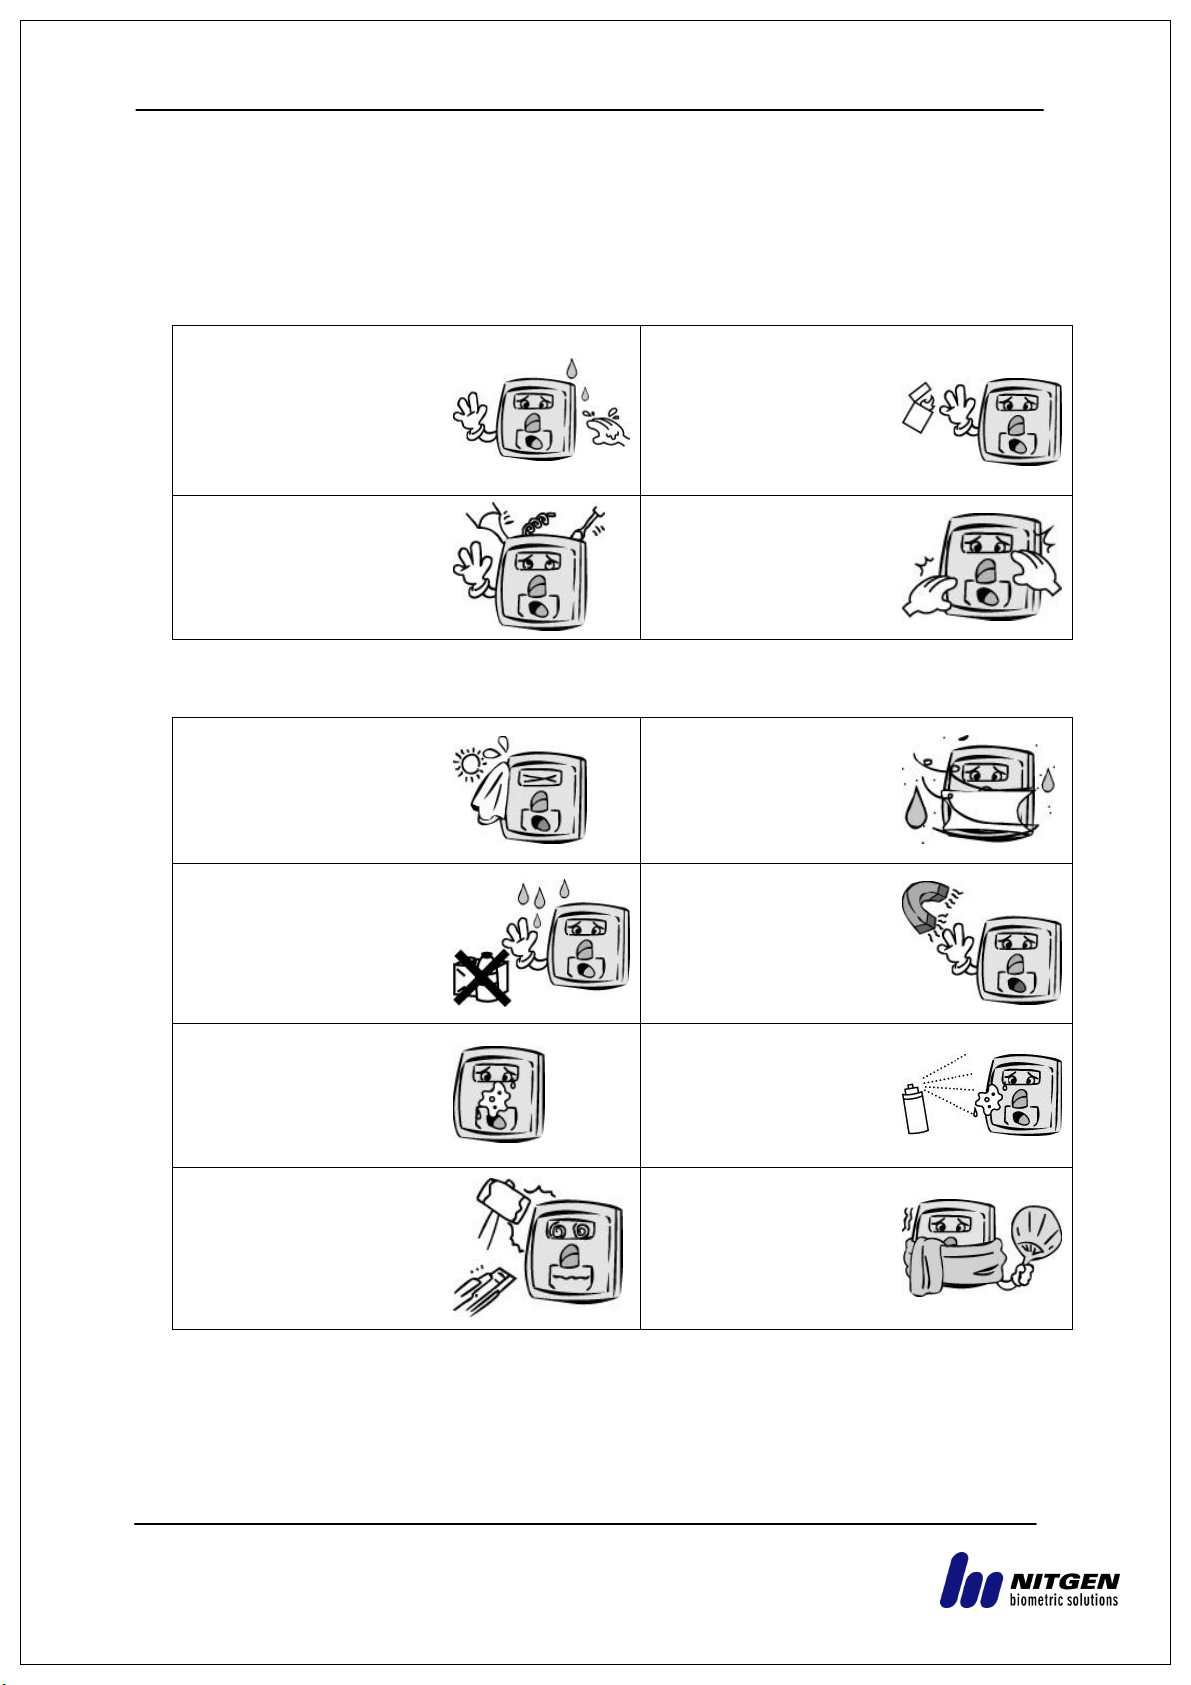
Do not operate the device
with a wet hand. Do not
allow liquid such as water
into the device
.
-> It can cause failure,
electric shock.
Do not device heat
source near the device.
-> It can cause fire.
Do not randomly
disassemble, repair or
remodel.
-> It can cause failure,
electric shock or fire.
Keep children away from
the device. -> It can
cause children‟s safety
accident or failure.
Do not install the device in
place exposed to direct rays
of the sun.
-> It can cause
malfunction, deformation
and/or discolor.
Do not install the device
in a place where with
much moisture or dust.
-> It can cause failure.
Do not wash the device by
directly splay water and do
not clean it with benzene,
thinner or alcohol.
-> It can cause electric
shock or fire.
Do not allow magnetics
near the device.
-> It can cause failure
and/or malfunction.
Do not make fingerprint
input part dirty.
-> Correct fingerprint
recognition won‟t be
possible.
Do not spray insecticide
or flammable spray on
the device.
-> It can cause
deformation and discolor.
Do not allow impact on the
device or contact with
sharp object.
-> It can cause failure due
to product damage.
Do not install the device
in a place where
temperature severely
changes.
-> It can cause failure.
1. Checking before use
1.1. Safety precautions
Warning
- Failing to observe the precautions mentioned above can cause user death or serious injury.
Caution
- Failing to observe the precautions mentioned above can cause user injury or property damage.
※ Nitgen does not take any responsibilities for any accident, damage and/or loss caused
by not observing the details in the user manual.
NITGEN Co,. Ltd / #1208 ,641-4, Munjeong-dong, Songpa-gu, Seoul, Korea (138-050)
Tel: 02-6488-3232, Fax: 02-6488-3099, E-Mail: [email protected]
Page 7
eNBioAccess-T9 user guide 7
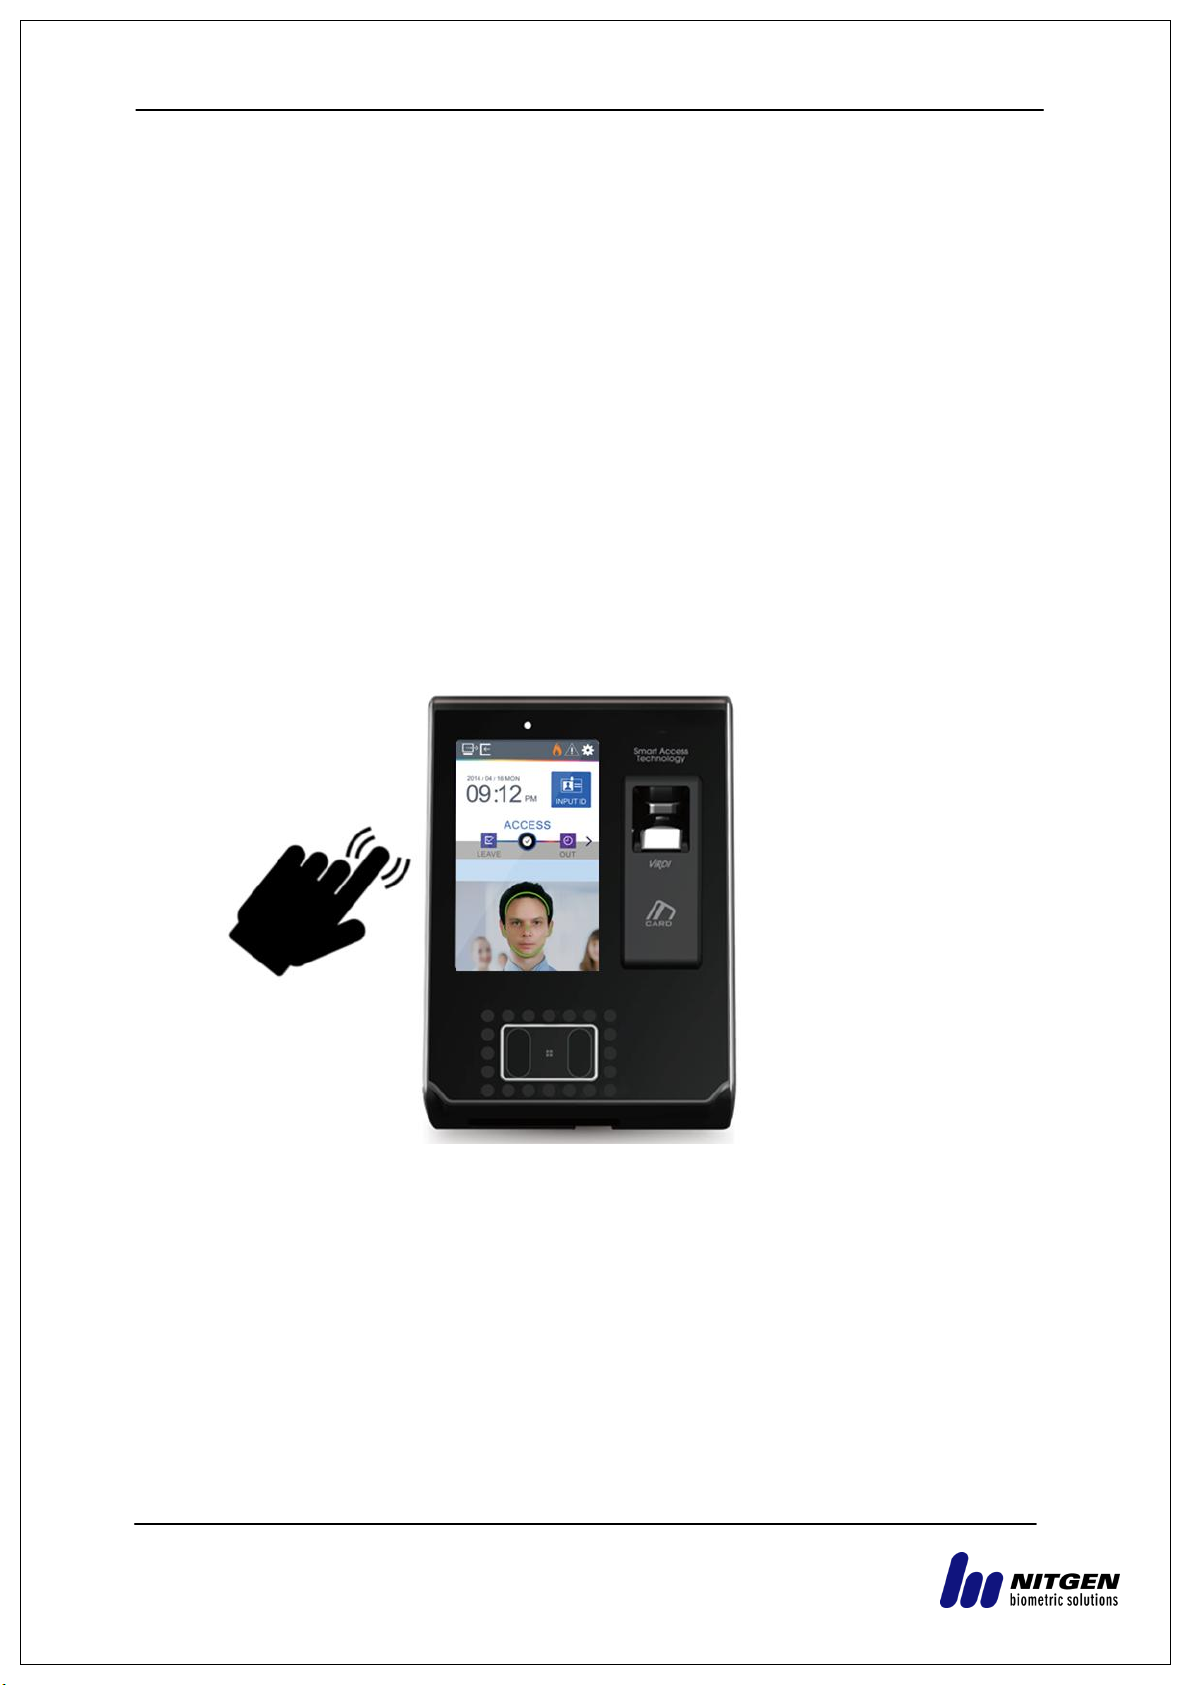
How to use touch screen
To select the function you want, touch lightly with your fingertip.
When the touch is recognized, the color of button or icon will be temporarily reversed and
return to the orginal color.
Touch screen operates by recognizing human body‟s tiny current (capacitive), so you must
use your fingertip. (do not use fingernails).
[Caution]
- Do not let anything with electricity flow touch the touch screen. The touch screen
might not operate properly due to electric stimulation such as static.
- Do not press strongly with sharp object. The touch screen might be damaged.
The touch sensor might not properly operate with water on the screen or on your
finger.
NITGEN Co,. Ltd / #1208 ,641-4, Munjeong-dong, Songpa-gu, Seoul, Korea (138-050)
Tel: 02-6488-3232, Fax: 02-6488-3099, E-Mail: [email protected]
Page 8

eNBioAccess-T9 user guide 8
* Caution when installing
- Install the device indoor.
- Do not install under an incandescent light.
- Do not install where there is direct sunlight or counterlight.
How to use face recognition
Installation height for face recognition: We recommend that the device to be installed
125cm high from the ground.
NITGEN Co,. Ltd / #1208 ,641-4, Munjeong-dong, Songpa-gu, Seoul, Korea (138-050)
Tel: 02-6488-3232, Fax: 02-6488-3099, E-Mail: [email protected]
Page 9
eNBioAccess-T9 user guide 9
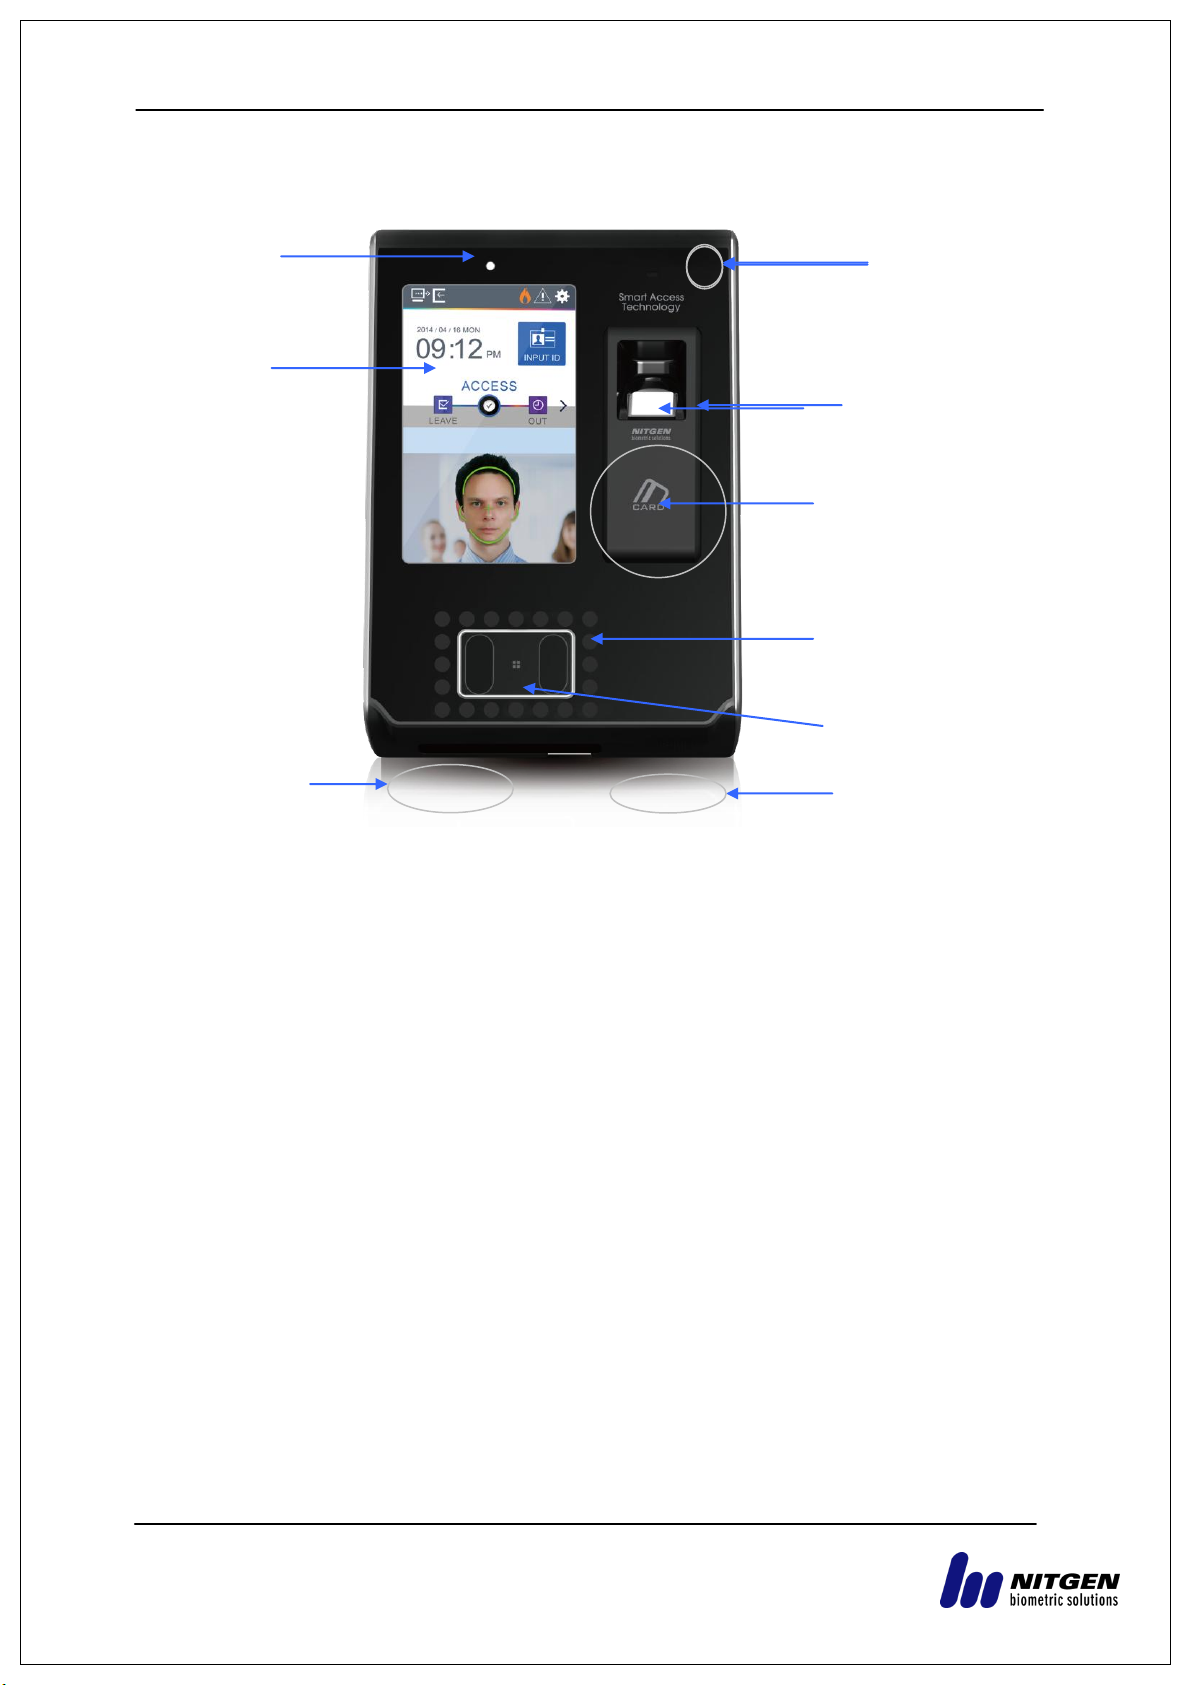
Touch LCD
Fingerprint sensor
Dual camera
Card input
IR LED
Illuminance
sensor
SD card input
Speaker
Microphone
1.2. Name of each part of the terminal
NITGEN Co,. Ltd / #1208 ,641-4, Munjeong-dong, Songpa-gu, Seoul, Korea (138-050)
Tel: 02-6488-3232, Fax: 02-6488-3099, E-Mail: [email protected]
Page 10
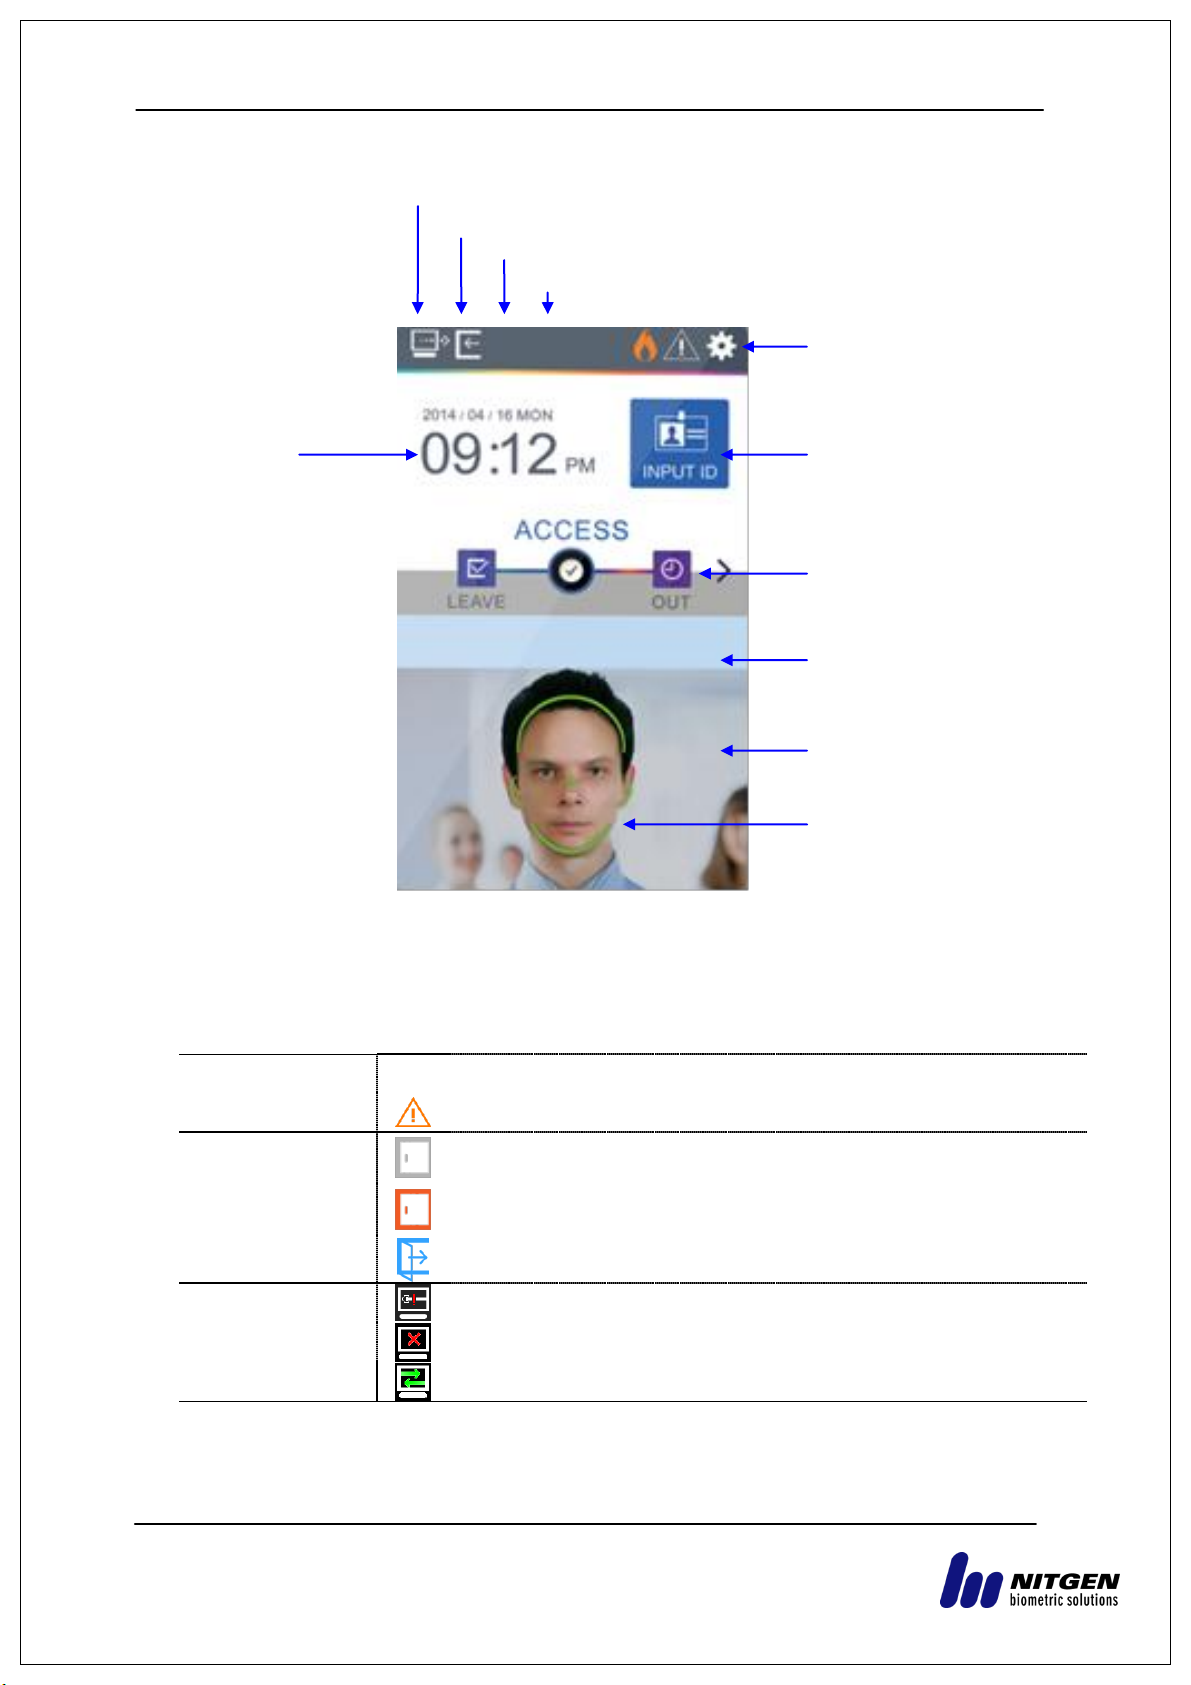
eNBioAccess-T9 user guide 10
① Warning
display
None
: Normal
: Terminal is disassembled or abnormal status like door error
② Door status
: Door status is not known
: Door is closed
: Door is open
③ Server
connection
status
: LAN cable is not connected
: Not connected to server program
: Not connected to server program
④ Fire sensor
③ Warning signals such as terminal separation
② Current state of the entrance
① Connection state with the server
Menu button
ID input button
Entrance mode selection
button (Indication of the
state of the entrance)
User guidance message
Camera movie display
Face registration location
guide
1.3. Screen information during operation
1.3.1. Icon information
NITGEN Co,. Ltd / #1208 ,641-4, Munjeong-dong, Songpa-gu, Seoul, Korea (138-050)
Tel: 02-6488-3232, Fax: 02-6488-3099, E-Mail: [email protected]
Page 11
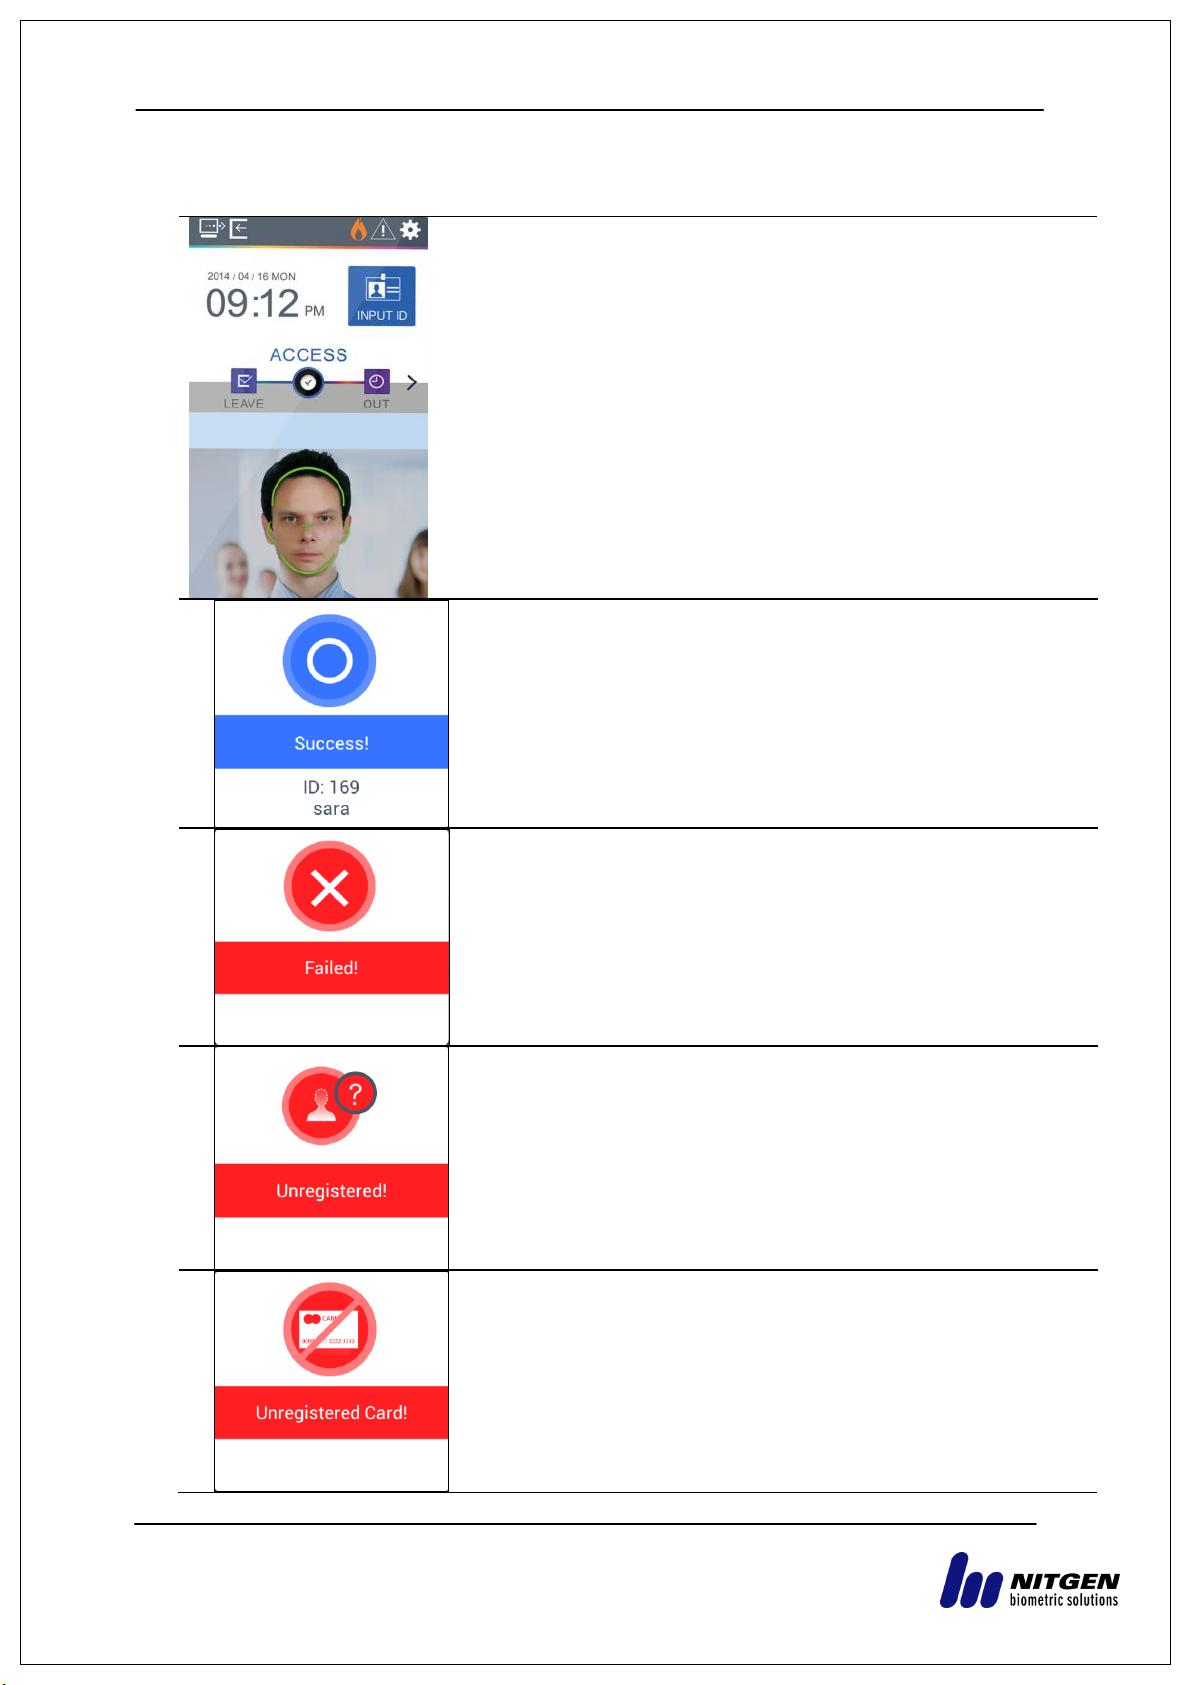
eNBioAccess-T9 user guide 11
- Main screen
- Authentication is successful
- Authentication failed
- Unregistered user ID is input
- Unregistered card is input
1.3.2. Message information
NITGEN Co,. Ltd / #1208 ,641-4, Munjeong-dong, Songpa-gu, Seoul, Korea (138-050)
Tel: 02-6488-3232, Fax: 02-6488-3099, E-Mail: [email protected]
Page 12
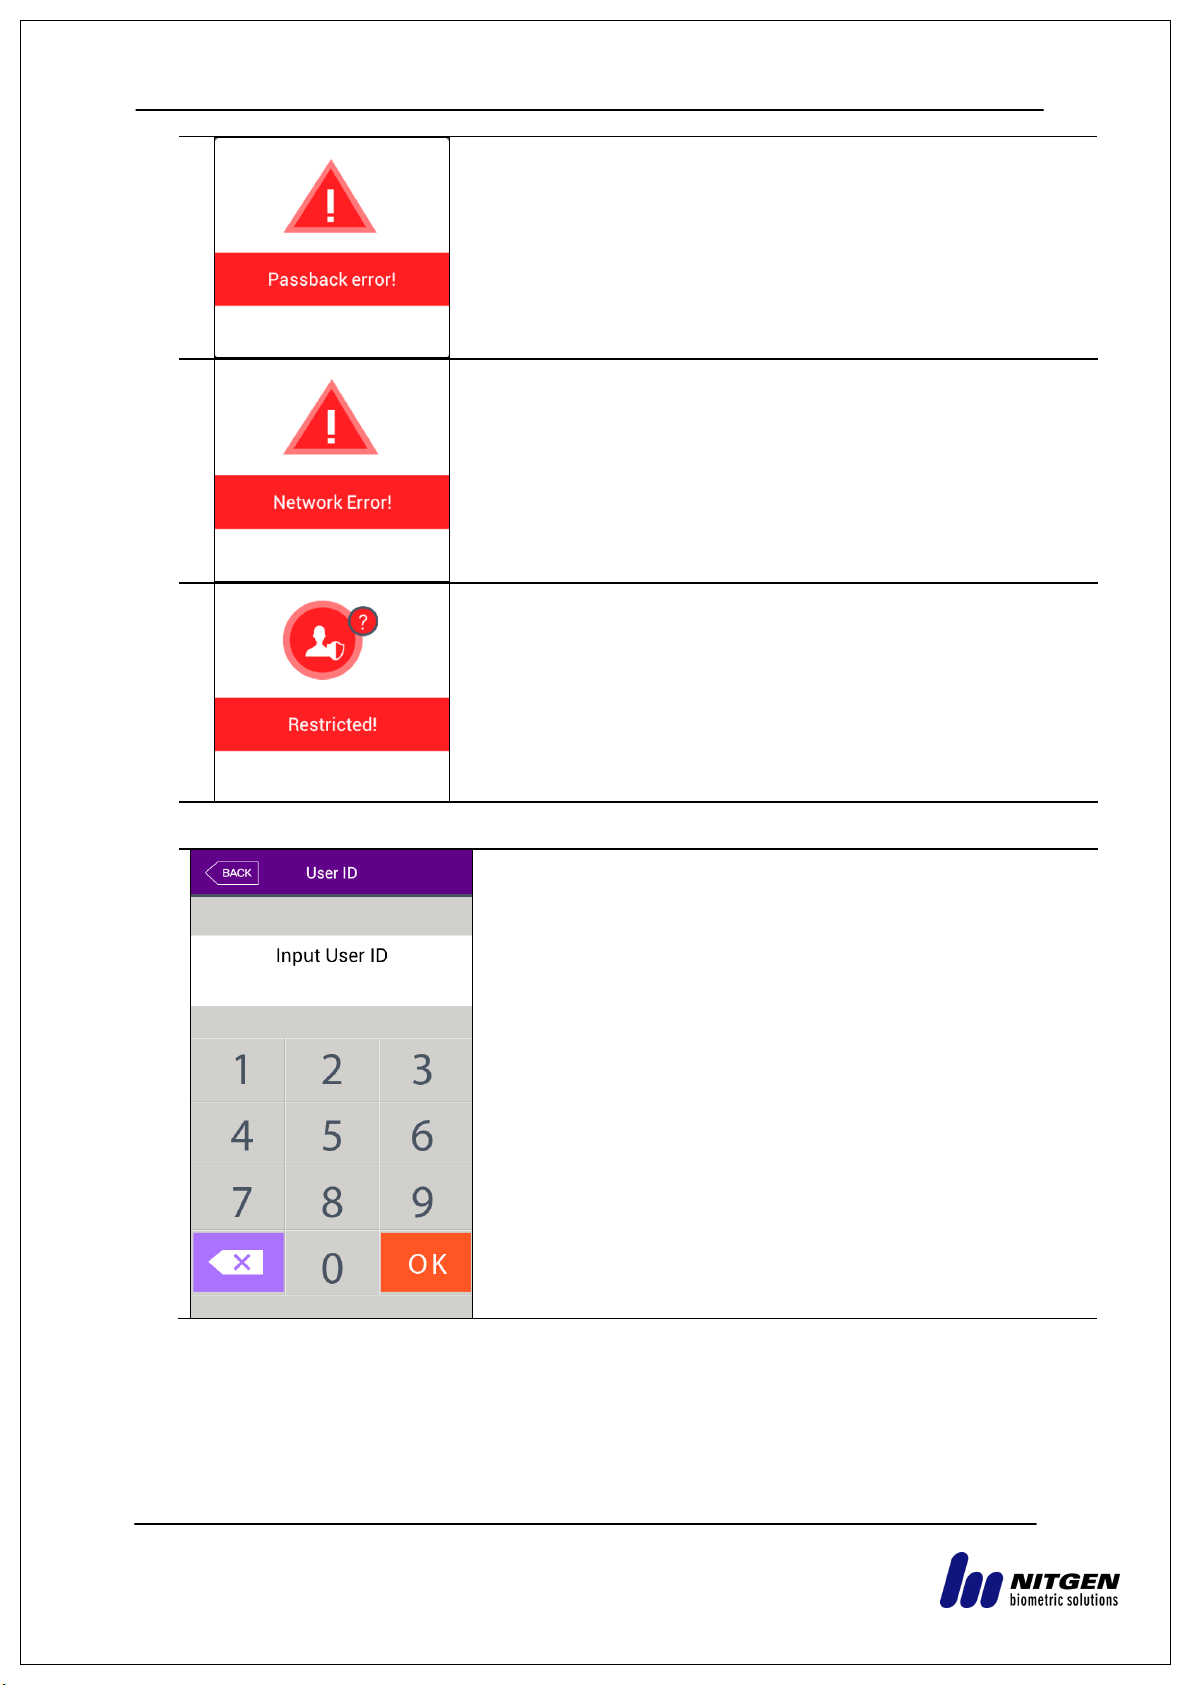
eNBioAccess-T9 user guide 12
- Pass back error occurred when anti-pass back function is
used.
- No response from the server while trying authentication.
- Network to the server is disconnected while trying
authentication.
- Registered but no authentication authorization, or
authentication is tried when it is not access time
- Waiting for user ID input
NITGEN Co,. Ltd / #1208 ,641-4, Munjeong-dong, Songpa-gu, Seoul, Korea (138-050)
Tel: 02-6488-3232, Fax: 02-6488-3099, E-Mail: [email protected]
Page 13
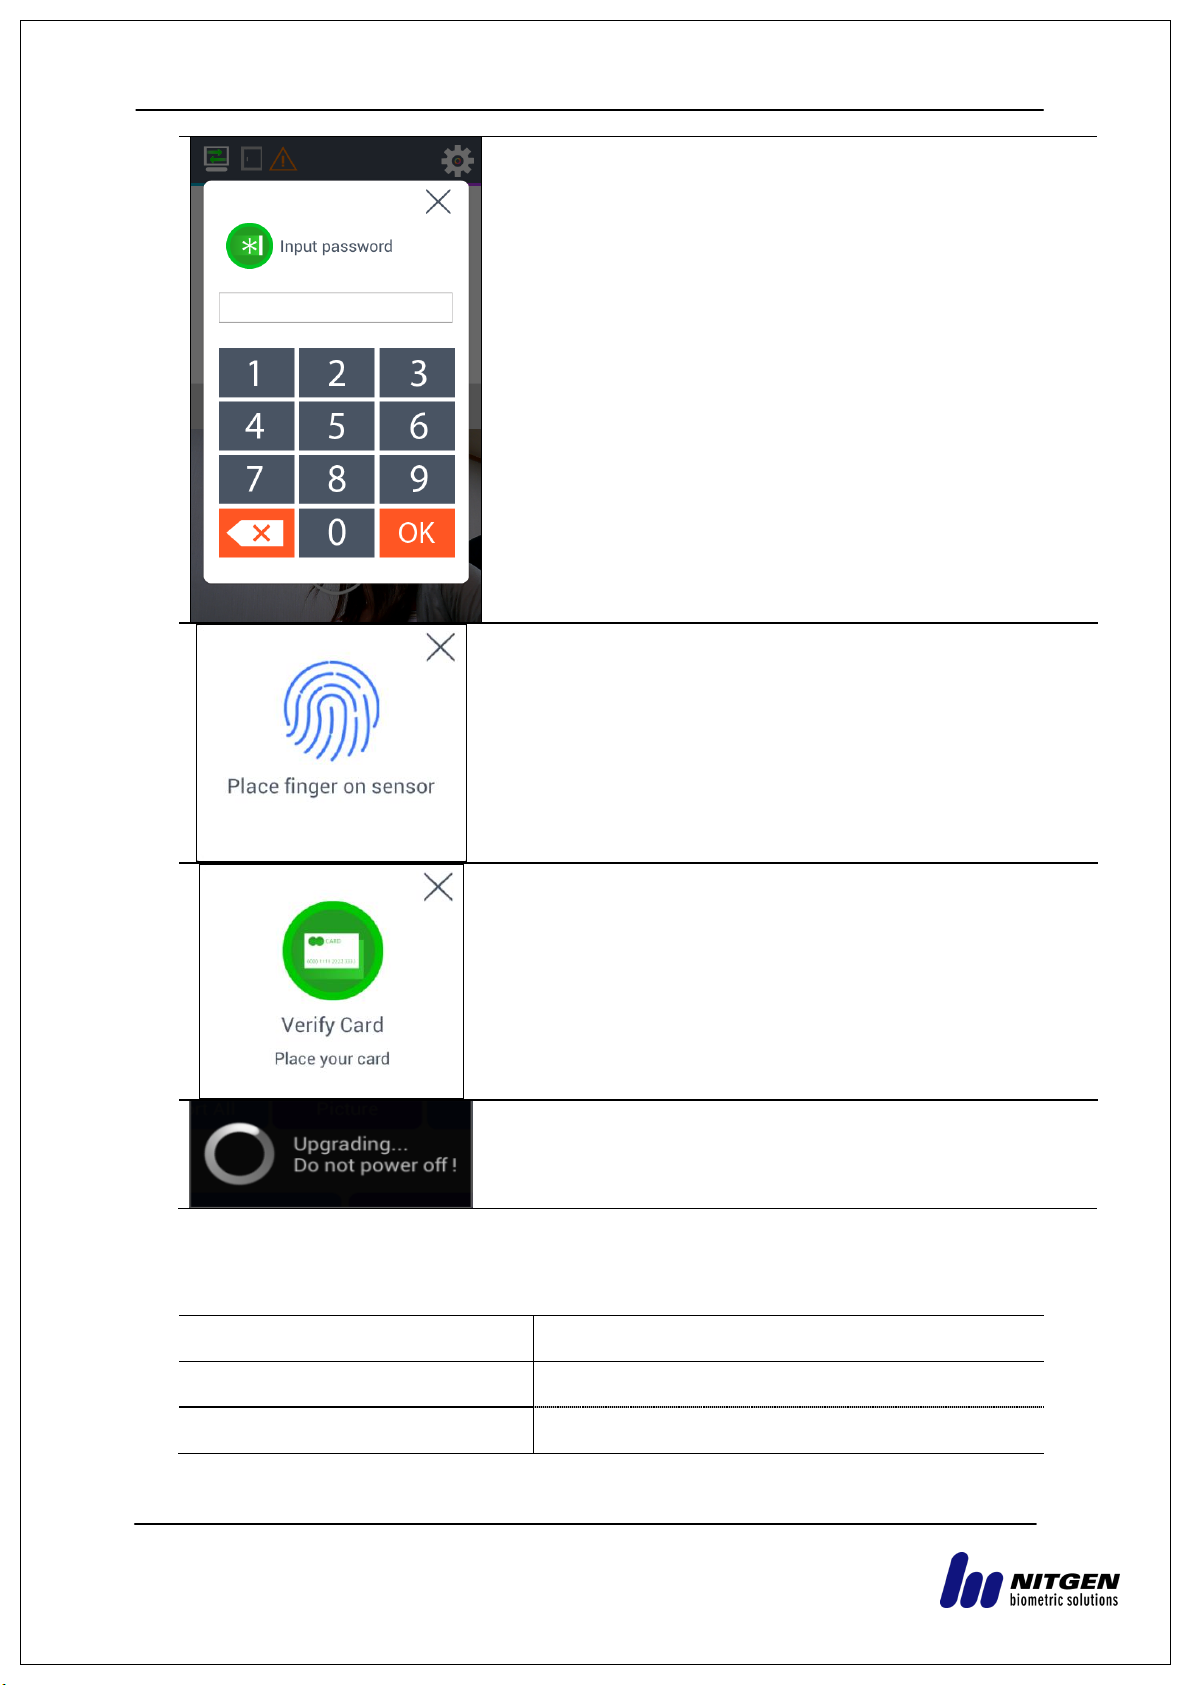
eNBioAccess-T9 user guide 13
- Waiting for password input
- Waiting for fingerprint input
- Waiting for card input
- Upgrading terminal program
(Do not turn OFF terminal power when this message is
displayed.)
Division
Voice information
When authentication is successful
You are authenticated.
When authentication failed
Please try again.
1.4. Voice information during operation
NITGEN Co,. Ltd / #1208 ,641-4, Munjeong-dong, Songpa-gu, Seoul, Korea (138-050)
Tel: 02-6488-3232, Fax: 02-6488-3099, E-Mail: [email protected]
Page 14

eNBioAccess-T9 user guide 14
Beep
Reading Fingerprint
or card
A card is read.
fingerprint is input in the fingerprint window
Beep, beep
Verification failed
Authentication is failed
Long beep
Verification is
successful
Authentication is succeeded
1.5. Buzzer sound information during operation
1.6. Correct face registration and authentication method
Face registration method
- Maintain distance between terminal and face to be about 50 cm.
(Place face into the guide line in the LCD screen.)
- Register face pose according to information. However, stop movement during
capturing.
- Register face after lift up hat or hair to prevent blocking of the lower part of face
including eyebrow. (Based on picture for passport)
- In case of people who wear glasses, he must register both of face with glasses and
face without glasses. However, if glasses frame is replaced, face with glasses must
be registered again.
Face authentication method
Face authentication method can be set in user environment with the following 3
modes.
- Normal mode: Tilting function of the camera works when a user approaches within
1.5m by detecting user‟s face and face position. Face authentication will be
performed when a user approaches between 50 ~ 70 cm. IR LED remains on under
high-intensity illumination while remains off under low illumination.
- Fixed mode: The mode has the fastest authentication speed. However, since it does
not have tilting function, maintain distance between the terminal and user at 50Cm
to set user face position into the LCD guideline. IR LED remains on at all times
- Adaptive mode: The camera will tilt according to face position by detecting user‟s
face when a user approaches within 3m. Face authentication will be performed
when a user approaches between 50 ~ 70 cm. IR LED remains on under highintensity illumination while remains off under low illumination.
Cautions
- It is the best to register and authenticate in terminal installation place.
- If a user takes a pose which is different from the registered face, it can reduce face
recognition rate.
If possible, it is best to take a pose facing the front.
NITGEN Co,. Ltd / #1208 ,641-4, Munjeong-dong, Songpa-gu, Seoul, Korea (138-050)
Tel: 02-6488-3232, Fax: 02-6488-3099, E-Mail: [email protected]
Page 15
eNBioAccess-T9 user guide 15
- Thick glasses frame or sunglasses can reduce face recognition rate.
Installation precautions
- Make sure the terminal is installed indoor.
- Do not install the device under lighting with incandescent lamp.
- It is not recommended that installation in environment exposed to backlight or direct
rays of the sun.
1.7. How to register and input correct fingerprint
Correct fingerprint input method
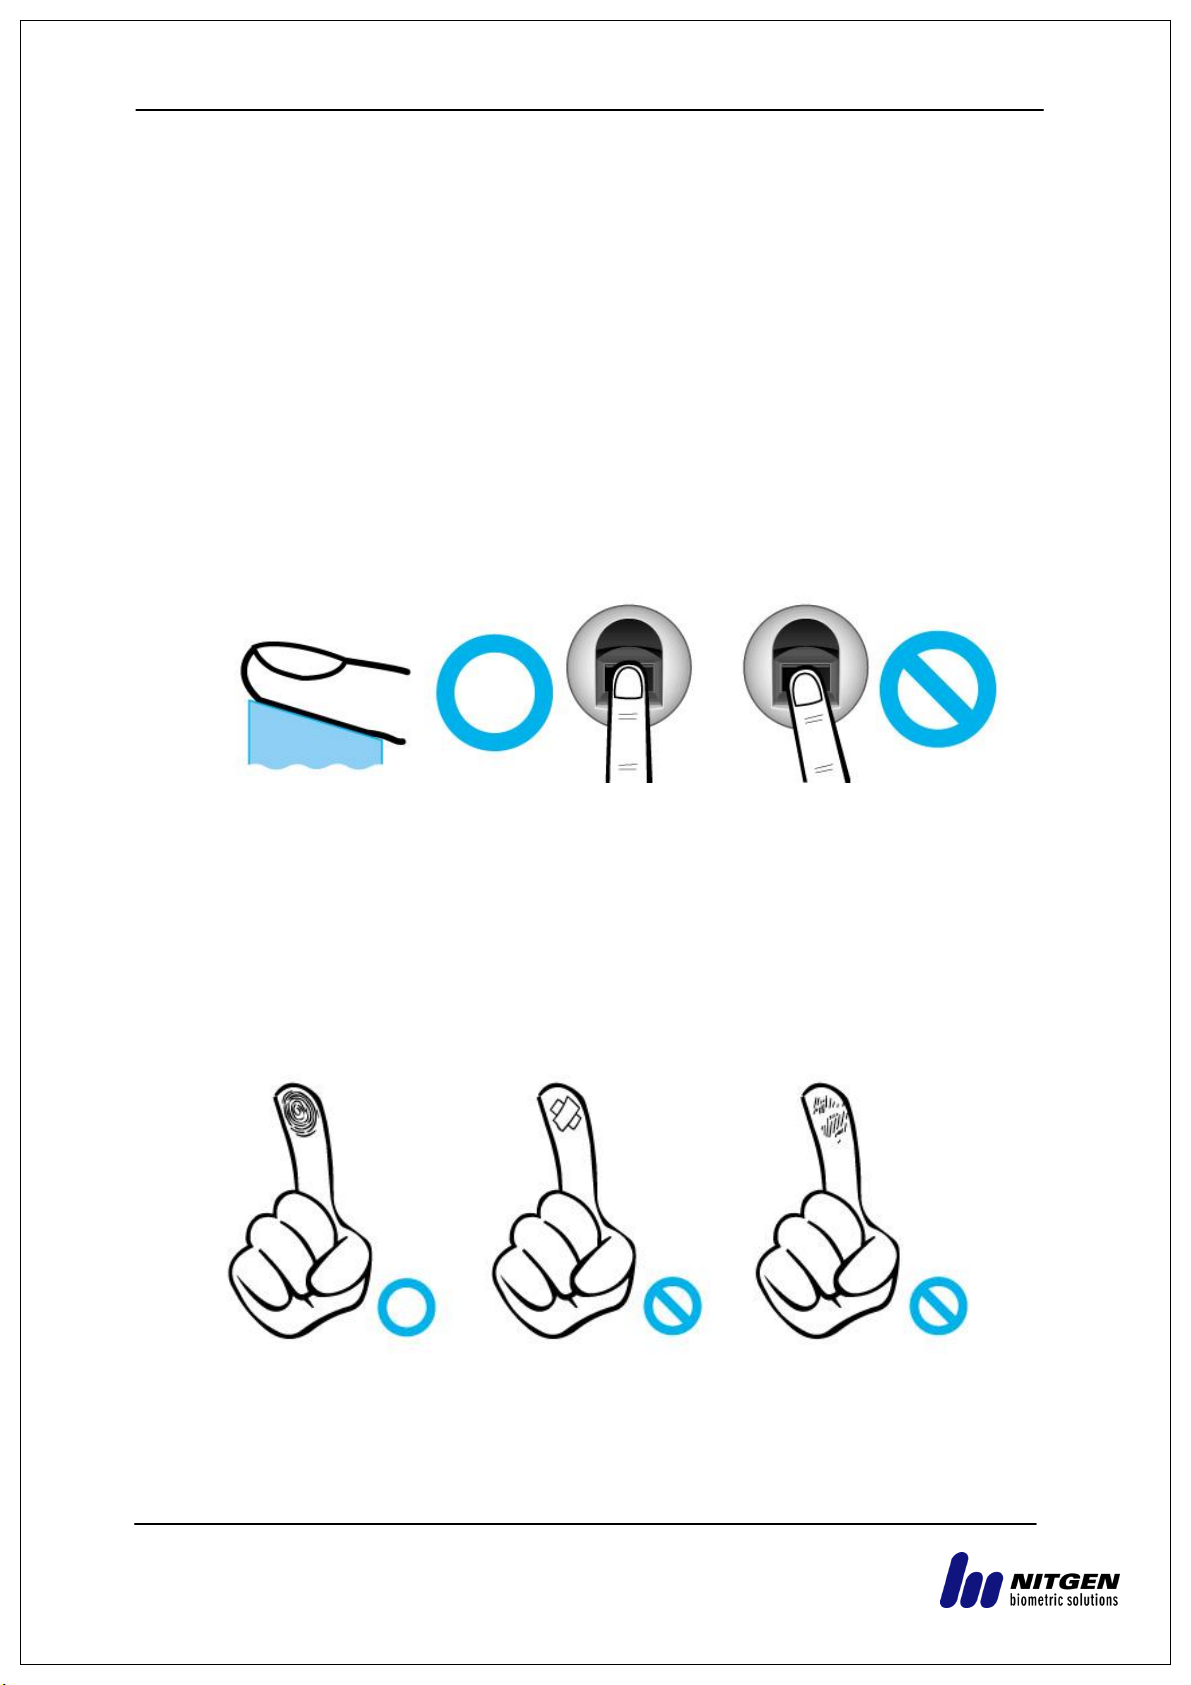
If possible, input index finger as like to imprint thumbmark.
Slight contact of fingertip is not a correct register/input method.
Touch the center of a fingerprint in the fingerprint input part.
If possible, input fingerprint of index finger.
For correct and stable input of fingerprint is possible if index finger is used.
Check if fingerprint is blur or there is any wound.
In case of too dry or moist fingerprint, blur fingerprint or wounded fingerprint, it is
hard to recognize. In this case, register fingerprint of another finger.
Precautions according to fingerprint status
Sometimes fingerprint can‟t be used or there can be difficulty in using fingerprint
according to user‟s fingerprint state.
NITGEN Co,. Ltd / #1208 ,641-4, Munjeong-dong, Songpa-gu, Seoul, Korea (138-050)
Tel: 02-6488-3232, Fax: 02-6488-3099, E-Mail: [email protected]
Page 16
eNBioAccess-T9 user guide 16
The product is a fingerprint recognition system. If fingerprint is damaged or too
tender, fingerprint can‟t be used, and password must be used.
If hands are too dry, blow user’s breaths on the fingerprint for easy use.
In case of children, If fingerprint is too small or too tender, sometimes use is
difficult or impossible. It is needed to newly register fingerprint every 6 months.
In case of the old, if there are too many crackles on the fingerprint to be
registered, it can be hard to register fingerprint.
If possible, it is recommended that more than 2 fingerprints of a user are
registered.
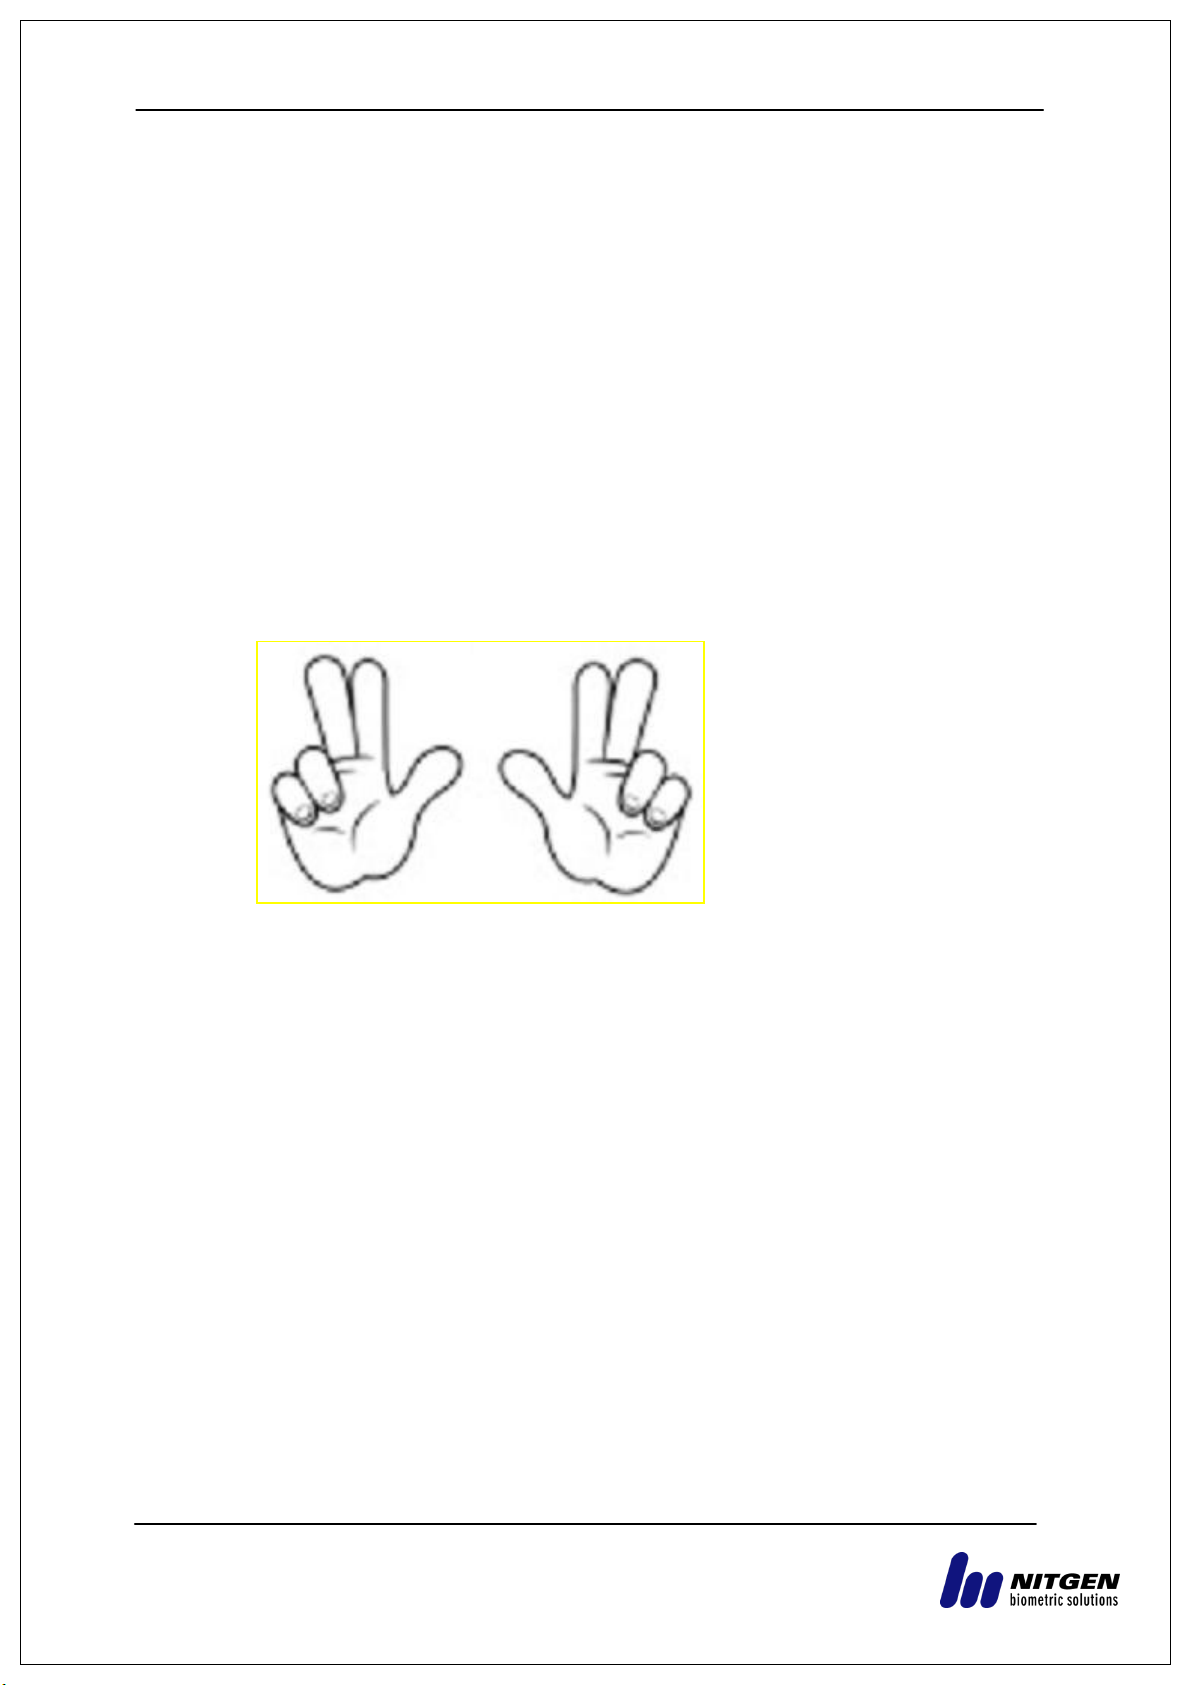
If you want to increase the success of authentication, you‟d better use 6 fingers
among ten fingers as below.
NITGEN Co,. Ltd / #1208 ,641-4, Munjeong-dong, Songpa-gu, Seoul, Korea (138-050)
Tel: 02-6488-3232, Fax: 02-6488-3099, E-Mail: [email protected]
Page 17

eNBioAccess-T9 user guide 17
2. Introduction
2.1. Features
Multi-Modal product which can use both of face and fingerprint authentication functions.
Tilting camera automatically trace face position.
Since an illuminance sensor and a Dual Camera (Color & IR) are installed, face
recognition is impossible even in a dark place. Save log image which can be recognized.
Can be used along with RF Card (EM Card; 125 kHz) and Smart Card (Mifare Card;
13.56MHz) simultaneously.
Simple self- authentication through face or fingerprint
- Face recognition and fingerprint recognition technology (Biometrics) are used for
the device. Therefore, risk of password forgetting, card or key missing or robbery
can‟t be prevented. In addition, security is enhanced using one‟s own biometric
information.
Access control system through network (LAN)
- Since communication is made between fingerprint recognition device and
authentication server using TCP/IP protocol, expansion is easy because it can be
directly applied to the existing Network. Not only 10/100 Mbps Auto Detect secures
quick speed but also management and monitoring through network is easy and
simple.
Various registration and authentication methods are provided
- Or / And combination of face, fingerprint, card and password is supported.
If it is set to ‘Or‟, authentication will be regarded as successful if any of the
registered authentication method is successful. If it is set to „And‟, all registered
Authentication methods must be successful to regard authentication as to be successful.
Ex> Fingerprint, card or fingerprint, fingerprint and card, face or f ingerprint or
card or password
NITGEN Co,. Ltd / #1208 ,641-4, Munjeong-dong, Songpa-gu, Seoul, Korea (138-050)
Tel: 02-6488-3232, Fax: 02-6488-3099, E-Mail: [email protected]
Page 18
eNBioAccess-T9 user guide 18
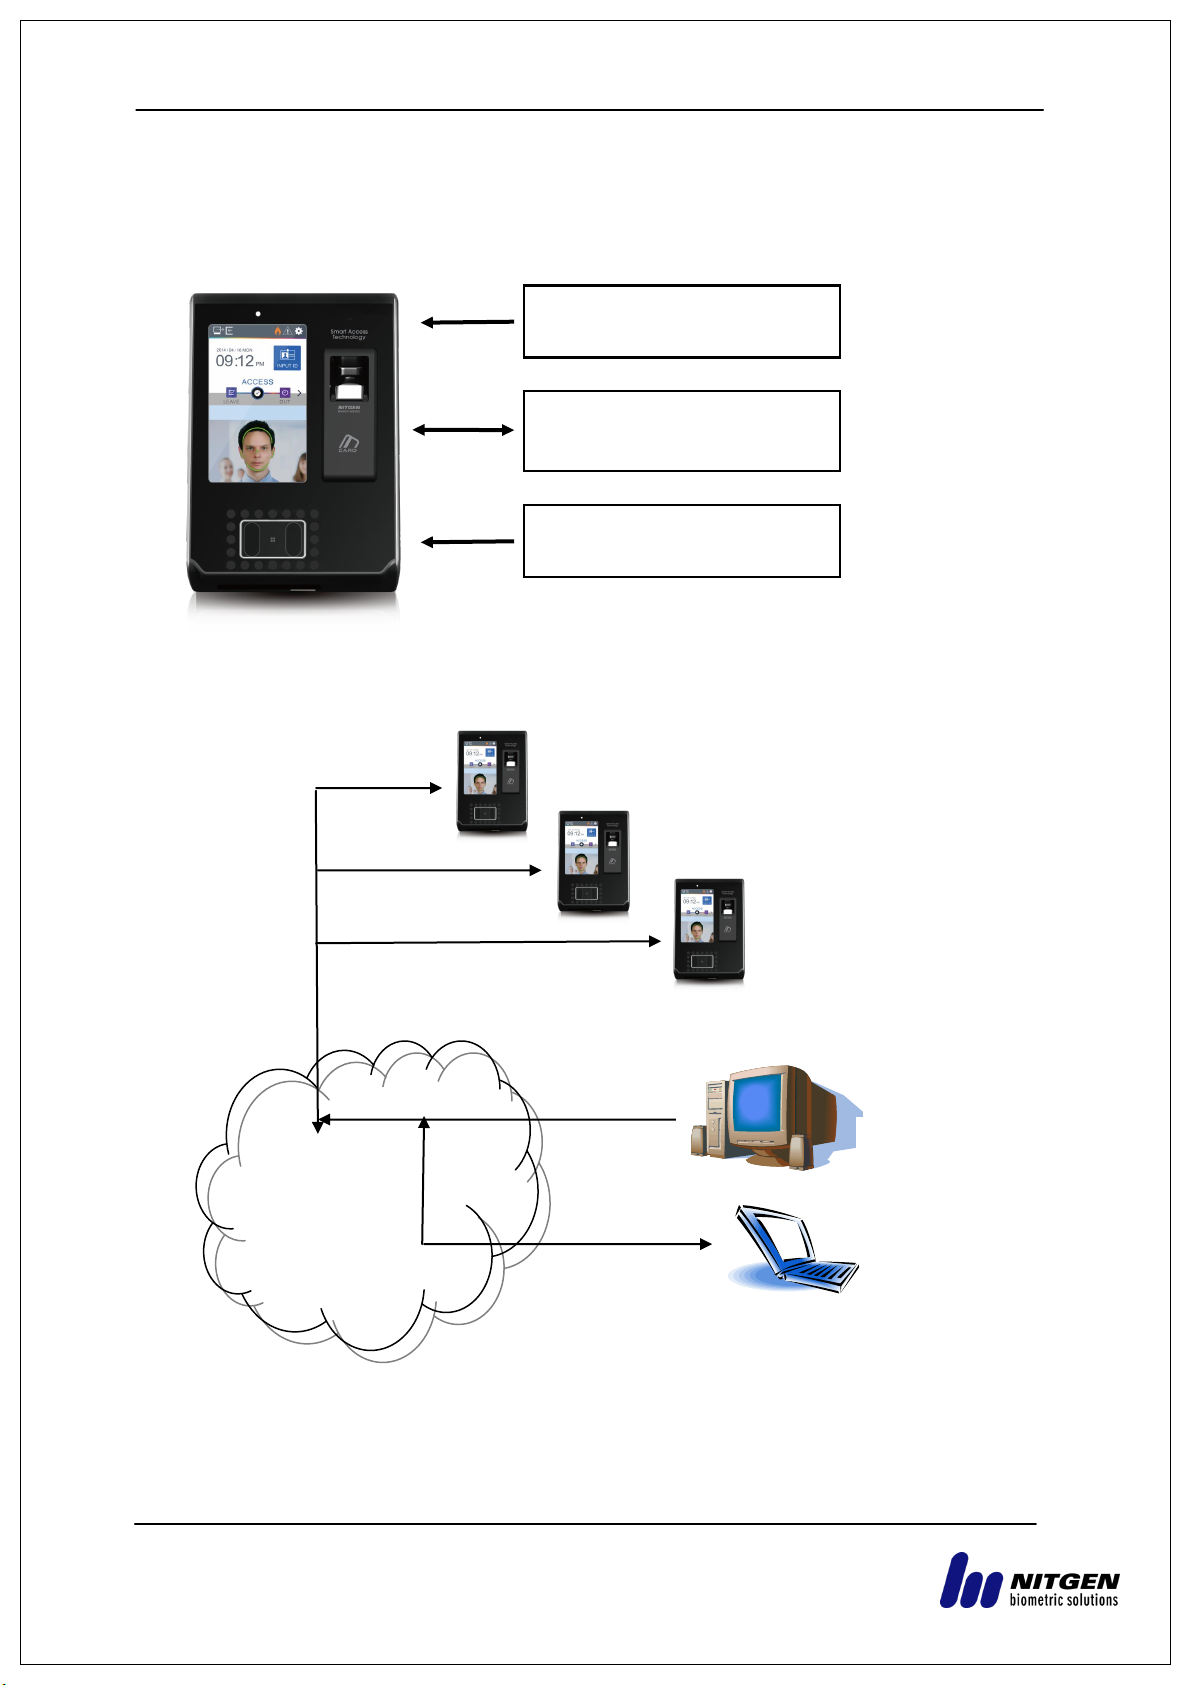
TCP/IP
Internet /
WAN / LAN
TCP/IP
Fingerprint authentication
server (Static IP) database
(MSSQL)
TCP/IP
Remote admin program
(Management of user and
terminal setting)
TCP/IP
DC12V Adapter
(DC12V, 3.5A)
Electric lock
(Lock+, Lock-, Monitor)
Exit Button
2.2. Configuration diagram
2.2.1. Exclusive usage (access)
2.2.2. Connection with PC server (access, time & attendance and drinking water
management)
NITGEN Co,. Ltd / #1208 ,641-4, Munjeong-dong, Songpa-gu, Seoul, Korea (138-050)
Tel: 02-6488-3232, Fax: 02-6488-3099, E-Mail: [email protected]
Page 19
eNBioAccess-T9 user guide 19
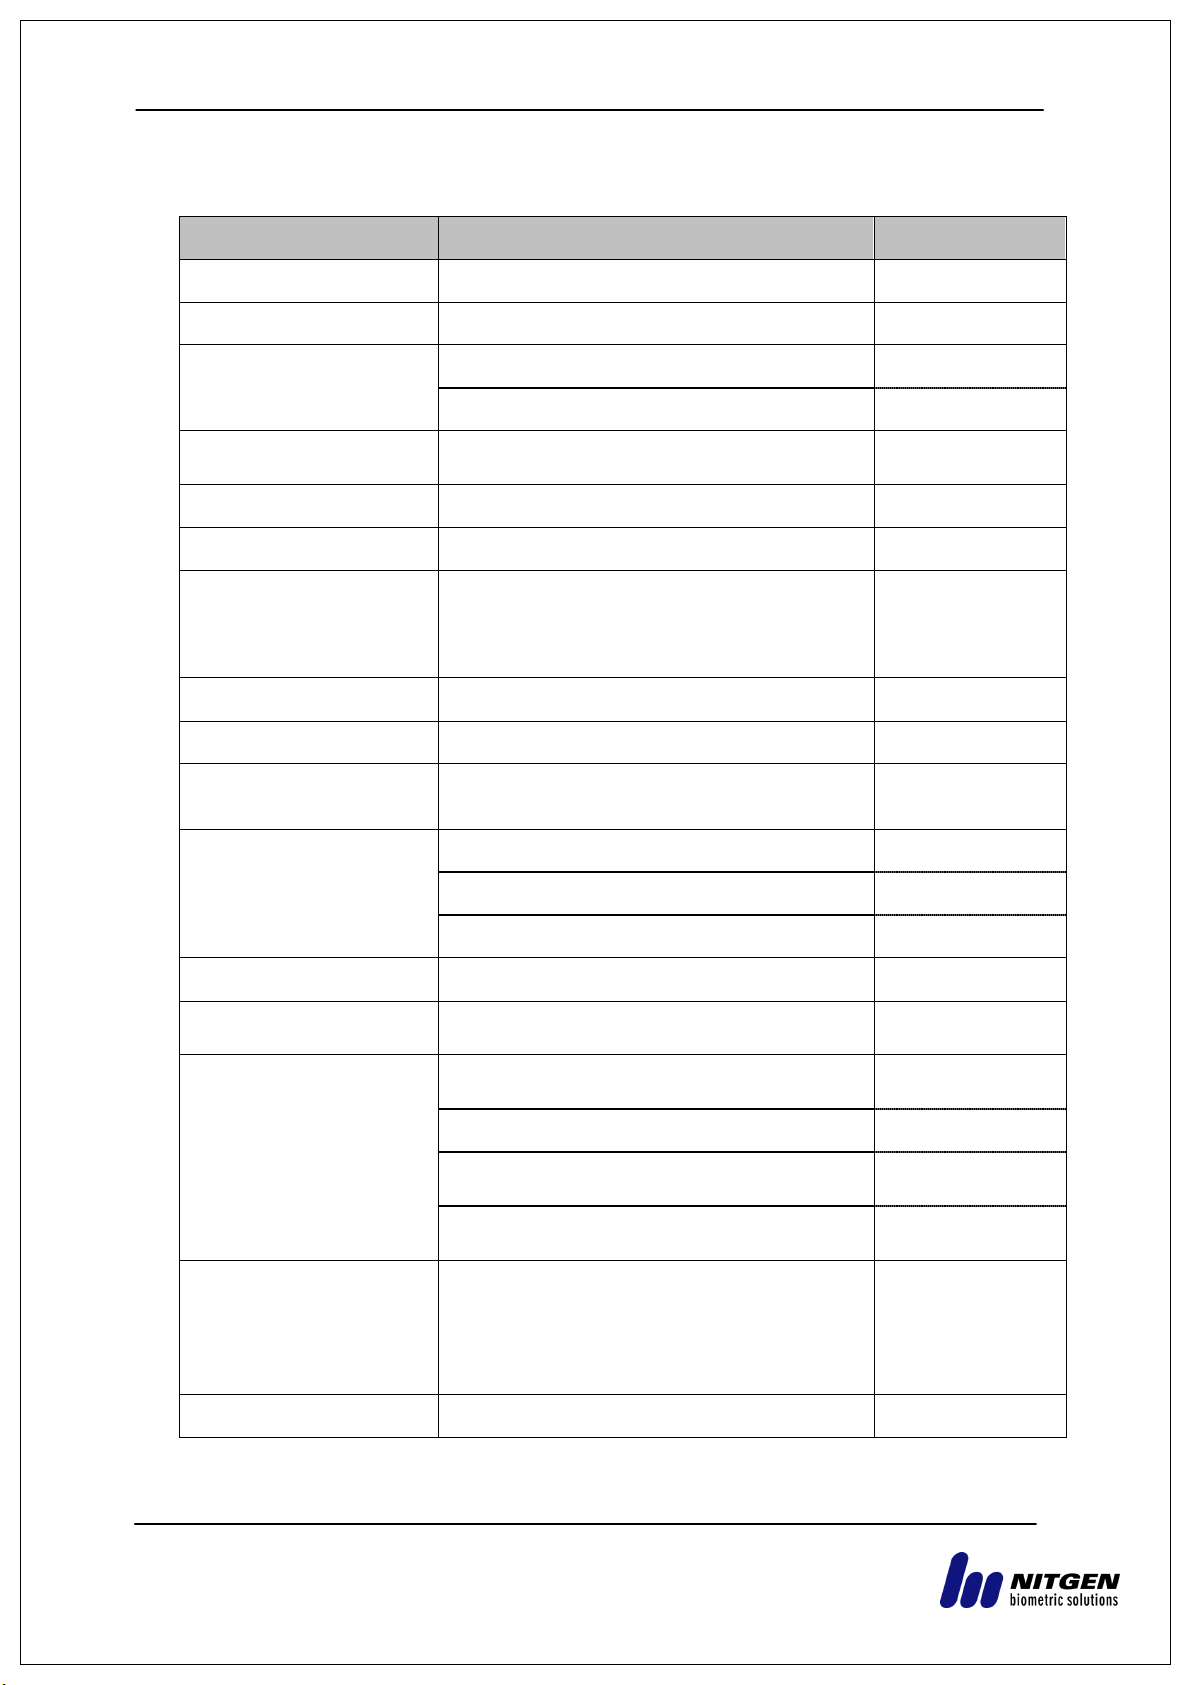
Division
SPEC
REMARK
CPU
1GHz Quad Core CPU
LCD
5.0 inch Touch LCD (480*800)
MEMORY
4G + 8G Bytes Flash
2GBytes RAM
External SD Card
support
data backup / FW upgrade
Camera
Tilted Dual Camera (Color & IR)
Authentication speed
Within 1 second
Number of users
100,000 User
100,000 Template (1: N1: 100,000)
10,000 Face (1: N1: 2,000)
1,000,000 Log / 20,000 Image Log
Fingerprint sensor
Optical type
Scan Area / Resolution
20 * 20mm / 500 DPI
Temperature /
Humidity
-20 ~ 45 /
Lower than 90% RH
AC / DC Adapter
INPUT: Universal AC100 ~ 250V
OUTPUT: DC 12V (Option: DC 24V)
UL, CSA, CE Approved
Lock Control
EM, Strike, Motor Lock, Auto Door
I/O
4 In (1 Exit, 3 Monitor)
2 Out (Also for Lock Control)
Communication Port
TCP/IP (10/100Mbps)
Authentication
server comm.
RS-232
RS-485
Controller
communication
Wiegand In/Out
Card reader or
Controller comm.
Card Reader
125KHz RF / 13.56MHz Smart
simultaneous use
(1 SAM socket)
HID 125K Prox card (option)
HID iClass Card (option)
option
Dimension
88.0mm * 175.0mm * 43.4mm
2.3. Product specification
NITGEN Co,. Ltd / #1208 ,641-4, Munjeong-dong, Songpa-gu, Seoul, Korea (138-050)
Tel: 02-6488-3232, Fax: 02-6488-3099, E-Mail: [email protected]
Page 20
eNBioAccess-T9 user guide 20
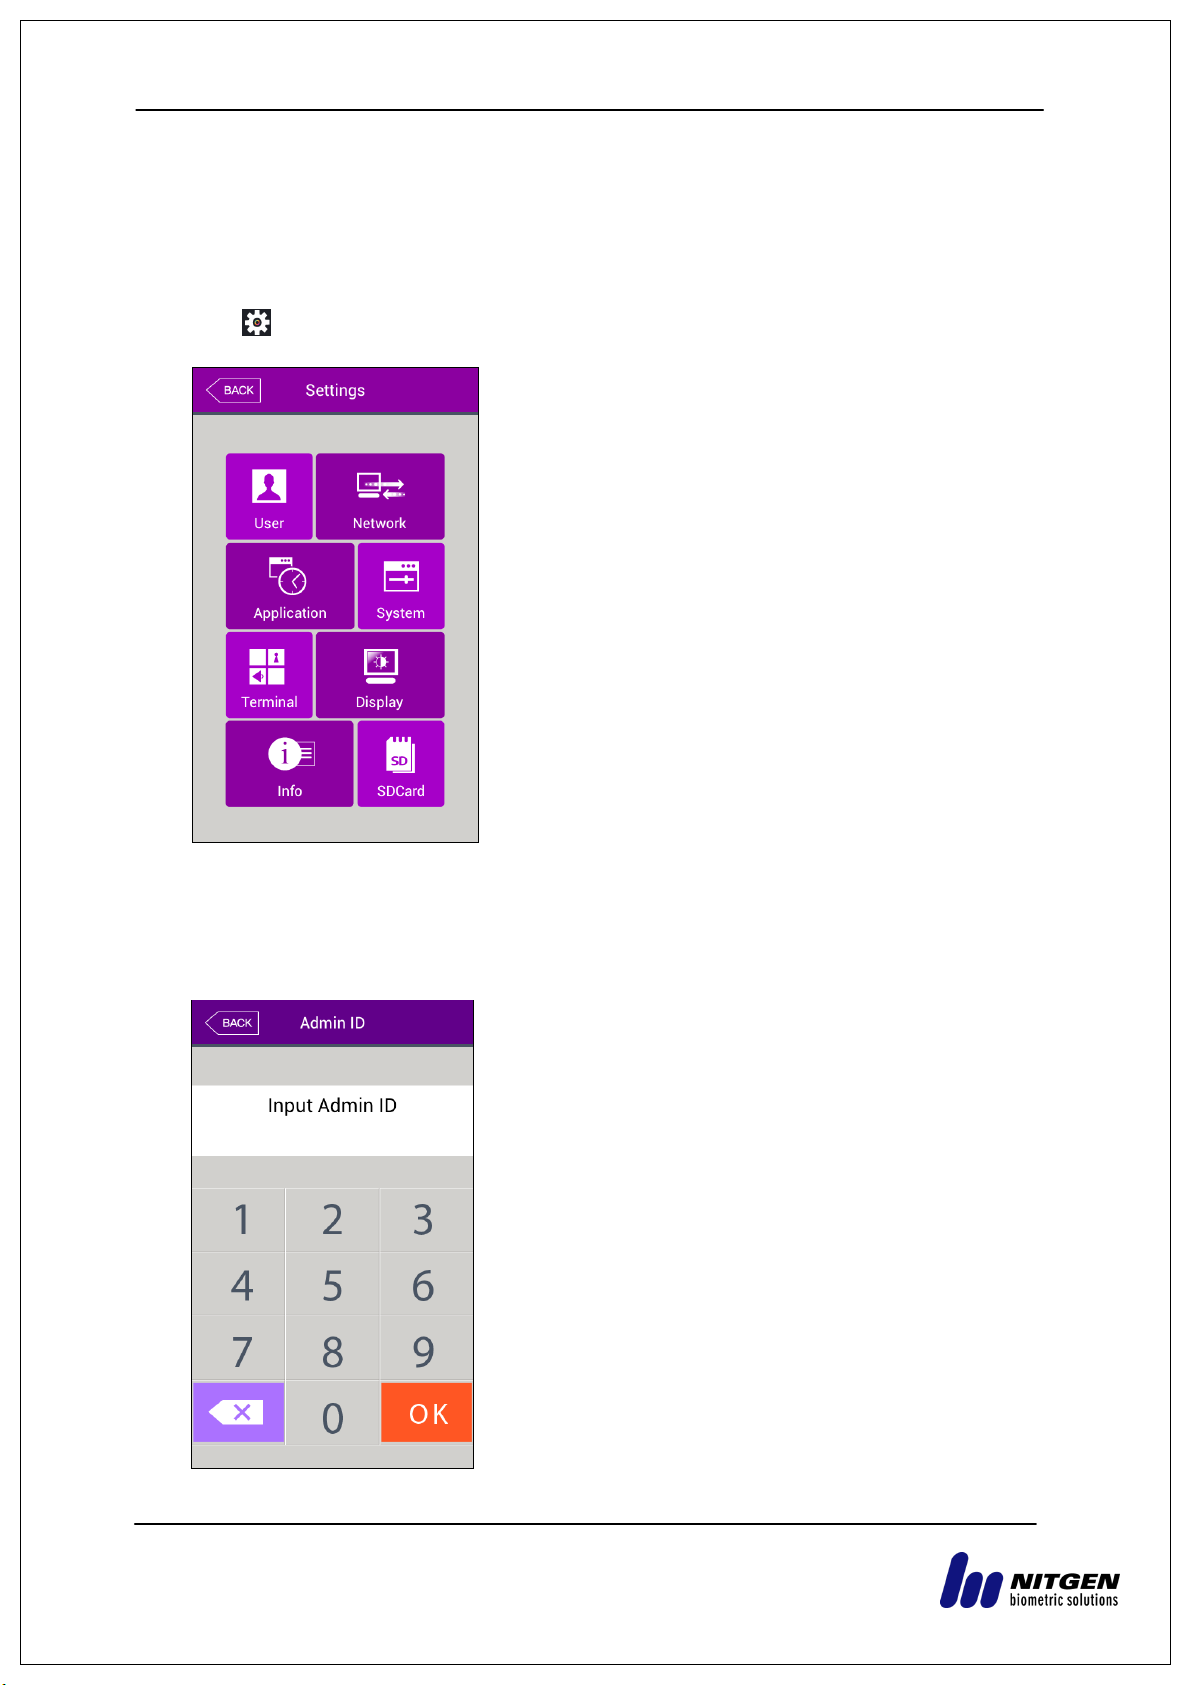
Press the relevant button to move to each sub
menu.
▶ Administrator authentication
Input administrator ID to proceed with administrator
authentication using card, fingerprint, face or
password according to authentication method of the
relevant administrator.
Administrator authentication screen will be displayed
only when there is a registered administrator.
Authentication will be performed only once to enter
menu mode. After that, access to all menus is
possible until completely move out of the main
menu.
3. Configuration
3.1. Check points before configuration
3.1.1. Entering menu
Press [ ] icon in the main screen to access into the main menu screen below.
3.1.2. Administrator authentication
If an administrator is registered, the following administrator authorization screen will be
displayed first.
NITGEN Co,. Ltd / #1208 ,641-4, Munjeong-dong, Songpa-gu, Seoul, Korea (138-050)
Tel: 02-6488-3232, Fax: 02-6488-3099, E-Mail: [email protected]
Page 21
eNBioAccess-T9 user guide 21
3.1.3. Method to enter menu without administrator authorization
The method is to enter the menu when an administrator lost registered administrator card
which is registered at the terminal or when fingerprint or face verification is impossible
because there is no administrator.
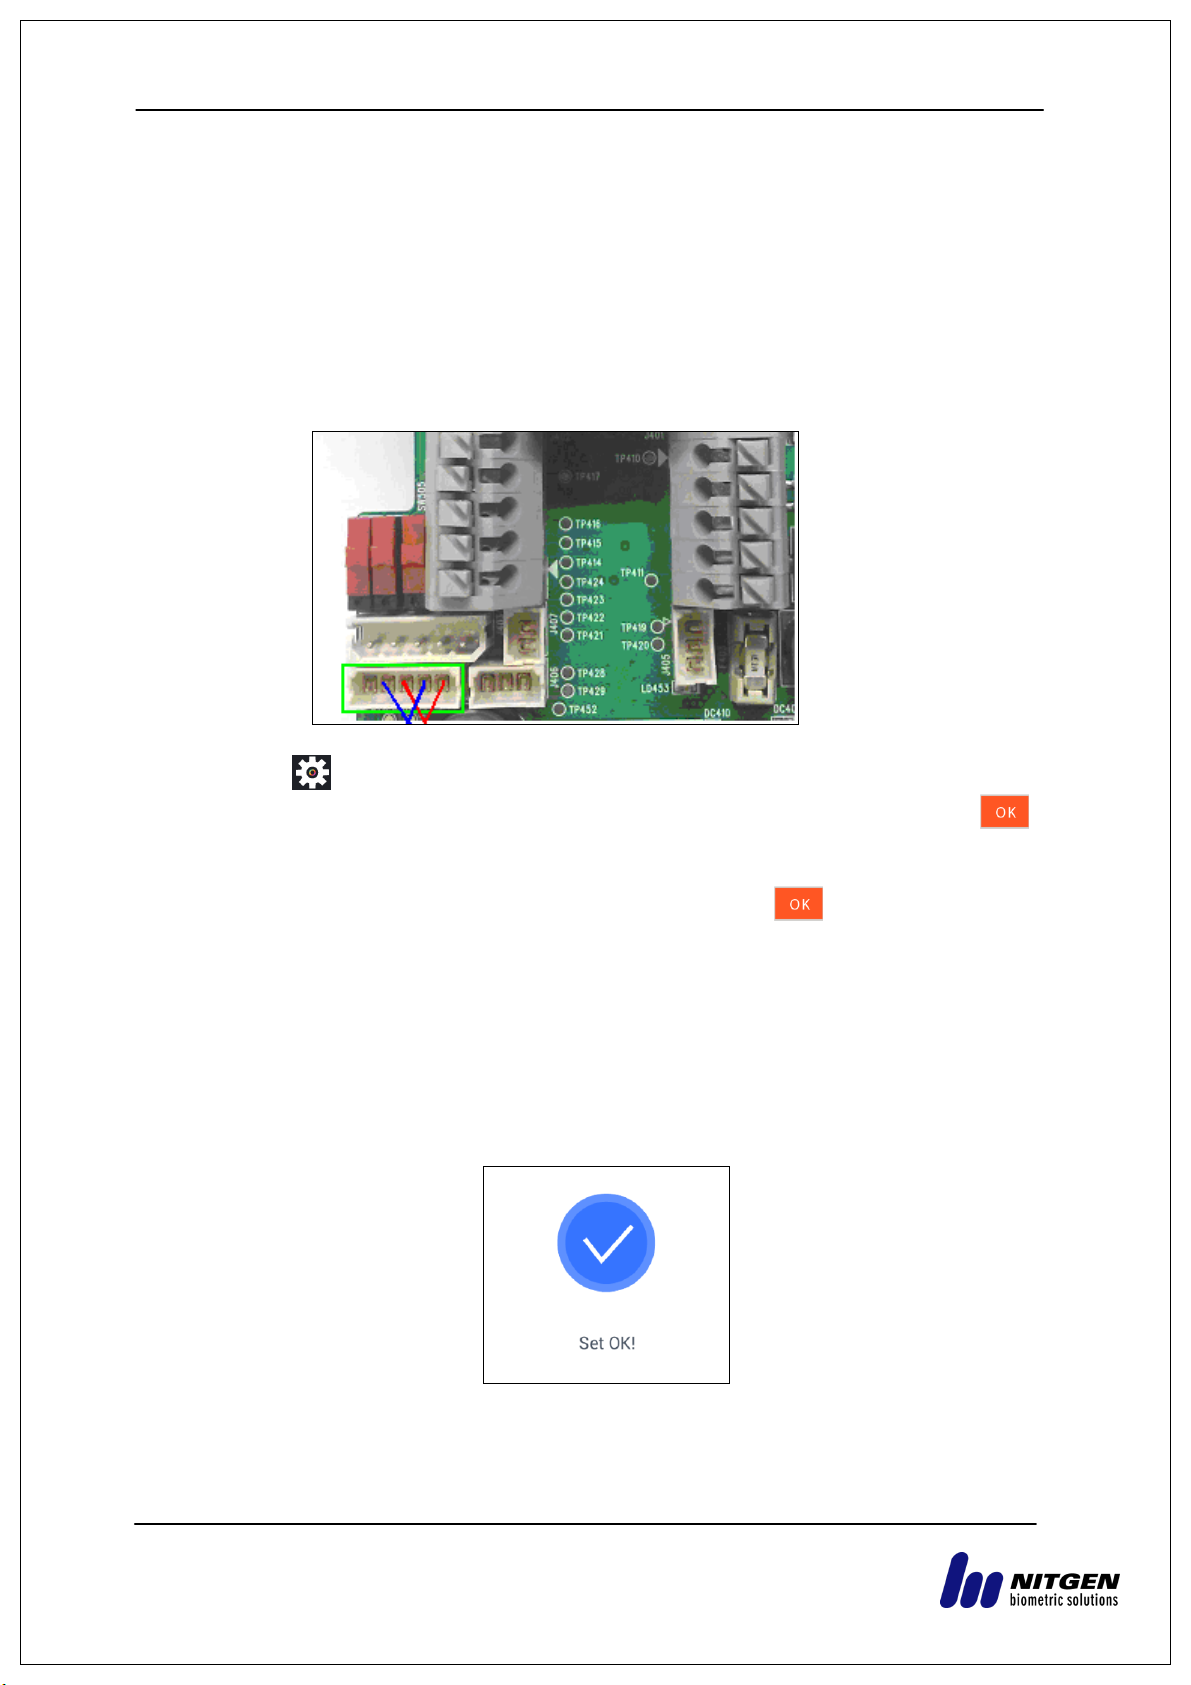
① Remove the bracket on the rear side of the terminal to open the cover
② As shown in the figure below, in cover open status, connect each of the following 5-
pin connector No 1 and 3 pin, No 2 and 4 pin on the rear side of the terminal.
<Figure3-3>
② Press icon in the main screen to access into administrator authorization
screen in <Figure3-2>, fill with „0‟ for administrator ID length and press [ ]
button to enter menu screen.
(But if the admin user ID was „000…0‟, you can insert the unregistered user ID as
you please instead of the ID „000…0‟ and then press [ ] button to enter the
menu screen)
▶ Make sure that connection pin of the connector is removed after modifying the
setting value.
3.1.4. Saving setting value
When [OK] button in each menu is pressed after setting change to save change detail, the
setting detail in the screen will be saved and the following message box will be displayed.
▶ If nothing is changed, the screen will move to the previous menu screen.
▶ If nothing is input for 30 seconds while changing setting value in the menu, the
screen will move to the previous menu.
NITGEN Co,. Ltd / #1208 ,641-4, Munjeong-dong, Songpa-gu, Seoul, Korea (138-050)
Tel: 02-6488-3232, Fax: 02-6488-3099, E-Mail: [email protected]
Page 22

eNBioAccess-T9 user guide 22
1. User
management
1. Add
2. Change
3. Delete
4. Delete All
5. Search
2. Network
Terminal IP address
Static IP / DHCP
▶ Terminal IP address
▶ Subnet Mask
▶ Gateway
DNS server
▶ DNS server1
▶ DNS server2
Server IP address
▶ Server IP address
▶ Port
Terminal ID
▶ Terminal ID
3. Operation
mode
1. Function key
setting
□ F1 use
□ F2 use
□ F3 use
□ F4 use
□ ID button
□ Access button
□ F key mode: Normal,Fixed
4. System
1. System
▶ User ID length
▶ Authentication: Server/Terminal
Terminal/Server
Server Only
Terminal Only
▶OperationMode : Network/StandAlone
2. Fingerprint
recognition
▶ 1: N level [3~9]
▶ 1 to 1 level [1~9]
▶ Fake fingerprint detection : None
Low
Medium
High
□ Check similar FP
3. Face recognition
▶ Face Authentication Use
▶ Matching level [1~4]
▶ Face recognition: Fixed
Normal
Adaptive
▶ Camera Angle [-2~4]
▶ Enrollment Sensitivity: Auto
3.2. Menu configuration
NITGEN Co,. Ltd / #1208 ,641-4, Munjeong-dong, Songpa-gu, Seoul, Korea (138-050)
Tel: 02-6488-3232, Fax: 02-6488-3099, E-Mail: [email protected]
Page 23

eNBioAccess-T9 user guide 23
[1~10]
4. Date/time
▶ Display format
▶ Set Date
▶ Set Time
5. Database
1. Delete all users
2. Delete setting
3. Delete Log
4. Delete image log
5. Factory Init
5. Terminal
setting
1. Sound
▶ Voice volume
▶ Buzzer volume
□ User Voice
2. Terminal option
▶ Read Card Number
▶ Card format
□ Lock Terminal
▶ Card reader: Standard
HID-iCLASS (option)
3. Input setting
▶ M0
▶ M1
▶ M2
▶ IO
▶ Warn door open (sec)
□ Tamper alarm
4. Lock setting
▶ Lock1 option
▶ Lock2 option
▶ Lock1 duration (ms)
▶ Lock2 duration (ms)
5. External setting
▶ Wiegand Sitecode
▶ Wiegand output
▶ Wiegnad Input
6. Screen
setting
1. Theme
▶ Background
2. Camera
▶ Display option
▶ Save option
□ Save success log
□ Save failed log
3. Language
▶ Language
4. Option
▶ Screen saver
▶ Display option
NITGEN Co,. Ltd / #1208 ,641-4, Munjeong-dong, Songpa-gu, Seoul, Korea (138-050)
Tel: 02-6488-3232, Fax: 02-6488-3099, E-Mail: [email protected]
Page 24

eNBioAccess-T9 user guide 24
5. Message display
time
▶ Message display time (ms)
7. Terminal
information
1. System
▶ System information
▶ Disk
▶ RAM
2. Terminal
▶ Terminal information
Terminal ID
Application
Language
3. Network
▶ Network info
MAC
<Ethernet>
IP
4. User
▶ User
5. Log
▶ Log
6. About
▶ About
8. SD card
1. Export
1. User data
2. Event log
3. System option
4. Export all
5. Picture
2. Import
1. User data
2. System option
3. Others
1. Theme
2. F/W upgrade
3.3. User management
Select [User] in the main menu to display the screen below.
NITGEN Co,. Ltd / #1208 ,641-4, Munjeong-dong, Songpa-gu, Seoul, Korea (138-050)
Tel: 02-6488-3232, Fax: 02-6488-3099, E-Mail: [email protected]
Page 25

eNBioAccess-T9 user guide 25
Number of all registered users including administrator will
be displayed on the top of the screen.
To add a new user, press [Add] button.
To change a user, press [Change] button.
To delete user with specific ID, press [Delete] button.
To delete all users, press [Delete All] button.
To search registered user list, press [View] button.
NITGEN Co,. Ltd / #1208 ,641-4, Munjeong-dong, Songpa-gu, Seoul, Korea (138-050)
Tel: 02-6488-3232, Fax: 02-6488-3099, E-Mail: [email protected]
Page 26

eNBioAccess-T9 user guide 26
Input user ID to be registered and press [OK] button.
In this case, ID which can be registered is
automatically displayed in the screen. Hence,
registration is easy and convenient. To change ID,
Press [ ] button to delete the existing value and
to input a new one.
Press [BACK] button to cancel and move out.
Each icon has the following meaning.
: number of registered face
: number of registered fingerprint templet (X, 2~20)
: whether password is registered (X: not registered,
O: registered)
: whether card is registered (X: not registered, O:
registered)
: user ID to be registered
: user
: administrator
button: take user‟s picture to register it
3.3.1. Adding
Select [User] [Add] in the main menu to display the screen below.
If an already registered ID is input, failure message will be displayed. If it is an
unregistered ID, the screen below will be displayed.
Press [name] to register name, press [Fingerprint] to register fingerprint, press
[face] to register face, press [card] to register card, press [password] button to
register password. Basically, everybody is registered as a user. Press [administrator]
button to convert into an administrator. To save registration after completing, press
[Save] button or press [Cancel] or [BACK] button to cancel input or to move out of it.
NITGEN Co,. Ltd / #1208 ,641-4, Munjeong-dong, Songpa-gu, Seoul, Korea (138-050)
Tel: 02-6488-3232, Fax: 02-6488-3099, E-Mail: [email protected]
Page 27

eNBioAccess-T9 user guide 27
Press [ ] button in [Add user] screen to register a
picture.
Press [Save] button to register current camera image as
a picture.
To cancel registration and move out, press [Cancel] or
[BACK] button.
Press [Name] button in [Add user] screen to register a
name.
Input name using the keyboard displayed below and
press OK button. Up to 29 characters can be input for
name.
To cancel registration and move out, press [ ] button.
※ Only the user who is registered as an administrator can change operation method for
the terminal, and can register/change/delete information of all users saved at the
terminal. Hence, care is required to register administrator.
3.3.1.1. Registering picture
3.3.1.2. Registering name
NITGEN Co,. Ltd / #1208 ,641-4, Munjeong-dong, Songpa-gu, Seoul, Korea (138-050)
Tel: 02-6488-3232, Fax: 02-6488-3099, E-Mail: [email protected]
Page 28

eNBioAccess-T9 user guide 28
① Press [Fingerprint] button in [Add user] screen to
register.
To cancel registration and move out, press [ ] button.
When the left screen is displayed, select a finger to be
registered.
※ In case of registering many fingers, already
registered finger will be displayed in blue circle ( ).
If an already registered finger is selected, the
following message will be displayed. Select Reregister to delete the existing registered fingerprint
and try again.
② Input f ingerprint(s) referring to „1.7. Method to
correctly register and input fingerprint„. Input
fingerprint 2 times according to information in the
screen as below 2.
When the fingerprint sensor lamp is ON along with the
message of „input fingerprint„, put f inger in fingerprint
input window and wait for about 2~3 seconds until
lamp OFF and then remove the finger.
④ Input the fingerprint which is just input one
more time when the message of „Input the
same fingerprint once again‟ will be displayed.
※ For the second input of the fingerprint after the first
input, make sure that f inger is removed from the
fingerprint input window before the second input.
3.3.1.3. Registering fingerprint
NITGEN Co,. Ltd / #1208 ,641-4, Munjeong-dong, Songpa-gu, Seoul, Korea (138-050)
Tel: 02-6488-3232, Fax: 02-6488-3099, E-Mail: [email protected]
Page 29

eNBioAccess-T9 user guide 29
④ Message on the left will be displayed when input is
completed. Press [OK] button to complete registration
and move to the upper menu.
To register fingerprint again, press [Retry] button to
start it again from the process of ② above. To cancel
it, press [ ] button to move to upper menu.
If a fingerprint is similar with an already registered
fingerprint, message of “similar with an already
registered fingerprint” will be displayed as shown on
the left. In this case, press [Retry] button to start it
again from the process of ② above.
To cancel it, press [ ] button to move to upper menu.
※ Max 10 fingerprints for each ID can be registered, but more than 10 fingerprints can
be registered.
In case of failing after 2~3 times of registration try according to correct f ingerprint
registration method, it is recommended that face, password or card is used.
NITGEN Co,. Ltd / #1208 ,641-4, Munjeong-dong, Songpa-gu, Seoul, Korea (138-050)
Tel: 02-6488-3232, Fax: 02-6488-3099, E-Mail: [email protected]
Page 30

eNBioAccess-T9 user guide 30
Press [Face] button in [Add user] screen to
select [Regular Registration] or [Quick
Registration].
To cancel registration, press [BACK] button.
* In case of general registration, register face through 5
steps after fixing face and pose according to the guideline.
* In case of simple registration, register face through 3
steps using auto face search function when face area is
detected.
② Press [Start] button to register face.
As shown in the left screen, set face to face contour in the
screen and then look ahead according to the information
message displayed in the screen.
3.3.1.4. Registering face
Register face referring to „1.6 Correct face registration and authentication method„.
NITGEN Co,. Ltd / #1208 ,641-4, Munjeong-dong, Songpa-gu, Seoul, Korea (138-050)
Tel: 02-6488-3232, Fax: 02-6488-3099, E-Mail: [email protected]
Page 31

eNBioAccess-T9 user guide 31
③ As shown in the left screen, if face is normally
recognized, guide line will be changed into green to start
registering face. At this point, do not move face and stand
still for easy registration.
④ Move face to front/up/down little by little whenever
information message is displayed in the screen. At this
point, do not move more than 15 degree.
After registering face, message of “completed” will be
displayed as shown in the left screen. Press [OK] button to
complete face registration and to move to the previous
screen.
To register face again, press [Start] button to start it
again from the process of ② above.
NITGEN Co,. Ltd / #1208 ,641-4, Munjeong-dong, Songpa-gu, Seoul, Korea (138-050)
Tel: 02-6488-3232, Fax: 02-6488-3099, E-Mail: [email protected]
Page 32

eNBioAccess-T9 user guide 32
Input 4~8 digit password in password input window and
press [OK] button to move input focus to „password
check‟ window below. Input the same password again
and press [OK] button.
To cancel and move out, press [ ] button.
※ If wrong password is input after checking password
input, message of “Check input value” will be displayed
as below.
Press [Card] button in [Add user] screen to register
a card. To move out without registering, press [ ]
button.
※ If an already registered card is input, the message
below will be displayed
※ If registration of more than 10 cards for each user is
tried, the following message will be displayed.
3.3.1.5. Registering password
3.3.1.6. Registering card
NITGEN Co,. Ltd / #1208 ,641-4, Munjeong-dong, Songpa-gu, Seoul, Korea (138-050)
Tel: 02-6488-3232, Fax: 02-6488-3099, E-Mail: [email protected]
Page 33

eNBioAccess-T9 user guide 33
▶ ‟Fingerprint verification level‟ (Default setting: „0‟)
This item is to decide fingerprint verification level for
each user. Authentication level for each registered user
can be changed by change this value.
If it is set to „0‟, authentication will be done using 1 to 1
fingerprint verification level at the terminal.
▶
If „Allow 1 to N face identification (Default setting: face
is registered [v])‟ option is checked, authentication with
only face without user ID or card is possible.
Press [Auth Type] button in [Add user] screen to set
authentication method. (However, this can be set only
when more than one authentication method are
registered.)
To move out without changing, press [BACK] button.
“▶ registered authentication method” in the left screen
shows all already registered authentication methods. If
each authentication method is selected, it will be deleted
from authentication method.
The buttons below display combination of authentication
method which can be selected. Press the button desired
to be changed to change authentication method to move
to the previous screen.
The followings are icons for authentication method.
: fingerprint : face
: card : password
3.3.1.7. Authentication option
3.3.1.8. Authentication method
NITGEN Co,. Ltd / #1208 ,641-4, Munjeong-dong, Songpa-gu, Seoul, Korea (138-050)
Tel: 02-6488-3232, Fax: 02-6488-3099, E-Mail: [email protected]
Page 34

eNBioAccess-T9 user guide 34
When [Save] button is pressed,
Normally registered
When [Save] button is pressed,
User registration failed
: None of authentication method using fingerprint,
face, card or password is registered
When [Authentication Method] button is pressed,
No Authentication Method is registered
When [Save] button is pressed,
User registration/modification failed
: Operation is under Network mode but the terminal is
not connected to the server
3.3.1.9. Saving
After completing all registering processes, press [Save] button. At this point, if [Cancel]
or [BACK] button is pressed without pressing [Save] button, the user won‟t be saved.
The following shows LCD messages which can be displayed during registering processes.
NITGEN Co,. Ltd / #1208 ,641-4, Munjeong-dong, Songpa-gu, Seoul, Korea (138-050)
Tel: 02-6488-3232, Fax: 02-6488-3099, E-Mail: [email protected]
Page 35

eNBioAccess-T9 user guide 35
During [Register Fingerprint]
Not same fingerprint but different f ingerprint is input
during fingerprint registration
During [Register Fingerprint]
Already registered fingerprint is tried to be registered
again
(However, same fingerprint input with same user ID is
possible.)
※ To register same fingerprint with another different
ID, „System fingerprint recognition prevention of
registration of similar fingerprint‟ function must be
released. However, in this case, same fingerprint can
be authenticated as different ID each other. Hence, it is
not proper for something like time and attendance
management.
3.3.2. Deleting
Select [User management] [Delete] in the main menu to display the screen below
NITGEN Co,. Ltd / #1208 ,641-4, Munjeong-dong, Songpa-gu, Seoul, Korea (138-050)
Tel: 02-6488-3232, Fax: 02-6488-3099, E-Mail: [email protected]
Page 36

eNBioAccess-T9 user guide 36
Input user ID to be deleted and press [OK] button.
Press [BACK] button to cancel and move out.
Failure message of “unregistered user” will be
displayed in the screen when unregistered ID is
input, and success message of “deleted” will be
displayed when registered ID is input.
Normally deleted
Unregistered ID is input
However, it is not deleted from the server even when it is deleted from the terminal.
Therefore, it must be deleted from the server in order to completely delete it.
Deletion will be performed without distinction of user/administrator. Hence, care is
required. If a user registered only at the terminal without registering at the network
server is deleted, recovering is impossible. Hence, be cautious of it.
The following shows LCD messages which can be displayed during deletion.
NITGEN Co,. Ltd / #1208 ,641-4, Munjeong-dong, Songpa-gu, Seoul, Korea (138-050)
Tel: 02-6488-3232, Fax: 02-6488-3099, E-Mail: [email protected]
Page 37

eNBioAccess-T9 user guide 37
Operation is under Network mode but the terminal is not
connected to the server.
Input user ID to be changed and press [OK] button.
Press [BACK] button to cancel and move out.
3.3.3. Changing
Select [User management] [change] in the main menu to display the screen below.
If an unregistered ID is input, failure message will be displayed. If a registered ID is
input, information of the registered user will be displayed as below.
NITGEN Co,. Ltd / #1208 ,641-4, Munjeong-dong, Songpa-gu, Seoul, Korea (138-050)
Tel: 02-6488-3232, Fax: 02-6488-3099, E-Mail: [email protected]
Page 38

eNBioAccess-T9 user guide 38
Each icon displayed on the left has the following
meaning.
: number of registered face
: number of registered fingerprint (X, 1~10)
: whether password is registered (O: registered/X: not
registered)
: whether card is registered (O: registered/X: not
registered)
: user ID to be registered
: user
: administrator
Touch picture to take user‟s picture again to register a
new one.
To really delete all users, press [Yes]. To cancel it,
press [No]
※ If [Yes] is selected, all users and administrators
will be deleted. Recovering after deleting is
impossible. Hence, it should take extra care.
Since the method to change each item is same with that for user add, refer to „3.3.1.
Add‟.
3.3.4. Deleting All
Select [User] [Delete All] in the main menu to display the screen below
3.3.5. Searching
Select [User] [View] in the main menu to search the list of all registered users as
below.
NITGEN Co,. Ltd / #1208 ,641-4, Munjeong-dong, Songpa-gu, Seoul, Korea (138-050)
Tel: 02-6488-3232, Fax: 02-6488-3099, E-Mail: [email protected]
Page 39

eNBioAccess-T9 user guide 39
User list will be displayed in the order of ID. Scroll
down screen to search following user lists.
List will be displayed by 100 persons unit. If there
are more than 100 persons, press [BACK] or
[NEXT] button below to search the previous or the
next list.
▶ [ID]: Touch ID of a specific user to directly
move to the screen to change it.
▶ [Delete]: Check at the check box on the right
and press Delete button to delete checked users
at a time.
Press [BACK] button on the top in this screen to
move to the previous „3.3. User management‟
menu.
▶ [ID search]: As shown in the left screen, input
a user ID to search the relevant user.
Press [BACK] button in this screen to move to
„3.3. User management‟ menu.
NITGEN Co,. Ltd / #1208 ,641-4, Munjeong-dong, Songpa-gu, Seoul, Korea (138-050)
Tel: 02-6488-3232, Fax: 02-6488-3099, E-Mail: [email protected]
Page 40

eNBioAccess-T9 user guide 40
▶ [Name]: Press the button and input user name
to display registered user list with the name in
which input character string is included.
Press [BACK] button in this screen to move to
„3.3. User management‟ menu.
Ex) In case of searching with “Yeon”, all users
who have “Yeon” in their names will be
searched as shown in the left screen.
3.4. Network setting
Select [network] in the main menu to display the screen below.
NITGEN Co,. Ltd / #1208 ,641-4, Munjeong-dong, Songpa-gu, Seoul, Korea (138-050)
Tel: 02-6488-3232, Fax: 02-6488-3099, E-Mail: [email protected]
Page 41

eNBioAccess-T9 user guide 41
▶ Default setting: same with the setting in the left
screen
Select [Static IP] if IP is fixed in the connected
network is allocated. Select [DHCP] if there is a
DHCP server at the connected network and IP is
allocated from it.
In case of setting it to [Static IP], set terminal IP
address, subnet mask and gateway.
If [DHCP] is selected, no need to set it.
DNS can be input in [Server IP address] instead of
IP. In case of using specific DNS server, input IP
address of [DNS server] too. Up to 2 DNS servers
can be designated. To input DNS, check at DN□ to
input English.
Touch a desired item to be changed to display
keypad.
After completing input for the relevant item using the
keypad, touch [ ] button or the next input window
to continue input. After completing input, touch not
input window but background to close the keypad.
Press [OK] button to apply the changed value after
setting. To cancel it, press [BACK] button to move to
upper menu.
▶ [Port]: default port value of the authentication server (AccessServer server) is „7332‟.
In case of changing the value, the value must be changed to the same value at the
server program as well. Hence, care is necessary to change it.
▶ [Terminal ID]: unique ID used to distinction of terminal by authentication server,
and default value is „1‟. It must match with the ID of terminal registered by the server
program. Up to 2000 ID can be input.
3.5. Operation mode
3.5.1. Operation mode
NITGEN Co,. Ltd / #1208 ,641-4, Munjeong-dong, Songpa-gu, Seoul, Korea (138-050)
Tel: 02-6488-3232, Fax: 02-6488-3099, E-Mail: [email protected]
Page 42

eNBioAccess-T9 user guide 42
▶ Default setting: same with the setting in the left
screen
▶ Function key setting
[F1] ~ [F4], [Access], [ID Input] buttons used to
change authentication mode for attending/quitting.
Press function button to convert authentication mode
into the relevant mode. Only the checked button will
be displayed in the main screen. Hence, it can be
used for exclusive terminal for attending/quitting by
unchecking other function keys.
▶ F key mode
Normal : Selected F Key value is set back to 0 after
user authentication.
Fixed : Selected F Key value remains unchanged if no
other F Key is selected.
Select [Application] in the main menu to display the screen below.
To apply the setting value, press [OK] button, or and press [BACK] button to cancel and
to move to the upper menu.
NITGEN Co,. Ltd / #1208 ,641-4, Munjeong-dong, Songpa-gu, Seoul, Korea (138-050)
Tel: 02-6488-3232, Fax: 02-6488-3099, E-Mail: [email protected]
Page 43

eNBioAccess-T9 user guide 43
▶ Default setting: same with the setting in the left
screen
▶ Length of user ID
This part is to set the length of user ID. It can be
changed to 4~ 20-digit ID and it must be same
with the length of registered ID at the server
program. If ID registered at the server program
uses 6-digit ID of „000075‟, set it to „6‟.
▶ Authentication
This item is to decide authentication priority
between the terminal and the network server.
Authentication will be performed according to the
setting order.
▶ Operation Mode
There are Network Mode that requires server
connection and StandAlone Mode where the
terminal can function on its own without server
connection. When switching from the Stand Alone
mode to the Network mode, there may be a
discrepancy between the server data and the
terminal data. To solve this, download the users
from AccessManager to the terminal or vice versa.
3.6. System
3.6.1. System
Select [System] [System] in the main menu to display the screen below.
To apply the setting value, press [OK] button or press [BACK] button to cancel and to
move to the upper menu. If [OK] button is pressed without changing the setting value,
directly move to upper menu.
To continuously set another item, press the relevant menu item button on the left
3.6.2. Fingerprint recognition
Select [System] [Fingerprint recognition] in the main menu to display the screen
below.
NITGEN Co,. Ltd / #1208 ,641-4, Munjeong-dong, Songpa-gu, Seoul, Korea (138-050)
Tel: 02-6488-3232, Fax: 02-6488-3099, E-Mail: [email protected]
Page 44

eNBioAccess-T9 user guide 44
▶ Default setting: same with the setting in the left
screen
▶ 1 to N level (3~9)
This authentication level is used for 1 to N fingerprint
verification. Since authentication level for each user is
not set for 1 to N identification, it is always based on
the authentication level of the terminal.
▶ 1 to 1 level (1~9)
This authentication level is used for 1 to 1 fingerprint
verification. However, 1 to 1 verification level of the
relevant user will be performed for the user for whom
1 to 1 verification level is not to set „0‟ (use
authentication level of the terminal).
▶ Fake Finger Detection
This is to set LFD level to prevent input of fake fingerprint. The higher LFD level, the
higher function to prevent input of fake f ingerprint made of rubber, paper, f ilm or
silicon. However, sometimes input of real fingerprint can be difficult if f ingerprint is too
dry.
▶ Check similar FP
If this item is checked ( ), check f ingerprint whether it is an already registered
fingerprint to prevent reregistering it as another user ID by duplicating a same
fingerprint. The function is only for the users who are saved at the terminal. It is a
separate function from similar fingerprint prevention function of the server.
To apply the setting value, press [OK] button or press [BACK] button to cancel and to
move to the upper menu. If [OK] button is pressed without changing the setting value,
directly move to upper menu.
NITGEN Co,. Ltd / #1208 ,641-4, Munjeong-dong, Songpa-gu, Seoul, Korea (138-050)
Tel: 02-6488-3232, Fax: 02-6488-3099, E-Mail: [email protected]
Page 45

eNBioAccess-T9 user guide 45
▶ Default setting: same with the setting in the left
screen
▶ Face Authentication
Press the check box to enable the function.
▶ Matching Level
Level used for face authentication. It is set to 1~4
of steps according to match degree with
registered face. Match degree must be higher
than the setting authentication level for successful
authentication.
The higher the authentication level, security can
be the higher. However, since it requires relatively
high match rate, probability that failure of
authentication will be higher during selfauthentication.
3.6.3. Face recognition
▶ Face Recognition
The mode is to designate method for face authentication, and it can be set according
to use environment.
For more information on each setting method, refer to „1.6, correct face registration
and Authentication Method‟.
▶ Camera Angle
The mode is to set the default value of camera angle for face authentication, and it
can be selected from –2 degrees to +4 degrees
▶ Enrollment sensitivity
This is to set face registration sensitivity. Default value is automatically set.
To apply the setting value, press [OK] button or press [BACK] button to cancel and to
move to the upper menu. If „OK‟ button is pressed without changing the setting value,
directly move to upper menu.
3.6.4. Setting current time
Select [System] [Date/time] in the main menu to display the screen below.
NITGEN Co,. Ltd / #1208 ,641-4, Munjeong-dong, Songpa-gu, Seoul, Korea (138-050)
Tel: 02-6488-3232, Fax: 02-6488-3099, E-Mail: [email protected]
Page 46

eNBioAccess-T9 user guide 46
▶ Default setting: same with the setting in the left screen
▶ Display format
This is to set the method to display the current time of the terminal.
- yyyy-mm-dd: displayed in the order of year, month, day
- dd-mmm-yyyy: displayed in the order of day, month (English), year
▶ Set Date/Set time
This is to change the current time of the terminal. If the server is connected and the
above [Time sync] is set to [Auto], the time is synchronized with the time of the
server. Hence, no need to change it.
To apply the setting value, press [OK] button or press [BACK] button to cancel and to
move to the upper menu.
3.6.6. Database
Select [System] [Database] in the main menu to display the screen below.
NITGEN Co,. Ltd / #1208 ,641-4, Munjeong-dong, Songpa-gu, Seoul, Korea (138-050)
Tel: 02-6488-3232, Fax: 02-6488-3099, E-Mail: [email protected]
Page 47

eNBioAccess-T9 user guide 47
To delete all users, press [Delete all users] button.
To reset the setting value, press [Delete setting]
button. To reset authentication record, press [Delete
Log] button. To delete only image log, press [Delete
image log] button. To delete the whole data to make
the device to factory setting status, press [Factory
Init] button.
Press [Close] or [BACK] button to move to upper
menu.
To delete all users, press [Yes] button, or press [No]
or [ ] button to cancel it.
If nothing is input for 5 seconds in this status,
message box will be closed without delete.
3.6.6.1. Deleting all users
Select [System] [Database] [Delete all users] in the main menu to display the
screen below.
The following success message box will be displayed when all users are successfully
deleted by pressing [Yes].
In this case, all of users and administrators will be deleted. They can’t be recovered
after deleting.
NITGEN Co,. Ltd / #1208 ,641-4, Munjeong-dong, Songpa-gu, Seoul, Korea (138-050)
Tel: 02-6488-3232, Fax: 02-6488-3099, E-Mail: [email protected]
<Figure3-5>
Page 48

eNBioAccess-T9 user guide 48
To reset all setting values, press [Yes] button, or press
[No] or [ ] button to cancel it.
If nothing is input for 5 seconds in this status, message
box will be closed without resetting.
To delete all authentication records saved at the terminal,
press [Yes] button, or press [No] or [ ] button to
cancel it.
If nothing is input for 5 seconds in this status, message
box will be closed without delete.
3.6.6.2. Setting delete
Select [System] [Database] [Delete setting] in the main menu to display the
screen below.
Success message in <Figure3-5> will be displayed when the setting is successfully
delete by pressing [Yes] and display language and voice will be changed to default
value (English). Reset all setting values of the terminal excepting MAC (physical) address
and [Fingerprint templet format], but user and authentication record won‟t be deleted.
3.6.6.3. Log data delete
Select [System] [Database] [Delete Log] in the main menu to display the screen
below.
Success message in <Figure3-5> will be displayed when successfully deleted by
pressing [Yes].
All authentication logs including image log will be deleted. They can‟t be recovered after
deleting.
3.6.6.4. Image log delete
Select [System] [Database] [Delete Image log] in the main menu to display the
screen below.
NITGEN Co,. Ltd / #1208 ,641-4, Munjeong-dong, Songpa-gu, Seoul, Korea (138-050)
Tel: 02-6488-3232, Fax: 02-6488-3099, E-Mail: [email protected]
Page 49

eNBioAccess-T9 user guide 49
To delete all image logs saved at the terminal, press
[Yes] button, or press [No] or [ ] button to cancel it.
If nothing is input for 5 seconds in this status, message
box will be closed without delete.
To reset the terminal to factory setting status, [Yes]
button, or press [No] or [ ] button to cancel it.
If nothing is input for 5 seconds in this status, message
box will be closed without resetting.
Success message in <Figure3-5> will be displayed when successfully deleted by
pressing [Yes].
Only image saved as a log will be deleted, but authentication log itself won‟t be deleted.
3.6.6.5. Deleting all
Select [System] [Database] [Factory Init] in the main menu to display the
screen below.
Success message in <Figure3-5> will be displayed when successfully deleted by
pressing [Yes], and display language and voice will be changed to the default value
(English).
Delete all setting values and user, log information excepting MAC (physical) address saved
at the terminal to make the terminal to factory setting status. They can‟t be recovered
after resetting. Hence, great care is required.
3.7. Terminal setting
3.7.1. Sound
Select [Terminal] [Sound] in the main menu to display the screen below.
NITGEN Co,. Ltd / #1208 ,641-4, Munjeong-dong, Songpa-gu, Seoul, Korea (138-050)
Tel: 02-6488-3232, Fax: 02-6488-3099, E-Mail: [email protected]
Page 50

eNBioAccess-T9 user guide 50
▶ Default setting: same with the setting in the left
screen
▶ Voice volume
Scroll to the left/right in 0~15 steps to set voice
size. Press [ ] button on the right to play voice in
order to check voice volume.
▶ Beep volume
Scroll to the left/right in 0~3 steps to set buzzer
sound size. Press [ ] button on the right to make
buzzer sound in order to check buzzer sound
volume.
▶ User voice
To change voice which outputs when authentication is successful or failed, copy the
relevant voice to the terminal and then check at this option to output user voice. For
the method to copy voice to the terminal, refer to 3.10. SD card [theme] or 3.11.2
voice message change.
To apply the setting value, press [OK] button, or press [BACK] button to cancel and to
move to the upper menu. To continuously set another item, press the relevant menu item
button on the left
3.7.2. Terminal option
Select [Terminal] [Option] in the main menu to display the screen below.
NITGEN Co,. Ltd / #1208 ,641-4, Munjeong-dong, Songpa-gu, Seoul, Korea (138-050)
Tel: 02-6488-3232, Fax: 02-6488-3099, E-Mail: [email protected]
Page 51

eNBioAccess-T9 user guide 51
▶ Default setting: same with the setting in the left
screen
▶ Read Card number
Touch a card on this screen to display card No on
the LCD. Card No according to the setting value can
be searched by changing [card format].
▶ Lock terminal
The function is directly lock or unlock the terminal
by an administrator not from the server program
but at the terminal. If it is checked ( ), terminal
will become lock status in which nobody can access
until the administrator release the setting.
▶ Card reader
Card reader can be set to Standard or HID iClass. The
reader will recognize only the setting type of card.
Card format
Card No
Display method
Standard
02207638
Displayed in (3+5)-digit decimal
number
[022 (16h) +07638 (1DD6h) ]
Card format
Card No
Display method
Standard
529D06E3
Displayed in 8-digit hexadecimal
▶ Card format
This is to set method to display card No. Since card No becomes different according to
the setting value as below, set it during initial installation. If it is inevitably changed
during operation, the card must be registered again.
RF card(EM Card) example) card No (5byte): 08h 01h 16h 1Dh D6h
SC card(Mifare Card) example) card No (4byte): 52h 9Dh 06h E3h
To apply the setting value, press [OK] button or press [BACK] button to cancel and to
move to the upper menu.
3.7.3. Input setting
Select [Terminal] [Input] in the main menu to display the screen below.
NITGEN Co,. Ltd / #1208 ,641-4, Munjeong-dong, Songpa-gu, Seoul, Korea (138-050)
Tel: 02-6488-3232, Fax: 02-6488-3099, E-Mail: [email protected]
Page 52

eNBioAccess-T9 user guide 52
▶ Default setting: same with the setting in the left
screen
▶ M0: Set this to connect an external contact to DM0.
(If motor lock is used, set it to [door open status NO] or [door open status NC].)
- Not use: Select this when nothing is connected.
- Door open status NO or door open status NC: when door open status monitoring pin
is connected.
Set NO/NC according to status of pin which is input during detection.
▶ M1/M2: Set this to connect an external contact to DM1/DM2.
(If motor lock is used, set it to [locked status NO] or [lock status NC].)
- Not use: Select this when nothing is connected.
- Locked status NO or locked status NC: when locked status monitoring pin is
connected
Set NO/NC according to status of pin which is input during detection
▶ IO: Set this to connect an external contact to Exit pin.
- Not use: select this when nothing is connected
- Inside Open NO or Inside Open NC: Exit button is connected
Set NO/NC according to status of pin which is input during detection
▶ Warn Door open (sec)
This function makes the terminal to check door Open time to make a warning sound if
the door is open more than the setting time (min 5 seconds ~ max 60 seconds).
If it is set to [0], no warning sound will be made. Warning sound will be started after
min 5 seconds even when it is set to [01~04].
The door must be closed within the setting time. If not due to unexpected situation,
the terminal will make warning sound to inform the situation administrator to take
measures for normal door closing.
To use this function, monitoring of the Lock for door open lock status must be possible,
and monitoring pin of the Lock must be also connected to M0. In addition, M0 must be
set to [door open status NO] or [door open status NC] as well.
NITGEN Co,. Ltd / #1208 ,641-4, Munjeong-dong, Songpa-gu, Seoul, Korea (138-050)
Tel: 02-6488-3232, Fax: 02-6488-3099, E-Mail: [email protected]
Page 53

eNBioAccess-T9 user guide 53
▶ Default setting: same with the setting in the left
screen
▶ Tamper Alarm
If this is checked ( ), warning sound will be made when the terminal is disassembled.
To apply the setting value, press [OK] button, or press [BACK] button to cancel and to
move to the upper menu.
3.7.4. Lock setting
Select [Terminal] [Lock] in the main menu to display the screen below.
▶ Lock 1 option
- Not use: when it is not used
- Strike/Auto/successful authentication notice: warning lamp to indicate Strike type,
auto door or authentication success/failure is connected to Lock1
- Motor lock 1: when a motor lock is connected
▶ Lock 2 option
- Not use: when it is not used
- Authentication failure notice: warning lamp to indicate authentication failure is
connected to Lock2
- Motor lock 2: when a motor lock is connected
▶ Lock 1 Duration (ms)
This is to designate time to give signal when Lock 1 is set to „Strike/Auto/successful
authentication notice‟. Since it is set to ms unit, set it to 3000 to designate it to 3
seconds. Strike type means time until the door is closed again when the door is open
after authentication.
▶ Lock 2 Duration (ms)
This is to designate time to give signal when Lock 2 is set to „authentication failure
notice‟. Since it is set to ms unit, set it to 3000 to designate it to 3 seconds.
NITGEN Co,. Ltd / #1208 ,641-4, Munjeong-dong, Songpa-gu, Seoul, Korea (138-050)
Tel: 02-6488-3232, Fax: 02-6488-3099, E-Mail: [email protected]
Page 54

eNBioAccess-T9 user guide 54
▶ Basic setting : Same with the window at the left
side.
None
General case. It does not use Wiegand out port.
26bit
Because it sends “Sitecode[1byte] + User ID[2 byte]”, set the user ID
less or equal than 4 digits.
Send example) In case of SiteCode:045(2Dh), UID:6543(198Fh)
1 00101101 0001 1001 10001111 0
34bit
Because it sends “Sitecode[1 byte] + User ID[3 byte]”, set the user ID
less or equal than 7 digits.
But, if the user ID is 8 digits, ignore sitecode and send only the “User
ID[4byte]”.
To apply the setting value, press [OK] button or press [BACK] button to cancel and to
move to the upper menu.
3.7.5. External terminal setup
If you select the [Terminal]->[External device] in the main menu, the following
window appears.
▶Site code
It sets the sitecode value sent in Wiegand output below.
▶Wiegand Output
It is used only when the special controller is equipped running by the Wiegand input.
When the authorization is finished, the data of the following format is sent to the
Wiegand port of the terminal.
NITGEN Co,. Ltd / #1208 ,641-4, Munjeong-dong, Songpa-gu, Seoul, Korea (138-050)
Tel: 02-6488-3232, Fax: 02-6488-3099, E-Mail: [email protected]
Page 55

eNBioAccess-T9 user guide 55
Send example) SiteCode:001(1h), UID:123456(1E240h)
0 00000001 00000001 11100010 01000000 0
User
definition
It is set by the user definition, which only can be set in the server, and
the setting type only can be inquired in the terminal.
▶ Default setting: same with the setting in the left
screen
▶ Main background
This is to set background of the main screen. Press
[ ] button to search the next image.
Click [OK] button to apply the set value, and click [BACK] button to cancel and return.
3.8. Screen setting
3.8.1. Theme
Select [Display] [Theme] in the main menu to display the screen below.
To apply the setting value, press [OK] button or press [BACK] button to cancel and to
move to the upper menu. To continuously set another item, press the relevant menu item
button on the left.
3.8.2. Camera
Select [Display] [Camera] in the main menu to display the screen below.
NITGEN Co,. Ltd / #1208 ,641-4, Munjeong-dong, Songpa-gu, Seoul, Korea (138-050)
Tel: 02-6488-3232, Fax: 02-6488-3099, E-Mail: [email protected]
Page 56

eNBioAccess-T9 user guide 56
▶ Default setting: same with the setting in the left
screen
▶ Display option
This is to select image displayed in authentication
success message window.
- None
- Registered photo
▶ Save success log
If this is checked ( ), capture camera image and
save it as an image log when authentication is
successful.
▶ Save failed log
If this is checked ( ), capture camera image and
save it as an image log when authentication failed.
▶ Default setting: „English‟
▶ Language
Press „OK‟ button after changing language to
change voice message and message displayed in
the screen to the setting language.
Press [BACK] button to cancel and to move to the
upper menu.
※ Support language
English, Korean, Japanese, Portuguese, Chinese,
French
To apply the setting value, press [OK] button or press [BACK] button to cancel and to
move to the upper menu.
3.8.3. Language
Select [Display] [Language] in the main menu to display the screen below.
3.8.4. LCD option
NITGEN Co,. Ltd / #1208 ,641-4, Munjeong-dong, Songpa-gu, Seoul, Korea (138-050)
Tel: 02-6488-3232, Fax: 02-6488-3099, E-Mail: [email protected]
Page 57

eNBioAccess-T9 user guide 57
▶ Default setting: same with the setting in the left
screen
▶ Screen saver (5 seconds ~ 10 minutes)
If nothing is input for the setting time, the screen
will be automatically OFF. However, LCD will be
always ON if it is set to „None‟.
▶ Display option
This is to set detail to be displayed when
authentication is successful.
- None: display only authentication result of
[Successful/Failed]
- User ID
- User name: If user name is not registered, user
ID will be displayed (In this case, add “ID:” to distinct
it from name)
- Social No.
▶ Default setting: same with the setting in the left
screen
▶ Message display (ms)
This is to set time to be displayed in authentication
result window.
Up to 0~5000 can be set. Authentication result
window will be displayed for the setting time and
then it will be closed. Since it is by ms unit, input
2000 to set it to 2 seconds.
Select [Display] [Option] in the main menu to display the screen below.
To apply the setting value, press [OK] button or press [BACK] button to cancel and to
move to the upper menu.
3.8.5. Message time setting
Select [Display] [Message display time] in the main menu to display the screen
below.
To apply the setting value, press [OK] button or press [BACK] button to cancel and to
move to the upper menu.
NITGEN Co,. Ltd / #1208 ,641-4, Munjeong-dong, Songpa-gu, Seoul, Korea (138-050)
Tel: 02-6488-3232, Fax: 02-6488-3099, E-Mail: [email protected]
Page 58

eNBioAccess-T9 user guide 58
▶ System info
This is to display hardware and firmware version of
the terminal.
▶ Disk (amount used/total)
This is to display amount of used storage space.
If amount of used storage space is getting too
much, it will be displayed in red.
▶ RAM (amount used / total)
This is to display amount of RAM being used out of
total RAM.
If amount of used memory is getting too much, it
will be displayed in red.
3.9. Terminal information
3.9.1. System information
Select [Terminal info] [System] in the main menu to display the screen below.
To move to upper menu after searching, press [BACK] button. To continuously search
another item, press the relevant menu item button on the left
3.9.2. Terminal information
Select [Terminal info] [Terminal] in the main menu to display the screen below.
NITGEN Co,. Ltd / #1208 ,641-4, Munjeong-dong, Songpa-gu, Seoul, Korea (138-050)
Tel: 02-6488-3232, Fax: 02-6488-3099, E-Mail: [email protected]
Page 59

eNBioAccess-T9 user guide 59
▶ Terminal info
This is to display option setting value of the
terminal.
▶ Network info
This is to display network setting value of the
terminal.
To move to upper menu after searching, press [Close] or [BACK] button.
3.9.3. Network information
Select [Terminal information] [network] in the main menu to display the screen
below.
To move to upper menu after searching, press [Close] or [BACK] button.
NITGEN Co,. Ltd / #1208 ,641-4, Munjeong-dong, Songpa-gu, Seoul, Korea (138-050)
Tel: 02-6488-3232, Fax: 02-6488-3099, E-Mail: [email protected]
Page 60

eNBioAccess-T9 user guide 60
▶ User information
- User: number of registered user (including
administrator)
- Admin: number of registered administrator
- FP: number of all registered fingerprint
- Face: number of user who registered face
- Face1toN: number of user for whom 1 to N face
identification is possible
- Photo: number of user who registered picture
(Max means maximum number can be registered
for each item.)
▶ Log information
Log: number of log saved at the terminal
Image Log: number of image log saved at the
terminal
(Max means maximum number can be saved for
each item.)
▶ View Log
This is to display log time and authentication status.
3.9.4. User information
Select [Terminal info] [User] in the main menu to display the screen below.
To move to upper menu after searching, press [Close] or [BACK] button.
3.9.5. Log information
Select [Terminal information] [log] in the main menu to display the screen below.
NITGEN Co,. Ltd / #1208 ,641-4, Munjeong-dong, Songpa-gu, Seoul, Korea (138-050)
Tel: 02-6488-3232, Fax: 02-6488-3099, E-Mail: [email protected]
Page 61

eNBioAccess-T9 user guide 61
▶ Log search
Press [Terminal info] [Log] -> [View Log] ->
[Log Search] button to set start date, end date,
event condition and press [OK] button to search log.
▶ Search result
Log search result is to check information of date,
time, ID, authentication result (successful or failed).
Press [BACK] or [NEXT] button to check search
information.
To move to upper menu after searching, press [Close] or [BACK] button.
3.9.6. About
Select [Terminal info] [About] in the main menu to display the screen below.
NITGEN Co,. Ltd / #1208 ,641-4, Munjeong-dong, Songpa-gu, Seoul, Korea (138-050)
Tel: 02-6488-3232, Fax: 02-6488-3099, E-Mail: [email protected]
Page 62

eNBioAccess-T9 user guide 62
▶ About
License information of Korean font applied to the
terminal will be displayed.
<When SD card is inserted,>
< When SD card is not inserted,>
To move to upper menu after searching, press [Close] or [BACK] button.
3.10. SD card
Select [SD card] in the main menu to display the screen below.
※ This can be done only when SD card is inserted. As shown in the figure below, the
card must be over side down. (Only SD card with capacity below 32G can be used.)
NITGEN Co,. Ltd / #1208 ,641-4, Munjeong-dong, Songpa-gu, Seoul, Korea (138-050)
Tel: 02-6488-3232, Fax: 02-6488-3099, E-Mail: [email protected]
Page 63

eNBioAccess-T9 user guide 63
This function is to backup data of the terminal using
[EXPORT]. Data backed up by [IMPORT] can be
copied back to the terminal.
▶ Export
This is to copy the relevant data from the terminal to an external SD card.
- User data: copy user DB into „eNBioAccessT9/terminal ID/user/today‟s date‟ folder in
the SD card.
- System option: Copy option setting values of the terminal into „eNBioAccesT9/config‟
folder.
- Event log: Copy authentication log into „eNBioAccessT9/terminal ID/log/ today‟s date‟
folder in the SD card. (Do not copy image log.)
Click event log button and select period of authentication log to be
exported as shown in the image below.
- Picture data: Save image log into „eNBioAccessT9/terminal ID/log/today‟s date /
pictures‟ folder in the SD card as a .jpg file.
- Export all: Export the above user data and system option, event log, image log. In
case of export all, all of the saved event logs will be saved.
NITGEN Co,. Ltd / #1208 ,641-4, Munjeong-dong, Songpa-gu, Seoul, Korea (138-050)
Tel: 02-6488-3232, Fax: 02-6488-3099, E-Mail: [email protected]
Page 64

eNBioAccess-T9 user guide 64
▶ import
This is to copy the relevant data from a SD card to the terminal
- User data: Copy user data of *.ndb f ile name from „eNBioAccessT9/user‟ folder in the
SD card to the terminal.
- System option: Copy option setting values of the terminal saved in the SD card
(„eNBioAccessT9/config‟ folder) by exporting to the terminal.
To apply a new DB or setting value when import is performed, the terminal must be
rebooted.
▶ Others
- Theme: This is to copy voice file in „eNBioAccessT9/audio‟ folder of SD card to the
terminal.
In case of replacing authentication success (user_ok.mp3), authentication
failure (user_fail.mp3) message with user voice, copy each of voice defined by
a user by designating it as a stipulated file name to play user voice.
- F/W Upgrade: This is to upgrade firmware from a SD card
(Firmware must be located in „eNBioAccessT9‟ folder in the SD card.)
To move to upper menu after upgrade, press [OK] or [BACK] button.
NITGEN Co,. Ltd / #1208 ,641-4, Munjeong-dong, Songpa-gu, Seoul, Korea (138-050)
Tel: 02-6488-3232, Fax: 02-6488-3099, E-Mail: [email protected]
Page 65

eNBioAccess-T9 user guide 65
Card Input part
4. How to use terminal
Background image and configuration in the main screen can be changed according to the
setting by an administrator. In addition, if screen saver time is set by the administrator,
LCD screen will be automatically OFF if nothing is operated at the terminal for the
designated time. when a user approach the terminal, when authentication is tried with
something like fingerprint/card or when the main screen is touched, the LCD screen will
be automatically activated.
4.1. Converting authentication mode
<Figure 4-1>
Press attending [F1]/quitting [F2] button in the screen to convert into a desired
authentication mode. Press button on the right of the screen to display the screen
below in order to select mode (Going out [F3], Return [F4], Access [Access], etc) beside
the modes in the screen.
NITGEN Co,. Ltd / #1208 ,641-4, Munjeong-dong, Songpa-gu, Seoul, Korea (138-050)
Tel: 02-6488-3232, Fax: 02-6488-3099, E-Mail: [email protected]
Page 66

eNBioAccess-T9 user guide 66
Press desired access mode button in access mode
selection screen in the left to close selection screen and
to convert mode in the main screen into the relevant
mode.
Input user ID and press [OK] button to display
fingerprint input, face input, card input or password
input screen according to Authentication Method of a
user.
4.2. ID input
Press [Input ID] button in the main screen to display the following ID input window.
NITGEN Co,. Ltd / #1208 ,641-4, Munjeong-dong, Songpa-gu, Seoul, Korea (138-050)
Tel: 02-6488-3232, Fax: 02-6488-3099, E-Mail: [email protected]
Page 67

eNBioAccess-T9 user guide 67
4.3. Authentication
4.3.1. Face authentication
▶ 1 to N identification
Set face position until guide line is changed to green, look at the camera when the
guide line becomes green and then stop movement for a moment to proceed with
authentication.
▶ 1 to 1 verification
As shown in the figure below, press [ID input] button to input ID first. After that, set
face position until guide line becomes green when face input message is displayed and
then look at the camera stopping movement for a while.
4.3.2. Fingerprint verification
▶ 1 to N identification
When fingerprint is placed on the fingerprint sensor in the main screen, buzzer sounds
and the sensor lamp turns ON to receive fingerprint. Do not remove finger until lamp
of the fingerprint sensor is completely OFF.
▶ 1 to 1 verification
As shown in the figure below, press [ID input] button to input ID first, input fingerprint
when fingerprint input window is displayed and f ingerprint sensor lamp is ON. Do not
remove finger until lamp of the fingerprint sensor is completely OFF and the following
fingerprint input window is closed.
NITGEN Co,. Ltd / #1208 ,641-4, Munjeong-dong, Songpa-gu, Seoul, Korea (138-050)
Tel: 02-6488-3232, Fax: 02-6488-3099, E-Mail: [email protected]
Page 68

eNBioAccess-T9 user guide 68
▶ Authentication while loading fingerprint data
The saved fingerprint data of all users will be loaded to the memory for 1 to N
identification during terminal booting. Progress will be displayed during loading in the
top left of the screen as below.
Server 1 to N identification will be tried if server authentication is included among the
authentication methods at the terminal when 1 to N fingerprint verification is requested
by a user during loading.
In case of authentication method by the terminal itself, ID input window will pop up to
proceed with 1 to 1 verification.
4.3.3. Card authentication
Put the card on the card Figure in <Figure 4-1>.
4.3.4. Password authentication
As shown in the figure below, press [Input ID] button to input ID first and then input
password when password input window is displayed.
NITGEN Co,. Ltd / #1208 ,641-4, Munjeong-dong, Songpa-gu, Seoul, Korea (138-050)
Tel: 02-6488-3232, Fax: 02-6488-3099, E-Mail: [email protected]
Page 69

eNBioAccess-T9 user guide 69
4.3.5. Multi authentication
In case of a user for whom more than 2 authentication methods such as card &
fingerprint, card & fingerprint & face are required, if ID is input first, authentication will
be processed in the order of (fingerprint password card face). Multi
authentication will be performed as well when face or fingerprint is authenticated first.
NITGEN Co,. Ltd / #1208 ,641-4, Munjeong-dong, Songpa-gu, Seoul, Korea (138-050)
Tel: 02-6488-3232, Fax: 02-6488-3099, E-Mail: [email protected]
Page 70

eNBioAccess-T9 user guide 70
Note: This equipment has been tested and found to comply with the limits for CLASS B digital
device, pursuant to Part 15 of FCC Rules. These limits are designed to provide reasonable
protection against harmful interference when the equipment is operated in a commercial
environment This equipment generates, uses and can radiate radio frequency energy and, if
not installed and used in accordance with the instructions, may cause harmful interference to
radio communications. However, there is no guarantee that interference will not occur in a
particular installation. If this equipment does cause harmful interference to radio or television
reception, which can be determined by turning the equipment off and on, the user is
encouraged to try correct the interference by one or more of the following measures:
1.1. Reorient or relocate the receiving antenna.
1.2. Increase the separation between the equipment and receiver.
1.3. Connect the equipment into an outlet on a circuit different from that to which receiver is
connected.
1.4. Consult the dealer or experienced radio/TV technician for help.
FCC Information
This device complies with part 15 of the FCC Rules. Operation is subject to the following
two conditions :
(1) This Device may not cause harmful interface, and
(2) This device must accept any interference received, including interference that
may cause undesired operation.
WARNING
Changes or modifications not expressly approved by the manufacturer could void the
user‟s authority to operate the equipment.
“CAUTION : Exposure to Radio Frequency Radiation.
This equipment should be installed and operated with a minumum distance of 20 cm between
the radiator and your body.
NITGEN Co,. Ltd / #1208 ,641-4, Munjeong-dong, Songpa-gu, Seoul, Korea (138-050)
Tel: 02-6488-3232, Fax: 02-6488-3099, E-Mail: [email protected]
 Loading...