

Page 1

AC-7000 .User guide
Version kor-1.00
Copyright 2000 By Union Community Co., LTD.
Page 2

AC-7000 User guide 2
<Revison History>
Version Date Description Firmware Version
1.00 2014-08-14 Initial Release
0.0.x.51.00-000.06
㈜㈜㈜㈜Union Community / Hyundai Topics building 5
Songpa-gu, Seoul, Korea (138-050)
Tel: 02-6488-3000, Fax: 02-6488-3099, E-Mail:sales@unioncomm.co.kr
http://www.unioncomm.co.kr
th
floor, 44-3, Bangi 2-dong,
Page 3

AC-7000 User guide 3
< Glossary>
Admin, Administrator
- A user who can enter into the terminal menu mode, he/she can register/modify/delete
terminal users and change the operating environment by changing settings.
- If there is no administrator for a terminal, anyone can change the settings. In this regard,
it is recommended to register at least one administrator.
- Caution is required with registration and operation because an administrator has the
right to change critical environmental settings of the terminal.
1 to 1 Verification
- A user’s verification fingerprint (template) is compared to the user’s enrollment
fingerprint (template) previously registered. The terminal performs 1:1 matches against
the user’s enrolled template until a match is found.
- It is called 1 to 1 Verification because only the fingerprint registered in the user’s ID or
card is used for comparison.
1 to N Identification
- The terminal performs matches against multiple fingerprints (templates) based solely
on fingerprint information.
- Without the user’s ID or card, the user’s fingerprint is compared to fingerprints
previously registered.
Authentication level
- Depending on the fingerprint match rate, it is displayed from 1 to 9. Authentication is
successful only if the match rate is higher than the set level.
- The higher the Authentication level, the higher the security. However, it requires a
relatively high match rate, so Authentication is vulnerable to failure.
- 1:1 Level: Authentication level used for 1:1 verification
- 1:N Level: Authentication level used for 1:N identification
Authentication Method
- This represents the various types of authentication, including Face authentication, FP
(fingerprint) authentication, RF (card) authentication or a combination of these methods.
Example: Face or FP: Authentication with face or fingerprint
LFD (Live Finger Detection)
- This function allows the input of only real fingerprints and blocks the input of imitation
fingerprints produced using rubber, paper, film, and silicone.
㈜㈜㈜㈜Union Community / Hyundai Topics building 5
Songpa-gu, Seoul, Korea (138-050)
Tel: 02-6488-3000, Fax: 02-6488-3099, E-Mail:sales@unioncomm.co.kr
http://www.unioncomm.co.kr
th
floor, 44-3, Bangi 2-dong,
Page 4

AC-7000 User guide 4
Contents
<Revison History> .................................................................................................... 2
<Term Definition> ......................................................... Error! Bookmark not defined.
Contents ....................................................................... Error! Bookmark not defined.
1. Before use ............................................................................................................. 6
1.1. Safety precautions ................................................................................................. 6
1.2. Specific names of the terminal .............................................................................. 7
1.3. Window after operation ......................................................................................... 8
1.3.1. Icon ................................................................................................................ 8
1.3.2. Message ......................................................................................................... 9
1.4. Sounds in the operation ...................................................................................... 12
1.5. Beep sound in the operation ............................................................................... 13
1.6. How to register and authorize the face properly ............................................... 13
1.7. Proper fingerprint registration and input methods ............................................ 14
2. Product introduction .......................................................................................... 16
2.1. Product characteristics ....................................................................................... 16
2.2. Product components ........................................................................................... 18
2.2.1. Single use (entrance) .................................................................................... 18
2.2.2. Connected with PC server (entrance, attendance, meal personnel
management) ......................................................................................................... 18
2.3. Product specification ........................................................................................... 19
3. Enverinment setting ........................................................................................... 20
3.1. Checks before setting the environment ............................................................. 20
3.1.1. Entering the menu ........................................................................................ 20
3.1.2. Administrator authorization ........................................................................... 20
3.1.3. How to enter the menu without administrator authorization ........................... 21
3.1.4. How to save the set values ........................................................................... 22
3.2. Menu composition ............................................................................................... 23
3.3. Users management .............................................................................................. 26
3.3.1. Addition ......................................................................................................... 26
3.3.1.1. Photo registration .................................................................................. 28
3.3.1.2. Name registration .................................................................................. 28
3.3.1.3. Fingerprint registration .......................................................................... 29
3.3.1.4. Face registration ................................................................................... 31
3.3.1.5. Password registration ............................................................................ 33
3.3.1.6. Card registration .................................................................................... 33
3.3.1.7. Authorization options ............................................................................. 34
3.3.1.8. Authorization method ............................................................................. 34
3.3.1.9. Save ...................................................................................................... 35
3.3.2. Deletion ........................................................................................................ 36
3.3.3. Modification .................................................................................................. 37
3.3.4. Delete all ...................................................................................................... 38
3.3.5. Search .......................................................................................................... 38
3.4. Network setting .................................................................................................... 40
3.5. Application mode ................................................................................................. 41
3.5.1. Application mode .......................................................................................... 41
3.5.1.1. Entrance control or attendance management setting ............................. 41
3.5.1.2. Meal personnel management setting ..................................................... 43
3.5.2. Function keys ............................................................................................... 43
3.6. System .................................................................................................................. 44
㈜㈜㈜㈜Union Community / Hyundai Topics building 5
Songpa-gu, Seoul, Korea (138-050)
Tel: 02-6488-3000, Fax: 02-6488-3099, E-Mail:sales@unioncomm.co.kr
http://www.unioncomm.co.kr
th
floor, 44-3, Bangi 2-dong,
Page 5

AC-7000 User guide 5
3.6.1. System ......................................................................................................... 44
3.6.2. Fingerprint recognition .................................................................................. 44
3.6.3. Face recognition ........................................................................................... 46
3.6.4. Authorization ................................................................................................. 47
3.6.5. Present time setting ...................................................................................... 49
3.6.6. Database ...................................................................................................... 49
3.6.6.1. Delete all the users ................................................................................ 50
3.6.6.2. Delete settings ...................................................................................... 51
3.6.6.3. Delete logs data .................................................................................... 51
3.6.6.4. Delete image logs.................................................................................. 51
3.6.6.5. Delete all ............................................................................................... 52
3.7. Terminal settings ................................................................................................. 52
3.7.1. Sounds ......................................................................................................... 52
3.7.2. Terminal option ............................................................................................. 53
3.7.3. Input settings ................................................................................................ 55
3.7.4. Lock settings................................................................................................. 56
3.7.5. External terminal setup ................................................................................. 57
3.8. Display settings ................................................................................................... 59
3.8.1. Theme .......................................................................................................... 59
3.8.2. Camera ......................................................................................................... 59
3.8.3. Language ..................................................................................................... 60
3.8.4. LCD option ................................................................................................... 61
3.8.5. Message time settings .................................................................................. 61
3.9. Terminal information ............................................................................................ 62
3.9.1. System information ....................................................................................... 62
3.9.2. Terminal information ..................................................................................... 63
3.9.3. Network information ...................................................................................... 63
3.9.4. User information ........................................................................................... 64
3.9.5. Log information ............................................................................................. 64
3.9.6. About ............................................................................................................ 65
3.10. SD card ............................................................................................................... 66
3.11. User file download ............................................................................................. 68
3.11.1. Background screen change ........................................................................ 68
3.11.2. Voice message change ............................................................................... 68
4. How to use terminal ........................................................................................... 70
4.1. Authorization mode change ................................................................................ 70
4.2. ID input ................................................................................................................. 70
4.3. Authorization ........................................................................................................ 71
4.3.1. Face authorization ........................................................................................ 71
4.3.2. Fingerprint authorization ............................................................................... 72
4.3.3. Card authorization ........................................................................................ 73
4.3.4. Password authorization ................................................................................ 73
㈜㈜㈜㈜Union Community / Hyundai Topics building 5
Songpa-gu, Seoul, Korea (138-050)
Tel: 02-6488-3000, Fax: 02-6488-3099, E-Mail:sales@unioncomm.co.kr
http://www.unioncomm.co.kr
th
floor, 44-3, Bangi 2-dong,
Page 6
AC-7000 User guide 6
1. Before use
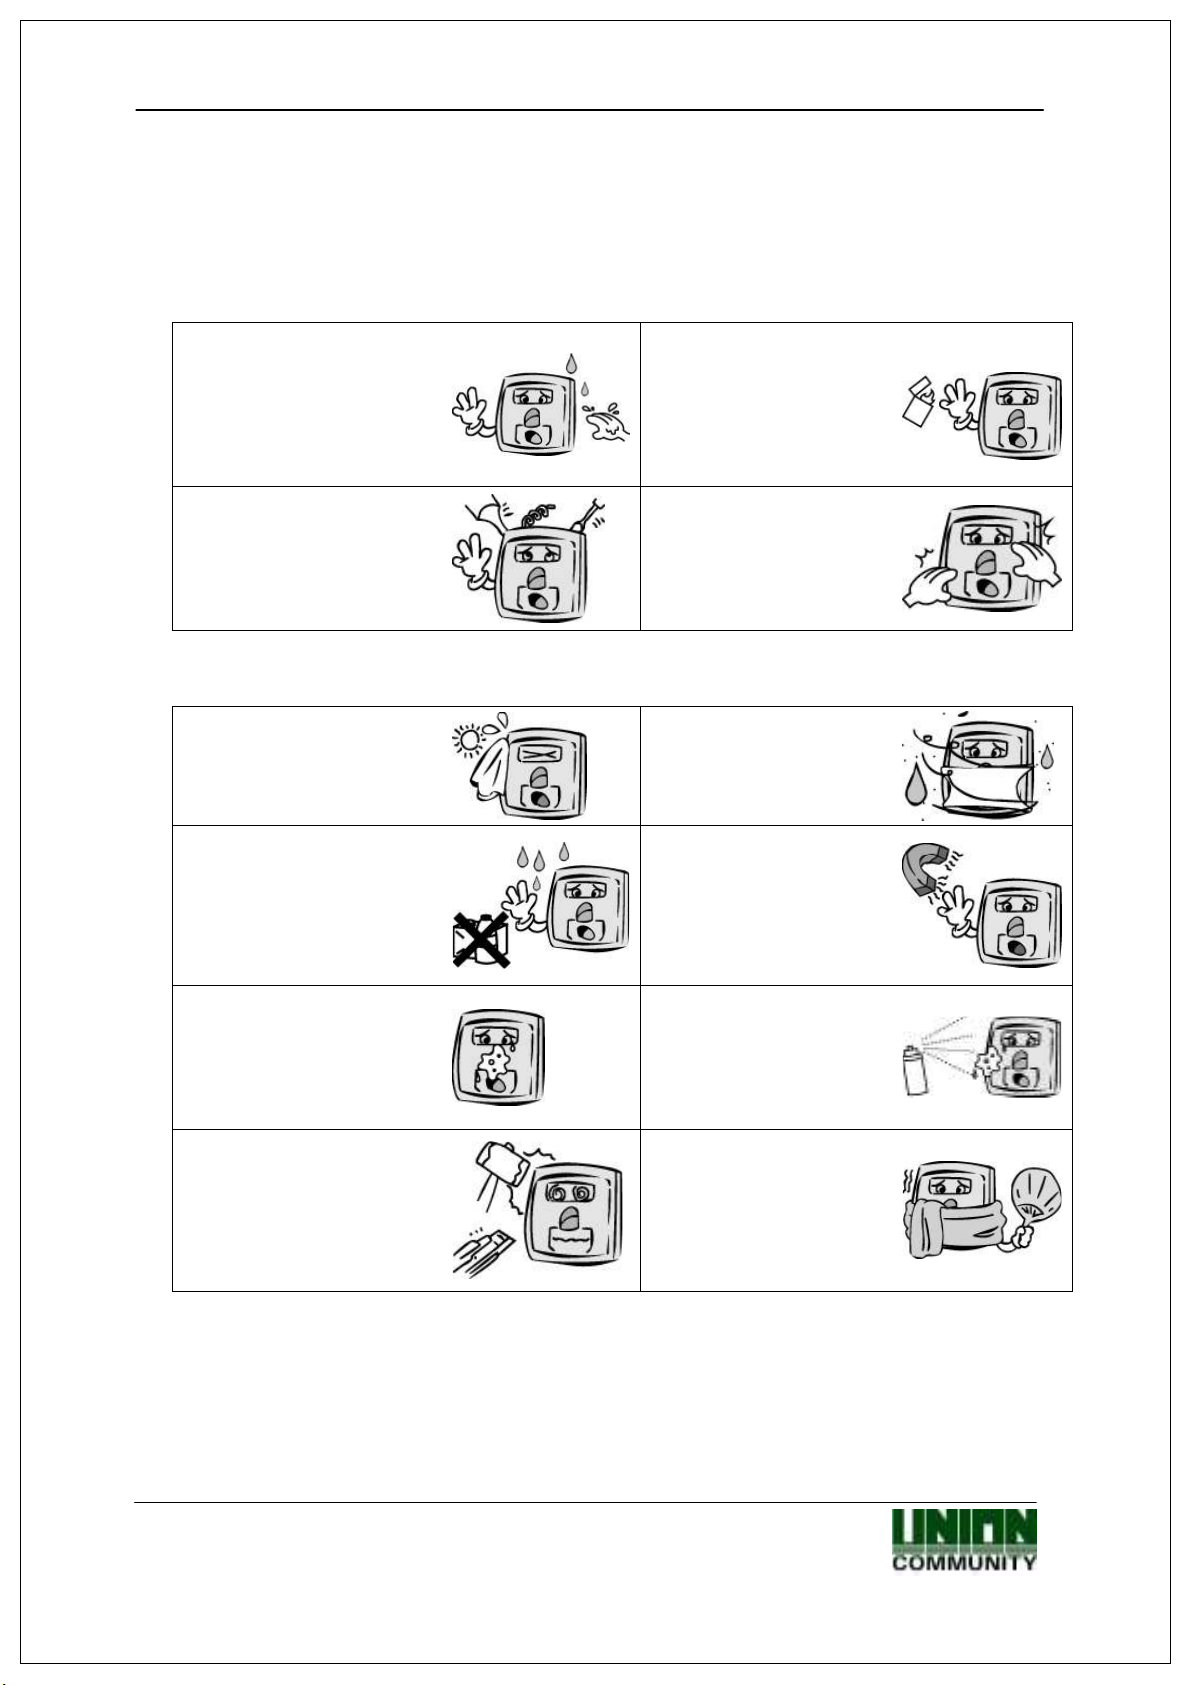
1.1. Safety precautions
Warning
Handling with wet hands or
allowing liquid to flow into it
is prohibited.
-> It may cause an
electric shock or damage.
Do not disassemble, repair,
or modify the terminal at
discretion.
-> It may cause an electric
shock, fire or damage.
- If the above warning is ignored, it may result in death or serious injury.
Do not place a fire source
near the terminal.
-> It may cause a fire.
Keep out of reach of
children.
-> It may cause an
accident or damage.
Cautions
Keep away from direct
sunlight
-> It may cause
deformation or color
change.
Avoid using water,
benzene, thinner, or
alcohol for cleaning
-> It may cause an electric
shock or fire.
Avoid high humidity or
dust
-> The terminal may be
damaged.
Do not place a magnet
close to the terminal.
-> The terminal may
break down or
malfunction.
Avoid using insecticide or
Do not contaminate the
fingerprint input area.
-> Fingerprints may not be
well recognized.
Avoid impacts or using
sharp objects on the
terminal.
-> The terminal may be
damaged and broken.
- If the above cautions are ignored, it may result in property loss or human injury.
flammable spray near the
terminal.
-> It may result in
deformation or color
change.
Avoid severe temperature
changes
-> The terminal may be
broken.
※ Under no circumstances will UNION COMMUNITY be responsible for accidents or
damages caused by inappropriate use of the product without referring to the user
manual.
㈜㈜㈜㈜Union Community / Hyundai Topics building 5
Songpa-gu, Seoul, Korea (138-050)
Tel: 02-6488-3000, Fax: 02-6488-3099, E-Mail:sales@unioncomm.co.kr
http://www.unioncomm.co.kr
th
floor, 44-3, Bangi 2-dong,
Page 7

AC-7000 User guide 7
1.2. Specific names of the terminal
Illuminance
sensor
Touch LCD
SD card input
Microphone
Fingerprint sensor
Card input
IR LED
Dual camera
Speaker
㈜㈜㈜㈜Union Community / Hyundai Topics building 5
Songpa-gu, Seoul, Korea (138-050)
Tel: 02-6488-3000, Fax: 02-6488-3099, E-Mail:sales@unioncomm.co.kr
http://www.unioncomm.co.kr
th
floor, 44-3, Bangi 2-dong,
Page 8

AC-7000 User guide 8
:
The state in which the fire senso
r is recognized (When the
:
Abnormal state such as separation of the terminal or
Prese
nt time
1.3. Window after operation
① Connection state with the server
② Current state of the entrance
③ Warning signals such as terminal separation
④ Fire sensor
Menu button
ID input button
Entrance mode selection
button (Indication of the
state of the entrance)
User guidance message
1.3.1. Icon
① Fire detection
② Warning
indicator
③ Entrance state
None : Normal
fire detector is connected)
None : Normal
entrance disability
: Do not know about the entrance state
: The entrance is closed
Camera movie display
Face registration location
guide
: The entrance is open
: LAN line is not connected
④Server
connection state
: Not connected to the server program
: Connected to the server program
㈜㈜㈜㈜Union Community / Hyundai Topics building 5
Songpa-gu, Seoul, Korea (138-050)
Tel: 02-6488-3000, Fax: 02-6488-3099, E-Mail:sales@unioncomm.co.kr
http://www.unioncomm.co.kr
th
floor, 44-3, Bangi 2-dong,
Page 9

AC-7000 User guide 9
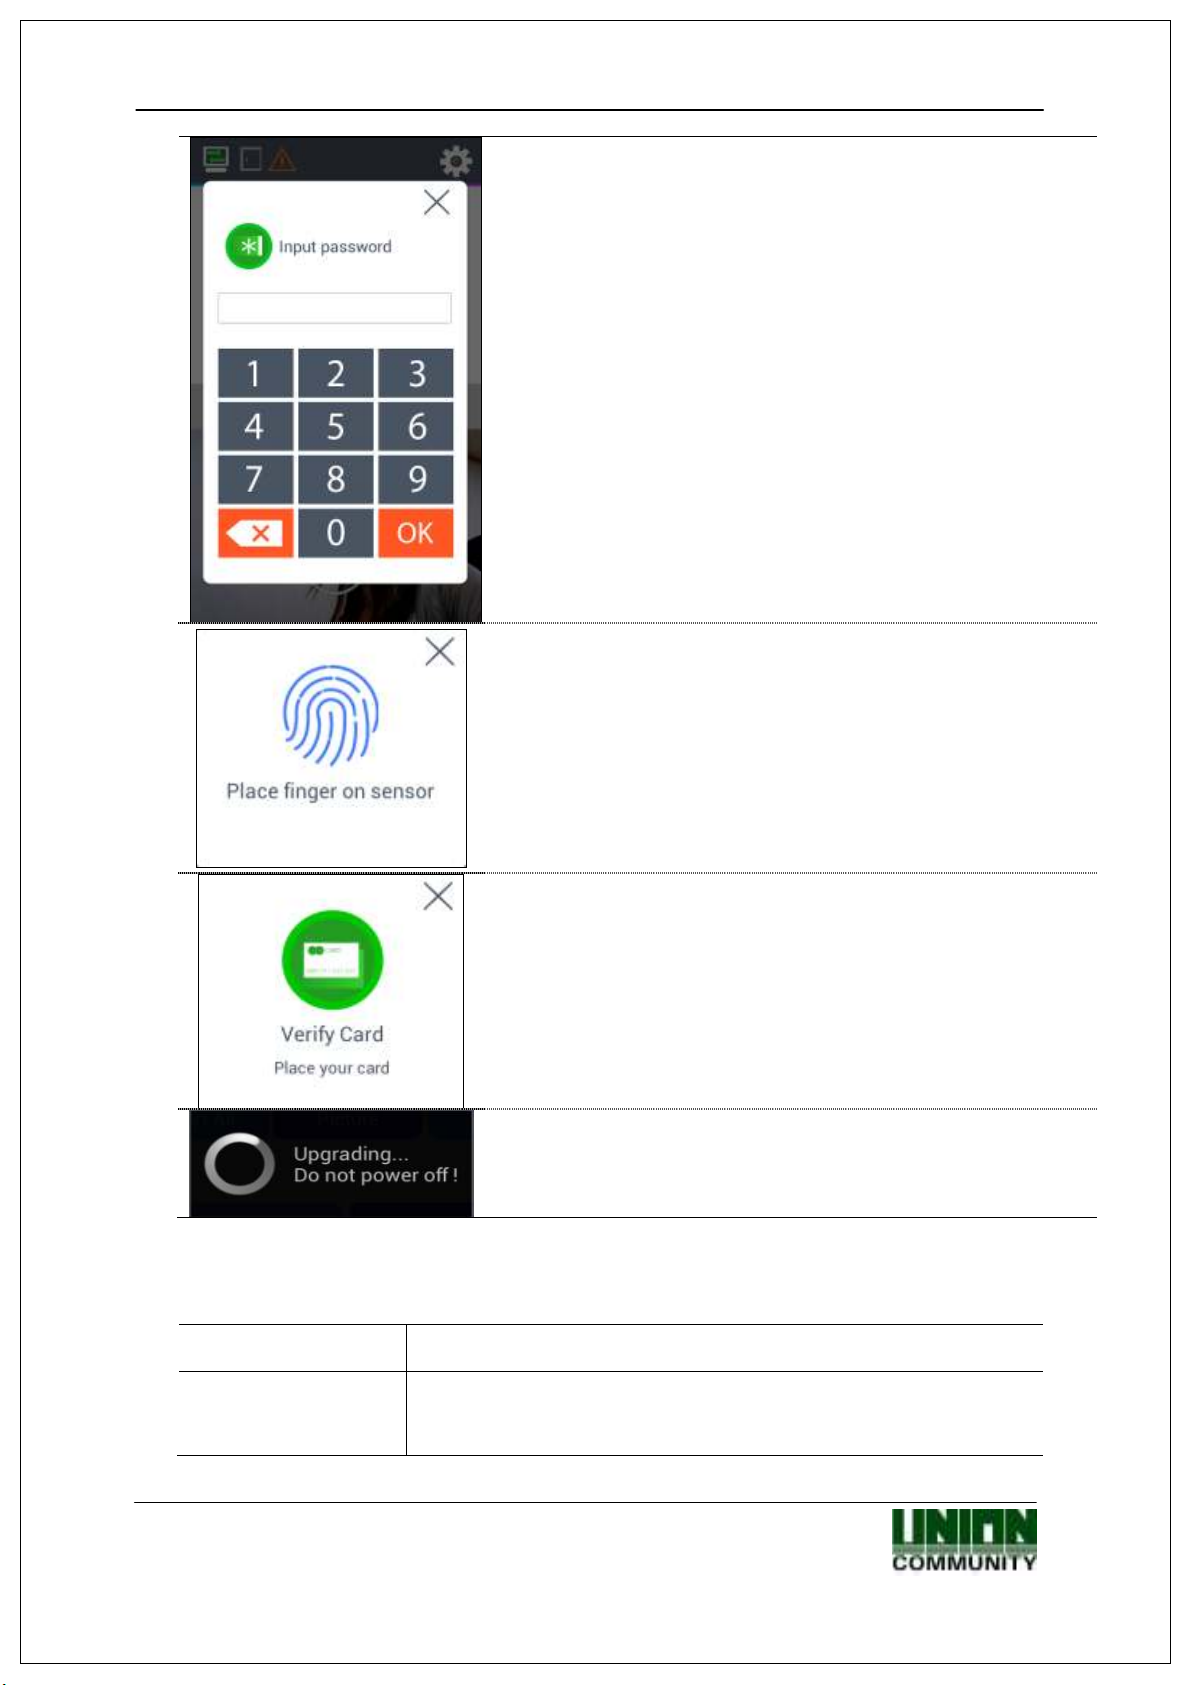
1.3.2. Message
- Basic window
- When authorization is successful
- When authorization is failed.
- When unregistered user ID is entered.
㈜㈜㈜㈜Union Community / Hyundai Topics building 5
Songpa-gu, Seoul, Korea (138-050)
Tel: 02-6488-3000, Fax: 02-6488-3099, E-Mail:sales@unioncomm.co.kr
http://www.unioncomm.co.kr
th
floor, 44-3, Bangi 2-dong,
Page 10

AC-7000 User guide 10
- When unregistered card is entered
- Passback error when using anti-passback function.
- When a user tried the authorization more than twice in
one meal time when using as meal personnel management
- When the server does not respond during the authorization
attempt to the server
- When the network is disconnected during the authorization
attempt to the server
- Registration without authorization right or authorization
attempt when the entrance is not permitted.
- When the user is designated in the blacklist
㈜㈜㈜㈜Union Community / Hyundai Topics building 5
Songpa-gu, Seoul, Korea (138-050)
Tel: 02-6488-3000, Fax: 02-6488-3099, E-Mail:sales@unioncomm.co.kr
http://www.unioncomm.co.kr
th
floor, 44-3, Bangi 2-dong,
Page 11

AC-7000 User guide 11
- When the terminal is set locked
- When it is not the meal time when set in the meal
personnel management.
- The state waiting for the input of the user ID
㈜㈜㈜㈜Union Community / Hyundai Topics building 5
Songpa-gu, Seoul, Korea (138-050)
Tel: 02-6488-3000, Fax: 02-6488-3099, E-Mail:sales@unioncomm.co.kr
http://www.unioncomm.co.kr
th
floor, 44-3, Bangi 2-dong,
Page 12
AC-7000 User guide 12
- The state waiting for the input of password
1.4. Sounds in the operation
- The state waiting for the input of fingerprint
- The state waiting for the input of the card
-When the terminal program is being upgraded
(In this state, you should not turn off the terminal)
Operation type Sound
When the
authorization was
You are authorized.
successful
㈜㈜㈜㈜Union Community / Hyundai Topics building 5
Songpa-gu, Seoul, Korea (138-050)
Tel: 02-6488-3000, Fax: 02-6488-3099, E-Mail:sales@unioncomm.co.kr
http://www.unioncomm.co.kr
th
floor, 44-3, Bangi 2-dong,
Page 13

AC-7000 User guide 13
Sound at the
Pi-pick When failed
When the
authorization
was failed
When
When the
authorization was
Please try again.
failed.
1.5. Beep sound in the operation
When the card was read
When the fingerprint was entered in the fingerprint
window
When the authorization was successful
Pick
Pi~ik~
reading of
fingerprint of
card
succeeded
1.6. How to register and authorize the face properly
Face registration method
- Maintain the distance between the terminal and face in about 50 cm.
(Locate the face in the guide line of LCD window)
- Register the face pose along with the guidance. During the shooting, please
maintain the attention.
- When registering the face, register after sweeping your hair up not to hide the
eyebrow or lower face with your hair or hat (Passport picture standard).
- If you wear the glasses, you should register both pictures with and without glasses.
But, if you change your glasses, you should repeat the registration procedures.
Face authorization method
You can select three modes as the face authorization method.
- Normal mode: When the user gets close within 1.5m, the tilting function of the
camera is operated by recognizing the face of user. When the user is within
50~70cm, the face authorization is fulfilled.
- Fixed mode: It has the fastest authorization speed, but because it does not include
the tilting function, please locate the user face at the LCD guideline by maintaining
the distance between the terminal and user in 50 cm.
- Adaptive mode: When the user accesses within 3m, the camera is tilted along with
the location of user’s face. When the user is within 50~70cm, the face
authorization is fulfilled.
Notes
㈜㈜㈜㈜Union Community / Hyundai Topics building 5
Songpa-gu, Seoul, Korea (138-050)
Tel: 02-6488-3000, Fax: 02-6488-3099, E-Mail:sales@unioncomm.co.kr
http://www.unioncomm.co.kr
th
floor, 44-3, Bangi 2-dong,
Page 14

AC-7000 User guide 14
- It is recommended to register and authorize at the location where the terminal is
installed.
- If you pose differently with the registered face, the recognition rate of face can
decrease. It is good to locate the full face as much as possible
- The thick glasses frame or sun-glasses can decrease the recognition rate of face
Cautions in the installation
- Be sure to install the terminal indoor.
- Do not install under the light bulb.
- Not recommended in the circumstance of backlight or direct light.
1.7. Correct fingerprint registration and input methods
Correct fingerprint registration methods
Place your index finger on the window just as you do with a finger stamp.
Do not use the tip of the finger.
Make sure the center of your finger touches the window.
Use your index finger if possible, it is the easiest for orientation and
guarantees a stable input method. Using the thumb or baby finger can be
awkward and may result in a bad image.
Check if your fingerprint is unclear or damaged.
It is tricky to recognize fingerprints on dry, wet, unclear, or injured fingers. Use
another finger in this case.
㈜㈜㈜㈜Union Community / Hyundai Topics building 5
Songpa-gu, Seoul, Korea (138-050)
Tel: 02-6488-3000, Fax: 02-6488-3099, E-Mail:sales@unioncomm.co.kr
http://www.unioncomm.co.kr
th
floor, 44-3, Bangi 2-dong,
Page 15

AC-7000 User guide 15
Be aware of certain fingerprint conditions
Depending on the user’s fingerprint condition, some fingerprints may not be
used or may cause an inconvenience.
If the fingerprint is damaged or very unclear, then it cannot be recognized.
Please use a password instead in this case.
When a finger is dry, breathe on the finger for smooth operation.
For kids, it may be tricky or impossible to use the terminal because their
fingerprints are too small or very unclear. It is recommended to register
their fingerprints every six months.
For the elderly, it may not be possible to register their fingerprints if there
are too many fine lines on the fingerprints.
If fingerprints are very unclear, it may be convenient if you register 2~3
fingerprints.
It is recommended that you register more than 2 fingerprints.
㈜㈜㈜㈜Union Community / Hyundai Topics building 5
Songpa-gu, Seoul, Korea (138-050)
Tel: 02-6488-3000, Fax: 02-6488-3099, E-Mail:sales@unioncomm.co.kr
http://www.unioncomm.co.kr
th
floor, 44-3, Bangi 2-dong,
Page 16

AC-7000 User guide 16
Face
Face
registration
Fingerprint
Fingerprint
registration
Card
Card
registration
Password
Password
registration
Card
or
Card
, fingerprint
registration
Card
&
Card
, f
ingerprint
registrat
ion
C
ard or
Card, password
registration
C
ard and
C
ard,
password
registration
Fingerprint
or
Fi
ngerprint
, password
registration
Fingerprint
&
Fingerprint
, password
registration
2. Product introduction
2.1. Product characteristics
Multi-Modal product with which the user can use both face and fingerprint authorization
functions together.
Authorization by automatic tracing the location of face with tilting camera
The face recognition is possible even in the dark place with the illumination sensor and
dual camera (color & IR) and saving the discriminable log images.
RF (125kHZ) and smart card (13.56MHz) can be used at the same time.
Easy authorization with the face or fingerprint
- Can prevent the hazard factors such as forgetting password, losing the card or key,
or stealing with the biometrics such as face and fingerprint recognition and
increasing the safety with using the person’s own bionic information.
Entrance management system with using LAN
- Easy expansion by direct applying to the previous network because it
communicates with using TCP/IP protocol between the fingerprint recognition
terminal and authorization server. High speed with 10/100 Mbps Auto Detect and
easy management and monitoring with network.
Various registration and authorization methods
fingerprint
fingerprint
password
password
password
Face authorization
Fingerprint authorization
Card authorization
Password authorization
Card or fingerprint authorization
Fingerprint authorization after card authorization
Card or password authorization
Password authorization after card authorization
Password authorization when fingerprint authorization was failed
Password
㈜㈜㈜㈜Union Community / Hyundai Topics building 5
Songpa-gu, Seoul, Korea (138-050)
Tel: 02-6488-3000, Fax: 02-6488-3099, E-Mail:sales@unioncomm.co.kr
http://www.unioncomm.co.kr
Password authorization after fingerprint authorization
th
floor, 44-3, Bangi 2-dong,
Page 17

AC-7000 User guide 17
C
ard or face C
ard, face registration
C
ard & face C
ard, face registration
Face
or
F
ace, password
registration
F
ace & password
Face, password
registration
Fingerprint
or
Fingerprint
,
face registration
Fing
erprint
&
Fingerprint
,
face registration
C
ard,
C
ard, f
ingerprint
,
face registration
(ID or card
) &
C
ard, f
ingerprint
registration
(ID or card) &
C
ard, password
registration
(ID or card
) &
C
ard, face registration
C
ard &
Card, fingerprint
, and password
registration
C
ard & face &
C
ard, face, and
password
registration
C
ard &
C
ard, f
ingerprint
, and face registration
Fingerprint
&
Fingerprint
,
face, and
password
registration
C
ard &
C
ard, f
ingerprint
,
face, and
password
registration
Card or face authorization
Face authorization after the card authorization
password
face
face
fingerprint, or
face
Fingerprint
password
Face authorization or password authorization when the face
authorization was failed after ID input
Password authorization after face authorization
Fingerprint or face Authorization, face authorization when
fingerprint authorization was failed after ID input
Face authorization after fingerprint authorization or fingerprint
authorization after face authorization
Face authorization when the fingerprint authorization was failed
after the input of card, fingerprint, face authorization, or ID.
Fingerprint authorization after ID input or fingerprint authorization
after card authorization
Password authorization after ID input or password authorization
after card.
face
Face authorization after ID input or face authorization after card
authorization
fingerprint &
Fingerprint and password authorization after the card authorization
password
password
fingerprint &
Face and password authorization after the card authorization
Fingerprint and face authorization after the card authorization
face
face & password
fingerprint &
face &password
Face and password authorization after the fingerprint authorization
Fingerprint, face and password authorization after the card
authorization
㈜㈜㈜㈜Union Community / Hyundai Topics building 5
Songpa-gu, Seoul, Korea (138-050)
Tel: 02-6488-3000, Fax: 02-6488-3099, E-Mail:sales@unioncomm.co.kr
http://www.unioncomm.co.kr
th
floor, 44-3, Bangi 2-dong,
Page 18

AC-7000 User guide 18
TCP/IP
TCP/IP
Fingerprint authorization
TCP/IP
Remote management
(user and terminal setting
TCP/IP
TCP/IP
TCP/IP
Electric lock
2.2. Product components
2.2.1. Single use (entrance)
DC12V Adapter
(Lock+, Lock-, Monitor)
2.2.2. Connected with PC server (entrance, attendance, meal personnel management)
Internet /
WAN / LAN
server (static IP)
UDB server
database (MDB or MSSQL)
program
management)
Meal management
program
Attendance
management program
㈜㈜㈜㈜Union Community / Hyundai Topics building 5
Songpa-gu, Seoul, Korea (138-050)
Tel: 02-6488-3000, Fax: 02-6488-3099, E-Mail:sales@unioncomm.co.kr
http://www.unioncomm.co.kr
th
floor, 44-3, Bangi 2-dong,
Page 19

AC-7000 User guide 19
External SD Card
250,000 User / 250,000 Card
OUTPUT : DC 12V
4 In (1 Exit, 3 Monitor)
Authorization
Meal ticket
Controller
C
ard reader
2.3. Product specification
Types SPEC REMARK
CPU 1GHz Quad Core CPU
LCD 5.0 inch Touch LCD(480*800)
4G + 8G Bytes Flash
MEMORY
2GBytes RAM
support
Data backup / FW upgrade
Camera Tilted Dual Camera (Color & IR)
Authorization speed Within 1 sec
User number
250,000 Finger (1:N1:25,000)
10,000 Face (1:N1:2,000)
10,000,000 Log / 20,000 Image Log
Fingerprint sensor Optical
Scan Area / Resolution 20 * 20mm / 500 DPI
Temperature /
Humidity
-20 ~ 45 /
Lower than 90% RH
INPUT : Universal AC100 ~ 250V
AC / DC Adapter
(Option : DC 24V)
UL, CSA, CE Approved
Lock Control EM, Strike, Motor Lock, Auto Door
I/O
2 Out (Also for Lock Control)
TCP/IP (10/100Mbps)
RS-232
Communication Port
RS-485
Wiegand In/Out
㈜㈜㈜㈜Union Community / Hyundai Topics building 5
Songpa-gu, Seoul, Korea (138-050)
Tel: 02-6488-3000, Fax: 02-6488-3099, E-Mail:sales@unioncomm.co.kr
http://www.unioncomm.co.kr
th
floor, 44-3, Bangi 2-dong,
server
communication
printer
communication
or
Controller
communication
Page 20

AC-7000 User guide 20
125KHz RF / 13.56MHz Smart
You can enter the subdivision menu by c
licking
simultaneous use
Card Reader
(1 Sam socket)
option
HID 125K Prox card (option)
HID iClass Card (option)
SIZE 88.0mm * 175.0mm * 43.4mm
3. Environment setting
3.1. Checks before setting the environment
3.1.1. Entering the menu
If you click the [ ] icon at the basic window, you can enter the main menu window as
follows.
each button.
<Fig. 3-1>
3.1.2. Administrator authorization
If the administrator is registered, the following administrator authorization window
appears first.
㈜㈜㈜㈜Union Community / Hyundai Topics building 5
Songpa-gu, Seoul, Korea (138-050)
Tel: 02-6488-3000, Fax: 02-6488-3099, E-Mail:sales@unioncomm.co.kr
http://www.unioncomm.co.kr
th
floor, 44-3, Bangi 2-dong,
Page 21

AC-7000 User guide 21
▶Administrator authorization
If you enter the administrator ID, the administrator
authorization is fulfilled along with the authorization
method of the administrator such as card,
fingerprint, face, or password.
The administrator authorization only appears when
the registered administrator exists. The
authorization is fulfilled only once when entering
the menu mode and you can access to all the menu
until you quit the main menu.
<Fig. 3-2>
3.1.3. How to enter the menu without administrator authorization
It is how to enter the menu when the fingerprint or face authorization is impossible
because the administrator card registered in the terminal was lost or there is no
administrator.
① Open the cover by removing the bracket at the backside of the terminal
② With the opened cover, connect the 5pin connector number 1 with 3, and 2 with 4 at
the bottom of the backside of the terminal.
<Fig. 3-3>
③ Click the icon at the basic window to enter the administrator authorization
window in <Fig. 3-2>, and fill the administrator ID with ‘0’ and click [ ] button,
then you can enter the menu window.
▶ Be sure to remove the connection pin of the connector after modifying the setting
value.
㈜㈜㈜㈜Union Community / Hyundai Topics building 5
Songpa-gu, Seoul, Korea (138-050)
Tel: 02-6488-3000, Fax: 02-6488-3099, E-Mail:sales@unioncomm.co.kr
http://www.unioncomm.co.kr
th
floor, 44-3, Bangi 2-dong,
Page 22

AC-7000 User guide 22
3.1.4. How to save the set values
If you click the [Complete] button at each menu to save the changed value after the
change of settings, the set value of the window is saved and the following message box
appears.
<Fig. 3-4>
▶ If there is no changed value, the window is moved to the previous menu.
▶ If there is no signal for 30 seconds while changing the set value in the menu, the
window is moved to the previous menu.
㈜㈜㈜㈜Union Community / Hyundai Topics building 5
Songpa-gu, Seoul, Korea (138-050)
Tel: 02-6488-3000, Fax: 02-6488-3099, E-Mail:sales@unioncomm.co.kr
http://www.unioncomm.co.kr
th
floor, 44-3, Bangi 2-dong,
Page 23

AC-7000 User guide 23
1.
User
1.
Addition
2. Network
Terminal
IP
address
Static
IP / DHCP
DNS
server
Server
IP address
Terminal
ID
3.
Operating
1.
Operating mode
2.Function key
□
F1
use
3.2. Menu composition
management
mode
2. Change
3. Deletion
4. Whole deletion
5. Search
▶Terminal IP address
▶Subnet mask
▶Gateway
▶DNS server 1
▶DNS server 2
▶Server IP address
▶Port
▶Terminal ID
▶Entrance control / Attendance management
/ Meal personnel management
1. When setting as Entrance control or
attendance management
▶Schedule setting
Attend (F1) time
Leaving (F2) time
Going out(F3) time
Returning(F4) time
Entrance time
▶Re- authorization prohibiting time
2. When setting as the meal personnel
management
▶Schedule setting
Breakfast time
Lunch time
Dinner time
Supper time
Snack time
□Allowing repetition
㈜㈜㈜㈜Union Community / Hyundai Topics building 5
Songpa-gu, Seoul, Korea (138-050)
Tel: 02-6488-3000, Fax: 02-6488-3099, E-Mail:sales@unioncomm.co.kr
http://www.unioncomm.co.kr
setting
□F2 use
□F3 use
□F4 use
□ID button
□Entrance button
□The number of expansible function keys
th
floor, 44-3, Bangi 2-dong,
Page 24

AC-7000 User guide 24
5.
Window setting
4. System
1.
System
2.
Fingerprint
3. Face recognition
4.
Authorizati
on
5.
Date
/ time
6.
Database
1.
Delete all the users
5.
Terminal
1.
Sound
2.
Terminal
option
▶Background screen
▶Screen saver
▶Location of the watch
▶Length of the user ID
▶Authorization: only for terminal
▶Essential registration items
□Face
□Fingerprint
□Card
□Password
□Name
Registration fingerprint number[1~10]
▶1:N level [3~9]
recognition
▶1:1 level [3~9]
▶Perceiving fake fingerprint ▶Fingerprint
template format
□Preventing similar fingerprint registration
□Multiple fingerprint authorization
□1:N Authorization permission
setting
▶Authorization level [1~4]
▶Face recognition mode
▶Camera angle
▶Terminal Authorization method
□Fingerprint template card
▶Visual synchronization
▶Display format
▶Present date setting
▶Present time setting
2. Delete settings
3. Delete log data
4. Delete image log
5. Delete all
▶Sound volume
▶Beep volume
□User sound using
▶Card number search
▶Card format
□Terminal lock setting
㈜㈜㈜㈜Union Community / Hyundai Topics building 5
Songpa-gu, Seoul, Korea (138-050)
Tel: 02-6488-3000, Fax: 02-6488-3099, E-Mail:sales@unioncomm.co.kr
http://www.unioncomm.co.kr
th
floor, 44-3, Bangi 2-dong,
Page 25

AC-7000 User guide 25
3. Input
setting
4. Lock
setting
5.
External
terminal
6.
Screen setting
1.
Theme
2.
Camera
3.
Language
4. LCD
option
5.
Message time
7.
Terminal
1.
System
2.
Terminal
3.
Network
4.
User
5.
Log
▶M0
▶M1
▶M2
▶IO
▶Warning time for opened door(sec)
□Warning sound for terminal removal
▶Lock1 option
▶Lock2 option
▶Lock1 time (ms)
▶Lock2 time (ms)
▶RS232 option
setting
▶RS485 option
▶Wiegand
Site code
Wiegand Output
Wiegand Input
▶Main background screen
information
▶Display option
▶Save option
□Save when authorization was successful
□Save when authorization was failed
▶Language
▶Screen saver setting
▶User display option
▶Message indicating time (ms)
setting
▶System information
▶Hard disk
▶Ram
▶Terminal information
Terminal ID
Operation mode
Language
▶Network information
MAC
<Ethernet>
IP
▶User information
▶Log information
㈜㈜㈜㈜Union Community / Hyundai Topics building 5
Songpa-gu, Seoul, Korea (138-050)
Tel: 02-6488-3000, Fax: 02-6488-3099, E-Mail:sales@unioncomm.co.kr
http://www.unioncomm.co.kr
th
floor, 44-3, Bangi 2-dong,
Page 26

AC-7000 User guide 26
6.
About
8. SD
card
1.
Export
1. User data
2.
Import
1. User data
3.
etc 1.
Theme
▶About
2. Event log
3. System option
4. Sending out all
5. Picture data
2. System option
2. F/W upgrade
3.3. Users management
When you select the [Users management] at the main menu, the following window
appears.
The number of all the users is shown at the top of screen
including administrator.
Click [Add] button to add the new user, [Modify] button to
modify the user, [Delete] button to delete the specific user,
[Delete All] button to delete all the users, and [View]
button to inquire the registered user list.
3.3.1. Addition
If you select [User management]->[Add] in the main menu, the following screen
appears
㈜㈜㈜㈜Union Community / Hyundai Topics building 5
Songpa-gu, Seoul, Korea (138-050)
Tel: 02-6488-3000, Fax: 02-6488-3099, E-Mail:sales@unioncomm.co.kr
http://www.unioncomm.co.kr
th
floor, 44-3, Bangi 2-dong,
Page 27

AC-7000 User guide 27
The icons in the left side mean as follows.
Input the user ID to be registered and click [OK]
button.
In this case, the ID which can be registered is shown
on the screen automatically, so you can register
conveniently. If you want to change ID, delete the
previous value by clicking [ ] button and input the
new value.
Click [Back] button to cancel and go back.
If you enter ID which is already registered, the failure message appears, and if the ID is
not registered, the following screen appears.
: The number of registered faces
: The number of registered fingerprints (X,1~10)
: Existence of password registration (X:no
registration, O:registration)
: The number of registered cards (X,1~10)
: User ID to be registered
: User
: Administrator
button: Registration with taking a picture of the
user.
You can register the name with [Name], fingerprint with [Fingerprint], face with [Face],
card with [Card], and password with [Password] button. The registration is basically set
to be user, and it is can be changed to administrator if you click [Admin] button. Click
[Save] button to save the registration, and click [Cancel] or [Back] button to cancel
the registration and return.
※ Only user who is registered as administrator can change the operating method of the
㈜㈜㈜㈜Union Community / Hyundai Topics building 5
Songpa-gu, Seoul, Korea (138-050)
Tel: 02-6488-3000, Fax: 02-6488-3099, E-Mail:sales@unioncomm.co.kr
http://www.unioncomm.co.kr
th
floor, 44-3, Bangi 2-dong,
Page 28

AC-7000 User guide 28
terminal and can register/modify/delete the information of all the saved users, so be
careful to register the administrator.
3.3.1.1. Photo registration
Register by clicking [ ] button at the [Add user]
screen.
Click the [Save] button to register with the present
camera image.
Click [Cancel] or [BACK] button to cancel the
registration and return.
3.3.1.2. Name registration
Register by clicking [Name] button in the [Add user]
window.
After entering name with the under keyboard, click OK
button.
Click the [ ] button to cancel the registration and
return.
㈜㈜㈜㈜Union Community / Hyundai Topics building 5
Songpa-gu, Seoul, Korea (138-050)
Tel: 02-6488-3000, Fax: 02-6488-3099, E-Mail:sales@unioncomm.co.kr
http://www.unioncomm.co.kr
th
floor, 44-3, Bangi 2-dong,
Page 29

AC-7000 User guide 29
3.3.1.3. Fingerprint registration
①①①①Register by clicking [Fingerprint] button at the [Add
user] screen.
Click [ ] button to cancel the registration and return.
Choose the finger to be registered when the left screen
appears.
※※※※ If you register the multiple fingers, the fingers
already registered are represented by blue circle
( ). If you select the finger already registered,
the following message appears, and if you select the
re-registration, you can register again with deleting
previously registered fingerprint.
②②②② Enter the fingerprint with referring ‘1.7 Proper
fingerprint registration and input methods’. Enter the
fingerprint twice according to the screen instruction as
follows.
When the light is turned on at the fingerprint sensor
with the message ‘Register FP’, put your finger on the
input screen and wait for 2~3 seconds until the light is
turned off.
③③③③ When the message ‘Enter the same fingerprint
again’ appears, enter the same fingerprint again.
※※※※In the second fingerprint input after the first
fingerprint, you should take off your finger from the
screen once and input again.
㈜㈜㈜㈜Union Community / Hyundai Topics building 5
Songpa-gu, Seoul, Korea (138-050)
Tel: 02-6488-3000, Fax: 02-6488-3099, E-Mail:sales@unioncomm.co.kr
http://www.unioncomm.co.kr
th
floor, 44-3, Bangi 2-dong,
Page 30

AC-7000 User guide 30
④④④④ The message of the left side appears when the input
is completed. If you click [OK] button, the registration
is completed and the screen is returned to the upper
menu.
If it is similar with the fingerprint already registered, the
message “Already registered finger!” appears like the
left side, and you can start again from the procedure of
②②②② if you click the [Retry] button.
You can click [ ] button to cancel and return to the
upper menu.
※You can register 10 fingerprints at most for one ID, and you cannot register more than
10 IDs.
If the registration was failed 2~3 times despite the proper fingerprint registration method, it is
recommended to use face, password, or card.
㈜㈜㈜㈜Union Community / Hyundai Topics building 5
Songpa-gu, Seoul, Korea (138-050)
Tel: 02-6488-3000, Fax: 02-6488-3099, E-Mail:sales@unioncomm.co.kr
http://www.unioncomm.co.kr
th
floor, 44-3, Bangi 2-dong,
Page 31

AC-7000 User guide 31
3.3.1.4. Face registration
Register with referring ‘1.6. How to register and authorize the face properly ‘
①①①① If you press [face] button on the [Add user] page,
you can select either [Regular Registration] or [Quick
Registration]
If you wish to cancel the enrollment, press the [BACK]
button
*Registration follows the guideline which enrolls the face
in 5 steps after the face and the posture is fixed.
*Quick Registration enrolls the face in 3 steps using the
auto face search function, which enrolls the face when the
face area is detected.
②②②② Locate your face to be fitted to the face lines like the
left picture, and look directly at the screen according to
the guidance of the screen.
㈜㈜㈜㈜Union Community / Hyundai Topics building 5
Songpa-gu, Seoul, Korea (138-050)
Tel: 02-6488-3000, Fax: 02-6488-3099, E-Mail:sales@unioncomm.co.kr
http://www.unioncomm.co.kr
th
floor, 44-3, Bangi 2-dong,
Page 32

AC-7000 User guide 32
ation begins.
③③③③ If the face was recognized properly like the left picture,
the guide is turned green and the face registr
At this point, you should maintain the stopped state
without moving face for the better registration.
④④④④ Move your face slightly directly, upward, or downward
according to the direction of the screen. At this point,
please do not move more than 15˚.
When the registration is ended, the message [Completed!]
appears like the left screen, and if you click the [OK]
button, the face registration is completed and the screen
is moved to the previous screen.
If you want to register again, click the [OK] button to start
from the procedure of ②②②②
㈜㈜㈜㈜Union Community / Hyundai Topics building 5
Songpa-gu, Seoul, Korea (138-050)
Tel: 02-6488-3000, Fax: 02-6488-3099, E-Mail:sales@unioncomm.co.kr
http://www.unioncomm.co.kr
th
floor, 44-3, Bangi 2-dong,
Page 33

AC-7000 User guide 33
If you enter the password in 1~8 characters into the
3.3.1.5. Password registration
password input window and click [OK] button, the input
focus is moved to the ‘password confirm’ window at
below. Enter the same password again and click [OK]
button.
Click [ ] button to cancel and return.
※※※※ If you enter the different password in the
confirm window, the message “Wrong input!”
appears as follows.
3.3.1.6. Card registration
RRRRegister with clicking [card] button in the [Add
egister with clicking [card] button in the [Add
egister with clicking [card] button in the [Add egister with clicking [card] button in the [Add
user] button. Click
user] button. Click [ ] button to cancel and
user] button. Click user] button. Click
return.
※※※※ If you entered the card already registered,
If you entered the card already registered,
If you entered the card already registered, If you entered the card already registered,
the following message appears
the following message appears
the following message appearsthe following message appears
※※※※If a user tried over than 10 registrations,
If a user tried over than 10 registrations,
If a user tried over than 10 registrations, If a user tried over than 10 registrations,
the followi
the following message appears.
the followithe followi
ng message appears.
ng message appears.ng message appears.
㈜㈜㈜㈜Union Community / Hyundai Topics building 5
Songpa-gu, Seoul, Korea (138-050)
Tel: 02-6488-3000, Fax: 02-6488-3099, E-Mail:sales@unioncomm.co.kr
http://www.unioncomm.co.kr
th
floor, 44-3, Bangi 2-dong,
Page 34

AC-7000 User guide 34
Set by cl
icking [Auth type] at the [Add user] window.
3.3.1.7. Authorization option
▶’Fingerprint authorization level’ (basic setting:’0’)
It decides the fingerprint authorization level of each
user, and the registered users can have different
authorization level by modifying this value. If you
set ‘0’, the authorization uses the level of fingerprint
authorization.
▶Enable 1:N Fingerprint authorization (basic setting:
when the fingerprint is registered, [v])
If this option is checked, you can authorize only with
fingerprint without user ID or card.
▶ Enable 1:N face authorization (basic setting: when
the face is registered, [v])
If this option is checked, you can authorize only with
face without user ID or card.
3.3.1.8. Authorization method
(But, it can be set when there are more than 2
authorization methods registered)
Click [BACK] button to cancel and return.
At the left picture, “▶Auth Type” at the upper side
shows all the authorization methods already registered,
and the buttons at the lower side shows the methods
which can be selected. Present authorization method
is distinguished with different color.
If you click the button you want to change to, the
authorization method is changed and the screen moves
to the previous window.
The authorization method icons are represented as
follows.
: Fingerprint : face
※※※※In case of authorization method, if it is not set, the authorization methods
In case of authorization method, if it is not set, the authorization methods
In case of authorization method, if it is not set, the authorization methods In case of authorization method, if it is not set, the authorization methods
previously registered are set automatically. (But, if there are more than 3
previously registered are set automatically. (But, if there are more than 3
previously registered are set automatically. (But, if there are more than 3 previously registered are set automatically. (But, if there are more than 3
authorization methods registered, the password is excluded).
authorization methods registered, the password is excluded).
authorization methods registered, the password is excluded).authorization methods registered, the password is excluded).
㈜㈜㈜㈜Union Community / Hyundai Topics building 5
Songpa-gu, Seoul, Korea (138-050)
Tel: 02-6488-3000, Fax: 02-6488-3099, E-Mail:sales@unioncomm.co.kr
http://www.unioncomm.co.kr
: card : password
th
floor, 44-3, Bangi 2-dong,
Page 35

AC-7000 User guide 35
In [Register FP
],
3.3.1.9. Save
Click the [Save] button to save when all the registration procedure is finished. At this
point, if you click [Cancel] or [BACK] button to return, the user is not saved.
Next is the LCD messages which can appear at the registration procedure.
When you clicked the [Save] button,
the case registration was successful
When you clicked the [Save] button,
the case registration was failed
: The case none of authorization methods such as
fingerprint, face, card, and password is registered.
When you clicked the [Auth method] button,
the case none of the authorization method was
registered.
the case you input the different fingerprint at the
fingerprint registration.
㈜㈜㈜㈜Union Community / Hyundai Topics building 5
Songpa-gu, Seoul, Korea (138-050)
Tel: 02-6488-3000, Fax: 02-6488-3099, E-Mail:sales@unioncomm.co.kr
http://www.unioncomm.co.kr
th
floor, 44-3, Bangi 2-dong,
Page 36

AC-7000 User guide 36
In [Register FP
],
The case you tried to registered the fingerprint already
registered. (But, you can input the same fingerprint
with the same user ID).
※ If you want to register the same fingerprint in the
different ID, you should uncheck the ‘System
Fingerprint recognition preventing the similar
fingerprint registration’. But, in this case, because the
same fingerprint can be authorized as different ID, it is
not suitable for the attendance management.
3.3.2. Deletion
The following window appears if you click [User management]->[Delete] at the main
menu.
Input the user ID to be deleted and click [OK]
button.
Click [BACK] button to cancel and return.
If you input the unregistered ID, the failure message
“Unregistered user” appears, and if you input the
registered ID, success message “Deleted” appears.
But, the deletion in the terminal is not led to the deletion in the server, so if you want to
delete completely, you should delete it also in the server.
The deletion delete both user and admin, so you should be cautious, and the user
registered only in the terminal is cannot be recovered.
The followings are LCD guidance which can appear at the deletion procedure.
㈜㈜㈜㈜Union Community / Hyundai Topics building 5
Songpa-gu, Seoul, Korea (138-050)
Tel: 02-6488-3000, Fax: 02-6488-3099, E-Mail:sales@unioncomm.co.kr
http://www.unioncomm.co.kr
th
floor, 44-3, Bangi 2-dong,
Page 37

AC-7000 User guide 37
When it is deleted normally.
When unregistered ID was entered
Input
the user ID to be modified and click [OK]
3.3.3. Modification
The following window appears if you click the [User management]->[Modification] in the
main menu.
button.
Click [BACK] button to cancel and return.
The failure message appears if you input the unregistered ID, and if you input the
registered ID, the information of registered user is represented as follows.
㈜㈜㈜㈜Union Community / Hyundai Topics building 5
Songpa-gu, Seoul, Korea (138-050)
Tel: 02-6488-3000, Fax: 02-6488-3099, E-Mail:sales@unioncomm.co.kr
http://www.unioncomm.co.kr
th
floor, 44-3, Bangi 2-dong,
Page 38

AC-7000 User guide 38
The icons at the left side means as follows.
If you want to delete all the users, click [YES], and
: The number of registered faces
: The number of registered fingerprints (X,1~10)
: Existence of password registration
(O:registration/X:미registration)
: The number of registered cards (X,1~10)
: User ID to be registered
: User
: Administrator
If you touch the picture, you can register with re-taken
picture.
The modification method of each item is the same with the user addition, so refer to the
‘3.3.1. Addition’
3.3.4. Delete all
If you click the [User management]->[Delete all] in the main menu, the following
window appears.
3.3.5. Search
if you want to cancel, click [NO].
If you click [YES], the users and admin are deleted,
and the restoration is impossible once they are
deleted, so be careful.
㈜㈜㈜㈜Union Community / Hyundai Topics building 5
Songpa-gu, Seoul, Korea (138-050)
Tel: 02-6488-3000, Fax: 02-6488-3099, E-Mail:sales@unioncomm.co.kr
http://www.unioncomm.co.kr
th
floor, 44-3, Bangi 2-dong,
Page 39

AC-7000 User guide 39
The user list appears by the order of ID, and if
If you click the [User management]->[Search] in the main menu, all the users
registered can be searched as follows.
you slide the screen upward, you can search the
additional user list.
The list appears in the unit of 100 people and if
the list is more than 100 people, you can see the
previous or next list by clicking [BACK] or [NEXT]
button.
▶[ID]: If you click the ID of specific user, you can
directly move to the modification window of the
user.
▶[Delete]: If you check the box of the right side
and click the [Delete] button, you can delete all
the checked users at once.
If you click [BACK] button on the top, you can
move to the previous ‘3.3 User management]
menu.
▶If you input the User ID by clicking [ID search]
button, the user is searched like in the left
picture.
If you click [BACK] button in this window, you
can move to the ‘3.3. User management’
menu.
㈜㈜㈜㈜Union Community / Hyundai Topics building 5
Songpa-gu, Seoul, Korea (138-050)
Tel: 02-6488-3000, Fax: 02-6488-3099, E-Mail:sales@unioncomm.co.kr
http://www.unioncomm.co.kr
th
floor, 44-3, Bangi 2-dong,
Page 40

AC-7000 User guide 40
▶If you input the user name by clicking [Search
name] button, the registered user list including
the characters is shown.
If you click [BACK] button in this window, you
can move to the ‘3.3. User management’ menu.
Ex) If you searched with “ma”, all the users
who contain “ma” in their name are
searched.
3.4. Network setting
If you select [Network] in the main menu, the following window appears.
▶Basic setting : Same with the window at the left
side.
Select the method [Static IP] if the static IP is
allocated from the connected network, and select
[DHCP] if the IP is allocated from the DHCP server
in the connected network.
If you selected [Static IP], set the IP address,
subnet mask, and gateway. And if you selected
[DHCP], you don’t have to set them.
DNS entry is possible instead of IP in the [Server
IP], and if you use specific DNS server, input the
IP address of [DNS] server together. You can
designate the DNS servers up to two.
▶[Port]: The basic port value of the authorization server (UNIS server) is ‘9870’, and if
you change the value, you should change the server program with the same value, so
be cautious.
▶[Terminal ID]: It is unique ID used by the terminal to distinguish the terminals and the
default value is ‘1’. It should be the same with the ID of the terminal registered, and
㈜㈜㈜㈜Union Community / Hyundai Topics building 5
Songpa-gu, Seoul, Korea (138-050)
Tel: 02-6488-3000, Fax: 02-6488-3099, E-Mail:sales@unioncomm.co.kr
http://www.unioncomm.co.kr
th
floor, 44-3, Bangi 2-dong,
Page 41

AC-7000 User guide 41
If you touch the item you want to change, the
the characters can be up to 9 digits.
keypad appears at the bottom.
If the input is finished with the keypad, continue the
input by touching [ ] button or the next input
window. If you touch the background window
which is not the input window, the keypad
disappears.
If you want to apply the changes, click [Complete]
button, and return to the previous menu by clicking
[BACK] button.
3.5. Application mode
3.5.1. Application mode
If you select the [Application mode] in the main menu, the following window appears.
In the application mode, you can select the [Entrance control/ Attendance
management/ Meal personnel management] according to the purpose.
3.5.1.1. Entrance control or attendance management setting
㈜㈜㈜㈜Union Community / Hyundai Topics building 5
Songpa-gu, Seoul, Korea (138-050)
Tel: 02-6488-3000, Fax: 02-6488-3099, E-Mail:sales@unioncomm.co.kr
http://www.unioncomm.co.kr
th
floor, 44-3, Bangi 2-dong,
Page 42

AC-7000 User guide 42
It is the screen appearing when you select the Access.
It is the screen appearing when you select the [TnA].
Click [OK] button to apply the changes, and click
[BACK] button to cancel and return.
▶ Basic setting : Same with the window at the left side
Click the [OK] button to apply the changes, and click
[BACK] button to cancel and return.
▶Schedule setting (00:00~23:59): You can set the time for each authorization mode and
if you do not need the function, set ’00:00-00:00’.
During the set time, the set mode is always shown unless clicking another function button,
and it is convenient for the TnA management because the indication mode is changed to the
set authorization mode automatically though another mode was authorized by clicking
another function key.
The time periods should not be overlapped, but if they are overlapped, the application order is
Attend->Leave->Out->In->Access.
▶Blocking time: This function prevents the same user to authorize again in the set time.
There is no restriction if it is set 0, but if it is set bigger than 0, the user can authorize
again when the set time (sec) is passed from the previous authorization. It can be set
㈜㈜㈜㈜Union Community / Hyundai Topics building 5
Songpa-gu, Seoul, Korea (138-050)
Tel: 02-6488-3000, Fax: 02-6488-3099, E-Mail:sales@unioncomm.co.kr
http://www.unioncomm.co.kr
th
floor, 44-3, Bangi 2-dong,
Page 43
AC-7000 User guide 43
authorization mode is changed to the mode.
up to 86,400 seconds (24 hours).
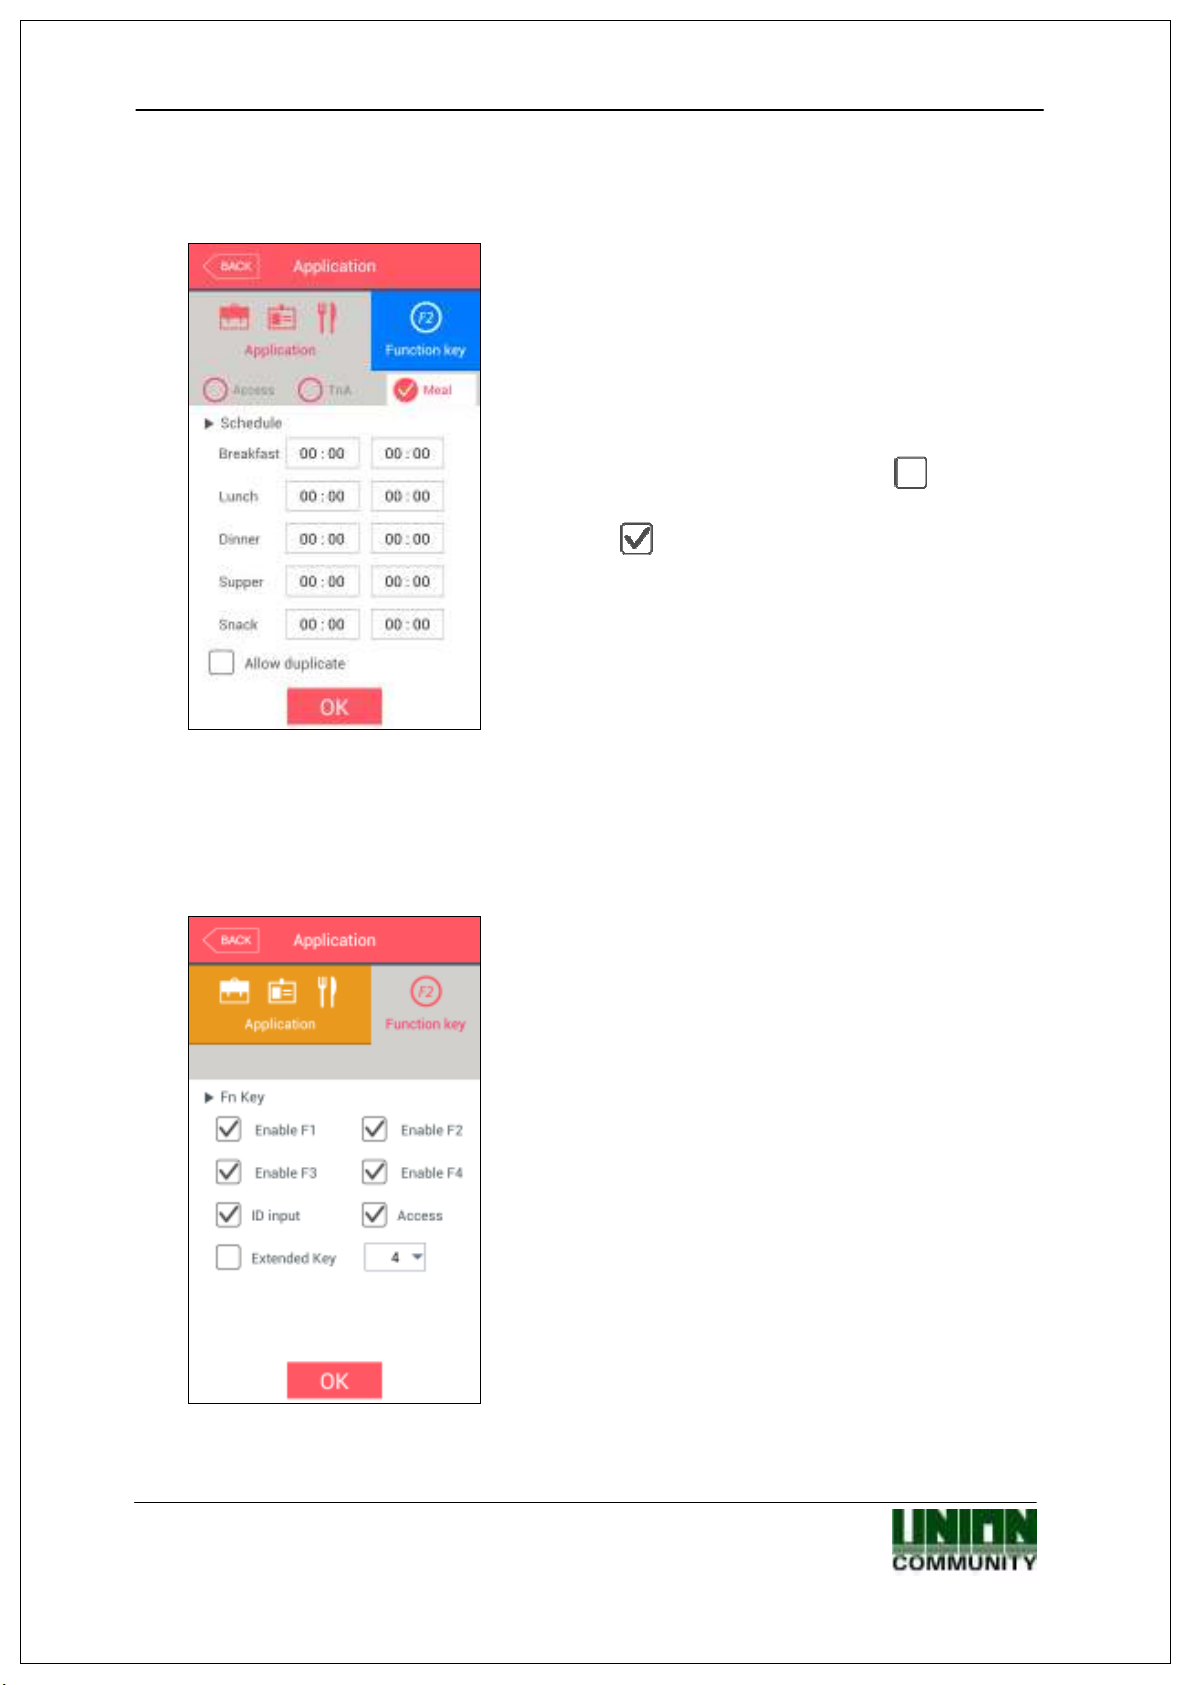
3.5.1.2. Meal personnel management setting
It is the screen appearing when selecting the meal
management.
You can set the time period of each meal type.
And if the setting is not needed, set ‘00:00-00:00’.
▶Allow duplicate: If it is unchecked( ), each user
can authorize once in the one meal, but if it is
checked( ), the multiple authorization is possible
regardless of the previous authorizations.
Click the [OK] button to apply the changes, and click
[BACK] button to cancel and return.
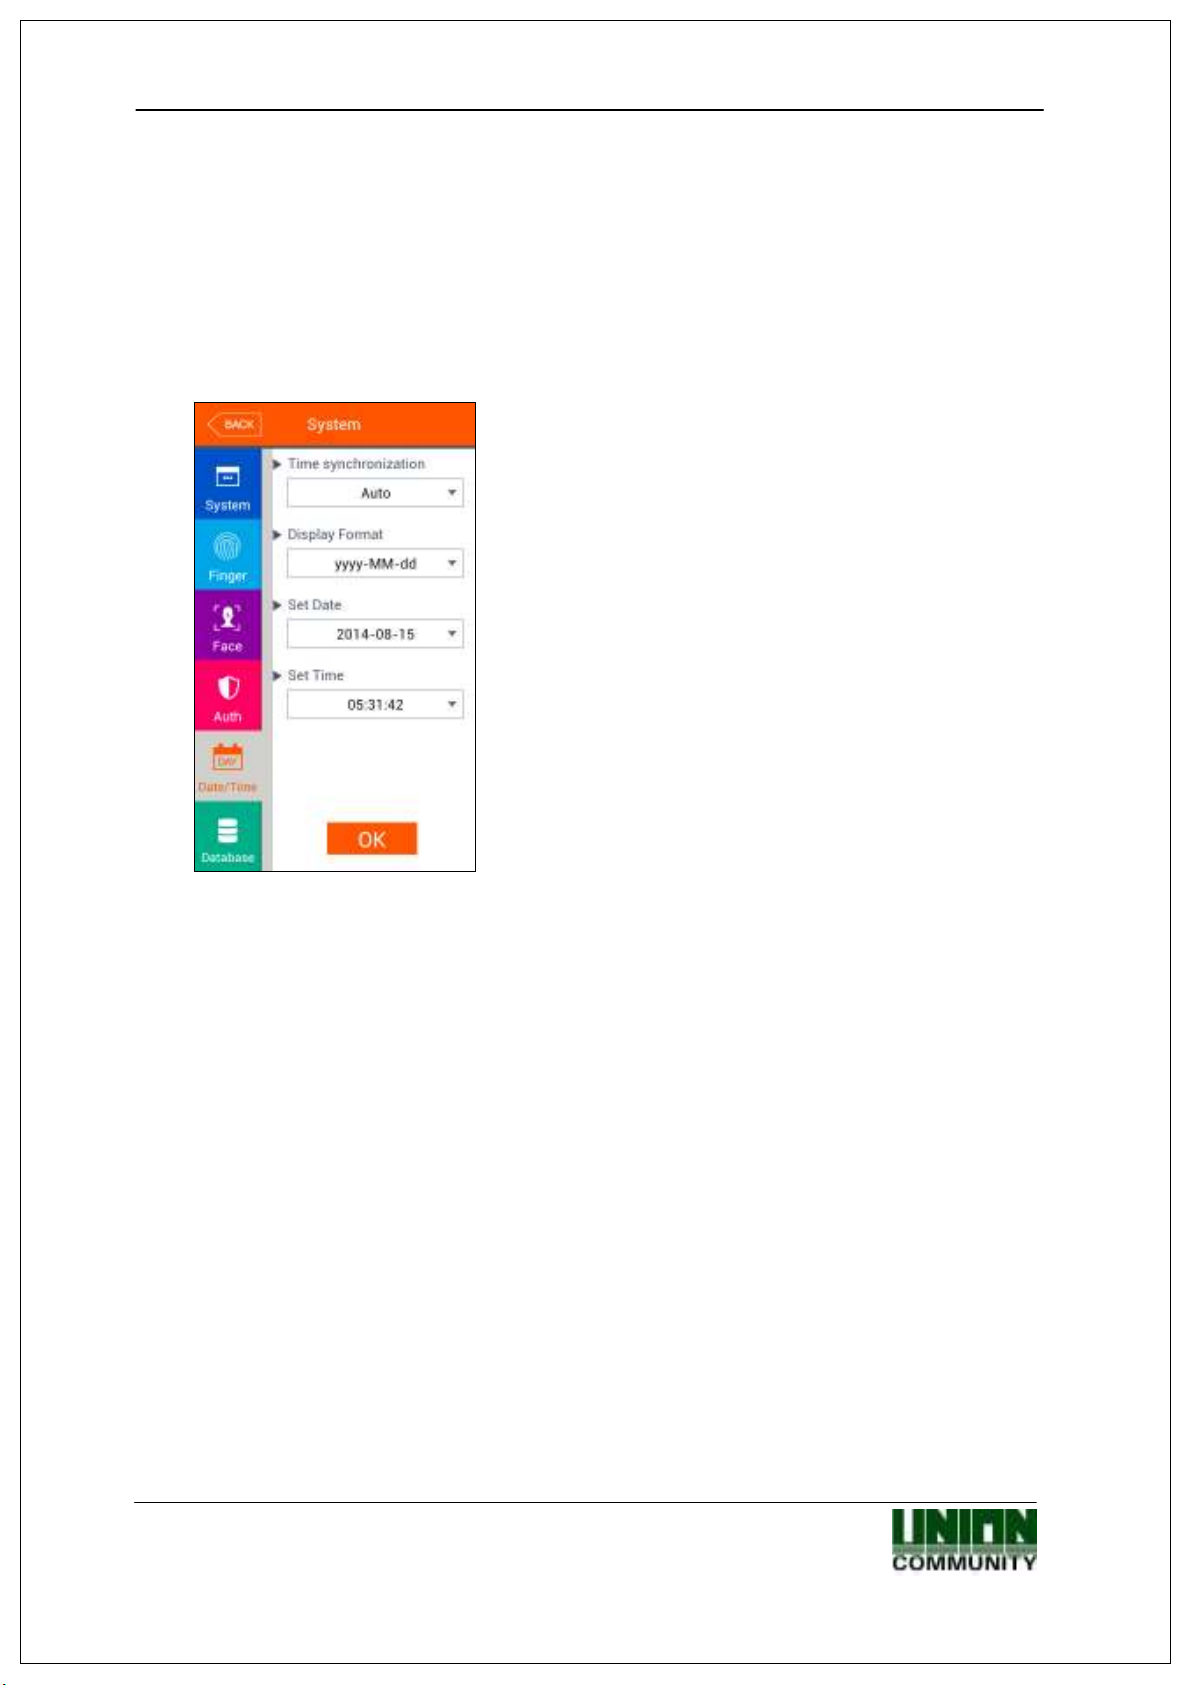
3.5.2. Function keys
The following window appears if you select the [Application mode] -> [Function
key] in the main menu.
▶ Basic setting : Same with the window at the left side
▶Fn key
It means the [F1]~[F4], Access button used to
change the authorization mode such as attendance
and leaving, and if you click the fn key, the
Because only the checked buttons are represented on
the basic window, you can use with unchecking other
function keys when using as device only for the
attendance or leaving.
▶ The expended key is the function by which you can
expend the keys when you need the additional
authorization mode besides the basic function keys
([F1]~[F4], [Access]). Check the [number of the
extension function key] to use the extended key, and
the number can be set 4, 8, 12, 16, 20, 24, 28, 32,
36, and 40.
Click [OK] to apply the set value, and click [BACK] button to move to the previous menu.
㈜㈜㈜㈜Union Community / Hyundai Topics building 5
Songpa-gu, Seoul, Korea (138-050)
Tel: 02-6488-3000, Fax: 02-6488-3099, E-Mail:sales@unioncomm.co.kr
http://www.unioncomm.co.kr
th
floor, 44-3, Bangi 2-dong,
Page 44

AC-7000 User guide 44
3.6. System
3.6.1. System
The following window appears if you select the [System]->[System] in the main menu.
▶ Basic setting : Same with the window at the left
side
▶User ID Length
It sets the length of the user ID, and it can be 2~9
characters and should be the same with the length
of the registered ID of the server program. If the
ID registered in the server program uses ‘000075’
as a 6 digits ID, set 6.
▶Authentication
It determines the priority of the authorization
between the terminal and network server, and
AC7000 only supports the terminal authorization
method. It only authorizes the user registered in
the terminal, and the authorization result is sent to
the server in real time if connected with the server.
▶Mandatory registration items
It determines the items which should be entered in the user registration, and the user can be
registered when all the checked items are entered. The number of registered fingerprints is
only valid when the [Fingerprint] is checked.
Click [OK] button to apply the set value, and click [BACK] button to cancel and return. If you
click the OK button without changing the set value, it is moved to the upper menu directly.
Click the menu button at the left side to set additionally.
3.6.2. Fingerprint recognition
The following screen appears if you select the [System]->[Fingerprint recognition]
in the main menu.
㈜㈜㈜㈜Union Community / Hyundai Topics building 5
Songpa-gu, Seoul, Korea (138-050)
Tel: 02-6488-3000, Fax: 02-6488-3099, E-Mail:sales@unioncomm.co.kr
http://www.unioncomm.co.kr
th
floor, 44-3, Bangi 2-dong,
Page 45

AC-7000 User guide 45
▶Basic setting : Same with the window at the left side
▶1: N level (3~9)
It is the authorization level used in the 1:N
Fingerprint authorization. In case of 1:N
authorization, the authorization level is not set for
each user, so the authorization level of the terminal is
always the standard.
▶1:1 level (1~9)
It is the authorization level used in the 1:1 Fingerprint
authorization. But, in case of the user whose 1:1
authorization level is not set ‘0’ (using the
authorization level of the terminal), it follows the 1:1
authorization level of the user.
▶Face fingerprint detection
It sets the LFD level to prevent the fake fingerprint input. The higher level of the LFD
level, the preventing function of the fake fingerprint input such as rubber, paper, film,
or silicon is strengthened, but the fingerprint also can be hard to enter if the finger is
dry too much.
▶Fingerprint template format
It determines the format of fingerprint template. When some applications using SDK
need another format of the fingerprint, the fingerprint template format of the terminal
can be changed. But, if using UNIS server, it should be set the same with the
template format of the server.
- Union: It is the default setting and the volume is 400 bytes for each template. It is
the most optimized format related with all the functions using fingerprint (1:1 level,
1:N level, authorization speed, and fake fingerprint detection), and the authorization
can be fulfilled rapidly and correctly.
- ISO Standard: Fingerprint data is saved as ISO template which is 500 bytes for each
template
- ISO Extended: Fingerprint data is saved as ISO template which is 600 bytes for each
template
If you change the template format of the fingerprint, the following message box
appears.
㈜㈜㈜㈜Union Community / Hyundai Topics building 5
Songpa-gu, Seoul, Korea (138-050)
Tel: 02-6488-3000, Fax: 02-6488-3099, E-Mail:sales@unioncomm.co.kr
http://www.unioncomm.co.kr
th
floor, 44-3, Bangi 2-dong,
Page 46

AC-7000 User guide 46
If you click the [OK] button, the new format is applied, and if you click the [Cancel] button,
the format value before the change is maintained.
※※※※ Cautions: If you change the fingerprint template format, all the
Cautions: If you change the fingerprint template format, all the
Cautions: If you change the fingerprint template format, all the Cautions: If you change the fingerprint template format, all the
registered fingerprints are deleted, so be cautions.
registered fingerprints are deleted, so be cautions.
registered fingerprints are deleted, so be cautions.registered fingerprints are deleted, so be cautions.
▶Preventing similar Fingerprint registration
If it is checked( ), the re-recognition as another user ID is prevented by checking if
the fingerprint is already registered.
▶Multiple fingerprint authorization
If it is checked ( ), all the registered fingerprints should be authorized after the ID
(or card) input. If it is checked, the user should input the user ID or card, [Enable 1:N
Authorization] is unchecked automatically.
It is the function used when managing the access control of the special area strictly.
For example, if the user with ID ‘0001’ has three fingerprints registered, the user
should be authorized with all three fingerprints after entering ID.
In this case, the order of three fingerprints is not important, but if one of the
fingerprints is failed to be authorized, the authorization is failed.
▶1:N Authorization permission
If it is checked ( ), the user can be authorized only with the fingerprint without user
ID or card. Though the user is registered by enabling 1:N authorization, in the
terminal where the option is not checked, only the 1:1 authorization is possible.
Click [OK] button to apply the set value, and click [BACK] button to cancel and return. If
you click [OK] button without changing the set value, it is moved to the upper menu
automatically.
3.6.3. Face recognition
㈜㈜㈜㈜Union Community / Hyundai Topics building 5
Songpa-gu, Seoul, Korea (138-050)
Tel: 02-6488-3000, Fax: 02-6488-3099, E-Mail:sales@unioncomm.co.kr
http://www.unioncomm.co.kr
th
floor, 44-3, Bangi 2-dong,
Page 47

AC-7000 User guide 47
▶ Basic setting : Same with the window at the left
side
▶Authorization level
It is the level used in face authorization, and it can
be set 1~4 stages according to the accordance
degree with the registered face. And the
authorization is successful when the accordance
degree is higher than set authorization level.
If the authorization level is higher, the security level
will be higher, but you also can fail to authorize
easily due to the high requirement for the
accordance level.
▶Face recognition mode
It determines the face authorization method, and you can set along with the using
condition. The specific explanation about each set method can be referred in ‘1.6.
How to register and certify the face properly’.
Click [OK] button to apply the set value, and click [BACK] button to cancel and return. If
you click [OK] button without changing the set value, it is moved to the upper menu
automatically.
3.6.4. Authorization
If you select the [System]->[Authorization] in the main menu, the following window
appears.
㈜㈜㈜㈜Union Community / Hyundai Topics building 5
Songpa-gu, Seoul, Korea (138-050)
Tel: 02-6488-3000, Fax: 02-6488-3099, E-Mail:sales@unioncomm.co.kr
http://www.unioncomm.co.kr
th
floor, 44-3, Bangi 2-dong,
Page 48

AC-7000 User guide 48
▶ Basic setting : Same with the window at the left
side
▶ Terminal authorization type: Select the authorization method of the terminal.
- Card: Though the user is registered with the authorization method requiring the face,
fingerprint, or password in addition to the card, the terminal with the checking of the
item, the card can authorize by itself. For fingerprint, face or password users, follow
the same authentication procedure as per normal to authenticate.
-Fingerprint: Though the user is registered with the authorization method requiring
the card, face, or password in addition to the fingerprint, the terminal with the
checking of the item, the fingerprint can authorize by itself. For fingerprint, face or
password users, follow the same authentication procedure as per normal to
authenticate.
-Face: Though the user is registered with the authorization method requiring the card,
fingerprint, or password in addition to the face, the terminal with the checking of the
item, the face can authorize by itself. For fingerprint, face or password users, follow
the same authentication procedure as per normal to authenticate.
▶Fingerprint template card
If this option is checked ( ), the option enables the authorization only with the user
information in the card and the fingerprint without downloading the user in the
terminal. To run this option, the SCcard reader must be equipped, and the fingerprint
㈜㈜㈜㈜Union Community / Hyundai Topics building 5
Songpa-gu, Seoul, Korea (138-050)
Tel: 02-6488-3000, Fax: 02-6488-3099, E-Mail:sales@unioncomm.co.kr
http://www.unioncomm.co.kr
th
floor, 44-3, Bangi 2-dong,
Page 49
AC-7000 User guide 49
card layout should be set in the server and applied to the terminal.
Click [OK] button to apply the set value, and click [BACK] button to cancel and return
3.6.5. Present time setting
If you select the [System]->[Date/Time] in the main menu, the following window
appears.
▶ Basic setting : Same with the window at the left side
▶Time synchronization
It determines the synchronization method between the present time of terminal and
server. If you want automatic synchronization, set [Auto], and if you want manual
synchronization, set [Manual].
▶Display format
The present time indicating method of the terminal
-yyyy-mm-dd: Order of year, month, and date.
-dd-mmm-yyyy: Order of date, month (English), and year
▶Present date setting/present time setting
It changes the present time of the terminal. If the server is connected and the [Time
synchronization] is set [Auto], you don’t have to change because it is synchronized
with the server time.
Click [OK] button to apply the set value, and click [BACK] button to cancel and return.
3.6.6. Database
If you select the [System]->[Database] in the main menu, the following window
㈜㈜㈜㈜Union Community / Hyundai Topics building 5
Songpa-gu, Seoul, Korea (138-050)
Tel: 02-6488-3000, Fax: 02-6488-3099, E-Mail:sales@unioncomm.co.kr
http://www.unioncomm.co.kr
th
floor, 44-3, Bangi 2-dong,
Page 50

AC-7000 User guide 50
If you want to delete all the users, click [Delete all
If you want to dele
te all users, click [YES] button,
appears.
users] button.
If you want to initialize the settings, click [Delete
setting] button.
If you want to initialize the authorization record, click
[Delete Log] button.
If you want to delete image log only, click [Delete
image log] button.
If you want to delete all the data and initialize with the
factory setting, click [Factory init] button.
If you want to move to the upper menu, click [Close] or
[BACK] button.
3.6.6.1. Delete all the users
If you select the [System]->[Database]->[Delete all the users] in the main menu,
the following window appears.
and if you want to cancel, click [NO] or [X] button.
If there is no signal for 5 seconds in this state, the
message box disappears without deletion.
If deletion is successful by click [YES], the following success message box appears.
㈜㈜㈜㈜Union Community / Hyundai Topics building 5
Songpa-gu, Seoul, Korea (138-050)
Tel: 02-6488-3000, Fax: 02-6488-3099, E-Mail:sales@unioncomm.co.kr
http://www.unioncomm.co.kr
<Fig.3-5>
th
floor, 44-3, Bangi 2-dong,
Page 51

AC-7000 User guide 51
Click [YES] button to initialize all the set values, and click
In this case, both the users and administrator are deleted, and the restoration is
impossible once the data is deleted.
3.6.6.2. Delete settings
If you select the [System]->[Database]->[Delete setting] in the main menu, the
following screen appears.
[NO] or [ ] button to cancel.
If there is no signal for 5 seconds in this state, the
message box disappears without initialization.
If the deletion is successful by clicking [YES], the success message in <Fig. 3-5> is
displayed and the display language and voice is changed to the default value English.
All the set value of the terminal besides the MAC address, but the record of the users
and authorizations is not deleted.
3.6.6.3. Delete logs data
If you select the [System]->[Database]->[Delete log data] in the main menu, the
following window appears.
If you want to delete all the authorization record in the
terminal, click [YES] button, and if you want to cancel,
click the [NO] or [ ] button.
If there is no signal for five seconds in this state, the
message box disappears without deletion.
If it is deleted successfully by clicking [YES], the success message in [Fig. 3-5] is
displayed. All the authorization log is deleted including image log, and the restoration
after the deletion is impossible.
3.6.6.4. Delete image logs
If you select the [System]->[Database]->[Delete image logs] in the main menu,
the following window appears.
㈜㈜㈜㈜Union Community / Hyundai Topics building 5
Songpa-gu, Seoul, Korea (138-050)
Tel: 02-6488-3000, Fax: 02-6488-3099, E-Mail:sales@unioncomm.co.kr
http://www.unioncomm.co.kr
th
floor, 44-3, Bangi 2-dong,
Page 52

AC-7000 User guide 52
If you want to initialize the terminal in the factory setting,
If you want to delete all the image log in the terminal,
click [YES], and if you want to cancel, click [NO] or [ ]
button.
If there is no signal for five seconds in this state, the
message box disappears without deletion.
If it is deleted successfully by clicking [YES], the success message in the <Fig. 3-5> is
displayed. The images saved as logs are only deleted and the authorization logs are not
deleted.
3.6.6.5. Delete all
If you select the [System]->[Database management]->[Delete all] in the main
menu, the following window appears.
click [YES] button, and if you want to cancel, click [NO] or
[ ] button.
If there is no signal for five seconds in this state, the
message box disappears without initialization.
If it is deleted successfully by clicking [YES], the success message in <Fig. 3-5> appears,
and the display language and voice is changed to the default value English.
All the set value, users and log information besides the MAC address in the terminal to
make the terminal in the factory setting. The restoration after the deletion is
impossible, so be careful.
3.7. Terminal settings
3.7.1. Sounds
If you select the [Terminal]->[Sound] in the main menu, the following window
appears.
㈜㈜㈜㈜Union Community / Hyundai Topics building 5
Songpa-gu, Seoul, Korea (138-050)
Tel: 02-6488-3000, Fax: 02-6488-3099, E-Mail:sales@unioncomm.co.kr
http://www.unioncomm.co.kr
th
floor, 44-3, Bangi 2-dong,
Page 53

AC-7000 User guide 53
▶ Basic setting : Same with the window at the left
side.
▶Voice volume
Scroll from side to side in 0~15 degrees to set the
voice volume. If you click the [ ] button at the
right side, the voice is played to check the volume.
▶Beep volume
Scroll from side to side in 0~3 degrees to set the
beep volume. If you click the [ ] button at the
right side, the beep sound is played to check the
volume.
▶User voice
If the user wants to change the voice played when the authorization is successful or
failed, the user voice can be played if the user copy the sound into terminal and check
the option. The method to copy the sound into the terminal can be referred in [3.10.
SDcard]->[Theme] or [3.11.2 voice message modification].
Click [OK] button to apply the set value, and click [BACK] button to cancel and return. If
you want to set another items, click the menu you want to change at the left side.
3.7.2. Terminal option
If you select the [Terminal]->[Terminal option] in the main menu, the following
window appears.
㈜㈜㈜㈜Union Community / Hyundai Topics building 5
Songpa-gu, Seoul, Korea (138-050)
Tel: 02-6488-3000, Fax: 02-6488-3099, E-Mail:sales@unioncomm.co.kr
http://www.unioncomm.co.kr
th
floor, 44-3, Bangi 2-dong,
Page 54

AC-7000 User guide 54
C
ard format
Card number
Expression
(3+5)
digits
decimal
Hexadecimal
0801161DD6
10digits
hexadecimal
Post
erior
4byte
: 10
digits
decimal
3,5 Digit Decimal
02207638
Same with
[
Standard
]
6 Digit
Hexad
ecimal
161DD6
Posterior 3byte: 6digits hexadecimal
C
ard format
Card number
Expression
Standard
529D06E3
8 digits hexadecimal
8 digits hexadecimal with changing the
10 Digit Decimal
1386022627
hexadecimal
529D06E3
: 10 digits decimal
3,5 Digit Decimal
3808861522
hexadecimal
E3069D52
: 10 digits decimal
6 Digit Hex
adecimal
069D52
Locate the
foremost 3bytes backwards.
▶ Basic setting : Same with the window at the left
side.
▶ Read card number
If the user put the card on the screen, the card
number is displayed on the LCD. you can change the
[Card format] to check the card number according to
the set value.
▶ Lock terminal
This function enables the administrator to lock or
unlock the terminal directly on the terminal, not on
the server program. If it is checked ( ), none can
access due to the lock until the administrator unlock
the setting.
▶Card format
It determines the representation method of the card number. The card number is changed
according to the following settings. So if you have to change the card expression method,
you should register the card again.
RFcard EX) Card number(5byte): 08h 01h 16h 1Dh D6h
Standard 02207638
10 Digit Decimal 0018226646
[022(16h)+07638(1DD6h)]
(01161DD6h)
SCcard example) card number(4byte): 52h 9Dh 06h E3h
Hexadecimal E3069D52
order of byte
Click [OK] button to apply the set value, and click [BACK] button to cancel and return.
㈜㈜㈜㈜Union Community / Hyundai Topics building 5
Songpa-gu, Seoul, Korea (138-050)
Tel: 02-6488-3000, Fax: 02-6488-3099, E-Mail:sales@unioncomm.co.kr
http://www.unioncomm.co.kr
th
floor, 44-3, Bangi 2-dong,
Page 55
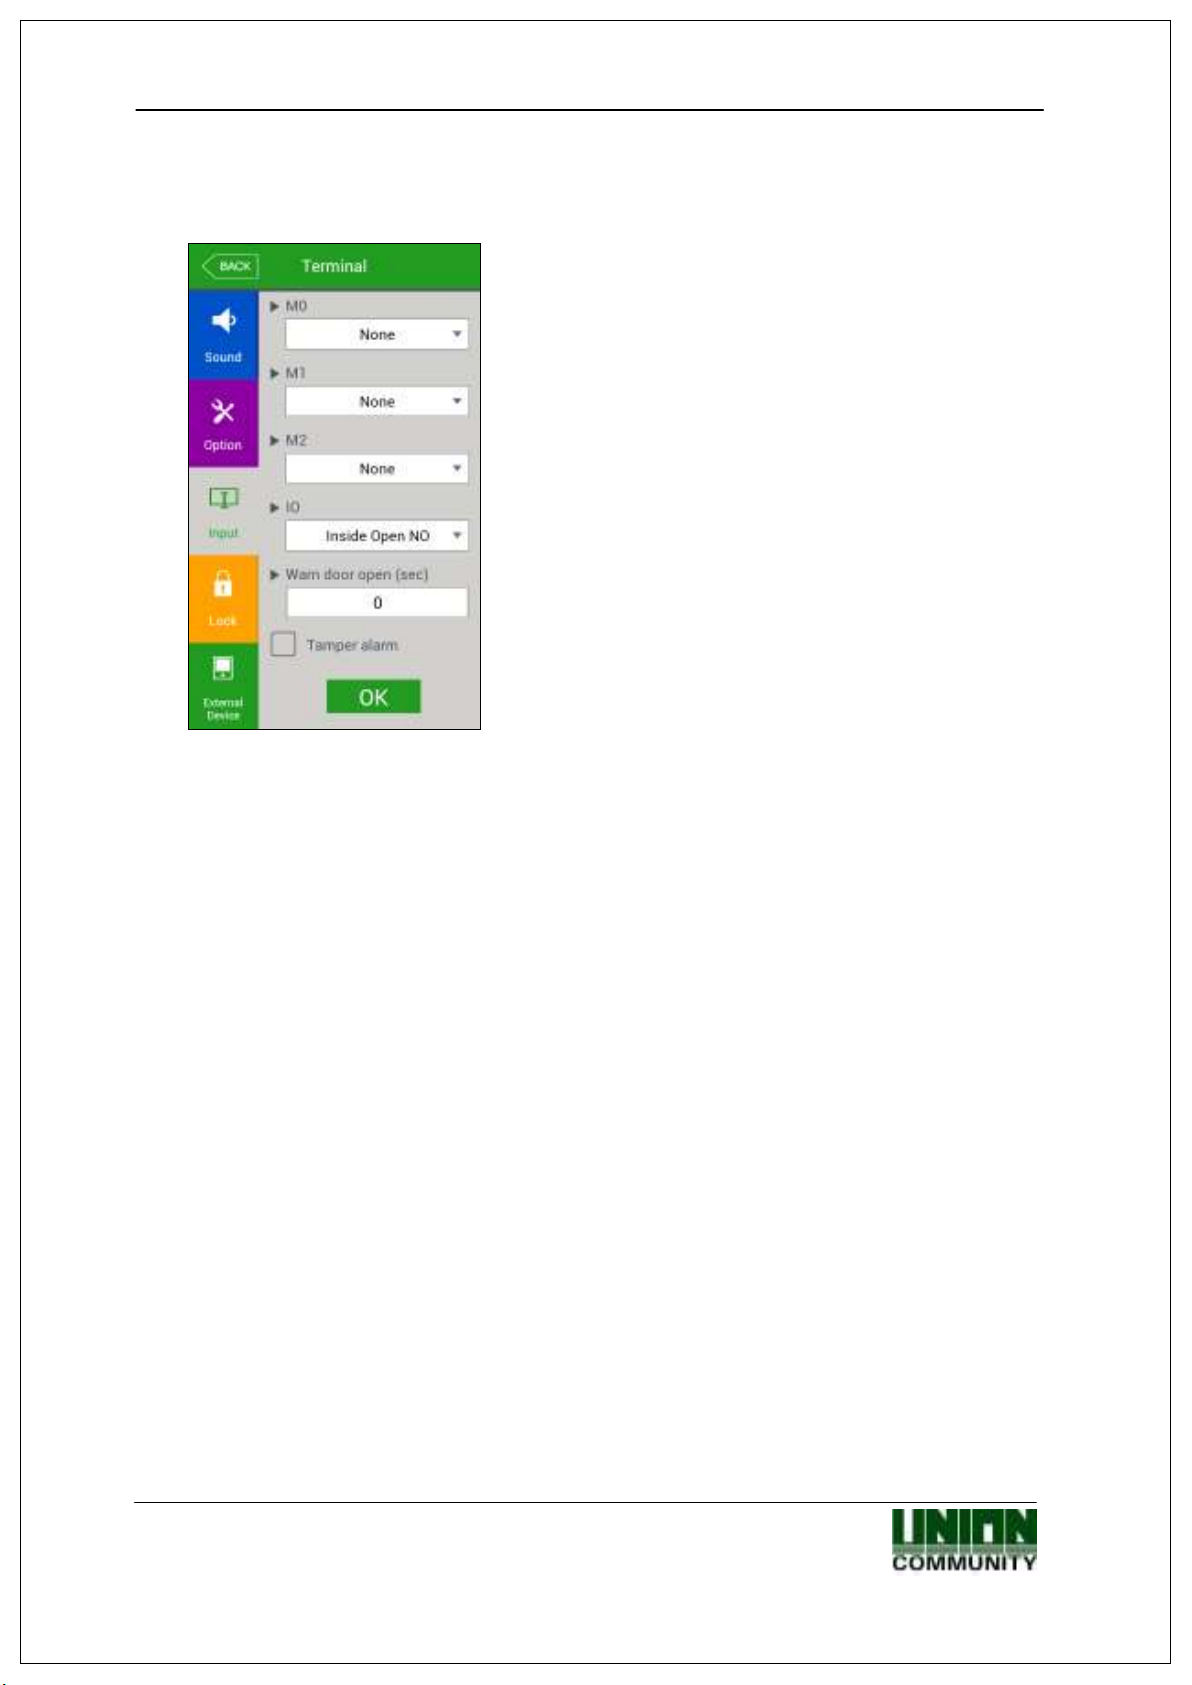
AC-7000 User guide 55
3.7.3. Input settings
If you select the [Terminal]->[Input] in the main menu, the following window appears.
▶ Basic setting : Same with the window at the left
side.
▶M0: It is set when connecting the external access point to the DM0
(When using motor lock, set [Door open NO] or [Door open NC].)
-None: When nothing is connected.
-Door open NO or Door open NC: When the door open monitoring pin was
connected.
-Fire detection NO or Fire detection NC: When the fire detection sensor is
connected.
-Panic detection NO or panic detection NC’: When the panic situation detection
sensor is connected.
-Emergency detection NO or emergency detection NC’: When the emergency
situation detection sensor is connected.
-> Set NO/NC according to the state of pin input in detection.
▶ M1/M2: Set when connecting the external access point to DM1/DM2
(When using motor lock, set [Lock NO] or [Lock NC].)
-None: When nothing is connected.
- Lock NO or Lock NC: When the lock monitoring pin was connected.
-Fire detection NO or Fire detection NC: When the fire detection sensor is
connected.
-Panic detection NO or panic detection NC’: When the panic situation detection
sensor is connected.
-Emergency detection NO or emergency detection NC’: When the emergency
situation detection sensor is connected.
-> Set NO/NC according to the state of pin input in detection.
▶IO: Set when connecting the external access point to the Exit pin
-None: When nothing is connected
㈜㈜㈜㈜Union Community / Hyundai Topics building 5
Songpa-gu, Seoul, Korea (138-050)
Tel: 02-6488-3000, Fax: 02-6488-3099, E-Mail:sales@unioncomm.co.kr
http://www.unioncomm.co.kr
th
floor, 44-3, Bangi 2-dong,
Page 56

AC-7000 User guide 56
-Inside Open NO or Inside Open NC: When the exit button was connected
-Fire detection NO or Fire detection NC: When the fire detection sensor is
connected.
-Panic detection NO or panic detection NC’: When the panic situation detection
sensor is connected.
-Emergency detection NO or emergency detection NC’: When the emergency
situation detection sensor is connected.
-> Set NO/NC according to the state of pin input in detection
▶Warn door open (sec)
This function alarms when set time for door open (5~30 seconds) is passed with the
opened door.
If it is set [0], no alarm is ringing, and though you set [01~04], the alarm will ring after 5
seconds.
This function enables the appropriate action to close the door when someone could know
that the door is not closed properly by alarming when the door is not closed for specific
time.
To use the function, the lock must be able to be monitored if it is opened or closed, and
the monitoring pin of the lock also should be connected with M0. In addition, the
previous M0 also should be set [Door open NO] or [Door open NC].
▶단말기 해체 경고음
체크( )시 단말기가 해체된 경우 경고음을 울립니다
Click [OK] button to apply the set value, and click [BACK] button to cancel and return.
3.7.4. Lock settings
If you select the [Terminal]->[Lock settings] in the main menu, the following
windows appears.
㈜㈜㈜㈜Union Community / Hyundai Topics building 5
Songpa-gu, Seoul, Korea (138-050)
Tel: 02-6488-3000, Fax: 02-6488-3099, E-Mail:sales@unioncomm.co.kr
http://www.unioncomm.co.kr
th
floor, 44-3, Bangi 2-dong,
Page 57

AC-7000 User guide 57
▶ Basic setting : Same with the window at the left
side.
▶Lock1 option
- None: When it is not used
- Strike/Auto/OK: When the warning light is connected to indicate the strike type,
auto door, or authorization success/failure on Lock1.
- Motor lock 1: When the motor lock is connected.
- Regular notification: When the siren setting of the terminal option was sent to the
terminal, it sends the operating signal about it.
▶Lock2 option
- None: When it is not used
- Authorization fail notification: When the warning light was connected to indicate the
authorization failure on Lock2.
- Motor lock 2: When the motor lock is connected
- Regular notification: When the siren setting of the terminal option was sent to the
terminal, it sends the operating signal about it.
▶Lock 1 time (ms unit)
When Lock 1 is set ‘Strike/Auto/OK’, it determines the signaling time. Because it is set
in ms unit, if you want to set 3 seconds, you should set 3000. The strike type means
the time until the door is locked again when opening the door after authorization.
▶Lock 2 time (ms unit)
It sets the signaling time when Lock 2 is set ‘Authorization failure notification’.
Click [OK] button to apply the set value, and click [BACK] button to cancel and return.
Because it is set in ms unit, if you want to set 3 seconds, you should set 3000.
3.7.5. External terminal setup
If you select the [Terminal]->[External device] in the main menu, the following
㈜㈜㈜㈜Union Community / Hyundai Topics building 5
Songpa-gu, Seoul, Korea (138-050)
Tel: 02-6488-3000, Fax: 02-6488-3099, E-Mail:sales@unioncomm.co.kr
http://www.unioncomm.co.kr
th
floor, 44-3, Bangi 2-dong,
Page 58

AC-7000 User guide 58
None
Gener
al case. It does not use Wiegand out port.
window appears.
▶ Basic setting : Same with the window at the left
side.
▶RS232 option: It sets the device connected to RS232 port
-None: When there is no device connected to the RS232 port
-Attendance ticket/Meal ticket: The authorization result is printed when the
authorization is successful. The terminal ID, user ID, authorization time, and
authorization mode are printed by the printer connected to the RS232 port.
The printing format differs from the setting, and the terminal name becomes the title
on the top side when setting as [Meal ticket]. The printer used to print ticket is
“SRP-350} serial type model.
▶RS485 option: It sets the connecting device to RS485 port.
-None: When there is no device connected to RS485.
-LC010: When LC010 is connected.
-LC015: When LC015 is connected.
-SR100: When SR100 is connected.
▶Site code
It sets the sitecode value sent in Wiegand output below.
▶Wiegand Output
It is used only when the special controller is equipped running by the Wiegand input.
When the authorization is finished, the data of the following format is sent to the
Wiegand port of the terminal.
㈜㈜㈜㈜Union Community / Hyundai Topics building 5
Songpa-gu, Seoul, Korea (138-050)
Tel: 02-6488-3000, Fax: 02-6488-3099, E-Mail:sales@unioncomm.co.kr
http://www.unioncomm.co.kr
th
floor, 44-3, Bangi 2-dong,
Page 59

AC-7000 User guide 59
26bit
Because it sends
“Sitecode[1
byte
] +
User
ID[2
byte
]”
, set the user ID
l34bit
Because it sends
“Sitecode[1
byte
] +
User
ID[3
byte
]”,
set the user ID
User
It is set by the user definition, which only can be set in the server, and
less or equal than 4 digits.
Send example) In case of SiteCode:045(2Dh), UID:6543(198Fh)
1 00101101 0001 1001 10001111 0
less or equal than 7 digits.
But, if the user ID is 8 digits, ignore sitecode and send only the “User
ID[4byte]”.
Send example) SiteCode:001(1h), UID:123456(1E240h)
0 00000001 00000001 11100010 01000000 0
definition
the setting type only can be inquired in the terminal.
Click [OK] button to apply the set value, and click [BACK] button to cancel and return.
3.8.Display settings
3.8.1. Theme
If you select [Display]->[Theme] in the main menu, the following window appears.
▶ Basic setting : Same with the window at the left
side.
▶The main background.
It sets the background of the basic window. You
can inquire the next image by clicking [ ] button.
Click [OK] button to apply the set value, and click [BACK] button to cancel and return. If
you want to set another items, click the menu you want to change at the left side.
3.8.2. Camera
㈜㈜㈜㈜Union Community / Hyundai Topics building 5
Songpa-gu, Seoul, Korea (138-050)
Tel: 02-6488-3000, Fax: 02-6488-3099, E-Mail:sales@unioncomm.co.kr
http://www.unioncomm.co.kr
th
floor, 44-3, Bangi 2-dong,
Page 60

AC-7000 User guide 60
If you select the [Display]->[Camera] in the main menu, the following window
appears.
▶ Basic setting : Same with the window at the left
side.
▶Display option
Choose the image displayed in the message window
of authorization success
- None
- Registered user’s picture.
▶Save success log
If it is checked ( ), the camera image is captured
as image log when the authorization was
successful.
▶Save failed log
When it is checked( ), the camera image is
captured as image log when the authorization was
failed.
Click [OK] button to apply the set value, and click [BACK] button to cancel and return.
3.8.3. Language
If you select the [Display]->[Language] in the main menu, the following window
appears.
▶Basic setting: ‘English’
▶Language
If you change the language and click ‘OK’ button,
the voice message and language are changed to
the set language.
If you want to cancel and move to the upper menu,
click [BACK] button.
※※※※Supporting languages
English, Korean, and Japanese
㈜㈜㈜㈜Union Community / Hyundai Topics building 5
Songpa-gu, Seoul, Korea (138-050)
Tel: 02-6488-3000, Fax: 02-6488-3099, E-Mail:sales@unioncomm.co.kr
http://www.unioncomm.co.kr
th
floor, 44-3, Bangi 2-dong,
Page 61

AC-7000 User guide 61
3.8.4. LCD option
If you select [Display]->[LCD option] in the main menu, the following window appears.
▶ Basic setting : Same with the window at the left side.
▶Screen saver setting (10 seconds~ 10minutes)
If there is no input for set duration, the LCD screen is
turned off automatically. But, if you set ‘None’ the
LCD is always turned on.
▶User display option
It sets what will be shown at the LCD screen when
the authorization is successful.
-None: The authorization result [Success/Failure] is
only represented.
-User ID
-User name: Representing user ID if it is not
registered.
- Personnel number: Representing user ID if it is not
registered.
Click [OK] button to apply the set value, and click [BACK] button to cancel and return.
3.8.5. Message time settings
If you select the [Display]->[Message time setting] in the main menu, the following
window appears.
㈜㈜㈜㈜Union Community / Hyundai Topics building 5
Songpa-gu, Seoul, Korea (138-050)
Tel: 02-6488-3000, Fax: 02-6488-3099, E-Mail:sales@unioncomm.co.kr
http://www.unioncomm.co.kr
th
floor, 44-3, Bangi 2-dong,
Page 62

AC-7000 User guide 62
▶ Basic setting : Same with the window at the left
side.
▶Message display (ms unit)
It sets the time for which the authorization result
window to be displayed.
0~5000 is available for the value, and the
authorization result window appeared and
disappear for the duration.
Because it is set in ms unit, if you want to set 2
seconds, you should set 2000
Click [OK] button to apply the set value, and click [BACK] button to cancel and return.
3.9. Terminal information
3.9.1. System information
If you select the [Terminal info]->[System] in the main menu, the following window
appears.
▶System info
The hardware and firmware version of the terminal
is shown.
▶Hard disk (using/all)
It shows the using amount of the hard disk.
If the using amount is high, it is represented in red.
▶Ram (using/all)
The using amount of Ram among the all amount is
represented.
If the using amount is high, it is represented in red.
㈜㈜㈜㈜Union Community / Hyundai Topics building 5
Songpa-gu, Seoul, Korea (138-050)
Tel: 02-6488-3000, Fax: 02-6488-3099, E-Mail:sales@unioncomm.co.kr
http://www.unioncomm.co.kr
th
floor, 44-3, Bangi 2-dong,
Page 63

AC-7000 User guide 63
Click [BACK] button to finish the inquiry and move to the upper menu. Click the menu on
the left side to inquire additional item.
3.9.2. Terminal information
If you click the [Terminal information] -> [Terminal] in the main menu, the
following window appears.
▶Terminal information
It represents the option setting value of the
terminal.
Click [Close] or [BACK] button to finish the inquiry and move to the upper menu.
3.9.3. Network information
If you select the [Terminal information]->[Network] in the main menu, the
following window appears.
㈜㈜㈜㈜Union Community / Hyundai Topics building 5
Songpa-gu, Seoul, Korea (138-050)
Tel: 02-6488-3000, Fax: 02-6488-3099, E-Mail:sales@unioncomm.co.kr
http://www.unioncomm.co.kr
th
floor, 44-3, Bangi 2-dong,
Page 64

AC-7000 User guide 64
▶Network information
It shows the network setting value of the terminal
If you want to finish the inquiry and move to the upper menu, click [CLOSE] or [BACK] button.
3.9.4. User information
If you select the [Terminal information]->[User] in the main menu, the following
window appears.
▶User information
- User: The number of users registered (including
administrator)
- Admin: The number of the administrators
registered.
- FP: The number of all the fingerprints registered.
- FP1 to N: The number of fingerprints which can
be authorized by 1:N.
- Face: The number of the users who registered the
face
- Face1 to N: The number of users who can be
authorized by 1:N
- Card: The number of cards registered
- Photo: The number of users who registered the
picture
(Max means the maximum number of registrations
for each item.)
Click the [Close] or [BACK] button to finish the inquiry and move to the upper menu.
3.9.5. Log information
㈜㈜㈜㈜Union Community / Hyundai Topics building 5
Songpa-gu, Seoul, Korea (138-050)
Tel: 02-6488-3000, Fax: 02-6488-3099, E-Mail:sales@unioncomm.co.kr
http://www.unioncomm.co.kr
th
floor, 44-3, Bangi 2-dong,
Page 65

AC-7000 User guide 65
If you select the [Terminal information] -> [Log] in the main menu, the following
window appears.
▶Log information
Log: The number of logs saved in the terminal
Image Log: The number of image logs saved in the
terminal.
(Max means the maximum number of items which
can be saved in each item.
If you want to finish the inquiry and move to the upper menu, click [Close] or [BACK] button.
3.9.6. About
If you select the [Terminal information] -> [About] in the main menu, the following
window appears.
▶About
It shows the license information of the Korean font
applied to the terminal.
If you want to finish the inquiry and move to the upper menu, click [Close] or [BACK]
button.
㈜㈜㈜㈜Union Community / Hyundai Topics building 5
Songpa-gu, Seoul, Korea (138-050)
Tel: 02-6488-3000, Fax: 02-6488-3099, E-Mail:sales@unioncomm.co.kr
http://www.unioncomm.co.kr
th
floor, 44-3, Bangi 2-dong,
Page 66

AC-7000 User guide 66
<
When the
SD
card
was inserted
> < When the SDcard was not inserted
>
3.10. SD card
If you select the [SD card] at the main menu, the following screen appears.
※※※※ It works only if the SDcard is inserted, and it should be inserted with the
It works only if the SDcard is inserted, and it should be inserted with the
It works only if the SDcard is inserted, and it should be inserted with the It works only if the SDcard is inserted, and it should be inserted with the
back side face forward like the figure. (The side of the SD card should not
back side face forward like the figure. (The side of the SD card should not
back side face forward like the figure. (The side of the SD card should not back side face forward like the figure. (The side of the SD card should not
exceed 32G.)
exceed 32G.)
exceed 32G.) exceed 32G.)
㈜㈜㈜㈜Union Community / Hyundai Topics building 5
Songpa-gu, Seoul, Korea (138-050)
Tel: 02-6488-3000, Fax: 02-6488-3099, E-Mail:sales@unioncomm.co.kr
http://www.unioncomm.co.kr
th
floor, 44-3, Bangi 2-dong,
Page 67

AC-7000 User guide 67
It is the function used for data backup of the
terminal
by [Export], and you can copy the backup data from
the [Export] into the terminal again.
▶Export
It copies the data from the terminal to the external SDcard.
-User data: It copies the user DB to the ‘AC7000/db’ folder of the SDcard.
-System option: The option setting value of the terminal is copied to the ‘AC7000/config’
folder.
-Event log: It copies the authorization log DB to the ‘AC7000/db’ folder of the SDcard.
-Export all: It copies all the user’s data and event log to the ‘AC7000/db’ folder of the
SDcard.
-Photo data: The image log data is saved in the ‘AC7000/logimage’ folder of the SDcard,
and the photo data of the user is saved in the ‘AC7000/userphoto’ folder of the SDcard as
jpg file.
▶Import
It copies the data from the SDcard to the terminal
- User data: The user’s DB saved in the SDcard(‘AC7000/db’ folder) by export is copied
to the terminal
- System option: The option setting values of the terminal saved in the
SDcard(‘AC7000/config’ folder) by export is copied to the terminal.
If you fulfilled the import and if you want to apply the new DB or setting value, you should
reboot the terminal
ETC.
-Theme: The voice file in the ‘AC7000/audio’ folder in the SDcard is copied to the terminal.
If you want to replace the authorization success (user_ok.mp3) and the authorization fail
(user_fail.mp3) message with the user voice, you can play the user voice by copying with
㈜㈜㈜㈜Union Community / Hyundai Topics building 5
Songpa-gu, Seoul, Korea (138-050)
Tel: 02-6488-3000, Fax: 02-6488-3099, E-Mail:sales@unioncomm.co.kr
http://www.unioncomm.co.kr
th
floor, 44-3, Bangi 2-dong,
Page 68

AC-7000 User guide 68
changing the file name to the user voice sound.
-F/W upgrade: It upgrades the firmware from the SDcard.
(The firmware should be in the ‘AC7000’ folder of the SDcard.)
If you want to finish working and move to the upper menu, click the [OK] or [BACK]
button.
3.11. User file download
If necessary, the user can change the background screen or voice message with this
function. It can be fulfilled by copy with SDcard or downloading the user file from the
UNIS server program.
3.11.1. Background screen change
If you select the ‘User file send’ in the UNIS program, the following window appears.
If you select the file type as ‘Background image file(.jpg)’, select the image file (.jpg),
and click the ‘Send’ button, the terminal selection window appears. If you select the
terminal in the terminal list window and click the ‘Send’ button again, the file is sent and
the download result is represented.
At this point, the file name should not exceed 15 characters, and the jpg file whose size
is 480*800 is only can be sent. If the data with different format is downloaded, the
version error is shown in the send result.
If you want to change the background screen to the basic screen, you can select it by
yourself in the [3.8.1. Screen setting] -> [Theme].
3.11.2. Voice message change
If you select the ‘User file sending’ at the UNIS program, the following window appears.
㈜㈜㈜㈜Union Community / Hyundai Topics building 5
Songpa-gu, Seoul, Korea (138-050)
Tel: 02-6488-3000, Fax: 02-6488-3099, E-Mail:sales@unioncomm.co.kr
http://www.unioncomm.co.kr
th
floor, 44-3, Bangi 2-dong,
Page 69

AC-7000 User guide 69
If you select ‘Sound file in success (.wav)’ as the file type and click ‘Send’ button after
selecting the sound file (.wav or mp3), the terminal selecting window appears. If you select
the terminal in the terminal list window and click the ‘Send’ button again, the file is sended
and the result of download appears.
In this time, the file name should be less than 15 characters including extension and mp3
format.
In case of sound in failure also can be changed by selecting ‘Sound file in failure(.wav)’
with the same manner.
If you want to change to the basic sound from the user’s sound, remove the check of the
[Using the user sound] at the [3.7.1 Terminal setting] -> [Sound].
㈜㈜㈜㈜Union Community / Hyundai Topics building 5
Songpa-gu, Seoul, Korea (138-050)
Tel: 02-6488-3000, Fax: 02-6488-3099, E-Mail:sales@unioncomm.co.kr
http://www.unioncomm.co.kr
th
floor, 44-3, Bangi 2-dong,
Page 70

AC-7000 User guide 70
4. How to use terminal
The background image and composition of the basic window can be changed according
to the administrator’s setting. In addition, if the administrator set the screen saver time,
the LCD screen is turned off automatically if there is no action for set time, and when the
user accessed to the terminal, tried the authorization with fingerprint/card, or touched
the main screen, the LCD screen is turned on automatically.
4.1. Authorization mode change
Card Input part
<Fig. 4-1>
Change to the desired authorization mode by clicking the attendance [F1], leaving [F2],
going out [F3], coming back [F4], and entrance [Access] button in the screen.
4.2. ID input
If you click the [ID input] button at the basic window, following ID input window appears
as follows.
㈜㈜㈜㈜Union Community / Hyundai Topics building 5
Songpa-gu, Seoul, Korea (138-050)
Tel: 02-6488-3000, Fax: 02-6488-3099, E-Mail:sales@unioncomm.co.kr
http://www.unioncomm.co.kr
th
floor, 44-3, Bangi 2-dong,
Page 71

AC-7000 User guide 71
Enter the user ID to be certified and click [OK]
button, then the input screen of fingerprint, face,
card, or password according to the authorization
method of the user.
<Fig. 4-2>
4.3. Authorization
4.3.1. Face authorization
▶1:N Authorization
Set the location of your face at the LCD guideline until the guideline is changed green,
and gaze the camera and stop moving to try authorization.
▶1:1 Authorization
As shown in the following figure, enter your ID first by clicking [Input ID] button, and
when the face input message appears, locate your face until the LCD guideline is
turned green, and gaze the camera and stop moving.
㈜㈜㈜㈜Union Community / Hyundai Topics building 5
Songpa-gu, Seoul, Korea (138-050)
Tel: 02-6488-3000, Fax: 02-6488-3099, E-Mail:sales@unioncomm.co.kr
http://www.unioncomm.co.kr
th
floor, 44-3, Bangi 2-dong,
Page 72

AC-7000 User guide 72
4.3.2. Fingerprint authorization
▶1: N Authorization
If you put your fingerprint at the fingerprint sensor at the basic window, the fingerprint
is entered with the light on the sensor. Do not take off your finger until the light of
the sensor turns off completely.
▶1:1 Authorization
As shown in the following figure, enter your ID first by clicking the [Input ID] button,
and input your fingerprint when the fingerprint entering window appears and the light
is turned on at the fingerprint sensor.
㈜㈜㈜㈜Union Community / Hyundai Topics building 5
Songpa-gu, Seoul, Korea (138-050)
Tel: 02-6488-3000, Fax: 02-6488-3099, E-Mail:sales@unioncomm.co.kr
http://www.unioncomm.co.kr
th
floor, 44-3, Bangi 2-dong,
Page 73

AC-7000 User guide 73
4.3.3. Card authorization
Put the card on the card picture in <Fig. 4-1)
4.3.4. Password authorization
Input your ID by clicking [ID input] button as follows and input password when the
password input window appears.
㈜㈜㈜㈜Union Community / Hyundai Topics building 5
Songpa-gu, Seoul, Korea (138-050)
Tel: 02-6488-3000, Fax: 02-6488-3099, E-Mail:sales@unioncomm.co.kr
http://www.unioncomm.co.kr
th
floor, 44-3, Bangi 2-dong,
Page 74

AC-7000 User guide 74
4.3.5. Multi authentication
For user who needs to authenticate via more than 2 methods such as –card & fingerprint
OR card & fingerprint & face,
The preferential precedence of the authentication after the ID is typed is as follows:
cardfingerprintfacepassword
It activates even face or fingerprint authenticates first
㈜㈜㈜㈜Union Community / Hyundai Topics building 5
Songpa-gu, Seoul, Korea (138-050)
Tel: 02-6488-3000, Fax: 02-6488-3099, E-Mail:sales@unioncomm.co.kr
http://www.unioncomm.co.kr
th
floor, 44-3, Bangi 2-dong,
Page 75

AC-7000 User guide 75
FCC Information
This device complies with part 15 of the FCC Results. Operation is subject to the following
two conditions :
(1) This Device may not cause harmful interface, and
(2) This device must accept any interference received, including interference that
may cause undesired operation.
Note: This equipment has been tested and found to comply with the limits for CLASS B digital
device, pursuant to Part 15 of FCC Rules. These limits are designed to provide reasonable protection
against harmful interference when the equipment is operated in a commercial environment This
equipment generates, uses and can radiate radio frequency energy and, if not installed and used in
accordance with the instructions, may cause harmful interference to radio communications. However,
there is no guarantee that interference will not occur in a particular installation. If this equipment
does cause harmful interference to radio or television reception, which can be determined by
turning the equipment off and on, the user is encouraged to try correct the interference by one or
more of the following measures:
1.1. Reorient or relocate the receiving antenna.
1.2. Increase the separation between the equipment and receiver.
1.3. Connect the equipment into an outlet on a circuit different from that to which receiver is
connected.
1.4. Consult the dealer or experienced radio/TV technician for help.
WARNING
Changes or modifications not expressly approved by the manufacturer could void the
user’s authority to operate the equipment.
“CAUTION : Exposure to Radio Frequency Radiation.
Antenna shall be mounted in such a manner to minimize the potential for human contact
during normal operation. The antenna should not be contacted during operation to avoid
the possibility of exceeding the FCC radio frequency exposure limit.
㈜㈜㈜㈜Union Community / Hyundai Topics building 5
Songpa-gu, Seoul, Korea (138-050)
Tel: 02-6488-3000, Fax: 02-6488-3099, E-Mail:sales@unioncomm.co.kr
http://www.unioncomm.co.kr
th
floor, 44-3, Bangi 2-dong,
 Loading...