


iColor
350 Dye Sublimation
Transfer Media Printer User Manual
®
February 2019 Edition – A newer version of this manual may be available at www.icolorprint.com/support

Table of Contents
iColor® 350 Model Summary Page 3
Unpacking and Installing Consumables Page 4 - 7
Loading Paper Page 7 - 9
Control Panel Layout Page 10
Printer Software Installation Instructions Page 11 - 17
Wireless Setup Page 17 - 20
Setting a Static IP Page 20
Installing the iColor® 350 Dye Sublimation ICC Profile Page 21
Before you print with the iColor® 350 Page 22 - 23
Printing with the iColor® 350 Page 23
Specific Substrate Recommendations Page 24 - 26
Removing Polymer Residue on Hard Surfaces Page 26
iColor® 350 Printing Tips Page 27
Using Genuine iColor® Consumables Page 27
Replacing the Print Cartridges Page 28 - 30
Replacing the Waste Toner Bottle Page 30 - 32
Non User Replaceable Components Page 32
Cleaning the Toner Density Sensor Page 33
Cleaning the Registration Roller Page 34
Cleaning the Paper Tray, Friction Pad and Paper Feed Roller Page 34 - 35
Removing Paper Jams Page 33 - 37
iColor® 350 Printer Spec Sheet Page 38
UniNet iColor Printing Solutions | sales@icolorprint.com | www.icolorprint.com
2

iColor
The iColor® 350 is an on-demand, full color toner-based dye sublimation transfer printer for short to
mid run dye sublimation transfer production of garments, hard surfaces, and much more! The iColor®
350 does not require special software or special transfer media! Keep costs low by printing on regular
copy paper instead of expensive dye sublimation media.
What’s so unique about the iColor® 350 dye sublimation printer compared to ink
based systems?
Suited for a production level environment, the iColor® 350 features vastly faster print speeds:
20 pages per minute vs 1 page per 2 minutes for ink (photo mode)
No clogged heads resulting from non-use. Toner based systems do not have this maintenance
issue.
Much longer expiration date on toner (ink expires within one year). Uninet suggests the
cartridges are used within a 2 year period.
Much higher page yield options
350 Dye Sublimation Media Printer
®
What is Dye Sublimation?
The iColor® 350 printer uses heat to transfer an image printed with dye sublimation toner onto
polyester coated materials such as a plastic, ceramics and fabric. This is a fast and easy way to transfer
images, since it is a one step process and the image is permanent. The toner serves as a carrier for the
sublimation dye, which transitions from a solid to a gas state. Thus, your transferred image is ‘in’ the
substrate, not on top like heat transfers are. Since white underbase is not possible using this
technique, all transfers must be done on white or light colored materials.
Amplify your printed offerings by producing high quality, vibrant color prints for sublimation transfers
onto polyester–based textiles and sublimation coated hard surface substrates such as ceramic, metal,
acrylic, UniSub, DynaSub, Subliboard and more.
Getting started with dye sublimation is now easier and more affordable than ever. This low cost
solution allows for the creation of garments, ceramic mugs, coasters, cell phone covers and other
wearables.
UniNet iColor® Sublimation Toner Cartridges offer higher yields compared to ink sublimation systems,
and print at much higher speeds for greater efficiency and productivity.
UniNet iColor Printing Solutions | sales@icolorprint.com | www.icolorprint.com
3

Unpacking and installing consumables
1. Remove orange security tape and packing material from around the printer.
2. Open front cover and remove the security tape from inside the printer.
UniNet iColor Printing Solutions | sales@icolorprint.com | www.icolorprint.com
4

3. Flip up the blue handles to engage the fuser, then close the front cover.
4. Open the top cover and remove orange security tape and packing material from inside
UniNet iColor Printing Solutions | sales@icolorprint.com | www.icolorprint.com
the printer.
5

5. Remove the black toner cartridge from the front of the machine. Place it on a flat, solid
surface and carefully remove the orange security tape and protective paper.
6. Be careful not to touch the drum or the contacts on the side of the cartridge.
UniNet iColor Printing Solutions | sales@icolorprint.com | www.icolorprint.com
6

7. Reinstall the black cartridge in the front of the machine. The above illustration shows
how the cartridges should be installed at all times. Do not change the cartridge order in
the iColor® 350. Once installed, close the top cover.
Loading Paper
1. Pull out the paper cassette and push down the metal base.
UniNet iColor Printing Solutions | sales@icolorprint.com | www.icolorprint.com
7

2. Squeeze the clips on the paper guides and slide them to match paper size. Do not move
the paper guides forcefully. Doing so may damage the tray.
3. Load media with the print side face up and ensure it locks in underneath the guides
before closing the cassette. Ensure the paper stack does not exceed the upper limit
mark inside the paper tray. To avoid paper jams, make sure the tray is securely inserted
UniNet iColor Printing Solutions | sales@icolorprint.com | www.icolorprint.com
and the media is not excessively stacked.
8

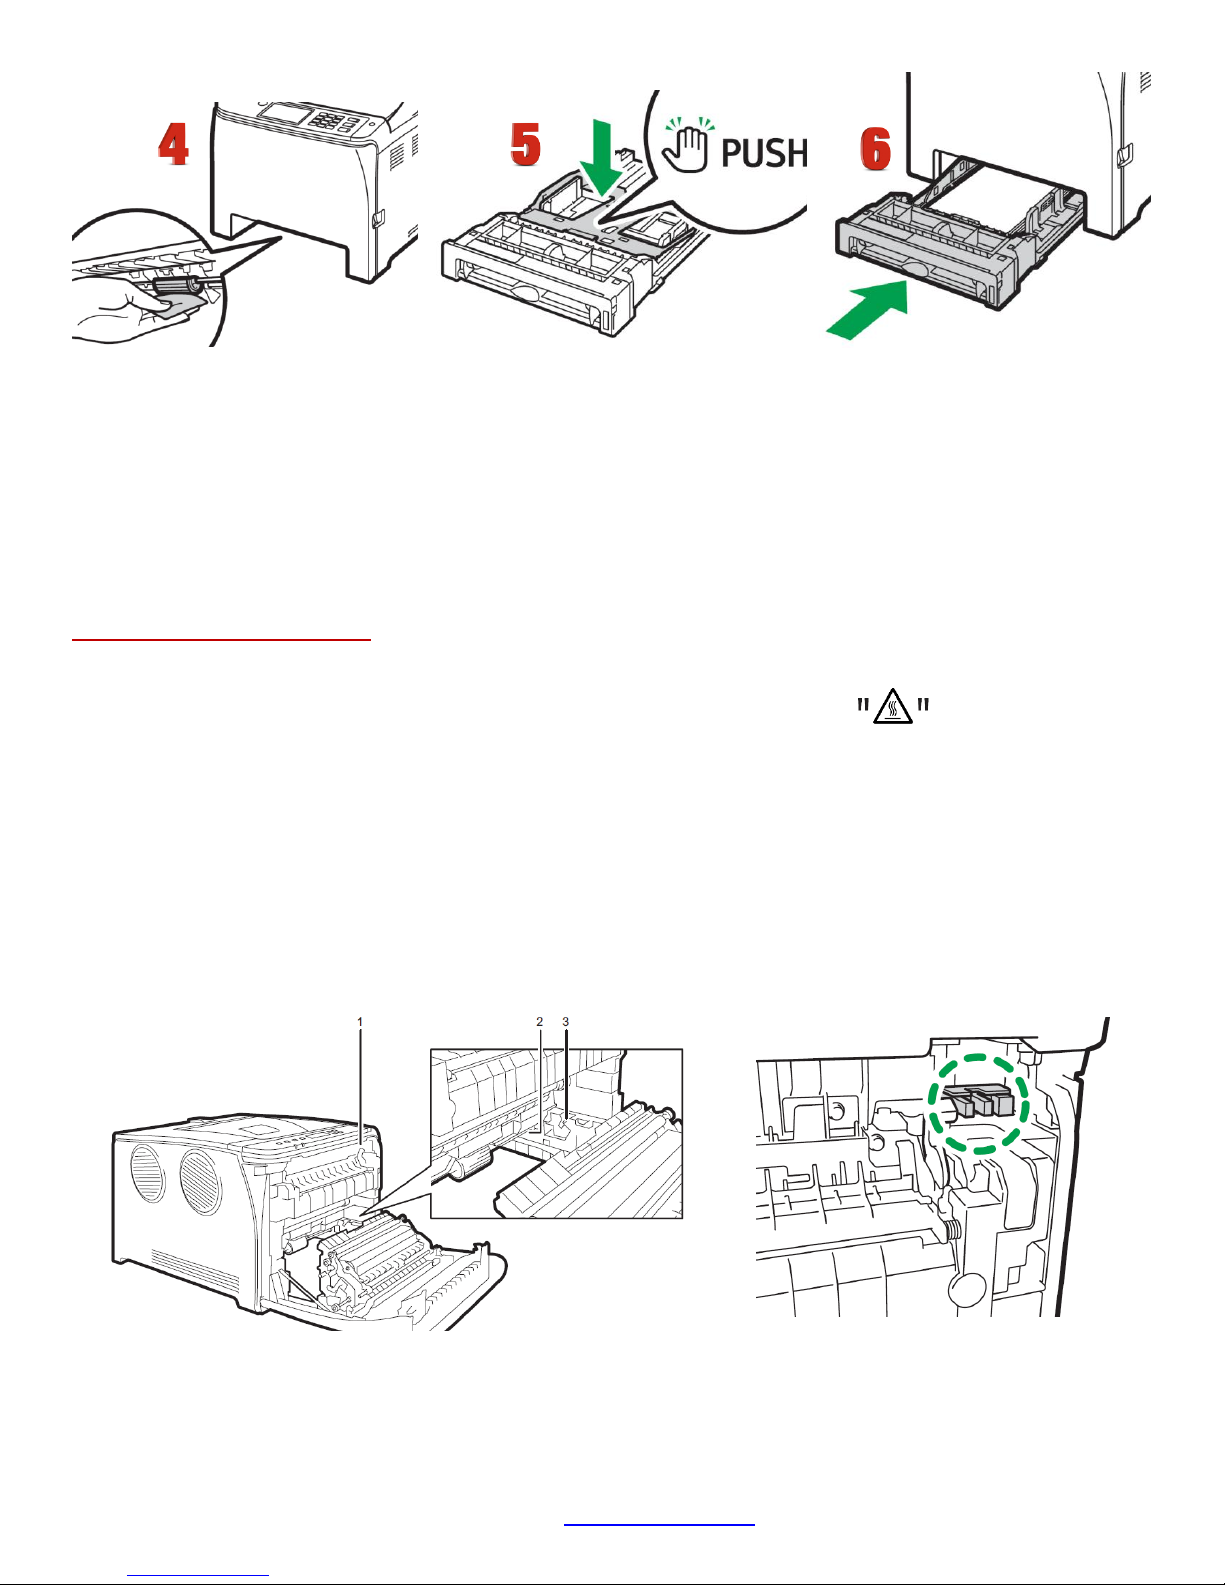
4. When loading paper longer than 11” into tray 1, remove the lower rear cover using a
coin. Push the metal plate down until it clicks. Pinch the extender in the "PUSH"
direction, and then pull out the extender until it clicks to accommodate lengths up to
14” long. After extension, check that the arrows on the extender and tray are aligned.
Do not extend this tray when loading A4 or letter size paper. Otherwise, a paper jam
may occur.
5. To use the bypass tray, load paper with the print side down and in the short-edge feed
direction. Insert the top edge of the paper into the machine. Adjust the paper guides to
the paper size. Support the paper with both hands, and insert it carefully until it stops.
UniNet iColor Printing Solutions | sales@icolorprint.com | www.icolorprint.com
9

6. Insert power cord and power on the unit. If connecting via USB, do not plug in the USB
cable until instructed to do so by the software.
Control Panel Layout
UniNet iColor Printing Solutions | sales@icolorprint.com | www.icolorprint.com
10

Installing the iColor
1. Locate the installation file ‘UniNet_iColor350’ on the USB drive that was shipped with your printer and
double click to launch the setup program (Compatible with Windows 7 / 8 / 10 only). You must have
Administrator privileges on the computer to proceed. If you encounter a warning that the driver is
potentially unsafe, ignore and proceed.
1. Click ‘Continue’ to
install the iColor®
350 driver.
350 printer on a PC
®
2. Click ‘Quick Install’ to
continue the
installation.
UniNet iColor Printing Solutions | sales@icolorprint.com | www.icolorprint.com
11

4. Agree to the End User
License agreement
and click ‘Next’.
Network Setup:
1. For wired network connectivity, connect the printer to your network via CAT 5 cable and power on the
printer. For wireless connectivity, first follow the setup instructions on pages 17 - 20, then proceed.
Your network will automatically assign an IP address to the printer, but it is suggested that you
program a static IP address to the printer to avoid possible reassignment of the IP address should the
machine be powered off (see page 26 for instructions).
UniNet iColor Printing Solutions | sales@icolorprint.com | www.icolorprint.com
12

5. Select ‘Network
Connection’ or ‘Wireless
Connection’ depending
on how your printer is
set up and click ‘Next’.
6. Select ‘Automatically
configure the printer
network’ and click
‘Next’.
UniNet iColor Printing Solutions | sales@icolorprint.com | www.icolorprint.com
13

7. If not already done, ensure your
printer is on the same network as
your PC. Click ‘Yes’.
8. The software will detect the
printer on your network. Click
on the printer and click ‘Next’.
The driver will now install.
9. Select ‘RICOH SP C261DNw PS’
ONLY. Click ‘Next’.
UniNet iColor Printing Solutions | sales@icolorprint.com | www.icolorprint.com
14
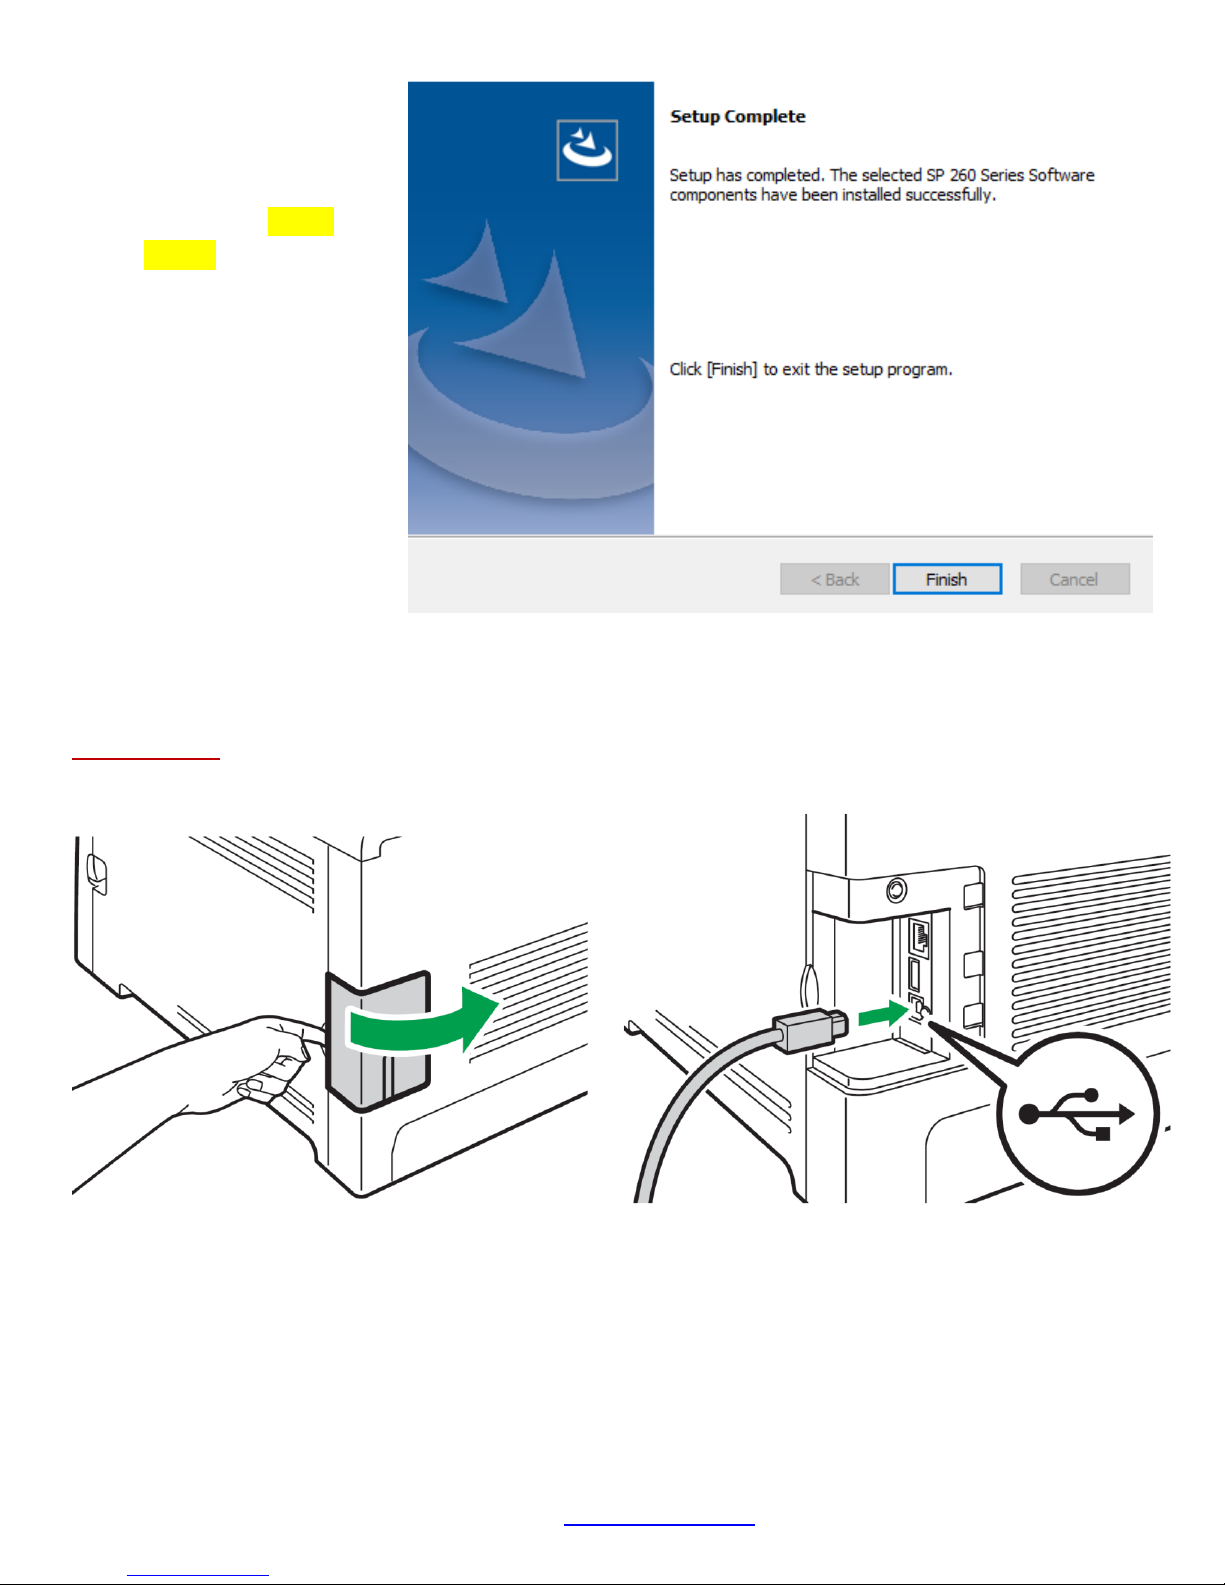
10. Click ‘Finish’ to complete
the installation. If
prompted to restart your
PC, click No. Do not
restart.
USB Setup:
1. Connect the USB cable to the printer and power on the printer. Do not connect to your PC yet.
UniNet iColor Printing Solutions | sales@icolorprint.com | www.icolorprint.com
15
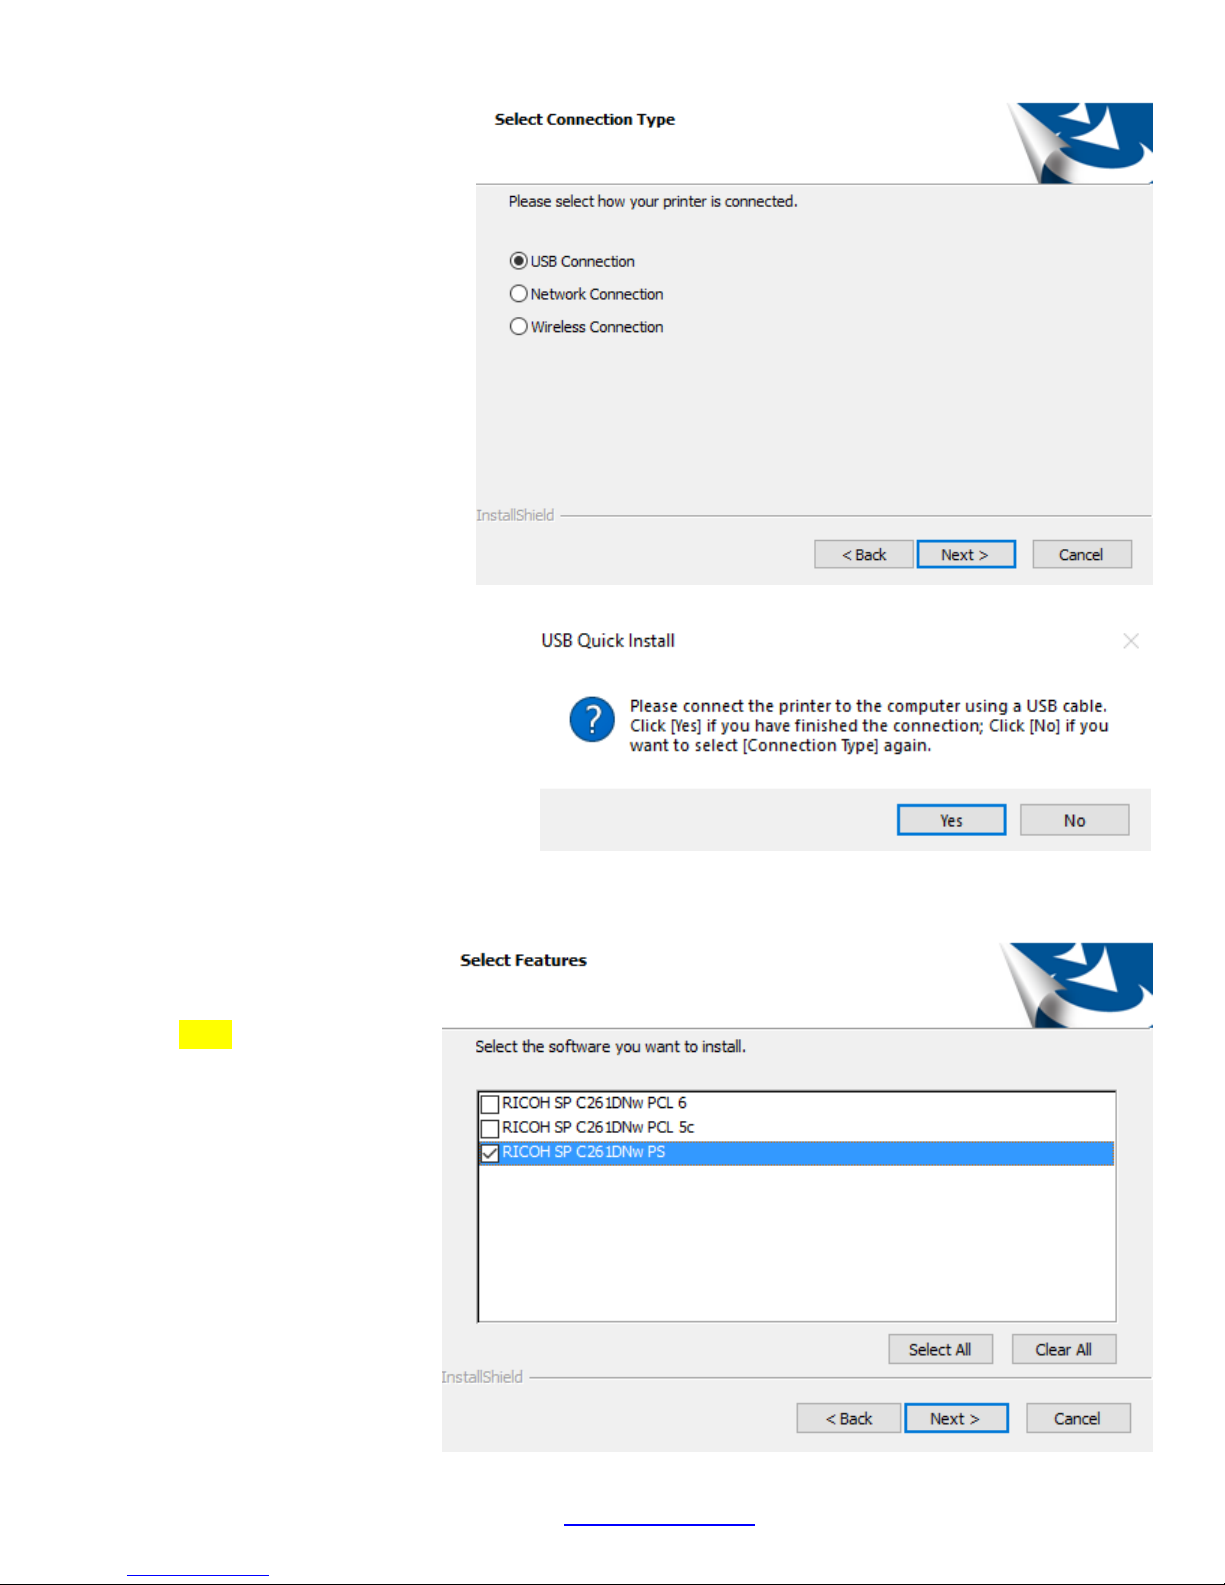
2. Select ‘USB Connection’ and
click ‘Next’.
3. Now, connect the USB cable to your
PC and wait 30 seconds.
4. Select ‘RICOH SP C261DNw
PS’ ONLY. Click ‘Next’.
UniNet iColor Printing Solutions | sales@icolorprint.com | www.icolorprint.com
16
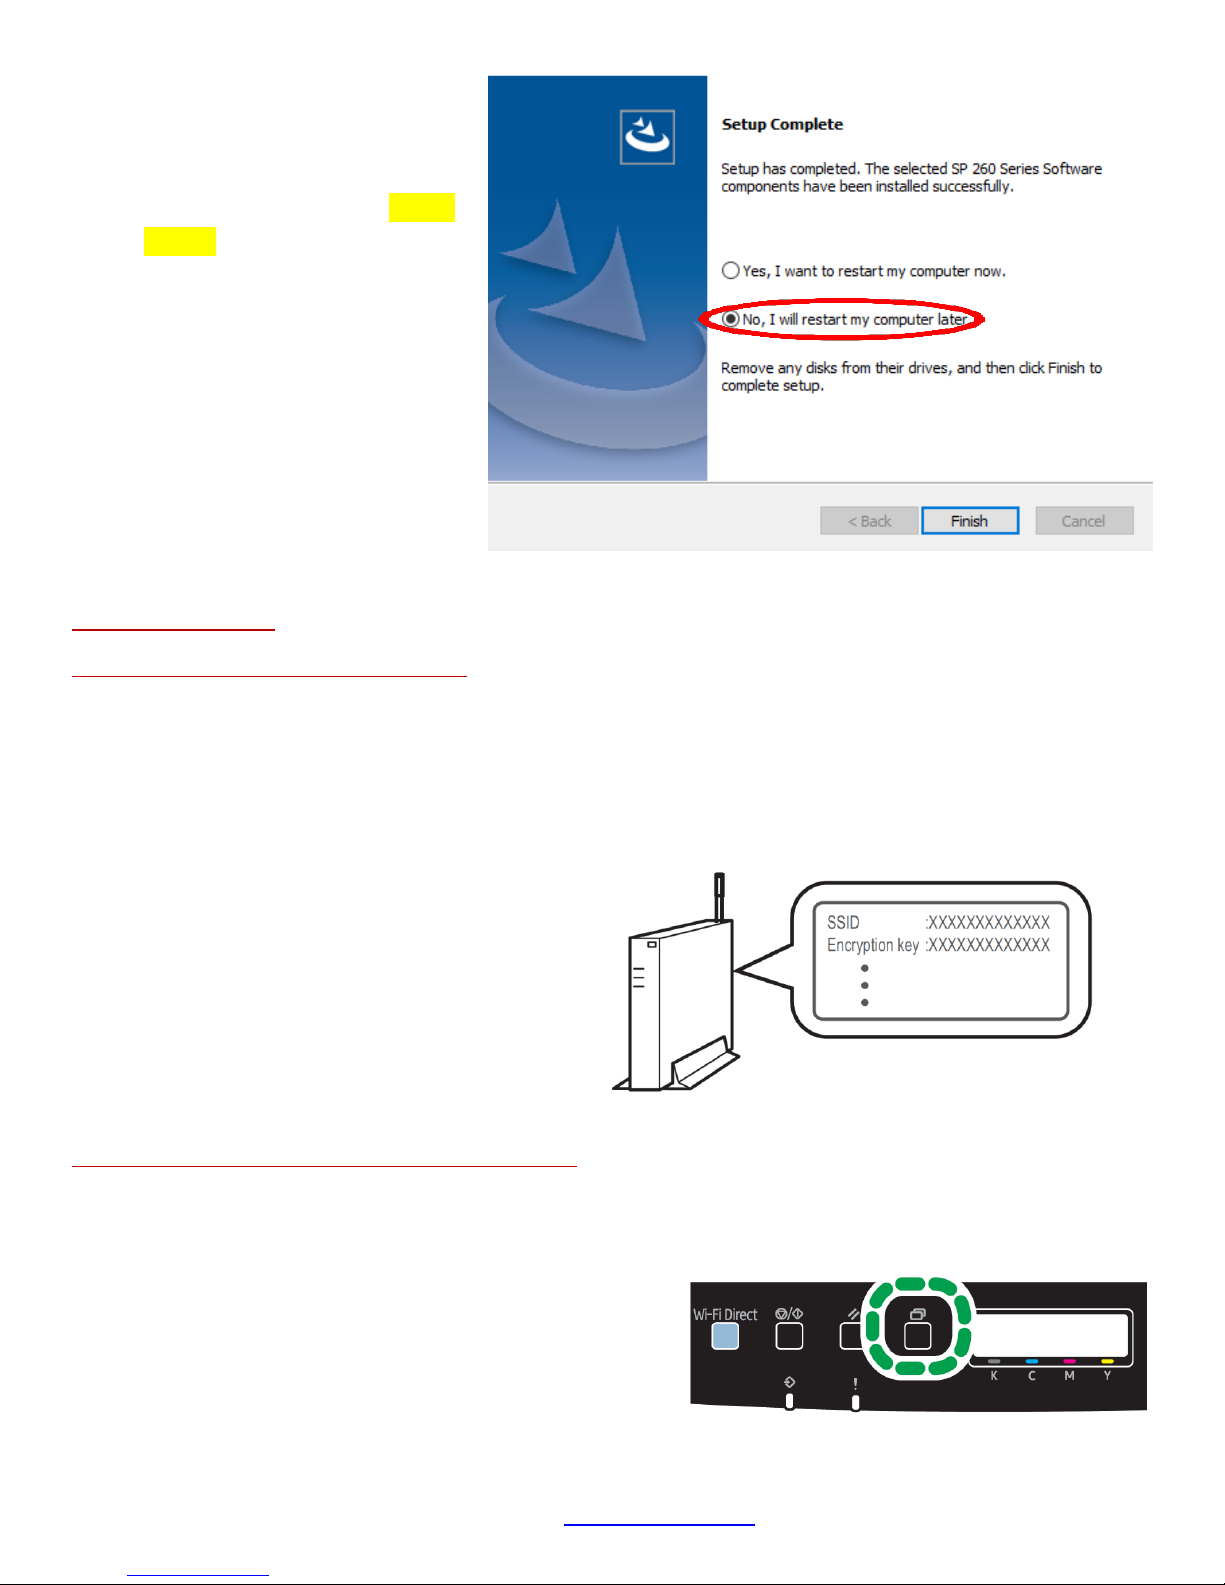
5. Click ‘Finish’ to complete the
installation. If prompted to
restart your PC, click No. Do not
restart.
Wireless Setup:
Easy Setup Using the Wi-Fi Setup Wizard
From the control panel of this printer, you can also configure the wireless LAN settings for the machine.
A router (access point) is necessary to set up a wireless connection.
The SSID and Encryption key for the router (access point) may be printed on a label affixed to the router
(access point). For details about the SSID and Encryption key, refer to the router (access point) manual.
Confirm the SSID and Encryption key, and write
them down on the blank space as shown below.
SSID: _________________________
Encryption key: _________________
Configuring Settings Using the Printer Control Panel
Make sure the Ethernet cable is not connected to the machine.
1. Check that the router (access point) is working correctly.
2. Press the [Menu] key.
3. Using the up/down keys, select [Host Interface], and then
press the [OK] key.
4. Using the up/down keys, select [Network Setting], and
then press the [OK] key.
UniNet iColor Printing Solutions | sales@icolorprint.com | www.icolorprint.com
17

5. Using the up/down keys, select [Wi-Fi Config.], and then press the [OK] key.
6. Using the up/down keys, select [Wi-Fi], and then press the [OK] key.
7. Using the up/down keys, select [Active], and then press the [OK] key.
8. Press the [Menu] key to return to the Initial screen.
9. Turn off the printer, and then turn it back on.
10. Press the [Menu] key.
11. Using the up/down keys, select [Host Interface], and then press the [OK] key.
12. Using the up/down keys, select [Network Setting], and then press the [OK] key.
13. Using the up/down keys, select [Wi-Fi Config.], and then press the [OK] key.
14. Using the up/down keys, select [Setup Wizard], and then press the [OK] key.
15. Using the up/down keys, select SSID of the router (access point) from the searched SSID list, and then
press the [OK] key.
16. Using the up/down keys, select the authentication method, and then press the [OK] key.
The next steps differ depending on the authentication method that you have selected. Proceed to Step 17 of
either section A or B.
Section A - Connecting to devices using the WPA2-PSK or Mix Mode WPA2/WPA authentication
17. Enter the encryption key (Passphrase) using the up/down keys, and then press the [OK] key.
As the passphrase, you can enter either 8 to 63 ASCII characters (0x20-0x7e) or 64 hexadecimal digits
(0-9, A-F, a-f).
To go to the next characters, press the [OK] key.
Press the [Escape] key to clear all characters.
18. Display will read ‘Connect?: Yes/No’. Press the [OK] key. After connecting to the network, the Wi-Fi screen
is displayed.
19. Using the up/down keys, select [Wi-Fi Status], and then press the [OK] key. When "Connected" is
displayed, the connection has been established. If "Disconnected" is displayed, the connection has not been
established. Start again from the beginning.
Section B - Connecting to the devices using the Open System or Shared Key authentication
17. Using the up/down keys, select the encryption method, and then press the [OK] key. The maximum
number of characters that can be entered in the encryption key field depends on the encryption method
settings.
Do not select [None] except in special circumstances. If selected, the security system will not work.
18. Enter the encryption key using the up/down keys, and then press the [OK] key.
To go to the next characters, press the [OK] key.
Press the [Back] key to clear all character.
19. Enter the ID using the up/down keys, and then press the [OK] key. The ID is used for identifying the
encryption key. You can register four encryption keys (ID 1 to 4).
20. Display will read ‘Connect?: Yes/No’. Press the [OK] key. After connecting to the network, the Wi-Fi screen
is displayed.
21. Using the up/down keys, select [Wi-Fi Status], and then press the [OK] key. When "Connected" is
displayed, the connection has been established. If "Disconnected" is displayed, the connection has not been
established. Start again from the beginning.
UniNet iColor Printing Solutions | sales@icolorprint.com | www.icolorprint.com
18
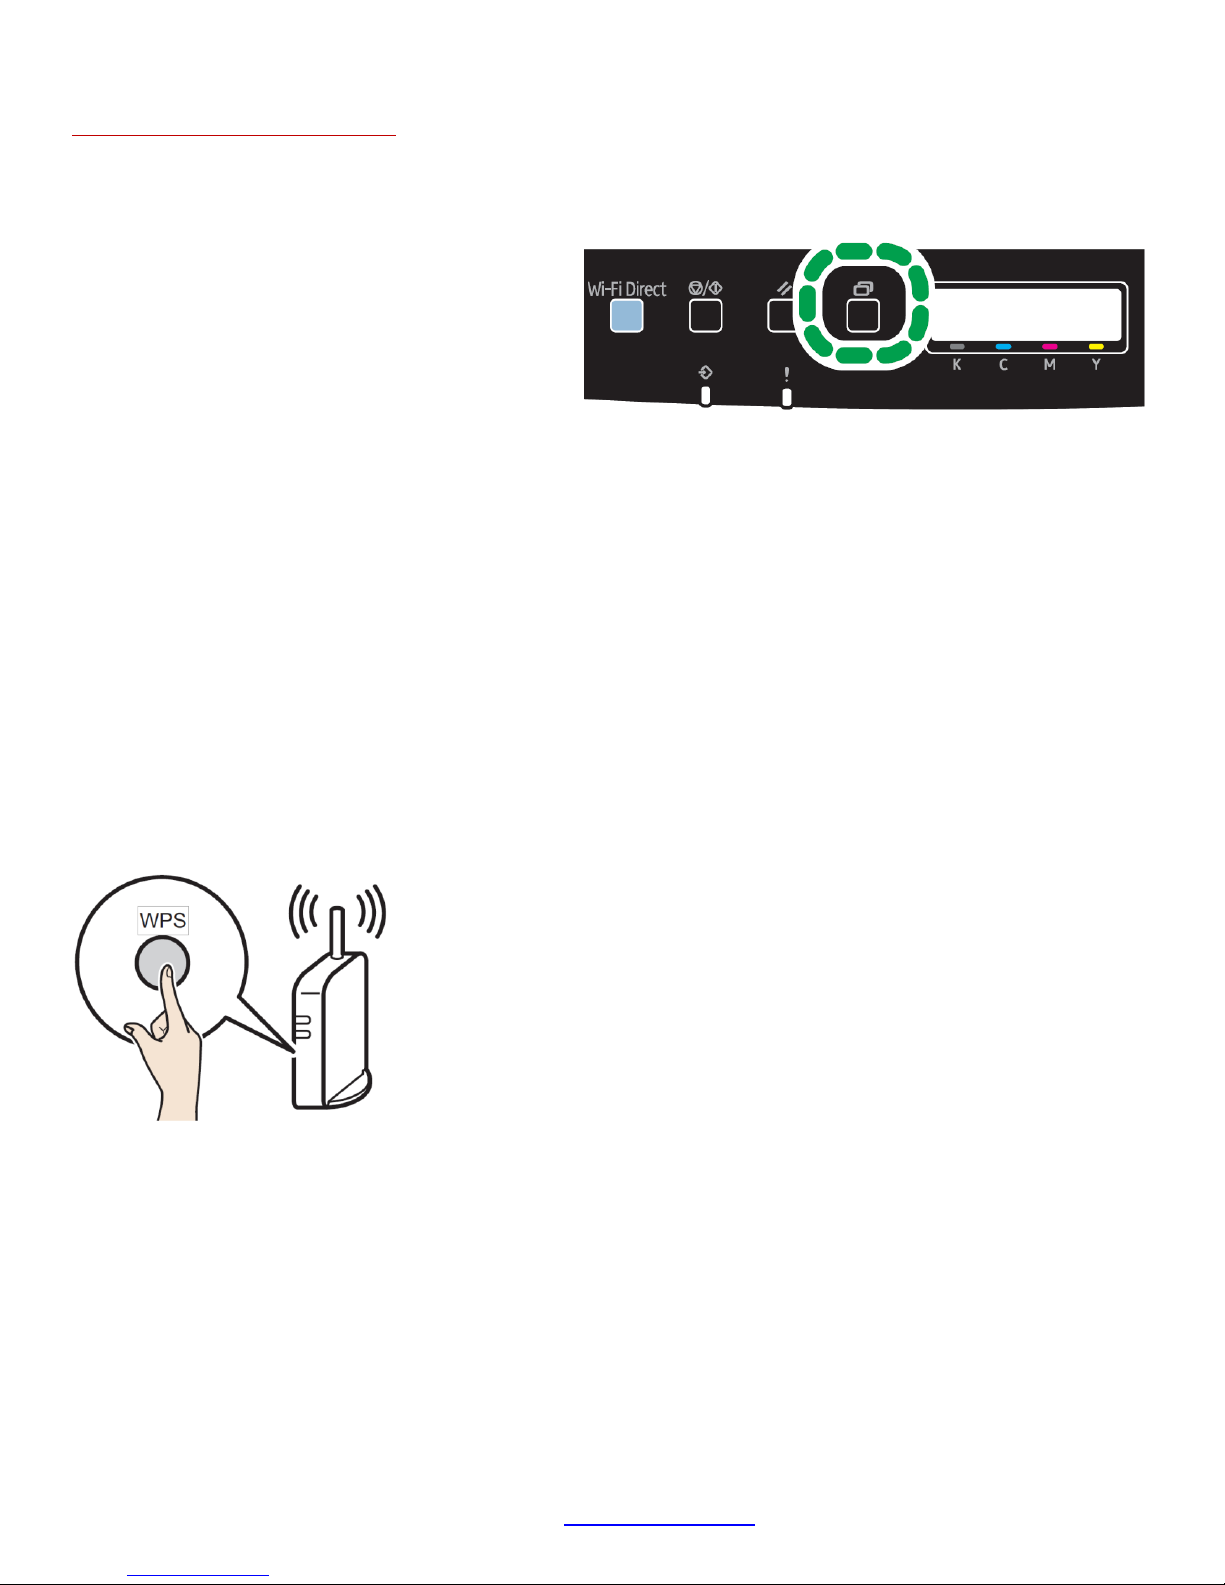
Easy Setup Using the WPS Button
Make sure the Ethernet cable is not connected to the machine.
1. Check that the router (access point) is working
correctly.
2. Press the [Menu] key.
3. Using the up/down keys, select [Host
Interface], and then press the [OK] key.
4. Using the up/down keys, select [Network
Setting], and then press the [OK] key.
5. Using the up/down keys, select [Wi-Fi Config.], and then press the [OK] key.
6. Using the up/down keys, select [Wi-Fi], and then press the [OK] key.
7. Using the up/down keys, select [Active], and then press the [OK] key.
8. Press the [Menu] key to return to the Initial screen.
9. Turn off the printer, and then turn it back on.
10. Press the [Menu] key.
11. Using the up/down keys, select [Host Interface], and then press the [OK] key.
12. Using the up/down keys, select [Network Setting], and then press the [OK] key.
13. Using the up/down keys, select [Wi-Fi Config.], and then press the [OK] key.
14. Using the up/down keys, select [WPS], and then press the [OK] key.
15. Using the up/down keys, select [PBC], and then press the [OK] key. "Connecting..." appears, and the
machine starts to connect in PBC method.
16. Press the WPS button on the router (access point) within two minutes.
17. Check the result. If connection has succeeded, press the [Menu] key to return to the initial screen. If
connection has failed, Press the [Back] key to return to the screen displayed in Step 15. Check the
configuration for the router (access point), then try the connection again.
18. Configuring the Wi-Fi settings is complete.
19. Once complete, follow the steps for ‘Network Setup’ beginning on page 12, but choose ‘Wireless
Connection’ as the connection type.
UniNet iColor Printing Solutions | sales@icolorprint.com | www.icolorprint.com
19

Setting a static IP on the iColor® 350:
Press the Menu button to the left of
the LED screen. Using the arrow
keys to the right of the LED screen,
select Network>>Host
Interface>>IPv4 Config.>>IP
Address. Use the arrow keys to set
the IP address. You can set the
subnet mask and default gateway
under the same menu.
Your printer will now be listed along with your other printers and devices.
UniNet iColor Printing Solutions | sales@icolorprint.com | www.icolorprint.com
20
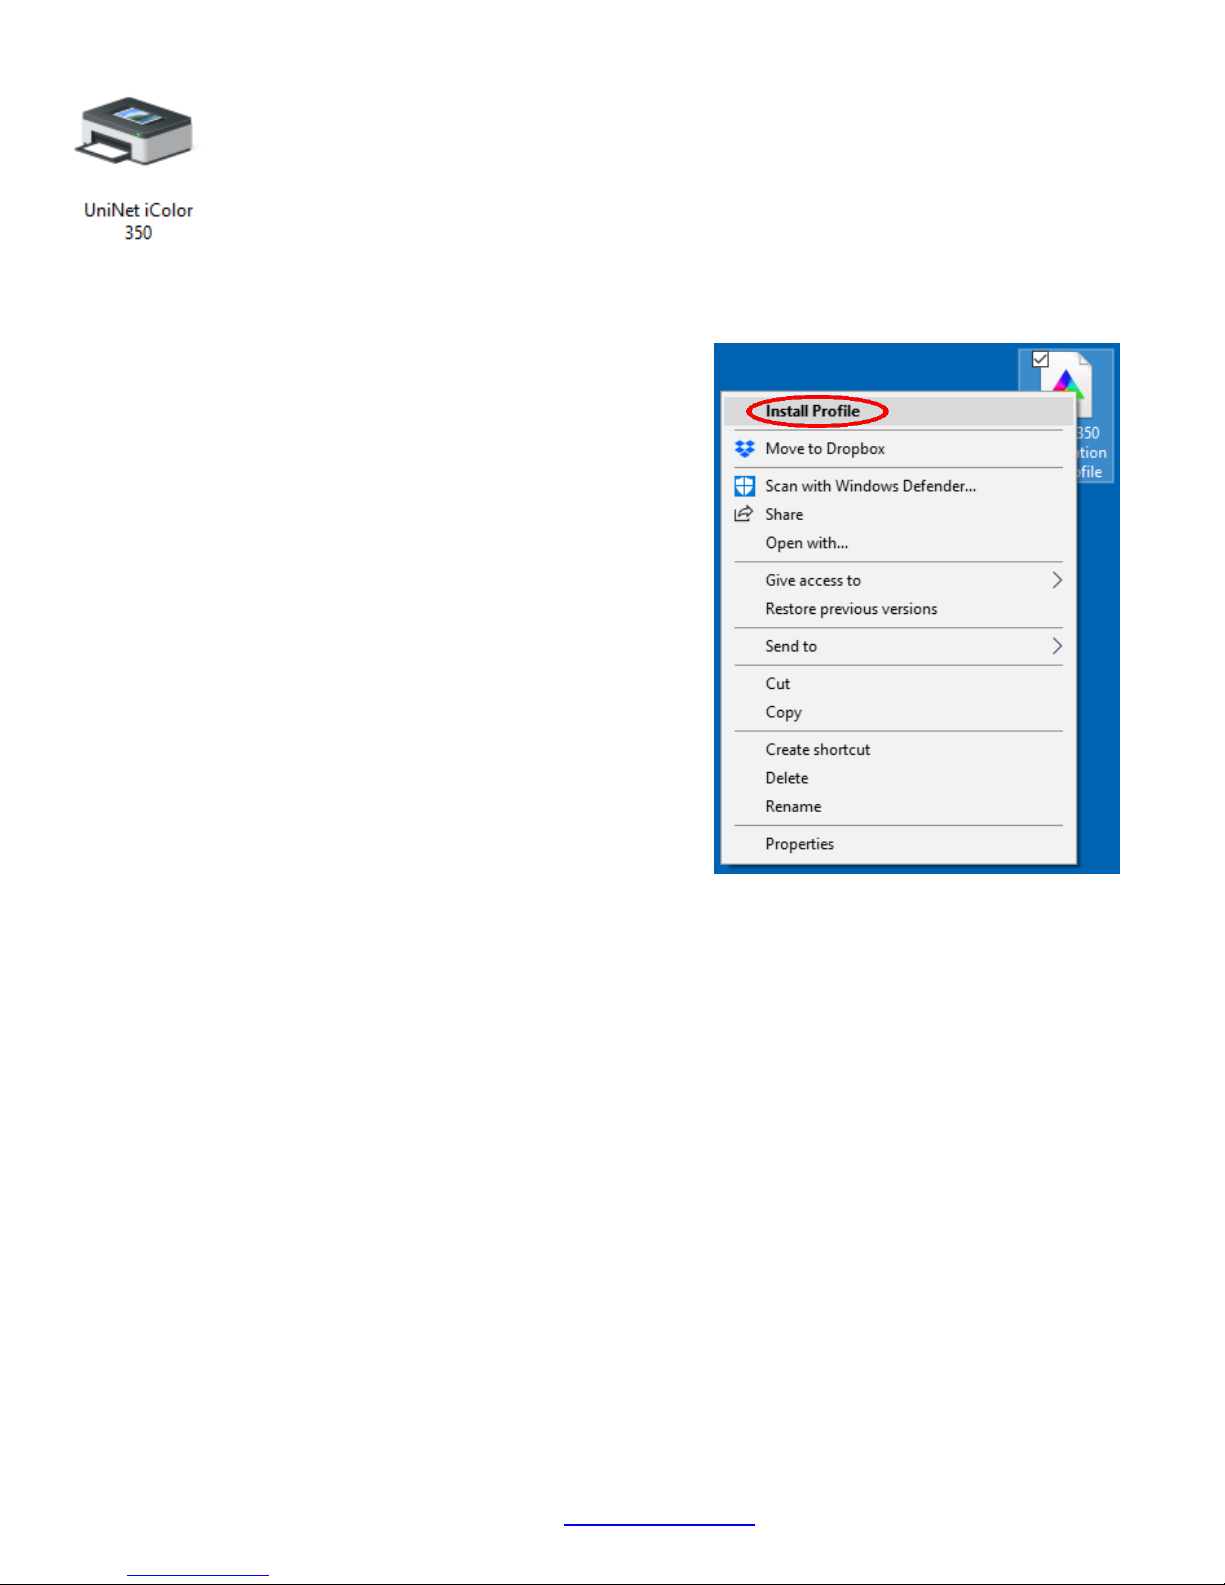
You are now ready to install the iColor
®
350 Sublimation ICC Profile.
1. Locate the file named ‘iColor 350 Sublimation ICC
Profile’ on the flash drive that came with your printer.
2. Right-click on the file, then left click on ‘Install Profile’
3. The profile is now installed.
UniNet iColor Printing Solutions | sales@icolorprint.com | www.icolorprint.com
21

Before you print with the iColor® 350:
1. If printing photographic type images requiring accurate colors from Photoshop, CorelDraw and other
software capable of utilizing standard ICC profiles, use the provided ICC profile. For photographs
(especially for skintones) which require more accurate color representation, UniNet suggests the use of
the provided ICC profile. Pressed images will have more accurate colors, but will not be as vibrant.
Color Handling should be set to allow your specific software package to handle colors. For example, in
Photoshop set to ‘Photoshop Manages Color’. Make sure you set the print driver to ‘No Color
Matching’ under ‘Color Management’ and ‘High Quality’ under ‘Job Options’. Be sure to mirror print
and select the proper ICC profile before printing (if desired).
2. For vector graphics or ‘cartoon-like’ images, where color matching isn’t as important as vibrancy, do
not use the ICC profile. This allows the prints to press as vividly as possible. Be sure to always mirror
your image before you print.
3. When printing black as part of your image, be sure to set the color to 100% K in your design software.
Printing composite blacks is not recommended and will not produce rich blacks. Note that some file
formats, such as PNG, cannot reproduce true black because they are saved as RGB images. If not
printing directly from your favorite graphics program, choose a file format such as PDF or TIFF to
preserve a CMYK file format for best results.
How to mirror print:
1. Click ‘Print’ from the graphics program of your choosing. Click ‘Printer Properties’. Select the
‘Paper/Quality’ tab and click ‘Advanced’.
UniNet iColor Printing Solutions | sales@icolorprint.com | www.icolorprint.com
22

2. Open the ‘PostScript Options’
dropdown and make sure ‘Mirrored
Output’ is set to ‘Yes’.
3. Click ‘OK’ to continue printing.
Printing with the iColor® 350:
1. Place your media into the tray of your iColor® printer and print your image. High quality copy paper is
suggested (Inkjet dye sublimation media will not work as well). The printed image may appear light and
have imprecise colors. Do not judge the quality of the print until you press the image - it will look
correct when pressed to the substrate after the sublimation process.
2. When ready to press the image, cover the transfer with copy paper instead of kraft paper, as the image
will sublimate upwards and transfer to it. For most applications, press at 380°F / 193°C with low
pressure. The duration of the press depends on the type and thickness of the substrate used, usually
between 60 – 120 seconds. Longer press duration increases color density. Quickly cool the substrate to
stop the sublimation process – not doing so could result in a lighter final result. The use of STC9
solution or SubliClean sheets will be needed for most hard surfaces (not textiles), to remove
transferred toner residue. Refer to instructions below for suggested press times and peeling method:
UniNet iColor Printing Solutions | sales@icolorprint.com | www.icolorprint.com
23

Specific Substrate Recommendations:
All instructions below are based on specific substrates. Your results may vary. Pressing time, temperature
and pressure settings may need to be adjusted based on the substrate used.
Sublimatable Glass (White Backer)
1) Close the press to preheat the lower platen. It is also recommended to warm up the glass substrate for
best results.
2) Print the image using the iColor® Dye Sublimation Toner kit. Do not mirror print for this application.
3) Place the substrate on the lower platen of the press (white backer face up). Align the printed image to
the substrate with the printed image on top (image facing the substrate). You can tape the paper to
the substrate or lower platen for additional stability.
4) Cover the transfer with copy paper or blow off sheets.
5) Press at 380°F / 193°C with low pressure for 420 seconds (7 mins).
6) Open the press slowly and peel immediately (hot peel).
7) Cool substrate as quickly as possible.
Coated Acrylic / Unisub Plastics
1) Close the press to preheat the lower platen.
2) Print the image using the iColor® Dye Sublimation Toner kit. Mirror Print.
3) Place the substrate on the lower platen of the press (coated side face up). Align the printed image to
the substrate with the printed image on top (image facing the substrate). You can tape the paper to
the substrate or lower platen for additional stability.
4) Cover the transfer with copy paper or blow off sheets.
5) Press at 380°F / 193°C with low pressure for 60 seconds.
6) Open the press slowly and peel immediately (hot peel).
7) Cool substrate as quickly as possible.
8) Clean excess toner residue with STC9 solution, or use a SubliClean sheet during the pressing stage.
Duraluxe Aluminum
1) Close the press to preheat the lower platen.
2) Print the image using the iColor® Dye Sublimation Toner kit. Mirror Print.
3) Place the substrate on the lower platen of the press (coated side face up). Align the printed image to
the substrate with the printed image on top (image facing the substrate). You can tape the paper to
the substrate or lower platen for additional stability.
4) Cover the transfer with copy paper or blow off sheets, and then a silicon pad.
5) Press at 380°F / 193°C with medium pressure for 90 seconds.
6) Open the press slowly and peel immediately (hot peel).
7) Cool substrate as quickly as possible.
8) Clean excess toner residue with STC9 solution, or use a SubliClean sheet during the pressing stage.
UniNet iColor Printing Solutions | sales@icolorprint.com | www.icolorprint.com
24

SubliSlate
1) Close the press to preheat the lower platen.
2) Print the image using the iColor® Dye Sublimation Toner kit. Mirror Print.
3) Place the substrate on the lower platen of the press (coated side face up). Align the printed image to
the substrate with the printed image on top (image facing the substrate). It is suggested you wrap the
transfer around the substrate and tape it securely. This will allow the edges of the substrate to accept
the transfer as well.
4) Cover the transfer with copy paper or blow off sheets.
5) Press at 380°F / 193°C with low pressure for 540 seconds (9 mins).
6) Open the press slowly and peel immediately (hot peel).
7) Cool substrate as quickly as possible.
8) Clean excess toner residue with STC9 solution, or use a SubliClean sheet (recommended) during the
pressing stage.
Dynasub / Unisub Metals
1) Close the press to preheat the lower platen.
2) Print the image using the iColor® Dye Sublimation Toner kit. Mirror Print.
3) Place the substrate on the lower platen of the press (coated side face up). Align the printed image to
the substrate with the printed image on top (image facing the substrate). You can tape the paper to
the substrate or lower platen for additional stability.
4) Cover the transfer with copy paper or blow off sheets.
5) Press at 380°F / 193°C with low pressure for 60 seconds.
6) Open the press slowly and peel immediately (hot peel).
7) Cool substrate as quickly as possible.
8) Clean excess toner residue with STC9 solution, or use a SubliClean sheet during the pressing stage.
Coated Ceramic (Heat Press)
1) Close the press to preheat the lower platen.
2) Print the image using the iColor® Dye Sublimation Toner kit. Mirror Print.
3) Place the substrate on the lower platen of the press (coated side face up). Align the printed image to
the substrate with the printed image on top (image facing the substrate). You can tape the paper to
the substrate or lower platen for additional stability.
4) Cover the transfer with copy paper or blow off sheets.
5) Press at 380°F / 193°C with low pressure for 150 - 180 seconds.
6) Open the press slowly and peel immediately (hot peel). Dunk into warm water to stop the sublimation
process.
7) Clean excess toner residue with STC9 solution, or use a SubliClean sheet during the pressing stage.
Ceramic Mugs (Mug Press)
1) Print the image using the iColor® Dye Sublimation Toner kit. Mirror Print.
2) Trim the image and align to the mug. Use heat resistant tape and hold in place. Be sure not to tape
over any part of the image or defects will result.
3) Place the mug into the mug press and press at 380°F / 193°C with medium pressure for 150 - 180
seconds.
4) Open the press slowly and peel immediately (hot peel). Dunk into warm water to stop the sublimation
process.
5) Clean excess toner residue with STC9 solution, or use a SubliClean sheet during the pressing stage.
UniNet iColor Printing Solutions | sales@icolorprint.com | www.icolorprint.com
25

Polyester Textiles
1) Close the press to preheat the lower platen.
2) Print the image using the iColor® Dye Sublimation Toner kit. Mirror Print.
3) THREAD the shirt or textile onto the lower platen of the press. Failure to thread the textile will cause
the image to sublimate onto the back of the textile.
4) Align the printed image to the substrate with the printed image on top (image facing the substrate).
You can tape the substrate to the printed transfer for additional stability.
5) Cover the transfer with copy paper or blow off sheets.
6) Press at 380°F / 193°C with low pressure for 60 - 90 seconds for full color images and up to 120
seconds for solid 100% K images (more time yields darker results).
7) Open the press slowly, peel immediately and cool the substrate as quickly as possible.
Removing the polymer residue left behind on hard surfaces:
SubliClean
For most hard surfaces, the use of UniNet SubliClean film will prevent toner residue from transferring to the
substrate during the pressing process. SubliClean is available in rolls, and is used in between the substrate and
the printed transfer.
1) Peel and cut a piece of subliClean slightly larger than the size of the substrate.
2) Lay it flat on the substrate, then cover with the printed transfer sheet.
3) Press as stated in the above instructions.
4) When using SubliClean, all hot peels now become warm peels. Otherwise, it will not peel away cleanly.
5) Not for use on fabrics or garments.
6) The result will be a brighter, glossier image on your substrate.
STC9 Solution
Instead of SubliClean, the use of STC9 cleaning solution will remove any toner residue that may have
transferred.
1) After the image has been pressed and peeled - Pour a small amount of the solution onto the
completed substrate and rub with a paper towel. The residue will come off rather easily.
2) Once finished, be sure to wash off the cleaner from the substrate with soap and water before using.
Not for use on fabrics or garments.
3) The result will be a brighter, glossier image on your substrate.
Be sure to order SubliClean or a bottle of STC9 with your Dye Sublimation kit if you plan to work with hard
surfaces!
UniNet iColor Printing Solutions | sales@icolorprint.com | www.icolorprint.com
26

Printing Tips
Some substrates may require more or less press time and/or varying pressure depending on the material used.
When pressing, a longer press duration will result in deeper and denser colors. Some testing may be required
to achieve the desired result. Pressing for too long can cause an overexposed look. If more vibrant colors are
desired, do not use the ICC profile. The profile is designed for photo-realistic images. To obtain the stand alone
ICC Profile, contact your iColor dealer.
For textiles and Tshirts, the use of a threadable heat press is required, otherwise the image could sublimate
onto the other side of the textile.
In order to stop the sublimation process on ceramics, you must dunk the substrate in water or the image may
start to blur and spread as the gasses rise. For other hard surfaces and textiles, it is suggested to quickly cool
the substrate after peeling away the transfer. Do this by air cooling, or placing the textile on a cold surface
such as stone or metal to retain color vibrancy.
Overbled images can sublimate onto the plates of the heat press, so the use of copy paper below and above
your project is recommended to protect the plates of your heat press. Use of upper and lower covers is also
suggested.
If you are using tape to secure your image to the substrate, make sure the tape is not covering any part of the
transfer, as that will lead to inconsistent results. Heat resistant tape is suggested.
To see video instructions for iColor® Dye Sublimation Toner, visit www.icolorprint.com/video
Use Geniune UniNet iColor® Consumables
Only use genuine UniNet iColor® consumables. The use of incompatible supplies (toner, transfer belts, fusers
and registration assemblies) may cause damage to your printer not covered by your warranty.
Suggested storage conditions:
Whenever not in use, be sure to store the Dye Sublimation cartridges in a dark, safe place with their plastic
drum covers. Prolonged exposure to light is detrimental to the OPC drum cylinder. The recommended range
for the temp and humidity is 40% RH to 70% RH, temp 59 to 77°F / 25°C.
UniNet iColor Printing Solutions | sales@icolorprint.com | www.icolorprint.com
27

Maintaining your Printer
Replacing the Print Cartridges:
• Store print cartridge in a cool dark place.
• Actual yield varies depending on image volume and density, number of pages printed, paper type and size,
and environmental conditions such as temperature and humidity.
• The manufacturer shall not be responsible for any damage or expense that might result from the use of
parts other than genuine parts from the manufacturer with your office products.
• When the toner runs out, pressing the [Stop/Start] key allows you to print a few more pages, but the print
quality of those pages may be lower.
• Do not allow paper clips, staples, or other small objects to fall inside the machine.
• Do not expose the print cartridge without its cover to direct sunlight for a long time.
• Do not touch the print cartridge's photo conductor unit or the ID chip on the side of the print cartridge as
indicated in the illustration below.
• When removing print cartridges, be careful not to touch the
laser scanning unit under the upper cover (the position shown
by the arrow in the illustration to the right).
• If cyan, magenta, or yellow toner runs out, you can print in
monochrome using just the black toner. Change the color
mode setting to Black and White using the machine's driver.
• If black toner runs out, you cannot print at all until the black
print cartridge is replaced.
UniNet iColor Printing Solutions | sales@icolorprint.com | www.icolorprint.com
28

Messages on the screen:
Replace the indicated print cartridge when any of the following messages appear on the screen:
"Replace Toner:" (X)
("X" indicates the toner color)
Prepare the indicated print cartridge when any of the following messages appear on the screen:
"Repl Tnr soon:" (X)
("X" indicates the toner color)
1. Pull up the lever on the top cover, and then carefully raise the top cover.
2. Carefully lift out the print cartridge vertically, holding its center. From the rear, the print cartridges are
installed in the order of cyan (C), magenta (M), yellow (Y), and black (K).
3. Take the new print cartridge out of the box, and then take it out of the plastic bag.
4. Hold the print cartridge and shake it from side to side five or six times. Even distribution of toner within
the bottle improves print quality.
5. Remove the protective cover from the print cartridge.
6. Check the toner color and corresponding location, and then carefully insert the print cartridge
vertically.
UniNet iColor Printing Solutions | sales@icolorprint.com | www.icolorprint.com
29

7. Using both hands, hold the center of the top cover and close the cover carefully.
8. Attach the protective cover you removed in Step 5 on the old print cartridge. Then, put the old print
cartridge into the bag, and then put it into the box.
Replacing the Waste Toner Bottle:
Messages on the screen
• Replace the waste toner bottle when the following message appears on the screen:
"Replace Waste Toner Bottle"
• Prepare a waste toner bottle when the following message appears on the screen:
"Replace soon: Waste Tnr Bottle"
• Waste toner bottles cannot be reused.
• When removing the waste toner bottle, make sure not to tilt it.
• Make sure the transfer unit is installed. If the transfer unit is not installed, install it before turning on the
power.
• Before removing the waste toner bottle from the machine, spread paper or similar material around the area
to keep toner from dirtying your workspace.
UniNet iColor Printing Solutions | sales@icolorprint.com | www.icolorprint.com
30
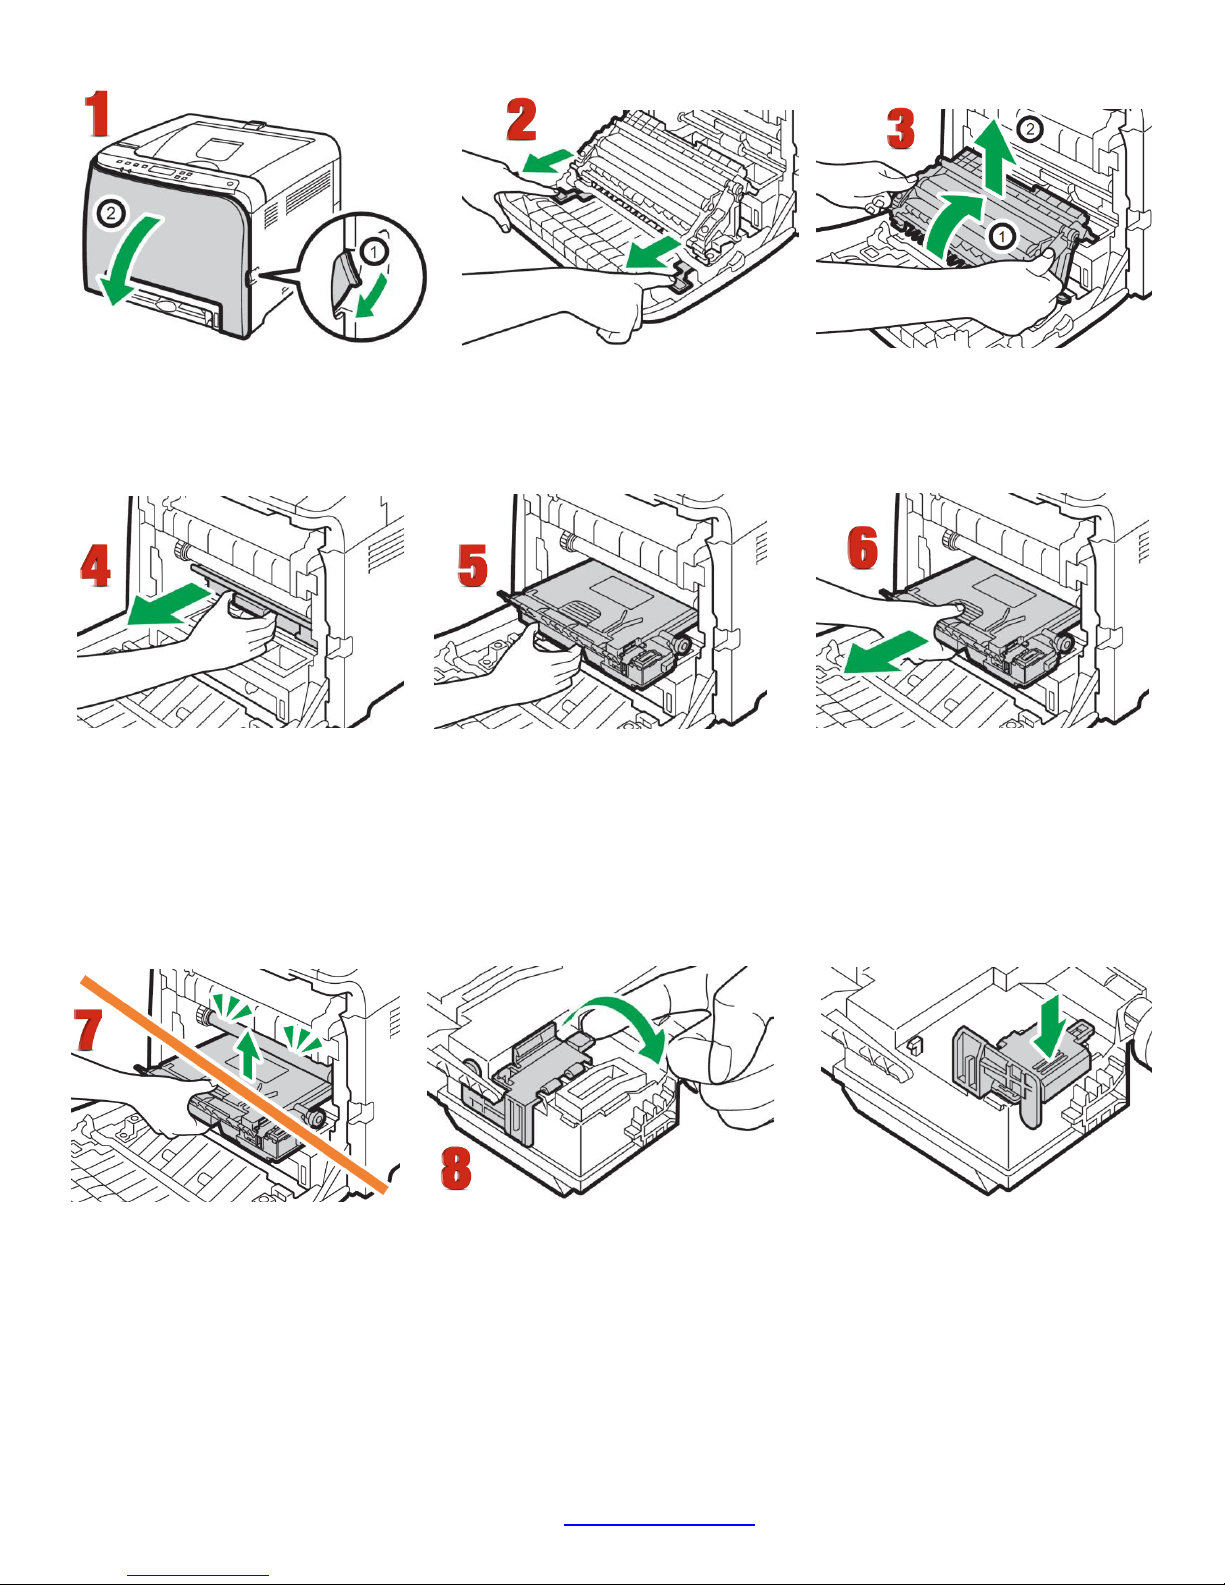
1. Pull the front cover open lever and then carefully lower the front cover.
2. Slide both levers on the front cover forward.
3. Holding the tabs on both ends of the transfer unit, tilt it backwards and lift it up.
4. Holding the handle at the center of the waste toner bottle, carefully pull it partially out without tilting
it.
5. Pull the waste toner bottle halfway out.
6. Holding the bottle firmly, pull it straight out.
7. To prevent the waste toner bottle from coming into contact with the intermediate transfer unit (the
position shown by the arrow in the illustration below), do not lift the bottle while pulling it out.
8. Close the bottle cap.
UniNet iColor Printing Solutions | sales@icolorprint.com | www.icolorprint.com
31
9. Holding the center of the new waste toner bottle, carefully insert it halfway into the machine body.
Leave the bottle cap open.
10. To prevent the waste toner bottle from coming into contact with the intermediate transfer unit (the
position shown by the arrow in the illustration below), do not lift the bottle while inserting it.
11. Push in the waste toner bottle until it clicks. Pressing the handle at the center, push the bottle all the
way in.
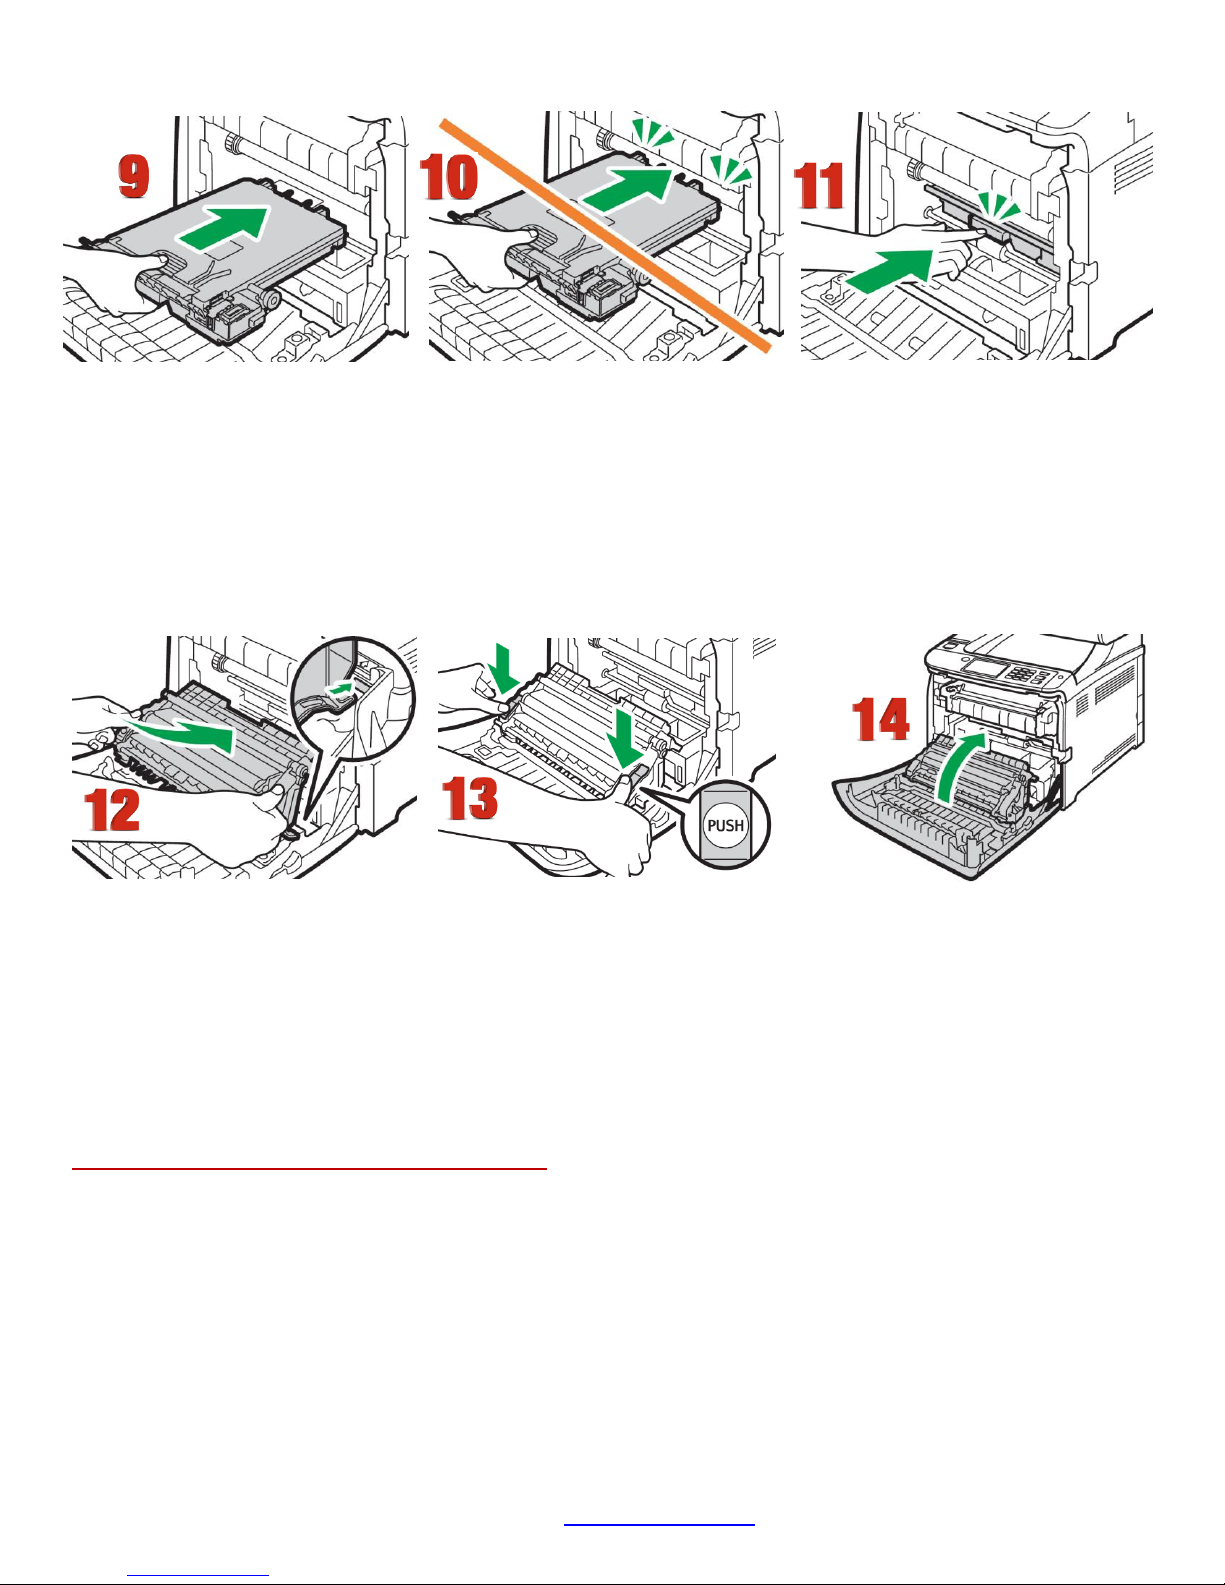
12. Place the transfer unit on the front cover. Slide the transfer unit along the guide rails into the machine.
13. When it stops, push on the PUSH mark until it clicks. 11. Using both hands, carefully push up the front
cover until it closes.
14. When closing the front cover, push the upper area of the cover firmly.
Non User Replaceable Components:
If the Alert indicator on the control panel lights up and the "Replace Intermdt Transfer Belt", "Replace Fusing
Unit" or "Replace Transfer Roller" message appears on the display, contact your sales or service
representative.
UniNet iColor Printing Solutions | sales@icolorprint.com | www.icolorprint.com
32
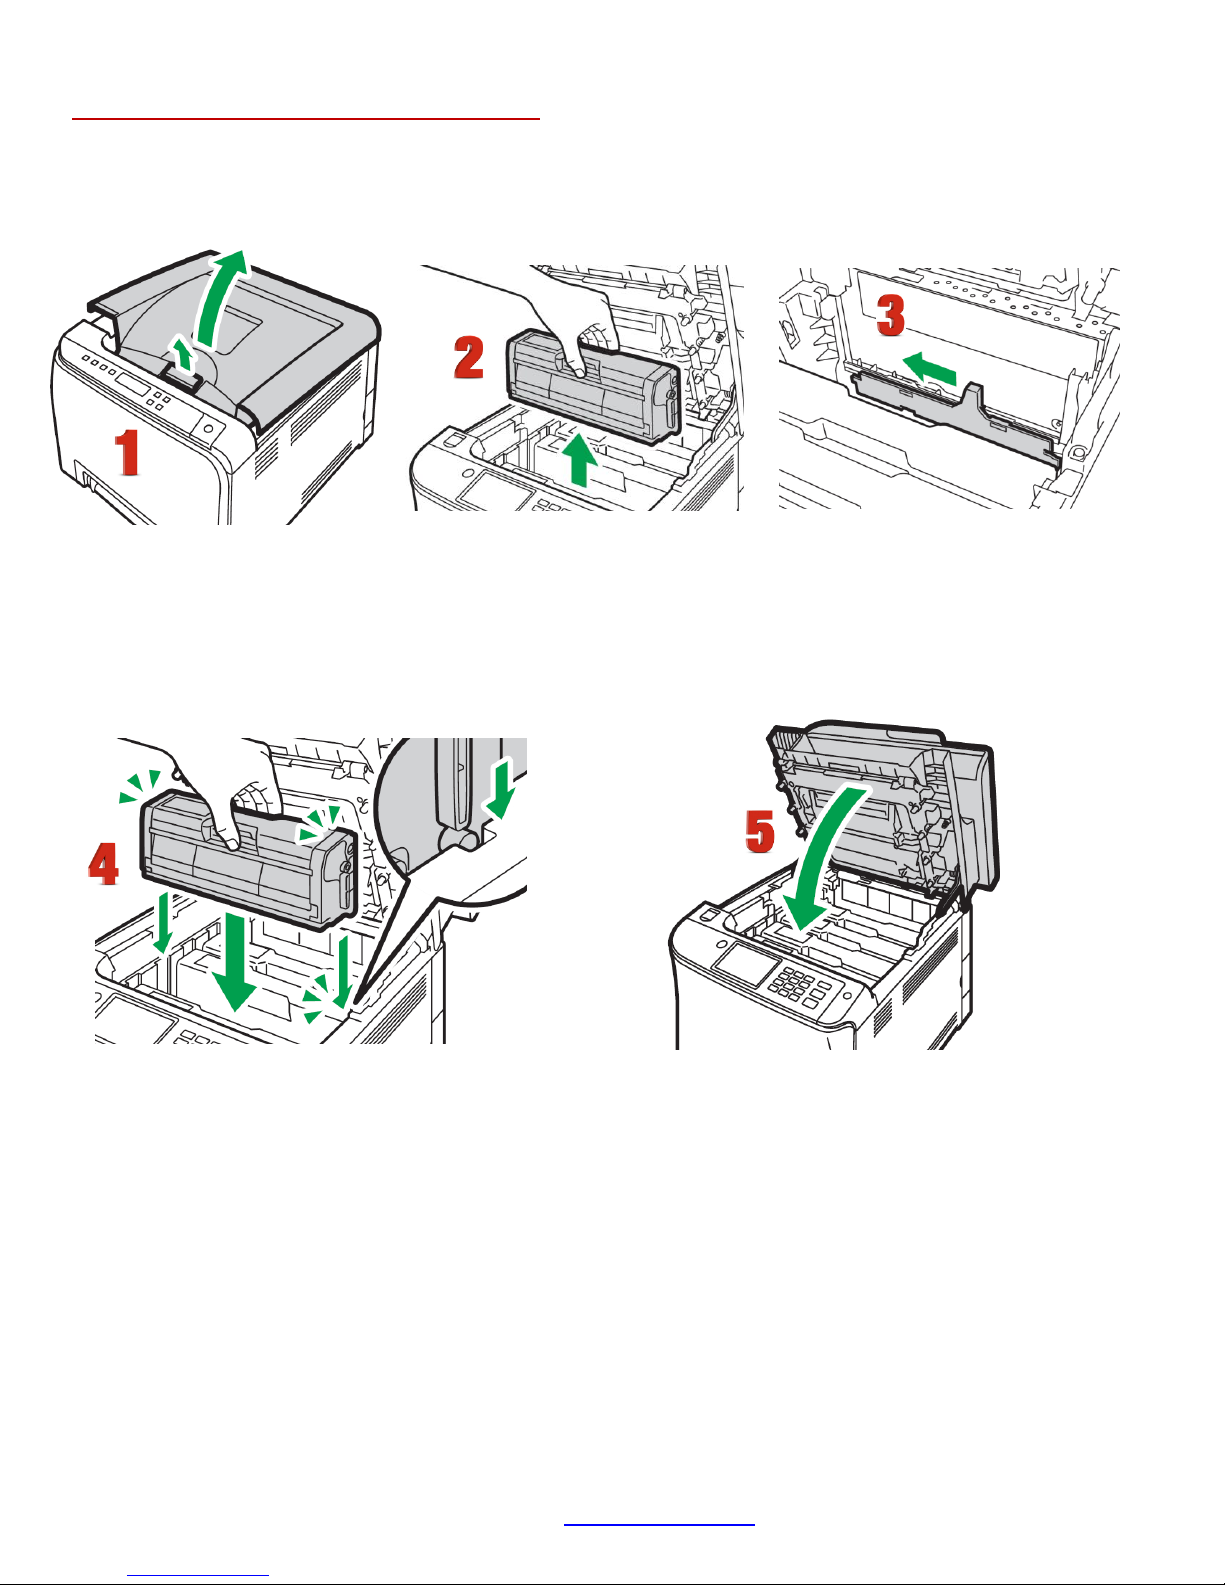
Cleaning the Toner Density Sensor:
Clean the toner density sensor when the following message appears on the control panel.
"Density Sensor Require Cleaning"
1. Pull up the lever on the top cover, and then carefully raise the top cover.
2. Remove the rearmost print cartridge.
3. Slide the toner density sensor lever once to the left.
4. Carefully insert the print cartridge removed in Step 2 vertically.
5. Using both hands, hold the center of the top cover and close the cover carefully. Be careful not to trap
your fingers.
UniNet iColor Printing Solutions | sales@icolorprint.com | www.icolorprint.com
33

Cleaning the Registration Roller
The registration roller can become dirty with paper dust if you print to non-standard paper.
Clean the registration roller if white dots appear on prints or if prints are smeared after a paper jam is
cleared.
• Do not use chemical cleaning fluids or organic solvents such as thinner or benzine.
1. Turn off the power and uplug the power cord. Pull the front cover open lever and then carefully lower
the front cover. Be sure to set the registration roller in the position shown by the arrow in the
illustration below. Do not touch the transfer roller.
2. Clean the registration roller by applying a soft damp cloth while turning it using both hands, carefully
push up the front cover until it closes.
3. When closing the front cover, push the upper area of the cover firmly.
Cleaning the Paper Tray, Friction Pad and Paper Feed Roller:
If the friction pad or paper feed roller is dirty, a multi-feed or misfeed might occur. The paper tray can become
dirty with paper dust if you print to non-standard paper.
1. Turn off the power and uplug the power cord. Pull out Tray 1 carefully with both hands.
2. Place the tray on a flat surface. If there is paper in the tray, remove it.
3. Wipe the friction pads and the inside of the paper tray with a cloth.
UniNet iColor Printing Solutions | sales@icolorprint.com | www.icolorprint.com
34
4. Underneath the printer, wipe the rubber part of the roller with a soft damp cloth. After that, wipe it
with a dry cloth to remove the moisture.
5. Push the metal plate down until it clicks.
6. Reload the removed paper into the tray, and then push the tray carefully into the machine until it clicks
into place.
Removing Paper Jams
Caution
• The inside of this machine becomes very hot. Do not touch the parts labeled (indicating a hot
surface).
• Some of this machine's internal components get very hot. For this reason, take care when removing misfed
paper. Not doing so could result in burns.
• Some of the internal components of this machine might be fragile. When you remove jammed paper, do not
touch the sensors, connectors, LEDs, or other fragile parts that are shown in this manual. Doing so may cause
malfunctions.
For the location of the sensors in the machine and extended options, see the following illustrations:
UniNet iColor Printing Solutions | sales@icolorprint.com | www.icolorprint.com
35

Important
• Jammed paper may be covered in toner. Be careful not to get toner on your hands or clothes.
• Toner on prints made immediately after clearing a paper jam may be insufficiently fused and may smudge.
Make test prints until smudges no longer appear.
• Do not forcefully remove jammed paper, as it may tear. Torn pieces remaining inside the machine will cause
further jams and possibly damage the machine.
• Paper jam can cause pages to be lost. Check your print job for missing pages and reprint any pages that did
not print out.
If paper jams inside the fusing unit, follow the procedure below to remove it.
• Since the temperature around the guide is high, wait for it to cool down before checking for jammed paper.
1. Pull the front cover open lever and then carefully lower the front cover.
2. Lower the fusing unit lever, and pull out the jammed paper carefully.
3. Do not touch the fusing unit.
UniNet iColor Printing Solutions | sales@icolorprint.com | www.icolorprint.com
36
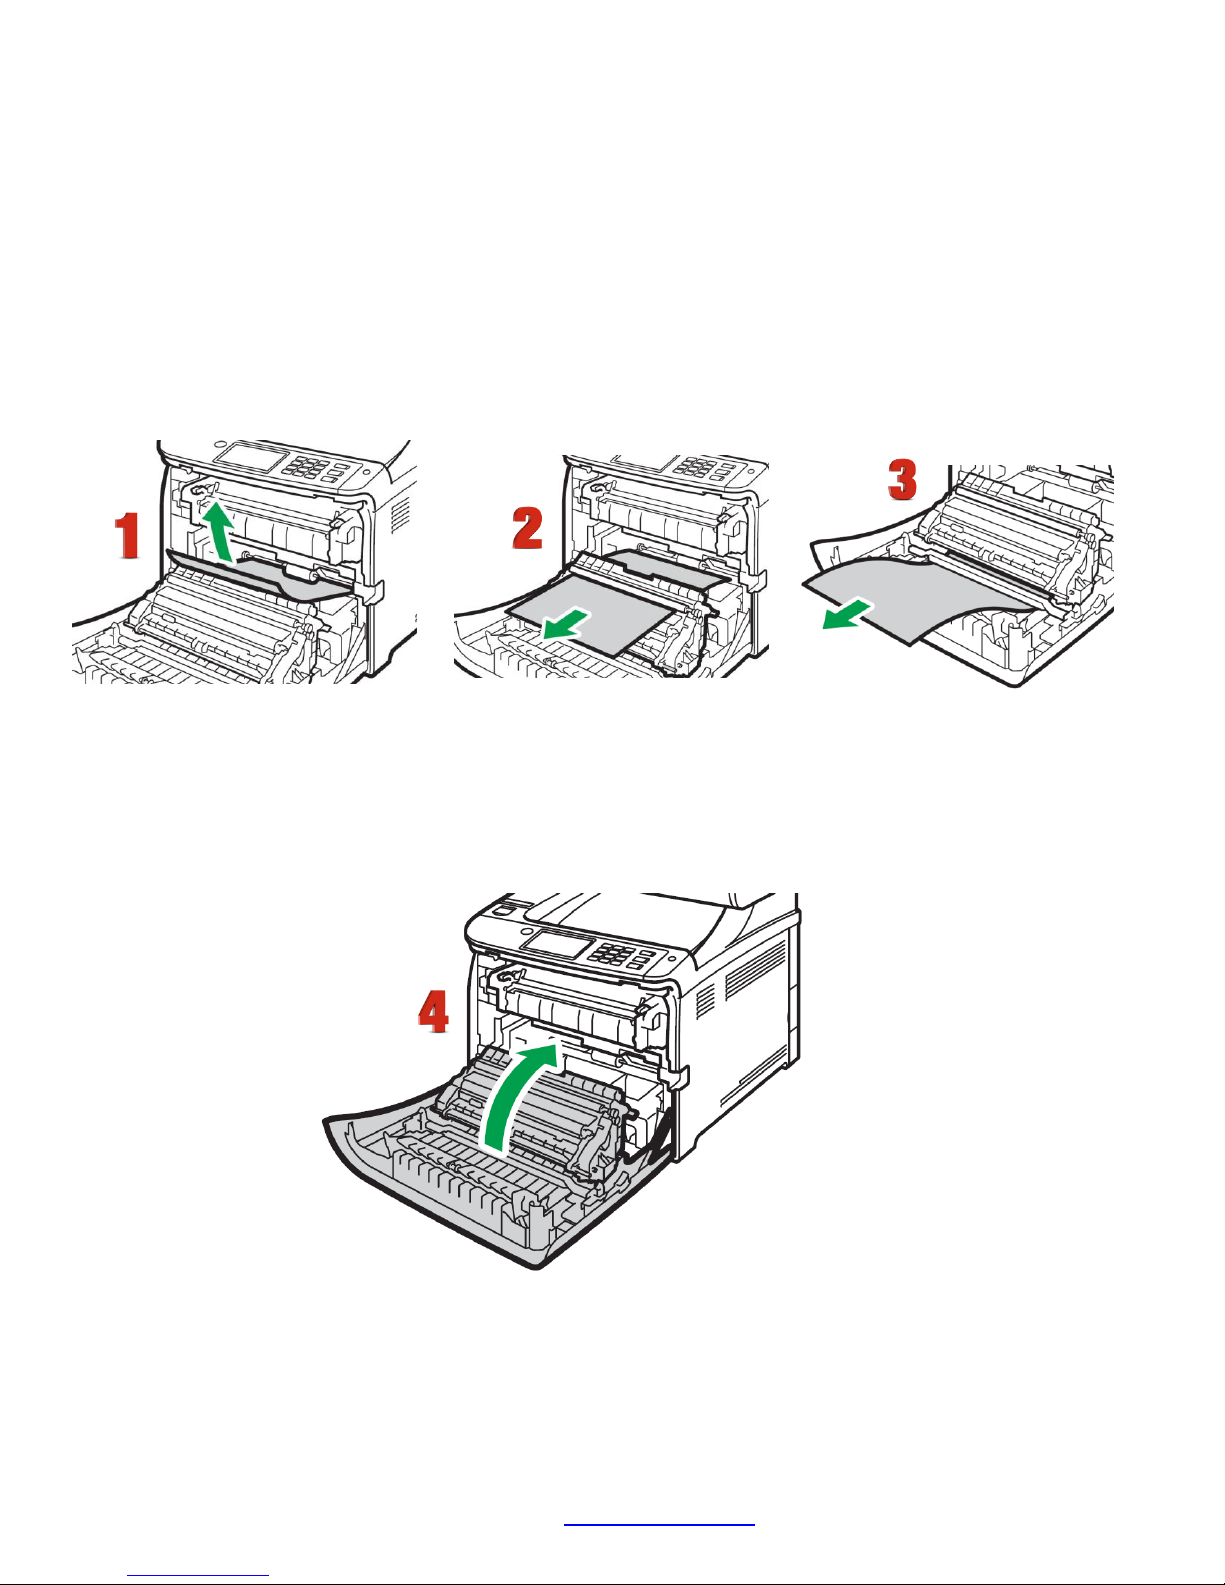
4. Pull the paper downward to remove it. Do not pull it upward.
5. If you cannot find the jammed paper, check for it by pulling down the guide.
6. Pull up the fusing unit levers.
If paper jams inside a tray
1. Pull out the jammed paper carefully. Do not pull out the paper tray or touch the fusing unit.
If paper has jammed inside the transfer unit
2. Holding both sides of the paper, pull the paper carefully forward.
3. Then pull out.
4. Once the jam is cleared, using both hands, carefully push up the front cover until it closes. When
closing the front cover, push the upper area of the cover firmly. After closing the cover, check that the
error is cleared.
UniNet iColor Printing Solutions | sales@icolorprint.com | www.icolorprint.com
37

iColor
Print Speed: Print Speed: Up to 20 ppm Color and Monochrome
Processor: 350 MHz
Duty Cycle: Up to 30,000 pg/mo.
Duplex: Standard
Memory: 256mb RAM
Resolution: Up to 2400 x 600 dpi
Emulation: PCL6c/5c, PostScript3 emulation, PictBridge 3™
Operating Systems: Standalone and network - Microsoft Windows® 7 / 8 / 10 (x32 & x64); Macintosh OS X
Native V10.9-10.12
Interfaces: 10Base-T/100Base-TX, IEEE 802.11b/g/n, NFC Tag, USB 2.0 High speed Type A (For Pictbridge, Scan
to USB Flash Drives)
Paper Cassette: 250-sheet Legal/Letter/Universal
Paper Sizes (Min./Max.): A4, A5, A6, B5, B6, Legal, Letter, HLT, Executive, F, Foolscap, Folio, Envelopes
350 System Specifications
®
(Com10, Monarch, C5, C6, DL) Custom size: (Min.) 90 x 148 mm, (Max.) 216 x 356 mm
Paper Weight: Standard Tray: 60 - 160 g/m; Optional Tray: 60 - 105 g/m; Bypass: 60 - 160 g/m; Duplex: 60 - 90
g/m
Size: (WxDxH): 15.8" x 17.7" x 12.6" (40 cm x 45 cm x 32 cm
Weight: 62.4 lb. (28.3 kg)
Power: 120v (230v coming soon)
UniNet iColor Printing Solutions | sales@icolorprint.com | www.icolorprint.com
38
 Loading...