

Uniden America UT653 User Manual
Atlantis 150
Marine VHF Radio
Radio VHF maritime
OWNER’S MANUAL
GUIDE D’UTILISATION

MAKING A DISTRESS CALL
For future reference, write your boat’s name & call sign here:
Speak slowly - clearly - calmly.
1. Make sure your radio is on.
2. Press the 16/9-TRI button to switch to Channel 16 (156.8 MHz).
(If the display does not show 16, press the 16/9-TRI button again
until it does.)
3. Press the Push to Talk button and say: “MAYDAY -- MAYDAY
-- MAYDAY.”
4. Say “THIS IS {name of your boat (three times) and call sign/
boat registration number (once)}.”
5. Repeat “MAYDAY {name of your boat}” once.
6. Tell where you are: (what navigational aids or landmarks are
near, or read the latitude and longitude from your GPS).
7. State the nature of your distress (e.g. sinking, medical
emergency, man overboard, on fire, adrift, etc.).
8. State the type of assistance you need (medical, towing, pumps,
etc.).
9. Give the number of persons aboard and describe the condition
of any injured persons.
10. Estimate present seaworthiness of your ship (e.g. how
immediate is the danger due to flooding or fire).
11. Briefly describe your ship, giving ship name (i.e., “Blue Duck is
32 foot cabin cruiser, white hull, blue deck house”).
12. Say: “I WILL BE LISTENING ON CHANNEL 16.”
13. End the message by saying “THIS IS {name or call sign of your
boat}, OVER.”
14. Release the Push to Talk button and listen.
If you do not get an answer after 30 seconds, repeat your
call beginning at step 3 above.
E-2 Uniden Atlantis 150 Owner’s Manual

FAIRE UN APPEL DE DÉTRESSE
Pour toute référence ultérieure, transcrivez ci-dessous le nom et l’indicatif
d’appel de votre bateau:
Parlez lentement – clairement – calmement.
1. Vérifiez si votre radio est en marche.
2. Appuyez sur la touche 16/9-TRI du microphone afin de commuter au
canal 16 (156,8 MHz). (Si le canal 16 n’apparaît pas à l’affichage,
appuyez de nouveau sur la touche 16/9-TRI jusqu’à ce qu’il soit
affiché.)
3. Appuyez sur le bouton de microphone Push to Talk et
dites:“MAYDAY -- MAYDAY -- MAYDAY”.
4. Donnez l’identité de votre navire en disant : “ICI {nom de votre bateau
(trois fois) ou indicatif d’appel et le numéro d’identification de votre
bateau (une fois)}”.
5. Dites “MAYDAY {nom ou indicatif d’appel de votre bateau} une fois”.
6. Donnez votre position : (quels sont les points de repère ou aides à
la navigation près de vous ou lisez les coordonnées de longitude et
de latitude apparaissant sur votre dispositif GPS).
7. Révélez la nature de votre détresse (par exemple, nous sommes en
train de couler, urgence médicale, un homme à la mer, un incendie,
nous sommes à la dérive, etc.
8. Révélez la nature de l’aide désirée (médicale, remorquage, essence, etc.)
9. Donnez le nombre de personnes à bord et les conditions des
blessés, s’il y en a.
10. Donnez la condition de navigabilité actuelle de votre navire, tel que le
degré de l’urgence par rapport une inondation, et une incendie.
11. Donnez une brève description de votre navire en donnant le nom
du bateau (par exemple, “Blue Duck est un yacht de croisière de 32
pieds, avec une coque blanche et un rouffle bleu.).
12. Dites : “JE VAIS ÉCOUTER SUR LE CANAL 16”.
13. Terminez le message en disant “ICI {nom ou indicatif d’appel de
votre bateau}, À VOUS”.
14. Relâchez le bouton Push to Talk du microphone et écoutez.
Si vous n’obtenez pas de réponse après 30 secondes, répétez l’appel
encommençant à l’étape 3 ci-dessus.
Uniden Atlantis 150 Owner’s Manual
E-3

TABLE OF CONTENTS
ATLANTIS 150 INTRODUCTION ..................................6
FEATURES ..................................................................................... 6
GETTING STARTED ......................................................7
WHAT’S INCLUDED ....................................................................... 7
CONTROLS AND INDICATORS .................................................... 8
CONNECTING POWER .................................................................. 9
INSTALL THE BATTERY PACK .................................................... 9
CHARGING THE BATTERY PACK ............................................. 10
Battery Level Display ...............................................................11
ATTACHING THE BELTCLIP ...................................................... 12
OPERATION ................................................................12
BASICS ......................................................................................... 12
Power On/Off ............................................................................. 12
Volume ....................................................................................... 12
Select a Channel ....................................................................... 12
Set Squelch ...............................................................................13
TRANSMITTING AND RECEIVING .............................................. 14
Selecting Channel Modes ........................................................14
Transmitting .............................................................................. 14
Receiving ................................................................................... 15
HOW IT WORKS .......................................................... 16
NORMAL MODE OPERATION .................................................... 16
Normal mode with Weather Alert Watch ................................17
Normal mode with Triple Watch .............................................. 17
SCAN MODE OPERATION .......................................................... 18
Using the radio in scan mode ................................................. 18
Scan mode with Weather Alert Watch ....................................19
Scan mode with Triple Watch .................................................. 19
WEATHER MODE ........................................................................ 20
Using the radio in weather mode ............................................20
E-4 Uniden Atlantis 150 Owner’s Manual

Weather mode with Weather Alert Watch ............................... 20
Weather mode with Triple Watch ............................................20
Emergency Channel 16/9 ......................................................... 21
Triple Watch ..............................................................................21
DROP-OUT DELAY ...................................................................... 21
BATTERY SAVE ........................................................................... 21
BACKLIGHTING ........................................................................... 21
KEYPAD LOCK ............................................................................ 22
KEY BEEP .................................................................................... 22
MAINTENANCE & TROUBLESHOOTING .................. 22
COMMON QUESTIONS ............................................................... 22
SPECIFICATIONS .......................................................23
CHANNELS AND FREQUENCIES (MHZ) ...................25
US CHANNEL FREQUENCIES AND NAMES ............................. 25
CANADIAN CHANNEL FREQUENCIES AND NAMES ............... 26
INTERNATIONAL CHANNEL FREQUENCIES AND NAMES ..... 28
REGULATIONS AND SAFETY WARNINGS ..............31
MARITIME RADIO SERVICES OPERATION .............................. 31
ONE YEAR LIMITED WARRANTY .............................35
Uniden Atlantis 150 Owner’s Manual
E-5

ATLANTIS 150 INTRODUCTION
The Atlantis 150 is a oating, waterproof, portable 2.5-watt two-way VHF
marine transceiver. It is compact, lightweight, rugged, and ts easily in
your hand. This handheld VHF marine radio will give you consistent,
outstanding performance in virtually all conditions and situations.
To ensure that you get the most from the Atlantis 150 features, please
read this operating guide carefully before using the unit.
FEATURES
• US,Canadian,andInternationalMarineChannels
• Built-inPrecisionMatchedAntenna
• Floating/WaterprooftoJIS8
• KeyBeep
• EmergencyCH16/CH9Mode
• 9WeatherChannel/WeatherAlert
• BatteryLevelDisplay
(BatteryLowAlertsoundsevery5secondsatLevel1)
• BatterySave
• MemoryScan
• TripleWatch
• TXPowerSelect
• ChannelSelect
• VolumeSelect
• 4-LevelDigitalSquelch
• KeypadLockOn/O
*Protected against the effects of continuous immersion in water.
The Atlantis 150 can withstand immersion in water up to 5 feet
depth for 1 hour.
# Note: This is not suitable for scuba diving.
The Atlantis 150 will float when the battery cover is securely
NOTE
fastened.
E-6 Uniden Atlantis 150 Owner’s Manual
GETTING STARTED
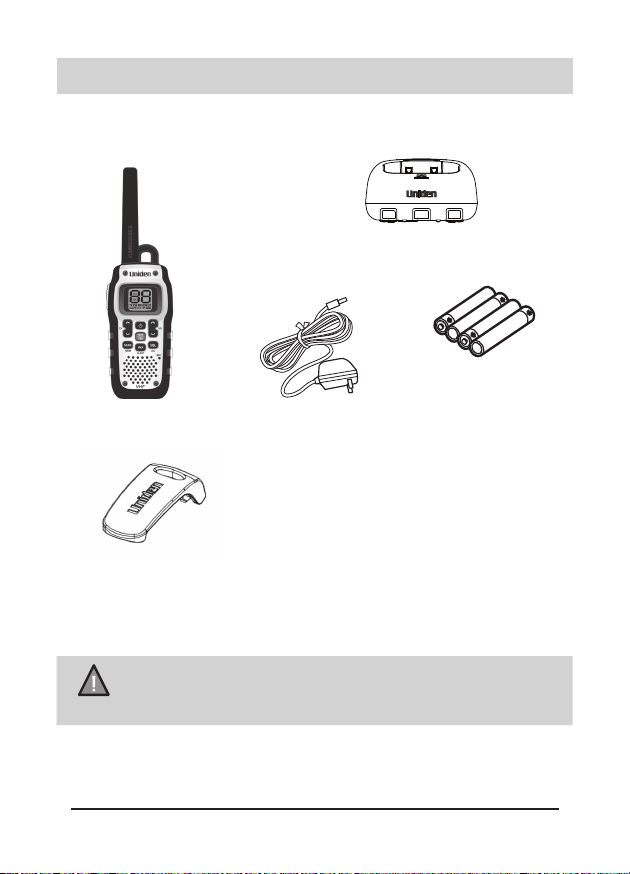
WHAT’S INCLUDED
Atlantis 150 Radio
Beltclip
Charging Cradle
NiMH Battery Pack
AC Adapter
Owner’s Manual
(Not Shown)
NOTE
If any of these items are missing or damaged, contact Uniden
Customer Service (see back cover for contact information). For
information on available accessories, visit www.uniden.com.
Uniden Atlantis 150 Owner’s Manual
E-7
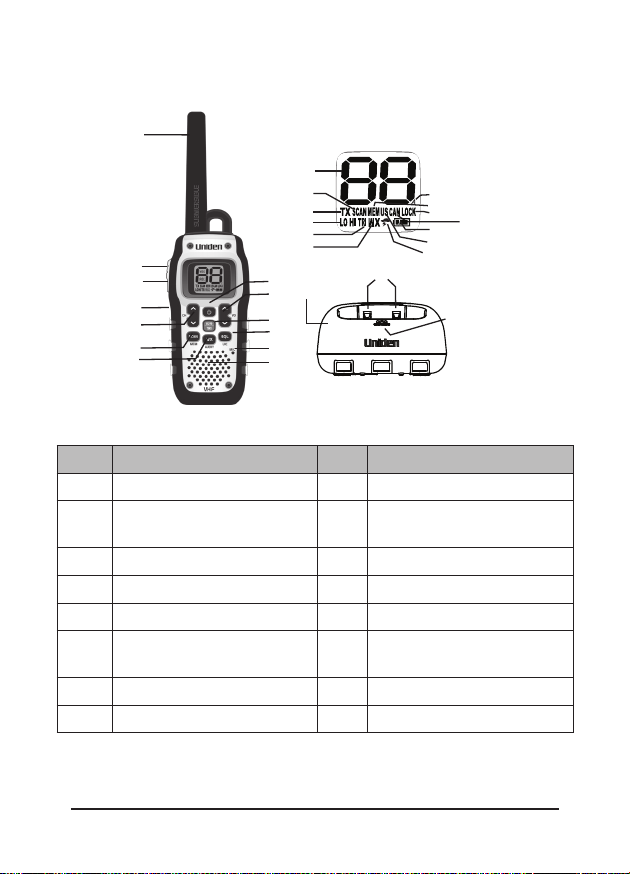
CONTROLS AND INDICATORS
1
14
VOL
SQL
15
16
17
18
2
3
4
5
6
7
19
8
27
9
10
11
12
13
No. Description No. Description
1 Antenna 9 Volume Up/Down
2
PTT (Push-To-Talk) button
10
3 Power Boost button 11
4
HI-LO/LOCK button
12 Microphone
5 Channel Up/Down 13 Speaker
6
SCAN/MEM (Memory) button
7
WX/ALERT
14 Channel/Volume/Squelch
15 Scan Indicator
8 Power Key 16 TX Indicator
20
21
22
23
24
25
26
28
29
16/9 TRI (Triple Watch)
button
SQL/UIC (Squelch) button
Indicator
E-8 Uniden Atlantis 150 Owner’s Manual
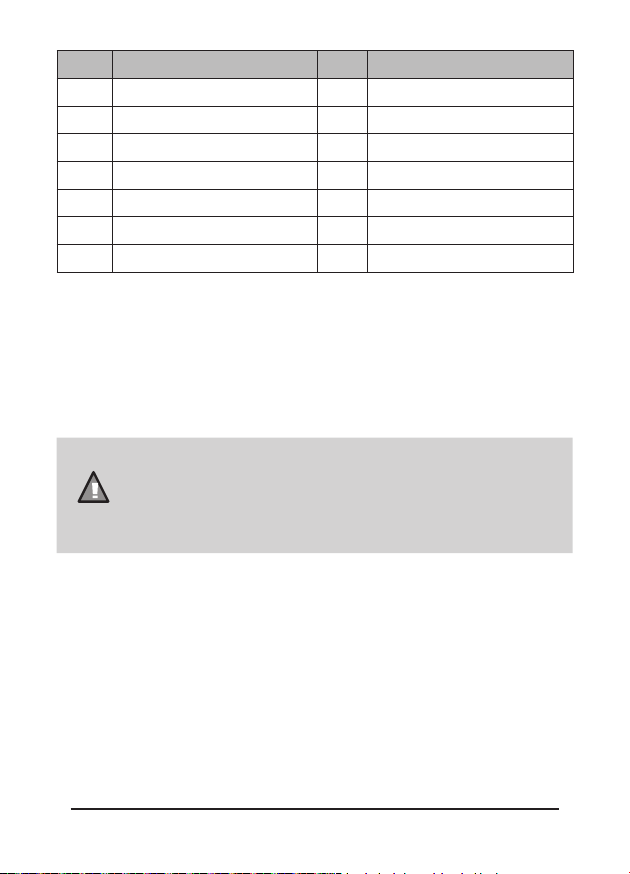
No. Description No. Description
17
TX LO/HI Power Indicator
18
Triple Watch Indicator
19
WX Indicator
20
“A” Channel Indicator
21
Memory Indicator
22
Keylock Indicator
23
Canada Channel Mode
24
Battery Level icon
25
US Channel Mode
26
WX Alert mode indicator
27 Charging Cradle
28 Charging Contacts
29 Charging Indicator
CONNECTING POWER
The charging cradle uses a single AC adapter.
1. Connect the AC adapter to the DC 9V jack on the rear of the
charging cradle.
2. Plug the other end of the AC adaptor into a 120 VAC wall
outlet.
• The drop-in charger is not waterproof. Ensure
the radio is dry before connecting to the charger.
• Don’t use the charger when the ambient
NOTE
temperature is below 32ºF (0ºC) or above 113ºF
(45ºC).
INSTALL THE BATTERY PACK
Your radio uses the supplied NiMH battery pack. To install the
NiMH battery:
1. Make sure the radio is off.
2. Use a screwdriver to turn the battery compartment screw
counterclockwise and then lift up and remove the battery cover.
3. Put the NiMH battery pack in the battery compartment, applying
the battery contacts to the lower charge contacts. Be sure
to follow the instructions written on the battery pack’s label.
Installing the battery pack incorrectly will prevent the unit from
operating.
Uniden Atlantis 150 Owner’s Manual
E-9

Use only the supplied NiMH battery pack. Do not
CAUTION
charge alkaline or non rechargeable batteries.
5. Before placing the battery cover back on the radio, check the
rubber seal around the battery compartment and the ribbon of
the battery pack. Make sure that the seal is in good condition
and that there is no foreign matter under the seal.
If the rubber seal appears worn, nicked, or dried out, replace
it. Visit the website on the cover of this manual to order a
replacement seal.
6. Replace the battery compartment door. Tighten the screws
securely.
CHARGING THE BATTERY PACK
Your radio includes a charging cradle and a rechargeable battery
pack. Follow these instructions to recharge the radio in the
charging cradle.
For the initial battery charge, make sure the radio is off for
optimum charging.
NOTE
1. Connect the charging cradle to power. Refer to page 9.
2. Set the charging cradle on the desk or tabletop, and place the
radio in the charging cradle with the keypad facing forward.
3. Make sure that the LED illuminates. Charge the radio for 13
hours then remove it from the charging cradle.
E-10 Uniden Atlantis 150 Owner’s Manual
• The charging cradle is not waterproof. If the
charging cradle falls into water, unplug it before
attempting to remove it from the water. Allow the
cradle to dry completely before reconnecting the
power.
WARNING
• If your radio is soiled or wet, wipe off dirt or
shake water from your radio before placing it in
the charging cradle.
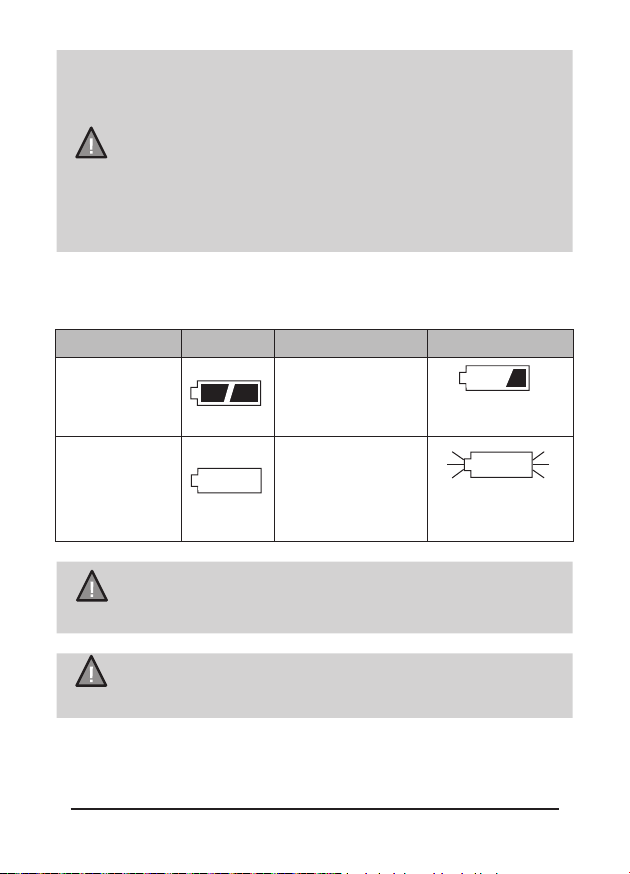
Baery Level Display
The battery icon at the bottom of the screen indicates the battery
level (displayed as one of the 4 levels below) at all times.
Battery Level Icon Battery Level Icon
LEVEL 4
Battery100%
full
LEVEL 3
Battery approx.40%
capacity
LEVEL 2
Low Battery
NOTE
NOTE
When the PTT button is pressed at Level 1, an error tone
sounds and transmission is disabled. Once at Level 1, the unit
will shutdown automatically after 60 seconds.
Recharge the battery at any time. From empty, the battery
requires 13 hours to fully charge. For faster charging, turn off
the radio.
LEVEL 1 (flashing)
Empty Battery
(Battery Low Alert
sounds every 5
seconds.)
Battery Life: 10 Hours (Typical)
Uniden Atlantis 150 Owner’s Manual
E-11

ATTACHING THE BELTCLIP
HI
To attach the belt clip:
Slide the belt clip until it snaps into place.
To remove the belt clip:
Press and hold the belt clip lock down while simultaneously
sliding it upward until it releases.
OPERATION
In order to get the most out of your new radio, read this owner’s
manual completely before attempting to operate the unit.
BASICS
Power On/O
1. Press and hold to turn the radio ON. A channel number and
battery level should appear on the display.
2. Press and hold to turn the radio OFF.
Volume
The volume level can be adjusted from 0
(no volume) to 15 (maximum volume).
Press VO or VO to increase or decrease
the volume level. The current volume level
ashes.
Select a Channel
Press CH or CH to scroll though the channels individually.
Press and hold CH or CH to scroll rapidly through the
channel numbers. Refer to page 25 for a list of available
channels and their corresponding frequencies and usage
guidelines.
VOL
E-12 Uniden Atlantis 150 Owner’s Manual
 Loading...