

Uniden America UT393 User Manual
®
PC787
Owner’s Manual
Printed in Vietnam
U01UT393ZZZ(0)
CONTENTS
SAFETY NOTICE .......................................................................... 4
UNPACKING ................................................................................ 4
DESCRIPTION ............................................................................. 5
FEATURES ...................................................................................................... 5
EMERGENCY OPERATION ......................................................... 6
CONTROLS AND FUNCTIONS .................................................... 6
INSTALLATION ............................................................................ 8
MOBILE INSTALLATION .............................................................................. 8
Mobile Antenna ........................................................................................... 9
Wireless CB Microphone Installation (Optional) ........................................ 9
Connecting the Power Cords ...................................................................... 9
Ground Information ................................................................................. 10
USING YOUR PC787 .................................................................. 10
TURN PC787 ON/OFF .................................................................................. 10
CB MODE ...................................................................................................... 10
Basic Settings ........................................................................................... 10
Calibrate Standing Wave Ratio (SWR) ..................................................... 11
PA MODE ...................................................................................................... 12
PREVENTIVE MAINTENANCE .................................................. 12
MAINTENANCE ......................................................................... 13
TROUBLESHOOTING ............................................................... 13
SERVICING YOUR TRANSCEIVER ........................................... 14

SPECIFICATIONS ....................................................................... 14
RADIO CODE DEFINITIONS ..................................................... 15
10CODES ..................................................................................................... 15
FCC PART 15 INFORMATION ................................................... 17
TWOYEAR EXTENDED WARRANTY ...................................... 17
© 2013 Uniden America Corporation
Uniden is a registered trademark of Uniden America Corporation.
Bearcat is a registered trademark of Uniden America Corporation.
Features, specications, and availability of optional accessories are all
subject to change without notice.
SAFETY NOTICE
The antenna used for this radio must be properly installed and
maintained and must provide a separation distance of at least 34 cm
(13.4 Inches) from all persons and must not be collocated or operated in
conjunction with any other antenna or transmitter. Never transmit if any
person is closer than the specified distance to the antenna.
Note that Uniden does not specify or supply any antenna with this
transceiver. While a 0 dBi gain antenna is normal for a typical installation,
the above limit applies to any antenna with up to 3 dBi gain.
L’appareil est conforme aux normes d’Industrie Canada. Son
fonctionnement est soumis aux deux conditions suivantes : (1) Ce
dispositif ne doit pas causer d’interférences et (2), il doit pouvoir accepter
les interférences, incluant celles pouvant nuire à son fonctionnement
normal.
Changes or modifications to this product or use of accessories not
expressly approved by Uniden, or operation of this product in any way
other than as provided in the Uniden Owner’s Manual could void your
authority to operate this product.
A complete Owner’s Manual in French can be downloaded from http://
www.uniden.com/.
UNPACKING
Your PC787 contains the following:
PC787 CB 2-way mobile radio
Microphone
Mounting Bracket Kit
DC Power Cord
Reference Guide
Part 95 Subpart D (FCC Rules)
If any items are missing or damaged, contact your place of purchase
immediately.
4

DESCRIPTION
Your PC787 represents the highest quality communications device
designed for use in the Citizens Band Radio Service. It will operate on any
of the 40 AM frequencies authorized by the Federal Communications
Commission (FCC).
The Citizens Band Radio Service is under the jurisdiction of the Federal
Communications Commission (FCC). Any adjustments or alterations
which would alter the performance of the transceiver's original FCC type
acceptance, or which would change the frequency determining method,
are strictly prohibited.
Replacement or substitution of crystal, transistors, ICs, regulator
diodes, or any other part of a unique nature, with parts other than those
recommend by Uniden, may cause violations of the technical regulations
in Part 95 of the FCC Rules or in violation of type acceptance requirements
in Part 2 of the rules.
FEATURES
CB AM 40 channels (4W)
7 weather channels with Weather Alert
Public Address function (External speaker required - not
provided)
Automatic Noise Limiter
Noise Blanker
Transmit/Receive LED (Red and yellow-green)
CH9 and CH19 direct tune
Dimmer control (High/Medium/Low)
Variable RF Gain
Variable MIC Gain
Variable Tone control
Multifunction Meter (RF, Signal Strength, and SWR)
Variable Volume control
Variable Squelch control
6-pin microphone jack
5
EMERGENCY OPERATION
2
161412109
8765431
11 1513
1. Move the 9/19/NORM switch to 9; the radio automatically tunes
to Channel 9 and disables the channel selector.
2. Press and hold PTT and speak clearly. Release PTT after speaking.
3. If there is no response, move the 9/19/NORM switch to 19; the
radio automatically tunes to Channel 19.
4. Press and hold PTT and speak clearly. Release PTT after speaking.
5. If there is still no response, move the 9/19/NORM switch to
NORM and ask that party to relay your emergency broadcast on
Channel 9.
All channels except Channel 9 may be used for normal communication.
The FCC reserves Channel 9 for emergencies involving the immediate
safety of individuals or protection of property. Use Channel 9 to render
assistance to a motorist.
This is an FCC rule and applies to all CB radio operators.
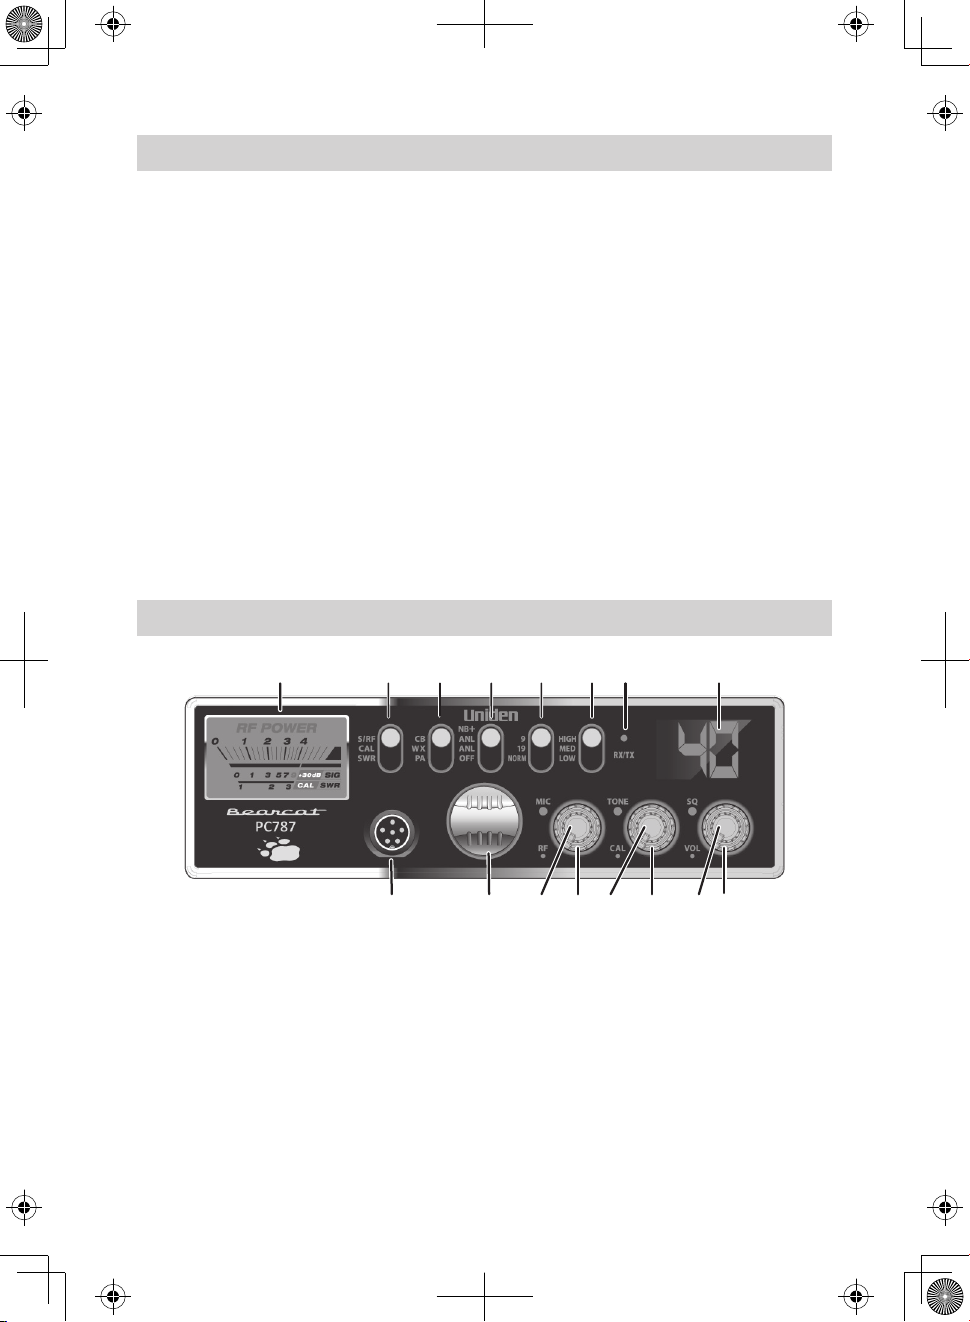
CONTROLS AND FUNCTIONS
1. Multifunction meter. When receiving, the meter shows the
received signal strength. Use CAL and SWR to tune an antenna for
best performance.
2. S/RF/CAL/SWR switch: Selects S/RF, CAL, and SWR to be
measured through the multifunction meter.
3. CB/WX/PA switch: Selects CB (Citizens Band) or WX (Weather)
modes, or activates the PA (Public Address) feature.
6

Do not use the PA function unless an external speaker is connected.
4. NB+ANL/ANL/OFF switch: Activates the Noise Blanker (NB) and
Automatic Noise Limiter (ANL) features. NB reduces external
noise and ANL reduces background noise from the car engine
and other sources. OFF turns o both the NB and ANL features.
5. 9/19/NORM switch: Move the switch to select emergency
channel 9, channel 19, or standard CB channels.
All channels except Channel 9 may be used for normal communication.
The FCC reserves Channel 9 for emergencies involving the immediate
safety of individuals or protection of property. Use Channel 9 to render
assistance to a motorist.
6. HIGH/MED/LOW switch: Adjust LCD backlight brightness.
7. RX/TX LED: Indicates whether the radio is transmitting (red) or
receiving (yellow-green).
8. Channel Indicator: Displays the channel currently in use.
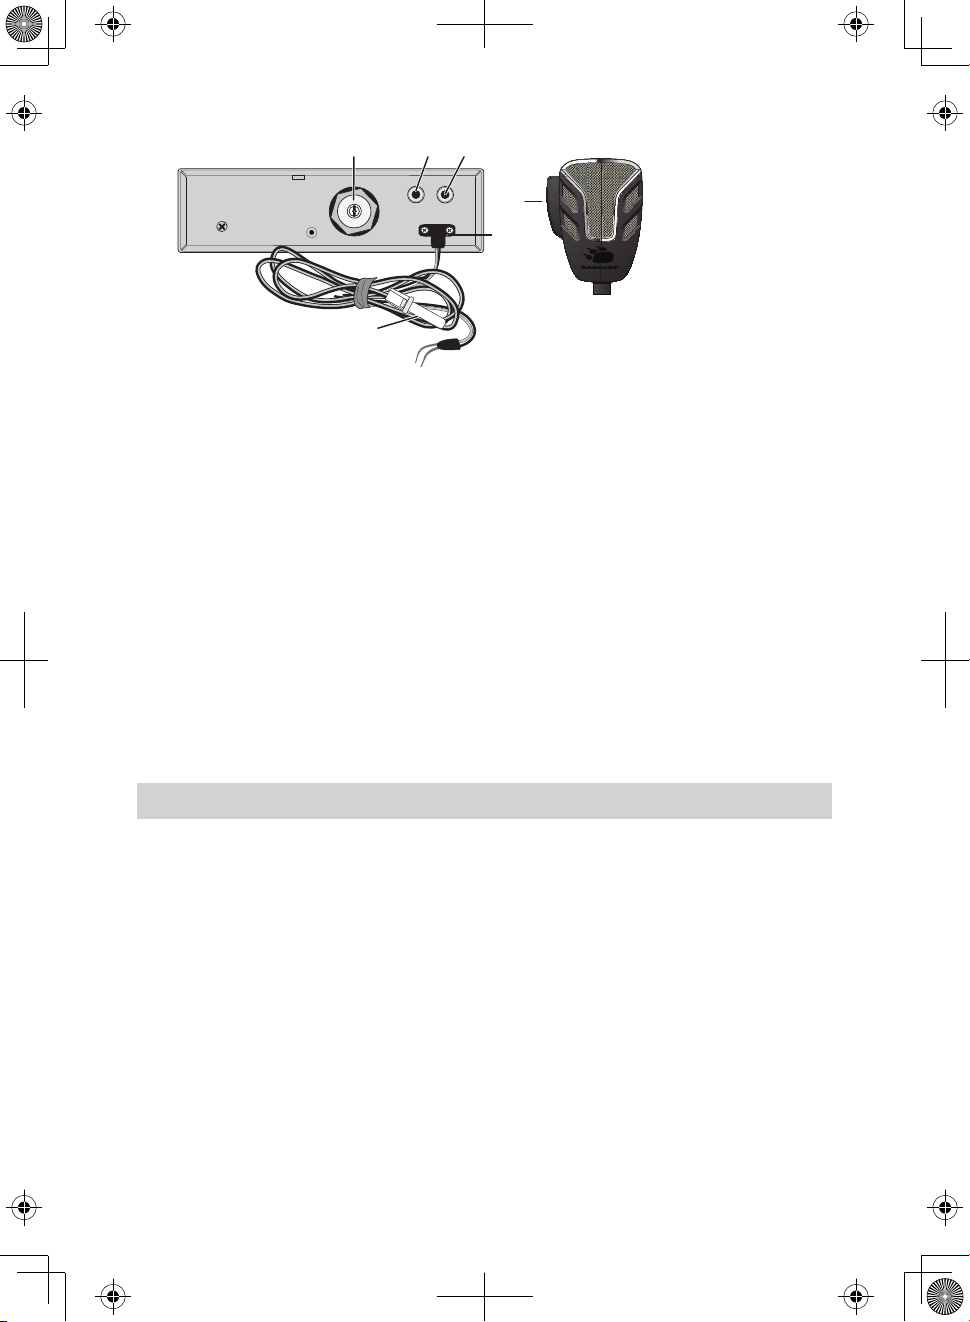
9. 6-Pin Microphone Jack: Connects the radio to the detachable
microphone (included).
10. Channel Selector knob: Turn this knob to select CB or Weather
channels.
11. RF Gain inner knob: Turn the inner knob to reduce interference in
strong signal areas.
12. MIC Gain outer knob: Turn the outer knob to adjust the
microphone sensitivity.
13. CAL inner knob: Turn the inner knob to calibrate the meter for
Standing Wave Ratio (SWR) measurements.
14. TONE outer knob: Turn the outer knob to change the tone quality.
15. VOL inner knob: Turn the inner knob to turn the radio on and o
and to adjust the volume.
16. SQUELCH outer knob: Turn the outer knob to reduce background
noise when there is no incoming signal.
7
17 18 19
22
20
21
17. Antenna socket: Connects antenna to the unit.
18. PA SP: Connects optional external 8-ohm, 4-watt speaker for use
as a public address system.
To prevent acoustic feedback, separate the microphone from the speaker
when operating the PA at high output levels.
19. EXT. SP: Connects optional external 8-ohm, 4-watt speaker for CB
and WX operation.
When the external speaker is plugged in, the internal speaker is o.
20. POWER: Connects DC power to transceiver.
21. Fuse.
22. PTT: Push-to-Talk.
INSTALLATION
MOBILE INSTALLATION
Plan the location of the transceiver and microphone bracket before
beginning installation.
1. Select a location that is convenient for operating the radio but
does not interfere with the driver or passenger.
2. Install bracket with self-tapping screws provided.
3. Connect power cords (see page 9).
4. Attach the microphone bracket to side of the radio.
5. Attach radio to bracket.
8

Mobile Antenna
WARNING! The antenna used for this radio must be installed at least 13.4
inches (34 cm) away from all persons. The antenna must not be collocated
or used with any other antenna or transmitter.
CAUTION: Never operate your radio with no antenna or with a damaged
antenna cable. This can damage the radio.
You must purchase an antenna to operate this radio. Because the
maximum power output of the transmitter is limited by the FCC, the
quality of your antenna is very important. To achieve the maximum
transmission distance, Uniden strongly recommends that you install only
a high quality antenna. You have just purchased a superior transceiver don't diminish its performance by installing an inferior antenna.
Only a properly matched antenna system will allow maximum power
transfer from the 50 ohm transmission line to the radiating element.
Your Uniden dealer is qualified to help you select the proper antenna for
your requirements. A whip style antenna may be used for automobile
installation.
A short ‘loaded’ whip antenna is easier to install on an automobile, but its
efficiency is less than that of a full quarter-wave whip antenna.
Wireless CB Microphone Installation (Optional)
Your PC787 is compatible with Uniden’s BC906W Wireless CB
Microphone. With a range up to 300 feet, the BC906W allows you to use
your CB to communicate even when you need to get out of your vehicle.
Follow the instructions provided in the BC906W kit to install the wireless
microphone.
Connecting the Power Cords
Uniden recommends connecting the power lead to the Ignition Switch
Accessory Terminal. This way, the transceiver is automatically turned off
when the ignition switch is turned off.
As an alternative, the power cord may be connected to an available
terminal on the fuse block or to a point in the wiring harness. However,
9
caution must be taken to prevent a short circuit. If in doubt, contact your
vehicle dealer for information.
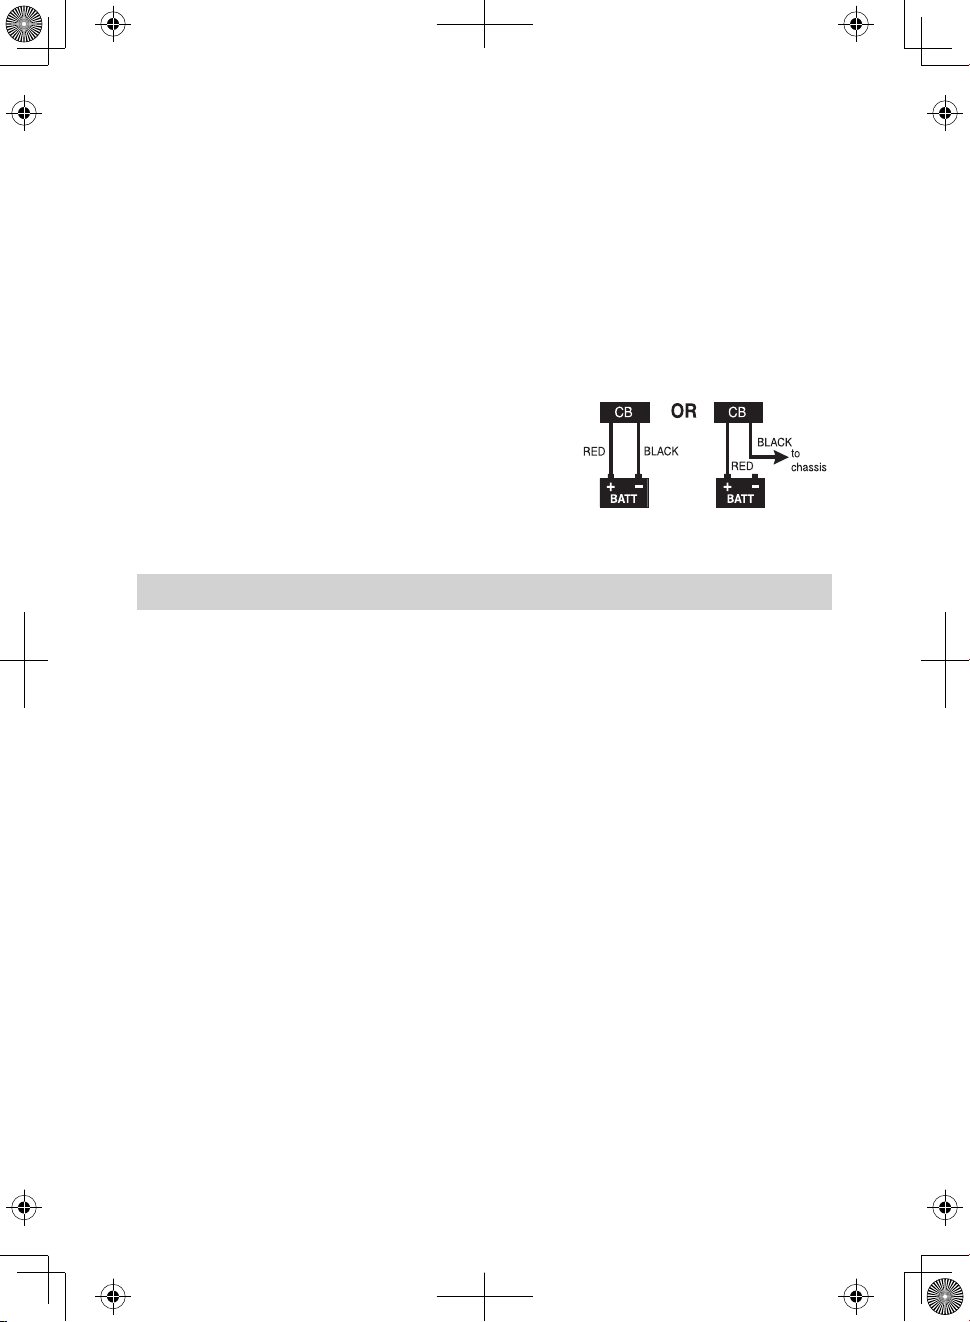
Ground Information
This transceiver may be installed and used in any 12-volt DC negative
ground system vehicle.
Negative Ground System
With a negative ground system, the negative (-) battery terminal is
usually connected to the vehicle motor block.
Connect the red DC power cord from the
transceiver to the positive (+) battery terminal
or other convenient point. Then connect the
black power cord to the vehicle chassis or negative (-) battery terminal.
USING YOUR PC787
TURN PC787 ON/OFF
Turn the VOL knob clockwise until the unit turns on and the display
backlight turns on.
Turn the VOL knob counter-clockwise to turn the unit off.
CB MODE
Be sure that the power source, antenna, and microphone are properly
connected before proceeding.
Basic Settings
1. Turn unit on. Set volume to a comfortable level.
2. Set switch to CB.
3. Select a CB channel (CH knob).
4. Set noise limitations as desired (ANL/NB switch).
5. Adjust squelch.
• Turn SQ knob fully clockwise so only strong signals can get
through.
10
• Turn SQ knob fully counterclockwise until you hear a hiss.
Everything gets through - noise, weak signals, and strong
signals
• Turn SQ knob clockwise until the hiss stops. Only clearer
signals get through.
Set SQUELCH only when the radio is not receiving a strong signal.
6. Set the S/RF/SWR/CAL switch to S/RF.
7. Press and hold PTT and check the multifunction meter. It will
show the RF output power. Adjust as needed.
8. Turn RF knob to set RF gain sensitivity. Normally, the knob is
turned clockwise to maximum.
9. Turn MIC knob to adjust microphone sensitivity for transmission.
Normally, the knob is turned clockwise to maximum.
10. Set the brightness (HIGH, MED, or LOW).
The Weather Alert system monitors the last weather channel you were on
before you changed to CB mode. It sounds a seven-second signal when it
decodes a severe weather alert issued for your area. Change to Weather
mode for details.
Calibrate Standing Wave Ratio (SWR)
SWR calibration monitors the coaxial cable quality and all RF connections.
Do not calibrate in an enclosed area such as a garage. Do not stand near
the antenna while calibrating.
1. Set CB/WX/PA to CB and select channel 20.
2. Set S/RF/SWR/CAL to CAL.
3. Press and hold PTT on the mic. The needle on the multipurpose
meter will begin to move.
4. Turn the CAL knob until the meter needle moved into the red
calibration block. When the needle moves towards the right-hand
side of the block, stop.
5. Still holding PTT, move the S/RF/SWR/CAL to SWR. The needle
should move back to the left-hand side of the meter. Ideally, it
should be as far left a possible. If the reading is higher than 3,
adjust the antenna height.
6. Release PTT.
11
7. Repeat the steps for channel 1 and channel 40 to complete
calibration.
The readings will be slightly higher for channel 1 and channel 40 than for
channel 20.
WEATHER MODE WX MODE
Your radio combines a CB radio with a Weather radio and a Weather Alert
system. The Weather radio continually broadcasts weather conditions
when you are in Weather mode.
Weather Alert function does not work in Weather mode.
1. Set the CB/WX/PA switch to WX. Your radio is now in Weather
radio mode.
2. Turn the channel selector knob to select 1 of 7 weather channels.
You cannot change ANL or NB settings while in WX mode. The radio will
sound an alert tone.
PA MODE
Using the PA mode requires an optional speaker.
1. Switch to PA.
2. Press and hold PTT to speak.
3. Release when nished.
To prevent acoustic feedback, separate the microphone from the speaker
when operating the PA at high output levels.
If you are in PA mode but not pressing PTT, the radio receives CB
transmissions and transmits them through the PA speaker. You cannot
respond to the transmission.
PREVENTIVE MAINTENANCE
Every six months:
1. Check the SWR.
2. Be sure all electrical connections are tight.
3. Inspect antenna coaxial cable for wear or breaks in shielding.
4. Be sure all screws and mounting hardware are tight.
12
 Loading...