

Uniden America UP095R Users manual
UP095BH.indd A
UP095BH.indd A
9/26/2006 5:51:19 PM
9/26/2006 5:51:19 PM
Setup Guide
UP095BH.indd 1
9/26/2006 5:51:20 PM
EXI4560/EXI4561
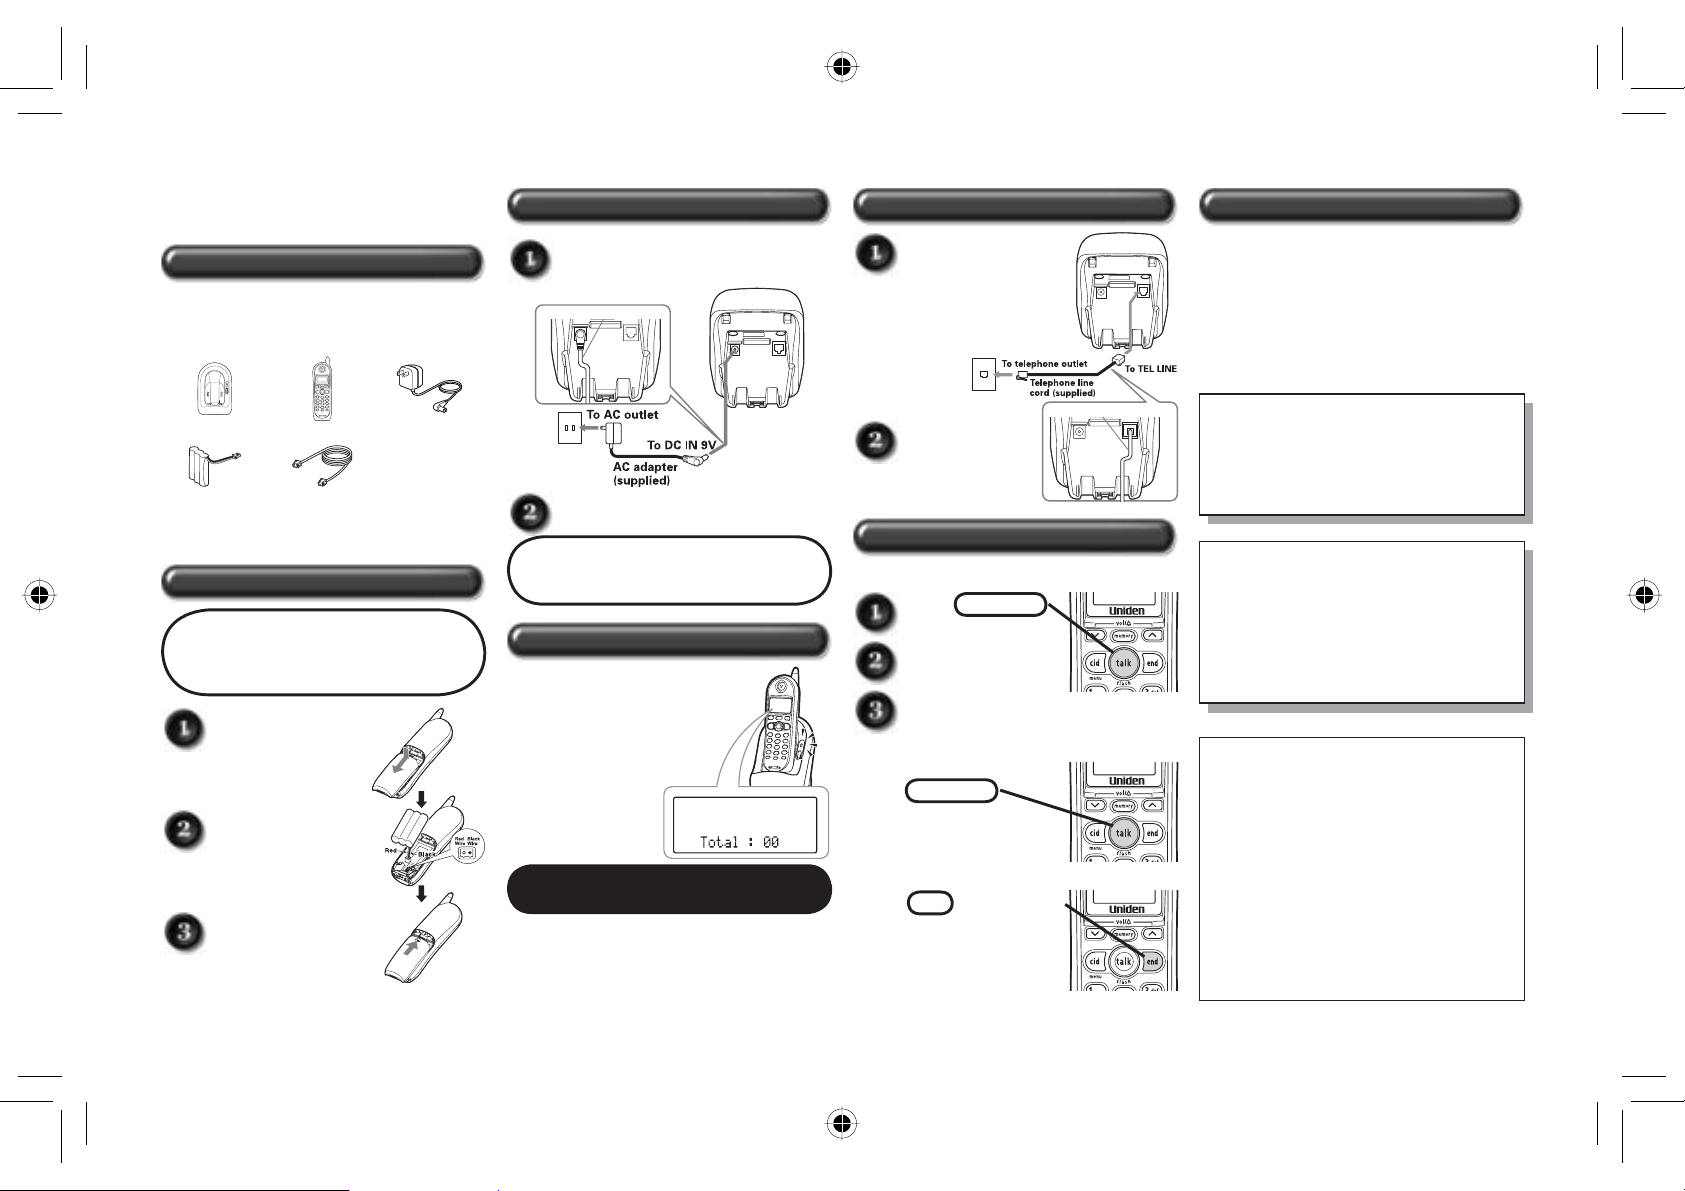
Step 1 Check the Package Contents
Make sure your cordless phone’s
packaging includes the following
items.
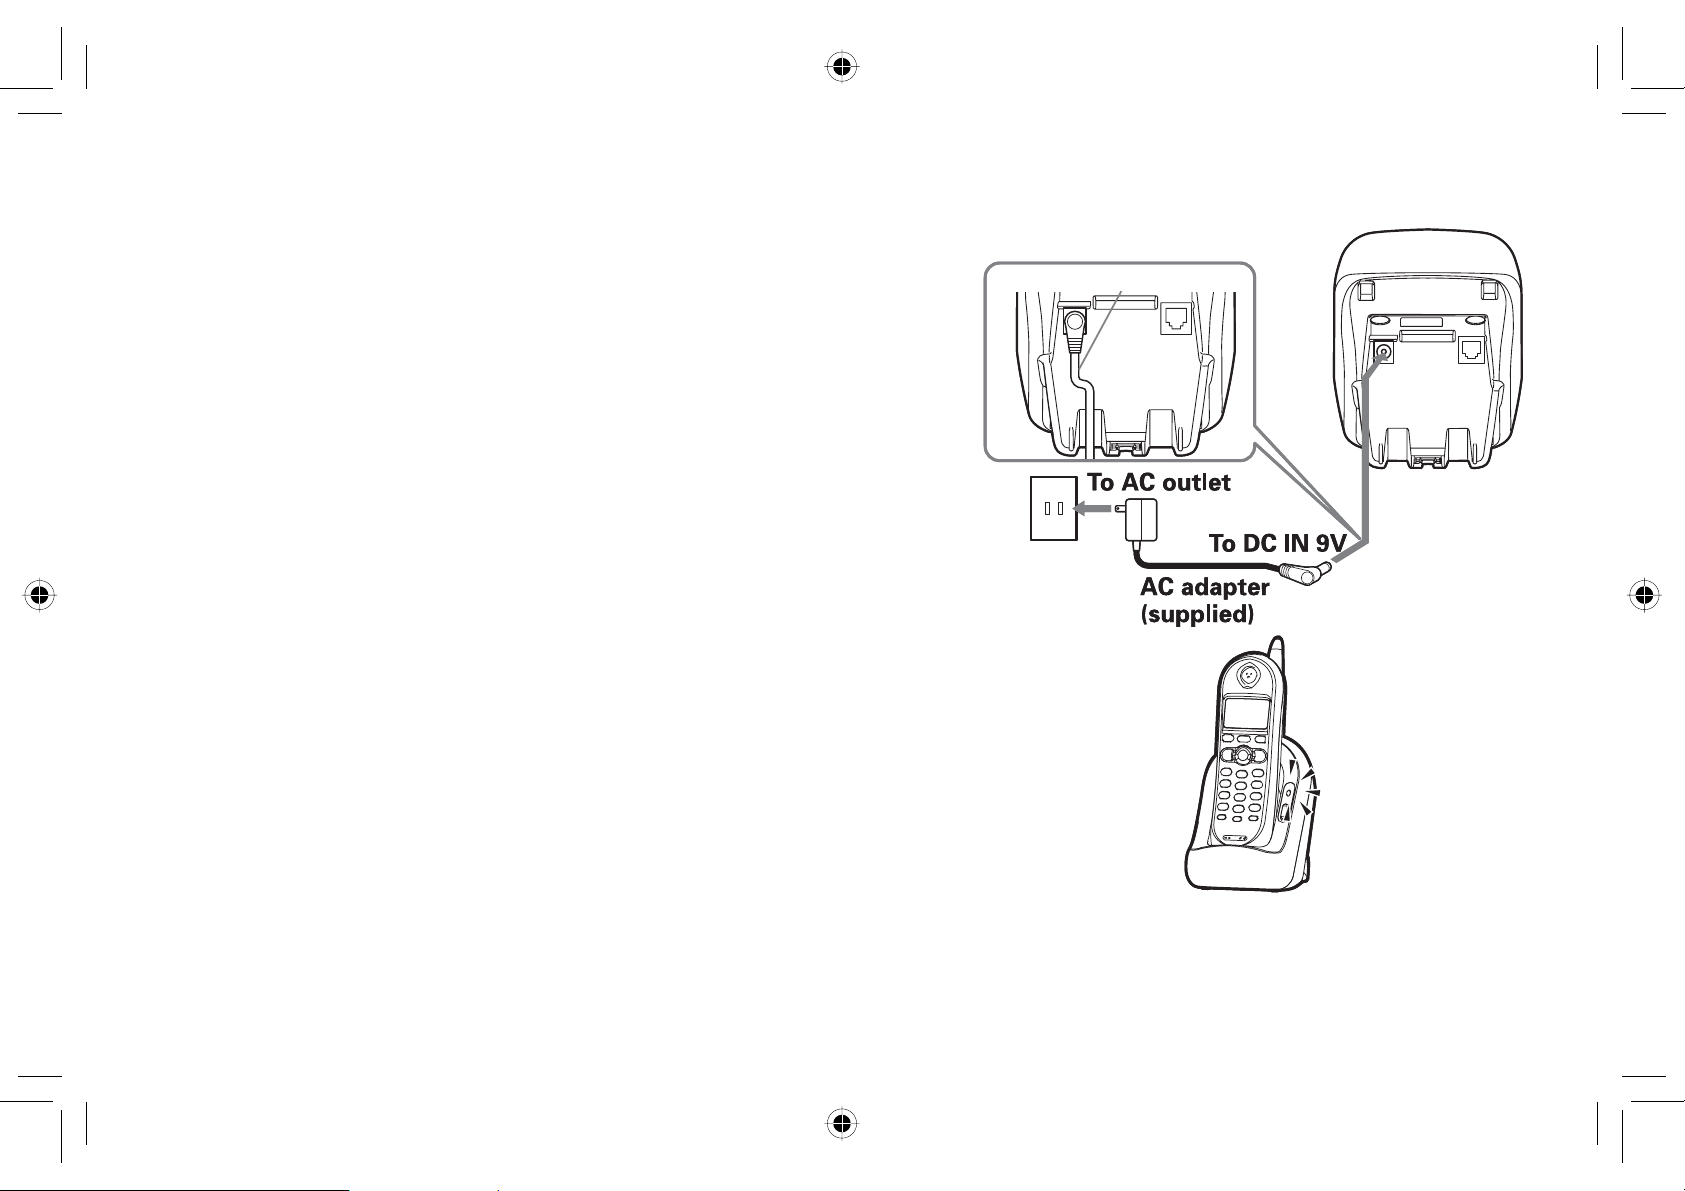
Step 3 Set up the Base
Plug the AC adapter cord to
the DC IN 9V jack (yellow).
Route the cord.
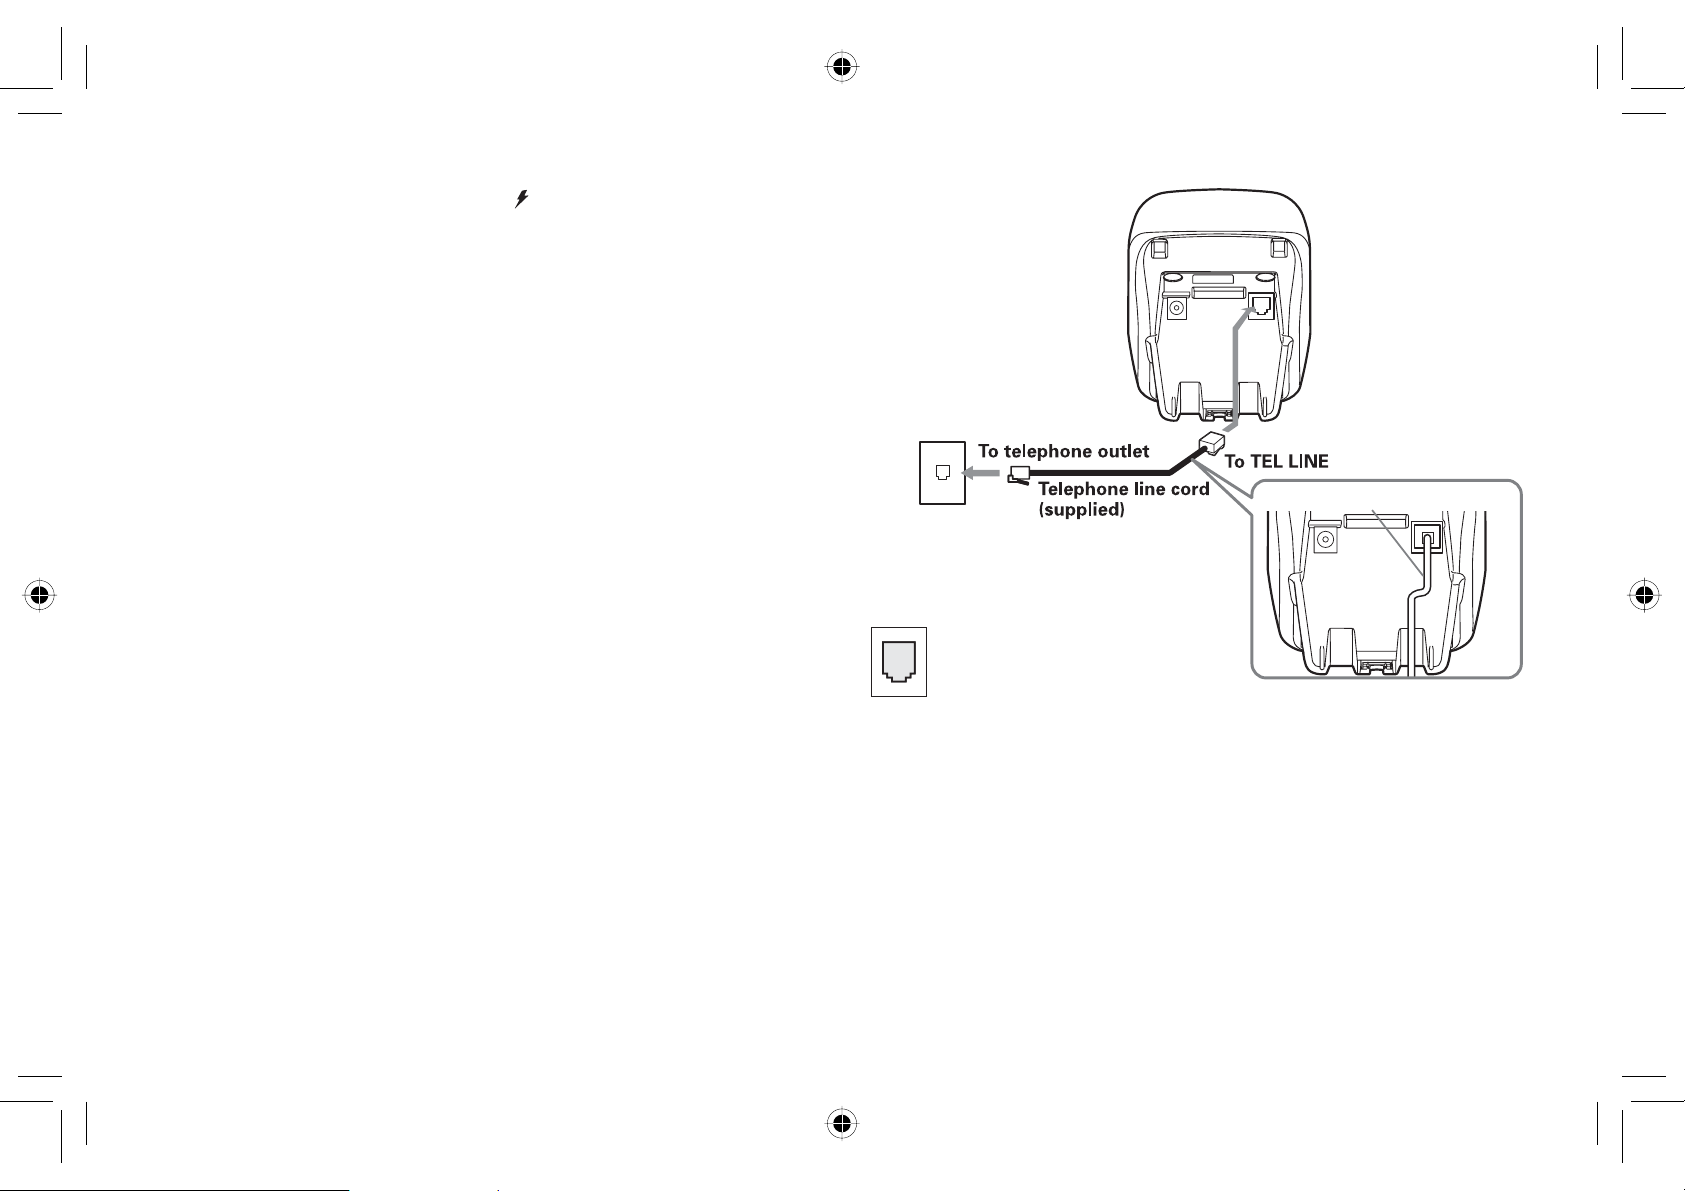
Step 5 Connect to the Phone Line
Plug one end of the
telephone cord into
the base TEL LINE
jack.
Additional Features
For more information on these
and other features, please refer to
your Owner’s Manual. For your
convenience, listed below are
important features that will help
you set up your new cordless
phone.
Base Handset AC adapter
Rechargeable
battery
Also included: • Owner’s manual
Telephone
cord
Step 2 Install the Handset Battery Pack
Note Use ONLY the Uniden
rechargeable battery pack
supplied with your new
phone!
Remove the
cover.
Connect the
battery pack
with the correct
polarity.
Replace the
cover.
Plug the AC adapter to a
120V AC power outlet.
Note Use ONLY the Uniden AC
adapter supplied with your
new phone!
Step 4 Charge the Handset
Place the handset in
the base.
Make sure that
charge LED
illuminates.
Charge for 15-20 hours before
using your phone.
Plug the other
end into the
telephone wall
jack.
Route the cord.
Step 6 Make & Receive Calls
To Make a Call
Press
talk/fl ash
Listen for dial tone.
Dial the desired
number.
.
To Receive a Call
Pick up the handset and
press
talk/fl ash
.
To Hang Up a Call
Press
handset to the base.
or return the
end
Handset/Base Set up:
- Adjust the Earpiece
Volume o P.25
- Set the Ringer Volume o P.25
- Set Tone/Pulse Dialing o P.17
Caller ID:
Set Caller ID on Call Waiting
(CIDCW) o P.15
Note: You must subscribe to
Caller ID services through your
local telephone provider to use
Caller ID and CIDCW.
Refer to your Owner’s Manual for
detailed operations.
For answers to questions and to
order genuine Uniden parts and
accessories 24 hours a day visit
our website at www.uniden.com. If
you have any problems, you can
also call our Customer Hotline at
1-800-297-1023, Mon-Fri 7 a.m.
to 7 p.m., Sat/Sun 9 a.m. to 5 p.m.
CST. (Phone support is closed on
holidays.)
UP095BH.indd 1
1
9/26/2006 5:51:20 PM
Guía de programación
negro
UP095BH.indd 2
9/26/2006 5:51:21 PM
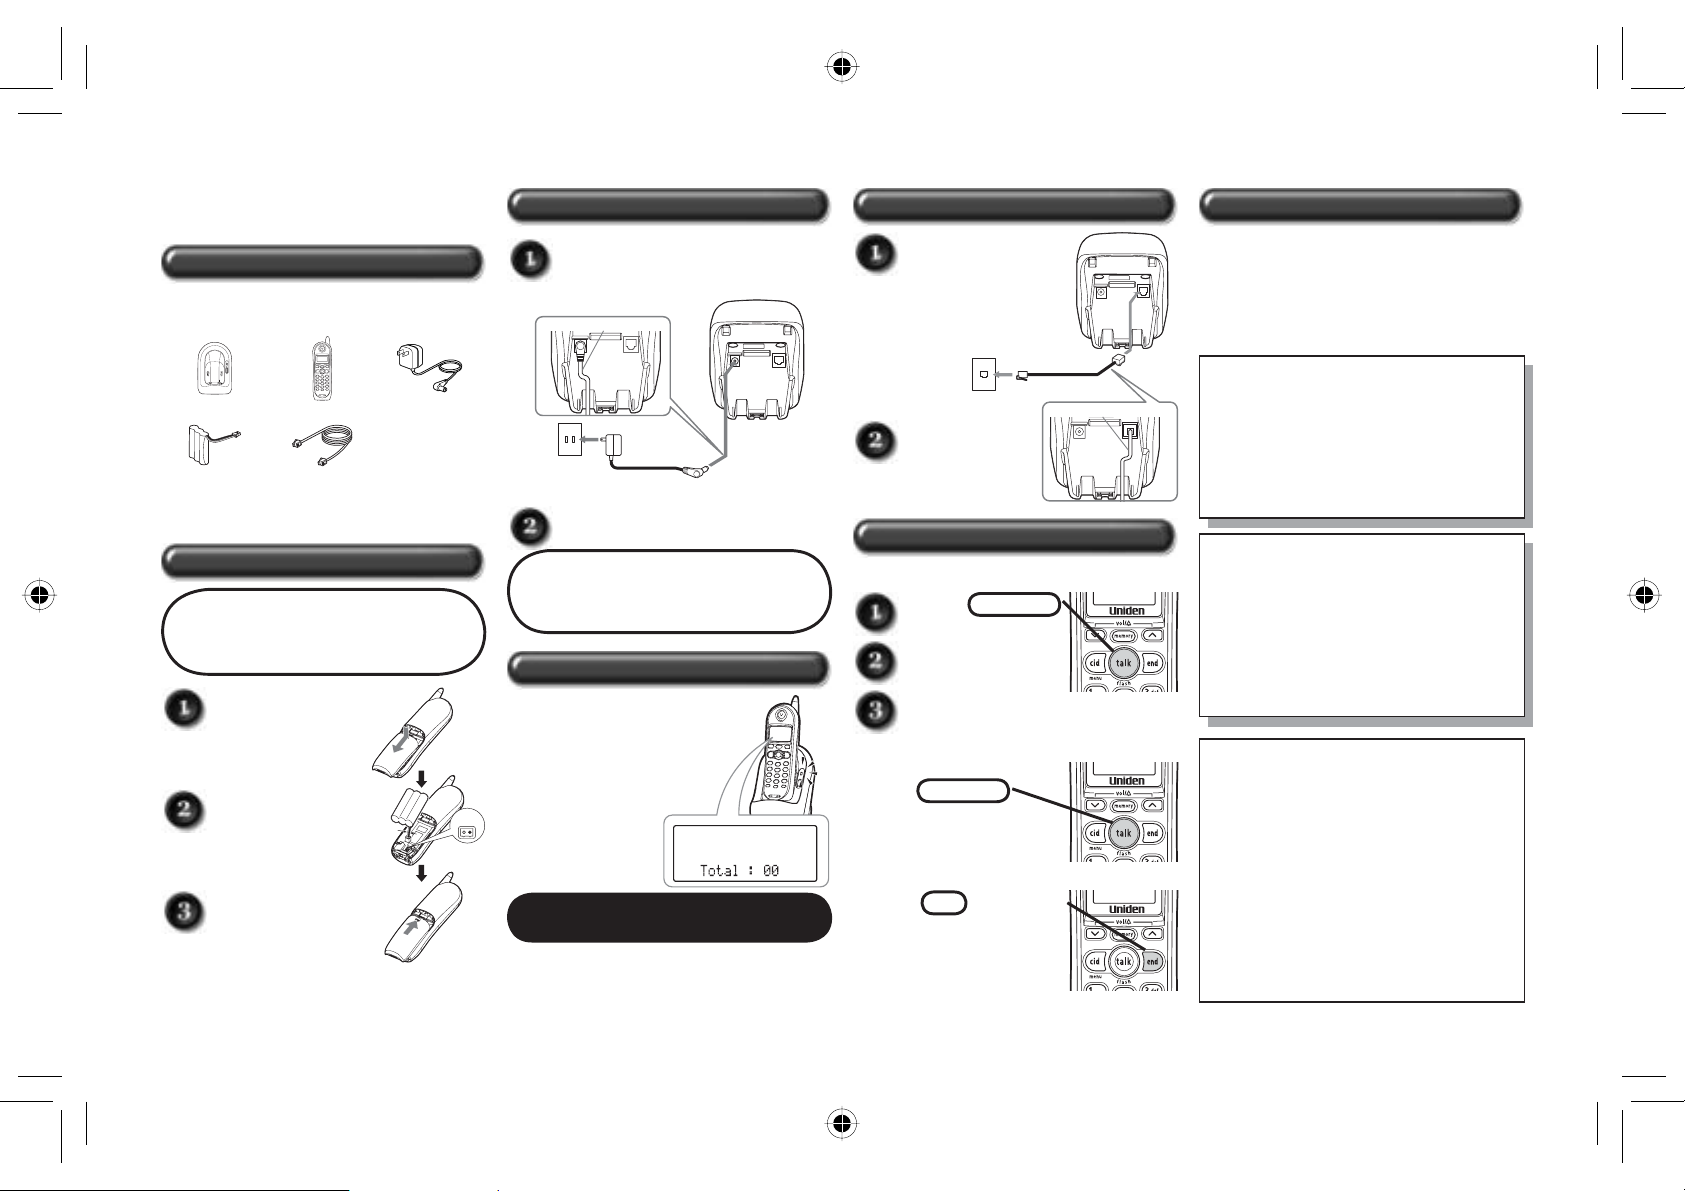
3° Paso Preparación de la base
EXI4560/EXI4561
1° Paso Inspección del contenido del embalaje
Asegúrese de que haya recibido los
siguientes artículos en el paquete
Base Receptor
Pila
recargable
Además va incluido: • Manual del usuario
Cable
telefónico
Adaptador CA
2° Instalación del paquete de pilas del receptor
Nota ¡Use SOLAMENTE el
paquete de pilas recargable
de Uniden suministrado con
su nuevo teléfono!
Quite la tapa.
Conecte el
paquete de pilas
con la polaridad
correcta.
Reponga la tapa
rojo
negro
negro
Coloque el receptor
en la base.
Asegúrese de que el
LED de carga se
ilumine.
negronegro
rojo
Conecte el adaptador CA
en el enchufe (amarillo) DC
IN 9V.
Pase el cable
A la toma CA
Conecte el adaptador CA en
una toma de 120V CA.
Nota ¡Use SOLAMENTE el
adaptador CA de Uniden
suministrado con su
teléfono!
4° Paso Carga del receptor
Cargue el receptor de 15 a 20
horas antes de usar el teléfono.
Al enchufe
DC IN 9V
Adaptador CA
(suministrado)
5° Paso Conexión de la línea telefónica
Conecte un
extremo de la
línea telefónica en
el enchufe TEL
LINE en la base.
Al enchufe telefónico
Cable de la línea
telefónica (suministrado)
Conecte el otro
extremo en el
enchufe telefónico
de la pared.
Pase el cable
Al enchufe
TEL LINE
Características adicionales
Para más información sobre estas y otras
características, le rogamos que consulte su
Manual del usuario. Para su conveniencia, hemos
listado abajo unas características importantes, las
cuales le ayudarán a programar su nuevo teléfono
inalámbrico de Uniden.
Programación del receptor/base:
- Ajuste del volumen del auricular y del
altavoz o P.25
- Programación del volumen del timbre
o P.25
- Programación de la marcación por
tono/pulso o P.17
6° Paso Realización y recepción de llamadas
Identifi cación de llamadas (Caller ID):
Para hacer una llamada
Oprima
talk/fl ash
Espere por el tono de
marcación.
Marque el número
deseado.
.
Para recibir una llamada
Levante el receptor y
oprima
talk/fl ash
.
Para colgar una llamada
Oprima
el receptor a la base.
o devuelva
end
Programe la Identifi cación de llamadas en
Llamadas en espera (CIDCW) o P.15
Nota: Usted debe estar suscrito al
servicio de Identifi cación de llamadas
con su proveedor de telefonía local para
poder usar las características de Caller
ID y de CIDCW
Consulte su manual del usuario para
operaciones más detalladas.
Para hacer preguntas u ordenar partes
genuinas y accesorios de Uniden, llame a
nuestra línea para atención al cliente en
el 1-800-297-1023.
Horario:
Lunes - viernes: 7 de la mañana- 7 de la
tarde. Sábado/domingo: 9 de la mañana
- 5 de la tarde. No habrá ayuda telefónica
los días festivos. O, visite nuestra página
Web: http://www.uniden.com
UP095BH.indd 2
2
9/26/2006 5:51:21 PM

Contents
UP095BH.indd 3
9/26/2006 5:51:22 PM
Setup Guide ...................................................................1
Welcome/ Accessibility .................................................4
Terminology/ Manual Conventions ..............................5
Product Overview ..........................................................6
Controls and Functions ................................................7
Installing the Phone ......................................................9
Choosing the Best Location ................................................9
Installing the Rechargeable Battery Pack into the
Handset.......................................................................10
Installing the Base Unit ..................................................... 11
Mounting the Base Unit on a Wall .....................................13
Basic Setup ..................................................................15
Activating AutoT alk ............................................................15
Activating Caller ID on Call Waiting ..................................15
Programming Your Area Code ..........................................16
Choosing the Dialing Mode ...............................................17
Setting the Language ........................................................18
Using the Speed Dial Memory ....................................19
Storing a Name and Number in Memory ..........................19
Storing Caller ID in Speed Dial Memory ...........................22
Using Your Phone ........................................................23
Making and Receiving Calls .............................................23
Making a Call from Speed Dial Memory ...........................23
Making a Call from the Caller ID List ................................24
Redialing the Last Dialed Number ....................................24
Selecting the Ring Tone and Volume ................................25
Adjusting the Earpiece Volume .........................................25
Using Call Waiting .............................................................26
Selecting a Different Channel ...........................................26
Find Handset ....................................................................26
Tone Dialing Switch-over ..................................................27
Voice Mail Waiting Indicator ..............................................27
Caller ID and CIDCW (Caller ID on Call Waiting) ......28
Caller ID on Call Waiting (CIDCW) ...................................29
Viewing the Caller ID Message List ..................................29
Deleting Information from the Caller ID List ......................30
Changing the Digital Security Code ..........................31
Maintenance .................................................................32
T roubleshooting ..........................................................35
Liquid Damage ..................................................................37
Precautions ..................................................................38
The FCC Wants You To Know ..........................................39
I.C. Notice .........................................................................41
One Year Limited Warranty .........................................42
UP095BH.indd 3
3
9/26/2006 5:51:22 PM

Welcome
UP095BH.indd 4
9/26/2006 5:51:22 PM
Congratulations on your purchase of the Uniden cordless telephone. This cordless phone is designed for reliability,
long life, and outstanding performance.
Note: Illustrations in this manual are used for explanation purposes. Some illustrations in this
manual may differ from the actual unit. The color of your cordless telephone may vary.
Uniden
®
is a registered trademark of Uniden America Corporation.
AutoTalk, AutoStandby and UltraClear Plus are trademarks of Uniden America Corporation.
Accessibility
Uniden provides a customer service hotline for accessibility questions. If you have a disability and need customer
service assistance or if you have any questions about how Uniden’s products can accommodate
persons with disabilities, please call the accessibility voice/TTY line:
1-800-874-9314.
A representative is available to talk to you M-F, 8:00 am to 5:00 pm, CST. After hours, you can leave us a message,
and we will call you back. Information is also available on our website, www.uniden.com, under the "Accessibility"
link.
4
UP095BH.indd 4
9/26/2006 5:51:22 PM
Terminology
UP095BH.indd 5
9/26/2006 5:51:22 PM
Base
CID
CIDCW
Handset
The main part of the phone that connects to your phone line and lets you make and receive calls.
Caller ID is available from your telephone provider. With this service, you can see the name and number of incoming
callers.
Caller ID on Call Waiting is available from your telephone provider. With this service, you can see incoming caller
information while on another call.
A cordless handset that can be placed anywhere in your home or offi ce where AC power is available.
The handset may be sitting on the base charging or out of the base cradle, but is NOT in use.
Standby
[talk/fl ash] has not been pressed and there is no dial tone.
Talk
When a dial tone has been enabled allowing the user to dial and carry on a conversation with an outside party.
Manual Conventions
This manual uses several different type styles to help you distinguish between different parts of the phone:
• lower case bold text with “[ ]” indicates a key or button on the phone
• ALL CAPITALS indicates text on the display, such as menu options, prompts, and confi rmation messages
• lower case bold text indicates a status light on the phone base
UP095BH.indd 5
5
9/26/2006 5:51:22 PM

Product Overview
UP095BH.indd 6
9/26/2006 5:51:22 PM
Main Phone Features
• 2.4 GHz Extended Range Technology
• Caller ID/Caller ID on Call Waiting
• 3-Line Backlit LCD
• Trilingual Menu Displays
• 30 Caller ID Memory
• 10 Number Memory Dialing
• Last Number Redial
• Tone/Pulse Dialing
• Page/Find Handset Key
• Earpiece/Ringer Volume Controls
• Mute or Turn Ringer Off
• Hearing Aid Compatible
• 20-Channel Auto Scan
• Desk or Wall Mountable
UP095BH.indd 6
6
9/26/2006 5:51:22 PM
Controls and Functions
UP095BH.indd 7
9/26/2006 5:51:22 PM
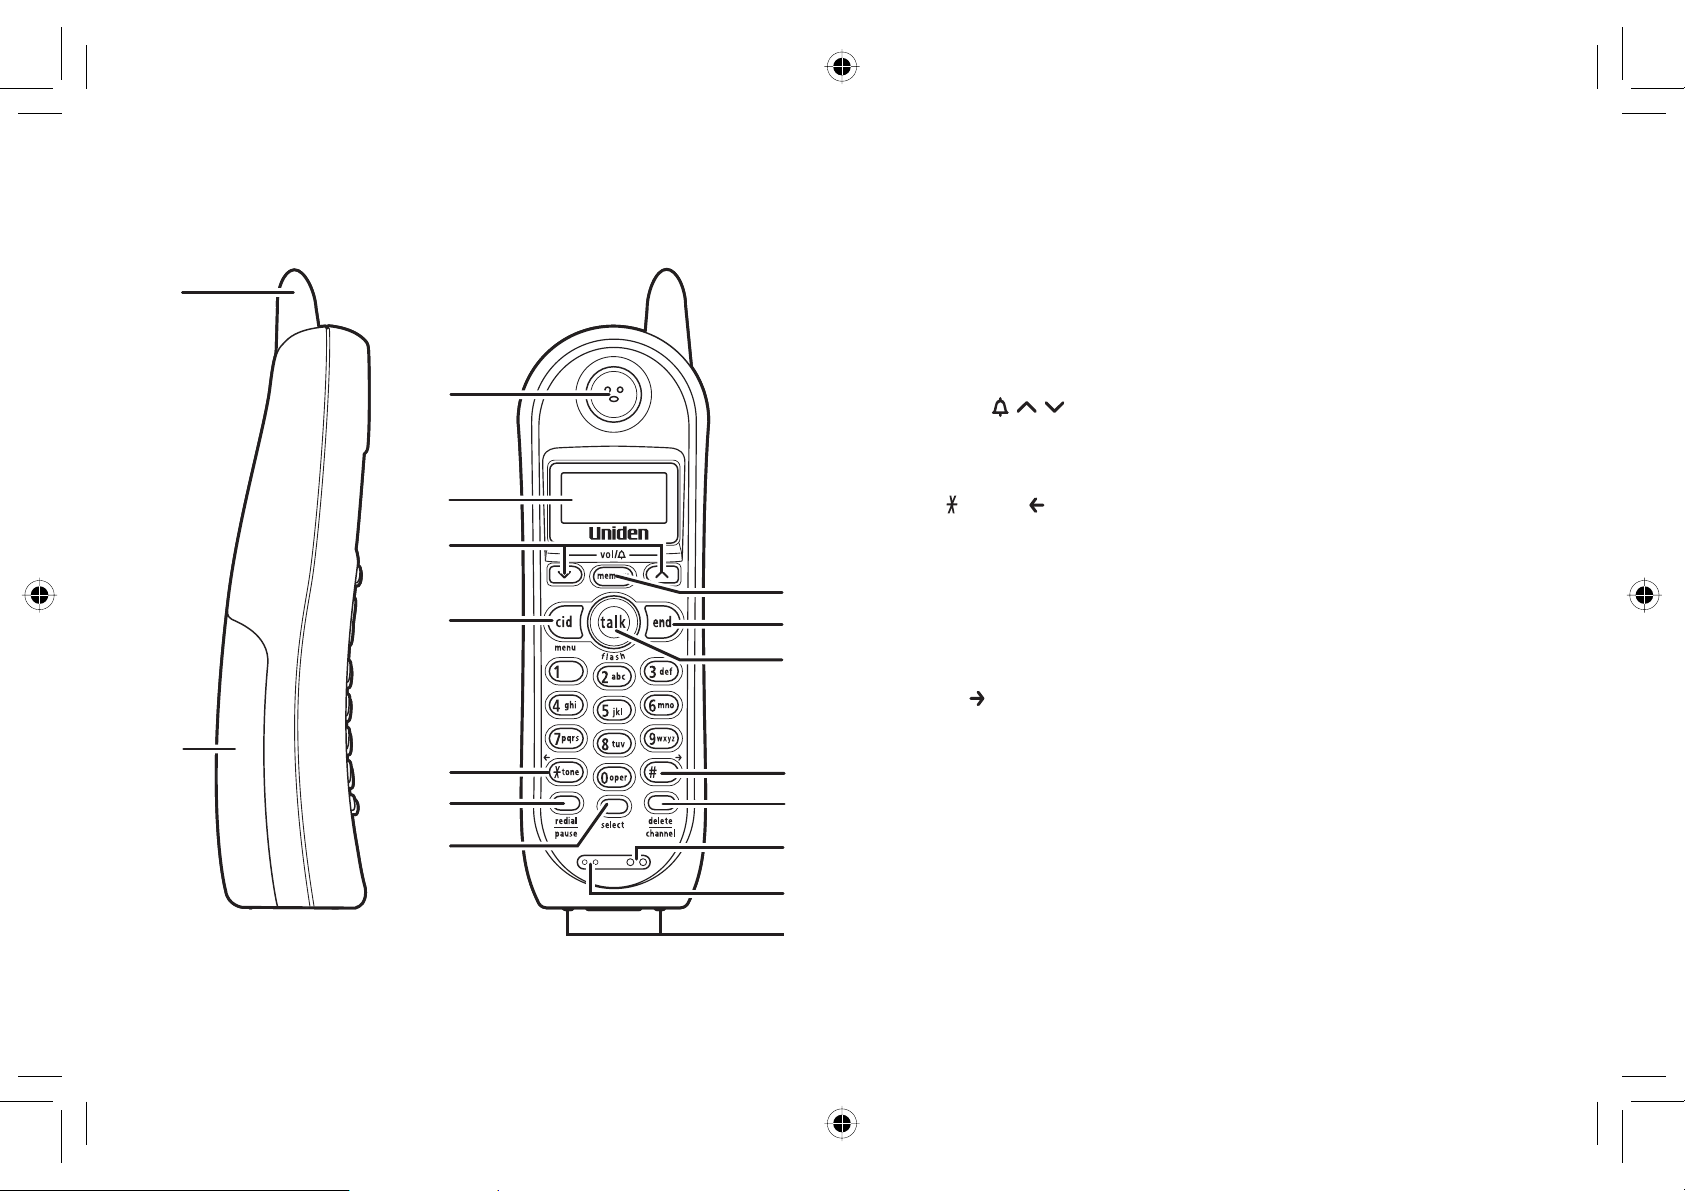
Handset
1
1
3
3
4
4
5
5
6
6
2
2
7
7
8
8
9
9
10
10
11
11
12
12
13
13
14
14
15
15
1. Handset antenna
2. Handset battery compartment
3. Handset earpiece
4. LCD display
5. [vol/
(volume & ringer up/down) key
6. [cid/menu] key
7. [
8. [redial/pause] key
9. [select] key
10. [memory] key
11. [end] key
12. [talk/fl ash] key
13. [#/
14. [delete/channel] key
15. Handset ringer speaker
16. Handset microphone
17. Handset charging contacts
/ / ]
/tone/ ] (left cursor) key
] (right cursor) key
UP095BH.indd 7
16
16
17
17
7
9/26/2006 5:51:22 PM
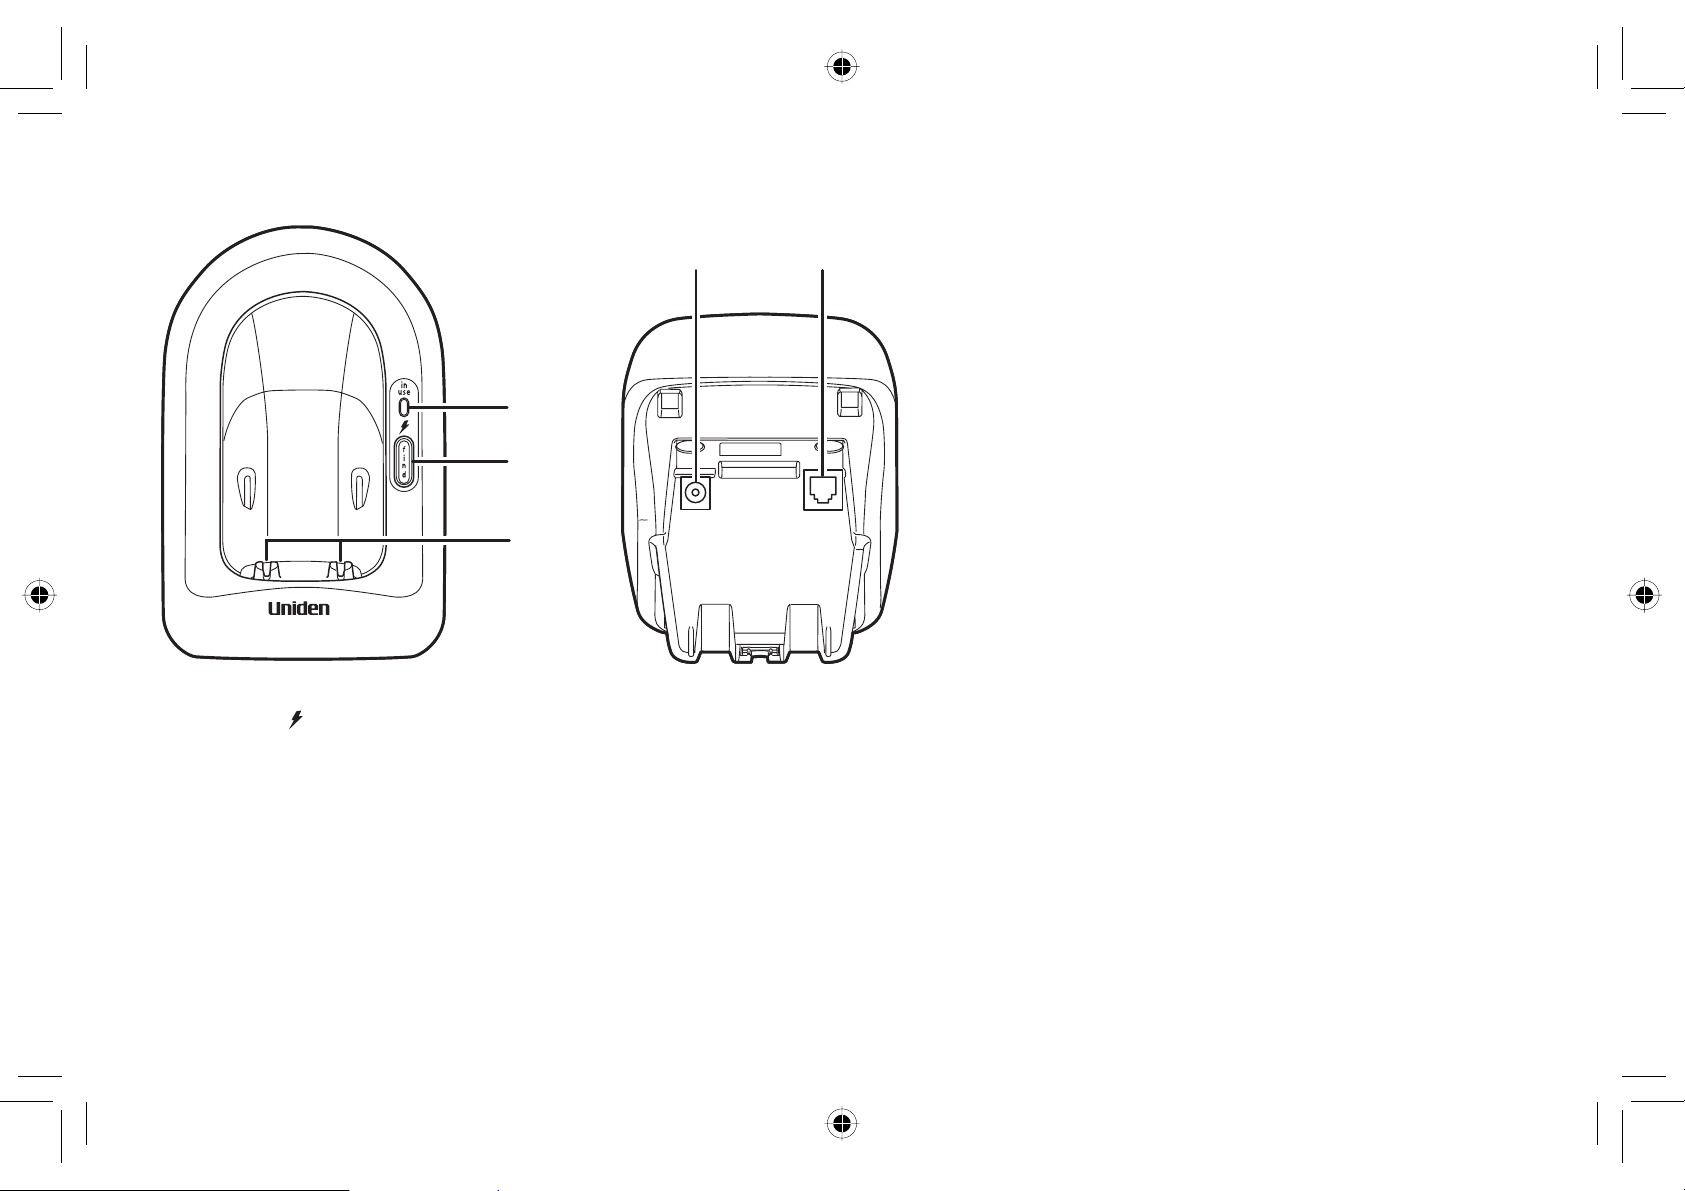
Main Base Unit
UP095BH.indd 8
9/26/2006 5:51:23 PM
18
18
19
19
20
20
21 22
21 22
18. in use/ LED
19. [fi nd] key
20. Base charging contacts
UP095BH.indd 8
21. Base DC IN 9V jack
22. TEL LINE jack
8
9/26/2006 5:51:23 PM
Installing the Phone
UP095BH.indd 9
9/26/2006 5:51:23 PM
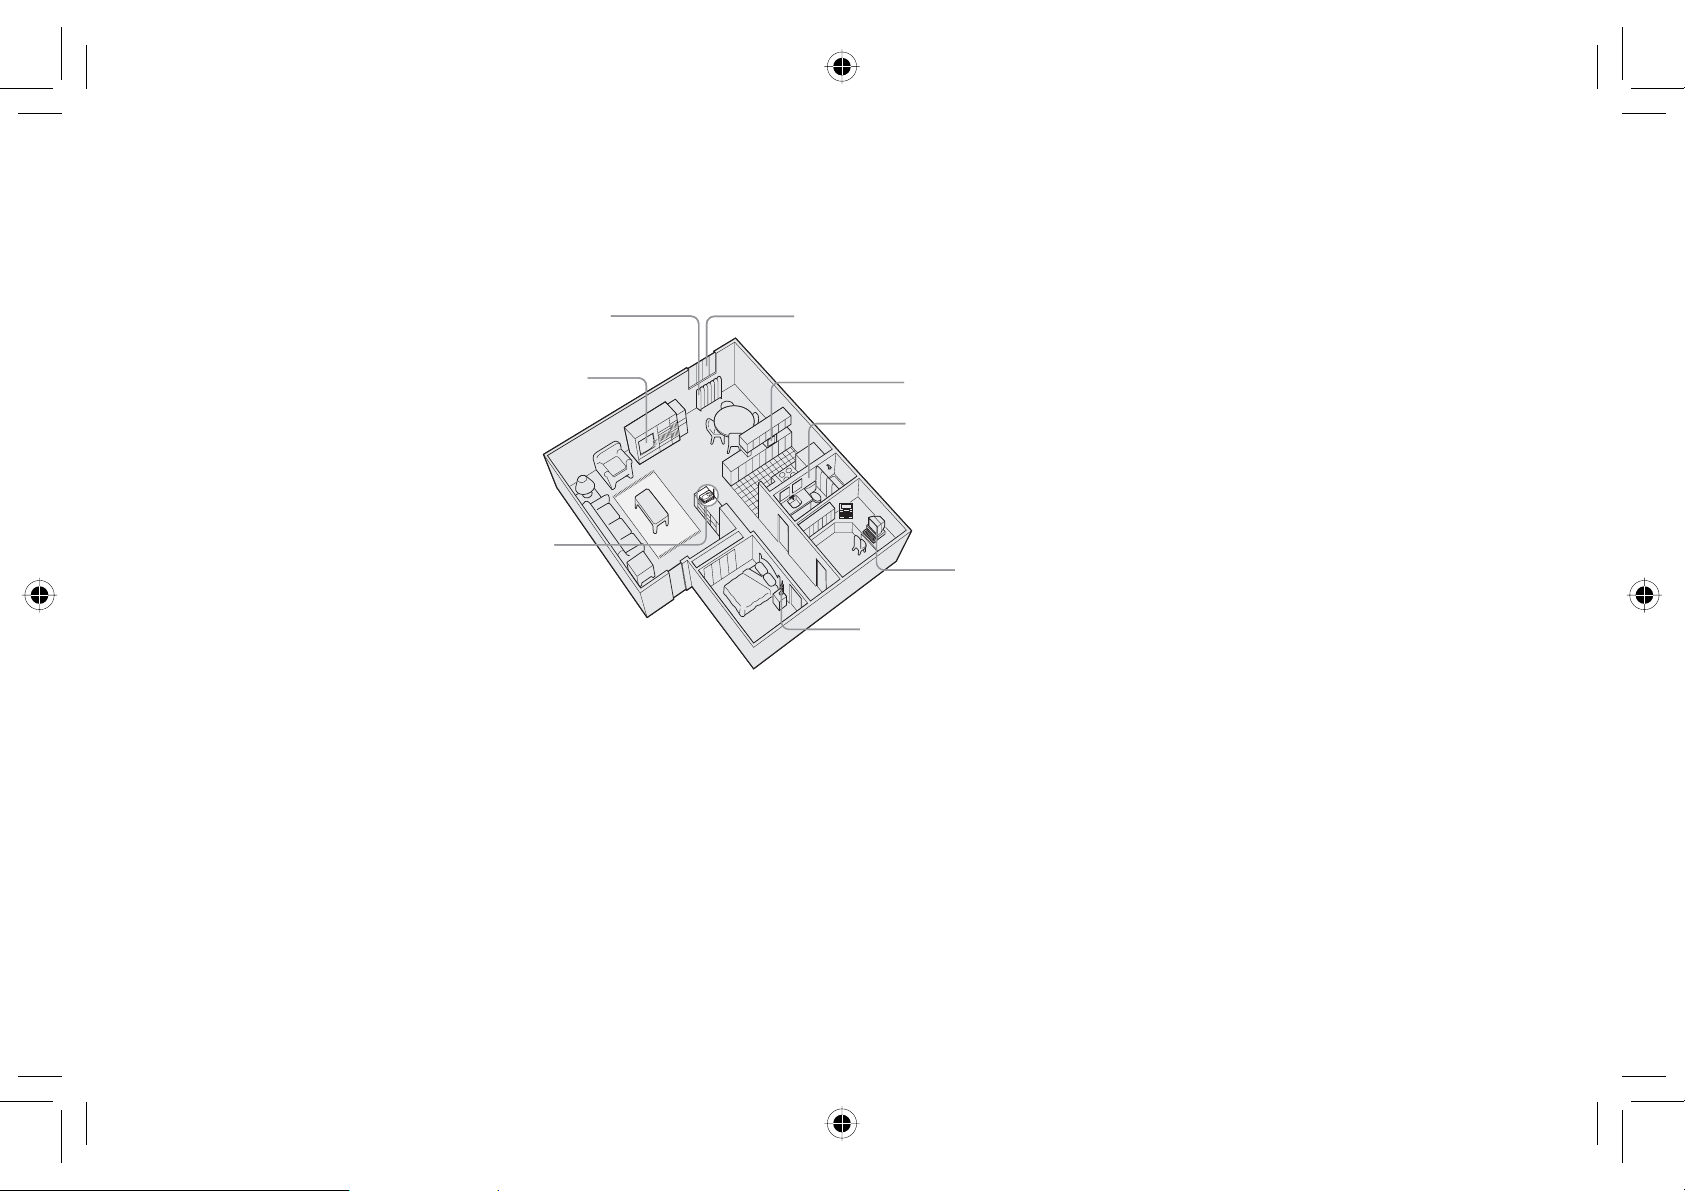
Choosing the Best Location
Before choosing a location for your new phone, here are some important guidelines you should consider:
Avoid heat sources, such as radiators,
Avoid heat sources, such as radiators,
air ducts, and sunlight
air ducts, and sunlight
Avoid television sets and other
Avoid television sets and other
electronic equipment
electronic equipment
Choose a central location
Choose a central location
• The location should be close to both a phone jack and a continuous power outlet (one which is not connected to a
switch).
• The base and handset should be kept away from sources of electrical noise such as motors, microwave ovens,
and fl uorescent lighting.
• The base can be placed on a desk, tabletop, or mounted on a standard wall plate. For better reception, place the
base as high as possible.
• The base should be placed in an open area for optimum range and reception.
• If your home has specially wired alarm equipment connected to the telephone line, be sure that installing
the system does not disable your alarm equipment. If you have questions about what will disable your alarm
equipment, contact your telephone company or a qualifi ed installer .
Avoid noise sources such as a window by
Avoid noise sources such as a window by
a street with heavy traffi c
a street with heavy traffi c
Avoid microwave ovens
Avoid microwave ovens
Avoid excessive moisture,
Avoid excessive moisture,
extremely low temperatures, dust,
extremely low temperatures, dust,
mechanical vibration, or shock
mechanical vibration, or shock
Avoid personal computers
Avoid personal computers
Avoid other cordless telephones
Avoid other cordless telephones
UP095BH.indd 9
9
9/26/2006 5:51:23 PM
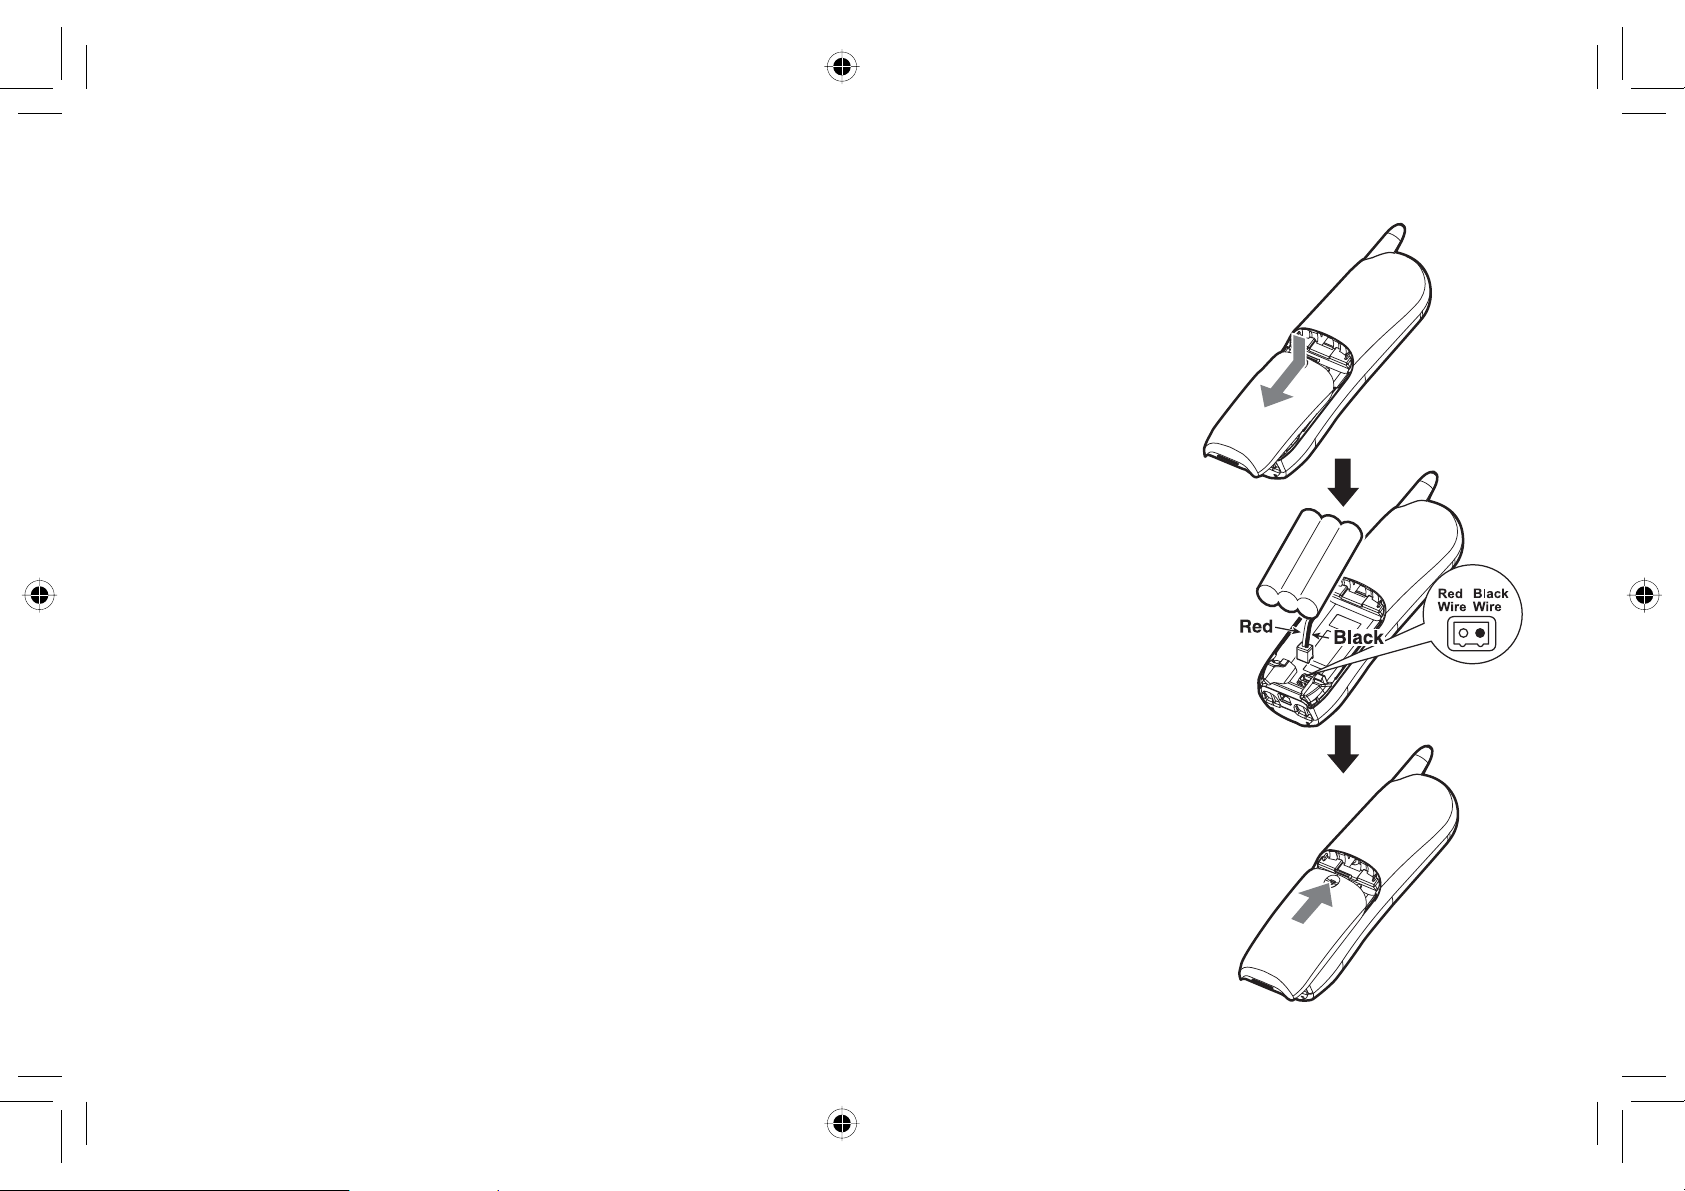
Installing the Rechargeable Battery Pack into the Handset
UP095BH.indd 10
9/26/2006 5:51:23 PM
The handset is powered by a rechargeable battery pack. Once installed, the battery
charges automatically when the handset is placed in the base unit.
To install the rechargeable battery pack:
1) Press down on the handset battery case cover (use the fi nger indention for a better
grip) and slide the cover downward to remove.
2) Plug the battery pack connector (red & black wires) into the small jack inside the
battery compartment. (The connector notches fi t into the grooves of the jack only
one-way.) Match the wire colors to the polarity label in the battery compartment,
connect the battery, and listen for a click to insure connection.
3) Make sure you have a good connection by slightly pulling on the battery wires. If
the connection is secure, the battery jack will remain in place.
4) Place the battery case cover back in the handset by sliding it upwards until it clicks
into place.
Note: Use only the Uniden (BT-1006) rechargeable battery pack supplied
with your phone.
UP095BH.indd 10
10
9/26/2006 5:51:23 PM
Installing the Base Unit
UP095BH.indd 11
9/26/2006 5:51:23 PM
1) Connect the AC adapter to the DC IN 9V jack and to the
standard 120V AC wall outlet.
Note:
• Use only the supplied AD-0001 AC adapter. Do not
use any other AC adapter.
• Do not place the power cord where it creates a trip
hazard or where it could become chafed and create a
fi re or electrical hazard.
2)
Charge the handset by placing in the base unit with the keypad
facing forward.
Route the cord.Route the cord.
UP095BH.indd 11
11
9/26/2006 5:51:23 PM
3) Make sure that the in use/ LED illuminates. If the LED
UP095BH.indd 12
9/26/2006 5:51:24 PM
does not illuminate, check to see that the AC adapter is
plugged in and that the handset makes good contact with
the base's charging contacts.
Note:
• Connect the AC adapter to a continuous power
supply (not controlled by a wall switch).
• Place the base unit close to the AC outlet to
avoid long extension cords.
• Charge your handset at least 15 - 20 hours
before plugging into the phone line.
4) Once the handset battery pack is fully charged, connect
the telephone line cord to the TEL LINE jack and a
telephone outlet. If your telephone outlet isn't modular,
contact your telephone company for assistance. Modular
Route the cord.
Modular
UP095BH.indd 12
12
9/26/2006 5:51:24 PM
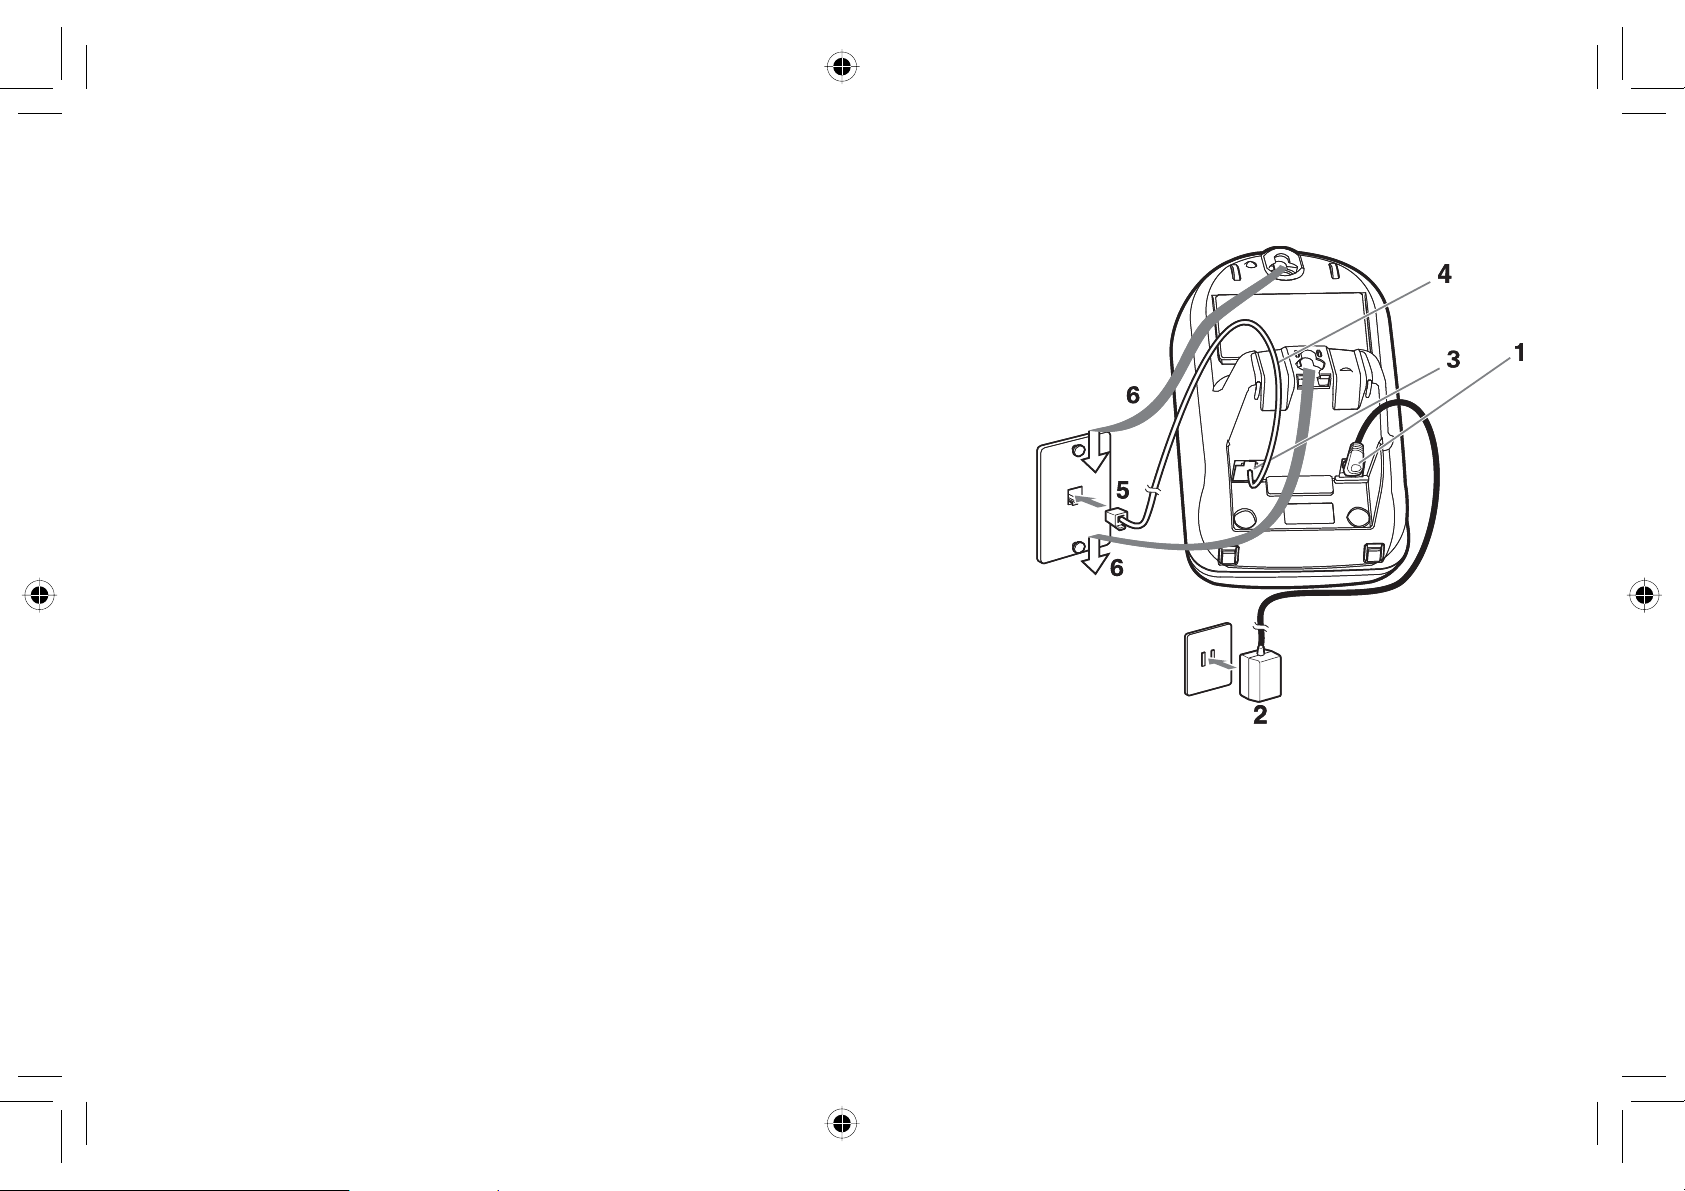
Mounting the Base Unit on a Wall
UP095BH.indd 13
9/26/2006 5:51:24 PM
Standard wall plate mounting
This phone can be mounted on any standard wall plate.
1) Plug the AC adapter to the DC IN 9V jack.
2) Plug the AC adapter into a standard120V AC wall outlet.
3) Plug the telephone line cord into the TEL LINE jack.
4) Route the telephone line cord through the groove as shown.
5) Plug the telephone line cord into the telephone outlet.
6) Align the mounting slots on the base with the mounting posts on the
wall. Then push in and down until the phone is fi rmly seated.
UP095BH.indd 13
13
9/26/2006 5:51:24 PM

Direct wall mounting
UP095BH.indd 14
9/26/2006 5:51:24 PM
If you don’t have a standard wall plate, you can mount your phone directly to the wall. Before
doing this, consider the following:
• Avoid electrical cables, pipes, or other items behind the mounting location that could cause a
hazard when inserting screws into the wall.
• Try to mount your phone within 5 feet of a working phone jack to avoid excessive lengths.
• Make sure the wall material is capable of supporting the weight of the base and handset.
• Use #10 screws (minimum length of 1-3/8 inches) with anchoring devices suitable for the wall
material where the base unit will be placed.
1) Insert two mounting screws into the wall (with their appropriate anchoring device), 3-15/16
inches apart. Allow about 1/8 of an inch between the wall and screw heads for mounting the
phone.
2) Refer to steps 1 through 6 on page 13 to mount the telephone.
UP095BH.indd 14
14
9/26/2006 5:51:24 PM
 Loading...