

Uniden America UP033, UP033R User Manual

EXAI 7248
SERIES
OWNER'S
MANUAL
CH04_Contents.fm 1 ページ 2004年1月13日 火曜日 午後2時35分
Contents
Welcome/Features 2
Controls and Functions 3
Terms Used in this Manual 4
Getting Started 5
Installing the Phone 5
A. Choose the Best Location 5
B. Install the Rechargeable Battery Pack into the Handset 6
C. Connect the Base Unit and Charge the Handset 7
D. Mount the Base Unit on a Wall 8
Installing the Beltclip 9
Headset Installation 10
Basic Setup 11
Activating AutoTalk 11
Activating Caller ID on Call Waiting 11
Entering Your Area Code 12
Choosing the Dialing Mode 13
Setting the Language 13
Selecting the Ring Tone and Volume 14
Basics 15
Using Your Phone 15
Making and Receiving Calls 15
Adjusting the Earpiece Volume 16
Tone Dialing Switch-over 17
Traveling Out-of-Range 17
Selecting a Different Channel 17
Find Handset 18
Using Call Waiting 18
RocketDial 19
RocketDial 19
Using the Speed Dial Memory 20
Caller ID Features 25
The Integrated Answering Device 29
Additional Information 50
Storing the RocketDial 19
Using the Speed Dial Memory 20
Storing Names and Numbers in Speed Dial Memory 20
Storing Caller ID messages in Speed Memory Locations 23
Making Calls from Speed Dial Memory 24
Caller ID and CIDCW (Caller ID on Call Waiting) 25
When the Telephone Rings 25
Viewing the Caller ID Message List 26
Deleting Information from the Caller ID List 27
Making a Call from the Caller ID List 28
The Integrated Answering Device 29
Turning the Answering System On/Off 30
Setting Up Your Answering System 31
Using Your Answering System 40
Remote Operation 45
Changing the Digital Security Code 50
Note on Power Sources 51
General Information 53
Troubleshooting 54
Liquid Damage 57
Precautions & Warranty 58
I.C. Notice 60
Index 61
Remote Operation Card
[1]
www.uniden.com
EXAI7248.book 2 ページ 2004年1月1
2日 月曜日 午後5時13分
Welcome
Features
Congratulations on your purchase of the Uniden cordless telephon
phone is designed and engineered to exacting standards f
performance.
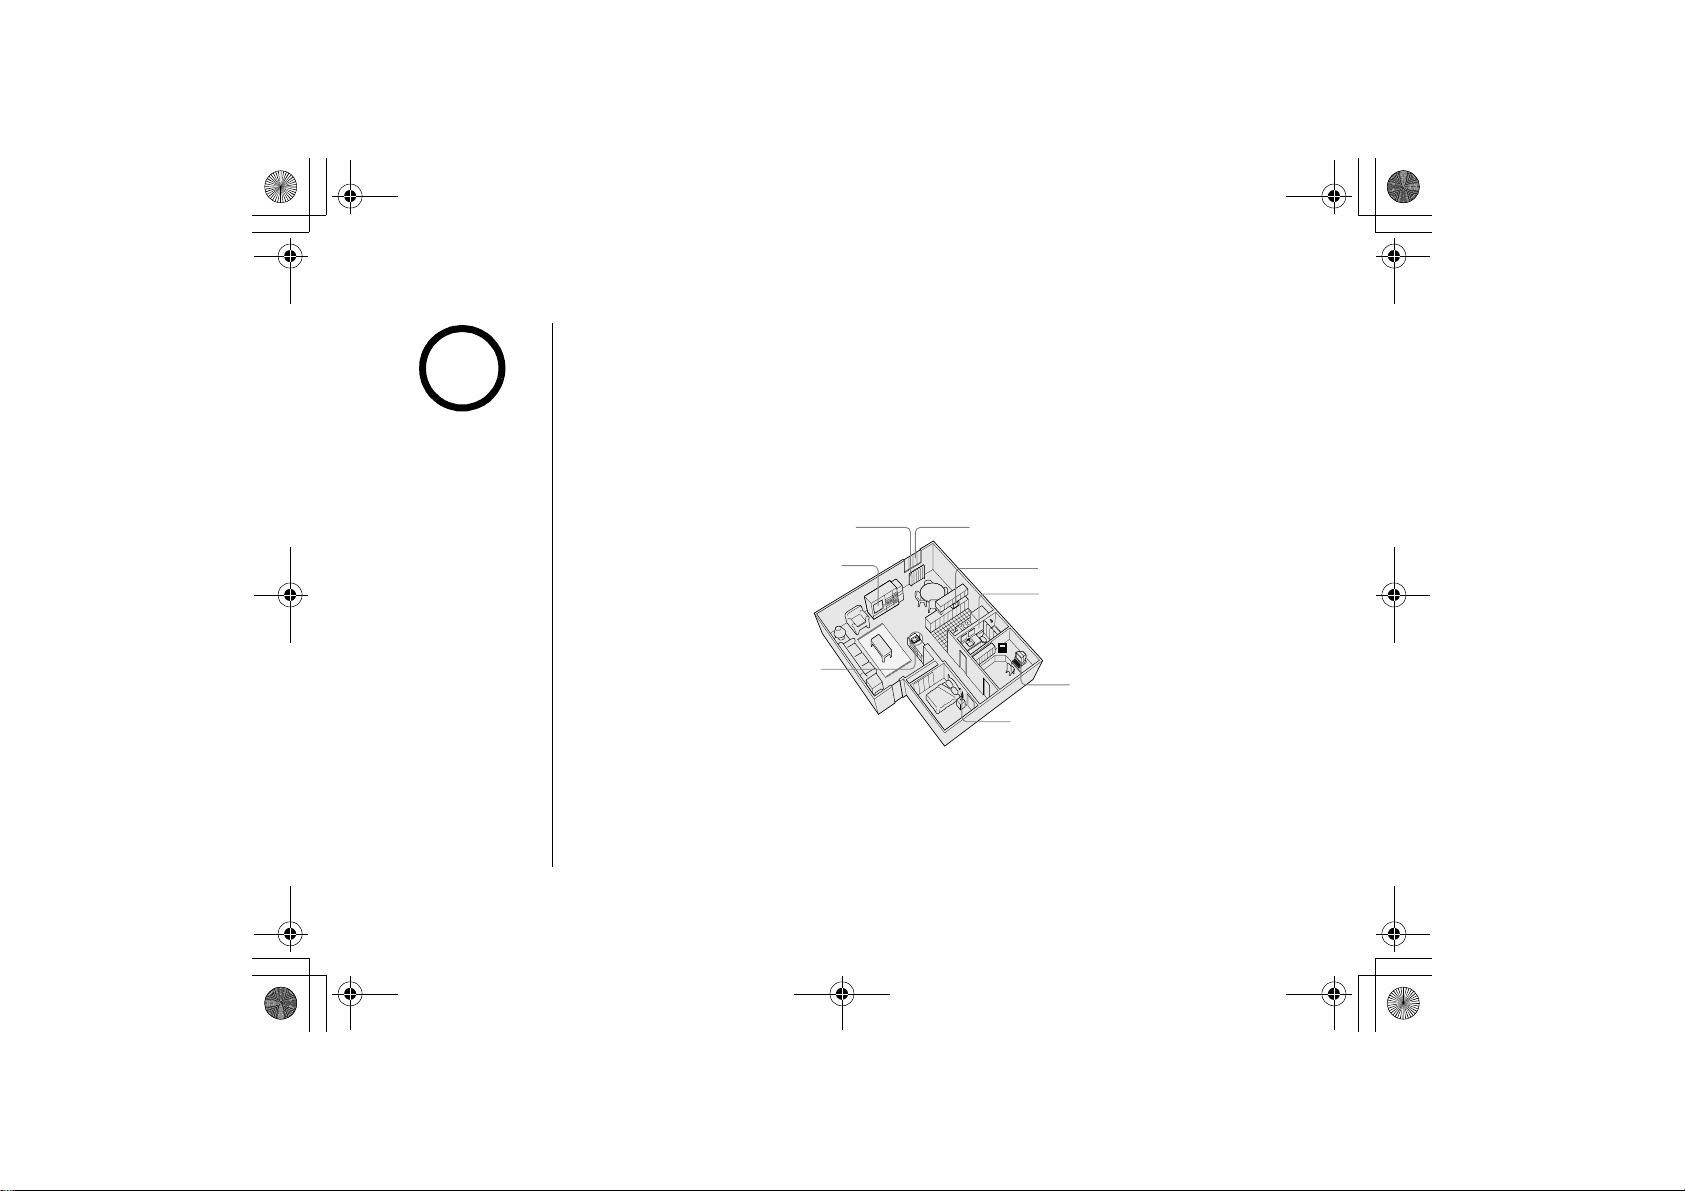
Note:Illustrations in this manual are used for explanatio
illustrations in this manual may differ from the actual uni
cordless phone may vary.
As an Energy Star Partner, Uniden has determined that this product or product
models meets the Energy Star
Energy Star
• 2.4GHz Extended Range Technology
• 3 Line Backlit Display
• Caller ID and Caller ID on Call Waiting
• Integrated Telephone Answering Device
(ITAD)
• Trilingual Voice Prompts (English, French
or Spanish Support)
• 10 Number Memory Dialing
• One touch RocketDial®
Be sure to visit our web site: www.uniden.com
Uniden® and RocketDial® are registered trademarks of Uniden Ameri
AutoTalk, AutoStandby, UltraClear Plus, Random Code, and Au
Uniden America Corporation.
is a U.S. registered mark.
guidelines for energy efficiency.
or reliability, long life, and outstanding
n purposes. Some
• Last Number Redial
• English, French or Spanish Support
• Pulse/Tone Dialing
•Find Handset
• Earpiece Volume Control
•Ringer Volume Control
• Hearing Aid Compatible
• 20 Channel Autoscan
toSecure are trademarks of
e and answering system. This
t. The color of your
ca Corporation.
www.uniden.com
[2]
EXAI7248.book 3 ページ 2004年1月1
2日 月曜日 午後5時13分
Controls and Functions
1
2
3
4
Retrieve TAD message
with Handset Remote keys
Repeat
Delete
5
6
7
8
9
10
11
Play
Skip
Stop
12
13
14
15
16
17
18
19
1. Handset antenna
2. Jack for optional headset
3. Beltclip hole
4. Handset battery compartment
5. Handset earpiece
6. LCD display
7. caller id/menu key (pages 11 and 25)
8. / /vol/ (earpiece volume, ringer
volume and scroll) key (pages 11, 14 and
16)
/tone/←
9.
*
(pages 17 and 20)
key (left cursor) key
10. redial/pause key (pages 16 and 22)
11. select/remote key (pages 11 and 48)
12. Rocketdial key (page 19)
13. talk/flash key (pages 15 and 18)
14. end key (pages 15 and 16)
15. #/→ (right cursor) key (page 20)
16. memory key (page 20)
17. delete/channel key (pages 17, 20 and 27)
18. Handset microphone and ringer speaker
19. Handset charging contacts
CONTROLS & FUNCTIONS
[3] CONTROLS & FUNCTIONS
www.uniden.com
EXAI7248.book 4 ページ 2004年1月1
20
23
24
25
26
27
28
2日 月曜日 午後5時13分
Terms Used in this Manual
• Standby Mode - The handset may be sitting in or off the ba
not been pressed and there is no dial tone.
• Talk Mode - The handset is off the base and the
• CID - Caller ID
• CIDCW - Caller ID on Call Waiting
• RocketDial - One touch speed dial
talk/flash key has been pressed, enabling a dial tone.
20. Telephone line jack
21. DC IN 9V jack
22. Base antenna
21
23. Base speaker
24. (repeat/rewind) key (page 41)
25. memo rec (record) key (page 44)
26. menu/clock key (pages 31 and 32)
22
27. ringer key (page 39)
28. Base charging contacts
29. charge in use LED
30. (play/stop) key (pages 39 and 40)
31. (skip/fast forward) key (page 42)
29
32. (delete) key (page 43)
30
31
33. greeting key (page 38)
32
34. answer on/off key (page 30)
33
35. set key (page 31)
34
36. find hs (handset) key (pages 18 and 50)
35
36
37. / /volume/select keys (pages 31 and 39)
37
38. mic (microphone)
38
se, but is NOT in use. The
talk/flash key has
CONTROLS & FUNCTIONS
www.uniden.com
CONTROLS & FUNCTIONS [ 4 ]
EXAI7248.book 5 ページ 2004年1月1
Installing the Phone
note
If your home has
specially wired alarm
equipment connected to
the telephone line, be
sure that installing the
system does not disable
your alarm equipment.
If you have questions
about what will disable
your alarm equipment,
contact your telephone
company or a qualified
installer.
Do the following steps:
A. Choose the Best Location
B. Install the Rechargeable Battery Pack into the Handset
C. Connect the Base Unit and Charge the Handset
D. Mount the Base Unit on a Wall
A. Choose the Best Location
When choosing a location for your new phone, here are some importan
consider:
Avoid heat sources, such as radiators,
air ducts, and sunlight
Avoid television sets and other
electronic equipment
Choose a central location
2日 月曜日 午後5時13分
GETTING STARTED
t guidelines you should
Avoid noise sources such as a window by
a street with heavy traffic
Avoid microwave ovens
Avoid excessive moisture,
extremely low temperatures, dust,
mechanical vibration, or shock
Avoid personal computers
Avoid other cordless telephones
• The location should be close to both a phone jack and a co
• The base and handset should be kept away from sources of elec
• The base can be placed on a desk, tabletop, or mounted on
• There should be enough space to fully extend the antenna.
[5] GETTING STARTED
which is not connected to a switch).
ntinuous power outlet (one
trical noise such as motors,
microwave ovens, and fluorescent lighting.
a standard wall plate.
www.uniden.com
EXAI7248.book 6 ページ 2004年1月1
2日 月曜日 午後5時13分
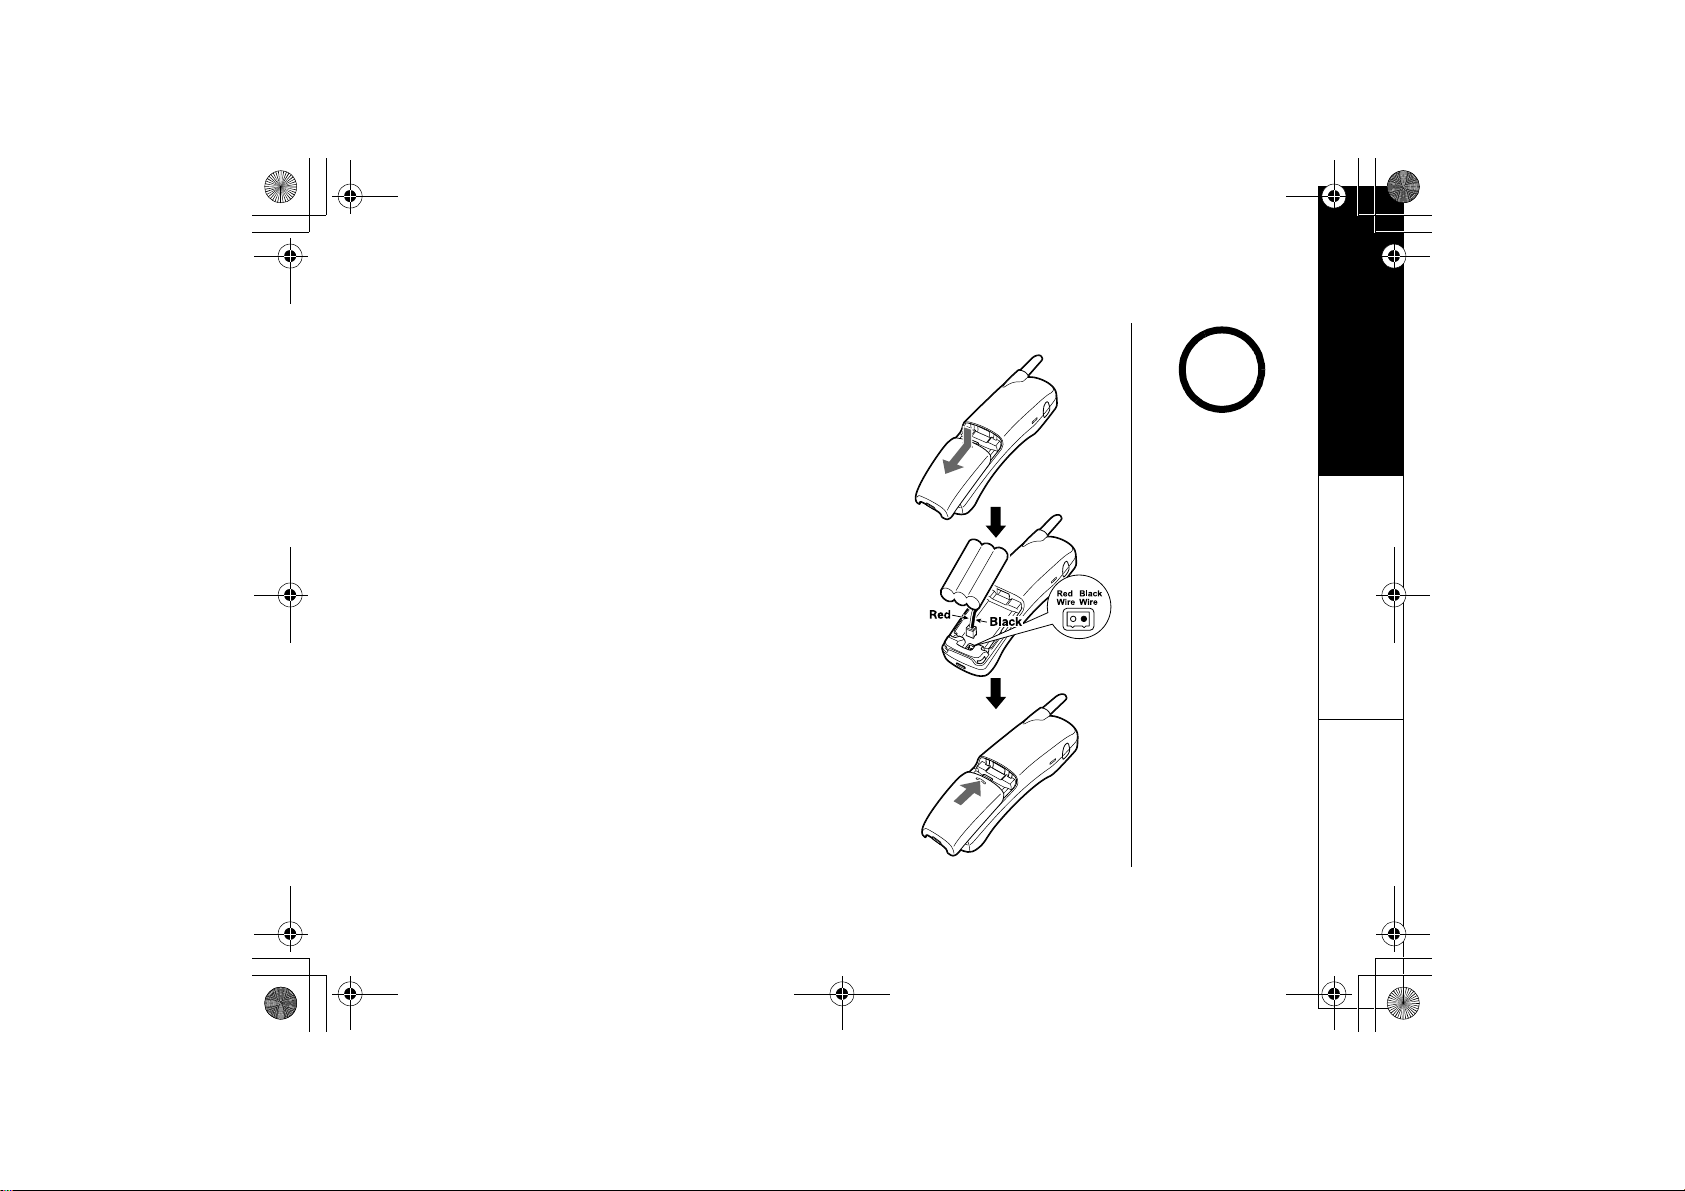
B. Install the Rechargeable Battery Pack into the Handset
The handset is powered by a rechargeable battery pack. The
battery recharges automatically when the handset is placed in
the base unit.
GETTING STARTED
!
1) Press down on the handset battery case cover (use the
finger indention for a better grip) and slide the cover
downward to remove.
2) Plug the battery pack connector (red & black wires) into the
jack inside the battery compartment.
(The connector notches fit into the grooves of the jack only
one way.) Match the wire colors to the polarity label in th
battery compartment, connect the battery and listen for a
click to insure connection.
3) Make sure you have a good connection by slightly pulling on
the battery wires. If the connection is secure, the battery
jack will remain in place.
4) Place the battery case cover back in the handset by sliding
it upwards until it clicks into place.
www.uniden.com
•Use only the Uniden
(BT-905)
rechargeable battery
pack supplied with
your cordless
telephone.
e
•Replacement batteries
are also available
through the Uniden
Parts Department at
(800) 554-3988,
Monday through Friday
from 8:00 a.m. to 5:00
p.m. or online at
www.uniden.com
GETTING STARTED [6]
EXAI7248.book 7 ページ 2004年1月1
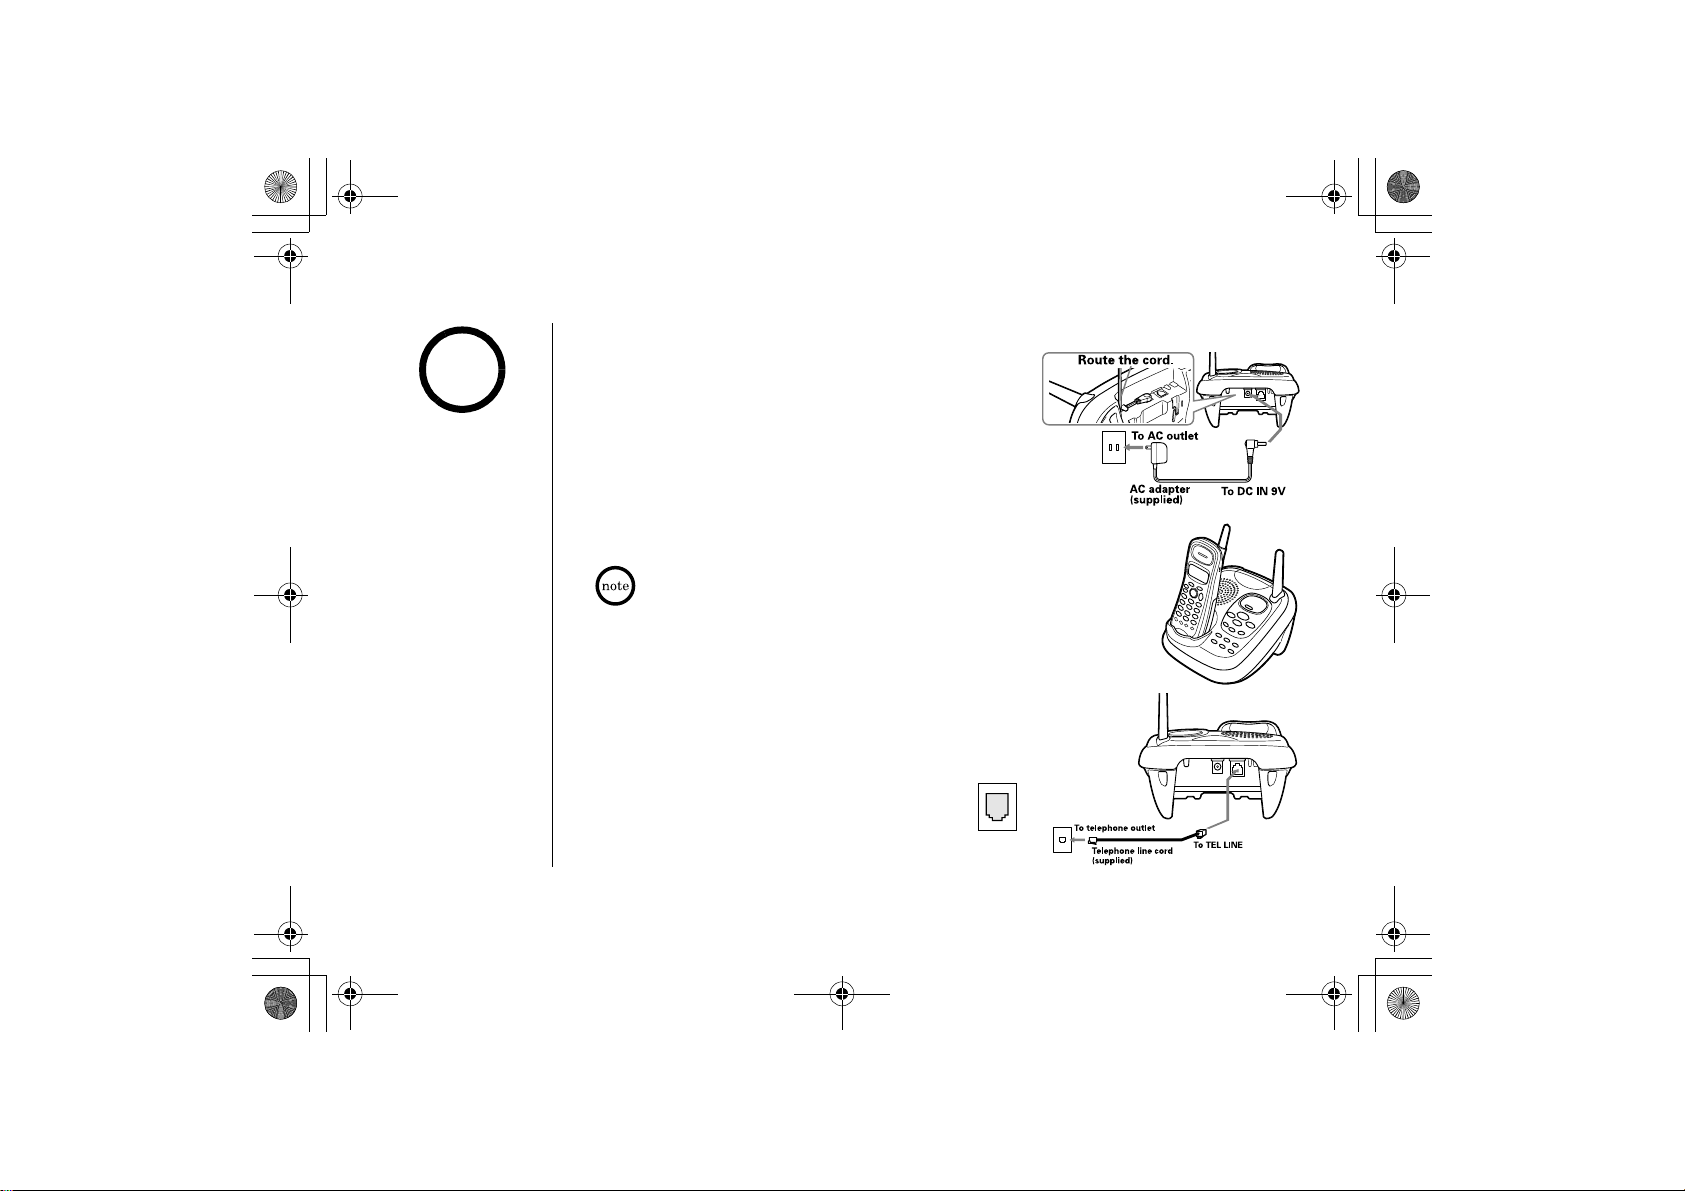
C. Connect the Base Unit and Charge the Handset
1) Connect the AC adapter to the
!
•Use only the supplied
AD-314 AC adapter.
Do not use any other
AC adapter.
•Do not place the power
cord where it creates a
trip hazard or where it
could become chafed
and create a fire or
electrical hazard.
standard 120V AC wall outlet.
2) Place the handset in the base unit with the keypad
facing forward.
3) Make sure the charge in use
If the LED does not illuminate, check to see that the
AC adapter is plugged in and the handset makes good
contact with the base charging contacts.
• Connect the AC adapter to a continuous power su
• Place the base unit close to the AC outlet so tha
4) Charge your handset at least 15-20 hours before
plugging into the phone line.
5) Once the handset battery pack is fully
charged, connect the telephone line cord to
the TEL LINE
If your telephone outlet isn't modular,
contact your telephone company for
assistance.
2日 月曜日 午後5時13分
LED illuminates.
the AC adapter easily.
jack and a telephone outlet.
GETTING STARTED
DC IN 9V jack and to a
pply.
t you can unplug
[7] GETTING STARTED
Modular
www.uniden.com
EXAI7248.book 8 ページ 2004年1月1
2日 月曜日 午後5時13分
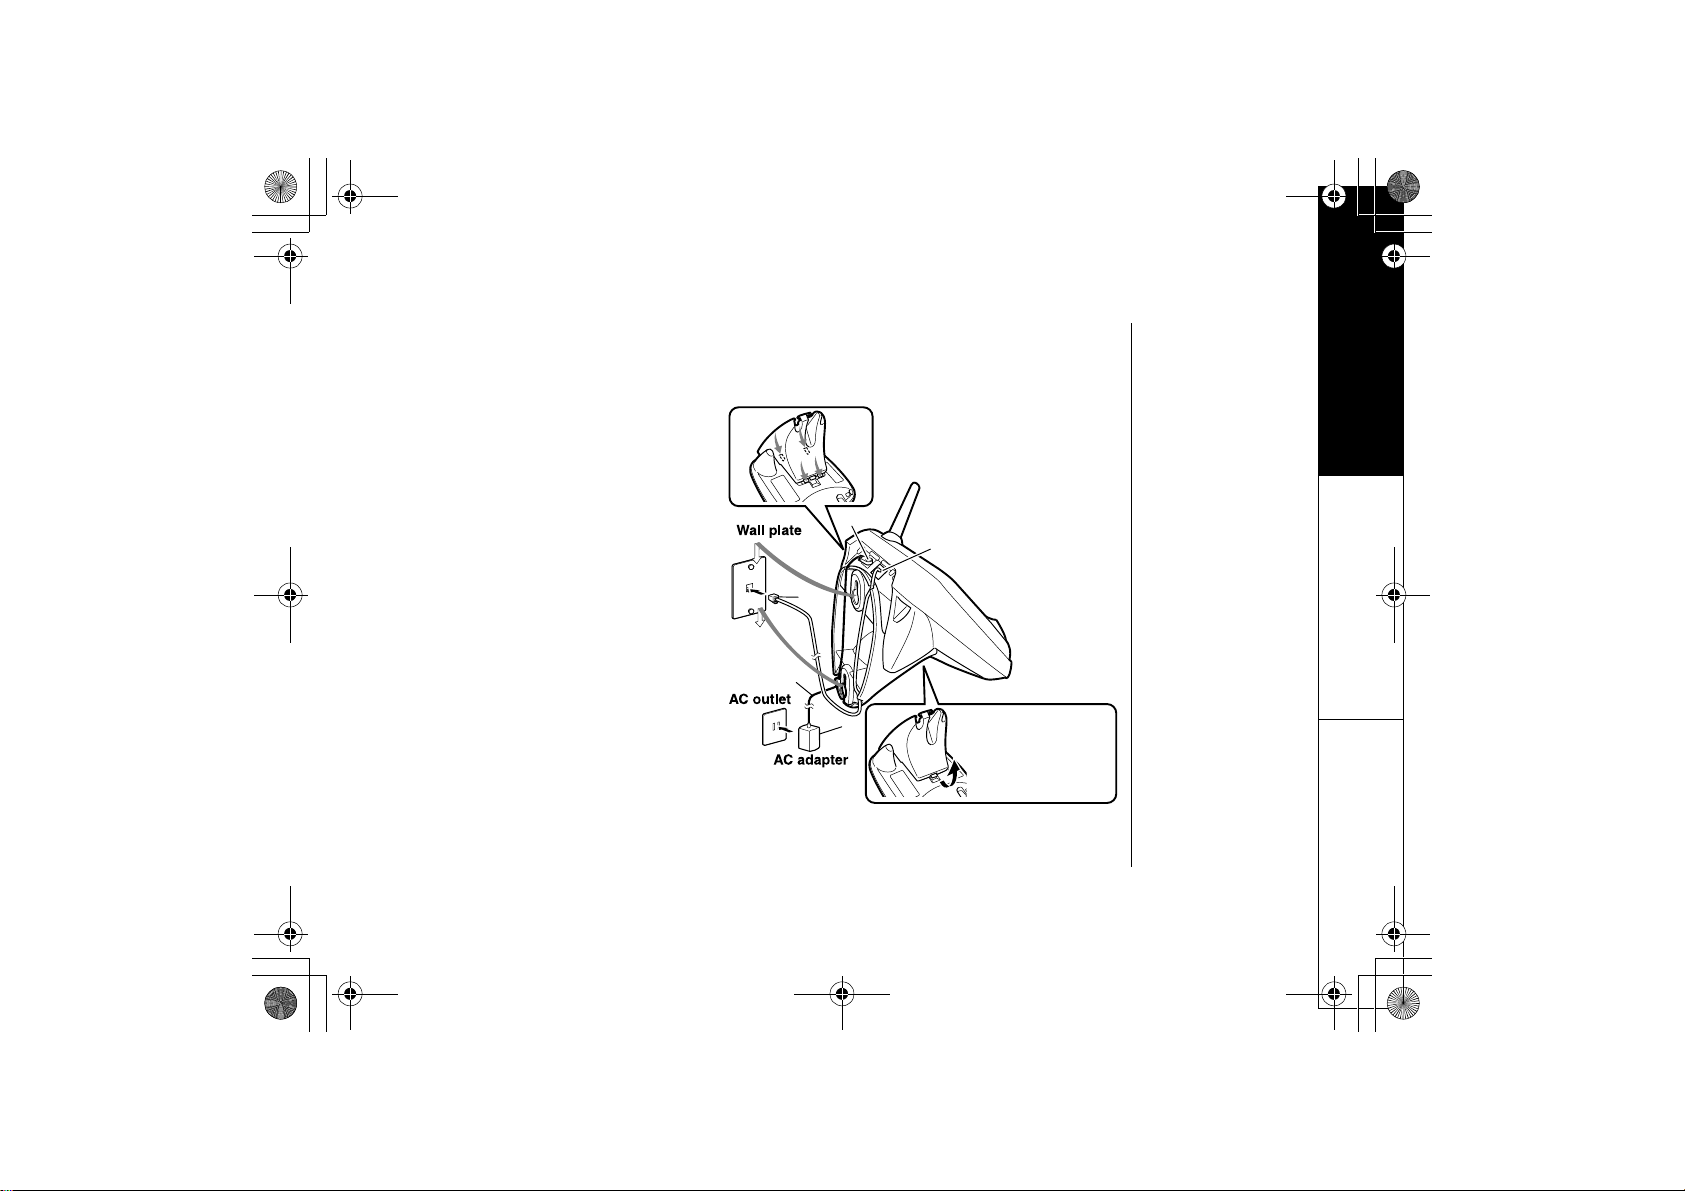
D. Mount the Base Unit on a Wall
Standard wall plate mounting
This phone can be mounted on any standard wall plate.
1) Locate the base unit on the wall
mount adapter as shown and slide
the wall mount adapter into the
notches on the base bottom.
2) Plug the AC adapter to the
jack.
3) Route the AC adapter cord through
the molded wiring channel as shown.
4) Plug the AC adapter into a standard
120V AC wall outlet.
5) Plug the telephone line cord into the
TEL LINE jack. Route the cord
through the molded wiring channel
as shown.
6) Plug the telephone line cord into the
telephone outlet.
7) Align the mounting slots on the base
with the mounting posts on the wall.
Then push in and down until the
phone is firmly seated.
DC IN 9V
GETTING STARTED
1
2
5
7
6
7
3
4
To remove, push up
a tab on the wall
mount adapter as
shown.
www.uniden.com
GETTING STARTED [8]
EXAI7248.book 9 ページ 2004年1月1
Direct wall mounting
If you don't have a standard wall plate, you can mount your ph
directly to the wall. Before doing this, consider the following:
• Avoid electrical cables, pipes, or other items behind the mounting
location that could cause a hazard when inserting screws in
wall.
• Try to mount your phone within 5 feet of a working phone j
avoid excessive cord lengths.
• Make sure the wall material is capable of supporting the wei
the base and handset.
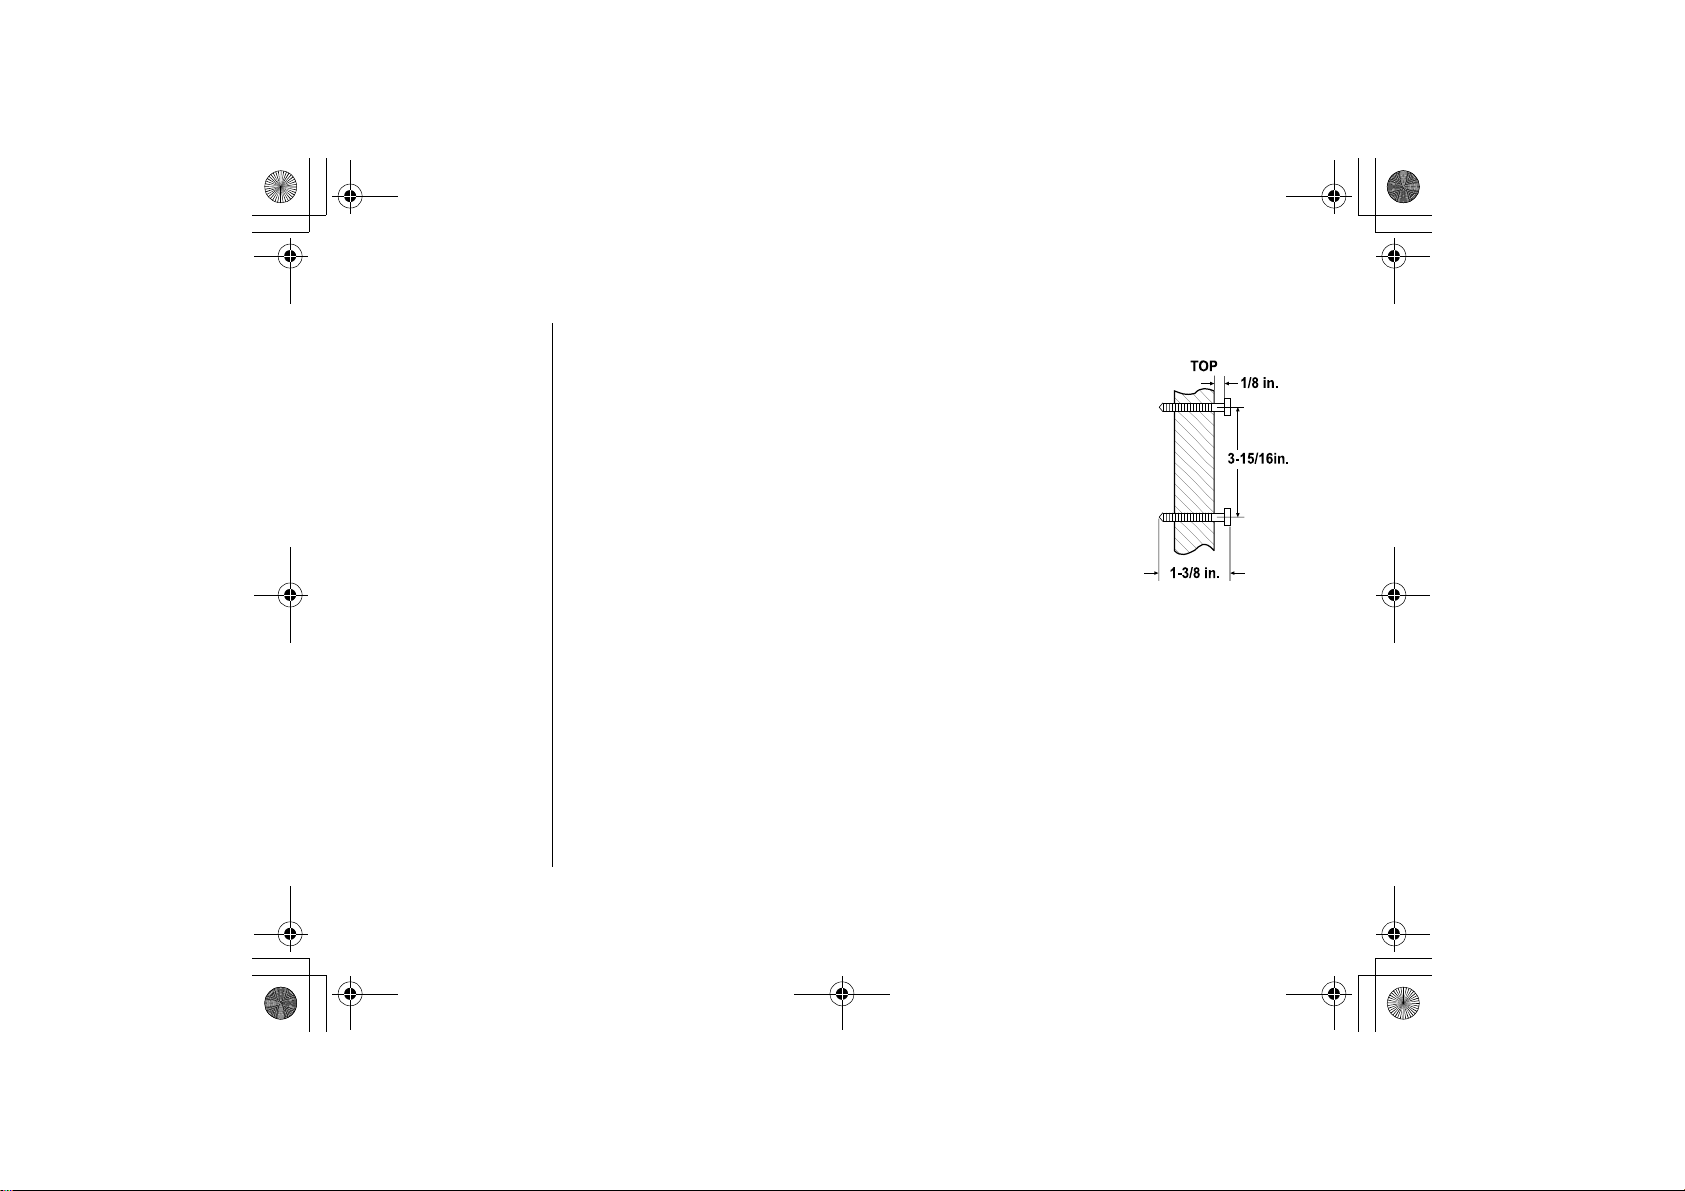
• Use #10 screws (minimum length of 1-3/8 inches) with an
devices suitable for the wall material where the base unit will be
placed.
2日 月曜日 午後5時13分
GETTING STARTED
one
to the
ack to
ght of
choring
1) Insert two mounting screws into the wall, (with their appr
2) Refer to step 1 through 7 on page 8 to mount the telephone.
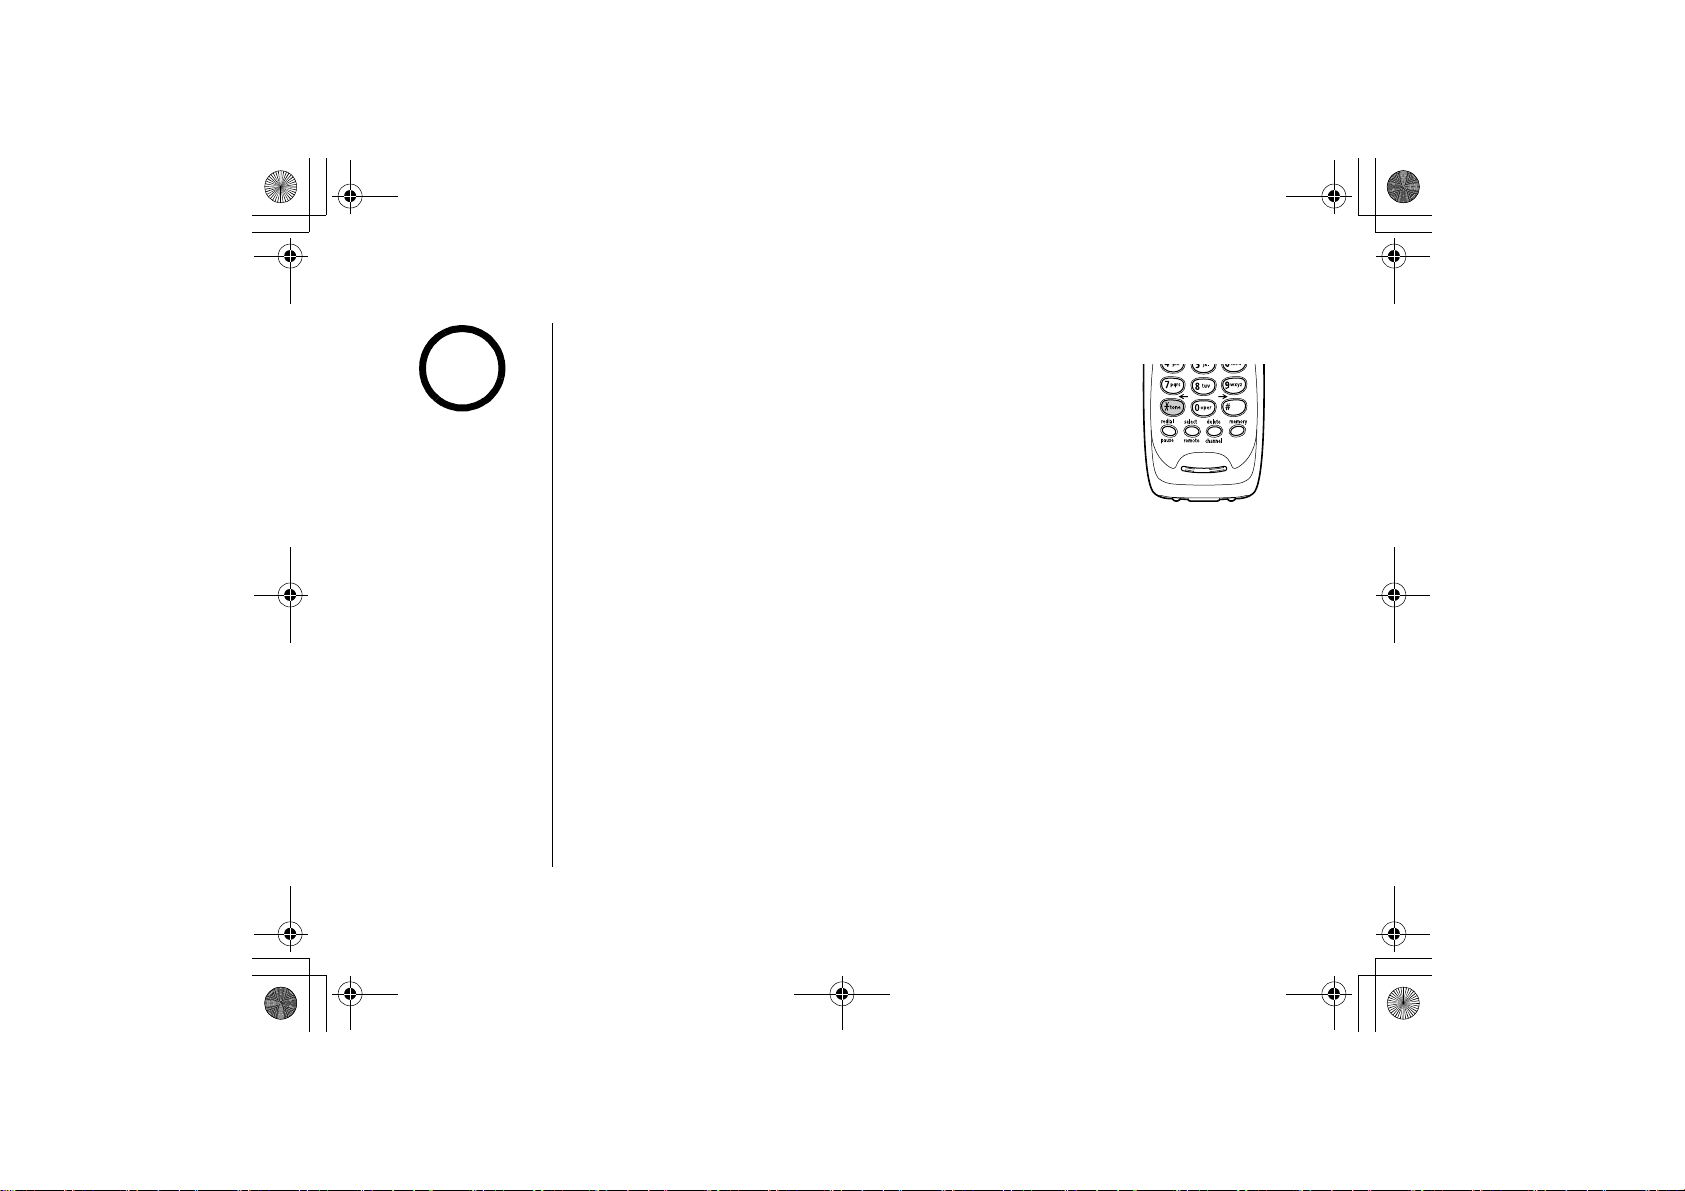
Installing the Beltclip
To attach the beltclip
Insert the beltclip into the holes on each side of the handset. Press d
To remove the beltclip
Pull both sides of the beltclip to release the tabs from the holes.
[9] GETTING STARTED
15/16 inches apart. Allow about 1/8 of an inch between the wa
opriate anchoring device), 3-
mounting the phone.
ll and screw heads for
own until it clicks.
www.uniden.com
EXAI7248.book 10 ページ 2004年1月12日
月曜日 午後5時13分
Headset Installation
Your phone may be used with an optional headset, the Uniden
To use this feature, insert the headset plug into the headset jack.
Your phone is ready for hands-free conversations.
(Headset may be purchased by calling the Uniden Parts Department or
visiting the web site. See page 53.)
GETTING STARTED
HS910.
www.uniden.com
GETTING STARTED [10]
EXAI7248.book 11 ページ 2004年1月12日
Basic Setup
There are five basic options that you will need to set up: AutoT
Waiting), Area Code, Dial Mode and Language.
Activating AutoTalk
AutoTalk allows you to answer the phone simply by removing th
do not have to press any keys.
月曜日 午後5時13分
GETTING STARTED
alk, CIDCW (Caller ID on Call
e handset from the base. You
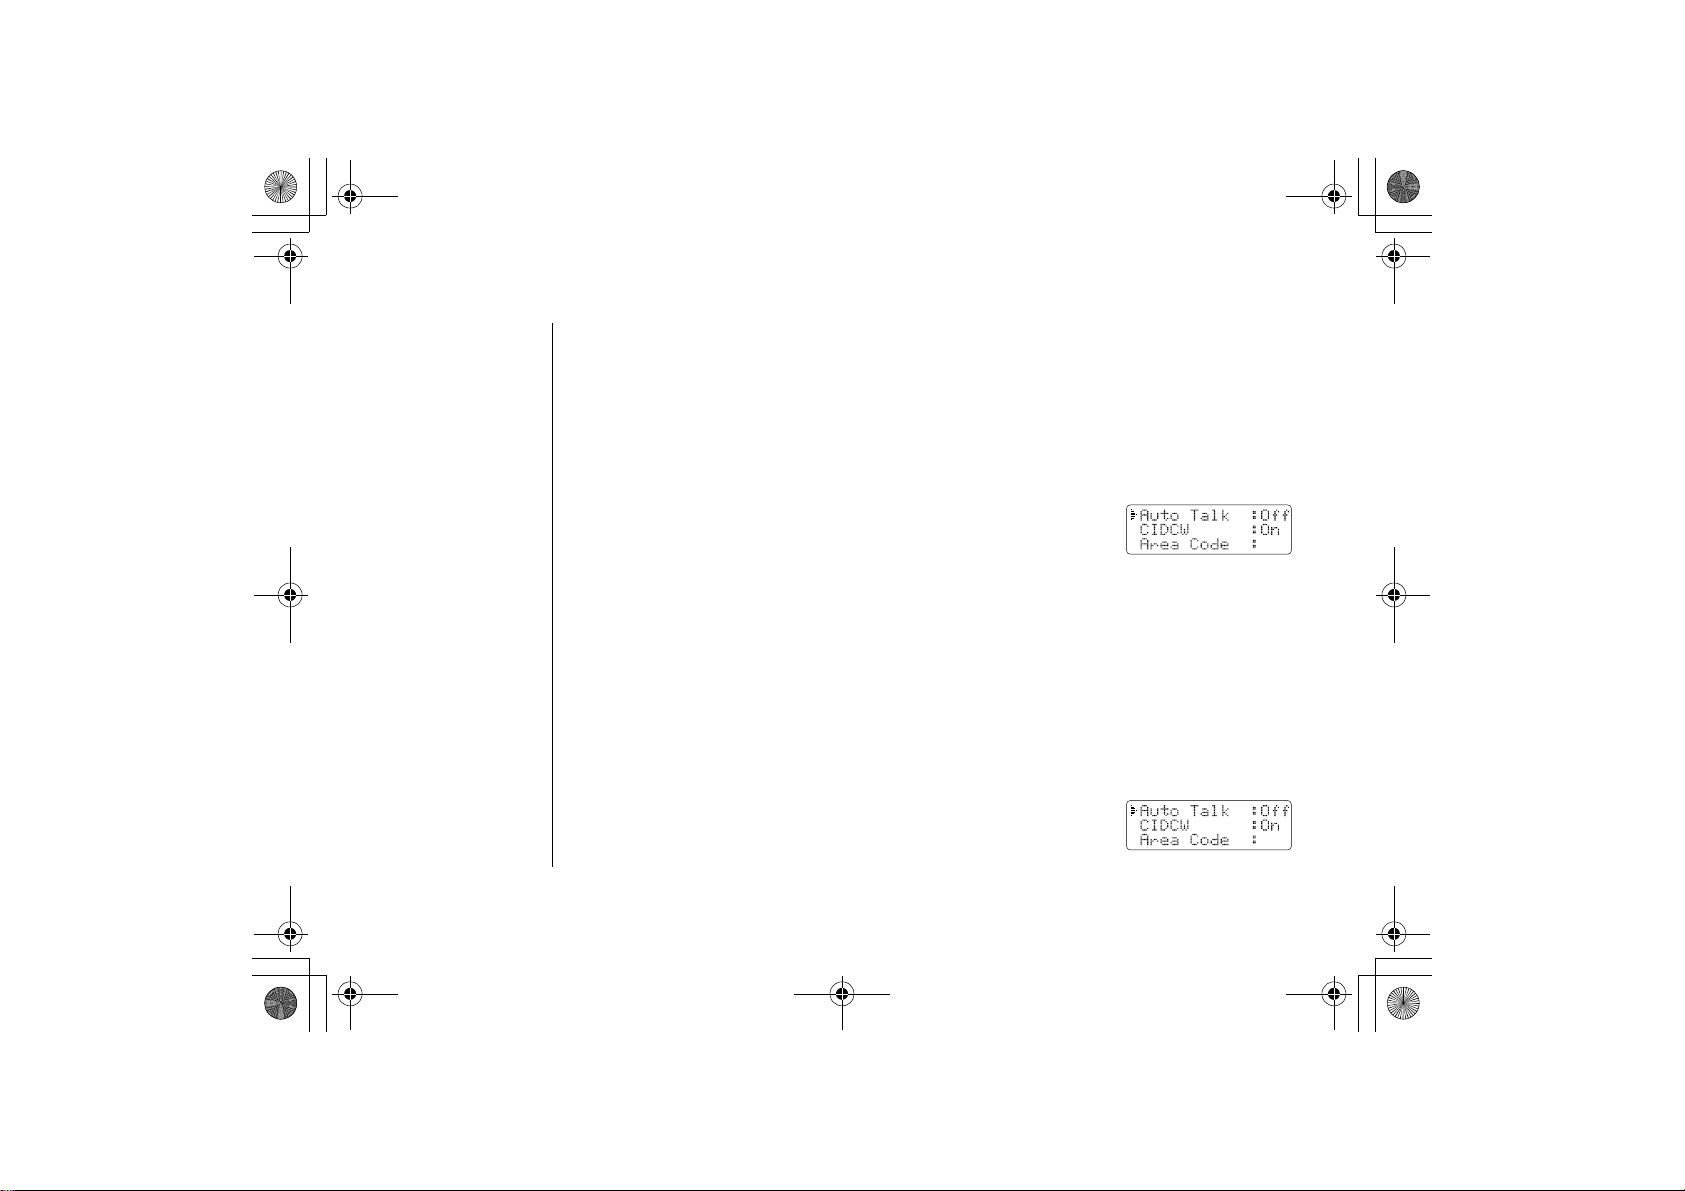
1) When the phone is in standby mode, press and hold the caller id/
menu
2) Press the
3) Press the
Activating Caller ID on Call Waiting
Caller ID allows you to see the name and number of the calling
phone. Caller ID on Call Waiting (CIDCW) lets you see th
comes in when you are on the line.
You must subscribe to Caller ID service throug
feature.
1) When the phone is in standby mode, press and hold the caller id/
menu
[11] GETTING STARTED
key. The following screen appears.
select/remote
end key to complete the setting. The handset returns to standb
key. The following screen appears.
key to turn AutoTalk on.
party before you answer the
e name and number of a call that
h your local telephone provider to use this
y mode.
www.uniden.com

EXAI7248.book 12 ページ 2004年1月12日
月曜日 午後5時13分
GETTING STARTED
2) Press the
/vol/
3) Press the select/remote
key to select
CIDCW
.
key to toggle and turn on Caller ID on Call
Waiting.
4) Press the
end key and return the handset to the base unit to complete th
handset returns to standby mode.
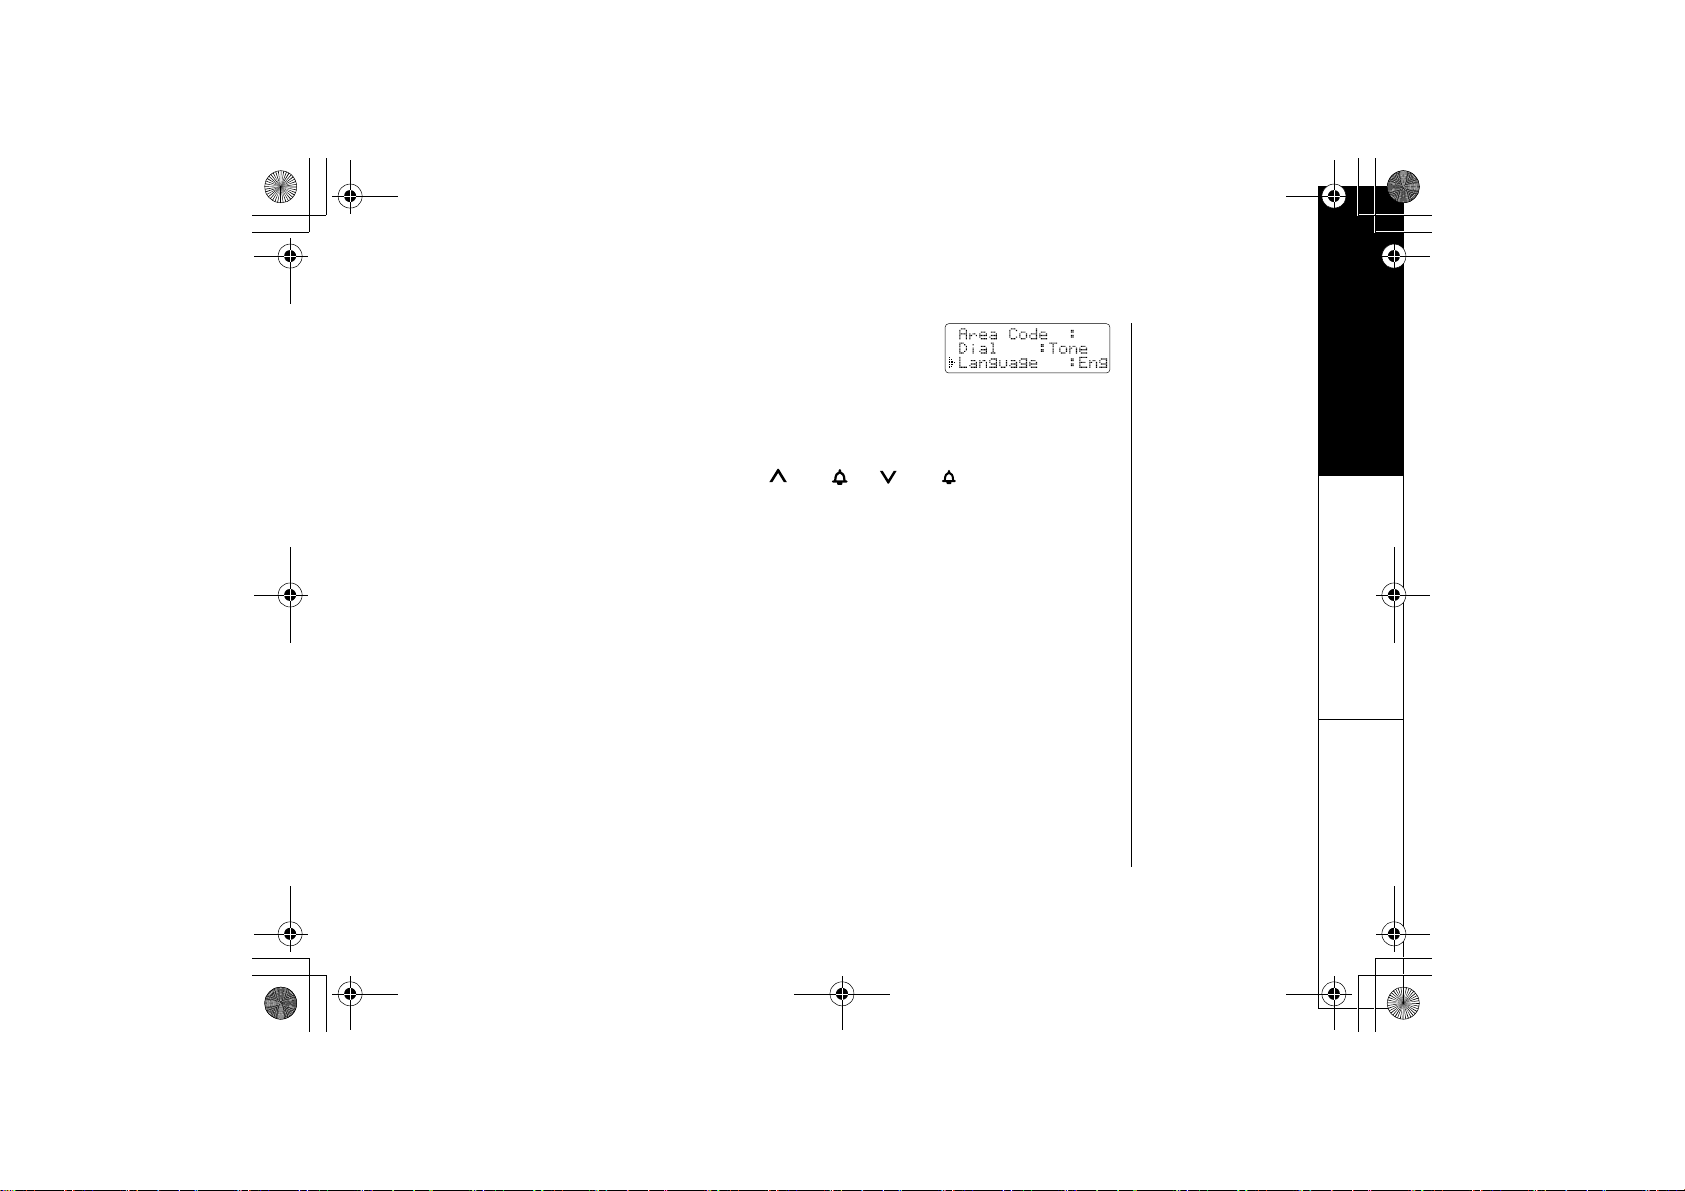
Entering Your Area Code
If you enter a 3-digit area code number in the
appear in Caller ID messages. Do not program this option if your c
dialing. When reviewing Caller ID messages, you will see only th
calls received from outside your local area
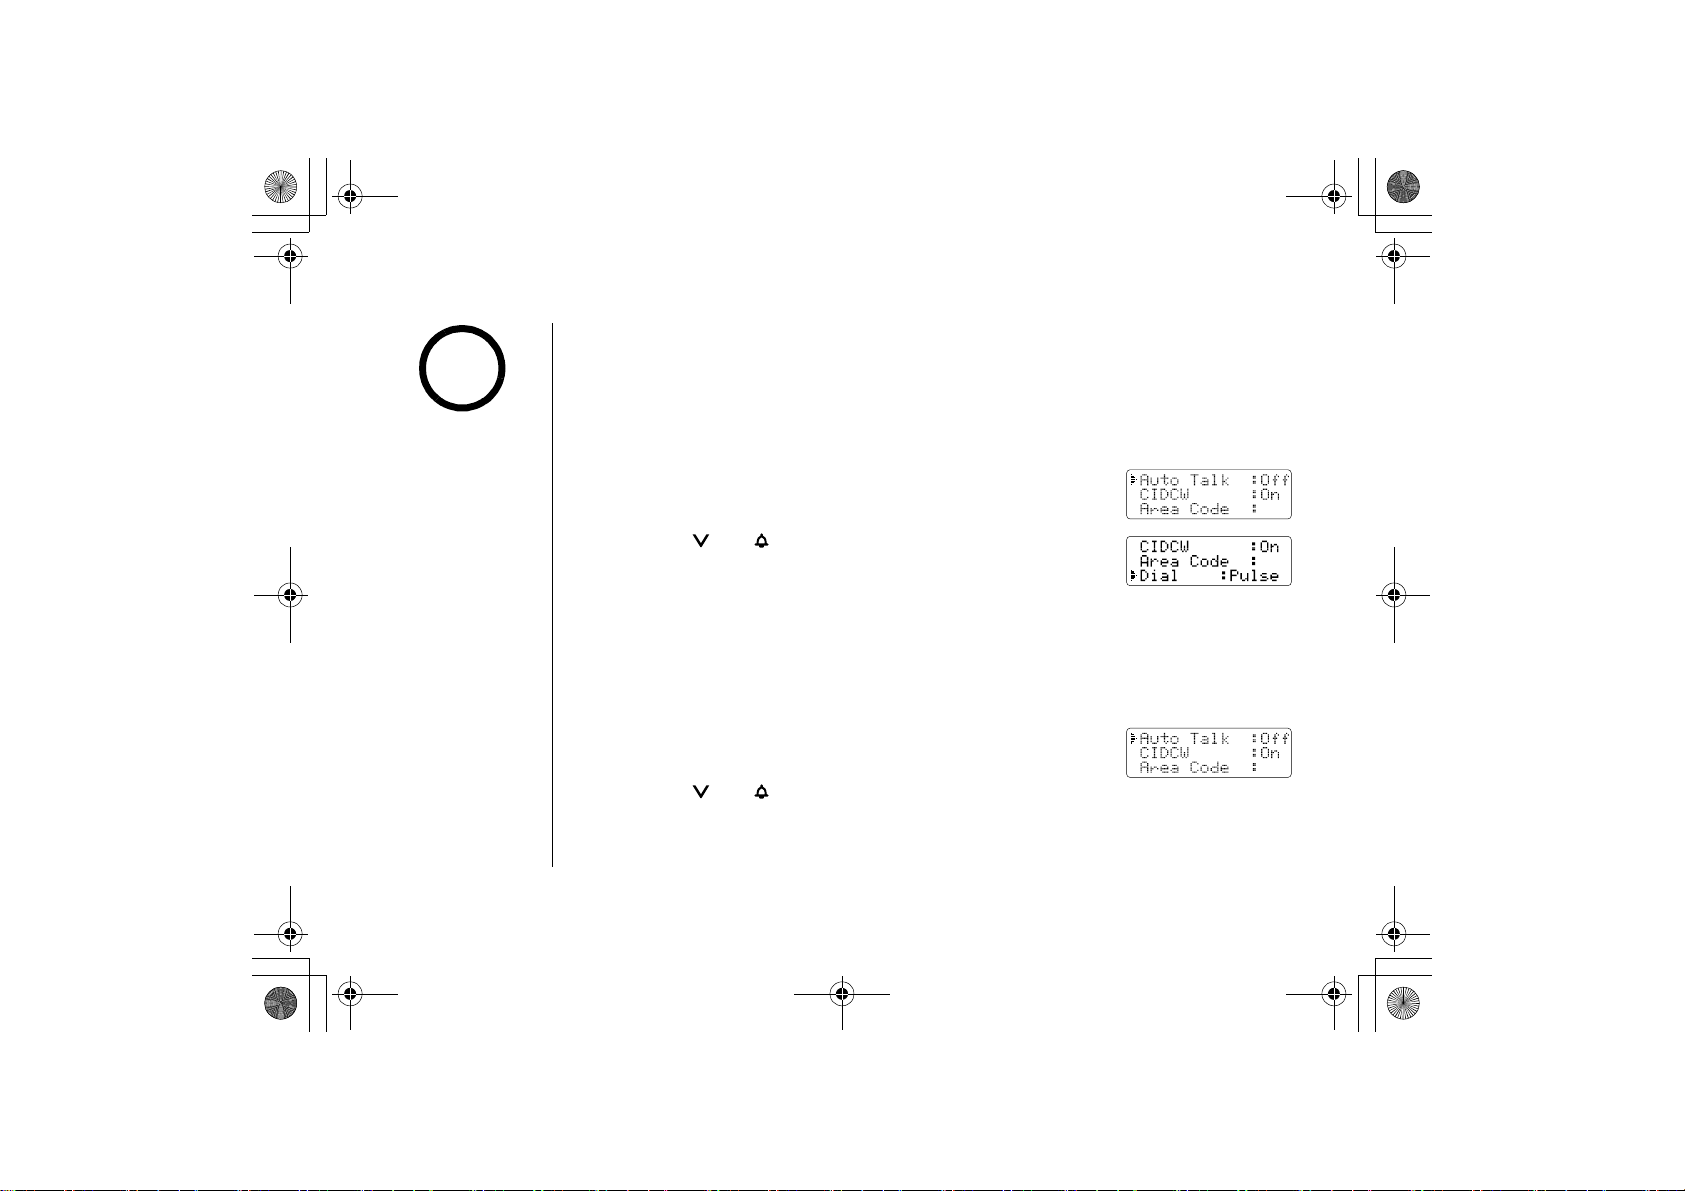
1) When the phone is in standby mode, press and hold the
menu key. The following screen appears.
2) Press the
3) Press the
/vol/
select/remote
key twice to select
key. If an area code was already stored,
the phone will display it.
4) Use the number keys
make an error, use the
5) Press the
select/remote
(0 - 9) to enter the 3-digit area code. If you
delete/channel
key. A confirmation tone sounds.
Area Code
option, your local area code does not
e local seven digit number. For
code, you will see a full 10-digit number.
caller id/
Area Code
.
key to backspace.
e setting. The
alling area requires 10-digit
www.uniden.com
GETTING STARTED [12]
EXAI7248.book 13 ページ 2004年1月12日
月曜日 午後5時13分
GETTING STARTED
note
•If you are not sure of
your dialing system,
make a trial call. If the
call connects, leave
the setting as is.
Otherwise, set for
pulse dialing.
•If your phone system
requires pulse dialing
and you need to send
DTMF tones during a
call, you can
temporarily switch
over to tone dialing.
(Refer to “Tone Dialing
Switch-over” on
page 17.)
6) Press the
end key to complete the setting. The handset returns to standby m
Choosing the Dialing Mode
Most phone systems use tone dialing. However some phone sys
still use pulse dialing. Your Uniden phone supports both tone a
setting is tone dialing. If your phone system uses pulse dialing,
change the dialing mode:
1) When the phone is in standby mode, press and hold the call
key. The following screen appears.
menu
2) Press the /
3) Press the
4) Press the
vol/ key three times to select
select/remote
key to set the phone to pulse dialing.
Dial
.
end key to complete the setting. The handset returns to
standby mode.
tems (such as in rural areas)
nd pulse dialing. The default
follow the steps below to
er id/
Setting the Language
There are three languages to choose from; English, French and Spani
1) When the phone is in standby mode, press and hold the call
key. The following screen appears.
menu
2) Press the /
vol/ key four times to select
Language
er id/
.
ode.
sh.
[13] GETTING STARTED
www.uniden.com
EXAI7248.book 14 ページ 2004年1月12日
月曜日 午後5時13分
GETTING STARTED
3) Press the
select/remote
4) Press the end
key to complete the setting. The handset returns to
key to select
Eng, Fr.
or
Esp.
standby mode.
Selecting the Ring Tone and Volume
Your phone has five different
1) With the phone in standby mode, press the
2) The phone will sound the different ring tones at different volume
3) When the phone sounds the ring tone and volume you wish to us
ringer tone/volume combinations you can choose from.
/vol/
or /vol/
key.
s.
e, press the end
key.
www.uniden.com
GETTING STARTED [14]
EXAI7248.book 15 ページ 2004年1月12日
Using Your Phone
Making and Receiving Calls
Making a call
1) Remove the handset from the base.
2) Press the
3) Listen for the dial tone.
4) Dial the number.
OR
1) Remove the handset from the base.
2) Dial the number.
3) Press the talk/flash
Receiving a call
1) Remove the handset from the base. (If AutoTalk is on, the ph
answer the call when you pick it up.)
2) Press the
note
Refer to page 11
"Basic Setup" to turn on
the AutoTalk feature if
desired.
OR
1) If the handset is off the base, press the
on.)
Hanging up
Press the end
月曜日 午後5時13分
talk/flash
talk/flash
key or return the handset to the base.
key.
key.
key.
talk/flash
BASICS
one will automatically
key or any number key. (AutoTalk is
[15] BASICS
www.uniden.com

EXAI7248.book 16 ページ 2004年1月12日
Redialing the last dialed number
1) Remove the handset from the base.
2) Press the talk/flash
3) Listen for the dial tone.
4) Press the redial/pause
OR
1) Remove the handset from the base.
2) Press the
3) Press the
redial/pause
talk/flash key.
key.
key.
key.
月曜日 午後5時13分
Adjusting the Earpiece Volume
To change the earpiece volume, press the
/vol/
key during a call.
Temporarily Mute Ringer
If the handset is off the base while an incoming call is ringing,
simply press the
The ringer will sound with the next incoming call.
www.uniden.com
end key to temporarily mute the incoming ring.
or /vol/
BASICS
BASICS [16]
EXAI7248.book 17 ページ 2004年1月12日
Tone Dialing Switch-over
note
The UltraClear PlusTM
true compander circuitry
virtually eliminates
background noise. This
innovative technology,
together with 20
different channels,
provides you with the
best possible reception
during all your
conversations.
If your telephone company requires pulse dialing, you can switc
over to tone dialing after the call connects. This feature is useful
when you need tone dialing to use any automated menu system
such as telephone bank tellers,
customer support menus, etc.
If your phone is set to pulse dialing mode, make your call
normally. Once your call connects, press the
digits you enter from then on wi
this particular call ends, the phone automatically returns to pulse di
Traveling Out-of-Range
During a call, as you begin to move your handset too far from y
increases. If you pass the range limits of the base unit, your call will t
minute.
Selecting a Different Channel
If you encounter interference while using your phone, you can
channel for clear operation. While using your phone, press the
appears on the display, indicating the phone is changing to anot
information on interference, refer to "Precautions" on pag
月曜日 午後5時13分
telephone prescription refills,
ll be sent as tone digits. When
/tone/←
*
h-
s,
key. Any
aling mode.
our base unit, noise
erminate within one
manually change the phone´s
delete/channel
her channel. For more
e 59.
key.
Scanning
BASICS
[17] BASICS
www.uniden.com

EXAI7248.book 18 ページ 2004年1月12日
月曜日 午後5時13分
Find Handset
To locate the handset, press the find hs
handset beeps for 60 seconds.
Paging is canceled when pressing any handset key, the
key on the base or the handset is returned to the base.
Paging is also canceled when the phone receives an incoming
call.
key on the base. The
Using Call Waiting
If you have Call Waiting service, you can receive calls while on
the line.
find hs
BASICS
You must subscribe through your local telephone company
service.
www.uniden.com
1) If a call comes in while you are on the phone, you will h
call waiting tone. If you have
CIDCW activated, you will see
the name and number of the incoming caller.
2) Press the
talk/flash key to accept the waiting call. After a
short pause, you will hear the new caller.
3) To return to the original caller, press the
talk/flash
key again.
to receive Call Waiting
ear a
BASICS [18]
EXAI7248.book 19 ページ 2004年1月12日
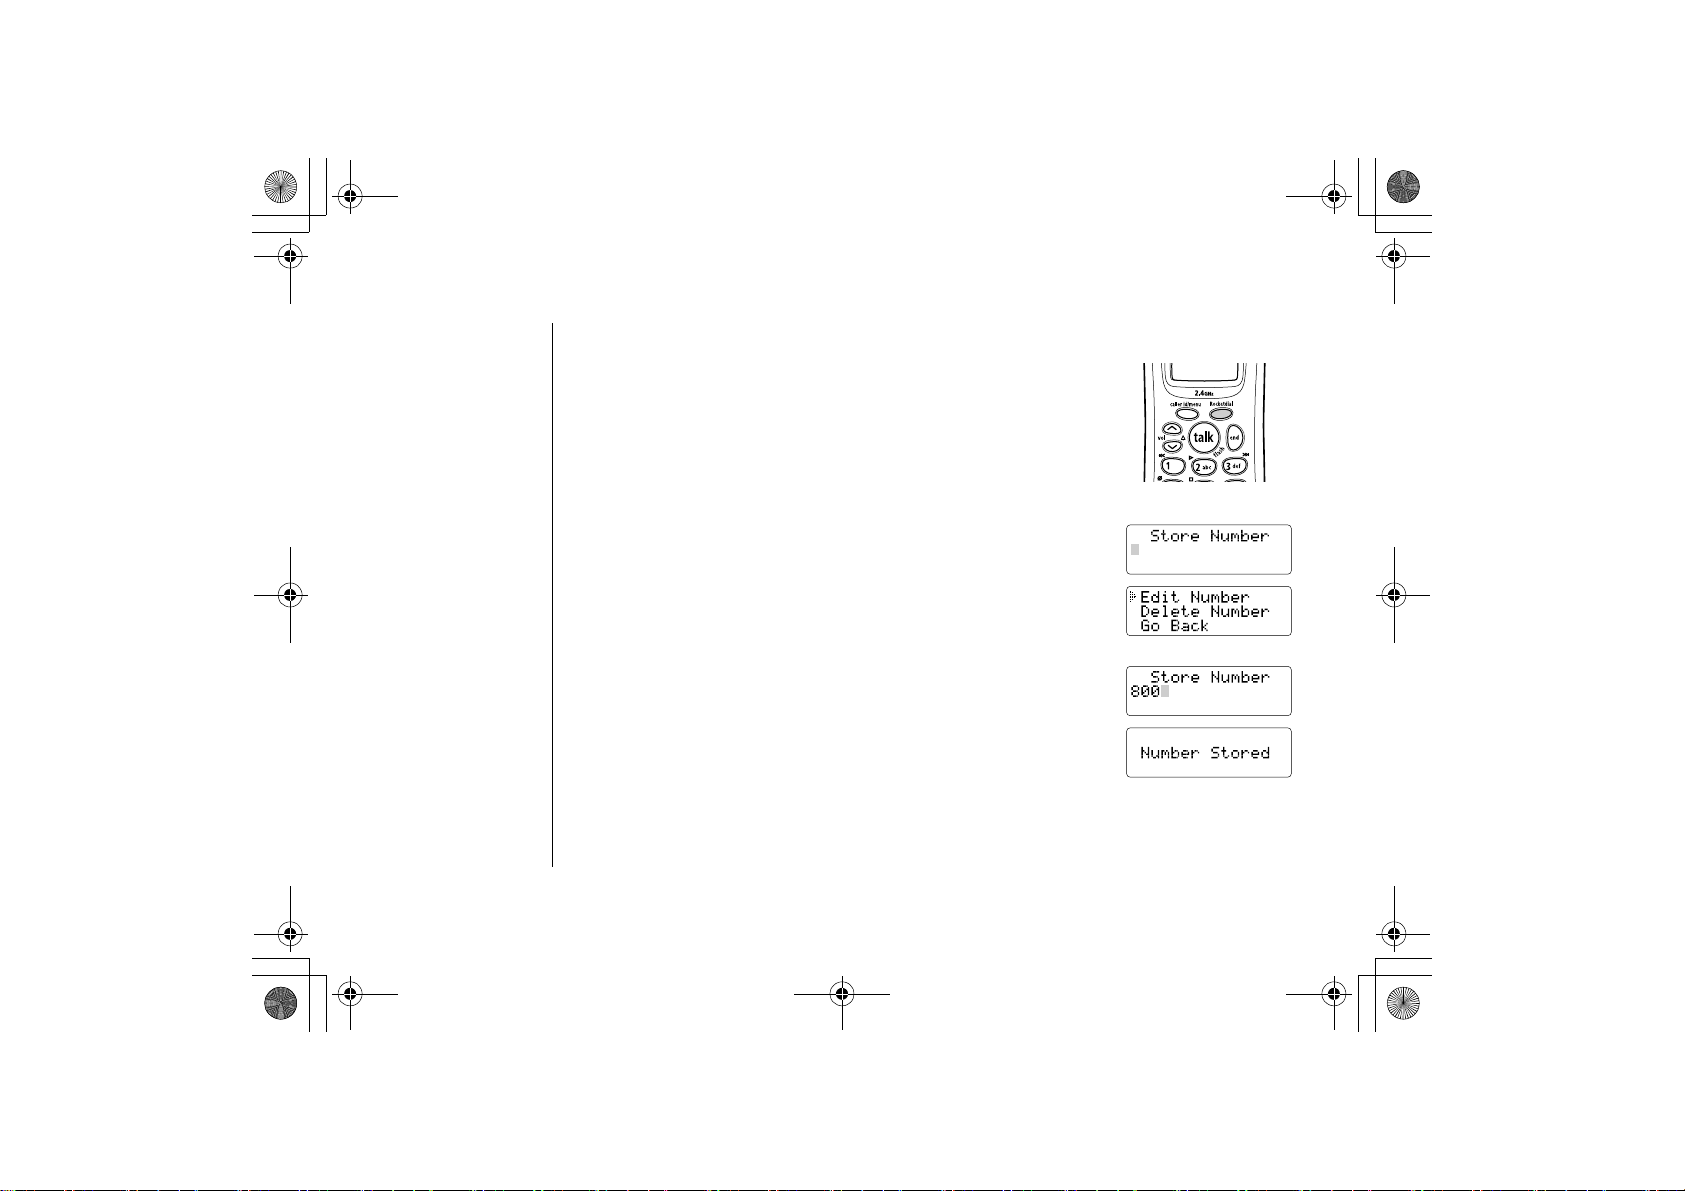
RocketDial
RocketDial is a one-touch speed dial key. Store your most
important or most frequently called number as your RocketDial
number. Then, simply press the Rocketdial
will automatically dial the number.
Storing the RocketDial
1) When the phone is in standby mode, press and hold the
Rocketdial
月曜日 午後5時13分
key, and your phone
key. The following display appears.
[19] ROCKETDIAL
If the RocketDial number is already programmed, the Edit screen
appears. You can select
erase this entry or select
to edit this entry, select
Go Back
to return to the standby mode.
Delete
Edit
2) Store the number by following step 6 under “Storing Name
Numbers in Speed Dial Memory” on page 20.
3) Press the
select/remote
You hear a confirmation tone, and
key.
Number Stored
appears.
Memory storage is complete.
to
s and
ROCKETDIAL
www.uniden.com

EXAI7248.book 20 ページ 2004年1月12日
月曜日 午後5時13分
Using the Speed Dial Memory
The speed dial memory allows you to store up to 10 names and
can dial these numbers with just a few key presses.
numbers in the handset. You
USING THE SPEED DIAL MEMORY
note
The speed dial memory is not limited to phone numbers. You can store
digits) that you need to enter once your call connects. This is
For example, you can save your bank account number to speed dial m
your bank's telephone teller service and are pr
press the memory
Then press the
key and the speed dial number where you stored your account n
select/remote
key.
ompted to enter your account number, simply
Storing Names and Numbers in Speed Dial Memory
1) With the phone in standby mode, press the
2) Enter
0-9 to select the speed dial number where you would like to
memory
store this entry. You can also scroll through the list with the
vol/
3)
Store Name
and /vol/
appears and a cursor flashes indicating that the
keys. Press the select/remote
display is ready for the name to be entered.
If the selected speed dial number is already assigned, the Edit
screen appears. You can select
Delete
to erase this entry, or select
Edit
to edit this entry, select
Go Back
speed dial number.
www.uniden.com
key.
key twice.
to choose another
referred to as Chain Dialing.
any number (up to 20
emory. When you call
umber.
When editing the speed
dial memory, you must
press a key within 30
seconds or the phone
will return to standby
mode. If you return the
handset to the base, the
phone will return to
standby mode also.
/
USING THE SPEED DIAL MEMORY [2
0]
 Loading...