

UH-042XR
Operating
Guide

➤ Do not operate the transmitter of any radio equipment unless all the Radio
Frequency (RF) connectors are secured and any open connectors are
properly terminated.
➤ Do not operate the transmitter of any radio equipment near electrical
blasting caps or in an explosive atmosphere.
➤ Do not let children operate any transmitter-equipped radio equipment unless
supervised.
➤ Have your radio equipment serviced by a qualified Uniden technician.
➤ Do not operate the transmitter of any radio equipment with the antenna
touching or close to the eyes, face, or exposed body parts.
The exclamation point within an equilateral triangle is
intended to alert the user to the presence of important
operating and maintenance (servicing) instructions in the
literature accompanying the appliance.
WARNING!

Introduction
Features . . . . . . . . . . . . . . . . . . . . . . . . . . . . . . . . . . . . . . . . . . . . . . . . 1
Technical Support & Service . . . . . . . . . . . . . . . . . . . . . . . . . . . . . . . . . . 2
Included in your UH-042XR Package . . . . . . . . . . . . . . . . . . . . . . . . . . . . 3
Getting Started
Battery Installation . . . . . . . . . . . . . . . . . . . . . . . . . . . . . . . . . . . . . . . . . 4
Low Battery Alert. . . . . . . . . . . . . . . . . . . . . . . . . . . . . . . . . . . . . . . . . . . 5
Belt Clip . . . . . . . . . . . . . . . . . . . . . . . . . . . . . . . . . . . . . . . . . . . . . . . . . 5
Operation
Power on/off. . . . . . . . . . . . . . . . . . . . . . . . . . . . . . . . . . . . . . . . . . . . . . 6
Volume. . . . . . . . . . . . . . . . . . . . . . . . . . . . . . . . . . . . . . . . . . . . . . . . . . 6
Selecting a Channel. . . . . . . . . . . . . . . . . . . . . . . . . . . . . . . . . . . . . . . . . 7
To Transmit and Receive . . . . . . . . . . . . . . . . . . . . . . . . . . . . . . . . . . . . . 7
To Operate in Duplex Mode. . . . . . . . . . . . . . . . . . . . . . . . . . . . . . . . . . . 8
Scanning . . . . . . . . . . . . . . . . . . . . . . . . . . . . . . . . . . . . . . . . . . . . . . . . 8
Open Scan . . . . . . . . . . . . . . . . . . . . . . . . . . . . . . . . . . . . . . . . . . . . . . . 8
Group Scan. . . . . . . . . . . . . . . . . . . . . . . . . . . . . . . . . . . . . . . . . . . . . . . 9
Priority Channel . . . . . . . . . . . . . . . . . . . . . . . . . . . . . . . . . . . . . . . . . . 10
Programming Scan Channels . . . . . . . . . . . . . . . . . . . . . . . . . . . . . . . . . 10
Continuous Tone Coded Squelch System (CTCSS) . . . . . . . . . . . . . . . . . . 11
Built-in Voice Activated Circuit (VOX) . . . . . . . . . . . . . . . . . . . . . . . . . . 13
Drop-Out Delay. . . . . . . . . . . . . . . . . . . . . . . . . . . . . . . . . . . . . . . . . . . 14
Power Save . . . . . . . . . . . . . . . . . . . . . . . . . . . . . . . . . . . . . . . . . . . . . . 14
Busy Channel Lock-out . . . . . . . . . . . . . . . . . . . . . . . . . . . . . . . . . . . . . 15
Sending Call Tones. . . . . . . . . . . . . . . . . . . . . . . . . . . . . . . . . . . . . . . . 15
Backlight . . . . . . . . . . . . . . . . . . . . . . . . . . . . . . . . . . . . . . . . . . . . . . . 16
Keypad Lock . . . . . . . . . . . . . . . . . . . . . . . . . . . . . . . . . . . . . . . . . . . . . 16
Monitor . . . . . . . . . . . . . . . . . . . . . . . . . . . . . . . . . . . . . . . . . . . . . . . . 16
Battery Level Display . . . . . . . . . . . . . . . . . . . . . . . . . . . . . . . . . . . . . . . 17
Charging Batteries . . . . . . . . . . . . . . . . . . . . . . . . . . . . . . . . . . . . . . . . 18
UHF Channels and Frequencies . . . . . . . . . . . . . . . . . . . . . . . . . . . . . . . 19
CTCSS Codes and Frequencies . . . . . . . . . . . . . . . . . . . . . . . . . . . . . . . . 20
Optional Accessories . . . . . . . . . . . . . . . . . . . . . . . . . . . . . . . . . . . . . . . . 20
Technical Specifications. . . . . . . . . . . . . . . . . . . . . . . . . . . . . . . . . . . . . . 20
Warranty . . . . . . . . . . . . . . . . . . . . . . . . . . . . . . . . . . . . . . . . . . . . . . . . . 22
Controls & Indicators . . . . . . . . . . . . . . . . . . . . . . . . . . . . . . . . . . . . . . . 24
CONTENTS

The UH-042XR is a portable two-way UHF-CB radio. It is compact, rugged and
fits easily in your hand. This hand held UHF radio will give you consistent,
outstanding performance in virtually all conditions and situations. To ensure that
you get the most from the UH-042XR’s features, please read this operating guide
carefully before using the unit.
FEATURES
➤ 40 Channels
➤ 500mW Output Power
➤ Up to 3 km range*
➤ LCD Display
➤ Group Scan
➤ Open Scan
➤ Duplex Capability
➤ 38 Built-in Continuous Tone Coded Squelch System (CTCSS)
➤ Monitor
➤ Busy Channel Lock-out
➤ LCD Back Light (Auto On for 5 Sec)
➤ Built-in Voice Activated Function (VOX)
➤ Auto Power Save
➤ Battery Level Indicator
➤ Built in Keypad Lock
➤ 2 Different Ring Tones
➤ Auto Squelch Control
* Range varies depending on the environment. 3km range is noted in a flat open
environment.
INTRODUCTION
1

TECHNICAL SUPPORT AND SERVICE
Should you find it desirable or necessary to service your UH-042XR, we suggest
you contact the Uniden dealer where you purchased your radio. Your dealer will
be able to assist you with the complete service information.
If you require service that is within the terms of your warranty, you should present
a copy of your receipt to your dealer to authenticate your claim.
If you find it inconvenient to obtain service assistance from a dealer, please pack
your radio in suitable packaging that will provide adequate protection to your
radio. Enclose a note describing the problem, a copy of your receipt, and send it
prepaid to:
AUSTRALIA: NEW ZEALAND:
Uniden Australia Pty Ltd Uniden New Zealand Ltd
Customer Service Division Customer Service Division
345 Princes Highway 150 Harris Road
Rockdale NSW 2216 East Tamaki, Auckland
Ph. (02) 9599-3355 Ph. (9) 273 8383
Fax. (02) 9599-3278 Fax. (9) 274 4253
Toll Free 1300 366 895 Toll Free 0800 4 UNIDEN
4 864336
Caution: Changes or modifications to this product not expressly approved by
Uniden; or operation of this product in any way other than as detailed by this
Operating Guide, can void your warranty and authority to operate this product.
2

INCLUDED IN YOUR UH-042XR PACKAGE
3
Note: If any of these items are missing from the box, contact your Uniden Dealer.
Wrist Strap Belt Clip
Operating Guide Product Registration Card
and other printed materials
UH-042XR
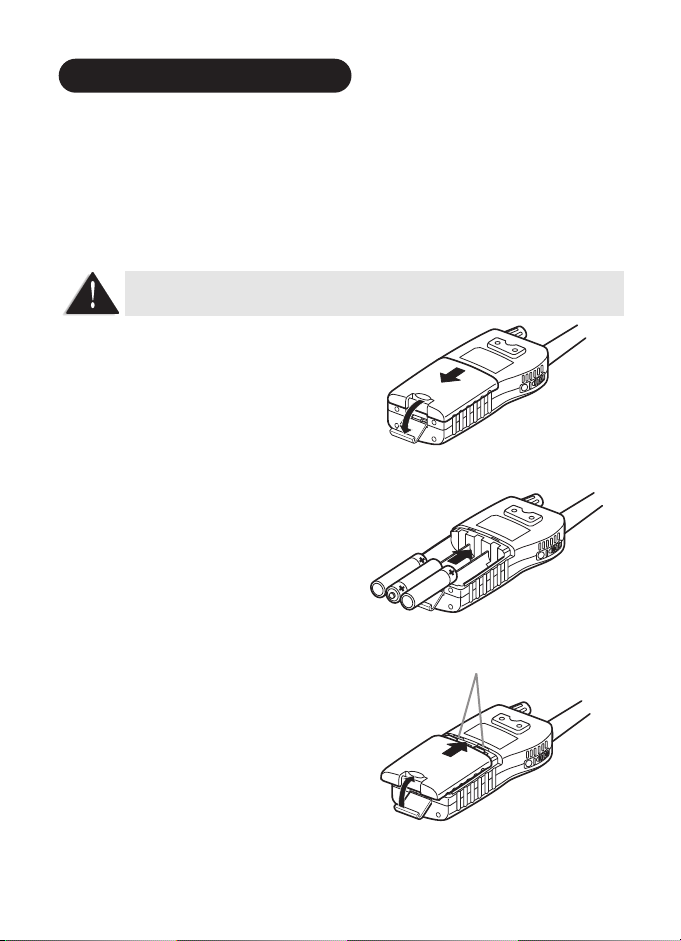
BATTERY INSTALLATION
Your UH042XR radio uses 3 AA ALKALINE batteries for power.
Please refer to page 18 should you wish to use rechargeable batteries.
To install the batteries:
1. Make sure your radio is off.
2. Release the battery cover clip, then
remove the battery cover.
3. Insert 3 AA ALKALINE batteries
according to the polarity symbols
inside the battery compartment.
4. Align the battery cover tabs with the
UH042XR tab holes then replace
the cover.
Note: Batteries are not supplied
GETTING STARTED
4
Do not mix old and new batteries to avoid damage to the unit.
Tab holes
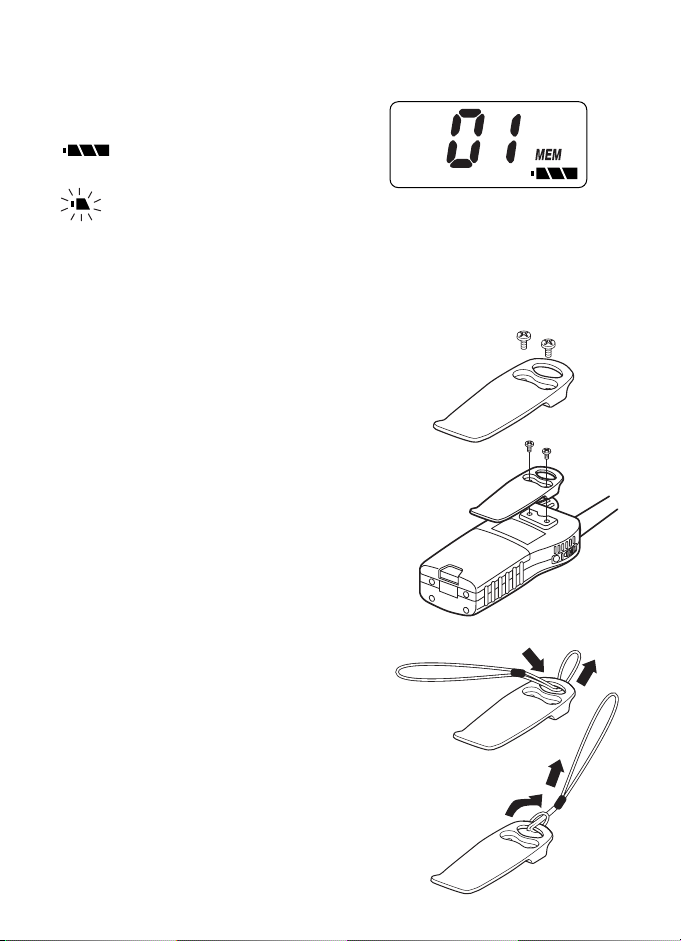
LOW BATTERY ALERT
The LCD on your radio shows a battery
meter in the lower right corner.
icon indicates a fully powered
unit. As the batteries lose power,
will flash.
When the batteries in the unit are low,
the unit will go into a Battery Low/Sleep Mode. The Scan Mode, Transmit,
Transmit Call Tone Mode are disabled. Replace the batteries immediately to
continue using the radio.
BELT CLIP
As you will usually use your radio when you are
out and about, the unit comes equipped with a
belt clip to securely fasten the unit to your belt,
pocket or purse.
To remove the belt clip, turn the screw
counterclockwise.
To attach the belt clip:
1. Insert the belt clip screw into the slot on
the belt clip.
2. Align the screw with the hole on the back
of the radio and turn it clockwise, using a
Phillips screwdriver to secure the belt
clip. Do not over-tighten.
WRIST STRAP
1. Insert the short end of the strap through
the belt clip hole.
2. Slip the long end through the loop to
enclose the clip in the strap and pull tightly.
5
➤ When you press any key (except PTT), a short tone sounds.
➤ See the Controls and Indicators page at the back of this operating guide for
button and key operations.
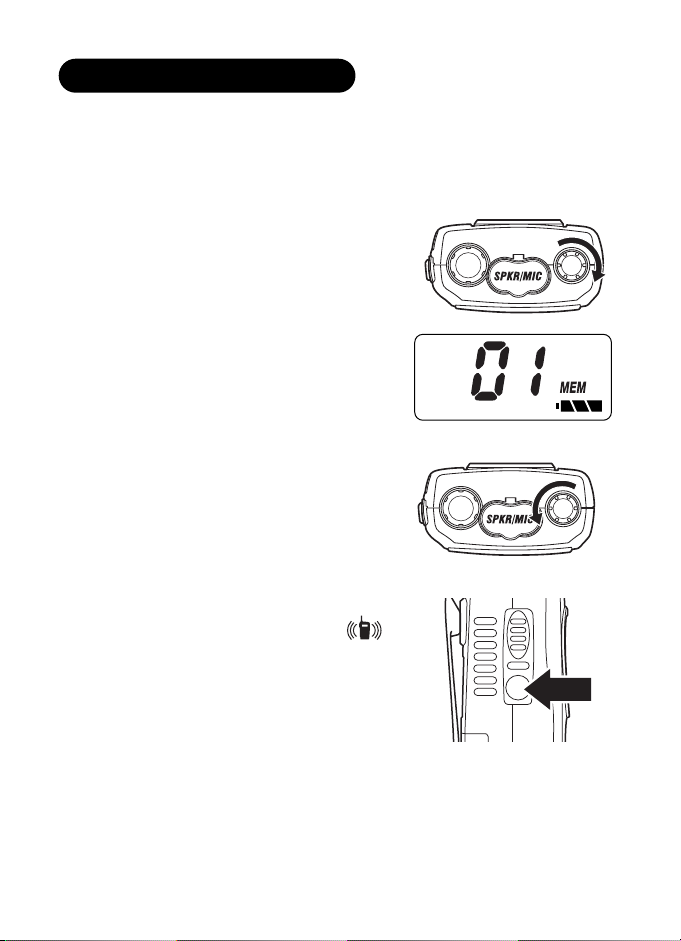
POWER ON/OFF
To turn the unit ON, rotate the [ON/OFF VOL]
clockwise until a “click” is heard. A channel number
and battery level should appear on the display.
To turn the unit OFF, rotate the
[ON/OFF VOL]
knob counter-clockwise until a “click” is heard.
The display will disappear.
VOLUME
1. Press the [MON] button to hear
background noise. The “BUSY” icon will
appear on the display.
2. Turn the
[ON/OFF VOL] control clockwise to
increase the volume, counterclockwise to
decrease the volume.
OPERATION
6
 Loading...