

Uniden UH041 User Manual
Color profile: Disabled
Composite Default screen
UH041/
UH041P
Operating Guide
channel/
scan
hi/lo
dup mon
hi/lo
channel/
scan
dup mon
volume
To bring outstanding wireless communication products
to people's lives throughout the world.
UH041 Manual.prn
UH041 Manual - UT01912AZ
Monday, October 13, 2003 6:52:17 PM
volume
Color profile: Disabled
Composite Default screen
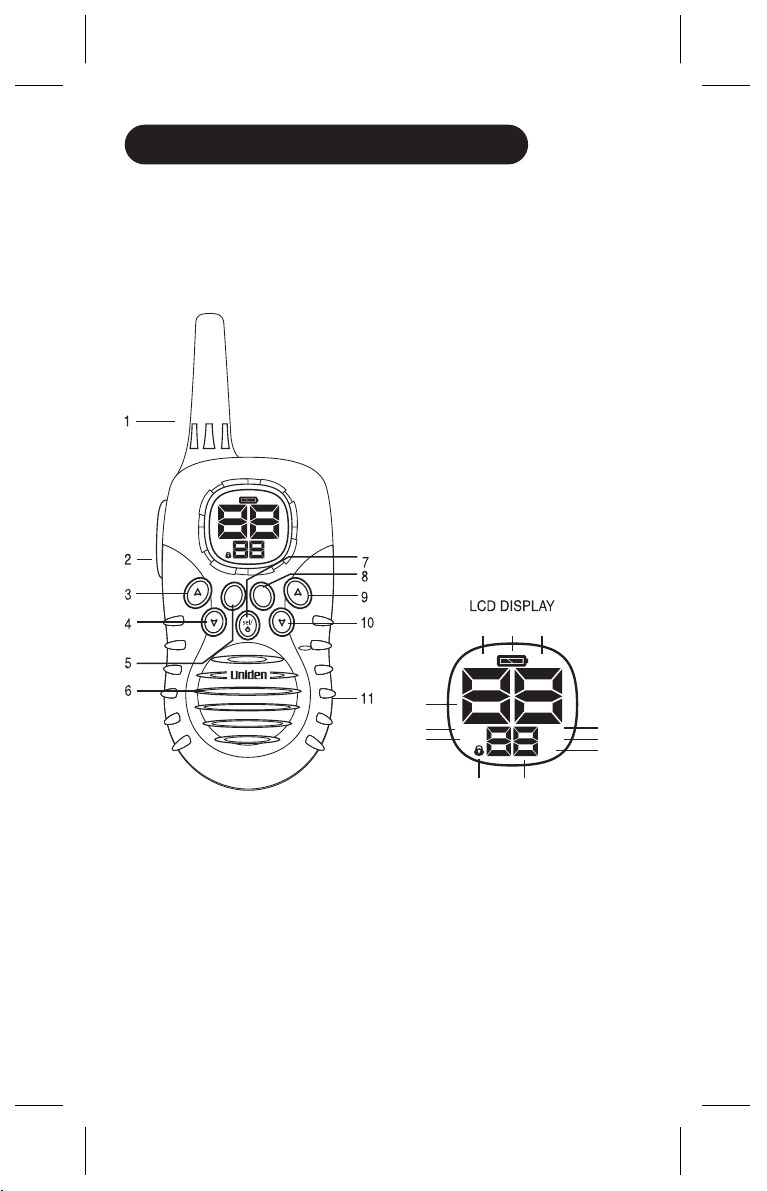
CONTROL & INDICATORS
INCLUDED IN YOUR PACKAGE:
Please check which model you have - UH041 or UH041P.
UH041 UH041P
RX TX
SCAN
VOX
hi/lo
dup mon
!
UH041 Radio
!
Operating Guide
!
Belt Clip
VOL
DUP
HI
!
UH041P Radio (2)
!
Operating Guide
!
Belt Clip (2)
!
Charging Cradle with
AC Adaptor
!
NiMH Battery Pack (2)
OPTIONAL ACCESSORIES
!
Charging Cradle with AC
Adaptor
!
NiMH Battery Pack
!
VOX Earset
channel/
scan
volume
1 Antenna
2 PTT (Push-To-Talk) Button
3 Channel/scan up Key
4 Channel/scan down Key
5 Duplex/Transmit Hi/Lo
6 Speaker
7 Power On/Off/Select Key
8 Monitor Key
9 Volume up Key
10 Volume down Key
11 Battery Compartment Door
UH041 Manual.prn
UH041 Manual - UT01912AZ
Monday, October 13, 2003 6:52:20 PM
1413 15
RX TX
12
16
SCAN
VOX
17
18
VOL
DUP
HI
22
12 Channel Indicator
13 Receive Indicator
1415Transmit Indicator
Battery Indicator
16 Scan Indicator
17 Vox on Indicator
18 Key lock setting Indicator
19 Volume setting Indicator
20 Duplex Indicator
21 TX Hi Indicator
22 CTCSS channel indicator
1
19
20
21
Color profile: Disabled
Composite Default screen
GETTING STARTED
Uniden does not represent this product to be
waterproof. Do not expose this product to Rain
or Moisture.
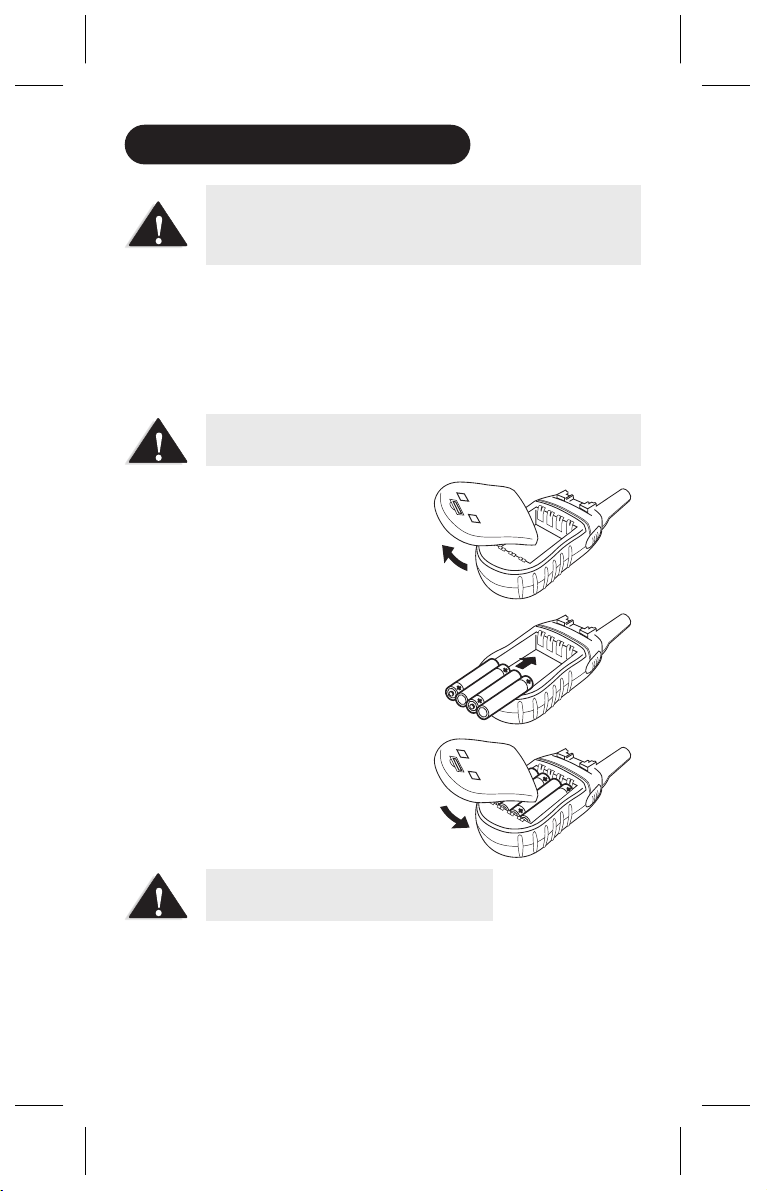
BATTERY INSTALLATION
Your radio uses 4 AAA ALKALINE or optional
UH041/UHO41P
NiMH battery pack (UH041P includes NiMH battery pack)
batteries for power.
To avoid damage to the unit do not mix
old and new batteries.
To install the batteries:
1. Make sure your radio is off.
2. Remove the battery
compartment door by pressing
the tab at the bottom of the
compartment door allowing the
door to be removed.
3. Insert 4 AAA ALKALINE batteries
according to the polarity
symbols inside the battery
compartment.
4. Replace the battery cover.
Do not charge alkaline or non
rechargeable batteries.
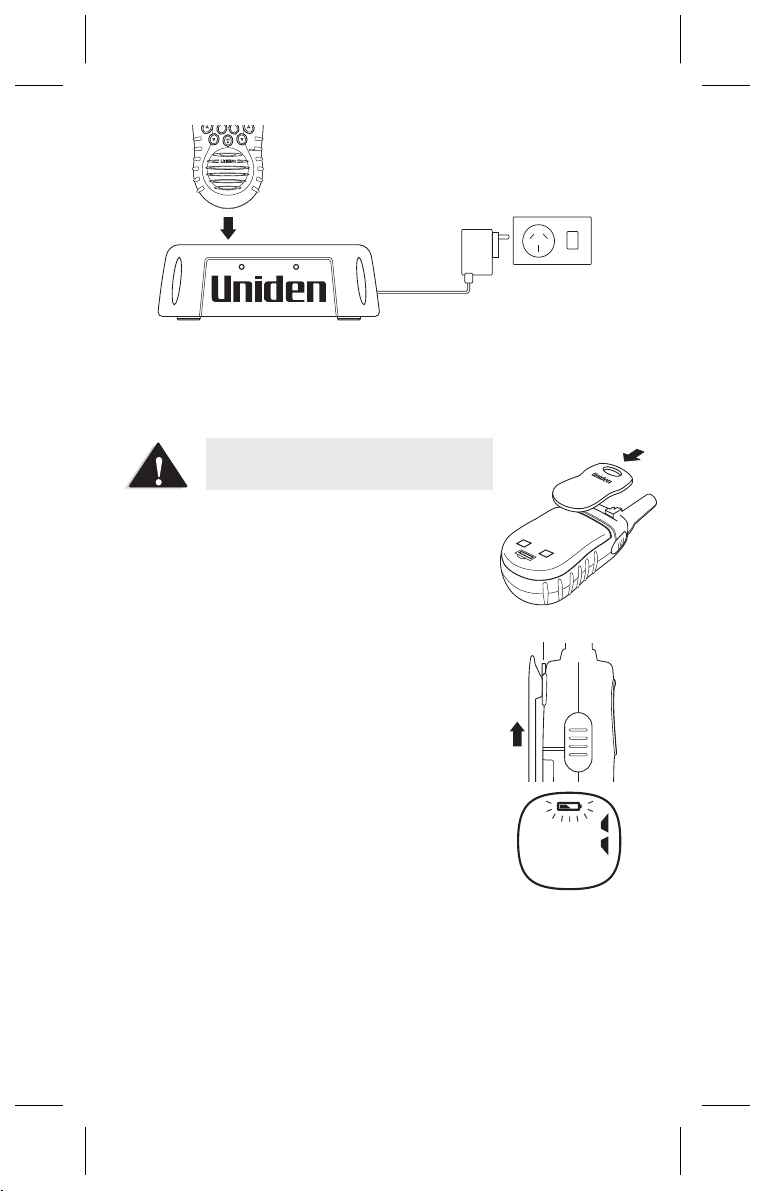
INSTALLING THE CHARGE CRADLE (UH041P only)
!
Install the NiMH Battery Pack as per above instructions.
!
Plug the AC Adaptor into the rear of the charge cradle and
into the mains power.
2
UH041 Manual.prn
UH041 Manual - UT01912AZ
Monday, October 13, 2003 6:52:20 PM
Color profile: Disabled
Composite Default screen
dup mon
channel/
volume
scan
charge 1 charge 2
Power Point
Place the UH041P into the charge cradle. The charge light will
come on to indicate the unit is charging. Before operating the
UH041P, charge the battery pack for 16 hours.
Do not charge alkaline or non
rechargeable batteries.
BELT CLIP
To attach the belt clip:
Slide the belt clip until it snaps into place.
Belt Clip Locker
To remove the belt clip:
To remove the belt clip. Press and hold
belt clip locker, slide the belt clip at the
same time until released.
LOW BATTERY ALERT
If the Battery level becomes low, the battery
indicator icon on the LCD begins flashing..
When the batteries in the unit are low, the unit will go into a
Battery Low Mode. The Transmit Mode is disabled. Replace the
alkaline batteries immediately or if you are using the NiMH
Battery pack, place the Radio on the charge cradle to recharge
(supplied with , optional accessory for to
UHO41P UH041)
continue using the radio.
3
UH041 Manual.prn
UH041 Manual - UT01912AZ
Monday, October 13, 2003 6:52:22 PM
 Loading...