

Page 1

OWNER’S MANUAL
TRU 3485
Page 2

Contents
Introduction / Features 2
Controls and Functions 4
Getting Started
Read this firs t 6
Step 1: Checking t he pack age cont ents 7
Step 2: Setting up the base unit 8
Step 3: Installing t he handset batte r y pack 10
Step 4: Setting Caller ID options 12
Entering your Area Code 13
Basics
Making a call 14
Receiving a call 16
Mute 17
Adjusting t he volume 18
Redialing a call 19
Tr aveling out-of-range 20
Memory Dialing
Storing phone numbers and names 21
Making calls with memor y dialing 23
Editing a stored name and/or phone number 25
Erasing a s tor ed name and phone number 26
Telephone Features
3-way conf er encing 28
Intercom F eature 29
Call Transfer F eature 30
Caller ID Features
Caller ID 31
When the t el ephone rings 31
Viewing t h e Caller ID Messag e list 32
Deleting infor mation from the Caller ID lis t 33
Using the Caller ID lis t 34
Using “Caller ID on call waiting“ service 36
Call Waiting Features 37
Page 3
The Integrated Answering Device
Features 38
Setting up your answering sy stem 39
Using your answering sy s tem 42
Additional Information
Changing the digit al security code 47
Installing t he beltclip 48
Headset installation 48
Note on power sources 49
Maintenance 50
Troubleshooting 51
General Information 53
Index 55
Page 4

Welcome
Congratulations on y our purchase of the TRU 3485 cordless t elephone. This
phone is designed for r eliability, long life and outst anding per for mance
utilizing the lates t in 2.4 GHz Spread Spectr um Technology.
NNoottee:: SSoommee iilllluussttrraattiioonnss iinn tthhiiss mmaannuuaall mmaayy ddiiffffeerr ffrroomm tthhee aaccttuuaall uunniitt ffoorr
eexxppllaannaattiioonn ppuurrppoosseess..
Features
INTRODUCTION/FEATURES[ 2 ]
• 2.4 GHz Spread Spectrum Technology
• Secure Digit al Transmission
• Integrat ed Answering De vice
• Caller ID and Call Waiting Caller ID
• Advanced Caller ID with Call Waiting Options
• 50 Number Caller ID Memory
• 30 Number Memory (20 on t he handset and 10 on t he base)
• 3 Line Backlit Display
• 3 Redial Memories (up to 32 digit)
• Flash and Pause
• Pulse / Tone Dialing
• 10 Day St andby Batte ry Lif e
• 6 Hour Talk Time
• Handset Earpiece and Ringer Volume Control
• Base Speakerphone with Keypad
• 3-Way Conference Operation
• Dual Keypad Oper ation
Page 5

DDiiggiittaall SSpprreeaadd SSppeeccttrruumm TTeecchhnnoollooggyy
utilizes a “wider frequency band“ vs. a
“single narrow band“ used in standard digit al transmissions. The 2.4 GHz
frequency r ange was recently released t o commercial communications. The
result is a more secure conv ersation wit h the clarity of digit al sound, extended
range, and minimal int er fer ence from other cordless phones.
RRaannddoomm CCooddee
TM
digital security automaticall y selects one of over 65,000 codes
for the handset and base.
These features enhance y our ph one´s security and also prevent unauthorized
calls as a result of your phone being activ ated by other equipment.
Throughout this manual, t er ms such as Standb y and Talk Mode are used. Below
is the terminology explanation.
SSttaannddbbyy MMooddee
•
- The handset is not in use, of f the base and has not
talk
been pressed. A dial tone is not present and t he display is blank.
has been pressed enabling a
TTaallkk MMooddee
•
dial tone.
Uniden®is a registered tr ademark of Uniden America Corporation.
Random Code
- The handset is of f the base and
appears in the display.
Talk
TM
and Auto TalkTMare trademark s of Uniden America Corporation.
talk
INTRODUCTION/FEATURES
[ 3 ]
Page 6
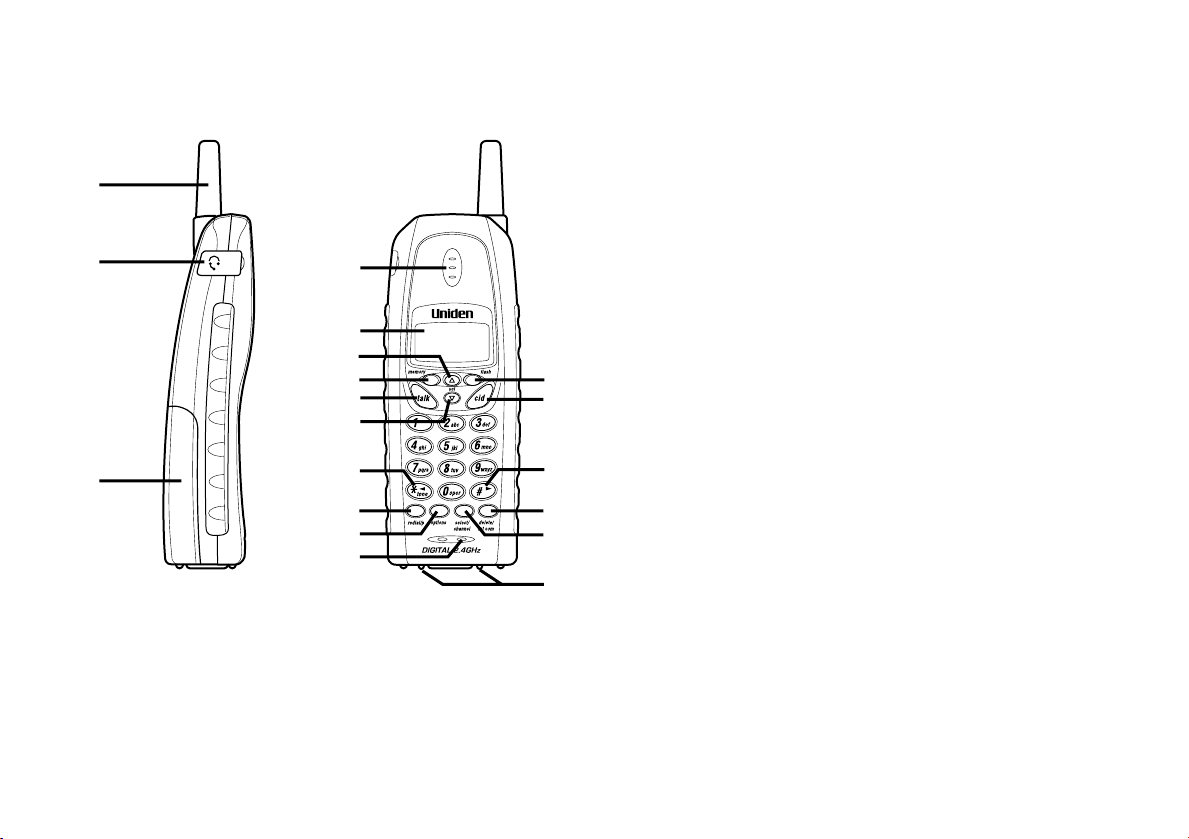
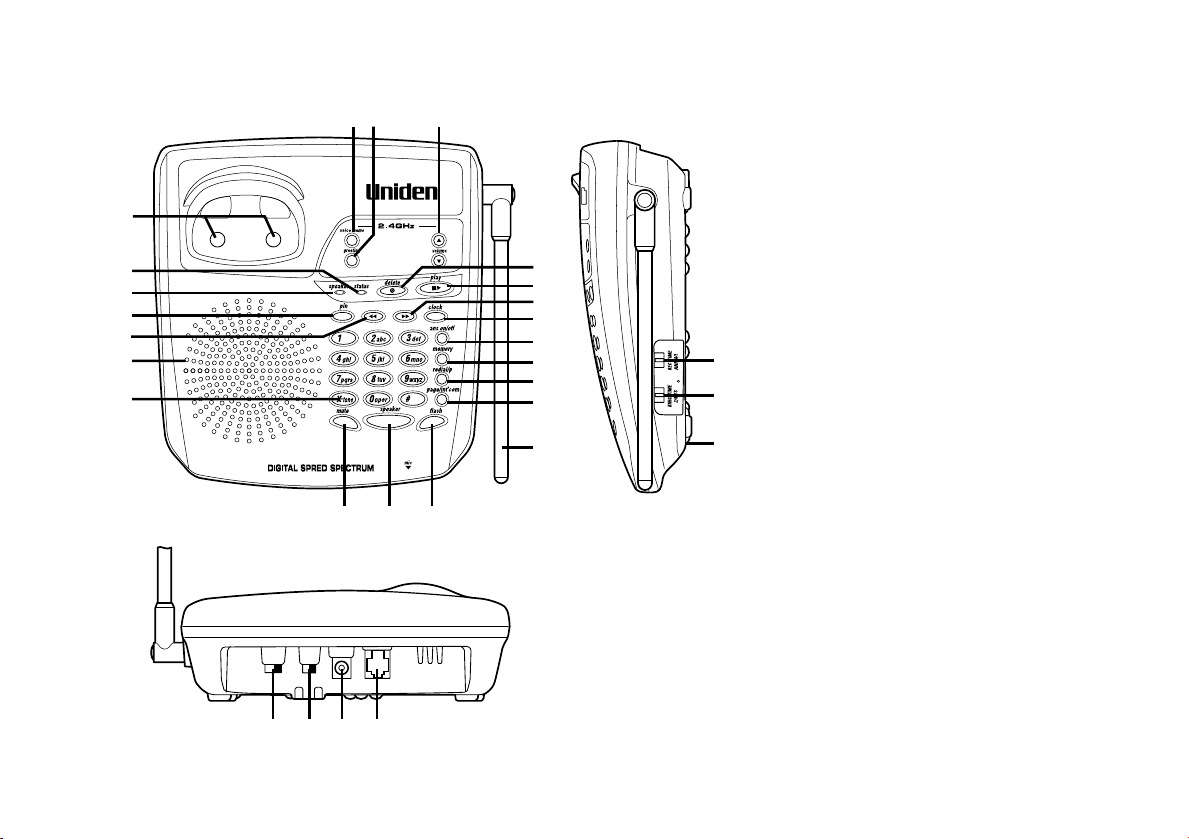
Controls and Functions
1
2
3
4
5
6
7
8
9
10
11
12
13
14
15
16
17
18
19
1. Handset Antenna
2. Headset Jack Cover
3. Handset Batter y Compar tment
4. Handset Earpiece
5. LCD Display
6. Volume Up Ke y
7. Memory Key
8. Talk Ke y
9. Volume Down Ke y
10. Tone/Lef t Cursor Ke y
11.Redial/P ause Key
12. Options Key
13. Handset Microphone
14. Flash Key
15. Caller ID Key
16. Right Cursor Key
17. Delet e/Inte rcom K ey
18. Select/Channel Key
19. Handset Charging Contacts
CONTROLS AND FUNCTIONS[ 4 ]
Page 7
20
21
22
23
24
25
26
2728 29
39 40 41
45 46 47 48
30
31
32
33
34
35
36
37
38
42
43
44
20. Base Charging Contacts
21.Status LED
22. Speaker LED
23. PIN K e y
24. Reverse Key
25. Base Speaker
26. Tone Key
27. Voice Memo Key
28. Greeting Ke y
29. Base Speaker
Volume Adjust
30. Delete Key
31. Play Key
32. Forwa rd Key
33. Clock Key
34. Answe r on/of f Key
35. Memory Key
36. Redial/Pause Key
37. Page/Inte rcom Ke y
38. Base Antenna
39. Mute Key
40. Speaker Key
41. Flash Key
42. Record Time Switch
43. Ring Time Swit ch
44. Base Microphone
45. Base Ringer Swit ch
46. Pulse-Tone Switch
47. DC Power Input
48. Phone Jac k
CONTROLS AND FUNCTIONS
[ 5 ]
Page 8
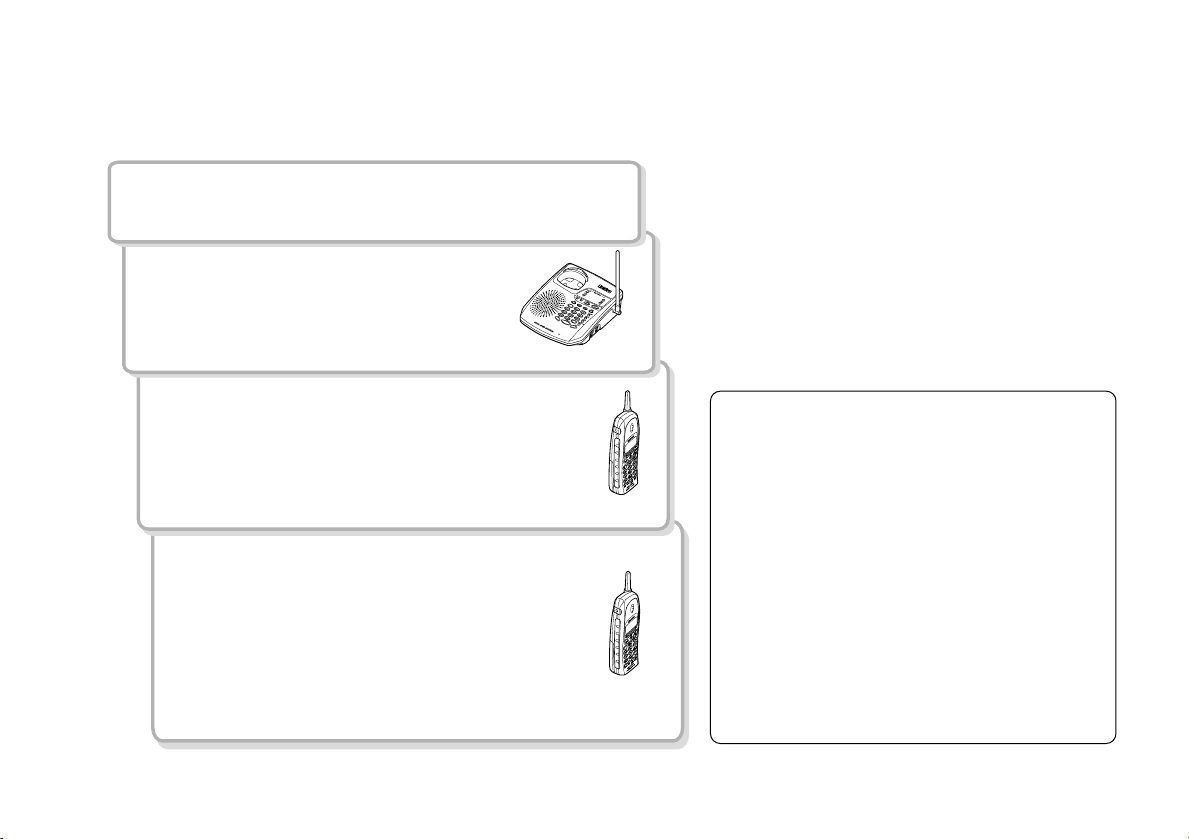
Read This First
This cordless telephone mus t be set up befo re use. Fo llow these st eps;
SStteepp 11
Unpack t he telephone and accessories.
SStteepp 22
Next, choose t he best location t o
set up the base unit.
SStteepp 33
Then, inser t the batter y pack into the
handset. You must charge the batt ery
pack for
((ppaaggee 77))
((ppaaggee 88 ttoo 99))
((ppaaggee 1100 ttoo 1111))
1155 hhoouurrss bbeeffoorree uussiinngg tthhee pphhoonnee..
SStteepp 44
Finally, set the Ca ller ID o ptions a nd
stor e your ar ea code in the memory to
use the Cal ler ID ser vice.
NNoottee::
calling area requires 10-digit dialing.
((ppaaggee 1122 ttoo 1133))
Skip the a rea code setting if yo ur
BBaassee uunniitt
HHaannddsseett
HHaannddsseett
AAbboouutt tthhee ddiiggiittaall sseeccuurriittyy ccooddee
This cordless telephone uses a digit al
security code to prevent unaut horized
access to your base unit. This security
code prevents other cordless handsets
from making calls th rough yo ur
base unit.
A random security code will be
assigned automatically between your
base unit and handset when you charge
the batte r y pack for t he f ir st time.
If you want t o r eset the se curity code,
see page 47.
GETTING STARTED[ 6 ]
Page 9
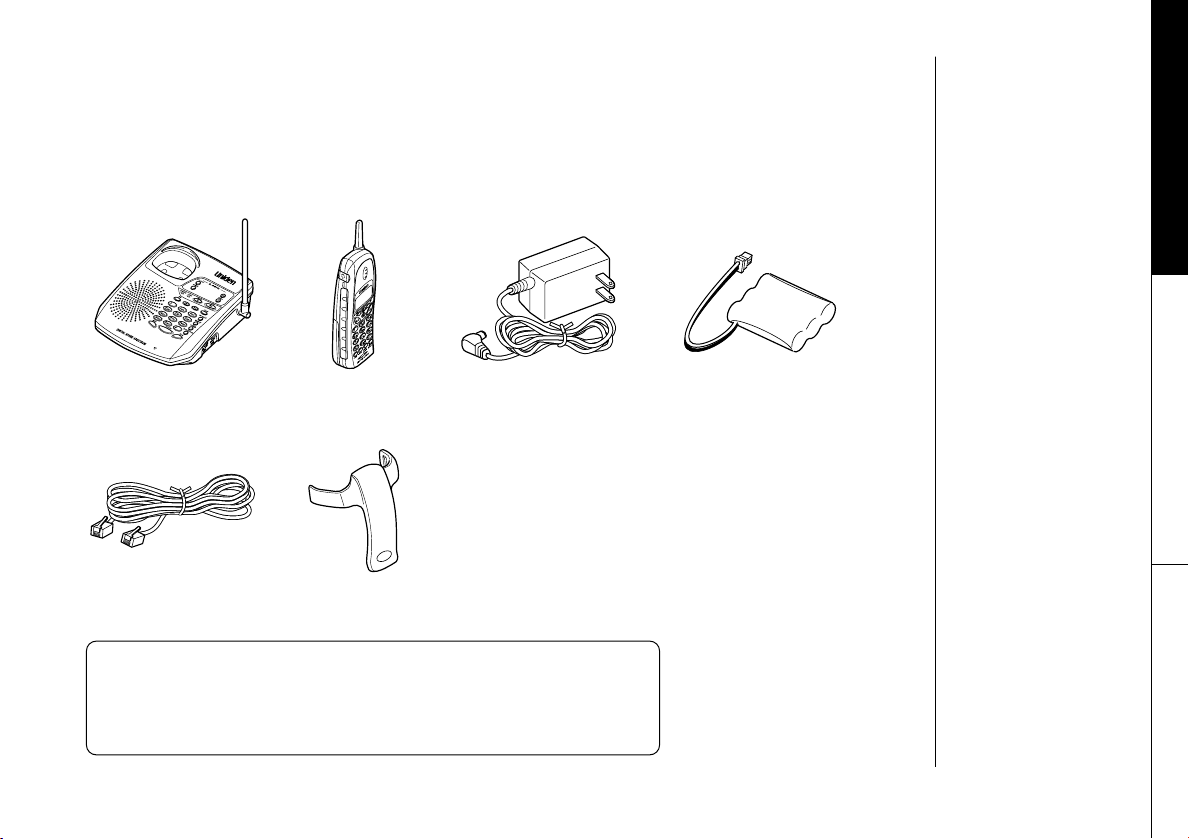
Checking the Package Contents
Make su re you have r eceived t he following it ems in t he pack age.
If any of these items ar e missing or damaged, cont act the U niden P arts
Depar tment (see below).
GETTING STARTED
•• BBaassee uunniitt •• HHaannddsseett •• AACC aaddaapptteerr ((AADD--331122)) •• RReecchhaarrggeeaabbllee
•• TThhiiss OOwwnneerr´´ss MMaannuuaall
•• QQuuiicckk RReeffeerreennccee GGuuiiddee
•• PPrreeccaauuttiioonnss aanndd IImmppoorrttaanntt
SSaaffeettyy IInnssttrruuccttiioonnss
•• TTeelleepphhoonnee lliinnee ccoorrdd
•• BBeellttcclliipp
•• RReeggiissttrraattiioonn CCaarrdd
bbaatttteerryy ppaacckk
((BBTT--990055))
UUnniiddeenn PPaarrttss DDeeppaarrttmmeenntt
(800) 554-3988
Hours: M-F 7:00 AM to 5:00 PM CST.
We can also be reached on the web at www.uniden.com.
GETTING STARTED
[ 7 ]
Page 10

Setting Up the Base Unit
Do the f ol lo wing st eps.
• Choose the bes t location
• Connect the base unit
• Choose the dialing mode
CChhoooossee tthhee bbeesstt llooccaattiioonn
Befor e choosing a location for your ne w phone, read the INS TALLATION CONSIDERATIONS included
in the PREC AUTIONS AND IMPOR TANT S AFETY INSTRUCTIONS broc hure. Here ar e some import ant
guidelines you should consider:
AAvvooiidd hheeaatt ssoouurrcceess,, ssuucchh aass
rraaddiiaattoorrss,, aaiirr dduuccttss,, aanndd ssuunnlliigghhtt
AAvvooiidd tteelleevviissiioonn sseettss aanndd
ootthheerr eelleeccttrroonniicc eeqquuiippmmeenntt
AAvvooiidd nnooiissee ssoouurrcceess ssuucchh aass aa wwiinnddooww
bbyy aa ssttrreeeett wwiitthh hheeaavvyy ttrraaffffiicc
AAvvooiidd mmiiccrroowwaavvee oovveennss
AAvvooiidd eexxcceessssiivvee mmooiissttuurree,, eexxttrreemmeellyy llooww
tteemmppeerraattuurreess,, dduusstt,, mmeecchhaanniiccaall vviibbrraattiioonn,, oorr sshhoocckk
AAvvooiidd ppeerrssoonnaall ccoommppuutteerrss
CChhoooossee aa cceennttrraall llooccaattiioonn
• After ins t alling t he batte r y pack in the handset, y ou should c har ge your handset f or
bbeeffoorree uussiinngg tthhee pphhoonnee
. Once the handset batt er y pack is full y charged, connect t he telephone
AAvvooiidd ootthheerr ccoorrddlleessss tteelleepphhoonneess
1155 hhoouurrss
line cord to the base and telephone wall outlet.
• The location should be close to bot h a phone jack and a continuous power outlet whic h is not
switchable.
• Keep the base and handset away from sources of electrical noise suc h as motors and
fluorescent lighting.
• Be sure th ere is suff icient space t o r aise the base ant enna to a ver tical position.
GETTING STARTED[ 8 ]
Page 11
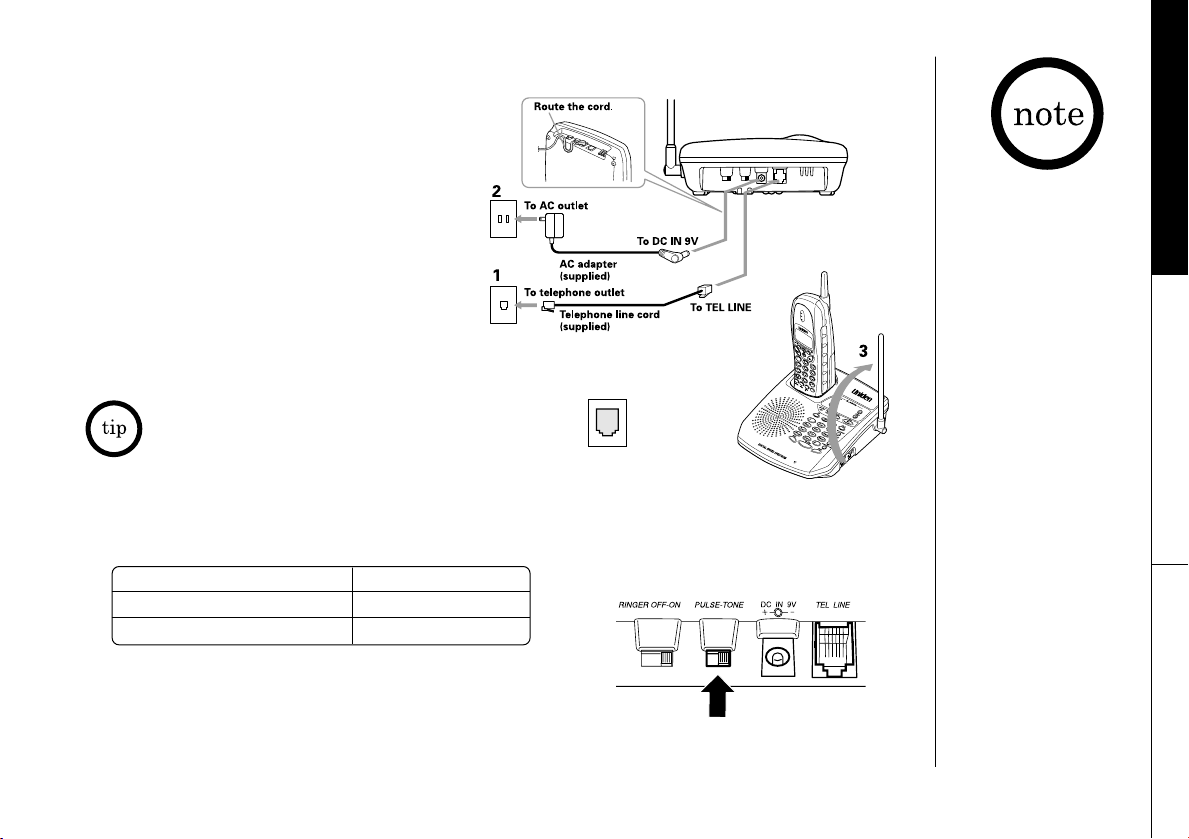
CCoonnnneecctt tthhee bbaassee uunniitt
11
Connect the telephone line cord to
TTEELL LLIINNEE
the
telephone outlet.
jack and to a
GETTING STARTED
22
Connect the AC adapter t o the
IINN 99VV
jack and t o a st andard 120V
DDCC
AC wall outlet.
33
Set the base unit on a desk or
tabletop. Place t he handset on t he
base unit as shown. Then raise t he
antenna t o a ver tical position.
If your telephone outlet isn´t modular, contact
your telephone company for assistance.
CChhoooossee tthhee ddiiaalliinngg mmooddee
Depending on your dialing sys tem, set the
IIff yyoouurr ddiiaalliinngg ssyysstteemm iiss SSeett tthhee sswwiittcchh ttoo
Tone
Pulse
TTOONNEE
PPUULLSSEE
If you aren´t sure of your dialing system,
make a trial call with the PUL S E-TONE switch
set to
TTOONNEE
.
If t he call connects, leave the switch as is;
otherwise, set t o
PPUULLSSEE
.
PPUULLSSEE--TTOONNEE
MMoodduullaarr
switch as f ollows:
• Place the power cord so
it does not create a trip
hazard or where it could
become chafed and
create a fire or electrical
hazard.
• Use only the supplied
AD-312 AC adapt er.
Do not use any other AC
adapter.
• Connect the AC adapter
to a continuous power
supply.
• Place the base unit close
to the AC outlet so that
you can unplug the AC
adapter easily.
GETTING STARTED
[ 9 ]
Page 12
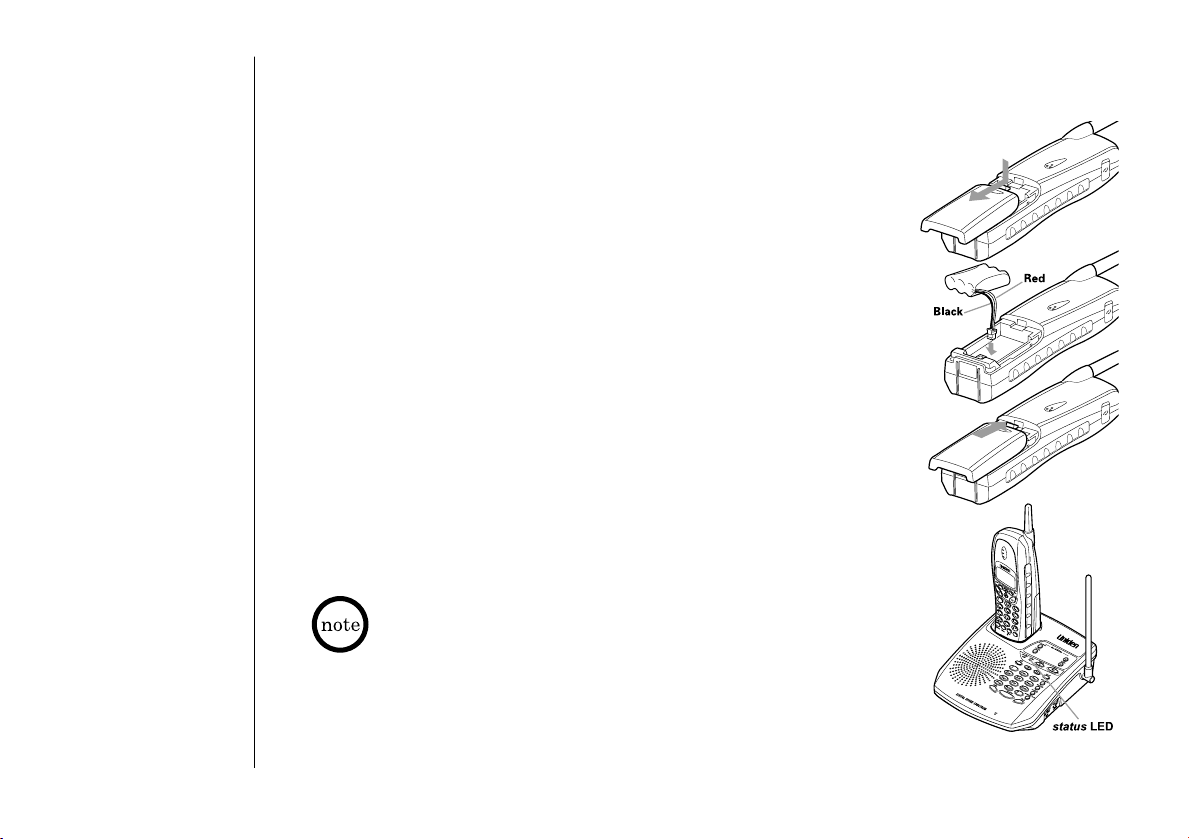
Installing the Handset Battery Pack
CChhaarrggee tthhee bbaatttteerryy ppaacckk ffoorr 1155 hhoouurrss bbeeffoorree yyoouu ssttaarrtt uussiinngg
yyoouurr pphhoonnee..
11
Press in on the batt er y cover release and slide the co ver
down until it comes of f.
22
Connect the batt er y pack connect or with the cor rect
polarity (black and red wires), t hen inser t the batter y
pack into the batt ery compar tment.
33
Slide the batt er y cover for wa rd until it snaps into place.
44
Place the handset on t he base.
55
Make s ure that t h e “
ssttaattuuss
“ LED lights. If the LED
doesn´t light, check to see that t he AC adapter i s
plugged in and that the handset makes good cont act
with the base char ging contacts.
Use only the Uniden Batter y (BT-905) supplied with your phone.
Replacement batteries are also available t hrough the Uniden
Par ts Depar tment (See page 7).
GETTING STARTED[ 10 ]
Page 13
BBaatttteerryy uussee ttiimmee ((ppeerr cchhaarrggee))
From fully charged
• 6 hours continuous use.
• 10 days when the handset is in t he s tandb y mode.
GETTING STARTED
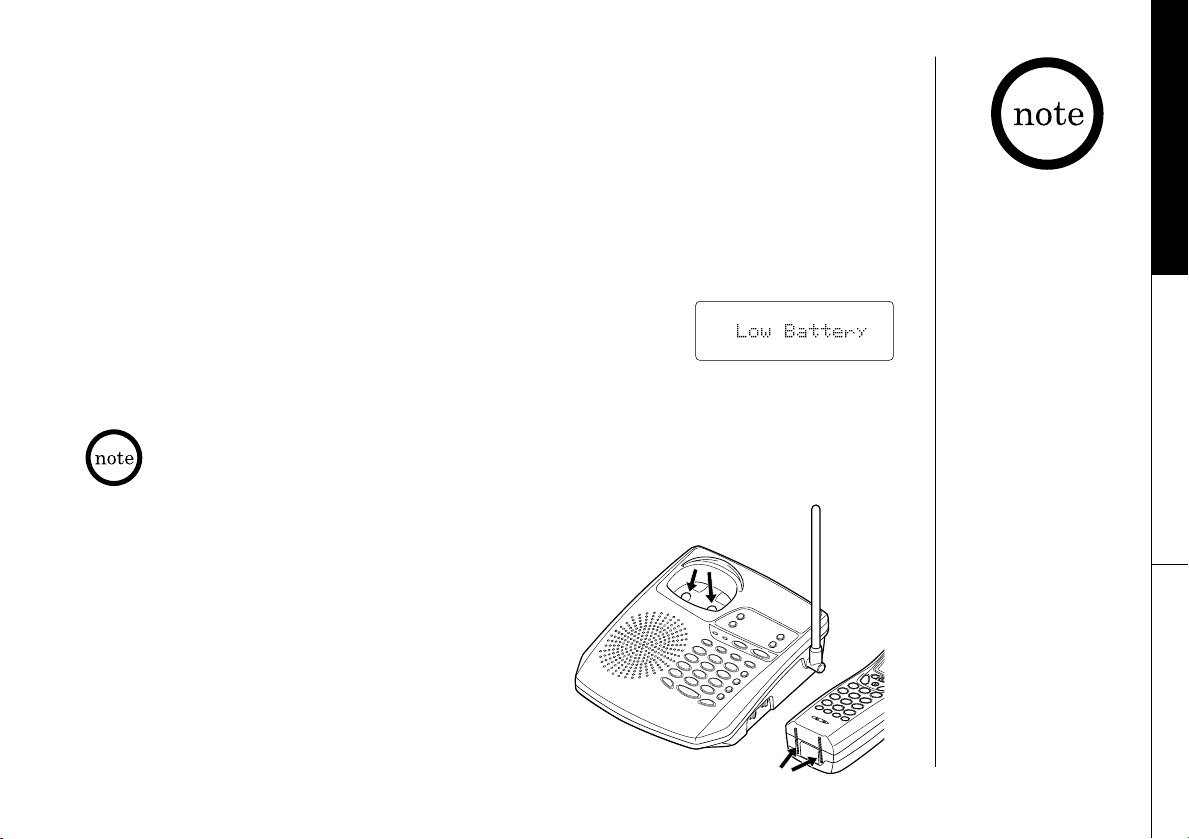
WWhheenn tthhee bbaatttteerryy cchhaarrggee bbeeccoommeess llooww
When the volt ag e of batt er y pac k in the handset is very low
and needs to be charged, t he phone is progr ammed t o
eliminate functions in order t o save power. If t he batte r y
charge becomes low, “
Low Battery“ appears on the LCD.
If you mak e a call, the handset beeps. Com plete your
conver sation as quickly as possible and retur n the handset
to the base unit f or charging.
The built-in memory backup can hold numbers and names s tored
in the memor y even if the batter y pack is completely disc h a r ge d.
CClleeaanniinngg tthhee cchhaarrggiinngg ccoonnttaaccttss
To maint ain a good c ha rge, it is imp or t ant to
clean the batt er y cont acts on t he handset and
base unit with a dr y cloth or a pencil er aser
about once a month.
DDoo nnoott uussee aannyy lliiqquuiiddss oorr ssoollvveennttss..
• Even when the battery
pack is not being used, it
will gradually discharge
over a long period of
time. For optimum
performance, be sure to
return the handset to the
base unit after a
telephone call for
charging the battery.
• The redial memory
numbers backup for up
to 2 minutes while you
replace the battery pack.
• If you must replace the
battery pack during a
telephone call, complete
the replacement of the
battery pack within
30 seconds, and you
can return to the
original call.
GETTING STARTED
[ 11 ]
Page 14
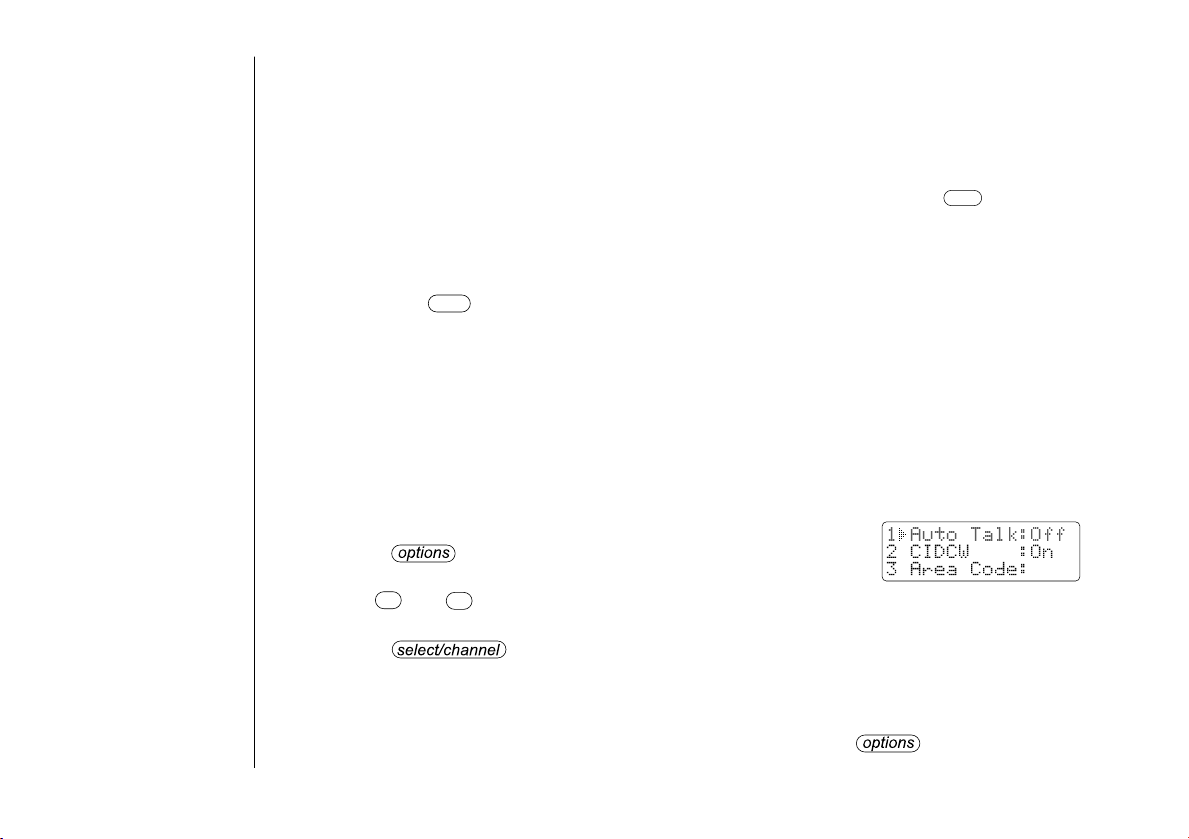
Setting Caller ID Options
There are three Caller ID setup options available; t hey are AutoTalk, CIDCW (Caller
ID on Call Waiting), and Area Code. See pag e 13 for Area Code setup ins tructions.
[ 12 ]
AAuuttooTTaallkk
phone rings when AutoTalk is on, simply remove t he handset from the base and
the phone automatically answe rs the call. Or if t he handset is not on t he base,
press any key to answer t he call. If t he phone rings when AutoTalk is off, you
must pre ss to answer t he call.
CCaalllleerr IIDD oonn CCaallll WWaaiittiinngg ((CCIIDDCCWW))
waiting number. Call waiting options allow you to handle call waiting calls in six
dif fe rent w a ys. (See pag e 37.)
YYoouu mmuusstt ssuubbssccrriibbee ttoo CCIIDDCCWW ffrroomm yyoouurr pphhoonnee ccoommppaannyy iinn oorrddeerr ttoo uussee
tthhiiss ffeeaattuurree..
To change your Caller ID options:
11
Pres s . The following screen appear s.
22
Use and or a number key (1-3) to move the pointer t o the selection that
you would like to change.
Press to toggle between “
For “
service to which you subscribe.
33
After you have made your Caller ID selections, press and retur n the
handset to the base.
GETTING STARTED
TM
allows you to answ er the phone wit hout pressing t he button. If t he
talk
talk
per for ms the same as regular Caller ID on a call
•
CIDCW“, choose “On“, “Off“, or “Opt“ depending upon t he type of
ª
On“ and “Off“ for “Auto Talk“.
Page 15

Entering Your Area Code
If you ent er a 3-digit area code number in t he Area Code option, y our local
area code does not appear in Caller ID messages. Do not prog ram this option, if
your calling area requires 10-digit dialing.
When reviewing Caller ID messages, y ou will see only the local seven digit
number. F or calls received from outside y our local area code, you will see a full
10-digit number.
11
When the phone is in t he st andby mode, press .
The Caller ID setting screen appears.
22
Press to select “
33
Press .
44
Use the number keypad ( t o ) to enter the 3-digit area code.
55
Press . A tone sounds and the displayed area code is ente red.
66
Press to complet e the setting. Or return the handset to the base unit
3
to complete the setting. The handset returns to the standb y mode.
Area Code“ or press .
90
ª
GETTING STARTED
If your calling area
requires 10-digit dialing,
do not program this
option.
When the area code has already been s tored in memor y, the
stored area code will be displayed. To change it, use the
delete/int com
code. Then press .
To complete the setting, press or r eturn the handset
to the base unit.
and number keypad to enter t he new area
GETTING STARTED
[ 13 ]
Page 16
• Press if
delete/int com
delete/int com
you enter a wrong
number at the step 1.
To delete all the numbers
that you have entered,
press and hold
until
the display clears.
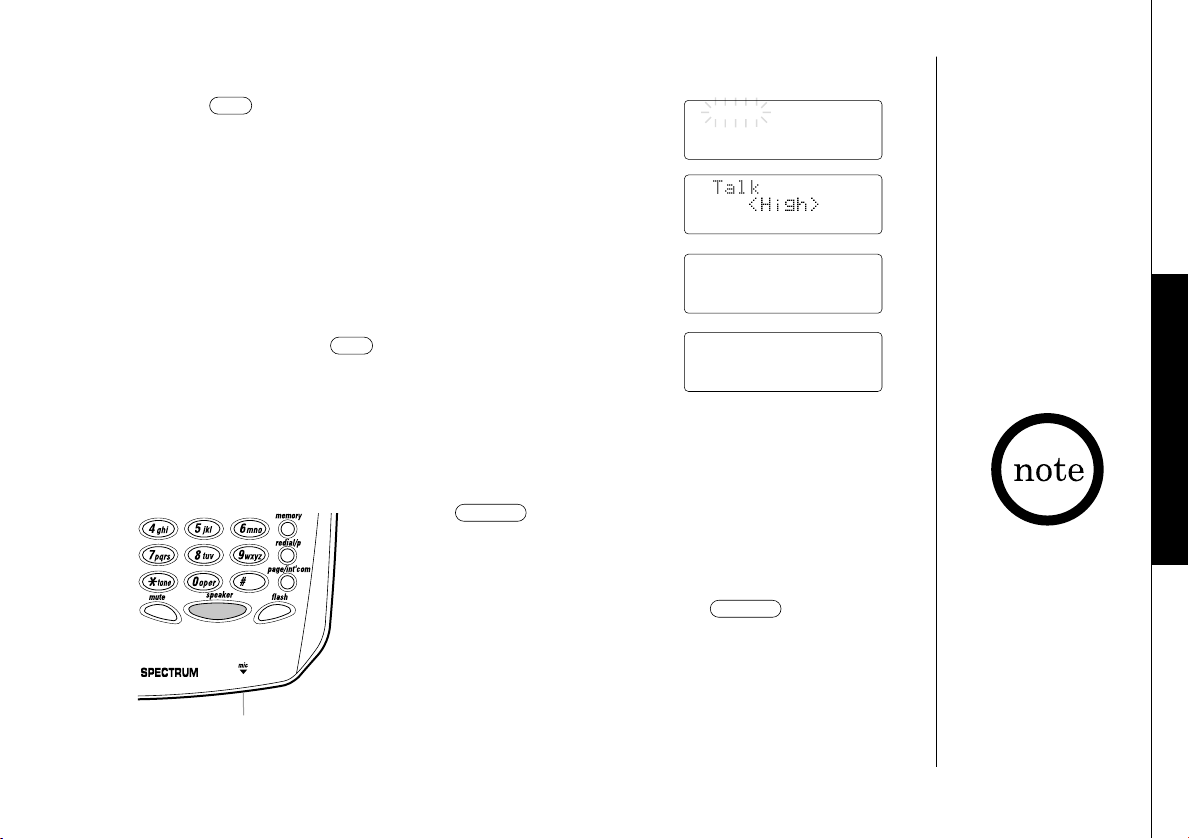
Making a Call
DDiiaalliinngg ffrroomm SSttaannddbbyy MMooddee
11
Enter the phone number and press . “ Talk“ flashes
on the display.
Then curr ent volume setting is displayed.
22
The number is dialed. Af ter about 5 seconds, the call-time
display appears.
talk
Talk
8178583300
Talk
<High>
Talk 0:00
8178583300
• You must press a key
within 20 seconds or the
phone will return to
standby.
• Refer to terminology
explanation on Page 3
if necessary.
33
To hang up, press or place t he handset on the base.
talk
The call-time will be displayed for about 5 seconds.
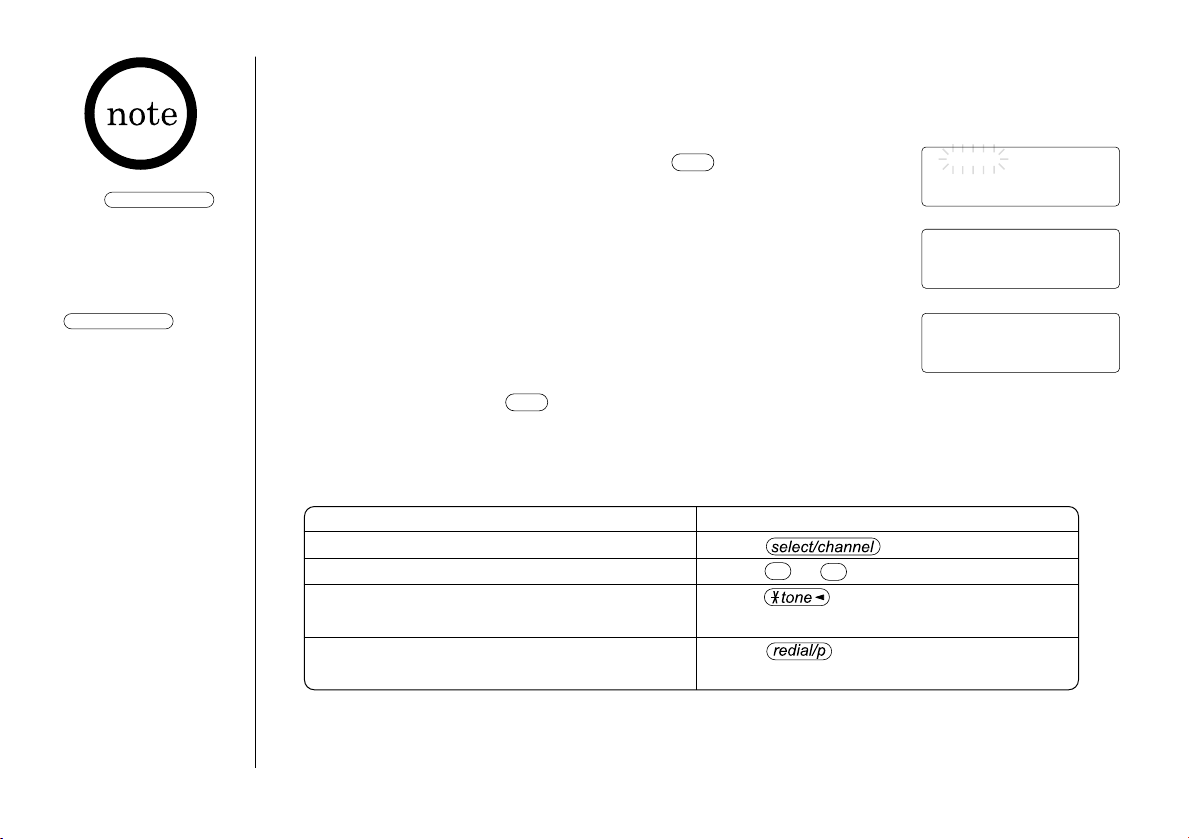
OOtthheerr OOppeerraattiioonnss
TToo
To improve the r eception
To adjus t the earpiece volume
To t em p or a r il y swit c h to t one dial
(When the base is set t o pulse mode)
To ent er a pause within t he dialing
sequence
BASICS[ 14 ]
DDoo tthhiiss
Press during a call.
•
Press or during a call.
ª
Pres s . The following number s
will be sent as tone dialing.
Press . “
P“ appears in the
display which r ep resents a pause.
Page 17
DDiiaalliinngg ffrroomm TTaallkk MMooddee
11
Press . “Talk“ flashes on t he display.
talk
Then curr ent volume setting is displayed.
22
Dial the phone number.
EExxaammppllee
33
To hang up, press or place t he handset on the
: Enter 8178583300
talk
base. The call-time will be displayed for about
5 seconds.
FFrroomm tthhee bbaassee
11
Press .
22
Dial the number on t he keypad.
33
When you finish t he call, press to hang up.
speaker
Talk
Talk 0:17
8178583300
10:03
speaker
BASICS
The base microphone is
located under the phone.
Position yourself as near to
the base as possible and
speak clearly.
Microphone
BASICS
[ 15 ]
Page 18

Receiving a Call
FFrroomm tthhee hhaannddsseett
11
The phone rings. “Incoming Call“appears on
the display.
Incoming Call
22
Press . “
talk
Talk“ and volume setting appear on
the display.
33
Talk wit h the caller.
44
To hang up, press or place t he handset on the base.
talk
Talk 0:00
<Normal>
Talk 0:02
115:35
The call-time will be displayed for about 5 seconds.
AAuuttooTTaallkk wwhheenn rriinnggiinngg
When the AutoTalk setting is on and there is an incoming call, sim ply lif t the
handset from the base unit to answ er th e phone. See “SETTING CALLER ID
OPTIONS“ on page 12 for more det ails.
AAnnyy kkeeyy aannsswweerr wwhheenn rriinnggiinngg
When the AutoTalk setting is on and the handset is of f the base, press any
handset key to answer the incoming call.
CCaallll WWaaiittiinngg
NNoottee:: YYoouu mmuusstt ssuubbssccrriibbee ttoo CCaallll WWaaiittiinngg sseerrvviiccee ttoo uussee tthhiiss ffeeaattuurree..
When a call is received during a t elephone call already in progress, press
flash
to switch t o the ne w call. If y ou also subscribe t o Call Waiting on Caller ID, you
BASICS[ 16 ]
will see the name and number of t he caller in call waiting. (See page 36.)
Page 19

FFrroomm tthhee bbaassee
11
The phone rings. The
22
Press and begin speaking.
33
To hang up, press .
speaker
ssttaattuuss
speaker
LED on the base f lashes.
Mute
You can tur n off the base microphone so t hat th e per son yo u are t alking wit h
cannot hear you.
11
Press during a telephone call. The microphone
is tur ned o f f. The
22
To cancel mut e, pr ess .
mute
ssppeeaakkeerr
mute
LED on the base f lashes.
The base microphone is
located under the phone.
Position yourself as near to
the base as possible and
speak clearly.
BASICS
Microphone
BASICS
[ 17 ]
Page 20

Adjusting the Volume
HHaannddsseett rriinnggeerr ttoonnee aanndd vvoolluummee
•
Press or in Standby mode to select one of f our ringer
ª
tone and volume combinations. (Refer t o terminology
explanation on Page 3, if necessar y.)
EEaarrppiieeccee vvoolluummee
•
Pressing or during a call will change t he earpiece volume of t he handset.
ª
Ringer A High
ª
Ringer A Low
ª
Ringer B High
ª
Ringer B Low
•
•
•
This setting will remain in ef fect aft er the telephone call has ended.
ª
<High> <Medium><Loud>
•
When you p res s in Loud mode or in Nor mal mode, an err or tone sounds.
•
ª
•
ª
ª
•
<Normal>
BBaassee rriinnggeerr sswwiittcchh
This switch t ur ns th e base ringer on or off.
BBaassee ssppeeaakkeerr vvoolluummee
To control t he speaker volume of t he base, adjust the
volume control as desired.
BASICS[ 18 ]
Page 21

Redialing a Call
The last three phone number s dialed can be quickly redialed.
RReeddiiaalliinngg ffrroomm SSttaannddbbyy MMooddee
FFrroomm tthhee HHaannddsseett
11
Press .
The ph one num ber t hat w as la st dialed appears on the displa y.
22
Press again.
Each press of will display one of the las t thr ee numbers dialed.
MMoosstt
rreecceenntt
33
Press . “
is displayed.
44
Then the selected number is dialed. After about 5 seconds, the call-time
display appears.
55
To hang up, press or place the handset on t he base. The call-time will
be displayed for about 5 seconds.
talk
Talk“ appears on the display, then the volume setting
talk
• If the number exceeds
32 digits, only the first
32 digits are retained
for redialed.
• Press and hold
delete/int com
delete the displayed
redial number.
• Refer to terminology
explanation on Page 3,
if necessary.
BASICS
to
[ 19 ]
BASICS
Page 22

RReeddiiaall ffrroomm TTaallkk MMooddee
Only the last number
dialed can be accessed
talk
afte r has been
pressed.
11
Press .
“
22
Press .
talk
Talk“ appears on the display.
The last number dialed will be displayed and redialed.
33
To hang up, press or place t he handset on the base. The call-time will be
talk
displayed for about 5 seconds.
FFrroomm tthhee BBaassee
11
To call the las t number dialed from the base,
press .
22
Press . The last number dialed fr om the base
speaker
redial/p
is redialed.
speaker
Microphone
33
To hang up, press .
Traveling Out-of-Range
During a call, as you begin to move your handset too far f rom your base unit,
noise increases. If you pass t he r ange limits of t he base unit, your call will
terminat e within 30 seconds.
BASICS[ 20 ]
Page 23

Storing Phone Numbers and Names
Memor y Dialing allows you to dial a number using just a few key strokes. Your
TRU 3485 stor es up to 20 names/numbers in handset plus 10 numbers in the base.
WWiitthh tthhee HHaannddsseett
11
Press and hold until “Memory Store“
is displayed.
22
Press and or enter a two-digit number (01 - 20) to select t he memor y
•
ª
location where you would like to s tor e the number.
33
Press . The f oll owing scr een appears and a
cursor f lashes indicating that t he display is ready f or
the name to be ent ere d.
If t his screen appears, the select ed memor y location is
already s tor ed. Then you mus t either change the entry
in this location, clear the entr y in t his location, or
select “
44
Use , , , , or to enter the name. The name cannot
Go Back“ to choose another location.
•
#
ª
delete/int com
exceed 13 char acte rs.
• Use and to scroll th rough the ch aracter menu. It cont ains upper and
•
ª
lower case letter s and various char acters.
• Use and to move the cursor t o the desired location.
• Use to delete char acters as needed.
• Press and hold to delete all t he char acter s.
#
delete/int com
delete/int com
Memory Store
01
02
Store Name
Edit Memory07
Delete Memory07
Go Back
MEMORY DIALING
In memory dialing
operation, you must press
a key within 20 seconds or
the phone will return
to standby. If you return
the handset to the base,
the phone will return
to standby also.
MEMORY DIALING
[ 21 ]
Page 24

• The pause feature is
useful for long distance
calling, credit card
dialing, or sequences
that require a pause
between digits.
• The 10 memory locations
in the base are
independent locations
from the handset.
• The 10 memory locations
are represented by the
numbers 0-9 on the
keypad. If you store a
number in one of
locations, then attempt
to store a different
number in the same
location later, the new
number will overwrite
the previous one.
55
Press . “Store Number“ is displayed.
The cursor f lashes indicating that t h e display is ready
for the number t o be entered.
66
Use the number ke ypad to enter t he phone number.
The phone number cannot exceed 20 digits.
• Use to enter pause in the dialing sequence.
The display shows a “
P“. E a ch pause counts as one
digit and repr esents a two second dela y of time between
the digits.
• Use to delete digits as needed.
77
Press . The handset beeps and displays the
delete/int com
conf ir mation screen. Memor y stor age is complete.
For ex ample, if you s tore a name and number int o
memor y location number 07, the display shows
“
Memory07 Stored“.
After about 2 seconds, “
88
Press to return to standb y mode.
Memory Store“ is displayed.
WWiitthh tthhee BBaassee
11
Pres s . The
22
Dial the number you wish t o stor e.
(The phone number cannot exceed 20 digits.)
ssttaattuuss
Store Number
Store Number
8178583300
Memory07 Stored
Memory Store
07 UNIDEN CORP
08
LED blinks.
33
Press . Enter the memor y location number (0-9)
on the ke ypad. The
ssttaattuuss
LED goes out.
A conf ir mation tone sounds and t he number is s tored.
MEMORY DIALING[ 22 ]
Page 25

Making Calls with Memory Dialing
delete/int com
talk
WWiitthh tthhee HHaannddsseett
MMeemmoorryy ddiiaalliinngg ffrroomm SSttaannddbbyy MMooddee
11
Press .
The handset displays your programmed memor y locations.
22
Press and or ent er a two-digit number (01 - 20) t o
•
ª
select the memor y location y ou would like to dial.
33
Press . “
talk
Talk“ and the volume setting appear on
the display. Then the displayed number is dialed.
DDiissppllaayy aa PPrrooggrraammmmeedd NNuummbbeerr
#
Use and to t oggle between the names displa y and the numbers display.
PPrrooggrraamm nnaammee PPrrooggrraamm nnuummbbeerr
1
01 UNIDEN CORP
02 JOHN DOE
03 MOM AND DAD
01 8178583300
02 5452930
1
03 8175551212
01 UNIDEN CORP
02 JOHN DOE
03 MOM AND DAD
Talk
0123456789012
• If you press
before
, you can confirm
the name and number
stored in the selected
memory location. To exit
this mode, press and
hold
until the display clears.
• To exit the memory
function without dialing,
press . The
handset returns to
standby.
• Whenever you are using a
menu screen, you mus t
press a key within 20
seconds or the phone
will return to standby.
MEMORY DIALING
When the s tor ed phone number has 14 or more digits,
“ \ “ is displayed next to the 12th digit. Pr ess to see
the extra digits and to return.
#
05 012345678901
06 011813554329
07
MEMORY DIALING
[ 23 ]
Page 26

MMeemmoorryy ddiiaalliinngg ffrroomm TTaallkk MMooddee
11
Press . “Talk“ and the
volume setting appear.
22
Press .
33
Enter a two-digit number (01 - 20) t o select the memor y
talk
Talk
location of the desired phone number. The selected phone
number is displayed. Then the number is dialed.
44
To hang up, press .
talk
WWiitthh tthhee BBaassee
11
Press .
22
Press . Enter the memor y location number
(0-9) to dial t he number.
33
To hang up, press .
speaker
speaker
Talk
<High>
Talk 0:00
Talk 0:35
0123456789012
Microphone
MEMORY DIALING[ 24 ]
Page 27

Editing a Stored Name and/or Phone Number
11
Press and hold until “Memory Store“
is displayed.
22
Press and or enter a two-digit number (01 - 20)
•
ª
to select the memor y location y ou would like to edit.
33
Press .
The fo ll owing scr een appears with the memor y location
number that y ou have select ed in t he display.
•
44
Press or to select “
ª
Edit Memory“ , then press
. The fol lowing screen appears.
The cursor f lashes indicating that t h e display is ready
for the name t o be edited. When a name has not been
stor ed, th e cur sor appears at the beginning of the
second line.
Memory Store
01 UNIDEN CORP
02 JOHN DOE
Edit Memory01
Delete Memory01
Go Back
Store Name
UNIDEN CORP
•
55
Press , , , , or to edit the name .
ª
delete/int com
(See page 21.)
To edit only the phone number, skip this s tep.
66
Press . The f oll owing scr een appears.
The cursor f lashes indicating that t h e display is ready
for the number t o be edited.
77
Use the number keypad, or to edit t he
delete/int com
phone number. The phone number cannot exceed 20 digits.
(See page 22.)
If you don´t want to chang e the phone number, skip this ste p.
Store Number
817858330
MEMORY DIALING
MEMORY DIALING
[ 25 ]
Page 28

To edit the numbers that
you have stored in the
base, simply overwrite the
existing number. Refer to
“ Storing Phone Numbers
and Names; With the
Base“ on Page 22.
88
Press . The handset beeps and displays the
conf ir mation screen. The memor y stor age is complete.
Memory01 Stored
For ex ample, if you s tore a name and number int o memor y
location number 01, t he display shows “
Stored
“. A f ter about 2 seconds, “Memory Store“
is displayed.
99
Press to return to s tandb y mode.
Memory01
Memory Store
01 UNIDEN CORP
02 JOHN DOE
Erasing a Stored Name and Phone Number
11
Press and hold until “Memory Store“
is displayed.
22
Press and or ent er a two-digit number (01 - 20) t o
•
ª
select the memor y location you would like to edit.
33
Press .
The fo ll owing scr een appears with the memor y location
number that y ou have select ed in t he display.
Memory Store
01 UNIDEN CORP
02 JOHN DOE
Edit Memory02
Delete Memory02
Go Back
44
Press to move the pointer do wn to “
command line.
55
Pres s . The f oll owi ng confir mation
screen appears.
66
Press to move the pointer to “
MEMORY DIALING[ 26 ]
ª
•
Delete Memory“
Yes“.
Edit Memory02
Delete Memory02
Go Back
Delete Memory02?
Yes
No
Page 29

77
Press or .
delete/int com
There is a conf ir mation t one and the entry is deleted.
The fo ll ow ing screen appear s.
88
After a f ew seconds t he display retur ns to the
“
Memory Store“ sc reen.
You may select another number to delet e (return to
step 2) or press to retur n to s tandb y.
WWiitthh tthhee BBaassee
11
Press .
22
Press again.
33
Enter the memor y location number (0-9) of t he
number you wish t o delete. The
out. A conf ir mation tone indicat es the number
has been erased.
Memory02 Deleted
Memory Store
02
03 MOM AND DAD
ssttaattuuss
LED goes
MEMORY DIALING
MEMORY DIALING
[ 27 ]
Page 30

3-way Conferencing
speaker
The Uniden TRU 3485 per mits 3-way conversations betw een
the handset, base and outside line.
• Pressing the
key on the base while
dialing with the handset
will set the 3-way
conversation mode, and
dialing is not affected.
• During a 3-way
conversation, you can
only dial from the
handset.
WWhheenn ssppeeaakkiinngg oonn tthhee hhaannddsseett
11
Press on the base
to join the 3-w ay conv er sati on.
22
To hang up, press on
the base. The handset will still
be connected to the call.
Microphone
WWhheenn ssppeeaakkiinngg oonn tthhee bbaassee
11
Press on the handset to join t he
3-way conversation.
22
To hang up, retur n the handset to the
base, or press on t he handset.
The base will still be connect ed to
the call.
speaker
speaker
talk
talk
TELEPHONE FEATURES[ 28 ]
Page 31

Intercom Feature
IInntteerrccoomm ffrroomm tthhee bbaassee ttoo hhaannddsseett
TELEPHONE FEATURES
11
Press on the base. The handset and t he base beep. (If no answer,
press again to disconnect.)
22
Press or on the handset to answ er. “
page/int'com
page/int'com
delete/int com
talk
Intercom“ appears
on the display.
33
To tur n off the intercom, press on the handset or on the base.
speakertalk
IInntteerrccoomm ffrroomm tthhee hhaannddsseett ttoo bbaassee
11
Press on the handset. (If no answe r, press again
to disconnect.)
22
At t he base, press or to answer. Speak into the base
page/int'com
speaker
microphone.
33
To tur n off the intercom, press on the handset or on the base.
delete/int comdelete/int com
speakertalk
If the page is not answered
within one minute, the
paging sounds stops
automatically.
TELEPHONE FEATURES
[ 29 ]
Page 32

Call Transfer Feature
TToo TTrraannssffeerr ffrroomm tthhee HHaannddsseett ttoo tthhee BBaassee
11
Press on the handset. The caller is put on hold and t he intercom
delete/int com
tone sounds on the base.
22
Press or on the base. The inter com mode is activat ed,
page/int'com
speaker
but the caller is s till on hold.
33
To tr ansfer t he call to the base, press on the handset. To cancel the
transf er, press on the base.
speaker
talk
TToo TTrraannssffeerr ffrroomm tthhee BBaassee ttoo tthhee HHaannddsseett
11
Press on the base. The caller is put on hold and the intercom t o ne
sounds on the handset.
22
Press or on the handset. The int ercom mode is activ ated ,
but the caller is s till on hold.
33
To tr ansfer t he call to the handset, press on the base. To cancel
the transf er, press on the handset.
page/int'com
delete/int com
talk
speaker
talk
TELEPHONE FEATURES[ 30 ]
Page 33

Caller ID
YYoouu mmuusstt ssuubbssccrriibbee ttoo CCaalllleerr IIDD sseerrvviiccee ttoo uussee tthhiiss ffeeaattuurree..
When the t elephone rings, t he Caller ID featur e allows you t o view t he caller´s
name and phone number on the display before you answer t he phone.
The handset displays the phone number of the incoming call, t he name, time,
and the number of calls. Additionally, you can dial the displa yed number and
sto re t he inf or mation f or memor y dialing.
Make sure you have turned on t he Caller ID/Call Waiting feature (See pag e 12).
• If you answer a call
before the Caller ID
message is received
(Example: before the
second ring), the
Caller ID message will
not appear.
CALLER ID FEATURES
When the Telephone Rings
11
When the Caller ID message is received, t he display shows the caller´s phone
number along with the date and time. The incoming call inf or mation is s tored
in the Caller ID record. If the Caller ID service includes t he calle r´s name, the
caller´s name appears on the display (up to 15 letters).
The date and
time received
Caller's name
Caller's phone number
5/11 12:30PM 01
UNIDEN CORP
817-858-3300
Here are some typical displa ys;
WWhheenn tthhee pphhoonnee nnuummbbeerr
aanndd nnaammee ddaattaa aarree rreecceeiivveedd
WWhheenn iinnvvaalliidd ddaattaa iiss rreecceeiivveedd
WWhheenn aa pprriivvaattee nnuummbbeerr iiss rreecceeiivveeddWWhheenn aa pprriivvaattee nnaammee iiss rreecceeiivveedd
Number of calls
from the same
Caller ID
CALLER ID FEATURES
• When the call is received
via a telephone company
that does not offer
Caller ID service, the
caller´s phone number
and name do not appear.
(This includes
international calls.)
• When the call is via a
private br anc h exchange
(PBX), the caller´s
phone number and name
may not appear.
[ 31 ]
Page 34

• In Caller ID operation, if
•
no key is pressed for
more than 20 seconds,
an error tone sounds and
the telephone returns to
the standby mode.
WWhheenn aann uunnkknnoowwnn nnuummbbeerr iiss rreecceeiivveeddWWhheenn aann uunnkknnoowwnn nnaammee iiss rreecceeiivveedd
22
When you pick up t he phone, the display changes t o “Talk“ .
Data errors appear as “2“ .
• If a call comes in via a
telephone system that
does not offer Caller ID
service, no information
is stored.
•“End“ appears when
you have reviewed all
messages in the Caller ID
list. Press
repeatedly to return to
the summary screen.
• Each message can be up
to 15 charac ters for the
phone number and the
name.
Viewing the Caller ID Message List
The Caller ID list sto res info rmation f or up to 50 incoming calls - e ven
unanswered calls.
11
Press .
The summar y screen appears.
The screen shows the number of new messag es and
total messages.
22
Press to display the latest Caller ID message.
33
Press to see the next messag e. Or press to see
previous message.
44
Press to retur n to standby.
CALLER ID FEATURES[ 32 ]
cid
ª
ª
cid
New :01
Total:02
5/17 12:30PM 03
UNIDEN CORP
817-858-3300
•
Page 35

Deleting Information from the Caller ID List
The TRU 3485 sto res up t o 50 messages. If t he phone receives the 51st message,
the oldest one in the lis t is aut omatically deleted. Caller ID dat a can also be
deleted manually.
DDeelleettiinngg aa CCaalllleerr IIDD mmeessssaaggee
11
Press . Displa y t he message to be deleted from
the Caller ID list by pressing or .
22
Press .
33
Press or to select “
44
Press or .
WWhheenn tthhee ppooiinntteerr iiss aatt ““
cid
delete/int com
•
ª
•
Yes“ or “No“ .
delete/int com
““ ::
Yes
ª
A t one sounds and the Caller ID messag e is deleted. The next Caller ID
message is then displayed.
WWhheenn tthhee ppooiinntteerr iiss aatt ““No““ ::
The display returns to the Caller ID message.
DDeelleettiinngg aallll CCaalllleerr IIDD nnaammeess//nnuummbbeerrss
5/17 12:30PM 03
UNIDEN CORP
817-858-3300
Delete Message?
Yes
No
• While using the
“
Delete All?“ or
“
Delete Message?“
screen if no key is
pressed for more than
20 seconds, an error
tone sounds and the
telephone returns to
standby.
• If you get an incoming
call or page, the deleting
operation is canceled
and the telephone
returns to standby so
you can answer the call
or page.
CALLER ID FEATURES
11
Press .
22
Press .
cid
delete/int com
New :01
Total:02
Delete All?
Yes
No
CALLER ID FEATURES
[ 33 ]
Page 36

•
33
Press or to select “Yes“ or “No“ .
ª
• You cannot make a call
from the Caller ID list if
your TRU 3485 is
connected to private
branch exchange (PBX).
• When a long distance
call has been set, “
appears in the display.
1“
44
Press or .
WWhheenn tthhee ppooiinntteerr iiss aatt ““
delete/int com
““ ::
Yes
A t one sounds and all stor ed Caller ID messages
are deleted.
WWhheenn tthhee ppooiinntteerr iiss aatt ““
No
““ ::
The display returns to the summary screen.
Using the Caller ID List
CCaalllliinngg aa ppaarrttyy ffrroomm tthhee CCaalllleerr IIDD lliisstt
You can place a call from the Caller ID lis t. The TRU 3485 s tores up t o
50 messages.
11
Press . Select t he phone number that y ou want t o dial
by pressing or .
22
Press . The displayed phone number dials
automatically.
LLoonngg DDiissttaannccee ccaallllss aanndd AArreeaa CCooddee sseettttiinngg//CCaanncceellllaattiioonn
cid
talk
•
ª
Total:00
New :01
Total:02
5/17 12:30PM 03
UNIDEN CORP
817-858-3300
Talk
8178583300
[ 34 ]
Pressing while the incoming call inf ormation is displa yed (in step 1) will
1
set or cancel a long distance call. Pr essing will set or cancel an area
code setting.
CALLER ID FEATURES
3
Page 37

DDiiaall eeddiitt
You can edit the phone number of Caller ID dat a when you pr ess
af ter the s tep 1.
SSttoorriinngg CCaalllleerr IIDD mmeessssaaggeess iinn MMeemmoorryy ddiiaalliinngg
Messages shown in the Caller ID list can be stor ed in memor y dialing.
Using the incoming call info rmation (i.e., Caller ID lis t), the phone number of
the par ty on the Caller ID list can be sto red in memor y dialing.
11
Press .
Select the phone number t o be stored from the Caller ID
list by pressing or .
22
Press .
33
Press and or enter a two-digit number (01 - 20)
to select the memor y location t o be st ored.
44
Press .
A t one will sound. The number is sto red in memor y,
and the displa y returns to the Caller ID list.
cid
•
ª
•
If a message has already been s tored in the selected memor y
number location, a conf irmation screen is displa yed. Press
to select “
display returns to the Caller ID list.
ª
Yes“. Pre ss to o verwrite. The
5/17 12:30PM 03
UNIDEN CORP
817-858-3300
Select Location
01 UNIDEN CORP
02 JONE DOE
5/17 12:30PM 03
UNIDEN CORP
817-858-3300
Replace Memory?
•
Yes
No
• You can not store
a Caller ID message if no
phone number appears in
the message.
• If there is an incoming
call or page, memor y
storage is canceled and
the telephone is set to
receive the incoming call
or page.
CALLER ID FEATURES
CALLER ID FEATURES
[ 35 ]
Page 38

Using “Caller ID on Call Waiting” Service
““CCaalllleerr IIDD““ aanndd ““CCaallll wwaaiittiinngg““ aarree sseeppaarraattee sseerrvviicceess.. CCIIDDCCWW ((CCaalllleerr IIDD oonn
CCaallll WWaaiittiinngg)) ppeerrffoorrmmss tthhee ssaammee aass rreegguullaarr CCaalllleerr IIDD oonn aa ccaallll wwaaiittiinngg nnuummbbeerr..
YYoouu mmuusstt ssuubbssccrriibbee ttoo tthhee ““CCaalllleerr IIDD oonn ccaallll wwaaiittiinngg ((CCIIDDCCWW)) sseerrvviicceess““ bbeeffoorree
yyoouu ccaann uussee tthhee ffoolllloowwiinngg ffeeaattuurreess.. TThhee ““CCaallll wwaaiittiinngg““ sseerrvviiccee ccaann aallssoo bbee
uusseedd iinnddeeppeennddeennttllyy.. PPlleeaassee ccoonnttaacctt yyoouurr llooccaall tteelleepphhoonnee ccoommppaannyy ffoorr ddeettaaiillss..
11
When a new incoming call ar rives during your cur rent
telephone call, the phone number and t he name of the
caller are displayed.
Talk 10:30
UNIDEN CORP
817-858-3300
22
Press .
flash
You will be able to t alk with the second caller. The f i rs t caller
will be put on hold.
33
To retur n to the firs t caller, press again.
When CIDCW is set to “Opt“ in the Caller ID setup menu (see pag e 12), you can
press the ke y afte r receiving a call w aiting call and view a lis t of ways to
handle the new call. Choose an option using t he and keys and press
CALLER ID FEATURES[ 36 ]
to activat e.
flash
•
ª
Page 39

Call Waiting Features
Your TRU 3485 gives y ou new options f or call waiting. A t the touch of a butt on,
you can ask the caller t o hold or confe rence t hem into your curr ent call. You
may be requ ired to subscribe t o call waiting and call w aiting options t o use
these features. N ot all features are available in all areas. Check with your local
telephone company for details.
11
When you r eceive a call w aiting call, press
for a list of options.
22
Press the or key or number keys to select
•
an option.
33
Press .
A conf ir mation scr een will appear.
Your TRU 3485 is pre-programmed wit h six call w aiting options. You may select
to ask the calling party to hold, send them a busy messag e, or conference
them into the cur rent call. You may also select t o answer and drop the fir s t
caller or, at an y time, c hoose to drop the first or drop the last caller.
Check with your local telephone company for a full list of options.
ª
You can also answer a call
waiting call immediately
by pressing . The
first caller will be placed
on hold. To return to the
original caller, press
flash
flash
again.
CALLER ID FEATURES
CALLER ID FEATURES
[ 37 ]
Page 40

The Integrated Answering Device
The TRU 3485 has a built-in answering sys tem that answe rs and recor ds
incoming calls.
You can also use your answ ering sys tem to record a conver sation, leave a voice
memo message for other s who use the phone, or to announce a special messag e
to callers when you´re away from y our phone.
Features
• Digit al Tapeless Recording
• 15 minutes of Recording T ime
• Selective Gr eetings (Outgoing Messages)
• Message Received Time and Da y Announcement
• Remot e Message Retrieval and Room Monit or
• Toll Saver
• Conve rsation Recor ding
Digital Tapeless Recording allows you to quickly review, save or delete the
messages. You ´ll n ever have to wo rry about a t ape wearing out, jamming, or
resetting impr operly.
The Integrat ed Answ erin g S ys tem is easy and conv enient to use, but please
read th rough all of t he instr uctions carefully.
THE INTEGRATED ANSWERING DEVICE[ 38 ]
Page 41

Setting Up Your Answering System
TTuurrnniinngg tthhee aannsswweerriinngg ssyysstteemm oonn//ooffff
11
To tur n the answering sy stem on, press . The current gr eeting
ans on/off
message will be played and a tone will sound.
22
To tur n the answerin g sys tem of f, pres s again.
When the answerin g sys tem is full, displays on the base and t he system
announces “No remaining time“. You should delete some messages so that
the system can record new messag es.
ans on/off
SSeettttiinngg tthhee cclloocckk
The clock on TRU 3485 Answer ing Sy stem s t ar ts when po wer is applied to the
base. Follow these steps to set t he cloc k to the co rr ect time.
11
Press and hold until a tone sounds.
22
Fir st, pr ess or repeated ly until t he corr ect day of the week is
announced. (Number through displa ys on the base as each day is
announced.) Press again to select the da y.
33
Next, press or r epeatedly until you hear t he corr ect hour
setting. Numbers through display on the base as each hour is
announced. Press again to select the corr ect hour.
44
Press or repeatedl y until you hear the cor rect minut e setting.
Numbers through display on the base as each minute is announced.
Press again to select t he cor r ect minute.
clock
clock
clock
clock
THE INTEGRATED ANSWERING DEVICE
• Press and hold
or to quickly
scroll through numbers
on the display.
• If you don´t complete
the clock setting within
two minutes, the system
returns to standby.
[ 39 ]
ANSWERING DEVICE
THE INTEGRATED
Page 42

55
The LED displays or . Press or until you hear the cor rect
AM/PM setting.
• You can record a greeting
up to 30 second.
• Position yourself as near
to the base as possible
and speak clearly when
recording your outgoing
message.
66
Press again to end the time/da y setting. The TRU 3485 announces
clock
the time that y ou have set.
SSeettttiinngg yyoouurr ggrreeeettiinngg
When you receiv e a call, the answ ering sy s tem automatically plays either a
preset message or your o wn greeting.
PPrreesseett MMeessssaaggee
▼
The fo ll owing messag e is prerecorded:
“Hello, no one is available t o take your call. Please leave a message after
the tone.“
RReeccoorrddiinngg aa ppeerrssoonnaall oouuttggooiinngg mmeessssaaggee ((GGrreeeettiinngg))
▼
11
Press and hold until you hear a tone. S tar t recording your
message immediately af ter you hear t he tone end.
22
When you f inish r ecording your message, press o r .
A t one sounds and your message pla ys back on t he phone.
CChhoooossiinngg bbeettwweeeenn tthhee ttwwoo oouuttggooiinngg mmeessssaaggeess
▼
11
Press to play the outgoing message.
greeting
greeting
playgreeting
22
Press again while t he message is played. This swit ches between
greeting
the two options.
THE INTEGRATED ANSWERING DEVICE[ 40 ]
Page 43

SSeelleeccttiinngg tthhee mmeessssaaggee rreeccoorrdd ttiimmee
You can set your answering sy stem to recor d messages up to one or
four minutes long.
One minute option: move the
Four minutes option: move the
AAnnnnoouunnccee oonnllyy ffeeaattuurree::
▼
RREECC TTIIMMEE
RREECC TTIIMMEE
switch t o 11.
switch t o 44.
The announce only feature plays an outgoing message, but it will not allow
the caller to leave a message. Mo ve the
RREECC TTIIMMEE
switch t o t he
AANNNN
position.
The message counter LED displays ““ when the system is on standby.
Prerecorded outgoing message for Announce only feature is:
“Hello, no one is available t o take your call.“ (twice)
SSeelleeccttiinngg aa PPIINN ccooddee
To play your messages fr om a remote location, you will need t o enter a two-digit
Personal Identif ication N umber (PIN) code (00-99). To select a PIN, perfo rm the
follo wing s teps.
11
On the base, press and hold until a tone sounds and t he LED displays .
22
To set t he fir st number, press or repeatedly to scroll from 0 to 9.
When the desired number appears in the display, press .
33
To set t he second number, press or to scroll from 0 to 9. When the
desired number appears in the display, press . Then the enter ed PIN code
is announced.
THE INTEGRATED ANSWERING DEVICE
Press and hold or
to quickly scroll
through numbers on the
display.
[ 41 ]
ANSWERING DEVICE
THE INTEGRATED
Page 44

• If you answer at another
phone extension and the
greeting has started, you
cannot stop the
message. Wait until your
greeting is complete
before starting your
conversation.
SSeettttiinngg rriinngg ttiimmee sswwiittcchh
The ring time/toll saver swit ch allows you to set the number of rings the caller
hears before the answ ering sys tem plays your outgoing message. You can set the
switch to answ er aft er tw o rings or af ter four rings.
Once the gr eeting has s ta r ted, y ou can st op it when you pic k up the call at t he
handset or base.
In th e
TTSS
(Toll Saver) position, t he answering sy stem picks up af ter two rings if
you have new messages, and after four rings if t her e is none. This way, if you
call long distance t o check your messages, you can hang up after the thi rd ring
to avoid billing charges.
Using Your Answering System
PPllaayyiinngg yyoouurr mmeessssaaggeess
The base LED shows the number of total messag es on the display. If the display
is blinking, then t her e are new messag es waiting for y ou. The TRU 3485 is
designed to play your new messages f ir st. After y ou play your new messages you
can then play your old messages.
• To stop playing your
messages, press
play
[ 42 ]
again.
THE INTEGRATED ANSWERING DEVICE
11
Press . The sys tem announces the number of ne w and old messages,
play
then the incoming message s are played. The time and da y each message was
received is announced af ter t he message is pla yed.
22
When all new messages have pla yed, a tone is heard. The message count er LED
stops f lashing t o indicate that all of t he new messages ha ve been reviewed.
33
After you ha ve reviewed all your messages, y ou can play your old messages
again. Press and follow the instructions abo ve.
play
Page 45

RReeppeeaattiinngg aa mmeessssaaggee
11
Press to review your message. The number of sto red messages
play
is announced.
22
After a message has pla yed for a few seconds, press to repeat the message.
33
Press at any time to stop reviewing messages and retur n to standb y.
play
The message counter LED shows the tot al number of messages still on t he system.
SSkkiippppiinngg aa mmeessssaaggee
11
Press to review your messages. The number of messages is announced.
22
Press at anytime t o skip t o the next messag e.
33
Pres s at an y time to s t op r evie wing y our messages and retur n to standby.
The message counter LED shows the total number of messag es on the system.
play
play
DDeelleettiinngg aa mmeessssaaggee
DDeelleettiinngg iinnddiivviidduuaall mmeessssaaggee
▼
11
Press to review your message.
22
If you decide t o delete a messag e, press anytime during the messag e.
The sys tem beeps and immediatel y goes to the next message.
DDeelleettiinngg aallll mmeessssaaggeess
▼
Press and hold while the sys tem is in standby. A tone sounds when all
messages are deleted. If t her e are an y messages you have not r eviewed, you can
not delete all messages at once. An er ror t one occurs.
play
delete
delete
THE INTEGRATED ANSWERING DEVICE
• Pressing before
2 seconds (4 seconds
from remote) of the
message has played
causes the system to
scan back one message.
• If you have several
messages, press
and hold until you return
to the message you want
to replay.
• Each time is
pressed, the system
scans forward one
message.
• If you have several
messages, press and
hold to find the
message you want to
play.
• When you press ,
you are permanently
deleting the message.
The message cannot
be replayed.
delete
[ 43 ]
ANSWERING DEVICE
THE INTEGRATED
Page 46

VVooiiccee mmeemmoo
The voice memo function allows the user t o record a message (up t o 10 minutes)
on the base.
• The voice memo function
is completely
independent of the
outgoing message.
It s handy for leaving
others a quick message.
• A voice memo message
will be stored as a typical
recorded message.
• Position yourself as near
to the base as possible
and speak clearly.
• A recorded conversation
is stored and played back
with typical recorded
messages.
11
Press and hold until you hear a tone. The messag e counter
voice memo
LED blinks.
22
Speak into the microphone.
33
When you h ave f inished, pr ess or to stop recording.
playvoice memo
The sys tem retur ns to standb y.
44
To play voice memo, press .
play
RReeccoorrddiinngg aa ccoonnvveerrssaattiioonn
You can record up to 10 minutes of conversation while you are making your call
from the handset.
11
During the conversation from the handset, press and hold on the
base. The unit begins recording and the LED blink s. Both par ties can hear
tones ever y 15 seconds.
22
To stop the recording, press or .
You cannot recor d a conversation while y ou are speaking on t he base.
playvoice memo
voice memo
THE INTEGRATED ANSWERING DEVICE[ 44 ]
Page 47

RReemmoottee aacccceessss aawwaayy ffrroomm hhoommee
You can oper ate your answering sys tem from a remot e location using any touchtone telephone. Use this function t o check for recorded messag es, to play or
delete messages, t o record a new outgoing message, and t o monitor sounds in
the room.
11
Call your telephone number.
22
While the gr eeting message is played, pr ess # and your PIN code wit hin
2 seconds.
If t he answering sy stem is of f, let it ring 10 times. The tone sounds. Then,
press # and y our PIN code wit hin 2 seconds.
33
The answering sy s tem announces the time and da y and the number of
messages stored in memor y. Then the message pla yback aut omatically begins.
44
You may continue t o lis ten to your message, or y ou may select a command
from t he f ol lo wing c ha r t.
CCoommmmaanndd FFuunnccttiioonn
# then
# then
# then
# then
# then
# then
# then
# then
# then
# then
55
After all of y our messages have played, or t he playback time ex ceeds 4
minutes, you will hear int er mitt ent beeps indicating t hat the sy stem is in t he
command waiting mode. You may enter anot her command at this time fr om
the cha r t abo ve.
11
Repeat a message
22
Playing your messag es
33
Skipping a message
44
Deleting a message
55
Stop message playback
66
Answering sy stem on
77
Voice memo record/stop (up to 4 minute s recording time)
88
Greeting message record/s top
99
Answer sy st em of f
Room monitor
*
THE INTEGRATED ANSWERING DEVICE
• During the remote
operation, displays
on the base.
• You must enter a
command within 15
seconds when entering
command waiting mode
is started otherwise the
answering system
automatically hangs up
and returns to standby.
• The system will only
playback messages for
four minutes and then it
returns to command
waiting mode. To
continue playing your
message, press # then
again within 15 seconds.
[ 45 ]
22
ANSWERING DEVICE
THE INTEGRATED
Page 48

66
When you f inish, hang up t o exit the sys tem.
The answering sy stem aut omatically retur ns to standby.
RReemmoottee rroooomm mmoonniittoorr
If you enter an incorrect
PIN code three times, an
error tone sounds and the
phone automatically
hangs up.
You can call your answ ering sys tem from an y touch-tone phone and monito r
sounds in the room where your base is ins talled.
11
Call your telephone number.
22
While the gr eeting message is played, pr ess # and your PIN code.
33
The answering sys tem begins announcing the time and da y.
44
Press # then
55
Press # then
55
to stop the messages.
. You hear sounds in the room wher e your phone is installed.
*
After 15 seconds, t he answering sy stem retur ns to the command waiting mode.
66
Press # then
to monitor t he r oom for another 15 seconds. Or select anot her
*
remote function. Or hang up t o exit the sy stem. The answ ering sys tem
automatically returns to st andby.
TTuurrnn oonn tthhee aannsswweerriinngg mmaacchhiinnee rreemmootteellyy
If y ou have for gotten to tur n on your answ ering mac hine, you can turn it on
remote ly from an y touch-t one t elephone.
11
Call your telephone number.
22
Wait t en rings until the mac hine answer s.
33
Press # and enter y our PIN code wit hin 2 seconds. The answering sy stem
begins to announce t he time and day.
44
Press # then
55
Hang up the phone and subsequent calls will be answ ered by the machine.
66
to turn the answering sy stem on.
THE INTEGRATED ANSWERING DEVICE[ 46 ]
Page 49

Changing the Digital Security Code
The digital security code is an identification code used to connect t he handset
and the base unit. No rmall y, setting the code is not necessar y.
The f i rs t time y ou c ha rg e your handset, t he security code is automaticall y set.
(See page 6.)
In the ra re situation t hat you suspect anot her cordless t elephone is using the
same security code, you can change t he code.
11
Remove the handset from the base unit.
Press on the base.
22
While the handset is emitting t he paging sound,
replace the handset t o the base unit. The paging
tone stops.
Leave the handset on the base f or mor e than
3 seconds. A random, ne w security code is set.
page/int'com
If the handset battery pack
is completely discharged o r
the battery pack is
removed, the digital
security code will be lost.
If this happens, a new
security code is set
automatically next time the
battery pack is charged.
INFORMATION
ADDITIONAL
ADDITIONAL INFORMATION
[ 47 ]
Page 50

Installing the Beltclip
TToo aattttaacchh tthhee bbeellttcclliipp
Inser t the beltclip into the holes on
each side of t he handset. Press do wn
until it click s.
TToo rreemmoovvee tthhee bbeellttcclliipp
Pull both sides of t he beltclip t o
release the tabs fr om the holes.
Headset Installation
Your phone may be used with an optional headset, the Uniden
HS910. To use this featur e, inser t headset plug into the headset
jack. Your phone is ready fo r hands-free conversations.
(Headset may be purchased by calling t he Uniden Pa r ts
Department or visiting t he website. See P age 7.)
ADDITIONAL INFORMATION[ 48 ]
Page 51

Note on Power Sources
BBaatttteerryy rreeppllaacceemmeenntt aanndd hhaannddlliinngg
When the ope rating time becomes shor t, even af ter a batt er y is rech arged ,
please replace the batter y.
With normal usag e, your batte r y should las t about one yea r.
Please contact y our p lac e of p urchase or t he Uniden Pa r ts Depar tment for a
replacement batte r y. (See Page 7.)
PPoowweerr FFaaiilluurree
During the period t hat the power is off, you will not be able to make
or receiv e calls with the t elephone.
RREECCYYCCLLIINNGG NNIICCKKEELL--CCAADDMMIIUUMM BBAATTTTEERRIIEESS
NNIICCKKEELL--CCAADDMMIIUUMM BBAATTTTEERRIIEESS MMUUSSTT BBEE DDIISSPPOOSSEEDD OOFF PPRROOPPEERRLLYY..
Nickel-cadmium cells are used in the batt er y pack. Please t ake
your used nickel-cadmium batter y pack s to a store that
recycles nickel-cadmium batteries.
INFORMATION
ADDITIONAL
CCaauuttiioonn
• Use t he specif ied batt ery pac k.
• Do not remo ve the batter y from the handset t o charge it.
• Never t hrow the batter y into a fire, disassemble it, or heat it.
• Do not remo ve or damage the batte r y casing.
ADDITIONAL INFORMATION
[ 49 ]
Page 52

Maintenance
WWhheenn sslliigghhttllyy ddiirrttyy
Wipe with a soft, dry cloth.
WWhheenn vveerryy ddiirrttyy
Wipe with a sof t clot h that has been dampened wit h diluted, neutr al
detergent. Dr y with a dry cloth.
WWhheenn tthhee cchhaarrggiinngg tteerrmmiinnaallss bbeeccoommee ddiirrttyy
Wipe with a dr y clot h or a pencil eraser, if necessary.
CCaauuttiioonn
Do not use paint t hinner, benzene, alcohol, or other chemical
products. Doing so may discolor t he sur f ace of the telephone
and damage the finish.
ADDITIONAL INFORMATION[ 50 ]
Page 53

Troubleshooting
talk
If your phone is not per fo rming t o your expectations, please tr y these simple steps f ir st.
SSyymmppttoomm
The
ssttaattuuss
LED won ´t light
when the handset is placed
in the base unit.
The audio sounds weak
and/or scratchy.
Can´t m ake or receiv e calls.
The handset doesn´t ring
or receiv e a page.
The Caller ID/CIDCW does not
display.
• Make sure the AC adapter is plugged into the base unit and wall outlet.
• Make sure the handset is properly seated in the base unit.
• Make sure the charging cont acts on the handset and base unit ar e clean.
• Press during a call to help eliminate backgr ound noise.
• Make sur e that the base unit ant enna is in a ve r tical position.
• Move the handset and/or base unit to a different location a way from metal
objects or appliances and tr y again.
• Make sur e that y ou are not t oo f a r f rom t he base.
• Check both ends of t he base unit telephone line cord.
• Make sure the AC adapter is plugged into the base unit and wall outlet.
• Disconnect the AC adapter f or a fe w minutes, t hen reconnect it.
• Reset the digit al security code (See page 47).
• Make sure is pressed.
• The batte r y pac k may be w eak. Charge the batter y on the base unit fo r
more than 15 hour s.
• The handset may be too far away from the base unit.
• Place the base unit away from appliances or met al objects.
• Reset the digit al security code (See page 47).
• The handset was picked up bef ore the second ring.
• The call was placed t hrough a swit ch boar d.
• Call your local telephone compan y to verify y our Caller ID service
is current.
• Make sur e that the CIDCW option is set t o “
• Charge the handset.
SSuuggggeessttiioonn
On“ or “Opt“ .
INFORMATION
ADDITIONAL
ADDITIONAL INFORMATION
[ 51 ]
Page 54

SSyymmppttoomm
The answering sy stem does
not work.
Messages are incomplet e.
After a power f ailure, the
outgoing message is deleted.
No sounds on the base unit
speaker during call monitoring
or message playback.
Cannot access remote call-in
features from another touchtone phone.
Sever e noise inte r ference .
SSuuggggeessttiioonn
• Make sure the base unit is plugged in.
• Make sure that t he answer ing sy stem is tur ned on.
AANNNN
• Make s ure that t he message record time is not set to
(See page 41).
• The incoming messages may be too long. Remind callers to leave a
brief message.
• The memory may be full. Delet e some or all of the saved message s.
• Record your greeting again.
The preset messages should remain.
• Adjust the speaker volume on the base unit.
• Make sure you ar e using the cor rect PIN number.
• Make sure that t he touch-t one phone y o u ´re using can tr ansmit t he
tone for at leas t two seconds. If it cannot, you may have to use anothe r
phone to access your messag e.
• Keep the handset away from microwave ovens, comput ers, remote
control toys, wireless microphones, alar m systems, int ercoms, r oom
monitor s, f luorescent lights and electrical appliances.
• Move to another location or turn off the source of interfe rence.
ADDITIONAL INFORMATION[ 52 ]
Page 55

General Information
The TRU 3485 complies with FCC P arts 15 and 68.
Operating Temperature: -10ºC to +50ºC (+14ºF t o + 12 2ºF)
AACC AAddaapptteerr IInnffoorrmmaattiioonn
AC Adapter part number: AD-312
Input Volt age : 120V AC 60H z
Output Voltag e: 9V DC 350 mA
BBaatttteerryy IInnffoorrmmaattiioonn
Batter y par t number: BT-905
Capacity: 600 mAH, 3.6V
Battery Use Time (per c har ge)
From fully charged:
Talk Mode dur ation 6 hours
Standby Mode dur ation 10 days
If t he handset is lef t of f of the base, the actual Talk Mode duration will be reduced
respective to the amount of time the handset is off the base.
Recharge your phone on a regular basis about once a week b y placing the handset on t he base for 15
hours. When the operating time becomes short, even af ter t he batte r y is recharged, please replace t he
batter y. With nor mal usage, t he battery should last about one y ear.
Replacement batteries may be purchased at your local Uniden dealer or b y contacting t he Uniden P arts
Department (800) 554-3988. Hour s are from 7:00 a.m. t o 5:00 p.m. Central Time, Monday through F riday.
We can also be reached on the web at www.uniden.com
INFORMATION
ADDITIONAL
Specif ications, features, and a vailability of optional accessories are all subject to change without
prior notice.
ADDITIONAL INFORMATION
[ 53 ]
Page 56

AAtt UUnniiddeenn,, wwee´´llll ttaakkee ccaarree ooff yyoouu!!
If y ou need any assis tance with this pr oduct, please call our Customer Hotline at
11--880000--229977--11002233
PPLLEEAASSEE DDOO NNOOTT RREETTUURRNN TTHHIISS PPRROODDUUCCTT TTOO TTHHEE PPLLAACCEE OOFF PPUURRCCHHAASSEE..
Our Uniden represent atives will be happ y to help you with any matt er s reg ar ding
the ope ration of t his unit, av ailable accessories, or any other related matter s.
Thank you for purchasing a Uniden product.
Hours: M-F 7:00 AM to 7:00 PM CST.
ADDITIONAL INFORMATION[ 54 ]
Page 57

Index
00 -- 99
3-way conferencing . . . . . . . . 28
AA
Adjusting the volume . . . . . . . 18
Answering device
Features . . . . . . . . . . . . . . 38
Setting up . . . . . . . . . . . . . 39
Using . . . . . . . . . . . . . . . . 42
BB
Base ringer switch . . . . . . . . . 18
Base speaker volume . . . . . . . 18
Battery pac k
Preparing and cha rging. . . . . 10
Replacement and handling . . 49
CC
Caller ID
Caller ID service . . . . . . . . . 31
Calling. . . . . . . . . . . . . . . 34
Call Waiting . . . . . . . . . . . . 37
Deleting . . . . . . . . . . . . . . 33
Features. . . . . . . . . . . . . . 12
Setting. . . . . . . . . . . . . . . 12
Storing . . . . . . . . . . . . . . 35
Using . . . . . . . . . . . . . . . . 34
Viewing. . . . . . . . . . . . . . . 32
Connection. . . . . . . . . . . . . . . 9
DD
Dialing mode . . . . . . . . . . . . . 9
Digital security code . . . . . . 6, 47
EE,, FF,, GG
Earpiece volume . . . . . . . . . . . 18
HH
Headset installation . . . . . . . . 48
II,, JJ,, KK,, LL
Installing t he belt clip. . . . . . . 48
Intercom . . . . . . . . . . . . . . . 29
MM,, NN,, OO
Maintenance . . . . . . . . . . . . . 50
Making a call. . . . . . . . . . . . . 14
Memory dialing
Erasing a s tored name
and phone number. . . . . . . . 26
Making calls
with memory dialing . . . . . . 23
Storing phone
numbers and names . . . . . . . 21
Mute . . . . . . . . . . . . . . . . . . 17
PP,, QQ
Package cont ents. . . . . . . . . . . 7
RR
Receiving a call . . . . . . . . . . . 16
Redialing a call . . . . . . . . . . . 19
Ringer volume . . . . . . . . . . . . 18
ADDITIONAL INFORMATION
SS
Setting up your
answering sys tem
Selecting a PIN code . . . . . . 41
Selecting the
message record time . . . . . . 41
Setting ring time switch . . . . 42
Setting the clock. . . . . . . . . 39
Setting your greeting . . . . . . 40
Turning the answering
system on/off . . . . . . . . . . . 39
Setting up the Base unit . . . . . . 8
Setting up the Handset . . . . . . 10
TT
Troubleshooting . . . . . . . . . . . 51
Tr ansf er ring a call. . . . . . . . . 30
UU,, VV,, WW,, XX,, YY,, ZZ
Using your answering sy stem
Deleting a message . . . . . . . 43
Playing your messages . . . . . 42
Recording a conversation . . . 44
Remote access
away from home . . . . . . . . . 45
Remote room monit or. . . . . . 46
Repeating a message . . . . . . 43
Skipping a message . . . . . . . 43
Voice memo . . . . . . . . . . . . 44
[ 55 ]
INFORMATION
ADDITIONAL
Page 58

Memo
[ 56 ]
Page 59

Memo
[ 57 ]
Page 60

THANK YOU FOR PURCHASING A UNIDEN CORDLESS PHONE
Covered under one or more of the following U.S. patents:
4,511,761 4,523,058 4,595,795 4,797,916 5,381,460 5,426,690
5,434,905 5,491,745 5,533,010 5,574,727 5,650,790 5,660,269
5,661,780 5,663,981 5,671,248 5,717,312 5,754,407 5,768,345
5,787,356 5,838,721 5,864,619 5,893,034 5,912,968 5,915,227
5,929,598 5,930,720 5,960,358 5,987,330
© 2000 Uniden America Corporation, Fort Worth, TX
All rights reserved.
Printed in China
UCZZ01709BZ
 Loading...