

Page 1
Page 2

Welcome
Congratulations on your purchase of the Uniden TCX905
accessory handset and charger. You can place this fully
featured cordless handset anywhere your home has AC
power.
Note: Illustrations in this manual are used for explanation
purposes. Some illustrations may differ from the actual unit.
Accessibility
Uniden provides a customer service hotline for accessibility
questions. If you have a disability and need customer service
assistance or if you have any questions about how Uniden's
products can accommodate persons with disabilities, please
call the accessibility voice/TTY line: 1-800-874-9314.
A representative is available to talk to you M-F, 8:00 am to
5:00 pm, CST. After hours, you can leave us a message, and
we will call you back. Information is also available on our
website, www.uniden.com, under the "Accessibility" link.
Important!
The TCX905 accessory handset will not operate until it is
registered to a Uniden main base. This manual describes how
to set up your new handset; for more detailed instructions on
operating your new handset, please refer to the manual
supplied with your base.
Terminology Used in this Manual
Base
Charger
Accessory
Handset
Standby
Station Any handset or the base.
Ta lk
Uniden is a registered trademark of Uniden America Corporation.
The main part of the phone that connects to your phone line
and lets you make and receive calls.
A cradle that charges an accessory handset. It connects to
power but not to a phone line.
A handset that works with an expandable phone base.
Accessory handsets must be registered to a base.
The handset is not in use. If it is off the cradle, no line has
been activated. No dial tone is present.
A telephone line has been activated on the handset or the
base, enabling a dial tone.
1
Page 3

Compatible Bases
Your phone is compatible with the following Uniden 5.8 GHz
Digital Expandable Systems: the TRU9 series (TRU9460,
TRU9465, TRU9466, TRU9480, TRU9485, TRU9488,
TRU9496), the TRU8 series (TRU8860, TRU8865, TRU8866,
TRU8880, TRU8885, TRU8888), the CLX series (CLX465,
CLX485), the Elite series (ELT560, ELBT585, ELBT595), and
the UIP18 series (UIP1868P and UIP1869V).
Please visit our website at www.uniden.com for the most upto-date list of compatible bases.
Note: Two-line operation is supported only when the handset
is registered to a two-line base.
Installing the Accessory Handset
Checking the Package Contents
Make sure your package contains the following items. If any
items are missing or damaged, contact our Customer Service
Hotline. See back cover page for contact information.
• Cordless Handset
• Charging Cradle
• AC Adapter, model # AD-0005
Input: 120V AC 60 Hz
Output: 9V DC 210 mA
• Rechargeable NiMH Battery
Pack, model # BT-446
Capacity: 800 mAh, 3.6V
•Beltclip
• Printed Material
2
Page 4
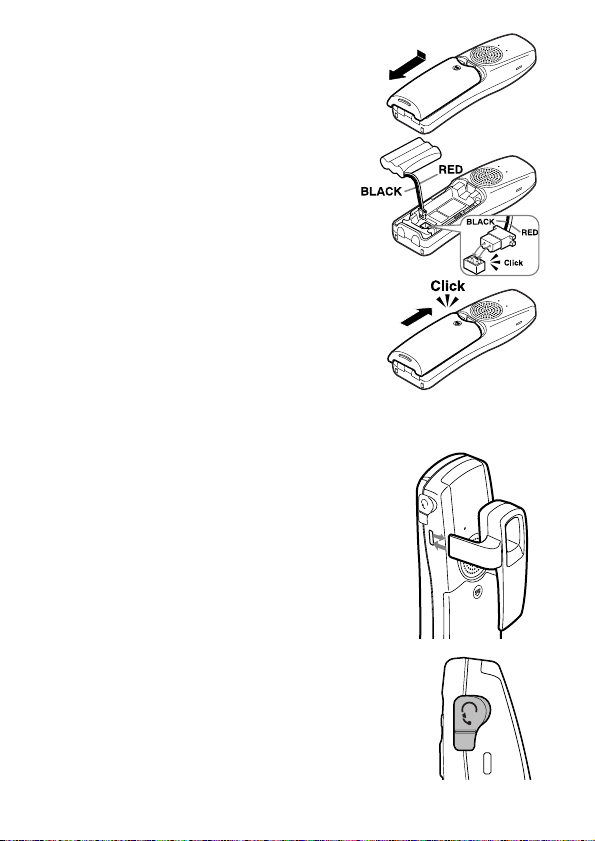
Installing the Battery
Follow the steps below to install the
rechargeable battery pack.
1. Using the finger indentation, press
in on the battery case cover and
slide it down to remove it.
2. Plug the battery connector into the
battery compartment jack. Be sure
to match the red and black wires to
the label near the jack.
3. Gently pull on the battery wires. If
the battery connector comes
loose, try connecting it again.
4. Replace the battery case cover
and slide it up until it clicks into
place.
Note: Use only the Uniden BT-446 rechargeable battery pack
supplied with your cordless telephone.
Installing the Belt Clip
Line up the tabs with the holes on each
side of the handset. Press the belt clip
down until both tabs click into place.
To remove the belt clip, pull both sides of
the clip to release the tabs from the
holes.
Installing the Optional Headset
Your phone may be used with an optional
headset. To use a headset, insert the
headset plug into the headset jack.
Headsets may be purchased by calling
the Uniden Parts Department. See back
cover page for contact information.
3
Page 5
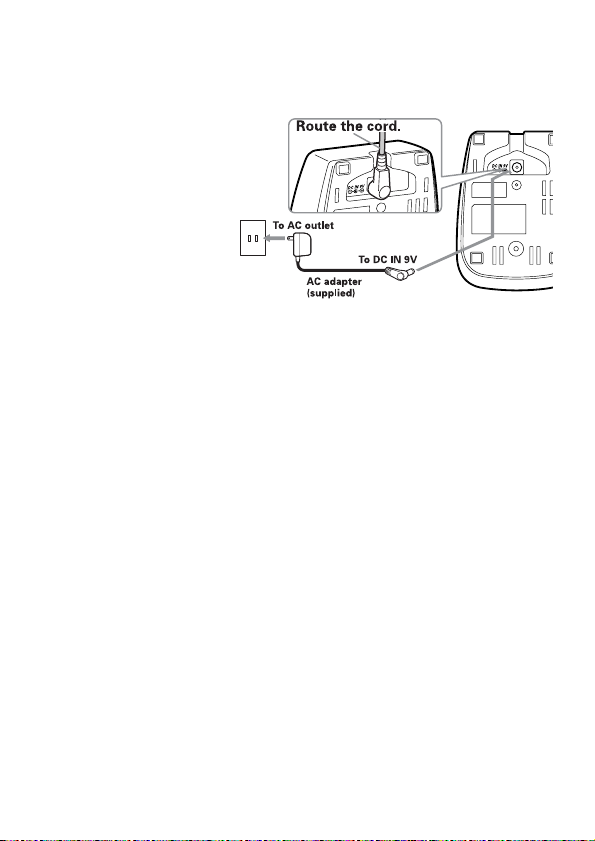
Charging the Accessory Handset
The handset is powered by a rechargeable battery pack that
automatically recharges when the handset is placed in the
charger.
1. Connect the AC
adapter to the
IN 9V
jack and to a
120V AC outlet that
is not controlled by
a wall switch.
Caution: Use only
the Uniden AD-0005
adapter.
2. Set the charger on
a desk or tabletop,
and place the handset in the charger with the keypad facing
forward.
3. Make sure that the
illuminate, check to see that the AC adapter is plugged in and
the handset makes good contact with the charging contacts on
the charging cradle.
4. Charge the handset battery pack for at least 15-20 hours before
using your new handset for the first time.
DC
charge
LED illuminates. If the LED does not
Registering the Handset
You must register the handset to the base before you can use it.
Only one handset can be registered at a time. (If an accessory
handset has previously been registered to a base, you must reset
the handset before you can register it to a new base.)
4
Page 6
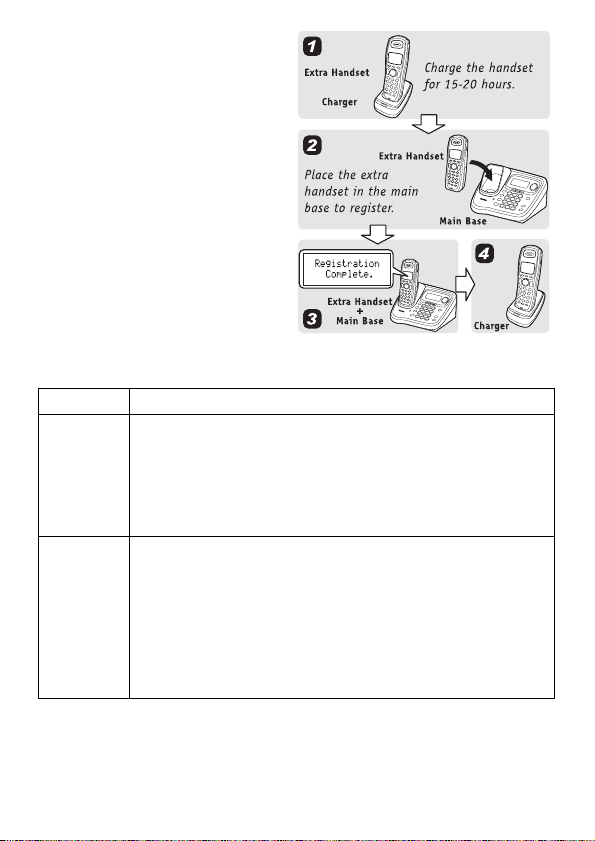
For Base Models TRU9460,
TRU9465, TRU9466,
TRU9480, TRU9485:
To register to a TRU9 series
base, simply place the
accessory handset in the
base. While the handset is
registering, HANDSET
REGISTERING will appear in
the LCD. When
REGISTRATION COMPLETE.
is displayed; the handset has
been registered to the base.
If REGISTRATION FAILED.
appears, remove the handset
from the base and try again.
For Other Base Models
1. Select your base model from this list and follow these directions:
MODEL DIRECTIONS:
TRU9488
TRU9496
UIP1868P
UIP1869V
TRU8888
CLX465
CLX485
ELBT585
ELBT595
• On the base, press the
• Scroll down to REGISTER HANDSET and press the
OK
soft key.
• On the handset, press and hold
reads HANDSET REGISTERING and you hear a
beep.
• On the base, press [menu/select].
• Scroll down to SYSTEM SETUP and press the
key.
• Select REGISTER HANDSET and press the
key.
• On the handset, press and hold
reads HANDSET REGISTERING and you hear a
beep.
MENU
soft key.
[#] until the display
[#] until the display
OK
OK
soft
soft
5
Page 7

MODEL DIRECTIONS:
• Remove the battery compartment cover from the
ELT560
TRU8860
TRU8865
TRU8866
TRU8885
TRU8880
bottom of the main base.
• Press and hold the
battery compartment until the base LEDs start
blinking.
• On the handset, press and hold
reads HANDSET REGISTERING and you hear a
beep.
• Disconnect the base AC adapter.
• While holding the [find handset], reconnect the AC
Adapter.
• On the handset, press and hold
reads HANDSET REGISTERING and you hear a
beep.
• Disconnect the base AC adapter.
• While holding the
Adapter.
• On the handset, press and hold
reads HANDSET REGISTERING and you hear a
beep.
• Disconnect the base AC adapter.
• While holding the
AC Adapter.
• On the handset, press and hold
reads HANDSET REGISTERING and you hear a
beep.
Registration
[flash/find hs], reconnect the AC
[find hs/intercom], reconnect the
button located in the
[#] until the display
[#] until the display
[#] until the display
[#] until the display
2. When REGISTRATION COMPLETE. is displayed; the handset
has been registered to the base. If REGISTRATION FAILED.
appears, please try these steps again.
6
Page 8

Resetting Handsets
If you want to register the handset to a different base or
replace a handset with another one, you must first clear the
registration information from the base and the handset.
1. Press and hold [] and
at least 5 seconds, until the
SYSTEM RESET menu
appears.
2. Select the DEREGISTER HS
submenu. WHICH HANDSET?
appears in the display.
3. Move the cursor to select the handset ID to be de-registered
from the list, and then press the
appears.
4. Move the cursor to select YES, and then press the
When ARE YOU SURE? appears, select YES. You will hear a
confirmation tone.
[#]
for
9JKEJ*CPFUGV!
*CPFUGV
*CPFUGV
$#%- $#%- 1-
OK
soft key. DEREGISTER HS
OK
soft key.
Resetting the Handset Without the Base
If the original base this handset was registered to is not
available for some reason (for example, it is lost or somehow
incapacitated), you can still reset the handset and use it with
another base.
1. Press and hold [] and
SYSTEM RESET menu appears.
2. Select the BASE UNAVAILABLE submenu.
BASE UNAVAILABLE appears in the display.
3. Move the cursor to select YES, and then press the
When ARE YOU SURE? appears, select YES. You will hear a
confirmation tone, and the handset deletes its own link to the
base without trying to contact the base.
Now you are ready to register the handset to the new base.
[#]
for more than 5 seconds, until the
OK
soft key.
7
Page 9
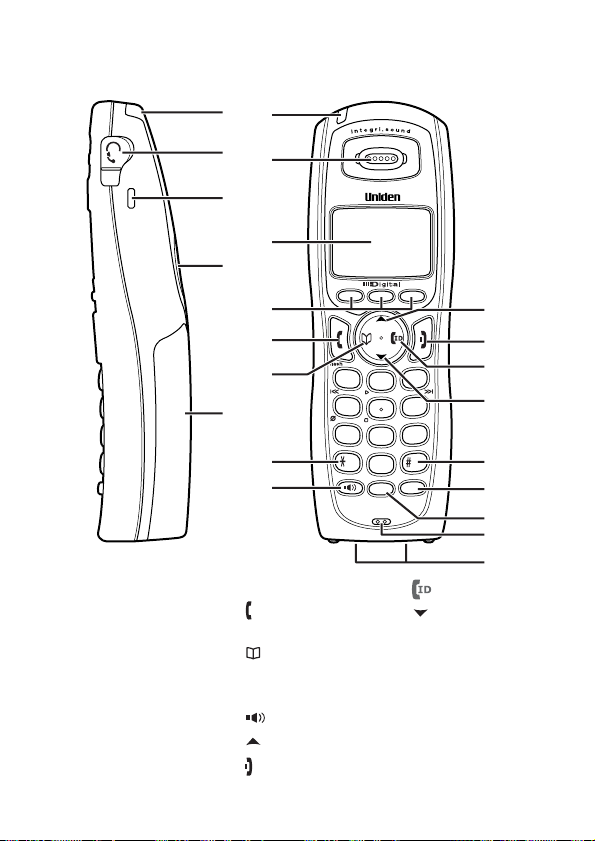
Using the Interface
Parts of the Handset
1
6
2
7
3
8
4
1. Handset Antenna
2. Headset Jack Cover
3. Beltclip Hole
4. Speakerphone
Speaker and Ringer
5. Handset Battery
Compartment
6. New Message LED
7. Handset Earpiece
8. LCD Display
9
10
11
5
12
13
9. Soft keys
[ /flash]
10.
(talk/flash) key
11.
[]
(phonebook) key
[*/tone]
12.
13.
[]
(speaker) key
14.
[]
(up) key
15.
[]
(end call) key
8
key
1
ghi
4
pqrs
7
tone
speaker
def
abc
3
2
mno
jkl
6
5
wxyz
tuv
9
8
oper
0
redial
int,com
pause
hold
16.
[]
(caller ID) key
17.
[]
(down) key
18.
[#]
(pound) key
19.
[redial/pause]
20.
[int'com/hold]
(intercom/hold) key
21.Handset Microphone
22.Handset Charging
Contacts
14
15
16
17
18
19
20
21
22
key
Page 10

Reading the Display
The handset display uses icons to tell you the status of your
phone. The table below lists the icons and what they mean.
ICON STATUS DESCRIPTION
Talk The talk icon appears while on a call.
Ta lk
Ta lk
Ta lk
Ta lk
Ta lk
Ta lk
Ta lk
Standby
Standby/Talk
The Standby Screen
When the phone is in standby, the handset display shows the
following items:
570#
*CPFUGV
0GY%+&
4'&+#. /'07
Note: Illustration is of a single line system. Dual line systems
will have different soft keys and standby screen.
The privacy icon appears when Privacy
mode is turned on.
The call record icon appears while
recording a conversation (Answering
System base only).
The mute icon appears when you mute
the handset.
The speaker icon appears when the
handset speakerphone is in use.
This icon appears when T-coil mode is
turned on.
This icon appears when Line 1 is in use.
(two-line base only.)
This icon appears when Line 2 is in use.
(two-line base only.)
The ringer off icon indicates that the
ringer is turned off.
The battery icon indicates the handset
battery status: empty, low, medium, and
full.
Ringer off icon (when the ringer is off) / day of the week and time / battery icon
Handset ID and Banner
Number of new Caller ID calls receiv ed (If there are no new Calle r ID messages,
the Handset ID appears here.)
9
Page 11

Using the Four-way Function Key
Your handset has a four-way
function key that allows you
to move the cursor (or
highlighted area) on the
display and access the most
commonly used features at
the touch of a button. By
View the
phonebook
moving this key to the left,
you open the Phonebook.
Move the key to the right to
Four-way
Function Key
access Caller ID information.
To use this four-way key,
place your thumb over the
key on the station and move to the four positions to get the
feel of how it moves and operates.
Up
View the
Caller ID
def
1
abc
3
2
Down
Using the Handset Menus
To open the menu, press the
option you want by pressing the four-way function key. This
will move the cursor; the option currently highlighted appears
in reversed out text. Select the highlighted option by pressing
the OK soft key. To exit the menu and return to standby, press
[] on the handset.
If you do not press a key within 30 seconds, the phone will
time out and exit the menu. When setting Date and Time, the
time-out period is extended to two minutes.
MENU
soft key. Highlight the
Entering Text from Your Handset
You can use the number keypad on your phone to enter text by
referring to the letters printed on each number key. When you
press the number key in a text entry field, the phone displays
the first letter printed on the number key. Press the number
key twice to display the second letter and three times to
display the third. Capital letters are displayed first, then lower
case letters, then the number on the key.
10
Page 12

If two letters in a row use the same number key, enter the first
letter, then use
to move the cursor to the next position to enter the second
letter. For example, to enter "Movies":
[right] or [left] on the four-way function key
Number of times key is pressed
1. Press
2. Use
3. Press
4. Press
5. Press
6. Press
7. Press
8. Press the
If you make a mistake while entering a name, use [right] or
[6]
[right]
the right.
[6]
[8]
[4]
[3]
[7]
once to enter M.
on the four-way function key to move the cursor to
six times to enter o.
six times to enter v.
six times to enter i.
five times to enter e.
eight times to enter s.
OK
soft key to end your text entry.
[left] on the four-way function key to move the cursor to the
incorrect character. Press the
wrong character, and then enter the correct character. To
delete all characters, press and hold the
DELETE
11
soft key to erase the
DELETE
soft key.
Page 13

Using Your Accessory Handset
Making and Receiving Calls
Using the handset Using the speakerphone
1. Remove the handset from
Making a
call
Answering
a call
Hanging
up
the charger.
2. Dial the number.
3. Press
1. Pick up the handset.
2. Press
Press [].Press [].
[/flash]
(If AutoTalk is on, the
phone will answer when
you remove the handset
from the charging cradle.)
[/flash]
Key Answer is on, you can
also press any number
keypad.)
Adjusting the Volume
Choose from three ringer volume settings (off,
Ringer Volume
Earpiece Volume
Speaker Volume
low, and high). With the phone in standby, use
[] and [] to adjust the ringer volume.
Choose from six volume levels for the handset.
While on a call, press
volume louder or
Choose from six volume levels for the handset
speakerphone. While on a call, press
make the speaker volume louder or
it softer.
.
. (If Any
1. Remove the handset from
the charger.
2. Dial the number.
3. Press
1. Pick up the handset.
2. Press
[]
(If AutoTalk is on, the phone
will answer when you
remove the handset from
the charging cradle.)
[]
[] to make the handset
[] to make it softer.
.
.
[] to
[] to make
Using Caller ID and Call Waiting
You can store up to 100 Caller ID numbers in your handset.
Your phone shares a total of 100 memory entries between
your Phonebook and Caller ID. Once you store 100
phonebook names, Caller ID information can not be stored
(but it will still display when the call comes in).
12
Page 14

Note: You must subscribe to Caller ID and Call Waiting
through your telephone provider.
Press [] to open the Caller ID list. The first thing you will
see is the summary screen. From the summary screen, you
have the following options:
Scroll through the list
Jump to entries
beginning with a
particular letter
Store a Caller ID entry
in the phonebook
Dial a Caller ID entry
Delete a Caller ID
entry
Delete all entries
Exit the Caller ID list
To scroll through the list from A to Z, press
To scroll through the list from Z to A press
Press the number key corresponding to the letter
you want to jump to.
Find the entry you want to store and press
soft key.
Find the entry you want to dial and press
flash] or [].
Find the entry you want to delete and press the
DELETE
soft key.
DELETE
Press the
appears, select YES and press the
[] or press the
Press
again if you are on a call.
soft key. ARE YOU SURE?
BACK
soft key or [ /flash]
OK
soft key.
[].
[].
STORE
[/
Using Call Waiting
If a second call comes in when you are on the phone, a call
waiting tone sounds, and the caller ID information of the
waiting call appears on the display. Press [/flash] on the
handset to accept the waiting call. There is a short pause, and
then you will hear the new caller. To return to the original
caller, press
[ /flash] on the handset again.
Using the Phonebook
Your phone allows you to store up to 2 numbers per name and
up to 100 names in your phonebook. Your phone shares a total
of 100 memory entries between your phonebook and CID. Once
you store 100 phonebook entries, CID information will not be
stored and will only display at time of new incoming calls. When
Phonebook entries are full, you will hear a beep and MEMORY
FULL appears. You cannot store any additional names and
numbers unless you delete some of the existing ones.
13
Page 15

Press [] to enter the phonebook. Once in the phonebook,
you have the following options:
Scroll through the
entries
Jump to entries
beginning with a
particular letter
Store a new entry Press the
Copy entries to
another handset
Copy ALL entries
to another handset
Dial an entry
Delete an entry
Delete all entries
Close the
phonebook
To scroll through the phonebook from A to Z, press
[]. To scroll through the phonebook from Z to A
[].
press
Press the number key corresponding to the letter
you want to jump to.
NEW
soft key and follow the directions.
1. Find the entry you want to copy.
2. Press the
3. Select COPY SELECTION, and then press the OK
soft key.
4. TO WHICH UNIT? appears. Select the station you
want to copy this entry to, and then press the
soft key. You will hear a confirmation tone.
1. Press the
2. Select COPY ALL and press the
3. TO WHICH UNIT? appears. Select the station you
want to copy this entry to, and then press the
soft key.
4. ARE YOU SURE? appears. Select YES and press
the
1. Find the entry you want to dial.
2. Press
1. Find the entry you want to delete.
2. Press the
3. Select DELETE SELECTION, and then press the OK
soft key.
4. ARE YOU SURE? appears. Select YES and press
the
1. Press the
2. Select DELETE ALL and press the
3. ARE YOU SURE? appears. Select YES and press
the
Press
on a call.
OPTIONS
OPTIONS
OK
soft key. You will hear a confirmation tone.
[/flash]
OPTIONS
OK
soft key. You will hear a confirmation tone.
OPTIONS
OK
soft key. You will hear a confirmation tone.
[] or the
soft key.
soft key.
or
[]
soft key.
soft key.
BACK
soft key repeatedly if you are
OK
soft key.
.
OK
soft key.
OK
OK
14
Page 16

Redialing a Number
You can quickly redial the last 3 numbers dialed on the
handset.
1. With the phone in standby, press
REDIAL
2. Use
3. When you find the number you want to dial, press
[]
Note: You can also press [/flash] or [] before you open
the redial list. In this case, press
soft key to open the redial list.
[]
and
[]
to scroll through the redial list.
.
[redial/pause]
[redial/pause].
or the
[ /flash]
or
Muting the Ringer (One Call Only)
While the handset is ringing, press [] to mute the ringer for
this call. The phone will ring again on the next call. (The
handset must be off the cradle to mute the ringer.)
Muting the Microphone
To mute the microphone so the caller can't hear you, press the
MUTE
soft key while on a call. MUTE ON will appear in the
display for 2 seconds, but the icon will appear and remain in
the display until the feature is turned off. Repeat the procedure
to cancel muting.
Privacy Mode
To prevent other stations from interrupting a call, press the
PRIVACY
appear in the display for 2 seconds, but the icon will appear
in the display until the feature is turned off. Repeat the
procedure to turn off privacy mode.
soft key while on a call. PRIVACY MODE ON will
15
Page 17

Using Hold, Conference, Transfer and
Intercom
Press [int'com/hold]. If you leave a caller on hold
Put a call on
hold
Join a call in
progress
Transfer a call
Cancel a
transfer
Accept a
transferred call
Make an
intercom page
Cancel a page
Answer an
intercom page
for more than five minutes, the call will be
disconnected. To return to the party on hold, press
[/flash] or [].
To join a call already in progress, press [ /flash] or
[]. You can hang up normally; the other station
remains connected to the call.
Press [int'com/hold]; the call will automatically be
placed on hold. Use
station you want to transfer the call to, and press the
OK
soft key. (To page all stations at once, select
ALL.) When the other station answers, you can talk
to the station; the outside call remains on hold. If the
other station accepts the call, you will be
disconnected.
To cancel the transfer and return to the call, press
[] or [] to select the
[/flash] or [].
To answer the page and speak to the transferring
station, press
accept the call and speak to the caller, press
[ /flash] or [int'com/hold]. To
[/
flash] again.
With the phone in standby, press [int'com/hold].
[] or [] to select the station you want to
Use
talk with, then press the
ALL, all other stations will be paged.)
To cancel the intercom page, press the
[].
key or
Press [ /flash] or [int'com/hold]. If AutoTalk is
on, the handset automatically answers the page
when you remove it from the cradle.
OK
soft key. (If you select
CANCEL
soft
16
Page 18

Accessing Your Answering Machine
If your base has an answering machine, you can use your
handset to get your messages and change your answering
machine setup. To access the answering machine, press the
soft key. The answering machine announces the number of
new and old messages and then waits for your next command.
You have the following options:
Play messages
Repeat a message
Skip a message
Delete a message
End message
review
Record a memo
Turn the answering
machine on or off
Record a greeting
Listen to Help Press [0] to hear the Help prompts.
Exit and hang up
Press [/2]. The system announces the time,
and number of new and old messages.
Press [|<</1] to go to the start of the current
message. Press
to a previous message.
Press [>>|/3] to go to the beginning of the next
message.
While a message is playing, press [∅/4] and
the message will be permanently deleted.
Press [/5] to stop the message playback.
Press [7] to start recording. Press [/5] or [7]
to stop.
TRU9480 and TRU8 series:
Press
[6] to turn the answering machine on.
[9] to turn the answering machine off.
Press
TRU9485/9488/9496 & ELT/CLX series:
Press
[9] to turn the answering machine on/off.
Press [8] to start recording. Press [/5] or [8]
to stop.
Press [] to exit the system and return to standby.
[|<</1] repeatedly to go back
Screening Calls
You can listen to callers who leave a message. Press the
SCREEN
caller without answering the phone.
soft key when the system is answering to listen to the
17
Page 19

Accessing Voicemail
If you subscribe to a voice mail service, you can program your
access number into your handset and access your voice mail
at the touch of a button.
1. Press the
VOICE MAIL submenu.
2. Enter your personal access number (up to 20 digits).
3. If you need to have the phone wait before sending the next
digits, press
the dialing sequence. For a longer pause, press the key multiple
times. A P appears in the display each time you press the key
and each pause counts as one digit.
4. Press the
Once you program your access number, press the soft key
to dial your voice mail service.
MENU
soft key. Select HANDSET SETUP and EDIT
[redial/pause]
OK
soft key when you are finished.
to insert a two-second pause in
Maintenance
Battery Life
With average use, your battery talk time will be approximately
5 hours and standby time will be approximately 7 days. For
optimum performance, be sure to return the handset to the
cradle after each call. If the handset is left off of the base, the
actual talk time duration will be reduced respective to the
amount of time the handset is off the cradle.
Note:
Do not place the power cord where it creates a trip hazard or
where it could become chafed and create a fire or electrical
hazard.
Low Battery Alert
When the battery pack is very low, the display shows LOW
BATTERY and the empty battery icon. If the phone is in
standby, none of the keys will operate. If you are on a call,
complete your conversation as quickly as possible, and return
the handset to the charging cradle.
18
Page 20

Battery Replacement and Handling
With normal usage, your battery should last about one year.
When the talk time becomes short, even after the battery is
recharged, please replace the battery. A replacement Uniden
adapter or battery may be purchased by calling Uniden's Parts
department. See back cover page for contact information.
Warning
To avoid the risk of personal injury or property damage from
fire or electrical shock, use only BT-446 battery pack with
your phone.
Caution:
- This equipment contains a rechargeable Nickel-MetalHydride battery.
- Do not remove the batteries from the handset to charge
them.
- Never throw the battery into a fire, disassemble it, or heat it.
- Do not remove or damage the battery casing.
- Nickel is a chemical known to State of California to cause
cancer.
- Do not short-circuit the battery.
- Do not charge the battery used in this equipment in any
charger other than the one specified in the owner's manual.
Using another charger may damage the battery or cause the
battery to explode.
- Rechargeable Batteries Must Be Recycled or Disposed of
Properly.
19
Page 21

Clean the Battery Contacts
To maintain a good
charge, clean the
charging contacts on
the handset once a
month. Dampen a
cloth with plain water.
Gently rub the damp
cloth over the
charging contacts
until all visible dirt is removed. Dry the contacts thoroughly
before returning the handset to the charging cradle.
Caution: Do not use any chemical products (alcohol, paint
thinner, etc.). Doing so may discolor the surface and damage
the finish.
The FCC Wants You To Know
Changes or modifications to this product not expressly approved by
Uniden, or operation of this product in any way other than as detailed
by the owner's manual, could void your authority to operate this
product.
This device complies with part 15 of the FCC rules. Operation is
subject to the following two conditions: (1) This device may not cause
harmful interference, and (2) This device must accept any interference
received, including interference that may cause undesired operation.
Privacy of communications may not be ensured when using this
phone.
To insure the safety of users, the FCC has established criteria for the
amount of radio frequency energy various products may produce
depending on their intended usage. This product has been tested and
found to comply with the FCC's exposure criteria. For body worn
operation, the FCC RF exposure guidelines were also met when used
with the Uniden accessories supplied or designed for this product.
Use of other accessories may not ensure compliance with FCC RF
exposure guidelines and should be avoided.
20
Page 22

I.C. Notice
Terminal Equipment
NOTICE:This equipment meets the applicable Industry Canada
Terminal Equipment Technical Specifications. This is confirmed by the
registration number. The abbreviation, IC, before the registration
number signifies that registration was performed based on a
Declaration of Conformity indicating that Industry Canada technical
specifications were met. It does not imply that Industry Canada
approved the equipment.
NOTICE:The Ringer Equivalence Number (REN) for this terminal
equipment is marked on the equipment itself. The REN assigned to
each terminal equipment provides an indication of the maximum
number of terminals allowed to be connected to a telephone interface.
The termination on an interface may consist of any combination of
devices subject only to the requirement that the sum of the Ringer
Equivalence Numbers of all the devices does not exceed five.
Radio Equipment
The term "IC:" before the radio certification number only signifies that
Industry Canada technical specifications were met. Operation is
subject to the following two conditions: (1) this device may not cause
interference, and (2) this device must accept any interference,
including interference that may cause undesired operation of the
device. "Privacy of communications may not be ensured when using
this telephone".
As an Energy Star
that this product or product models meets the Energy
guidelines for energy efficiency. Energy Star is
Star
a U.S. registered mark.
Partner, Uniden has determined
21
Page 23

One Year Limited Warranty
Important: Evidence of original purchase is required for warranty service.
WARRANTOR: UNIDEN AMERICA CORPORATION ("Uniden") ELEMENTS OF
WARRANTY: Uniden warrants, for one year, to the original retail owner, this
Uniden Product to be free from defects in materials and craftsmanship with only
the limitations or exclusions set out below.
WARRANTY DURATION: This warranty to the original user shall terminate and
be of no further effect 12 months after the date of original retail sale. The warranty
is invalid if the Product is (A) damaged or not maintained as reasonable or
necessary, (B) modified, altered, or used as part of any conversion kits,
subassemblies, or any configurations not sold by Uniden, (C) improperly installed,
(D) serviced or repaired by someone other than an authorized Uniden service
center for a defect or malfunction covered by this warranty, (E) used in any
conjunction with equipment or parts or as part of any system not manufactured by
Uniden, or (F) installed or programmed by anyone other than as detailed by the
owner's manual for this product.
STATEMENT OF REMEDY: In the event that the product does not conform to this
warranty at any time while this warranty is in effect, warrantor will either, at its
option, repair or replace the defective unit and return it to you without charge for
parts, service, or any other cost (except shipping and handling) incurred by
warrantor or its representatives in connection with the performance of this
warranty. Warrantor, at its option, may replace the unit with a new or refurbished
unit. THE LIMITED WARRANTY SET FORTH ABOVE IS THE SOLE AND
ENTIRE WARRANTY PERTAINING TO THE PRODUCT AND IS IN LIEU OF
AND EXCLUDES ALL OTHER WARRANTIES OF ANY NATURE
WHATSOEVER, WHETHER EXPRESS, IMPLIED OR ARISING BY OPERATION
OF LAW, INCLUDING, BUT NOT LIMITED TO ANY IMPLIED WARRANTIES OF
MERCHANTABILITY OR FITNESS FOR A PARTICULAR PURPOSE. THIS
WARRANTY DOES NOT COVER OR PROVIDE FOR THE REIMBURSEMENT
OR PAYMENT OF INCIDENTAL OR CONSEQUENTIAL DAMAGES. Some
states do not allow this exclusion or limitation of incidental or consequential
damages so the above limitation or exclusion may not apply to you.
LEGAL REMEDIES: This warranty gives you specific legal rights, and you may
also have other rights which vary from state to state. This warranty is void outside
the United States of America and Canada. PROCEDURE FOR OBTAINING
PERFORMANCE OF WARRANTY: If, after following the instructions in the
owner's manual you are certain that the Product is defective, pack the Product
carefully (preferably in its original packaging). Disconnect the battery from the
Product and separately secure the battery in its own separate packaging within
the shipping carton. The Product should include all parts and accessories
originally packaged with the Product. Include evidence of original purchase and a
note describing the defect that has caused you to return it. The Product should be
shipped freight prepaid, by traceable means, to warrantor at:
Uniden America Service
4700 Amon Carter Blvd.
Fort Worth, TX 76155
22
Page 24

Memo
23
Page 25

Memo
24
Page 26

Memo
25
Page 27

At Uniden, we'll take care of you!
Thank you for purchasing a Uniden product. if you have any
questions or problems, please do not return this product to the
place of purchase.
Our customer care specialists are here
to help you! Visit our website at
Having
trouble?
Need a part?
Help for our
customers
with special
needs
May be covered under one or more of the following U.S. patents:
4,797,916 5,381,460 5,426,690 5,434,905 5,491,745
5,493,605 5,533,010 5,574,727 5,581,598 5,650,790
5,660,269 5,661,780 5,663,981 5,671,248 5,696,471
5,717,312 5,732,355 5,754,407 5,758,289 5,768,345
5,787,356 5,794,152 5,801,466 5,825,161 5,864,619
5,893,034 5,912,968 5,915,227 5,929,598 5,930,720
5,960,358 5,987,330 6,044,281 6,070,082 6,125,277
6,253,088 6,314,278 6,418,209 6,618,015 6,671,315
6,714,630 6,782,098 6,788,920 6,788,953 6,839,550
6,889,184 6,901,271 6,907,094 6,914,940
Other patents pending.
www.uniden.com or call our Customer
Service Hotline at 1-800-297-1023,
Monday through Friday, 7 AM to 7 PM
or Saturday/Sunday, 9 AM to 5 PM, CST.
The Customer Service Hotline is closed
on holidays.
To order headsets, additional handsets,
replacement batteries, or other
accessories, visit our website at
www.uniden.com or call
1-800-554-3988, Monday through
Friday, 8 AM to 5 PM, CST.
If you need special assistance due to a
disability or have questions on the
accessibility features of this product,
please call 1-800-874-9314 (voice or
TTY).
26
Page 28

UUZZ01433BZ(0)
 Loading...