

Page 1

TCX 805
Accessory Handset
OWNER'S
MANUAL
Page 2

Welcome
Congratulations on your purchase of the Uniden TCX805 accessory
handset and charger. This expansion handset is compatible with the
TRU8866 2-line base (model numbers may vary.) You can place a fully
featured cordless handset anywhere in your home where you have AC
power.
IMPORTANT
The TCX805 expansion handset will not operate unless it has been
registered to your main base. This manual describes how to set up and
connect your new handset; for more detailed instructions on operating
your new handset, refer to the owner's manual supplied with your main
base.
Backward / Forward Compatibility
Your phone is compatible with other Uniden 5.8GHz Digital Expandable
Systems. Compatible models include the Elite series (ELT560, ELBT585,
ELBT595), the CLX Series (CLX485 and CLX465), and the TRU8 series
(TRU8860, TRU8865, TRU8866, TRU8880, TRU8885, and TRU8888). The
Elite and CLX series bases contain advanced features that may not be
supported by this handset. Please visit our website at www.uniden.com
for feature comparisons.
Two-line operation is supported only when the handset
is registered to a two-line base.
Checking the Package Contents
Make sure you have received the following items in the package.
If any items are missing or damaged, contact Customer Service.
• Cordless Handset
•Charging Cradle
• AC Adapter (AD-0005)
(INPUT: 120V AC 60Hz)
(OUTPUT: 9V DC 210 mA)
For answers to questions and to order genuine Uniden parts and
accessories 24 hours a day, visit our website at www.uniden.com.
Customer support is also available by calling 1-800-297-1023, Mon-Fri
7 a.m. to 7 p.m., Sat/Sun 9 a.m. to 5 p.m. CST. (Phone support is
closed on holidays.)
• Battery Pack (BT-446)
(Capacity: 800 mAH, 3.6V)
•Beltclip
• This Owner’s Manual
• Other Printed Material
– 2 –
Page 3
Help for our Special Needs Customers
If you need special assistance due to a disability or have questions on
the accessibility features of this product, please call 1-800-874-9314
(voice or TTY).
Basic Setup
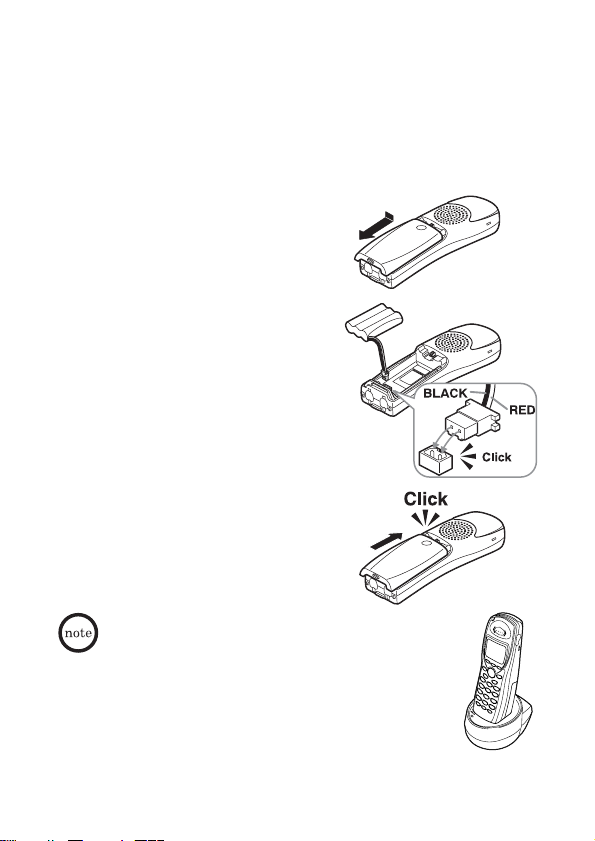
Install the Battery Pack
Press down on the handset battery
1
case cover (use the finger indention
for a better grip) and slide the cover
downward to remove.
Plug the battery pack connector
2
(red & black wires) into the jack
inside the battery compartment.
(The connector notches fit into the
grooves of the jack only one-way.)
Match the wire colors to the polarity
label in the battery compartment, and
push the connector in until you hear a
click.
Make sure you have a good connection
3
by slightly pulling on the battery
wires. If the connection is secure, the
battery jack will remain in place.
Place the battery case cover back on
4
the handset by sliding it upwards
until it clicks into place.
Place the handset in the charging
5
cradle with the keypad facing forward.
• Use only the Uniden battery
(BT-446) supplied with your phone.
• Recharge your handset on a regular basis by
returning the handset to the charger after each
phone call.
Rechargeable Nickel-Metal-Hydride Batteries Must Be
Recycled or Disposed of Properly
– 3 –
Page 4
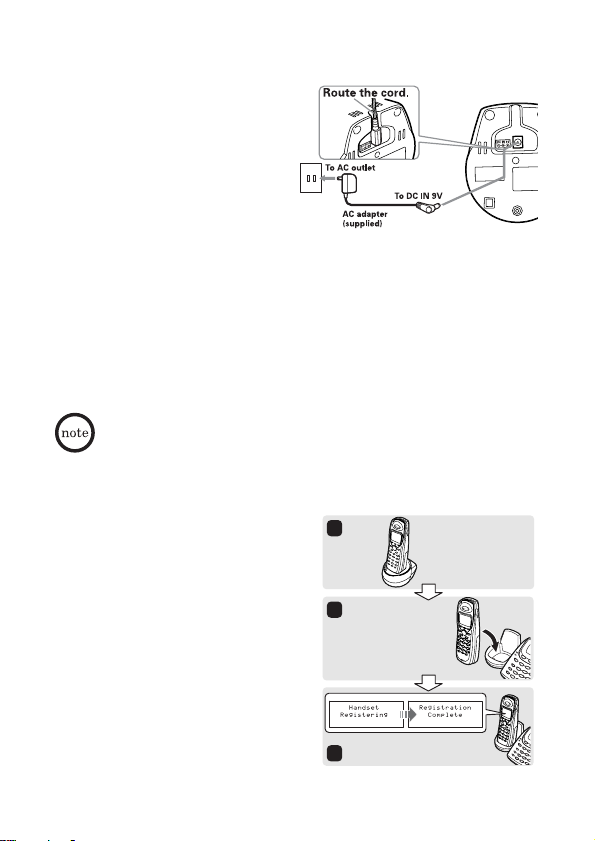
Connect the Charger
Connect the AC adapter to the
1
DC IN 9V jack and to a standard
120V AC wall outlet.
Set the charger on a desk or
2
tabletop, and place the handset
in the charger with the keypad
facing forward.
Make sure the
3
illuminates. If the LED does not
charge
LED
illuminate, check to see that the AC adapter is plugged in and that
the handset makes good contact with the charger's contacts.
Caution: To avoid risk of fire or shock, use only the supplied AD-0005
AC adapter. Do not use any other AC adapter.
4 Charge the handset for 15-20 hours before using.
Register the Handset
YOU NEED TO REGISTER THE TCX805 TO THE MAIN BASE BEFORE USE!
If the handset was registered to a different base, you
must de-register the handset before you can register it
to a new base. (See page 5.)
For Main Base Models TRU8860, TRU8865, TRU8866, TRU8880 and
TRU8885
Be sure the handset battery is
1
fully charged.
With the main base in standby
2
mode (i.e., not being used), place
the expansion handset in the main
base to begin registration.
While the handset is registering,
3
Handset Registering
will
appear in the handset LCD. When
Registration Complete
displayed, the handset has been
registered to the base.
Registration Failed
If
appears, please try these steps
again.
is
– 4 –
1
TCX805
Handset
Charger
2
Place the TCX805
handset in the main
base to register.
3
Charge the handset
for 15-20 hours.
TCX805
Handset
Main Base
TCX805 Handset
+
Main Base
Page 5

For Main Base Model TRU8888 (corded base model)
With the main base in standby mode (i.e. not being used), press the
1
MENU soft key on the base.
Use the up/down key to select
2
the OK soft key.
Use the up/down key to select
3
Base LCD screen will display the following prompt:
4
On handset press & hold "#" key for 2 sec
On the handset, press and hold the # key until you hear a beep.
5
For Main Base Model ELT560
Remove the battery compartment
1
cover from the back of the main base.
Press and hold the Registration
2
button in the battery compartment.
Keep pressing the Registration button
3
until the handset charge LED on main
base starts to blink.
On the handset, press and hold the # key until you hear a beep.
4
For Main Base Models ELBT585, ELBT595, CLX465, and CLX485
With the main base in standby mode (i.e. not being used), press
1
menu/select.
Use the up/down key to select
2
Use the up/down key to select
3
The base LCD screen will display the following prompt:
4
On handset, press & hold "#" key for 2 sec
On the handset, press and hold the # key until you hear a beep.
5
HS Registration
Register Handset
Registration
button
System Setup
Register Handset
.
, and then press
.
.
De-register the handset
Press the MENU soft key. Scroll down to
OK soft key. When the handset asks you to confirm, select
press the OK soft key.
Deregister HS
and press the
– 5 –
Yes
and
Page 6

Installing the Beltclip
To attach the beltclip
Insert the beltclip into the holes on each side of the
handset. Press down until it clicks.
To remove the beltclip
Pull either side of the beltclip to release the tabs from the
holes.
Using Your Handset
Now that your new handset is registered, it can perform all the same
functions as the handsets originally included with your phone. With
your new handset, you can
• Transfer calls between handsets
• Use two handsets as an intercom
• Use two handsets as 2-way radios in DirectLink mode
• Use two handsets as a baby/room monitor
• Hold conference calls
See the owner's manual that came with your main base unit for
complete instructions on operating your new expanded digital phone.
You can also download owner's manuals from our website at
www.uniden.com.
• Two-line operation is supported only when the handset
is registered to a two-line base.
• The Elite and CLX series bases contain advanced
features that may not be supported by this handset.
Please visit our website at www.uniden.com for feature
comparisons.
– 6 –
Page 7

Controls & Functions
1
2
3
4
5
6
7
8
9
10
11
12
13
1. Handset Antenna
2. Beltclip Hole
3. Speakerphone Speaker and
Ringer
4.Handset Battery
Compartment
5. New Message LED
6. Handset Earpiece
7. LCD Display
8. soft Keys
9. cid/vol (volume up)
10. redial/p/vol (volume
down)
14
15
16
17
18
19
20
21
11.
/tone/<
*
12. speaker
13. intcom/hold
14. Headset Jack Cover
15. talk/flash
16. end
17. phonebook
18. #/>
19. /conference
20. Handset Microphone
21. Handset Charging
Contacts
– 7 –
Page 8

Reading the Display
Example of the standby mode display
ICON
Ringer off icon (when the ringer is off)/ day of
the week and time / battery icon
Handset ID and Banner
Number of new Caller ID calls received (If there
are no new Caller ID messages, the Handset ID
appears here.)
Appears
During
Standby/
Battery icons indicate the handset
battery status. This icon changes
Talk
depending on the battery status (empty,
low, medium and full).
DESCRIPTION
(for two-line base model)
(for two-line base model)
Standby
Standby/
Talk
Talk
Talk
Talk
The Ringer off icon indicates that ringer
is turned off.
The Line icon indicates the line in use
or the line received a new Caller ID
message(Line1 and/or Line2).
The Mute icon appears when you mute
the handset.
The Speaker icon appears when the
handset speaker phone is used.
The Privacy icon appears when the
Privacy Mode is turned on.
– 8 –
Page 9

Main Menu Options
Main Menu
DirectLink Mode
Room Monitor
Handset Setup
Global Setup
Answ. Setup ***
Deregister HS
* Two-line base model only
** Caller ID base model only
*** Answering System base
model only
Submenu
Set TEL-LINE *
Edit Voice Mail **
Ringer Volume
Ringer Tones
Distinctive Ring
Auto Talk
Anykey Answer
Banner
Language
LCD Contrast
Key Touch Tone
Animation Screen
Room Monitor
Day & Time
CIDCW
Area Code
Dial Mode
Voice Mail Tone **
Security Code
Ring Time
Message Alert
Language
Call Screen
Adjusting the Volume
• To adjust ringer volume, press the MENU soft key, select the Handset
Setup menu, and then the Ringer Volume submenu. Use or to
select "Hight", "Low", or "Off." Press the OK soft key.
• To adjust the earpiece or speaker volume, press the and keys
while the handset is on a call. The new setting will remain in effect
after the call has ended.
– 9 –
Page 10

Making and Receiving Calls
Making a call
Answering a call
Hanging up
Using Call Waiting
Putting a Call on Hold
Using a Headset
Your phone may be used with an optional headset.
To use this feature, insert the headset plug into
the headset jack. Your phone is ready for handsfree conversations. (Headset may be purchased by
calling the Uniden Parts Department or visiting the
web site. See page 2.)
Remove the handset from the
charger. Dial the number you want
to call and press talk/flash. To
make a call with the
speakerphone, dial the number
and press speaker.
Remove the handset from the
charger and press talk/flash. To
answer with the speakerphone,
press speaker.
Press end.
If the call waiting tone sounds
while you are on the phone, press
talk/flash to speak to the waiting
caller. Use talk/flash to switch
back and forth between the callers.
Press intcom/hold to put the caller
on hold. Press talk/flash or
speaker to talk to the caller again.
Transferring Calls
1. To transfer a call, press intcom/hold. The call will be placed on
hold, and the display will show the list of available stations.
2. Select the station you want to transfer the call to and press the OK
soft key. To page all stations at once, select the ALL soft key.
3. When the other station answers, you can talk to the other station;
the call will still be on hold. If the other station connects to the
call, your handset will be disconnected.
If another station transfers a call to this handset, press talk/flash
to answer the transfer page. Press talk/flash again to connect to
the outside caller (the other station will be disconnected).
– 10 –
Page 11

Conferencing
To join a call already in progress, press talk/flash. If there are
already two handsets on a call or another station is in privacy
mode, the display will show
Intercom
To page another station, press intcom/hold. The display will show
the list of available stations. Select the station you want to page
Unavailable
and press the OK soft key. To page all stations at once, select
.
All
To answer an incoming page, press talk/flash.
Using the Phonebook
Press phonebook to enter the Phonebook. Once in the phonebook,
you have the following options:
.
Scroll through the entries
Jump to entries beginning
with a particular letter
Store a new entry Press the STORE soft key.
Dial and entry Highlight the entry and press talk/flash.
Use the and keys to highlight an entry.
Press the number key corresponding to the letter
to you want to jump to.
Using Caller ID
Press cid/vol to bring up the caller ID list. You have the follow-
ing options:
Scroll through the entries
Delete entries
Store an entry in the
phonebook
Dial an entry Highlight the entry and press talk/flash.
Use the and keys to highlight an entry.
Press the EDIT soft key. Select
then press the OK soft key. Select
then the OK soft key.
Press the EDIT soft key. Select
PB?
and then press the OK soft key.
Delete?
Store into
Yes
and
, and
– 11 –
Page 12

Using the Redial List
Press redial/p/vol to bring up the redial list. You have the fol-
lowing options:
Scroll through the entries
Delete entries
Store an entry in the
phonebook
Dial an entry Highlight the entry and press talk/flash.
Use the and keys to highlight an entry.
Press the EDIT soft key. Select
then press the OK soft key. Select
then the OK soft key.
Press the EDIT soft key. Select
PB?
and then press the OK soft key.
Delete?
Store into
Yes
and
, and
Getting Your Messages (Answering
Machine Base Only)
With the phone in standby mode, press /conference to access
your voice mail or your answering machine (depending on the
main base). You have the following options:
1) When the phone is in standby mode, press /conference on the
handset.
the handset display. The answering system announces the current
time and the number of messages stored in the memory. Messages
will be played in the order in which they were received. The time
and day that each message was received is announced after the
message is played.
2) The phone will announce, "To play incoming messages, press two.
For help, press zero." You will hear a beep.
Remote AnsweringMachine operation
• If you press end before the answering system answers, the
phone will return to standby.
• When the answering system does not answer within 6
seconds, you hear a beep and the phone will return to
standby.
• When you receive a call, the remote operation is canceled.
• You can change the handset volume during a remote operation.
• During the remote operation
operation
•If you have new messages and old messages, after you
have reviewed your new messages, you can play your old
appears on the base.
AnsweringMachine
appears on
messages by pressing 2 again.
– 12 –
Page 13

3) Enter a command within 30 seconds. Select a command from the
following chart:
Remote Key Function
|<</1 Repeat a Message* 6 Answering System On
Playing incoming
/2
Messages
>>|/3 Skipping a Message 8
∅/4 Deleting a Message 9 Answer System Off
/5 Stop Operation 0 Help Guidance
* For the Repeat a Message function, press 1 within about four
seconds to repeat the previous message, or press 1 after about four
seconds to repeat the current message.
** For the Memo Record and Greeting Message Record function, the
first time you enter the corresponding command, it starts the
Recording function. If you want to stop the recording, press 7, 8 or
5.
4) After the command has finished, you will hear intermittent beeps
indicating that the system is waiting for a command. You may enter
another command at this time from the chart above.
5) When you are finished, press end to exit the system.
7 Memo Record/Stop**
Greeting Message
Record/Stop**
Battery Information
Low battery alert
When the batteries are very low and need to be charged, the phone is
programmed to eliminate functions in order to save power.
The batteries need to be charged when:
- The empty battery icon appears.
-
Low Battery
If the phone is in standby mode, none of the keys will operate.
If you are on a call, complete your conversation as quickly as possible,
and return the handset to the charging cradle.
appears in the display.
– 13 –
Page 14

Cleaning the battery charging contacts
To maintain a good charge, clean the
charging contacts on the handset
once a month. Dampen a cloth with
plain water, and wipe the charging
contacts clean. Be sure to dry the
contacts thoroughly before returning
the handset to the charger.
Caution: Do not use paint thinner, benzene, alcohol, or other chemical
products. Doing so may discolor the surface of the telephone and
damage the finish.
I.C. Notice
TERMINAL EQUIPMENT
NOTICE: This equipment meets the applicable Industry Canada Terminal Equipment Technical
Specifications. This is confirmed by the registration number. The abbreviation, IC, before the
registration number signifies that registration was performed based on a Declaration of
Conformity indicating that Industry Canada technical specifications were met. It does not
imply that Industry Canada approved the equipment.
NOTICE:
The Ringer Equivalence Number (REN) for this terminal equipment is marked on the
equipment itself. The REN assigned to each terminal equipment provides an indication of the
maximum number of terminals allowed to be connected to a telephone interface. The termination
on an interface may consist of any combination of devices subject only to the requirement that
the sum of the Ringer Equivalence Numbers of all the devices does not exceed five.
RADIO EQUIPMENT
The term “IC:” before the radio certification number only signifies that Industry Canada
technical specifications were met.
Operation is subject to the following two conditions: (1) this device may not cause
interference, and (2) this device must accept any interference, including interference that may
cause undesired operation of the device. “Privacy of communications may not be ensured when
using this telephone.”
As an Energy Star® Partner, Uniden has determined that this product or product
models meets the Energy Star® guidelines for energy efficiency.Energy Star® is a
U.S. registered mark.
– 14 –
Page 15

THE FCC WANTS YOU TO KNOW
Changes or modifications to this product not expressly approved by Uniden, or operation of this
product in any way other than as detailed by the owner's manual, could void your authority to
operate this product.
This device complies with part 15 of the FCC rules. Operation is subject to the following two
conditions: (1) This device may not cause harmful interference, and (2) This device must accept
any interference received, including interference that may cause undesired operation. Privacy of
communications, may not be ensured when using this phone.
To insure the safety of users, the FCC has established criteria for the amount of radio frequency
energy various products may produce depending on their intended usage. This product has been
tested and found to comply with the FCC’s exposure criteria. For body worn operation, the FCC RF
exposure guidelines were also met when used with the Uniden accessories supplied or designed
for this product. Use of other accessories may not ensure compliance with FCC RF exposure
guidelines and should be avoided.
Uniden works to reduce lead content in our PVC coated cords in our products and accessories.
Warn ing!
The cords on this product and/or accessories contain lead, a chemical known to the State of
California to cause birth defects or other reproductive harm. Wash hands after handling.
One Year Limited Warranty
Important: Evidence of original purchase is required for warranty service.
WARRANTOR: UNIDEN AMERICA CORPORATION (“Uniden”)
ELEMENTS OF WARRANTY: Uniden warrants, for one year, to the original retail owner, this Uniden
Product to be free from defects in materials and craftsmanship with only the limitations or
exclusions set out below.
WARRANTY DURATION: This warranty to the original user shall terminate and be of no further
effect 12 months after the date of original retail sale. The warranty is invalid if the Product is
(A) damaged or not maintained as reasonable or necessary, (B) modified, altered, or used as part
of any conversion kits, subassemblies, or any configurations not sold by Uniden, (C) improperly
installed, (D) serviced or repaired by someone other than an authorized Uniden service center
for a defect or malfunction covered by this warranty, (E) used in any conjunction with
equipment or parts or as part of any system not manufactured by Uniden, or (F) installed or
programmed by anyone other than as detailed by the owner’s manual for this product.
STATEMENT OF REMEDY: In the event that the product does not conform to this warranty at any
time while this warranty is in effect, warrantor will either repair or replace the defective unit and
return it to you without charge for parts, service, or any other cost (except shipping and handling)
incurred by warrantor or its representatives in connection with the performance of this warranty.
Warrantor may replace the unit with a new or refurbished unit. THE LIMITED WARRANTY SET FORTH
ABOVE IS THE SOLE AND ENTIRE WARRANTY PERTAINING TO THE PRODUCT AND IS IN LIEU OF AND
EXCLUDES ALL OTHER WARRANTIES OF ANY NATURE WHATSOEVER, WHETHER EXPRESSED, IMPLIED
OR ARISING BY OPERATION OF LAW, INCLUDING, BUT NOT LIMITED TO ANY IMPLIED WARRANTIES OF
MERCHANTABILITY OR FITNESS FOR A PARTICULAR PURPOSE. THIS WARRANTY DOES NOT COVER OR
PROVIDE FOR THE REIMBURSEMENT OR PAYMENT OF INCIDENTAL OR CONSEQUENTIAL DAMAGES.
Some states do not allow this exclusion or limitation of incidental or consequential damages so the
above limitation or exclusion may not apply to you.
LEGAL REMEDIES: This warranty gives you specific legal rights, and you may also have
other rights which vary from state to state. This warranty is void outside the United States of
America and Canada.
PROCEDURE FOR OBTAINING PERFORMANCE OF WARRANTY: If, after following the instructions in
the owner’s manual you are certain that the Product is defective, pack the Product carefully
(preferably in its original packaging). Disconnect the battery from the Product and separately
secure the battery in its own separate packaging within the shipping carton. The Product should
include all parts and accessories originally packaged with the Product. Include evidence of
original purchase and a note describing the defect that has caused you to return it. The Product
should be shipped freight prepaid, by traceable means, to warrantor at:
Uniden Service Inc.
4700 Amon Carter Blvd.
Fort Worth, TX 76155
– 15 –
Page 16

FOR
ACCESSORIES,
GO ONLINE @
WWW.UNIDEN.COM
REGISTER ONLINE TODAY!
THANK YOU FOR BUYING A UNIDEN PRODUCT.
©2005 Uniden America Corporation, Fort Worth, Texas. Contains additional foreign articles. Custom manufactured in China.
UUZZ01424BZ(0)
May be covered under one or more of the following U.S. patents:
4,797,916 5,381,460 5,426,690 5,434,905 5,491,745 5,493,605 5,533,010
5,574,727 5,581,598 5,650,790 5,660,269 5,661,780 5,663,981 5,671,248
5,696,471 5,717,312 5,732,355 5,754,407 5,758,289 5,768,345 5,787,356
5,794,152 5,801,466 5,825,161 5,864,619 5,893,034 5,912,968 5,915,227
5,929,598 5,930,720 5,960,358 5,987,330 6,044,281 6,070,082 6,125,277
6,253,088 6,314,278 16,418,209 6,618,015 6,671,315 6,714,630 6,782,098
6,788,920 6,788,953
Other patents pending
 Loading...