

Page 1

CONTENTS
Welcome ...................................2
Features ....................................2
Included In Your Package ...................3
Installing the Batteries .......................4
Buttons and controls ........................5
Application Buttons .......................5
•
Action Buttons .........................5
•
The Start Button and Taskbar..................6
•
• Input Method Select.......................6
Adjusting the Display Contrast .................6
•
Opening Programs .......................7
•
• Exiting Programs ........................7
Minimizing Programs......................7
•
• Calibrate “Hot” Key .......................7
• Help ..............................7
The Stylus ..................................8
Powering up ................................9
The Setup Wizard ...........................9
Calibrating Your Display....................10
•
•
World Clock - Setting the Time and Date............10
•
Entering Owner Properties...................12
Quick Start Applications ....................13
Type, write, and draw ......................17
•
Type with the Keyboard ....................17
•
Write Using JOT ........................18
•
Draw Directly to the Screen ..................19
Communicating With Your PC ..............20
•
Installing Windows™ CE Software ...............20
•
Hardware Setup ........................21
•
Using Your Modem ......................23
1
Page 2

WELCOME
Congratulations on your purchase of the
™ PC100, a member of the expanding
family of mobile devices powered by the Microsoft®
Windows® CE operating system. This product is
designed for reliability, long life, and
outstanding performance.
Use this Startup Guide to familiarize yourself with
your new PC100. The information contained on the
following pages will get you up and running as
quickly as possible.
FEATURES
•
Jot Character Recognition
• ActiveSync™ Docking
•
28.8/33.6 (v.34) kbps Internal Modem
•
Voice Recorder
•
Windows® CE Compatibility
•
CompactFlash™ slot
•
Infrared Communication
•
Backlit LCD Display
™ is a proprietary trademark of
Uniden America Corporation
2
Page 3
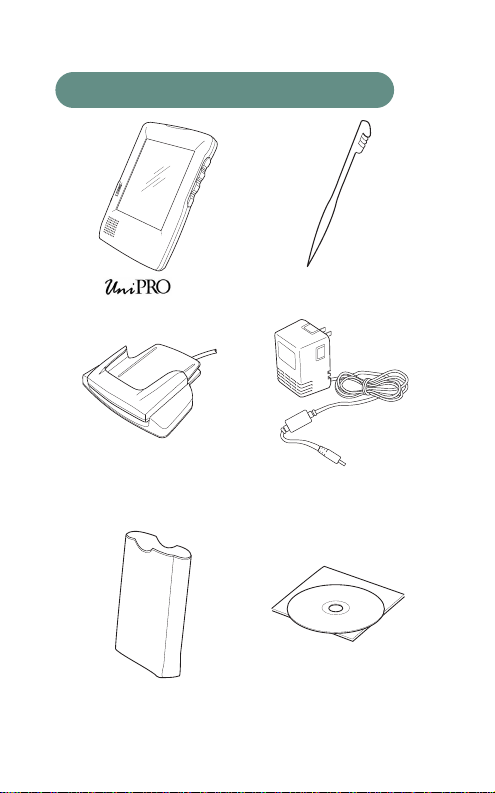
INCLUDED IN YOUR PACKAGE
PC100
Docking Cradle with
serial cable
Carrying Case
Stylus
AC Adapter
Windows CE Software
3
Page 4
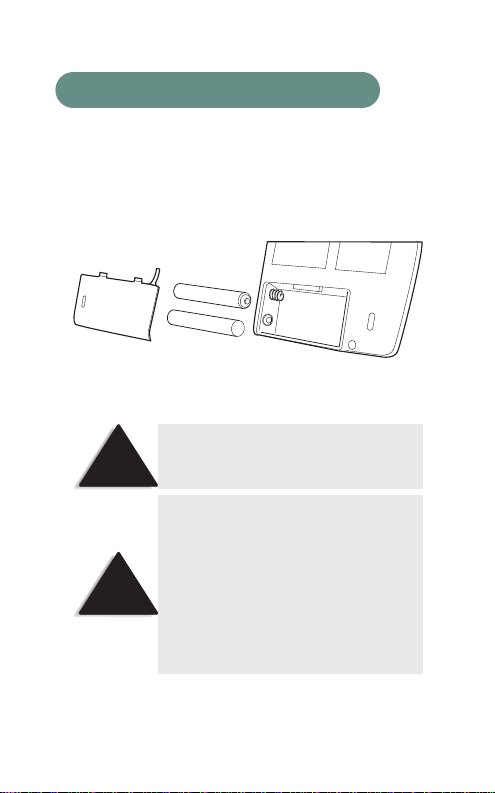
INSTALLING THE BATTERIES
Your PC100 uses two AA alkaline batteries for power.
Slide the battery cover off and insert two AA
batteries as shown. Replace the cover.
-
+
When inserting the batteries, be sure the
NOTE
NOTE
negative (-), or flat end of each battery is
inserted toward the spring.
Your PC100 has an internal, self-charging
standby power supply. For first time use,
leave the PC100 docked in the cradle for
twelve hours with the AC adapter
plugged in and the PC100 turned on.
Standby power provides one minute of
user data retention while the AA batteries
are being replaced.
4
Page 5
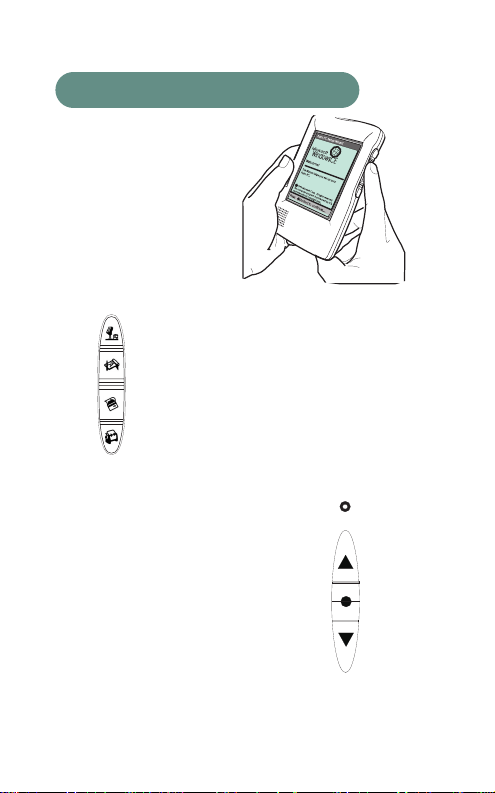
BUTTONS AND CONTROLS
♦ Application Buttons
Application buttons are
located on the side of the
PC100, to the right of
the screen display.
Launch any of the
programs below by
simply pushing a button.
Voice Recorder
Note Taker
Calendar
Contacts
♦ Action Buttons
Action Buttons are located
on the side of the PC100, to
the left of the screen
display. Use these buttons to
scroll through menus, exit
applications, and adjust the
display contrast.
5
Page 6

♦ The Start Button and Taskbar
Tap the Start Button on the Taskbar to
open programs, find information, and view help.
The Taskbar is located at the bottom of the
screen display.
Start
Start
12:32 a
♦ Input Method Select
Tap the Input Method arrow on the Taskbar to select
Keyboard or JOT Character Recognizer input.
Jot Character Recognizer
Keyboard
♦ Adjusting
the Display Contrast
To adjust the display
contrast, press and
hold the green
Action button to the
left of the display
while pressing scroll
up or scroll down.
Press
and
Hold
6
Page 7
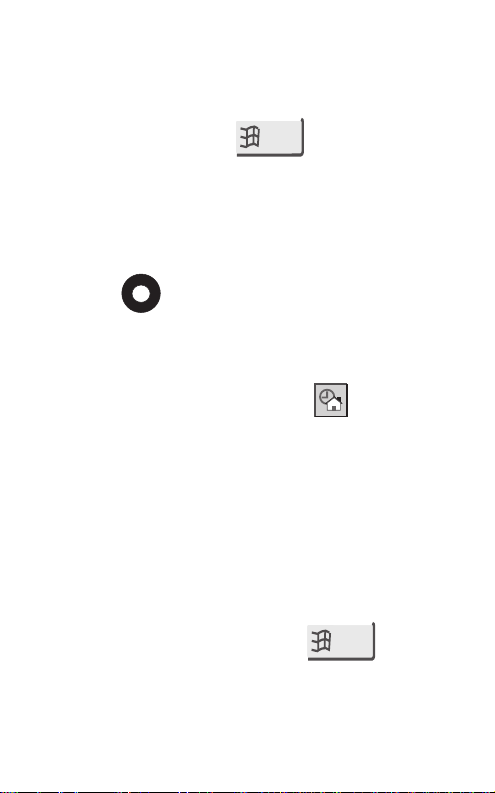
♦ Opening Programs
To open a program, tap and choose
from the list of programs, or press one of the
Application buttons on the side of the PC100.
Start
♦ Exiting Programs
Exit a program by pressing the red Exit Program
button to the left of the display.
♦ Minimizing Programs
Minimize an application by tapping at the
bottom right of the screen display. Maximize the
document or program by tapping it again.
♦ Calibrate “Hot” Key
Press the red Exit Program and Scroll Up buttons
simultaneously to enter display calibration anytime
after initial setup.
♦ Help
Online help is available by tapping , then
choosing Help from the menu.
Start
7
Page 8
THE STYLUS
The stylus is the pencil-like device stored in the
upper right corner of your PC100. By tapping on the
display screen with the stylus, you can change
settings, open programs, and enter information.
8
Page 9

POWERING UP
The Power Button is located
to the left of the screen
display. Use the stylus
or your fingernail to
turn the power on. To
turn the power off, push
the power button again.
To turn on the display backlight, press and
hold the power button down for two or
NOTE
more seconds. To turn the backlight off,
push the power button again.
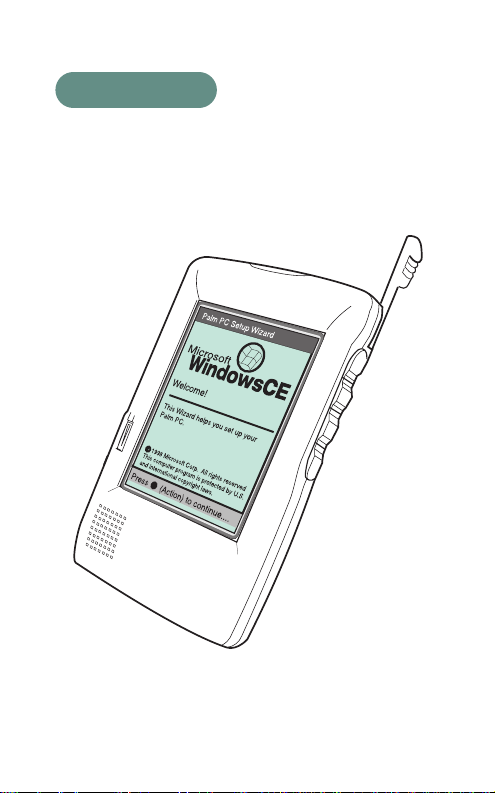
THE SETUP WIZARD
After power-up, the
Setup Wizard
launches. The
Setup Wizard helps
you calibrate the
display, set the
time/date, and enter
personal
information.
Palm PC SetupWizard
Microsoft
WindowsCE
Welcome!
This Wizard helps youset up your
Palm PC.
1998 Microsoft Corp. All rights reserved
This computer program is protected by U.S.
and international copyright laws.
Press (Action) to continue....
9
Page 10

♦ Calibrating Your Display
To calibrate your display, just follow the on-screen
instructions after launching the Setup Wizard.
♦ World Clock - Setting the Time and Date
After calibrating your display, World Clock appears.
From here you can set the local time and date as
well as other options.
1. Using the stylus,
select your city
from the list,
then tap .
OK
World Clock
Time Home Visiting Alarms
Fort Worth, TX (USA)
Fort Worth, TX (USA)
Fortaleza (Brazil)
Frankfurt (Germany)
Fremont, CA (USA)
Fresnom CA (USA)
Fukuoka (Japan)
Geneva (Switzerland)
George Town(Cayman Islands)
Glasgow (Scotland)
Glendale, CA (USA)
3
4
5
Esc
Tab
CAP
Shift
Ctl Alt
1
q
a
6
2
e
r
t
w
z
y
s
d
f
g
h
c
v
b
x
.
\
Set home city, then tap OK.
OK X
7
u
n
=
9
0
-
8
o
p
[
I
j
l
;
k
u
,
/
m
]
‘
10
Page 11

2. Tap the date arrow
under the
local time clock,
then select the
current date from
the calendar.
World Clock
Time
Home Visiting Alarms
July 1998
Fort Worth,...
SMTW T FS
11 11
28 29 30
10 10
567891011
99
13
12 14 15 16 17 1813
19 20 21 22 23 24 25
88
26 27 28 29 30 31
77
6
Today: 7/13/98
2:02:18 PM
1/1/1998
1
2
3
Esc
q
w
Tab
a
s
CAP
z
x
Shift
.
Ctl Alt
Start
Paris
11
1234
22
11
33
44
55
9:02:18 PM
1/1/1998
4
5
6
7
9
8
e
r
t
y
u
d
c
\
I
f
g
h
j
k
v
b
n
u
m
12:32 a
OK X
6
0
-
=
o
p
[
]
l
;
‘
,
/
3. Tap and drag the
minute/hour hands
on the clock face to
set the time, then tap
.
OK
Fort Worth,...
11
10
9
8
7
6
2:02:18 PM
4. Setup is complete.
Tap the screen with your stylus to finish.
1
2
3
4
5
11
Page 12

♦ Entering Owner Properties
1. To enter personal
information, tap
the Owner
Information line
on the
touch-screen.
Tuesday,June 30, 1998
Owner
Owner information not yet set.
Taphere to set owner information.
Upcoming Appointments
No upcoming appointments
today.
ActiveTasks
No Active Tasks
Microsoft
WindowsCE
2. Enter
information by
tapping the keys
on the keyboard
with the stylus.
Tap
OK
when finished.
12
Start
Owner Properties
Identification
Name:
John Smith
Company:
Address:
Work Phone:
1
2
3
4
Esc
q
w
e
r
Tab
a
s
d
CAP
z
x
c
Shift
.
\
Ctl Alt
Start
Notes:
5
f
v
11:29 a
OK X
6
7
9
0
-
=
8
t
y
u
o
p
[
]
I
g
h
j
l
;
‘
k
b
n
u
,
/
m
11:31 a
Page 13

QUICK START APPLICATIONS
Start any of the following programs by pushing its
assigned button to the right of the display screen.
Voice Recorder (Top Button)
With Voice
Recorder you can
capture thoughts,
record reminders,
ideas, and phone
numbers. Use
Voice Recorder in
“eyes free” mode
with the
application
buttons, or use the
stylus to tap the
screen controls.
If you run out of memory while
recording, “out of memory” appears. See
NOTE
NOTE
your software guide for allocating more
memory to Voice Recorder.
You may need to adjust the volume
control for comfortable playback.
<All Folders>
Name
Date Duration
Ready 3.246s Free
Start
11:29 a
13
Page 14

Tasks
Use Tasks to create
a to-do list or
remind yourself
of something
important. Check
appointments in
four views; Day,
Week, Month, or
Year (1,7,31,12).
Mark tasks as
complete when
they are finished.
New
Jan 01, 1998
9
10
11
12
1
2
3
4
5
6
7
8
9
10
Start
1
73112
SMTWTFS
12:12 a
14
NOTE
TIP
Overdue tasks are displayed in bold.
Switch among the different views by
tapping the day, week, month, or year
view (17,31,12) at the top of the screen.
Page 15

Calendar
Use Calendar to
schedule
appointments,
meetings, and
other events.
Check your
calendar in one
of four views;
Day, Week,
Month, and Year
(1,7,31,12).
TIP
TIP
New
Jan 15, 1998
7
8
Planning mtg.
Call Eastern office
9
Revise Crandell proposal
10
11
Lunch
12
1
Conf call with Mr. Smith
2
3
4
5
Pick up kids for soccer
6
7
8
Start
1
73112
SMTWTFS
12:09p
Switch among the different views by
tapping the day, week, month, or year
view (1,7,31,12) at the top of the screen.
Display your appointments for the current
day on your active desktop (for more
information, see Chapter 1 of your
software user’s guide).
15
Page 16

Contacts
Use Contacts to
maintain a list
of friends and
colleagues.
Enter details
about your
contact on the
contact card.
TIP
New
Mary Jones, ABC Company
Work: (213) 345-7890
Email1: MJones@xyz.com
File As Work Tel
Alexander,As . . .(765) 123-4567
Batz, Leslie (408) 555-1144
Conte, Mike (516) 555-3457
Gifford, Mike (914) 555-3456
Jones, Mary1 (123) 456-7890
Landis, Jeanie (717) 555-2233
O"Hara, Bob (212) 555-1256
Rick, David (456) 876-7654
Shore, March (800) 555-1234
Smith, Bob (800) 555-1212
Toyota, Joan (123) 098-6754
Tuniman, Dave (510) 555-1514
Start
<Find>
11:29 a
To change the look of your list, tap
Tools, then Options.
16
Page 17

TYPE, WRITE, AND DRAW
You can type with the keyboard, write using JOT, or
write and draw directly on the screen.
♦ Type with the Keyboard
1. Open an application such
as Note Taker, then tap the
keyboard icon on the Taskbar
to maximize the keyboard (as shown below).
2. Tap the
keyboard with
your stylus.
Characters
display as you
type them.
NOTE
X+OK
team members wi
Esc
Tab
CAP
Shift
Ctl Alt
1
Start
Window
2
3
4
5
6
7
9
0
-
=
q
w
e
a
s
d
z
x
.
\
8
r
t
y
u
o
p
[
I
f
g
h
j
l
;
‘
c
k
v
b
n
u
,
/
m
11:29 a
As you type, the PC100 anticipates the
word you are typing and displays it above
the keyboard.
]
17
Page 18

♦ Write Using JOT
1. Open an application such as Note Taker from
the Start Menu.
2. Tap the Input
Method arrow
on the Taskbar,
Jot Character Recognizer
Keyboard
then select Jot.
3.
+
Tap at the top of the jot screen to select a
convenient font size.
4. As you draw
the letters in
the Jot screen,
they appear
Directions to Crandell Corp.
follow signs to Arboretum
make hard left at gas stat
+
above in the
application
work space.
station
abc ABC 123
Help
Symb
12:39 p
18
NOTE
Start
abc
Before using Jot, go through the tutorial
included in the Jot Help menu to familiarize
yourself with the characters.
OK
X
Page 19

♦ Draw Directly to the Screen
1. Tap the Jot icon on the Taskbar to
minimize the Jot screen.
2. Now, you
can draw a
map or write
a character
directly on
the screen.
Directions to Crandell Corp.
take bridge westbound
take first exit
follow signs to Arboretum
make hard left at gas station
X marks the spot
Start
abc
abc
+
12:39 p
OK
X
19
Page 20

COMMUNICATING WITH YOUR PC
Before the PC100 can share
information with your desktop PC,
you need to install the software
included in your package.
Because you will be restarting your
computer during this installation, save
your work and quite all programs before
!
you begin.
Installing Windows™ CE Software
1. Place the Windows™ CE CD-ROM into your
CD-ROM drive. Setup launches automatically and
the following screen appears.
20
Page 21

“Auto Insert” in your Computer’s system
NOTE
2. Follow the on-screen instructions to install your
Windows™ CE software.
settings must be enabled before
Windows™ CE will AutoPlay.
♦ Hardware Setup
1. Place the docking cradle
upright on the desktop
near your computer.
Make sure there is an
adequate AC power
source nearby.
2. Plug the docking cradle’s serial cable
into the serial port of your
computer. Tighten the finger
screws on back of the
plug.
3. Plug the AC adapter into the wall.
Use only the Uniden AC Adapter
supplied with your PC100.
!
21
Page 22

5. Plug the other
end of the AC
Adapter into the
DC input on
back of the
docking cradle.
6. Line the PC100 up with the
docking cradle. Slide it down
into the docking cradle until
both connectors mate.
Make sure the connectors on the
bottom of the PC100 and the inside of
NOTE
the docking cradle mate properly.
7. Turn on your PC100, then tap with
the stylus.
22
Start
Page 23

It takes a few minutes for the software to locate your
device, com port, and to set the baud rate.
If this process fails, see “Changing
NOTE
Communications Settings” in your
software guide.
♦ Using Your Modem
Your PC100 is equipped with a 28.8/33.6
kbps (v.34) internal modem. You can use your
modem to send and receive email messages over
telephone lines. To hook up your modem, plug the
telephone cord into the
modem port on the
back of your PC100.
See your software guide (chapters 5-7) for further
information on using your modem.
23
Page 24

ACCESSORIES LIST
AC Adapter
•
Docking Cradle
•
Stylus
•
Carrying Case
•
Windows™ CE Software
•
24
 Loading...