

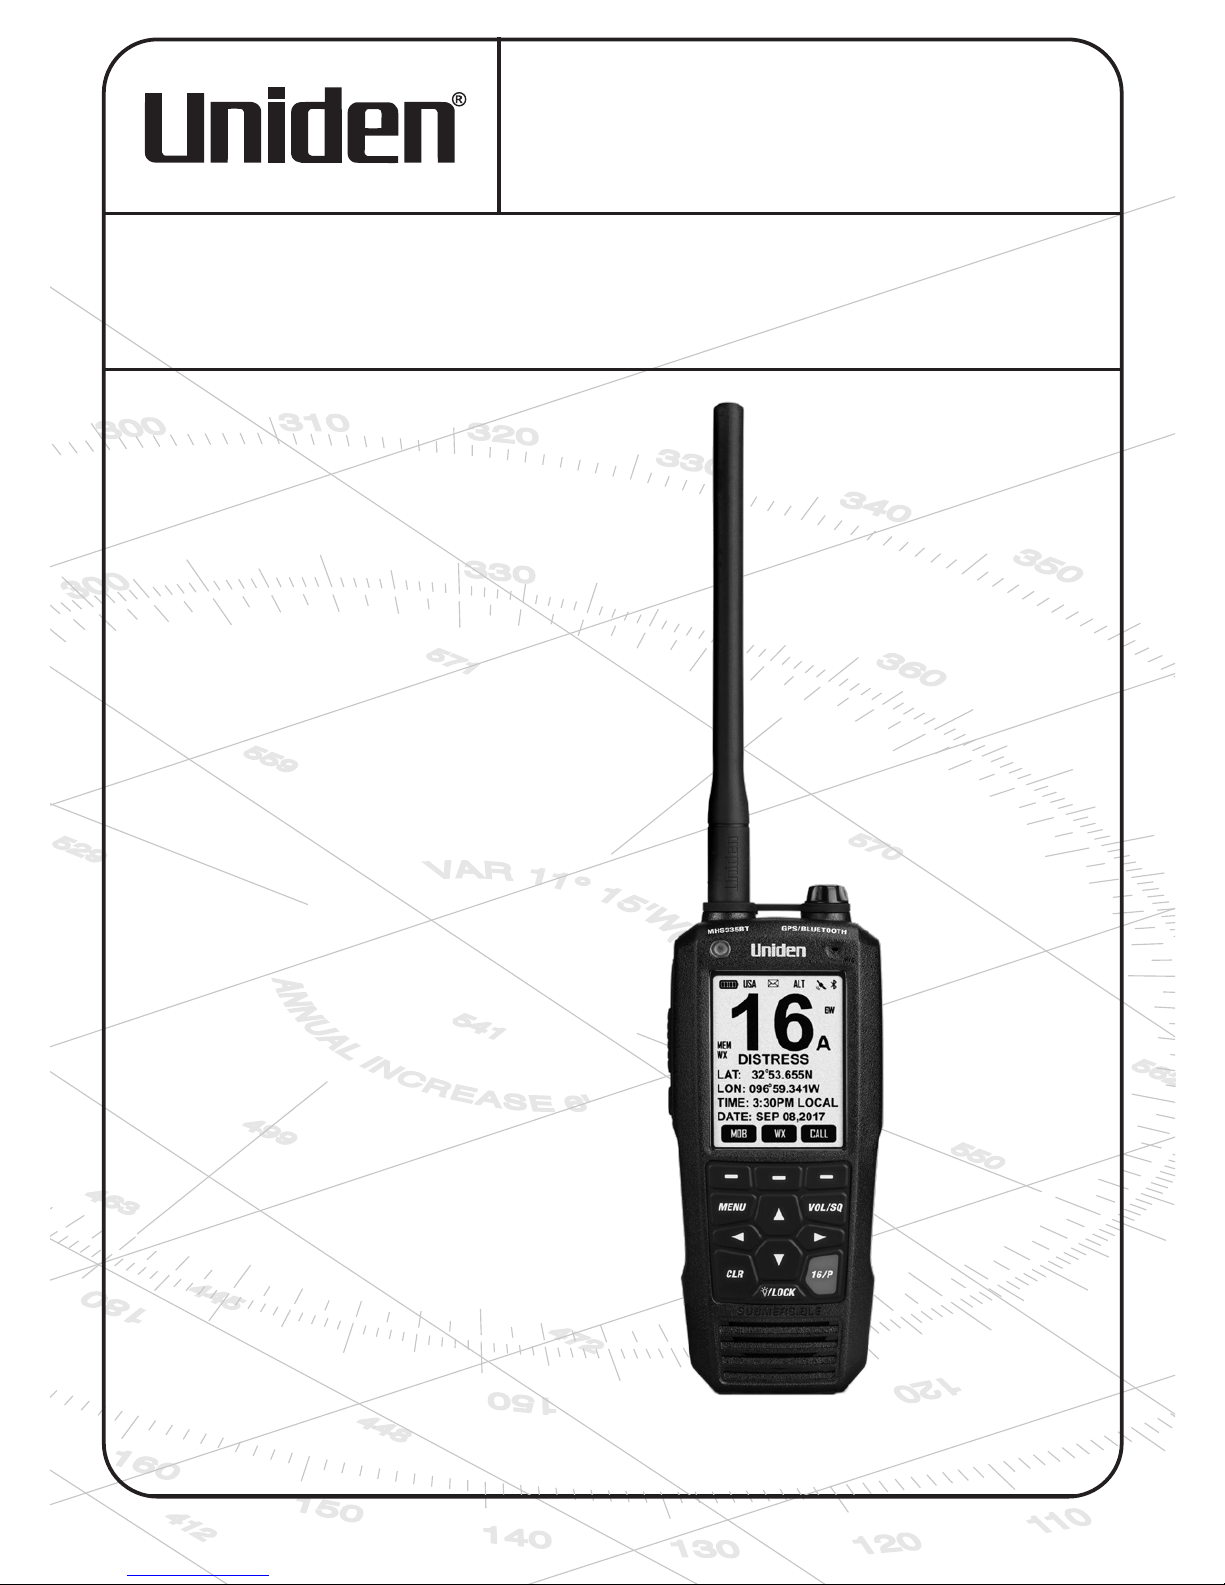
Uniden MHS335 Owner's Manual
RADIO VHF MARITIME FLOTTANTE
OWNER’S MANUAL
GUIDE D’UTILISATION
FLOATING VHF MARINE RADIO
MHS335
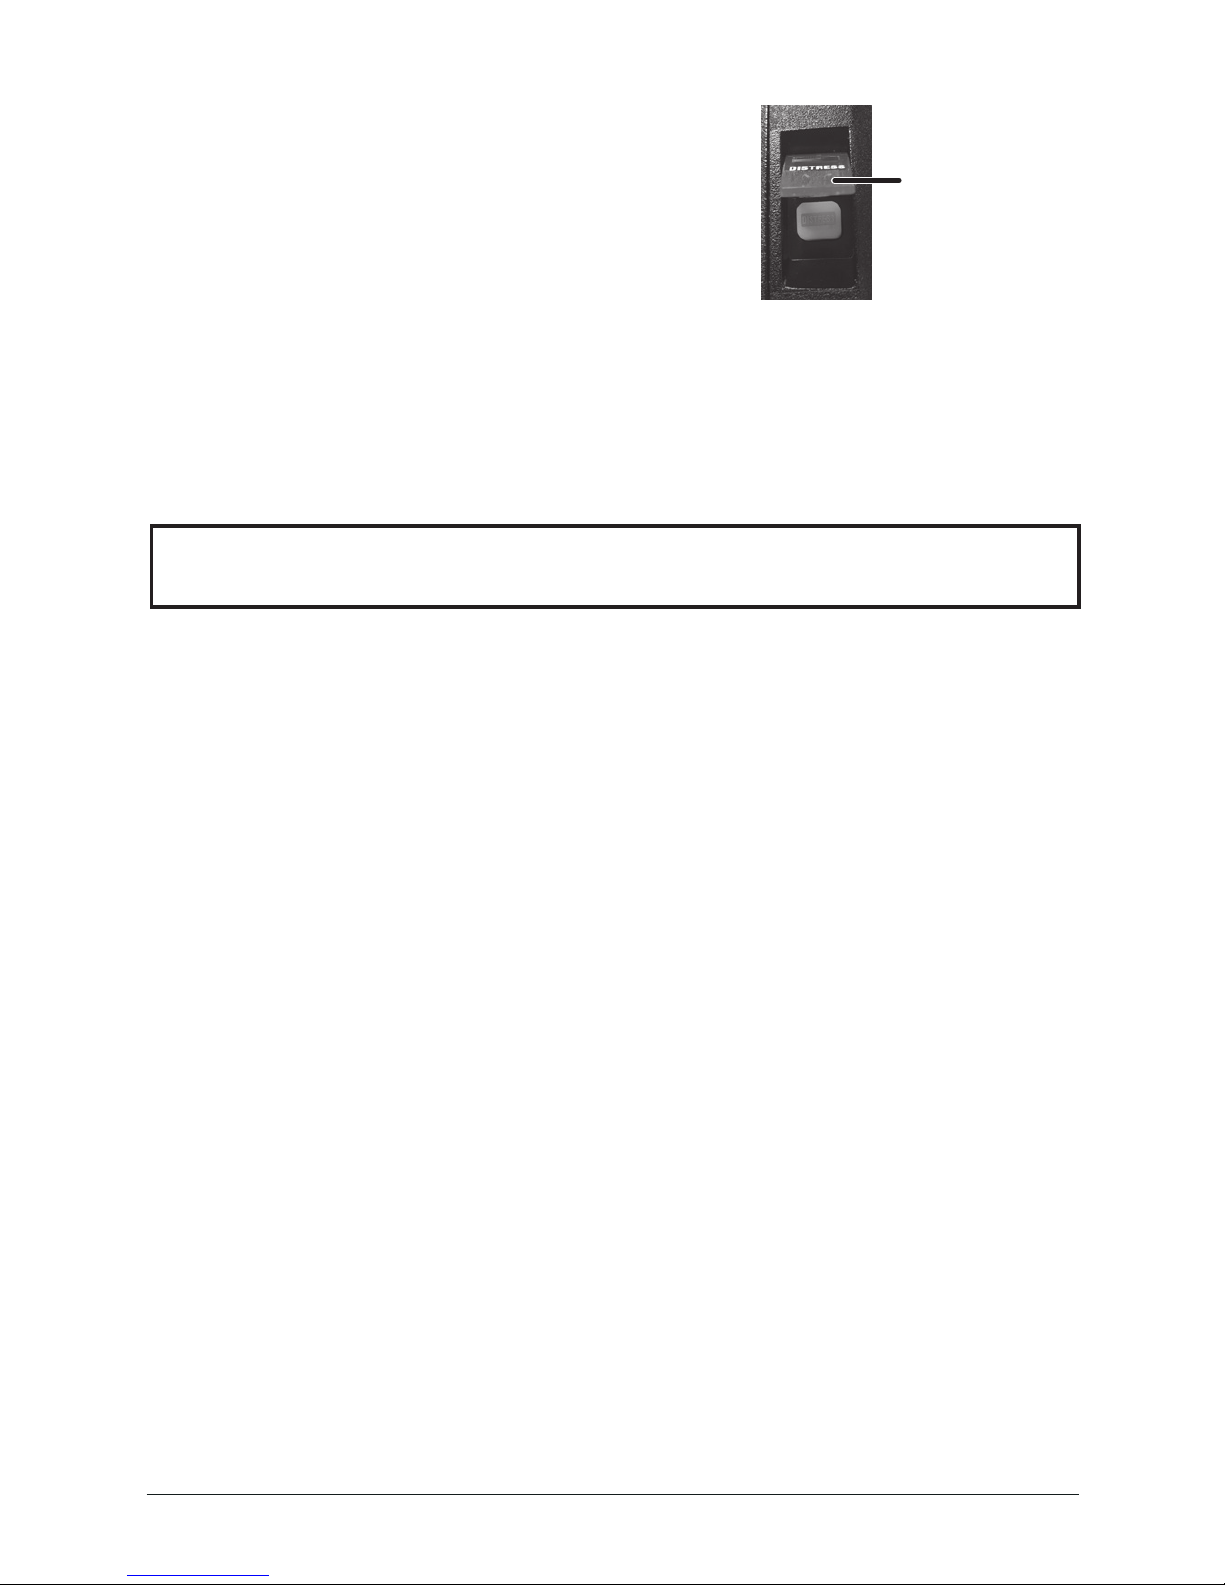
MAKING A DISTRESS CALL
Lift the red cover. Press and hold the DISTRESS
key
for three seconds. Your radio transmits
your ship’s location every few minutes until you
receive a response.
NOTE: If the radio displays
Enter User MMSI
, cancel the automac
distress call and make a normal voice distress call.
Making a Voice Distress Call
Speak slowly - clearly - calmly.
For future reference, write your ship’s name & call sign here:
1. Make sure your radio is on.
2. Press the
16/P
key
to switch to Channel 16 (156.8 MHz). (If the corner of the display
does not show 16, press the 16/P
key
again until it does.)
3. Press the
PUSH-TO-TALK
key
and say: “MAYDAY -- MAYDAY -- MAYDAY.”
4. Say “THIS IS {name of your ship (three times)} and call sign/ship registration
number (once).”
5. Repeat “MAYDAY {name of your ship}” once.
6. Tell where you are: (what navigational aids or landmarks are near, or read the
latitude and longitude from your GPS).
7. State the nature of your distress (e.g. are you sinking, medical emergency, man
overboard, on fire, adrift, etc. ).
8. State the type of assistance you need (medical, towing, pumps, etc.).
9. Give number of persons aboard and conditions of any injured persons.
10. Estimate present seaworthiness of your ship (e.g. how immediate is the danger due
to flooding or fire or proximity to shore).
11. Briefly describe your ship, giving ship name (e.g. “Blue Duck is 32 foot cabin cruiser,
white hull, blue deck house”).
12. Say: “I WILL BE LISTENING ON CHANNEL 16.”
13. End message by saying “THIS IS {name or call sign of your ship}, OVER.”
14. Release the
PUSH-TO-TALK
key
and listen.
If you do not get an answer aer 30 seconds, repeat your call, beginning at step 3, above.
Lift the red cover
and press the white
DISTRESS button
underneath.

FAIRE UN APPEL DE DÉTRESSE
Soulevez le couvercle noir. Maintenez DISTRESS
enfoncé pendant trois secondes. Votre radio
transmettra l’emplacement de votre bateau toutes
les quelques minutes jusqu’à ce que vous receviez
une réponse.
Remarque : Si la radio ache
Enter User MMSI
, annulez l’appel de
détresse automaque et eectuez un appel de détresse vocal
normal.
Faire un appel de détresse
Parlez lentement – clairement – calmement.
Pour toute référence ultérieure, écrivez ci-dessous le nom et l’indicatif d’appel de votre
bateau:
1. Vérifiez si votre radio est en marche.
2. Appuyez sur la touche 16/P afin de commuter au canal 16 (156,8 MHz). (Si le canal 16
n’apparaît pas à l’affichage, appuyez de nouveau sur la touche 16/P jusqu’à ce qu’il soit
affiché.)
3. Appuyez sur le bouton Push-to-Talk et dites:“MAYDAY -- MAYDAY -- MAYDAY”.
4. Donnez l’identité de votre navire en disant : “ICI {nom de votre bateau (trois fois) ou indicatif
d’appel et le numéro d’identification de votre bateau (une fois)}”.
5. Dites “MAYDAY {nom ou indicatif d’appel de votre bateau} une fois”.
6. Donnez votre position : (quels sont les points de repère ou aides à la navigation près de vous
ou lisez les coordonnées de longitude et de latitude apparaissant sur votre dispositif GPS).
7. Révélez la nature de votre détresse (par exemple, nous sommes en train de couler, urgence
médicale, un homme à la mer, un incendie, nous sommes à la dérive, etc.
8. Révélez la nature de l’aide désirée (médicale, remorquage, essence, etc.)
9. Donnez le nombre de personnes à bord et les conditions des blessés, s’il y en a.
10. Donnez la condition de navigabilité actuelle de votre navire, tel que le degré de l’urgence par
rapport une inondation, et une incendie.
11. Donnez une brève description de votre navire en donnant le nom du bateau (par exemple,
“Blue Duck est un yacht de croisière de 32 pieds, avec une coque blanche et un rouffle bleu.).
12. Dites : “JE VAIS ÉCOUTER SUR LE CANAL 16”.
13. Terminez le message en disant “ICI {nom ou indicatif d’appel de votre bateau}, À VOUS”.
14. Relâchez le bouton Push-to-Talk du microphone et écoutez.
Si vous n’obtenez pas de réponse après 30 secondes, répétez l’appel en commençant à l’étape 3
ci-dessus.
Soulevez le
couvercle et
appuyez sur le
bouton DISTRESS
blanc en dessous.

Table of Contents
INTRODUCTION .......................E-3
FEATURES ................................E-3
WHAT'S INCLUDED ..................E-4
PARTS OF THE MHS335BT ......E-4
Front View ................................. E-4
Back View .................................E-5
Charger ..................................... E-6
READING THE IDLE SCREEN .. E-6
Display Icons and
What They Mean ................... E-6
HOW IT WORKS .......................E-8
USING THE POP-UP
KEYBOARD ............................E-8
MENUS ......................................E-8
DISTRESS MESSAGE
Menu ... E-10
GENERAL SETUP
Menu ......... E-10
RADIO SETUP
Menu ............... E-11
GPS
Menu ...............................E-12
WAYPOINT SETUP
Menu .......E-12
BLUETOOTH
Menu ................. E-12
DSC SETUP
Menu ..................E-12
ABOUT
Menu .......................... E-13
RESET (To Factory Defaults)
Menu ...................................E-13
USING SOFT KEYS ................. E-13
MOB Soft Key .........................E-14
WX Soft Key............................E-14
CALL Soft Key ........................E-14
HILO Soft Key ......................... E-16
TRI Soft Key............................E-16
MEM Soft Key ......................... E-17
SCAN Soft Key .......................E-17
COMP Soft Key .......................E-17
NAV Soft Key ..........................E-17
WPT Soft Key .........................E-17
BT Soft Key ............................. E-17
SPKR Soft Key........................E-18
OPERATION MODES ..............E-18
Normal ....................................E-20
Scan ........................................ E-20
Weather ..................................E-22
SETTING UP THE
HARDWARE ........................E-23
ATTACHING THE ANTENNA ... E-23
INSTALLING THE BATTERY ...E-23
MOUNTING THE CHARGER...E-23
Charging the Battery ............... E-23
Charging the Radio with
Battery Pack Installed..........E-24
Charging the Battery
Pack Only ............................ E-24
Important Notes on
Charging the battery ............ E-24
SETTING UP YOUR RADIO ...E-24
TURNING IT ON .....................E-24
ENTERING THE
USER MMSI .......................... E-24
SETTING IT UP ........................E-25
Acquiring GPS Location .......... E-25
Changing the Volume .............E-25
Setting the Squelch Level ....... E-25
Setting the UIC Channel
Mode (USA/CAN/INTL) .......E-26
Setting Key Lock ..................... E-26

Setting WX Alert Mode ............E-26
Setting FIPS Codes ................E-26
Adjusting the Backlight............E-26
Adjust the LCD Contrast .........E-27
Turning the Key Beep
On and Off ........................... E-27
OPERATING THE RADIO ....... E-27
Making a Transmission ...........E-27
Changing theTransmission
Level .................................... E-27
Saving the Channel into
Memory ...............................E-28
Using the LED Light ................ E-28
DIGITAL SELECTIVE CALLING
FEATURES (DSC) ...............E-28
WHAT IS DSC? ....................... E-28
MMSI NUMBERS ..................... E-28
Entering MMSI Numbers ........E-29
USING THE DIRECTORIES ....E-29
Individual Directory .................E-29
Group Directory.......................E-30
MAKING DSC CALLS .............. E-30
Calling a Single Station
(Individual Call) ...................E-32
Calling a Particular Group
of Ships (Group Call) ........... E-32
Calling all ships
(All-Ships Call) .....................E-32
MAKING AN AUTOMATIC DISTRESS
CALL ........................................E-33
Canceling an Automatic |
Distress Call .......................E-33
Resending an Automatic
Distress Call .......................E-33
Receiving an Automatic
Distress Call
Acknowledgement ...............E-33
Receiving a Distress Call ....... E-33
DSC CALLS .............................E-34
Individual DSC Call ................. E-34
Group DSC Call ......................E-34
Answer a DSC Call .................E-34
DSC Call Logs ........................E-34
Making or Returning a Call .....E-35
TEST CALLS ............................ E-36
Making Test Calls (Test) ......... E-36
Receiving Test Call Setup ....... E-36
POSITION REQUEST AND
REPLY ................................... E-36
Enabling Automatic Position
Reply ...................................E-36
POS Request .......................... E-36
Position Send ......................... E-37
DISABLING AUTOMATIC
CHANNEL SWITCHING ........E-37
GPS FEATURES .....................E-37
GPS OPERATION
OVERVIEW ...........................E-37
GPS MENU .............................. E-38
NMEA FEATURES ..................E-39
Chartplotter Connection ......... E-39
NMEA Output .........................E-40
ADDITIONAL FEATURES ......E-40
Renaming Channels ................E-40

UNIDEN MARINE APP ...........E-40
MAINTENANCE AND
TROUBLESHOOTING .........E-40
SPECIFICATIONS ...................E-42
REFERENCE TABLES ............E-43
Channel Descriptions and
What They Mean ................. E-43
MARINE RADIO CHANNEL
CHART ..................................E-44
WEATHER CHANNELS AND
FREQUENCIES
(US, CAN, AND INTL) ...........E-48
EMERGENCY ALERT (SAME)
SYSTEM ...................................E-49
Types of Events ......................E-49
No Response Event Code ......E-50
REGULATIONS AND
SAFETY WARNINGS ...........E-51
Maritime Radio Services
Operation ...............................E-51
Basic Radio Guidelines ............ E-51
RBRC Information .................E-52
COMPLIANCE ........................E-53
Three Year Limited
Warranty ..............................E-54

E-3
Uniden MHS335 Radio Owner’s Manual
INTRODUCTION
Uniden's MHS335BT is a oating, hand-held class D DSC radio with an integrated GPS
receiver. It is also Bluetooth capable so you can use Uniden's smartphone app (iOS and
Android) to set up the radio and text message other VHF text message capable radios.
You can enter other information such as DSC directory information and update the radio's
rmware.
FEATURES
Your radio provides the following key features:
x Submersible design. Complies with oating JIS8/IPX8 water-resistant standards,
which means the radio can be submerged in 4.9 feet of water for up to 30 minutes
without damage.
NOTES:
The radio will only meet this rating if fully assembled and all rubber seals and
bungs are well maintained and correctly tted. This means that the speaker
microphone bung is inserted, and the battery pack (or case) and antenna are
attached and securely fastened.
After your radio is submerged in water, the sound might be distorted. This
is because there is still water remaining in and around the speaker and
microphone. Just shake the radio to clear excess water, and the sound should
return to normal.
If your radio is exposured to salt water, clean it thoroughly with fresh water
and dry it before turning it on.
The charger is not waterproof.
x Memory Scan mode. Lets you save channels to memory and monitor them in quick
succession.
x High/LO power level select. Lets you boost the transmitter power from 1W to 2.5 or
6W for added transmission distance.
x Battery level display and low battery alert.
x Dual and Triple Watch operation. These different watch modes let you monitor up to
two Coast Guard Distress/Hailing channels and one weather channel along with one
regular marine channel.
x All marine VHF channels for the U.S., Canada, and international waters
x Emergency 16/09 Channel monitoring. Set unit to scan one or both of these
emergency channels regularly within normal scanning cycles.
x Class D second receiver is dedicated to monitoring the DSC watch channel 70 to
ensure that no incoming messages are missed.
x National Oceanic and Atmospheric Administration (NOAA) Weather Channel
watch. Sounds a warning tone when a hazard alert is issued.
x LCD and key backlight/Flashlight/SOS Strobe. Pressing the Light/Lock key initiates
various light options (see Page E-5).
x Key Lock. Locks keys to prevent accidentally changing channels or entering data.
x Selectable Backlight Timer. Lets you select the length of time the backlight will be
on.
x DSC. Lets you call other ships or groups using their unique identication code. This
radio complies with International Class D DSC standards for Handheld GPS/VHF
E-4
Uniden MHS335 Radio Owner’s Manual
marine transceivers.
x GPS (Favorite Position mode). Lets you save your current position as well as
manually enter other positions.You can save positions into a directory to return to them
as desired.
x Bread Crumbs. Tags specic GPS points along your route. You can set how far apart
these points should be (seconds, minute, etc) through the menus.
x Waypoints. Create a list of coordinates and use that list to navigate to various
destinations.
x NMEA input/output. Lets you connect to a chartplotter and, through menus,
determine what NMEA data you want to receive.
x 10 weather channels available for monitoring.
x MOB (Man Overboard). Lets you lock onto the current position when a Man
Overboard situation occurs.
x Compass Display. Lets you determine the way you want the radio to display your
course - by showing your course and direction or by showing location on an north-
south-east-west display. Automatically auto-plots to a received DSC distress call.
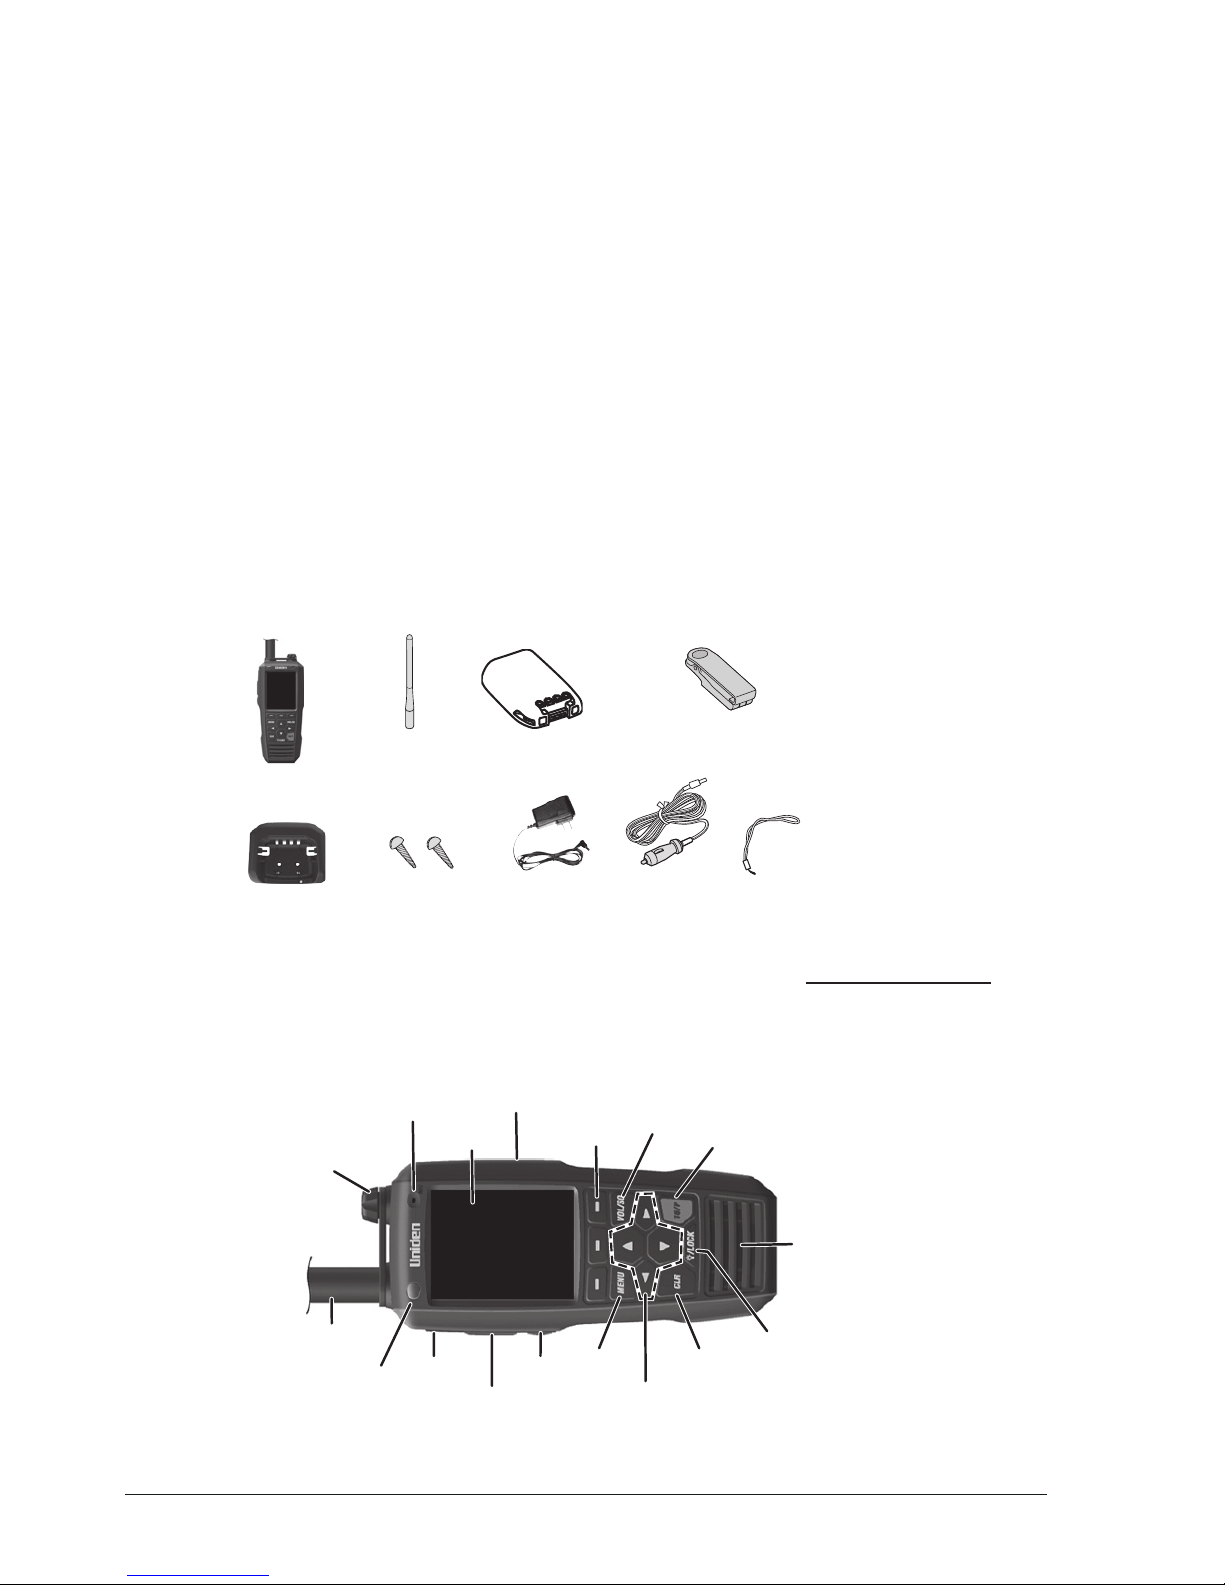
WHAT'S INCLUDED
NOTE: Some of the graphics in this manual may vary slightly from the actual product.
If any pieces are missing or damaged, contact Customer Service at www.uniden.com.
PARTS OF THE MHS335BT
Front View
Antenna
MHS335 Radio
Charging Cradle
AC Adapter
DC Adapter
Lithium Ion
Rechargeable Battery
Not shown:
External speaker/
microphone
1 meter NMEA
cable
Belt Clip
Wrist Strap
Mounting Hardware
Note: Thermal sensor on back.
Screen
Ext. Speaker/
Mic jack
Antenna
Power
Push-
to-Talk
Monitor
Menu
Direction
Arrows
CLR
Light/Lock
Speaker
16/P
VOL/
SQ
Function
Keys
LED
DISTRESS
Microphone
E-5
Uniden MHS335 Radio Owner’s Manual
Key Press to... Press and hold to...
POWER N/A Turn radio on and off.
Push-to-Talk N/A Transmit on a current TX power.
MON key
Quickly open and close
squelch (single press/release).
Open Squelch.
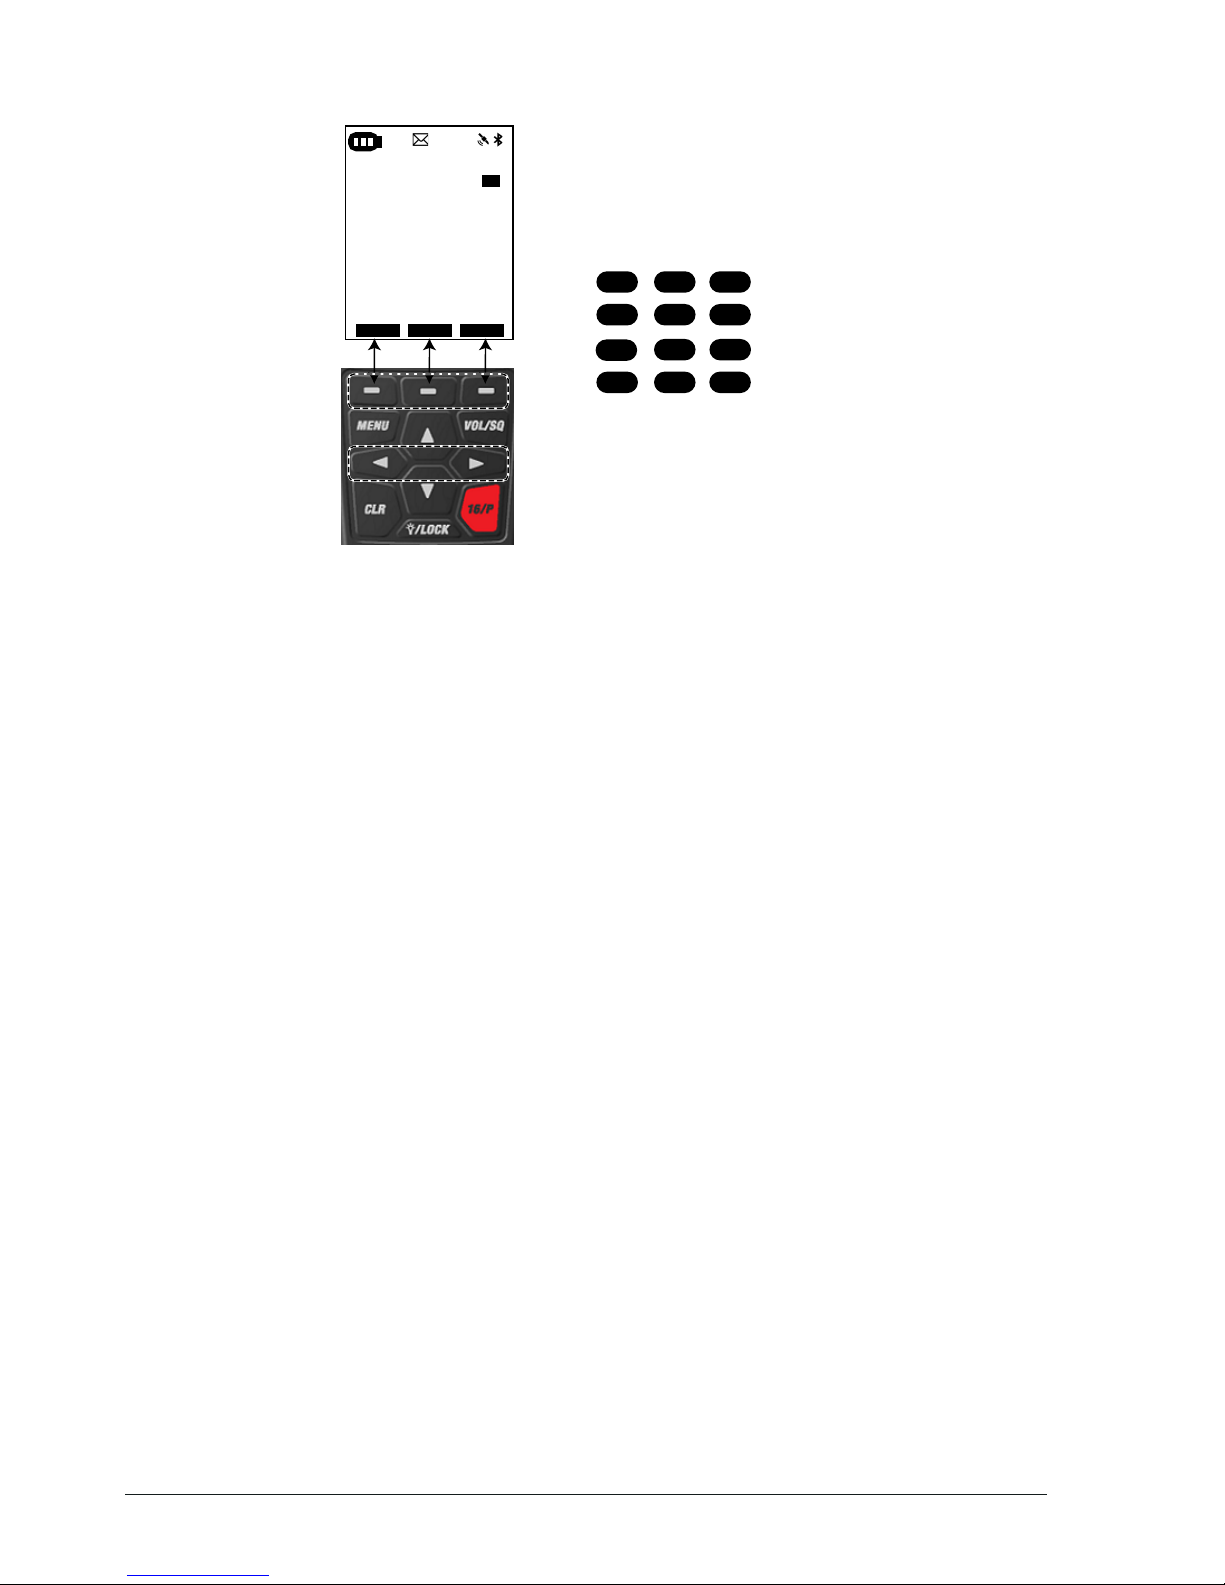
Soft Function Keys (3)
Activate function assigned to
that key. Function displays on
screen above key. See page
E-13.
NA
MENU KEY Open the menus. NA
◄ / ▲ / ► / ▼
Move up, down, left, or right
on a screen.
NA
CLR key Returns to the IDLE screen. NA
Light/LOCK key
- Press once to activate the
LCD and key backlight.
- Press twice to activate LED
steady on (Flashlight).
- Press three times to activate
the SOS strobe light.
- Press a fourth time to turn
the LED off.
Lock key input to prevent input
errors.
16/P key
Cycle through call channel,
channel 16, channel 9, and
back to the starting channel..
NA
VOL/SQ key
Press once: Adjust volume.
Press twice: Adjust squelch.
NA
DISTRESS key Activate DISTRESS screen. Send out default distress signal.
Back View
Belt clip
Battery
Battery charging
Battery
latch
Wrist strap slot
E-6
Uniden MHS335 Radio Owner’s Manual
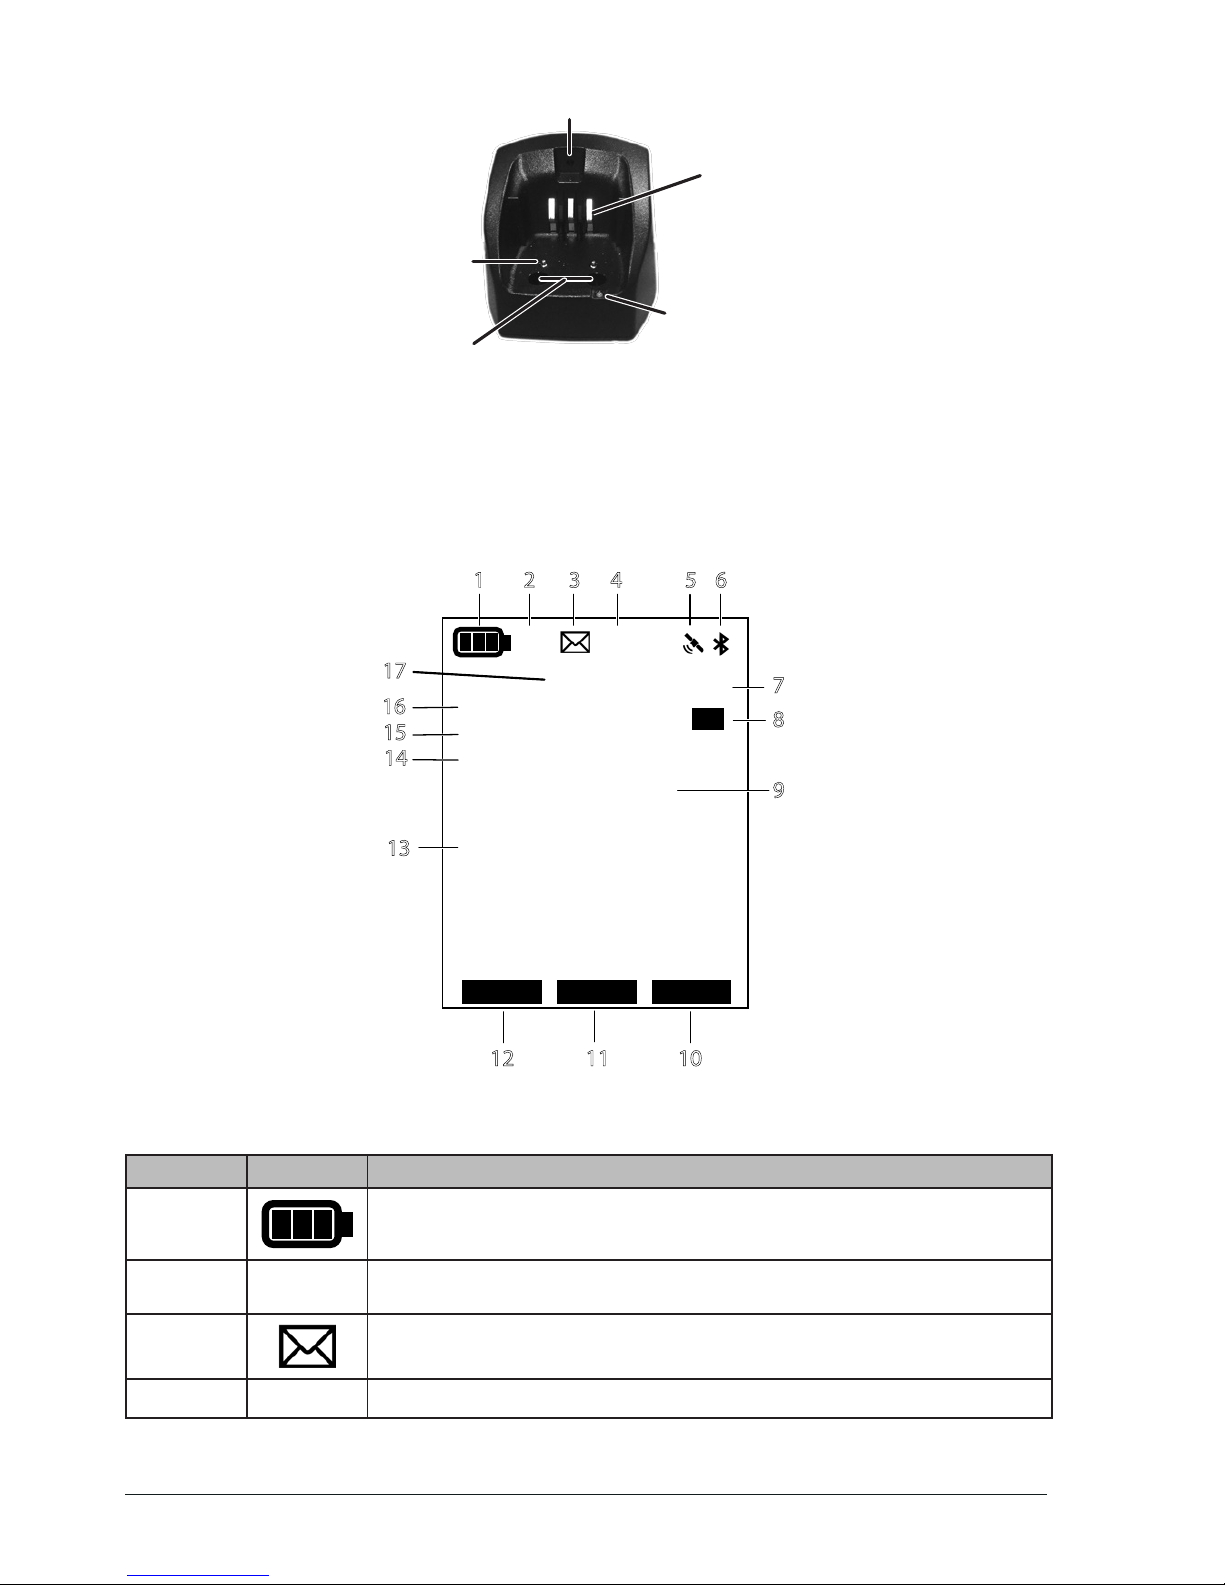
Charger
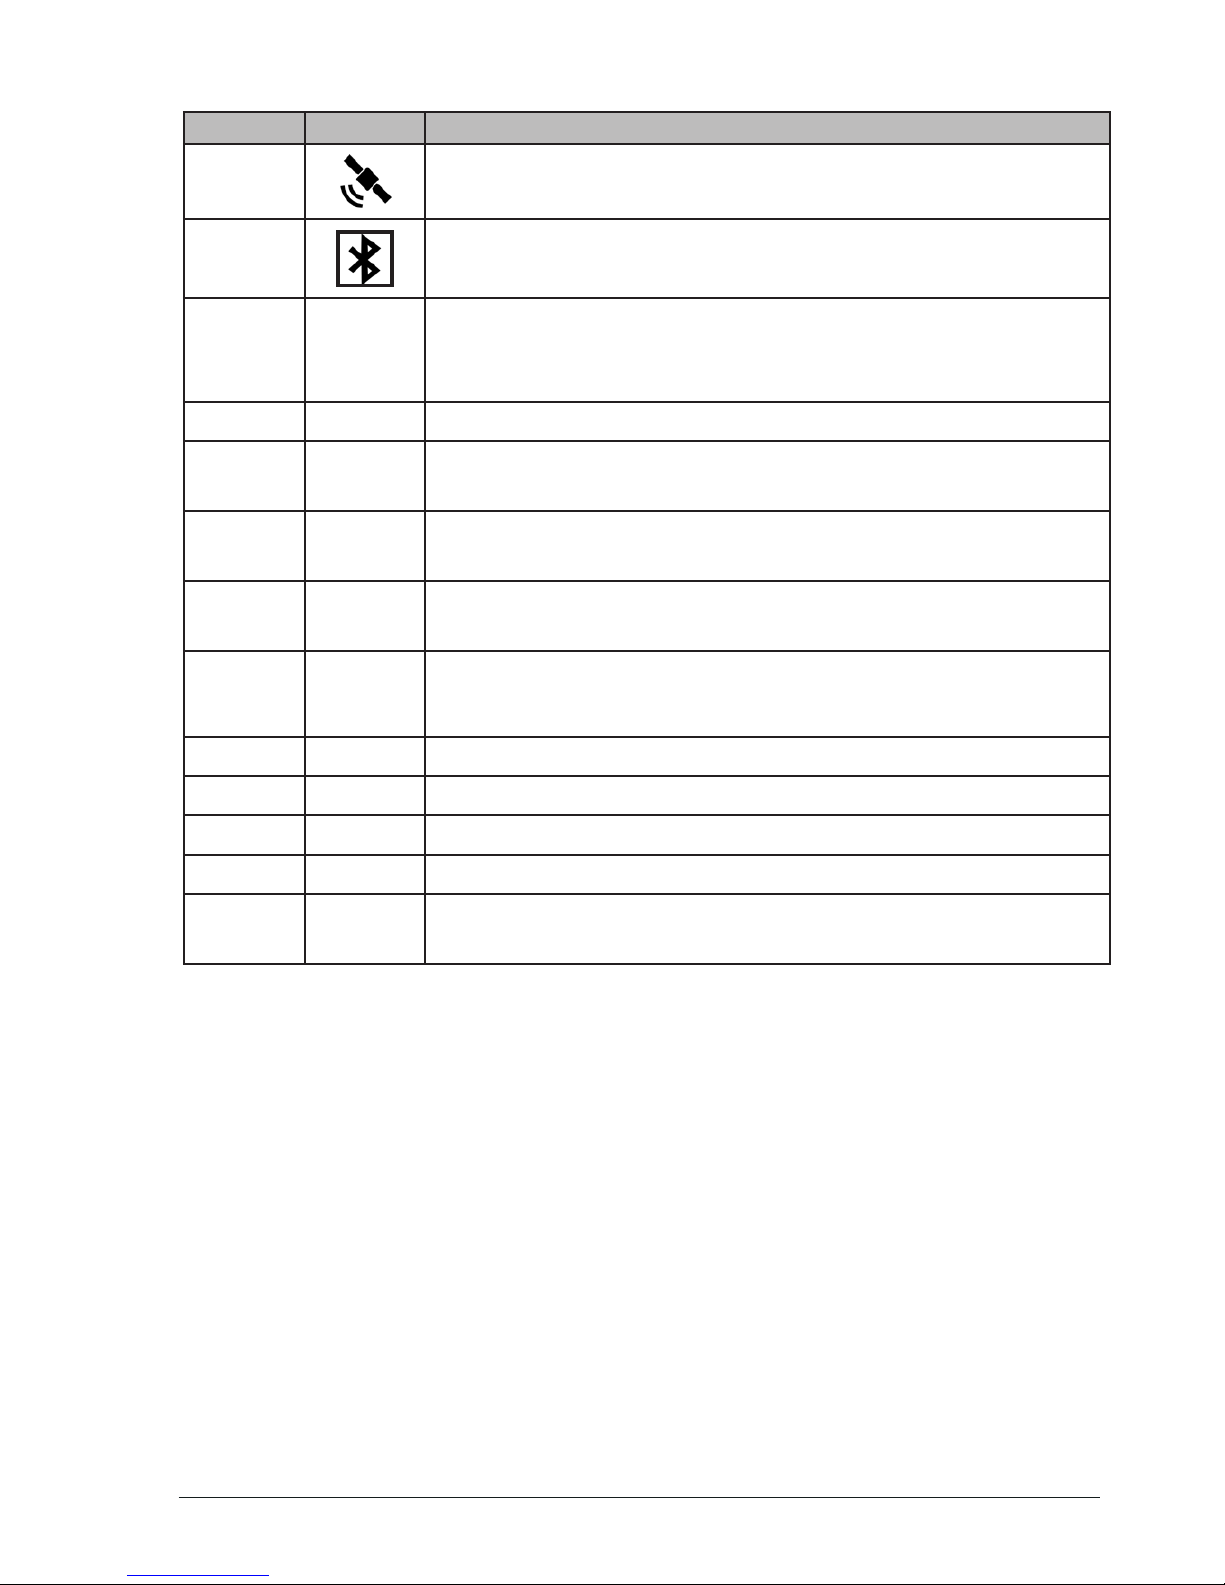
READING THE IDLE SCREEN
The Idle screen shows different information depending on what you are doing. Not all icons
display on every screen. This dummy Idle screen displays many of the possible icons. The
table below shows possible icons and what they mean.
ALT
INTL
6W
TRI
MEM
WX
15
COMMERCIAL
MOB WX CALL
<
>
TX
LAT:32˚53,6604N
LON:096˚59,3158W
TIME:20:47 Local
DATE:Aug 23,2017
1
8
9
7
65432
101112
16
15
14
13
17
Display Icons and What They Mean
Number Icon What it means
1
Battery level
2
INT
Channel mode (USA, INTL, or CAN)
3
Displays when mail is available.
4
ALT
Weather Alert
Charging
contacts
CHARGE LED
Screw holes
NMEA
contacts
Screw hole
E-7
Uniden MHS335 Radio Owner’s Manual
Number Icon What it means
5
Flashes when satellite acquired. Does not display if no satellite
acquired.
6
Displays when Bluetooth is turned on.
7
1W,
2.5W, or
6W
Power output.
8 TX or RX
Indicates Transmitting (TX) or Receiving (RX).
9
Various
Text
Channel Name
10
Soft Key
#3
Name of soft key (see page E-13).
11
Soft Key
#2
Name of soft key (see page E-13).
12
Soft Key
#1
Name of soft key (see page E-13).
13
GPS Data Latitude, Longitude, Time, and Date at current position.
14 WX
Displays when Weather mode active.
15 MEM
Displays when a channel is saved into memory.
16 TRI
Displays TRI (Triple) or DUAL (Dual) watch mode as set in Menus.
17
Channel
Number
Current channel number.

E-8
Uniden MHS335 Radio Owner’s Manual
HOW IT WORKS
The MHS335 uses a 3-part operating structure: Menus, Soft Keys, and a pop-up keyboard.
These elements work with each other to quickly set up and operate your radio.
x Menus - Press the MENU key to access the menus (see page E-8).
x Soft Keys - The soft keys relate to the three keys on the bottom of the screen. Many of
these keys can access functions that are set up through the menus (see page E-13).
x Pop-Up Keyboard - Some of the menus and soft keys require alphanumeric input. The
radio brings up a keyboard for this. You can change the keyboard from alphanumeric
characters to special characters.
When you need to enter text, a digital keyboard pops up. "Type" on this keyboard by using
the ▲, ▼, ►, and ◄ keys on the radio's keypad to move a curser through the keyboard.
Press
SELECT
to select that character and move to the next spot.
x The
ABC/abc
key switches between capital and lower case letters.
x Select the
@&?
key to switch to the special character keyboard. Select
ABC/abc
to
switch back to an alphanumeric keyboard.
x After using the ▲, ▼, ►, and ◄ keys on the radio's keypad to select a letter, press
SELECT
to "type" the letter. The letter then displays on the screen.
x Select the ◄ and ► keys to move the curser backwards or forwards into the entry.
x Select
ENTER
to move the curser to the next line.
x Select
del
to delete the character to the left of the curser.
BACK
TEXT SELECT
C
BAD
M
LKN
WVU
X
3
214
EFGHI
J
O
P
Q RST
Y Z
5 67890
Enter
space
@&?
abc
del
TITLE
Switch between all
capital letters and
lower case letters
Move curser to
next line
Switch to special
character keyboard
Go to previous
screen
Varies with screen
type. Can be
CONFIRM, NEXT, etc.
Select letter
chosen
Move curser
to previous or
next letter
Delete character
to the left of the
curser
MENUS
Various menus let you establish guidelines and parameters for sending and receiving calls.
Menus also let you set your radio’s characteristics such as brightness, Code selection, and
contrast.
The MENU key accesses menus that let you set the way your radio operates. The following
Menus display on the screen.
x DISTRESS MESSAGE (see page E-10 for details)
x GENERAL SETUP (see page E-10 for details)
x RADIO SETUP (see page E-11 for details)
E-9
Uniden MHS335 Radio Owner’s Manual
x GPS (see page E-12 for details)
x WAYPOINT SETUP (see page E-12 for details)
x BLUETOOTH SETUP (see page E-12 for details)
x DSC SETUP (see page E-12 for details)
x ABOUT (see page E-13 for details)
x RESET (see page E-13 for details)
Use the UP ( ▲) and DOWN ( ▼ ) keys to nd a menu category. Press the
SELECT
soft
key to select and go to that menu.
Select
BACK
DISTRESS MESSAGE
GENERAL SETUP
RADIO SETUP
GPS
WAYPOINT SETUP
BLUETOOTH SETUP
DSC SETUP
ABOUT
RESET
MENU DESCRIPTION REF. PAGE
DISTRESS
MESSAGE
Types of distress messages such as ooding,
capsizing, and man overboard.
Page E-10
GENERAL SETUP Basic radio conguration such as backlight,
key beep, and reset to factory defaults.
Page E-10
RADIO SETUP Basic radio conguration such as channel
mode, priority channel, and scan type.
Page E-11
GPS Set up GPS conguration such as time offset,
unit of measure, and direction.
Page E-12
WAYPOINT SETUP Establish Waypoint and route directories and
routing information.
Page E-12
BLUETOOTH
SETUP
Turn Bluetooth on and off and provide a
broadcast identier (name) for your radio.
Page E-12
DSC SETUP Congure DSC calling and directories. Page E-12

E-10
Uniden MHS335 Radio Owner’s Manual
MENU DESCRIPTION REF. PAGE
ABOUT Displays radio, GPS, and Bluetooth rmware
version numbers.
Page E-13
RESET (To Factory
Defaults)
Reset the radio to factory defauts. All
programming is lost, but not the MMSI number.
Page E-13
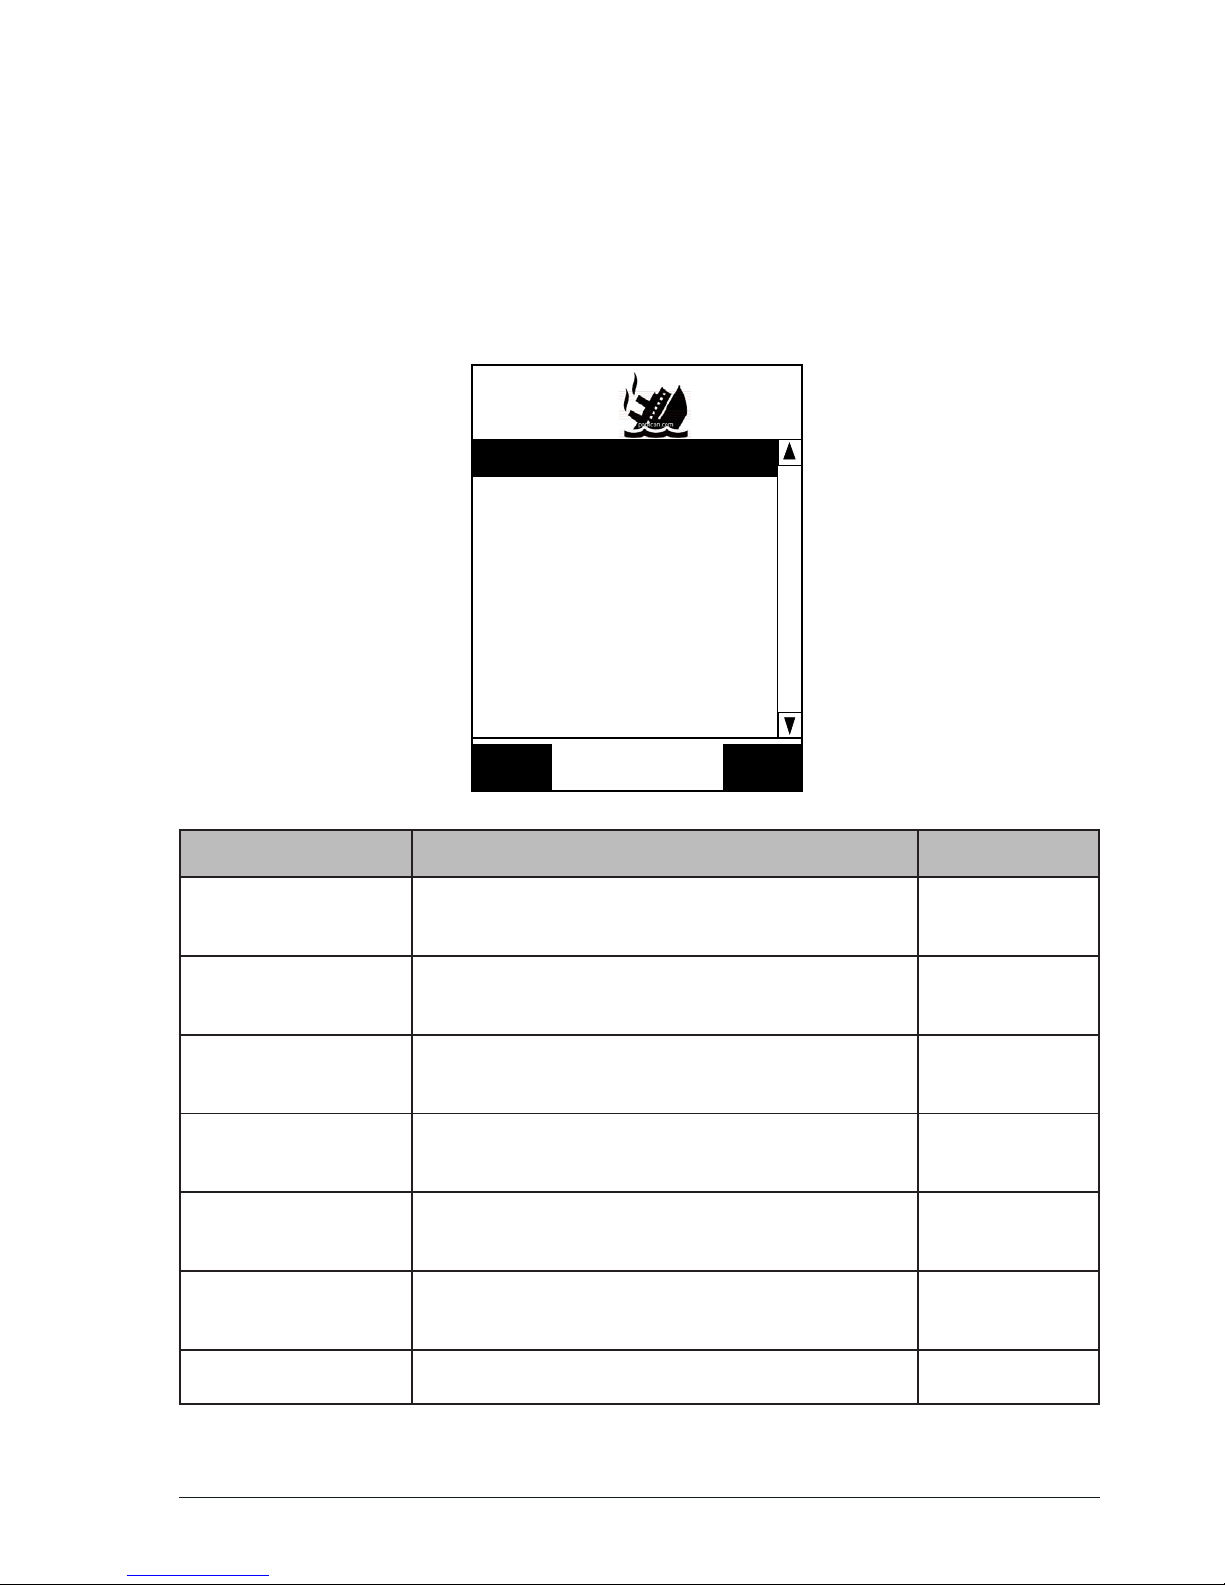
DISTRESS MESSAGE
Menu
Select a distress message type to transmit when you use the DISTRESS key on the side of
the radio. See page E-33 for information on how to send a distress message.
MENU ITEM DESCRIPTION
Undesignated Send this type when you, your crew, and/or your ship are in
clear danger and there is no time to search for a more inclusive
designation to use.
Fire, Explosion Send this type if there has been an explosion or a re on the ship
and you are in immediate danger.
Flooding Send this type if your ship is taking on water and you are in
immediate danger.
Collision Send this type if your ship has collided with another ship or
obstruction.
Grounding Send this type if the ship has run aground.
Capsizing Send this type if the ship is capsizing.
Sinking Send this type if the ship is sinking.
Adrift Send this type if the ship is adrift and unable to navigate on its own.
Abandoning Ship Send this type if you and the crew must evacuate the ship.
Piracy Send this type if your ship is under attack or unauthorized boarding.
Man Overbard Use this type if someone has gone overboard and you are unable
to assist/locate them.
Distress messages are always transmitted on channel 70 at maximum RF power (6W).
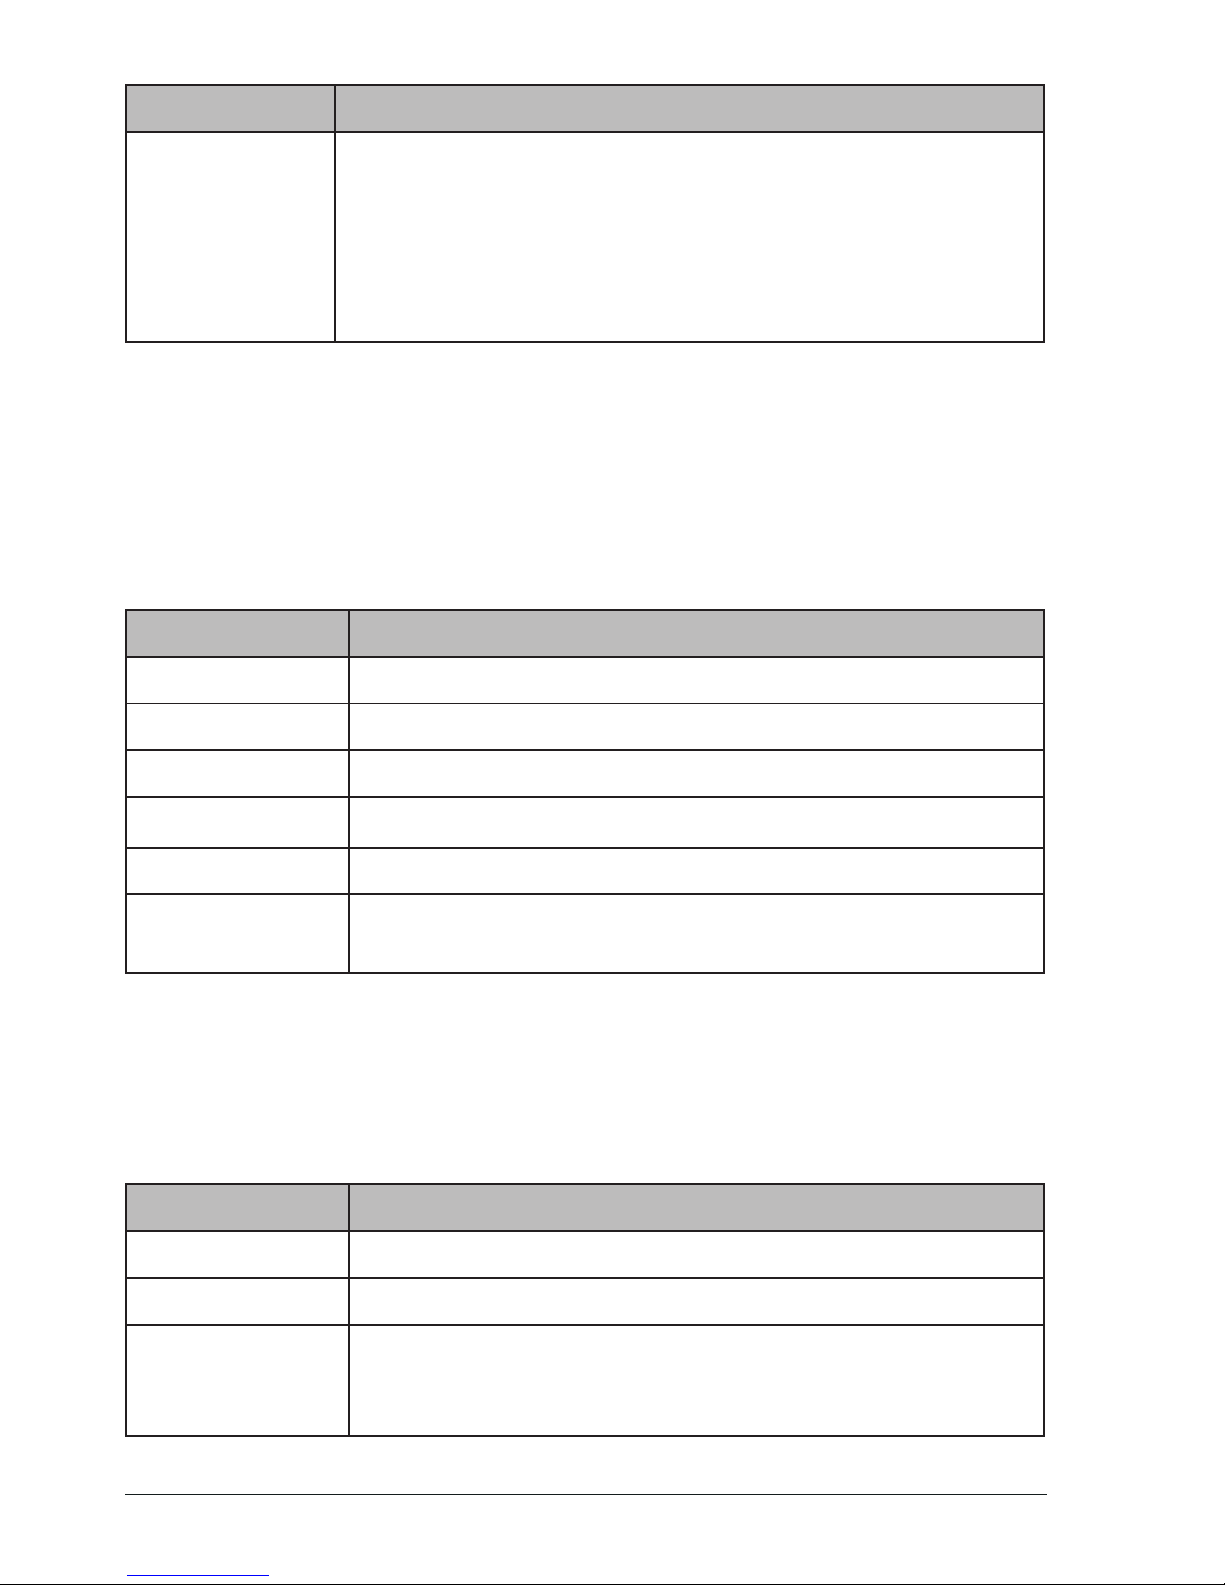
GENERAL SETUP
Menu
You can set up how your radio operates through the
GENERAL SETUP
menu.
MENU ITEM DESCRIPTION
Backlight Set how bright the backlight is and how long the backlight stays on.
Backlight level: Off, 1 - 5 (Default = 3). Backlight duration: Always
on, 5 sec , 10 sec, 20 sec, or 30 sec.

E-11
Uniden MHS335 Radio Owner’s Manual
MENU ITEM DESCRIPTION
Contrast Set how dark the screen images are against the background.
Contrast levels are 1 - 8 (Default = 4). (See page E-27.)
Key Beep With Key Beep turned on (default), the radio will beep every time
you press a key.
SOS Strobe The LED on the front of the radio acts as a strobe light. Set water
activation and timeout duration here.
Inactivity Timer Set how long the radio remains inactive before it times out.
Key Assignment Reassign soft key functions to different keys.
Reset Radio to
Factory
Return your radio to the factory defaults. You will lose all
programming.
RADIO SETUP
Menu
Use the RADIO SETUP menu to ne tune how the radio will operate. For example, you can
rename channels, set channel modes, etc.
MENU ITEM DESCRIPTION
Channel Mode Set to USA, CAN (Canada), or INTL (International). (See page
E-26.)
Weather Radio Turn weather alerts on or off (see page E-26) and enter S.A.M.E
codes (see page E-26).
Dual/Tri Watch Turn Dual or Triple Watch on and off (see page E-18).
Priority Channel Select a channel to be the priority channel when scanning. (See
page E-17.)
2nd Priority
Channel
Select a channel to be the secondary priority channel when
scanning. (See page E-17.)
Scan Type Select a scanning type: Priority Scan or Memory Scan (see page
E-17.)
Scan Pause
Timer
Set how long scanning will pause when the
SCAN
soft key is
pressed.
Channel Name Rename a channel (see page E-40).
Noise Cancel Select noise cancelling for received or transmitted signals.
E-12
Uniden MHS335 Radio Owner’s Manual
MENU ITEM DESCRIPTION
Receive Audio
Pitch
Set audio pitch.
- Normal
- Mid Range
- Highs & Lows Boost
- Lows Boost
- Highs Boost
GPS
Menu
The GPS section on provides an overview of the GPS menu options and how they work.
WAYPOINT SETUP
Menu
Waypoints (also called landmarks) mark specic points in traveling between two locations.
They serve as directional indicators. For example, once you reach a specic waypoint,
you need to adjust your course to reach the next waypoint (and as you continue, your
destination). See page E-17 for details on setting up waypoints.
MENU ITEM DESCRIPTION
Waypoint Directory Displays a list of all available waypoints.
Current Position Displays latitude, longitude, time, SOG, and COG.
Route Directory Displays a list of routes stored in the directory.
Routing Method Automatic or Manual
Route Display Displays routes on a compass screen.
Arrival Alarm Enter the distance at which you want the radio to alert you that
you are close to the destination.
BLUETOOTH
Menu
Smart phones can discover your radio when you turn Bluetooth on with this menu. You can
also change your radio's broadcast identier (name).
DSC SETUP
Menu
You can congure your DSC operation through this menu.
MENU ITEM DESCRIPTION
Enter Radio MMSI Enter the radio’s MMSI number to use DSC features.
Individual Directory Add, edit, or delete individual directory entries.
Group Directory Set up a group with an Group MMSI. Send this GROUP MMSI
number to other ships.Those ships are now part of the group you
created.

E-13
Uniden MHS335 Radio Owner’s Manual
MENU ITEM DESCRIPTION
Auto ACK Automatically send an acknowledgement when you receive a
test call. Options are
Individual ACK
or
Position ACK
request. You
can set Auto/Manual for each option so when you get a call or a
position request, the radio will kow how you want to respond.
Test Call ACK Acknowledge receipt of a test call sent to you.
Individual Call
Ring
Set the amount of time a call will ring before it times out.
Auto Channel
Switch
Set whether or not he radio will automatically switch to channel 16
from your current channel when it receives a DSC call.
Auto MOB Set Turn Auto MOB on and off.
Wait to POS Fix Set how long the radio takes to acknowledge a POS x.
Auto Polling Time Set how long the radio takes between polling activities.
DSC Alarm Setup Turn DSC alarms on and off.
ABOUT
Menu
This menu displays the current software version for the radio, GPS, and Bluetooth.
RESET (To Factory Defaults)
Menu
Using this menu resets the unit to factory defaults, except for the MMSI number. Select OK
to conrm the reset. Otherwise, select
Exit
to cancel.
MENU operations can set up the radio's conguration and databases. Soft keys use that
information to perform quickly accessed procedures. For example, you can add ships to call
(name and MMSI numbers) through MENU/
DSC SETUP/Individual Directory
. Then select
CALL/INDIVIDUAL CALL
through the soft keys and the ship you added through the menus
displays.
E-14
Uniden MHS335 Radio Owner’s Manual
Default; Scroll Right
Scroll left Scroll right
Soft Key Order
WXMOB CALL
HI/LO
MEM
TRI
SCAN
WPT
NAV
BT
COMP
Scroll Right
Scroll Right
Scroll Right
Soft Keys
Soft Key
Operation
ALTINTL
6W
MEM
WX
15
COMMERCIAL
MOB WX CALL
<
>
TX
LAT:32˚53,6604N
LON:096˚59,3158W
TIME:20:47 Local
DATE:Aug 23,2017
SPKR
NOTE: After selecting WX soft key, it changes
to CH to return to the last marine channel.
MOB So Key
The Man Overboard (MOB) soft key does not require setup through the menus.
1. Press the
MOB
soft key and the screen automatically marks your current location
as MOB. The MOB screen displays the latitude, longitude, time, BRG (Bearing to
Destination), and DIST (Distance to Destination). The radio’s GPS supplies this
information automatically. The soft keys change to
BACK, DEL
, and
NAV
.
2. Select
BACK
to return to the previous mode and keep the current MOB information.
3. Select
DEL
to delete the current MOB information and return to the previous mode.
4. Select
NAV
to activate the COMPASS screen. Navigate to your destination
WX So Key
Press the WX soft key to display the last WX channel accessed (WX changes to CH). The
screen displays the latitude, longitude, and time. Press ▲ and ▼ to scroll through weather
channels. Press CH to return to the last marine channel.
CALL So Key
The
CALL
soft key opens a
CALL
menu. You can use this menu as a “shortcut” to making
different kinds of calls. You can also send and receive position requests and view the DSC
call logs.
Some call types use the information previously set up in the menus to congure the call
parameters. For example, if you select
INDIVIDUAL CALL
through the
CALL
soft key, a list
of ships that were set up through MENU/
DSC SETUP/Individual Directory
displays.
 Loading...