

Uniden MHS155UV Owner's Manual
MHS155UV
Dual Band (UHF CB+VHF Marine) Radio
For more exciting new products please visit our website:
Australia: www.uniden.com.au

Making a Distress Call (VHF Marine)
Speak slowly - clearly - calmly.
For future reference, write your boat’s name & call sign here:
1. Make sure your radio is on.
2. On the radio, press the 16/67-Tri button to switch to Channel 16
(156.8 MHz). (If the corner of the display does not show 16, press the
16/67-Tri button again until it does.)
3. Press the push to talk button and say: “MAYDAY -- MAYDAY -MAYDAY.”
4. Say “THIS IS {name of your boat (three times) and call sign/boat
registration number (once)}.”
5. Say “MAYDAY {name or call sign of your boat}.”
6. Tell where you are: (what navigational aids or landmarks are near, or
read the latitude and longitude from your GPS).
7. State the nature of your distress, (e.g. are you sinking, medical
emergency, man overboard, on re, adrift, etc.)
8. State the type of assistance you need (medical, towing, pumps, etc.).
9. Give number of persons aboard and conditions of any injured
persons.
10. Estimate present seaworthiness of your ship (e.g. how immediate is
the danger due to ooding or re or proximity to shore).
11. Briey describe your ship, giving the ship name (e.g. “Blue Duck is
32 foot cabin cruiser, white hull, blue deck house”).
12. Say: “I WILL BE LISTENING ON CHANNEL 16.”
13. End message by saying “THIS IS {name or call sign of your boat},
OVER.”
14. Release the push to talk button and listen.
If you do not get an answer after 30 seconds, repeat your
call, beginning at step 3, above.
2
UHF CB+VHF Marine RadioUNIDEN MHS155UV
Warning
The exclamation point within an equilateral triangle is
intended to alert the user to the presence of important
operating and maintenance (servicing) instructions in the
literature accompanying the appliance.
NOTE
Floating/Waterproof: JIS7/IPX7
Uniden’s MHS155UV radio is designed to meet the water proong
standard of JIS7/IPX7 and will oat in water.
This Means: Protected against the effects of continuous immersion in
water.The MHS155UV can withstand immersion in water up to 1.0m
depth for 30 minutes. Note this is not suitable for scuba diving.
The MHS155UV will only meet this rating if fully assembled
and all rubber seals are well maintained and correctly tted,
and the battery cover securely fastened.
After your radio is submerged in water, you might notice that the sound
is distorted. This is because there is still water remaining in and around
the speaker and microphone. Just shake the radio to clear excess water,
and the sound should return to normal.
If your radio is exposed to salt water, clean your radio
thoroughly with fresh water, and dry it before turning it on.
3
UHF CB+VHF Marine RadioUNIDEN MHS155UV
The charger is not waterproof.
NOTE
NOTE
NOTE
USER LICENSE INFORMATION
The citizen band radio service is licensed in Australia by
ACMA Radio-communications (Citizen Band Radio
Stations) Class Licence and in New Zealand by MED
General User Licence for Citizen Band Radio and
operation is subject to conditions contained in those
licenses.
NOTE

Contents
Making a Distress Call .......................................................................... 2
Warning ................................................................................................ 3
Introduction ............................................................................................6
Features .................................................................................................................. 6
Getting Started .......................................................................................7
What’s Included? .................................................................................................... 7
Controls and Indicators ........................................................................ 8
MHS155UV Radio .................................................................................................. 8
Charger .................................................................................................................10
Reading the Display ..............................................................................................10
Setting up the Hardware ..................................................................... 12
Installing the Battery ............................................................................................. 12
Mounting the Charger ...........................................................................................13
Charging the Battery .............................................................................................14
Attaching the Belt Clip .......................................................................................... 14
Installing optional External Speaker/Mic ...............................................................14
Using Your Radio .................................................................................15
Turning It On .........................................................................................................15
Setting It Up ..........................................................................................................15
Changing the Volume ........................................................................................... 15
Setting the Squelch Level .....................................................................................15
Selecting the UIC Channel Mode.......................................................................... 16
Selecting a Channel ..............................................................................................16
Making a Transmission .........................................................................................16
Boosting the transmission power ..........................................................................17
INSTANT Channel Feature ...................................................................................17
Saving Channels to Memory..................................................................................17
Key Beep On and Off ............................................................................................18
Setting Key Lock ...................................................................................................18
Backlight On/Off ....................................................................................................18
Using the Battery Save feature .............................................................................18
How it Works? (Common)......................................................19
4
UHF CB+VHF Marine RadioUNIDEN MHS155UV

How it Works? (VHF Marine) ................................................20
Band Select ..........................................................................................................20
Normal Mode Operation .......................................................................................20
Normal mode with Triple Watch or Dual Watch ....................................................20
Scan Mode Operation ...........................................................................................21
Using the radio in Scan Mode ...............................................................................21
Scan mode with Triple Watch or Dual Watch ........................................................22
Weather Mode ......................................................................................................22
Using the radio in Weather Mode .........................................................................22
How it Works? (UHF CB) .......................................................23
Band Select ..........................................................................................................23
CTCSS ..................................................................................................................23
DCS ...................................................................................................................... 23
Operate in Duplex Mode .......................................................................................24
Normal Mode Operation ....................................................................................... 25
Normal mode with Dual Watch ............................................................................. 25
Normal mode with Triple Watch ............................................................................25
Scan Mode Operation ...........................................................................................26
Using the radio in Scan Mode ...............................................................................26
Scan mode with Triple Watch or Dual Watch ........................................................27
Busy Channel Lockout ..........................................................................................27
Vibrator ..................................................................................................................28
Maintenance and Troubleshooting .................................................... 29
Specications ...................................................................................... 31
VHF Marine Channels and Frequencies (MHz) ................................. 33
US Channel Frequencies and Names ..................................................................33
Canadian Channel Frequencies and Names ........................................................35
International Channel Frequencies and Names ................................................... 37
UHF CB Channel Guidelines ................................................................................39
CTCSS Codeas and Frequencies ........................................................................ 40
DCS Codes Table ................................................................................................. 41
UHF CB Channel and Frequencies ......................................................................42
Regulations and Safety Warnings ..................................................... 44
Warranty ...............................................................................................45
5
UHF CB+VHF Marine RadioUNIDEN MHS155UV

Introduction
The MHS155UV is a oating, waterproof, portable two-way UHF CB +
VHF Marine transceiver. It is compact, lightweight, rugged and ts easily
in your hand. This handheld radio will give you consistent, outstanding
performance in virtually all conditions and situations.
To ensure that you get the most from the MHS155UV’s features, please
read this operating guide carefully before using the unit.
Features
Your radio provides the following key features:
VHF Marine
• Marine Channels: US, International and Canadian
• WX Channels: CH67 (AUS), CH20-23 (NZ)
UHF CB
• 80 Channels UHF-CB Transceiver (with CTCSS/DCS)
• Busy CH Lock Out
• Duplex ( at CH01-08, CH41-48 )
• Vibrator
Common
• Submersible design. Complies with oating JIS7/IPX7 water-resistant
standards.
• Memory Scan mode. Lets you save channels to memory and monitor
them in quick succession.
• Dual Watch: This mode lets you monitor Instant CH along with one
regular marine/UHF channel.
• Triple Watch: This mode lets you monitor 16CH, 67CH along with one
regular marine/UHF channel.
• Battery Save. The Battery Save feature automatically turns off RX
power at regular intervals to save battery power.
• Emergency 16/67 Channel monitoring. Set unit to scan one or both of
these emergency channels regularly within normal scanning cycles.
• Transmitter power level select/Boost
• Key Lock
• Selectable Volume (0 - 15) and Squelch (0 - 3) levels.
• Instant CH Programming/Recalling
• External Speaker Jack
6
UHF CB+VHF Marine RadioUNIDEN MHS155UV
Getting Started
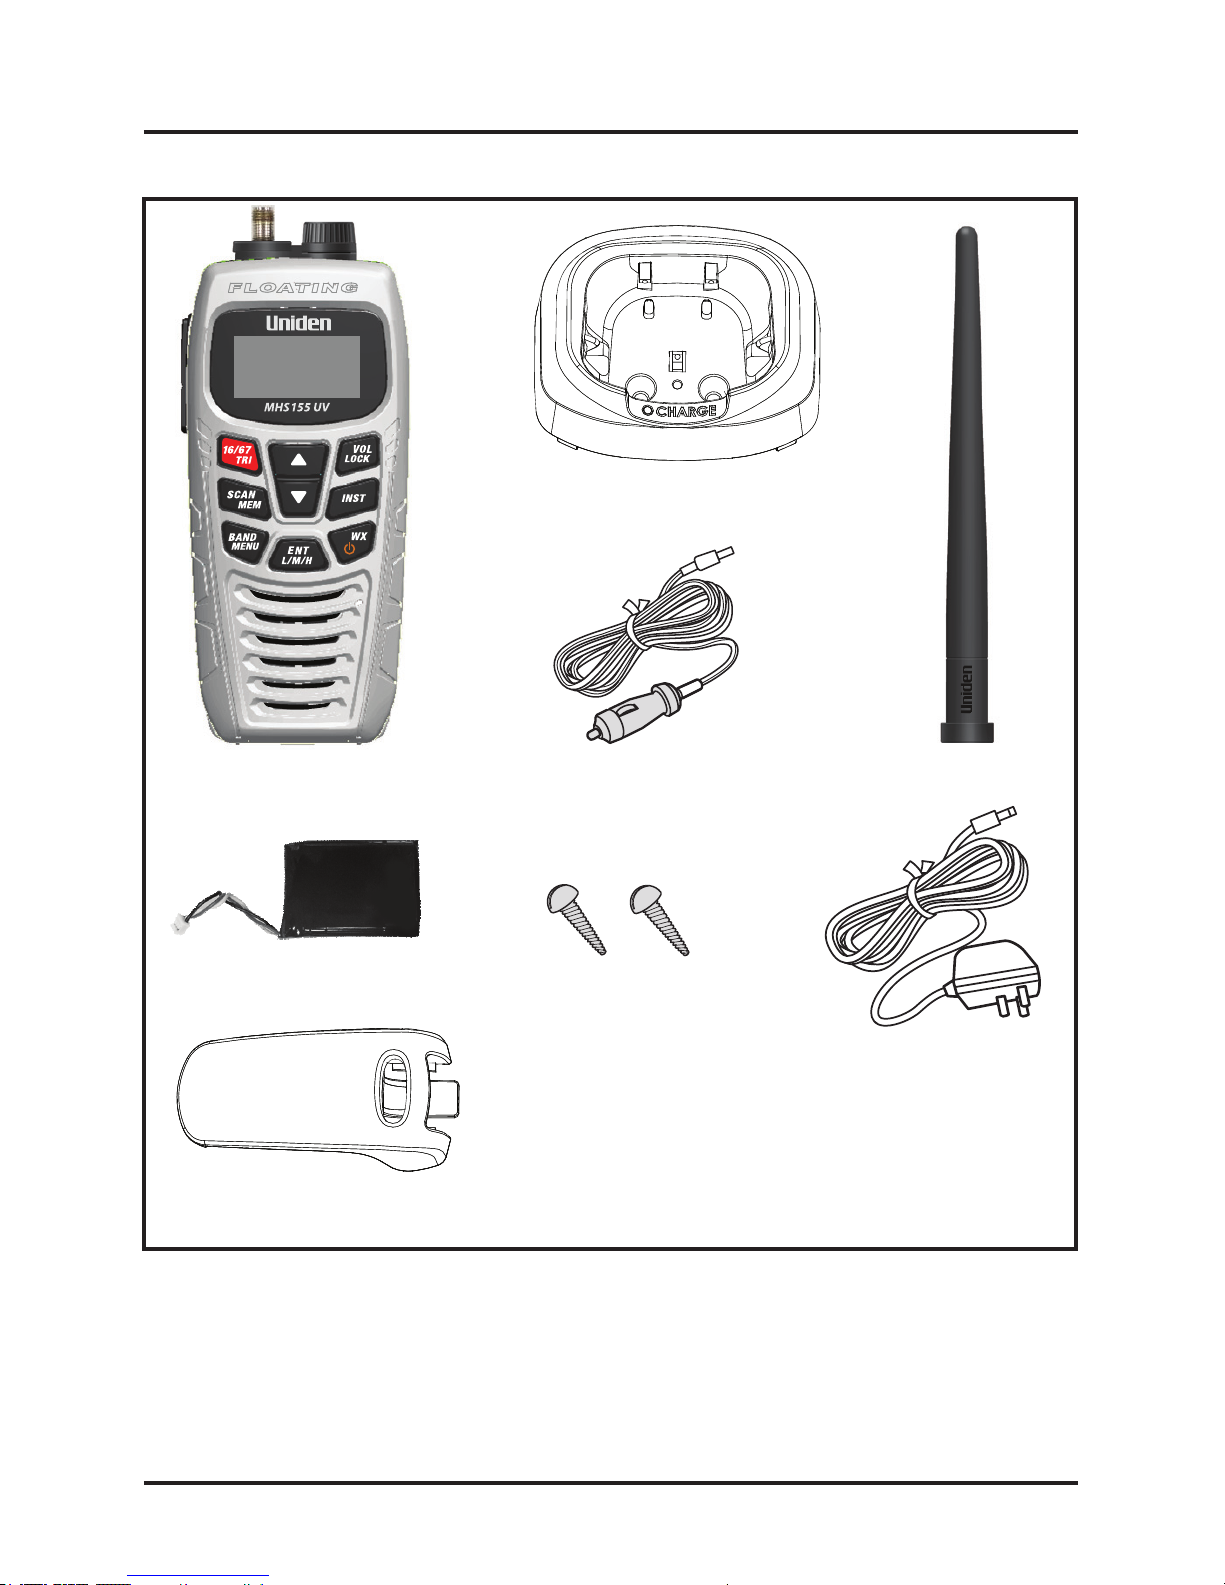
What’s Included?
• If any item is missing or damaged, contact your place of purchase
immediately. Never use damaged products!
• Need help? Get answers at our website:
www.uniden.com.au for Australian model
7
UHF CB+VHF Marine RadioUNIDEN MHS155UV
Charging Cradle
AC Adaptor
Lithium Ion Battery
DC Adaptor
Belt Clip
Mounting Hardware
MHS155UV Radio
Not shown:
AAAX4 Alkaline BatteryTray
Antenna
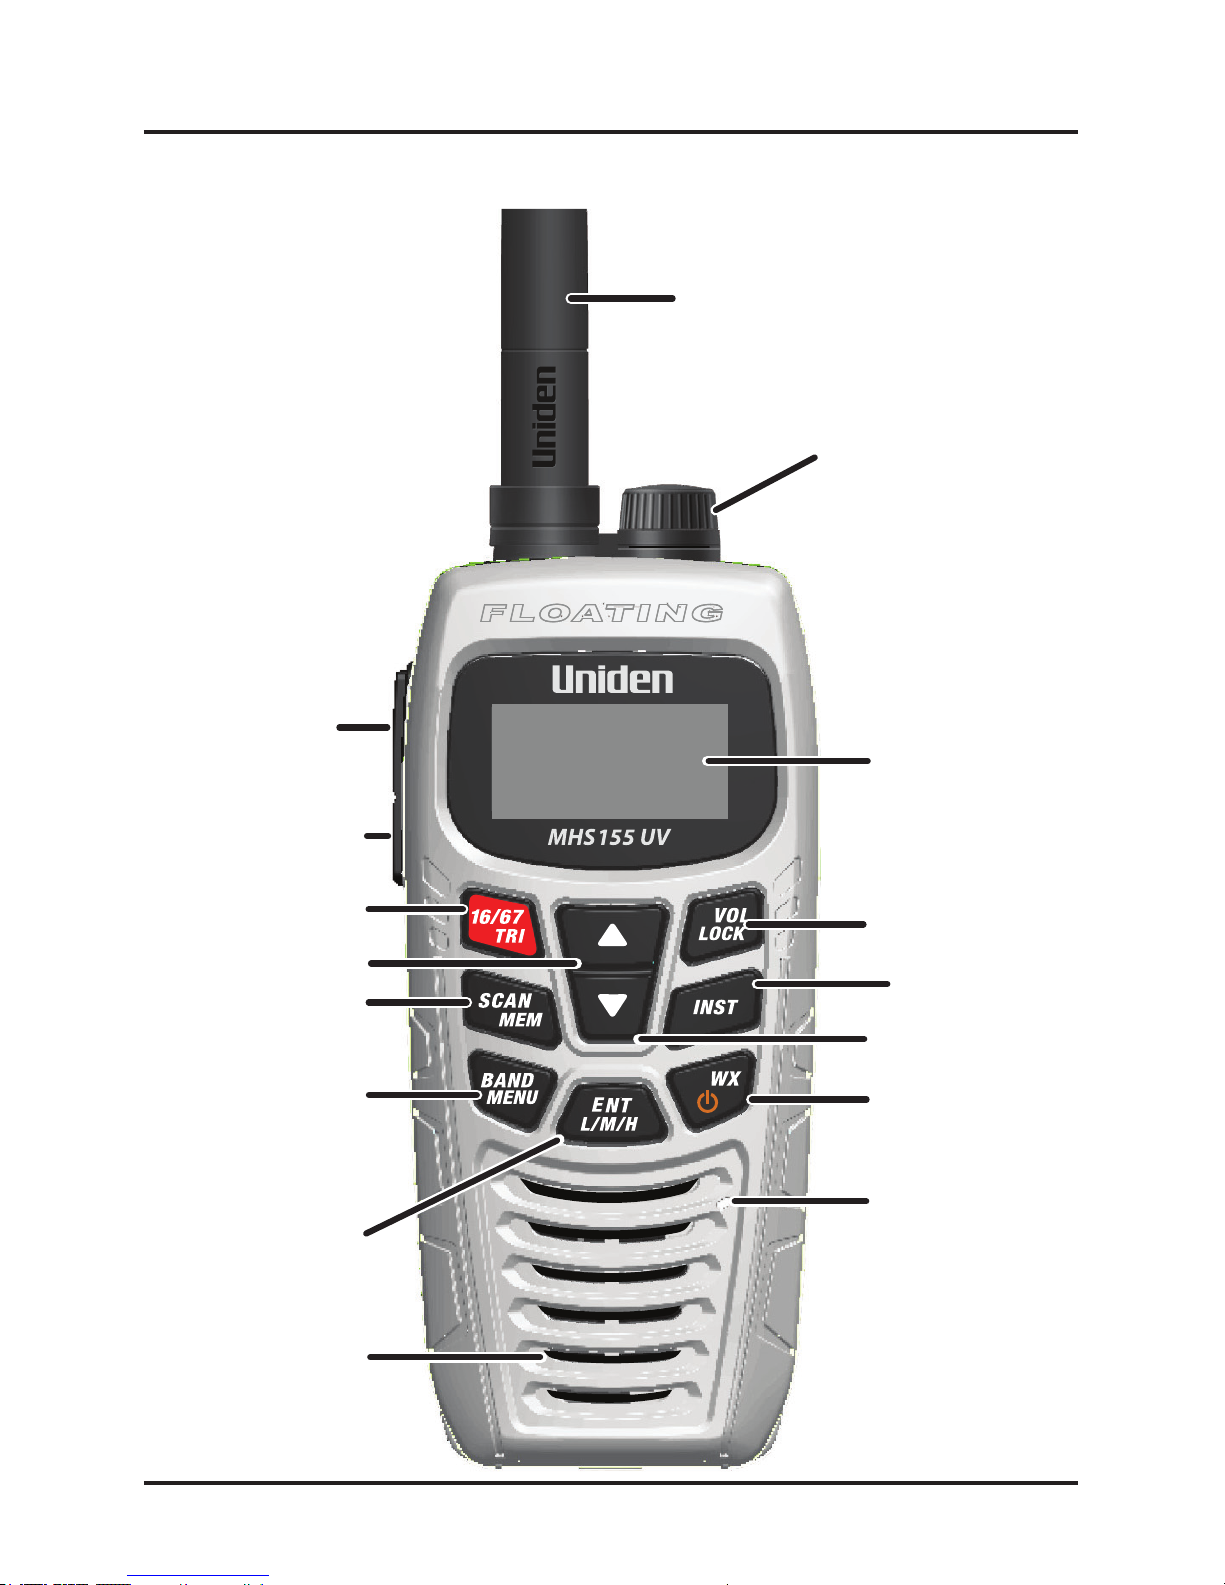
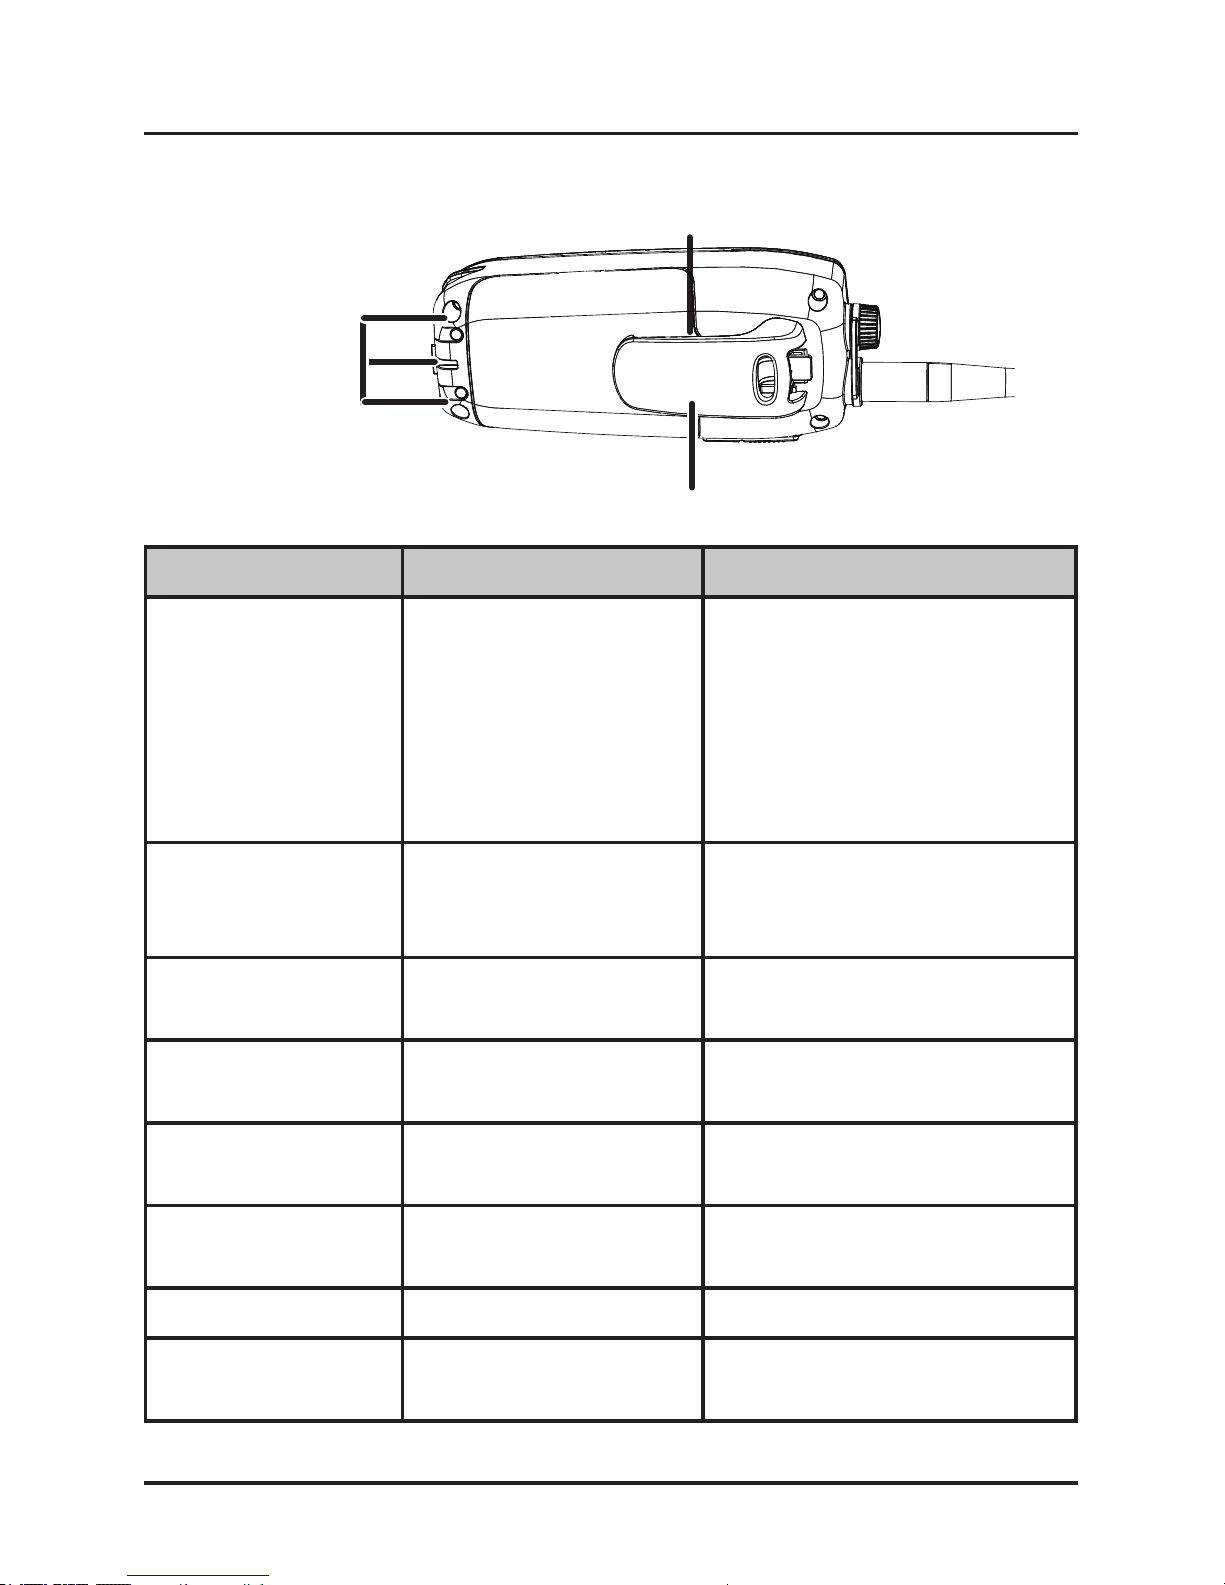
Controls and Indicators
MHS155UV Radio
8
UHF CB+VHF Marine RadioUNIDEN MHS155UV
Antenna
LCD
VOL/LOCK
INST
WX/POWER
16/67/TRI
ENT
L/M/H
SCAN/MEM
Speaker
Microphone
CHANNEL UP
CHANNEL DOWN
Push To Talk
BOOST
BAND/MENU
External Speaker
Jack
Controls and Indicators
Button Press to... Press and hold to...
16/67/TRI 1st press: Go to
channel 16.
2nd press: Go to
channel 67.
3rd press: Go back
to the starting
channel.
Turn Triple/Dual Watch on
and off. Triple/Dual setting
has to be selected in the
Menu.
SCAN/MEM Turn on/off Scan
function.
Save a channel into
memory or delete a
channel from memory.
BAND/MENU Select UHF CB band
or VHF Marine band.
Enter the Menu function.
PTT (Push to
Talk)
NA Talk/transmit on a channel.
BOOST NA Transmit with a higher
power level.
VOL/LOCK Enter volume setting
condition.
Select Key Lock function.
INST Instant CH Call Instant CH programming
WX/POWER Select WX channel Turn on or off radio’s
power.
9
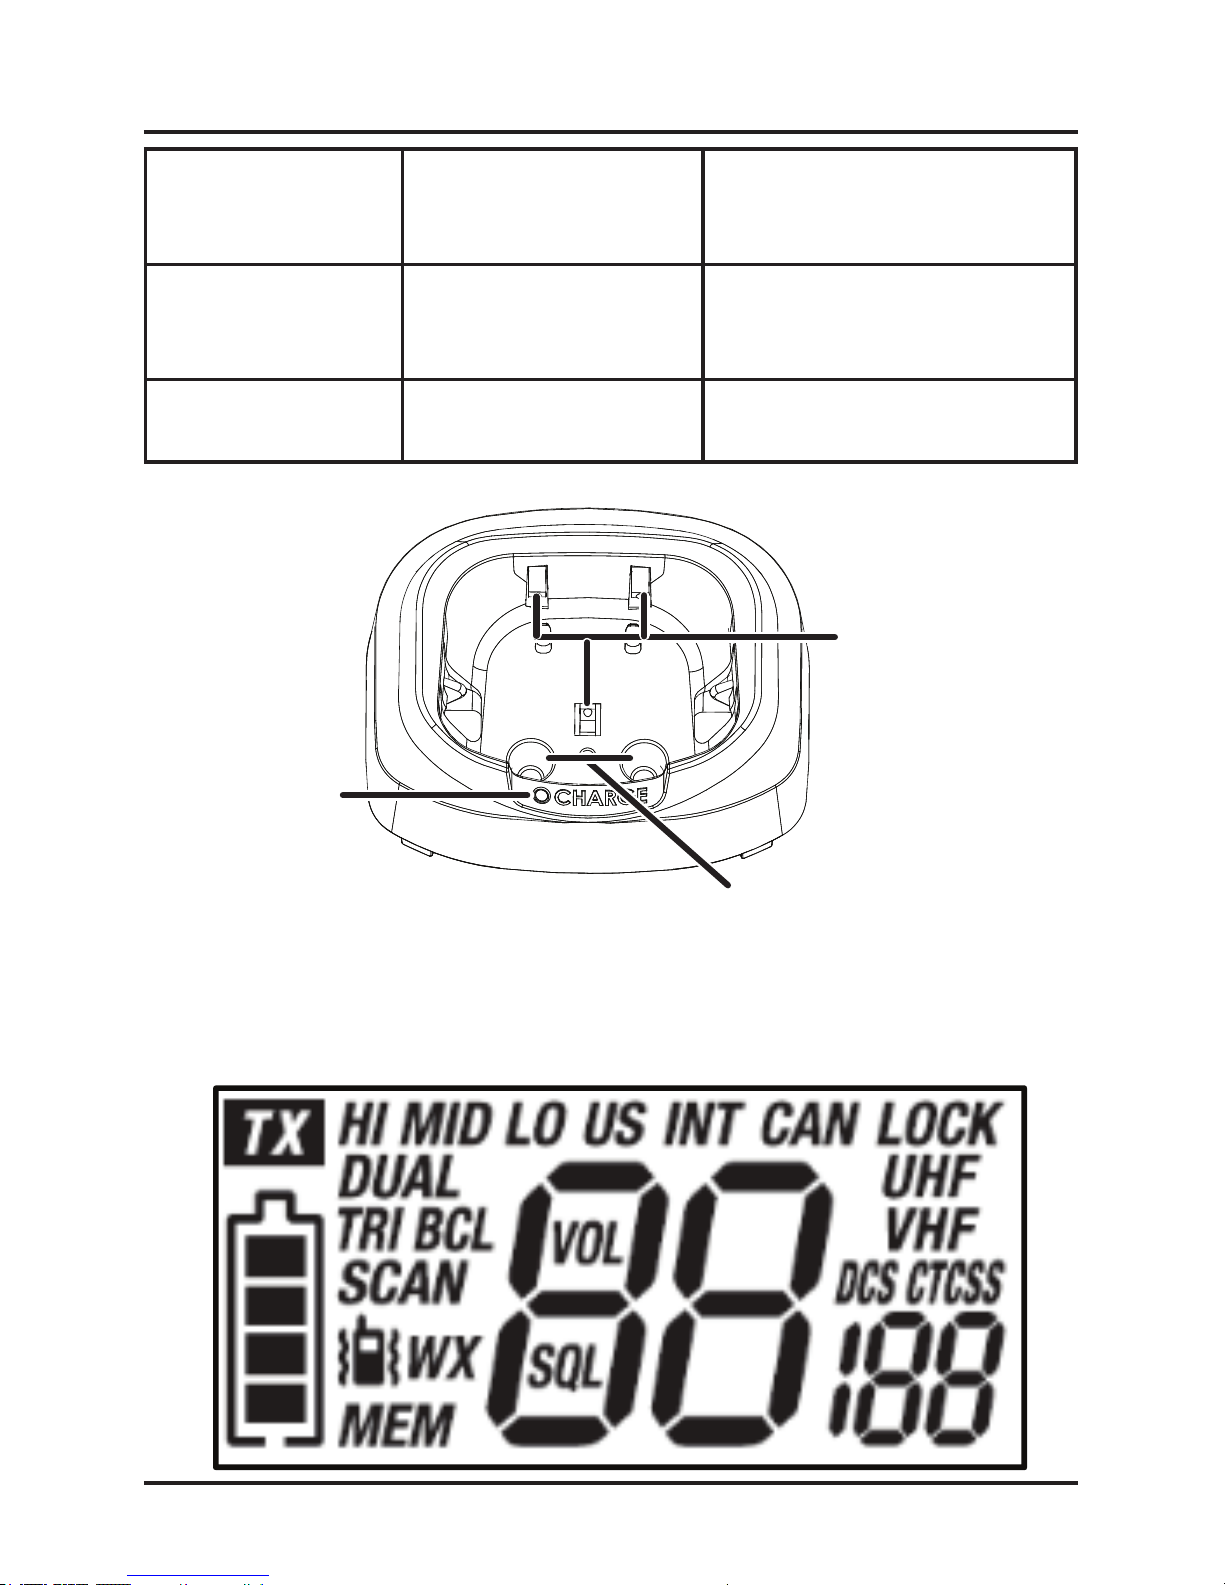
UHF CB+VHF Marine RadioUNIDEN MHS155UV
Battery Charging
Contacts
Battery Cover Screw
(under belt clip)
Belt Clip
Controls and Indicators
CHANNEL UP Move up channel or
squelch/volume one
step at a time.
Move quickly up the
channels/ squelch/volume
steps.
CHANNEL
DOWN
Move down channel
or squelch/volume
one step at a time.
Move quickly down the
channels/ squelch/volume
steps.
ENT L/M/H Select item in setting
condition.
Select transmit power L,
M or H.
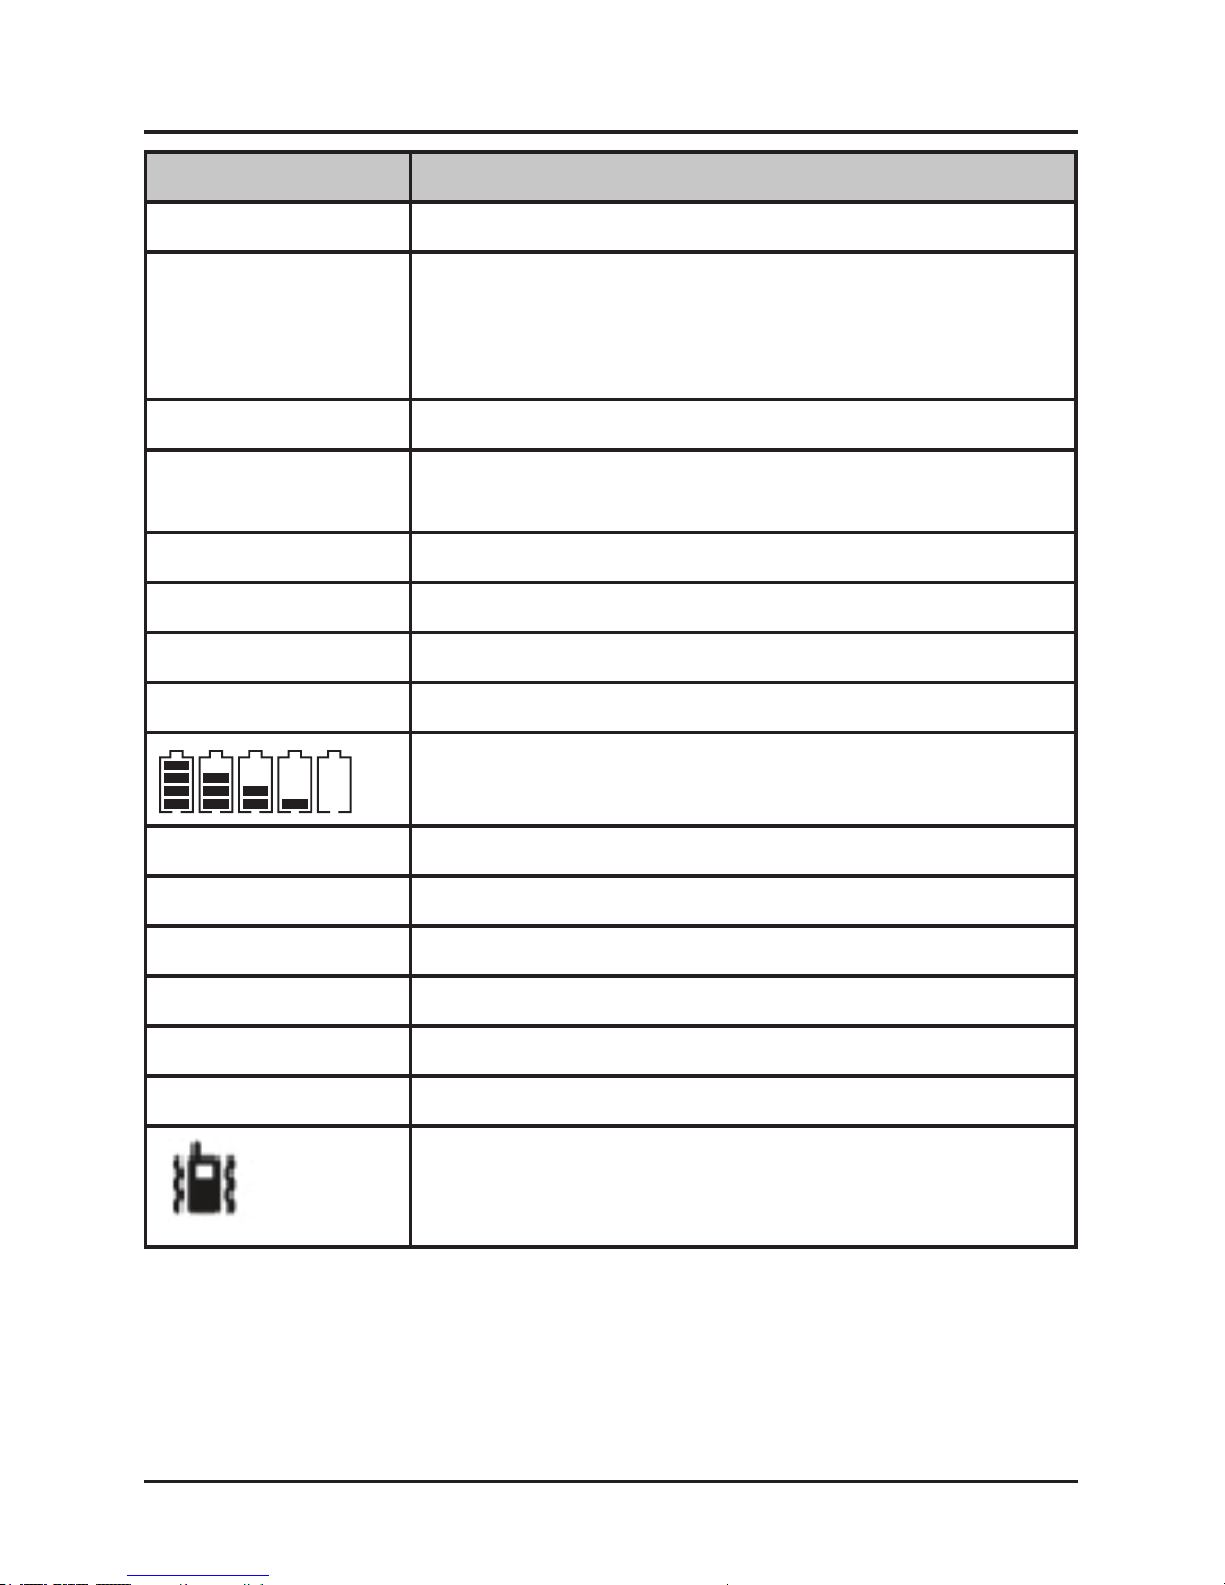
Reading the Display
Charger
The LCD display shows different information depending on what you are
doing. This sample screen shows some of this information. The following
table shows all the possible icons and what they mean.
10
UHF CB+VHF Marine RadioUNIDEN MHS155UV
Charging
Contacts
Screw holes for
mounting
Charge LED
Controls and Indicators
Icon Detail
TX You are currently transmitting.
HI/MID/LO These indicators indicate whether the transmitter
power is set to HI, MID or LO. This is not
indicated in the WX mode and on the receiving
only channels of Marine.
LOCK The keys are locked.
US, CAN, or INT Indicates if the radio is set for US channels,
CANadian channels, or INTernational channels.
TRI or DUAL TRIple Watch or DUAL Watch is turned on.
MEM The current channel is saved in memory.
SCAN The radio is in Scan mode.
WX The weather channels are displayed.
The battery is fully charged, mostly charged,
halfcharged, mostly empty, or completely empty.
88A Current channel number.
UHF/VHF Band Type
DCS/CTCSS Indicates whether DCS or CTCSS is selected.
BCL Busy Channel Lockout is enabled.
VOL Indicates volume adjust mode.
SQL Indicates Squelch adjust menu mode.
Indicates active vibrator.
11
UHF CB+VHF Marine RadioUNIDEN MHS155UV
12
UHF CB+VHF Marine RadioUNIDEN MHS155UV
Setting up the Hardware
Installing the Battery
Your radio uses the supplied Lithium Ion battery pack. To install the
Lithium Ion battery pack:
1. Remove the belt clip if installed.
2. Use a screwdriver to turn the battery compartment screw
counterclockwise and then lift up and remove the battery cover.
3. Line up the new battery’s connector with the jack inside the battery
compartment (the connector only ts one way).
4. Push the connector in rmly. Tug on the battery wires gently to make
sure you have a good connection.
5. Before replacing the battery cover, check the rubber seal located
on the under side of the cover; make sure that the seal is set in the
groove and that there is no foreign matter under the seal.
6. Replace the battery compartment cover. Tighten the screw securely.
If the rubber seal appears warn, nicked, or dried out, you
must replace it. If the seal looks worn or damaged, contact
customer service to order a replacement (see front cover
page for contact information).
NOTE
The radio also comes with an accessory battery tray that holds four AAAtype Alkaline batteries (not included).
Follow these steps to use the accessory battery tray:
1. Align the batteries’ positive and negative terminals with the markings
on the case and snap each battery into place.
Installing Alkaline Batteries
When using Alkaline batteries, transmit power is limited to
MID or LOW power.
NOTE
Attaching the Antenna
The antenna detaches from the radio for easy shipping or storage. To
attach the antenna to your radio, screw it tightly onto the anchor post at
the top of the radio.
Setting up the Hardware
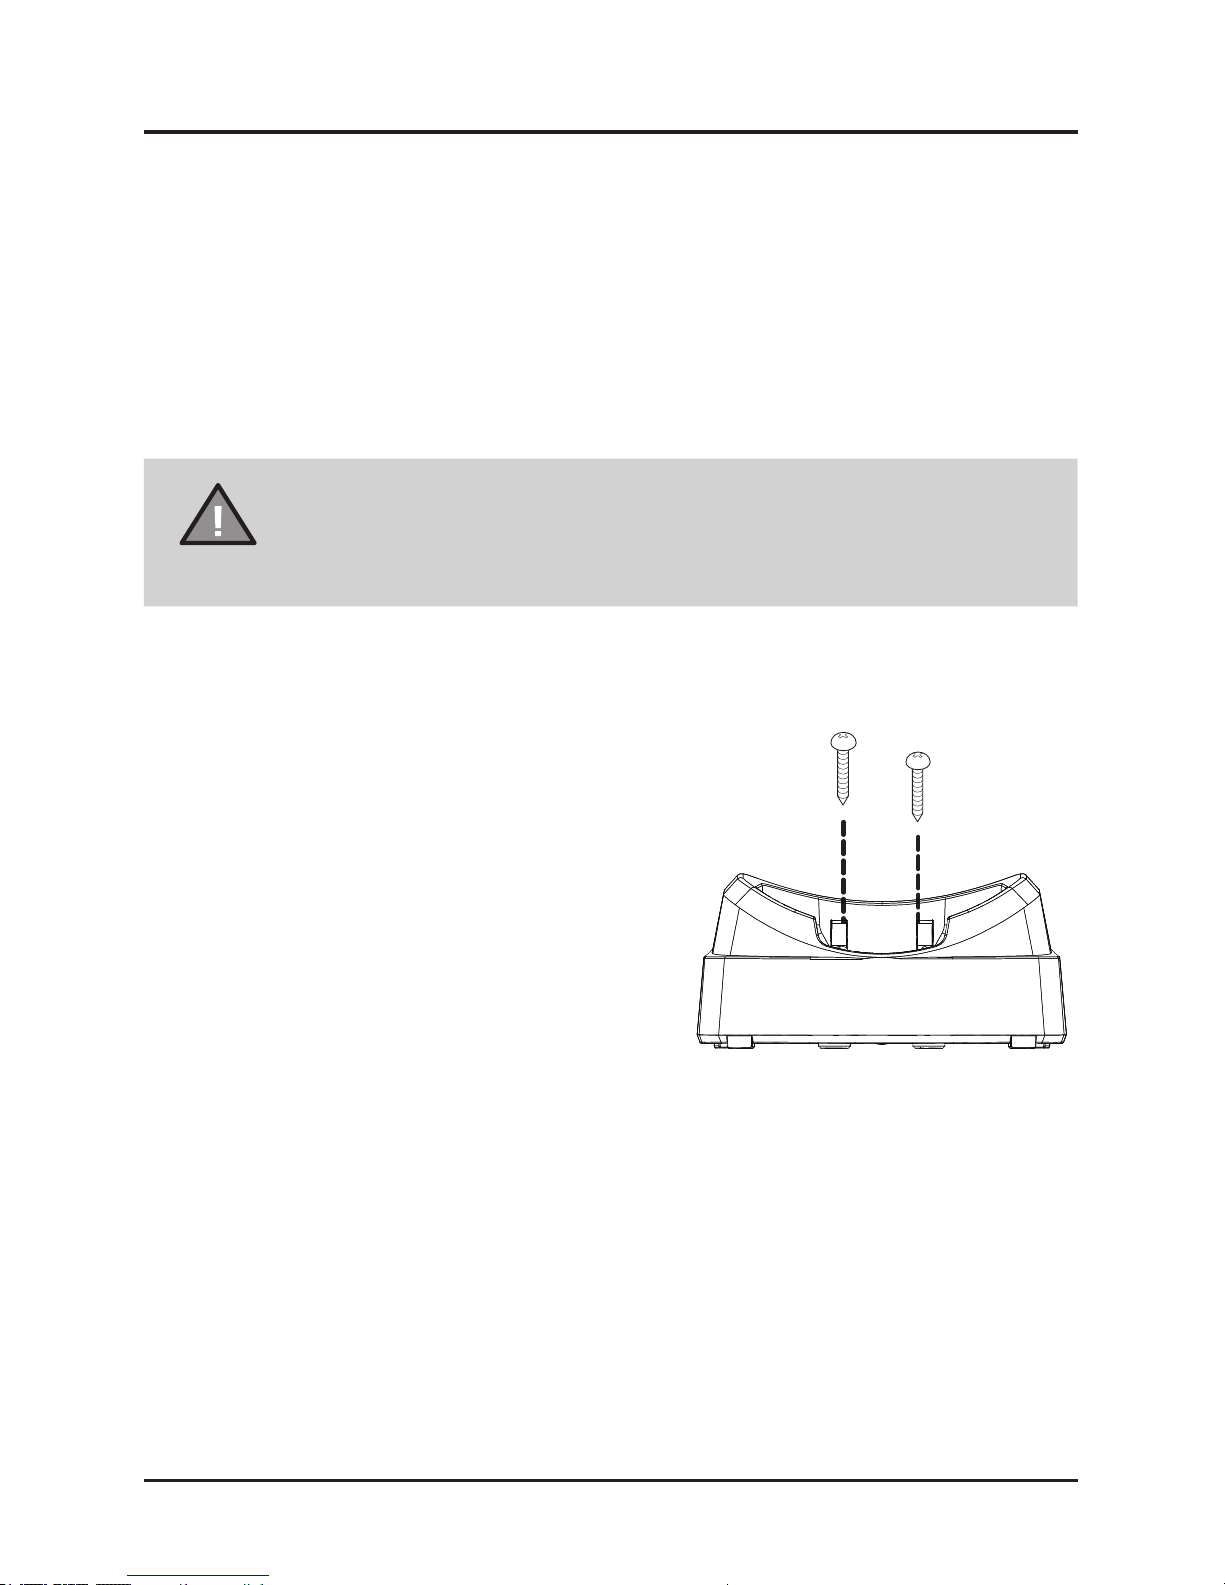
Mounting the Charger
1. Use the two holes at the base of the
charger as a template to mark the drill
holes.
2. Using a 3mm (1/8-inch) drill bit, drill
two holes 13mm (1/2 inch) deep.
3. Use the provided screws to attach the
charger to the surface.
You can mount the charger on any at surface.
2. Line up the battery’s connector with the jack inside the battery
compartment (the connector only ts one way).
3. Push the connector in rmly. Tug on the battery wires gently to make
sure you have a good connection.
4. Seat the battery case in the battery compartment.
5. Before replacing the battery cover, check the rubber seal located
on the under side of the cover; make sure that the seal is set in the
groove and that there is no foreign matter under the seal.
6. Replace the battery compartment cover. Tighten the screw securely.
WARNING: The accessory battery tray is designed to
prevent the accidental charging of non-rechageable
batteries. Never use non-rechargeable batteries in the
radio without the accessory battery tray.
NOTE
13
UHF CB+VHF Marine RadioUNIDEN MHS155UV
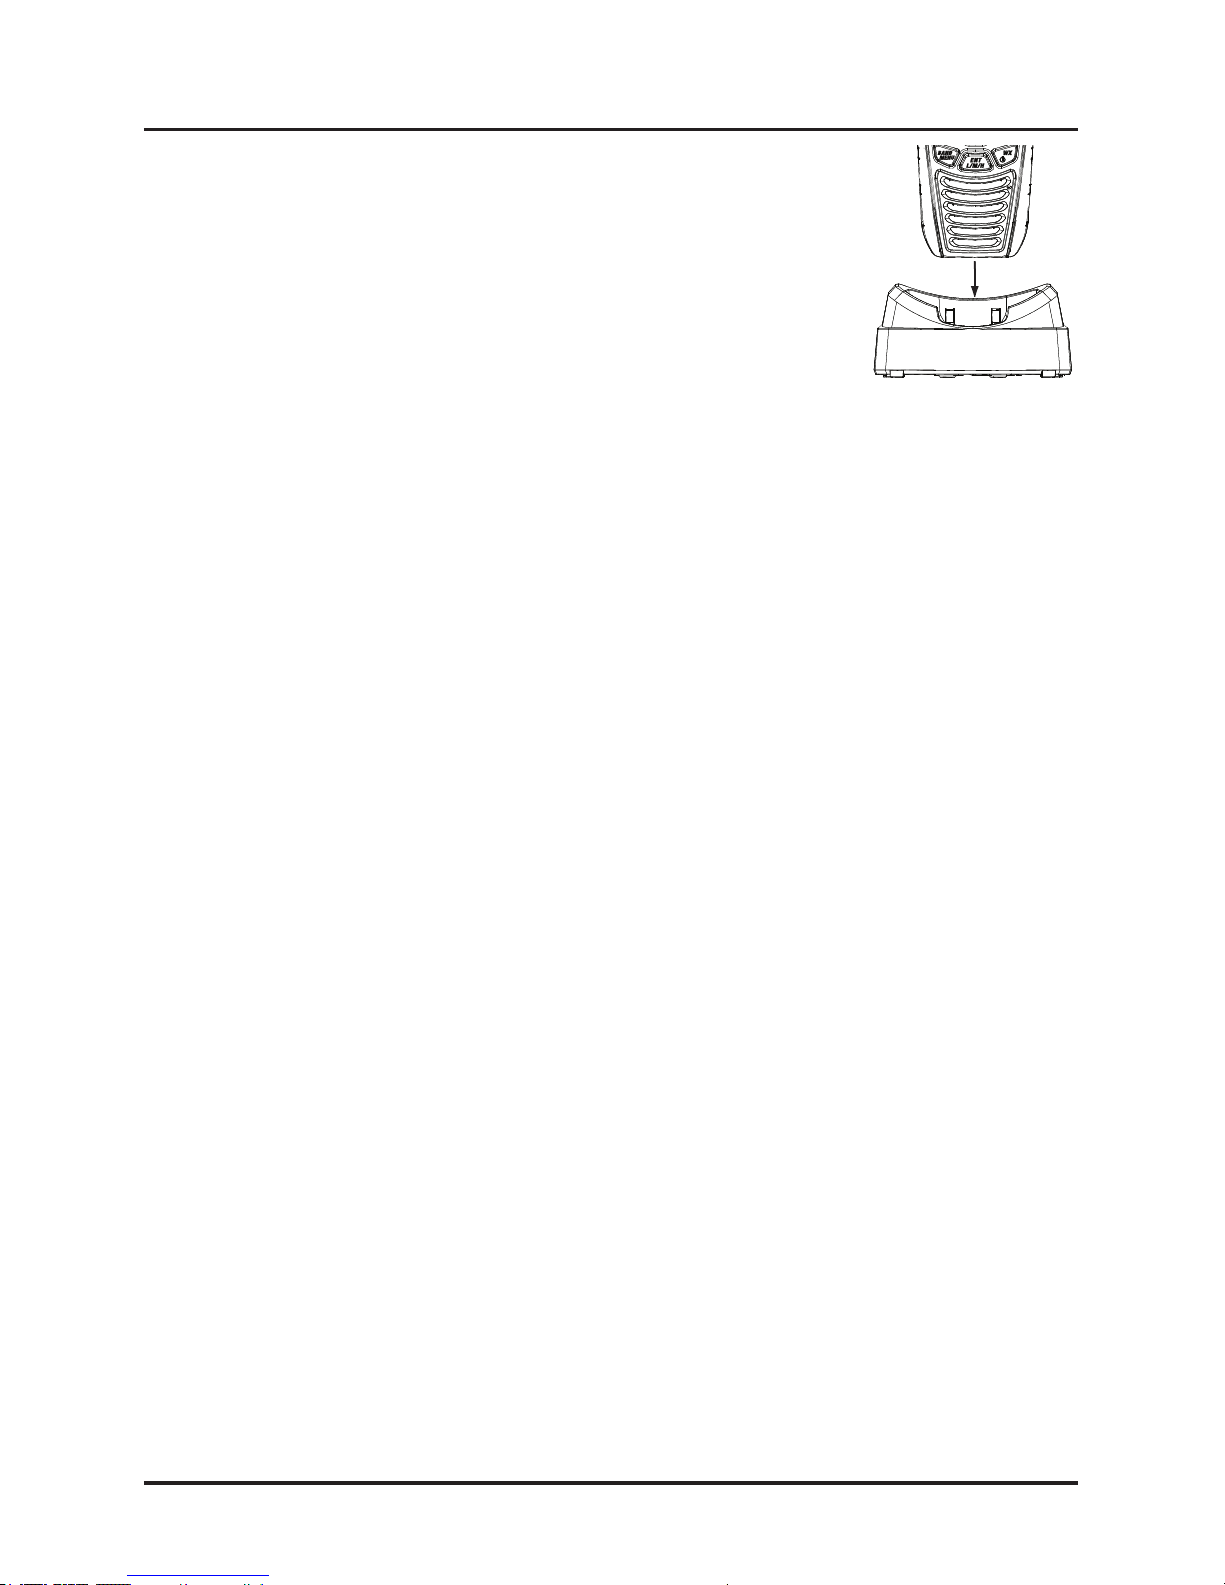
Charging the Battery
Setting up the Hardware
Your radio includes a charger and a rechargeable
battery pack. Place your radio in the charger with the
display facing forward. Make sure that the CHARGE
LED on the charger turns orange.
Cautions:
• Use only the battery and charger supplied with this radio.Using a
different charger or battery can damage the radio and create a risk of
re or shock.
• The charger is not waterproof. If the charger falls into the water,
unplug it before attempting to remove it from the water. After you
remove the charger from the water, please contact our Customer Care
Service.
• Wipe off dirt or shake water from your radio before placing in the
charger if your radio gets dirty or wet.
• Charge the battery fully before using the radio. When the battery is
completely charged, the CHARGE LED turns green.
• Don’t use the charger when the ambient temperature is below 5° C
(41° F) or above 40° C (104° F).
• If the radio is powered down, the battery can charge in about seven
hours. (If the radio is powered on, the battery takes longer to charge.)
Important notes on charging the battery
Belt Clip
To install the belt clip:
Slide the belt clip down over the latch until you hear it click.
To remove the belt clip:
1. Lift the at latch.
2. Slide the clip up until it comes free of the latch.
The MHS155UV has a jack for an optional external speaker or
microphone.
1. Unscrew the cover to the speaker/microphone jack.
2. Insert the speaker/microphone plug into the jack.
Install Optional External Speaker/Microphone
14
UHF CB+VHF Marine RadioUNIDEN MHS155UV
Using Your Radio
Turning It On
Press and hold WX/POWER for at least two seconds to turn the radio
on. Press and hold WX/POWER again to turn the unit off.
Setting It Up
Even though you can change your radio’s settings at anytime, you will
probably want to establish initial settings after you have turned it on for
the rst time. You will adjust some of these settings on an as-needed
basis, but some settings might only need to be set once.
Changing the Volume
To change the speaker volume, press VOL/LOCK to enter Volume
Setting mode. 0 (for volume level 0 - 15) displays. Press CHANNEL UP
or CHANNEL DOWN to increase or decrease the volume levels. Press
VOL/LOCK to save.
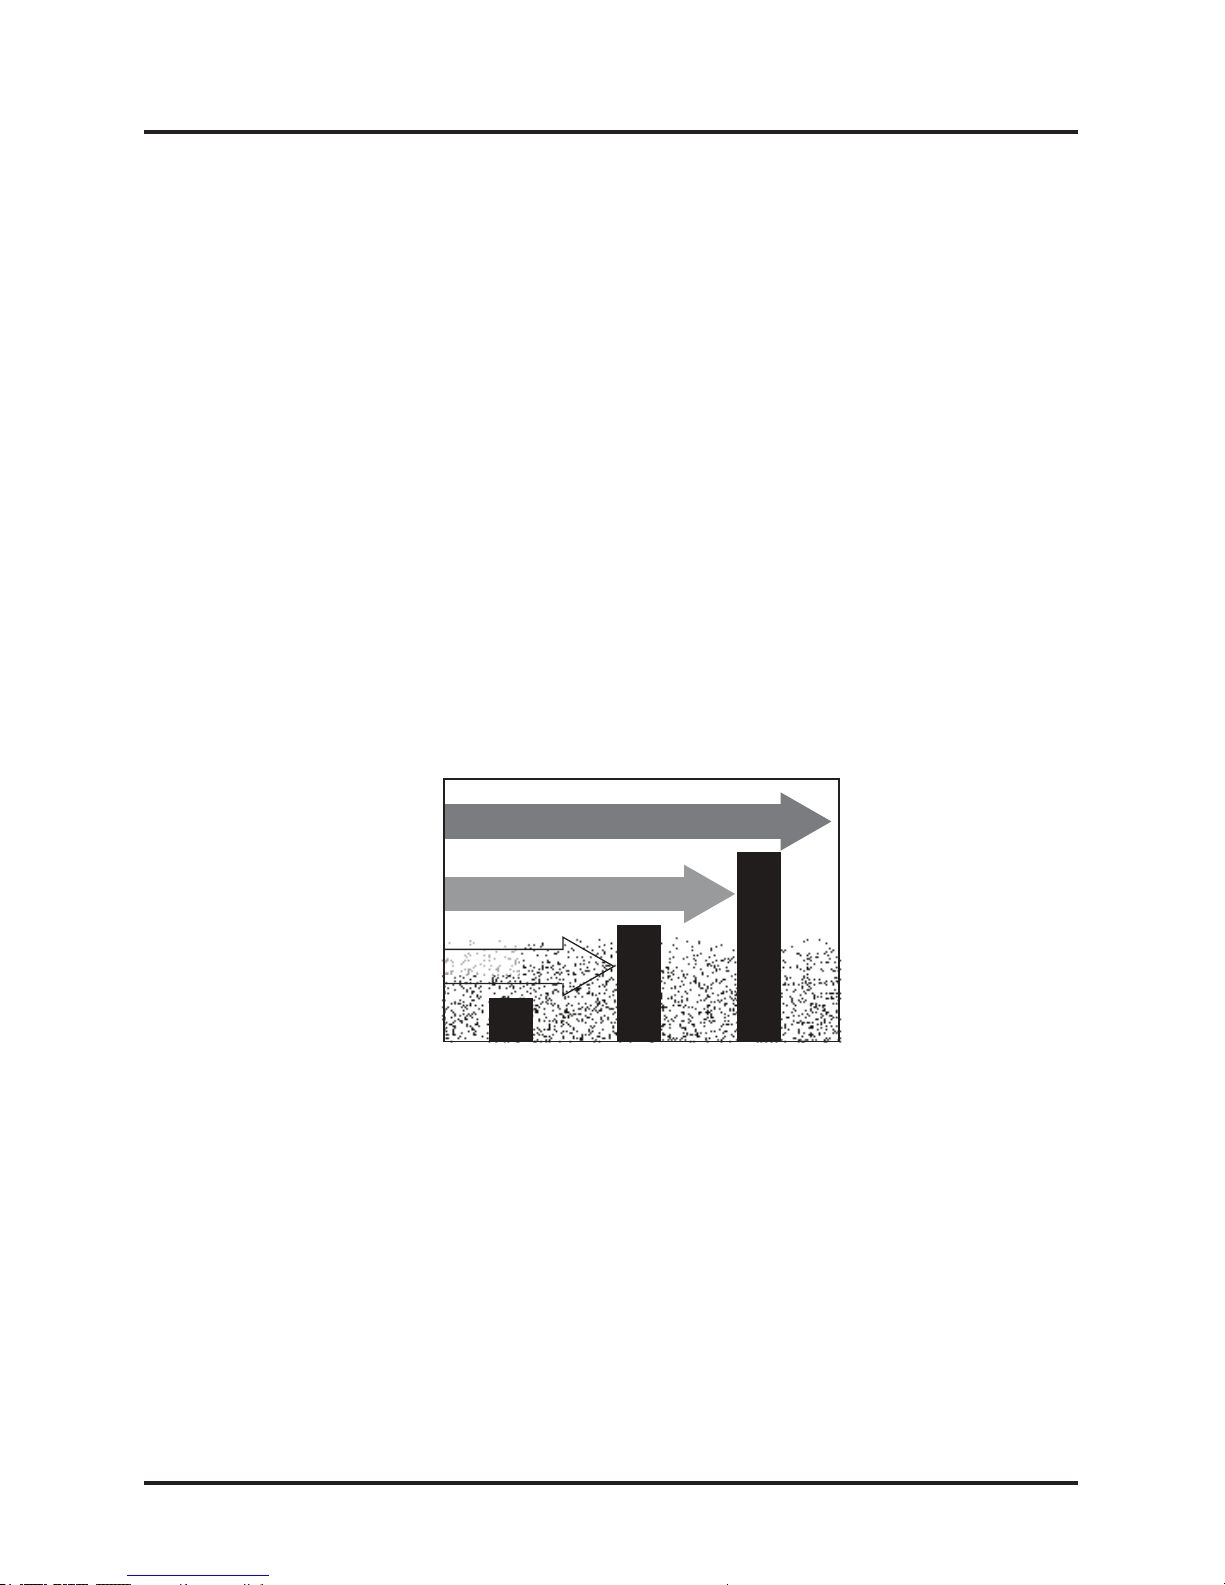
Setting the Squelch level
The MHS155UV recognizes signals as transmissions if they exceed a
signal strength threshold.
Adjusting the squelch sets this threshold level. Increasing squelch
requires a signal to be stronger to be seen as a transmission. If you set
the squelch too high, you will risk not receiving transmissions that are
lower than that threshold. Reducing the squelch allows weaker signals to
be accepted.However, if you lower the squelch too much, you will hear
white noise all the time.
While listening to a channel, press and hold BAND/MENU to enter the
Menu. Press ENT/L/M/H till you enter the Squelch menu mode.The
Squelch level number displays on the LCD. Press CHANNEL UP or
CHANNEL DOWN to increase or decrease the squelch levels (0 - 3).
Press ENT/L/M/H to save the setting.
Weak signals
No
Squelch
Medium
Squelch
High
Squelch
Strong signals
Noise
15
UHF CB+VHF Marine RadioUNIDEN MHS155UV
 Loading...