

Uniden MapTrax GPS402 Owner's Manual
GPS402 Owner’s Manual

2
TM
Table of Contents
Introduction ...................................................................... 3
Features ........................................................................................3
Important Vehicle and Product Safety Information .........................3
Getting Started .................................................................. 4
What’s Included ............................................................................4
The Parts of the GPS Device ..........................................................5
Installing the GPS Device in Your Vehicle .....................................7
Using the Interface ............................................................ 9
Using the Main Menu Screen .........................................................9
Using the Map Screen .................................................................10
Changing the Map View ...............................................................11
Changing the Map Options .......................................................... 12
Creating a Route .............................................................. 14
Entering an Address as Your Destination ....................................15
Reading the Route Screen ............................................................17
Route Information and Current Route Options ............................18
Running a Route Demo ...............................................................19
Using Other Destinations for Routing ..........................................20
Using the Quick Find Feature ......................................................22
Using the Mark Menu ..................................................................24
Working With Waypoints .............................................................25
Changing the Route Guidance Options ........................................26
Changing the Default Route Options ...........................................26
Customizing Your GPS Device .......................................... 27
Changing the Language ............................................................... 27
Changing the Voice Prompts ........................................................27
Entering Your Home Location ......................................................28
Entering the Date and Time .........................................................28
Customizing Your Display ...........................................................29
Setting Up Speed Alerts ............................................................... 30
Accessories ...................................................................... 31
Using an External Antenna..........................................................31
Using a Headset ..........................................................................31
Maintenance .................................................................... 32
Updating Maps and Software .......................................................32
Battery Information ..................................................................... 32
Troubleshooting ..........................................................................32
Using the GPS Status Screen .......................................................33
One Year Limited Warranty .............................................. 34
Copyright Information .................................................................35
Declarations of Conformity and Compliance ................................35
Congratulations on your purchase of Uniden’s
GPS402 navigation device. This manual
contains important information on how to safely use
your GPS device in your vehicle. Please read this manual
carefully and follow all safety instructions.
Visit our web site at www.uniden.com to download
updated maps, order accessories, or get answers to any
questions about your GPS device.
Features
The navigation device receives signals
from Global Positioning Satellites (GPS) and uses these
signals and the advanced navigation software from Space
Machine to plot a route from your current location to your
chosen destination.
The GPS402 offers
Fast signal acquisition
Accurate, detailed maps covering all of the US and
Canada
Turn-by-turn guidance with true human voice
technology
Fast recalculation of routes
2 million pre-programmed points of interest
Three different navigation views (2 map and 1 full arrow)
Memory for 25 custom routes, 10 waypoints per route,
50 recently-used locations, and 50 favorite locations
A breadcrumbs feature to track your current route
●
●
●
●
●
●
●
●
3
TM
Introduction
Important Vehicle and
Product Safety Information
Before using your GPS device, be sure you
review and understand the following information.
This device is not a substitute for common sense and
careful driving. Always comply with all trafc laws of the
state and city in which you are driving.
Do not allow the GPS device to be a distraction to safe
driving. What you see through your windshield is more
important than what you see on the LCD screen.
Do not attempt to input locations, change routing
options, or recongure your GPS device while driving.
Park your car or ask a passenger to operate the GPS
device for you.
Some states, such as California and Minnesota, prohibit
mounting any mobile electronics device on the windshield
of your vehicle. Before mounting your GPS device, check
to see if your state (and any state you plan to travel to)
have regulations governing how devices can be installed
in vehicles.
Never leave the in plain sight in an
unattended vehicle.
Remove the device from your vehicle to avoid prolonged
exposure to extremes of temperature and moisture.
Dense overhead trees, tunnels, and certain types of
metallic window tinting may temproarily disrupt the
connection to the satellites.
●
●
●
●
●
●
●
GPS402
4
TM
Getting Started
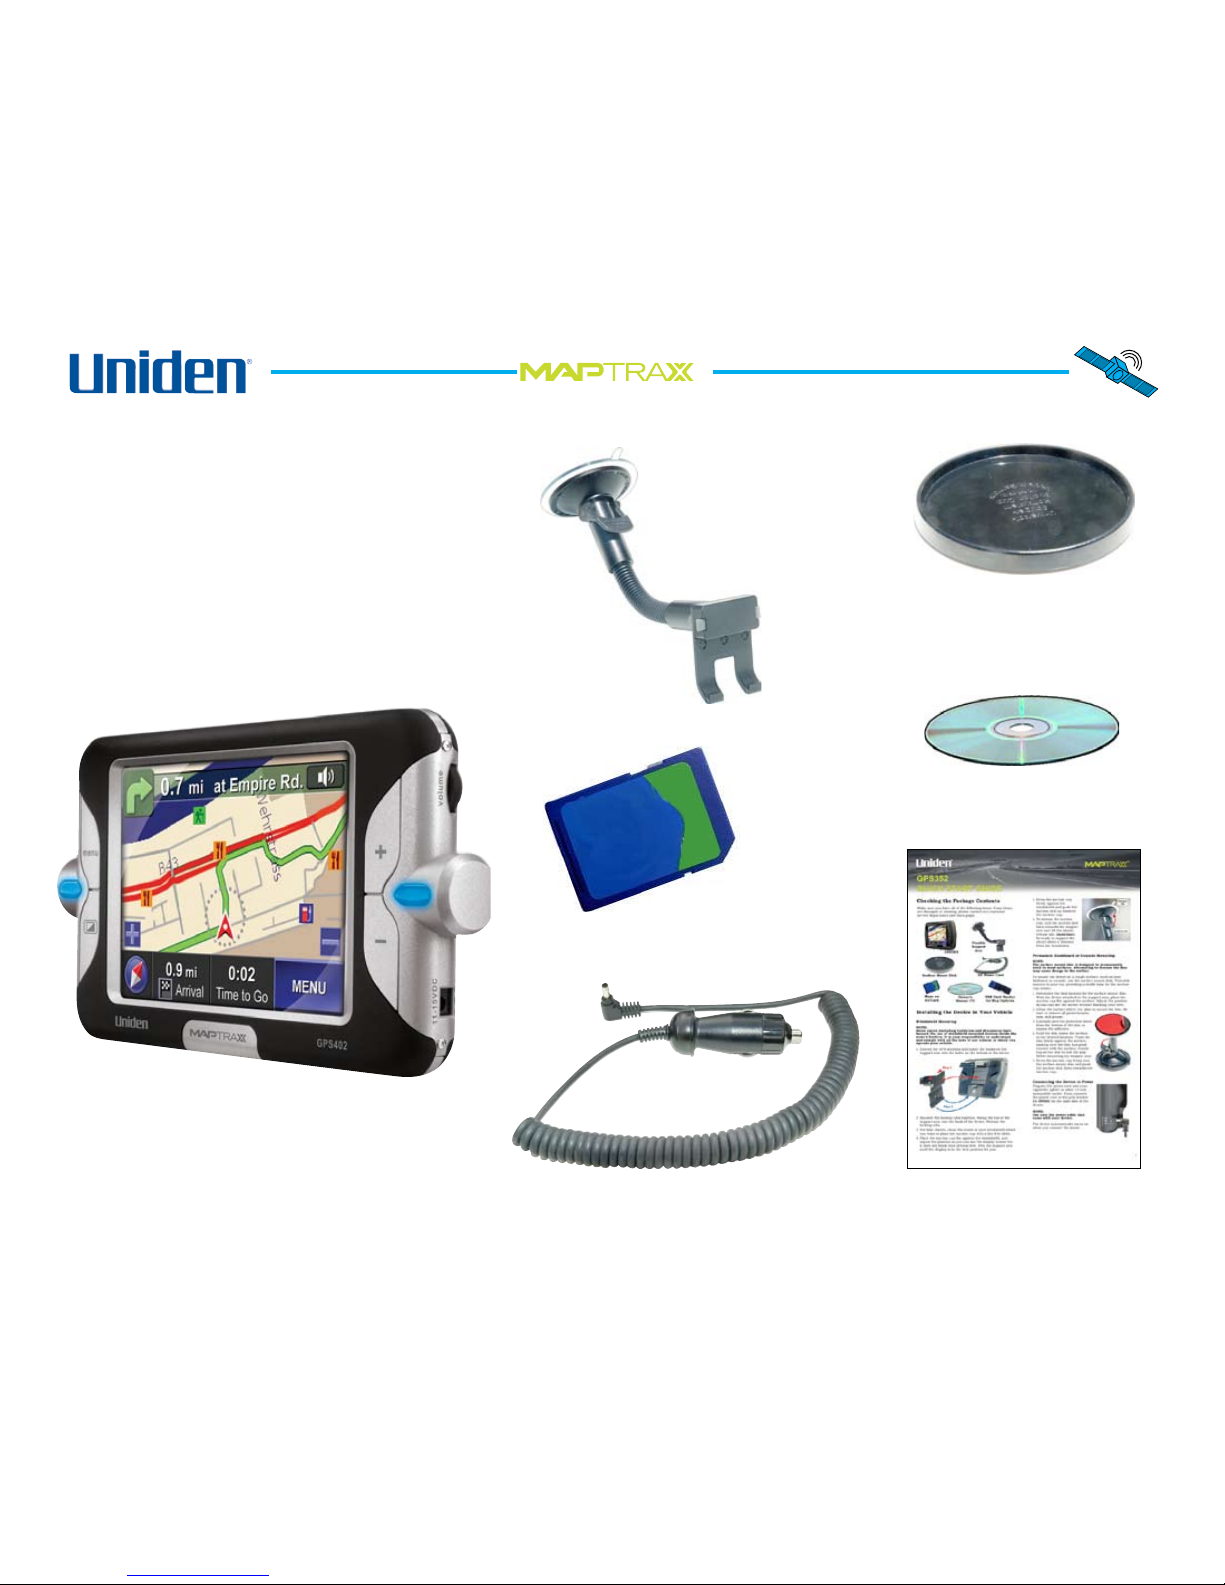
What’s Included
Check the contents of the box and make
sure you have all of the following items. If
any items are damaged or missing, please
contact our customer service department
(see back page).
Flexible
Support Arm
Owner’s Manual CD
Surface Mount Disk
DC Power Cord
Quick Reference Guide
Maps on
SD Card
M
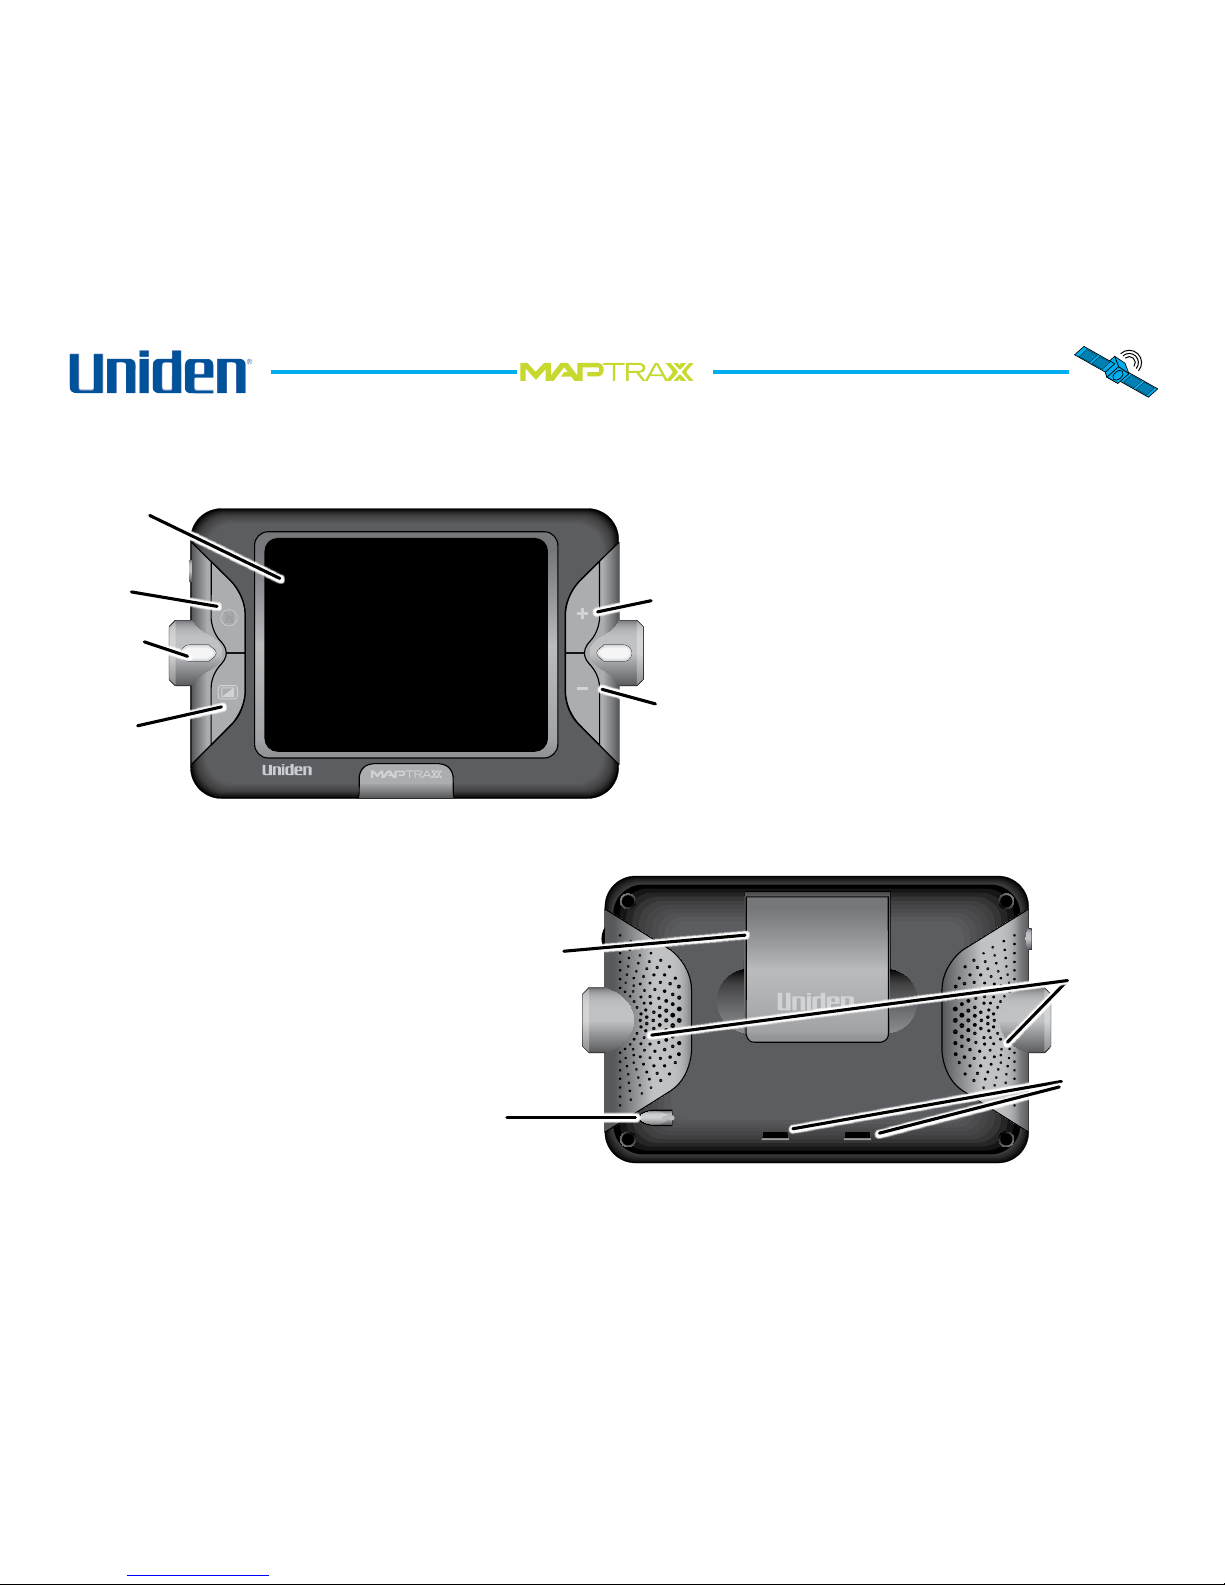
LCD
Touch
Screen
Go to
Menu
LCD
Screen
ON/OFF
Zoom IN or
Scroll UP
Zoom OUT or
Scroll DOWN
Front
Removeable
Stylus
Back
Speakers
Mounting
Holes for
Support
Arm
GPS
Antenna
Turn
Indicator
5
TM
The Parts of the GPS Device
See the pictures below and on the following page for the parts of the GPS402 that you will use on a regular basis.
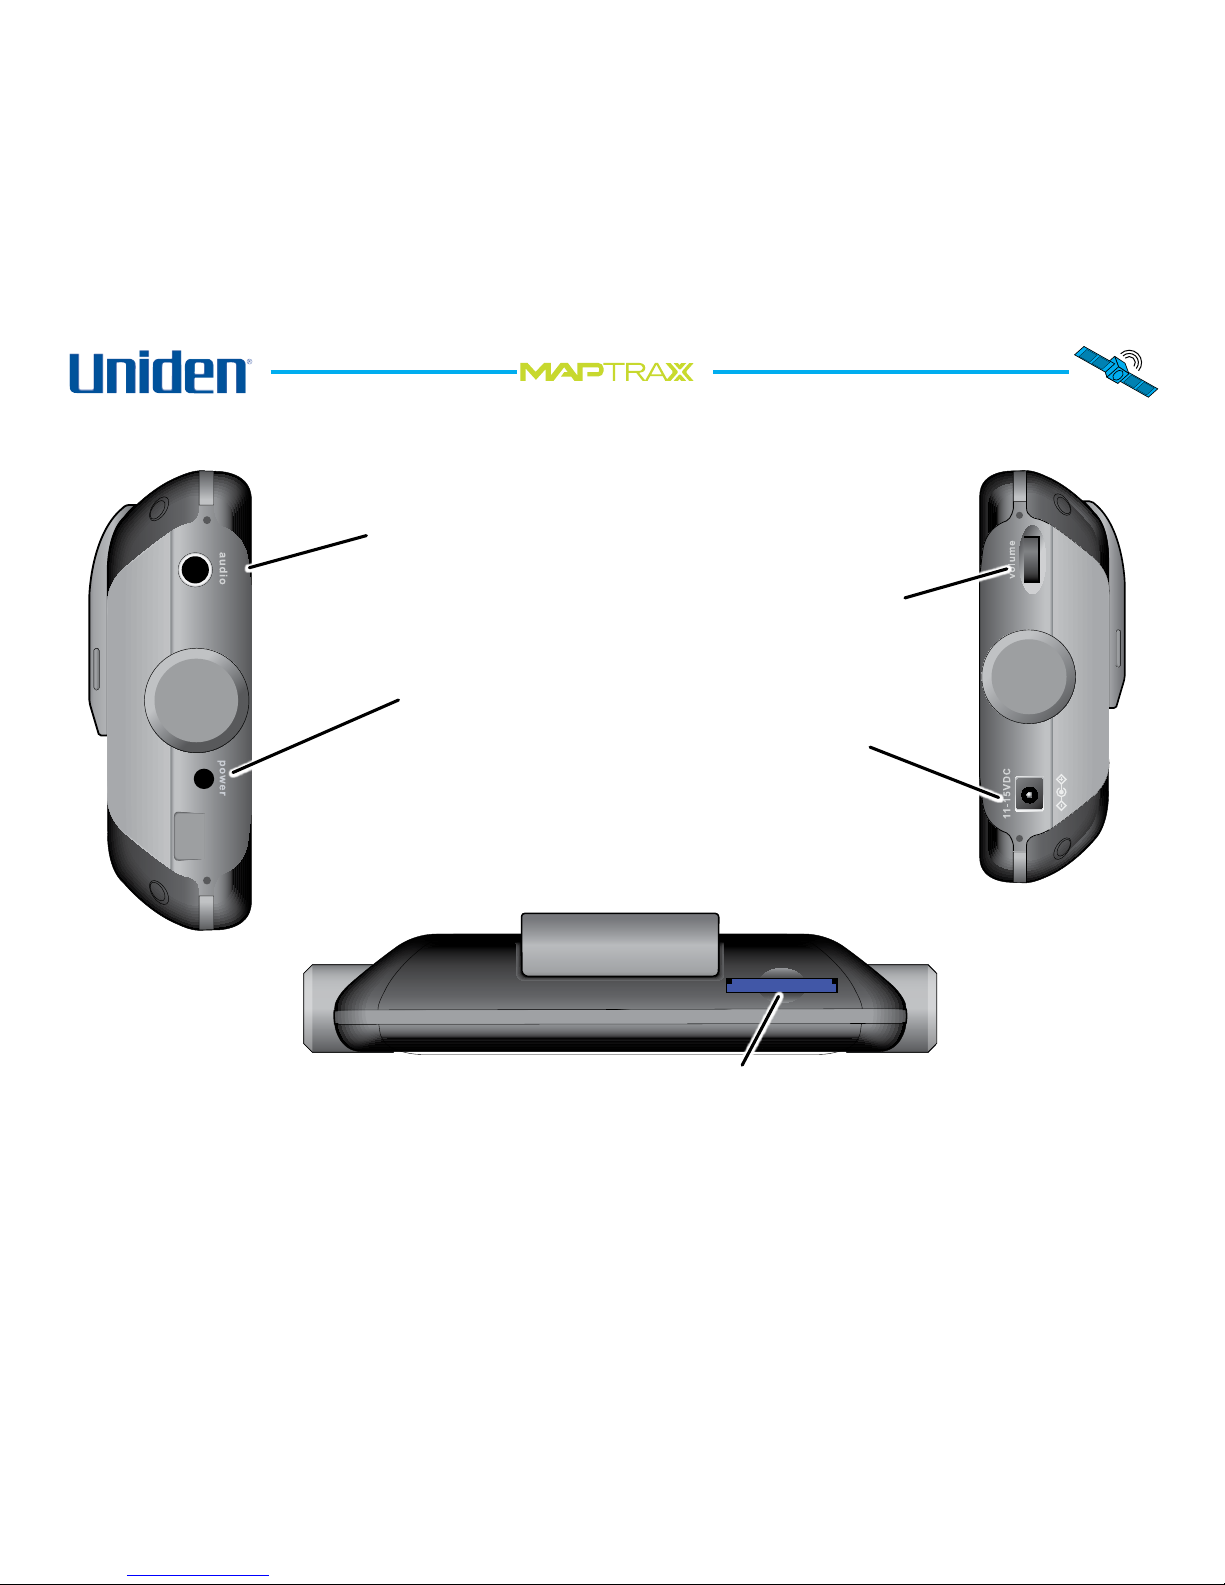
Left
Right
Power ON/OFF
Audio OUT
Supports standard
3.5 mm audio
headphones.
Turns the entire
device on or off.
Top
SD Card
DC Power
Input
Volume
Control
The SD Card must be
installed for mapping
features to operate
properly.
6
TM
Step 1
Step 2
7
TM
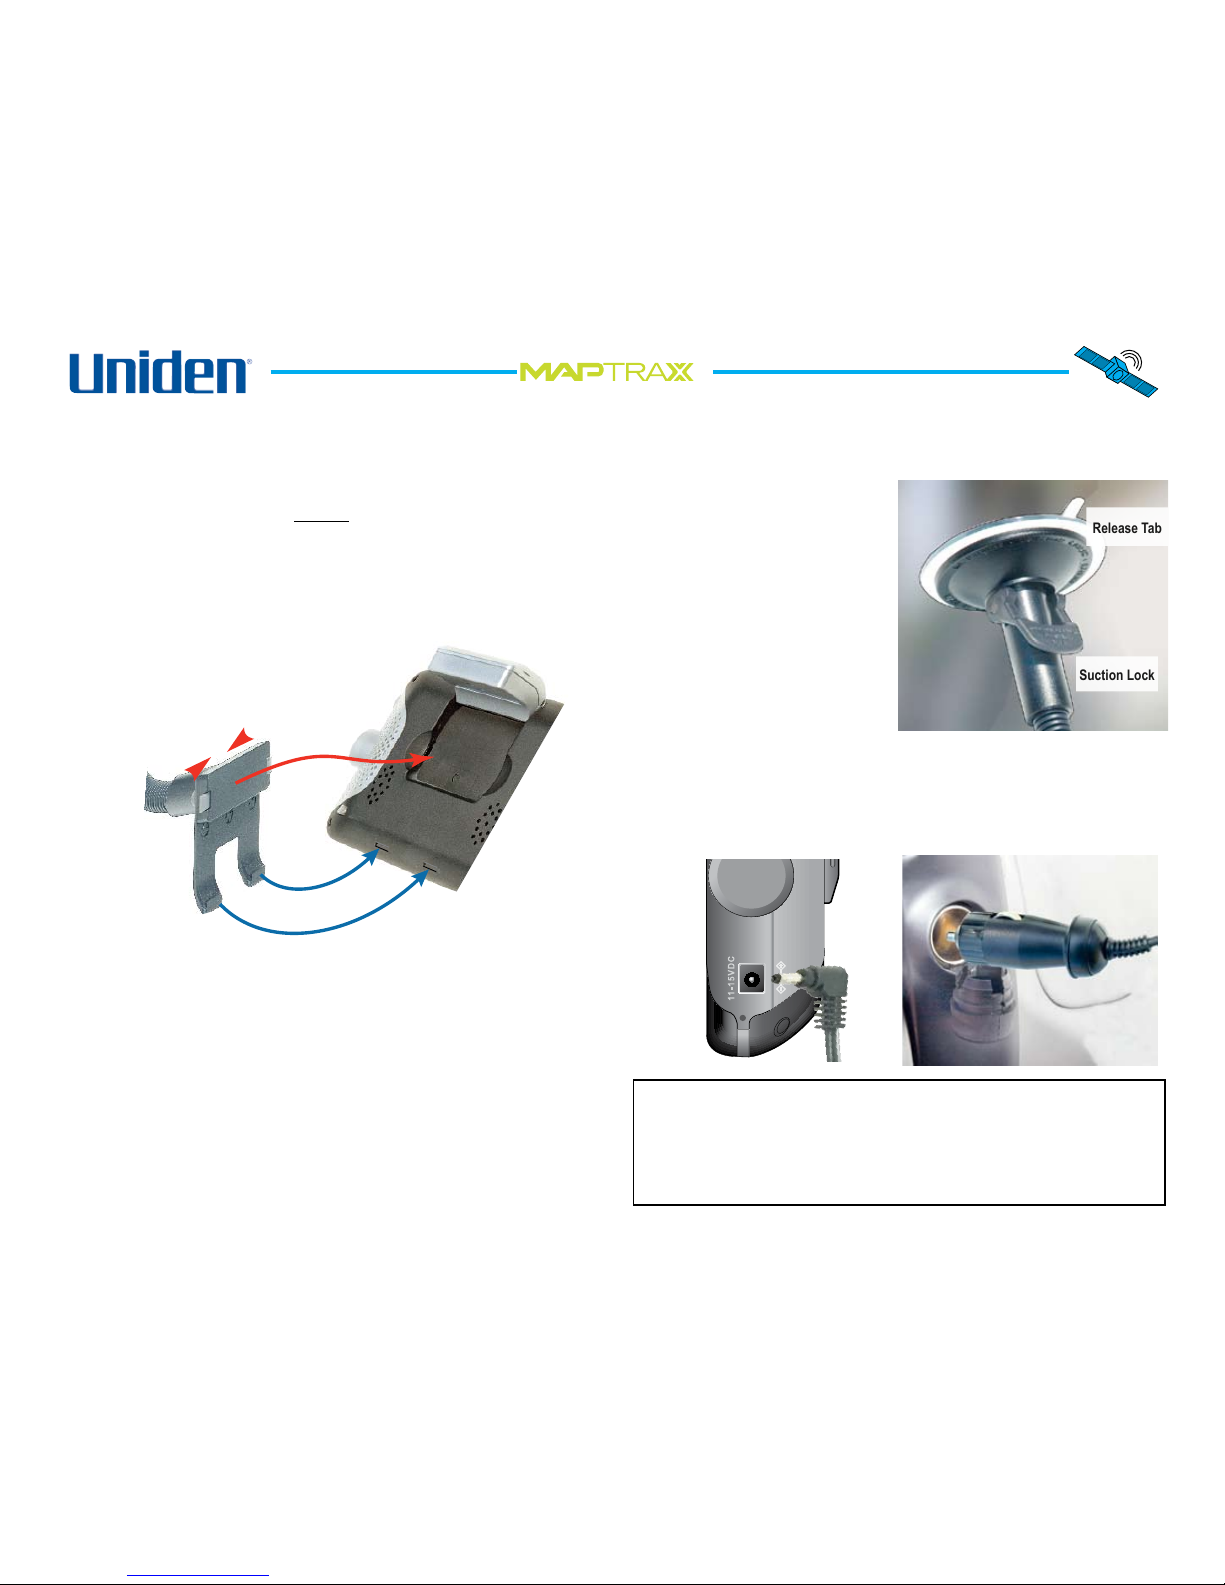
Installing the GPS Device in Your Vehicle
Windshield Mounting
When you install the device for the rst time, attach the
device to the support arm before attaching the arm to your
vehicle windshield.
Note: Before attaching the suction cup, clean the inside
of your windshield with a standard window cleaner and a
lint-free cloth.
Extend the GPS antenna and insert the hooks on the
support arm into the holes on the bottom of the Device.
Squeeze the locking tabs together. Swing the top of the
support arm into the back of the device. Release the
locking tabs.
Place the suction cup at against the windshield, and
adjust the position so you can easily see the display screen
but your driving view is not obstructed. Flex the gooseneck support arm until the display is in the right position.
1.
2.
3.
Press the suction cup
rmly against the
windshield and push
the suction lock up
towards the suction
cup. To release the
suction cup, pull the
lock back towards the
support arm and lift the
plastic tab. Important:
be ready to support the
device when it releases
from the windshield.
Connect the DC power cord to the 11-15VDC jack.
Then, insert the cigarrette-lighter plug into a standard
12-volt outlet. The device automatically turns on when
you connect the power.
4.
5.
Suction Lock
Release Tab
NOTE:
Some states (including California and Minnesota)
have banned the use of windshield-mounted devices
inside the state’s borders. It is your responsibility
to understand and comply with all the laws of any
state(s) in which you operate your vehicle.

8
TM
Permanent Dashboard or Console Mounting
To mount the device on a rough surface, such as your
dasboard or console, use the surface mount disk that
came with your device. This disk permanently mounts in
your car and provides a stable base for the suction cup
mount.
Determine the best location for the surface mount disc.
Attach the device to the support arm. Place the suction
cup at against the surface, and adjust the position so
you can easily see the display screen but your driving
view is not obstructed.
1.
Clean the surface where you plan to mount the disc. Be
sure to remove all protecterants, wax, and grease.
Carefully peel the protective sheet
from the bottom of the surface
mount disc to expose the adhesive.
Position the disc above the surface
in the desired location, Press the
disc rmly against the surface,
making sure that all parts of the
disc have good contact with the surface. Gently tug on the
disc to test the adhesive before mounting the support arm.
Press the suction cup rmly
into the surface mount disc and
push the suction lock down
towards the suction cup.
To release the suction cup,
pull the lock back towards the
support arm and lift the plastic
tab. Important: be ready to
support the device when it
releases from the windshield.
Connect the DC power cord to
the 11-15VDC jack. Then, insert the cigarrette-lighter plug
into a standard 12-volt outlet. The device automatically
turns on when you connect the power.
2.
3.
4.
5.
6.
7.
NOTE:
The surface mount disc is designed to
permanently stick to most surfaces. Attempting
to remove the disc may cause damge to the
surface. Be certain you have the disc in the
desired location before exposing the adhesive.

9
TM
Show the
current
map and
location
Go to the
GPS status
screen
Change the device setup
and user information.
Battery
charge
indicator
Using the Interface
Using the Main Menu Screen
When the device rst powers on, it displays the menu screen. To select any item on any screen, simply tap the item
with your nger or the removeable stylus.
Enter or
select a
destination
Show the
hardware
and software
versions
10
TM
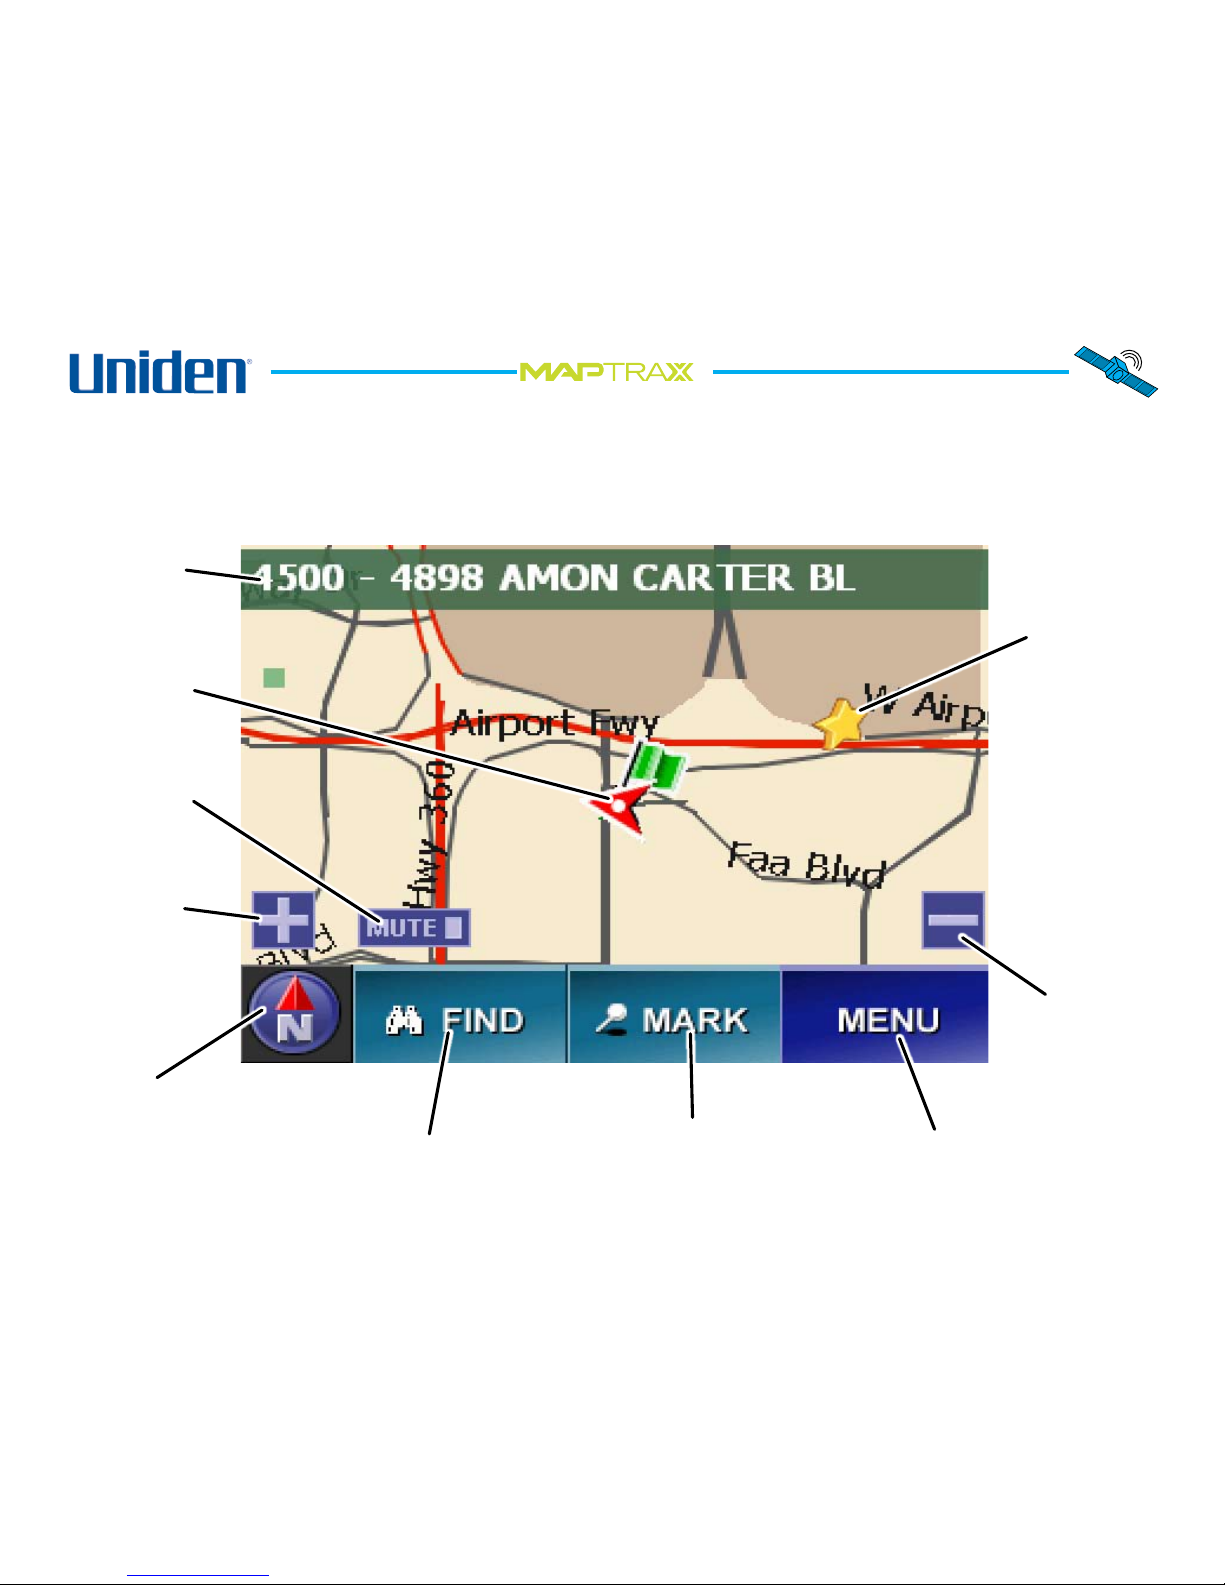
Zoom in on
the map
center
Go to the Quick
Find screen
Zoom out
from the
map center
Your current
location (the
map center)
Using the Map Screen
As soon as the device acquires a valid satellite signal, it switches to the Map screen. You will probably use this screen the
most, so be sure you are familiar with its layout, icons, and options. The arrow in the center of the screen shows your
current position. If the arrow is red, it means the device has a valid GPS lock on your current position; if the arrow is
gray, the device does not have a lock on your position. (See Troubleshooting if you have difculty achieving a lock.)
Go to the Mark menu.
Mark a location as a
point on a route or as a
favorite location.
Go back to
the menu
Your current
location and
direction
A previously
bookmarked
favorite
location (tap
the icon to
see the name,
full address,
and phone
number for
any marked
location)
Turn off
the voice
prompts
The current map
view: by default,
north is always at
the top. Tap this
icon to change views.
11
TM
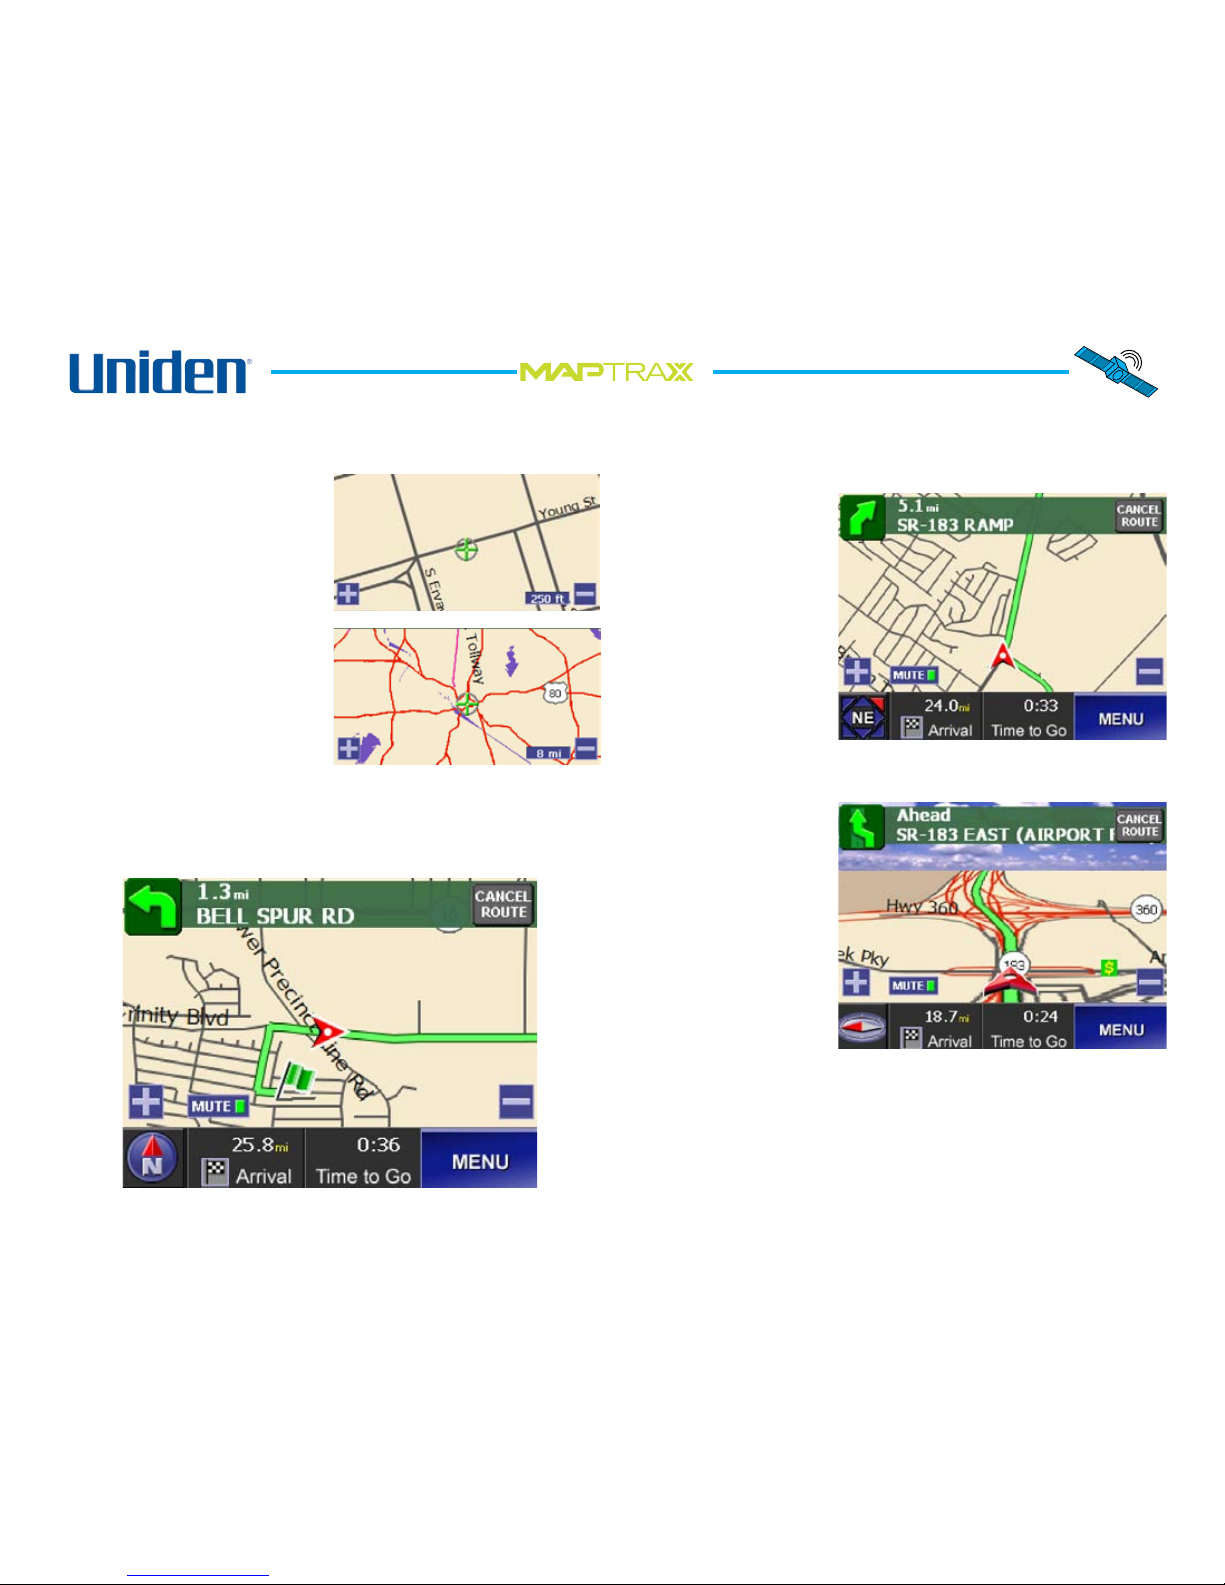
Changing the Map View
Zooming In and Out
The device has 8 zoom
levels. One-half inch on the
screen can equal 8 miles, 4
miles, 2 miles, 1 mile, 1/2
mile, 1000 feet, 500 feet,
or 250 feet. Tap the plus
button to zoom in to the
next level and the minus
button to zoom out. Each
time you zoom, the scale
appears in the lower right
corner of the map.
Changing Heading and Compass Direction
The map screen normally shows north always at the top
of the map and turns the arrow that shows what direction
you are traveling:
You can set the view so that the direction you are heading
is always at the top of the map, and the map itself turns.
Tap the compass
icon in the bottom
left corner of the
map to change the
heading direction.
When you set the
map to show your
heading at the top,
the compass icon
changes to show you
the actual direction
of your heading.
Using the Three-Dimensional View
Another map view is
the three-dimensional
view. In 3D view,
your heading is
always towards the
top of the screen.
Tap the compass icon
in the bottom left
corner of the map. In
3D view, the compass
icon points toward
north, wherever that
appears on the screen.
 Loading...