


Owner's Manual for the
GNS8431
and
GNS8436
In Car Navigation System
OWNER’S MANUAL

WARNINGS & NOTIFICATIONS
When used correctly, the GNS8431/8436 enhances
your driving experience. The voice and map
information in the GNS8431/8436 cannot be
guaranteed accurate as road layout may change.
Always follow the posted road signs and traffic laws.
Do not mount the GNS8431/8436 in a position which
may obstruct the driver's view or prevent the safe
operation of the vehicle.
Do not mount the GNS8431/8436 in a position within
an air bag field of deployment.
The Global Positioning System is operated and
maintained by the US Government. The US
Government is completely responsible for the
accuracy of the Global Positioning System.
The US Government reserves the right to make
changes to the Global Positioning System in
accordance with the Department of Defence civil GPS
user policy and the Federal Radio navigation plan.
These changes along with poor satellite geometry
could cause inaccurate readings.
GPS signal reception can be affected by the location
of satellites, tall buildings, tunnels, bridges, etc. If the
GNS8431/8436 is not receiving a signal, you will
need to change your location until a signal is
received.
WARNINGS
i
Quick Start
Guide
1
3
Software CD
+12V to +24V Cigarette
Lighter Power Cord
2
QUICKSTART GUIDE
Start
Here
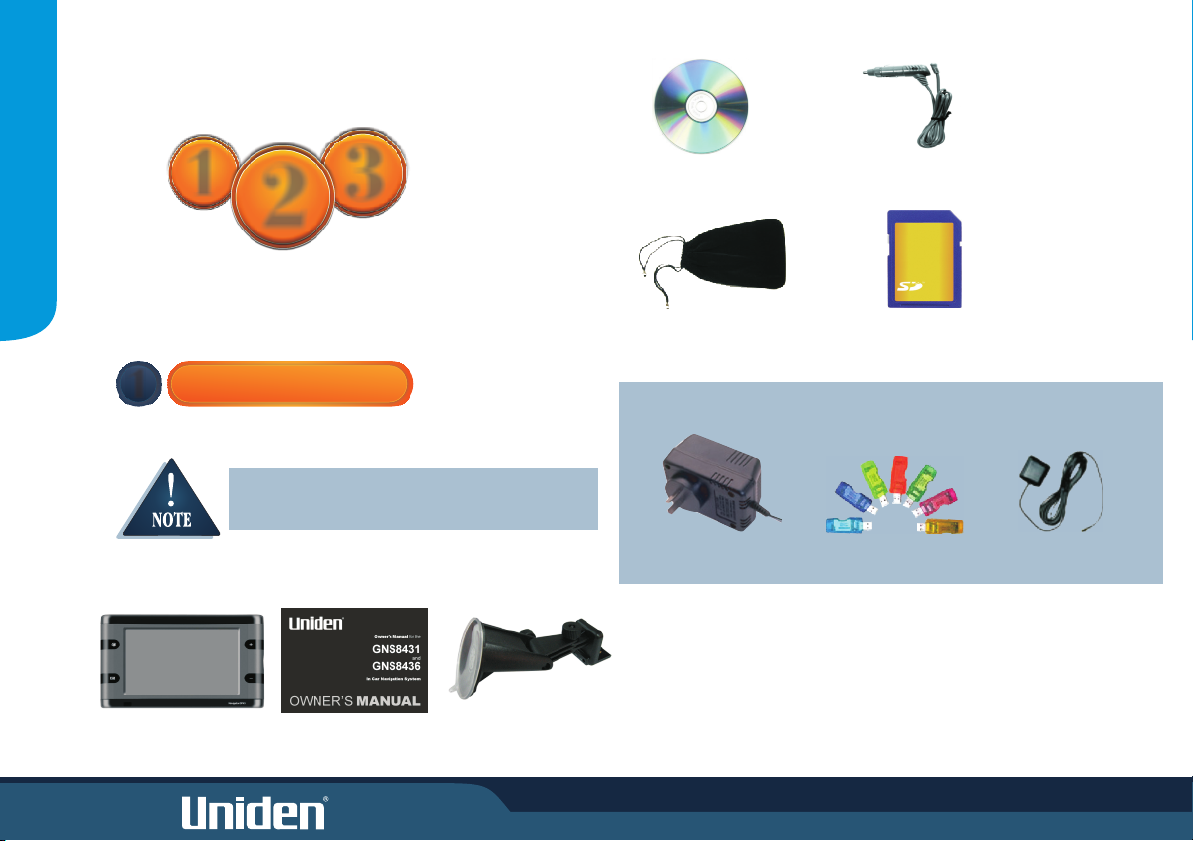
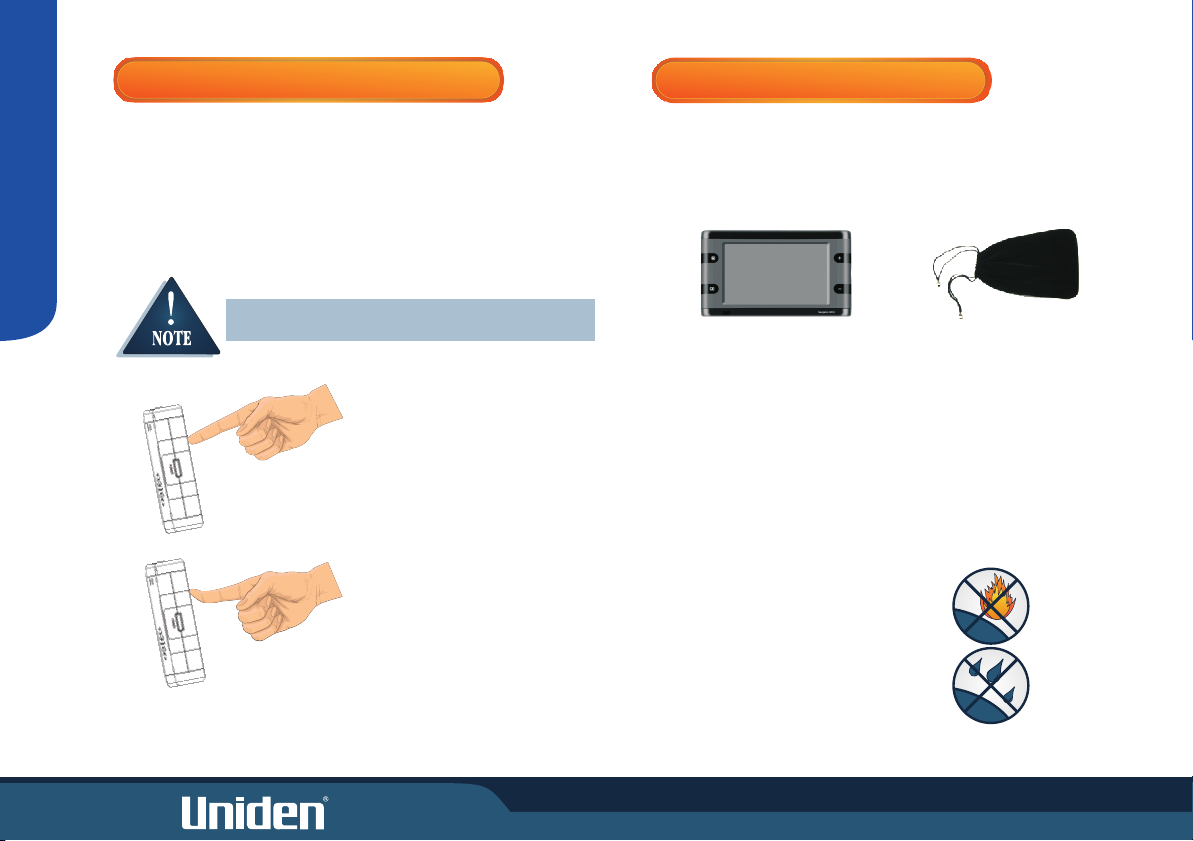
BOX CONTENTS
1
Box Contents
Main Unit
Please contact your place of purchase if any of the
following items are missing.
This Owners Manual
Suction-Cup Mount Bracket
Carrying Case
Optional Accessories
AC Power Adaptor
SD Memory Card
SD Card Reader
External GPS Antenna
ii
2
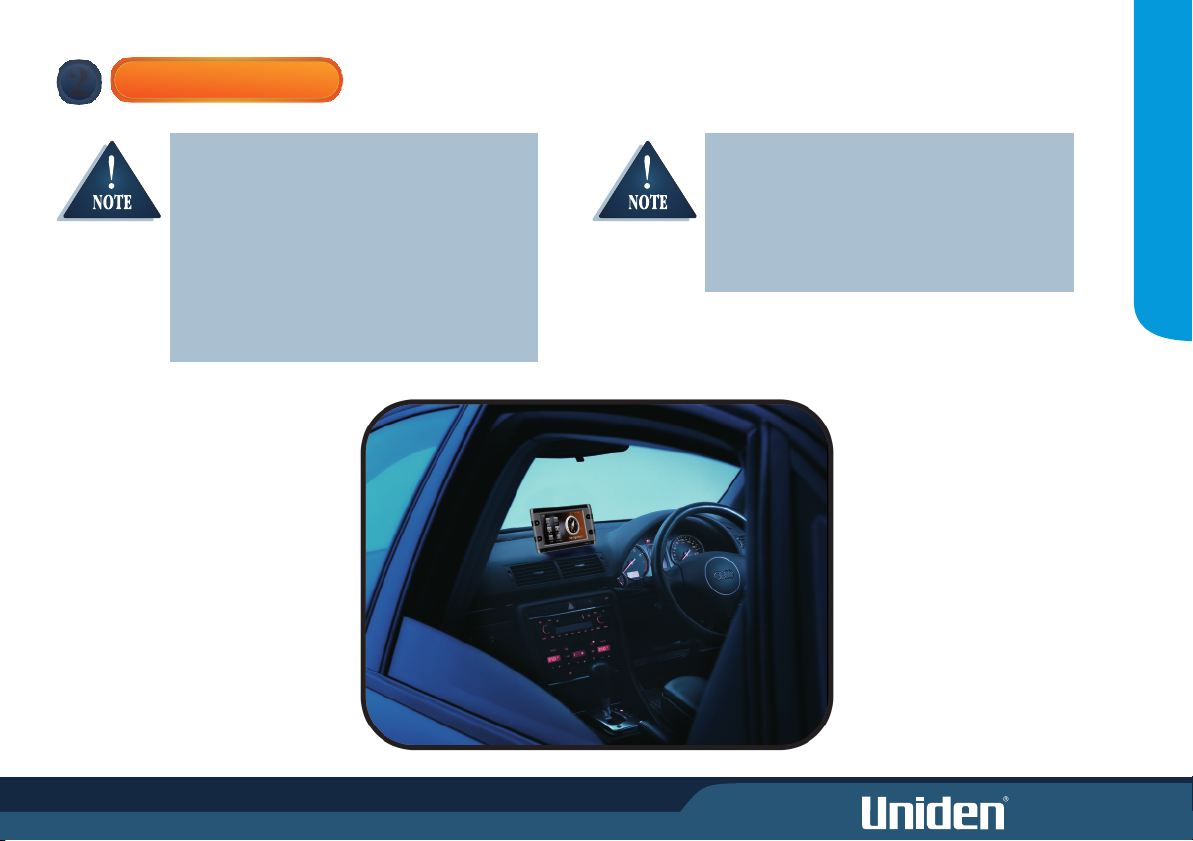
INSTALLATION
Please consider the following when choosing a mount
location:
! Choose a location where the fixed antenna,
when extended horizontally will have a clear
view of the sky.
! Do not mount within any Airbag deployment
areas.
! Do not mount where the driver's view will be
obstructed or where safe operation of the vehicle
may be obstructed.
Ensure the mount location;
! Allows room to raise the GPS antenna
horizontally.
! Allows for the GNS8431/8436 to be slotted in
and out of the mount stand.
! Allows for the tilt angle to avoid reflected
sunlight.
QUICKSTART GUIDE
iii i
3
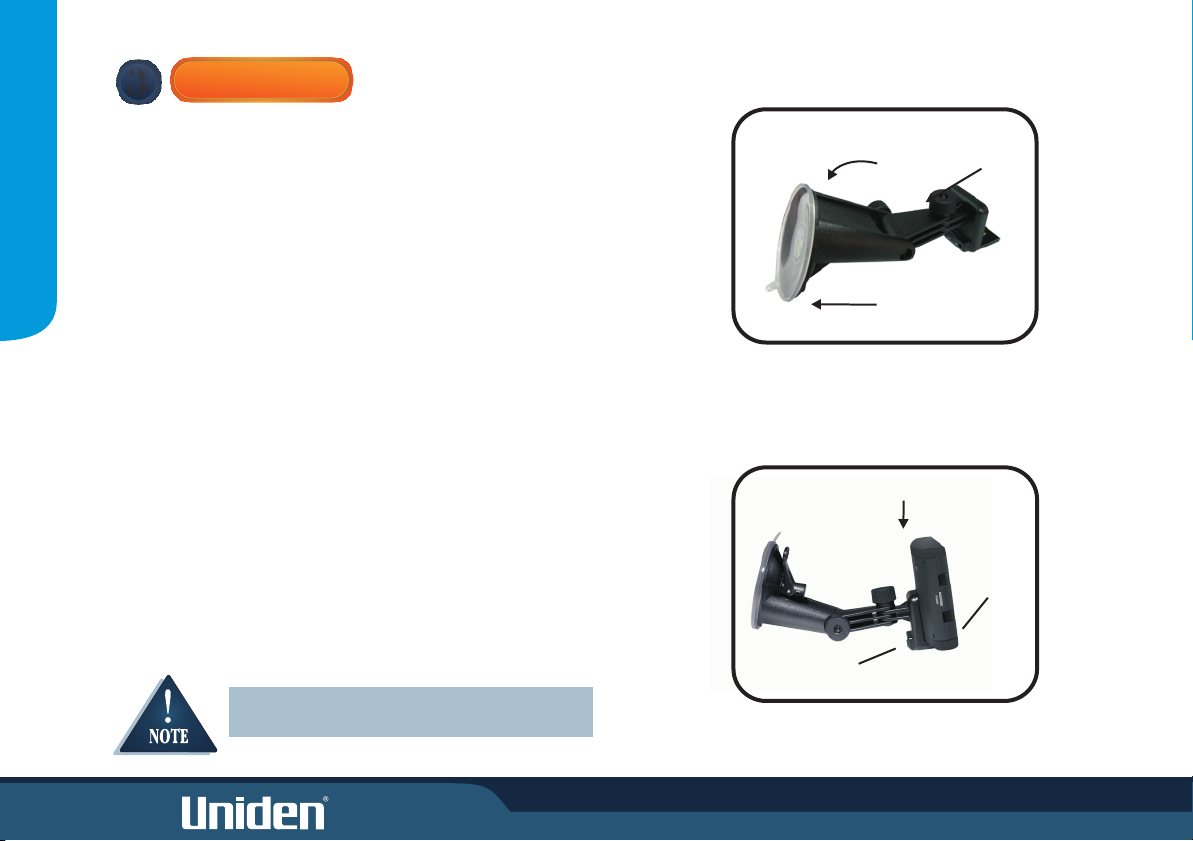
MOUNTING
Glass Mount Bracket
1. Make sure the glass area you wish to attach the Glass Mount Bracket to is
clean.
2. Double check that the final location does not impede the safe operation
QUICKSTART GUIDE
of the vehicle.
3. Loosen the turn screw. Hold the Glass Mount Bracket up to the intended
position and adjust the angle between the suction mount and bracket
arm. Tighten the turn screw. With the release lever loose firmly press
the suction cup against the windscreen, push the release lever to secure
suction. (fig 1).
Secure
Press
Turn
screw
Fig 1: Line up glass mount to
Attach main unit
Secure unit to bracket. (fig 2).
1. The main unit has guide slots at the rear. Position the main unit with guide slots
above the mount bracket stand and then slide it down to lock into place.
2. To release the main unit push the release button at the front of the stand and
sliding the unit up.
Connect Power
1. For convenience the power lead can be connected to the mount bracket stand instead
of the main unit. This allows for easy removal of the main unit. Insert DC plug of the
Cigarette Lighter Lead into the DC Power socket at the back of the Mount Bracket
Stand and connect the other end to the +12V to 24V Cigarette lighter socket.
.
Ensure the cord does not interfere with safe
vehicle operation
windscreen
Slide onto stand
Release
Button
Mount stand power jack
Fig 2: Secure unit to bracket
iv
4
POWER ON SCREEN
Turn the ignition on and will power on.
GNS8431/8436
The is On when the buttons left and right of the screen are lit
with a blue LED backlight.
Press the POWER button at the left side of the momentarily to
turn power On or Off.
The screen may be turned on or off by pressing ( model only).
When the GNS8431/8436 powers on for the first time you will be prompted to
view A Brief Tour. Please take the opportunity to view the brief tour as this
feature will not appear again whether you choose to view the brief tour or not.
This Quick Start Guide is now complete.
GNS8431/8436
GNS8431/8436
GNS8431
QUICKSTART GUIDE
THIS OWNER’S MANUAL
The remainder of this OM describes the
GNS8431/8436 operating functions and other (non
navigation) applications which can be performed.
NAVIGATION MANUAL
The Uniden Navigation software is loaded onto the
supplied SD card. A separate manual is supplied with
instructions to use the Uniden Navigation software.
vii
CONTENTS
FEATURES
Contents..................................................................................................................1
Features...................................................................................................................1
Controls & Views.......................................................................................................2
CONTENTS
Using the Touchscreen.............................................................................................3
Care & Maintenance.................................................................................................3
Main Menu............................................................................................................4
Playing Music Files....................................................................................5
Playing Movie Files....................................................................................6
Viewing Pictures........................................................................................7
Game........................................................................................................8
Settings.....................................................................................................9
Built-In Battery Specification....................................................................11
Bluetooth (GNS8436 Model Only).............................................................12
Pairing Your Phone with the GNS8436....................................... 12
Making a Bluetooth Call............................................................. 15
Answering a Bluetooth Call......................................................... 17
Future Software Improvements.............................................................................18
CD Contents.............................................................................................18
Troubleshooting.....................................................................................................19
Warranty................................................................................................................20
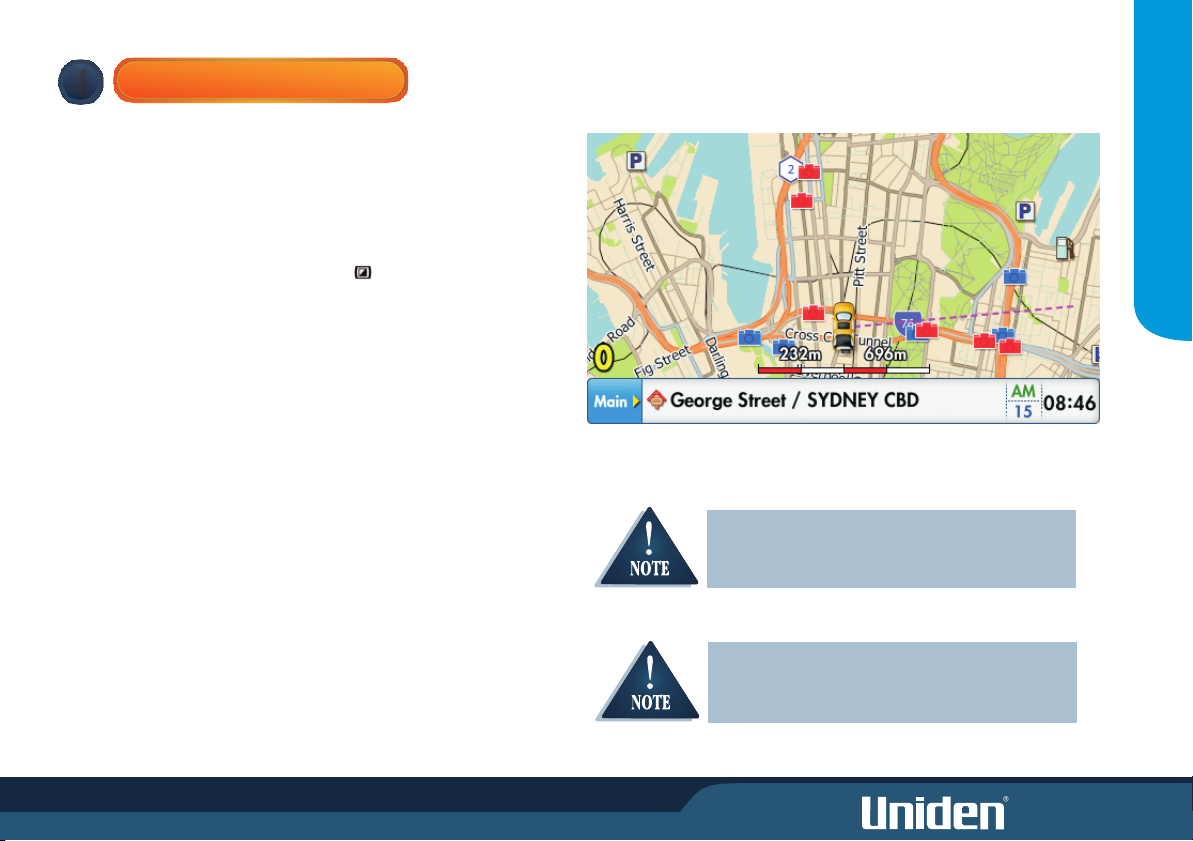
Car Navigation
! Navigate to pre-programmed State/City locations
! Navigate to street address
! Navigate to over 500,000 pre-installed points of interest (POI)
! Mark often used destinations as My POI
! Dynamic voice and visual guidance: Constant route verification and
re-calculation with turn by turn instructions
! Road Map
Speed and Safety Warning System
! Receive audio and visual warnings when you approach:
Fixed Speed camera
Red Light camera
Moving speed alerts
Other Great Features
! 4.3 inch Widescreen High Definition Non reflective LCD Screen
! Touchscreen
! Intuitive technology
! Built in GPS antenna
! 400MHz processor SIRF III GPS
! Bluetooth capability for hands-free Mobile phone use
(GNS8436 model only)
Updateable Software* for;
Operation
Map data
* Yearly map updates are licensed from a third party and a license fee is
required for future map updates. For the latest update information please
visit the webpage for your GNS model at www.uniden.com.au (Australian
model) or www.uniden.co.nz (New Zealand model).
11

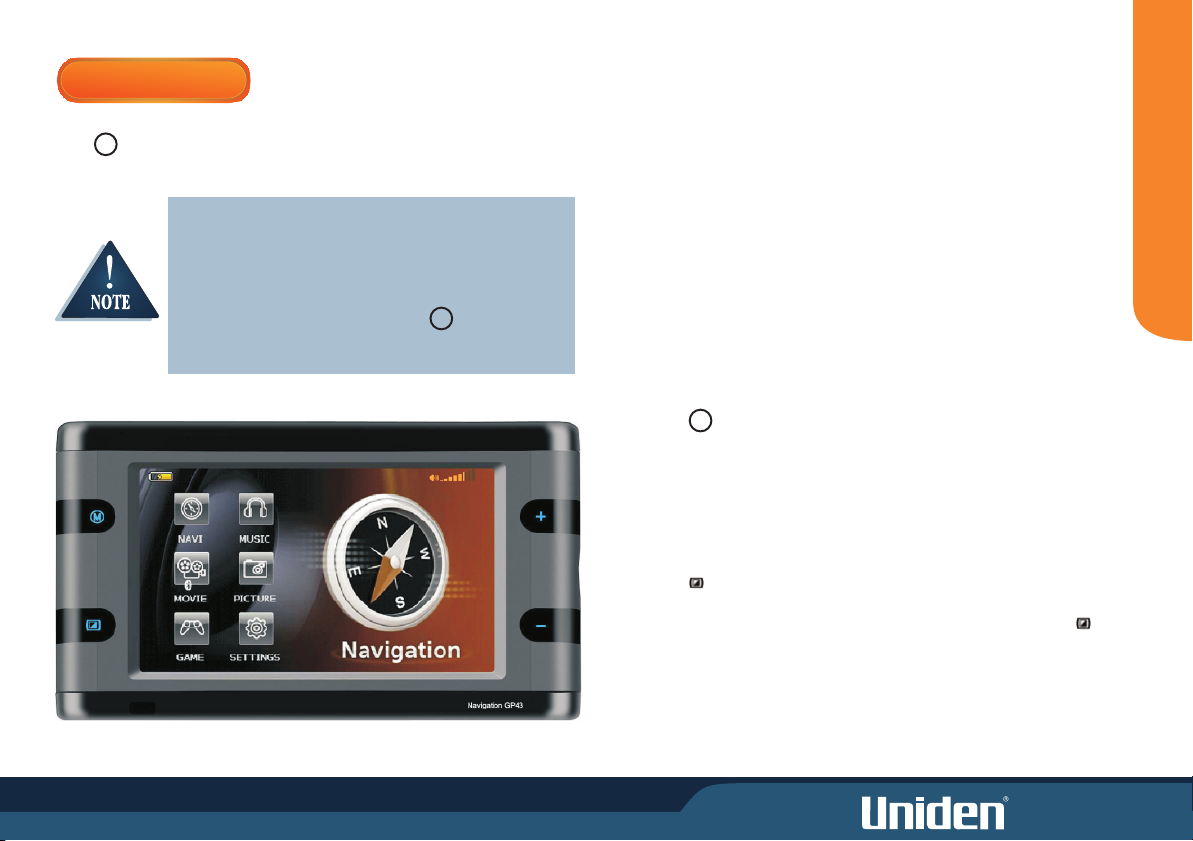
CONTROLS & VIEWS
13
POW
1
2
3
4
RE
14
OPERATION
LEFT SIDE RIGHT SIDE
FRONT
6
7
BACK
101112
5
1 Main Menu Button
2 Screen On/Off Button
(Bluetooth Button - for GNS8436 model only)
3&4 Map Zoom In/Out
8
9
5 SD Card Slot
6 GPS Antenna
7 Mount Bracket Slots
8 External GPS Antenna Jack
9 Speaker
10 Audio-Out Jack
11 Power Jack
12 USB Jack
13 Power ON/OFF Button
14 Volume Control
BOTTOM
2
USING THE TOUCHSCREEN
CARE & MAINTENANCE
The GNS8361/8436 is designed to respond to touchscreen input. Momentarily
touch the screen with the tip of your finger when making a selection (fig 3).
OPERATION
Avoid applying excessive pressure to the screen or holding a finger for more
than a moment (fig 4).
Do not use sharp objects which may scratch or damage
the screen.
Please take the following steps to ensure your GNS8431/8436 is looked
after.
! Always transport and store the GNS8431/8436 using the carry case.
+
! Keep the GNS8431/8436 free from dust by regularly cleaning the
screen with an LCD cleaner.
Fig 3
Take measures to reduce the risk of theft by covering the unit or remove
the unit from your dash when not in use.
! Do not leave unattended in direct
sunlight for extended periods.
Fig 4
3
! Avoid any moisture contact.
MAIN MENU
M
M
M
The Main Menu facility gives you access to additional application modes.
Press to access the Main Menu screen.
Multitasking two applications in the Main Menu is
available for the GNS8431 model only.
Multitasking is disabled for the GNS8436 to accommodate
the Bluetooth facility. To access the Main Menu when
running the Navigation software press to go to the
Navigation main screen and then close and exit the
Navigation software.
Using SD Cards
· The supplied SD memory card has the map file stored with room for
additional files. If the supplied SD memory card is short of capacity for new
files do not delete the map file to increase capacity. Purchase another SD
card then you can save more files. If the map file is deleted, the navigation
function will not perform properly.
· Total number of files on SD card: Up to 9999 files for each application can
be read. Note that performance may decrease if more than 200 files are
read.
Running more than one mode (GNS8431 model only)
To perform multitasking (for example, navigation plus audio playback).
1 Select an application in the main menu (Navi, Music…) to get on.
2 Press to come back on main menu. The available applications
will have coloured icons, those which are not available are in grey color.
3 Select an available application: applications are working simultaneously.
Turning the screen off temporarily (GNS8431 model only)
This function is used to turn the LCD screen off temporarily without ending the
current program.
1 Press briefly; The LCD is turned off to prevent dazzle at night or to save
power. The current program continues to be executed even though nothing
appears on the screen, voice alerts and instructions are still heard. Press
again to display the screen.
MODE
4
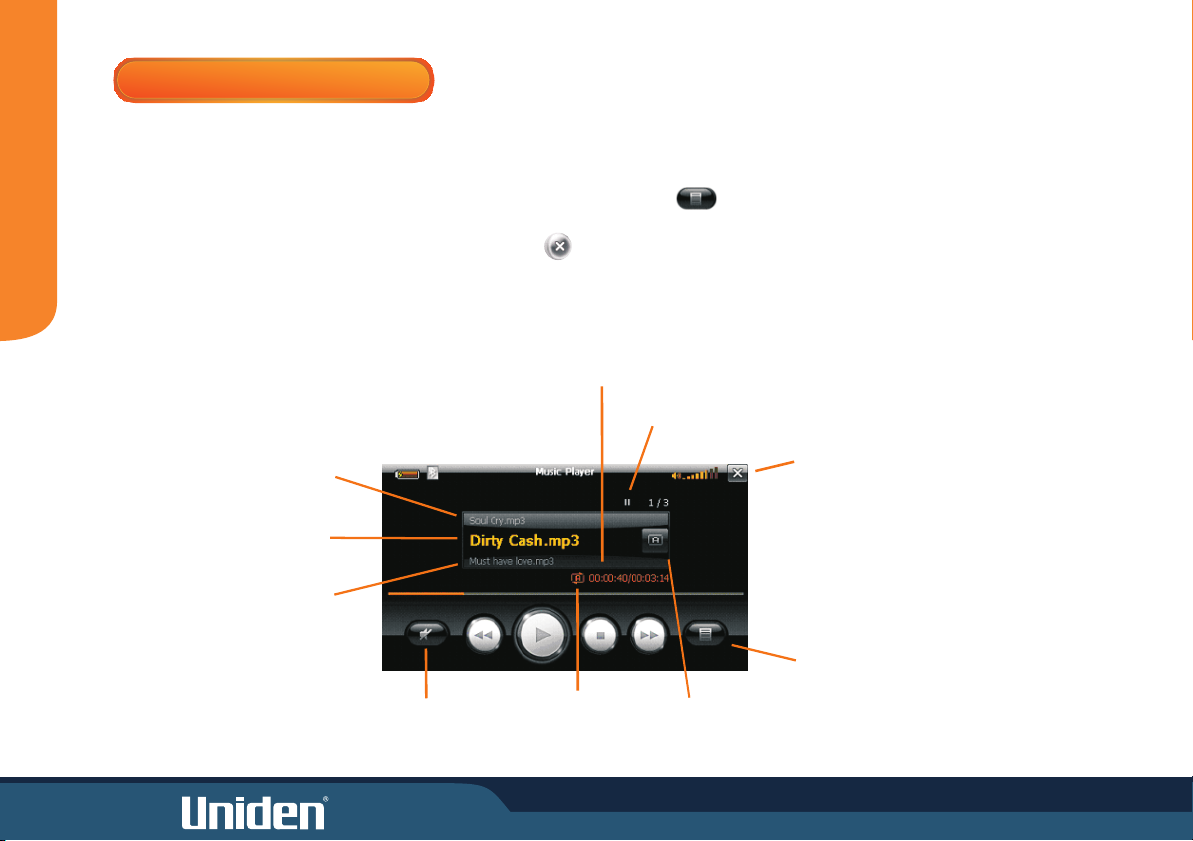
PLAYING MUSIC FILES
The GNS8431/8436 will play MP3 and wav music files (converted for
Repeat
Windows Mobile(WIN CE)) saved onto the SD memory card. If the
MODE
increase capacity. Purchase another SD card then you can save more files.
The Music Screen with the last file played is displayed. If there is no SD
memory card installed, a sample file is played. Touch the End Button
to end Music and return to the main menu.
If you press the main menu key, the music continues and you can choose
other available applications.
Previous Music
Current Music: If the name of the
music file being played does not
appear completely in one line,
the file name flows from right to left.
Next Music
Mute
supplied SD memory card is short of capacity do not delete the map file to
Mode
Repeat All --> Play All --> Repeat 1 Track --> Repeat All ...
Touch to select the desired option
Previous/Next Music File
Zoom -/+:
Select the next music file while the last music file is being played or select the
previous music file while the first music file is being played.
Current Playing Time/
Total Playing Time
Current Status
Play/Pause/Stop
Repeat
Activated
End
Playlist
Repeat
5
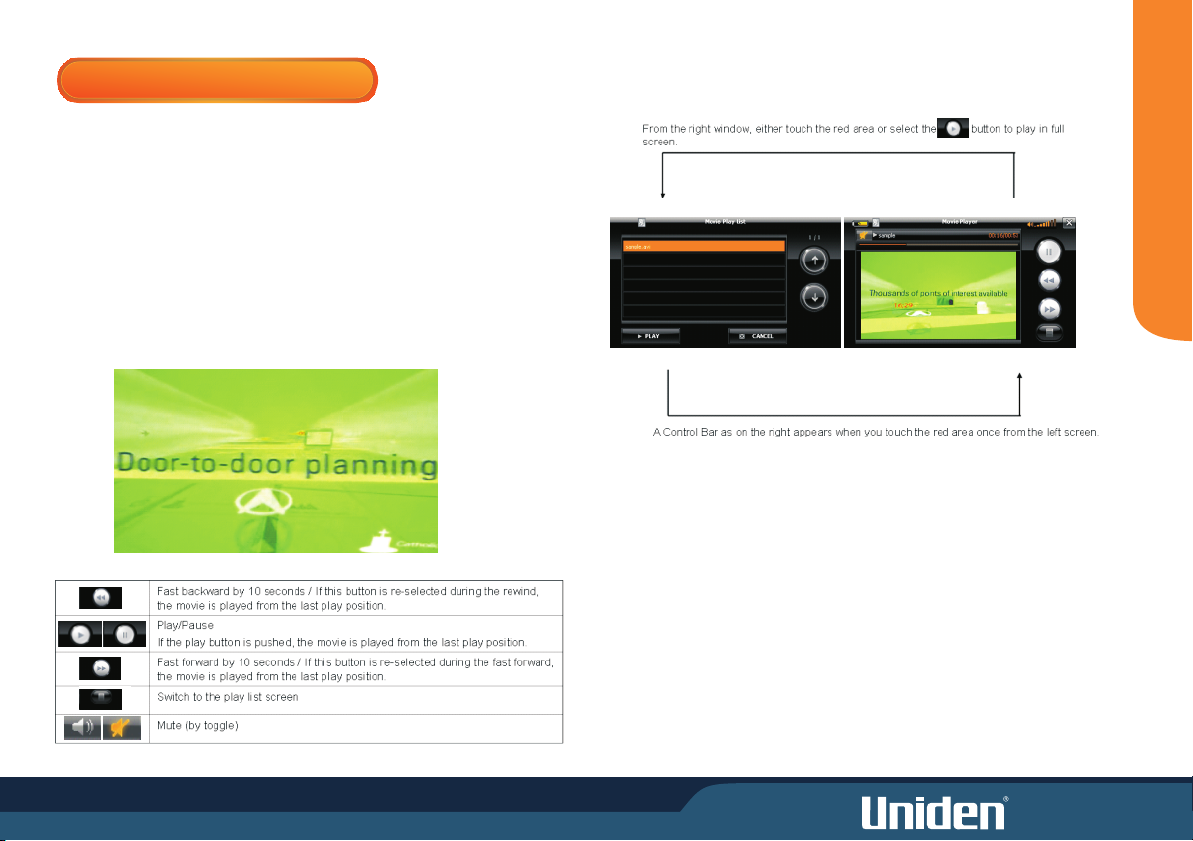
PLAYING MOVIE FILES
When a movie file (avi file converted for Windows Mobile (WIN CE)) exists in the
SD memory card that is inserted into the device, it automatically searches and
shows both the file list and the movie start screen.
If the supplied SD memory card is short of capacity do not delete the map file to
increase capacity. Purchase another SD card then you can save more files.
Full screen is optimized to the movie size of 480 x 272.
Control Bar/Button
MODE
6
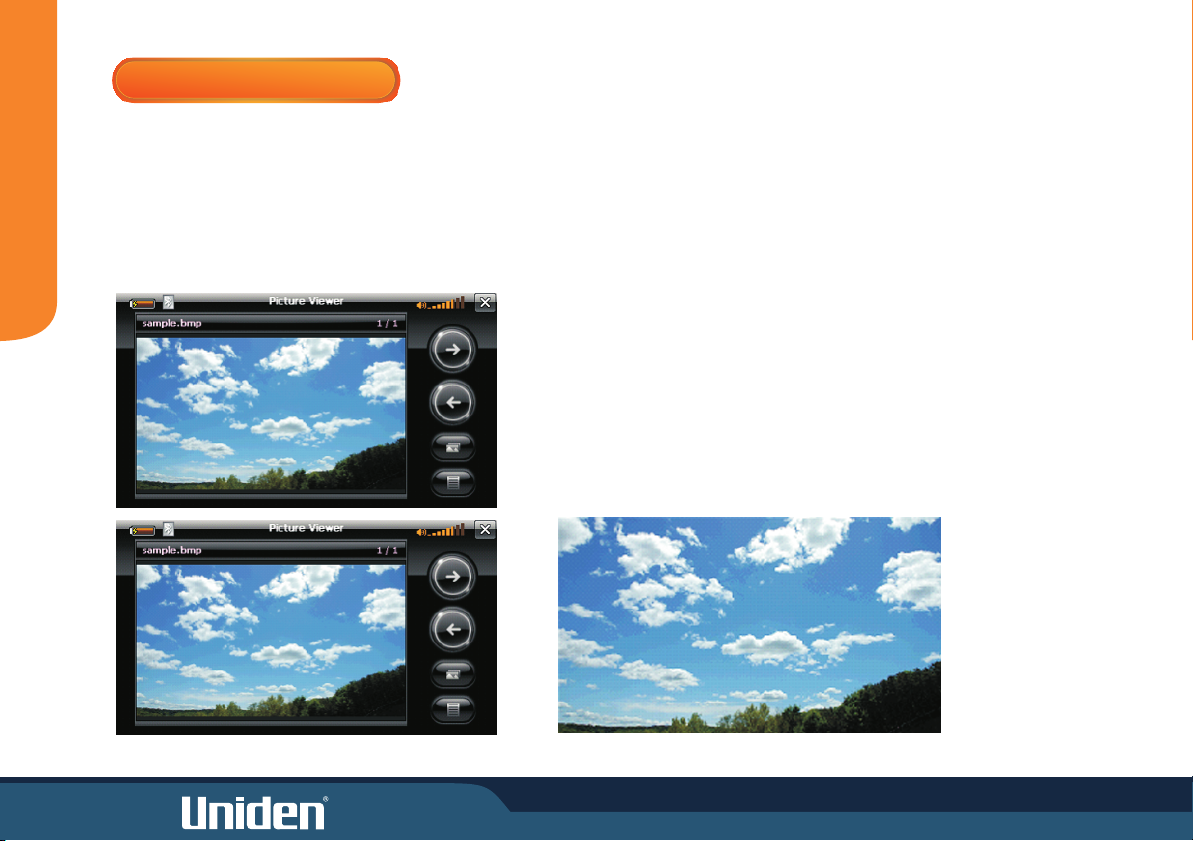
VIEWING PICTURES
To view an image file, the bmp, jpeg, gif or png file must be saved in a SD
memory card. If the supplied SD memory card is short of capacity do not
delete the map file to increase capacity. Purchase another SD card then
MODE
you can save more files.
For optimal performance view only images up to 1MB in size.
Enlarge/Reduce
Arrow-shaped buttons (left, right, up and down) appear, enabling an image to
be enlarged/reduced.
Slide Show
Images are displayed at three second intervals. Slide show occurs in full screen.
If the screen is pressed during a slide show, the current image is displayed in
the previous mode
7

GAME
PAIRS GAME
This is a simple pairs game where you pair 2 cards with the same picture from among 32
different picture cards.
Once you start the game, the preview mode will display all the cards for 5 seconds before
starting actual game. The initial card selected will be reversed and the game time will begin.
Once your game time is over, you can start new game by pressing the "New Game" button.
Score
. Each single failure of a card pairing will deduct 10 points from your score.
. Each single success of a card pairing will add 100 points to your score.
Once your game time is over, the below screen will be pop-up. You can start new game by
pressing "Play again" button.
MODE
8
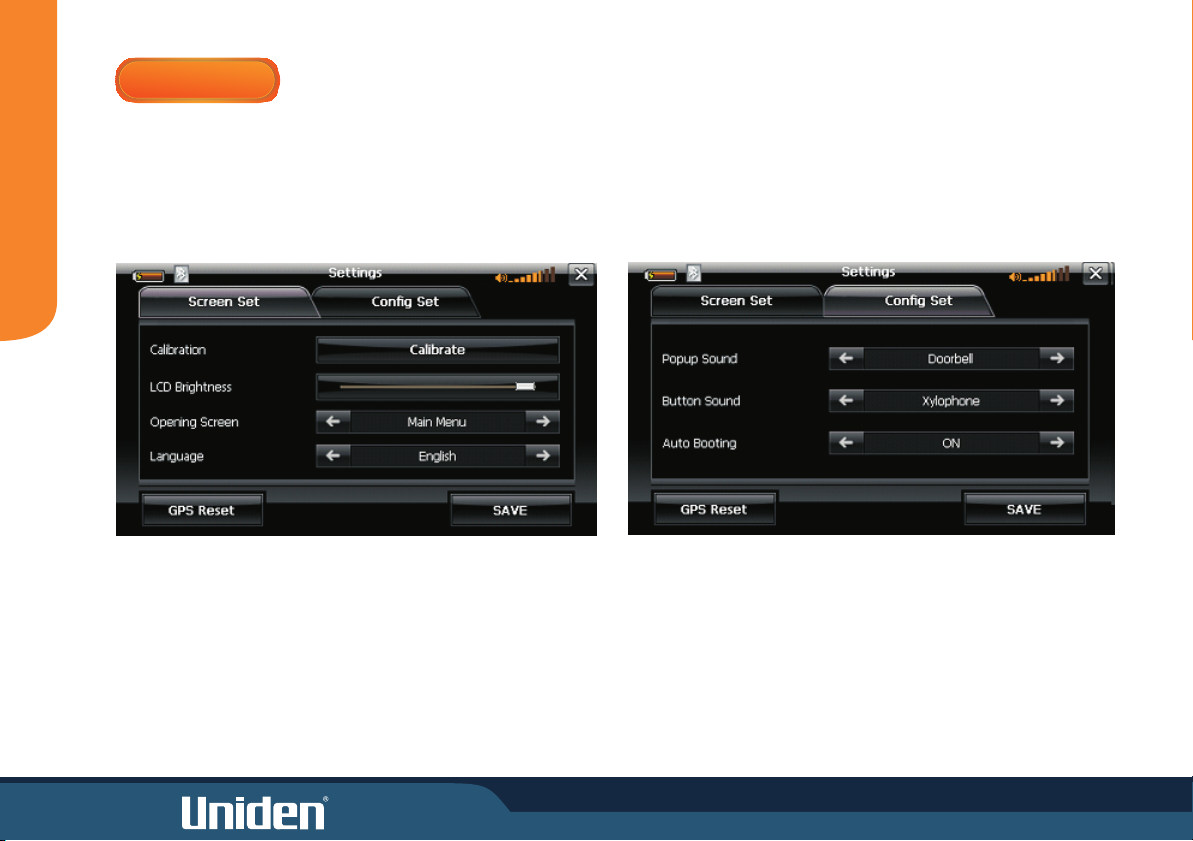
SETTINGS
Environment Settings
Settings are applied immediately. The screen setting tabs appear. When
MODE
accessing the screen setting tab, the last setting status appears. If a screen
with changes is exited without touching the ‘Save’ button, the change is
canceled.
9
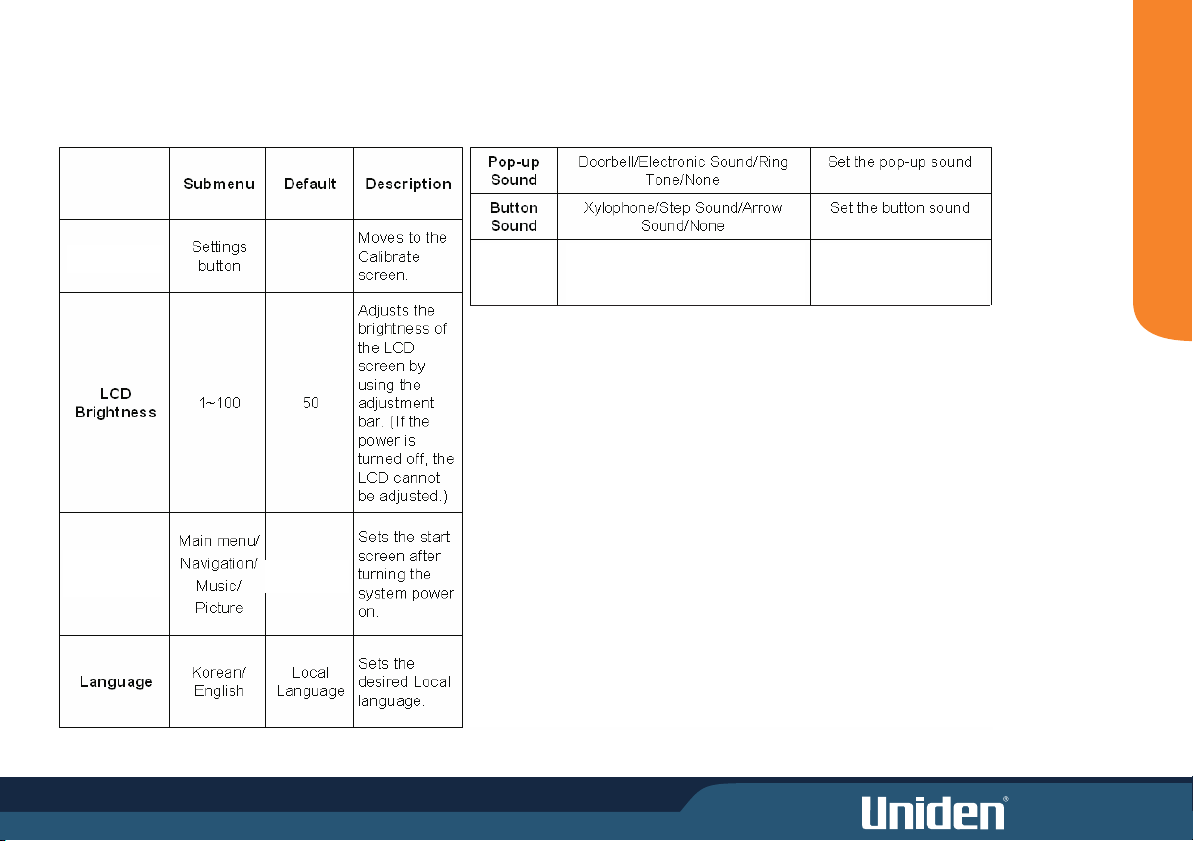
Setting Options
Calibrate
(Screen)
Opening
Screen
Setting
Navigation
Auto
Booting
ON
MODE
Boot up automatically
with ignition ON
10
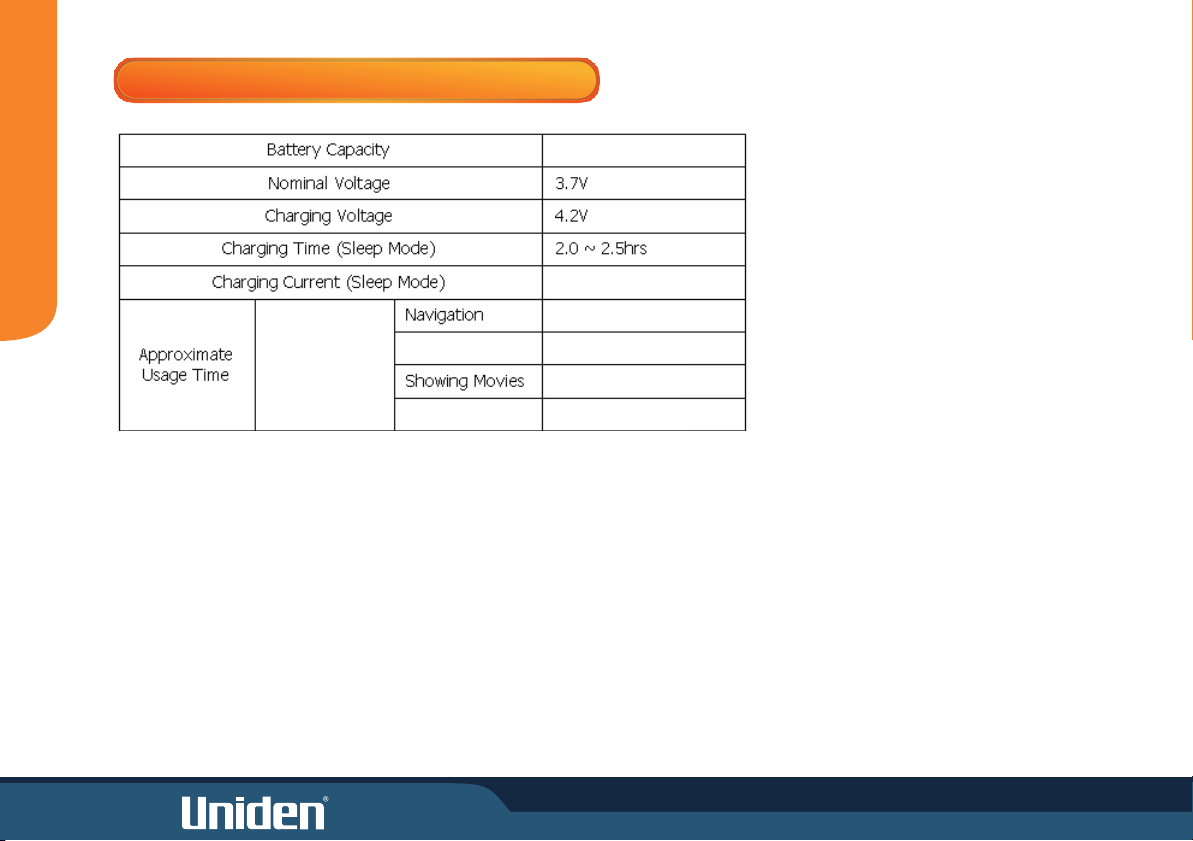
BUILT IN BATTERY SPECIFICATION
2100mAH
MODE
1050mAH
4.0 - 4.5hrs
3.0 - 3.5hrs
11
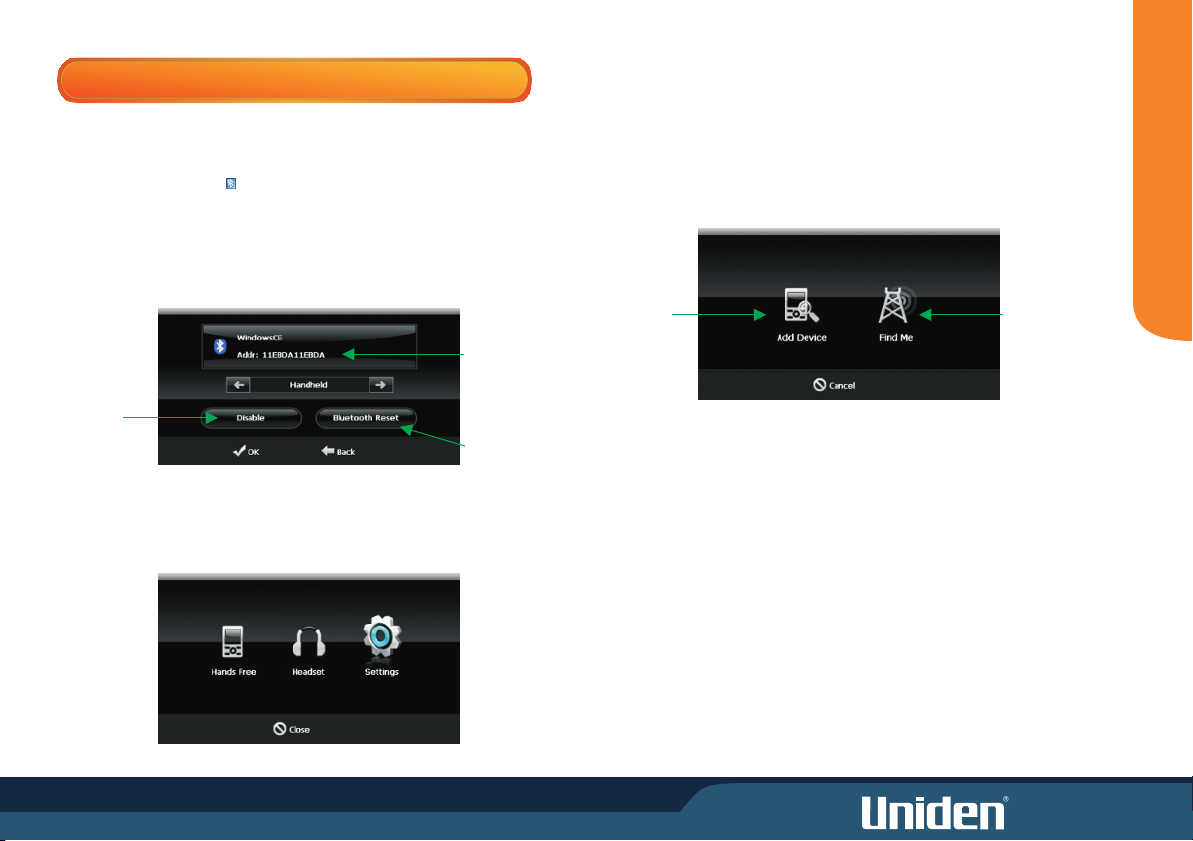
BLUETOOTH (GNS8436 Model Only)
The GNS8436 includes Bluetooth® connectivity. With its integrated microphone, the
GNS8436
allows you to answer and make calls from the touch screen.
Pressing the Bluetooth button on the front of the launches the Bluetooth
GNS8436
system.
Settings
Tapping the Settings button opens the Settings Screen.
Shows the
current name and
address of your
GNS8436 device
Tap to toggle
between
Bluetooth
“Enable” and
“Disable”
Tap to reset
Bluetooth
Pairing your Phone with the as a Hands Free DeviceGNS8436
Ensure that Bluetooth is active and discoverable on your phone and tap the
Hands Free button to set up your phone with the GNS8436
Tap to have
GNS8436
connect to your
phone
Tap to allow
GNS8436 to be
found by your
phone. You will
use your phone
to connect to
GNS8436.
If you choose Add Device, you may have to set your phone to allow devices to find it.
MODE
12
GNS8436
Using to Connect to Your Phone
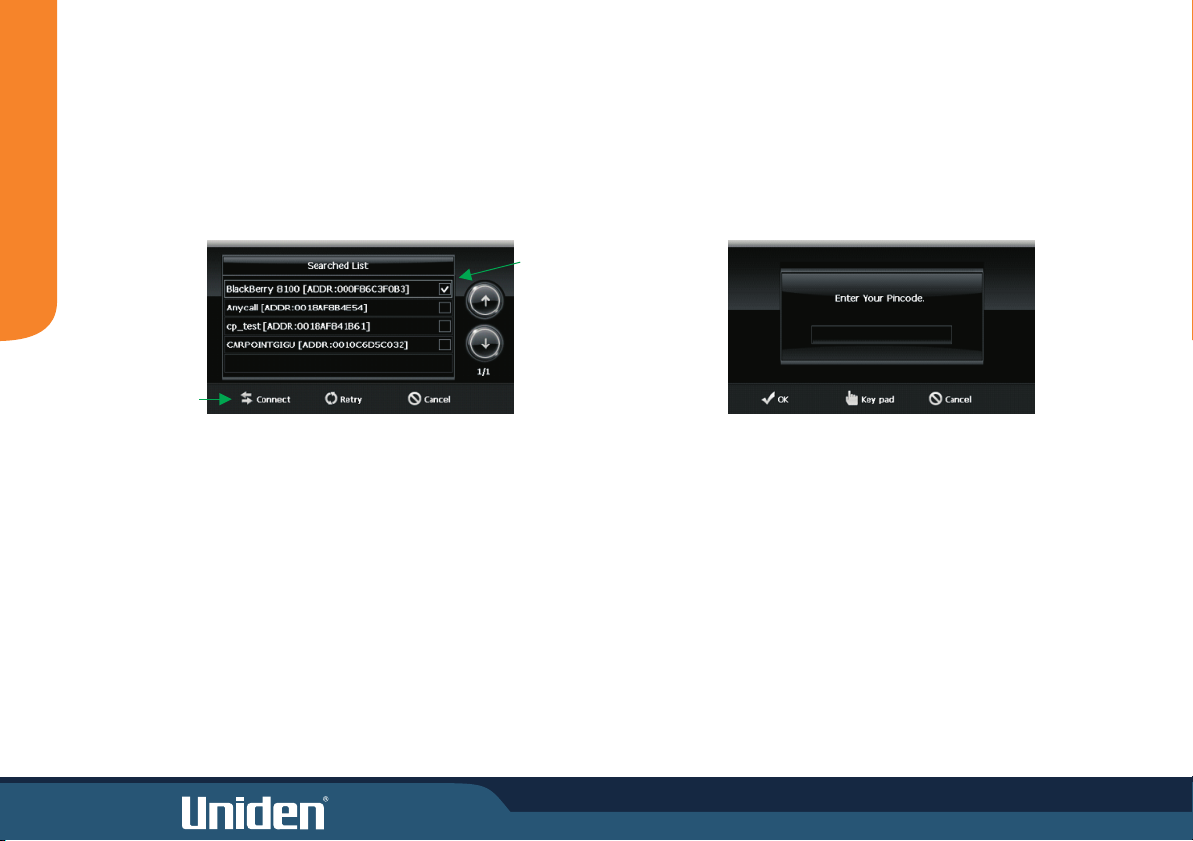
Tapping Add Device will cause the to search for available Bluetooth devices.
GNS8436
NOTE: During this process, please watch your phone screen for any additional
response that the phone may require.
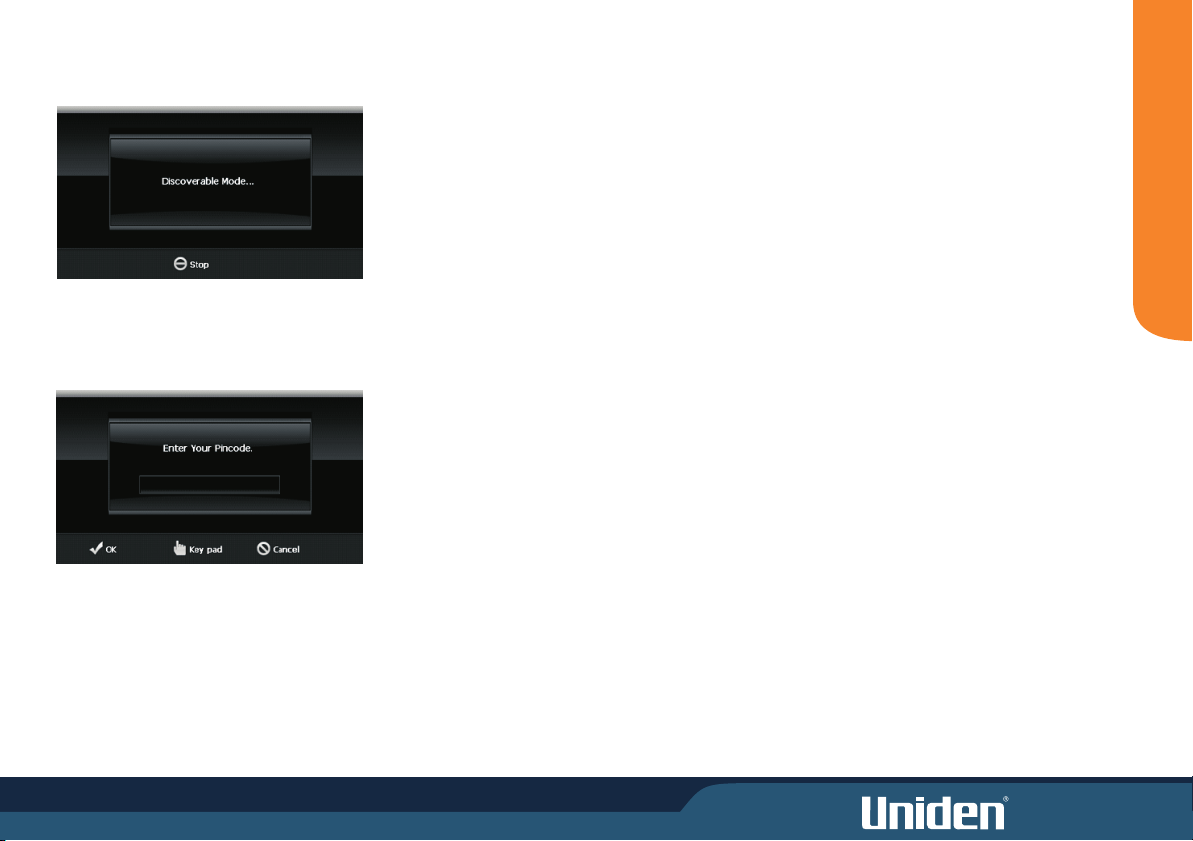
Tap Touch pad to open the on-screen key board and enter your PIN code. The default
pin code is 0000. Tap OK to record your entry.
GNS8436
The will pair with your phone. You may need to enter the PIN code or
perform other functions on your phone to complete the pairing. Please watch your
phone screen during this process.
MODE
Select your phone from the list and tap Connect to connect the to your phone. GNS8436
Tap to connect
to your phone
Select your
phone from the
list
When connection is successful, you will be prompted to enter your PIN code.
13
Using your Phone to Connect to GNS8436
Pairing your Phone with the as a Headset
GNS8436
Tapping Find Me will cause the
GNS8436
to enter "discoverable
mode," allowing other Bluetooth
devices to connect to it.
You can now use your device to pair with the . Once you enter the PIN number
on your phone, the will ask that you verify the PIN.
Tap Touch pad to open the on-screen key board and enter your PIN code. The default
pin code is 000. Tap OK to record your entry.
GNS8436
GNS8436
You may pair your phone with the as a headset by tapping the Headset
button from the Main Menu. This method of connecting the to your phone is
useful only if there has been difficulty connecting the as a hands free device.
When you pair the and your phone this way, the allows you to
answer calls only. You cannot initiate calls using the in headset mode.
GNS8436 GNS8436
GNS8436
GNS8436
GNS8436
GNS8436
MODE
14
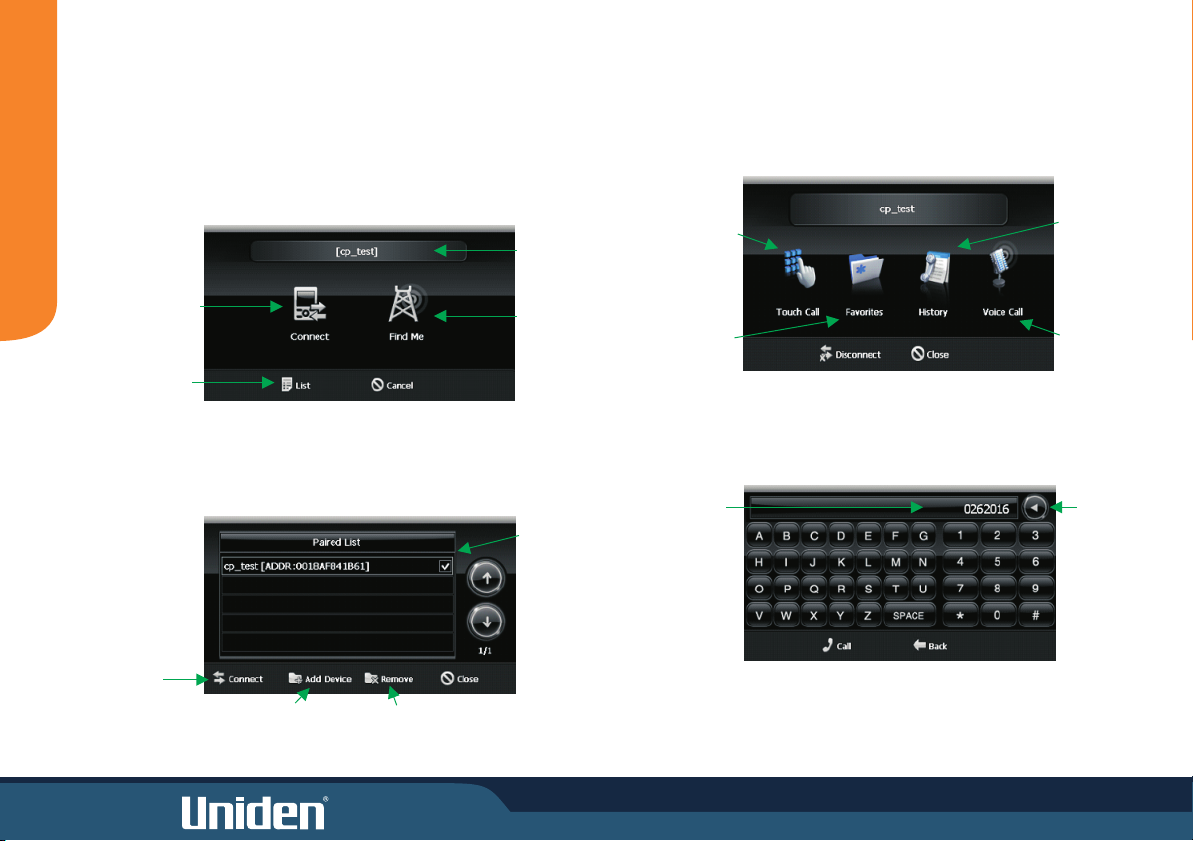
Managing Bluetooth Devices
Making a Bluetooth Call
You may have multiple phones set up for connection with your
GNS8436.
You can add and remove phones from your list and disconnect and connect to different
phones using the List Screen. If you have phones already paired to the , but
GNS8436
Select the Hands Free button from the Bluetooth menu to place a call using a
currently connected device.
have none of them currently connected, the following screen appears when you select
MODE
Hands Free from the Main Menu.
Currently
selected device
Tap to connect
to the currently
selected device
Tap to display
the device list
screen
Tap to put
GNS8436 in
“Discoverable
Mode” allowing
Bluetooth
devices to find it
Device List Screen
This screen allows you to connect to a device, add devices, and remove devices.
Select a device
to connect to or
remove from the
list
Tap to
connect
to the
selected
device
Tap to add a
device
Tap to remove
the selected
device
Tap to open the
number keypad
and dial the call
Tap to access
previously
stored favourite
nuambers
Tap to select
recent call history
and select a
number to call
Tap to make a
voice call (voice
calling must be
enabled on the
phone)
Touch Call-Tapping Touch Call opens the keypad
Numbers
appear here
as you tap
the keys
Tap the keys for the number you wish to call and then tap Call to initiate the call.
Tap to
backspace
a character
15
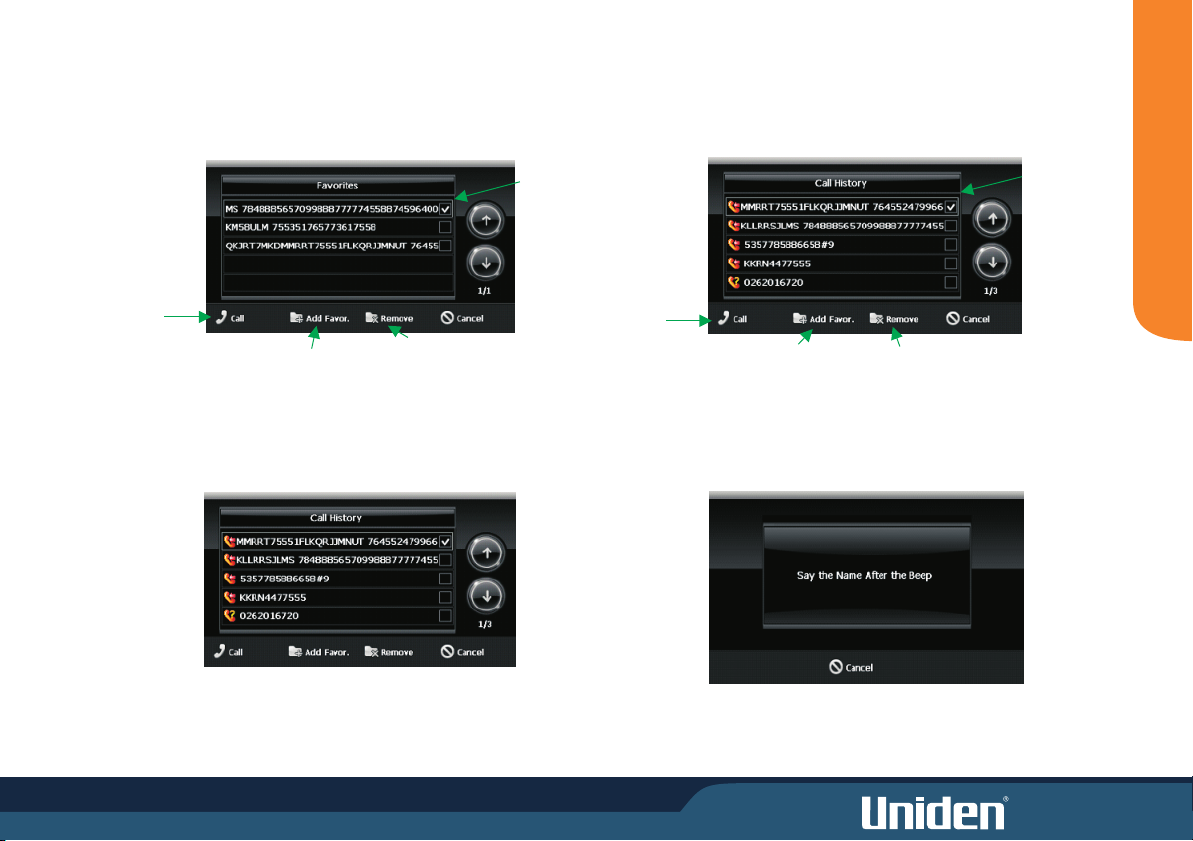
Favorites
History
Tapping Favorites accesses a list of your previously stored favorite numbers
Tap to call the
selected
favourite
Tap to add a
favourite number
Tap to remove a
selected favourite
number
Adding Favorites
If you have no Favorites on the Favorites list, the following screen is displayed.
Select a
number from
the list
Tapping History accesses a list of your previously called or received numbers.
Select a
number from
the list
Tap to call the
selected
number
Tap to add selected
number to your list of
favourite numbers
Tap to remove the
selected number from
the list
Voice Call
Tapping Voice Call allows you to make a call by speaking the name of a previously
recorded voice call number on your phone.
MODE
Tap Yes to display the touch pad to add a Favorite. You can also add a favorite number
by selecting Add Favor. from the Favorites list screen.
NOTE: Voice calling must be set up on your phone to use this feature.
16
 Loading...