

Page 1
Accessory Camera for G17xx Series
Surveillance Systems
What’s in the Box?
1 x Camera
1 x Antenna
1 x Stand
1 x AC Adaptor
1x Extension Cable
Screws and Anchors
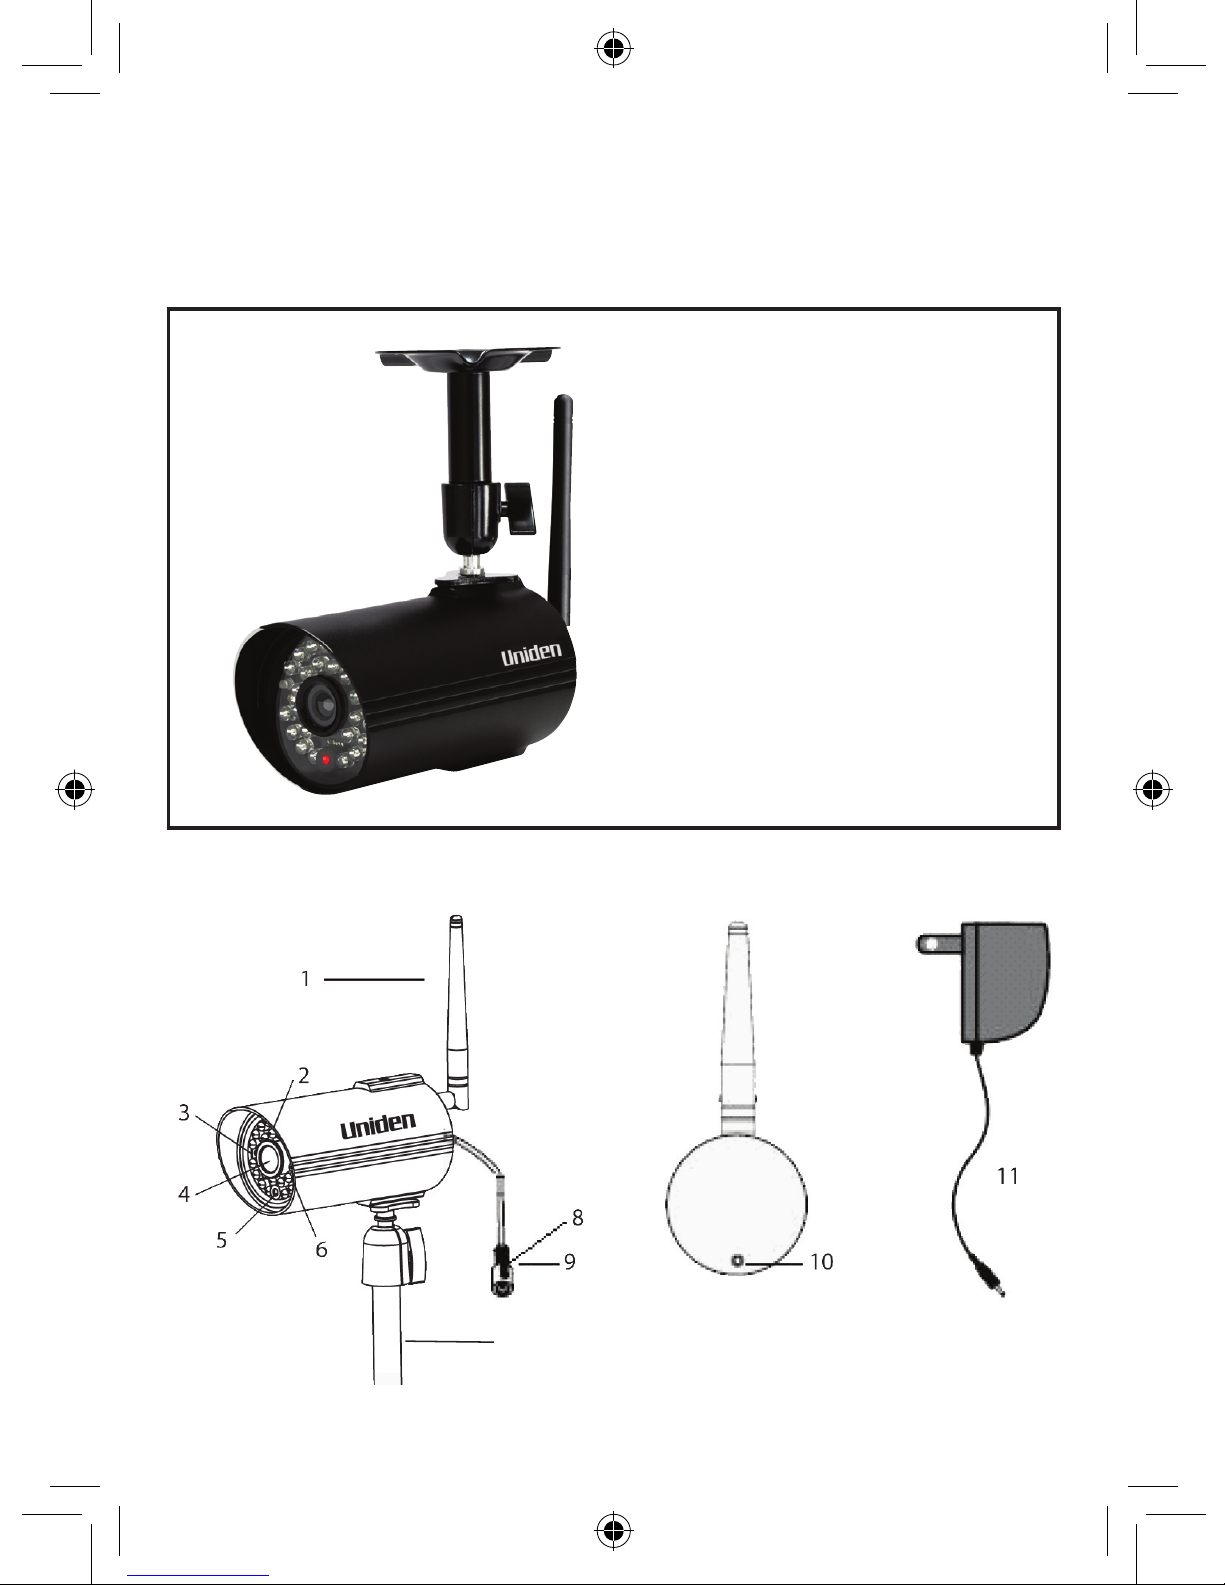
Outdoor Camera
7
Page 2

2
No Keys/Indicators
1 Antenna
2 Link LED (Green)
3 Power LED (Red)
4 Camera Lens
5 Light Level Sensor
6 IR LED (25)
7 Camera Stand
8 Pairing button
9 Power Jack
10 Microphone
11 Power Adaptor
Page 3
3
The cameras included with your monitor are weatherproof and
have an IP66 weather rating. Water can be sprayed on them and
they will still work; however, the cameras cannot be submerged
underwater.
Although the cameras can be exposed directly to the rain, it is
recommended that, if they are used outdoors, they be mounted
under some type of cover like a patio overhang or eave. As rainwater drops start to dry on the camera glass, it can create spots
that will reect the light from the infrared LEDs used for night
vision, thus causing lower quality video.
Also, as dust, grime, and cobwebs accumulate on the camera
glass, they can reect light from the infrared LED and might
lower video quality. Periodically, clean the lens glass with a soft
cloth.
General Placement Considerations
Consider the following when placing the camera:
• Clear line of sight video transmission distance is up to 150ms.
- Walls, especially brick and concrete, shorten the transmission
distance.
- Placement next to windows allows better transmission.
• Avoid having a direct light source in view of the camera. This
includes street lights, ceiling or oor lamps, spotlights in the
driveway, etc.
• The cameras are equipped with built-in infra-red LEDs so you
can use night vision for 24-hour surveillance. The LEDs automatically activate at night and the picture viewed turns to
black and white. The night viewing range is up to 5 ms. Avoid
pointing the camera lens directly at clear glass; the night vision LEDs will cause a blurred image.
• Optimized motion detection range is up to 1.8ms. The farther
away an object is, the less accurate the motion detection.
Set Up the Camera
Page 4

4
• Avoid pointing the camera directly at any bushes, tree branches, or moving objects that might naturally move due to winds.
Otherwise, the motion detection feature may record unnecessarily.
Installing the Camera
You can mount the camera with the stand on the bottom (for a
at surface such as a tabletop), on the side (for a wall), or on the
top (for the ceiling). When you are positioning the camera, you
might want to bring the monitor along; it’s much easier to get
the camera into the right position when you have the display
handy.
The following tools are
required:
• Electric Drill
• 5mm Drill Bit
• 15mm Drill Bit
• No. 2 Phillips Screwdriver
Mount the Camera Base
1. Hold the base of the
camera stand where you want to mount it and mark the
location of the screw holes.
2. Use the included screws to attach the base to the wall or
ceiling. You can also screw the base into a flat surface such as
a tabletop if needed.
3. Before attaching the camera, tug gently on the stand to make
sure it is securely in place.
Page 5

5
Attach the Camera
1. For each camera, attach the camera bracket to the mounting
screw. You can attach the stand to the top or the bottom of
the camera as needed. Tighten it a few turns, then turn the
camera to face the direction you want.
2. Tighten the camera brace up against the camera to secure it
into place.
3. Unlock the mounting post by turning the wingnut a few turns
to the left.
4. Set the mounting post to the correct angle, then tighten the
wingnut until the post is locked into place.
5. Attach the antenna to the rear of the camera.
1
2
4
3
Loosen the
wingnut to
unlock the
mounting
post.
Attach the camera
to the mounting
screw and turn it
to the desired
direction.
Adjust the post to
the correct angle,
then tighten the
wingnut to lock the
post into place.
Tighten the brace against
the camera to
secure it
in place.
Page 6

6
Power Up the Camera
1. Connect one end of an AC adaptor to the camera’s power
pigtail and plug the other end into a 240 volt AC (standard
indoor) power outlet. (If necessary, connect the extension
cord to the camera’s pigtail and connect the AC adaptor to
the extension cord.)
2. Make sure the
Power status
light turns on. If it doesn’t, try
reconnecting the AC adaptor, and make sure the power outlet
isn’t controlled by a wall switch.
Be sure the power plug and the connector are tightly twisted
together to avoid water leaking in.
Pairing Accessory Cameras to the Monitor
To pair the camera to the G17xx Series monitor, follow the steps
below.
1. Press M and access the main menu. Then select
Camera
Setup
and press M. Scroll to the camera number you want to
assign to the new camera. Press M.
2. Press
CH+
to scroll to the pairing option. Press M to pair the
camera.
3. Within 30 seconds, press the
PAIRING
button on the
camera’s power cord.
Pairing Button
For more details on the G17xx Surveillance System, please
refer to the G17xx Series Owner’s Manual.
Page 7

7
SPECIFICATION
CAMERA
Communication Range 150 ms in open space
Camera Resolution 640 x 480
Operating Temperature -10°C ~ +50°C
Operating Voltage DC 5V / 1A
Current Consumption 550mA (max)
Night Vision 5ms
Dimension 123L x 65H x 65W mm
Page 8

8
G1700
IMPORTANT: Satisfactory evidence of the original purchase is
required for warranty service
Please refer to our Uniden website for any details or warranty durations
offered in addition to those contained below.
Warrantor: The warrantor is either Uniden Australia Pty Limited ABN 58 001
865 498 (“Uniden Aust”) or Uniden New Zealand Limited (“Uniden NZ”) as the
case may be.
Terms of Warranty: Uniden Aust/NZ warrants to the original retail purchaser
only that the G1700 (“the Product”), will be free from defects in materials and
craftsmanship for the duration of the warranty period, subject to the limitations
and exclusions set out below.
Warranty period: This warranty to the original retail purchaser is only valid
in the original country of purchase for a Product rst purchased either in
Australia or New Zealand and will expire one (1) year from the date of the
original retail sale.
If a warranty claim is made, this warranty will not apply if the Product is found
by Uniden to be:
A. Damaged or not maintained in a reasonable manner or as recommended in
the relevant Uniden Owner’s Manual;
B. Modified, altered or used as part of any conversion kits, subassemblies or any
configurations not sold by Uniden Aust or Uniden NZ;
C. Improperly installed contrary to instructions contained in the relevant
Owner’s Manual
D. Repaired by someone other than an authorized Uniden Repair Agent in
relation to a defect or malfunction covered by this warranty; or
E. Used in conjunction with any equipment, parts or a system not manufactured
by Uniden.
Parts Covered: This warranty covers the Product and included accessories.
User-generated Data: This warranty does not cover any claimed loss of
or damage to user-generated data (including but without limitation phone
numbers, addresses and images) that may be stored on your Product.
ONE YEAR LIMITED WARRANTY
Page 9

9
Statement of Remedy: If the Product is found not to conform to this warranty
as stated above, the Warrantor, at its discretion, will either repair the defect
or replace the Product without any charge for parts or service. This warranty
does not include any reimbursement or payment of any consequential
damages claimed to arise from a Product’s failure to comply with the
warranty.
Our goods come with guarantees that cannot be excluded under the
Australian Consumer Law. You are entitled to a replacement or refund for a
major failure and for compensation for any other reasonably foreseeable loss
or damage. You are also entitled to have the goods repaired or replaced if
the goods fail to be of acceptable quality and the failure does not amount to a
major failure.
This warranty is in addition to and sits alongside your rights under either the
COMPETITION AND CONSUMER ACT 2010 (Australia) or the CONSUMER
GUARANTEES ACT (New Zealand) as the case may be, none of which can
be excluded.
Procedure for obtaining warranty service: Depending on the country in
which the Product was rst purchased, if you believe that your Product does
not conform with this warranty, you should deliver the Product, together with
satisfactory evidence of your original purchase (such as a legible copy of the
sales docket) to Uniden at the addresses shown below. You should contact
Uniden regarding any compensation that may be payable for your expenses
incurred in making a warranty claim. Prior to delivery, we recommend that you
make a backup copy of any phone numbers, images or other data stored on
your Product, in case it is lost or damaged during warranty service.
UNIDEN NEW ZEALAND LTD
Service Division
150 Harris Road, East Tamaki
Auckland 2013
Phone: (09) 273 8377
Email: service@uniden.co.nz
UNIDEN AUSTRALIA PTY LTD
Service Division
345 Princes Highway,
Rockdale, NSW 2216
Phone: 1300 366 895
Email: custservice@uniden.com.au
Page 10

10
Page 11

11
Page 12

© 2013 Uniden Australia Pty Limited. Uniden New Zealand Limited.
Printed in PRC.
 Loading...