

Page 1
FP
107
Digital
Answer Machine
Caller ID
Speaker Phone
OWNER’S
MANUAL
Page 2

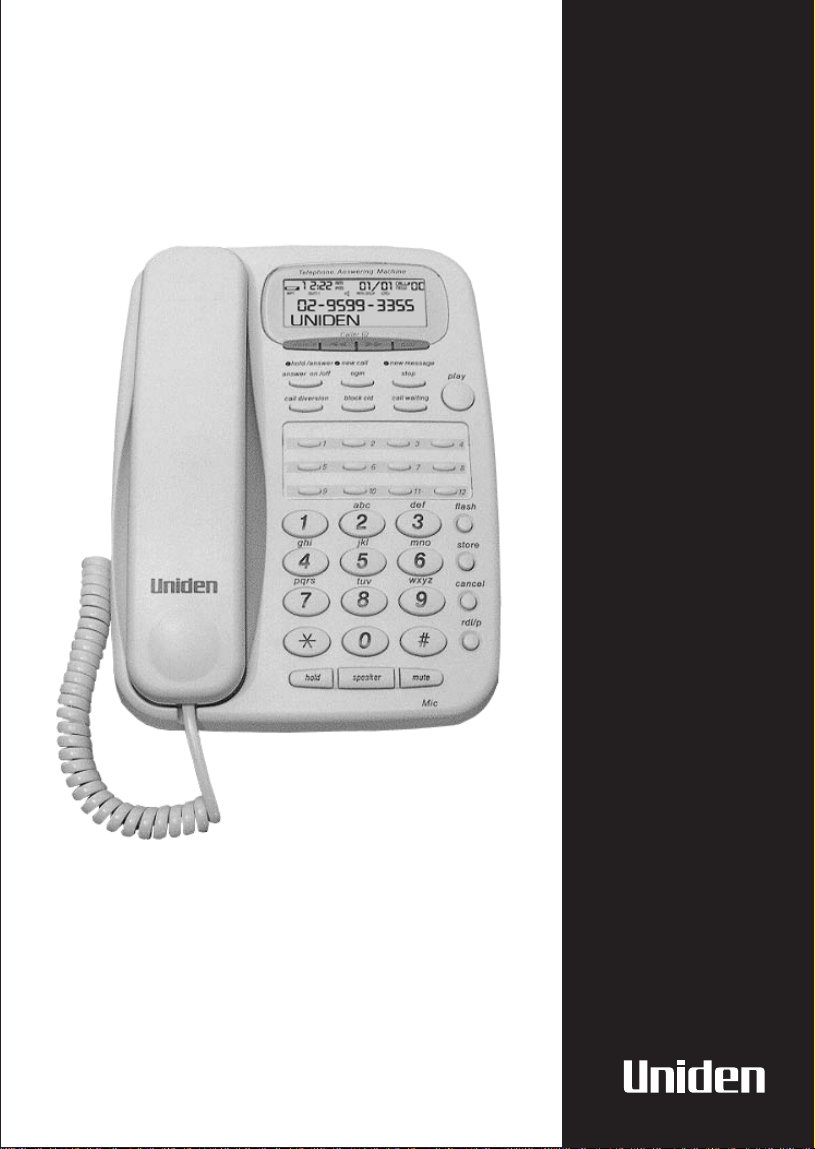
CONTROLS & FUNCTIONS
Telephone Answering Machine
AM
call#
NEW
PM
1
2
3
4
5
6
RPT OGM 1 ANS ON
Caller ID
delete
hold / answer
new call
1
5 6 7
9
1
ghi
4
7
ogm
2
10 11
abc
2
jkl
5
tuv wxyz
8
answer on / off
call diversion
pqrs
0
hold speaker mute
dial
new message
stop
call waitingblock cid
3 4
def
3
mno
6
9
play
8
12
flash
store
cancel
rdl/p
7
8
9
10
11
12
13
Answer Phone Base Unit
1 LCD Screen
2 Delete
3 Hold / Answer LED
New Call LED
New Message LED
4 Answer on/off
Out Going Message (OGM)
Stop
5 Handset
6 Alpha Numeric Keypad
7 Dial
1
14
15
16
8 Call Diversion
Block CID
Call Waiting
9 12 one touch Speed Dial
10 Flash
11 Store
12 Cancel
13 Redial/Pause
14 Hold
15 Speaker
16 Mute
Page 3
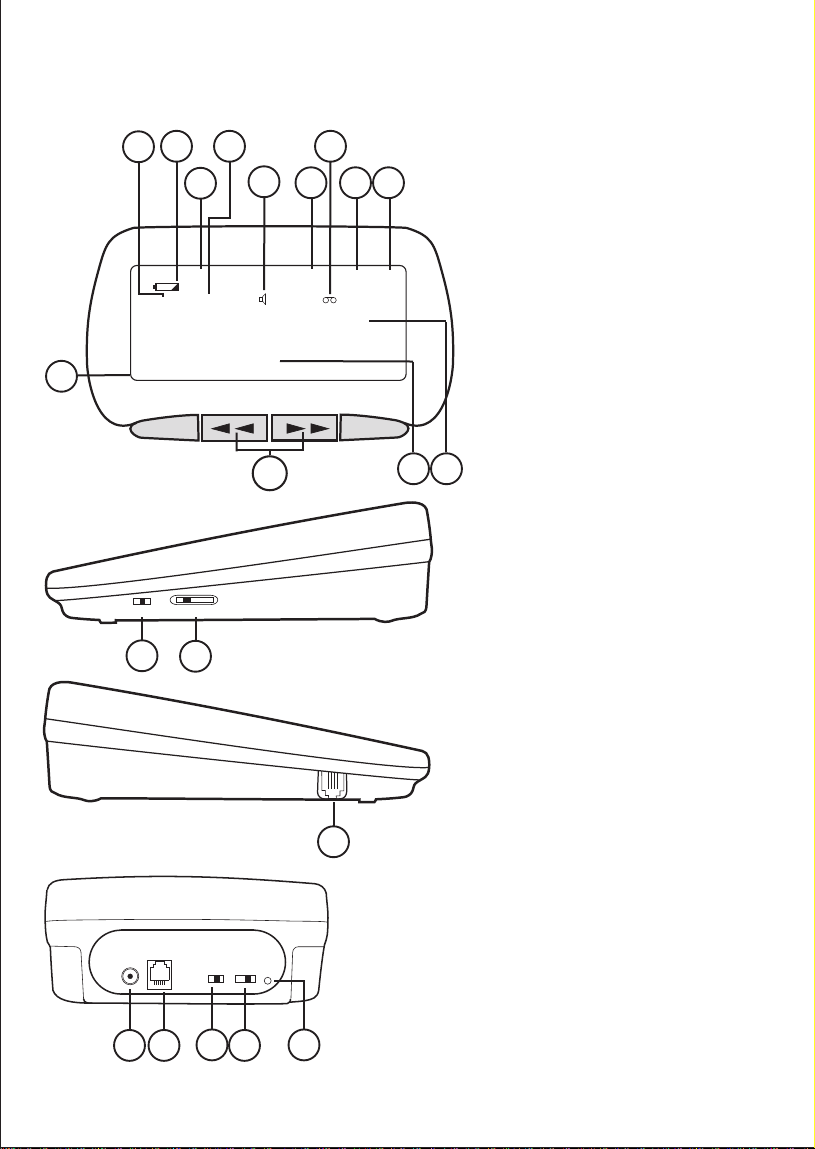
LCD Screen
19
18
20
21
22
23
25
24 26 27
Telephone Answering Machine
AM
1 2:22
RPT OGM 1 ANS ON
PM
01/01
call#
NEW
00
02-9599-3355
UNIDEN
Caller ID
delete
dial
18 LCD Screen
19 Repeat
20 Battery low icon
21 Time
22 OGM 1
23 Speaker phone
24 Date
25 Message
26 New call icon
27 Call counter
28 Telephone number
29 Name
30 Review
Base Unit - right side
normal
hi
min
speaker volume
32
max
mid
handset volume
31
Base Unit - rear
telephone
line
power
3534 37
ringer
ringer
select
volume
2 4 7 TS
off / lo / hi
36 38
30
Base Unit - left side
33
reset
2829
31 Handset volume control
32 Speaker volume control
33 Handset cord jack
34 AC Adaptor plug
35 Telephone line connection
36 Ringer volume control
37 Answer machine ring select
38 Reset
2
Page 4

CONTENTS
Controls and Functions
Contents
Quick Start Guide
Introduction
Features
Installation / Safety
Supplied with Your FP107
Wall Installation
Adjusting the Ringer Volume and Tone
Setting the Clock
Telephone Operation
Making a Call
Answering an Incoming Call
Using Flash
Using Hold
Using Mute
Memory Dialling
Storing a Number in Memory
Storing a Number from Caller ID Records
Entering a Pause in a Memory Number
Reviewing Memory Numbers
Dialling a Memory Number
OF YOUR OWNERS MANUAL
Chain Dialling
Call Diversion
Telephone Answer Device
Recording Outgoing Messages
Checking te Outgoing Message
Using Toll Saver
Setting the FP107 to Answer Calls
Caller ID Operation
Name Tagging
Reviewing Caller ID Records
Deleting Call Records
FP107 Operation
Playing Messages
Deleting Messages
Screening Calls
Advanced Features
Setting the Display Contrast
Using Call Breakthrough
Remote Operation
Changing the Remote Operation Security Code
Remote Command List
Troubleshooting
3
CONTENTS
Warranty
1
3
4
6
6
6
7
8
9
9
10
10
10
11
11
11
12
12
12
13
13
13
14
14
15
15
16
16
16
17
17
18
18
19
19
19
19
20
20
20
20
20
21
22
23
Page 5
This page is a very condensed version of the Owners Manual. It is designed to allow you
to get your phone installed and operating as quickly as possible - however it does not
attempt to explain any of the advanced features of the FP107 .
Start
Here!
Quick Start Guide
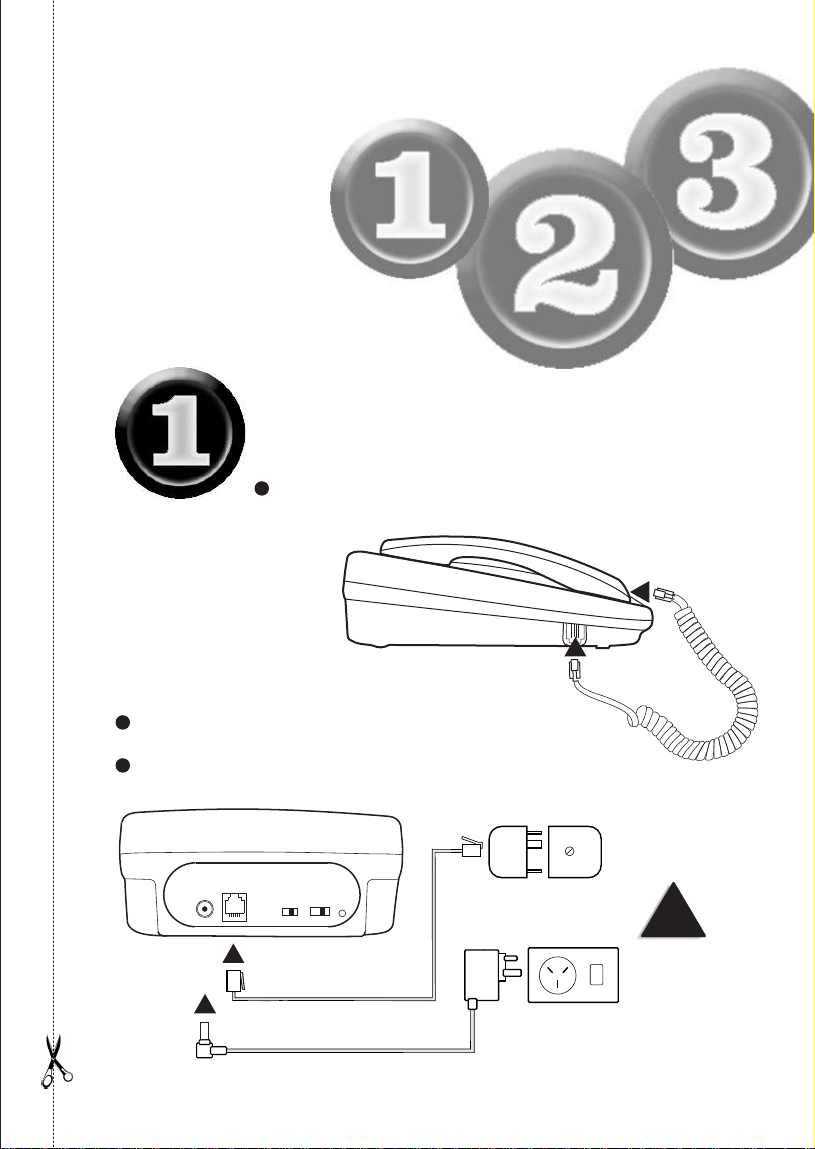
Installing
the Base Unit
Plug one end of the Handset curly cord into the handset and the
other into the jack on the side of the telephone base.
Plug the Telephone Cord into the Base Unit,
then into the Phone Socket on the wall.
Plug the AC Adaptor into the Base Unit, then
into the Power Point.
telephone
line
power
ringer
ringer
select
volume
2 4 7 TS
off / lo / hi
reset
Telephone cord
AC Adaptor
Phone socket
Power point
!
Make sure the AC
Adaptor remains
switched ON at all
times.
4
Page 6
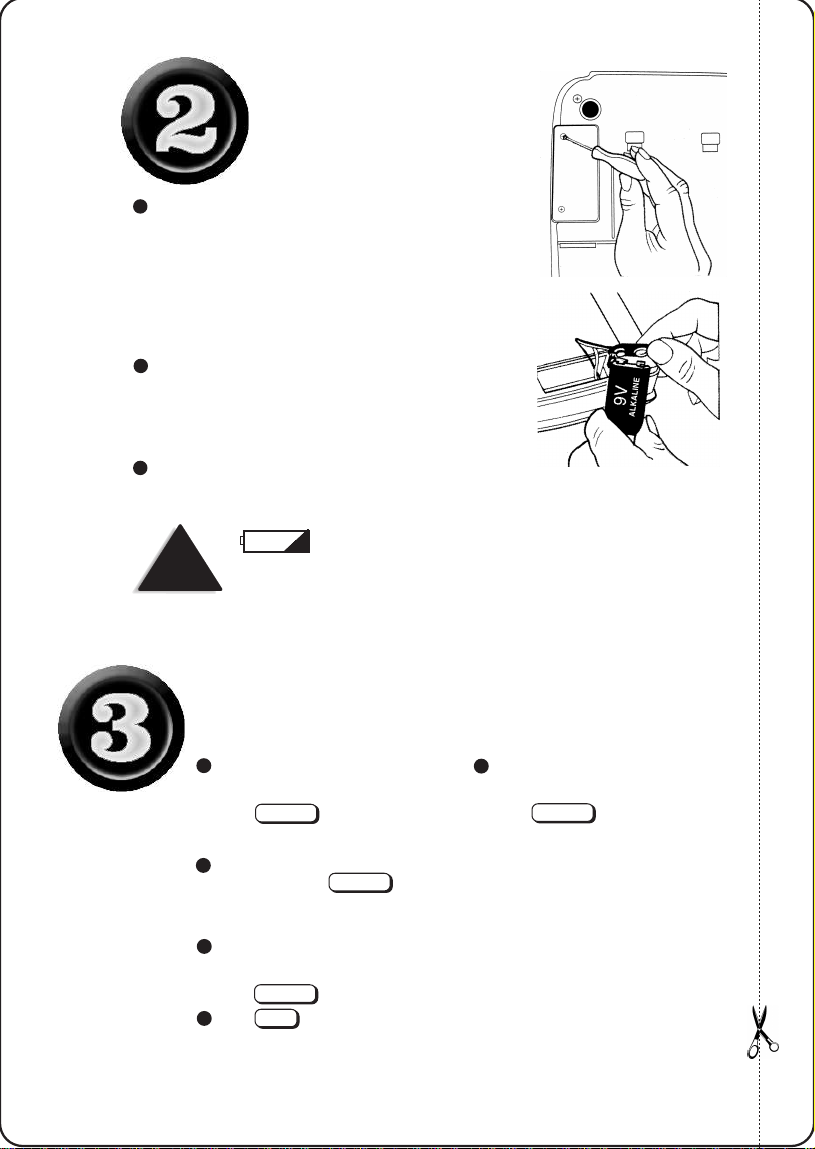
Installing the
Backup Battery
Use a small Phillips screwdriver to remove the two screws on
the battery compartment cover located under the base.
Remove the cover.
Plug the battery contacts in place and lay the battery in the battery
compartment.
Replace the cover and secure with the screws.
This symbol on the display screen indicates the battery level
is low. Disconnect the telephone line cord and replace it with a 9V alkaline
NOTE
battery.
Making a Call
Pick up the handset
OR
speaker
Press
Dial the number
To hang up, replace the handset on
the base - or press
speaker
Answering a Call
Pick up the handset from the base and speak.
OR
speaker
Press and speak
To Redial (last number dialled)
Pick up the handset
OR
speaker
Press
rdl/p
Press
The telephone will automatically
5
redial the last number dialled.
Page 7
FEATURES
l
12 Number Memory Dialling
l
Speakerphone
l
Flash
l
Mute
l
Hold
ANSWER MACHINE
FEATURES
l
Recordable Outgoing Message
l
Voice/Date/Time Stamp
l
Adjustable Ring Number
l
Toll-Saver
l
Phone Pick-Up Detection
TO YOUR NEW PHONE
CALLER ID FEATURES
l
3-Line Display
l
Caller ID Memory
l
Call Summary
l
Name Tagging
INSTALLATION & SAFETY
l
Pause
l
Redial
l
Volume Controls
l
Adjustable Ringer Volume
l
Hearing-Aid Compatible
l
Tone Dialing
l
Call Breakthrough (CBT) with Programmable Code
l
Call Screen
l
Remote Operation with Programmable Code
l
Room Monitor
l
Memory Backup
l
New Call Indicator
l
Review Scrolling
l
Dialling Option
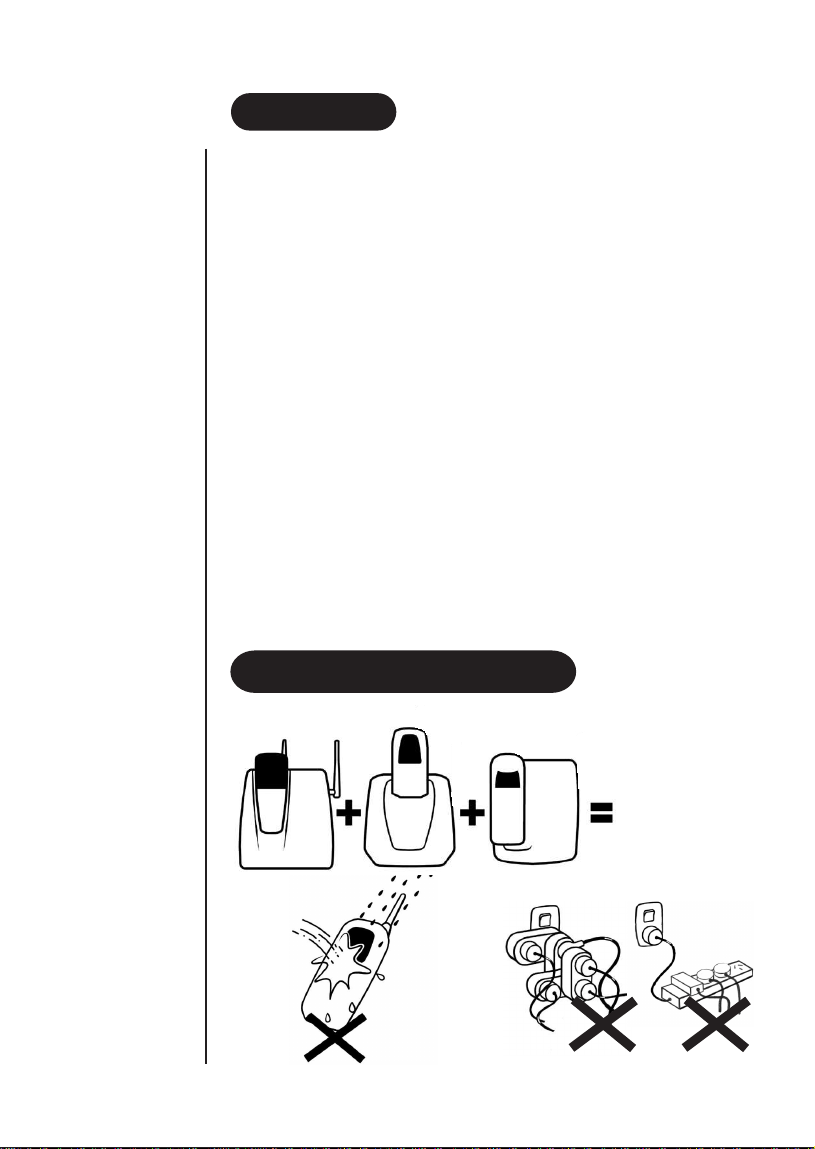
AVOID -
Connecting
more than
3
phones as Ringing
may be impaired.
AVOID -
moisture
INTRODUCTION
DON’T -
overload the
power oulet
OR
plug into a multi
power board.
6
Page 8
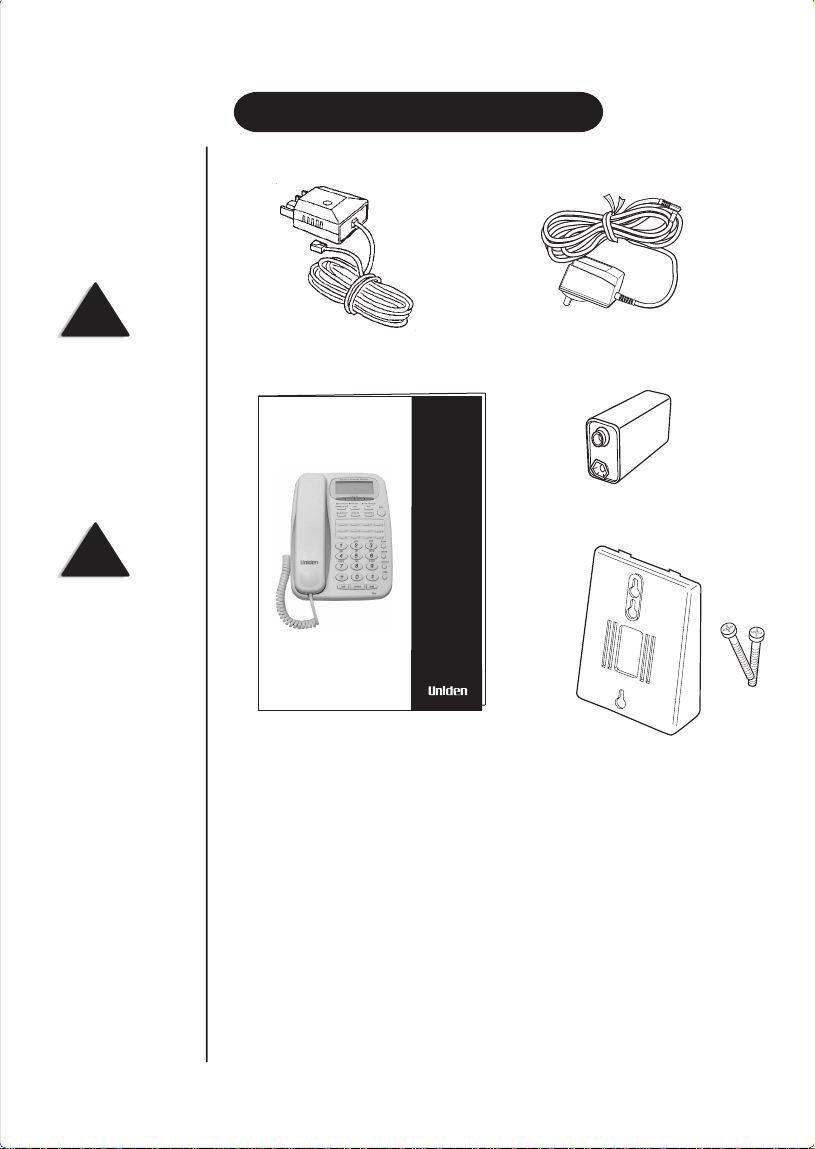
SUPPLIED WITH YOUR FP107
NOTE
To get the most from your
purchase, please read the
Owners Manual
thoroughly . Also be sure
to complete the Customer
Support Card.
NOTE
If any of these items are
missing or damaged,
contact the place of
purchase.
1 - Telephone line cord
OWNER’S
MANU AL
1 - Owners Manual
1 - Customer Support card
FP
107
Digital Answerphone
1 - AC Adaptor
1 - 9V battery
1 - Wall mount bracket
and 2 screws
7
Page 9
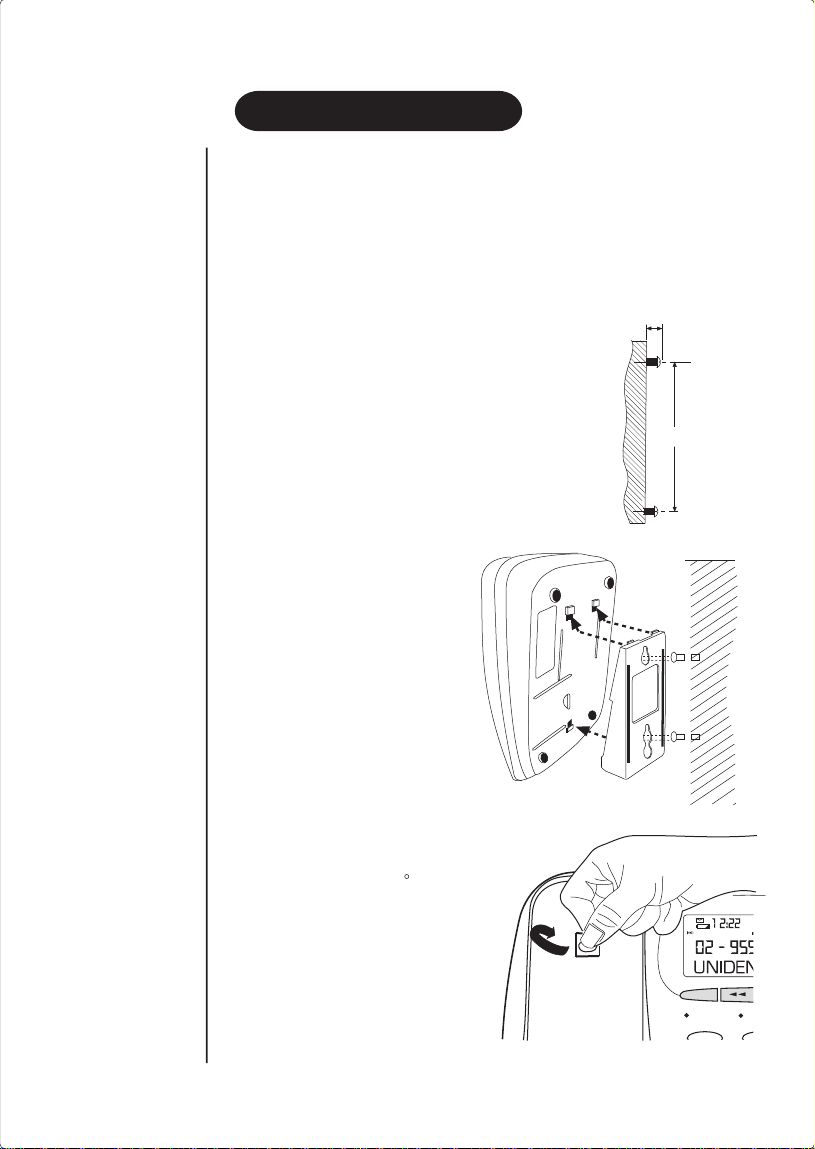
WALL INSTALLATION
Wall Mounting
If required, you can mount y our phone directly on a w all.
Before mounting your phone, please consider the follo wing:
Select a location away from electrical cables , pipes or other items behind the
•
mounting location that could cause a hazard when inserting screws into the wall.
•
Make sure the wall material is capable of supporting the weight of the telephone.
Use the screws (supplied) with anchoring devices suitable for the wall material
•
where the Telephone will be placed.
Insert two mounting screws 100mm apart.
Allow about 5mm between the wall and
screw heads for mounting the phone.
Attach the wall mounting
bracket to the telephone base.
5mm
100mm
Place the base unit on the
screws and push down until it
is firmly seated.
Gently pull out the handset retainer
tab, turn it 180 and refit it.
Telephone Answering Machine
AM
call#
NEW
PM
PM VIP OGM OGM2 ANS ONLY
Caller ID
delete
hold / answer
answer on / off
new call
ogm
dial
new message
8
stop
Page 10
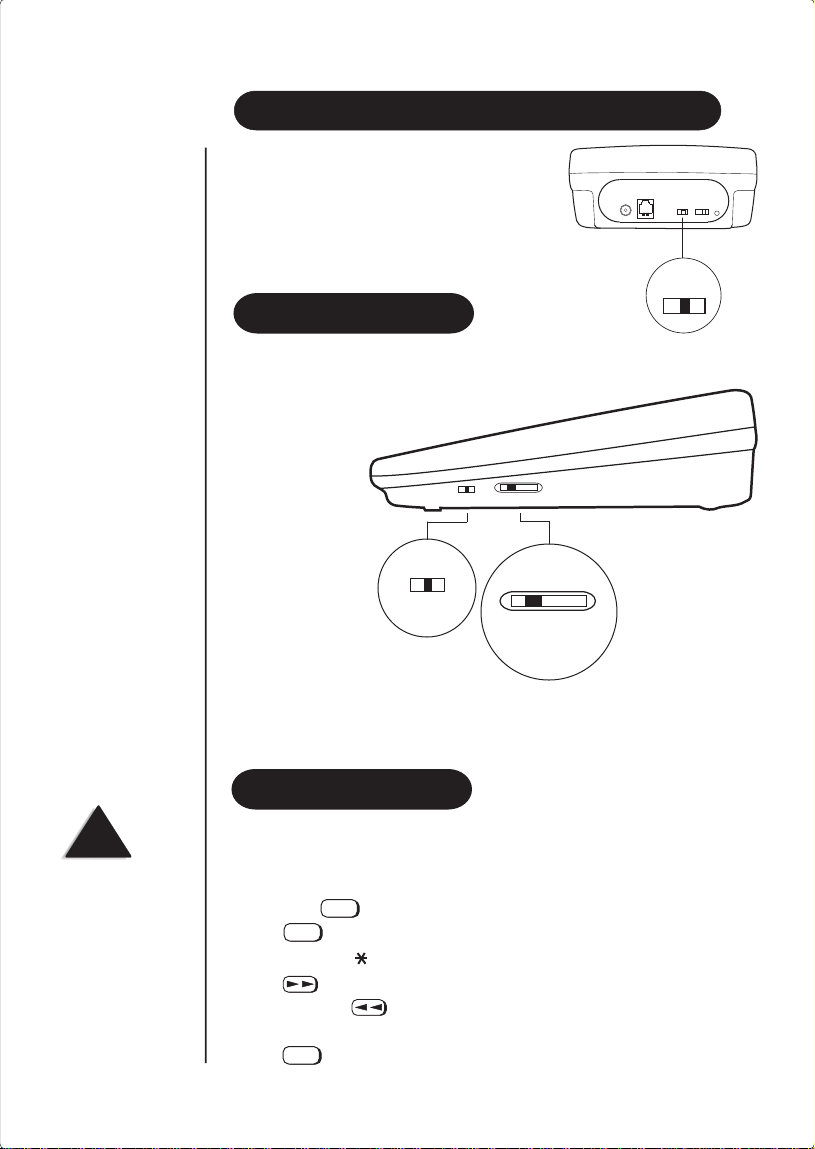
ADJUSTING THE RINGER VOLUME AND TONE
Ringer volume control
Locate the volume control switch at the rear of the
base.
Slide the ringer volume switch to the desired
off/lo/hi setting.
ringer volume
off / lo / hi
VOLUME CONTROL
Handset volume control
While using the phone you can adjust the handset volume with
the control, located at the side of the base.
normal
hi
min
speaker volume
max
mid
handset volume
NOTE
If you do not complete
each step with-in 8
seconds, the FP107 exits
setup. Start again at
Step 1.
9
normal
hi
mid
handset volume
min
speaker volume
max
Speaker volume control
During a speaker phone conversation, you can adjust the speaker volume by sliding the
control (located on thr side of the base) until you hear the desired volume.
SETING THE CLOCK
To avoid losing the day and time settings if AC power fails, we recommend you install
a backup battery before you set the day and time (see “Installing a Backup Battery” on
Page 5). Follow these steps so the FP107 can record the correct day and time each
message and memo is recorded.
1. Hold down until the FP107 beeps once.
2. Press 3 times until SUNDAY appears.
3. Repeatedly press or # to select AM or PM.
4. Press . The hour digit flashes.
5. Repeatedly press to set the correct hour.
6. Repeat Steps 4 and 5 to set the minute, month, date, and the day of the week.
7. Press .
store
store
store
Page 11

TELEPHONE OPERATION
Making a Call
To make a call with the handset, pick up the handset. When you hear the dial tone, dial
the phone number, DIALLING is displayed. You will see the number as you dial, then
(after 8 seconds) the elapsed time of your call.
speaker
Press to make a call using the speakerphone. SPEAKERPHONE is displayed.
Dial the phone number, DIALING is briefly displayed, followed by the number as you
dial, then (after 8 seconds) the elapsed time is displayed.
NOTE
If any background noise
interferes with the
speakerphone's operation,
mute
press to turn off
the base's microphone
while the other party is
speaking.
rdl/p
0
hold
speaker
Answering an Incoming Call
To answer an incoming call:
1. Pick up the handset
OR
Press .
speaker
To end a call:
1. Place the handset back on the base
OR
speaker
Press .
Using Redial
To redial the last number you dialled:
1. Lift the handset and press
OR
speaker
Press . Press . The telephone will
automatically redial the last number dialled
mute
Mic
rdl/p
rdl/p
Telephone Answering Machine
RPT OGM 1 ANS ONLY
1 2:22
AM
PM
01/01
call#
NEW
00
02-9599-3355
SPEAKERPHONE
Caller ID
delete
dial
0
hold speaker mute
rdl/p
Mic
10
Page 12

NOTE
If y ou do not have special
phone services, from your
telephone company or
PBX, pressing
flash
may disconnect the
current call.
NOTE
The FP107 will not show
Caller ID information for
an incoming call while
another call is on hold.
Using Flash
flash
Use to perform the hook switch operation for special services, such as Call
Transfer on a business PBX.
Using Hold
mute
hold
rdl/p
Telephone Answering Machine
rpt OGM 1 ANS ONLY
1 2:22
AM
PM
01/01
call#
NEW
00
02-9599-3355
Mic
<HOLD>
Caller ID
delete
dial
To put a caller on hold, press . The FP107 beeps, <HOLD> is displayed, and the
hold/answer indicator flashes. You can now hang up the handset without disconnecting
the call.
To resume the call:
Press again
hold
OR
Lift the handset if the handset is placed on the base
OR
Pickup any extension phone on the same line.
0
hold
speaker
11
Using Mute
To talk to someone else in the room without the person on the other end of the phone
line hearing you, press . The FP107 beeps, and <MIC MUTE> is displayed.
mute
Press again to resume your conversation.
0
speaker
hold
mute
mute
Mic
rdl/p
Telephone Answering Machine
rpt OGM 1 ANS ONLY
1 2:22
AM
PM
01/01
call#
NEW
00
02-9599-3355
<MIC MUTE>
Caller ID
delete
dial
Page 13

NOTE
You must complete each
step within 8 seconds.
MEMORY DIALLING
You can store up to 12 numbers in memory and dial any stored number by pressing one
key.
Storing a Number in Memory
There are 12 memory location buttons.
store
1. Press . NUMBER? is displayed.
NOTE
Store your area code with
your number eg: 02, for
name tagging to operate.
NOTE
If you make a mistake
while entering the number,
or name press
once then re-enter.
NOTE
To change a number or
name in memory, store a
new one in its place.
NOTE
To erase a memory press
store
3 times, followed
by the memory location
you wish to delete.
11
def
3
mno
6
wxyz
9
flash
store
cancel
Telephone Answering Machine
RPT OGM 1 ANS ONLY
1 2:22
AM
01/01
PM
02 - 9599 - 3355
NUMBER?
Caller ID
delete
2. Enter the number you want to store.
store
3. Press , NAME? is displayed.
4. Enter the name using the alpha keys.
store
5. Press again. STORE TO? is displayed.
Press a memory location (1-12).
2
1
5 6 7
10 11
9
abc
2
1
Storing Numbers from Caller ID Records
You can store a number from a Caller ID record.
1. Repeatedly press or to select the desired phone number.
store
2. Press three times.
3. Then press a memory location key to store the number
call#
NEW
dial
def
3
00
3 4
8
12
flash
3
2
1
5
6
10
9
abc
2
1
4
7
8
11
12
def
flash
3
12
Page 14

NOTE
Each pause entry uses one
digit of memory.
Entering a Pause in a Memory Number
The pause feature is useful for long distance calling or for access codes that require a
pause between digits.
When storing a number in memory, press . This enters a 2-second pause. P
(pause) is displayed. For a long pause, press again.
rdl/p
rdl/p
rdl/p
0
hold
speaker
Reviewing Memory Numbers
To review stored numbers, press the memory location key (1 - 12). Only the first 12
digits of the phone number is displayed. To view the remainder press that location
number button again.
1
5 6 7
9
1
Dialing a Memory Number
There are two ways of dialling memory numbers.
1. Lift the handset or press
2. Press the desired memory location key.
OR
Press the desired memory location key then press .
2
10 11
abc
2
mute
Mic
3 4
def
3
8
12
flash
speaker
dial
13
hold
0
speaker
mute
rdl/p
Telephone Answering Machine
RPT OGM 1 ANS ONLY
1 2:22
AM
PM
01/01
call#
NEW
00
02-9599-3355
Mic
delete
Caller ID
dial
Page 15

Chain-Dialling
For quick recall of numbers for special services, you can store each group of numbers
in its own memory location. Then, when calling special services, dial the service's
main number first. At the appropriate place in the call, press the memory location
button for the additional numbers you want to send.
NOTE
For Call Waiting to
operate, you must first
subscribe to this service
through your telephone
company.
NOTE
For Call Diversion to
operate, you must first
subscribe to this service
through your telephone
company.
Call Waiting:
When the call waiting tone sounds, press followed by . This will
call waiting
dial
switch between the original and incoming call.
Caller ID
delete
hold / answer
answer on / off
call diversion
new call
ogm
block cid
dial
new message
stop
call waiting
play
Block CID:
Each time you make a call, your telephone number is automatically forwarded to the
party you are calling. You can use Block CID to prevent your number being sent.
1. Pick up the handset or press .
2. Wait for the dial tone. Press then press .
speaker
block cid
dial
3. Dial the telephone number of the person you wish to call. Your telephone number
will not be forwarded for this call only.
Call Diversion:
If your phone is not answered within 20 seconds (approximately 7 or 8 rings), it can be
diverted to another number.
Pick up the handset
OR
Press the button.
Wait for the dial tone, press - CALL DIVERT ON is displayed - then
press and hang up.
The telephone will automatically dial the access code 61# and will enable the “Call
Forward No Answer” feature, diverting unanswered calls to the fixed number you have
previously assigned the divert to.
speaker
call diversion
dial
14
Page 16

NOTE
The maximum length for
outgoing message is 60
seconds. As you record,
the message counter
shows the recording time.
NOTE
OGM1 flashes on the
display if an out-going
message has not yet been
recorded.
Caller ID
delete
hold / answer
answer on / off
call diversion
new call
ogm
block cid
dial
new message
stop
call waiting
play
To Cancel ‘Call Diversion’
1. Pick up the handset
OR
speaker
Press .
call diversion
2. Press - CALL DIVERT OFF is displayed - then press again
dial
and hang up.
The telephone will automatically dial the access code 61# and will cancel the
#
diversion.
TELEPHONE ANSWER DEVICE
Recording Outgoing Messages
Before the FP107 can answer calls and record messages, you must record an outgoing
message (OGM).
1. To record the OGM 1 message, hold down until the timer starts counting.
OGM1 RECORDING is displayed.
2. Speak clearly at about 20cm from the front of the FP107 the message that you want
incoming callers to hear.
3. When you finish speaking, press . The FP107 beeps and plays back the outgoing
stop
message.
Caller ID
delete
hold / answer
answer on / off
call diversion
new call
ogm
block cid
dial
new message
stop
call waiting
play
ogm
15
Page 17

NOTE
If the FP107 Answer
Machine is off, after 15
rings it will automatically
switch on and answer the
call.
NOTE
The maximum recording
capacity is 16 minutes (or
68 recorded messages), or
86 Caller ID records.
Checking the Outgoing Message
To check an outgoing messag e, press . OGM1 PLAYING appears and the message
plays.
If no outgoing message is recorded when you press OGM1, the FP107 announces
“You have no announcement one” and sounds four beeps.
Number of Rings
The FP107 can be set to 2, 4 or 7 rings before it answers the call and plays
your message. The selector is located at the rear of the base unit.
ogm
ringer
select
2 4 7 TS
Using the Toll Saver
If the ring select switch is set to TS (toll-saver), the FP107 answers after two rings if you
have new messages. If there are no new messages, the FP107 answers after four rings.
This gives you time to hang up before the FP107 answers so you can avoid unnecessary
long-distance charges.
Setting the FP107 to Answer Calls
To turn on the FP107 and set it to answer calls and record messages, press the
answer on/off
once. The FP107 says “Answer on”. ANS ON is displayed, the FP107
plays the outgoing message. The hold answer indicator lights to show that the FP107
is ready to answer calls.
ANS ON
Telephone Answering Machine
AM
1 2:22
01/01
PM
OGM 1 ANS ON
RPT
-00- -00-
CALLS MESSAGES
Caller ID
delete
hold / answer
new call
answer on / off
call diversion
ogm
2
1
call#
NEW
00
dial
new message
stop
call waitingblock cid
3 4
Telephone Answering Machine
AM
call#
PM
Caller ID
new call
ogm
01/01
2
NEW
00
dial
new message
stop
call waitingblock cid
3 4
play
1 2:22
RPT OGM 1 ANS ONLY
OGM1 PLAYING
delete
hold / answer
play
answer on / off
call diversion
1
16
Page 18

CALLER ID OPERA TION
If you subscribe to Caller ID service from your phone company, the phone automatically
displays the information the phone company sends between the first and second rings
of every call you receive. It stores up to 86 numbers only or name and number call
records in its Caller ID memory.
It also shows the date and time the call was received. The display also shows if caller
information is not available or if the sender chose not to send the information.
The new call LED flashes during an incoming call, and the Caller ID record
is displayed. The total Caller ID record is displayed for about 8 seconds, after the last
ring stops.
If you receive more than one call (without an accompanying message) from the same
phone number, RPT (repeat) is displa y ed, and the FP107 stores a single Caller ID record
for that number with the date and time of the last call. Any call with a voice message
will have a call ID record.
If only Caller ID records (both incoming messages and Caller ID records) are full, the
FP107 announces “Memory is full”, and CALLS MSG FULL appears. The FP107
answers calls after answer rings and plays “Message is full. Thank you for your call”.
Caller ID Messages
Display Description
-XX- -XX-
CALLS MESSAGES Appears as new calls are received. xx is the number of new calls.
PRIVATE Appears when the caller has blocked the Caller ID information from
OUT OF AREA Appears when the caller is not within a Caller ID service area. No caller
ERROR Appears if there was an error during the transmission of Caller ID
END OF CALLS Appears when you have reached the end of your call records.
TOP OF CALLS Appears when you have reached the top of your call records.
RPT Appears when you review a Caller ID record from someone who has
being sent.
information appears.
information.
called more than one time from the same number.
17
Name Tagging
If the caller ID telephone number exactly matches a n umber you have stored in memory,
the name stored in memory will be displayed with caller ID numbers.
Page 19

NOTE
The FP107 returns to the
time/date display after 8
seconds if you do not
press a key.
REVIEWING CALLER ID RECORDS
Each time you receive a call, the FP107 stores a Caller ID record that you can review
later, even during a call.
A Caller ID record includes:
• Call number
• Time and date of the call
• Callers' telephone number (if available)
• Caller's name (if available)
• Voice message (if the calling party leaves a message)
Repeatedly press to see more recent call records or to see older call records.
To review the new call only, hold down or until the new call appears.
If you receive a call with a message, flashes on the display. To play a specific
message, repeatedly press or until the selected Caller ID information
appears, then press . To play all messages, press only.
play
play
NOTE
You can review the Caller
ID information, but
cannot play the messages
when the handset is off the
cradle or the speakerphone
is in use.
NOTE
The FP107 will not delete
Caller ID records or
messages that have not
been reviewed or played.
You cannot delete Caller
ID records during a call.
Deleting Call Records
Deleting a Single Call
To delete a specific call record, repeatedly press or until the call you want
to delete appears. Then press .
To delete a call that has a message, repeatedly press or until the desired
call appears. Press to play the message, then press during the playback.
play
After the message is deleted, press to delete the Caller ID record.
Deleting All Calls
To delete all calls, press and hold on the current date/time display until dEL
ALL appears, then press . To return to the current time display, wait for seconds,
stop
or press .
Using Dial
1. Repeatedly press or to select the desired phone number.
2. To callback a phone number from Caller records with the speakerphone, press
OR
To call back a phone number from Caller ID records with the handset, pick up the
handset then press .
delete
delete
delete
delete
dial
dial
18
Page 20

NOTE
If you answer the phone
just as the TAD answers,
the TAD may not stop
playing the outgoing
message. If this occurs,
simply press .
stop
FP107 OPERA TION
Playing Messages
The FP107's message window shows the total number of messages, both old and new.
If there are new messages, the new message LED flashes.
To play all messages, press .
To adjust the FP107’s volume, slide the speaker volume min/max on the right side
of the phone.
To play only new messages, hold down for 2 seconds.
To replay a message while you are listening to it, press . The current message
replays from the beginning.
To select another message, press or until the desired message number
appears in the display.
To pause while listening to messages, press . PAUSE is displayed. To resume
playback, press again within 60 seconds.
play
To stop playback, press . The FP107 beeps, says “End of messages” and END
OF MESSAGES is displayed. The FP107 then resets to answer calls.
Deleting Messages
To delete a specific message, press while the message is playing.
To delete all messages, stop playback and hold down until dEL ALL appears,
then press .
The TAD does not delete new messages.
Screening Calls
To screen calls, let the FP107 answer them. TAD IN USE is displayed.
Listen to the caller's message through the FP107's speaker. To adjust the volume, slide
speaker volume - min / max on the right side of the FP107.
If you decide to answer the call, pick up any phone on the same phone line as the
FP107. The FP107 stops recording and resets to answer the next call.
If you do not want to take the call, let the FP107 finish recording the caller's message.
play
play
play
stop
delete
delete
19
Page 21

NOTE
The FP107 has ten (0–9)
display contrast settings.
ADVANCED FEA TURES
Setting the Display Contrast
store
store
stop
speaker
1. Hold down until the FP107 beeps once. 5 and LCD CONTRAST appear.
5 flashes.
2. Repeatedly press or to select the desired display contrast settings.
3. Press to confirm the setting, then press to return to the time display.
Using Call Breakthrough
If you screen your calls but want to know when calls come in from certain people, give
them your Call Breakthrough (CBT) Code.
When a caller enters the CBT code during the outgoing message (168 factory preset),
the FP107 alerts you with a series of loud beeps for 35 seconds. To answer the call, pick
up the handset or press . If you do not answer, the caller can leave a message
after the outgoing message plays.
NOTE
If you do not complete
each step within 8
seconds, the FP107 exits
setup. Start again from
Step 1.
NOTE
If the FP107 Answer
Machine is off, after 15
rings it will automatically
switch on and answer the
call.
NOTE
If y ou do not enter a digit
within 8 seconds, the
FP107 hangs up.
Changing the CBT Code
The CBT code is preset to 168, but you can change it by following these steps:
1. Hold down until the FP107 beeps once.
2. Press two times. 168 and SET CBT CODE are displayed.
store
store
3. Enter the new 3 digit code.
store stop
4. Press then press to return to the time display.
Remote Operation
You can operate the FP107 from almost any touch-tone phone or from a rotary phone
using a pocket tone-dialer.
Follow these steps to operate the FP107 remotely.
1. Dial your phone number from another phone.
2. When the FP107 answers, enter your remote operation security code (705 factory
preset). The FP107 beeps once to confirm that you entered the correct code.
3. Enter a remote command (see “Remote Command List”).
4. When you finish, hang up.
Changing the Remote Operation Security Code
The FP107's remote operation security code is preset to 705, but you can change it by
following these steps.
1. Hold down until the FP107 beeps once.
2. Press once. 705 and SECURITY CODE are displayed. 7 flashes.
3. Enter the new 3 digit code.
4. Press then press to return to the time display.
store
store
store stop
20
Page 22

REMOTE COMMAND LIST
Press To
00 Set the FP107 to not answer calls.
01 Set the FP107 to answer calls.
21 Play all messages.
22 Announce all Caller ID records.
31 Play new messages. .
32 Announce new Caller ID information.
4 Monitor the room for 20 seconds. Press 4 to repeat
5 Delete all messages (except new messages).
5 Delete all Caller ID calls (except new Caller ID calls).
6 Stop playback or recording.
8 Change OGM 1. After the FP107 beeps, begin speaking.
9 Play OGM 1.
After pressing 21, 22, 31, or 32 to play Caller ID records/messages remotely,
you can
Press To
1 Replay the previous Caller ID record or message.
3 Skip to the next Caller ID record or message.
4 Replay the current Caller ID record or message.
5 Delete the current Caller ID record or message.
6 Stop message playback.
monitoring.
The FP107 says “Erase”, then press 1
The FP107 says “Erase”, then press 2
When you finish, press 6.
21
Page 23

QUICK REFERENCE CHART
If your phone is not performing to your expectations , please try these simple steps
first before calling Uniden customer service -
PROBLEM
No dial tone
Does not ring
YOUR NEW PHONE
Speakerphone
will not work
No LCD display
new call light
flashes continuously
Cannot delete all
messages or records
SUGGESTION
Check that the phone line cord connectors at both ends
are pushed in until they click.
You may have exceeded the limit of the number of
phones that can be connected to the same line, unplug
some phones.
Check the ringer volume switch position is not off.
Check the AC Adaptor is plugged in and switched on.
Check the AC Adaptor is plugged in and switched on.
Review all New Calls .
Press Reset.
Review all New Messages and Caller ID Records.
Press Reset .
TROUBLESHOOTING
22
Page 24

WARRANTY
One Year Limited Warranty
Important: Evidence of original purchase is required for warranty service.
Warrantor: Uniden Australia Pty Limited A.B.N. S8 001 865 498
Uniden New Zealand Limited
ELEMENT OF WARRANTY:
the duration of this warranty, its FP107 (herein after referred to as the Product), to be
free from defects in materials and craftsmanship with only the limitations or exclusions
set out below.
WARRANTY DURATION
shall terminate and be of no further effect 12 months after the date of original retail
sale. This warranty will be deemed invalid if the product is; (A) Damaged or not
maintained as reasonable and necessary, (B) Modified, altered or used as part of any
conversion kits, subassemblies or any configurations not sold by Uniden, (C) Improperly
installed, (D) Repaired by someone other than an authorised Uniden Repair Agent for
a defect or malfunction covered by this warranty, (E) Used in conjunction with any
equipment or parts or as part of a system not manufactured by Uniden. (F) Only available
in the original country of sale.
PARTS COVERED
only. All accessories (A C Adaptor, Wall mount bracket, etc.) are covered for 90 days only .
: This warranty covers for one (1) year, the Base and Handset
Uniden warrants to the original retail owner for
: This warranty to the original retail owner only,
23
STATEMENT OF REMEDY
to this warranty at any time while this warranty is in effect, the warrantor at its discretion,
will repair the defect or replace the product and return it to you without charge for parts
or service. THIS WARRANTY DOES NOT COVER OR PROVIDE FOR THE
REIMBURSEMENT OR PAYMENT OF INCIDENTAL OR CONSEQUENTIAL
DAMA GES. THIS GUARANTEE IS IN ADDITION T O AND DOES NOT IN ANY
WAY AFFECT YOUR RIGHTS UNDER THE CONSUMER GUARANTEE ACT.
PROCEDURE FOR OBTAINING PERFORMANCE OR
WARRANTY
Product should be shipped or delivered, freight pre-paid, with evidence of original
purchase (eg. a copy of the sales docket), to the w arrantor at:
UNIDEN AUSTRALIA PTY LIMITED
SERVICE DIVISION
345 Princes Highway,
Rockdale NSW 2216
Ph (02) 9599 3577 Fx (02) 9599 3278
Toll Free 1300 366 895
www.uniden.com.au
Customers in other States should ship or deliver the Product freight pre-paid to their nearest
Uniden Authorised Repair Centre. See Unidens Website for the nearest Repair Centre.
: In the event that the product does not conform to this warranty, the
: In the event that the product does not conform
UNIDEN NEW ZEALAND LIMITED
SERVICE DIVISION
150 Harris Road,
East Tamaki, Auckland
Ph (09) 273 8383 Fx (09) 274 4253
Toll Free 0800 4 UNIDEN
(864 336)
www.uniden.co.nz
WARRANTY
Page 25

NOTES
Page 26

NOTES
Page 27

NOTES
Page 28

FOR PURCHASING A UNIDEN PHONE!
THANK YOU
© 2001 Uniden Australia Pty Limited
Uniden New Zealand Limited
 Loading...