

Page 1
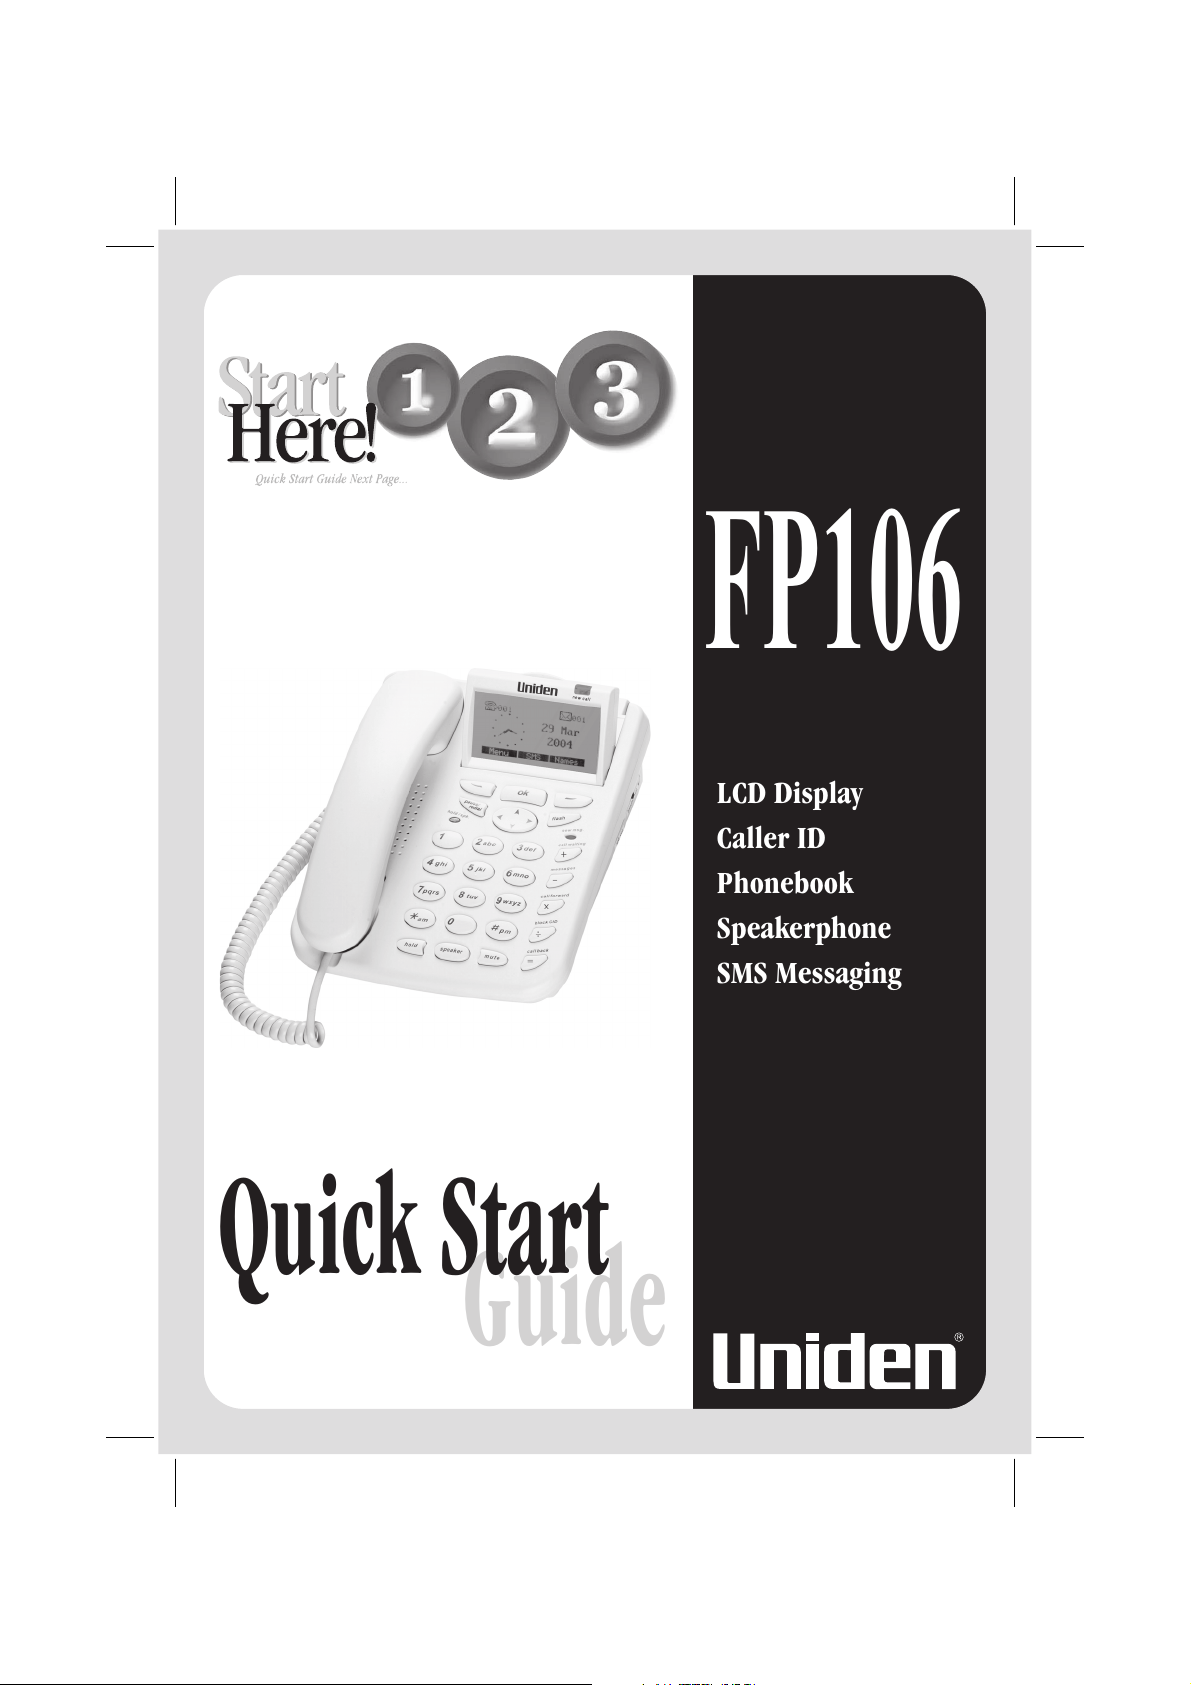
FP106
LCD Display
Caller ID
Phonebook
Speakerphone
SMS Messaging
Quick Start
Guide
Page 2

Page 3
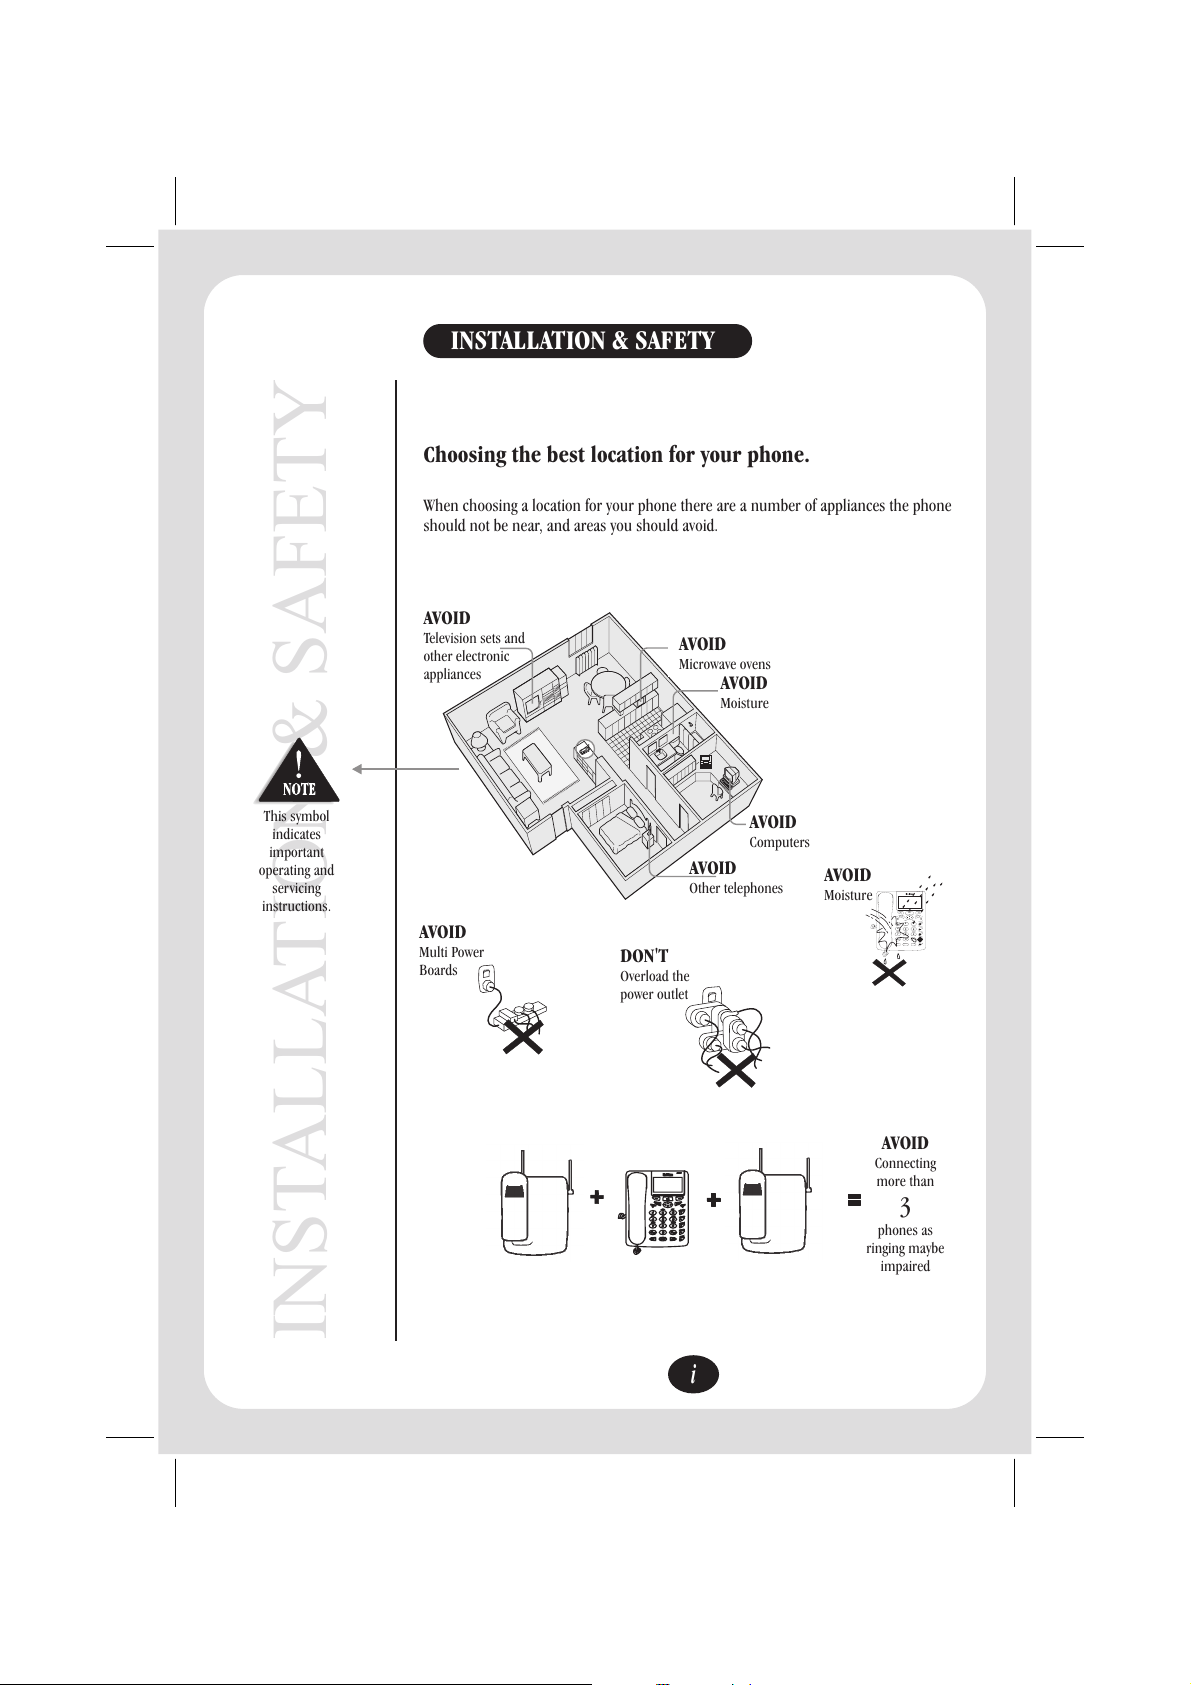
INSTALLATION & SAFETY
Choosing the best location for your phone.
When choosing a location for your phone there are a number of appliances the phone
should not be near, and areas you should avoid.
AVOID
Television sets and
other electronic
appliances
AVOID
Microwave ovens
AVOID
Moisture
This symbol
indicates
important
operating and
servicing
instructions.
AVOID
Multi Power
Boards
INSTALLATION & SAFETY
DON'T
Overload the
power outlet
ok
pause/
redial
hold/
s
spk.
pk.hold/
def
abc
3
1
2
ghi
jkl
mno
4
6
5
tuv
wxyz
pqrs
9
7
8
pm
am
0
mute
hold
hold
speaker
AVOID
Other telephones
newcallnewcall
flash
newmsg.
aitingcall
waiting
w
call
messages
ivertcall
divert
d
call
blockCID
headset
i
AVOID
Computers
AVOID
Moisture
newcall
ok
pause/
redial
flash
h
o
ld
/
s
p
k
newmsg.
.
def
abc
aiting
w
call
3
1
2
ghi
jkl
mno
messages
4
6
5
tuv
wxyz
pqrs
ivert
d
call
9
7
8
blockCID
pm
am
0
headset
mute
hold
speaker
AVOID
Connecting
more than
3
phones as
ringing maybe
impaired
Page 4
QUICK START GUIDEQUICK START GUIDE
This page is a very condensed version of the Owner’s
Manual. It is designed to allow you to get your phone
installed and operating as quickly as possible -however
it does not attempt to explain any of the
advanced features of the FP106 series.
Make sure the AC
Adapter remains
switched ON at all
times. Use only the
Uniden AC Adapter
supplied with
this unit.
During a power cut
or if the AC adapter
is switched off,
this telephone will
still function as a
basic phone but
without the
speaker phone and
display.
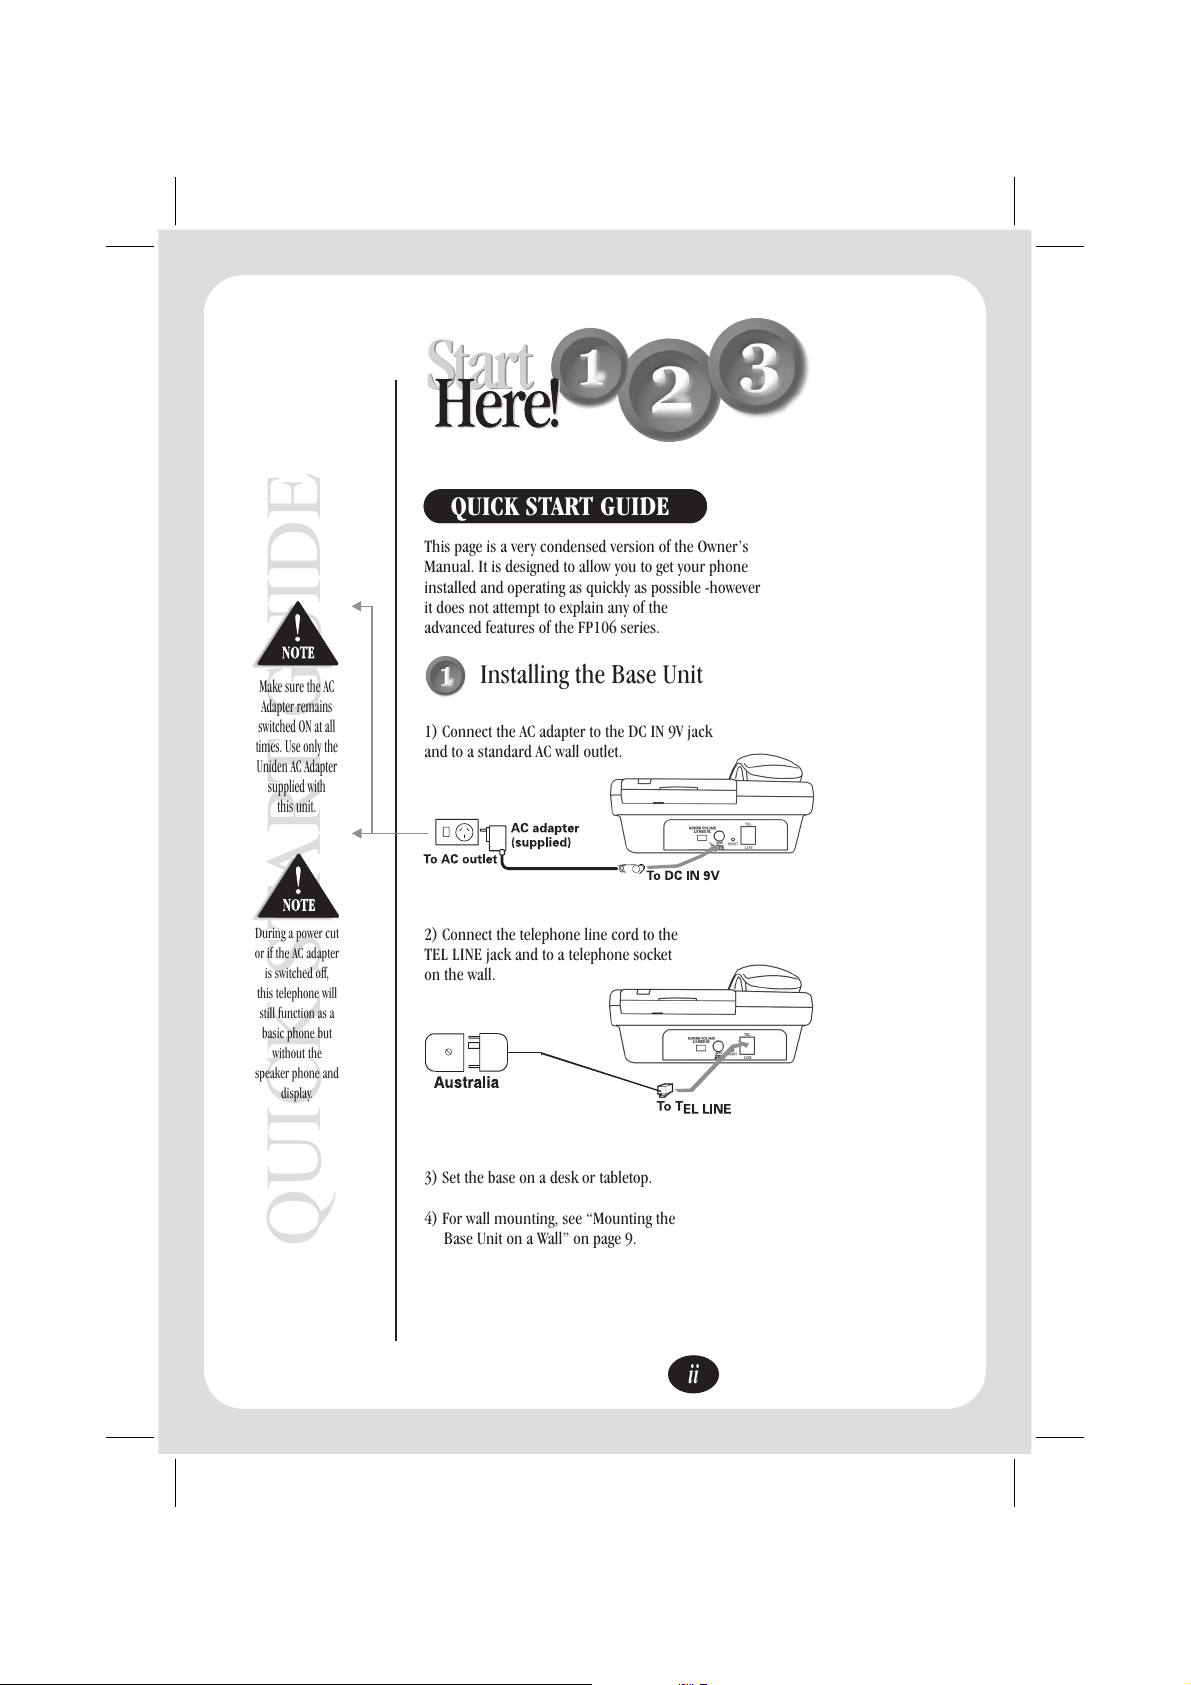
QUICK START GUIDE
Installing the Base Unit
1) Connect the AC adapter to the DC IN 9V jack
and to a standard AC wall outlet.
2) Connect the telephone line cord to the
TEL LINE jack and to a telephone socket
on the wall.
3) Set the base on a desk or tabletop.
4) For wall mounting, see “Mounting the
Base Unit on a Wall” on page 9.
ii
Page 5
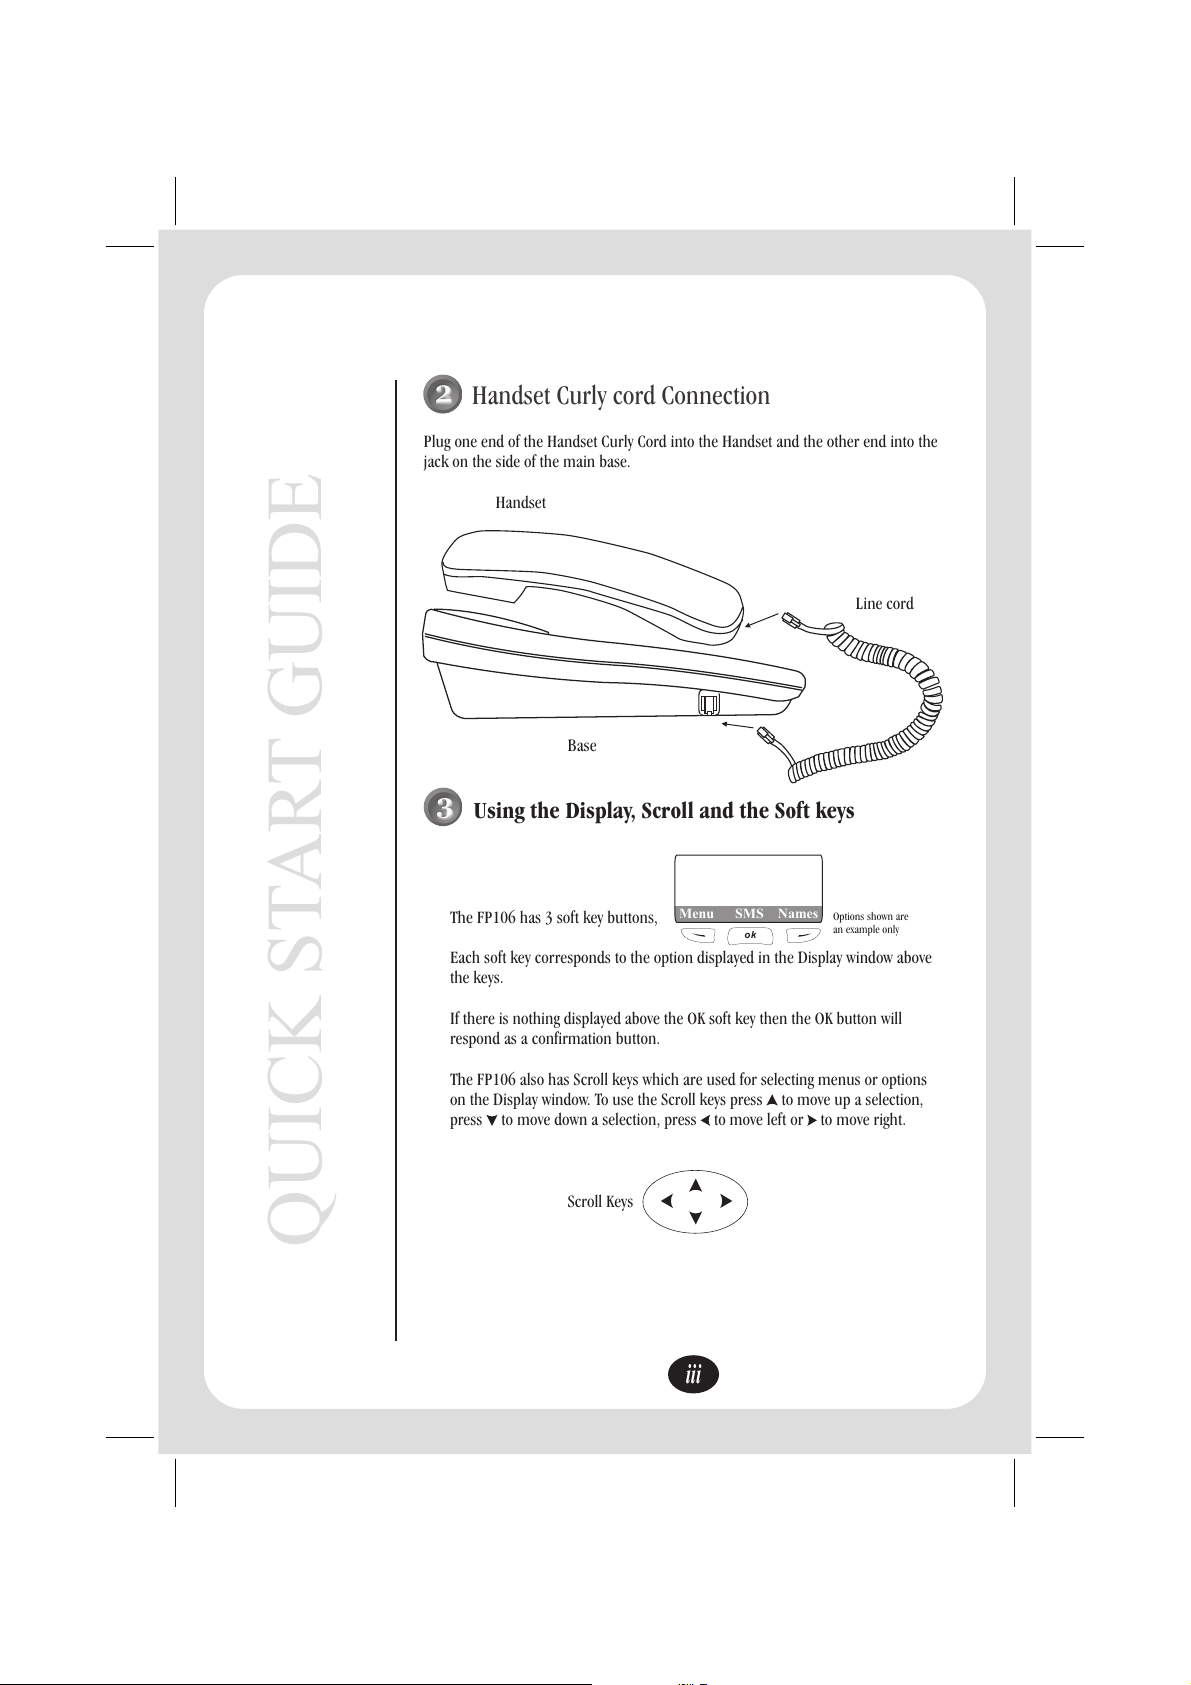
Handset Curly cord Connection
Plug one end of the Handset Curly Cord into the Handset and the other end into the
jack on the side of the main base.
Handset
Line cord
Base
Using the Display, Scroll and the Soft keys
The FP106 has 3 soft key buttons,
Each soft key corresponds to the option displayed in the Display window above
the keys.
If there is nothing displayed above the OK soft key then the OK button will
respond as a confirmation button.
The FP106 also has Scroll keys which are used for selecting menus or options
on the Display window. To use the Scroll keys press to move up a selection,
press to move down a selection, press to move left or to move right.
QUICK START GUIDE
Scroll Keys
Menu SMS Names
ok
iii
Options shown are
an example only
Page 6
Using Your Phone
4
1. To make a call:
Pick up handset or press
Listen for the dial tone, then dial phone number.
Or for On Hook Dialling:
Dial the number first, then pick up handset or press
2. To answer a call:
Pick up the handset to talk to the other party or press
to use the speaker phone.
3. To end a call:
Place handset back into cradle of base unit or if using the
speaker phone press
Using SMS Service
5
A subscription to an SMS service is required for SMS to function.
Setting SMS
To set the SMS alert ON so as to be alerted when an SMS is
received please refer to the instructions on page 22.
Sending an SMS
To send an SMS message please refer to the instructions on
page 23.
speaker
speaker
speaker
speaker
QUICK START GUIDE
iv
Page 7
Setting the Clock
6
If you subscribe to Caller ID the time & date will be set
automatically with the first incoming call.
Or see 'Clock' on page 25 for manual instructions.
Storing Numbers
7
For storing phone numbers into memory please see 'Storing a
Name with phone numbers' page 16.
End of
Quick Start
Guide
QUICK START GUIDE
v
Page 8
The illustrations
in this manual
are intended as a
guide and may
differ from
actual unit.
WELCOME
Congratulations on your purchase of this Uniden corded telephone. This unit is
designed for reliability, long life and outstanding performance utilising the latest in
telephone technology.
UNIDEN COMPANY PHILOSOPHY
To bring outstanding communication products to people’s lives throughout the world.
IMPORTANT INFORMATION
1
Page 9
FEATURES
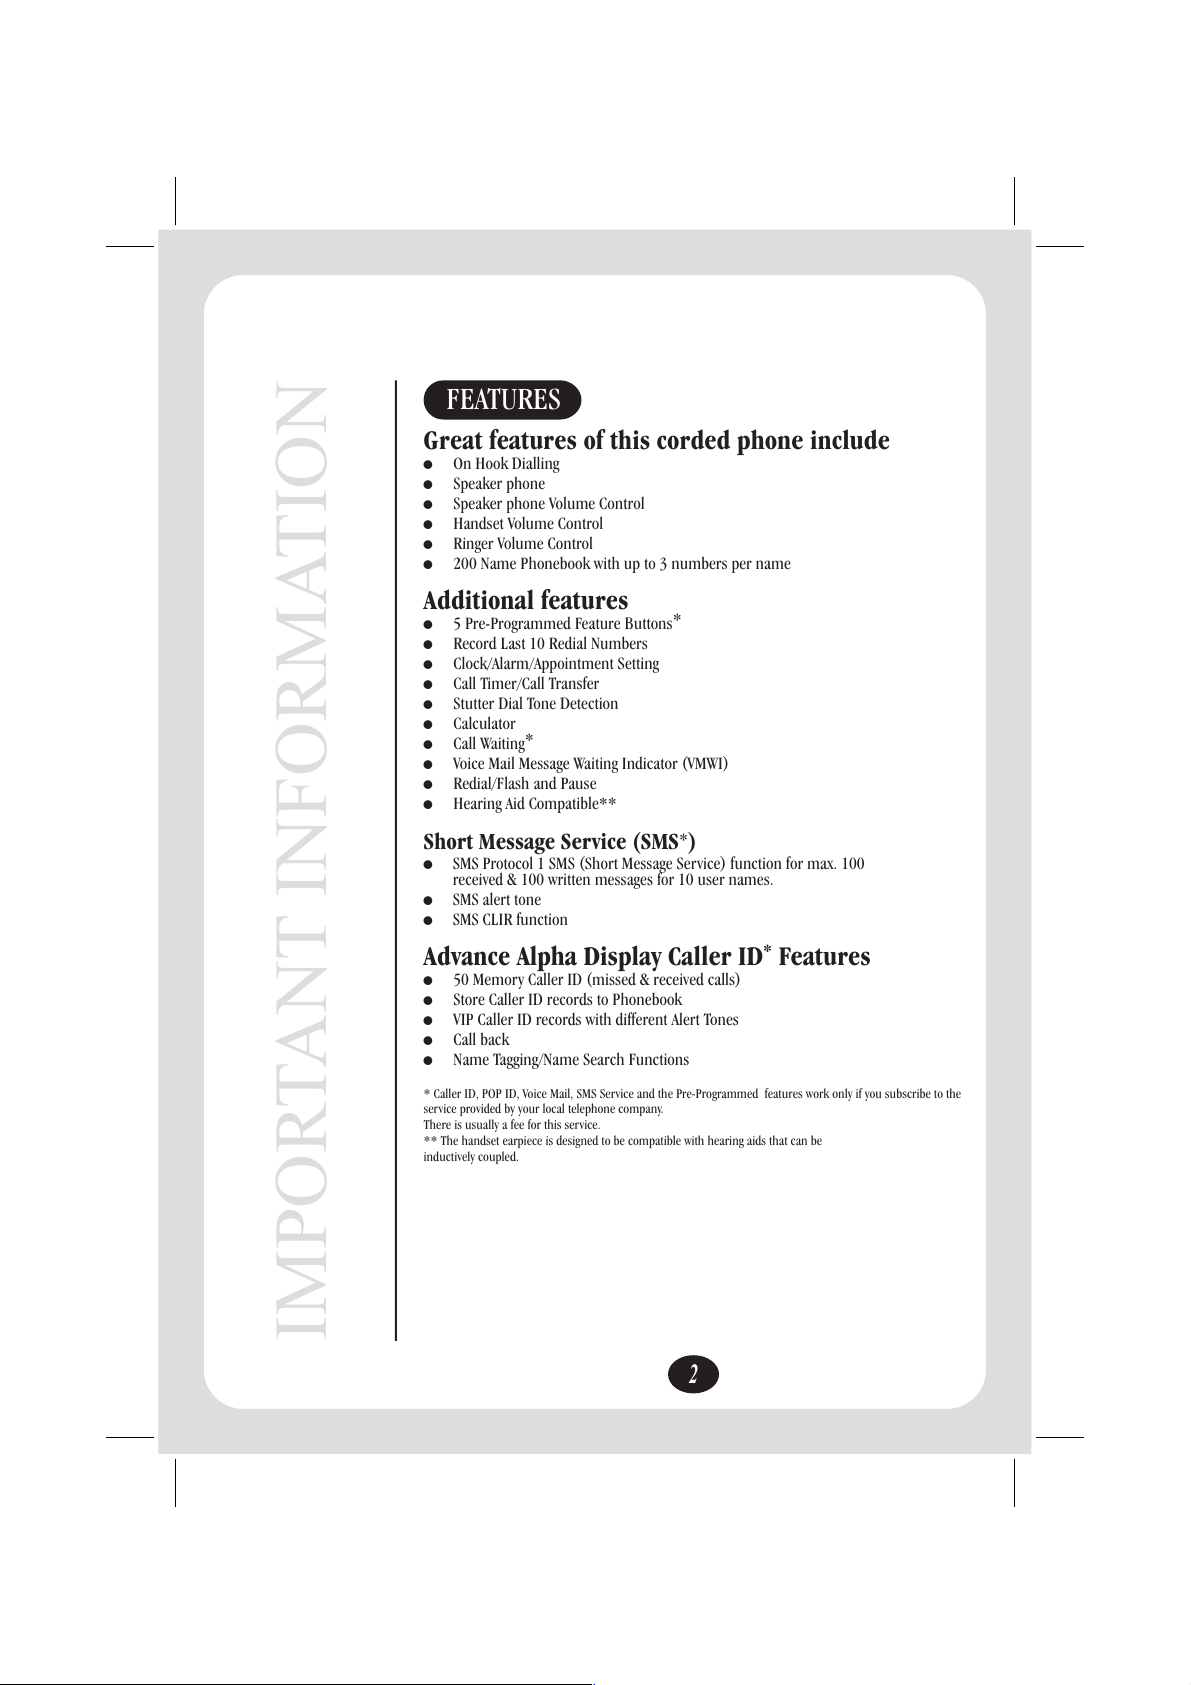
Great features of this corded phone include
On Hook Dialling
!
!
Speaker phone
!
Speaker phone Volume Control
!
Handset Volume Control
!
Ringer Volume Control
!
200 Name Phonebook with up to 3 numbers per name
Additional features
!
5 Pre-Programmed Feature Buttons
!
Record Last 10 Redial Numbers
!
Clock/Alarm/Appointment Setting
!
Call Timer/Call Transfer
!
Stutter Dial Tone Detection
!
Calculator
!
Call Waiting
!
Voice Mail Message Waiting Indicator (VMWI)
!
Redial/Flash and Pause
!
Hearing Aid Compatible**
*
Short Message Service (SMS )
!
SMS Protocol 1 SMS (Short Message Service) function for max. 100
received & 100 written messages for 10 user names.
!
SMS alert tone
!
SMS CLIR function
Advance Alpha Display Caller ID Features
!
50 Memory Caller ID (missed & received calls)
!
Store Caller ID records to Phonebook
!
VIP Caller ID records with different Alert Tones
!
Call back
!
Name Tagging/Name Search Functions
* Caller ID, POP ID, Voice Mail, SMS Service and the Pre-Programmed features work only if you subscribe to the
service provided by your local telephone company.
There is usually a fee for this service.
** The handset earpiece is designed to be compatible with hearing aids that can be
inductively coupled.
*
*
*
IMPORTANT INFORMATION
2
Page 10
CONTENTS
Installation & Safety.................................................. (i)
Quick Start Guide..................................................... (ii)
Important Information
Welcome.................................................................... 1
Uniden Company Philosophy..................................... 1
Features..................................................................... 2
Contents..................................................................... 3
Included in your Package........................................... 5
Controls & Functions................................................. 6
Function flow Chart................................................... 8
Installation
WallMounting............................................................. 9
How to Use Your Phone
LCD Display................................................................ 10
Using Your Phone...................................................... 10
Speaker phone........................................................... 10
Redial......................................................................... 10
Pause......................................................................... 11
Flash.......................................................................... 11
Mute.......................................................................... 11
Hold........................................................................... 11
Music on Hold........................................................... 11
Using Caller ID.
Missed Calls............................................................... 12
Received Calls............................................................ 13
Dialled Numbers........................................................ 14
Phone Book
CONTENTS
.................................................................... 15
Storing a name with phone numbers/setting VIP........ 16
Searching for or editing an existing entry................... 16
Browsing Entries........................................................ 16
VIP List....................................................................... 17
3
Page 11

CONTENTS
Using the Pre-Programmed Feature Buttons
Call Waiting................................................................ 18
Messages.................................................................... 18
Call Forward............................................................... 19
Call Forward No Answer............................................. 19
Call Forward Busy...................................................... 20
Call Forward Immediate............................................ 20
Block Caller ID........................................................... 21
Caller......................................................................... 21
Calculator
Using SMS
Advanced Settings
CONTENTS
Troubleshooting
Warranty
........................................................................ 21
SMS Setting............................................................... 22
Setting User No.......................................................... 22
Sending New SMS Messages...................................... 23
Reviewing the Received SMS..................................... 24
Modifying an SMS...................................................... 24
Ring Tone................................................................... 25
Clock.......................................................................... 25
Alarm......................................................................... 26
Call Screen: VIP Filter................................................. 26
Call Screen: Call Reject.............................................. 27
Stutter Dial Tone........................................................ 27
Call Wait ID ON/OFF (CID Type 2).............................. 27
First Ring.................................................................... 27
Area Code................................................................... 28
SMS Setting................................................................ 28
LCD Contrast.............................................................. 28
Reset.......................................................................... 29
Delete SMS................................................................. 29
Delete Phonebook...................................................... 29
Delete Call List........................................................... 29
Delete All.................................................................... 29
............................................................. 30
.......................................................................... 31
4
Page 12
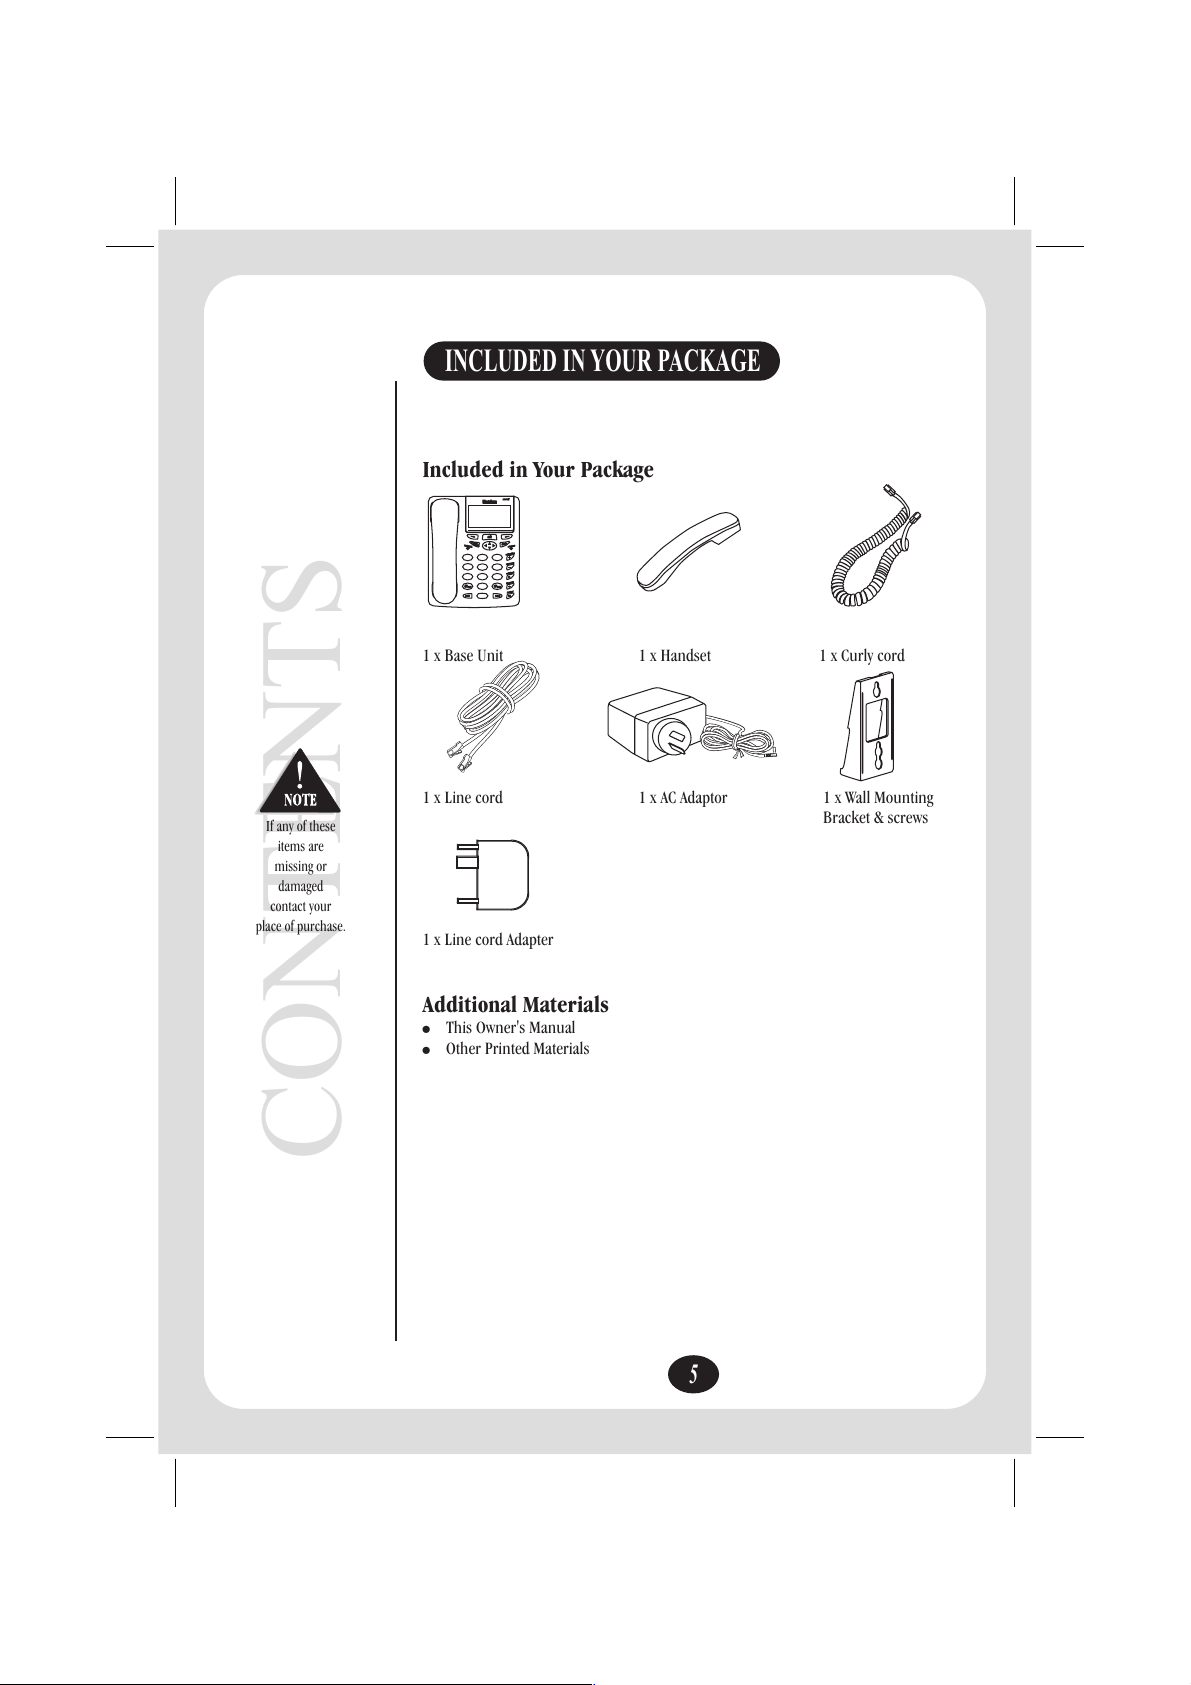
If any of these
items are
missing or
damaged
contact your
place of purchase.
INCLUDED IN YOUR PACKAGE
Included in Your Package
newcallnewcall
ok
pause/
redial
flash
hold/
hold/
s
spk.
pk.
newmsg.
aiting
waiting
w
call
call
messages
ivert
divert
d
call
call
blockCID
pm
am
et
et
s
s
head
head
mute
hold
1 x Base Unit 1 x Handset 1 x Curly cord
1 x Line cord 1 x AC Adaptor 1 x Wall Mounting
Bracket & screws
1 x Line cord Adapter
Additional Materials
!
This Owner's Manual
!
Other Printed Materials
CONTENTS
5
Page 13

CONTROLS & FUNCTIONS
17
1
2
newcall
16
15
14
CONTROLS & FUNCTIONS
1 New Call LED
2 Soft Keys
3 Scroll Keys
4 Flash
flash
ok
13
3
ok
pause/
redial
hold/
s
pk.
2
abc
1
4
ghi
5
jkl
7
pqrs
8
tuv
am
0
hold
speaker
flash
newmsg.
aiting
w
call
3
def
messages
6
mno
orward
f
call
9
wxyz
blockCID
pm
ack
b
call
mute
4
5
6
7
8
9
10
12
10 Callback
11 Mute
12 Speaker
13 Hold
11
callback
mute
speaker
hold
5 New SMS LED
6 Call Waiting
7 Messages
CONTROLS & FUNCTIONS
8 Call Forward
9 Block CID
callwaiting
messages
f
call
blockCID
orward
14 Hold/ Speaker LED
15 Pause/Redial
16 Handset Retainer Tab
17 On Hook Switch
6
pause/
redial
Page 14

CONTROLS & FUNCTIONS
OFF LO HI
1
Rear Connections & Controls
1. Ringer Volume control
2. DC power socket
3. Telephone Reset
4. Telephone Line socket
2
Side Controls
5. Speaker Volume control
6. Handset Volume control
CONTROLS & FUNCTIONS
3
56
4
7
Page 15

FP106 FUNCTION FLOW CHART
FUNCTION FLOW CHART
Menu
SMS
Missed Calls
Received Calls
Dialled
Numbers
Phone Book
Call Feature
Calculator
Settings
SMS User
(0#-9#)
Edit Number
Edit Number
Erase
Dial Blocking
Erase
Edit Number
Edit Number
Erase
Dial Blocking
Erase
Edit Number
Edit Number
Erase
Dial Blocking
Erase
All List
Add Entry
VIP List
Message Bank
Call Waiting
Call Forward No Answer
Call Forward Busy
VIP List
Call Forward Immediate
Ring Tone
Clock
Alarm
Call Screen
Stutter Dial Tone
CID Type 2
First Ring
Area Code
SMS Setting
Contrast
Reset
Received
Write New
Written
Name
Number
Melody
VIP
Name
Number
Melody
VIP
Name
Number
Melody
VIP
Edit
Erase
Block CID
Edit
Erase
Block CID
Delete Phonebook
7
Home Number
Office Number
Mobile Number
Dial Priority
Deactivate
Deactivate
Deactivate
Deactivate
Alarm Clock
Appointment
VIP Filter
Call Reject List
SMS Alert Tone
Validity Period
Delivery Report
SMS Centre
SMS User
Delete SMS
Delete Call List
Delete All
Store As
Store As
Store As
Name
Melody
VIP
Activate
Check
Activate
Check
Activate
Check
Activate
Check
Home
Office
Mobile
Erase xxx?
Erase all missed?
Home
Office
Mobile
Erase xxx?
Erase all received?
Home
Office
Mobile
Erase xxx?
Erase all dialled?
ON/OFF
1h/12h/1day/3days
ON/OFF
SC1/SC2/Disable CLIR
0-9
8
Page 16

INSTALLATION
WALL MOUNTING
If required, you can mount your phone directly on a wall.
Before mounting your phone, please consider the following:
!
Select a location away from electrical cables, pipes or other items behind the
!
mounting location that could cause a hazard when inserting screws into the wall.
Make sure the wall material is capable of supporting the weight of the telephone.
!
Use the screws (supplied) with anchoring devices suitable for the wall material
!
where the Telephone will be placed.
1. Insert two mounting screws
100 mm apart. Allow about 5mm
between the wall and screw heads for
mounting the phone.
2. Gently pull out the handset retainer
tab, turn 180° and re-fit.
See Controls & Functions Page 5
for location of Handset Retainer Tab.
TOP
100mm
35mm
5mm
3. Attach the wall mounting bracket
to the bottom of the telephone
as shown.
INSTALLTION
4. Place the base unit on the screws
and push down until it’s firmly seated.
9
Page 17

HOW TO USE YOUR PHONE
The following page information expands on the basic phone use as explained in Step
4 of the Quick Start Guide.
LCD Display:
ICON NAME
The Icons shown here will display
at the top of the Display window when such
functions are in operation.
The icon names will appear at the bottom of the
Display window.
Using Your Phone
1. To make a call:
Pick up handset or press
Listen for the dial tone, then dial phone number.
Or for On Hook Dialling:
Dial the number first, then pick up handset or press
2. To answer a call:
Pick up the handset to talk to the other party or press to use the
speaker phone.
3. To end a call:
Place handset back into cradle of base unit or if using the
speaker phone press
SPEAKER PHONE
You can continue a call on Speaker phone mode anytime by pressing the
button during a call, then place the Handset on the base.
When speaking, Speak clearly towards the base of the telephone.
Also, you can transfer a call to the Handset anytime during a call by simply picking
up the Handset.
speaker
speaker
speaker
speaker
speaker
REDIAL
If you want to redial the last number dialled, simply pick up the handset or press the
speaker
button, then press the button. The telephone will automatically dial
the last dialled number.
HOW TO USE YOUR PHONE
pause/
redial
10
Page 18

PAUSE
During the Phonebook storage procedure, you may wish to press the button to
pause/
redial
insert a pause between numbers. (This is sometimes useful for accessing a switch board,
telephone banking or long distance dialling).
pause/
Pressing button more than once will increase the pause between digits.
Each time the button is pressed, a 'P' will show on the LCD to indicate a 2 second
redial
pause/
redial
pause in the dialling sequence. Each pause counts as one digit.
FLASH
The Flash feature can be used to momentarily break the line for transferring calls on a
PABX system or for a Call Waiting service.
While talking, you hear the call waiting signal (series of beep tones), press the
2
button then to switch call and put the current call on hold.
To switch back to original call, press the button then
abc
flash
1
flash
1. Pressing + toggles the call between the incoming and the original call.
2. Pressing + will drop the current call connection and pick up the
flash
flash
incoming call or the call on hold.
MUTE
Press the button to turn off the handset microphone, allowing private
conversations in the same room without the other party hearing.
Press the button again to resume the conversation with the calling party.
mute
mute
HOLD
To place a call on hold, press the button and hang up.
To begin conversation again, pick up the handset or press the button or pick up
an extension phone (if available).
MUSIC ON HOLD
When a call is placed on hold, the FP106 will play a popular melody to reassure your
caller that the call has not been disconnected. The selected melody is fixed and cannot be
altered or muted.
HOW TO USE YOUR PHONE
2
abc
1
hold
hold
11
Page 19

If there is an
answer
machine on
the same line
which answers
the call then
the call will be
treated as a
Received Call
USING CALLER ID
When subscribed to Caller ID the caller's number appears on the Display window,
usually after the first ring.
Missed Calls
When someone calls and the call is not answered their number is stored in the Missed
Calls list. This function allows you to view a list from which somebody tried to all you
with no success.
Using the Soft Key options provided in the Missed calls menu you can view the date and
time of each call, and view, edit, erase or save the number. Each memory location can
store a maximum of 20-digit number and 16-digit name.
Edit Number Erase Dial Blocking CID
Name
Number (Store home/office/mobile 3 different numbers)
Melody
VIP
Display Example:
Missed call:
JOHN SMITH
0932125520
0222474816
BOB LEE
Details Dial Back
To review missed calls
CALLER ID.
1. Select scroll to and press
2. If the same number called several times, it shows the number of times next to the
telephone number.
3. Any number that has been set as a VIP call will display the VIP icon.
4. If no missed calls, the screen displays “No Missed Calls”.
01/04
menu Missed Calls
12
The 1st number indicates the
highlighted call.
The 2nd number indicates the total
number of current missed calls
ok
Page 20

Received Calls
This function allows you to view a list from which you have recently accepted calls.
Using the Soft Key options provided in the Received calls menu you can view the date
and time of each call, and view, edit, erase or save the number. Each memory location
can store a maximum of 20-digit number and 16-digit name.
Edit Number Erase Dial Blocking CID
Name
Number (Store home/office/mobile 3 different numbers)
Melody
VIP
Display Example:
Received call:
JOHN SMITH
0932125520
0222474816
BOB LEE
Details Dial Back
To Review Received Calls:
1. Select then scroll to and press
2. If the same number is received twice then only the details of the latest call is stored
and displayed.
3. Any number that has been set as a VIP call will display the VIP icon.
4. If no received calls, the screen displays “No Received Calls”.
CALLER ID.
01/04
Menu Received Call
13
The 1st number indicates
the highlighted Received call.
The 2nd number indicates
the total received calls.
ok
Page 21

Dialled Numbers
This function allows you to view a list of the last 10 phone numbers that you have
recently called or tried to call.
Using the Soft Key options provided in the Dialled calls menu you can view the date and
time of each call, and view, edit, erase or save the number. Each memory location can
store a maximum of 32-digit number and 16-digit name.
Edit Number Erase Dial Blocking CID
Name
Number (Store home/office/mobile 3 different numbers)
Melody
VIP
Display example:
Dialled call:
JOHN SMITH
0932125520
0222474816
BOB LEE
Details Dial Back
To Review Dialled Numbers:
1. Select then scroll to and press
2. If the same number is dialled twice, the list displays the number twice.
CALLER ID.
3. If the number is a VIP call, the VIP icon will display next to the number.
4. If no dialled numbers, the screen displays “No Dialled Numbers”.
01/10
Menu Dialled call
The 1st number indicates the
highlighted call out of the last 10 calls.
14
ok
Page 22

PHONE BOOK
You can store phone numbers and the associated names in the memory of the phone
book. You can store up names with 3 different numbers (each of which can have
up to 32 digits) and other settings.
In standby mode (on or off hook) press or on the scroll key to jump to the start
or end of the phonebook. Pressing on the scroll key will jump to the last dialled
numbers. Pressing on the scroll key will jump to the call features
200
Menu
Phone Book
OK
Name
Home Number
Office Number
Edit
Mobile Number
Dial Priority
Melody
VIP
Add Entry
Name
Home Number
Office Number
Mobile Number
Dial Priority
Melody
VIP Filter
All List
PHONE BOOK
Erase
Block CID
15
VIP List
Name
Home Number
Office Number
Mobile Number
Edit
Dial Priority
Melody
VIP
Erase
Block CID
Page 23

Display example:
Storing a name with phone numbers/ Setting VIP
OR press
Names
standby
display as a
shortcut.
1. Select then choose and press
2. Scroll to and press
3. Key in the Name and number (or numbers if available)
in the
4. Press to confirm.
Menu Phone book
Add Entry
The first character in the field must be a letter (for searching or browsing).
If you make a mistake, you can remove characters to the left of the cursor by
Delete
pressing as many times as necessary.
Pressing and holding clears the screen.
To switch between upper and lower character case, press The symbol ABC or
abc shown at the top of the display indicates the selected case. The phone reverts to
upper case for every new entry. To insert a space press
Pressing brings up a list of special characters. Move through the list to the
desired character with and and press to insert it in the name.
After entering Name, Number (Home, Work, Mobile: Press to skip a number
entry) press to view and options. Press or to
change or select these options.
If setting VIP to ON then the Melody selection must be set to
Ring3 No Selection
or .
ok
Delete
am
Searching for or Editing an Existing Entry
1. Select then scroll to and press
2. Scroll to and press
3. Key in the first letter of the name to jump to first corresponding entry.
4. Use or to reach the desired name.
5. Press to dial the preset priority number. Or press to view other
6. Press to view or options.
PHONE BOOK
7. Scroll to to edit the name, numbers, dial priority, melody and VIP
Menu Phone book
All List
ok
numbers.
Options Edit Number Erase
Edit Number
settings for the current entry.
ok
ok
Name
pm
0
Use
Dial Priority, Melody VIP
Ring1, Ring2,
ok
ok
details
Browsing entries
Pressing the or button from standby mode allows browsing of the phone book.
Keying in thefirst letter ofthe namejumps tofirst correspondingentry.
16
Page 24

VIP needs to
be selected to
ON before an
entry will
appear in the
VIP list.
Please see
Setting VIP on
page 15.
VIP LIST
The VIP list is a list of names for whose phone number(s) triggers a secondary beeping
tone. The VIPlist requiresthe CallerID serviceto work.
You can transfer any Caller ID record into the VIP list.
The Melody selection for each Name entry must be set to or
Selection
Please see Call Screen: VIP Filter on page 26 to activate VIP function.
Display example:
for the VIP beeping tone to function.
Ring1, Ring2, Ring3 No
1. Select then choose
2. Scroll to and press
3. Use the or buttons to scroll through the VIP list.
4. When you locate the desired number, press to dial the number or
Menu Phone book
VIP list
enter mode for the detail information.
Details
ok
PHONE BOOK
17
and press
ok
ok
Page 25

USING THE PRE-PROGRAMMED FEATURES BUTTONS
Easy access to some of most popular network service features have been
programmed into the telephone for your convenience.
CALL WAITING
If you subscribe to Call Waiting service, Call Waiting lets you know if you have another
call while you are already on the phone. Call Waiting sends a discrete tone when you
have another call.
!
A discrete tone tell you someone's calling you when you're on another call.
However, you have longer than this to answer the second call. The second caller
simply hears a ringing tone and will usually keep holding for six to eight rings.
Excuse yourself from the first caller, then press the button on your phone.
!
You can then talk to the second caller.
To return to the first caller, simply press the button again and you will be
!
able to continue your original conversation.
callwaiting
callwaiting
MESSAGES
Telstra Home Messages 101 is a free, easy-to-use home message solution that allows
voice messages to be left for you when you are away from the phone, on another call
or dialled up to the Internet. All you have to do is dial 101 from your Telstra home
phone to collect up to 10 messages at a time.
Telstra Home Messages 101 has a standard greeting and NO PIN number.
The phone will ring for approximately 20 seconds before Telstra Home Messages 101
takes the call.
To change the length of time before Telstra Home Messages 101 answers an incoming
call, dial *99 and enter the number of seconds you would like the phone to ring
(amount must be between 05 and 60 seconds). Then press
When you have a message you will hear the Stutter Dial Tone when you pick up the
phone receiver.
When a new message has been left in your mailbox, the will flash on the
display.
pm
There may be
a delay in
these
indicators
turning off.
To Use Messages feature:
1. Press the button.
2. Enter your PIN at the prompt and follow the
recorded instructions.
When you have cleared the message (from any phone), the
Message icon will turn off.
FEATURE BUTTONS
messages
18
Page 26

CALL FORWARD
Call Forward Immediate (Variable Number) With Variable Number Forward you can
forward your calls to a number you select and change it at any time.
You can press
on scroll
keys to enter
Call Features
directly.
1. Select then scroll to Call Feature.
2. Scroll to Call Fwd Immediate and press to confirm.
3. Choose Activate and the display shows Enter the Fwd Number and enter the
4. Press and the telephone will automatically dial the access code
5. Choose Deactivate, the telephone will automatically dial the access code
6. Choose Check, the telephone will automatically dial the access code *#21#
menu
telephone number.
ok
*21(NUMBER)# and will enable Activate Call Forward Immediate feature.
#21# and will enable Deactivate Call Forward Immediate feature.
and will enable Check activation state feature.
ok
CALL FORWARD NO ANSWER
Telstra’s “Call Forward No Answer” service is available for diverting calls to another
number if your phone is not answered within 20 seconds (approximately 7 or 8 rings).
1. Press Menu then choose Call Feature.
2. Scroll to Call Fwd No Answer and press to confirm.
3. Select Activate and the display shows Enter the Fwd Number and enter the
telephone number.
4. Press and the phone will automatically dial the access code
5. Select Deactivate, the telephone will automatically dial the access code “#61#”
6. Select Check, the telephone will automatically dial the access code “*#61#”
ok
“*61(NUMBER)#” and enable Call Forward No Answer feature.
and will enable Deactivate Call Forward No Answer feature.
and will enable Check activation state feature.
ok
FEATURE BUTTONS
19
Page 27

CALL FORWARD BUSY
When you know your phone is going to be busy, this feature allows you to redirect your
calls to any other number anywhere in Australia.
1. Press Menu then choose
2. Scroll to and press to confirm.
3. Select and the display shows and enter the
4. Press and the phone will automatically dial the access code
5. Select , the telephone will automatically dial the access code
6. Select , the telephone will automatically dial the access code “*#24#”
Call Fwd Busy
Activate Enter the Fwd Number
telephone number.
ok
“*24(NUMBER)#”and enable feature.
Deactivate
“#24#” and will enable feature.
Check
and will enable Check activation state feature.
Call Feature.
ok
Call Forward Busy
Deactivate Call Forward Busy
CALL FORWARD IMMEDIATE
You can redirect calls to anywhere, including mobiles, pagers and answering services.
Call Forward Immediate (Variable Number) With Variable Number Forward you can
forward your calls to a number you select and change it at any time.
1. Press Menu then choose .
2. Scroll to and press to confirm.
3. Select and the display shows and enter the
4. Press and the telephone will automatically dial the access code
5. Select , the telephone will automatically dial the access code
6. Select , the telephone will automatically dial the access code “*#21#”
Call Fwd Immediate
Activate Enter the Fwd Number
telephone number.
ok
“*21(NUMBER)#” and will enable
feature.
Deactivate
“#21#”and will enable feature.
Check
and will enable feature.
Check activation state
Call Feature
ok
Activate Call Forward Immediate
Deactivate Call Forward Immediate
You can press
on scroll
keys to enter
Call Features
directly.
FEATURE BUTTONS
20
Page 28

BLOCK CALLER ID
Each time you make a call, your telephone number is automatically forwarded to the
party you are calling (unless your number is a private number). In certain cases you
may wish to prevent your number being sent, follow these steps.
You must
subscribe to a
Call Back
service.
1. Pick up the handset or press the button. Wait for the dial tone.
2. Press the button.
blockCID
speaker
3. Dial the telephone number of the person you wish to call. Your telephone
number will be withheld for this call only.
CALL BACK
If the number you are calling is engaged, Call Back can ring you when the number
is free. It will keep trying a busy number for up to 45 minutes, and (provided you have
a compatible phone) will alert you with a distinctive ring when the called number
is free.
1. When you dial a number and receive the engaged tone, press
callback
2. You will hear the confirmation announcement.
3. Hang up the phone.
4. Your phone will ring with a distinctive ring tone when the number you called
is free.
5. Pickup the handset and wait for the call to be connected.
Calculator
1. Select then choose and press
2. Using numeric keypads and on the right side for
Menu Calculator
callwaiting
messages
call
orward
f
blockCID
fundamental operations of arithmetic.
The display showing “E”means the content is too long or has an error.
pm
The key is for a decimal point.
ok
callback
3. Select button to leave.
FEATURE BUTTONS
21
Page 29

USING SMS SERVICE
A subscription to an SMS service is required. Then you can send and receive SMS.
SMS SETTING
1. Select then scroll to Settings and press
2. Scroll to SMS Setting.
3. Select to set SMS alert tone (On/Off).Once you turn on the alert tone, the
4. Select to set Validity Period. There are four options (one hour, 12 hours,
5. Select to set SMS Delivery report (On/Off) if you want a report on the
SETTING USER NO.
This FP106 can be used by multiple users or connected in parallel to other SMS
capable product.
If you do not want to set up any user names or passwords and have only one SMS entity,
you can simply use the phone and neglect the user no.
When you have more than one SMS product in your house, or want to set up user names
SMS
and passwords to protect your privacy, please read the following instructions carefully.
menu
ok
Box will sound an alert every time when it receives an SMS.
ok
one day, and 3 days). You can choose how long you would like the messages to be
kept in the service centre for you to retrieve.
ok
sending results (sent, failed, pending).
Otherwise no SMS functions will operate.
ok
1. Select then scroll to Settings then press
2. Scroll to SMS Setting.
3. Press to confirm.
4. Scroll or to select SME User (0# - 9#).
5. Choose the desired user number (0-9) and it is the terminal number.
6. Press to confirm.
7. Enter your user name (up to 10 digits) and password.
8. Press to confirm.
Press Back to return to the standby mode or press or to set other functions.
menu
ok
Once you decide to set the user No., always set user NO. 0 because many SMS will
be sent to user NO. 0. Apart from user NO. 0, you can choose whatever user No.
(between 1-9) you want.
ok
ok
ok
22
Page 30

SENDING NEW SMS MESSAGES
1. In standby mode, press SMS OR select then scroll to SMS then
ok
press Scroll to User and press There are 3 features SMS
Received, SMS Write new?, SMS Written?
2. Scroll or to SMS Write new appears. Press to confirm.
3. Use keypad to key in the message content.
Each SMS message may contain a maximum 160 characters. Press or to
move cursor in the text field. The next digit entered will appear to the right of the
cursor. Press Delete to delete the digits at the left of the cursor. Hold down Delete to
delete all digits at the left of the cursor.
4. When finished, press OK and enter the information for No. and Terminal.
5. Press to confirm all information in the message and select Send and save.
6. Press again to send the message. The display shows Sending.
7. If sending fails, the display will show Send error then show Send and Save. If you
ok
ok
ok
press the message will be resent again. If you press Back, the FP106 will
return and by mode. If the message is transmitted, the display shows Send OK and
return to written mode.
1) You must enter the receiver’s telephone number when sending an SMS. Other
information can be omitted.
2) You can select Load from phonebook to recall the phone book records.
3) Press to switch ABC/abc
4) Press to choose specific characters.
5) When you are writing an SMS message and the ring is coming, the message will
store on the "Written" box. You can retrieve the unfinished message from the
"Written" box.
pm
am
menu
ok
ok
SMS FUNCTIONS
23
Page 31

REVIEWING THE RECEIVED SMS
1. In standby mode, press SMS.
2. Choose a User and press
3. Press Received and choose a SM then press
4. Press or to see the SMS content.
5. Press to reply/Dial/Forward/Delete the message.
ok
ok
ok
MODIFYING AN SMS
To modify the message content of a finished or received SMS, follow the standard steps
below.
1. Select and scroll to SMS and press OK. Select User and press OK.
2. Choose the message you wish to modify. For example, choose SMS written? and
3. Select and scroll to Modify?.
4. Press to modify the message. When you have finish the modification,
5. Press for Save?
6. You can choose Load from phonebook to recall the phone book records before
7. When you finish the modification, press to confirm all information in the
menu
ok
press to confirm.
OK
ok
ok
press and you will be prompted with save? or send?
ok
sending out the SM. Press for the desired name.
message and press when the display shows Send?
ok
ok
ok
SMS FUNCTIONS
24
Page 32

ADVANCED SETTINGS
RING TONE
There are 4 different ring tones, 12 melody music for your options.
Selecting a
Melody tone as
the main ring
tone will not
affect the VIP
function.
If you make a
mistake use the
or buttons to
move the cursor
and re-enter the
correct
information.
1. Select then scroll to and press
2. Scroll to and press to confirm.
3. Scroll to desired tone.
4. Press to confirm.
Menu Settings
Ring Tone
ok
ok
ok
CLOCK
If you do not subscribe to a Caller Display service you will need to set the clock
as follows.
1. Select then scroll to and press
2. Scroll to and press to confirm.
3. Use the keypad buttons to set the date and time manually following
4. Press or
5. Press to confirm.
Menu Settings
Clock
the cursor position.
am
ok
pm
ok
ok
Clock Display Form
You can choose between an analogue and a digital display as follows.
1. Select then scroll to and press
2. Scroll to and press to confirm.
3. Press and then key to choose Digital or Analog.
SETTINGS
4. Press to confirm.
Menu Settings
Clock
ok
ok
ok
25
Page 33

The Phone
alarms at a
specified time
everyday
unless you
turn the alarm
clock off.
ALARM
The phone can be set to alarm at a specified time. Please see the Clock and
Appointment instructions below for actual settings.
ALARM CLOCK
When the alarm time is reached, the phone sounds an alert tone. When the phone
is alerting, “Alarm Clock” is shown on the LCD display. Press any key to stop the
alarm.
1. Select then scroll to
2. Scroll to then select Alarm clock and press
3. Use the keypad buttons to set the alarm time.
4. Scroll to , then scroll to turn
5. Press to confirm.
Menu Settings
Alarm
On/Off ON or OFF.
ok
or
and press
ok
ok
An error tone
sounds when
an invalid
time is
entered.
ALARM APPOINTMENT
The function helps you to keep track of reminders, calls that you need to make,
meetings, and birthdays. The phone sounds an alarm tone when the alarm time is
reached. Press any Key to stop the alarm.
1. Select then scroll to
2. Scroll to select and press
3. Use the keypad buttons to set the alarm time.
4. Scroll to to write a note. Please see
5. Scroll to , then scroll to turn
Menu Settings
Alarm Appointment
Note Storing a Name with Phone
numbers
on page 16 for instructions on how to enter text.
On/Off ON or OFF.
or
and press
ok
ok
CALL SCREEN
You can set VIP Filter and Call Reject List. Call Screen allows you to set a filter for
your VIP calls.
VIP FILTER
SETTINGS
In the case that the VIP filter is set , all calls will ring normally but numbers
in the VIP list will ring with a second beeping tone as well. In the case that the
VIP Filter is all calls ring normally with no secondary beeping tone.
1. Press then scroll to and press
2. Scroll to then press .
3. Press or to turn VIP Filter Or
4. Press to confirm.
OFF
Menu Settings
Call Screen VIP Filter
ok
ON
ok
ON OFF.
26
Page 34

You will hear
the Call Wait
confirmation
while on a call
to let you
know of
another caller.
CALL REJECT LIST
The Call Reject List is able to store 5 numbers. The function of the Call reject list is to
screen incoming calls for any of those numbers and to answer and then hang up the
call after 3 rings. Numbers in the Call Screen List ring with a secondary ring tone on
top of the normal ring, This ring is sounded briefly after entries are confirmed in the
list to alert the user. The Call Reject List is always on.
Menu Settings
1. Press then choose .
2. Scroll to then choose .
3. Press to edit the numbers; you can press to edit other numbers.
Call Screen Call Reject List
Edit
or
STUTTER DIAL TONE
The Stutter Dial Tone Detect enables the phone to listen to the phone line for the stutter
dial tone used to indicate a message waiting on a voice mail service.
1. Select then scroll to
2. Scroll to “ ” then press
3. Press to turn Stutter Dial Tone Or
4. Press to confirm.
Menu Settings
Stutter dial tone
or
ok
and press
okokok
ON OFF.
okok
CALL WAIT ID ON/OFF (CID Type 2)
This feature allows you to see the number of the calling party (unless the call is blocked
or is from a private number) while you are on call. You can choose turn on or turn off
the function.
1. Select then scroll to Settings and press
2. Scroll to CID Type 2 then press
3. Scroll to select CID type 2 ON/OFF
4. Press to confirm.
Menu
okokok
or
ok
okok
FIRST RING
You can cancel first ring to prevent the incoming SMS being interrupted by off-hook.
Menu Settings
1. Press then choose .
2. Scroll to then press
3. Move the buttons to choose First Ring
SETTINGS
4. Press to confirm.
First Ring
or
ok
okokok
ON/OFF
27
okok
Page 35

AREA CODE
Menu Settings.
1. Press then choose
2. Scroll to then press
3. Key in the local area code.
4. Press to confirm.
Area Code
okok
okok
SMS SETTING
Menu
1. Press then scroll to Settings then press
2. Scroll to
3. Press to set Once you turn on the alert tone, the
4. Press to set Validity Period. There are four options (one hour, 12 hours, one
5. Press to set SMS Delivery report (On/Off) if you want a report on the
SMS Setting.
okok
FP106 will sound an alert every time an SMS message is received.
okok
day, and 3 days). You can choose how long you would like the messages to be kept
in the service centre for you to retrieve.
okok
sending results (sent, failed, pending).
SMS alert tone (On/Off).
LCD CONTRAST
You can choose the desired luminance of the Display Window by following the
steps below.
1. Select then scroll to
2. Scroll to then press
3. Scroll to choose the desired level.
4. Press to confirm.
Menu Settings
Contrast
or
ok
okokok
and press
SETTINGS
28
okok
Page 36

RESET
You can delete the Phonebook entries (including old and new entries), Caller
Display lists (including old and new entries) or delete all using the instructions
below.
DELETE SMS
To delete all messages from the SMS history:
1. Select Menu then scroll to Settings and press
2. Scroll to Reset and press
3. Scroll to Delete SMS and press
4. Scroll to select Yes or No.
5. Press to confirm.
or
ok
okokok
okok
DELETE PHONE BOOK
All records of phone book will be deleted.
1. Select then scroll to
2. Scroll to then press .
3. Scroll or to select or
4. Press to confirm.
Menu Settings
Reset Delete Phonebook
Yes No.
okok
and press
okok
DELETE Call List
All missed calls, received calls and dialled number call list will be deleted.
1. Select then scroll to
2. Scroll to then press .
3.
4. Press to confirm.
Menu Settings
Reset Delete Call List
Scroll or to select or
okok
Yes No.
and press
okok
DELETE All
SETTINGS
Deletes all stored memories and resets all pre-programmed codes to
factory default.
1. Select then scroll to
2. Scroll to then press .
3.
4. Press to confirm.
Menu Settings
Reset Delete All
Scroll or to select or
ok
Yes No.
and press
okok
29
Page 37

TROUBLESHOOTING
If your telephone is not performing to your expectations, here are some suggestions on
how to resolve the problem.
Problem
Can’t make or receive calls.
No Dial Tone.
Can’t hear the telephone ringing.
Speaker phone volume is too low.
Handset does not hang up in the wall
mount position.
New Call LED keeps flashing.
Caller Display and/or SMS Messaging
feature not working
Pre-programmed features not working.
Suggestion
• Make sure you use only the line cord
supplied with this telephone.
• Check that both ends of the telephone
line cord and Handset cord are plugged in.
• Plug another telephone into the
telephone socket and check for a dial
tone.
• Make sure the AC adaptor is plugged in
and the wall socket switched on.
• Make sure you do not have too many
telephones connected to the telephone line.
• Adjust the Ringer Volume Control.
• During speaker phone conversation,
adjust the speaker volume slider control
on the side of the telephone.
• Make sure the Handset Retainer Tab
has been turned around (point facing up)
and the Handset is placed firmly into the
cradle.
• All new calls must be reviewed before
the new call LED stops flashing.
• These are all subscription services.
To subscribe, or check the pricing and
availability, please contact your line services
provider.
Blank or faint LCD screen.
Speaker phone or display not working.
• Make sure the AC adaptor is plugged in
and the wall socket switched on.
• Check / adjust the contrast control
setting as described on page 28.
• Make sure the AC adaptor is plugged in
and the wall socket switched on.
TROUBLESHOOTING
30
Page 38

WARRANTY
One Year Limited Warranty
Important: Evidence of original purchase is required for warranty service.
Warrantor: Uniden Australia Pty Limited. ABN 58001 865 498
Uniden New Zealand
ELEMENT OF WARRANTY:
the duration of this warranty, its FP106 (herein after referred to as the Product), to be
free from defects in materials and craftmanship with only the limitations or exclusions
set out below.
WARRANTY DURATION:
terminate and be of not further effect 12 months after the date of original retail sale.
This warranty will be deemed invalid if the product is; (A) Damaged or not maintained
as reasonable and necessary, (B) Modified, altered or used as part of any conversion
kits, subassemblies, or any configurations not sold by Uniden, (C) Improperly installed,
(D) Repaired by someone other than an authorised Uniden Repair Agent for a defect or
malfunction covered by this warranty, (E) Used in conjunction with any equipment or
parts or as part of a system not manufactured by Uniden. (F) Only available in the
original country of sale.
PARTS COVERED:
Handset only. All accessories (Cables etc.) are covered for 90 days only.
STATEMENT OF REMEDY:
this warranty at any time while this warranty is in effect, the warrantor at its discretion,
will repair the defect or replace the product and return it to you without charge for
parts or service. THIS WARRANTY DOES NOT COVER OR PROVIDE FOR THE
REIMBURSEMENT OR PAYMENT OF INCIDENTAL OR CONSEQUENTIAL DAMAGES. THIS
GUARANTEE IS IN ADDITION TO AND DOES NOT IN ANY WAY AFFECT YOUR RIGHTS
UNDER THE CONSUMER GUARANTEE ACT.
PROCEDURE FOR OBTAINING PERFORMANCE OR
WARRANTY:
Product should be shipped or delivered, freight pre-paid, with evidence of original
purchase (e.g. a copy of the sales docket), to the warrantor at:
UNIDEN AUSTRALIA UNIDEN NEW ZEALAND LIMITED
SERVICE DIVISION SERVICE DIVISION
345 Princes Highway, 150 Harris Road,
Rockdale NSW 2216 East Tamaki, Auckland
Fax (02) 9599 3278 Fax (09) 274 4253
This warranty covers for one (1) year, the FP106 Unit and
In the event that the product does not conform to this warranty, the
Uniden warrants to the original retail owner for
This warranty to the original retail owner only, shall
In the event that the Product does not conform to
WARRANTY
www.uniden.com.au www.uniden.co.nz
Customers in other States should ship or deliver the Product freight pre-paid to their
nearest Uniden Authorised Repair Centre (Contact Uniden for the nearest Warranty
Agent to you).
31
Page 39

Page 40

FOR PURCHASING A UNIDEN PHONE
THANK YOU
© 2004
Uniden Australia Pty Limited
Uniden New Zealand Limited
 Loading...