

Page 1

OPERATING GUIDE
Caller Display with
Centrex Speaker Phone
FP105T
caller display
speaker
Page 2

caller display
speaker
1
Welcome
TO YOUR NEW PHONE
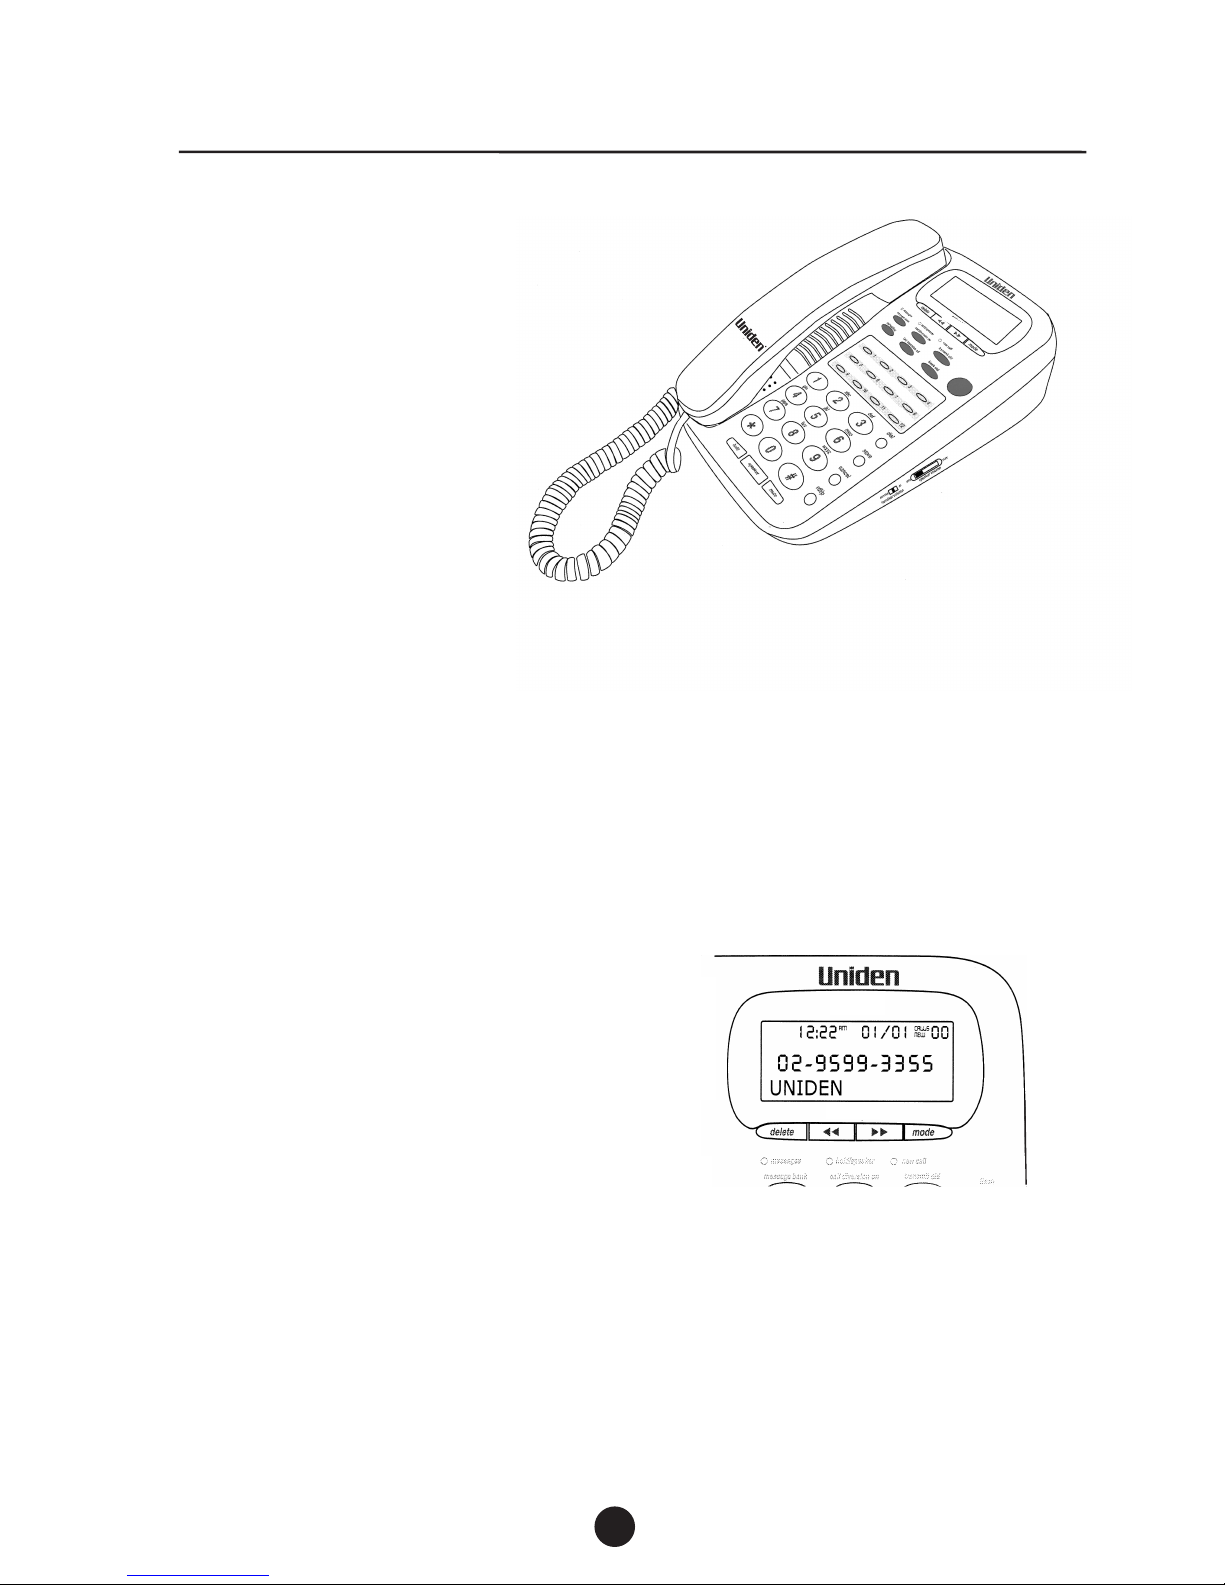
Congratulations on the purchase of your Uniden FP105H Telephone
The FP105H has been designed and engineered to exacting standards for
reliability, long life and outstanding performance.
To obtain the full benefit from your new telephone, please read this Operating
Guide thoroughly.
For your future reference, please fill in the panel below and attach your
Purchase Receipt / Sales Docket.
Serial No: Date of Purchase:
(found on the bottom of the product box)
Name and Address of Dealer:
WELCOME
INTRODUCTION
Page 3

Contents
CONTENTS
2
Important Safety Instructions
Contents
Introduction / Welcome
4
Included in Package
5
Features 6
7
8
Controls and functions
11
Installing your phone
11
12
13
14
Wall mounting
14
Using your phone
14
Placing a telephone call
Redial
Receiving a telephone call
2
1
CONTENTS
OF YOUR OPERATING GUIDE
Important Information
Handset cord connection
Connecting the power
14
14
Adjusting the ringer volume control
Adjusting the ringer tone control
Adjusting the handset volume control
15
Mute
Placing a call on hold
14
15
14
16
16
Speaker phone
17
Adjusting the speaker phone volume control
17
Storing one-touch speed dial numbers
17
Memory dial numbers
18
Pause
18
Dialing stored numbers
18
Chain dialing
19
Call timer
LCD backlight display
19
Editing a stored one-touch speed dial memory
19
Deleting one speed dial memory
Deleting all speed dial memories
Memory storage card
18
18
Page 4

3
Contents
CONTENTS
OF YOUR OPERATING GUIDE
Using the pre-programmed feature buttons - Centrex
20
Messages 20
Call Diversion 20
New call notification 22
New call review 22
Caller Display summary 23
Call review 23
Deleting a call from the call history 24
Deleting all calls from the call history 24
Speed dialling from the Caller Display list 24
Transferring a Caller Display number to a speed dial memory 24
Display messages 25
26Special features - VIP
Setting a VIP call 26
Reviewing VIP calls 26
Speed dialling from the VIP list 26
Resetting a VIP call 27
Deleting a VIP call 27
Name matching
27
Advanced user options menu 28
Setting the LCD contrast 28
Setting the time and date 28
Setting VIP alert on / off 28
Setting the stutter dial tone detect on / off 28
Troubleshooting 29
Specifications / Warranty 30
60 memory Caller Display 22
21
Call Waiting
21
Call Transfer / Conference Call
Call Pickup 21
21
Headset
22
Using Caller Display
Page 5
4
Important Information
IMPORTANT SAFETY INSTRUCTIONS
When using your telephone equipment, these basic safety precautions should always be followed to
reduce the risk of fire, electrical shock, and injury to persons:
1) Read and understand all instructions.
2) Follow all warnings and instructions marked on the product.
3) Unplug this product from the wall outlet before cleaning, and use a dry cloth, without liquid or
aerosol cleaners.
4) Do not use this product near water; for example, near a bath tub,wash bowl, kitchen sink or
laundry
tub, in a wet basement or near a swimming pool.
5) Do not place this product on an unstable cart, stand or table. The telephone may fall, causing
serious damage to the unit.
6) This product should be operated only from the type of power source indicated on the marking
label. If you are not sure of the type of power supply to your home, consult your dealer or local
power company .
7) Do not allow anything to rest on the power cord. Do not locate this product where the cord will
be damaged by persons walking on it.
8) Do not overload wall outlets and extension cords, as this can result in the risk of fire or electrical
shock.
This unit is not waterproof. T o reduce the risk of fire, electrical shock or damage,
DO NOT expose this product to rain, water or any other liquid or moisture.
Page 6

5
Important Information
Immediately disconnect this equipment should it become physically damaged,
and arrange for its disposal or repair.
IMPORTANT INFORMATION
CARING FOR YOUR TELEPHONE
·
Clean your telephone using a soft damp cloth.
·
DO NOT use solvents, detergents, sprays, abrasive pads, scouring powder
or otherproducts that may damage your telephone.
·
DO NOT place the telephone in direct sunlight.
·
DO NOT use in extreme humidity.
The exclamation point within an equilateral triangle is intended to alert the
user to the presence of important operation, maintenance and service
instructions in the literature accompanying this product.
IMPORT ANT NOTES
1.
2.
The grant of a Telepermit for any item of terminal equipment indicates only that
Telecom has accepted that the item complies with minimum conditions for
connection to its network. It indicates no endorsement of the product by Telecom,
nor does it provide any sort of warranty . Above all, it provides no assurance that
any item will work correctly in all respects with another item of Telepermitted
equipment of a different make or model, nor does it imply that any product is
compatible with all of Telecom's network services.
This telephone has been designed to conform to local regulations, and you can connect
it to most telephone lines, however you must not connect your phone to any of the
following:
PLEASE READ BEFORE USE AND SAVE THESE INSTRUCTIONS
·
Coin operated systems
·
Party-line systems
·
Most electronic key phone systems
Each device that you connect draws power from the phone line. We refer to the power
drawn as the device’s Ringer Equivalence Number (REN or RN). This number is shown
on the bottom of your telephone. If you are using more than one phone or other device
on the line, add up all the RN’s. If the total is more than three, your phones may not ring.
This equipment shall not be used in any manner which could constitute a
nuisance.
3.
Page 7
caller display
speaker
Features
6
FEATURES
Telephone
·
LCD with backlight
·
Hands-free speaker phone
·
12 one-touch speed dial
·
32 digit memory per speed dial
·
7 Pre-programmed feature buttons
·
Hearing aid compatible
·
Call Waiting
compatible
·
Redial, Flash and Pause
·
Mute
Caller Display
·
60 memory
Caller Display
·
24 digits and 16 characters per record
·
Advanced
Caller Display
review functions
·
VIP alert – 3 different ringer tones
·
Name matching
·
·
Call timer
·
Wall mountable
Adjustable ringer volume control
·
Adjustable handset volume control
·
Adjustable ringer tone control
·
Adjustable speaker phone volume control
caller display
·
Headset (optional)
Page 8

7
Included in your package
Quick start guide
NOTE
TIP
INCLUDED IN YOUR PACKAGE
Base Unit Handset Curly Cord
Telephone line cord AC Adaptor
Memory storage card
Registration card
Operating guide
If any of these items are missing or damaged, contact
the place of purchase.
To get the most from your purchase, please read this
Operating Guide thoroughly. Also be sure to complete
the Product Registration Form.
2 x Wall mounting
screws and plugs
Wall mounting bracket
caller display
speaker
Page 9
8
Controls and functions
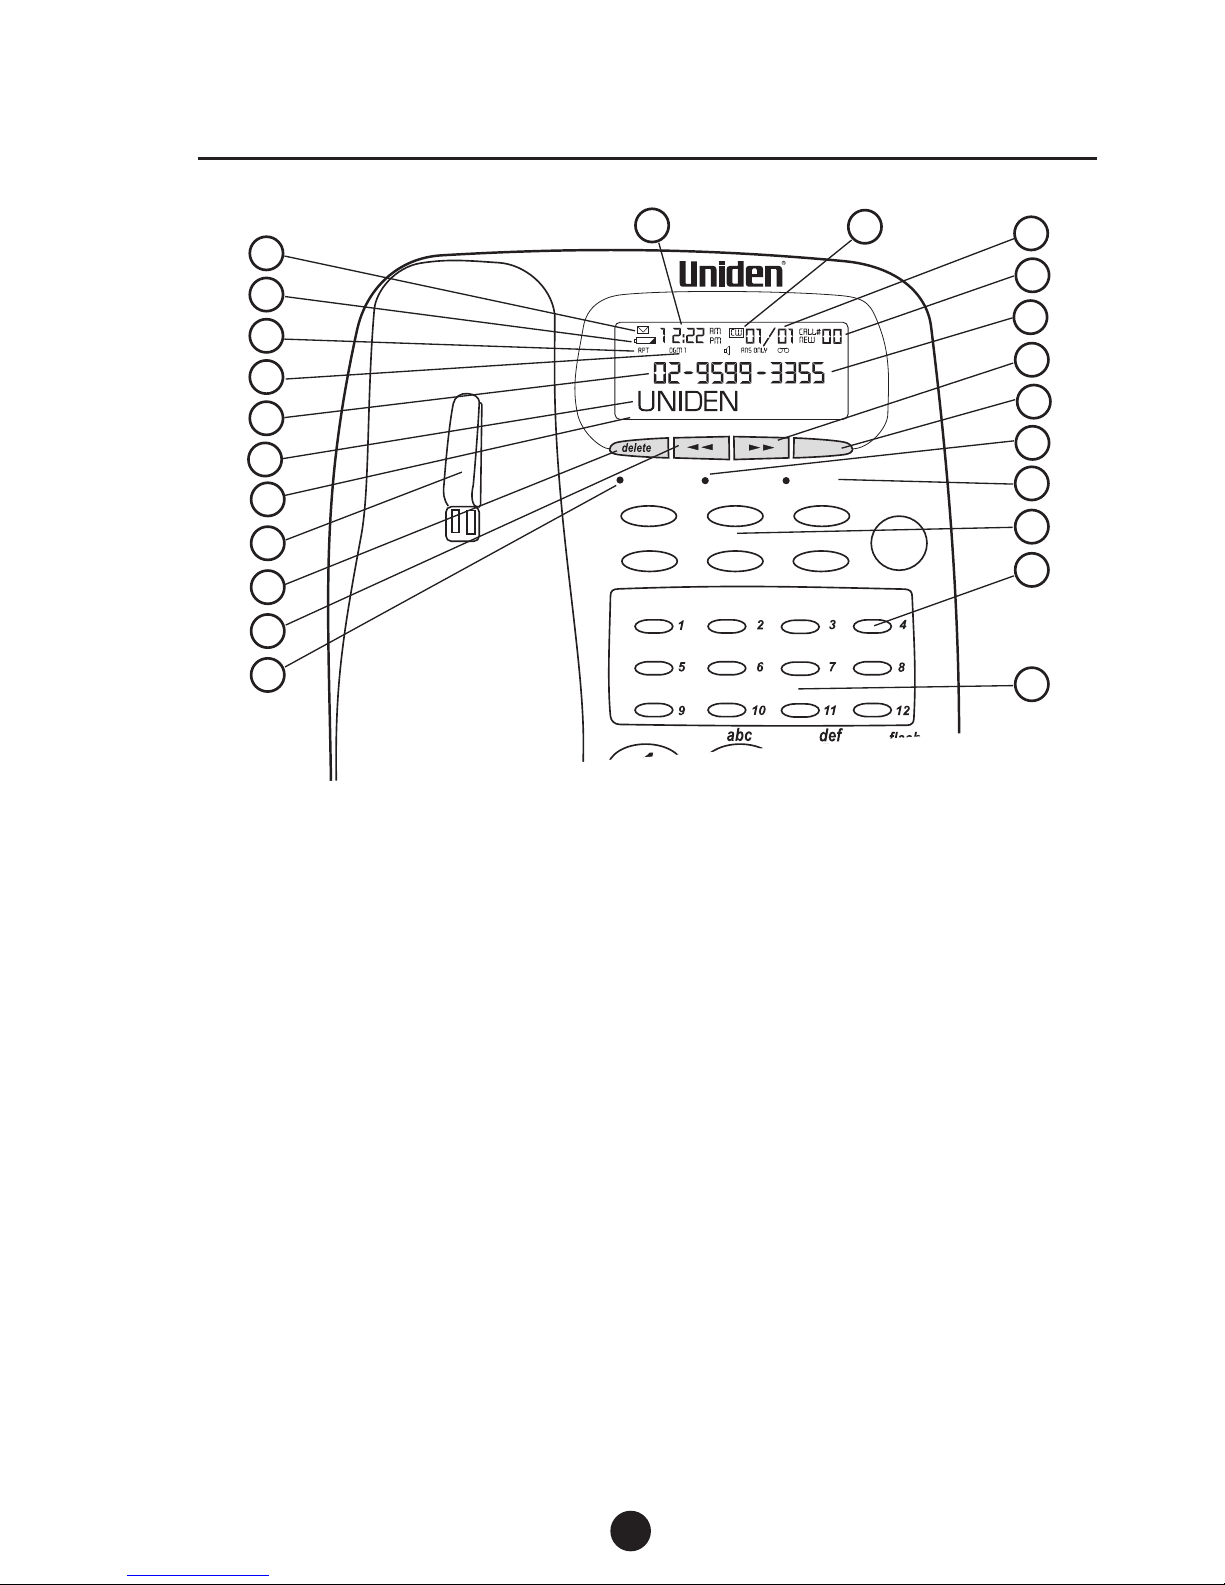
CONTROLS AND FUNCTIONS
mode
messages
hold / spkr
new call
messages divert imm. on
divert imm. off
call pickup
transfer/
conference
call waiting
headset
caller display
redial
9
3
2
4
10
1
FP105T
5
6
11
7
8
9
22
12
13
16
14
15
17
18
19
20
21
Base Unit
LCD screen
Time
1
6
7
8
9
10
Call waiting icon
11
Caller Display
delete
button
hold / spr LED
12
17
new call
LED
12 one-touch speed dial buttons
Memory storage card
Handset retainer tab
20
21
22
New call counter
Numeric line
Alpha line
Date
7 Service buttons
18
19
VIP on icon
2
<<
Scroll left button
13
VIP call icon
3
>> Scroll right button
14
Low battery icon
4
Caller Display
mode button
15
iconenvelopeMessage waiting
5
message waiting LED
16
Page 10
9
Controls and Functions
dial button
store button
cancel button
redial / pause button
hold button
speaker phone button
mute button
Memory storage
instructions tray
23
24
25
26
27
28
29
30
Handsetvolume control
Speaker volumecontrol
31
32
Battery cover located
underneath phone.
AC adaptor power socket
Telephone line socket
Ringer tone control
Ringer volume control
33
34
35
36
37
reset button
38
Page 11

10
Optional Backup Battery
OPTIONAL BACK-UP BATTERY
on the screen means;
·
The back-up battery is either low or not fitted.
If the power fails or you unplug the AC adaptor, the optional 9v back up battery
would save the telephone memory.
Always use a new 9v alkaline battery for optimum performance.
Disconnect the telephone line cord before replacing the battery.
Follow these steps to install the back-up battery.
1. Use a Phillips screwdriver to remove the two screws on the battery compartment
cover.
2. Remove the battery compartment cover.
3. Snap the battery’s contacts firmly to the battery connector, then place the battery
inside the compartment.
4. Replace the cover and secure with the screws.
Dispose of old batteries promptly and properly.
Disconnect the telephone line cord before replacing the battery and
always use a new 9v alkaline battery for optimum performance.
TIP
CAUTION
Page 12

11
Installing your phone
WALL MOUNTING
If required, you can mount your phone directly on a wall.
Before mounting your phone, please consider the following:
·
Select a location away from electrical cables, pipes or other items behind the
mounting location that could cause a hazard when inserting screws into the
·
Make sure the wall material is capable of supporting the weight of the telephone.
·
Use the screws (supplied) with anchoring devices suitable for the wall material
where theTelephone will be placed.
1. Insert two mounting screws 80mm apart. Allow
about 5mm between the wall and screw heads for
mounting the phone.
2. Gently pull out the handset retainer
tab, turn 180° and re-fit.
3. Attach the wall mounting bracket to the
bottom of the telephone as shown.
4. Place the base unit on the screws and push down until it’s firmly seated.
INSTALLING YOUR PHONE
Page 13

12
HANDSET CORD CONNECTION
Plug one end of the Handset Cord (curly) into the Handset and the othe end into the jack
on the side of the telephone.
Installing your phone
TELEPHONE LINE CORD CONNECTION
Plug one end of the Line Cord (straight) into the telephone line jack on the back of the
telephone and the othe end into the wall outlet.
CAUTION
Never install telephone wiring during a lightning storm.
Never touch uninsulated telephone wires or terminals unless the telephone
line has been disconnected.
Use caution when installing or modifying telephone lines.
NOTE: Most phone equipment available now use modular jacks. Phone cards
are fitted with a molded plastic connector which plugs into this type of jack. If
you do not have modular phone jacks, contact your telephone company or your
local electrician
for information about their installation.
Page 14

13
Installing your phone
CONNECTING THE POWER
2. Plug the AC adaptor into a standard 230~240V AC wall outlet and switch on.
1. Plug the AC adaptor lead into the power.
Use only the AC adaptor supplied with this phone.
Place the power cord and line cord so that they do not create a trip hazard or
where they could become chaffed and create fire or electrical hazard.
The telephone will beep and the display will show
SET TIME / DA TE
When you subscribe to Telecom
Caller Display
service, the time and date will be
automatically updated when the first message is received.
After 10 seconds the display will show
TOT AL CALLS 00
If you do not subscribe to Telecom
Caller Display
service, or you wish to set
the clock manually , please refer to the Advanced User Options Menu on page
28.
Once you have installed the phone, lift the handset and check for dial tone.
If there is no dial tone, please refer to the troubleshooting section on page 29.
CAUTION
TIP
DISPLAYS
NOTE
Page 15

Using your phone
USING YOUR PHONE
PLACING A TELEPHONE CALL
1. Remove the handset from the base, or press the speaker button.
2. Press the keypad buttons to dial the phone number you want.
3. After you have completed the call, place the handset back on the cradle.
REDIAL
If you want to redial the last number dialled, simply pick up the handset or press the
speaker
button, then press the redial
button. The telephone will automatically redial the
last number dialled.
RECEIVING A TELEPHONE CALL
When the phone rings, pick up the handset from the cradle or press thespeaker button
and begin the conversation.
ADJUSTING THE RINGER VOLUME CONTROL
While the phone is ringing, you can adjust the ringer volume of your telephone by moving
the ringer volume switch, located at the rear of the telephone, to the desired off/lo/hi
position.
ADJUSTING THE RINGER TONE CONTROL
While the phone is ringing, you can adjust the ringer tone of your telephone by moving
the ringer tone
switch, located at the rear of the telephone, to the desired position.
ADJUSTING THE HANDSET VOLUME CONTROL
While using the telephone, you can adjust the handset volume slider control, located
at the side of the telephone, to the desired position.
14
Page 16

15
Using your phone
MUTE
Press the mute button to turn off the handset microphone,
allowing private conversations in the same room without the
calling party hearing.
Press the mute button again to resume the
conversation with the calling party.
During the mute condition, the display will show < MIC MUTE >.
PLACING A CALL ON HOLD
1.
To place a call on hold, press the hold button
and hang up.
2. To begin conversation again:
Pick up the handset or press thespeaker button or pick up an extension phone,
the hold will then be automatically released.
NOTE
The hold/speaker LED will flash, the display
will show < CALL ON HOLD >.
caller display
headset
Page 17

16
Using your phone
SPEAKERPHONE
To answer an incoming call ;
1. Press the speaker button and begin your hands-free
speaker phone conversation.
2. Press the speaker button to hang up.
At any time during the conversation you can pick up the
handset to resume normal conversation.
To make a speaker phone call ;
Press the speaker button, listen for dial tone and then use the keypad to dial the number
you wish to call. Lift the handset to resume normal conversation.
During a regular conversation ;
Press the speaker button and replace the handset. The hold/speaker LED turns red
and you can begin your speaker phone conversation.
ADJUSTING THE SPEAKER PHONE VOLUME CONTROL
During a speaker phone conversation, you can adjust the speaker volume slider control,
located on the side of the telephone, until you hear the desired volume.
When the telephone is in the speaker phone mode, thehold/speaker LED turns red and
the display shows <SPEAKER PHONE>.
It is not recommended to operate the speaker phone mode under noisy room
conditions.
NOTE
NOTE
caller display
Page 18

17
TIP
NOTE
Using your phone
MEMORY DIAL NUMBERS
12 one-touch speed dial numbers can be programmed into the memory of your telephone.
Each memory location can store a maximum of 32 digits.
STORING ONE-TOUCH SPEED DIAL NUMBERS
Eg :
To program BOB DAY’s telephone number , 1234567 into speed dial location 3
1. Press the store button (Display shows NUMBER ?)
2. Enter the phone number
1 2 3 4 5
6 7 using the keypad
3. Press the store button (Display shows NAME ?)
4. *Enter the name
B O B D A Y
using the keypad
(22 666 22 1 3 2 999)
5. Press the store button (display shows LOCATION ?)
6. Press the speed dial button number 3
The phone will beep and the display will show STORED
* If you do not want to store a name, skip step 4 by pressing store again.
In the above example, pressing the keypad digit ‘1’ once inserts one space
between letters B and D.
If you want to insert more than one space, use the >> button to move the
cursor to the position required.
Repeated pressing of the keypad digit ‘1’ will step through the following symbols
;
– ‘ ( ) & , .
Repeated pressing of any other keypad digit will step through the letters and
number associated with that key.
Examples A=2, B=22, C=222, 2=2222, D=3, E=33, F=333, 3=3333
Repeated pressing of the << or >> button will move the cursor backwards or
forwards to the position required.
When the cursor is flashing on top of any character, you can press the delete
button to delete that character.
MEMORY STORAGE CARD
When you have programmed a number
into the speed dial memory, you can write
the name of the person on the memory
storage card (supplied).
Page 19

Using your phone
P AUSE
During the memory storage procedure, you may wish to press the redial button to insert
a pause between numbers. (This is sometimes useful for accessing a switch board,
telephone banking or long distance dialling).
Pressing the redial button more than once will increase the pause between digits.
Each time the redial
button is pressed, a ‘P’ will show on the LCD to indicate a 2 second
pause in the dialling sequence. Each pause counts as one digit.
For options 3 & 4, the LCD will show <EMPTY> if there is no number
stored in the memory button pressed.
CHAIN DIALING
On certain occasions (such as telephone banking), after dialing one number, you may
wish to dial another number without hanging up. This is known as chain dialling or cascade
dialling.
Simply store the second number in another memory location and press the corresponding
speed dial button when required. In this way you can recall both numbers that are stored
into their own memory locations at the relevant times.
CALL TIMER
Approximately 10 seconds after the handset is picked up,
or the speaker button is pressed, the call counter will
begin and show the elapsed time on the display screen.
LCD BACKLIGHT DISPLAY
The LCD has a back light that will turn on under the
following conditions;
·
Any incoming call
·
Picking up the handset
·
Pressing any button
The backlight will switch off automatically approximately 15 seconds after the
last activity . The back light will not work if the AC adaptor is switched off,
disconnected or there is a power cut.
DIALING THE STORED NUMBERS
There are four different ways to dial a stored speed dial number, depending on your
preference.
1. Pick up the handset and press the desired speed dial button (1 ~ 12).
2. Press the speaker button and then press the desired speed dial button (1 ~ 12).
3. Press the desired speed dial button (1 ~ 12), and check the LCD shows the
If you have selected a speed dial button that does not have a stored
number, the telephone will not dial.
18
NOTE
NOTE
caller display
correct information then press the
dial
button (the phone enters speakerphone
mode and dials the displayed number).
4. Press the desired speed dial button (1 ~ 12), and check the LCD shows the
correct information then pick up the handset and then press the
dial
button.
Page 20

19
Using your phone
.
EDITING A STORED ONE-TOUCH SPEED DIAL MEMORY
DELETING ONE SPEED DIAL MEMORY
Example :
To delete the details stored in speed dial location 3.
1. Press the speed dial button 3 (Display shows contents of this memory).
2. Press the delete button (Display shows DELETE 03 ?).
3. Press the delete button again.
The phone beeps and the display shows DELETED.
Example :
To edit the details stored in speed dial location 3 from BOB DAY 1234567
to BOB MAY 1235467.
1. Press the store button then the speed dial button 3 (Display shows NUMBER ?).
2. Edit the phone number using the << or >> button.
(Move the blinking cursor to after the digit 3 then enter 5 4 delete delete).
3. Press the store button (Display shows NAME ?).
4. Edit the name by using the << or >> button.
(Move the blinking cursor to the letter D. press the delete button to delete the letter
D, then select the letter M by pressing the keypad digit 6).
5. Press the store button (Display shows LOCATION ?).
6. Press the speed dial
location number 3.
The phone will beep & the number will be stored.
button 3 to store this edited information into speed dial memory
Page 21

20
Using the pre-programmed feature buttons - Centrex
USING THE PRE-PROGRAMMED FEATURE BUTTONS - Centrex
This telephone has been pre-programmed to provide easy access to Telecom
Centrex
services at the touch of a button. Y our Telecom
Centrex
service
User Guide
contains
use them.
For more information about Telecom
Centrex
services, their availability ,
charges and
CALL DIVERSION
If you subscribe to Telecom
Call Diversion
service,
Call Diversion
allows you to activate
the
Call Diversion
number you have registered against the *31
Call Diversion
code.
Divert Immediate On:
1. Lift the handset.
2. Press the
divert imm. on
button and wait for the confirmation tone. If required,
place a confirmation call.
3. Hang up the phone.
Divert Immediate Off:
1. Lift the handset and wait for the confirmation tone.
2. Press the
button and wait for the confirmation tone.
3. Hang up the phone.
NOTE
MESSAGES
If you subscribe to Telecom
Call Minder
, the messages button allows you to access
your Telecom
Call Minder
mailbox.
When a new message has been left in your
mailbox, the message waiting LED on your phone
will begin to flash and the Message Waitingenvelope
icon will show on the display.
To Use Call minder:
1. Lift the handset.
2. Press
the messages button.
3. Enter your PIN at the prompt and follow the recorded instructions.
When you have cleared the message (from any phone), the message
There may be a delay in these indicators turning on or off.
waiting LED and
envelope icon will turn off.
caller display
headset
information about these services and how to
subscribing to these services, call Telecom on 126.
divert imm. off
Page 22

21
Using the pre-programmed feature buttons - Centrex
CALL WAITING
If you subscribe to Telecom
Call Waiting
service,
Call Waiting
lets your know if you have
another call while you are already on the phone. T elecom
Call Waiting
sends you four
beeps when you have another call. If you do not want to be disturbed during a call, you
can temporarily
Suspend Call Waiting
.
To Use Call Waiting:
1.
2.
HEADSET (Optional)
Unplug the handset curly cord from the base (leave the handset sitting on the base). Plug
the optional headset into the base curly cord socket.
1. Press the headset button.
2. Dial the required number.
1. Press the headset button to receive a call.
2. Press the headset button to end a call.
To make a call :
To receive or end calls :
CALL PICKUP
If you subscribe to the Telecom Centrex service with pickup groups, you may answer any
other ringing phone in your pickup group.
1. Lift the handset.
2. Press the call pickup button.
3. Greet the caller.
If two or more phones are ringing you will pick up the one that started ringing first.
Y ou can transfer a call to any telephone number or Centrex extension. Before transfering
a call you can also set up a conference call.
T o Transfer a Call
1. Ask the caller to hold.
2. Press TRANSFER / CONFERENCE
3. Wait for recall dial tone.
4. Dial the number you want to transfer to.
5. Wait for the ringing tone.
6. When the call is answered, announce your caller.
7. Hang up to transfer the call.
Conference Call
Follow Call Transfer step s 1 - 6 then:
7. Press TRANSFER / CONFERENCE to connect all calls and begin your conference.
CALL TRANSFER / CONFERENCE CALL
Press the call waiting
button when you hear the four
Call Waiting
beeps.
The first call is placed on temporary hold and you are connected to the new call.
Press the call waiting
button to return to the first call and put the second call
on hold. Y ou can alternate between the two calls as often as necessary .
Page 23

22
Using Caller Display
USING CALLER DISPLAY
When you subscribe to the Telecom
Caller Display
service, your telephone allows you to see information
about the incoming call before you answer thephone.
Caller Display
gives you the reassurance that comes
with having more certainty as to who is calling and
allows you more choice of how to handle your call.
60 MEMORY CALLER DISPLAY
This telephone will store and display information about the last 60 calls received.
Each call is numbered in the call history, together with the time and date the call was
received and the number of the calling party. When the memory is full, the oldest call
information is deleted to make room for new incoming call information.
NEW CALL NOTIFICATION
When a new call is received, the time, date and
calling number will be displayed between the first
and second ring.
The new call LED will flash quickly when the phone
is ringing, and then change to a slow flash. It will
continue to flash until all new call information in the
call history has been reviewed.
NEW CALL REVIEW
To review only new call information,
1. Press the mode button, and the display will
show REVIEW NEW CALL.
2. Use the << or >> buttons to view the new calls.
When the display shows END OF LIST or TOP OF LIST, all new calls
have been reviewed and the new call LED will stop flashing.
NOTE
caller display
caller display
caller display
caller display
headset
Page 24

23
Using Caller Display
CALLER DISPLAY SUMMARY
The display will show the Caller Display summary
TOTAL CALLS XX(where XX is the total number of
calls stored in the memory)
The display will also show the number of new
calls received.(New calls means calls that have
not been reviewed yet)
CALL REVIEW
To review all the calls in the call history , use the << or >> buttons.
When the display shows END OF LIST or TOP OF LIST, all calls
have been reviewed.
Press and hold the << or >> buttons for 2
seconds and then release. The telephone
will automatically scroll through the Caller
Display records one by one. Press the cancel
button to exit this mode at any time.
If the Caller Display number is longer than
16 digits, you can press the keypad digit ‘3’
to view the next digit to the right and press
the keypad digit ‘1’ to view the next digit to
the left. The phone will beep three time is quick
succession when the end of the number has
been reached.
TIP
TIP
caller display
caller display
caller display
Page 25

24
Using Caller Display
DELETING A CALL FROM THE CALL HISTORY
To delete a call from the call history ;
1. Use the<< or >> buttons until the screen displays the
information of the call you wish to remove.
2.
Press the delete button once and the display will
show DELETE ?
DELETING ALL CALLS FROM THE CALL HISTORY
To delete all calls from the call history ;
1. Press the delete button once and the display will show DEL ALL CID ?
2. Press the delete button again.
The phone will beep once, all call records will be deleted and the display will show DELETED.
The display must be showing the call summary ‘TOT AL CALLS XX’
New calls can not be deleted until they have been reviewed.
SPEED DIALING FROM THE CALLER DISPLAY LIST
1. Use the << or >> buttons to scroll through the call history until you locate the number
you wish to call.
2. Press the dial button. The telephone will enter the speaker phone mode and dial
the displayed number. Pick up the handset at any time.
3. Press a speed dial button
(1 ~ 12) to store the number
The phone will beep once, and
the display will show STORED.
3. Press the delete button again.
The phone will beep once, and the display will show DELETED.
NOTE
TRANSFERRING A CALLER DISPLA Y NUMBER TO THE SPEED DIAL MEMORY
1. Use the << or >> buttons to scroll
through the call history .
2. When you locate the number
you wish to transfer, press the
store button.
The display will show STORE TO ?
caller display
caller display
caller display
into the one-touch speed dial list.
Page 26

25
Using Caller Display
DISPLAY MESSAGES
PRIV ATE
on the screen means;
·
The caller has chosen to withold their number
UNA VAILABLE
on the screen means;
·
A call from some older telephone exchanges
·
A call from a payphone
·
A call coming from a non-Telecom network.
0000
on the screen means;
·
A call coming from overseas
DA TA ERROR
on the screen means;
·
There has been an Error during the
transmission of
Caller Display
information. This
does not mean your phone is faulty.
END OF LIST or TOP OF LIST
on the screen means;
·
Y ou have reached the end of the
Caller Display
history information.
TOTAL CALLS 00
on the screen means;
·
You have not received any
Caller Display
information
·
No calls are stored in the
Caller Display
history
caller display
caller display
caller display
caller display
caller display
caller display
Page 27

26
Using Caller Display
NOTE
TIP
SPECIAL FEATURES – VIP
You can transfer any
Caller Display
record into the VIP Call List and gain these special
features:-
·
The telephone will sound a special VIP tone (3 dif ferent VIP tones are available) to
alert you to an incoming VIP call.
·
You can speed dial from the VIP Call list
SETTING A VIP CALL
1. Use the << or >> buttons to scroll through the call history until you locate the
number you wish to transfer.
2. Press the mode button. The display will show SET AS VIP ?
3. Press the mode button again. The display will show RING TYPE : 1
4. Press the mode
button to accept VIP ring type 1
(or press the>> button to select
a different ring type then press themode
button to confirm)
The phone will beep once, and the display will show STORED.
Each time you press the >> button the telephone will sound the particular
VIP ring tone so you can listen to the tone before choosing your preference.
As you scroll through the
Caller Display
history, any number that has been
set as a VIP call will display the VIP icon.
REVIEWING VIP CALLS
To review only VIP call information ;
1. Press the mode button twice, and the display will show REVIEW VIP CALL.
2. Use the << or >> buttons to view the VIP calls.
SPEED DIALING FROM THE VIP LIST
1. Press the mode button twice and the display will show REVIEW VIP CALL
2. Use the << or >> buttons to scroll through the VIP list.
3. Locate the number you wish to call then press the dial button.
The telephone will enter the speaker phone mode and dial the displayed number.
Pick up the handset at any time.
Page 28

27
Using Caller Display
NOTE
TIP
Example
If the number ‘9123 4567’ and the name ‘MUM’ is stored into one of the speed dial memory
locations (1 ~12) and the caller display number ‘9123 4567’ is sent by the Telecom
Caller
Display
network, the name ‘MUM’ will be automatically displayed together with the phone
number, time and date of the call.
You must subscribe to Telecom
Caller Display
service for this feature to work
Always store names with the numbers in your 12 one-touch speed dial memories
to maximise the benefit of this feature.
RESETTING A VIP CALL
To reset a VIP call to normal ;
1. Press the mode button twice, and the display will show REVIEW VIP CALL.
2. Use the << or >> buttons to view the VIP calls.
3. When you locate the VIP number you wish to reset to normal, press the mode
button. The display will show SET AS NORMAL ?
4. Press the mode button again.
The phone will beep once, and the display will show STORED.
DELETING A VIP CALL
To delete a VIP call ;
1. Press the mode button twice and the display will show REVIEW VIP CALL ?
2. Use the << or >> buttons to review the VIP calls.
3. When the screen displays the VIP call you wish delete, press the delete button.
The display will show DELETE ?
4. Press the delete button again.
The phone will beep once, the displayed call record will be deleted and the display will
show DELETED.
NAME MATCHING
When the phone number of an incoming call is matched with the exact same number
stored in one of the 12 one-touch speed dial memory locations, the name stored in the
memory will automatically be displayed together with the
Caller Display
number.
Page 29

28
Advanced User Options Menu
ADVANCED USER OPTIONS MENU
To enter the Advanced User Options Menu press and hold the store button for 2 seconds.
Release the store button when the display shows;
LCD CONTRAST
1. Press the >> or << buttons to adjust the display contrast to the desired viewing level.
2. Press the store button to set and move to the next menu option or cancel to exit.
SET TIME/DATE
The time and date can be set manually, as shown below.
Example
To set the time and date as : 08.45AM on the 9th of July
1. Use the keypad buttons and press * 0 8 4 5 0 9 0 7
2. Press the store button to set and move to the next menu option or cancel to exit.
To select AM press the * button, to select PM press the # button
Each press of a keypad digit moves the cursor to the next position to be set.
If you make a mistake, use the << or >> buttons to move the cursor and re-
enter the correct information.
If you subscribe to Telecom
Caller Display
service, the time and date will
be updated automatically when the first message is received, so you do not
need to set it manually.
VIP ALERT ON/OFF
1. Press the >> or << buttons to choose VIP ALERT ON/OFF
2. Press the store button to set and move to the next menu option or cancel to exit.
SDT DETECT ON/OFF
1. Press the >> or << buttons to choose STUTTER DIAL TONE DETECT ON/OFF
2. Press the store button to confirm your choice and exit the Advance User Options
Menu.
The Advanced User Options Menu can not be accessed if the handset is off
the cradle or if the telephone is in the speaker phone mode.
To exit the Advanced User Options Menu at any time, press the cancel button.
TIP
NOTE
NOTE
Page 30

29
Troubleshooting
If your telephone is not performing to your expectations, here are some suggestions on
how to resolve the problem.
TROUBLE SHOOTING
Suggestion
Problem
• These are all subscription services.
To subscribe, or check the pricing and
availability, please contact Telecom
Residential Sales and Service on ‘123’ or
Telecom Business on ‘126’
• Make sure the AC adaptor is plugged in
and the wall socket switched on.
• Make sure the AC adaptor is plugged in
and the wall socket switched on.
• Check / adjust the contrast control
setting as described in the Advanced
User Menu Options on page 28.
• Make sure you use only the line cord
supplied with this telephone.
• Check that both ends of the telephone
line cord and Handset cord are plugged
in.
• Plug another telephone into the
telephone socket and check for a dial
tone.
• Make sure the AC adaptor is plugged in
and the wall socket switched on.
• Make sure you do not have too many
telephones connected to the telephone
line.
• Adjust the Ringer Volume Control
• During speakerphone conversation,
adjust the speaker volume slider control
on the side of the telephone.
• Repeat the memory storage procedures
detailed on page 19.
• Make sure the Handset Retainer T ab
has been turned around (point facing up)
and the Handset is placed firmly into the
cradle.
• All new calls must be reviewed before
the new call LED stops flashing.
Can’t make or receive calls.
• Press the reset button located at the
rear of the phone.
Caller Display feature not working
Pre-programmed features not working
Blank or faint LCD screen
No Dial Tone.
Can’t hear the telephone ringing.
Speaker phone volume is too low.
One Touch speed dial numbers are not
working correctly.
Handset does not hang up in the wall
mount position.
New Call LED keeps flashing
Speaker phone or display not working
• Make sure the AC adaptor is firmly plugged in
at the phone and the wall, and is switched on.
Page 31

30
Specifications, Features and availability of any Optional Accessories shown
are typical and subject to change without notice.
Specifications / Warranty
Compliance :
PTC200, AS3108, AS3548 / CISPR 22 Class B
VMWI :
FSK Detection,
SDT Detection
Size :
165mm(W) x 115mm(D) x 80mm(H)
Weight :
Approx. 650g
NOTE
SPECIFICATIONS
WARRANTY
ONE YEAR LIMITED WARRANTY
IMPORTANT: Evidence of the original purchase is required for warranty service.
WARRANTOR: Uniden New Zealand Limited.
ELEMENTS OF WARRANTY: Uniden warrants to the original retail owner for the duration of this
warranty its FP105H hereinafter referred to as the Product), to be free from defects in materials
and craftsmanship with only the limitations or exclusions set out below.
WARRANTY DURATION: This warranty to the original retail owner only is only valid in the original
country of purchase and shall be of no further effect 12 months after the date of original retail
sale. This warranty will be deemed invalid if the Product is: (A) Damaged or not maintained as
reasonable and necessary, (B) Modified, altered or used as part of any conversion kits,
subassemblies, or any configurations not sold by Uniden, (C) Improperly installed, (D) repaired
by someone other than an authorised Uniden Repair Agent for a defect or malfunction covered
by this warranty, (E) Used in conjunction with any equipment or parts or as a part of a system
not manufactured by Uniden.
PARTS COVERED: This warranty covers for one (1) year, the telephone and Handset only. All
accessories (Cable and Modular Plug) are covered for 90 days only.
STATEMENT OF REMEDY: In the event that the Product does not conform to this warranty at
any time while this warranty is in effect, the warrantor, at its discretion, will repair the defect or
replace the Product and return it to you without charge for parts and service. THIS WARRANTY
DOES NOT COVER OR PROVIDE FOR THE REIMBURSEMENT OR P AYMENT OF INCIDENT AL
OR CONSEQUENTIAL DAMAGES. THIS GUARANTEE IS IN ADDITION TO AND DOES NOT
IN ANY WAY AFFECT YOUR RIGHTS UNDER THE CONSUMER ACT.
WARRANTY CARD: If a Warranty Card has been included with this Product, please complete
and return to us within 14 days of purchase. Your name and the serial number of the Product
will then be registered in our database and this will help us process your claim with greater speed
and efficiency should you require warranty service.
PROCEDURE FOR OBTAINING PERFORMANCE OF WARRANTY : in the event that the Product
does not conform to this warranty, the Product should be shipped or delivered, freight prepaid,
with evidence of original purchase (e.g. a copy of the sales docket) to the warrantor at:
UNIDEN NEW ZEALAND LIMITED
SERVICE DIVISION
150 Harris Road,
East Tamaki,
Auckland.
Ph: (09) 273 8383 Fax: 274 0009 FREE CALL: 0800 486 4336
www.uniden.co.nz
Page 32

THANK YOU
for purchasing a Uniden phone
A Clear Signal of What’s Ahead.
 Loading...