

Page 1
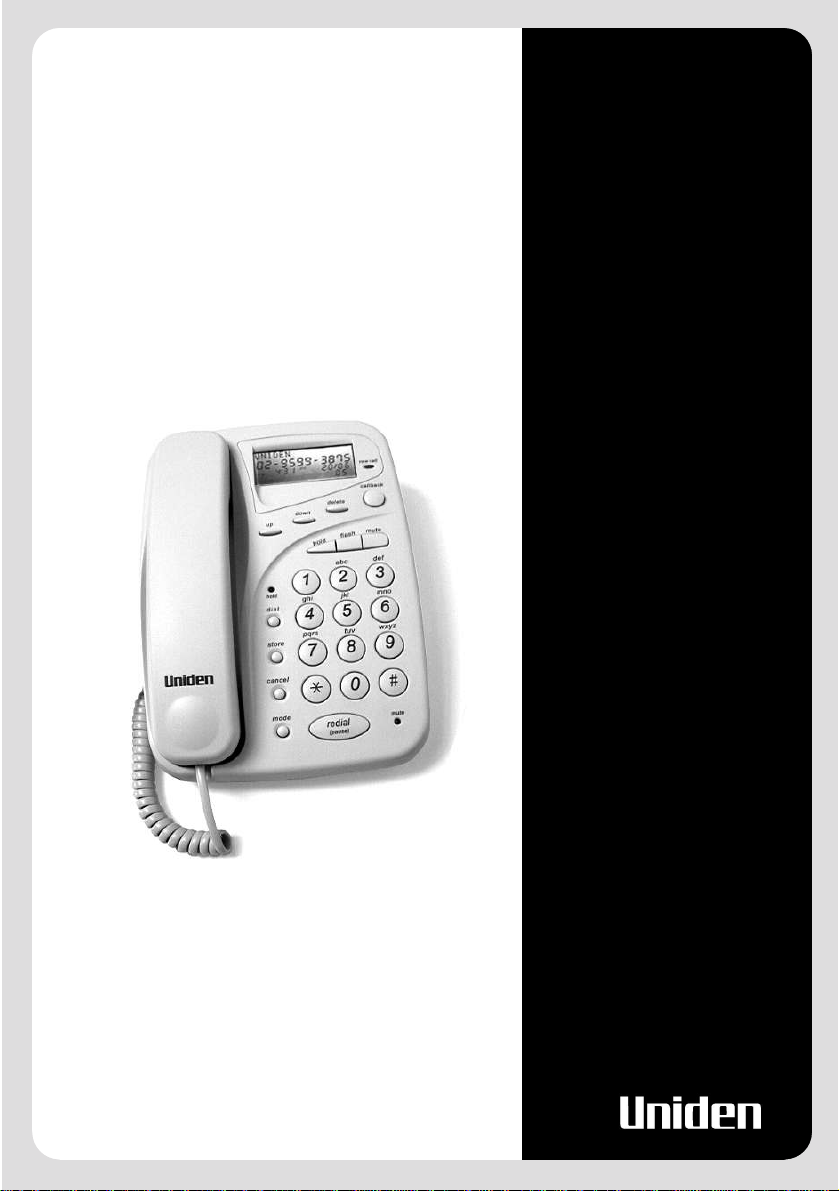
FP103
LCD Display
Caller ID
Music On Hold
12 Speed Dials
OWNERS
MANUAL
Page 2
CONTENTS
1
Contents & Features . . . . . . . . . . . . . . . . . . . . . . . . . . . . . .
Important Safety Instructions . . . . . . . . . . . . . . . . . . . . . . .
Your FP103 Package . . . . . . . . . . . . . . . . . . . . . . . . . . . . . .
Set Up . . . . . . . . . . . . . . . . . . . . . . . . . . . . . . . . . . . . . . . . .
Location and Controls & Connections . . . . . . . . . . . . . . . .
Operation . . . . . . . . . . . . . . . . . . . . . . . . . . . . . . . . . . . . . . .
Memory Dial Number . . . . . . . . . . . . . . . . . . . . . . . . . . . . .
Using Caller ID . . . . . . . . . . . . . . . . . . . . . . . . . . . . . . . . . .
Display Information . . . . . . . . . . . . . . . . . . . . . . . . . . . . . .
VIP Caller . . . . . . . . . . . . . . . . . . . . . . . . . . . . . . . . . . . . . .
Troubleshooting . . . . . . . . . . . . . . . . . . . . . . . . . . . . . . . . . .
Warranty . . . . . . . . . . . . . . . . . . . . . . . . . . . . . . . . . . . . . . .
FEATURES
• 12 speed dial memories
• Wall mountable
• Call Display
- 50 memory Caller ID
1
2
3
4
5
6
7
9
11
12
13
14
• Hearing aid compatible
• Redial, Flash and Pause
• Mute
• Music on hold
• Adjustable handset volume control
• Call timer
• Adjustable ringer volume control
- Review NEW/ALL/VIP calls
- VIP alert – 3 different ringer tones
- Phone book
- Name tagging
- Call back
- Repeat indicator
Page 3

2
IMPORTANT SAFETY INSTRUCTIONS
When using your telephone equipment, these basic safety precautions
should always be followed to reduced the risk of fire, electrical shock,
and injury:
1. Read and understand all instructions.
2. Follow all warnings and instructions marked on the product.
3. Unplug this product from the wall outlet before cleaning, and use a dry
cloth, without liquid or aerosol cleaners.
4. Do not use this product near water; for example, near a bathtub, shower,
washbowl, kitchen sink or laundry tub, in a wet basement or near a
swimming pool.
5. Do not place this product on an unstable cart, stand or table. The telephone
may fall, causing serious damage to the unit.
6. Do not allow anything to rest on the power cord. Do not locate this product
where the cord will be damaged by people walking on it.
7. Do not overload wall outlets and extension cords, as this can result in the
risk of fire or electrical shock.
8. Never spill liquid of any kind on the product.
9. Do not disassemble this product. Take it to a qualified service person when
service or repair work is required.
Opening or removing covers may expose you to dangerous voltages or other
risks. Incorrect reassembly can cause electric shock when the appliance is
subsequently used.
10. Unplug this product from the wall outlet and refer servicing to qualified
service personnel under the following conditions:
A. If the power supply cord is damaged or frayed.
B. If liquid has been spilled into the product.
C. If the product has been exposed to rain or water.
D . If the product does not operate normally when following the operating
instructions.
Page 4
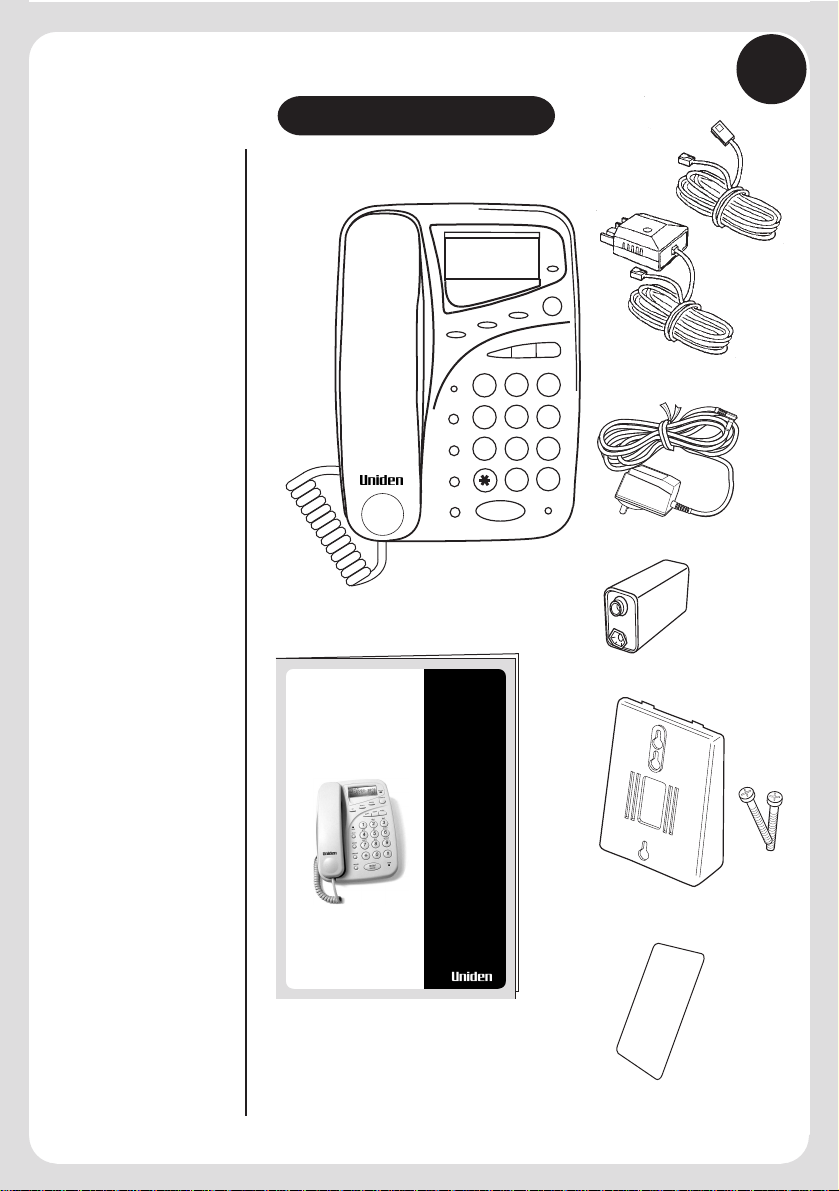
YOUR FP103 PACKAGE
3
Your FP103 package will contain:
02-9599-3675
AM
12:15
down
up
1
hold
ghi
dial
4
pqrs
store
7
cancel
mode
redial
(pause)
1 - Base Unit, Handset and Curly Cord
1 - Telephone line cord
new call
20/06
CALL
NEW
05
callback
delete
e
mu
t
h
s
a
l
f
d
l
o
h
def
abc
3
2
mno
jkl
5
6
wxyz
tuv
9
8
#
0
mute
(New Zealand)
- or 1 - Telephone line cord
(Australia)
1 - AC Adaptor
1 - 9V battery
O WNERS
MANU AL
1 - Owner's manual
FP103
LCD Display
Caller ID
Music On Hold
12 Speed Dials
1 - Wall mount bracket
and 2 screws
1 - Memory card
Page 5
For Caller ID to operate you
must first subscribe to a
Caller ID service from your
telephone company.
NOTE
If you subscribe to a Caller ID
service, the time and date will
be automatically updated when
the first CID information is
received. You do not need to
set it manually.
4
SET UP
Back-up Battery Installation
1. Remove the two screws on the battery compartment cover under the base.
2. Remove the cover and attach the connector to the battery.
3. Position the battery in the compartment and replace the cover and screws.
The battery will keep information without the power adaptor for 6 months. on
the screen means the battery is low, you should replace the battery within 7 days.
Connecting Line Cords
Plug one end of the supplied modular cord into the telephone wall jack. Then plug the
otherend intotelephone base linejack.
Caller ID Insert ‘0’ On/Off
On some telephone networks, to correctly display and dial Caller ID telephone numbers,
a ’0’ may need to be inserted. When the power is first connected to the FP103 CID insert
]
‘0’ off is displayed. If it is not displayed, press the reset button, located at the rear of the
telephone base. You may select ‘on’ or ‘off’ by pressing the up or down buttons followed
by the store button.
New Zealand:
Telecom - insert ‘0’ on.
Telstra/Saturn - insert ‘0’ off.
Australia:
Insert ‘0’ off.
Flash Time
After the caller ID insert ‘0’ option is set the screen will display . Select either
100 or 600 by pressing the up or down buttons, followed by the store button.
New Zealand:
600
Australia:
100
]
FLASH TIME
LCD Contrast
1. Press and hold the store button for approximately 2 seconds until the screen displays
]
LCD CONTRAST .
2. Press the up or down buttons to adjust the LCD display contrast to the desired viewing
level.
3. Press the store button to set and move to the next menu option or press cancel button
to save and exit.
]
Setting Time and Date
1. Press and hold the store button until the screen displays LCD CONTRAST .
2. Press the store button again - the screen displays SET TIME/DATE .
3. Press the up or down buttons to move the curser. Press the appropriate number to enter
the time and date. Press * (am) or # (pm). HH : MM MM / DD
If you make a mistake, use the up or down buttons to move the cursor and re-enter the
correct information.
4. Press the store button to set and move to the next menu option or press cancel to
save and exit.
SET TIME/DATE
AM
12:15
01:08
(hours : minutes)
]
]
(day : month)
LOW
]
]
]
]
Page 6

5
LOCATION OF CONTROLS & CONNECTIONS
Handset and Base Unit
Handset
cord
connection
Rear of Base Unit
02-9599-3675
AM
12:15
down
up
d
l
o
h
1
hold
ghi
dial
4
pqrs
store
7
cancel
mode
redial
(pause)
20/06
CALL
NEW
05
delete
f
abc
2
jkl
5
tuv
8
0
new call
callback
e
mu
t
h
s
a
l
def
3
mno
6
wxyz
9
#
mute
Handset
volume:
- normal
- mid
- hi
AC adaptor Telephone
Line
Ringer Volume
OFF LO HI
Reset
Page 7

6
OPERATION
Redial
If you need to call the last number dialed, simply pick up the handset and press the redial
(pause) button. The telephone will automatically redial the last number dialed.
Flash - Call Waiting
If the Call Waiting tone sounds while you are on a call -
New Zealand: Press the flash button to switch between callers.
Australia: Press flash then 2 to switch between callers.
Adjusting Volume Controls
Ringer volume:
You can adjust the ringer volume by moving the ringer volume switch, located at the
rear of the telephone base, to the desired off/lo/hi position.
Handset volume:
While on a call, adjust the handset volume switch, located at the side of the telephone
base, to the desired normal /mid/ hi level.
Placing a Call on Mute
To allow you to privately speak with another person while you have a caller on the line,
press the mute button. This will turn off the handset microphone, preventing any private
conversation from being heard by the caller. The mute light will turn on while the phone
is in this mute mode. The screen will display .
Press the mute button again to resume the telephone conversation with the calling party.
Placing a Call on Hold
There are two options:
1. If you need to leave the phone but wish to retain the caller on the line - press the hold
button and hang up. The hold light will turn on, the display will show CALL ON
HOLD . To begin conversation again, pick up the handset or pick up an extension
]
phone (if available), the hold will automatically release.
-or-
2. Press the hold button and do not hang up the handset. The hold light will turn on,
the screen will display CALL ON HOLD . When you want to talk to the caller
again, press the hold button again. You do not need to hang up the phone.
]
]
MIC MUTE
]
]
]
Music on Hold
When a call is on hold, the FP103 will play a popular melody to reassure your caller that
the call has not been disconnected.
Page 8

NOTE
You must subscribe to a
Caller ID Service for Name
Tagging to work.
TIP
Always store names with
the numbers in your 12
speed dial memories to
maximize the benefit of
this feature.
7
MEMORY DIAL NUMBERS
Twelve, speed dial, numbers can be programmed into the memory of your telephone.
Each memory location can store a maximum of 16 digits.
Storing Two-Touch Speed Dial Numbers
An example: You want to be able to speed dial Fred.
To program FRED (telephone number 09 273 8383) as a speed dial number follow these
steps:
1. Press the store button - the screen will display .
2. Enter Fred’s phone number 09 273 8383 using the keypad (up to 16 digits).
3. Press the store button - the screen will display .
4. Enter the name FRED using the alpha keypad - eg: (333,777,33, up button, 3).
5. Press the store button - the screen will display .
6. Press a number button of the location you wish to store the number in
either
The phone will beep and the screen will display .
If you do not wish to store a name, skip step 4.)
9
0
#
ororto
[
NUMBER?
[
NAME?
[
STORE TO?
[
STORED
Name Tagging
When the phone number of an incoming call matches with the exact number stored in
one of the 12 speed dial memory locations, the name stored in the memory will
automatically be displayed together with the caller ID number.
Pause
During the speed dial memory storage procedure, you may wish to insert a pause between
numbers. (used for accessing a switchboard, telephone banking or long distance dialling).
Pressing the redial (pause) button more than once will increase the pause period between
digits. Each time the redial (pause) button is pressed the screen will display a . This
indicates a 2 second pause in the dialing sequence. Each pause counts as one digit.
Editing a Stored Speed Dial Memory
1. Press the dial button - the screen displays MEMORY? .
2. Press the memory location number, either , that you want to edit.
3. Press the store button - the screen displays NUMBER? .
4. Use the up, down, delete buttons to edit the number.
5. Press the store button - the screen displays NAME? .
6. Using up, down, delete and the 12 digits buttons to edit the name.
7. Press the store button - the screen displays STORE TO? .
8. Press memory location, either , to store the edited information.
The phone will beep - the screen displays STORED .
0
[
0
to
[
[
[
9
or
or
to
[
]
]
]
]
]
[
P
]
9
or
#
or
]
]
]
#
]
Page 9

NOTE
If you have selected a speed
dial button that does not have
a stored number, the
telephone will not dial and
the screen will display
]
[
EMPTY.
8
Dialling Speed Dial Numbers
There are two different ways to dial a stored two-touch number:
1. a. Pick up the handset and press the dial button.
9
0
b. Press the desired memory location button, either .
-or-
2. a. Don’t pick up the handset - press the dial button.
b. Press the desired memory location button, either , then check
that the screen display shows the correct information.
c. Pick up handset, then press the callback button.
to
0
to
Chain Dialling
On certain occasions (such as telephone banking), after dialing one number, you may
wish to dial another number without hanging up. This is known as chain dialing or
cascade dialing.
Simply store the second number in another memory location. During your call, press
the dial button followed by memory location number to dial the 2nd memory. In this
way you can recall both n umbers that are stored into their own memory locations at the
relevant times.
Call Timer
Approximately 10 seconds after the handset is picked up, the call counter will begin and
show the elapsed time on the display screen.
Deleting a Speed Dial Memory
1. Press the dial button and press the desired memory location number
either - the screen displays the speed dial contents.
2. Press the delete button - the screen displays DELETE and the memory location
number.
3. Press the delete button again.
9
0
to
or
or
#
[
]
or
#
or
9
or
#
or
Page 10

For caller ID features to
operate, you must first
subscribe to the service from
your local telephone
company.
If the new call does not stop
flashing after all new calls
have been reviewed, the
memory may have been
corrupted due to a power
surge. Press the reset button
to manually clear all the
memory.
9
USING CALLER ID
50 Memory Caller ID
When you use this telephone with the Caller ID service,
you will see the number of the calling party (unless
the call is blocked or is from a silent number) before
you answer the phone. This telephone will store and
display information about the last 50 calls received.
Each call, together with the time and date, is numbered
in the call history . When the memory is full, the oldest
call information is deleted to make room for new
incoming call information.
New Call Light
When a new call is received, the time, date and calling number will be displayed between
the first and second ring.
The new call light will flash quickly when the phone is ringing, and then change to a
slow flash. It will continue to flash until all new call information in the call history has
been reviewed.
Caller ID Summary
The screen will display the caller ID summary TOTAL CALLS XX (where XX is the total
number of calls stored in the memory).
The display may also show the number of new calls received (New calls means calls that
have not been reviewed yet).
[
New Call Review
To review only new call information:
1. Press the mode button - the screen will display REVIEW NEW CALL .
[
2. Use the up or down buttons to view the new calls. If no calls have been received the
screen displays NO NEW CALL . When all new calls have been reviewed, the new
[
]
call light will stop flashing.
Call Review
To review all the calls in the call history, use the up or down buttons.
When the screen displays END OF LIST or TOP OF LIST , after all calls ha ve been re view ed.
[
[
]
Call Back Dialling
There are two different ways to call back:
1. Pick up handset, locate the number you want to call back by using the up or down
buttons then press the callback button.
-or-
2. Locate the number you want to call back by using up or down buttons then pick
up the handset and press the callback button.
]
02-9599-3675
AM
12:15
down
up
]
]
delete
20/06
CALL
NEW
05
new call
callback
Page 11

NOTE
New calls can not be deleted
until they have been
reviewed.
All information deleted
cannot be retrieved.
10
Deleting a Call from the Call History
To delete a call from the call history:
1. Use the up or down buttons until the screen displays the information you wish to
delete.
2. Press the delete button once and the screen will display DELETE? .
3. Press the delete button again.
The phone will beep once, the displayed call record will be deleted and the screen will
[
display DELETED .
]
[
Deleting all Calls from the Call History
To delete all calls from the call history, the screen must be displaying the call summary
[
TOTAL CALLS XX .
1. Press the delete button once - the screen will display DEL ALL CID? .
2. Press the delete button again.
The phone will beep once, all call records will be deleted and the display will show
[
DELETED .
]
[
]
Store a Received CID number to a Memory Location
1. Select the desired Call ID number using the up or down buttons.
[
2. Press the store button, the display shows
3. Press a memory location button, either , the phone will beep and
the display will show .
STORED
[
]
STORE TO ?
0
to
]
9
or
or
]
]
#
Page 12

DISPLAY INFORMATION
Display Messages:
[
]
PRIVATE on the screen means -
• The caller has chosen to block their number.
• A call from an old type of telephone network exchange.
• A call from a silent number subscriber.
• A call from any analogue cellular mobile telephone.
PRIVATE
AM
12:15
01:08
11
[
ERROR or DATA ERROR on the screen means -
[
]
]
• There has been an Error during the transmission of Caller ID information. This does
not mean your phone is faulty.
ERROR
AM
12:15
[
PAY PHONE on the screen means -
01:08
]
DATA ERROR
or
AM
12:15
01:08
• The call is coming from a payphone.
PAY PHONE
AM
12:15
[
OUT OF AREA or UNAVAILABLE on the screen means -
01:08
]
[
]
• A call is not within a Caller ID service area. No caller information appears.
OUT OF AREA
AM
12:15
[
END OF LIST or TOP OF LIST on the screen means;
01:08
]
[
UNAVAILABLE
or
AM
12:15
]
01:08
• You have reached the end or start of the caller ID history information.
END OF LIST
AM
12:15
TOTAL CALLS 00 on the screen means -
[
01:08
]
TOP OF LIST
or
AM
12:15
01:08
• You have not received any caller ID information
• No calls are stored in the caller id history
TOTAL CALLS 00
AM
12:15
01:08
0 0 0 0 on the screen means -
]
[
• A call coming from overseas
[0000]
AM
12:15
01:08
Page 13

NOTE
For VIP Alert to operate, you
must first turn VIP Alert on,
then set VIP to a Caller ID
number.
NOTE
As you scroll through the
caller id history, any number
that has been set as a VIP
call will display the VIP icon.
12
VIP CALLER
You can store 20 sets of Caller IDs as VIP callers. You can store any Caller ID record
into the VIP Call List and the telephone will sound a special VIP ring tone (3 different
VIP tones are available) to alert you to an incoming VIP call.
VIP Alert On/Off
1. Press and hold the store button until the sceen displays LCD CONTRAST .
2. Press the store button twice - the screen displays VIP ALERT ON .
3. Press the up or down buttons to choose VIP ALERT ON/OFF
3. Press the store button to set and move to the next menu option or the cancel button
to save and exit.
[
[
[
]
Setting a VIP Call
1. Use the up or down buttons to select the Caller ID number.
2. When you locate the number, press the mode button. The display will show SET AS
VIP?
]
3. Press the mode button again. The screen will display RING TYPE: 1 . Press the up
or down buttons to select a ring type.
4. Press the mode button to store. The phone will beep once and the display will show
]
STORED .
]
]
Reviewing VIP Calls
To review only VIP call information:
1. Press the mode button twice, and the display will show REVIEW VIP CALL .
2. Use the up or down buttons to view the VIP calls.
]
Resetting a VIP Call
1. Press the mode button twice, and the screen will display REVIEW VIP CALL .
Use the up or down buttons to view the VIP calls.
2. When you locate the VIP number you wish to reset to normal, press the mode button.
The screen will display SET AS NORMAL? .
3. Press the mode button again.
The phone will beep once, and the display will show STORED .
]
]
]
]
]
]
]
[
]
]
]
Page 14

13
TROUBLESHOOTING
Blank or faint screen
Check the line cord.
Replace batteries.
Check the AC Adaptor is plugged in and switched on.
Caller ID will not work
If you have an answering machine or fax connected to this phone, ensure it is set to
answer after at least two rings.
You have answered the call before two rings.
Contact your telephone company if the problem continues for more than 24 hours.
The telephone company may be experiencing a temporary line fault.
Phone will not ring
You may have too many communication devices connected to a single line. A
communication device can be a phone, a modem or fax machine. Disconnect some
devices.
No dial tone
Verify that you are using the correct line cord and that it is plugged in correctly.
No response on LCD display
If you have experienced a power failure when using the AC adaptor, the batteries for
memory backup may have become w eak or dead. If the power is restored and the display
screen does not respond then you need to replace the batteries. Press the reset button.
New Call light will not stop flashing
Review all new calls
Press the reset button to clear all memory
Call Waiting (flash) does not work
Check the flash time is set correctly for your country
Please refer to our website for further information and frequently asked questions.
New Zealand Australia -
www.uniden.co.nz
www.uniden.com.au
12
Page 15

FP103
14
FP103
www.uniden.com.au
www.uniden.co.nz
13
Page 16

FOR PURCHASING A UNIDEN PHONE
THANK YOU
© 2001
Uniden Australia Pty Limited
Uniden New Zealand Limited
 Loading...