

Page 1

FP099
LCD Display
Caller ID
OWNERS
MANUAL
Page 2

CONTENTS
Important Safety Instructions . . . . . . . . . . . . . . . . . . . . . . . . . .
Introduction
Features . . . . . . . . . . . . . . . . . . . . . . . . . . . . . . . . . . . . . . . .
Included in your package. . . . . . . . . . . . . . . . . . . . . . . . . . .
Location and Controls . . . . . . . . . . . . . . . . . . . . . . . . . . . . . . . .
Setup
Battery Installation . . . . . . . . . . . . . . . . . . . . . . . . . . . . . . . .
Connecting Line Cords . . . . . . . . . . . . . . . . . . . . . . . . . . . .
Setting Time and Date . . . . . . . . . . . . . . . . . . . . . . . . . . . . .
LDS Code Setting . . . . . . . . . . . . . . . . . . . . . . . . . . . . . . . .
Telephone Key Function . . . . . . . . . . . . . . . . . . . . . . . . . . . . . .
Display Messages . . . . . . . . . . . . . . . . . . . . . . . . . . . . . . . . . . .
Receiving Call Records . . . . . . . . . . . . . . . . . . . . . . . . . . . . . . .
Caller ID Operation . . . . . . . . . . . . . . . . . . . . . . . . . . . . . . . . . .
Troubleshooting . . . . . . . . . . . . . . . . . . . . . . . . . . . . . . . . . . . . .
Warranty . . . . . . . . . . . . . . . . . . . . . . . . . . . . . . . . . . . . . . . . . .
1
2
2
3
4
4
4
4
5
6
7
7
8
9
Page 3

IMPORTANT SAFETY INSTRUCTIONS
When using your telephone equipment, these basic safety precautions
should always be followed to reduced the risk of fire, electrical shock,
and injury:
1. Read and understand all instructions.
2. Follow all warnings and instructions marked on the product.
3. Unplug this product from the wall outlet before cleaning. Use a damp (not
wet) cloth. Never use abrasive or strong cleaners or solvents.
4. Do not use this product near water; for example, near a bathtub, shower,
washbowl, kitchen sink or laundry tub, in a wet basement or near a
swimming pool.
5. Do not place this product on an unstable stand or table. The telephone
may fall, causing serious damage to the unit.
6. Never spill liquid of any kind on the product.
7. Do not disassemble this product. Take it to qualified service personnel when service
or repair work is required. Opening or removing covers may expose you to dangerous
voltages or other risks. Incorrect reassembly can cause electric shock when the appliance
is subsequently used.
8. Unplug this product from the wall outlet and refer servicing to qualified
service personnel under the following conditions:
A. If liquid has been spilled into the product.
B. If the product has been exposed to rain or water.
C. If the product does not operate normally when following the operating
instructions.
1
Page 4
To get the most from your
phone, please read the
Owner’s Manual thoroughly.
Be sure to complete and mail
the product registration form.
INTRODUCTION
Features
Caller display
80 memory caller display
Out of area / Private / Repeat indicator
NEW CALL light
Battery Low indicator
Last number redial
Last 5 numbers redial
FLASH button
Message waiting icon (New Zealand Only)
Visual ringer
Mute button
Timer
Included in your package
1 - Handset with curly cord and phone base
1 - Telephone line cord
4 - AAA size 1.5V batteries
1 - Owner's manual
1 - Wall mounting bracket
2
Page 5

LOCATION OF CONTROLS
NOTE
This unit is not waterproof.
Do not expose this product
to rain, water, moisture or
any other liquid.
new
call
AM
ring
del
NEW
02
up
LOW
9:52 12/30
TOTAL CALLS 10
abc
def
2
jkl
3
mno
1
ghi
4 5 6
pqrs
7
mute
1
tuv
8 9
0
pause
wxyz
#
flash
6
9
4
3
dn review
call back
7
8
5
10
ÅTER
redial
2
1. mute button
2. redial button
3. pause button
4. flash button
5. del button
6. call back button
7. new call button
8. review up button
9. review dn button
10. Visual ringer
3
Page 6

NOTE
Match the + / - symbols in
the battery compartment
with each battery.
NOTE
If you hav e subscribed to the
Caller ID service, the Time
and Date will automatically
be set when you receive a
call.
NOTE
Australian Customers:
Setting the LDS code is not
required.
SETUP
Battery Installation
The Caller ID phone requires four 1.5V AAA size batteries for the LCD
display to operate.
1. Remove the screw and open the battery compartment under the base.
2.Insertfour1.5VAAAsizebatteries.
3. Position the batteries in the compartment and replace the
batterycompartment cover.
Connecting Line Cords
Plug one end of the supplied modular cord into the telephone line wall jack. Then
plugtheother end into the telephonelinejack located under the base.
Setting Time and Date
With handset in cradle follow these steps:
1.While holding down the del button, press the review dn button once.
2.Use review up or dn buttontoselectthecorrectnumber - HH : MM MM / DD
3.Press call back buttontoconfirm and movetothenextdigit.
4.Press del buttonto store and exit.
8:06 2/27
SET TIME
Digit Insert Caller ID (LDS Code)
To correctly display and dial Call ID numbers, you may need to insert a digit at the
beginning of your telephone number. (eg: in New Zealand, Telecom requires a ‘0’ to be
inserted.)
New Zealand:
If you subscribe to Telecom New Zealand, this code has already been set for you to ‘0’.
If you subscribe to another telephone company, please set the LDS code as blank ‘ ’.
If this phone is used with a business PABX - consult the PABX manufacturer for the
correct setting.
(hours : minutes) (month/day)
Australia:
For private household telephone lines, it is not necessary to set this code.
If this phone is used with a business PABX - consult the PABX manufacturer for the
correct setting.
1. While holding down the del button, press the review up button once.
8:06 2/27
--
SET LDS CODE
2. Press review up or dn to select the correct number to be inserted, press
call back to set the next digit, then press del to store and exit.
4
Page 7

NOTE
TELEPHONE KEY FUNCTION
Ringer Select Switch
If you do not wish the phone’s ringer to interrupt you, move the Ringer Selector Switch
(located under the base) to OFF.
Regular dialling
Lift the handset and listen for dial tone. Then enter the telephone number you wish to
call. The dialled number will appear on the LCD screen whenever you make a call.
Redial function
To redial the previous number you called. Lift the handset and press the redial button.
Pause function
To insert a temporary pause. press the pause button during a dialling sequence. For
example, in some cases when dialling an international number you need to place a pause
between the clusters of numbers to allow the telephone company, relaying the call, time
to process it. The number 011-886-22-795-1234 would need to be dialled 011 (pause) 886
(pause) 22 (pause) 795 (pause) 12345.
Mute button
For priv acy when you are required to consult with a person standing next to you and do
not wish the party on the line to hear your conversation, press and hold the mute button.
The call resumes on releasing the button.
For ‘Call W aiting’ to operate
you must subscribe to this
service through your local
telephone company.
If you do not have this
service, then pressing the
flashing button during a call
may disconnect the caller.
Flash button - Call Waiting
If the call Waiting tone sounds while you are on a call -
New Zealand: Press the flash button to switch between callers.
Australia: Press flash then 2 to switch between callers.
5
Page 8
For LCD messages to operate ,
you must first subscribe to the
caller ID service through your
local telephone company.
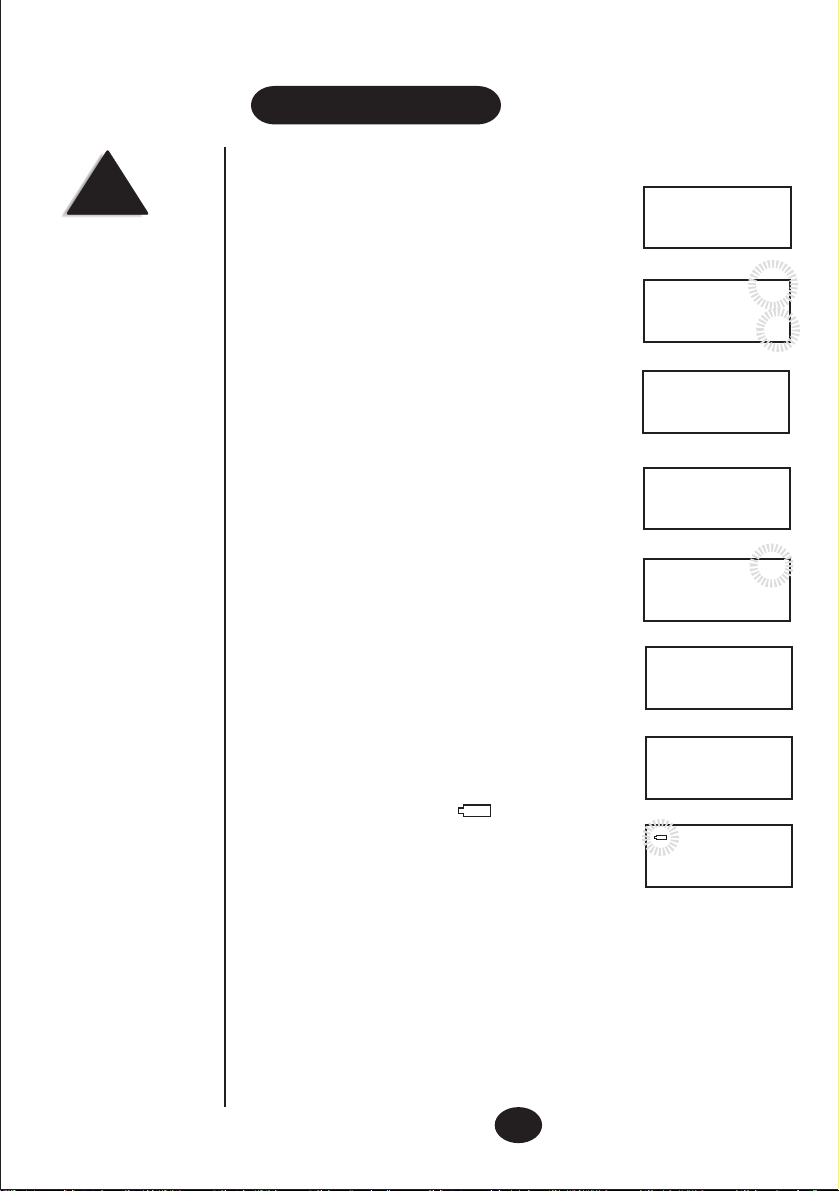
DISPLAY MESSAGES
Message Waiting (New Zealand Only) MSG
If you have arranged a voice mail service with your telephone
company, the LCD screen will display MESSAGE WAITING
for a few seconds after a call is received. The screen will then
display MSG in the upper left corner until you retrieve the
message from the voice mail service.
Total & New Calls
This displays the total calls received and which of those are
new calls. This example shows 10 calls which include 2
new calls.
No Calls
When all calls have been deleted the screen will display NO
CALL.
Private
If a caller has exercised the option which prevents the caller’s
name and number from being sent, the screen will display
PRIVATE.
Repeat Calls
If a call is received repeatedly, REPEAT will be displayed
in the top right of the LCD screen.
End of List
This is displayed when you use the review up or dn and
have reached the top end of the call history list. If there are
no calls in the list the LCD screen displays NO CALL.
Out of Area
This will be displayed when the caller’s telephone company
does not provide caller ID services or does not provide name
and number services via the long distance network.
Battery Low Indicator
This icon is displayed when the batteries require replacing.
LOW
MSG
9:52 30/12
TOTAL CALLS 10
PRIVATE
09 273 8383
9:52 30/12
END OF LIST
OUT OF AREA
LOW
9:52 30/12
AM
NO CALL
AM
AM
NEW
REPEAT
NEW
02
02
TOTAL CALLS 10
6
Page 9

The LCD display will not
operate if the batteries are flat
or not installed.
For call ID features to
operate you must first
subscribe to this service
through your local telephone
company.
RECEIVING CALL RECORDS
A caller ID record consists of the following information:
AM
9:52 30/12
TOTAL CALLS 04
AM
9:52 30/12
122-7461-2345
CALL#
02
CALL#
02
Number of call records received
Time and Date of the call
Total calls
Caller's number
Caller's name (if available)
CALLER ID OPERATION
New Call Indicator
The red indicator light of your phone will flash when you hav e New Calls. It will continue
to flash until you have reviewed the calls displayed on the LCD screen.
Review Call Records
Use the review up or dn buttons to scroll through the caller list. At the end of the call
record list, END OF LIST will be displayed.
Call Records
Your phone stores up to 80 Call records. When the list is full a new incoming call will
automatically delete the oldest call record.
Using the CALL BACK feature
You can automatically dial the number of a person who has recently called.
1) Lift the handset and listen for dial tone.
2) Select the caller that you wish to call back by pressing the review up or dn button.
3) Press call back to automatically dial the number of the person displayed in the LCD
screen.
Last 5 Numbers Redial
1) With the handset on the cradle, press the callback button once..
2) Use the review up or dn buttons to select one of the last 5 numbers you have dialled.
3) Pick up the handset and press callback, the number you have chosenwill automatically
be dialled.
Del button - for deleting Caller ID records
To delete numbers from your Caller ID number memory.
With the handset in its cradle, press review up or dn buttons to select the number you
wish to delete. Now press the del button. The L CD screen will show DEL?. T o confirm
the number chosen is to be deleted, press del again. The number will be deleted.
Timer
During a call, press the del button to start and stop the timer.
7
Page 10

TROUBLESHOOTING
Blank or faint screen
Check the line cord.
Connect telephone cord.
Replace batteries.
Caller ID will not work properly
Call your telephone company to verify that your caller ID service is active.
Phone will not ring
You may have too many communication devices connected to a single line. A
communication device can be a phone, a modem or fax machine. Disconnect some
devices.
No dial tone
Verify that you are using the correct line cord and that it is plugged in correctly.
No data sent
If you have an answering machine or fax connected to this phone, ensure it is set to
answer after at least two rings.
You have answered the call before two rings.
Contact your telephone company if the problem continues for more than 24 hours.
The telephone company may be experiencing a temporary line fault.
No response on LCD display
If you hav e experienced a po w er failure when using the optional A C adaptor, the batteries
for memory backup may have become weak or dead. If the power is restored and the
display screen does not respond then you need to replace the batteries.
Please refer to our website for further information and frequently asked questions.
New Zealand Australia -
www.uniden.co.nz
www.uniden.com.au
8
Page 11

FP099
FP099
a
www.uniden.com.au
a
www.uniden.co.nz
9
Page 12

FOR PURCHASING A UNIDEN PHONE
THANK YOU
© 2001
Uniden Australia Pty Limited
Uniden New Zealand Limited
 Loading...