

Uniden FLX9050 Owner's Manual
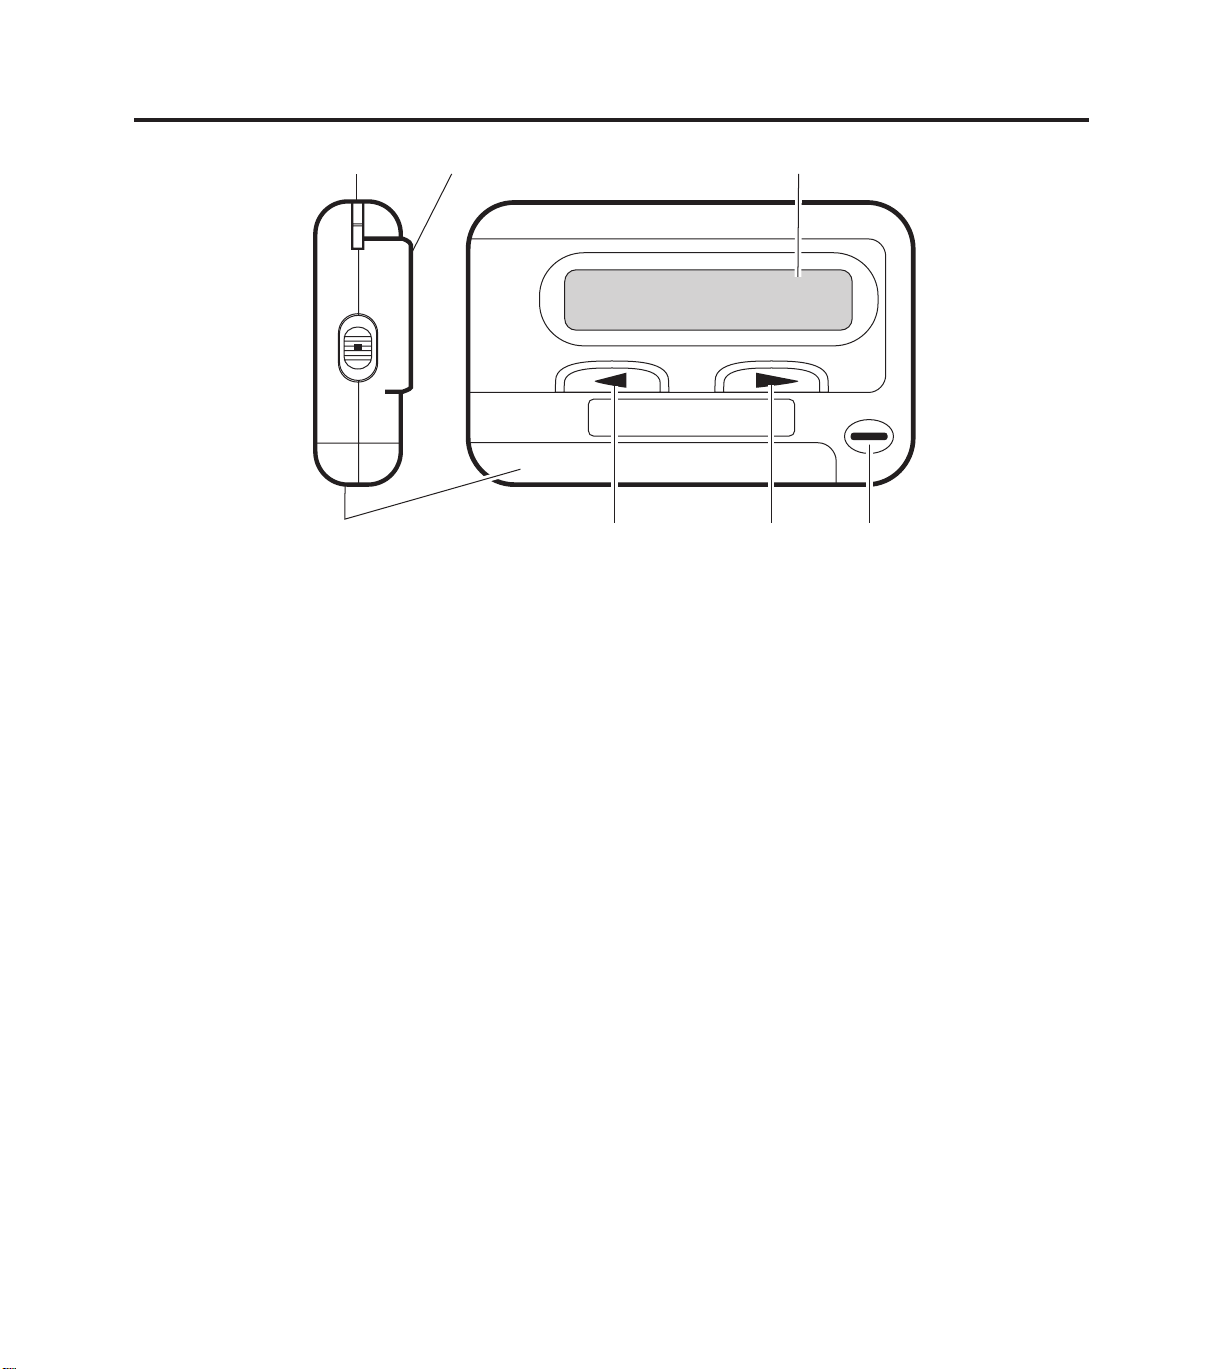
Controls
12 3
7654
1. Strap Attachment
2. Side Key ( S) - power on/off, selects pager alert
modes, and selects built-in menus for setup.
n
Bottom position - pager off
n
Middle position - pager on and set to vibrate
n
Top position - pager on and set to audio alert
mode. (See page 4.)
3. Display (refer to next page)
4. Speaker
5. Forward scroll (
6. Backscroll (
Note:
To stop the page alert, press & release any key.
B
F
) Key
) Key
To light the display, press and hold any key for
two seconds.
7. Battery Cover
1
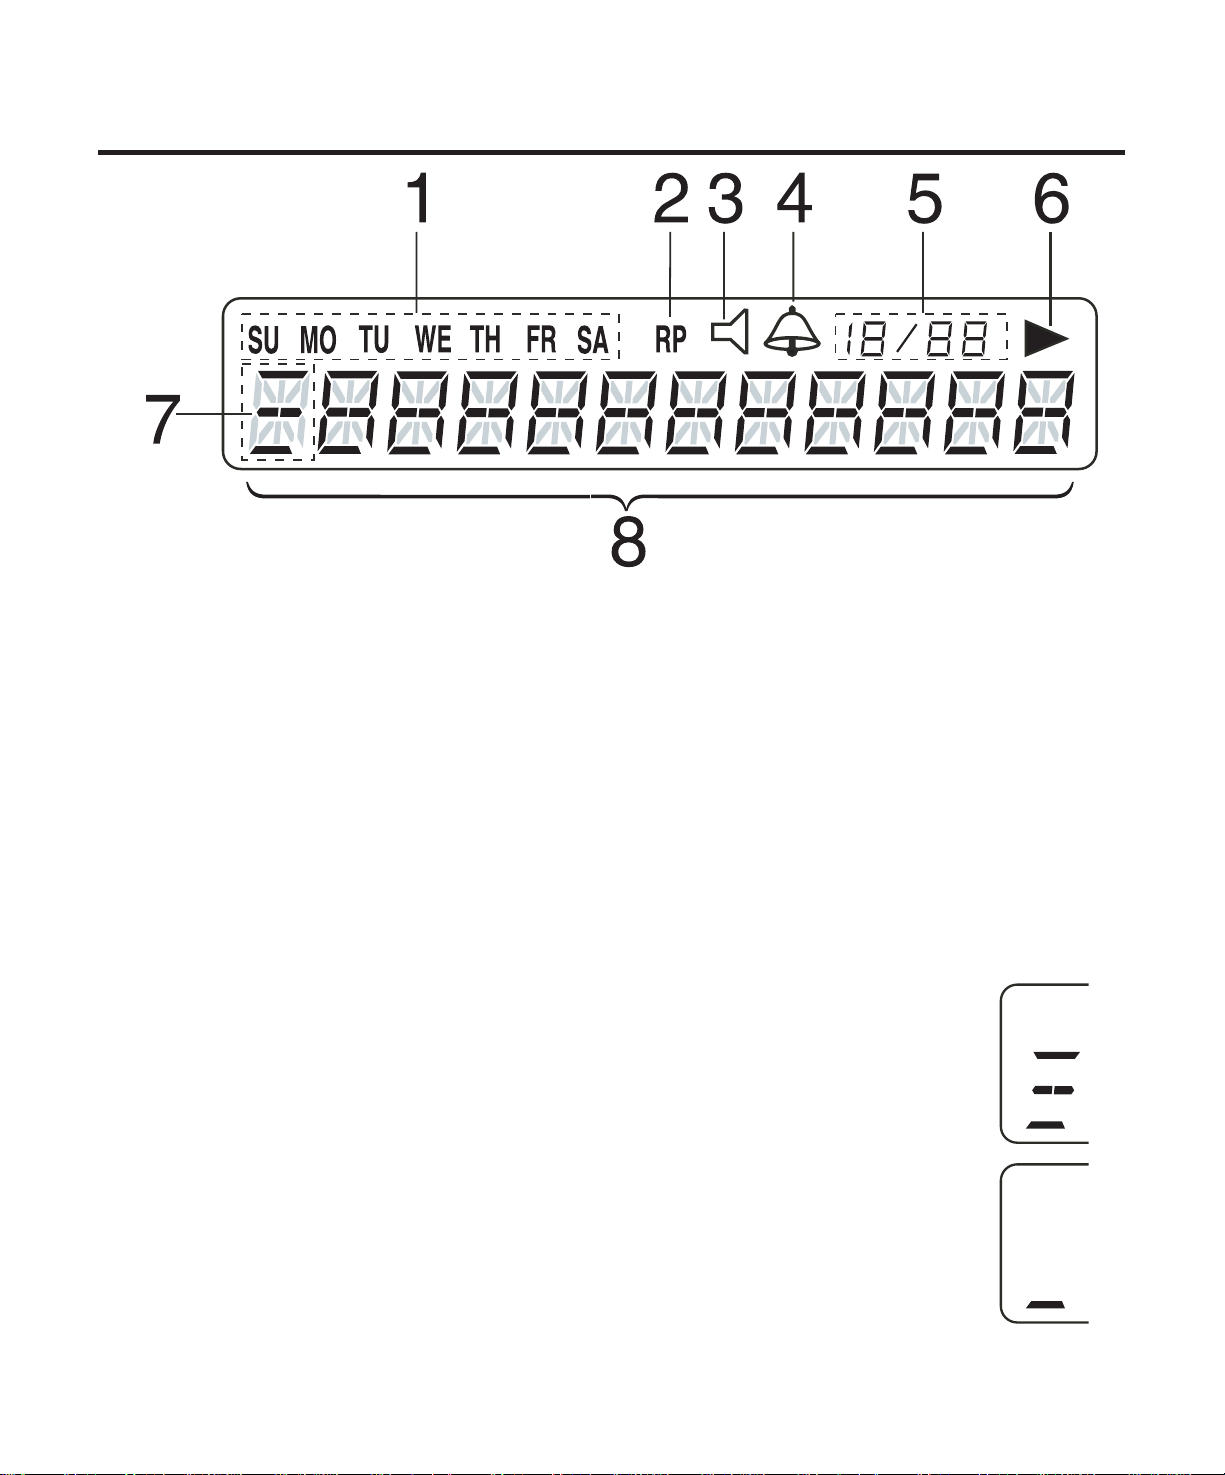
Display Indicators
1. Day Indicator
2. RP (duplicate message) - Repeat Page
3. Audio Alert Indicator
4. Alarm Mode Indicator
5. Month/Day/Message Number Indicator
6. Message Continued
7. Range Indicator
and first character
of the 12-Character Display
Strong
Weak
8. 12-Character Display
2

Introduction
Congratulations on your purchase of a FLX 9050! This
compact, state-of-the-art pager has many features:
Five Programmable Message Tags that store
messages with eight characters each
Quick View for easy message viewing
Day/Date/Time Stamp for each message
Time/Day/Date Alarms that are either audio or silent.
To ensure that you understand all the features and
capabilities of your FLX 9050, please read this Operating
Guide carefully before using it.
Note: Throughout the Owners Guide, the action
(i.e., press a key) is first, followed by a
display of the results.
press S., you will see:
Also, we have included a visual guide
foldout on the inside of the front cover.
3

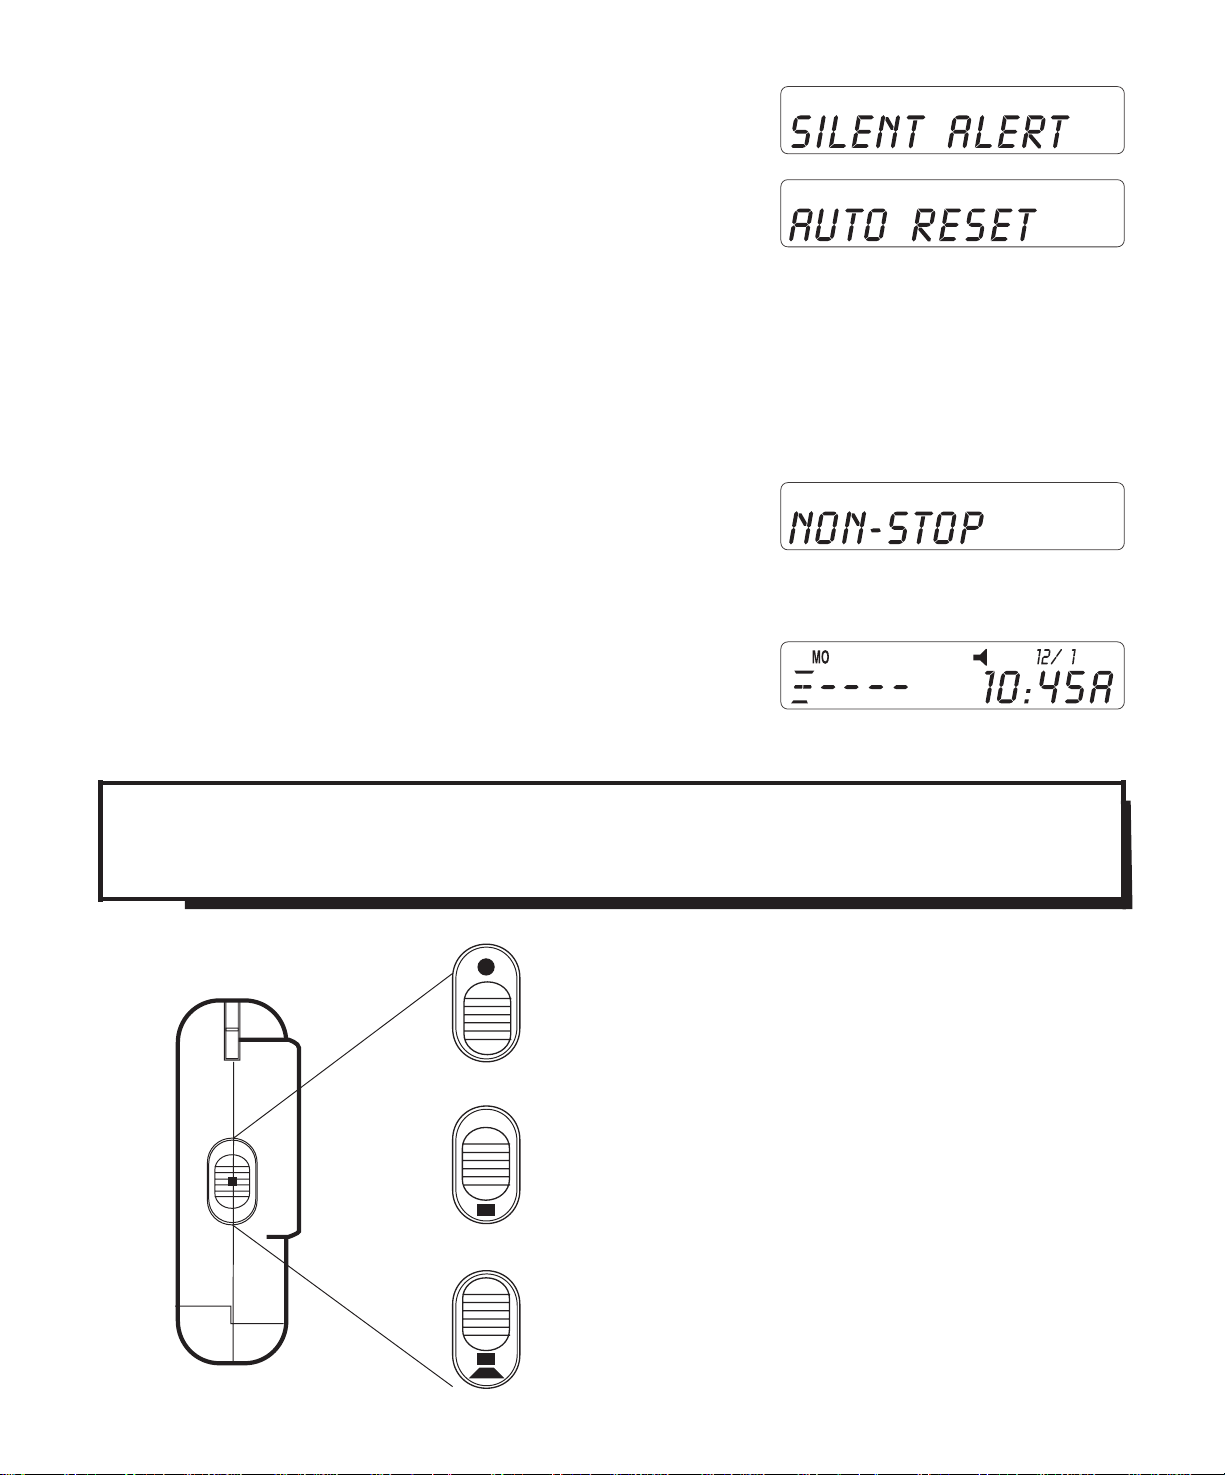
Pager Setup
Alert Tone
press: display:
1.
S
S
S
Note: If the pager has any messages, you will see:
S
S
F
S
2. Scroll through the Alert Tone options:
F
F
F
Note: Press
Alert 1 through 8
Non-stop Vibrate
Silent Alarm
F
to move forward to the next screen or
B
move backward to return to a previous display.
4
3. Stop on the Alert Tone you want:
4. To enter your selection into
memory, press S.
Next, choose between the two Alert Tone Duration modes:
Auto Reset - Alert tone stops after eight seconds,
or press any key.
Non-Stop - Alert tone continues until you press any key.
1. To select the Alert Tone duration
that you want, press
F
.
2. Press Sto enter your selection into memory.
The Standby display returns
showing the Audio Alert indicator.
To test the alert tone you selected,
move Sbetween “Vibrate” and “Audio Alert.”
Power Off
Power On/Vibrate Alert
Power On/Audio Alert
5
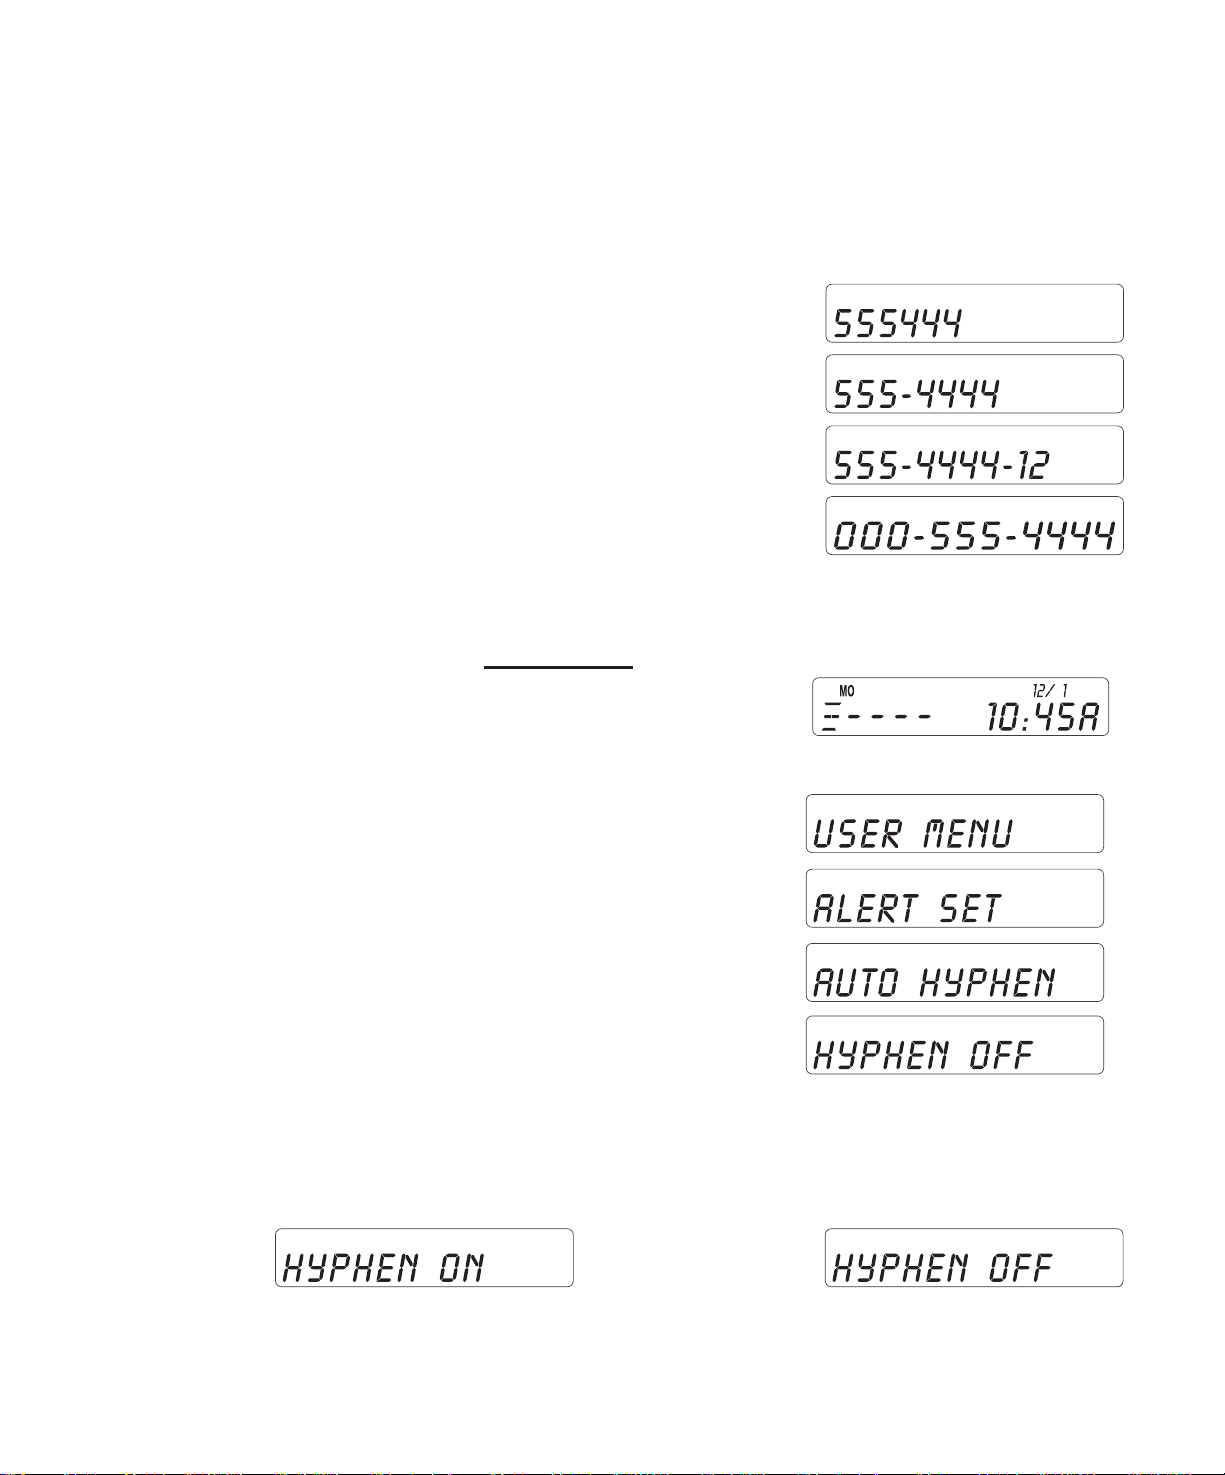
Auto Hyphen
Your FLX 9050 can automatically hyphenate numbers in
messages. The person calling can use a telephone keypad to
enter telephone numbers as a message:
Less than 7 digits, no hyphenation.
Seven digits:
More than 7, but less than 10 digits:
Ten through 21 digits:
Note:
More than 22 digits will not be hyphenated.
Start Auto Hyphen - Without messages in memory:
1. To reach the Auto Hyphen Menu,
press: display:
S
S
F
S
To turn on, To turn off,
press: display: press: display:
2.
F
2.
B
3. Press Sto enter your selection into memory.
6

Start Auto Hyphen - With messages in memory:
1. To reach the Auto Hyphen Menu,
press: display:
S
S
F
F
S
To turn on, To turn off,
press: display: press: display:
2.
F
2.
B
Then . . .
3. Press Sto enter your selection into memory.
7
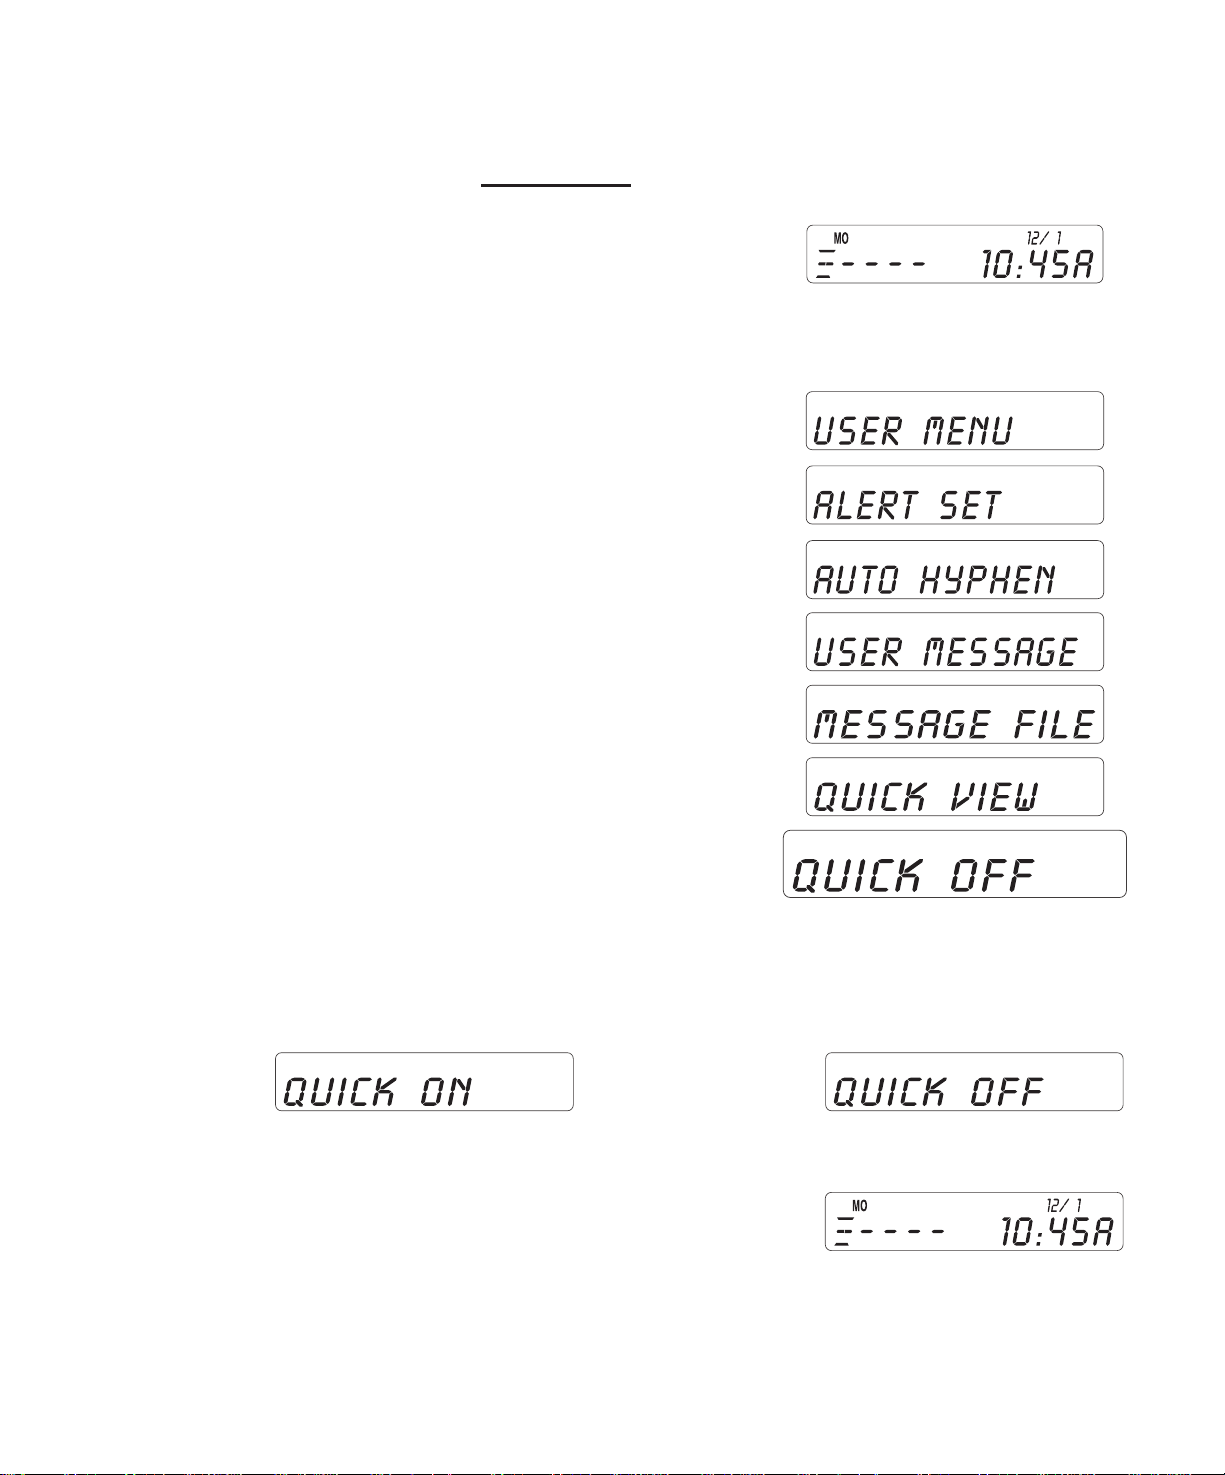
Quick View
Quick View On/Off -
Without messages in memory:
With the pager on,
1. To reach the Quick View menu,
press: display:
S
S
F
F
F
F
S
To turn on, To turn off,
press: display: press: display:
2.
F
2.
B
Then . . . press: display:
3. To enter selection, S
8

Turn Quick View On/Off - With messages in memory:
1. To reach the Quick View menu,
press: display:
S
S
F
F
F
F
F
S
To turn on, To turn off,
press: display: press: display:
2.
F
2.
B
Then . . . press: display:
3. To enter your selection S
9
Setting Time & Date Functions
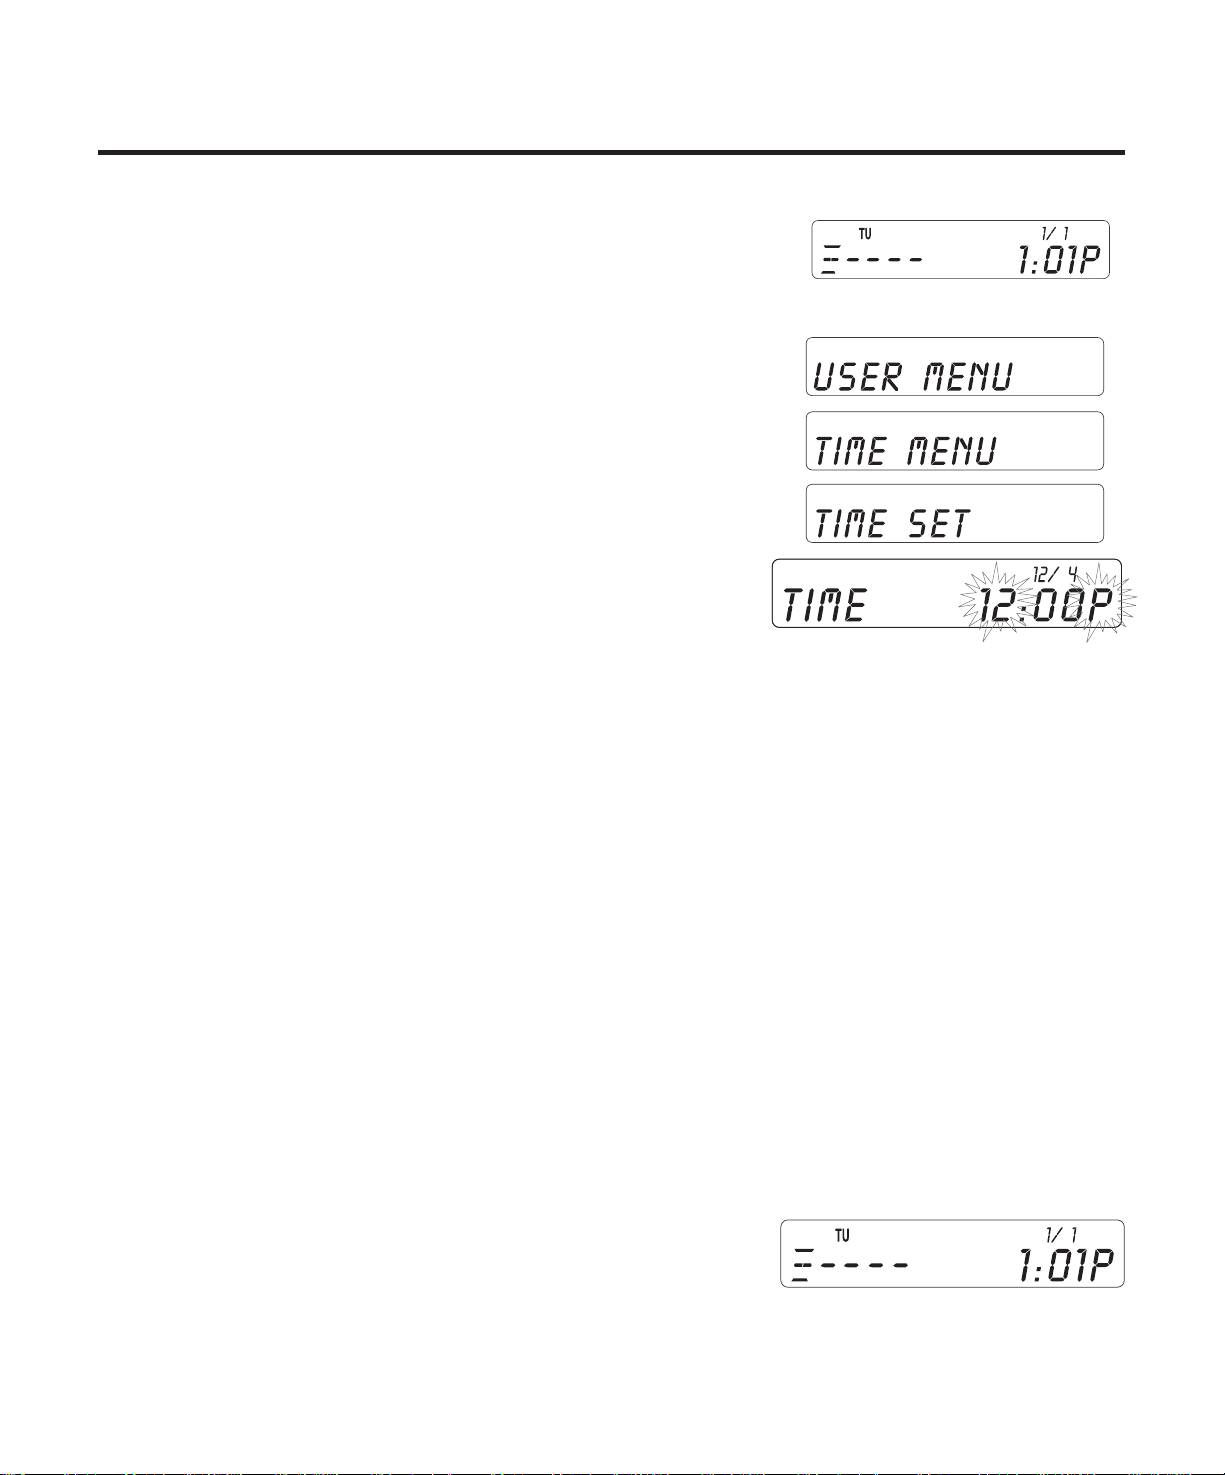
Setting the Time
1. To reach the Time Set menu,
press: display:
S
F
S
S
The display shows current time stored in memory, with
the hours digit and “P ” indicator flashing.
The 12 or 24 in the upper right corner indicates either
a 12-hour format, with A (a.m.) and P (p.m.) indicators,
or a 24-hour format.
2. Press
F
or
B
to change the hour. The A or P
display alternates after each 12-hour cycle.
3. To enter your selection and move to the next part of
the display, press S.
n
Repeat the process to set the minutes
and 12 or 24-hour format.
4. Press Sto enter your selection
into memory. The display returns
to Standby showing the new time.
10
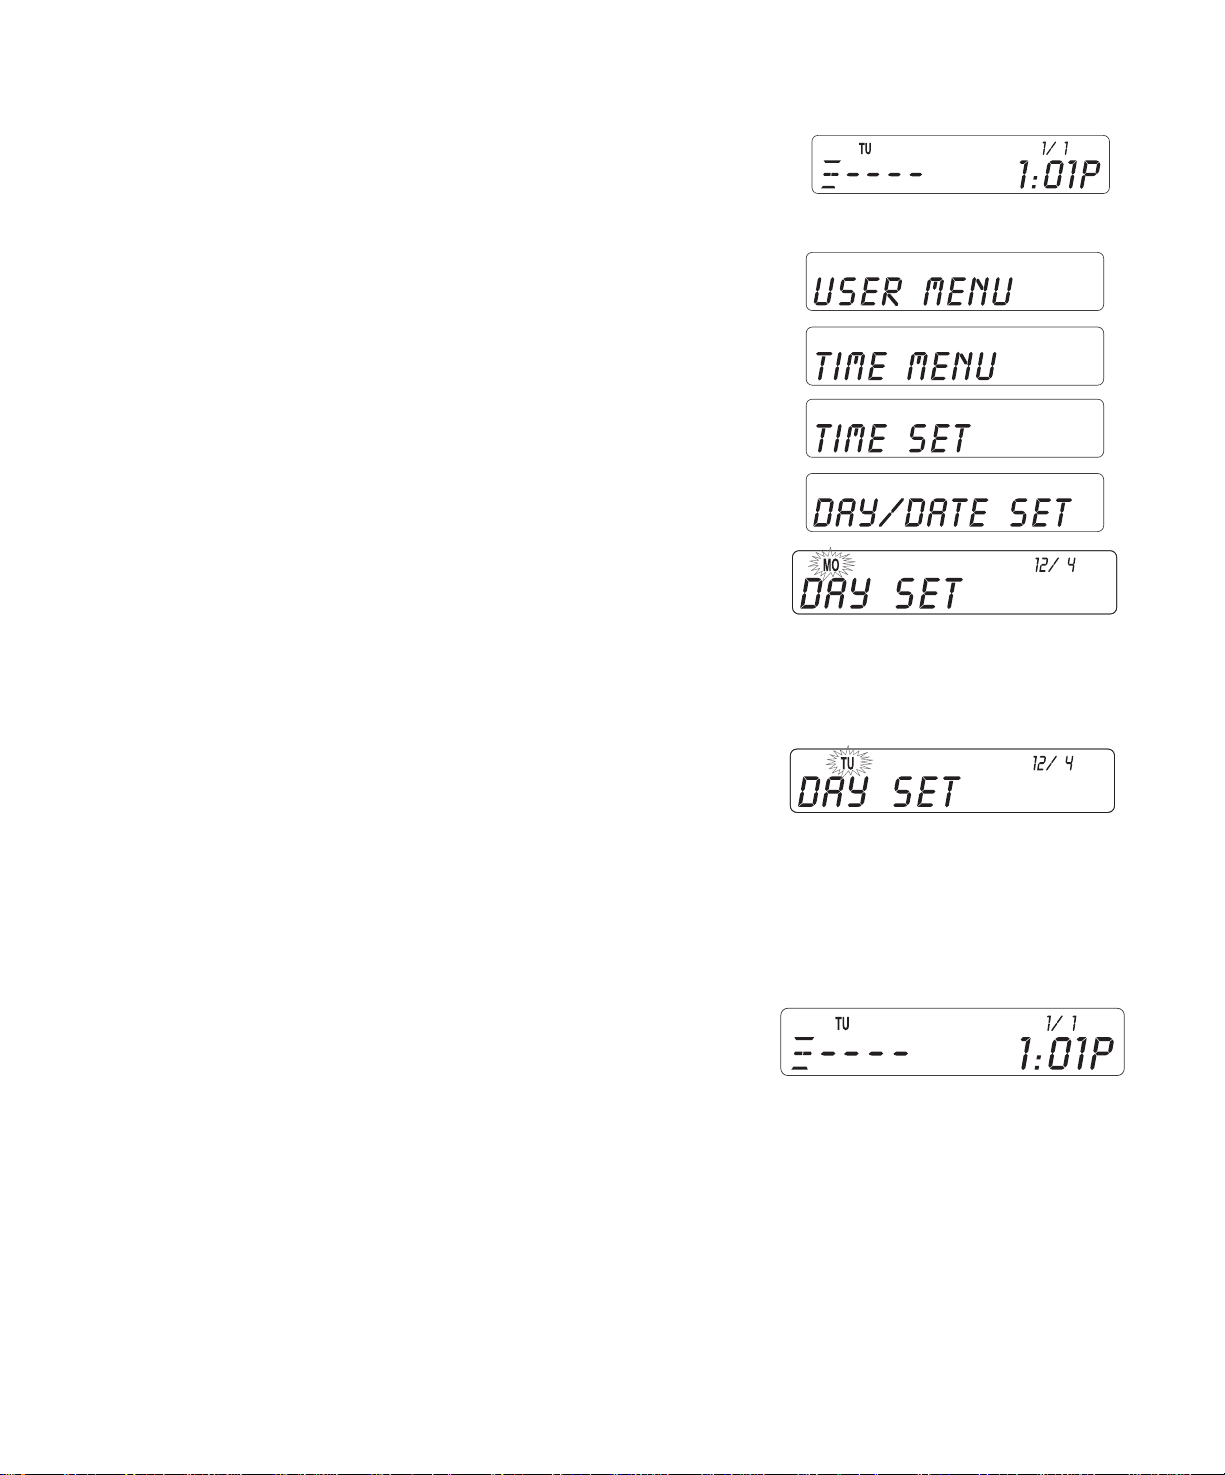
Setting the Date
1. To reach the Date/Day Set menu,
press: display:
S
F
S
F
S
The current month and date stored in the memory
appear with the day icon flashing.
2. To select the day of the week,
press
F
or
B
.
3. To enter your selection and move to the next part of
the display, press S.
n
Repeat the process to set the month and date.
4. Press Sto enter the Day/Date
Settings into memory.
The display returns to Standby
showing the new date and day.
11
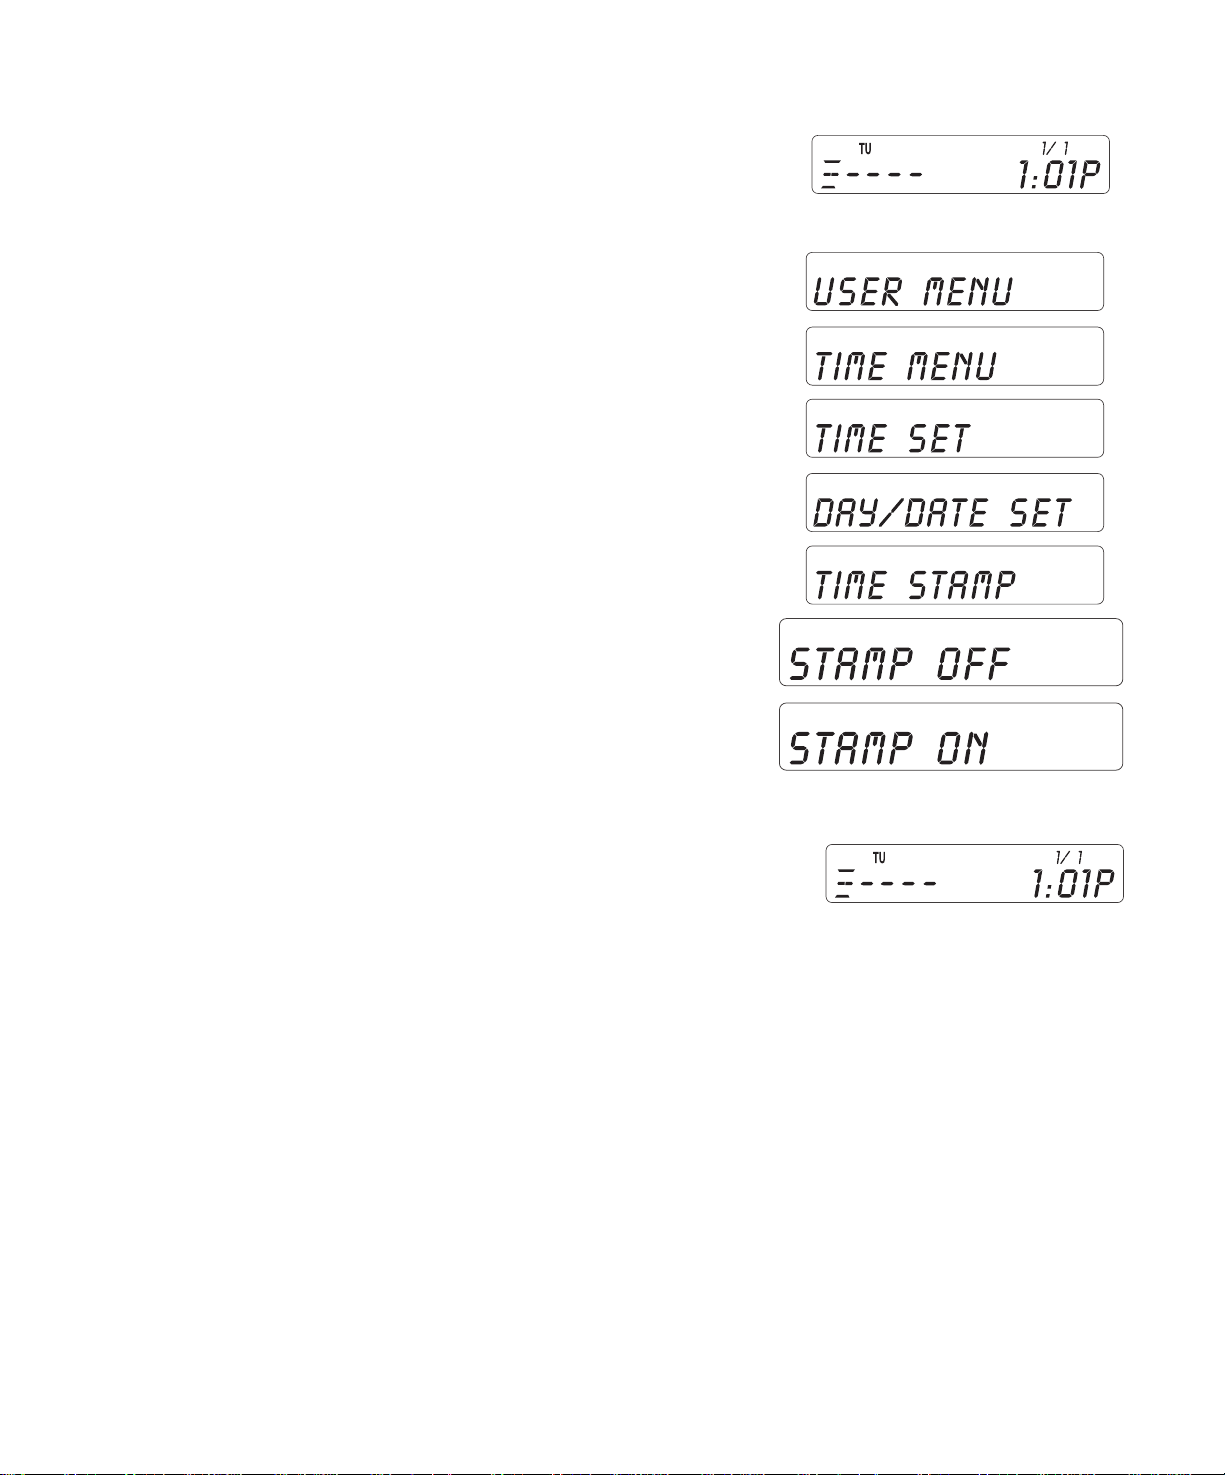
Activating the Time Stamp
1. To reach the Time Stamp menu,
press: display:
S
F
S
F
F
S
2. To turn on Time Stamp,
F
3. Press Sto enter your selection into memory.
The display returns to Standby.
12
 Loading...