

Uniden EXS 9660 User Manual

THE EXS 9660
SPREAD
SSPPEECCTTRRUUMM
Digital Spread Spectrum
provides the longest
range, the clearest sound
and the best privacy.
MANUAL
OWNER’S
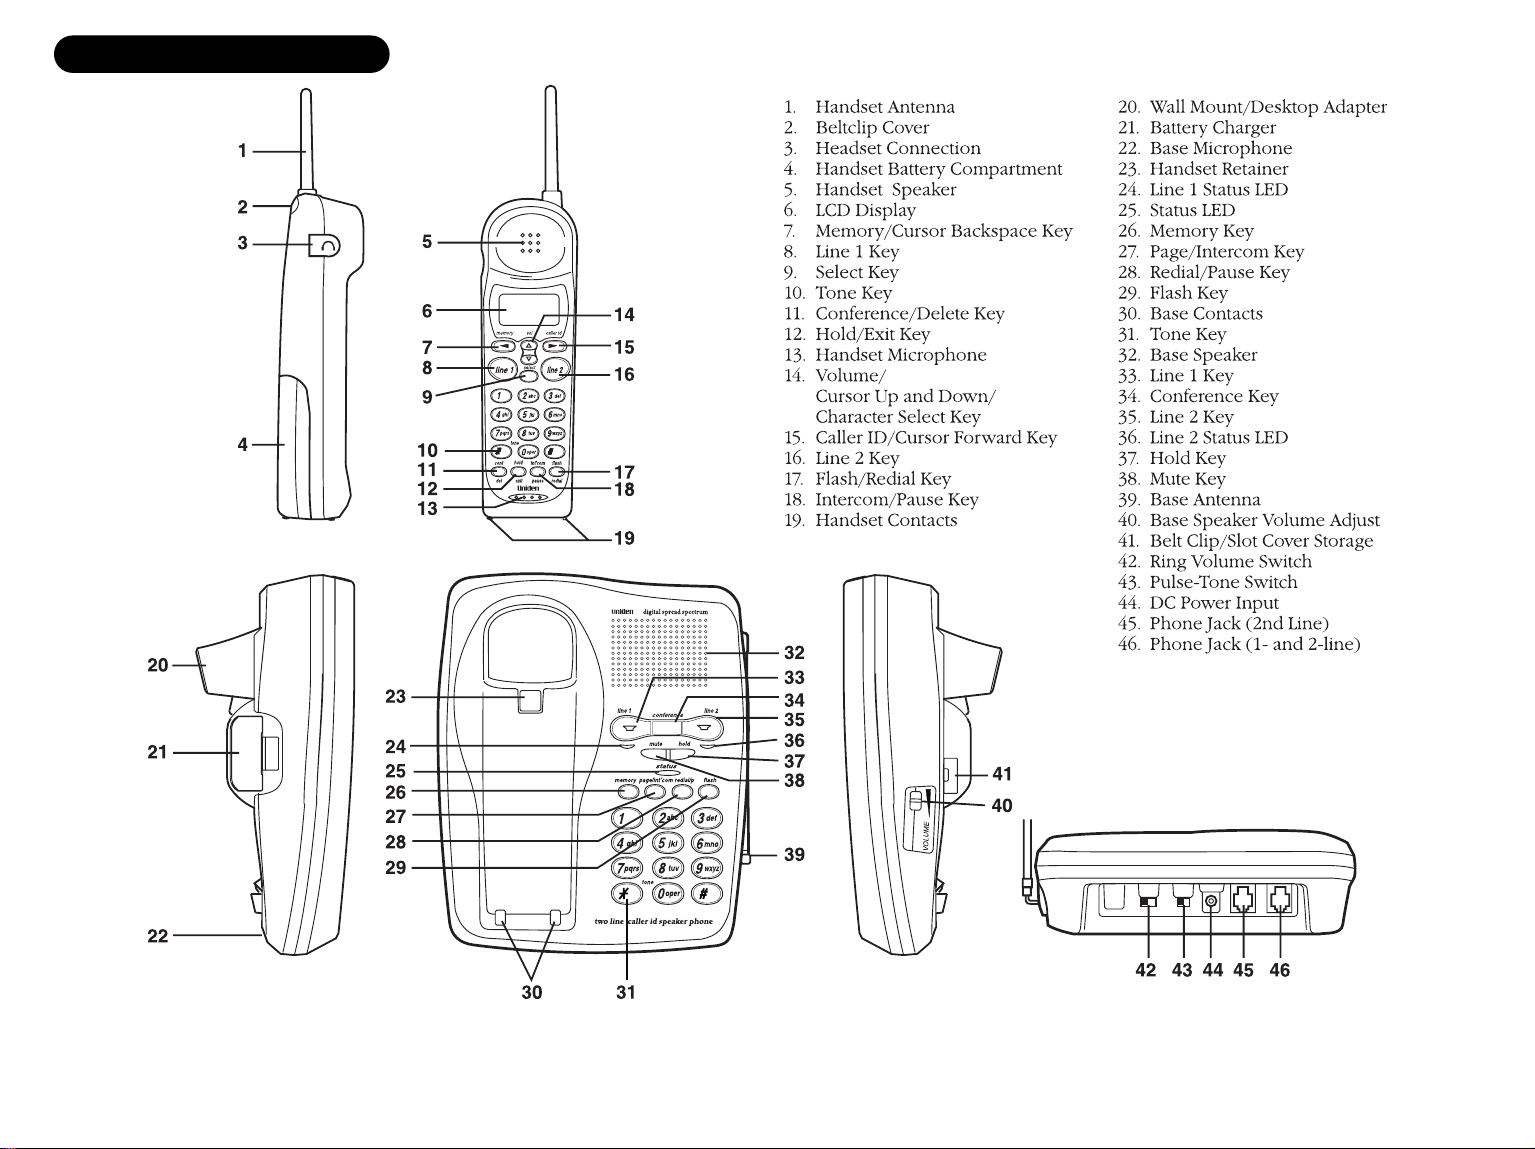
CONTROLS AND FUNCTIONS

Fold out the front
cover of this owner’s
manual to use the
handy CONTROLS AND
FUNCTIONS page
for reference.
CONTENTS
Controls and Functions . . . .Inside Front Cover
Introduction to Your New Phone . . . . . . . . . . .2
Features . . . . . . . . . . . . . . . . . . . . . . . . . . . . . . . . . . . . . . . . . . .2
Included in Your Package . . . . . . . . . . . . . . . . . . . . . . . . . . . .3
Installing and Adjusting Your Phone . . . . . . . .4
Selecting a Location . . . . . . . . . . . . . . . . . . . . . . . . . . . . . . . . .4
Desk/Tabletop Installation . . . . . . . . . . . . . . . . . . . . . . . . . . .5
Wall Installation . . . . . . . . . . . . . . . . . . . . . . . . . . . . . . . . . . . .6
Installing the Handset Battery Pack . . . . . . . . . . . . . . . . . .10
Charging the Battery Pack . . . . . . . . . . . . . . . . . . . . . . . . . .11
Cleaning the Battery Contacts . . . . . . . . . . . . . . . . . . . . . . .12
Setting the Pulse-Tone Switch . . . . . . . . . . . . . . . . . . . . . . .12
Adjusting the Volume Controls . . . . . . . . . . . . . . . . . . . . . .13
Installing the Beltclip . . . . . . . . . . . . . . . . . . . . . . . . . . . . . . .14
Headset Installation . . . . . . . . . . . . . . . . . . . . . . . . . . . . . . . .15
Automatic Digital Code Security . . . . . . . . . . . . . . . . . . . . .15
Using Your New Phone . . . . . . . . . . . . . . . . . . .16
Making and Receiving Calls . . . . . . . . . . . . . . . . . . . . . . . . .16
Making and Receiving Calls . . . . . . . . . . . . . . . . . . . . . . . . .17
Answering a Call from the Base . . . . . . . . . . . . . . . . . . . . .17
Answering a Call from the Handset . . . . . . . . . . . . . . . . . .18
Making a Call from the Base . . . . . . . . . . . . . . . . . . . . . . . .18
Making a Call from the Handset . . . . . . . . . . . . . . . . . . . . .18
Using the Tone Feature . . . . . . . . . . . . . . . . . . . . . . . . . . . . .19
Flash and Call Waiting . . . . . . . . . . . . . . . . . . . . . . . . . . . . . .19
Using Redial . . . . . . . . . . . . . . . . . . . . . . . . . . . . . . . . . . . . . .20
Placing a Call on Hold . . . . . . . . . . . . . . . . . . . . . . . . . . . . . .20
Using the Mute Feature . . . . . . . . . . . . . . . . . . . . . . . . . . . . .21
OF YOUR OWNERS MANUAL
Using the Page Feature . . . . . . . . . . . . . . . . . . . . . . . . . . . . .21
2-Line Operation . . . . . . . . . . . . . . . . . . . . . . . . . . . . . . . . . .22
3-Way Conferencing . . . . . . . . . . . . . . . . . . . . . . . . . . . . . . .23
4-Way Conferencing . . . . . . . . . . . . . . . . . . . . . . . . . . . . . . .24
Using Your EXS 9660 Intercom . . . . . . . . . . . . . . . . . . . . . .25
Transferring a Call . . . . . . . . . . . . . . . . . . . . . . . . . . . . . . . . .26
Traveling Out-of-Range . . . . . . . . . . . . . . . . . . . . . . . . . . . . .27
Storing a Phone Number in Memory . . . . . . . . . . . . . . . . .28
Editing a Phone Number in Memory . . . . . . . . . . . . . . . . .30
Erasing a Number from Memory . . . . . . . . . . . . . . . . . . . .32
Using Memory Dialing . . . . . . . . . . . . . . . . . . . . . . . . . . . . .34
Using Caller ID . . . . . . . . . . . . . . . . . . . . . . . . . .36
Using Caller ID . . . . . . . . . . . . . . . . . . . . . . . . . . . . . . . . . . . .36
Troubleshooting Your New Phone . . . . . . . . .44
Quick Reference Chart . . . . . . . . . . . . . . . . . . . . . . . . . . . . .44
Specifications . . . . . . . . . . . . . . . . . . . . . . . . . . .45
General . . . . . . . . . . . . . . . . . . . . . . . . . . . . . . . . . . . . . . . . .45
Base Unit . . . . . . . . . . . . . . . . . . . . . . . . . . . . . . . . . . . . . . . . .45
Handset . . . . . . . . . . . . . . . . . . . . . . . . . . . . . . . . . . . . . . . . .45
Introductionxx
Installing and xx
Adjustingxx
Using Yourxx
New Phonexx
Usingxx
Caller IDxx
Troubleshootingxx
Specificationsxx
CONTENTS

WELCOME
Congratulations on your purchase of the Uniden EXS 9660 cordless
telephone. This phone is designed for reliability, long life, and
outstanding performance utilizing the latest 900 MHz Spread
Spectrum Technology.
FEATURES
l 900 MHz Digital Spread Spectrum Technology
l 2-Line Operation
l Call Waiting/Caller ID
l 3 and 4-Way Conference Calling
l Speakerphone
l Back-up Power Supply (Requires Optional Battery Pack)
l 3-Line, 16 Character LCD Handset Display
TO YOUR NEW PHONE
l Headset Compatible
l Handset Earpiece and Ringer Volume Control
l 20 Channel AutoScan
l 40 Memory Dialing Locations
l 80 Number Caller ID Memory
l 32 Digit Redial
l 2-way Page/Intercom
l Hearing Aid Compatible
l Redial, Flash, and Pause
l Pulse/Tone Dialing
l 7-Day Standby Battery Time
l 4-Hour Talk Time
Digital Spread Spectrum Technology utilizes a “wider
frequency band” vs. a “single narrow band” used in standard digital
transmissions. The result is a more secure conversation with the clarity of
digital sound, extended range, and minimal interference from other
cordless phones.
Random Code
65,000 codes for the handset and base. This feature prevents unauthorized
calls as a result of your phone being activated by other equipment.
TM
digital security automatically selects one of over
INTRODUCTION
2

To get the most from
your phone, please read
this owner’s manual
thoroughly. Be sure to
complete and mail the
product registration form.
INCLUDED IN YOUR PACKAGE
Handset
Base
AC Adapter
If any of these items are
missing or damaged,
contact the Uniden Parts
Department at (800) 554-
3988. Hours are from
8:30 a.m. to 5:00 p.m.
Central Time, Monday
through Friday. We can
also be reached on the
web at www.uniden.com.
You must have a two-line
subscription from your
phone company to realize
the capability of your
two-line phone.
Rechargeable
Battery
Long Telephone
Cord
l This Owner’s Manual
l Precautions and Important Safety Instructions
l Registration Card
Short Telephone
Cord
Desktop/Wall
Mount Adapter
Beltclip
Wall Mounting
Screws
3

SELECTING A LOCATION
Before choosing a location for your new phone, read the
INSTALLATION CONSIDERATIONS included in the PRECAUTIONS AND
IMPORTANT SAFETY INSTRUCTIONS brochure. Here are some
important guidelines you should consider:
l The location should be close to
both a phone jack and a
continuous power outlet. (A
continuous power outlet is an AC
outlet which does not have a
switch to interrupt its power.)
l Keep the base and handset away
from sources of electrical noise
such as motors and fluorescent
lighting.
l Be sure there is sufficient space to rotate the base antenna
fully vertical.
l The base can be placed on a desk, tabletop or mounted on a standard
wall plate.
l You should charge your handset for 15-20 hours before connecting the
phone line.
l If your second phone line has a separate jack, place your phone so you
can access both jacks.
AND ADJUSTING YOUR PHONE
INSTALLING
4
Before using your phone,
charge the NickelCadmium battery pack
for 15-20 hours.
Place the power cord so
that it does not create a
trip hazard or where it
could become chafed and
create a fire or electrical
hazard.
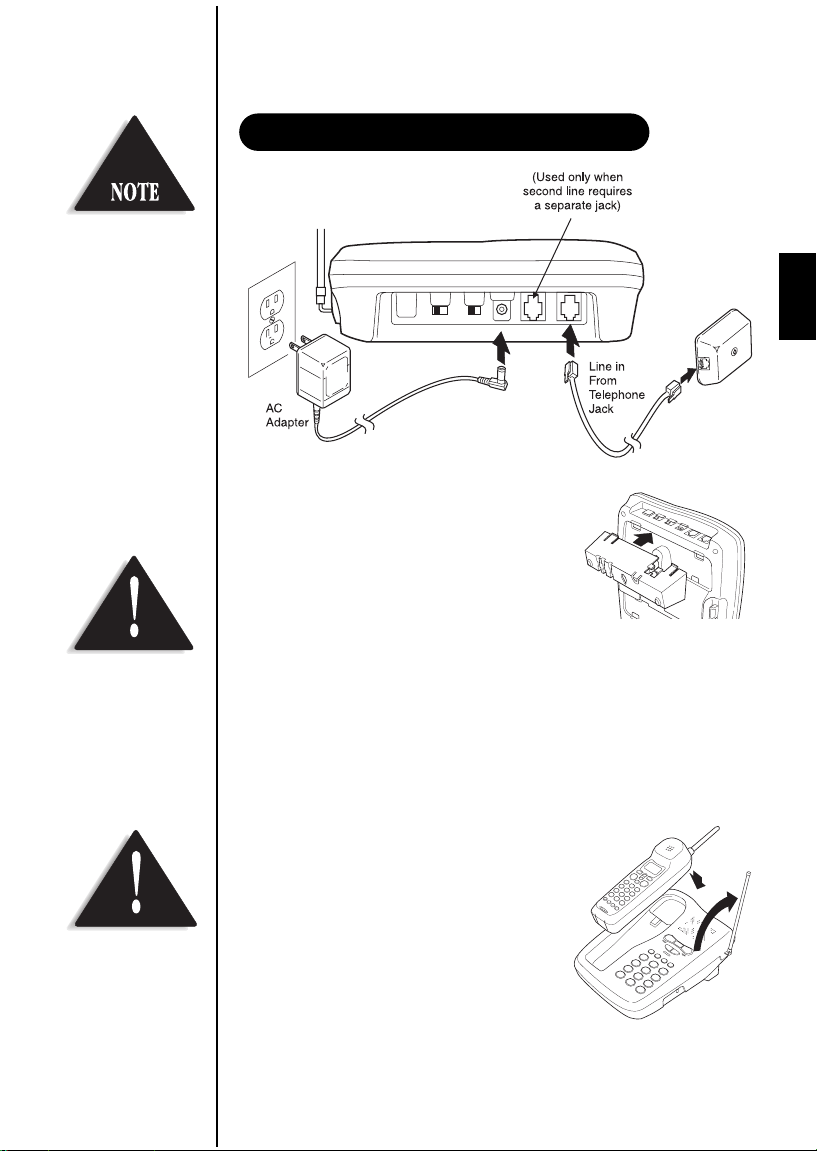
DESK/TABLETOP INSTALLATION
1. Snap the desktop/wall mount adapter
into the top of the base as shown.
2. Plug the AC adapter cord into the 10V DC
input jack on the back of the base.
3. Wrap the AC adapter cord around the strain
relief notch.
4. Plug the AC adapter into a standard 120V AC wall outlet.
5. Charge the battery (refer to CHARGING THE BATTERY PACK,
page 11).
6. Plug one end of the long telephone cord into the
the back of the base.
7. Plug the other end of the cord into the telephone jack on the wall.
8. Set the base on a desk or tabletop.
Place the handset on the base with the
keypad either facing up or down. Raise the
antenna to a vertical position.
TTEELL LLIINNEE 11//22
jack on
Use only the Uniden AC
adapter supplied with
this phone. DO NOT use
an outlet controlled by a
wall switch.
5
Place the power cord so
that it does not create a
trip hazard or where it
could become chafed
and create a fire or
electrical hazard.
DO NOT use an
outlet controlled by a
wall switch.
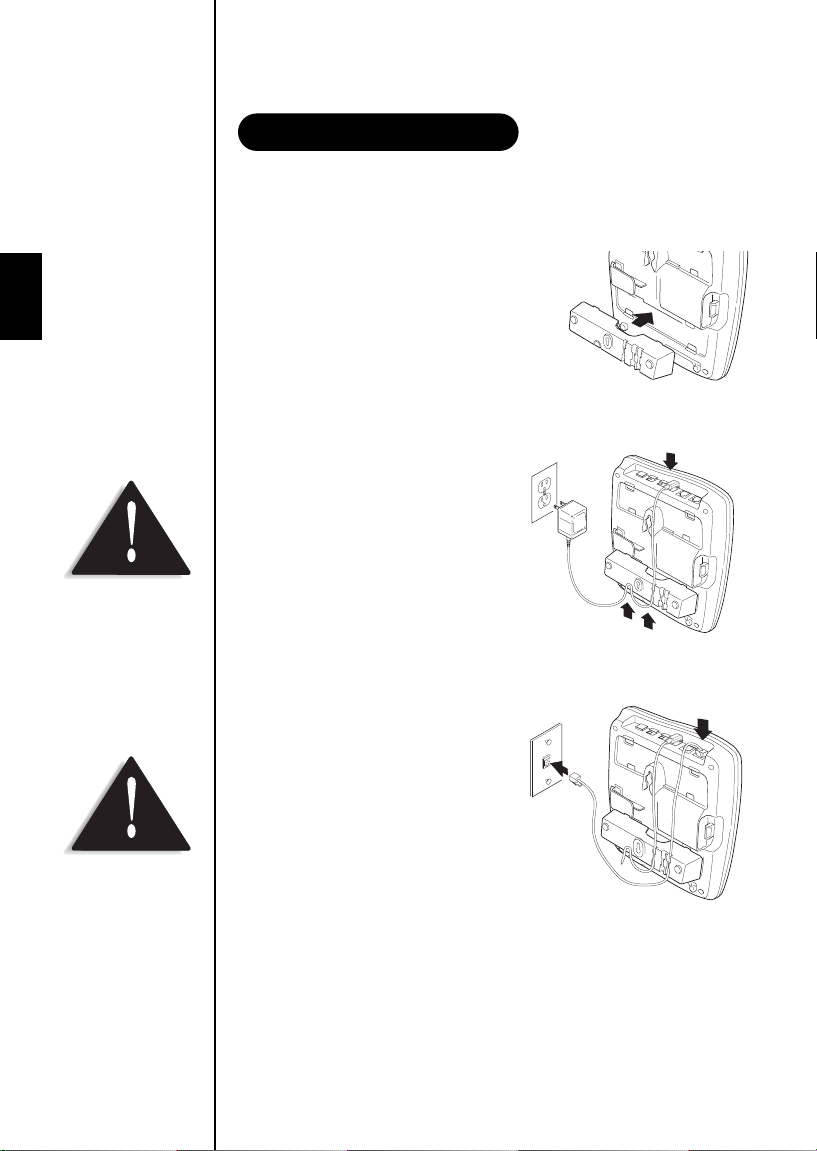
WALL INSTALLATION
t Standard wall plate mounting
This phone can be mounted on any standard telephone wall plate.
1. Snap the desktop/wall mount
adapter into the bottom of the base
as shown.
2. Plug the AC adapter into the base.
3. Place the AC adapter cord inside
the molded wiring channel.
Wrap the cord around the strain
relief notch.
4. Plug the AC adapter into a standard
120V AC wall outlet.
5. Plug one end of the short telephone
cord into the
on the back of the base. Plug the
other end into a standard
telephone jack.
If your second line has a separate
jack, plug the other cord into the
base and wall jack.
TTEELL LLIINNEE 11//22
jack
6

Before you plug the other
end of the telephone cord
into the modular jack on
the wall, charge the
battery (See CHARGING
THE BATTERY PACK,
page 11).
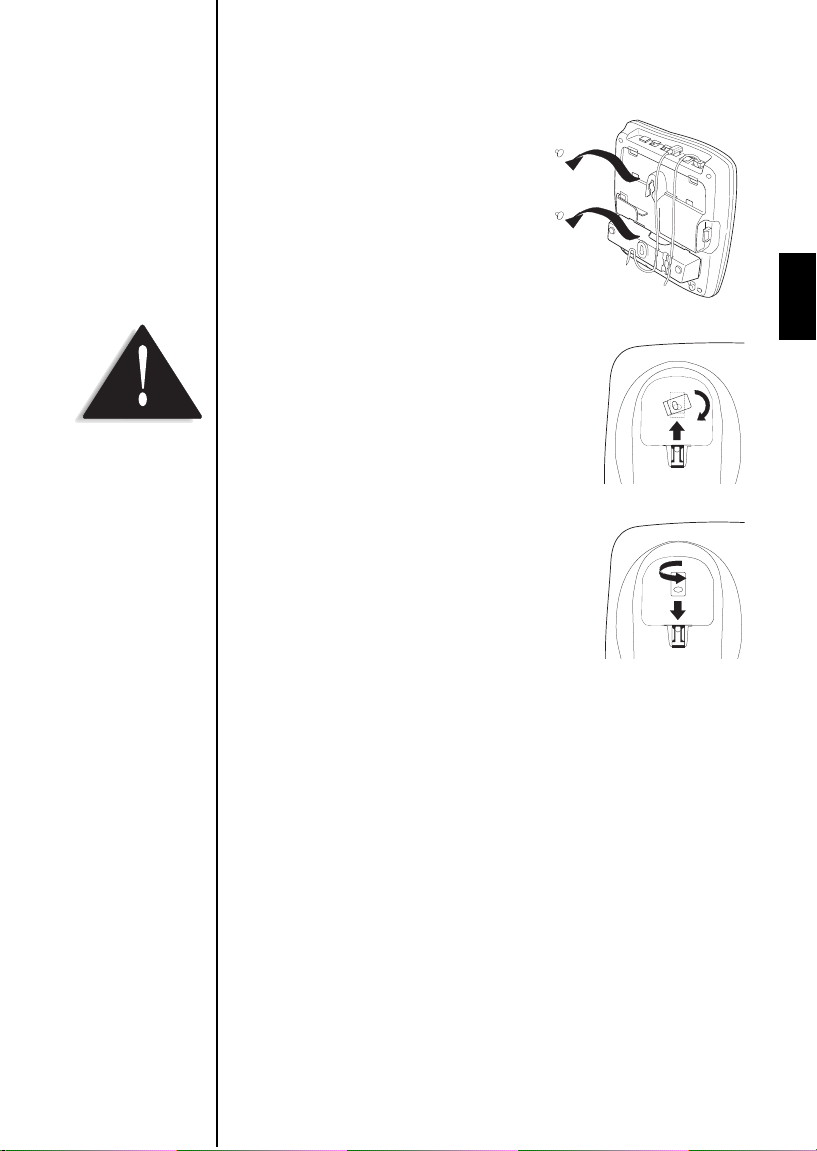
6. Align the mounting slots on the
base with the mounting posts on the
wall. Push in and down until the
phone is firmly seated.
7. On the base, pull the handset retainer out
of the slot. Rotate clockwise 180°.
8. Flip the retainer from front to back.
Slide it back into the slot so that the lip of the
retainer is up and the oval is down. The
retainer holds the handset in place.
t Direct wall mounting
If you don't have a standard wall plate, you can mount your phone
directly to the wall. Before doing this, consider the following:
l Select a location away from electrical cables, pipes, or other items
behind the mounting location that could cause a hazard when
inserting the screws into the wall.
l Mount your phone near a working phone jack to avoid
excessive cord lengths.
l Make sure the wall material is capable of supporting
the weight of the base and the handset.
7
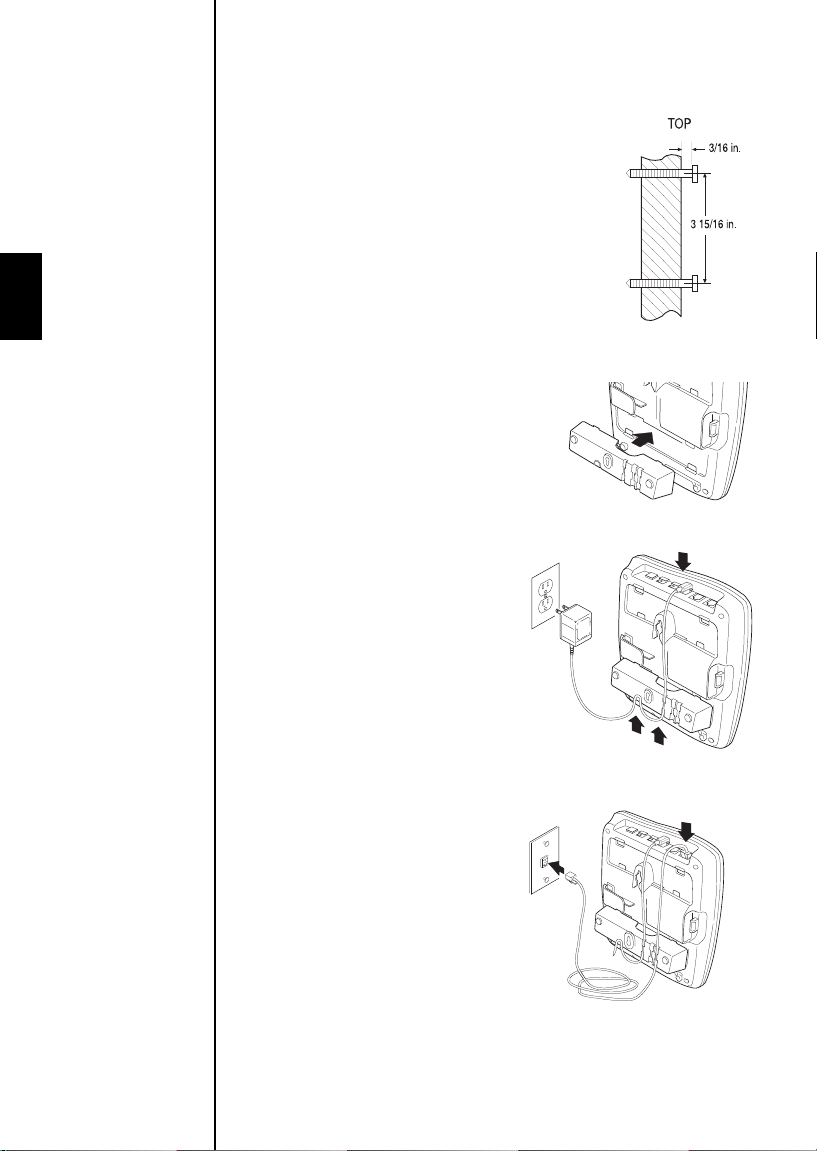
1. Insert two mounting screws (with the
appropriate anchoring device) into the wall
3-15/16 inches apart. Allow about 3/16 of an inch
between the wall and screw heads for mounting
the phone.
2. Snap the desktop/wall mount
adapter into the bottom of the base
as shown.
3. Plug the AC adapter cord into the
10V DC input jack on the back of
the base.
4. Put the AC adapter cord inside the
molded wiring channel. Wrap it
around the strain relief notch. Plug
the AC adapter into a standard
120V AC wall outlet.
5. Plug one end of the long telephone
cord into the
TTEELL LLIINNEE 11//22
jack
on the back of the base. Plug the
other end into a telephone jack.
8
Be careful not to insert
the mounting screws
into possible electrical
hazards such as cables,
wiring, or pipes.
6. Align the mounting slots on the
base with the mounting screws on
the wall. Push in and down until
the phone is firmly seated.
7. On the base, pull the handset retainer
out of the slot. Rotate clockwise 180°.
8. Flip the retainer from front to back.
Slide it back into the slot so that the lip of
the retainer is up and the oval is down.
The retainer holds the handset in place.
9
Use only Uniden Battery
(model BT-990) supplied
with your phone.
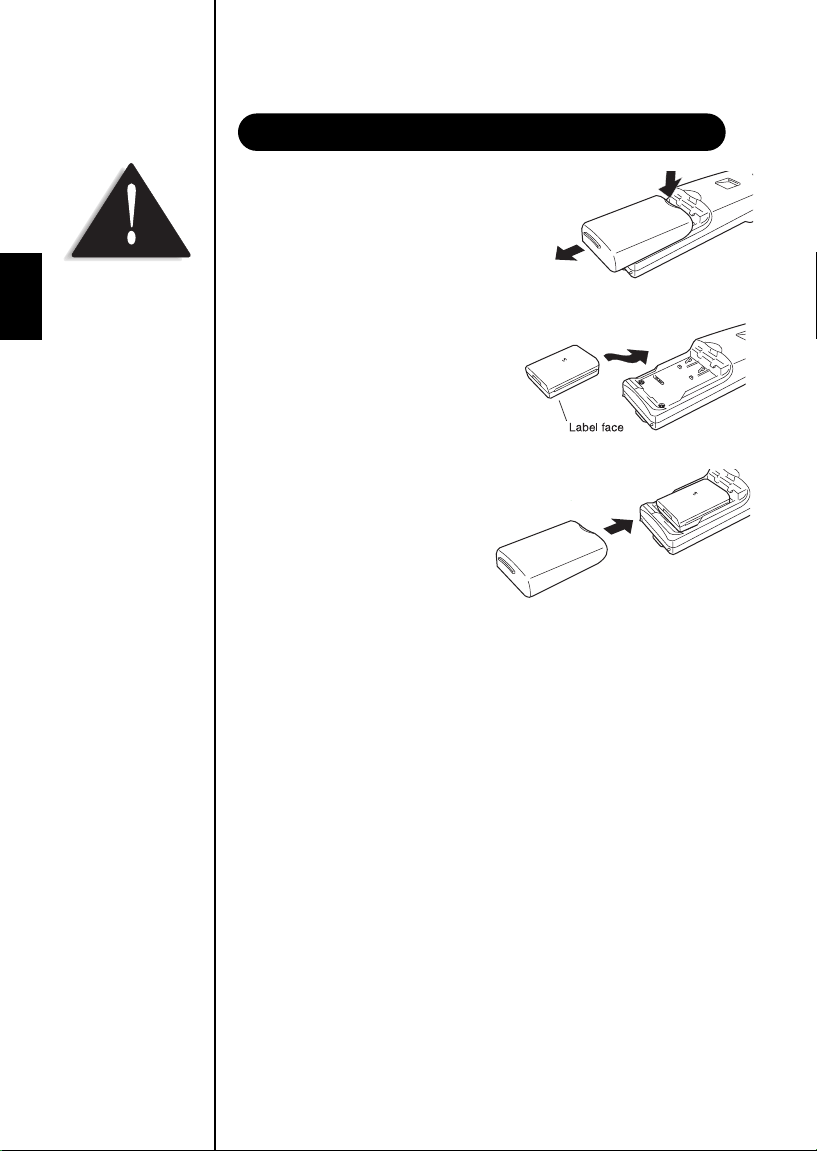
INSTALLING THE HANDSET BATTERY PACK
1. Press the battery cover release.
Slide cover off.
2. Install the nickel-cadmium battery
with the label down.
3. Slide the battery cover forward
until it snaps into place.
10
CHARGING THE BATTERY PACK
t Initial battery charging
Before connecting your phone for the first time, charge the
rechargeable battery pack for 15-20 hours without interruption.
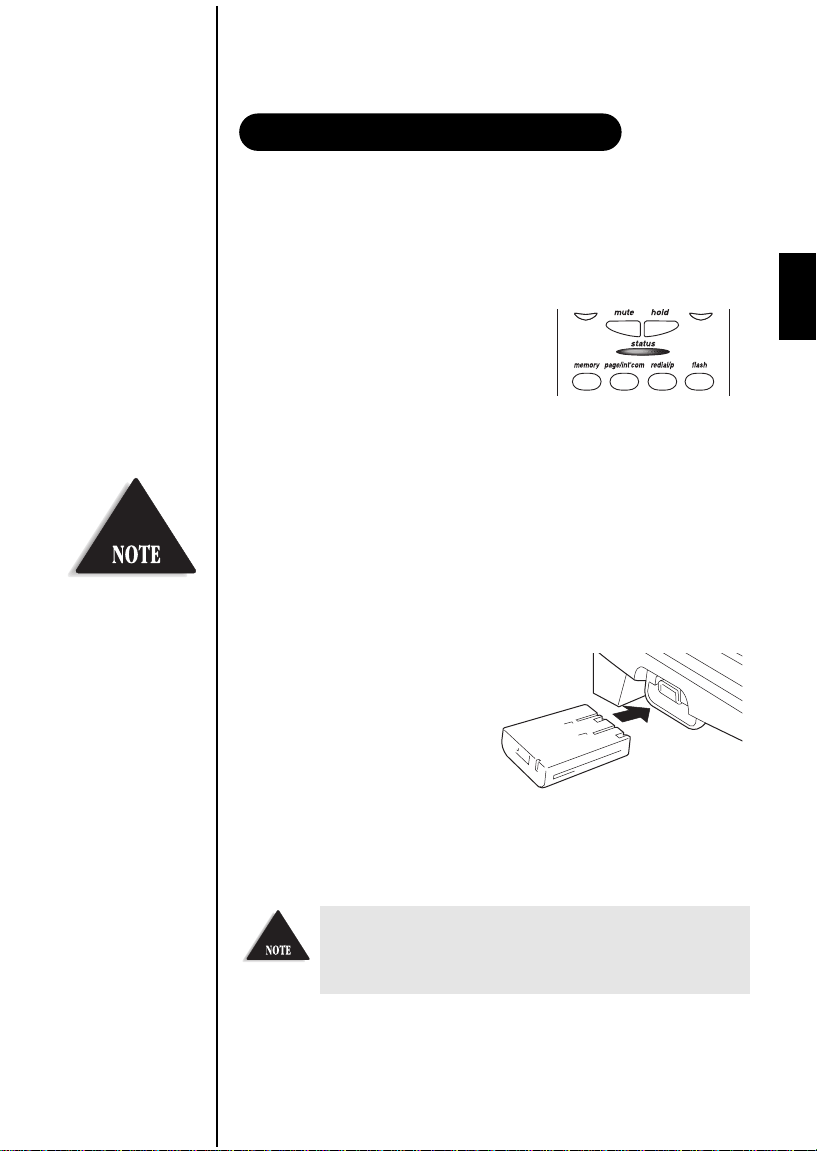
1. Place the handset on the base.
2. Make sure that
If the LED doesn’t light, be sure the AC
adapter is plugged in and the handset
makes good contact with the base
charging contacts.
t Charging optional battery packs
The base of your phone is equipped with a compartment for charging
an extra battery pack for use in your handset. You can obtain an
extra battery pack from your authorized Uniden dealer.
status
LED lights.
Please visit your
authorized Uniden dealer
to obtain an extra battery
pack or contact the
Uniden Parts Department
at (800) 554-3988. Hours
are from 8:30 a.m. to
5:00 p.m. Central
Standard Time, Monday
through Friday.
1. Position the battery pack so the contacts are face up.
2. Slide the battery pack into
the charging compartment until
it locks into place.
3. Charge the battery for 24 hours. When charging is complete, lift the
latch to remove the battery pack. To install the charged battery into the
handset, see INSTALLING THE HANDSET BATTERY PACK, page 10.
In the event of a power failure, your spare battery
pack temporarily provides power for the base so you
can still use your phone.
11

t Low battery indicator
When the battery pack is very low and needs
to be charged, the phone is programmed to
Low Battery
eliminate some functions to save power. If the
phone is not in use, Low Battery flashes.
If the phone is in use, Low Battery flashes and the handset beeps.
All rechargeable nickel-cadmium batteries
develop a “memory effect.” The memory effect
gradually reduces your talk and standby time.
t To avoid Memory Effect
On a monthly basis, use the phone until the “Low Battery” display
flashes. Then charge the battery for 15-20 hours.
With normal usage, your battery should last about one year.
CLEANING THE BATTERY CONTACTS
To maintain a good charge, clean all charging contacts on the handset
and base about once a month. Use a pencil eraser or other contact
cleaner. DO NOT use liquids or solvents; you may damage your phone.
Most phone systems use
tone dialing. Check with
your local phone
company if you’re not
sure whether your
system is tone or pulse.
12
SETTING THE PULSE/TONE SWITCH
Be sure the
is the
PULSE/TONE
TONE
position unless
your local phone system uses
pulse dialing.
switch
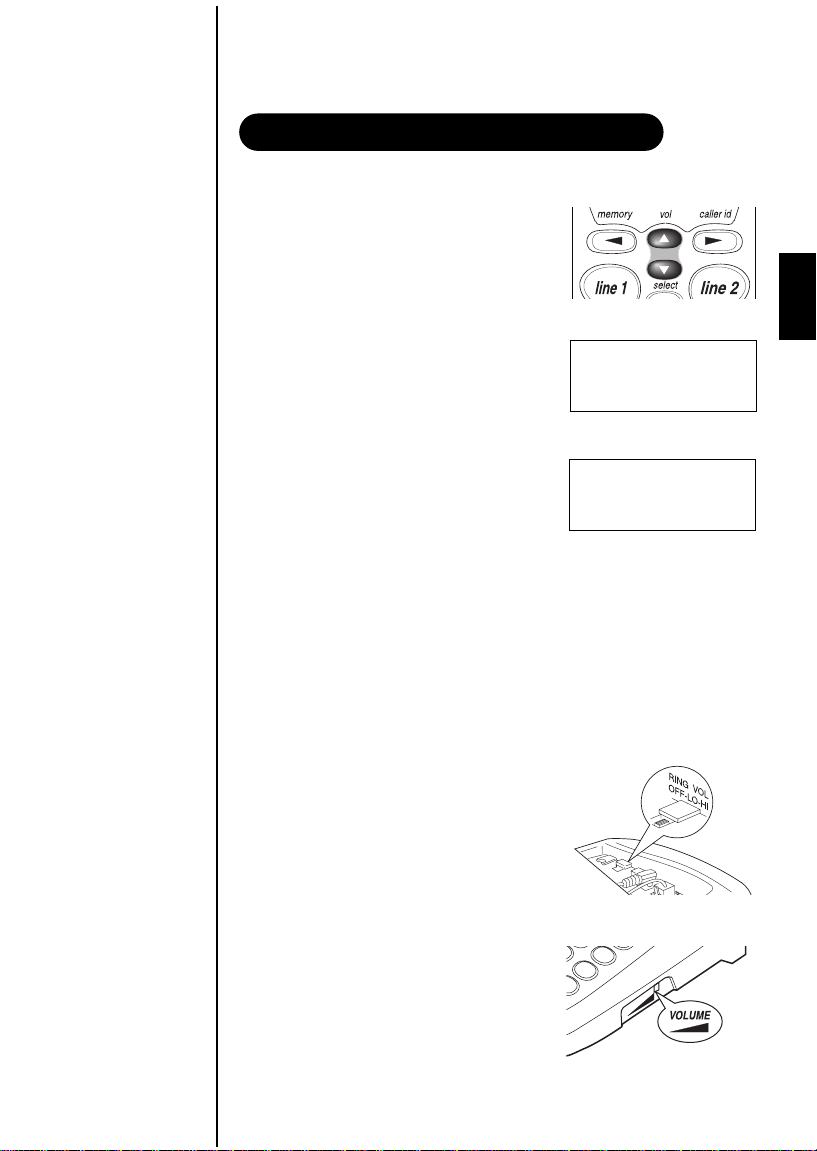
ADJUSTING THE VOLUME CONTROLS
t Handset ringer volume
Remove the handset from the base.
Press the
to set the handset ringer volume. There are
two ringer volume settings; high and low.
To select the high volume setting,
press
screen displays:
To select the low volume setting,
press
screen displays:
t Handset earpiece volume
There are three volume settings for the handset earpiece; high, normal
and low. The handset earpiece volume can be adjusted only during a call.
vol
s or t key on the handset
vol
s. The following
vol
t. The following
Ringer High
Ringer Low
To lower the volume, press
vol
t. To raise the volume, press
The handset displays Volume High, Volume Normal or
Volume Low indicating the current volume setting.
t Base ringer volume
The ringer control for the base of your
EXS 9660 allows you to turn the ringer
OFF
or to select
t Base speaker volume
LO orHI
volume.
To control the speaker volume of the
base, adjust the
VOLUME
slide switch
as desired.
vol
s.
13
 Loading...