

Page 1

Thank you for choosing the Uniden EXS 2010 cordless telephone.
Features
Introduction
This phone is designed for reliability, long life, and outstanding
performance utilizing the latest in 900 MHz Digital Spread Spectrum
technology.
Note: Some illustrations in this manual may differ from the
actual unit for explanation purposes.
• 900 MHz Digital Spread Spectrum Technology
• 10 Memory Dial Locations
TO YOUR NEW PHONE
• 32 Digit Redial
• Flash and Pause
• Pulse / Tone Dialing
• Page
• 6 Hour Talk Time
• 10 Day Standby Time
• Handset Earpiece and Ringer Volume Controls
• Hearing Aid Compatible
• Lighted Keypad
• Headset Compatible
Digital Spread Spectrum Technology utilizes a “wider
frequency band” vs. a “single narrow band” used in standard
digital transmissions. The result is a more secure conversation
with the clarity of digital sound, extended range, and minimal
interference from other cordless phone.
Random Code™ digital security automatically selects one of
over 65,000 codes for the handset and base.
These features enhance your phone’s security and also
prevent unauthorized calls as a result of your phone being
activated by other equipment.
The EXS 2010 features include
AutoTalk allows you to answer a call by just removing the
handset from the base so you don’t have to waste time
pushing buttons or flipping switches. AutoStandby allows you
hang up by simply returning the handset to the base.
AutoTalkTMand AutoStandby
TM
INTRODUCTION
Page 2
vol
DIGITAL SPREAD SPECTRUM
batttalk
mute redialmem
abc def
ghi mno
pqrs tuv wxyz
oper
channel pause tone ringer
jkl
12 3
45 6
78 9
0#
talk flash
page/find
power
status
5
10
12
11
6
7
8
9
13
15
16
17
20
18
19
14
1
2
3
4
27 28 29
25
23
24
26
21
22
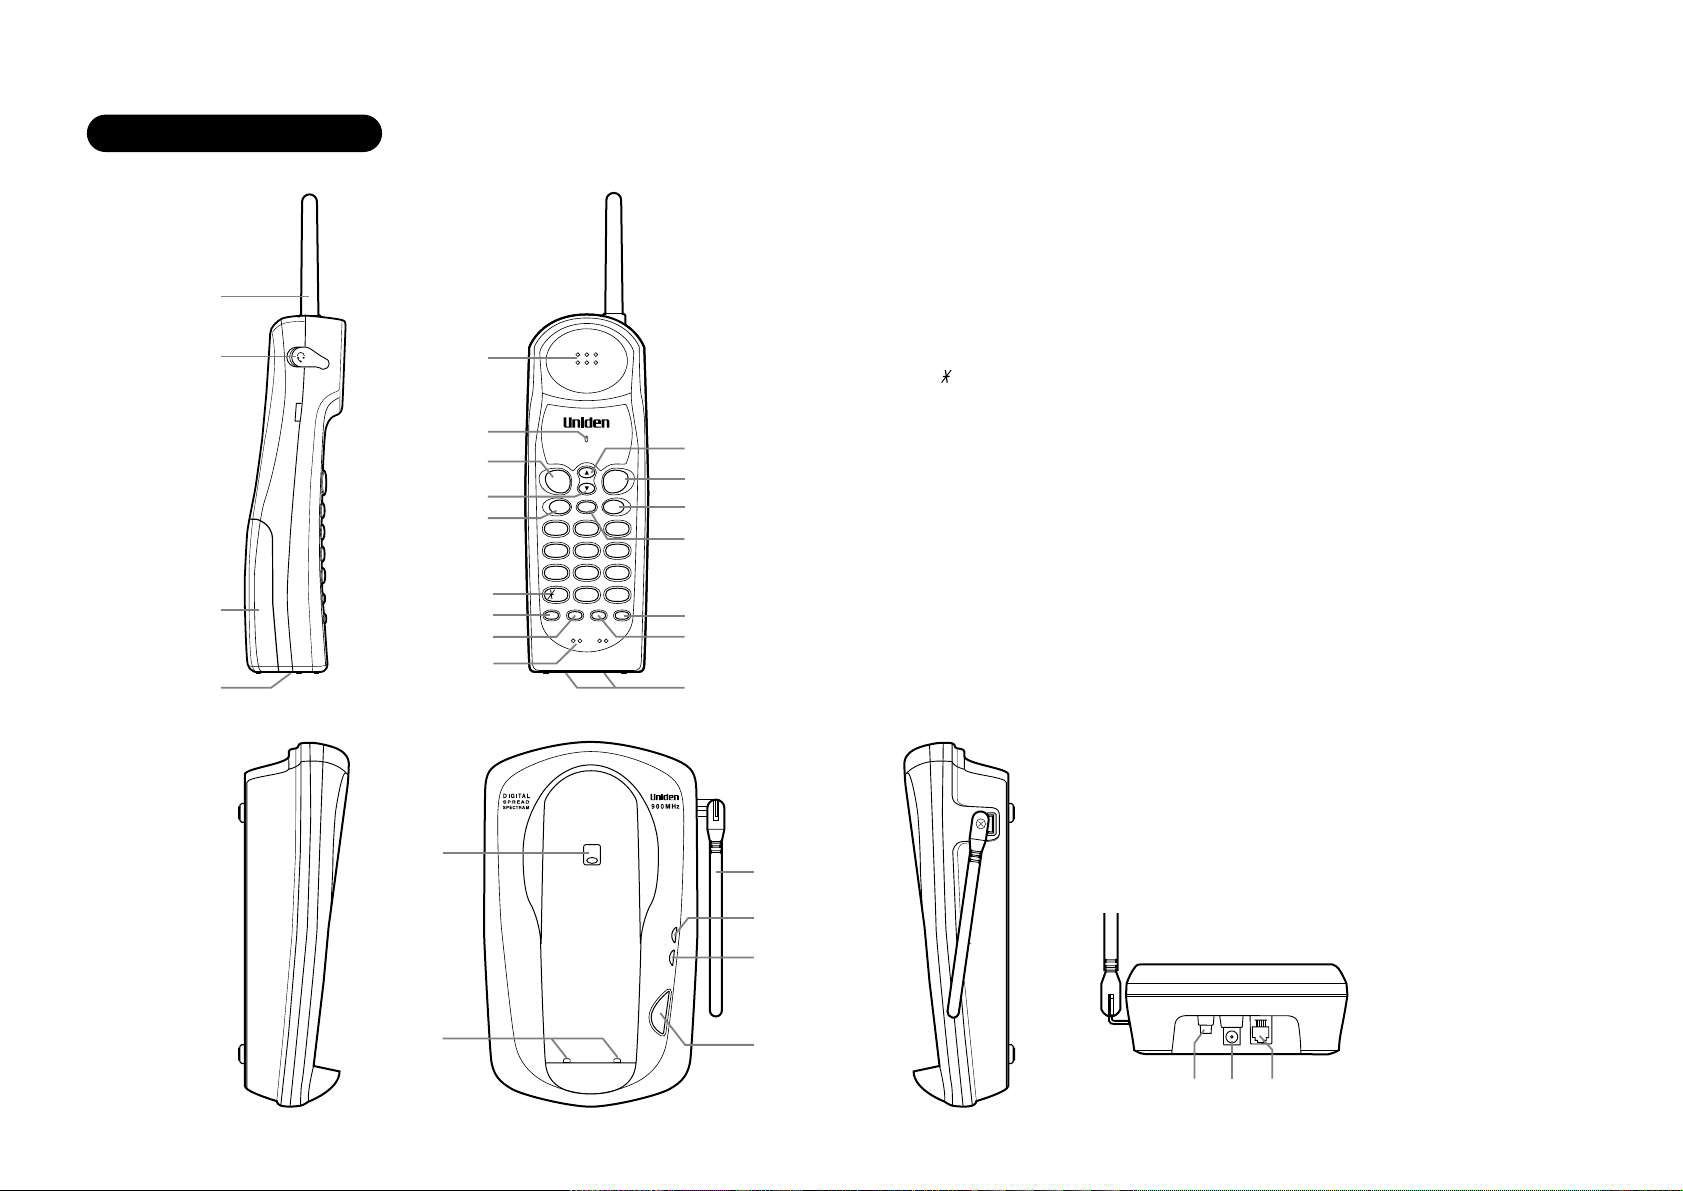
1. Handset antenna
Controls and functions
2. Headset jack cover
3. Handset battery compartment
4. Handset ring switch
5. Handset speaker
6. Talk/Batt LED
7. Talk key
8. Volume down key
9. Mute key
21. Handset retainer clip
22. Base charging contacts
23. Base antenna
24. Status LED
25. Power LED
26. Page/Find key
27. Pulse-Tone switch
28. DC power input
29. Phone jack
10. key
11. Channel key
12. Pause key
13. Handset microphone
14. Volume up key
15. Flash key
16. Redial key
17. Memory key
18. Ringer key
19. Tone key
20. Handset battery charging contacts
Page 3

Introduction / Features...............inside front cover
Contents
Controls and Functions ..............inside front cover
Getting Started
Read this first..........................................................2
Step 1: Checking the package contents...............3
Step 2: Setting up the base unit ...........................4
Mounting the base unit on a wall ...........7
Step 3: Installing the handset battery pack..........9
Automatic digital code security ..............10
Basics
Making a call ........................................................11
Receiving a call ....................................................12
Ringer mute ..........................................................12
Flash and Call Waiting .........................................13
Adjusting the ringer and earpiece volume.........13
Redialing a call.....................................................14
Mute ......................................................................15
Using page feature...............................................16
Memory Dialing
Storing phone numbers .......................................17
Making calls with memory dialing ......................18
Chain dialing.........................................................18
OF YOUR OWNER’S MANUAL
Erasing a stored phone number..........................19
Additional Information
Installing the beltclip............................................20
Headset installation..............................................20
Note on power sources .......................................21
Maintenance..........................................................21
Troubleshooting ................................................22
Index....................................................................24
Getting Started
Basics
Memory Dialing
Additional
Information
CONTENTS
Page 4
This cordless telephone must be set up before use. Follow these steps;
p
a
g
e
/
f
i
n
d
p
o
w
e
r
s
t
a
t
u
s
DIGITAL
S
P
R
E
A
D
S
P
E
C
T
R
A
M
900MHz
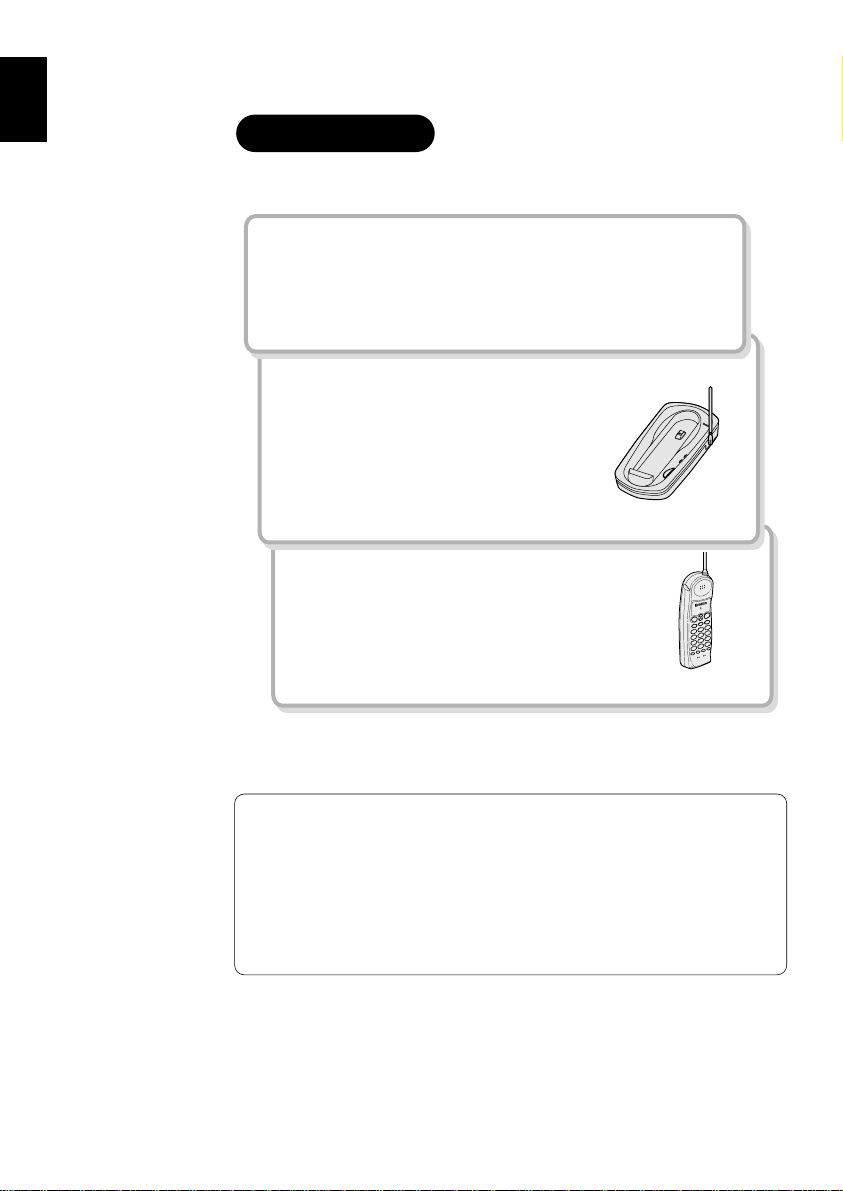
Read this first
Step 1 (page 3)
Unpack and check the telephone and accessories.
Step 2 (page 4 to 8)
Next, choose the best location to set
up the base unit.
Base unit
Step 3 (page 9 to 10)
Then, insert the battery pack into the handset.
You must charge the battery pack for 15 - 20
hours before using the phone.
Handset
2
GETTING STARTED
About the digital security code
This cordless telephone uses a digital security code to prevent
unauthorized access to your base unit. This security code prevents
other cordless handsets from making calls through your base unit.
A random security code will be assigned automatically between
your base unit and handset when you charge the battery pack for
the first time.
Page 5
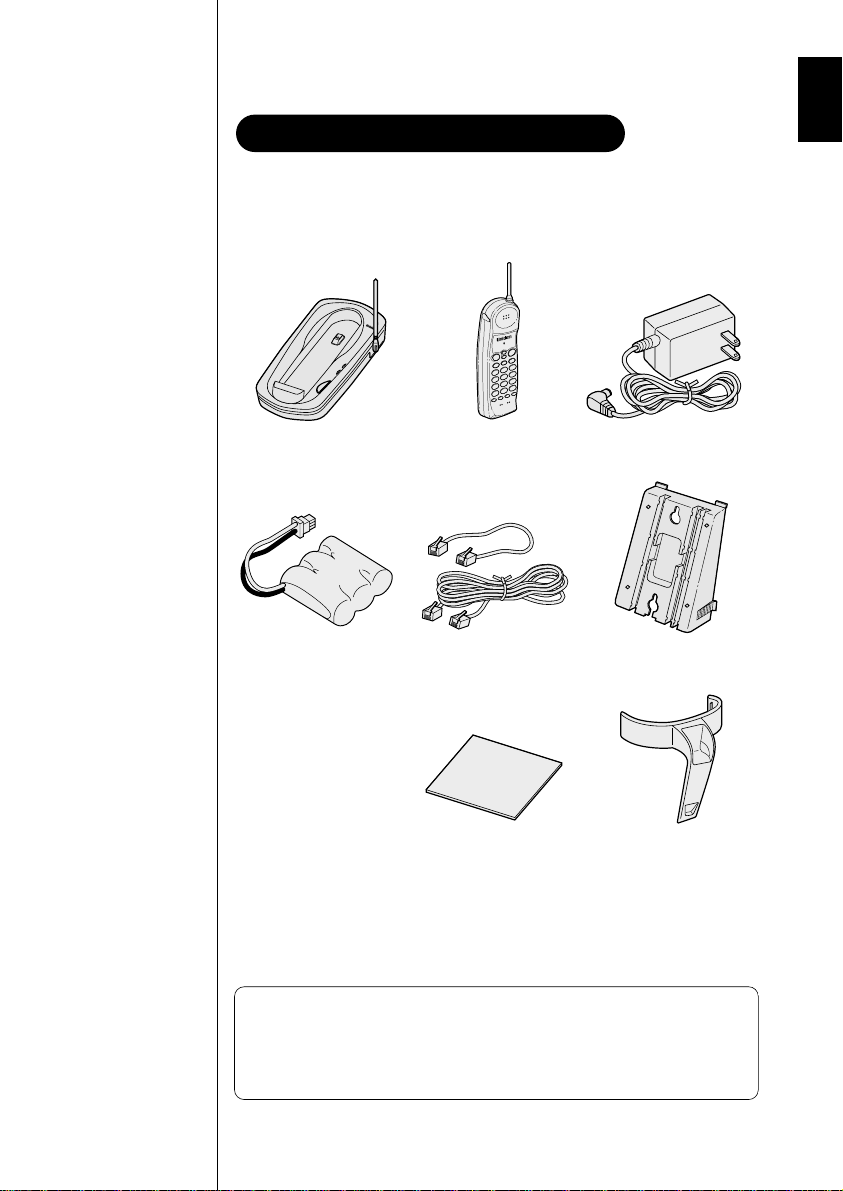
Make sure you have received the following items in the package.
p
a
g
e
/
f
i
n
d
p
o
w
e
r
s
t
a
t
u
s
DIGITAL
SPR
EA
D
S
PECTRA
M
9
0
0
M
H
z
Checking the package contents
If any of these items are missing or damaged, contact the
Parts Department
• Base unit • Handset • AC adapter (AD-310)
(see below).
Uniden
• Rechargeable
battery pack
(BT-905)
• This Owner's Manual
• Precautions and Important Safety Instructions
• Registration Card
• Quick Reference Guide
Uniden Parts Department
(800) 554-3988
Hours: M-F 8:30 AM to 5:00 PM CST.
We can also be reached on the web at www.uniden.com.
• Telephone line
cord (2)
• Memo sticker
• Wall mount adapter
• Beltclip
3
Page 6
Do the following steps.
Setting up the base unit
• Choose the best location
• Connect the base unit
• Choose the dialing mode
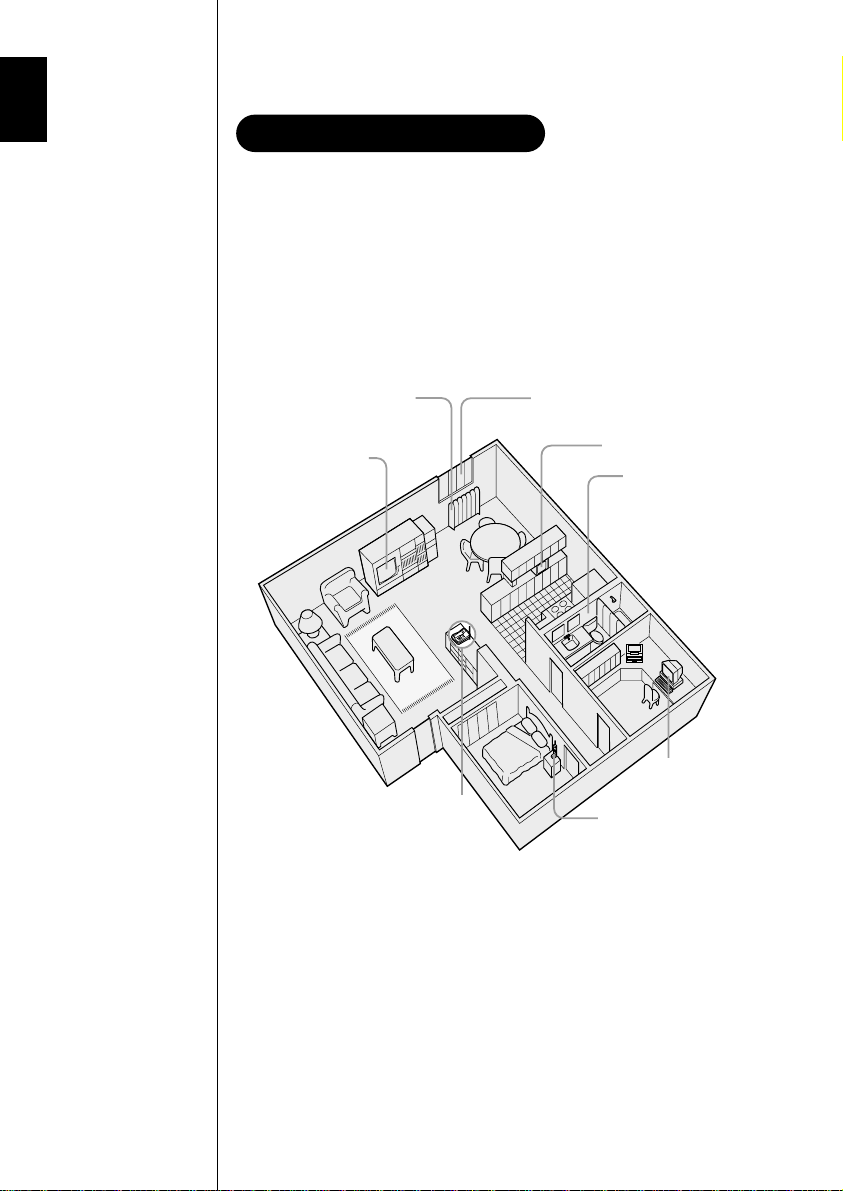
Choose the best location
Before choosing a location for your new phone, read the
INSTALLATION CONSIDERATIONS included in the PRECAUTIONS
AND IMPORTANT SAFETY INSTRUCTIONS brochure. Here are some
important guidelines you should consider:
Avoid heat sources, such as
radiators, air ducts, and sunlight
Avoid television sets
and other electronic
equipment
Choose a central location
Avoid noise sources such as a window
by a street with heavy traffic
Avoid microwave ovens
Avoid excessive
moisture, extremely low
temperatures, dust,
mechanical vibration, or
shock
Avoid personal
computers
Avoid other cordless
telephones
• You should charge your handset for 15 - 20 hours before using the
phone.
• The location should be close to both a phone jack and continuous
power outlet which is not switchable.
• Keep the base and handset away from sources of electrical noise
such as motors and fluorescent lighting.
• Be sure there is suf ficient space to raise the base antenna
fully vertical.
• The base can be placed on a desk, tabletop or mounted on a
standard wall plate.
4
Page 7
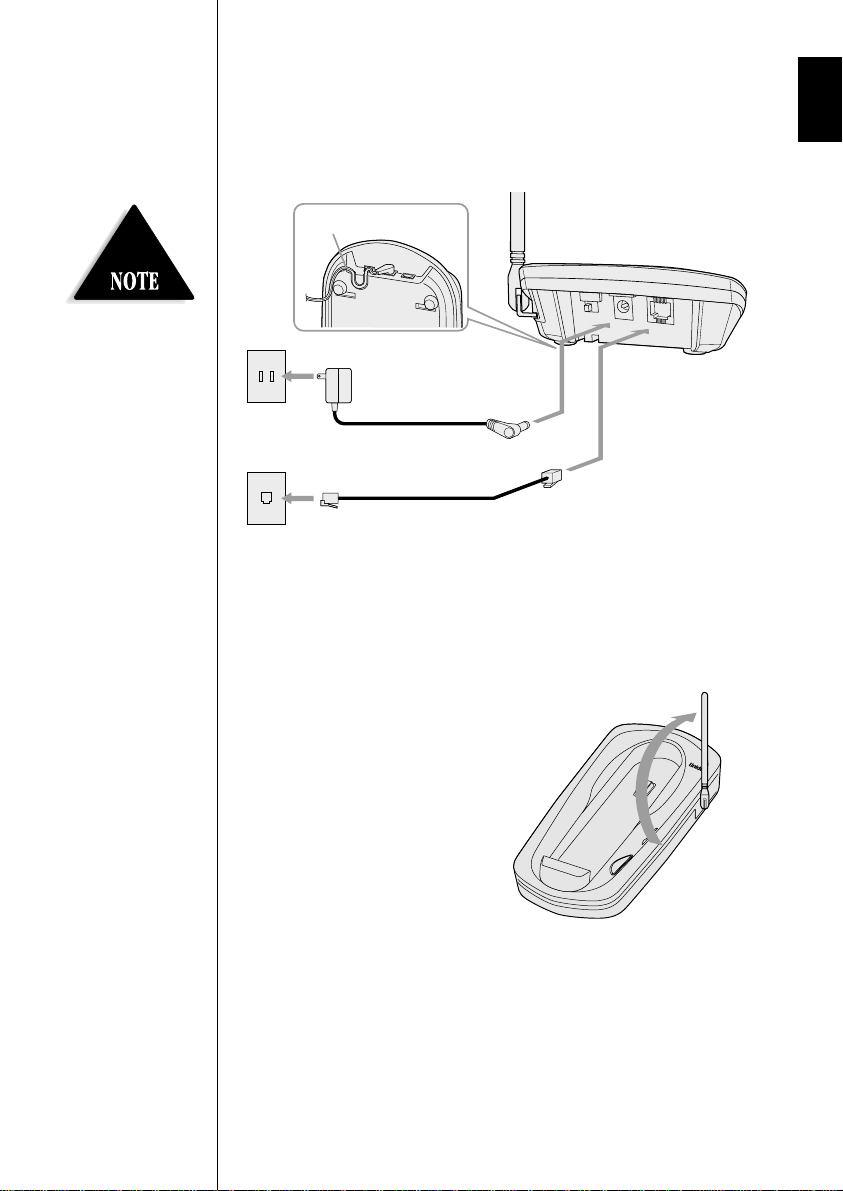
Route the cord.
To AC outlet
To telephone outlet
To TEL LINE
To DC IN 9V
AC adapter
(supplied)
Telephone line cord
(supplied)
1
2
Place the power cord so it
p
a
g
e
/
f
i
n
d
m
e
s
s
a
g
e
s
t
a
t
u
s
DIGITAL
S
P
R
E
A
D
S
P
EC
TR
A
M
9
00
M
H
z
does not create a trip
hazard, or where it could
become chafed and create
a fire or electrical hazard.
Connect the base unit
If you want to install the base unit on the wall, see page 7.
1 Connect the telephone line cord to the TEL LINE jack and to
a telephone outlet.
2 Connect the AC adapter to the DC IN 9V jack and to a
standard 120V AC wall outlet.
3 Set the base unit on a desk or
tabletop and place the handset
on the base unit.
Then raise the antenna to a
vertical position.
5
Page 8
Use only the supplied AD-310 AC
PULSE
TONE
adapter. Do not use any other AC
adapter.
Connect the AC adapter to a
continuous power supply.
Place the base unit close to the
AC outlet so that you can unplug the
AC adapter easily.
Polarity of the plug
If your telephone outlet isn't modular,
contact your telephone company for
assistance.
Modular
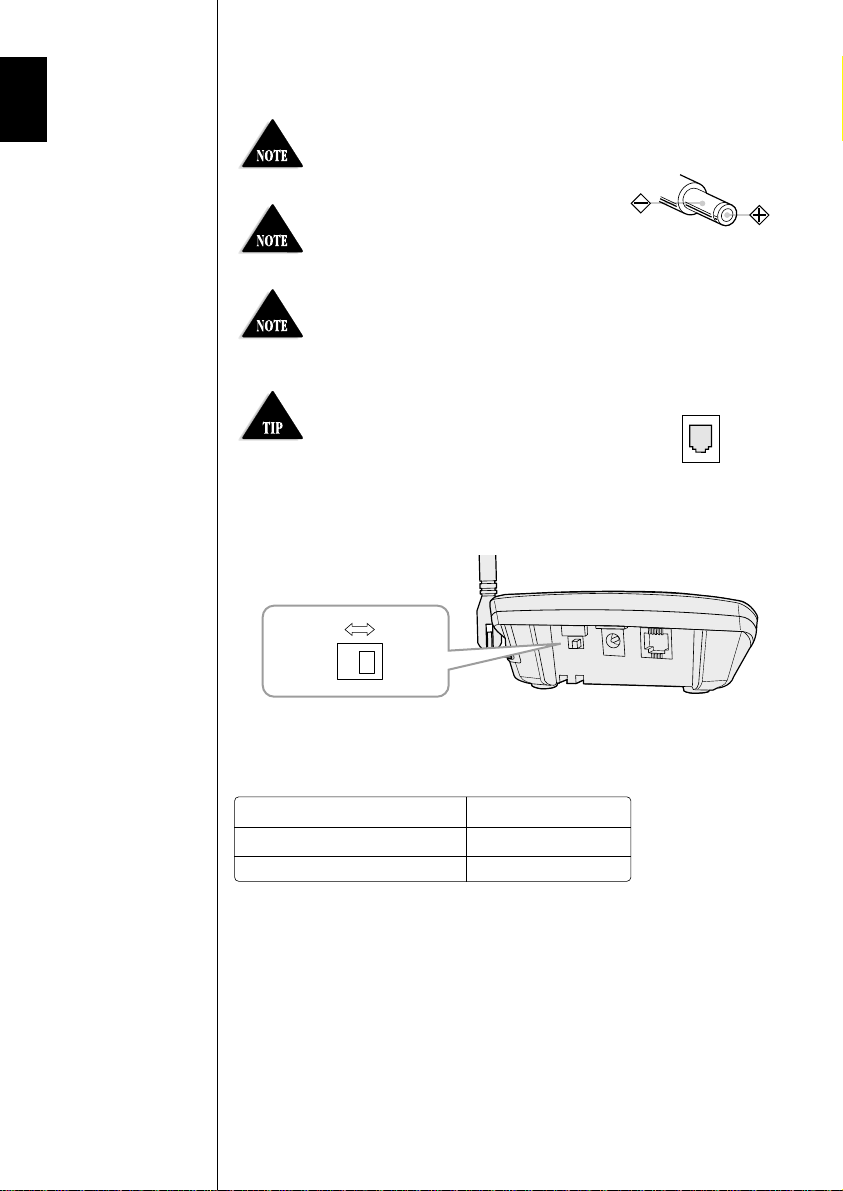
Choose the dialing mode
Depending on your dialing system, set the PULSE-TONE switch as
follows:
If your dialing system is Set the switch to
Tone TONE
Pulse PULSE
If you aren't sure of your dialing system
Make a trial call with the PULSE-TONE switch set to TONE.
If the call connects, leave the switch as is; otherwise, set to
PULSE.
6
Page 9
Standard wall plate mounting
2
6
4
7
7
3
5
AC adapter
Wall plate
AC outlet
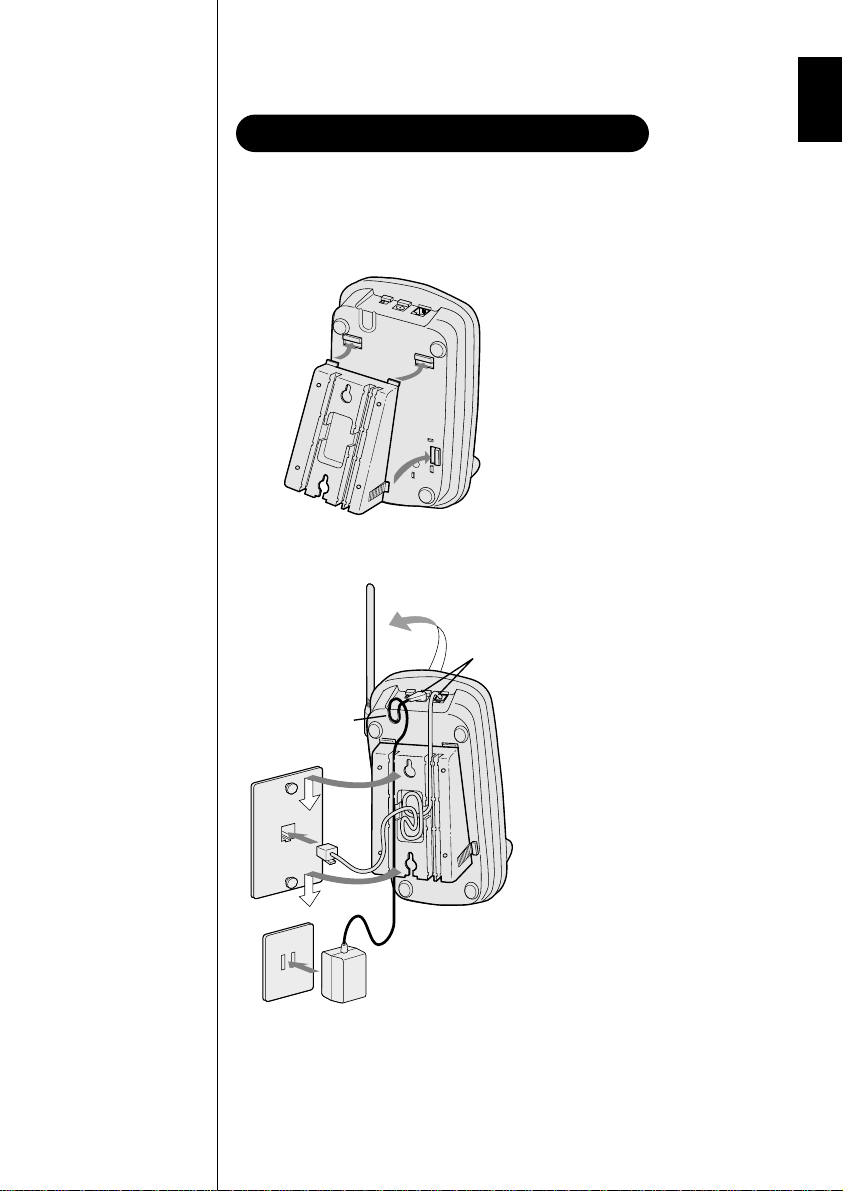
Mounting the base unit on a wall
This phone can be mounted on any standard telephone wall
plate.
1
adapter into the
notches on the base.
2 Plug the telephone
1 Snap the wall mount
line cord to the
TEL LINE jack and the
AC adapter to the
DC IN 9V jack.
3 Plug the telephone
line cord into the
telephone outlet.
4 Wrap the AC adapter
2 - 7
cord inside the
molded wiring
channel. Then wrap
the cord around the
strain relief notch.
5 Plug the AC adapter
into a standard
120V AC wall outlet.
6 Raise the antenna to a
vertical position.
7 Align the mounting
slots on the base with
the mounting posts on
the wall. Push in and
down until the phone
is firmly seated.
7
Page 10

TOP
3/16 in.
3-15/16 in.
Handset retainer
If the handset beltclip is
attached, you cannot
charge the handset facing
forward when the phone is
mounted on the wall (See
page 20).
8 On the base unit, pull the
handset retainer out of the slot.
Rotate it clockwise
180 degrees.
9 Flip the retainer from front to
back. Slide it back into the slot
DIGITAL
S
P
R
E
A
S
P
D
E
C
T
R
A
M
900MHz
Direct wall plate mounting
If you don't have a standard wall plate, you can mount your phone
directly to the wall. Before doing this, consider the following:
• Avoid electrical cables, pipes, or other items behind the mounting
location, that could cause a hazard when inserting screws into
the wall.
• Try to mount your phone within 10 - 15 feet of a working phone
jack to avoid excessive cord lengths.
• Make sure the wall material is capable of supporting the weight of
the base and handset.
• Use #10 screws (minimum length of 1-3/8 inches) with anchoring
devices suitable for the wall material where the base unit will be
placed.
so that the lip of the retainer is
up and the oval is down. The
retainer holds the handset
in place.
8
1 Insert two mounting screws
into the wall, (with their
appropriate anchoring device),
3-15/16 inches apart. Allow
about 3/16 of an inch between
the wall and screwheads for
mounting the phone.
2 Refer to steps 1 through 9 on
page 7 and 8 to mount the
telephone.
Page 11

Installing the handset battery pack
p
a
g
e
/f
in
d
p
o
w
e
r
s
t
a
t
u
s
DIGITAL
SP
R
E
A
D
S
P
EC
TR
A
M
9
0
0
M
H
z
Red
Black
status LED
Charge the battery pack for 15 - 20 hours before you start using
your phone.
1 Press the battery cover
release.
2 Connect the battery pack
connector with the correct
polarity (black and red
wires), then insert the battery
pack into the battery
compartment.
3 Slide the battery cover
forward until it snaps into
place.
4 Place the handset on the
base.
Use only Uniden Battery (BT-905) supplied with your
phone.
5 Make sure that the status
LED lights. If the LED
doesn’t light, check to see
that the AC adapter is
plugged in and that the
handset makes good contact
with the base charging
contacts.
9
Page 12

Even when the battery
Automatic digital code security
p
a
g
e
/
f
i
n
d
p
o
w
e
r
s
t
a
t
u
s
DIGITAL
S
P
R
E
A
D
S
P
E
C
T
R
A
M
900MHz
pack is not being used, it
will gradually discharge
over a long period. For
optimum performance, be
sure to return the handset
to the base unit after a
telephone call for
charging the battery.
Battery use time (per charge)
From fully charged
• Six hours coutinuous use.
• Ten days when the handset is in the standby mode.
When the battery charge becomes low
When the voltage of battery pack in the handset is very low and
needs to be charged, the phone is programmed to eliminate
functions in order to save power. If the battery charge becomes low,
talk/batt LED blinks. If the phone is in use, the handset beeps.
Complete your conversation as quickly as possible and return the
handset to the base unit for charging.
Cleaning the charging contacts
To maintain a good charge,
it is important to clean the
charging contacts on the
handset and base unit about
once a month. Use a pencil
eraser to gently wipe the
handset and base charging
contacts.
Do not use any liquids or solvents.
To prevent other parties from making unauthorized calls on your
phone line, a digital code was added to the EXS 2010. Your phone’s
handset and base share this code, which is randomly set each time
you place the handset on the base.
10
Page 13

ª
•
tone
Making a call
talk
If the talk/batt LED does
talk
channel
not stop flashing after
pressing the key,
place the handset on the
base for at least five
seconds and make a call
again.
talk
1 Press . Listen for dial tone.
2 Dial the phone number.
3 To hang up, press or return
the handset to the base.
Other Operations
To Do this
To adjust the ear speaker volume Press or during the call.
To temporarily switch to tone dial Press . The following
(When the base is set to pulse numbers will be sent as tone
mode) dialing.
To improve reception Press .
BASICS
11
Page 14

Receiving a call
talk
talk
talk
When you receive a call
talk
mute
mute
talk
during a page or memory
dialing operation, press
to answer the call.
Handset on the base
1 Phone rings. The talk/batt LED blinks.
2 Pick up the handset and begin
speaking.
3 To hang up, press or return the
handset to the base.
Handset off the base
1 Phone rings. The talk/batt LED blinks.
2 Press or any key (except )
and begin speaking.
3 To hang up, press or return the
handset to the base.
Ringer mute
You can temporarily mute the ringer by pressing when the
phone rings.
You may still press to answer the call.
12
Page 15

ringer
Adjusting the ringer and earpiece volume
Flash and Call Waiting
If you have “Call Waiting” service and a call
flash
flash
flash
ringer
•
ª
ringer
off
on
•
ª
waiting tone sounds while you are on a call,
press to accept the waiting call.
There is a short pause, then you will hear
the new caller. To return to the original
caller, press again.
Ringer tone/volume
The phone has four types of ringer tone
and volume combinations.
In standby mode, press repeatedly
on the handset.
To turn the ringer off,
set the
ringer on/off switch to off.
o
ff o
rin
g
e
r
n
Handset earpiece volume
The phone has four earpiece volume levels, Normal, Medium, High,
and Loud. Pressing or will change the earpiece volume of
the handset. This setting will remain in effect after the telephone call
has ended.
When you press in Loud mode or press in Normal mode,
error sound beeps.
13
Page 16

If the recently dialed
Redialing a call
talk
redial
talk
number exceeds 32 digits,
only the first 32 digits can
be redialed.
The last phone number dialed can be quickly redialed.
1 Press . The talk/batt LED lights.
2 Press .
3 To hang up, press or place the
handset on the base.
14
Page 17

You can turn off the handset microphone and temporarily mute
talk
Mute
mute
talk
mute
mute
talk
the ringer.
When speaking on the
handset
1 Press during a telephone call.
The
talk/batt LED flashes.
The other party will not be able to
hear you although you can hear
them.
2 To cancel mute, press or
again.
When the phone is ringing
Press when the phone rings.
The ringer sound turns off.
You may still press to answer the
call.
15
Page 18

page/find
p
a
g
e
/
f
i
n
d
p
o
w
e
r
s
t
a
t
u
s
DIGITAL
S
PR
EA
D
SP
E
C
TR
A
M
9
0
0
M
H
z
Using page feature
If you cancel the page by
talk
page/find
page/find
page/find
pressing , press
again to return to
talk
standby.
To locate the handset (while it’s off the
base), press on the base. The
handset beeps for 5 seconds.
Press and hold for more than 2 seconds to
page the handset for a minute. Press any key or return the
handset to the base to cancel the page.
If you hold down for more than a minute,
the handset beeps until you release
.
16
Page 19

mem
You must press a key
Storing phone numbers
mem
pause
within 20 seconds, or the
phone will return to
standby. If you return the
handset in the cradle, the
phone will also return to
standby.
Your EXS 2010 stores up to 10 numbers in the handset.
1 Press while in standby mode.
The
talk/batt LED flashes.
2
Dial the number you wish to store (up
to 20 digits).
3
Press again.
4 Press a number key (0 - 9) to select
the memory location where you
wish to store the number.
5 The talk/batt LED goes out.
A confirmation tone indicates the
number has been stored.
If a pause is needed during dialing to access long
DIALING
distance or other services, press to insert a
2-second pause between numbers. Entering a pause
counts as one digit.
MEMORY
Use the supplied memo sticker to write stored
numbers.
17
Page 20

Making calls with memory dialing
talk
mem
talk
If you select a memory
mem
talk
location that does not
have a stored number, the
handset will beep rapidly.
Press to return to
standby.
Memory dialing
1 Press . The talk/batt LED lights.
2 Press .
3 Enter a number (0 - 9) to select the
memory location you wish to dial.
4 To hang up, press or return the
handset to the base.
Chain dialing
On certain occasions after dialing a number, you may be requested
to enter an access code or other information, such as your account
number. You can enter this number into a memory location for later
use by doing the following.
18
1 Store the access code into one of the
memory location (0 - 9) following the
steps on page 17.
2 Dial the party or service main number.
3 When you need to enter the special
number, press followed by the
memory location (0 - 9).
Page 21

1 Press in the standby mode.
mem
Erasing a stored phone number
mem
The
talk/batt LED flashes.
2 Press again.
3 Enter the memory location number
(0 - 9) you wish to delete.
A confirmation beep indicates the
number has been erased.
19
Page 22

To attach the beltclip
headset
jack
Installing the beltclip
Headset installation
To remove the beltclip
If you have wall mounted
the base, you must remove
the beltclip to charge the
handset facing forward.
Insert the beltclip into the holes
on each side of the handset.
Press down until it clicks.
INFORMATION
Pull both sides of the beltclip to
release the tabs from the holes.
Your phone may be used with
an optional headset, the Uniden
HS910. To use this feature, simply
plug the headset plug into the
headset jack. Your phone is ready
for hands-free conversation.
20
ADDITIONAL
Page 23

Battery replacement
Note on power sources
Maintenance
and handling
When the operating time
becomes short, even after a
battery is recharged, please
replace the battery.
With normal usage, your
battery should last about one
year.
Please contact your place of
purchase for a replacement
battery.
Power Failure
During the period that the
power is off, you will not
be able to make or receive
calls with the telephone.
RECYCLING NICKELCADMIUM BATTERIES
NICKELCADMIUM
BATTERIES
MUST BE
DISPOSED OF
PROPERLY.
Nickel-cadmium cells are used
in the battery pack. Please
take your used nickelcadmium battery packs to a
store that recycles nickelcadmium batteries.
Caution
• Use the specified battery pack.
• Do not remove the battery from the handset to charge it.
• Never throw the battery into a fire, disassemble it, or heat it.
• Do not remove or damage the battery casing.
When slightly dirty
Wipe with a soft, dry cloth.
When very dirty
Wipe with a soft cloth that has
been dampened with diluted,
neutral detergent. Dry with a
dry cloth.
When the charging
terminals become dirty
Wipe with a pencil eraser or
other contact cleaner.
Caution
Do not use paint thinner,
benzene, alcohol, or other
chemical products. Doing
so may discolor the surface
of the telephone and
damage the finish.
21
Page 24

If your phone is not performing to your expectations, please try
talk
Troubleshooting
these simple steps first.
Symptom
The power LED won't
come on.
The
status LED won't
come on when the
handset is placed in
the base unit.
The audio sounds
weak and/or scratchy.
Can't make or receive
calls.
The handset doesn't
ring or receive a page.
Suggestion
• Make sure the AC adapter is plugged
into the base unit and wall outlet.
• Make sure the handset is properly
seated in the base unit.
• Make sure the charging contacts on the
handset and base unit are clean.
• Make sure that the base unit antenna is
in a vertical position.
• Move the handset and or base unit to a
different location away from metal
objects or appliances and try again.
• Make sure that you are not too far from
the base.
• Check both ends of the base unit
telephone line cord.
• Make sure the AC adapter is plugged
into the base unit and wall outlet.
• Disconnect the AC adapter for a few
minutes, then reconnect it.
• Make sure is pressed.
• The battery pack may be weak. Charge
the battery on the base unit for 15 - 20
hours.
• The handset may be too far away from
the base unit.
• Place the base unit away from
appliances or metal objects.
• Make sure Ringer switch of the handset
is set to ON.
22
TROUBLESHOOTING
Page 25

At Uniden, we’ll take care of you!
If you need any assistance with this product, please call our Customer Hotline at
1-800-297-1023
PLEASE DO NOT RETURN THIS PRODUCT TO THE PLACE OF PURCHASE.
Our Uniden representatives will be happy to help you with any
matters regarding the operation of this unit, available accessories,
or any other related matters.
Thank you for purchasing a Uniden product.
Hours: M-F 7:00 AM to 7:00 PM CST.
23
Page 26

24
Index
A, B
Battery pack
Preparing and
charging............................9
Replacement and
handling..........................21
Beltclip installation ...............20
C
Chain dialing.........................18
Connection..............................5
D
Dialing mode ..........................6
Digital security code........2, 10
E, F, G
Earpiece volume...................13
H, I, J, K, L
Handset ringer tone
and volume...........................13
Headset installation..............20
M, N, O
Maintenance..........................21
Making a call ........................11
Memory dialing
Erasing a stored
phone number................19
Making calls
with memory dialing ......18
Storing phone
numbers..........................17
Mounting the base unit
to a wall ..................................7
Mute ......................................15
P, Q
Package contents....................3
Page feature ..........................16
R
Receiving a call ....................12
Redialing a call.....................14
INDEX
Ringer mute ..........................12
S
Setup
Base unit...........................4
Handset.............................9
T, U, V, W, X, Y, Z
Troubleshooting....................22
Page 27

Page 28

 Loading...