


Step 1 Checking the Package Contents
Make sure you have received the following items in
the package. If any of these items are missing or
damaged, contact the Uniden Parts Department.
• Main base unit (1)
• Handset (2)
• Charging cradle (1)
• AC adapter (2)
• Rechargeable battery (2)
• Telephone cord (1)
• Beltclip (2)
• This owner’s manual (1)
• Other printed material (1)
Uniden Parts Department
at (800) 554-3988
Hours: M-F 8:00 a.m. to
5:00 p.m. CST.
or visit our website at
www.uniden.com for
replacement parts.
Step 2 Install and Charge the Handset Batteries
TO INSTALL THE HANDSET BATTERIES
(see page 10 for details)
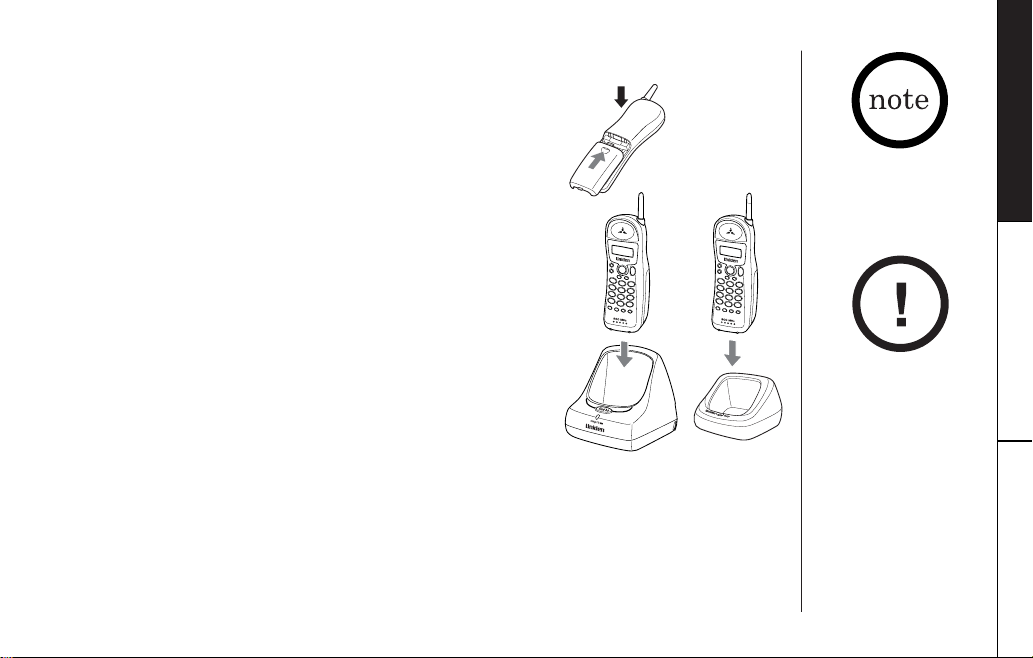
Charge the handset battery packs for at least
15-20 hours before using your new cordless
telephones for the first time!
Remove the cover.
Use only the Uniden
A
rechargeable battery
packs supplied with your
new phones!
Connect the battery Pack
connector with the
B
correct polarity.
Replace the cover.
C
Plug each AC adapter cord into each charging
cradle and then into each 120V AC outlet.
D
Use only the Uniden AC adapters supplied
with your new phones!
Place the handset in the main base and
place the other handset in the charging
E
cradle, and then charge continuously for
15 - 20 hours before using the phone.
Step 3 Connect to Phone Line
When the handset battery packs are
fully charged, after 15-20 hours of
charging, plug the telephone cord
into the main base unit and then
into a telephone wall jack.
Your phones are set for tone dialing. If your local
network requires pulse dialing, please see
“Choosing the dialing mode” on page 18.
Step 4 Register 2nd Handset to Main Base
After fully charging both handsets, remove
the second handset from the extra
charging cradle and place in the main base
A
unit. The main base LED light will flash
indicating registration is occurring.
Wait for at least 5 seconds before removing
handset. Once registration is complete, the
B
cordless phone is ready for use.
Step 5
Setting Menu Display Options
Note: There are five setup
options available. They are
Caller ID options (AutoTalk,
CIDCW [Caller ID on Call
Waiting], Area Code), Dial
Mode and Language
(see page 16 for details).
QUICK REFERENCE GUIDE
TO SET CALLER ID, LANGUAGE AND DIALING OPTIONS
Press and hold the caller id/menu key in
A
standby mode.
Press the vol/ / or vol/ / key to
B
move the pointer to an option.
Press the select/channel key to change the
C
option setting.
Press the end key to exit, and return the
D
handset to the main base.
OPTIONS INCLUDE
Auto Talk On/Off
A
CIDCW On/Off
B
(Caller ID on Call Waiting)
Area Code Enter/Remove
C
Dial Pulse/Tone
D
Language English/French/Spanish
E
QUICK REFERENCE GUIDE [ 3 ]www.uniden.com

NegrNegro
1° Paso Inspección del contenido del embalaje
Asegúrese de que haya recibido los siguientes
artículos en el paquete. Si alguno de estos artículos
falta o está dañado, comuníquese con el
departamento de partes de Uniden.
• Base principal (1)
• Receptor (2)
• Cargador (1)
• Adaptador CA (2)
• Pila recargable (2)
• Cable telefónico (1)
• Pinza para la correa (2)
• Este manual para el
usuario (1)
• Otros folletos (1)
Uniden Parts Department
Teléfono: (800)554-3988
Horas: de Lunes a Viernes
desde las 8:00 a.m. hasta las
5:00 p.m., hora central
O visítenos en nuestra página
Web en www.uniden.com
para conseguir las partes de
reemplazo.
2° Paso Instalación y carga de la pila para el receptor
PARA INSTALAR LA PILA DEL RECEPTOR
(Consulte la página 10 para más detalles)
¡
Cargue el paquete de pilas del receptor por lo
menos de 15-20 horas antes de usar sus nuevos
telefónos inalámbricos por primera vez!
Quite la tapa.
¡Use solamente los paquetes
A
de pilas recargables de
Uniden suministrado con sus
nuevos teléfonos!
Conecte el enchufe del
B
paquete de las pilas con
la polaridad correcta.
Reponga la tapa.
C
QUICK REFERENCE GUIDE
Conecte cada cable de los adaptadores CA
en cada cargador y luego en tomas de
120V AC.
D
¡Use solamente los adaptadores CA de
Uniden suministrados con sus nuevos
teléfonos!
Coloque el receptor en la base y coloque el
otro receptor en el cargador, y cárguelos
E
continuamente por 15-20 horas antes de
usar el teléfono.
3° Paso Conexión a la línea telefónica
Cuando los paquetes de pilas
estén totalmente cargados,
después de una carga de 15-20
horas, conecte el cable telefónico
en la base y luego en el enchufe
telefónico de la pared.
Sus teléfonos están programados para marcación
por tono. Si su red local requiere la marcación
por pulso, por favor consulte “Selección del modo
de marcación” en la página 18.
4˚ Paso Registre el 2° receptor en la base principal antes de usarlo
Después de cargar totalmente los dos
receptores, quite el segundo receptor del
cargador extra y colóquelo en la base
A
principal. El LED de la base comenzará a
destellar indicando que el registro está
teniendo lugar.
Espere por lo menos 5 segundos antes de
quitar el receptor de la base. Una vez que
B
el registro esté completo, podrá usar el
teléfono
5° Paso Programación de las opciones para la exhibición en la pantalla
PARA PROGRAMAR LAS OPCIONES DE IDENTIFICACIÓN
DE LLAMADAS, LENGUAJE Y MARCACIÓN
Mantenga oprimido el botón caller id/
A
menu en el modo de espera.
Oprima el botón vol/ / o vol/ /
B
para mover el cursor a la opción deseada.
Oprima el botón select/channel para
C
cambiar la opción.
Oprima el botón end para salir, y devuelva
D
el receptor a la base.
LAS OPCIONES INCLUYEN
Auto Talk Encendido/apagado
A
CIDCW Encendido/apagado
B
(Identificación de llamadas de llamadas en espera)
Código del área Insertar/quitar
C
Marcación Pulso/tono
D
Lenguaje Inglés/ Francés/ Español
E
Nota: Hay 5 opciones de
programación disponibles. Estas
son opciones de la identificación
de llamadas (AutoTalk, CIDCW
[Identificación de llamadas de
llamadas en espera], Código del
área), Modo de marcación y del
lenguaje. (Consulte la página 16
para más detalles).
www.uniden.com[ 4 ]

Contents
Quick Reference Guide 3
Welcome/Features 6
Controls and Functions 7
Getting Started
Setting up the Phone 9
Register Handsets to Main Base Before Using! 14
When to Re-register Handsets 15
Call Transfer Feature 15
Setting Menu Display Options 16
Basics
Making and Receiving Calls 19
Adjusting the Handset Ringer and
Earpiece Volume 20
Redial 21
Tone Dialing Switch-over 21
Traveling Out-of-Range 21
Selecting a Different Channel 22
Find Handsets 22
Flash and Call Waiting 22
Voice Mail Waiting Indicator 23
Memory Dialing
Storing Phone Numbers and Names in Memory
Dial 24
Steps for Entering Names and Special Characters 26
Making Calls with Memory Dialing 27
Chain Dialing 28
Editing a Stored Name and/or Phone Number 29
Erasing a Stored Name and Phone Number 31
RocketDial
RocketDial 32
Storing and Editing the RocketDial 32
Making Calls with the RocketDial 33
Deleting the RocketDial 33
Caller ID Features
Caller ID and CIDCW (Caller ID on Call Waiting) 34
When the Telephone Rings 34
Viewing the Caller ID Message List 35
Deleting Information from the Caller ID List 36
Using the Caller ID List 38
Additional Information
Changing the Digital Security Code 40
Installing the Beltclip 40
Headset Installation 41
Note on Power Sources 41
Maintenance 41
Troubleshooting 42
General Information 45
Precautions & Warranty 46
I.C. Notice 48
Index 49
www.uniden.com [ 5 ]

Welcome
Congratulations on your purchase of the Uniden cordless telephone. This cordless phone
is designed and engineered to exacting standards for reliability, long life, and
outstanding performance.
Note: Some illustrations in this manual may differ from the actual unit for
explanation purposes. The color of your cordless telephone may vary.
Features
[ 6 ] www.uniden.com
•900 MHz Extended Range Technology
•3 Line Backlit Display
•English, French or Spanish Display Option
• Caller ID and Caller ID on Call Waiting
• RocketDial®
• 10 Number Memory Dialing
• Last Number Redial
• Flash and Pause
Be sure to visit our web site: www.uniden.com
Uniden®and RocketDial® are registered trademarks of Uniden America Corporation.
AutoTalk, AutoStandby, UltraClear Plus, Random Code and AutoSecure are trademarks of
Uniden America Corporation.
•Tone/Pulse Dialing
• Find Handset Locator
• Earpiece Volume Control
• Ringer Volume Control (High-Low-Off)
•Hearing Aid Compatible
• 20 Channel Autoscan
• Call Transfer from Handset to Handset

5
6
7
8
9
10
11
12
1
3
4
2
13
14
15
16
17
20
18
19
Controls and Functions
Handsets
1. Handset antenna
2. Optional headset jack
3. Beltclip hole
4. Handset battery compartment
5. Handset earpiece
6. LCD display
7. vol/ / (volume & scroll) key (p. 20)
8. vol/ / (volume & scroll) key (p. 20)
9. caller id/menu key (p. 16/34)
10. /tone/ (left cursor) key (p. 21)
11. redial/pause key (p. 19)
12. select/channel key (p. 22/24)
13. talk/flash key (p. 19)
14. end key (p. 19)
15. RocketDial key (p. 32)
16. #/ (right cursor) key (p. 24)
17. memory key (p. 24)
18. delete/transfer key (p. 15/31)
19. Handset microphone and ringer speaker
20. Handset charging contacts
CONTROLS AND FUNCTIONS [ 7 ]www.uniden.com
24 25
22
23
21
26
27
28
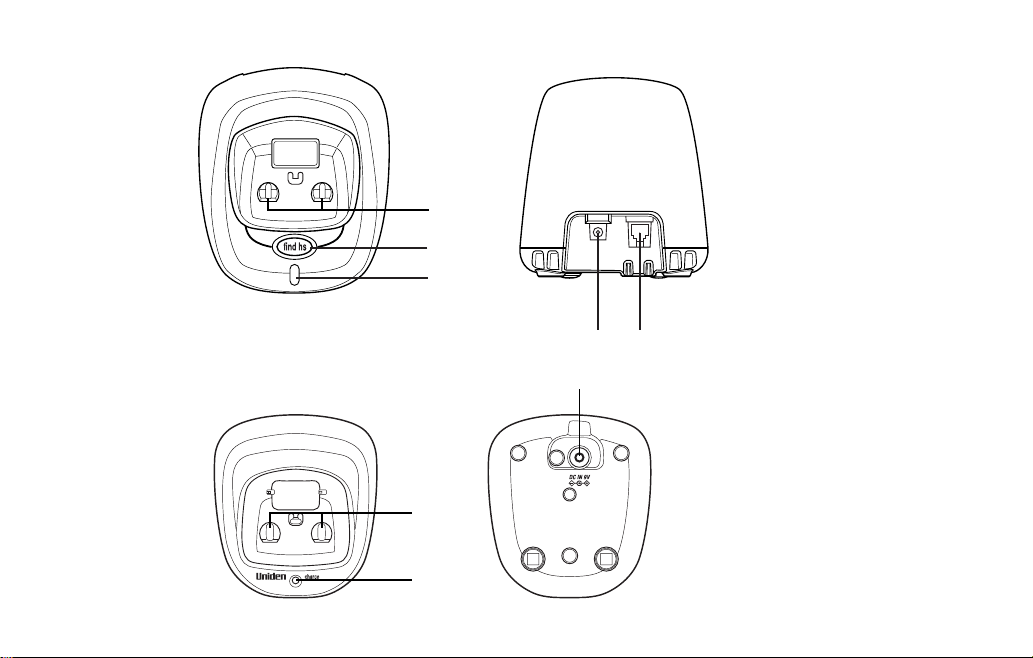
Main Base Unit
Extra Charging Cradle (for Second Handset)
CONTROLS AND FUNCTIONS[ 8 ] www.uniden.com
21. Main base charging
contacts
22. find hs key (p. 22)
23. charge/in use and VMWI
(Voice Mail Waiting
Indicator) LED
24. DC IN 9V jack
25. Telephone line jack
26. Charging contacts
27. Charge LED
28. DC IN 9V jack
Setting up the Phone
Do the following steps:
A. Choose the best location C. Connect the main base unit and charging cradle
B. Install the rechargeable battery packs into both handsets
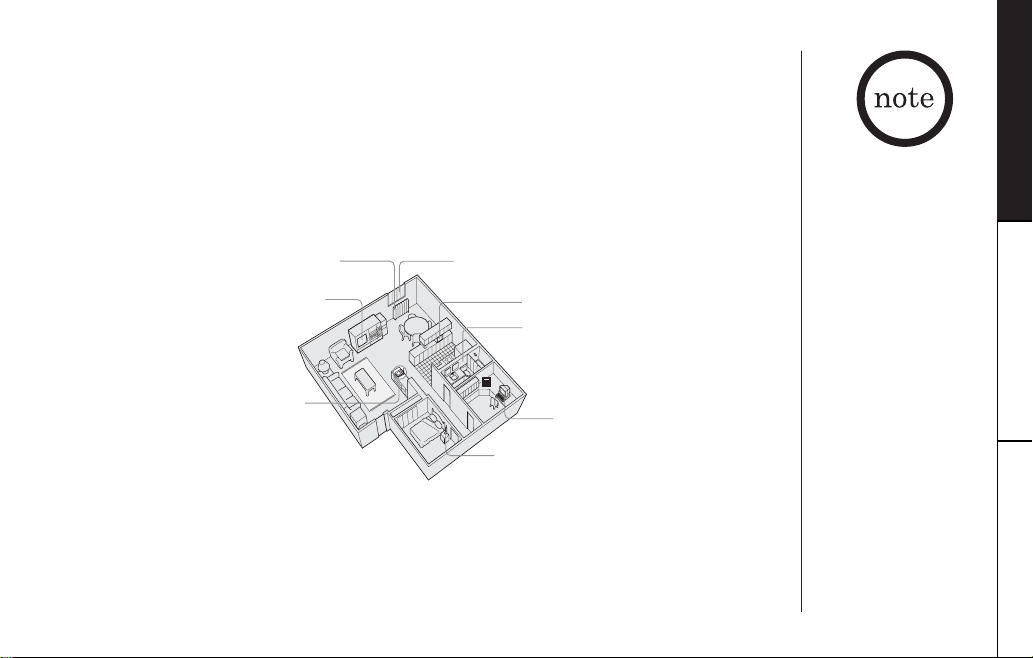
A. Choose the best location
Before choosing a location for your new phone, read the INSTALLATION
CONSIDERATIONS included in the PRECAUTIONS. Here are some important guidelines
you should consider:
Avoid heat sources, such as radiators,
air ducts, and sunlight
Avoid television sets and other
electronic equipment
Choose a central location
• The location should be close to both a phone jack and a continuous power outlet
which is not switchable.
• Keep the main base and each handset away from sources of electrical noise such as
motors, microwave ovens, and fluorescent lighting.
• The main base can be placed on a desk or tabletop.
Avoid noise sources such as a window
by a street with heavy traffic
Avoid microwave ovens
Avoid excessive moisture,
extremely low temperatures,
dust, mechanical vibration,
or shock
Avoid personal computers
Avoid other cordless telephones
GETTING STARTED
If your home has
specially wired alarm
equipment connected to
the telephone line, be
sure that installing the
system does not disable
your alarm equipment.
If you have questions
about what will disable
your alarm equipment,
contact your telephone
company or a qualified
installer.
GETTING STARTED [ 9 ]www.uniden.com
Use only the Uniden
(BT-905) rechargeable
battery packs supplied
with your cordless
telephones.
GETTING STARTED[ 10 ] www.uniden.com
B. Install the rechargeable battery packs into both
handsets
Both handsets are powered by a rechargeable battery packs.
The battery recharges automatically when the handset is
placed in the main base unit or charging cradle.
Charge the handset battery pack for at least 15-20
hours before using your new cordless telephone for the
first time! To maximize the charge capacity of your battery
pack, DO NOT plug the telephone cord into the main base
unit and wall jack until the battery is fully charged.
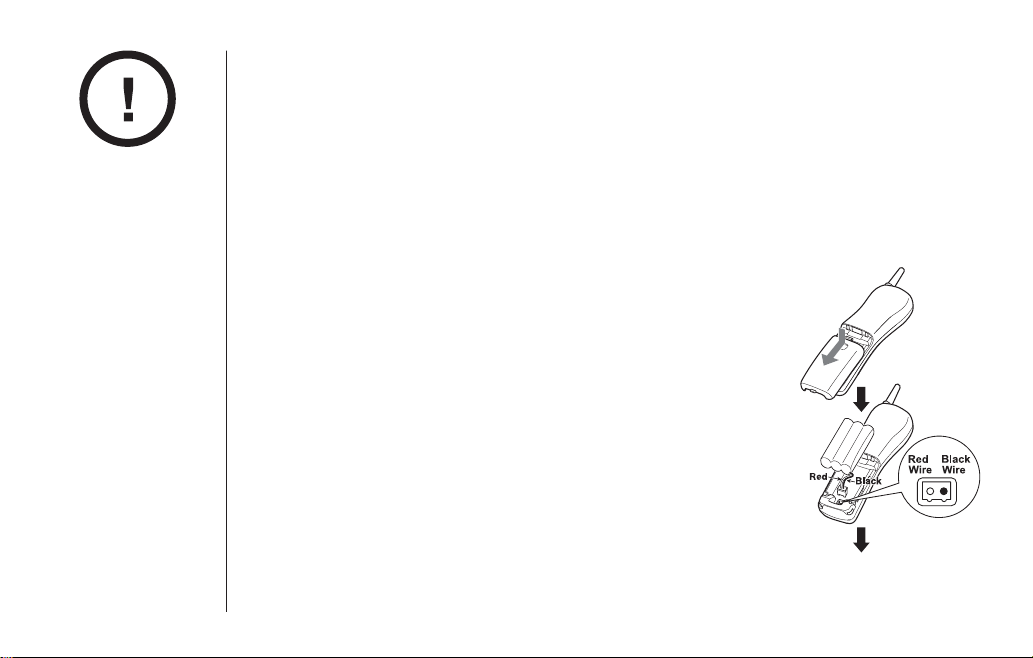
1) Press down on the handset battery case cover (use the
finger indention for a better grip) and slide the cover
downward to remove.
2) Plug the battery pack connector (red & black wires) into
the jack inside the battery compartment.
(The connector notches fit into the grooves of the jack only
one-way.) Match the wire colors to the polarity label in the
battery compartment, connect the battery, and listen for
a click to insure connection.
3) Make sure you have a good connection by slightly pulling
on the battery wires. If the connection is secure, the
battery jack will remain in place.
4) Place the battery case cover back on the handset by
sliding it upwards until it clicks into place.
5) Place one handset in the main base unit and one
handset in the charging cradle for 15-20 hours
without interruption. The main base or charging
cradle unit’s LED light (labeled charge/in use or
charge) illuminates once the handset is placed in the
main base or charging cradle. The LED light will
illuminate whether the battery pack is connected or
not.
If the main base charge/in use or charging cradle
charge LED light does not illuminate:
• Check to see if each AC adapter is plugged into
both cradles and the electrical wall outlets
properly. (Use only the supplied AC adapters. Do
not use any other AC adapters.)
• Check to see if both handsets are sitting correctly
in each cradle and making good contact with each
charging cradle unit’s charging contact.
GETTING STARTED
Place the handsets in
the main base and
charging cradle with
the keypad facing
forward for charging.
Replacement batteries
are also available
through the Uniden
Parts Department at
(800) 554-3988, Monday
through Friday from
8:00 a.m. to 5:00 p.m.
or online at
www.uniden.com
GETTING STARTED [ 11 ]www.uniden.com
•Even when the battery
pack is not being used,
it will gradually
discharge over a long
period of time. For
optimum performance,
be sure to return the
handset to either
cradle after a
telephone call.
• Talk Mode The handset is off
either charging cradle
and the talk/flash key
has been pressed,
enabling a dial tone.
• Standby Mode The handset may be
sitting in or off either
charging cradle but is
NOT in use. The
talk/flash key has not
been pressed and there
is no dial tone.
GETTING STARTED[ 12 ] www.uniden.com
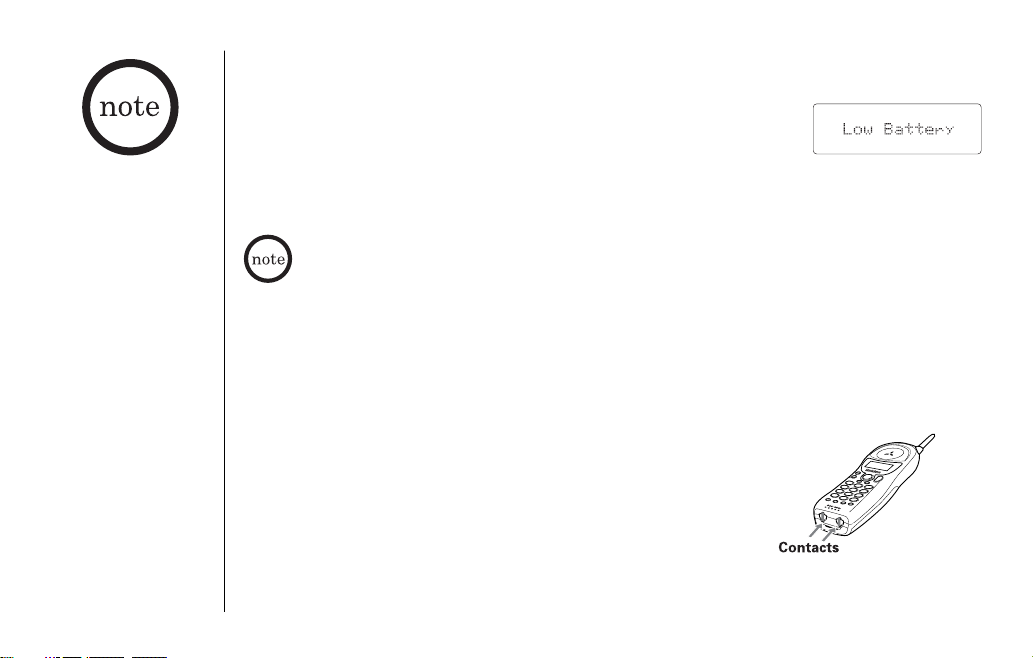
Low battery alert
When the battery pack is very low and needs to be charged, the
phone is programmed to eliminate functions in order to save
power. If the phone is not in use,
Low Battery appears on the
LCD and none of the keys will operate.
If the phone is in use,
Low Battery flashes and the handset
beeps. Complete your conversation as quickly as possible and
return the handset to either charging cradle for charging.
Dial mode setting, last number dialed, names and numbers stored
in memory locations (including RocketDial), CID list are retained
for up to 30 minutes while you replace the battery pack.
Cleaning the battery charging contacts
To maintain a good charge, it is important to clean the
charging contacts on both handsets once a month. Using
water only, dampen a cloth to clean the charging
contacts. Then make sure to go back over the charging
contacts with a dry cloth before returning the handsets to
the main base unit or charging cradle to charge.
Caution: Do not use paint thinner, benzene, alcohol, or
other chemical products. Doing so may discolor the
surface of the telephone and damage the finish.
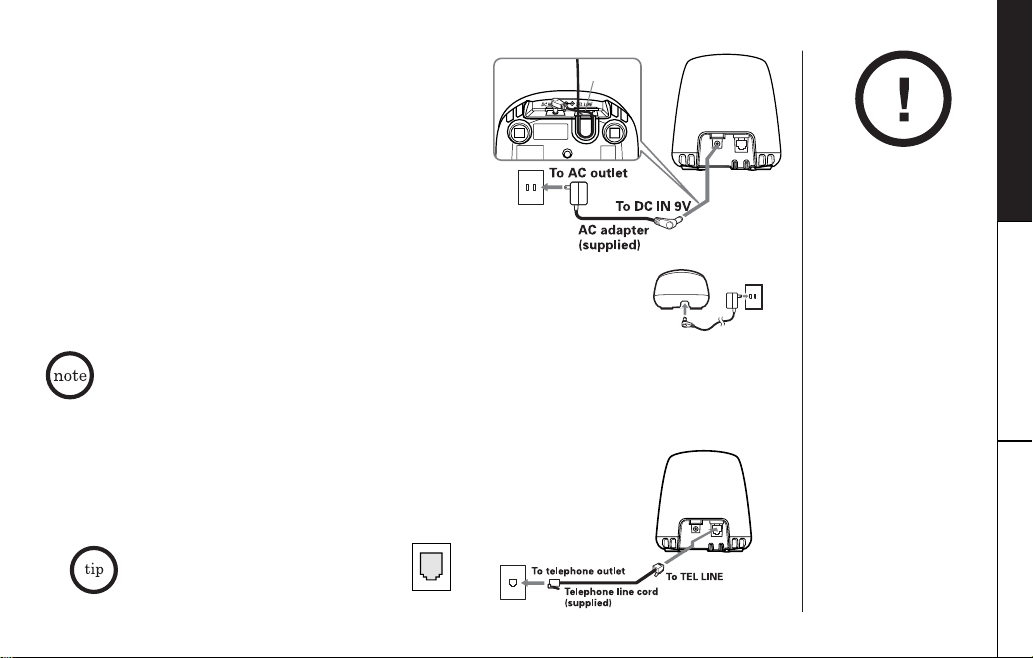
C. Connect the main base unit and charging
Route the corRoute the cord.d.Route the cord.
cradle
1) Connect each AC adapter to the DC IN 9V jack
and to each standard 120V AC wall outlet.
2) Set the main base and charging cradle on a
desk or tabletop, and place one handset in
the main base unit and one in the charging
cradle.
3) Make sure that the charge/in use and charge LED
illuminate.
If the LED does not illuminate, check to see that the AC
adapter is plugged in and the handset makes good contact
with the cradle's charging contacts.
• Connect each AC adapter to each continuous power supply.
•Place the main base unit and charging cradle close to the AC outlets so that you can unplug the AC
adapters easily.
• After installing the battery packs in the handsets, charge your handsets at least 15-
20 hours before plugging into the phone line
4) Once the handset battery packs are fully charged, connect the
telephone line cord to the
TEL LINE jack and to a telephone
outlet.
If your telephone outlet isn't modular,
contact your telephone company
for assistance.
Modular
.
GETTING STARTED [ 13 ]www.uniden.com
GETTING STARTED
• Use only the
supplied AD-0001
AC adapters.
Do not use any other
AC adapters.
• Place the power cord
so that it does not
create a trip hazard or
where it could
become chafed and
create a fire or
electrical hazard.

•When you charge the
HS1
New :01
Total:02
handsets, Caller ID
summary screen and
the name of the
handset, HS1
appears. If HS2
appears, you are
charging the handset
No. 2.
•The charging cradle
can be used to
charge either
handset.
GETTING STARTED[ 14 ] www.uniden.com
Register Handsets to Main Base Before Using!
When handsets are removed from the packaging, install batteries and fully charge for
15-20 hours.
The handset YOU CHOOSE (does not matter which handset) to place in the main base
to charge, will automatically be registered to that main base.
The second handset (charging in the extra charging cradle), MUST also be registered
to the main base before use. Follow the steps below to registered the second
handset.
Follow these simple steps to register:
1) First, install the battery packs in both handsets. Place either handset in the main
base, then place the second handset in the charging cradle. Charge both handsets
for 15-20 hours.
2) After fully charging both handsets, remove the handset in the charging cradle,
and place it in the main base. The charge/in use LED light on the main base will
begin to flash, indicating that the registration is taking place between the
second handset and the main base.
3) Wait for at least 5 seconds before removing the handset from the main base.
Congratulations, the registration has been completed, and your dual handset
cordless phones are ready for use!

When to Re-register Handsets
Hold
Transfer Call
Transfer Call
1) You’ll need to re-register the second handset (follow steps on page 14) each time
the digital security code is changed. Refer to page 40 for details regarding the
Digital Security Code.
2) When there is a power failure for more than one hour:
If power failure occurs (e.g. due to electrical storm or if the unit is unplugged
during a move), both handsets will need to be re-registered. To re-register, follow
the same registration process on page 14.
Call Transfer Feature
Conveniently, your cordless phone allows you to transfer outside calls from handset
to handset, simply by pressing the delete/transfer key. Not to worry, conversations
will not be interrupted; only one handset at a time can talk with an outside caller.
The second handset cannot go off hook to listen to conversations or make an
outgoing call while the other handset is in use.
To transfer a call (to the second handset)
1) Press delete/transfer during a call. The call will
automatically be placed on hold and the transfer tone sounds.
2) When the other handset receives the call, the transfer tone
stops. To cancel the transfer, press delete/transfer or talk/flash on the handset.
To receive a transfer call (from the second handset)
Pick up the handset (when AutoTalk is set to on), or pick up
the handset and press talk/flash to answer the transferred call.
Additionally, you can answer the transferred call by pressing
any number key, /tone/ or #/ (when AutoTalk is set to on).
GETTING STARTED
• If the second
handset’s battery
becomes very low,
the handset must be
recharged for 15-20
hours and reregistered to the
main base unit.
•Make sure to return
the handsets to the
charging cradles after
each phone call.
• Call transfer allows
you to transfer
outside calls from
handset to handset,
only one handset at
a time can talk with
an outside caller.
• If you transfer the
call and it is not
picked up after 5
minutes, the call will
be disconnected.
GETTING STARTED [ 15 ]www.uniden.com

The cordless phone
features include
AutoTalkTMand
AutoStandbyTM.
AutoStandby allows you
to hang up by simply
returning the handset
to the main base or
charging cradle.
GETTING STARTED[ 16 ] www.uniden.com
Setting Menu Display Options
There are five setup options available. They are Caller ID options (AutoTalk, CIDCW
[Caller ID on Call Waiting], Area Code), Dial mode and Language.
AutoTalk allows you to answer the phone without pressing the talk/flash key.
If the phone rings when AutoTalk is on, simply remove the handset from either
charging cradle and the phone automatically answers the call. If the phone rings
when AutoTalk is off, you must press the talk/flash key to answer the call.
CIDCW and Dial Mode options can only be set by using Handset 1. If you try to set
by using Handset 2, you will not see these options listed on the LCD screen.
To confirm which handset is HS1, refer to the display indicating
AutoTalk, Area Code and Language options can be set by using
either Handset 1 or Handset 2.
Caller ID options
To change your AutoTalk and CIDCW:
1) Press and hold the caller id/menu key. The following screen
appears.
2) Use the vol/ / or vol/ / key to move the pointer to
the selection that you would like to change.
Press the select/channel key to toggle between
3) Press the end key and return the handset to the main base unit to complete the
setting. The handset returns to standby mode.
On and Off.
HS1 or HS2.
 Loading...