

Page 1

DECT 6015
DECT 6015+1
Series
DECT6015 OM.indb iiDECT6015 OM.indb ii 8/8/07 4:10:27 PM8/8/07 4:10:27 PM
Page 2

Table of Contents
Welcome ....................................................................... 4
Terminology Used in this Manual .............................5
Manual Conventions ................................................ 5
Product Overview ........................................................6
Features ................................................................... 6
Parts of the Phone ................................................... 7
Using the Interface ...................................................... 9
Reading the Display ................................................. 9
Using the Four-way Function Key .......................... 10
Using the Handset Menus ..................................... 10
Entering Text from Your Handset ........................... 11
Installing the Phone ..................................................12
Choosing the Best Location ................................... 12
Installing the Battery .............................................. 13
Installing the Belt Clip ............................................ 14
Connecting the Base and Charging the Handset .. 14
Connecting to the Phone Line ............................... 15
Wall Mounting the Base ......................................... 16
Basic Setup ................................................................17
Activating Personal Ring ........................................ 17
Activating the Key Touch Tone ............................... 17
Name Tag............................................................... 18
Insert 0 ................................................................... 18
Expanding Your Phone ............................................. 19
Adding Accessory Handsets .................................. 19
Using Multiple Bases ............................................. 21
Setting Up the Phonebook ........................................ 22
Creating Phonebook Entries .................................. 22
Finding a Phonebook Entry ................................... 23
Editing an Existing Phonebook Entry ..................... 24
Storing Caller ID or Redial Numbers in the
Phonebook ....................................................... 24
Deleting Phonebook Entries .................................. 24
Copying Phonebook Entries to Another Handset .. 25
Using the Voice Mail Service .................................... 25
Resetting the Voice Message Waiting Indicator ..... 26
Customizing Your Phone ..........................................26
Changing the Handset Banner .............................. 26
Selecting a Ring Tone ............................................ 27
Activating AutoTalk ................................................. 27
Activating Any Key Answer .................................... 27
Using Your Phone ......................................................28
Making a Call from the Phonebook ........................ 29
Chain Dialing from the Phonebook ........................ 29
Switching to the Handset Speakerphone
During a Call ....................................................29
1
DECT6015 OM.indb 1DECT6015 OM.indb 1 8/8/07 4:10:27 PM8/8/07 4:10:27 PM
Page 3

Using Caller ID, Call Waiting, and Redial Lists ....... 30
Using the Caller ID List ......................................... 30
Making a Call from a Caller ID Record .................. 30
Deleting Caller ID Numbers ................................... 31
Using Call Waiting ..................................................31
Redialing a Number ............................................... 31
Deleting a Redial Record ....................................... 32
Adjusting the Ringer, Earpiece and
Speaker Volume ................................................ 32
Adjusting the Ringer Volume ................................. 32
Adjusting the Earpiece Volume .............................. 32
Adjusting the Speaker Volume ...............................32
Adjusting the Audio Tone ....................................... 33
Finding a Lost Handset ............................................. 33
Using Hold, Conference and Transfer .....................33
Placing a Call on Hold ........................................... 33
Conferencing ......................................................... 34
Transferring a Call ................................................. 34
Using Special Features .............................................35
Privacy Mode ......................................................... 35
Using the Intercom ................................................. 35
Muting the Ringer (One call only) .......................... 36
Muting the Microphone .......................................... 36
Line Mode Setup (Base only) ................................ 37
Installing the Optional Headset .............................. 37
Maintenance ............................................................... 38
Specifi cations ......................................................... 38
Battery Replacement and Handling ...................... 38
Cleaning the Battery Contacts ............................... 39
Low Battery Alert ...................................................39
Battery Life ............................................................. 39
Power Failures ....................................................... 39
Troubleshooting ........................................................40
Resetting the Handset ........................................... 40
Resetting the Handset Without the Base ............... 41
Traveling Out of Range .......................................... 41
Common Issues ..................................................... 42
Liquid Damage ....................................................... 44
Precautions! .............................................................. 45
Rechargeable Nickel-Metal-Hydride Battery
Warning ........................................................... 45
Index ........................................................................... 48
One Year Limited Warranty ....................................... 50
2
DECT6015 OM.indb 2DECT6015 OM.indb 2 8/8/07 4:10:27 PM8/8/07 4:10:27 PM
Page 4

3
DECT6015 OM.indb 3DECT6015 OM.indb 3 8/8/07 4:10:27 PM8/8/07 4:10:27 PM
Page 5

Welcome
Thank you for purchasing a Uniden Multi-Handset phone.
Note: Illustrations in this manual are used for explanation purposes. Some illustrations in this manual may differ
from the actual unit.
4
DECT6015 OM.indb 4DECT6015 OM.indb 4 8/8/07 4:10:27 PM8/8/07 4:10:27 PM
Page 6

Terminology Used in this Manual
Standby The handset is not in use. If it is off the cradle, no line has been activated. No dial tone is present.
CID
CID/CW or
CIDCW
Base The main part of the phone that connects to your phone line and lets you make and receive calls.
Charger
Accessory
Handsets
Global
Settings
Talk A telephone line has been activated on the handset, enabling a dial tone.
Caller ID is available from your Telephone provider and is offered to users on a subscription basis.
With this service, you will be able to see the incoming caller information such as name and phone number.
Caller ID with Call Waiting is available by subscription from your Telephone provider.
With this service, you will be able to view incoming caller information while on a call with another user.
A cradle that comes with an accessory handset and charges the handset battery.
It connects to power but does not connect to a phone line.
Additional handsets that can register to the base, allowing you to add handsets without connecting another
phone line. This base supports a total of six cordless handsets; see page 19 for Compatible Handsets.
This term relates to feature settings that will apply to all registered handsets.
These features are available by selecting "GLOBAL SETUP" in the handset menu. Only one handset can
change global settings at a time, and you have to make sure the phone is not currently being used. If you
have multiple bases, the different bases have each global settings; select the base before changing the global
setting (see Selecting the Base on page 21).
Manual Conventions
This manual uses several different type styles to help you distinguish between different parts of the phone:
Bold text with “• [ ]” indicates a key or button on the phone
ALL CAPITALS indicates text on the display, such as menu options, prompts, and confi rmation messages•
lower case bold text indicates a status light on the phone•
ALL CAPITALS BOLD indicates a connection jack on the base or charger•
5
DECT6015 OM.indb 5DECT6015 OM.indb 5 8/8/07 4:10:27 PM8/8/07 4:10:27 PM
Page 7

Product Overview
Features
1.8GHz DECT6.0 Expandable System•
Expands up to 6 Handsets•
Caller ID/Call Waiting•
Store 30 Caller ID Numbers•
Advanced Phonebook Features:•
Store 70 Phonebook Entries•
Alphabetical Search•
Personalized Ring by Party•
Transfer Single Listing or Entire Phonebook•
Speakerphone on Handset•
7 Ringer Options on Handset (3 Tones/4 Melodies)•
Last 5 Number Redial•
Call Transfer•
Conferencing•
Intercom•
6
DECT6015 OM.indb 6DECT6015 OM.indb 6 8/8/07 4:10:28 PM8/8/07 4:10:28 PM
Page 8

Parts of the Phone
The following illustrations show you all of the different parts of your phone.
Handset
1
2
3
4
10
11
12
13
5
6
7
14
8
9
15
16
17
18
19
20
21
22
Headset jack cover 1.
Belt clip hole2.
Speakerphone speaker and ringer3.
Handset battery compartment4.
new message5. LED
Handset earpiece6.
LCD display7.
[Clear/Int’com]8. key
] key (up)
[9.
[10. /Flash] key (talk/fl ash)
[11.
] key (phonebook/left)
[12.
/tone] key
*
[Redial/Pause]13. key
[Menu/Select]14. key
[15.
/Mute] key (messages/mute)
[16.
] key (caller ID/right)
[17.
] key (end call)
[18. ] key (down)
[#]19. key
[20.
] key (speaker)
Handset microphone21.
Handset charging contacts22.
7
DECT6015 OM.indb 7DECT6015 OM.indb 7 8/8/07 4:10:28 PM8/8/07 4:10:28 PM
Page 9

Base
23
PREMIUM DECT
24
Interference Free Communication
2625 27
Base charging contacts23.
charge 24. LED
[fi nd hs]25. key (fi nd handset)
DC IN 9V26. jack
TEL LINE27. jack
8
DECT6015 OM.indb 8DECT6015 OM.indb 8 8/8/07 4:10:28 PM8/8/07 4:10:28 PM
Page 10
Using the Interface
P
Reading the Display
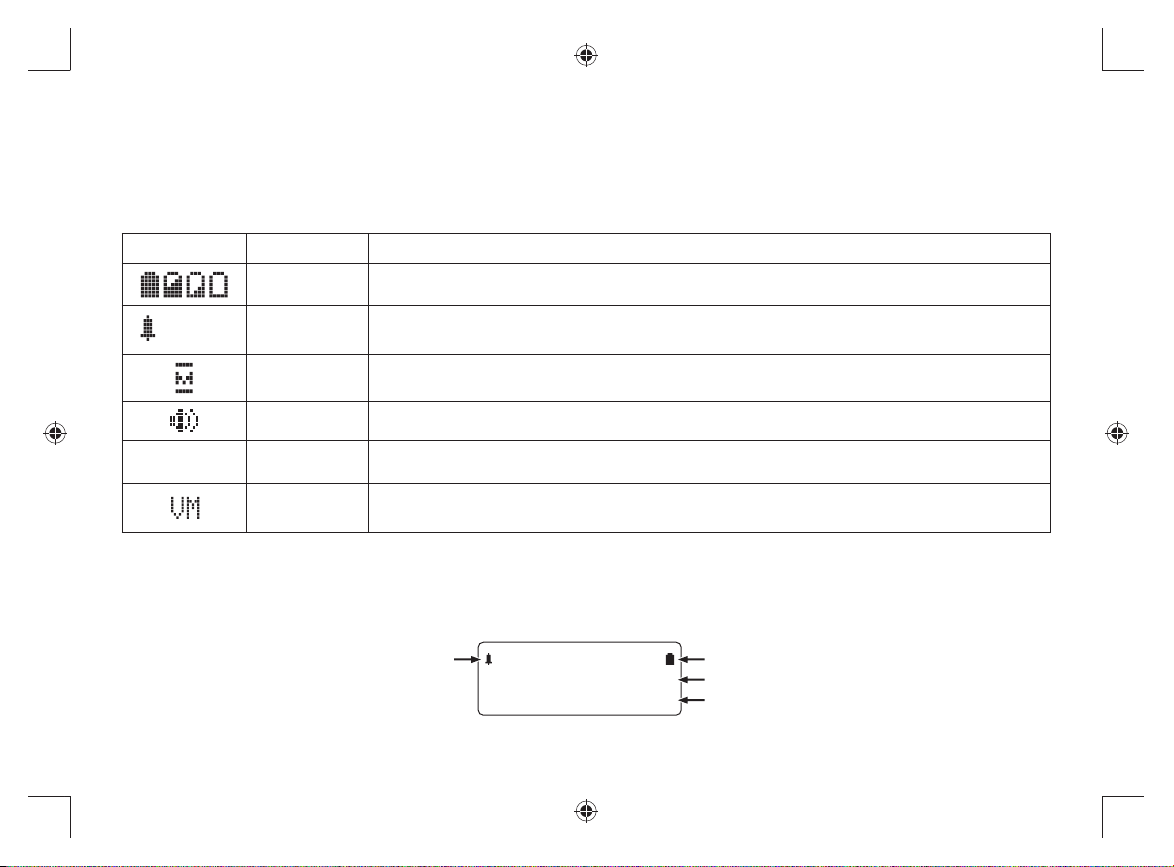
The handset display uses icons to tell you the status of your phone. The table below lists the icons and what they
mean.
Icon Status Description
Standby/Talk The battery icon indicates the handset battery status: full, medium, low, and empty.
:OFF
Standby The ringer off icon indicates that the ringer is turned off.
Talk The mute icon appears while the handset microphone is muted.
Talk The speaker icon appears when the handset speaker phone is in use.
Talk The privacy icon appears when the Privacy Mode is turned on.
Standby
The voice mail icon appears when you have messages waiting in your voice
mailbox.
The Standby Screen
When the phone is in standby, the handset display shows the following items:
Ringer off icon (when the ringer is off)
:OFF
Handset #1
New CID: 5
battery icon
Handset ID
Number of new Caller ID calls received
9
DECT6015 OM.indb 9DECT6015 OM.indb 9 8/8/07 4:10:28 PM8/8/07 4:10:28 PM
Page 11

Using the Four-way Function Key
Your handset has a four-way function key that
allows you to move the cursor or pointer on the
display and access the most commonly used
features at the touch of a button. By moving this
key to the left, you open the phonebook. Move the
key to the right to access Caller ID information. To
use this four-way key, place your thumb over the
key on the handset and move to the four positions
to get the feel of how it moves and operates.
View the
phonebook
Four-way
Function Key
Up
View the
Caller ID
Down
Using the Handset Menus
To open the menu, press [Menu/Select]. Highlight the option you want by pressing the four-way function key. This
will move the cursor; the option currently highlighted has a triangle beside it. Activate the highlighted option by
pressing [Menu/Select]. To go back to the previous screen, press [left] on the four-way function key. To exit the
menu and return to standby, press [
If you do not press a key within thirty seconds, the phone will time out and exit the menu.
Note: For GLOBAL SETUP menu options, make sure the line is not in use and the handsets are within range of
the base.
].
10
DECT6015 OM.indb 10DECT6015 OM.indb 10 8/8/07 4:10:28 PM8/8/07 4:10:28 PM
Page 12
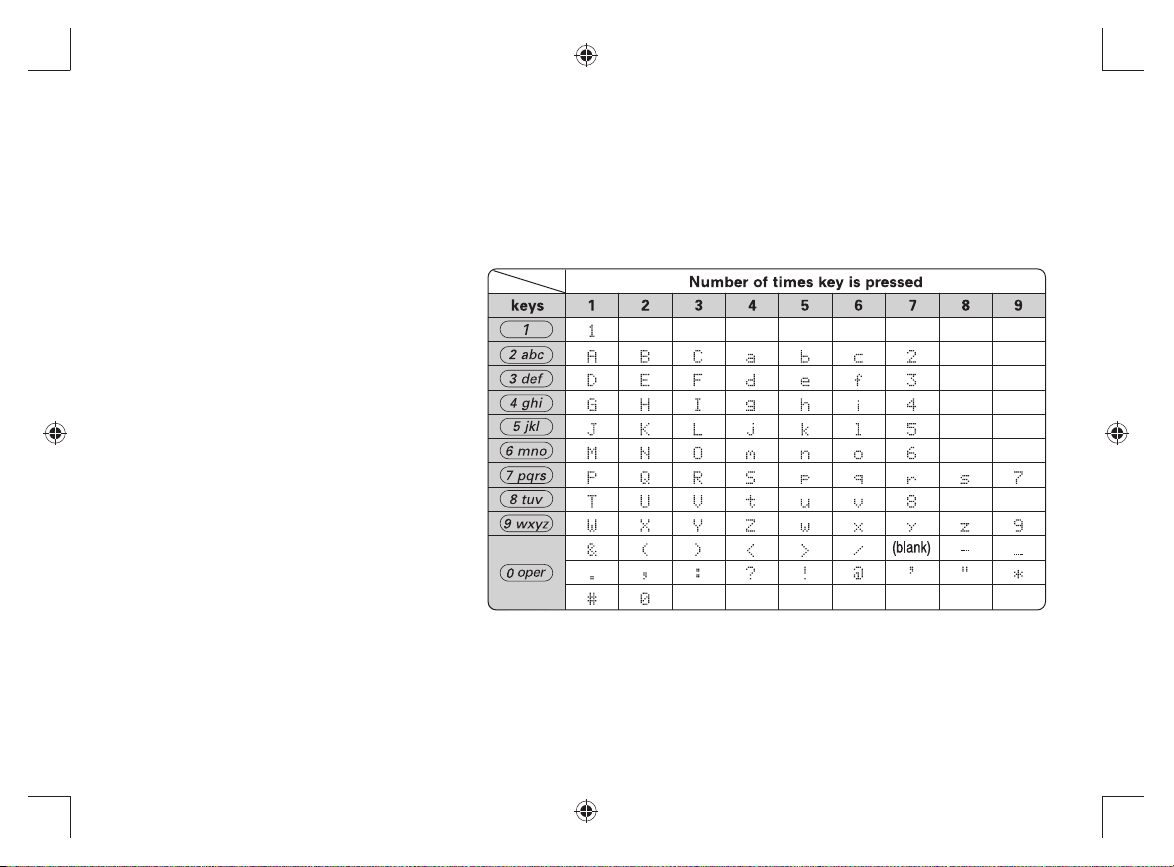
Entering Text from Your Handset
You can use the number keypad on your handset to enter text by referring to the letters printed on each number
key. When you press the number key in a text entry fi eld, the phone displays the fi rst letter printed on the number
key. Press the number key twice to display the second letter and three times to display the third. Capital letters are
displayed fi rst, then lower case letters, and then the number on the key.
If two letters in a row use the same number key, enter the fi rst letter, then use [right] on the four-way function key to
move the cursor to the next position to enter the second letter.
For example, to enter the word “Movies”:
Press 1) [6] once to enter M.
Use 2) [right] on the four-way function
key to move the cursor to the right.
Press 3) [6] six times to enter o.
Press 4) [8] six times to enter v.
Press 5) [4] six times to enter i.
Press 6) [3] fi ve times to enter e.
Press7) [7] eight times to enter s.
Press 8) [Menu/Select] to end your text
entry.
If you make a mistake while entering a
name, use [right] or [left] on the fourway function key to move the cursor to the
incorrect character. Press [Clear/Int’com] to erase the wrong character, and then enter the correct character. To
delete all characters, press and hold [Clear/Int’com].
Note: When you enter the text, you can also use [#] to move the cursor to right and [
left.
/tone] to move the cursor to
*
11
DECT6015 OM.indb 11DECT6015 OM.indb 11 8/8/07 4:10:28 PM8/8/07 4:10:28 PM
Page 13

Installing the Phone
Choosing the Best Location
When choosing a location for your new phone, here are some important guidelines you should consider:
The location should be close •
to both a phone jack and a
continuous power outlet (one
which is not connected to a
switch).
For optimum range and •
reception, place the base in an
open area, as high as possible.
If your home has wired alarm •
equipment connected to a phone
line, be sure that installing the
system does not disable your
alarm equipment. If you have
questions about what will disable
alarm equipment, contact your
telephone company or a qualifi ed
installer.
Note: For maximum range:
Keep both the base and handset antennas free of obstruction.•
When the handset is not in use, place the handset in an upright position.•
Metal and reinforced concrete may affect cordless telephone performance.•
Avoid heat sources, such
as radiators, air ducts,
and sunlight
Avoid television sets
and other electronic
equipment
Choose a central location
Avoid noise sources such
as a window by a street
with heavy traffic
Avoid sources of electrical
noise such as motors,
microwave ovens, and
fluorescent lighting
Avoid excessive moisture,
extremely low
temperatures, dust,
mechanical vibration, or
shock
Avoid personal computers
Avoid other cordless telephones
12
DECT6015 OM.indb 12DECT6015 OM.indb 12 8/8/07 4:10:29 PM8/8/07 4:10:29 PM
Page 14

Installing the Battery
Use only the Uniden BT-652 rechargeable battery pack supplied with your cordless telephone.
Follow the steps below to install the handset battery.
Press in on the handset battery case cover (use the fi nger 1)
indention for a better grip) and slide the cover downward
to remove.
Plug the battery cable into the battery jack. Be sure to 2)
match the red and black wires to the label near the jack.
The cable should snap into place. Gently pull on the
battery cable. If the battery connector comes loose, try
connecting again until the battery snaps into place.
Place the battery case cover back on the handset and 3)
slide it upwards until it clicks into place.
13
DECT6015 OM.indb 13DECT6015 OM.indb 13 8/8/07 4:10:29 PM8/8/07 4:10:29 PM
Page 15

Installing the Belt Clip
Line up the holes on each side of the handset. To attach the belt clip, insert into
the holes on each side of the handset. Press down until it clicks.
To remove the belt clip, pull either side of the belt clip to release the tabs from
the holes.
Connecting the Base and Charging the Handset
Route the AC adapter cord through the “LOOP” of base’s back as shown.1)
Connect the AC adapter to the DC IN 9V jack.2)
CAUTION: To avoid risk of fi re and shock, only use the
Connect the AC adapter to a standard 240V AC wall outlet. 3)
DO NOT use an AC outlet controlled by a wall switch.
Place the handset in the base with the LCD screen facing 4)
forward.
Make sure that the charge LED illuminates. If the LED does 5)
not illuminate, check to see that the AC adapter is plugged
in and the handset makes good contact with the charging
contacts.
Charge your handset at least 15 to 20 hours before plugging 6)
into the phone line.
Uniden AAD-041S AC adapter.
To DC IN 9V
Route the cord.
To AC outlet
AC adapter (supplied)
14
DECT6015 OM.indb 14DECT6015 OM.indb 14 8/8/07 4:10:29 PM8/8/07 4:10:29 PM
Page 16

Connecting to the Phone Line
Once the battery pack is fully charged, route the telephone 1)
cord through the “LOOP” of base’s back as shown, and
connect the telephone cord to the TEL LINE jack.
Connect the telephone cord to a telephone wall jack.2)
Testing the Connection
Try making a call. If your call does not connect or you cannot
get a dial tone, try the following steps:
Make sure the AC adapter cord is securely connected to 1)
the DC IN 9V jack and a standard power outlet.
Check to make sure the battery is fully charged. (If you 2)
don’t see the “battery full” icon, check to make sure the
battery is properly connected).
To TEL LINE
Route the cord.
Telephone cord
(supplied)
15
DECT6015 OM.indb 15DECT6015 OM.indb 15 8/8/07 4:10:29 PM8/8/07 4:10:29 PM
Page 17

Wall Mounting the Base
This phone can be mounted on any standard wall plate.
Snap the wall mount adapter into the notches on the base’s back.1)
Plug the AC adapter into the DC IN 9V jack.2)
Plug the AC adapter into a standard 240V AC wall outlet.3)
Plug the telephone cord into the TEL LINE jack.4)
Route the telephone cord through the hole of the wall mount 5)
adapter as shown.
Plug the telephone cord into the telephone wall jack.6)
Align the mounting slots on the base with the mounting posts on 7)
the wall. Then push in and down until the phone is fi rmly seated.
Notes:
To mount the phone directly on the wall, insert •
two #10 screws (minimum length of 35 mm, not
supplied) into the wall, 100 mm apart; leave the
screw heads 3 mm away from the wall to allow
room for mounting the phone. Be sure the wall is
capable of supporting the weight of the phone, and
use the proper type of anchoring device for the
wall material. No need to route the telephone cord
through the hole of the wall mount adapter when
mounting directly on the wall.
Route the cord.
Wall plate
AC outlet
AC adapter (supplied)
16
DECT6015 OM.indb 16DECT6015 OM.indb 16 8/8/07 4:10:30 PM8/8/07 4:10:30 PM
Page 18

Basic Setup
Activating Personal Ring
You can assign special ringer tones to anyone in your phonebook. When your phone gets a call, it looks up the
Caller ID information in your phonebook. If you’ve assigned a personal ringer to that number, the phone uses it so
you know who is calling. To turn the personal ringing on or off, follow these steps:
Press 1) [Menu/Select]. Select the HANDSET SETUP menu, and then
the PERSONAL RING submenu.
Move the cursor to select ON or OFF.2)
Press 3) [Menu/Select]. You will hear a confi rmation tone.
Activating the Key Touch Tone
Key Touch Tone is the tone your keypad makes when keys are pressed. You can turn this tone on or off.
Press 1) [Menu/Select]. Select the HANDSET SETUP menu, and then
the KEY TOUCH TONE submenu.
Move the cursor to select ON or OFF.2)
Press 3) [Menu/Select]. You will hear a confi rmation tone.
Personal Ring
On
Off
Key Touch Tone
On
Off
17
DECT6015 OM.indb 17DECT6015 OM.indb 17 8/8/07 4:10:30 PM8/8/07 4:10:30 PM
Page 19

Name Tag
Name Tagging works with the caller display number from Caller ID. You will need to subscribe to the Caller ID feature
with your phone company for Name Tagging to work.
When the phone rings, the received caller display number is compared
to numbers stored in the phonebook. If there is a match then any name
stored with the phonebook number will be displayed. To change the Name
Tagging setting, follow the steps listed below.
1) Press [Menu/Select]. Select the GLOBAL SETUP menu, and
then the NAME TAG submenu.
2) Move the cursor to select ON or OFF.
3) Press [Menu/Select]. You will hear a confi rmation tone.
Insert 0
This feature adds “0” or “00” at the beginning of the number received from Caller ID. The default setting for New
Zealand is ON. The default setting for Australia is OFF. To change the Name Tagging setting, follow the steps listed
below.
1) Press [Menu/Select]. Select the GLOBAL SETUP menu, and
then the INSERT 0 submenu.
2) Move the cursor to select ON or OFF.
3) Press [Menu/Select]. You will hear a confi rmation tone.
Insert 0
On
Off
18
DECT6015 OM.indb 18DECT6015 OM.indb 18 8/8/07 4:10:30 PM8/8/07 4:10:30 PM
Page 20

Expanding Your Phone
Adding Accessory Handsets
Your phone supports a total of six cordless handsets. You can now place a fully-featured cordless handset anywhere
AC power is available to connect the handset charger. All the handsets ring when a call is received.
Compatible Handsets
Your phone is compatible with the DECT 6005. If you purchased an accessory handset separately, you must register
the handset to the base before use. Accessory handsets will not operate until they are registered.
Charging Accessory Handsets
The handset’s battery recharges automatically when the handset is placed in the charger.
Use the supplied AC adapter (AAD-600S) to connect the DC IN 1)
9V jack to a standard 240V AC outlet.
Set the charger on a desk or tabletop, and place the handset in 2)
the charger with the LCD screen facing forward.
Make sure that the charge LED illuminates. If the LED does not 3)
illuminate, check to see that the AC adapter is plugged in and
the handset makes good contact with the charging contacts.
Charge the handset battery pack for at least 15-20 hours 4)
before using your new handset for the fi rst time.
To AC outlet
Route the cord.
To DC IN 9V
AC adapter (supplied)
Caution: Use only the Uniden AAD-600S adapter.
19
DECT6015 OM.indb 19DECT6015 OM.indb 19 8/8/07 4:10:30 PM8/8/07 4:10:30 PM
Page 21

Registering DECT 6005 Accessory Handsets
If you purchase an accessory handset, you need to register the handset before use. Handset(s) supplied in the box
with the base are pre-registered at the factory. When charged, pre-registered handsets display a handset ID number.
Handsets that have not been registered display:
Handset not
registered-place
handset on base
to register.
See your Owner's
Manual for help.
To register an accessory handset:
Charge the handset for 15-20 hours.1)
Place the handset in the main telephone base cradle to initiate registration. HANDSET REGISTERING will 2)
appear in the LCD.
Wait approximately thirty seconds, "REGISTRATION COMPLETE" will be displayed to indicate the handset has 3)
been registered to the base and a handset ID will be automatically assigned.
If REGISTRATION FAILED appears in the LCD, please try these steps again.
Note: If an accessory handset has ever been registered to a base, you must reset the handset before you can
register it to a new base. See Resetting the Handset on page 40.
20
DECT6015 OM.indb 20DECT6015 OM.indb 20 8/8/07 4:10:30 PM8/8/07 4:10:30 PM
Page 22

Using Multiple Bases
DECT 6005 handsets and the handsets supplied with your phone can be registered to a total of four different
DECT6015 or DECT6035 bases. Once your handset is registered to more than one base, you can set the handset to
search automatically the available base, or you can select manually which base the handset should connect to (for
example, if you have one base with an answering machine, you can tell the handset to connect that base to check
messages).
Registering the Handset to Another Base
To register a handset to another base:
Make sure the handset battery is fully charged.1)
On the base, disconnect the base AC adapter. Then press and hold 2) [fi nd hs] while you reconnect the adapter.
Keep pressing [fi nd hs] until the charge LED starts to blink.
On the handset, Press 3) [Menu/Select]. Select the REGISTER BASE menu. HANDSET REGISTERING will
appear in the display.
Wait approximately thirty seconds. “REGISTRATION COMPLETE” will be displayed to indicate the handset has 4)
been registered to the base and a handset ID will be automatically assigned.
If REGISTRATION FAILED appears in the LCD, please try these steps again.
Selecting the Base
When your handset is registered to another base, it will automatically connect to the base. A base ID (that is for the
handset only) will be assigned in the order of registration. You can either select a base you want to use manually, or
set to AUTO. If you set to AUTO, when the handset comes out of range, it searches automatically the available base
in order of base ID.
With the phone in standby, press 1) [Menu/Select]. Select the HANDSET SETUP menu, and then the SELECT
BASE submenu.
Move the cursor to select the base you want to connect to, or choose AUTO to have the handset automatically 2)
select the base.
Press 3) [Menu/Select]. SEARCHING will appear in the display.
21
DECT6015 OM.indb 21DECT6015 OM.indb 21 8/8/07 4:10:30 PM8/8/07 4:10:30 PM
Page 23

When the base is found, the handset will return to standby. If the base is not found, “SEARCHING” continues 4)
to appear. You can repeat the procedure listed above to return back to the original connection or to fi nd the
different base.
Notes: • You cannot change bases during a call.
• To confi rm which bases the handset is registered to, open the SELECT BASE submenu and use [
[
] to scroll through the list. Press [ ] to close the list and return to standby.
] and
Setting Up the Phonebook
Your handset can store up to seventy names and numbers in your phonebook. When all the phonebook entries are
full, you will hear a beep and MEMORY FULL appears. You cannot store any additional names and numbers unless
you delete some of the existing ones.
You can also use the phonebook entries to store a group of numbers (up to twenty digits) that you may need to enter
once your call connects. This is referred to as chain dialing. See Chain Dialing from the Phonebook on page 29.
Creating Phonebook Entries
To store names and numbers in your phonebook, please follow these steps:
When the phone is in standby mode, press 1) [ ] (on the left side of the fourway key).
To create a new phonebook entry, press 2) [Menu/Select]. Select the
CREATE NEW menu. EDIT NAME appears.
Enter the name for this entry (EDIT NAME). 3)
Use the keypad to enter a name for this entry; the name can contain up to sixteen characters. (See Entering
Text from Your Handset on page 11 for instructions on entering text.) If you do not want to enter a name for this
entry, your phone will store this entry as <NO NAME>. Press [Menu/Select] when you are fi nished.
Edit Name
22
DECT6015 OM.indb 22DECT6015 OM.indb 22 8/8/07 4:10:30 PM8/8/07 4:10:30 PM
Page 24

Enter the number for this entry (EDIT NUMBER).4)
Once you have stored a name, EDIT NUMBER appears next. Use the
number keypad to enter the phone number; the phone number can contain
Edit Number
8007303456
up to twenty digits. If you need the phone to pause between digits when it’s
dialing (for example, to enter an extension or an access code), press [Redial/
Pause] to insert a two-second pause. You will see a P in the display. You can
also use more than one pause together if two seconds is not long enough.
Each pause counts as one digit. Press [Menu/Select] when you are fi nished.
Assign a personal ring tone for this entry (PERSONAL RING).5)
You can attach a special ring tone to each phonebook entry; the phone will
use this ring tone when this person calls. Use [
of the seven different ring tone options (see Selecting a Ring Tone on page
27 for a complete list of ring tones). As you scroll through the tones, you will
hear a sample of each tone. When you hear the ring tone you want to use,
] and [ ] to select one
Personal Ring
No Selection
Flicker
press [Menu/Select]. If you do not want to use a personal ring tone for this
phonebook entry, choose NO SELECTION; the phone will use your standard
ring tone setting.
You will hear a tone confi rming that the new entry has been stored, and DONE! appears in the display.6)
Finding a Phonebook Entry
Press [ ] to open the phonebook. Phonebook entries are stored in alphabetical order. To scroll through the
phonebook from A to Z, press [
You can also use the letters on the number keys to jump to a name that starts with that letter. For example, to search
for an entry beginning with the letter M, press [6] once. The phonebook jumps to the fi rst entry that begins with the
letter you entered; you can then use [
To close the phonebook, press [
]. To scroll trough the phonebook from Z to A press [ ].
] and [ ] to scroll to other entries.
]. During a call, press [ ] again instead of [ ] to close the phonebook.
23
DECT6015 OM.indb 23DECT6015 OM.indb 23 8/8/07 4:10:30 PM8/8/07 4:10:30 PM
Page 25

Editing an Existing Phonebook Entry
When the phone is in standby, press 1) [ ] to open the phonebook.
Find the entry you want to edit and press 2) [Menu/Select].
Select EDIT. Follow the steps for Creating Phonebook Entries on 3) page 22. If you do not wish to change the
information at any step, simply press [Menu/Select] to go to the next step.
Storing Caller ID or Redial Numbers in the Phonebook
You can store Caller ID records or redial numbers in the phonebook so you can use them later. Go to the Caller ID or
redial list and select the number you want to store. (If the Caller ID information did not include the number, then you
will not be able to store it.)
When the phone is in standby, press 1) [
Use 2) [
you want to store, press [Menu/Select].
Select STORE INTO PB. EDIT NAME appears. If the phone number is already stored in memory, you will hear a 3)
beep, and THIS DATA IS ALREADY SAVED! appears in the display. The number will not be stored.
Continue by following the steps for Creating Phonebook Entries on 4) page 22.
] and [ ] to scroll through the Caller ID records or redial numbers. When you come to the information
] to open the Caller ID list or [Redial/Pause] to open the redial list.
Deleting Phonebook Entries
You can delete a single phonebook entry at a time or all phonebook entries at once:
To delete a single phonebook entry:
When the phone is in standby, press 1) [
Find the entry that you want to delete and press 2) [Menu/Select].
Select DELETE. DELETE ENTRY? appears in the display.3)
Move the cursor to select YES.4)
Press 5) [Menu/Select]. You will hear a confi rmation tone, and DELETED! appears in the display.
].
Edit
Copy
Delete
24
DECT6015 OM.indb 24DECT6015 OM.indb 24 8/8/07 4:10:31 PM8/8/07 4:10:31 PM
Page 26

To delete all phonebook entries:
When the phone is in standby, press 1) [
Press 2) [Menu/Select], and then select DELETE ALL. DELETE ALL? appears in the
display.
Move the cursor to select YES.3)
Press 4) [Menu/Select]. You will hear a confi rmation tone, and DELETED!
appears in the display.
].
Create New
Copy All
Delete All
Copying Phonebook Entries to Another Handset
If you have more than one handset, you can transfer phonebook entries from one handset to another without having to reenter names and numbers. You can transfer one phonebook entry at a time or all phonebook entries at once.
When the phone is in standby, press1) [
To copy one entry, fi nd the phonebook entry you want to copy. Press 2) [Menu/Select], and then select COPY.
To copy all entries, press [Menu/Select], and then select COPY ALL.
Move the cursor to select the handset which you want to transfer the entries to and then press 3) [Menu/Select].
If you select COPY ALL, ARE YOU SURE? appears on the display screen. Move the cursor to select YES, and then
press [Menu/Select].
The phonebook entries will be transferred to the designated handset. During the copy process, the receiving handset 4)
shows RECEIVING and the Handset ID of the sending handset.
When the transfer is completed, DONE! appears on the handset.5)
Notes: • The handsets must be currently connected to the same base (see page 21).
• If your phonebook contains seventy entries, you cannot store any new phonebook entries. You will hear a beep,
and NOT ENOUGH MEMORY IN RECEIVING UNIT appears on the display. If the selected handset is out of range
or data transfer is cancelled, UNAVAILABLE appears in the display. Phonebook listings will not be transferred.
].
Using the Voice Mail Service
If you subscribe to a voice mail service, you can use your phone to access your voice mailbox. The new message LED on
the handset fl ashes and
If you have programmed your access number into your phone, you can simply press [
When you subscribe to the service, your voice mail provider provides you with the access number and the required voice
mail signaling tone.
appears in the handset display whenever you have messages waiting in your voice mailbox.
/Mute] to access your voice mail.
25
DECT6015 OM.indb 25DECT6015 OM.indb 25 8/8/07 4:10:31 PM8/8/07 4:10:31 PM
Page 27

Programming One-Touch Voice Mail Access
You can program your voice mail access number to the Voice Mail key [ /Mute] on each handset so you can get your
messages at the touch of a button. Your voice mail service provider will supply you with the access number.
This number may be simply a phone number.
To edit the voice mail number, follow the steps below:
Press 1) [Menu/Select].
Move the cursor to select the HANDSET SETUP menu and press 2) [Menu/Select].
Move the cursor to select EDIT VOICE MAIL and press 3) [Menu/Select].
Enter your personal access number (up to twenty digits).4)
If you need to have the phone wait before sending the next digits, press 5) [Redial/Pause] to insert a two-second pause
in the dialing sequence. For a longer pause, press [Redial/Pause] multiple times. A P appears in the display each time
you press [Redial/Pause] and each pause counts as one digit.
Press 6) [Menu/Select] when you are fi nished.
Edit V-mail No.
Resetting the Voice Message Waiting Indicator
When you receive a new voice mail message, the new message LED on the top of the handset fl ashes and appears
in the handset display. In the event your message alert tone gets out of sync with your phone company’s voice messaging
system, you can reset back to its original “no messages waiting” state. To reset, press and hold [fi nd hs] on the base for
fi ve seconds. A beep sounds and the message alert tone is reset.
Customizing Your Phone
Changing the Handset Banner
Each handset will display a banner name once it is registered to the base. The default banner is Handset #1, Handset #2,
etc. You can change the name your phone displays by changing the banner display. If you have more than one handset, the
banner name identifi es your handset.
Press1) [Menu/Select]. Select the HANDSET SETUP menu, and then the BANNER submenu.
Use the keypad to enter or edit the banner name. (See Entering Text from Your Handset on page 11 for detailed 2)
instructions on entering text.)
26
DECT6015 OM.indb 26DECT6015 OM.indb 26 8/8/07 4:10:31 PM8/8/07 4:10:31 PM
Page 28

Press 3) [Menu/Select]. You will hear a confi rmation tone.
Note: When you have multiple bases and even if the handset ID is changed when you switch to a different base, the
handset will keep the banner name.
Selecting a Ring Tone
You may choose from four melodies or three tones for your phone’s primary ring tone. Each handset can use a different ring
tone or melody. The available ring tones are as listed:
1) Press [Menu/Select]. Select the HANDSET SETUP menu, and then the RINGER TONES submenu.
Move the cursor to select a ring tone. As each ring tone is highlighted, you will hear a sample.2)
When you hear the tone you want to use, press 3) [Menu/Select]. You will hear a
confi rmation tone.
Activating AutoTalk
AutoTalk allows you to answer the phone simply by picking up the handset from the cradle.
You do not have to press a button to answer the call.
Press 1) [Menu/Select]. Select the HANDSET SETUP menu, and then the AUTOTALK
submenu.
Move the cursor to select ON or OFF.2)
Press 3) [Menu/Select]. You will hear a confi rmation tone.
Ringer Tones
Flicker
Clatter
AutoTalk
On
Off
Activating Any Key Answer
Any Key Answer allows you to answer the phone by pressing any key on the dial pad.
Press 1) [Menu/Select]. Select the HANDSET SETUP menu, and then the ANY KEY
ANSWER submenu.
Move the cursor to select ON or OFF.2)
Press3) [Menu/Select]. You will hear a confi rmation tone.
Any Key Answer
On
Off
27
DECT6015 OM.indb 27DECT6015 OM.indb 27 8/8/07 4:10:31 PM8/8/07 4:10:31 PM
Page 29

Using Your Phone
From a cordless handset From a handset speaker phone
Pick up the handset from the cradle.1)
Press2) [
Listen for the dial tone.3)
Making
a call
Answering
a call
Hanging up
Dial the number.4)
OR
Pick up the handset from the cradle.1)
Dial the number.2)
Press 3) [
Pick up the handset. (If AutoTalk is on, the 1)
phone will answer when you pick up the
handset from the cradle.)
Press 2) [
you can also press any key on the dial pad.)
Press [
] or return the handset to the cradle. Press [ ] or return the handset to the cradle.
/Flash].
/Flash].
/Flash]. (If Any Key Answer is on,
OR
Pick up the handset from the cradle.1)
Press 2) [
Listen for the dial tone.3)
Dial the number.4)
Pick up the handset from the cradle.1)
Dial the number. 2)
Press3) [
Pick up the handset. 1)
Press2) [
].
].
].
28
DECT6015 OM.indb 28DECT6015 OM.indb 28 8/8/07 4:10:31 PM8/8/07 4:10:31 PM
Page 30

Making a Call from the Phonebook
When the phone is in standby, press 1) [ ] to open the phonebook.
Find the phonebook entry you want to call (see Finding a Phonebook Entry on 2) page 23).
Press 3) [
Note: You can also press [
/Flash] or [ ] to dial the number.
/Flash] or [ ] before you open the phonebook. When you come to the phone number
you want to dial, press [Menu/Select].
Chain Dialing from the Phonebook
You can use the phonebook entries to store a group of numbers (up to twenty digits) that you may need to enter
once your call connects.
Dial the number normally.1)
After the call connects, press 2) [
Use 3) [ ] or [ ] to select the phonebook entry that contains the digits you want to send.
Press4) [Menu/Select].
].
Switching to the Handset Speakerphone During a Call
To switch a normal call to the speakerphone, press [ ] on the handset. To switch from a speakerphone call to a
normal call, press [
].
29
DECT6015 OM.indb 29DECT6015 OM.indb 29 8/8/07 4:10:31 PM8/8/07 4:10:31 PM
Page 31

Using Caller ID, Call Waiting, and Redial Lists
If you subscribe to Caller ID service from your phone company, your phone will show you the caller’s phone number
and name (if available) whenever a call comes in. If you subscribe to Caller ID on Call Waiting, the phone will also
show you the name and the number of any call that comes in while you’re on the line.
Using the Caller ID List
You can store up to thirty Caller ID numbers in each handset. Caller ID records are
stored from newest to oldest. Once your Caller ID list is full, the oldest record will be
automatically deleted when a new call is received.
To open the Caller ID list, press [ ] (on the right side of the four-way key). The
phone will show the number of new Caller ID records and the total number of stored
records. Use [
] and [ ] to scroll through the list.
Making a Call from a Caller ID Record
When the phone is in standby, press 1) [ ] to open the Caller ID list.
Use2) [
Press3) [ /Flash] or [ ] to dial the number.
Note: You can also press [
] and [ ] to fi nd the Caller ID record you want to dial.
/Flash] or [ ] before you open the caller ID list. When you come to the phone number
you want to dial, press [Menu/Select].
Caller ID
New : 1
Total:30
21/12 12:00PM
Jane Smith
214-555-1234
30
DECT6015 OM.indb 30DECT6015 OM.indb 30 8/8/07 4:10:31 PM8/8/07 4:10:31 PM
Page 32

Deleting Caller ID Numbers
To delete only one Caller ID number, press [ ] when the phone is in standby, and then fi nd the number you want to
delete. Press [Menu/Select] and select DELETE ENTRY. When the phone asks you to confi rm, select YES.
To delete all the Caller ID numbers, press [
the phone asks you to confi rm, select YES.
Note: When you delete a Caller ID number, you delete it permanently.
] when the phone is in standby, and then press [Menu/Select]. When
Using Call Waiting
If you have Call Waiting service and a second call comes in when you are on the phone, a call waiting tone will
sound. (If you subscribe to Caller ID on Call Waiting, the handset displays the name and phone number of the
waiting call.)
For Australian Model:
Press [
the new caller after a short pause. To return to the original caller, press [
For New Zealand Model:
Press [
caller after a short pause. To return to the original caller, press [
Note: You must subscribe through your telephone provider to receive Call Waiting services.
/Flash] and then [2] on the handset to accept the waiting call. The fi rst caller is put on hold, and you will hear
/Flash] and then [2] again.
/Flash] on the handset to accept the waiting call. The fi rst caller is put on hold, and you will hear the new
/Flash] again.
Redialing a Number
You can quickly redial the last fi ve numbers dialed on each handset.
When the phone is in standby, press the 1) [Redial/Pause] to open the redial list.
Use 2) [
When you fi nd the number you want to dial, press3) [ /Flash] or [ ].
Notes: • If the number exceeds 32 digits, only the fi rst 32 digits are retained in redial memory.
• If the redial memory is empty, EMPTY appears in the display and you will hear a beep.
• You can also press [
] and [ ] or [Redial/Pause] to scroll through the redial list.
/Flash] or [ ] before you open the redial list. When you come to the phone number
you want to dial, press [Menu/Select].
31
DECT6015 OM.indb 31DECT6015 OM.indb 31 8/8/07 4:10:32 PM8/8/07 4:10:32 PM
Page 33

Deleting a Redial Record
If you want to delete a phone number from the handset’s redial list, follow the steps below:
When the phone is in standby, press 1) [Redial/Pause].
Use2) [
When you fi nd the redial number you want to delete, press 3) [Menu/Select] and select DELETE ENTRY.
When the phone asks you to confi rm, select YES. The redial number is deleted.4)
] and [ ] to scroll through the redial list.
Adjusting the Ringer, Earpiece and Speaker Volume
Adjusting the Ringer Volume
You can choose from four ringer volume settings (off, low, medium, and high) on the handset.
With the phone in standby, use [ ] to make the ringer volume louder or [ ] to
make it softer or turn it completely off.
Adjusting the Earpiece Volume
You can choose from six volume levels for the earpiece. To adjust the earpiece
volume while on a call, press [
Adjusting the Speaker Volume
You can choose from six volume levels for the handset speakerphone. To adjust the speaker volume while on a
speakerphone call, press [
] (to make it louder) or [ ] (to make it softer).
] (to make it louder) or [ ] (to make it softer).
32
DECT6015 OM.indb 32DECT6015 OM.indb 32 8/8/07 4:10:32 PM8/8/07 4:10:32 PM
Page 34

Adjusting the Audio Tone
If you aren’t satisfi ed with the audio quality of your phone, you can adjust the Audio Tone of the earpiece while on
a call. Your phone gives you three audio tone options: low, natural and high; the default setting, Natural Tone, is
recommended for hearing aid users. Audio tone adjustments only apply to the earpiece, not the speakerphone.
To adjust the audio tone:
While on a call, press 1) [Menu/Select].
Move the cursor to select AUDIO TONE, and then press2) [Menu/Select].
Move the cursor to select desired option (HIGH TONE, NATURAL TONE, or LOW TONE), and then press 3)
[Menu/Select]. Selected option appears in the display for two seconds, and then the display returns to normal.
Finding a Lost Handset
To locate a misplaced handset, press [fi nd hs] on the base when the phone is in standby. The handsets connected
to the paging base will beep for one minute, and PAGING appears on the handset display. To cancel paging, press
[fi nd hs] again or any key on the found handset.
Note: Handsets that are not currently connected to this base will not be paged.
Using Hold, Conference and Transfer
Placing a Call on Hold
During a call, press 1) [Clear/Int’com] on the handset to place the caller on hold. If you leave a caller on hold for
more than ten seconds, the display screen will read, Line On Hold.
To return to the party on hold, press2) [
Notes: • You can only place a caller on hold for fi ve minutes. Once fi ve minutes has passed, that party’s line will be
disconnected and the phone will return to standby.
• While a call is on hold, Caller ID and Call Waiting cannot be received.
/Flash] or [ ] on a handset. The phone will return to the holding party.
33
DECT6015 OM.indb 33DECT6015 OM.indb 33 8/8/07 4:10:32 PM8/8/07 4:10:32 PM
Page 35

Conferencing
If you have more than one handset, up to three people can participate in a conference call. A three-way conference
call consists of an outside line and two handsets. You can easily join a call already in progress. The handsets must
be currently connected to the same base (see page 21).
Press1) [
To hang up, return the handset to the cradle or press 2) [
/Flash] or [ ] to join the call.
]. The other party will still be connected to the call.
Transferring a Call
You can transfer a call from one handset to another. The handsets must be currently connected to the same base
(see page 21).
During a call, press1) [Clear/Int’com].
Use 2) [
ALL to page all other handsets. The call will automatically be placed on hold, and a paging tone sounds. To
cancel the transfer, press [
When another 3) handset accepts the transferred call, you will be disconnected. If you want to rejoin the call, press
[
Answering a Transferred Call
When a handset receives a call transfer, it sounds a paging tone; handsets also show the ID of the handset that is
paging. To accept the call transfer:
To answer the page and speak to the transferring 1) handset, press [
To accept the call and speak to the caller, press2) [
When you accept the transferred call, the transferring 3) handset will be disconnected.
Only the fi rst handset to answer the transfer page will be connected to the call. If the transfer page is not picked up
within one minute, the operation will be canceled.
] or [ ] to select the handset you want to transfer the call to, and then press [Menu/Select]. Select
/Flash] or [ ].
/Flash] again or [ ].
/Flash] or [Clear/Int’com].
/Flash].
34
DECT6015 OM.indb 34DECT6015 OM.indb 34 8/8/07 4:10:32 PM8/8/07 4:10:32 PM
Page 36

Using Special Features
Privacy Mode
If you don’t want other handsets to interrupt you while on a call, turn on privacy mode. As long as your handset
is in privacy mode, other handsets can’t join your call or make any calls of their own: their displays will show
UNAVAILABLE.
While on a call, press 1) [Menu/Select].
Select CALL PRIVACY. PRIVACY MODE ON appears in the display for two seconds; 2)
the display until the feature is turned off.
To turn privacy mode off, repeat the procedure listed above. PRIVACY MODE OFF appears.
Using the Intercom
You can use the intercom to talk to another handset without using the phone line. The handsets must be currently
connected to the same base (see page 21).
Making an Intercom Page
When the phone is in standby, press1) [Clear/Int’com].
Use 2) [ ] or [ ] to select the handset you want to talk with, and then press [Menu/Select]. Select ALL to page
all other handsets.
To cancel the intercom page, press3) [
Note: Intercom paging will be cancelled if any of the following things occur:
You receive an outside call or an intercom page while selecting the other handset.•
You do not select a handset within thirty seconds.•
Your handset is out of range (OUT OF RANGE appears in the display).•
The party does not answer the page within one minute.•
The party is busy.•
The party is out of range (UNAVAILABLE appears in the display).•
].
appears and remains in
35
DECT6015 OM.indb 35DECT6015 OM.indb 35 8/8/07 4:10:32 PM8/8/07 4:10:32 PM
Page 37

Answering an Intercom Page
When the intercom page tone sounds, the display will show the ID of the handset that is paging.
Press 1) [
pick up the handset from the cradle.
To hang up an intercom call, press 2) [
/Flash] or [Clear/Int’com]. If AutoTalk is on, the handset will automatically answer the page when you
].
Muting the Ringer (One call only)
While the phone is ringing, press [ ] to mute the ringer for this call. The phone will ring again on the next call.
Muting the Microphone
Mute turns off the microphone so the caller can’t hear you. This only works while you are on a call.
Press 1) [ /Mute]. MUTE ON and appear in the display; remains while muting is on.
To cancel muting, press2) [
/Mute] again. MUTE OFF appears.
36
DECT6015 OM.indb 36DECT6015 OM.indb 36 8/8/07 4:10:32 PM8/8/07 4:10:32 PM
Page 38

Line Mode Setup (Base only)
The Line Mode Setup feature is only used in instances where you have multiple phones where users may pick up an
extension while someone else is on the phone. Only in very rare instances where your phone system is not detecting
that an extension phone is picked up will you ever need to change this feature. There are three settings for this
feature: TYPE-A, TYPE-B, or OFF, but change this option only when instructed to by customer service. In most all
situations, this feature will never need to be used or modifi ed from the factory default setting of TYPE-A.
If you have multiple bases, select the base you need to change the setting (see page 21).1)
Press 2) [Menu/Select]. Select the GLOBAL SETUP menu, and then the SET LINE MODE submenu.
IF INSTRUCTED BY CUSTOMER SERVICE PRESS 3) [SELECT] appears. Press [Menu/Select].
Move the cursor to select TYPE - A, TYPE - B, or OFF.4)
Press5) [Menu/Select]. You will hear a confi rmation tone.
Installing the Optional Headset
Your phone may be used with an optional headset. To use this feature, insert the headset plug into
the headset jack. Your phone is ready for hands-free conversations. (Headsets may be purchased
by calling the Uniden Parts Department. See inside the back cover page for contact information.)
37
DECT6015 OM.indb 37DECT6015 OM.indb 37 8/8/07 4:10:33 PM8/8/07 4:10:33 PM
Page 39

Maintenance
Specifi cations
Operating Temperature 32° F to 122° F (0° C to 50° C)
AC Adapter Part Number
AC Adapter Input Voltage
AC Adapter Output
Voltage
Battery Part Number BT-652
Battery Capacity 2.4V DC @ 650mAh
Notes:
Use only the supplied AC adapters.•
Be sure to use the proper adapter for the base and any chargers.•
Do not place the power cord where it creates a trip hazard or where it could become chafed and create a fi re or •
electrical hazard.
Do not place the base in direct sunlight or subject it to high temperatures.•
Battery Replacement and Handling
With average use, your phone’s battery should last approximately one year. To order replacement batteries, please
visit Uniden’s customer support page at www.uniden.com.au (Australian model) or www.uniden.co.nz (New Zealand
model).
Caution:
Use only battery pack BT-652. •
Do not remove the batteries from the handset to charge them. •
Never throw the battery into a fi re, disassemble, or heat them. •
Do not remove or damage the battery casing. •
Base: AAD-041S
Charger: AAD-600S
Base: 240V AC, 50 Hz
Charger: 240V AC, 50 Hz
Base: 9V DC @ 350mA
Charger: 9V DC @ 210mA
38
DECT6015 OM.indb 38DECT6015 OM.indb 38 8/8/07 4:10:33 PM8/8/07 4:10:33 PM
Page 40

Cleaning the Battery Contacts
To maintain a good charge, clean the charging contacts on the handset
once a month. Dampen a cloth with plain water. Gently rub the damp cloth
over the charging contacts until all visible dirt is removed. Dry the contacts
thoroughly before returning the handset to the cradle.
Caution: Do not use paint thinner, alcohol, or other chemical products.
Doing so may discolor the surface of the telephone and damage the fi nish.
Low Battery Alert
When the battery pack is very low, the phone is programmed to eliminate functions in
order to save power. When LOW BATTERY appears in the display and the phone is in
standby, none of the keys will operate. If you are on a call, complete your conversation as
quickly as possible, and return the handset to the cradle.
The battery pack needs to be charged when the empty battery icon appears.
Low Battery
Battery Life
With average use, your handset battery provides approximately ten hours of talk time and approximately seven
days of standby time. You can achieve optimum battery life and performance by returning the handset to the base
or charger after each use. When your handset is left off of the cradle, the battery will gradually discharge even if
the handset is not being used. The actual talk time duration will be reduced in proportion to the amount of time the
handset is off of the cradle.
Power Failures
During a power failure, you will not be able to make or receive calls with the phone. To avoid damage from an
electrical spike when the power comes back on, we recommend you unplug your phone during power outages.
39
DECT6015 OM.indb 39DECT6015 OM.indb 39 8/8/07 4:10:33 PM8/8/07 4:10:33 PM
Page 41

Troubleshooting
Resetting the Handset
You may need to reset your handset in the following instances:
You lose a handset and purchase a new one.•
You get the message Registration Failed when you try to register the handset.•
You are unable to register any handsets to the base.•
When you register new handsets to the base, the handset IDs do not match. (For example, the handset registers •
as “Handset #4” but you only have two handsets.)
When you are instructed to by one of Uniden’s call center representatives.•
Select the base you want to de-register the handset from (see Selecting the Base on page 21).1)
Press and hold 2) [
Select the handset 3) which you are operating, and then press [Menu/Select].
The phone will ask you to confi rm the deregistration. Select YES. The selected handset will clear its registration 4)
information only from the base it is currently connected to, and then delete the link to the base from its own
memory.
When the base information is deleted, the handset displays HANDSET NOT REGISTERED-PLACE HANDSET 5)
ON BASE TO REGISTER. SEE YOUR OWNER'S MANUAL FOR HELP.
Re-register the handset to the base (see Registering Accessory Handsets on 6) page 20).
If the handset cannot contact the base, it will display OUT OF RANGE. Make sure the handset is in range of the
base and the base is connected to power; you can reset the handset without the base (see page 41).
] and [#] for more than fi ve seconds. Select DEREGISTER HS.
40
DECT6015 OM.indb 40DECT6015 OM.indb 40 8/8/07 4:10:33 PM8/8/07 4:10:33 PM
Page 42

Resetting the Handset Without the Base
If your original base is not available for some reason, you can still reset the handset and use it with another base.
Press and hold1) [
Move the cursor to select BASEUNAVAILABLE and then press 2) [Menu/Select].
Select the base which you want to de-register from, and then press 3) [Menu/Select].
Move the cursor to select YES, and then press 4) [Menu/Select]. You hear a confi rmation tone, and the
handset deletes its own base information without contacting the base. The handset displays HANDSET NOT
REGISTERED-PLACE HANDSET ON BASE TO REGISTER. SEE YOUR OWNER'S MANUAL FOR HELP.
Register the handset to the new base (see Registering Accessory Handsets on 5) page 20).
] and [#] for at least fi ve seconds.
Traveling Out of Range
During a call, if you move your handset too far from your base, noise may increase. If you pass the range limit of the
base, the handset will beep, display OUT OF RANGE, and then go to standby. The base will maintain the connection
for thirty seconds after the handset goes out of range. If you move the handset back within range of the base within
thirty seconds, press [
Note: If it is set to automatically select the available base, the handset will begin searching for another base thirty
seconds after going out of range. (see Selecting the Base on page 21).
/Flash] or [ ] to pick up the call again.
41
DECT6015 OM.indb 41DECT6015 OM.indb 41 8/8/07 4:10:33 PM8/8/07 4:10:33 PM
Page 43

Common Issues
If your phone is not performing to your expectations, please try these simple steps fi rst. If these steps do not
solve your problem, please visit Uniden’s customer support page at www.uniden.com.au (Australian model)
or www.uniden.co.nz (New Zealand model).
Symptom Suggestion
The charge LED won’t
illuminate when the handset
is placed in the cradle.
The audio sounds weak.
Can’t make or receive calls.
Severe noise interference.
Make sure the AC adapter is plugged into the base or the charger (if you have •
more than one handset) and wall outlet.
Make sure the AC outlet is not connected to a wall switch.•
Make sure the handset is properly seated in the cradle.•
Make sure the charging contacts on the handset are clean. •
Move the handset and/or base away from metal objects or appliances.•
Make sure that you are not too far from the base.•
Make sure that you are not too far from the base.•
Make sure the line is not in use. If an outside call is already using a line, you •
cannot use that line to make another outside call.
Make sure your handset is registered to the base.•
Check both ends of the base telephone cord.•
Make sure the AC adapter is plugged into the base and wall outlet.•
Disconnect the AC adapter and reconnect.•
Keep the handset away from microwave ovens, computers, remote control toys, •
wireless microphones, alarm systems, intercoms, room monitors, fl uorescent
lights, and electrical appliances.
Move to another location or turn off the source of interference.•
42
DECT6015 OM.indb 42DECT6015 OM.indb 42 8/8/07 4:10:33 PM8/8/07 4:10:33 PM
Page 44

Symptom Suggestion
The Caller ID does not
display.
The handset doesn’t ring or
receive a page.
You cannot register the
handset at the base.
The handset doesn’t
communicate with other
handsets.
An extra handset can’t join
the conversation.
The Voice Mail Waiting LED
fl ashes, but there are no new
messages.
The call was placed through a switchboard.•
Call your telephone provider to verify your Caller ID service is current. There may •
be a problem with your Caller ID service.
Make sure that you are not too far from the base.•
Make sure that your handset is registered to the base.•
Charge the battery in the handset for 15 to 20 hours.•
Charge the battery pack in the handset for 15 to 20 hours.•
Try resetting the handset (see Resetting the Handset on • page 40).
Make sure that you have registered all handsets to the same base, and all •
handsets are selecting the base (see page 21).
Make sure there are not two handsets already using the conference feature.•
Make sure that another handset is not in privacy mode.•
Make sure that you have registered both handsets to the same base, and both •
handsets are selecting the base (see page 21).
Reset the Voice Mail Waiting Indicator (see page 26).•
43
DECT6015 OM.indb 43DECT6015 OM.indb 43 8/8/07 4:10:33 PM8/8/07 4:10:33 PM
Page 45

Liquid Damage
Moisture and liquid can damage your cordless phone.
If the handset or base is exposed to moisture or liquid, but only the exterior plastic housing is affected, wipe off •
the liquid, and use as normal.
If moisture or liquid has entered the plastic housing (i.e. liquid can be heard in the phone or liquid has entered the •
handset battery compartment or vent openings on the base), follow the steps below:
Handset Base
Remove the battery cover and leave it off for 1)
ventilation.
Disconnect the battery pack. Leave the battery 2)
cover off and the battery pack disconnected for at
least 3 days.
Once the handset is completely dry, reconnect the 3)
battery pack and the battery cover.
Recharge the handset’s battery pack for 15 to 20 4)
hours before using.
IMPORTANT: You must unplug the telephone line while recharging the battery packs to avoid charge interruption.
CAUTION: DO NOT use a microwave oven to speed up the drying process. This will cause permanent
damage to the handset, base and the microwave oven. After following these steps, if your
cordless telephone does not work, please visit Uniden’s customer support page at www.uniden.
com.au (Australian model) or www.uniden.co.nz (New Zealand model).
Disconnect the AC adapter from the base, cutting 1)
off electrical power.
Disconnect the telephone cord from the base.2)
Let dry for at least 3 days. 3)
44
DECT6015 OM.indb 44DECT6015 OM.indb 44 8/8/07 4:10:33 PM8/8/07 4:10:33 PM
Page 46

Precautions!
Before you read anything else, please observe the following:
Warning!
Uniden Australia and Uniden New Zealand DOES NOT
represent this unit to be waterproof. To reduce the risk of fi re,
electrical shock, or damage to the unit, DO NOT expose this
unit to rain or moisture.
Rechargeable Nickel-Metal-Hydride
Battery Warning
This equipment contains a rechargeable Nickel-Metal-•
Hydride battery.
The rechargeable batteries contained in this equipment •
may explode if disposed of in a fi re.
Do not short-circuit the battery. •
Do not charge the rechargeable battery used in this •
equipment in any charger other than the one designed to
charge this battery as specifi ed in the owner's manual.
Using another charger may damage the battery or cause
the battery to explode.
Rechargeable Batteries Must Be Recycled or Disposed of
Properly.
Uniden works to reduce lead content in our PVC coated cords
in our products and accessories.
Important Safety Instructions
When using your telephone equipment, basic safety
precautions should always be followed to reduce the risk of fi re,
electric shock and injury to persons, including the following:
Do not use this product near water, for example, near 1.
a bath tub, wash bowl, kitchen sink or laundry tub, in a
wet basement or near a swimming pool.
Avoid using a telephone (other than a cordless type) 2.
during an electrical storm. There may be a remote risk
of electric shock from lightning.
Do not use the telephone to report a gas leak in the 3.
vicinity of the leak.
Use only the power cord and batteries indicated in 4.
this manual. Do not dispose of batteries in a fi re. They
may explode. Check with local authorities for possible
battery disposal instructions.
Do not disassemble any component of this product.5.
SAVE THESE INSTRUCTIONS
CAUTION
Risk of explosion if battery is replaced by an incorrect type.
Dispose of used batteries according to the instructions. Do not
open or mutilate the battery, and disconnect the battery before
shipping this product.
45
DECT6015 OM.indb 45DECT6015 OM.indb 45 8/8/07 4:10:33 PM8/8/07 4:10:33 PM
Page 47

Memo
46
DECT6015 OM.indb 46DECT6015 OM.indb 46 8/8/07 4:10:33 PM8/8/07 4:10:33 PM
Page 48

Memo
47
DECT6015 OM.indb 47DECT6015 OM.indb 47 8/8/07 4:10:33 PM8/8/07 4:10:33 PM
Page 49

Index
A
Answering calls............................ 28
Any key answer ........................... 27
AutoTalk ....................................... 27
B
Banner ......................................... 26
Base
Installing ................................... 14
Multiple Bases .......................... 21
Parts of the base ........................ 8
Wall mounting .......................... 16
Battery
Battery life ................................ 39
Installing ................................... 13
Low battery alert....................... 39
Replacement and handling ...... 38
Belt clip ........................................ 14
C
Caller ID....................................... 30
Deleting Caller ID records ........ 31
Making calls from ..................... 30
Call waiting .................................. 31
Chain dialing ................................ 29
Conferencing ............................... 34
F
Finding a handset ........................ 33
H
Handset
Accessory handsets ................. 19
Banner...................................... 26
Choosing a ringer ..................... 27
Copying phonebook entries ..... 25
Display and icons ....................... 9
Entering text ..............................11
Finding ..................................... 33
Parts of the handset ................... 7
Registering ......................... 20, 21
Resetting .................................. 40
Standby screen .......................... 9
Hanging up .................................. 28
Headset ....................................... 37
Hold ............................................. 33
I
Insert 0......................................... 18
Installation ................................... 12
Intercom....................................... 35
K
Key touch tone............................. 17
M
Maintenance ................................ 38
Making calls ................................. 28
Using Caller ID ......................... 30
Using redial .............................. 31
Using the phonebook ............... 29
Multiple Bases ............................. 21
Mute
Microphone .............................. 36
Ringer....................................... 36
N
Name Tag .................................... 18
O
Out of range................................. 41
P
Personal ring ............................... 17
Phonebook .................................. 22
Copying entries ........................ 25
Creating new entries ................ 22
Deleting entries ........................ 24
Editing entries .......................... 24
48
DECT6015 OM.indb 48DECT6015 OM.indb 48 8/8/07 4:10:34 PM8/8/07 4:10:34 PM
Page 50

Finding entries.......................... 23
Making a call from .................... 29
Storing Caller ID or redial
numbers ............................ 24
Privacy mode ............................... 35
R
Redial
Deleting a record ...................... 32
Making a calls with ................... 31
Ringer
Muting ...................................... 36
Personal ring ............................ 17
S
Safety notices .............................. 45
Selecting the base ....................... 21
T
Text, entering ................................11
Transferring a call ........................ 34
V
Voice Mail .................................... 25
Programming............................ 26
Waiting Indicator Reset ............ 26
Volume, adjusting ..................... 32
W
Wall mounting the base ............... 16
Warranty ...................................... 50
49
DECT6015 OM.indb 49DECT6015 OM.indb 49 8/8/07 4:10:34 PM8/8/07 4:10:34 PM
Page 51

ONE YEAR LIMITED WARRANTY
UNIDEN DECT 6015 and DECT 6015+1 CORDLESS PHONE
IMPORTANT :
WARRANTOR : Uniden Australia Pty Limited A.B.N. 58 001 865 498
Uniden New Zealand Limited
Warranty only available in original country of purchase.
ELEMENT OF WARRANTY :
Uniden warrants to the original retail owner for the duration of this warranty, its UNIDEN DECT 6015 and DECT 6015+1 CORDLESS
PHONE (herein after referred to as the Product), to be free from defects in materials and craftsmanship with only the limitations or
exclusions set out below.
WARRANTY DURATION:
This warranty to the original retail owner only, shall terminate and be of no further effect ONE (1) year after the date of original retail sale.
This warranty will be deemed invalid if the Product is;
(A) Damaged or not maintained as reasonable and necessary,
(B) Modified, altered or used as part of any conversion kits, subassemblies, or any configurations not sold by Uniden,
(C) Improperly installed,
(D) Repaired by someone other than an authorized Uniden Repair Agent for a defect or malfunction covered by this warranty,
(E) Used in conjunction with any equipment or parts or as part of a system not manufactured by Uniden, or
(F) Where the Serial Number label of the product has been removed or damaged beyond recognition.
Warranty only valid in the country of original retail/sale.
PARTS COVERED:
This warranty covers for one (1) year, the Product and included accessories.
STATEMENT OF REMEDY:
In the event that the Product does not conform to this warranty at any time while this warranty is in effect, the warrantor at its discretion,
will repair the defect or replace the Product and return it to you without charge for parts or service. This warranty does not provide for
reimbursement or payment of incidental or consequential damages.
This EXPRESS WARRANTY is in addition to and does not in any way affect your rights under the TRADE PRACTICES ACT 1974 (Cth)
(Australia) or the CONSUMER GUARANTEES ACT (New Zealand).
PROCEDURE FOR OBTAINING PERFORMANCE OR WARRANTY:
In the event that the Product does not conform to this warranty, the Product should be shipped or delivered, freight pre-paid, with evidence
of original purchase (e.g. a copy of the sales docket), to the warrantor at:
UNIDEN AUSTRALIA PTY LIMITED
SERVICE DIVISION SERVICE DIVISION
345 Princes Highway, Rockdale NSW 2216
Fx(02) 9599 3278 Fx(09) 274 4253
www.uniden.com.au www.uniden.co.nz
Customers in other States should ship or deliver the Product freight pre-paid to their nearest Uniden Authorized Repair Centre
(Contact Uniden for the nearest Warranty Agent to you).
Evidence of original purchase is required for warranty service.
UNIDEN NEW ZEALAND LIMITED
150 Harris Road, East Tamaki, Auckland
50
DECT6015 OM.indb 50DECT6015 OM.indb 50 8/8/07 4:10:34 PM8/8/07 4:10:34 PM
Page 52

Uniden Australia Pty Limited
Uniden New Zealand Limited
DECT6015 OM.indb 51DECT6015 OM.indb 51 8/8/07 4:10:34 PM8/8/07 4:10:34 PM
© 2007
Printed in China
UCZZ01902BZ(0)
 Loading...