

Page 1

DECT2085-4WX
UNIDEN
CORDLESS
TELEPHONES
i
Page 2

Table of Contents
Welcome .......................................................................5
Accessibility
What.Exactly.does.“Waterproof.Handset”.Mean?
Installing the Phone ....................................................6
Choosing.the.Best.Location
Installing.the.Battery
Installing.the.Belt.Clip
Connecting.the.AC.adapter
Charging.the.Handsets.
Connecting.to.the.Phone.Line
Changing.the.Dial.Mode
Wall.Mounting.the.Base
Product Overview ...................................................... 14
Features..................................................................14
Answering.System.Features
Terminology.Used.in.this.Manual
Manual.Conventions
Parts.of.the.Phone
Using the Interface ....................................................18
Reading.the.Display
Using.the.Four-way.Function.Key
Using.the.Handset.and.Base.Menus
..............................................................5
.....5
......................................6
.................................................7
...............................................8
.......................................8
............................................9
................................10
......................................... 11
.......................................... 12
...................................14
............................15
...............................................15
..................................................16
................................................18
...........................19
......................19
Entering.Text.from.Your.Phone
Basic Setup ................................................................21
Selecting.a.Language
Activating.Personal.Ring.(Handset.only)
Activating.the.Key.Touch.Tone
Setting Up the Phonebook ........................................23
Creating.Phonebook.Entries
Finding.a.Phonebook.Entry
Editing.an.Existing.Phonebook.Entry
Storing.Caller.ID.or.Redial.Numbers.in.the.
Phonebook........................................................ 25
Deleting.a.Single.Phonebook.Entry
Deleting.all.Phonebook.Entries
Copying.Phonebook.Entries.to.Another.Station
Using the Voice Mail Service ....................................27
Resetting.the.Voice.Message.Waiting.Indicator
Customizing Your Phone ..........................................28
Changing.the.Handset.Banner.(Handset.only)
Selecting.a.Ring.Tone.(Handset.only)
Activating.AutoTalk.(Handset.only)
Activating.Any.Key.Answer.(Handset.only)
.............................................21
...............................20
................22
................................22
...................................23
....................................24
......................24
........................25
...............................25
......26
......27
.......28
....................28
.........................29
.............29
2
Page 3

Using Your Phone ......................................................30
Making.a.Call.from.the.Phonebook
Chain.Dialing.from.the.Phonebook
Switching.to.the.Handset.Speakerphone.During.a.
Call....................................................................31
Using Caller ID, Call Waiting, and Redial Lists .......32
Using.the.Caller.ID.List
Making.a.Call.from.a.Caller.ID.Record
Deleting.Caller.ID.Numbers
Using.Call.Waiting
Redialing.a.Number
Deleting.a.Redial.Record
Adjusting the Ringer, Earpiece and Speaker
Volume ...............................................................35
Adjusting.the.Ringer.Volume
Muting.the.Ringer.(One.call.only)
Adjusting.the.Earpiece.Volume
Adjusting.the.Speaker.Volume
Adjusting.the.Audio.Tone.(Handset.only)
Finding a Lost Handset .............................................37
Using Hold, Conference and Transfer ..................... 37
Placing.a.Call.on.Hold
Conferencing
Transferring.a.Call
..........................................................37
...........................................32
...................................................34
................................................34
........................................34
............................................37
..................................................38
.........................31
.........................31
...................32
....................................33
..................................35
...........................35
...............................35
................................36
................36
Using Special Features ............................................. 39
Privacy.Mode
Using.the.Intercom
Muting.the.Microphone
Tone.Dialing.Switch.Over
Installing.the.Optional.Headset
Setting Up the Answering System ........................... 41
Using.Handset.and.Base.Menus
Handset.Operation
Recording.a.Personal.Greeting
Selecting.a.Greeting
Deleting.Your.Personal.Greeting
Selecting.the.Language.for.Announcements
Setting.the.Number.of.Rings
Setting.the.Day.&.Time.(for.Base)
Setting.the.Record.Time.(or.Announce.only)
Activating.the.Message.Alert
Activating.Call.Screening.on.the.Base
Using the Answering System ................................... 46
Turning.Your.Answering.System.On.and.Off
Reviewing.Messages
Screening.Calls
Turning.Off.the.Message.Alert.Tone
Operating.the.Answering.System.While.You.Are.
Away.from.Home
..........................................................39
..................................................39
...........................................40
........................................40
...............................40
............................41
..................................................41
..............................42
...............................................42
............................43
..........43
...................................43
..........................44
..........44
..................................45
....................45
..........46
..............................................47
.......................................................48
.......................48
...............................................48
3
Page 4

Maintenance ...............................................................50
Specications..........................................................50
Battery.Information
Power.Failures
Troubleshooting ........................................................53
Common.Issues
Resetting.the.Handset
Changing.the.Line.Mode.for.Multiple.Extensions
Traveling.Out.of.Range
Liquid.Damage
Precautions! ..............................................................59
Rechargeable.Nickel-Metal-Hydride.Battery.
Warning.
Important.Safety.Instructions.
The.FCC.Wants.You.To.Know.
I.C..Notice
One Year Limited Warranty .......................................62
Index ...........................................................................63
Remote Operation Card ............................................65
...............................................................61
.................................................50
........................................................52
......................................................53
............................................55
...57
...........................................57
........................................................58
.
............................................................59
.................................59
...............................60
4
Page 5

Welcome
Thank you for purchasing a Uniden Multi-Handset phone with a waterproof, oating handset.
Note:. Illustrations.in.this.manual.are.used.for.explanation.purposes..Some.illustrations.in.this.manual.may.differ.
from.the.actual.unit.
Accessibility
Uniden.provides.a.customer.service.hotline.for.accessibility.questions..If.you.have.a.disability.and.need.customer.
service.assistance.or.if.you.have.any.questions.about.how.Uniden’s.products.can.accommodate.persons.with.
disabilities,.please.call.the.accessibility.voice/TTY.line:.1-800-874-9314.
Our.customer.care.hours.as.well.as.accessibility.information.can.be.found.on.our.website,.www.uniden.com,.under.
the.“Accessibility”.link..If.your.call.is.received.outside.of.our.business.hours,.you.can.leave.us.a.message.and.we.will.
call.you.back.
What Exactly does “Waterproof Handset” Mean?
The yellow handset complies with the JIS7 water submersion specications. This means the handset can remain
submerged.under.3.feet.of.water.for.up.to.30.minutes.without.damage.or.loss.of.functionality..
The.handset.will.still.receive.calls.even.if.it.is.under.water,.but.you.probably.won’t.be.able.to.hear.the.ringer..To.avoid.
any.accidents,.
Is the Charging Cradle Waterproof?
None of the charging cradles are waterproof:.the.yellow.charging.cradle.is.water resistant..The.yellow.cradle.uses.
a.special.method.called.magnetic.inductive.charging,.so.it.can.charge.your.handset.without.exposing.any.electronic.
components..(You.may.notice.that.the.charging.contacts.are.enclosed.in.plastic.and.there.is.no.metal.showing.).This.
charging.method.makes.the.cradle.safe.to.use.near.water.or.in.highly.humid.environments,.
to be submerged in water.
do not try to use the handset while it is still under water.
but is it not designed
Welcome
5
Page 6
7
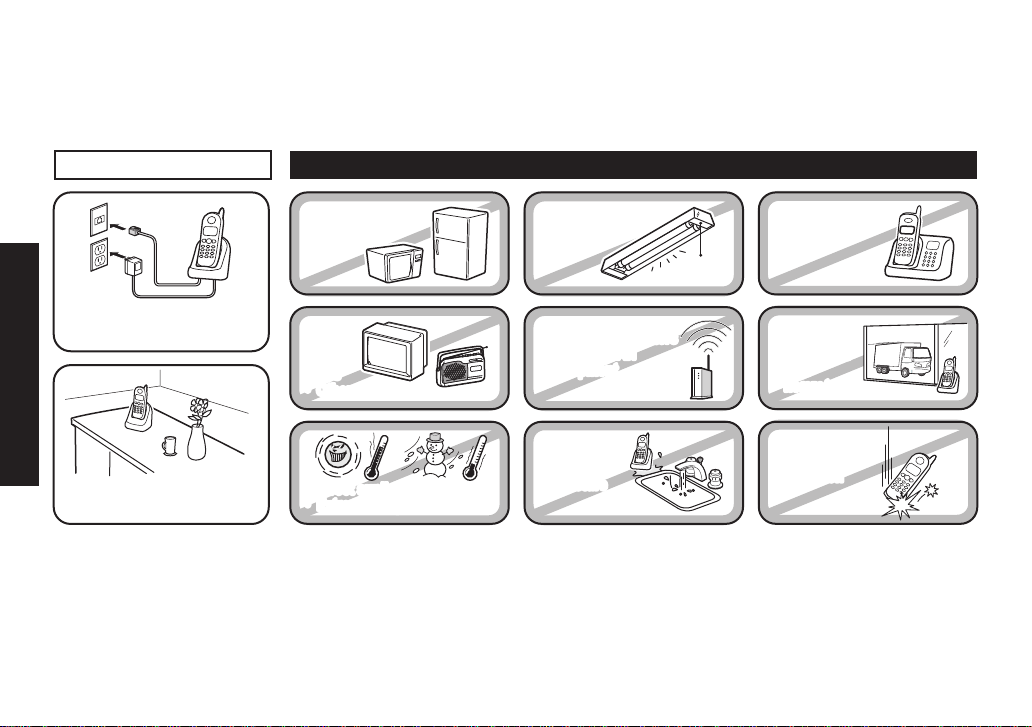
Installing the Phone
PLACE YOUR BASE
Near an AC outlet and
a telephone wall jack.
• Microwave ovens
• Refrigerators
• TVs
• Other electronics
• Direct sunlight
• Extreme temperatures
• Fluorescent
lighting
• Personal computers
• Wireless LAN
equipment
• Dust
• Excessive
moisture
• Other cordless
telephones
• A window
by a street
with
heavy traffic
• Shock
• Vibration
In a centrally-located
open area.
TRY TO AVOID
• TVs
• Other electronics
• Direct sunlight
• Extreme temperatures
• Personal computers
• Wireless LAN
equipment
• Dust
• Excessive
moisture
• A window
by a street
with
heavy traffic
• Shock
• Vibration
Choosing the Best Location
When.choosing.a.location.for.your.new.phone,.here.are.some.important.guidelines.you.should.consider:
Installing the Phone
Note:. For.maximum.range:.
•
Keep.both.the.base.and.handset.antennas.free.of.obstruction.
•
When.the.handset.is.not.in.use,.place.the.handset.in.an.upright.position.
•
Metal.and.reinforced.concrete.may.affect.cordless.telephone.performance.
6
Page 7
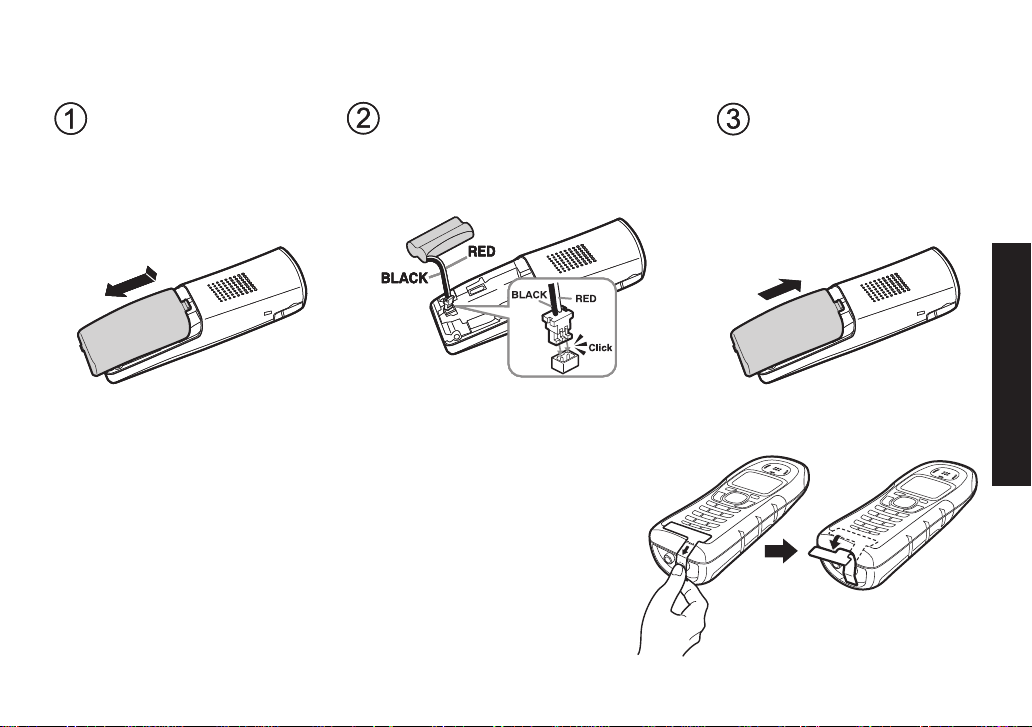
Installing the Battery
Press in on the handset
battery case cover.
Use the finger indention
for a better grip and slide
the cover downward to
remove.
Replace the battery
case cover back on the
handset and slide it
upwards until it clicks
into place.
Plug the battery cable into the
battery jack. Be sure to match the
red and black wires to the label
near the jack. The cable should
snap into place.
Gently pull on the battery cable. If the
connector comes loose, try connecting
again until the battery snaps into place.
Use.only.the.Uniden.BT-1008.rechargeable.battery.pack.supplied.with.your.cordless.telephone.
Installing the Phone
Activating the waterproof handset
The.waterproof.handset’s.battery.is.already.installed.in.the.battery.
compartment, but you have to activate it before you charge it for the rst
time.
Push.the.activation.pin.located.on.the.bottom.of.the.handset.(see.the.
1.
label.with.instructions).
Once.you.activate.the.handset,.remove.the.label.
2.
7
Page 8
9
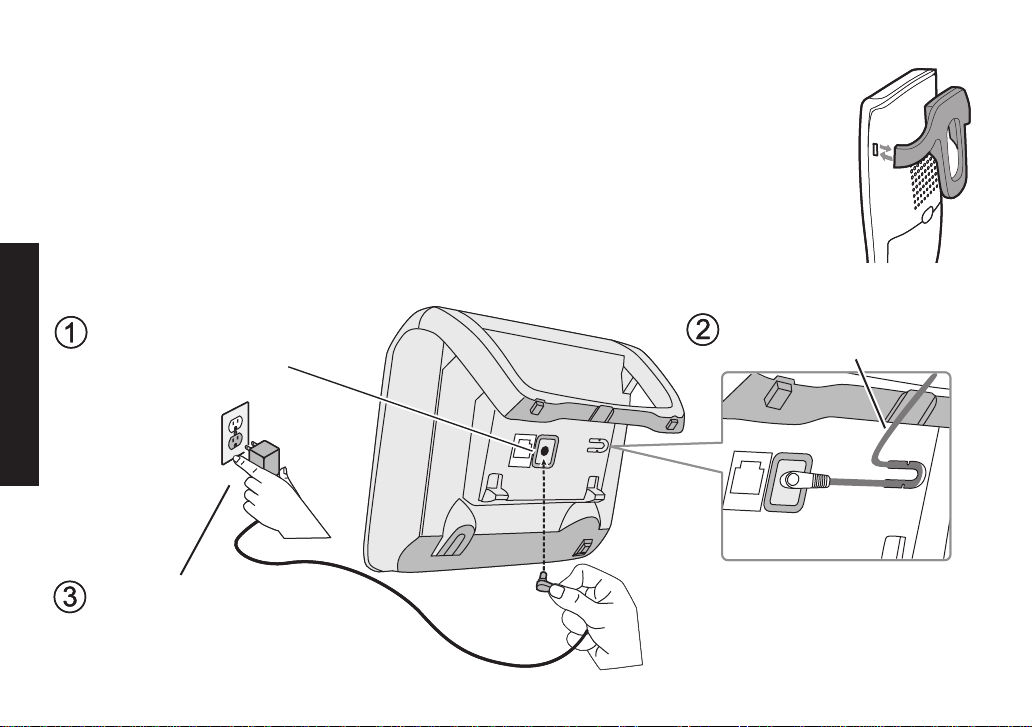
Installing the Belt Clip
Connect the large, yellowtipped AC adapter to the
base’s DC IN 9V jack.
Connect the AC adapter to a
standard 120V AC wall outlet.
DO NOT use an AC outlet
controlled by a wall switch.
Route the cord inside the
molded wiring channel.
Connect the large, yellowtipped AC adapter to the
base’s DC IN 9V jack.
Connect the AC adapter to a
standard 120V AC wall outlet.
DO NOT use an AC outlet
controlled by a wall switch.
Route the cord inside the
molded wiring channel.
Line.up.the.holes.on.each.side.of.the.handset..To.attach.the.belt.clip,.insert.into.the.holes.on.each.side.of.the.
handset..Press.down.until.it.clicks.
To remove the belt clip,.pull.either.side.of.the.belt.clip.to.release.the.tabs.from.the.holes.
Connecting the AC adapter
Base
To avoid risk of re and shock, only use the Uniden PS-0009 AC adapter supplied with your
cordless.telephone.
Installing the Phone
8
Page 9
Charger
Connect the smallest
AC adapter (labeled
PS-0011) to the
yellow charger’s
DC IN 19V jack.
Then, connect each
of the remaining AC
adapters (PS-0007)
to a regular charger’s
DC IN 9V jack.
Connect each AC adapter to a
standard 120V AC wall outlet.
DO NOT use an AC outlet
controlled by a wall switch.
Route the cord.
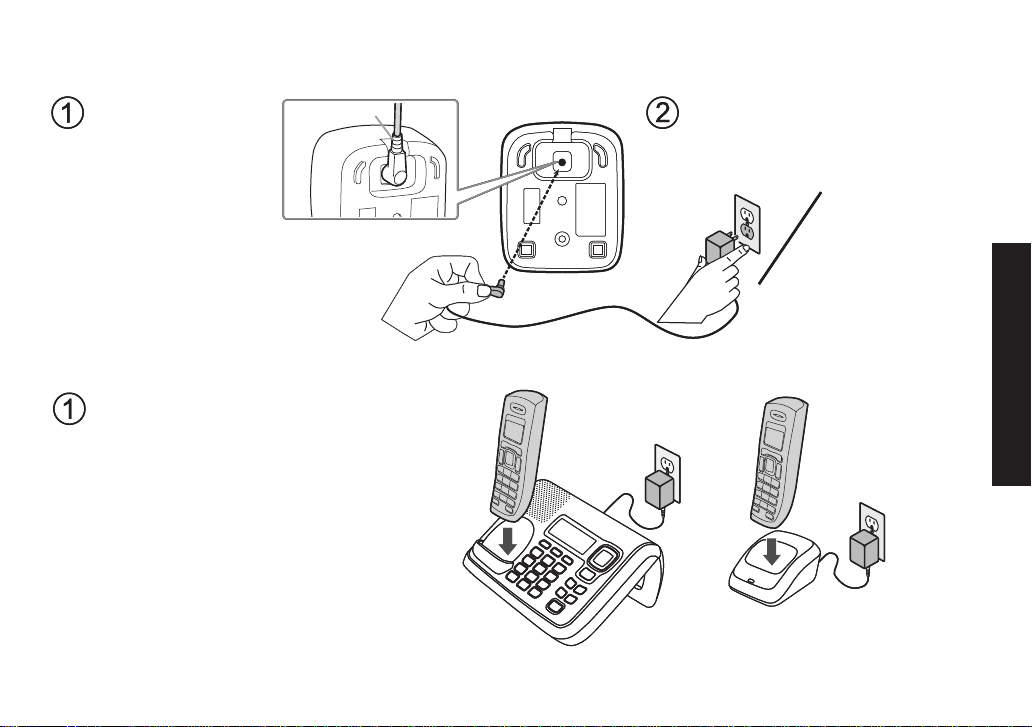
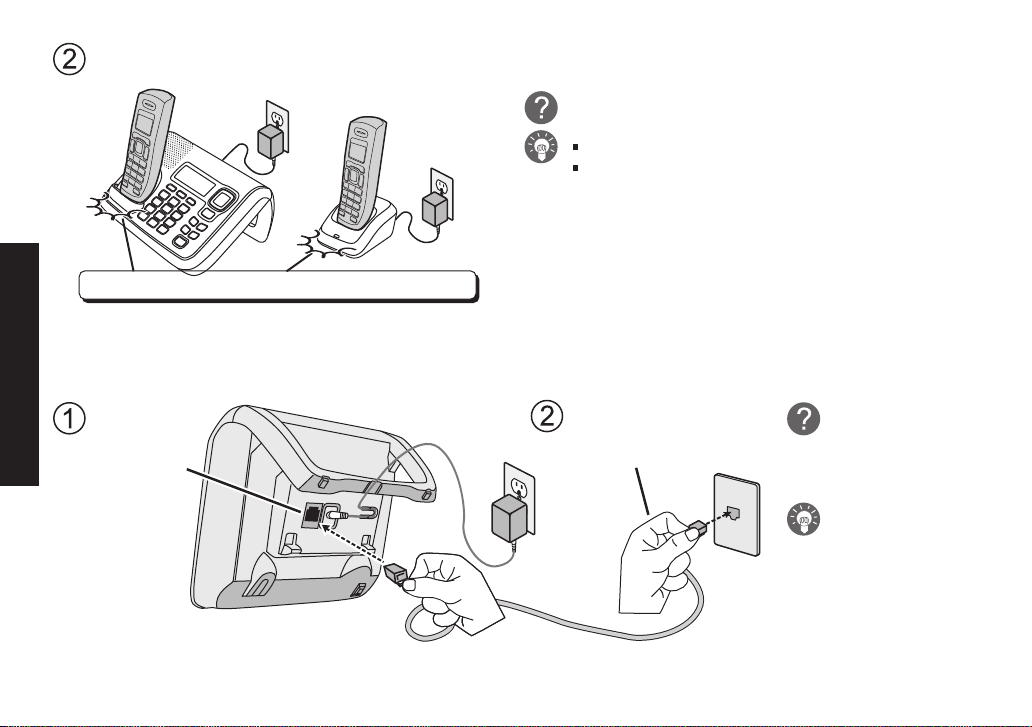
Place one handset in the base and
the others in the charging cradles
with the handset display facing
forward.
(The waterproof handset goes in the
yellow charging cradle; for the other
handsets, it doesn’t matter which one
goes in the base and which ones go
in the charging cradles.)
Place one handset in the base and
the others in the charging cradles
with the handset display facing
forward.
(The waterproof handset goes in the
yellow charging cradle; for the other
handsets, it doesn’t matter which one
goes in the base and which ones go
in the charging cradles.)
Use.only.the.Uniden.AC.adapters.supplied.with.your.phone..
Charging the Handsets
Installing the Phone
9
Page 10
11
Make sure that the charge LED illuminates.
What if the charge LED doesn’t light up?
Check the AC adapter connection.
Reseat the handset to make sure it makes
good contact with the charging contacts.
Charge your handsets completely before plugging in the phone line. The waterproof handset
need to charge for about 25 hours the first time; the others only need about 15-20 hours.
Connecting to the Phone Line
Connect the
telephone
cord to the
TEL LINE
jack.
Connect the
telephone cord to a
telephone wall jack.
What if CHECK
TEL LINE
appears on the
base display?
The telephone
cord may not be
connected
correctly. Check
the telephone
cord connection.
Make.sure.that.the.battery.pack.is.fully.charged.
Installing the Phone
10
Page 11
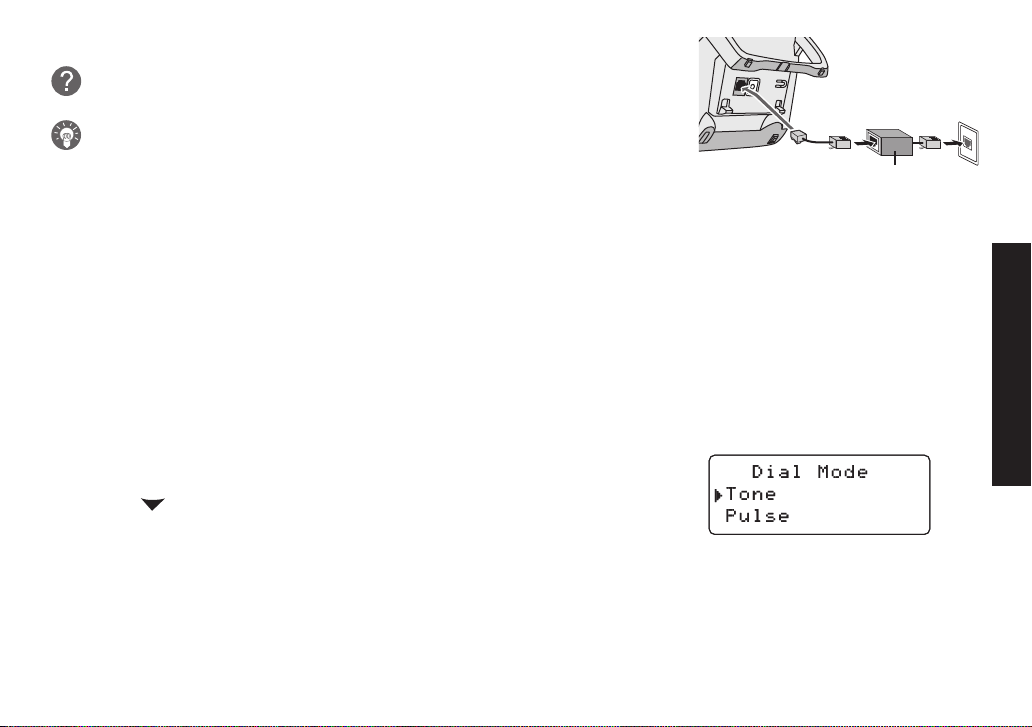
DSL Filter
Telephone cord
Telephone
wall jack
DSL filter
Do.you.have.DSL.or.any.high-speed.Internet.service.delivered.through.
your.phone.line?
Try putting a DSL lter between the base and the wall jack. Without a lter, .
telephone-line-based.Internet.services.can.interfere.with.standard.phones.
Testing the Connection
Try.making.a.call..If.your.call.does.not.connect.or.you.cannot.get.a.dial.tone,.try.the.following.steps:
Make.sure.the.AC.adapter.cord.is.securely.connected.to.the.
1.
Check.to.make.sure.the.battery.is.fully.charged..(If.you.don’t.see.the.“battery.full”.icon,.check.to.make.sure.
2.
the.battery.is.properly.connected.and.charge.again.)
Change.the.dial.mode.
3.
DC IN 9V.jack.and.a.standard.power.outlet.
Changing the Dial Mode
Your.phone.can.communicate.with.the.telephone.network.in.two.different.ways:.tone.dialing.or.pulse.dialing..These.
days,.most.base.networks.use.a.method.called.tone.dialing,.so.your.phone.comes.programmed.for.tone.dialing..If.
your.phone.company.uses.pulse.dialing,.you.will.need.to.change.your.phone’s.dial.mode..If.you.don’t.get.a.dial.tone.
or.can’t.connect.to.the.telephone.network,.please.follow.the.steps.below.to.modify.your.phone’s.settings:
Press.
1.
2.
3.
If.you.ever.need.to.change.the.dial.mode.back.to.tone.dialing,.follow.the.same.procedure,.but.select.TONE.in.step.2.
[Menu/Select]..Select.the.GLOBAL.SETUP.menu,.and.then.the.
DIAL.MODE.submenu.
Scroll.
[ ].to.highlight.PULSE.
Press.
[Menu/Select]. You will hear a conrmation tone.
NOW YOU ARE READY TO USE YOUR PHONE!
Installing the Phone
11
Page 12
13
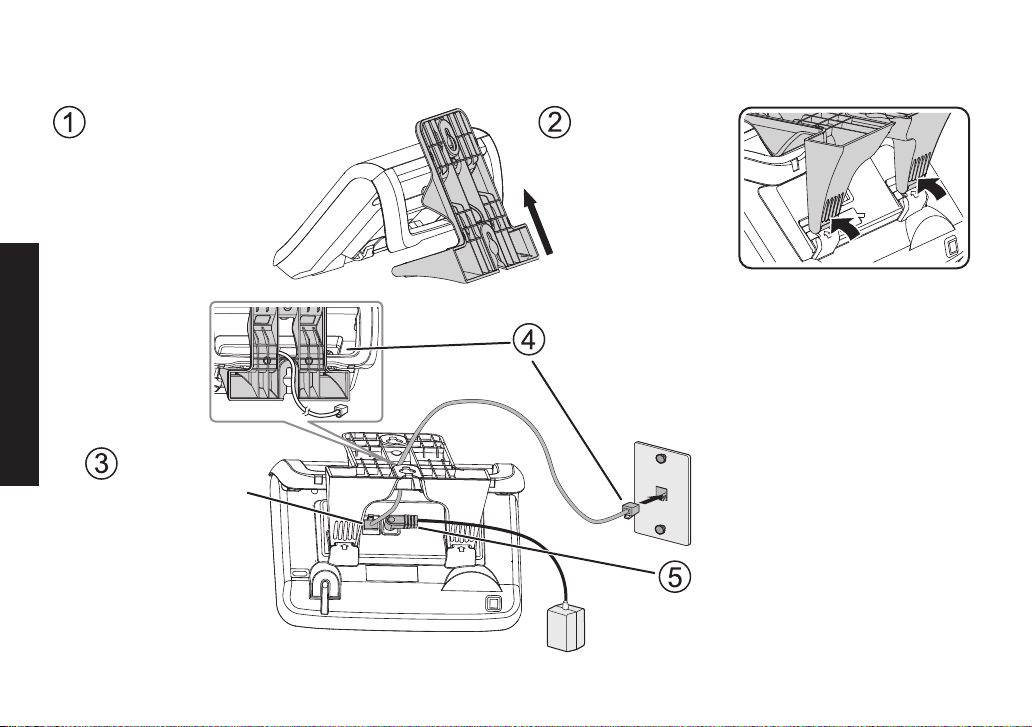
Wall Mounting the Base
Insert the two hooks on the
wall mount adapter into the
holes on the upper rear of
the base. Slide the adapter
up as far as it will go
(about 1/4 of an inch).
Gently press in
on the tabs at
the bottom of the
adapter. Slide
the bars under
the hooks on the
base.
Route the telephone cord through the hole of
the wall mount adapter, and plug the
telephone cord into the telephone wall jack.
Connect the AC adapter
to the DC IN 9V jack and
let the cord hang below
the wall mount adapter.
Connect the
telephone cord
into the TEL
LINE jack.
Wall plate
(To AC outlet)
Route the cord.
This.phone.can.be.mounted.on.any.standard.wall.plate.
Installing the Phone
12
Page 13
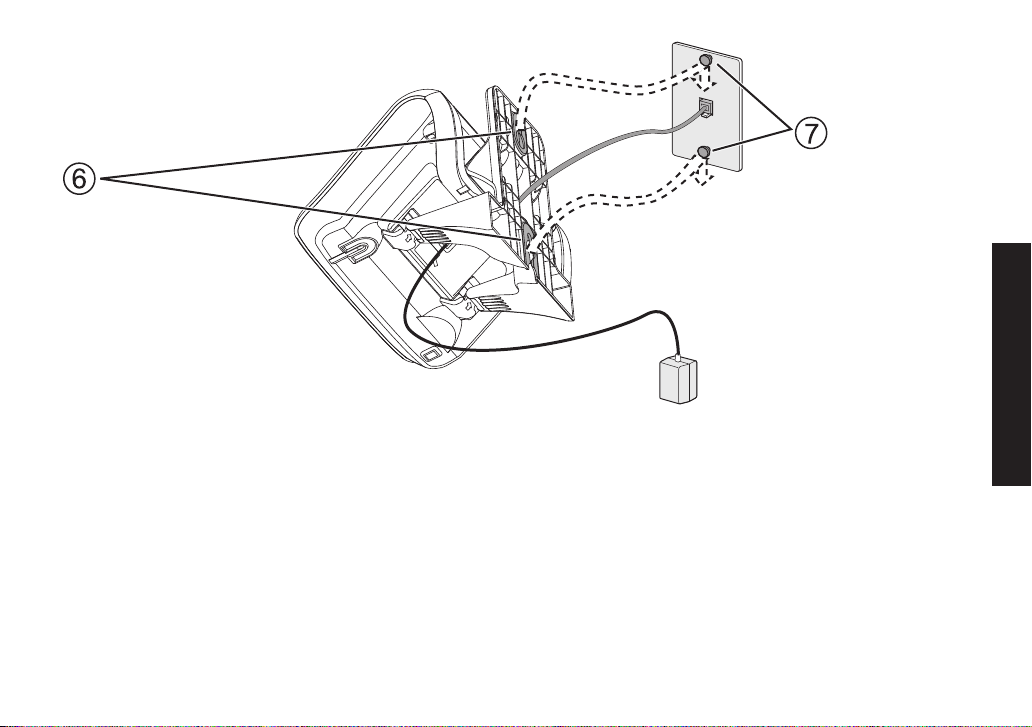
Place the
mounting slots
over the pins on
the wall plate.
Slide the base down
to lock it into place.
Wall plate
(To AC outlet)
Notes:
DO.NOT.use.an.AC.outlet.controlled.by.a.wall.switch.
•
To.mount.the.phone.directly.on.the.wall,.insert.two.#10.screws.(minimum.length.of.1.
•
the.wall,.3.
15
/16.inches.apart;.leave.the.screw.heads.1/8.inch.away.from.the.wall.to.allow.room.for.mounting.the.
phone..Be.sure.the.wall.is.capable.of.supporting.the.weight.of.the.phone,.and.use.the.proper.type.of.anchoring.
device.for.the.wall.material..No.need.to.route.the.telephone.cord.through.the.hole.of.the.wall.mount.adapter.when.
mounting.directly.on.the.wall.
3
/8.inches,.not.supplied).into.
13
Installing the Phone
Page 14

15
Product Overview
Features
1.9GHz.DECT6.0.System
•
Floating,.waterproof.handset.included
•
Integrated.Digital.Answering.System
•
Caller.ID/Call.Waiting
•
Base.Keypad
•
Advanced.Phonebook.Features:
•
Store.70.Phonebook.Entries.on.Base.&.each.
•
Handset
Alphabetical.Search
•
Personalized.Ring.by.Party.(on.Handset)
•
Transfer.Single.Listing.or.Entire.Phonebook
•
Answering System Features
•
Digital.Tapeless.Recording
•
Up.to.14.Minutes.of.Recording.Time
•
Call.Screening
Personal.or.Pre-recorded.Outgoing.Messages
•
Bilingual.Voice.Prompts.
•
(for.US.models:.English.and.Spanish,
for.Canadian.models:.English.and.French)
.
.
Store.30.Caller.ID.Numbers.on.Base.&.each.Handset
•
Speakerphone.on.Base.&.Handset
•
7.Ringer.Options.on.Handset.(3.Tones/4.Melodies)
•
Last.5.Number.Redial
•
Bilingual.Menu.Displays
•
(for.US.models:.English.and.Spanish,
for.Canadian.models:.English.and.French)
Call.Transfer
•
Conferencing
•
Intercom
•
•
Day.and.Time.Announcement
•
Remote.Message.Retrieval
•
Toll.Saver
•
Message.Alert
Records.Up.to.59.messages
•
.
.
Product Overview
14
Page 15
Terminology Used in this Manual
Standby
CID
CID/CW or
CIDCW
Base The.main.part.of.the.phone.that.connects.to.your.phone.line.and.lets.you.make.and.receive.calls.
Charger A.cradle.that.charges.the.handset.battery..It.connects.to.power.but.does.not.connect.to.a.phone.line.
Global
Settings
Station
Talk A.telephone.line.has.been.activated.on.the.handset.or.base,.enabling.a.dial.tone...
The.handset.and.the.base.are.not.in.use..If.the.handset.is.on.the.cradle.or.
[ ].on.the.base.is.not.pressed,.no.line.has.been.activated..No.dial.tone.is.present..
Caller.ID.is.available.from.your.Telephone.provider.and.is.offered.to.users.on.a.subscription.basis.
With.this.service,.you.will.be.able.to.see.the.incoming.caller.information.such.as.name.and.phone.number..
Caller.ID.with.Call.Waiting.is.available.by.subscription.from.your.Telephone.provider.
With.this.service,.you.will.be.able.to.view.incoming.caller.information.while.on.a.call.with.another.user.
This.term.relates.to.feature.settings.that.will.apply.to.all.registered.handsets.and.the.base.
These.features.are.available.by.selecting."GLOBAL.SETUP".in.the.handset.or.the.base.menu..Only.one.
handset.or.the.base.can.change.global.settings.at.a.time,.and.you.have.to.make.sure.the.phone.is.not.
currently.being.used..
Any.handset.or.the.base.
[ /ash].or.[ ].on.the.handset.or.
Manual Conventions
This.manual.uses.several.different.type.styles.to.help.you.distinguish.between.different.parts.of.the.phone:
Bold.text.with.“[ ]”.indicates.a.key.or.button.on.the.phone
•
ALL CAPITALS indicates text on the display, such as menu options, prompts, and conrmation messages
•
•
lower case bold.text.indicates.a.status.light.on.the.phone
•
ALL CAPITALS BOLD.indicates.a.connection.jack.on.the.base.or.charger
Product Overview
15
Page 16
17
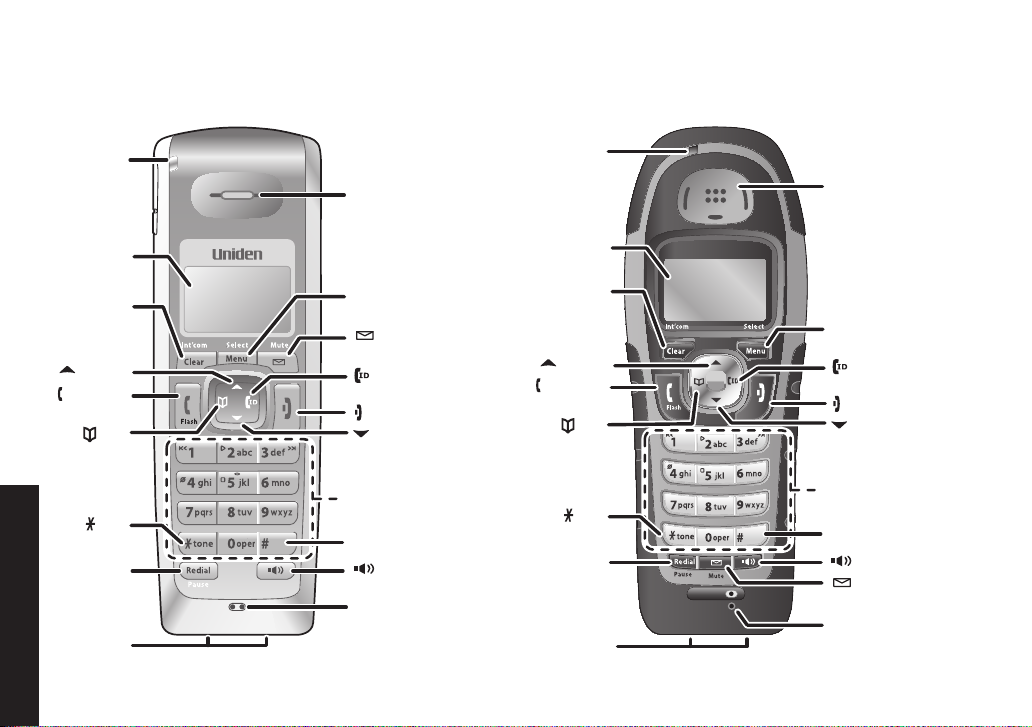
Parts of the Phone
new
message
LED
Earpiece
Display
(LCD)
[Clear/
Int’com]
key (clear/
intercom)
[ ] key (up)
[ /Flash] key
(talk/flash)
[ ] key
(phonebook/
left)
[ /tone]
key
[Redial/
Pause]
key
[Menu/Select]
key
[ /Mute] key
(messages/mute)
[ ] key
(caller ID/right)
[ ] key (end call)
[ ] key (down)
[#] key
[ ] key
(speaker)
Microphone
Charging
contacts
Twelve-key
dial pad
[ /Mute] key
(messages/mute)
new
message
LED
Earpiece
Display
(LCD)
[Clear/
Int’com]
key (clear/
intercom)
[ ] key (up)
[ /Flash] key
(talk/flash)
[ ] key
(phonebook/
left)
[ /tone]
key
[Redial/
Pause]
key
[Menu/Select]
key
[ ] key
(caller ID/right)
[ ] key (end call)
[ ] key (down)
[#] key
[ ] key (speaker)
Microphone
Charging
contacts
Twelve-key
dial pad
The.following.illustrations.show.you.all.of.the.different.parts.of.your.phone.
Handset
Product Overview
16
Waterproof handset
Page 17
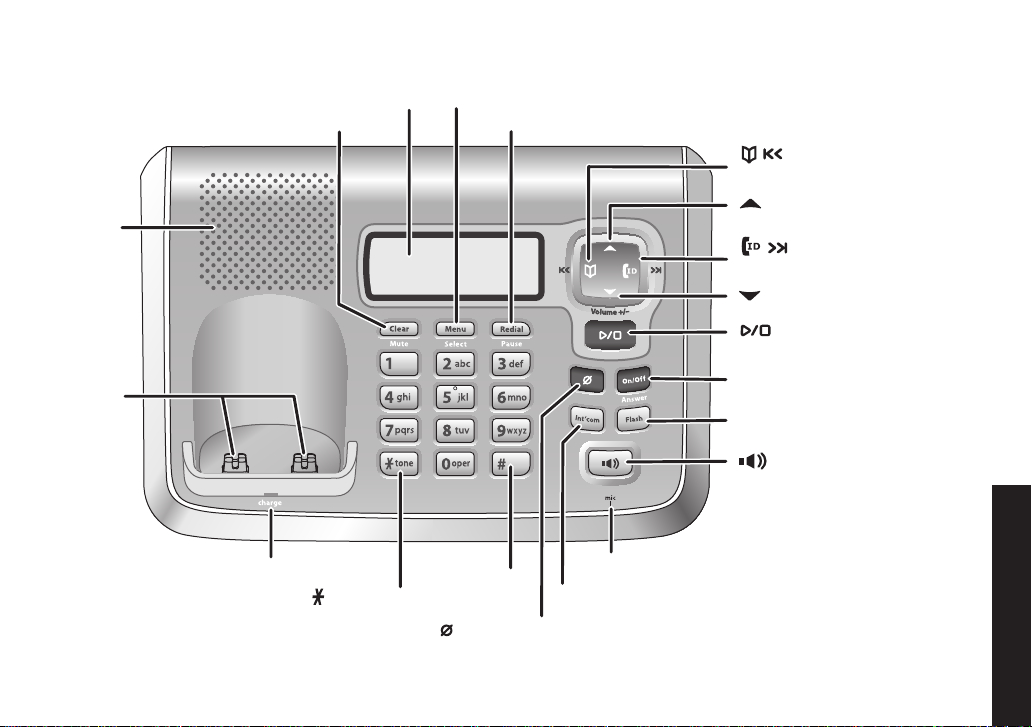
[Answer on/off] key
(answering system on/off)
[Flash] key
[ ] key and LED (speaker)
[ ] key (up)
[ ] key (down)
[ / ] key
(phonebook/repeat/left)
[ / ] key
(caller ID/skip/right)
[ ] key and LED (play/stop)
[Redial/Pause] key
[Menu/Select] key
[Clear/Mute] key
Base display (LCD)
[Int'com] key (intercom)
Base
speaker
Base
charging
contacts
charge LED
[#] key
Base microphone
[ /tone] key
[ ] key (delete)
Base
17
Product Overview
Page 18
19
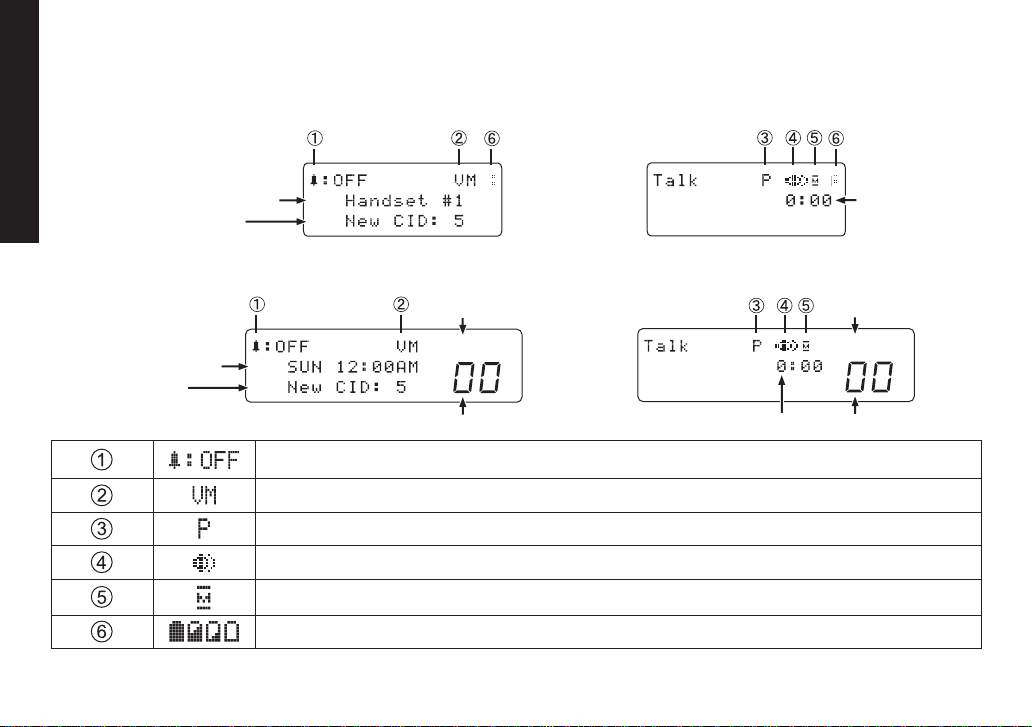
Using the Interface
Handset ID and banner
Number of new
Caller ID calls received
Call duration
In standby During a call
Status of your
answering system
Message counter
Day of the week
and time
Number of new
Caller ID calls received
Answer ON OFF
Status of your
answering system
Message counter
Call duration
Answer ON OFF
In standby During a call
Reading the Display
Handset
Using the Interface
Base
The.ringer off.icon.indicates.that.the.ringer.is.turned.off.
The.voice mail.icon.appears.when.you.have.messages.waiting.in.your.voice.mailbox.
The.privacy.icon.appears.when.the.Privacy.Mode.is.turned.on.
The.speaker.icon.appears.when.the.speaker.phone.is.in.use.
The.mute.icon.appears.while.the.microphone.is.muted.
The.battery.icon.indicates.the.handset.battery.status:.full,.medium,.low,.and.empty.
18
Page 19
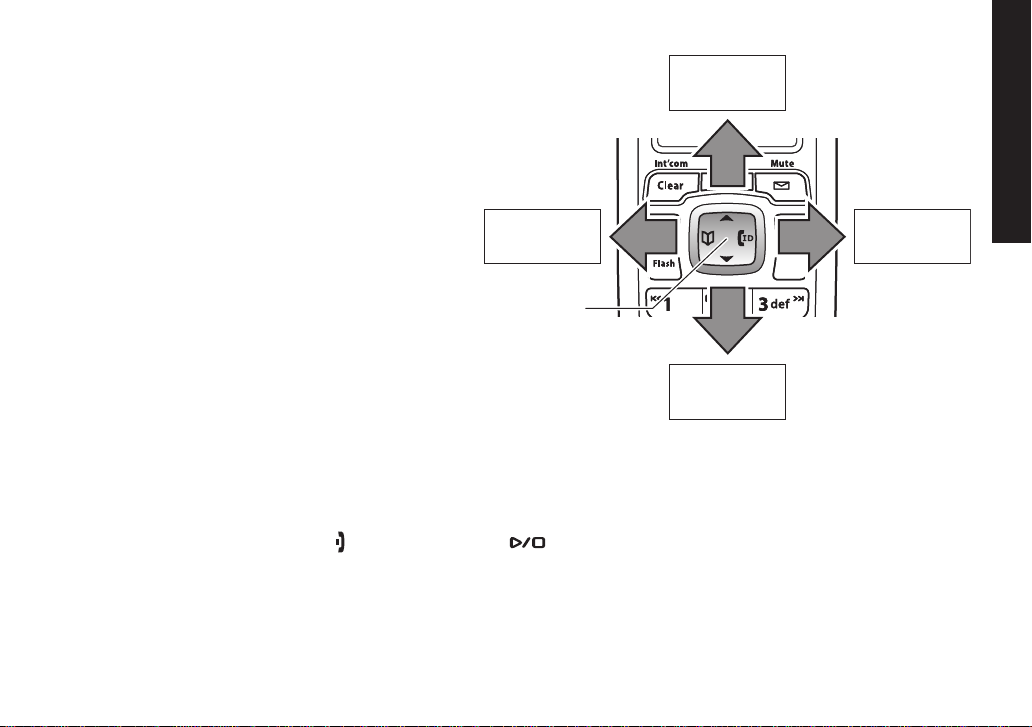
Using the Four-way Function Key
View the
phonebook
Four-way
Function Key
Up
View the
Caller ID
Down
View the
phonebook
Four-way
Function Key
Up
View the
Caller ID
Down
Your.handset.and.base.have.a.four-way.function..
key.that.allows.you.to.move.the.cursor.or.pointer.
on.the.display.and.access.the.most.commonly.
used.features.at.the.touch.of.a.button..By.moving.
this.key.to.the.left,.you.open.the.phonebook..
Move.the.key.to.the.right.to.access.Caller.ID.
information..To.use.this.four-way.key,.place.your.
thumb.over.the.key.on.the.station.and.move.to.the.
four.positions.to.get.the.feel.of.how.it.moves.and.
operates.
Using the Handset and Base Menus
To.open.the.menu,.press.[Menu/Select]..Highlight.the.option.you.want.by.pressing.the.four-way.function.key..This.
will.move.the.cursor;.the.option.currently.highlighted.has.a.triangle.beside.it..Activate.the.highlighted.option.by.
pressing.
menu.and.return.to.standby,.press.
If.you.do.not.press.a.key.within.thirty.seconds,.the.phone.will.time.out.and.exit.the.menu..When.setting.the.day.and.
time,.the.time-out.period.is.extended.to.two.minutes.
Note:. For.ANSW..SETUP,.GLOBAL.SETUP,.DAY.&.TIME.and.REGISTER.HANDSET.(base.only).menu.options,.
[Menu/Select]..To.go.back.to.the.previous.screen,.press.[left].on.the.four-way.function.key..To.exit.the.
[ ].on.the.handset.or.[ ].on.the.base.
make.sure.the.line.is.not.in.use.and.the.handsets.are.within.range.of.the.base.
Using the Interface
19
Page 20
Entering Text from Your Phone
You.can.use.the.number.keypad.on.your.handset.or.base.to.enter.text.by.referring.to.the.letters.printed.on.each.
number key. When you press the number key in a text entry eld, the phone displays the rst letter printed on the
number.key..Press.the.number.key.twice.to.display.the.second.letter.and.three.times.to.display.the.third..Capital.
letters are displayed rst, then lower case letters, and then the number on the key.
If two letters in a row use the same number key, enter the rst letter, then use [right] on.the.four-way.function.key.to.
move.the.cursor.to.the.next.position.to.enter.the.second.letter..
Using the Interface
For.example,.to.enter.the.word.“Movies”:.
Press.
1)
2)
3)
4)
5)
6)
7)
8)
If.you.make.a.mistake.while.entering.a.
name,.use.
way.function.key.to.move.the.cursor.to.the.
incorrect.character..Press.
on.the.handset.or.
to.erase.the.wrong.character,.and.then.enter.the.correct.character..To.delete.all.characters,.press.and.hold.
Int’com].on.the.handset.or.[Clear/Mute].on.the.base.
Note:. When.you.enter.the.text.on.the.handset,.you.can.also.use.
[6].once.to.enter.M.
Use.
[right].on.the.four-way.function.
key.to.move.the.cursor.to.the.right.
Press.
[6].six.times.to.enter.o.
Press.
[8].six.times.to.enter.v.
Press.
[4].six.times.to.enter.i.
Press [3] ve times to enter e.
Press.
[7].eight.times.to.enter.s.
Press.
[Menu/Select].to.end.your.text.
entry.
[right] or.[left] on.the.four-
[Clear/Int’com].
[Clear/Mute].on.the.base.
move.the.cursor.to.left.
[Clear/
[#].to.move.the.cursor.to.right.and.[*/tone].to.
20
Page 21
Basic Setup
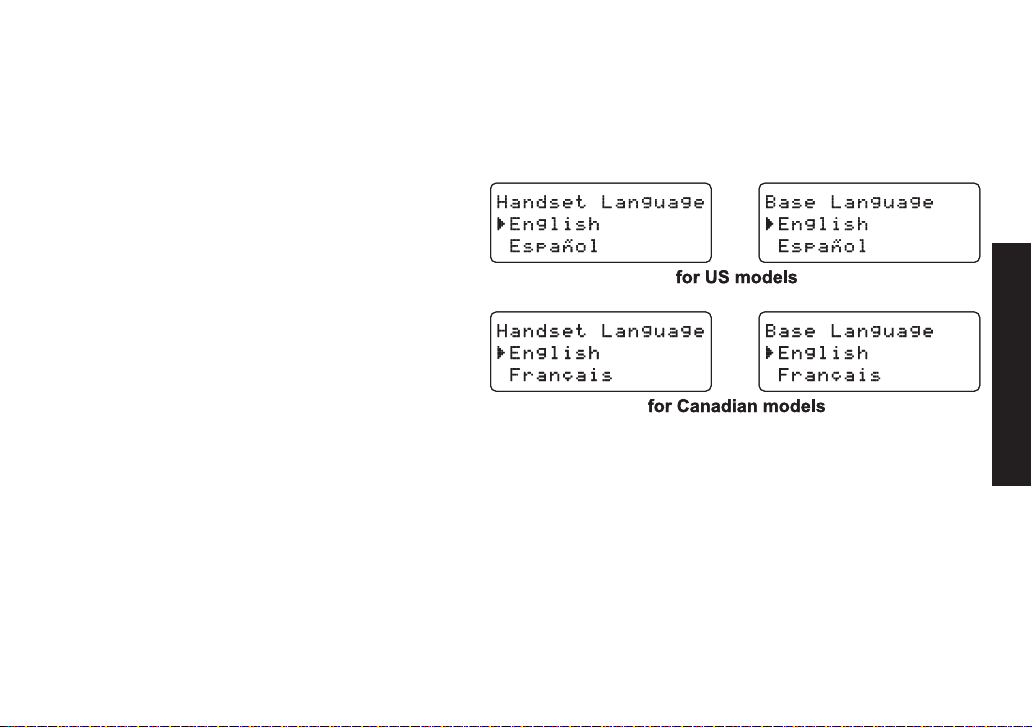
Selecting a Language
Each.station.supports.two.languages:.English.and.Spanish.for.US.models.or.English.and.French.for.Canadian.
models..Once.you.select.a.language,.the.menus.on.the.station.will.display.in.that.language..The.default.language.is.
English.
Press.
1)
2)
3)
[Menu/Select]...
Select.the.HANDSET.SETUP.or.BASE.
SETUP.menu,.and.then.the.HANDSET.
LANGUAGE.or.BASE.LANGUAGE.submenu.
Move.the.cursor.to.choose.a.language.
for US models:..
Choose.ENGLISH.or.ESPAÑOL.(Spanish)
for Canadian models:..
Choose.ENGLISH.or.FRANÇAIS.(French).
Press.
[Menu/Select]...
You will hear a conrmation tone.
.
..
Basic Setup
21
Page 22

Activating Personal Ring (Handset only)
You.can.assign.special.ringer.tones.to.anyone.in.your.phonebook..When.your.phone.gets.a.call,.it.looks.up.the.
Caller.ID.information.in.your.phonebook..If.you’ve.assigned.a.personal.ringer.to.that.number,.the.phone.uses.it.so.
you.know.who.is.calling..To.turn.the.personal.ringing.on.or.off,.follow.these.steps:
Press.
1)
2)
3)
[Menu/Select]..Select.the.HANDSET.SETUP.menu,.and.then.
the.PERSONAL.RING.submenu.
Move.the.cursor.to.select.ON.or.OFF.
Press.
[Menu/Select]. You will hear a conrmation tone.
Activating the Key Touch Tone
Key.Touch.Tone.is.the.tone.your.keypad.makes.when.keys.are.pressed..You.can.turn.this.tone.on.or.off.
Press.
1)
2)
3)
Basic Setup
[Menu/Select]..Select.the.HANDSET.SETUP.or.BASE.SETUP.
menu,.and.then.the.KEY.TOUCH.TONE.submenu.
Move.the.cursor.to.select.ON.or.OFF.
Press.
[Menu/Select]. You will hear a conrmation tone.
22
Page 23

Setting Up the Phonebook
Your.handset.and.base.can.store.up.to.seventy.names.and.numbers.in.your.phonebook..When.all.the.phonebook.
entries.are.full,.you.will.hear.a.beep.and.MEMORY.FULL.appears..You.cannot.store.any.additional.names.and.
numbers.unless.you.delete.some.of.the.existing.ones.
You.can.also.use.the.phonebook.entries.to.store.a.group.of.numbers.(up.to.twenty.digits).that.you.may.need.to.enter.
once.your.call.connects..This.is.referred.to.as.chain.dialing..See.Chain.Dialing.from.the.Phonebook.on.
Creating Phonebook Entries
To.store.names.and.numbers.in.your.phonebook,.please.follow.these.steps:
When.the.phone.is.in.standby.mode,.press.[ ].(on.the.left.side.of.the.four-way.key).
1)
page.31.
2)
To.create.a.new.phonebook.entry,.press.
CREATE.NEW.menu..EDIT.NAME.appears.
Enter the name for this entry (EDIT NAME)..
3)
Use.the.keypad.to.enter.a.name.for.this.entry;.the.name.can.contain.up.to.sixteen.characters..(See.Entering.
Text.from.Your.Phone.on.
entry,.your.phone.will.store.this.entry.as.<NO.NAME>..Press.
Enter the number for this entry (EDIT NUMBER).
4)
Once.you.have.stored.a.name,.EDIT.NUMBER.appears.next..Use.the.
number.keypad.to.enter.the.phone.number;.the.phone.number.can.contain.
up.to.twenty.digits..If.you.need.the.phone.to.pause.between.digits.when.it’s.
dialing.(for.example,.to.enter.an.extension.or.an.access.code),.press.
Pause].to.insert.a.two-second.pause..You.will.see.a.P.in.the.display..You.can.
also.use.more.than.one.pause.together.if.two.seconds.is.not.long.enough..
Each.pause.counts.as.one.digit..Press.
page.20.for.instructions.on.entering.text.).If.you.do.not.want.to.enter.a.name.for.this.
[Menu/Select]..Select.the.
.
[Menu/Select] when you are nished.
[Redial/
[Menu/Select] when you are nished.
23
Setting Up the Phonebook
Page 24

25
Assign a personal ring tone for this entry (PERSONAL RING) (Handset only).
5)
You.can.attach.a.special.ring.tone.to.each.phonebook.entry.on.the.handsets;.
the.phone.will.use.this.ring.tone.when.this.person.calls..Use.
select.one.of.the.seven.different.ring.tone.options.(see.Selecting.a.Ring.Tone
on.
page.28.for.a.complete.list.of.ring.tones)..As.you.scroll.through.the.tones,.
you.will.hear.a.sample.of.each.tone.(unless.the.handset.ringer.volume.is.set.
to.off)..When.you.hear.the.ring.tone.you.want.to.use,.press.
you.do.not.want.to.use.a.personal.ring.tone.for.this.phonebook.entry,.choose.
NO.SELECTION;.the.phone.will.use.your.standard.ring.tone.setting.
You will hear a tone conrming that the new entry has been stored, and DONE! appears in the display.
6)
[ ].and.[ ]..to.
[Menu/Select]..If.
Finding a Phonebook Entry
Press.[ ].to.open.the.phonebook..Phonebook.entries.are.stored.in.alphabetical.order..To.scroll.through.the.
phonebook.from.A.to.Z,.press.
You.can.also.use.the.letters.on.the.number.keys.to.jump.to.a.name.that.starts.with.that.letter..For.example,.to.search.
for.an.entry.beginning.with.the.letter.M,.press.
letter.you.entered;.you.can.then.use.
To.close.the.phonebook.and.return.to.standby,.press.
a.phonebook.entry.during.a.call.and.want.to.close.the.phonebook,.press.
[ ]..To.scroll.trough.the.phonebook.from.Z.to.A.press.[ ].
[6] once. The phonebook jumps to the rst entry that begins with the
[ ].and.[ ].to.scroll.to.other.entries.
[ ].on.the.handset.or.[ ].on.the.base..If.you.are.looking.up.
[ ].again.instead.of.[ ].or.[ ].
Editing an Existing Phonebook Entry
When.the.phone.is.in.standby,.press.[ ].to.open.the.phonebook.
1)
Find.the.entry.you.want.to.edit.and.press.
2)
Select.EDIT..Follow.the.steps.for.Creating.Phonebook.Entries.on.
3)
information.at.any.step,.simply.press.
[Menu/Select].
page.23..If.you.do.not.wish.to.change.the.
[Menu/Select].to.go.to.the.next.step.
Setting Up the Phonebook
24
Page 25

Storing Caller ID or Redial Numbers in the Phonebook
You.can.store.Caller.ID.records.or.redial.numbers.in.the.phonebook.so.you.can.use.them.later..Go.to.the.Caller.ID.or.
redial.list.and.select.the.number.you.want.to.store..(If.the.Caller.ID.information.did.not.include.the.number,.then.you.
will.not.be.able.to.store.it.)
When.the.phone.is.in.standby,.press.
1)
Use.
2)
3)
4)
[ ].and.[ ] .to.scroll.through.the.Caller.ID.records.or.redial.numbers..When.you.come.to.the.information.
you.want.to.store,.press.
Select.STORE.INTO.PB..EDIT.NAME.appears..If.the.phone.number.is.already.stored.in.memory,.you.will.hear.a.
beep, and THIS DATA IS ALREADY SAVED! appears in the display. The number will not be stored.
Continue.by.following.the.steps.for.Creating.Phonebook.Entries.on.
[Menu/Select]..
[ ].to.open.the.Caller.ID.list.or.[Redial/Pause].to.open.the.redial.list.
page.23.
Deleting a Single Phonebook Entry
When.the.phone.is.in.standby,.press.[ ].
1)
Find.the.entry.that.you.want.to.delete.and.press.
2)
Select.DELETE..DELETE.ENTRY?.appears.in.the.display.
3)
Move.the.cursor.to.select.YES.
4)
Press.
5)
[Menu/Select]. You will hear a conrmation tone, and DELETED! appears
in.the.display..
[Menu/Select]..
Deleting all Phonebook Entries
When.the.phone.is.in.standby,.press.[ ].
1)
Press.
2)
3)
4)
[Menu/Select],.and.then.select.DELETE.ALL..DELETE.ALL?.appears.in.
the.display.
Move.the.cursor.to.select.YES.
Press.
[Menu/Select]. You will hear a conrmation tone, and DELETED! .
appears.in.the.display.
Setting Up the Phonebook
25
Page 26

Copying Phonebook Entries to Another Station
You.can.transfer.phonebook.entries.from.one.station.to.another.without.having.to.re-enter.names.and.numbers..You.
can.transfer.one.phonebook.entry.at.a.time.or.all.phonebook.entries.at.once.
When.the.phone.is.in.standby,.press.
1)
To copy one entry, nd the phonebook entry you want to copy. Press [Menu/Select],.and.then.select.COPY..
2)
To.copy.all.entries,.press.
Move.the.cursor.to.select.the.station.which.you.want.to.transfer.the.entries.to.and.then.press.
3)
[Menu/Select],.and.then.select.COPY.ALL.
If.you.select.COPY.ALL,.ARE.YOU.SURE?.appears.on.the.display.screen..Move.the.cursor.to.select.YES,.and.
then.press.
The.phonebook.entries.will.be.transferred.to.the.designated.station..During.the.copy.process,.the.receiving.
4)
[Menu/Select].
station.shows.RECEIVING.and.the.ID.of.the.sending.station.
When the transfer is completed, DONE! appears on the station.
5)
Note:. . If.your.phonebook.contains.seventy.entries,.you.cannot.store.any.new.phonebook.entries..You.will.hear.a.
beep,.and.NOT.ENOUGH.MEMORY.IN.RECEIVING.UNIT.appears.on.the.display..If.the.selected.station.is.
out.of.range.or.data.transfer.is.cancelled,.UNAVAILABLE.appears.in.the.display..Phonebook.listings.will.not.
be.transferred.
[ ]..
[Menu/Select].
.
Setting Up the Phonebook
26
Page 27

Using the Voice Mail Service
If.you.subscribe.to.a.voice.mail.service,.you.can.use.your.phone.to.access.your.voice.mailbox..The.new message.
LED on the handset ashes and .appears.in.the.handset.and.base.display.whenever.you.have.messages.waiting.
in.your.voice.mailbox..When.you.subscribe.to.the.service,.your.voice.mail.provider.provides.you.with.the.access.
number.and.the.required.voice.mail.signaling.tone..You.can.use.your.phonebook.to.store.the.access.number.
Resetting the Voice Message Waiting Indicator
When.you.receive.a.new.voice.mail.message,.the.new message LED on the top of the handset ashes and ..
appears.in.the.handset.and.base.display..In.the.event.your.message.alert.tone.gets.out.of.sync.with.your.phone.
company’s.voice.messaging.system,.you.can.reset.back.to.its.original.“no.messages.waiting”.state.
On.the.base,.press.
1)
Move.the.cursor.to.select.YES.or.NO.
2)
Press.
3)
[Menu/Select]. You will hear a conrmation tone.
[Menu/Select]..Select.the.GLOBAL.SETUP.menu,.and.then.the.VMWI.RESET.submenu.
Voice Mail Service
Using the
27
Page 28

2929
Customizing Your Phone
Changing the Handset Banner (Handset only)
Each.handset.will.display.a.banner.name.once.it.is.registered.to.the.base..The.default.banner.is.Handset.#1,.
Handset.#2,.etc..You.can.change.the.name.your.phone.displays.by.changing.the.banner.display..If.you.have.more.
than one handset, the banner name identies your handset.
Press.
1)
2)
3)
[Menu/Select]..Select.the.HANDSET.SETUP.menu,.and.then.the.BANNER.submenu.
Use.the.keypad.to.enter.or.edit.the.banner.name..(See.Entering.Text.from.Your.Phone.on.page.20.for.detailed.
instructions.on.entering.text.)
Press.
[Menu/Select]. You will hear a conrmation tone.
Selecting a Ring Tone (Handset only)
You.may.choose.from.four.melodies.or.three.tones.for.your.
.phone’s.primary.ring.tone..Each.handset.can.use.a.different.
ring.tone.or.melody..The.available.ring.tones.are.as.listed:
Press.
1)
Customizing Your Phone
2)
[Menu/Select]..Select.the.HANDSET.SETUP.
menu,.and.then.the.RINGER.TONES.submenu.
Move.the.cursor.to.select.a.ring.tone..As.each.ring.tone.is.highlighted,.you.will.
hear.a.sample.(unless.the.handset.ringer.volume.is.set.to.off).
When.you.hear.the.tone.you.want.to.use,.press.
3)
[Menu/Select]..You.will.hear.a.
conrmation tone.
2828
Melodies
Melodies
Flicker
Fur.Elise.(ELISE)
Fur.Elise.(ELISE)
We.Wish.You.A.Merry Clatter
We.Wish.You.A.Merry Clatter
Christmas.(MERRY-XMAS) Wake.Up
Christmas.(MERRY-XMAS) Wake.Up
Aura.Lee.(AURA.LEE)
Aura.Lee.(AURA.LEE)
Star.Spangled.Banner
Star.Spangled.Banner
(STAR.SPNGL)
(STAR.SPNGL)
Tones
Tones
Flicker
Page 29

Activating AutoTalk (Handset only)
AutoTalk.allows.you.to.answer.the.phone.simply.by.picking.up.the.handset.from.the.cradle..You.do.not.have.to.press.
a.button.to.answer.the.call.
Press.
1)
2)
3)
[Menu/Select]..Select.the.HANDSET.SETUP.menu,.and.then.the.
AUTOTALK.submenu.
Move.the.cursor.to.select.ON.or.OFF.
Press.
[Menu/Select]. You will hear a conrmation tone.
Activating Any Key Answer (Handset only)
Any.Key.Answer.allows.you.to.answer.the.phone.by.pressing.any.key.on.the.dial.pad..
Press.
1)
2)
3)
[Menu/Select]..Select.the.HANDSET.SETUP.menu,.and.then.the.ANY.KEY.
ANSWER.submenu.
Move.the.cursor.to.select.ON.or.OFF.
Press.
[Menu/Select]. You will hear a conrmation tone.
2929
Customizing Your Phone
Page 30

31
Using Your Phone
Making
a call
Answering
a call
Hanging
up
From the base speakerphone From a cordless handset
Pick.up.the.handset.from.
1)
the.cradle.
Press.
1)
2)
3)
OR
1)
2)
Press.
Press.
[ ].
Listen.for.the.dial.tone.
Dial.the.number.
Dial.the.Number.
Press.
[ ].
[ ].
[ ].
Press.
2)
3)
4)
OR
1)
2)
3)
1)
2)
Press.
[ /Flash].
Listen.for.the.dial.tone.
Dial.the.number.
Pick.up.the.handset.from.
the.cradle.
Dial.the.number.
Press.
[ /Flash].
Pick.up.the.handset..(If.
AutoTalk.is.on,.the.phone.
will.answer.when.you.pick.
up.the.handset.from.the.
cradle.)
Press.
[ /Flash]..(If.Any.Key.
Answer.is.on,.you.can.also.
press.any.key.on.the.dial.
pad.)
[ ].or.return.the.handset.to.the.cradle.
From a handset
speakerphone
Pick.up.the.handset.from.
1)
the.cradle.
Press.
2)
3)
4)
OR
1)
2)
3)
1)
2)
[ ].
Listen.for.the.dial.tone.
Dial.the.number.
Pick.up.the.handset.from.
the.cradle.
Dial.the.number..
Press.
[ ].
Pick.up.the.handset..
Press.
[ ].
Using Your Phone
30
Page 31

Making a Call from the Phonebook
When.the.phone.is.in.standby,.press.[ ].to.open.the.phonebook.
1)
Find.the.phonebook.entry.you.want.to.call.(see.Finding.a.Phonebook.Entry.on.
2)
Press.
3)
Note:. You.can.also.press.
[ /Flash].or.[ ].on.the.handset.or.[ ].on.the.base.to.dial.the.number.
When.you.come.to.the.phone.number.you.want.to.dial,.press.
[ /Flash].or.[ ].on.the.handset.or.[ ].on.the.base.before.you.open.the.phonebook..
[Menu/Select].
page.24).
Chain Dialing from the Phonebook
If.you.often.have.to.enter.a.series.of.digits.or.some.type.of.code.number.during.a.call,.you.can.save.that.code.
number.to.a.phonebook.entry...When.your.call.connects,.just.use.the.phonebook.to.transmit.the.saved.code.number..
(This.is.referred.to.as.chain.dialing.).
Enter.the.code.number.(up.to.twenty.digits).into.the.phonebook.(see.Creating.Phonebook.Entries.on.page.23)..
1)
Be.sure.to.enter.the.code.number.into.the.phonebook.exactly.as.you.would.enter.it.during.a.call..
During.a.call,.when.you.hear.the.prompt.that.tells.you.to.enter.the.code.number,.press.
2)
Use.
3)
4)
[ ].or.[ ].to.select.the.phonebook.entry.that.contains.the.digits.you.want.to.send.
Press.
[Menu/Select]..The.phone.sends.the.digits.of.the.code.number.exactly.as.you.saved.them.in.the.
phonebook.entry.
[ ].
Switching to the Handset Speakerphone During a Call
To.switch.a.normal.call.to.the.speakerphone,.press.[ ].on.the.handset..To.switch.from.a.speakerphone.call.to.a.
normal.call,.press.
[ ].
Using Your Phone
31
Page 32

33
Using Caller ID, Call Waiting, and Redial Lists
If.you.subscribe.to.Caller.ID.service.from.your.phone.company,.your.phone.will.show.you.the.caller’s.phone.number.
and.name.(if.available).whenever.a.call.comes.in..If.you.subscribe.to.Caller.ID.on.Call.Waiting,.the.phone.will.also.
show.you.the.name.and.the.number.of.any.call.that.comes.in.while.you’re.on.the.line.
Using the Caller ID List
.You.can.store.up.to.thirty.Caller.ID.numbers.in.each.station..Caller.ID.records.are..
Using Caller ID, Call
stored.from.newest.to.oldest..Once.your.Caller.ID.list.is.full,.the.oldest.record.will.be.
Waiting, and Redial Lists
automatically.deleted.when.a.new.call.is.received.
To.open.the.Caller.ID.list,.press.
phone.will.show.the.number.of.new.Caller.ID.records.(that.is,.records.you.have.not.
reviewed.yet).and.the.total.number.of.stored.records..Use.
through.the.list..
Making a Call from a Caller ID Record
When.the.phone.is.in.standby,.press.[ ].to.open.the.Caller.ID.list.
1)
Use.
2)
3)
4)
Note:. You.can.also.press.
[ ].and.[ ] to nd the Caller ID record you want to dial.
If.you.need.to.add.(or.delete).a.“1”.to.the.beginning.of.the.displayed.phone.number,.press.
to.add.(or.delete).the.stored.area.code,.press.
Press.
[ /Flash].or.[ ].on.the.handset.or.[ ].on.the.base.to.dial.the.number.
When.you.come.to.the.phone.number.you.want.to.dial,.press.
What’s This “Add or Delete a 1” About?
Any phone number in the Caller ID records might (or might not!) have a “1” at the front, depending on how
•
different.phone.companies.send.the.Caller.ID.information..
The.phone.dials.the.number.exactly.as.it.appears.in.the.Caller.ID.record..
•
[ ].(on.the.right.side.of.the.four-way.key)..The.
[ ].and.[ ] .to.scroll.
[*/tone]..If.you.need.
[#].
[ /Flash].or.[ ].on.the.handset.or.[ ].on.the.base.before.you.open.the.caller.ID.list..
[Menu/Select].
32 33
Page 33

If.the.phone.number.is.a.long.distance.or.toll.call,.but.the.Caller.ID.record.does.not.have.a.“1”.in.front.of.the.
•
number,.press.
If.the.phone.number.is.a.local.or.non-toll.call,.but.the.Caller.ID.record.has.a.“1”.in.front.of.the.number,.press.
•
[*/tone].to.delete.it.
[*/tone].to.add.it..
.
Seven-Digit Dialing
If.you.can.make.a.local.call.by.dialing.only.seven.digits.instead.of.ten,.you.can.tell.the.phone.to.hide.your.local.area.
code.in.the.Caller.ID.list;.any.calls.from.outside.your.area.code.will.show.all.ten.digits..
To.program.your.local.area.code:
Press.
1)
2)
3)
The phone uses the stored area code as a lter. When a call comes in, the phone compares the incoming area code
to.the.code.programmed.on.the.phone..If.the.two.codes.match,.the.station.hides.the.area.code.in.the.Caller.ID.list.
When.you.are.viewing.a.Caller.ID.record,.you.can.show.the.hidden.area.code.by.pressing.
hide.the.area.code..When.you.dial.from.a.Caller.ID.record.or.store.a.Caller.ID.record.in.the.phonebook,.the.phone.
dials.or.stores.the.digits.exactly.as.they.appear.on.the.display..If.you.need.to.use.ten.digits,.be.sure.to.press.
show.the.area.code.before.you.dial.or.store.the.number..See.page.25.to.store.a.Caller.ID.record.in.the.phonebook.
[Menu/Select]..Select.the.GLOBAL.SETUP.menu,.and.then.the.AREA.CODE.submenu.
Use.the.number.keypad.(
stored,.it.appears.in.the.display..Press.
stored.code,.and.then.enter.a.new.one.
Press.
[Menu/Select]. You will hear a conrmation tone. The setting applies to all registered handsets and the
base.
[0].through.[9]).to.enter.a.three-digit.area.code..If.an.area.code.has.already.been.
[Clear/Int’com].on.the.handset.or.[Clear/Mute].on.the.base.to.delete.the.
[#]..Press.[#].again.to.
[#].to.
Deleting Caller ID Numbers
To.delete.only.one.Caller.ID.number,.press.[ ] when the phone is in standby, and then nd the number you want to
delete..Press.
To.delete.all.the.Caller.ID.numbers,.press.
the phone asks you to conrm, select YES.
Notes:.•.When.you.delete.a.Caller.ID.number,.you.delete.it.permanently.
[Menu/Select] and select DELETE ENTRY. When the phone asks you to conrm, select YES.
[ ].when.the.phone.is.in.standby,.and.then.press.[Menu/Select]..When.
Waiting, and Redial Lists
Using Caller ID, Call
33
Page 34

. •.Caller.ID.numbers.are.stored.separately.in.each.station..Deleting.a.record.from.one.station.will.not.delete.
the.record.from.any.other.stations.
Using Call Waiting
If.you.have.Call.Waiting.service.and.a.second.call.comes.in.when.you.are.on.the.phone,.a.call.waiting.tone.will.sound..
Press.
[ /Flash].on.the.handset.or.[Flash].on.the.base.to.accept.the.waiting.call..There.is.a.short.pause,.and.then.you.
will.hear.the.new.caller..To.return.to.the.original.caller,.press.
Using Caller ID, Call
Note:.You.must.subscribe.to.Call.Waiting.service.for.this.feature.to.operate..Not.all.features.are.available.in.all.areas.
Waiting, and Redial Lists
[ /Flash].on.the.handset.or.[Flash].on.the.base.
Redialing a Number
You can quickly redial the last ve numbers dialed on each station.
When.the.phone.is.in.standby,.press.the.
1)
Use.
2)
3)
Notes: • If the number exceeds 32 digits, only the rst 32 digits are retained in redial memory.
. •.If.the.redial.memory.is.empty,.EMPTY.appears.in.the.display.and.you.will.hear.a.beep.
. •.You.can.also.press.
[ ].and.[ ].or.[Redial/Pause].to.scroll.through.the.redial.list.
When you nd the number you want to dial, press [ /Flash].or.[ ].on.the.handset.or.[ ].on.the.base.
[ /Flash].or.[ ].on.the.handset.or.[ ].on.the.base.before.you.open.the.redial.list..
When.you.come.to.the.phone.number.you.want.to.dial,.press.
[Redial/Pause].to.open.the.redial.list.
[Menu/Select].
Deleting a Redial Record
If.you.want.to.delete.a.phone.number.from.the.redial.list,.follow.the.steps.below:
When.the.phone.is.in.standby,.press.
1)
Use.
2)
3)
4)
[ ].and.[ ].to.scroll.through.the.redial.list.
When you nd the redial number you want to delete, press [Menu/Select].and.select.DELETE.ENTRY.
When the phone asks you to conrm, select YES. The redial number is deleted.
[Redial/Pause].
34 PB
Page 35

Adjusting the Ringer, Earpiece and Speaker Volume
Adjusting the Ringer Volume
You.can.choose.from.four.ringer.volume.settings.(off,.low,.medium,.and.high).separately.
on.each.handset.or.the.base.
With.the.phone.in.standby,.press.
1)
volume.level.and.the.station.sounds.the.ringer.at.that.level..
Use.
2)
3)
Note:. If.you.set.the.ringer.volume.to.OFF,.the.station.won’t.ring..The.other.stations.will.ring.according.to.their.
[ ].to.make.the.ringer.volume.louder.or.[ ].to.make.it.softer.or.turn.it.
completely.off.
When.you.hear.the.ringer.volume.level.you.want.to.use,.stop.pressing.keys..
The.station.will.use.the.new.ringer.volume.starting.with.the.next.incoming.call.
individual.settings.
Muting the Ringer (One call only)
While.the.phone.is.ringing,.press.[ /Mute].or.[ ].on.the.handset,.or.[Clear/Mute].or.[ ].on.the.base.to.mute.the.
ringer.for.this.call..The.phone.will.ring.again.on.the.next.call.
Adjusting the Earpiece Volume
You.can.choose.from.six.volume.levels.for.the.handset.earpiece..To.adjust.the.earpiece.volume.while.on.a.call,.
press.
[ ].(to.make.it.louder).or.[ ].(to.make.it.softer)..The.handset.display.shows.the.current.volume.level.for.the.
earpiece.
[ ].or.[ ]..The.display.shows.the.current.
Earpiece and Speaker Volume
Adjusting the Ringer,
3535
Page 36

Adjusting the Speaker Volume
Handset Speaker:.You.can.choose.from.six.volume.levels.for.the.handset.speaker.while.on.a.speakerphone.call.or.
when.the.handset.is.accessing.the.answering.system..To.adjust.the.handset.speaker.volume,.press.
louder).or.
Note:. The.handset.earpiece.and.the.handset.speaker.have.separate.volume.settings.
Base Speaker:.You.can.choose.from.ten.volume.levels.for.the.base.speaker.while.on.a.speakerphone.call.or.when.
the.answering.system.announces.or.plays.a.message..To.adjust.the.base.speaker.volume,.press.
louder).or.
[ ].(to.make.it.softer)..The.handset.display.shows.the.current.volume.level.for.the.handset.speaker.
[ ].(to.make.it.softer)..The.base.display.shows.the.current.volume.level.for.the.base.speaker.
[ ].(to.make.it.
[ ].(to.make.it.
Adjusting the Audio Tone (Handset only)
If you aren’t satised with the audio quality of your phone, you can adjust the Audio Tone of the earpiece while on
a.call..Your.phone.gives.you.three.audio.tone.options:.low,.natural.and.high;.the.default.setting,.Natural.Tone,.is.
recommended.for.hearing.aid.users..Audio.tone.adjustments.only.apply.to.the.earpiece,.not.the.speakerphone.
To.adjust.the.audio.tone:
Adjusting the Ringer,
While.on.a.call,.press.
1)
Move.the.cursor.to.select.AUDIO.TONE,.and.then.press.
2)
Move.the.cursor.to.select.desired.option.(HIGH.TONE,.NATURAL.TONE,.or.LOW.TONE),.and.then.press.
3)
[Menu/Select]..Selected.option.appears.in.the.display.for.two.seconds,.and.then.the.display.returns.to.normal.
Earpiece and Speaker Volume
[Menu/Select].
[Menu/Select].
3636
Page 37

Finding a Lost Handset
To.locate.a.misplaced.handset,.press.[Int’com].on.the.base.when.the.phone.is.in.standby..Use.[ ].or.[ ].to.
select.the.handset.you.want.to.page,.and.then.press.
To.cancel.paging,.press.
[Int’com].on.the.base.again.
[Menu/Select]..Select.ALL.to.page.all.registered.handsets..
Using Hold, Conference and Transfer
Placing a Call on Hold
During.a.call,.press.[Clear/Int’com].on.the.handset.or.[Int’com].on.the.base.to.place.the.caller.on.hold..If.you.
1)
leave.a.caller.on.hold.for.more.than.ten.seconds,.the.display.screen.will.read,.Line.On.Hold.
To.return.to.the.party.on.hold,.press.
2)
to.the.holding.party.
Notes: • You can only place a caller on hold for ve minutes. Once ve minutes has passed, that party’s line will be
. •.While.a.call.is.on.hold,.Caller.ID.and.Call.Waiting.cannot.be.received.
disconnected.and.the.phone.will.return.to.standby.
Conferencing
If.you.have.more.than.one.handset,.up.to.four.people.can.participate.in.a.conference.call..A.four-way.conference.call.
consists.of.an.outside.line,.two.handsets,.and.the.base.speakerphone..You.can.easily.join.a.call.already.in.progress..
Press.
1)
2)
[ /Flash].or.[ ].on.the.handset.or.[ ].on.the.base.to.join.the.call.
To.hang.up,.return.the.handset.to.the.cradle.or.press.
will.still.be.connected.to.the.call.
[ /Flash].or.[ ].on.the.handset.or.[ ].on.the.base..The.phone.will.return.
[ ].on.the.handset.or.[ ].on.the.base..The.other.party.
Using Hold, Conference and Transfer
Using Hold, Conference
Finding a Lost Handset
and Transfer
37
Page 38

Transferring a Call
You.can.transfer.a.call.from.one.station.to.another..
During.a.call,.press.
1)
Use.
2)
3)
[ ].or.[ ].to.select.the.station.you.want.to.transfer.the.call.to,.and.then.press.[Menu/Select]..Select.ALL.
to.page.all.other.stations..The.call.will.automatically.be.placed.on.hold,.and.a.paging.tone.sounds..To.cancel.the.
transfer,.press.
When.another.station.accepts.the.transferred.call,.you.will.be.disconnected..If.you.want.to.rejoin.the.call,.press.
[ /Flash].or.[ ].on.the.handset.or.[ ].on.the.base.again.
Answering a Transferred Call
When.a.station.receives.a.call.transfer,.it.sounds.a.paging.tone;.stations.also.show.the.ID.of.the.station.that.is.
paging..To.accept.the.call.transfer:
To.answer.the.page.and.speak.to.the.transferring.station,.press.
1)
[ ].or.[Int’com].on.the.base.
To.accept.the.call.and.speak.to.the.caller,.press.
2)
base.
When.you.accept.the.transferred.call,.the.transferring.station.will.be.disconnected.
3)
Only the rst station.to.answer.the.transfer.page.will.be.connected.to.the.call..If.the.transfer.page.is.not.picked.up.
within.one.minute,.the.operation.will.be.canceled.
[Clear/Int’com].on.the.handset.or.[Int’com].on.the.base.
[ /Flash].or.[ ].on.the.handset.or.[ ].on.the.base.
[ /Flash].or.[Clear/Int’com].on.the.handset,.or..
[ /Flash].on.the.receiving.handset,.or.[ ].on.the.receiving.
.
and Transfer
Using Hold, Conference
38
Page 39

Using Special Features
Privacy Mode
If you don’t want other stations to interrupt you while on a call, turn on privacy mode. As long as your station
is in privacy mode, other stations can’t join your call or make any calls of their own: their displays will show
UNAVAILABLE.
While on a call, press [Menu/Select].
1)
Select CALL PRIVACY. PRIVACY MODE ON appears in the display for two seconds; appears and remains in
2)
the display until the feature is turned off.
To turn privacy mode off, repeat the procedure listed above. PRIVACY MODE OFF appears.
Using the Intercom
You can use the intercom to talk to another station without using the phone line.
Making an Intercom Page
When the phone is in standby, press [Clear/Int’com] on the handset or [Int’com] on the base.
1)
Use [ ] or [ ] to select the station you want to talk with, and then press [Menu/Select]. Select ALL to page
2)
all other stations.
To cancel the intercom page, press [ ] on the handset or [Int’com] on the base.
3)
Note: Intercom paging will be cancelled if any of the following things occur:
You receive an outside call or an intercom page while selecting the other station.
•
You do not select a station within thirty seconds.
•
Your handset is out of range (OUT OF RANGE appears in the display).
•
The party does not answer the page within one minute.
•
The party is busy.
•
The party is out of range (UNAVAILABLE appears in the display).
•
Using Special Features
39
Page 40

Answering an Intercom Page
When the intercom page tone sounds, the display will show the ID of the station that is paging.
Press [ /Flash] or [Clear/Int’com] on the handset, or [ ] or [Int’com] on the base. If AutoTalk is on, the
1)
handset will automatically answer the page when you pick up the handset from the cradle.
To hang up an intercom call, press [ ] on the handset or [Int’com] on the base.
2)
Muting the Microphone
Using Special Features
Mute turns off the microphone so the caller can’t hear you. This only works while you are on a call.
Press [ /Mute] on the handset or [Clear/Mute] on the base. MUTE ON and appear in the display; remains
1)
while muting is on.
To cancel muting, press [ /Mute] on the handset or [Clear/Mute] on the base again. MUTE OFF appears.
2)
Tone Dialing Switch Over
If your phone is set to pulse dialing, you can temporarily switch to tone dialing after the call connects. This feature
is useful when you need tone dialing to use automated menu systems, such as telephone bank tellers, telephone
prescription rells, customer support menus, etc. Make your call normally. Once your call connects, press [*/tone] on
the station. Any digits you enter from then on will be sent with tone dialing. When this particular call ends, the phone
automatically returns to pulse dialing.
See Changing the Dial Mode on page 11 for instructions on setting your phone for pulse or tone dialing.
Installing the Optional Headset
Your phone may be used with an optional headset. To use this feature, insert the
headset plug into the headset jack. Your phone is ready for hands-free conversations.
(Headsets may be purchased by calling the Uniden Parts Department. See the back
cover page for contact information.)
Note: The waterproof handset cannot be used with a headset.
40
Page 41

Setting Up the Answering System
Using Handset and Base Menus
You.can.set.up.your.answering.system’s.primary.features.from.the.base.or.handset.
When.the.phone.is.in.standby,.press.
1)
then.press.
Use.
2)
Select.the.option.by.pressing.
3)
To.exit.the.menu.and.return.to.standby,.press.
4)
[Menu/Select]..
[ ].or.[ ].to.scroll.through.the.answering.system.setup.menu.options..
[Menu/Select]..Move.the.pointer.to.select.the.ANSW..SETUP.menu,.and.
[Menu/Select].
[ ].on.the.handset.or.[ ].on.the.base.
Handset Operation
Your.handset.controls.all.of.the.answering.system.setup.options.except.for.the.personal.greeting.(personal.greetings.
must.be.changed.directly.at.the.base)..Here.are.some.hints.on.using.your.handset.to.access.your.answering.system:.
When.the.phone.is.in.standby,.press.
•
ANSWERING.MACHINE.OPERATION.appears.on.the.handset.display,.and.the.system.announces.the.time.and.
the.number.of.new.and.old.messages.
If.you.receive.a.call,.remote.operation.is.cancelled.
•
If.another.handset.makes.a.call,.remote.operation.is.cancelled.
•
During.remote.operation.HANDSET.REMOTE.MODE.appears.on.the.base.
•
[ /Mute].on.the.handset.to.access.the.answering.system..REMOTE.
4141
Answering System
Setting Up the
Page 42

4343
Recording a Personal Greeting
Your.answering.system.comes.with.a.pre-recorded.outgoing.message.or.greeting.that.plays.when.you.receive.a.
call:.“Hello,.no.one.is.available.to.take.your.call..Please.leave.a.message.after.the.tone.”.You.can.record.your.own.
personal.outgoing.greeting..Your.recorded.greeting.must.be.between.two.seconds.and.thirty.seconds.long.
On.the.base,.press.
1)
submenu.
RECORD.GREETING,.START.[SELECT].appears..Press.
2)
after.the.announcement.
The.
message counter.on.the.base.LCD.displays.“30”,.and.then.begins.to.count.down.
When you nish recording, press [Menu/Select].again.or.press.[ ]. You will hear a conrmation tone, and
3)
your.recorded.greeting.plays.back.for.you.
[Menu/Select]..Select.the.ANSW..SETUP.menu,.and.then.the.RECORD.GREETING.
[Menu/Select].to.start.the.recording..Begin.recording.
Selecting a Greeting
Once.you.have.recorded.a.personal.greeting,.the.phone.automatically.switches.to.your.personal.greeting..You.can.
also.switch.back.and.forth.between.the.pre-recorded.greeting.and.your.own.greeting.at.any.time.
On.the.base,.press.
1)
Setting Up the
submenu..
The.system.plays.the.current.greeting.
Answering System
To.keep.this.greeting,.do.nothing.
2)
To.switch.to.the.other.greeting,.press.
3)
current.greeting.
Each.time.you.press.
4)
The.last.greeting.you.hear.is.used.as.the.current.greeting.
[Menu/Select]..Select.the.ANSW..SETUP.menu,.and.then.the.GREETING.OPTIONS.
[ ].or.[ ].on.the.four-way.function.key.while.the.system.is.playing.the.
[ ].or.[ ],.the.system.switches.between.the.pre-recorded.and.the.personal.greeting..
4242
Page 43

Deleting Your Personal Greeting
You.can.delete.your.personal.greeting.from.the.base..You.cannot.delete.the.pre-recorded.greeting.
On.the.base,.press.
1)
submenu..
The.system.plays.the.current.greeting.
While.the.personal.greeting.is.playing,.press.
2)
The.system.announces.“Greeting.has.been.deleted,”.and.switches.back.to.the.pre-recorded.greeting.
3)
[Menu/Select]..Select.the.ANSW..SETUP.menu,.and.then.the.GREETING.OPTIONS.
[ ].
Selecting the Language for Announcements
You.can.select.the.language.of.your.answering.system.announcements..The.default.system.language.is.English.
Press.[Menu/Select]..Select.ANSW..SETUP,.and.then.the.ANSW..LANGUAGE.submenu.
1)
Move.the.cursor.to.choose.a.language.
2)
for.US.models:.Choose.ENGLISH.or.ESPAÑOL.(Spanish).
for.Canadian.models:.Choose.ENGLISH.or.FRANÇAIS.(French).
Press.
3)
[Menu/Select]. You will hear a conrmation tone.
.
.
Setting the Number of Rings
The.ring.time.setting.allows.you.to.set.the.number.of.rings.the.caller.hears.before.your.answering.system.plays.the.
outgoing.message..You.can.set.the.ring.time.to.answer.after.two,.four,.or.six.rings..If.you.enable.the.Toll.Saver.(TS).
setting,.the.answering.system.picks.up.after.two.rings.if.you.have.new.messages,.and.after.four.rings.if.there.are.
none..This.way,.if.you.make.a.long.distance.call.to.check.your.messages,.you.can.hang.up.after.the.third.ring.to.
avoid.long.distance.billing.charges.
Press.
1)
2)
3)
[Menu/Select]..Select.the.ANSW..SETUP.menu,.and.then.the.RING.TIME.submenu.
Move.the.cursor.to.select.a.ring.time.(TOLL.SAVER,.2.TIMES,.4.TIMES,.or.6.TIMES).
Press.
[Menu/Select]. You will hear a conrmation tone.
Answering System
Setting Up the
4343
Page 44

4545
Setting the Day & Time (for Base)
If.you.do.not.set.the.clock.on.your.answering.system,.your.messages.may.not.have.the.correct.time.and.day.stamp..
Press.
1)
2)
3)
4)
5)
Notes:.•.The.handset.does.not.display.the.day.and.time,.although.you.can.set.up.the.day.and.time.from.the.handset.
. •.When.the.power.of.the.base.is.off,.the.day.and.time.setting.will.be.erased;.you.need.to.set.up.again.
[Menu/Select].
Move.the.cursor.to.DAY.&.TIME.and.press.
Use.
[ ] and.[ ].to.select.the.day.of.the.week,.and.press.[Menu/Select].
Use.the.number.keypad.(
Use.
[ ] and.[ ].to.select.AM.or.PM,.and.press.[Menu/Select]. You hear a conrmation tone.
[0].through.[9]).to.enter.the.hour.and.minutes.
[Menu/Select].
Setting the Record Time (or Announce only)
You.can.choose.how.long.callers.have.to.record.a.message..Set.the.record.time.to.1.MINUTE.or.4.MINUTES.to.limit.
the.time.for.incoming.messages..If.you.set.the.record.time.to.ANNOUNCE.ONLY,.the.answering.system.answers.the.
call.but.prevents.callers.from.leaving.a.message.
Press.
1)
Setting Up the
2)
Answering System
3)
While.your.answering.system.is.set.to.ANNOUNCE.ONLY,.the.
you.are.using.the.prerecorded.greeting,.the.system.automatically.switches.to.the.following.message:.“Hello,.no.one.
is.available.to.take.your.call..Please.call.again.”.If.you.are.using.a.personal.greeting,.the.system.continues.to.use.
that.greeting.
[Menu/Select]...Select.the.ANSW..SETUP.menu,.and.then.the.RECORD.TIME.submenu.
Move.the.cursor.to.select.a.record.time.(1.MINUTE,.4.MINUTES,.or.ANNOUNCE.ONLY).
Press.
[Menu/Select]. You will hear a conrmation tone.
message counter.on.the.base.LCD.displays.“A.”.If.
4444
Page 45

Activating the Message Alert
The message alert feature sounds a short alert tone every fteen seconds whenever you have a new message.
To.turn.on.the.message.alert:
Press.
1)
2)
3)
[Menu/Select]..Select.the.ANSW..SETUP.menu,.and.then.the.MESSAGE.ALERT.submenu.
Move.the.cursor.to.select.ON.or.OFF.
Press.
[Menu/Select]. You will hear a conrmation tone.
Activating Call Screening on the Base
Your.phone.allows.you.to.listen.to.callers.leaving.you.a.message..The.call.screen.feature.on.the.base.can.be.turned.
on.or.off.
Press.
1)
2)
3)
[Menu/Select]..Select.the.ANSW..SETUP.menu.and.then.the.CALL.SCREEN.submenu.
Move.the.cursor.to.select.ON.or.OFF.
Press.
[Menu/Select]. You will hear a conrmation tone.
Answering System
Setting Up the
4545
Page 46

47
Using the Answering System
Turning Your Answering System On and Off
From the base From the handset
1)
When.the.phone.is.in.standby,.press.
[Answer on/off].
The.system.announces.“Answering.System.
Turning.On
Turning.Off
2)
is.on”.and.plays.the.current.greeting.
ANSWER.ON.appears.on.the.base.display.
3)
1)
When.the.phone.is.in.standby,.press.
[Answer on/off].
The.phone.announces.“Answering.System.
2)
is.off.”
ANSWER.OFF.appears.on.the.base.display.
3)
1)
2)
3)
1)
2)
3)
[Menu/Select]..Select.the.ANSW..
Press.
SETUP.menu,.and.then.the.ANSWER.
SETUP.submenu.
Move.the.cursor.to.select.ON.
Press.
[Menu/Select]..You.will.hear.a.
conrmation tone.
[Menu/Select]..Select.the.ANSW..
Press.
SETUP.menu,.and.then.the.ANSWER.
SETUP.submenu.
Move.the.cursor.to.select.OFF.
Press.
[Menu/Select]..You.will.hear.a.
conrmation tone.
System
Using the Answering
46
Page 47

Reviewing Messages
The.message counter.on.the.base.LCD.displays.the.number.of.messages.stored.in.memory..When.you.have.new.
messages.(that.you.have.not.listened.to.yet),.
The answering system plays your new messages rst. If you have no new messages, the system plays your old
messages..You.can.review.your.messages.from.the.base.or.from.the.handset:
From the base From the handset
[ ]..The.system.announces.the.
Press.
Playing.new.
messages
number.of.new.and.old.messages,.then.plays.
the rst new message followed by the day and
time.it.was.received..Then.the.system.plays.the.
new.messages.in.the.order.they.were.received.
Repeating
a.message
Skipping
a.message
Deleting
a.message
Deleting.all.
messages
Playing.old.
messages
Ending.the.
message.
review
Press [ ].once.to.go.to.the.beginning.of.the.
current.message..Press.
back.to.a.previous.message..
[ ].to.go.to.the.beginning.of.the.next.
Press.
message..
While.a.message.is.playing,.press.
The.message.is.permanently.deleted..
While.the.phone.is.in.standby,.press.
the system asks you to conrm, press [ ].
again..All.messages.are.permanently.deleted.
After.you.listen.to.your.new.messages,.press.
[ ].again.to.play.your.old.messages.
[ ].to.stop.the.message.playback.and.
Press.
return.to.standby..
[ ].on.the.base.and.the.new message LED on the handset ash.
Press.
[ /Mute]..The.system.announces.the.
number.of.new.and.old.messages,.then.plays.the.
rst new message followed by the day and time
it.was.received..Then.the.system.plays.the.new.
messages.in.the.order.they.were.received..
[1].once.to.go.to.the.beginning.of.the.
Press.
[ ].repeatedly.to.go.
current.message..Press.
[1].repeatedly.to.go.back.
to.a.previous.message.
Press.[3].to.go.to.the.beginning.of.the.next.
message.
[ ]...
While.a.message.is.playing,.press.
[4].
The.message.is.permanently.deleted..
[ ]...When.
Not.available.
.
After.you.listen.to.your.new.messages,.press.
[ /Mute].again.to.play.your.old.messages.
[5]..to.stop.the.message.playback.
Press.
Press.
[ ].to.exit.the.system.and.return.to.standby,.
or.press.
[2].to.restart.the.message.playback.
.
Using the Answering
System
47
Page 48

49
Screening Calls
If.you.activate.the.call.screening.feature.on.the.base,.you.can.listen.to.callers.leaving.a.message.without.answering.
the.call.(see.Activating.Call.Screening.on.the.Base.on.
To.screen.an.incoming.call.from.the.handset.speaker:
Press.
•
•
•
[ /Mute].when.the.system.is.answering..If.another.handset.is.screening.a.call,.you.will.hear.a.beep.and.
you.will.not.be.able.to.screen.the.call.
To.answer.the.call,.press.
To.stop.screening.the.call,.press.
[ /Flash].
[ ].
page.45)..You.can.always.hear.callers.from.the.base.speaker..
Turning Off the Message Alert Tone
When.all.new.messages.are.played.back,.the.message.alert.tone.will.automatically.deactivate..The.tone.will.not.
deactivate.until.all.new.messages.are.played.back..To.quickly.turn.off.the.tone,.press.any.key.on.the.base.
Operating the Answering System While You Are Away from Home
When.you.are.away.from.home,.you.can.operate.your.answering.system.with.any.touch-tone.telephone.
Setting a Security Code or Personal Identication Number (PIN)
To.operate.your.answering.system.when.you.are.away.from.home,.you.will.need.to.enter.a.two-digit.security.code.or.
Personal Identication Number (PIN). The default security code is 80.
Press.
1)
2)
3)
Dialing in to Your Answering System
Notes:
The.answering.system.will.only.playback.messages.for.four.minutes.and.then.it.returns.to.the.command.waiting.
•
mode..To.continue.playing.your.messages,.press.
If.you.enter.an.incorrect.security.code/PIN.three.times,.you.will.hear.a.beep.and.the.answering.system.will.return.
•
System
to.standby.
[Menu/Select]..Select.the.ANSW..SETUP.menu,.and.then.the.SECURITY.CODE.submenu.
Use.the.number.keypad.(
Press.
[Menu/Select]. You will hear a conrmation tone.
[0].through.[9]).to.enter.a.two-digit.security.code.(01-99).
[0].then.[2] again within fteen seconds.
Using the Answering
48
Page 49

To.operate.from.a.remote.location,.use.any.touch-tone.telephone,.and.follow.these.steps:
Call.your.telephone.number.and.wait.for.the.system.to.answer..If.the.answering.system.is.off,.it.will.answer.after.
1)
about.ten.rings.and.sounds.a.series.of.beeps.
During.the.greeting.or.the.beeps.(if.answering.system.is.off),.press.
2)
[0].and.enter.your.security.code/PIN.within.
two.seconds.
The.answering.system.announces.the.current.time.and.the.number.of.messages.stored.in.memory.
3)
.
You.hear.“To.play.incoming.messages,.press.zero-two..For.help,.press.one-zero”.followed.by.a.beep.
Enter a remote command from the chart below. You have fteen seconds to enter the rst command; after the
4)
rst command, you have two seconds to enter each command.
Remote Commands
Command Function Command Function Command Function
[0].then.[1] Repeat.a.message* [0].then.[4] Delete.a.message [0].then.[9] Answering.system.off
[0].then.[2] Play.incoming.messages [0].then.[5] Stop.operation [1].then.[0] Help
[0].then.[3] Skip.a.message [0].then.[6] Answering.system.on
*.If.you.press.
If.you.press.
When you nish, you will hear intermittent beeps indicating that the system is in the command waiting mode.
5)
[0].then.[1] in the rst four seconds of a message, the system skips to the previous message..
[0].then.[1] after the rst four seconds of a message, the system repeats the current message.
Enter another command from the chart within fteen seconds.
Hang.up.to.exit.the.system..The.answering.system.automatically.returns.to.its.normal.standby.setting.
6)
Using the Answering
System
49
Page 50

51
Maintenance
Specications
Operating.Temperature 32°.F.to.122°.F.(0°.C.to.50°.C)
Maintenance
Notes:
Use.only.the.supplied.AC.adapters.
•
Be.sure.to.use.the.proper.adapter.for.the.base.and.any.chargers.
•
Do not place the power cord where it creates a trip hazard or where it could become chafed and create a re or
•
electrical.hazard.
Do.not.place.the.base.in.direct.sunlight.or.subject.it.to.high.temperatures.
•
Battery Information
Battery Life
With.average.use,.your.handset.battery.provides.approximately.ten.hours.of.talk.time.and.approximately.seven.
days.of.standby.time..You.can.achieve.optimum.battery.life.and.performance.by.returning.the.handset.to.the.base.
or.charger.after.each.use..When.your.handset.is.left.off.of.the.cradle,.the.battery.will.gradually.discharge.even.if.
the.handset.is.not.being.used..The.actual.talk.time.duration.will.be.reduced.in.proportion.to.the.amount.of.time.the.
handset.is.off.of.the.cradle.
AC Adapter information Base Chargers Yellow charger
Part.Number
Input.Voltage 120V.AC,.60.Hz 120V.AC,.60.Hz 120V.AC,.60.Hz
Output.Voltage
Battery.Part.Number
Battery.Capacity 2.4V.DC.@.650mAh
PS-0009 PS-0007 PS-0011
9V.DC.@.350mA. 9V.DC.@.210mA 19V.DC.@.100mA
BT-1008
50 51
Page 51

Low Battery Alert
When.the.battery.pack.is.very.low,.the.phone.is.programmed.to.eliminate.functions.in.
order.to.save.power..When.LOW.BATTERY.appears.in.the.handset.display.and.the.
phone.is.in.standby,.none.of.the.keys.will.operate..If.you.are.on.a.call,.complete.your.
conversation.as.quickly.as.possible,.and.return.the.handset.to.the.cradle.
The.battery.pack.needs.to.be.charged.when.the.empty.battery.icon.appears.
Cleaning the Battery Contacts
To.maintain.a.good.charge,.clean.the.charging.contacts.on.the.handset.
once.a.month..Dampen.a.cloth.with.plain.water..Gently.rub.the.damp.cloth.
over.the.charging.contacts.until.all.visible.dirt.is.removed..Dry.the.contacts.
thoroughly.before.returning.the.handset.to.the.cradle.
Caution: Do.not.use.paint.thinner,.alcohol,.or.other.chemical.products..
Doing so may discolor the surface of the telephone and damage the nish.
Battery Replacement and Handling
With.average.use,.your.phone’s.battery.should.last.approximately.one.year..To.order.replacement.batteries,.please.
contact.Uniden’s.Parts.Department..The.contact.information.is.listed.on.the.back.cover.pag
Caution:
Use.only.battery.pack.BT-1008..
•
Do.not.remove.the.batteries.from.the.handset.to.charge.them..
•
Never throw the battery into a re, disassemble, or heat them.
•
Do.not.remove.or.damage.the.battery.casing..
•
e.
Maintenance
51
Page 52

Replacing the Waterproof Handset Battery Pack
Remove.the.four.screws.holding.the.battery.compartment.
1)
with.a.screwdriver.and.take.off.the.battery.cover..
Remove.the.old.battery.pack.from.the.battery.compartment.
2)
Line.up.the.red.and.black.wires.with.the.polarity.label.in.the.battery.
3)
Maintenance
compartment (the connector only ts one way). Push the connector in rmly;
you.should.hear.the.connector.click.into.place.
Tug.on.the.battery.wires.slightly.to.make.sure.you.have.a.good.connection.
4)
Before.placing.the.battery.cover.back.on.the.handset,.check.the.rubber.seal.
5)
located.on.the.under.side.of.the.cover:.make.sure.that.the.seal.is.in.good.
condition.and.that.there.is.no.foreign.matter.under.the.seal.
.
Note:.If.the.rubber.seal.appears.warn,.nicked,.or.dried.out,.replacement.seals.
are.available.through.the.Uniden.Parts.Department..See.the.back.cover.page.
for.contact.information..
Insert.the.bottom.end.of.the.cover.into.the.grooves.on.the.handset.and.lay.the.
6)
cover.over.the.battery.compartment..Tighten.the.four.screws.securely.
Notes:. •.If.there.is.any.foreign.matter.on.the.rubber.seal.located.on.the.under.side.of.the.battery.
. •.The.rubber.seal.should.be.replaced.every.two.years,.even.if.it.does.not.look.worn.
cover,.the.handset.may.not.be.water.tight.
.
.
Power Failures
During.a.power.failure,.you.will.not.be.able.to.make.or.receive.calls.with.the.phone..
To.avoid.damage.from.an.electrical.spike.when.the.power.comes.back.on,.we.
recommend.you.unplug.your.phone.during.power.outages.
52 PB
Page 53

54
Troubleshooting
Common Issues
If your phone is not performing to your expectations, please try these simple steps rst. If these steps do not solve
your.problem,.please.call.our.Customer.Hotline.(see.the.inside.of.the.back.cover.for.contact.information).
When you have this
problem...
The.
charge.LED.won’t.
illuminate.when.the.handset.
is.placed.in.the.cradle.
The.audio.sounds.weak..
No.handsets.can.make.or.
Troubleshooting
receive.calls..
A.single.handset.can’t.make.
or.receive.calls.(but.other.
handsets.can).
Try...
Checking.the.AC.adapter.connection.(see.page.8).
•
Re-seating.the.handset.in.the.cradle..
•
Cleaning.the.charging.contacts.on.the.handsets.(see.page.51)..
•
•
Moving.the.handset.closer.to.the.base.
•
Moving.the.handset.and/or.base.away.from.metal.objects.or.appliances.and.try.
again.
•
Checking.the.telephone.cord.connection..If.CHECK.TEL.LINE.appears.on.the.
base.display,.the.telephone.cord.may.not.be.connected.correctly.(see.page.10).
Disconnecting.the.base.AC.adapter..Wait.a.few.minutes,.then.reconnect.it.(see.
•
page.7).
Asking.your.telephone.company.if.they.use.pulse.dialing.(see.page.11).
•
•
Checking.the.battery.pack.connection.(see.page.7).
•
Charging.the.battery.for.15.to.20.hours.
Moving.the.handset.closer.to.the.base.
•
Making.sure.the.line.is.not.in.use..If.an.outside.call.is.already.using.a.line,.you.
•
cannot.use.that.line.to.make.another.outside.call.
Resetting.the.handset.(see.page.55).
•
53
.
Page 54

When you have this
problem...
A.handset.can.make.calls,.
but.it.doesn’t.ring.or.receive.
a.page.
Severe.noise.interference.
The.Caller.ID.does.not.
display..
I.can’t.register.the.handset.at.
the.base.
The.handset.doesn’t.
communicate.with.other.
handsets..
I.can’t.join.the.conversation.
The.answering.system.does.
not.work.
Try...
Making.sure.the.ringer.isn’t.turned.off.(see.page.35).
•
•
Keeping.all.handsets.away.from.microwave.ovens,.computers,.wireless.LAN.
station,.remote.control.toys,.wireless.microphones,.alarm.systems,.intercoms,.
room monitors, uorescent lights, and electrical appliances (see page 6).
Moving.the.base.to.another.location.or.turn.off.the.source.of.interference.
•
Checking.to.see.if.the.call.was.placed.through.a.switchboard.
•
Asking.your.telephone.company.to.verify.your.Caller.ID.service.is.current..There.
•
may.be.a.problem.with.your.Caller.ID.service.
•
Charging.the.battery.for.15.to.20.hours.
Resetting.the.handset.(see.page.55).
•
Resetting.the.handset.(see.page.55).
•
Resetting.all.handsets.(see.page.55).
•
•
Checking.to.see.that.there.are.not.two.handsets.already.using.the.conference.
feature.(see.page.37).
•
Checking.to.see.that.another.handset.is.not.in.privacy.mode.(see.page.39).
•
Resetting.the.handset.(see.page.55).
•
Resetting.all.handsets.(see.page.55).
•
Checking.the.AC.adapter.connection.(see.page.8)..
•
Checking.to.see.if.the.answering.system.is.turned.on.(see.page.46).
Checking.to.see.that.the.message.record.time.is.not.set.to.announce.only.(see.
•
page.44)
.
Troubleshooting
54
Page 55

56
When you have this
problem...
The.answering.system.does.
not.record.any.messages.
The.answering.system.
doesn’t.say.what.time.
messages.were.recorded.
Messages.are.incomplete..
Try...
The.memory.may.be.full..Delete.some.or.all.of.the.saved.messages.(see.page.
•
47).
Checking.to.see.if.you.have.set.the.time.(see.page.44).
•
The.incoming.messages.may.be.too.long..Ask.callers.to.leave.a.brief.message.
•
The.memory.may.be.full..Delete.some.or.all.of.the.saved.messages.(see.page.47).
•
I.can’t.hear.base.or.handset.
speaker.during.call.screening.
or.message.playback.
I.can’t.access.answering.
system.from.a.remote.
phone..
Troubleshooting
Adjusting.the.speaker.volume.on.the.base.or.handset.(see.page.35).
•
Checking.to.see.if.the.call.screen.feature.is.set.to.on.(see.page.45).
•
Checking.to.see.if.you.are.using.the.correct.PIN.number.(see.page.48).
•
Checking.to.see.if.the.touch-tone.phone.you’re.using.can.transmit.the.tone.for.at.
•
least.two.seconds..If.it.cannot,.try.using.a.different.touch-tone.phone.
Resetting the Handset
You.may.need.to.reset.your.handset.in.the.following.instances:
You.get.the.message.Registration.Failed.when.you.try.to.register.the.handset.
•
You.are.unable.to.register.any.handsets.to.the.base.
•
When.you.are.instructed.to.by.one.of.Uniden’s.call.center.representatives.
•
Press.and.hold.
1)
Select.the.handset.which.you.are.operating,.and.then.press.
2)
[ ].and.[#] for more than ve seconds. Select DEREGISTER HS.
[Menu/Select].
55
Page 56

The phone will ask you to conrm the deregistration. Select YES. The selected handset will clear its registration
3)
information.from.the.base.and.then.delete.the.link.to.the.base.from.its.own.memory.
When.the.base.information.is.deleted,.the.handset.displays.HANDSET.NOT.REGISTERED-PLACE.HANDSET.
4)
ON.BASE.TO.REGISTER..SEE.YOUR.OWNER'S.MANUAL.FOR.HELP.
Reregister.the.handset:
5)
For.regular.handsets:
Place.the.handset.in.the.base;.HANDSET.REGISTERING.will.appear.in.the.LCD..
•
Wait.approximately.thirty.seconds,."REGISTRATION.COMPLETE".appears.in.the.display.
•
If.REGISTRATION.FAILED.appears.in.the.LCD,.please.try.these.steps.again.
•
.
For.the.waterproof.handset:
With.the.phone.in.standby,.press.
•
Move.the.cursor.to.select.the.REGISTER.HANDSET.menu,.and.then.press.
•
[Menu/Select].on.the.base.
[Menu/Select]..HANDSET.
REGISTERING.will.appear.
On.the.handset,.press.and.hold.
•
When.the.handset.has.registered.to.the.base,.the.LCD.will.display.REGISTRATION.COMPLETE.
•
If.REGISTRATION.FAILED.appears.in.the.LCD,.please.try.these.steps.again.
•
[#].until.the.handset.beeps.and.displays.HANDSET.REGISTERING.
Troubleshooting
Notes:. • If.the.handset.cannot.contact.the.base,.it.will.display.OUT.OF.RANGE..Make.sure.the.handset.is.in.range.of.the.base.and.
. •.If.your.base.is.not.available.for.some.reason.(for.example,.it.was.lost.or.damaged),.the.BASE.UNAVAILABLE.option.will.
the.base.is.connected.to.power.
reset.the.handsets.so.you.can.use.them.with.a.replacement.base..Contact.Uniden.Customer.Service.if.you.need.to.
replace.your.base.with.a.new.one.
56
Page 57

58
Changing the Line Mode for Multiple Extensions
Line.mode.refers.to.the.method.that.telephones.use.to.signal.each.other.that.an.extension.is.in.use..Customer.
service.may.recommend.changing.the.line.mode.if.you.have.any.of.the.following.problems:
Your.phone.keeps.ringing.after.someone.answers.on.an.extension.phone.
•
Your.answering.system.doesn’t.stop.recording.when.you.answer.on.an.extension.phone.
•
Caller ID displays briey and then clears.
•
Press.
1)
2)
3)
4)
[Menu/Select]..Select.the.GLOBAL.SETUP.menu,.and.then.the.SET.LINE.MODE.submenu..
IF.INSTRUCTED.BY.CUSTOMER.SERVICE.PRESS.[SELECT].appears..Press.
Move.the.cursor.to.select.TYPE.-.A,.TYPE.-.B,.or.OFF.
Press.
[Menu/Select]. You will hear a conrmation tone.
[Menu/Select].
Traveling Out of Range
During.a.call,.if.you.move.your.handset.too.far.from.your.base,.noise.may.increase..If.you.pass.the.range.limit.of.the.
base,.the.handset.will.beep,.display.OUT.OF.RANGE,.and.then.go.to.standby..The.base.will.maintain.the.connection.
for.thirty.seconds.after.the.handset.goes.out.of.range..If.you.move.the.handset.back.within.range.of.the.base.within.
thirty.seconds,.press.
Troubleshooting
[ /Flash].or.[ ].to.pick.up.the.call.again.
57
Page 58

Liquid Damage
Moisture.and.liquid.can.damage.your.cordless.phone.
If.the.handset.or.base.is.exposed.to.moisture.or.liquid,.but.only.the.exterior.plastic.housing.is.affected,.wipe.off.
•
the.liquid,.and.use.as.normal..
If.moisture.or.liquid.has.entered.the.plastic.housing.(i.e..liquid.can.be.heard.in.the.phone.or.liquid.has.entered.the.
•
handset.battery.compartment.or.vent.openings.on.the.base),.follow.the.steps.below:
Handset Base
1)
Remove.the.battery.cover.and.leave.it.off.for.ventilation.
2)
Disconnect.the.battery.pack..Leave.the.battery.cover.off.
and.the.battery.pack.disconnected.for.at.least.3.days.
Once.the.handset.is.completely.dry,.reconnect.the.
3)
battery.pack.and.the.battery.cover.
Recharge.the.handset’s.battery.pack.for.15.to.20.hours.
4)
before.using..
IMPORTANT:.You.must.unplug.the.telephone.line.while.recharging.the.battery.packs.to.avoid.charge.interruption.
CAUTION: DO NOT use a microwave oven to speed up the drying process. This will cause permanent
damage to the handset, base and the microwave oven. After following these steps, if your phone
does not work, please call our Customer Service Hotline (see the back cover page).
If the waterproof handset falls in water
If.your.waterproof.handset.is.submerged.in.water,.just.pull.it.out.and.dry.it.off..You.might.notice.that.the.sound.is.
distorted..This.is.because.there.is.still.water.remaining.in.and.around.the.speaker.and.microphone..Just.shake.the.
handset.to.clear.excess.water,.and.the.sound.should.return.to.normal.
Note:. The.charging.cradle.is.not.waterproof..If.the.charging.cradle.falls.into.water,.unplug.it.before.attempting.to.
remove.it.from.the.water..Allow.the.cradle.to.dry.completely.before.reconnecting.the.power.
1)
Disconnect.the.AC.adapter.from.the.base,.
cutting.off.electrical.power.
2)
Disconnect.the.telephone.cord.from.the.base.
3)
Let.dry.for.at.least.3.days..
Troubleshooting
58
Page 59

60
Precautions!
Before.you.read.anything.else,.please.observe.the.following:
Warning!
Other.than.the.waterproof.handset,.Uniden.America.
Corporation.DOES.NOT.represent.any.other.part.of.this.unit.
to be waterproof. To reduce the risk of re, electrical shock,
or.damage.to.the.unit,.DO.NOT.expose.this.unit.to.rain.or.
moisture..
Rechargeable Nickel-Metal-Hydride
Battery Warning
This.equipment.contains.a.rechargeable.Nickel-Metal-
•
Hydride.battery..
The.rechargeable.batteries.contained.in.this.equipment.
•
may explode if disposed of in a re.
Nickel.is.a.chemical.known.to.state.of.California.to.cause.
•
cancer..
Do.not.short-circuit.the.battery..
•
Do.not.charge.the.rechargeable.battery.used.in.this.
•
equipment.in.any.charger.other.than.the.one.designed.to.
charge this battery as specied in the owner's manual.
Using.another.charger.may.damage.the.battery.or.cause.
the.battery.to.explode..
Rechargeable.Batteries.Must.Be.Recycled.or.Disposed.of.
Properly.
Uniden.works.to.reduce.lead.content.in.our.PVC.coated.cords.
in.our.products.and.accessories.
Precautions!
Warning!
The.cords.on.this.product.and/or.accessories.contain.lead,.a.
chemical.known.to.the.State.of.California.to.cause.birth.defects.
or.other.reproductive.harm..Wash.hands.after.handling.
Important Safety Instructions
When.using.your.telephone.equipment,.basic.safety.
precautions should always be followed to reduce the risk of re,
electric.shock.and.injury.to.persons,.including.the.following:.
Do.not.use.this.product.near.water,.for.example,.near.
1.
a.bath.tub,.wash.bowl,.kitchen.sink.or.laundry.tub,.in.a.
wet.basement.or.near.a.swimming.pool..
Avoid.using.a.telephone.(other.than.a.cordless.type).
2.
during.an.electrical.storm..There.may.be.a.remote.risk.
of.electric.shock.from.lightning..
Do.not.use.the.telephone.to.report.a.gas.leak.in.the.
3.
vicinity.of.the.leak..
Use.only.the.power.cord.and.batteries.indicated.in.
4.
this manual. Do not dispose of batteries in a re. They
may.explode..Check.with.local.authorities.for.possible.
battery.disposal.instructions..
Do.not.disassemble.any.component.of.this.product.
5.
SAVE THESE INSTRUCTIONS
CAUTION
Risk.of.explosion.if.battery.is.replaced.by.an.incorrect.type..
Dispose.of.used.batteries.according.to.the.instructions..Do.not.
open.or.mutilate.the.battery,.and.disconnect.the.battery.before.
shipping.this.product.
59
Page 60

The FCC Wants You To Know
This.equipment.complies.with.Part.68.of.the.FCC.rules.and.the.
requirements.adopted.by.the.ACTA..On.the.bottom.of.this.equipment.
is a label that contains, among other information, a product identier
in.the.format.US:.AAAEQ##TXXXX..If.requested,.this.number.must.be.
provided.to.the.telephone.company.
An applicable Universal Service Order Codes (USOC) certication
for.the.jacks.used.in.this.equipment.is.provided.(i.e.,.RJ11C).in.the.
packaging.with.each.piece.of.approved.terminal.equipment..A.plug.
and.jack.used.to.connect.this.equipment.to.the.premises.wiring.and.
telephone.network.must.comply.with.the.applicable.FCC.Part.68.rules.
and.requirements.adopted.by.the.ACTA..A.compliant.telephone.cord.
and.modular.plug.is.provided.with.this.product..It.is.designed.to.be.
connected.to.a.compatible.modular.jack.that.is.also.compliant..See.
installation.instructions.for.details.
The.REN.is.used.to.determine.the.number.of.devices.that.may.be.
connected.to.a.telephone.line..Excessive.RENs.on.a.telephone.line.
may.result.in.the.devices.not.ringing.in.response.to.an.incoming.call..In.
most but not all areas, the sum of RENs should not exceed ve (5.0).
To.be.certain.of.the.number.of.devices.that.may.be.connected.to.a.line,.
as.determined.by.the.total.RENs,.contact.the.telephone.provider..For.
products.approved.after.July.23,.2001,.the.REN.for.this.product.is.part.
of the product identier that has the format US:AAAEQ##TXXXX. The
digits.represented.by.##.are.the.REN.without.a.decimal.point.(e.g.,.03.
is.a.REN.of.0.3)..For.earlier.products,.the.REN.is.separately.shown.on.
the.label.
If.this.equipment.causes.harm.to.the.telephone.network,.the.telephone.
company.will.notify.you.in.advance.that.temporary.discontinuance.
of.service.may.be.required..But.if.advance.notice.isn’t.practical,.the.
telephone.company.will.notify.the.customer.as.soon.as.possible..Also,.
you will be advised of your right to le a complaint with the FCC if you
believe.it.is.necessary...The.telephone.company.may.make.changes.in.
its.facilities,.equipment,.operations.or.procedures.that.could.affect.the.
operation.of.the.equipment..If.this.happens.the.telephone.company.will.
provide advance notice in order for you to make necessary modications
to.maintain.uninterrupted.service.
Please.follow.instructions.for.repairing,.if.any.(e.g..battery.replacement.
section);.otherwise.do.not.substitute.or.repair.any.parts.of.the.device.
except as specied in this manual. Connection to party line service is
subject.to.state.tariffs..Contact.the.state.public.utility.commission,.public.
service.commission.or.corporation.commission.for.information..This.
equipment.is.hearing.aid.compatible.
Should.you.experience.trouble.with.this.equipment,.please.contact.
Uniden.customer.service.at.800-297-1023..If.the.equipment.is.causing.
harm.to.the.telephone.network,.the.telephone.company.may.request.that.
you.disconnect.the.equipment.until.the.problem.is.resolved..
NOTICE:.According.to.telephone.company.reports,.AC.electrical.surges,.
typically.resulting.from.lightning.strikes,.are.very.destructive.to.telephone.
equipment.connected.to.AC.power.sources..To.minimize.damage.from.
these.types.of.surges,.a.surge.arrestor.is.recommended.
Changes or modications to this product not expressly approved by
Uniden,.or.operation.of.this.product.in.any.way.other.than.as.detailed.by.
the.owner’s.manual,.could.void.your.authority.to.operate.this.product.
This.device.complies.with.part.15.of.the.FCC.rules..Operation.is.subject.
to.the.following.two.conditions:.(1).This.device.may.not.cause.harmful.
interference,.and.(2).This.device.must.accept.any.interference.received,.
including.interference.that.may.cause.undesired.operation..Privacy.of.
communications.may.not.be.ensured.when.using.this.phone.
To.insure.the.safety.of.users,.the.FCC.has.established.criteria.for.
the.amount.of.radio.frequency.energy.various.products.may.produce.
depending.on.their.intended.usage..This.product.has.been.tested.
and.found.to.comply.with.the.FCC’s.exposure.criteria..For.body.worn.
operation,.the.FCC.RF.exposure.guidelines.were.also.met.when.used.
with.the.Uniden.accessories.supplied.or.designed.for.this.product..Use.
of.other.accessories.may.not.ensure.compliance.with.FCC.RF.exposure.
guidelines.and.should.be.avoided.
The.antenna(s).used.for.the.base-unit.must.be.installed.to.provide.a.
separation.distance.of.at.least.20.cm.from.all.persons.and.must.not.
be.collocated.or.operated.in.conjunction.with.any.other.antenna.or.
transmitter.
If.your.home.has.wired.alarm.equipment.connected.to.a.phone.line,.be.
sure.that.installing.the.system.does.not.disable.your.alarm.equipment.
If.you.have.questions.about.what.will.disable.alarm.equipment,.contact.
your telephone company or a qualied installer.
Precautions!
60
Page 61

Radio Interference
Radio.interference.may.occasionally.cause.buzzing.and.
humming.in.your.cordless.handset,.or.clicking.noises.in.the.
base..This.interference.is.caused.by.external.sources.such.
as TV, refrigerator, vacuum cleaner, uorescent lighting, or
electrical.storm..Your.unit.is.NOT.DEFECTIVE..If.these.noises.
continue.and.are.too.distracting,.please.check.around.your.
home.to.see.what.appliances.may.be.causing.the.problem..
In.addition,.we.recommend.that.the.base.not.be.plugged.into.
a.circuit.that.also.powers.a.major.appliance.because.of.the.
potential.for.interference..Be.certain.that.the.antenna.on.the.
unit.is.fully.extended.when.needed..In.the.unlikely.event.that.
you.consistently.hear.other.voices.or.distracting.transmissions.
on.your.phone,.you.may.be.receiving.radio.signals.from.
another.cordless.telephone.or.other.source.of.interference..
If.you.cannot.eliminate.this.type.of.interference,.you.need.to.
change.to.a.different.channel.
Finally,.it.should.be.noted.that.some.cordless.telephones.
operate.at.frequencies.that.may.cause.interference.to.nearby.
TVs.and.VCRs..To.minimize.or.prevent.such.interference,.the.
base.of.the.cordless.telephone.should.not.be.placed.near.or.on.
top.of.a.TV.or.VCR..If.interference.is.experienced,.moving.the.
cordless.telephone.farther.away.from.the.TV.or.VCR.will.often.
reduce.or.eliminate.the.interference.
.
Cordless Telephone Privacy
Cordless.telephones.are.radio.devices..Communications.
between.the.handset.and.base.of.your.cordless.telephone.
are.accomplished.by.means.of.radio.waves.which.are.
broadcast.over.the.open.airways..Because.of.the.inherent.
physical.properties.of.radio.waves,.your.communications.can.
be.received.by.radio.receiving.devices.other.than.your.own.
cordless.telephone.unit..Consequently,.any.communications.
using.your.cordless.telephone.may.not.be.private.
I.C. Notice
Terminal Equipment
NOTICE:.This.equipment.meets.the.applicable.Industry.
Canada Terminal Equipment Technical Specications. This is
conrmed by the registration number. The abbreviation, IC,
before the registration number signies that registration was
performed.based.on.a.Declaration.of.Conformity.indicating.that..
Industry Canada technical specications were met. It does not
imply.that.Industry.Canada.approved.the.equipment.
NOTICE:.The.Ringer.Equivalence.Number.(REN).for.this.
terminal.equipment.is.marked.on.the.equipment.itself..The.REN.
assigned.to.each.terminal.equipment.provides.an.indication.
of.the.maximum.number.of.terminals.allowed.to.be.connected.
to.a.telephone.interface..The.termination.on.an.interface.may.
consist.of.any.combination.of.devices.subject.only.to.the.
requirement.that.the.sum.of.the.Ringer.Equivalence.Numbers.
of all the devices does not exceed ve.
Radio Equipment
The term “IC:” before the radio certication number only signies
that Industry Canada technical specications were met.
Operation.is.subject.to.the.following.two.conditions:.(1).this.
device.may.not.cause.interference,.and.(2).this.device.must.
accept.any.interference,.including.interference.that.may.cause.
undesired.operation.of.the.device..“Privacy.of.communications.
may.not.be.ensured.when.using.this.telephone.”
Precautions!
61
Page 62

One Year Limited Warranty
Important:.Evidence.of.original.purchase.is.required.for.
warranty.service..WARRANTOR:.UNIDEN.AMERICA.
CORPORATION.(“Uniden”).ELEMENTS.OF.WARRANTY:.
Uniden.warrants,.for.one.year,.to.the.original.retail.owner,.
this.Uniden.Product.to.be.free.from.defects.in.materials.and.
craftsmanship.with.only.the.limitations.or.exclusions.set.out.
below..WARRANTY.DURATION:.This.warranty.to.the.original.
user.shall.terminate.and.be.of.no.further.effect.12.months.
after.the.date.of.original.retail.sale..The.warranty.is.invalid.if.
the.Product.is.(A).damaged.or.not.maintained.as.reasonable.
or necessary, (B) modied, altered, or used as part of any
conversion kits, subassemblies, or any congurations not sold
by.Uniden,.(C).improperly.installed,.(D).serviced.or.repaired.by.
someone.other.than.an.authorized.Uniden.service.center.for.a.
defect.or.malfunction.covered.by.this.warranty,.(E)
used.in.any.conjunction.with.equipment.or.parts.or.as.part.of.
any.system.not.manufactured.by.Uniden,.or.(F).installed.or.
programmed.by.anyone.other.than.as.detailed.by.the.owner’s.
manual.for.this.product..STATEMENT.OF.REMEDY:.In.the.
event.that.the.product.does.not.conform.to.this.warranty.at.
any.time.while.this.warranty.is.in.effect,.warrantor.will.either,.
at.its.option,.repair.or.replace.the.defective.unit.and.return.
it.to.you.without.charge.for.parts,.service,.or.any.other.cost.
(except.shipping.and.handling).incurred.by.warrantor.or.its.
representatives.in.connection.with.the.performance.of.this.
warranty..Warrantor,.at.its.option,.may.replace.the.unit.with.
a.new.or.refurbished.unit..THE.LIMITED.WARRANTY.SET.
FORTH.ABOVE.IS.THE.SOLE.AND.ENTIRE.WARRANTY.
PERTAINING.TO.THE.PRODUCT.AND.IS.IN.LIEU.OF.
AND.EXCLUDES.ALL.OTHER.WARRANTIES.OF.ANY.
NATURE.WHATSOEVER,.WHETHER.EXPRESS,.IMPLIED.
OR.ARISING.BY.OPERATION.OF.LAW,.INCLUDING,.
BUT.NOT.LIMITED.TO.ANY.IMPLIED.WARRANTIES.OF.
MERCHANTABILITY.OR.FITNESS.FOR
One Year Limited Warranty
A.PARTICULAR.PURPOSE..THIS.WARRANTY.DOES.
NOT.COVER.OR.PROVIDE.FOR.THE.REIMBURSEMENT.
OR.PAYMENT.OF.INCIDENTAL.OR.CONSEQUENTIAL.
DAMAGES..
Some.states.do.not.allow.this.exclusion.or.limitation.of.
incidental.or.consequential.damages.so.the.above.limitation.or.
exclusion.may.not.apply.to.you.
LEGAL REMEDIES: This warranty gives you specic legal
rights,.and.you.may.also.have.other.rights.which.vary.from.
state.to.state..This.warranty.is.void.outside.the.United.States.
of.America.and.Canada..PROCEDURE.FOR.OBTAINING.
PERFORMANCE.OF.WARRANTY:.If,.after.following.the.
instructions.in.the.owner’s.manual.you.are.certain.that.the.
Product.is.defective,.pack.the.Product.carefully.(preferably.
in.its.original.packaging)..Disconnect.the.battery.from.the.
Product.and.separately.secure.the.battery.in.its.own.separate.
packaging.within.the.shipping.carton..The.Product.should.
include.all.parts.and.accessories.originally.packaged.with.the.
Product..Include.evidence.of.original.purchase.and.a.note.
describing.the.defect.that.has.caused.you.to.return.it..The.
Product.should.be.shipped.freight.prepaid,.by.traceable.means,.
to.warrantor.at:.
Uniden America Service
4700.Amon.Carter.Blvd.
Fort.Worth,.TX.76155
62
Page 63

64
Index
A
Accessibility.................................... 5
Answering.calls............................ 30
Answering.system
Reviewing.messages................ 47
Setting.up.................................. 41
Turning.on/off
When.away.from.home............. 48
Any.key.answer............................ 29
Area.code..................................... 33
AutoTalk........................................ 29
B
Index
Banner.......................................... 28
Base
Installing
Parts.of.the.base....................... 17
Reading.the.display.................. 18
Wall.mounting
Battery
Battery.life
Installing...................................... 7
Low.battery.alert
Replacement.and.handling.......51
Belt.clip
........................................... 8
............................ 46
...................................... 8
...........................12
................................. 50
....................... 52
C
Caller.ID....................................... 32
Deleting.Caller.ID.records......... 33
Making.calls.from...................... 32
Call.screening......................... 45, 48
Call.waiting................................... 34
Chain.dialing................................. 31
Conferencing................................ 37
D
Day.and.time................................44
Dial.mode................................11, 40
F
FCC.statements........................... 60
Finding.a.handset......................... 37
G
Greetings
Deleting..................................... 43
Recording.................................. 42
Selecting...................................42
H
Handset
Accessing.the.answering.
system................................ 41
Banner...................................... 28
Choosing.a.ringer
Copying.phonebook.entries
Entering.text
Finding
......................................37
Parts.of.the.handset.................. 16
Reading.the.display.................. 18
Resetting................................... 55
Hanging.up................................... 30
Headset........................................ 40
Hold.............................................. 37
...................... 28
......26
.............................. 20
I
Installation......................................6
Intercom....................................... 39
K
Key.touch.tone............................. 22
L
Language
Answering.system.
announcements.................. 43
Display......................................21
Line.mode.for.base....................... 57
Liquid.damage
Low.battery.alert
.............................. 58
........................... 51
63
Page 64

M
Maintenance................................. 50
Making.a.calls............................... 30
Using.Caller.ID.......................... 32
Using.redial............................... 34
Using.the.phonebook................ 31
Message.alert
Mute
Microphone
Ringer
......................... 45, 48
...............................40
....................................... 35
O
Out.of.range................................. 57
P
Personal identication number.
(PIN)......................................48
Personal.ring................................22
Phonebook...................................23
Copying.entries......................... 26
Creating.new.entries................. 23
Deleting.entries......................... 25
Editing.entries...........................24
Finding.entries.......................... 24
Making.a.call.from..................... 31
Storing.Caller.ID.or.redial.
numbers.............................25
Privacy.mode
Pulse.dialing............................11, 40
................................ 39
R
Redial
Deleting.a.record....................... 34
Making.a.calls.with.................... 34
Ringer
Choosing.a.handset.ringer........ 28
Muting.......................................35
Personal.ring............................. 22
S
Safety.notices............................... 59
Screening.calls....................... 45, 48
Security.code................................ 48
Seven-digit.dialing........................ 33
T
Text,.entering................................ 20
Tone.dialing.............................11, 40
Transferring.a.call......................... 38
V
Volume,.adjusting......................... 35
W
Wall.mounting.the.base................ 12
Warranty....................................... 62
Index
64
Page 65

Remote Operation Card
Remote access
away from home
Turn on the answering
system remotely
1. Call your phone number from a
touch-tone phone.
2. During the outgoing message,
press 0 and enter your PIN
code. The answering system
announces the number of
messages stored in memory
and the voice prompts.
3. To quit, hang up the phone.
1. Call your phone and let it ring
10 times until you hear a beep.
2. Press 0 and then enter your
PIN code.
3. Press 0 then 5 to stop the
announcement.
4. Press 0 then 6 to turn the
answering system on.
REMOTE OPERATION CARD
CUT
65
Page 66

CUT
Task Key
Repeat a Message
Play Incoming Messages
Skip a Message
Delete a Message
Stop Operation
Answering System On
Answering System Off
Help
CUT
Task Key
Repeat a Message
Play Incoming Messages
Skip a Message
Delete a Message
Stop Operation
Answering System On
Answering System Off
Help
CUT
Task Key
Repeat a Message
Play Incoming Messages
Skip a Message
Delete a Message
Stop Operation
Answering System On
Answering System Off
Help
CUT
Task Key
Repeat a Message
Play Incoming Messages
Skip a Message
Delete a Message
Stop Operation
Answering System On
Answering System Off
Help
66
Page 67

May.be.covered.under.one.or.more.of.the.following.U.S..patents:
4,797,916 5,426,690 5,434,905 5,491,745 5,493,605 5,533,010 5,574,727 5,581,598
5,650,790 5,660,269 5,661,780 5,663,981 5,671,248 5,696,471 5,717,312 5,732,355
5,754,407 5,758,289 5,768,345 5,787,356 5,794,152 5,801,466 5,825,161 5,864,619
5,893,034 5,912,968 5,915,227 5,929,598 5,930,720 5,960,358 5,987,330 6,044,281
6,070,082 6,125,277 6,253,088 6,314,278 6,418,209
6,782,098 6,788,920
6,953,118 7,023,176 7,030,819 7,146,160 7,203,307 7,206,403
Other.patents.pending.
6,788,953 6,839,550 6,889,184 6,901,271 6,907,094 6,914,940
6,618,015 6,671,315 6,714,630
Page 68

VISIT OUR WEBSITE AT
WWW.UNIDEN.COM IF YOU...
...HAVE A QUESTION OR A PROBLEM.
•
Or call our Customer Hotline at 1-800-297-1023 during regular business hours.*
...ARE LOOKING FOR A PART OR ACCESSORY.
•
Or call our Parts Department at 1-800-554-3988 during regular business hours.*
...NEED SPECIAL ASSISTANCE DUE TO A DISABILITY.
•
Or call our Accessibility help line at 1-800-874-9314 (voice or TTY).
© 2008 Uniden America Corp.,
Fort Worth, Texas. Printed In China.
UCZZ75539EZ(0)
* Central Standard Time. Detailed
customer service hours are available
at www.uniden.com.
 Loading...