

Page 1

DECT
1805
MANUAL
OWNER’S
Dect 1805 Qk 2/26/02 10:12 AM Page 1
Page 2
i
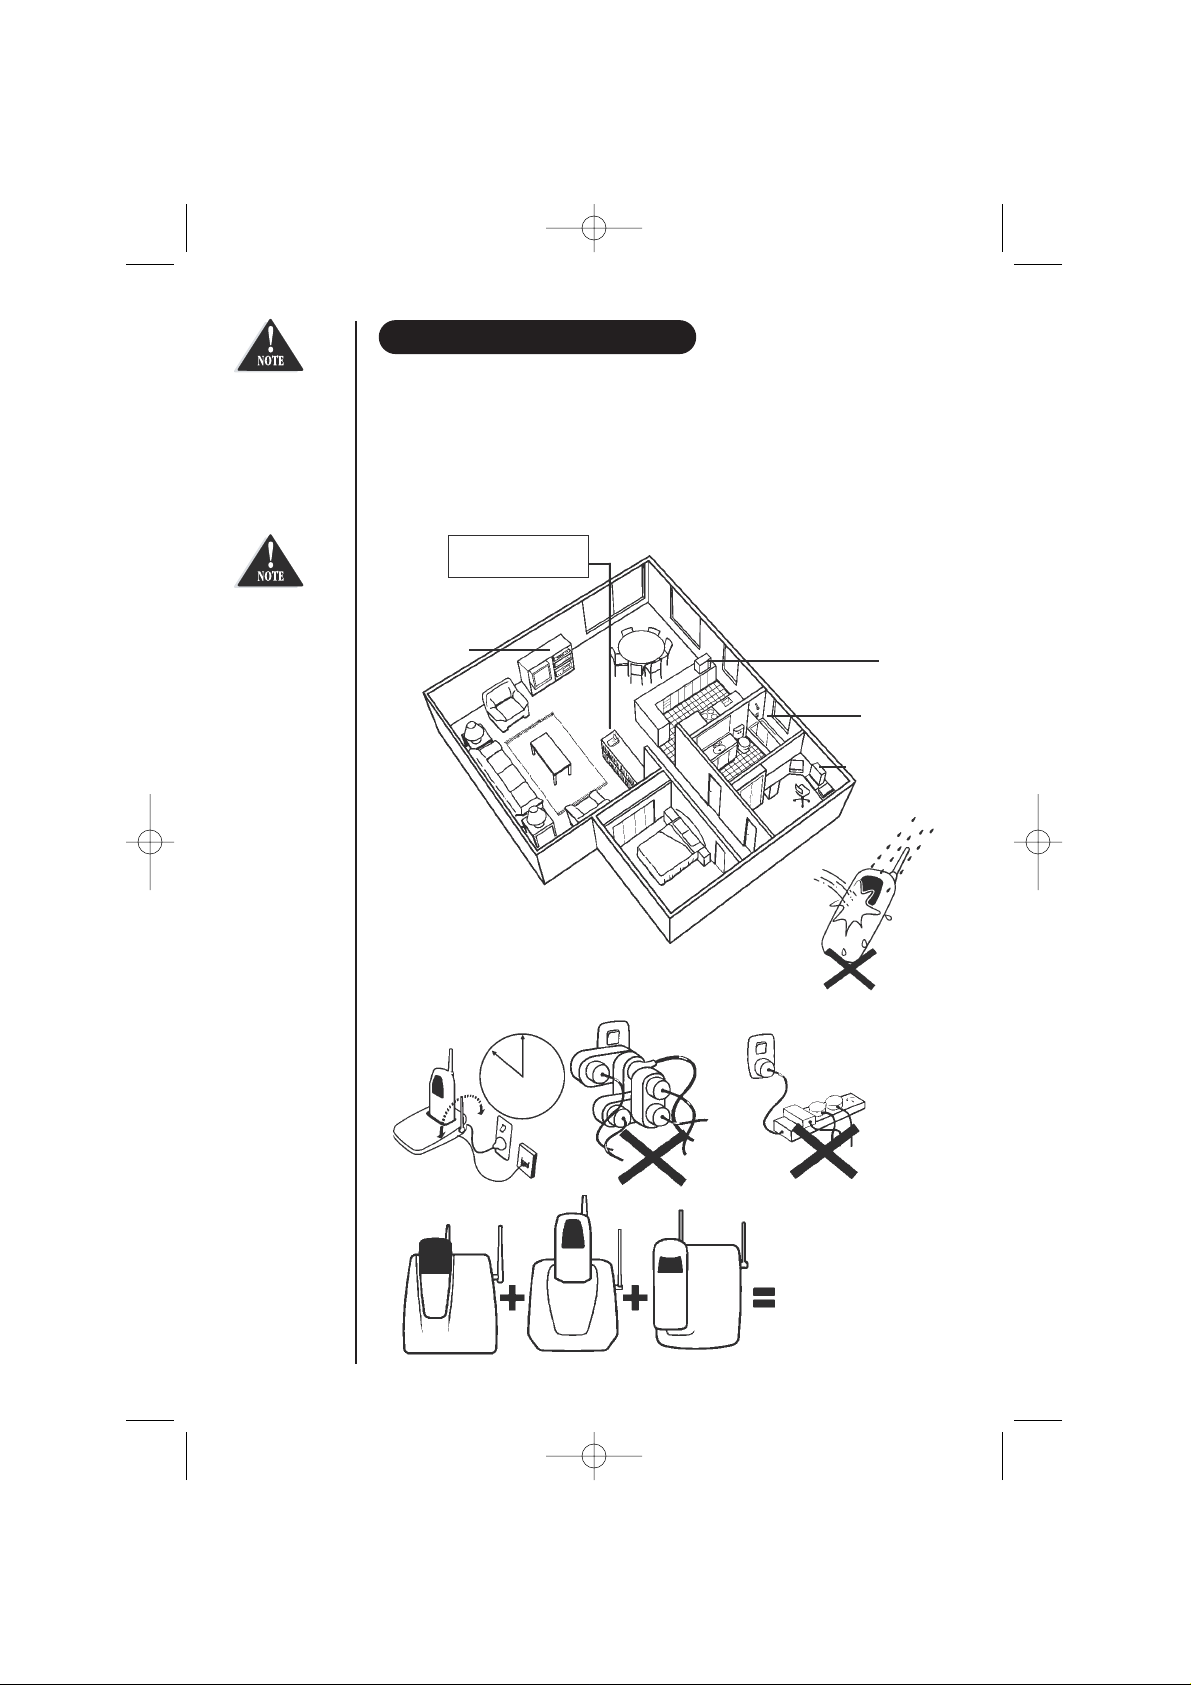
PRECAUTIONS
AVOID Television sets and
other electronic
appliances
CHARGE the new phone
for 15 - 20 hrs.
DON’T overload the
power outlet.
AVOID multi power
boards
AVOID -
connecting
more than
3
phones as ringing
may be impaired
AVOID -
Microwave
ovens
AVOID -
Moisture
AVOID -
Computers
CHOOSE a central location
AVOID Moisture
INSTALLATION & SAFETY
Choosing the best location for your phone
When choosing a location for your phone there are a number of appliances the phone
should be not be near, and areas you should avoid.
This symbol
indicates
important
operating
and servicing
instructions.
Please do not
attempt to
unplug any
appliance
during an
electrical storm.
Dect 1805 Qk 2/26/02 10:12 AM Page 2
Page 3

ii
This page is a very condensed version of your owners manual. It is designed to allow you to get your
phone installed and operating as quickly as possible - however it does not attempt to explain any of the
advanced features of your phone.
Here!
Installation
TEL PWR
(Australia)
Telephone socket
Main Base
(New Zealand)
Telephone cord
AC Adaptor
Power point
Quick Reference Guide
Start
Start
Here!
Plug the telephone cord into the main base unit,
then into the telephone socket on the wall.
Plug the AC Adaptor cord into the main base unit,
then into the power point.
Make sure the AC
Adaptor remains
plugged in and
switched on at
all times
Dect 1805 Qk 2/26/02 10:12 AM Page 3
Page 4
iii
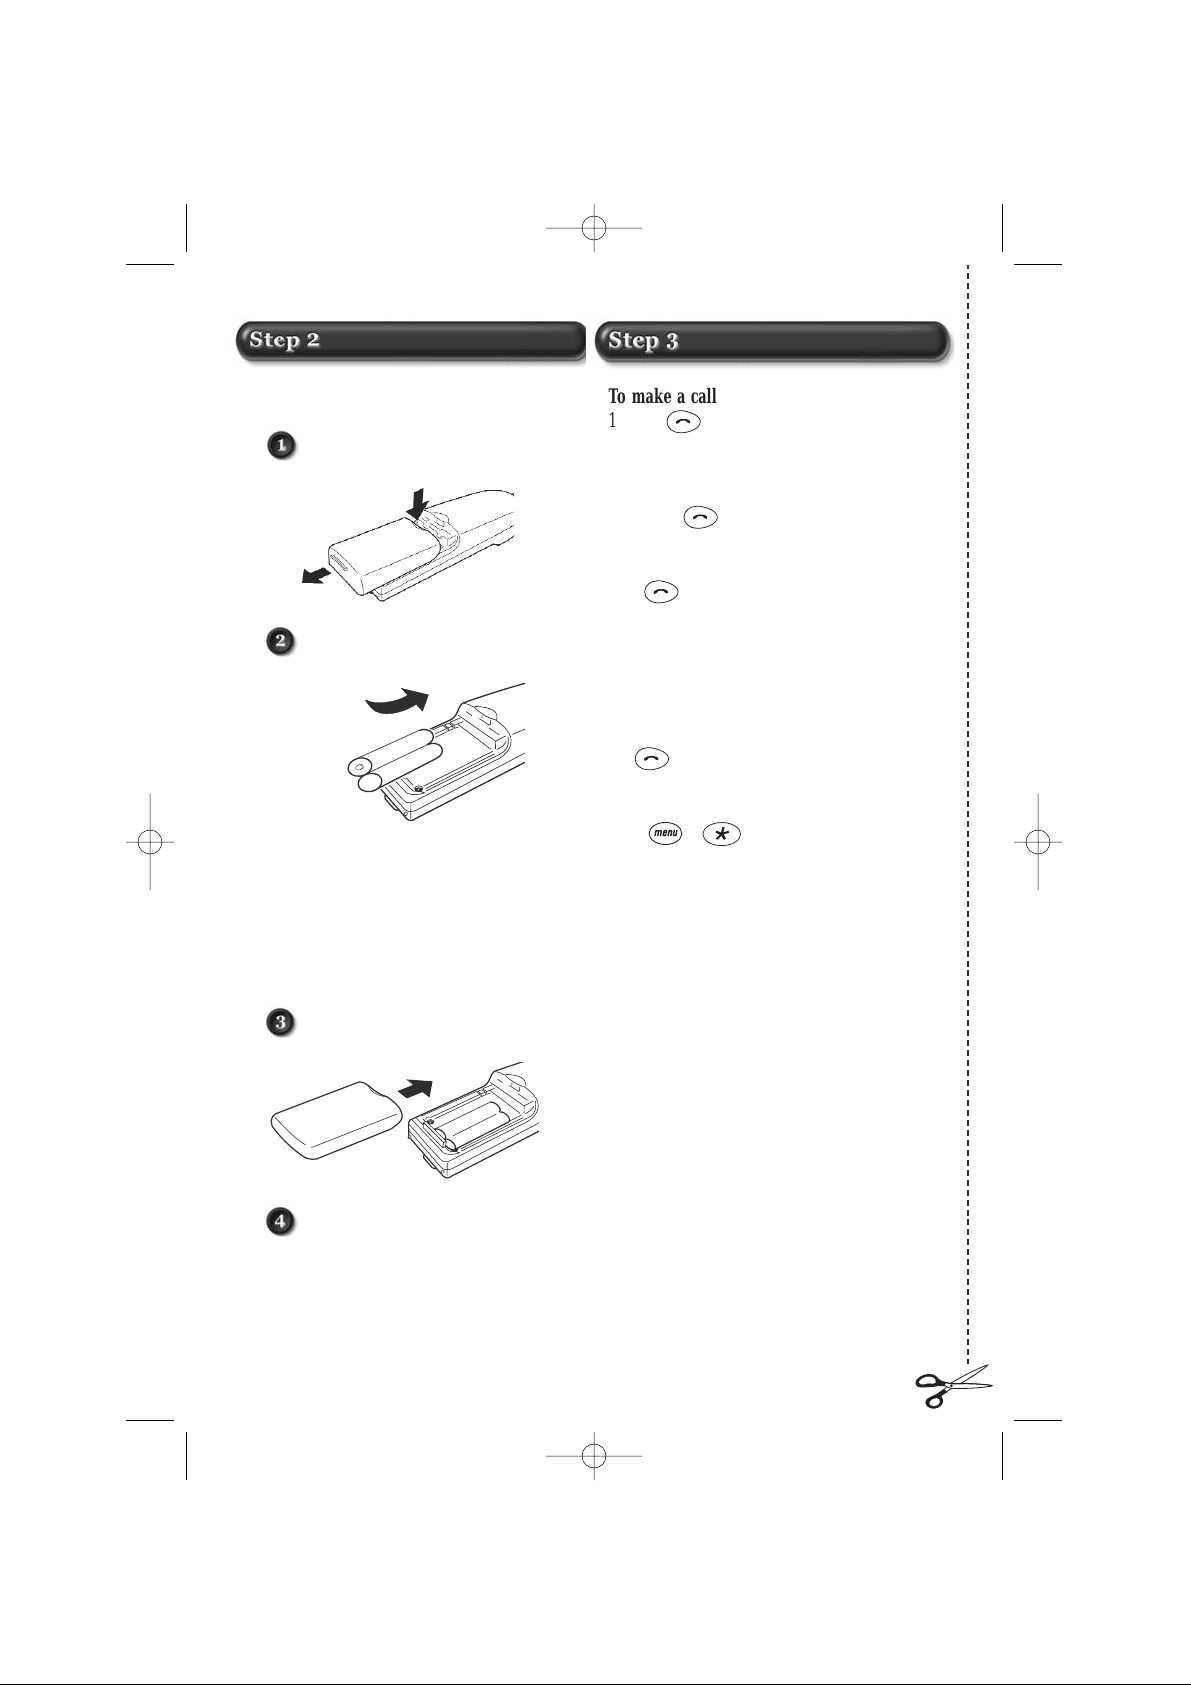
Installing the Handset Batteries
Press battery cover to release.
Slide cover off.
Install the 2 rechargeable
batteries in each handset.
Slide the battery covers back
until they snap into place.
Place the handsets on the base and
charge uninterrupted for 15 hours.
++--+
-
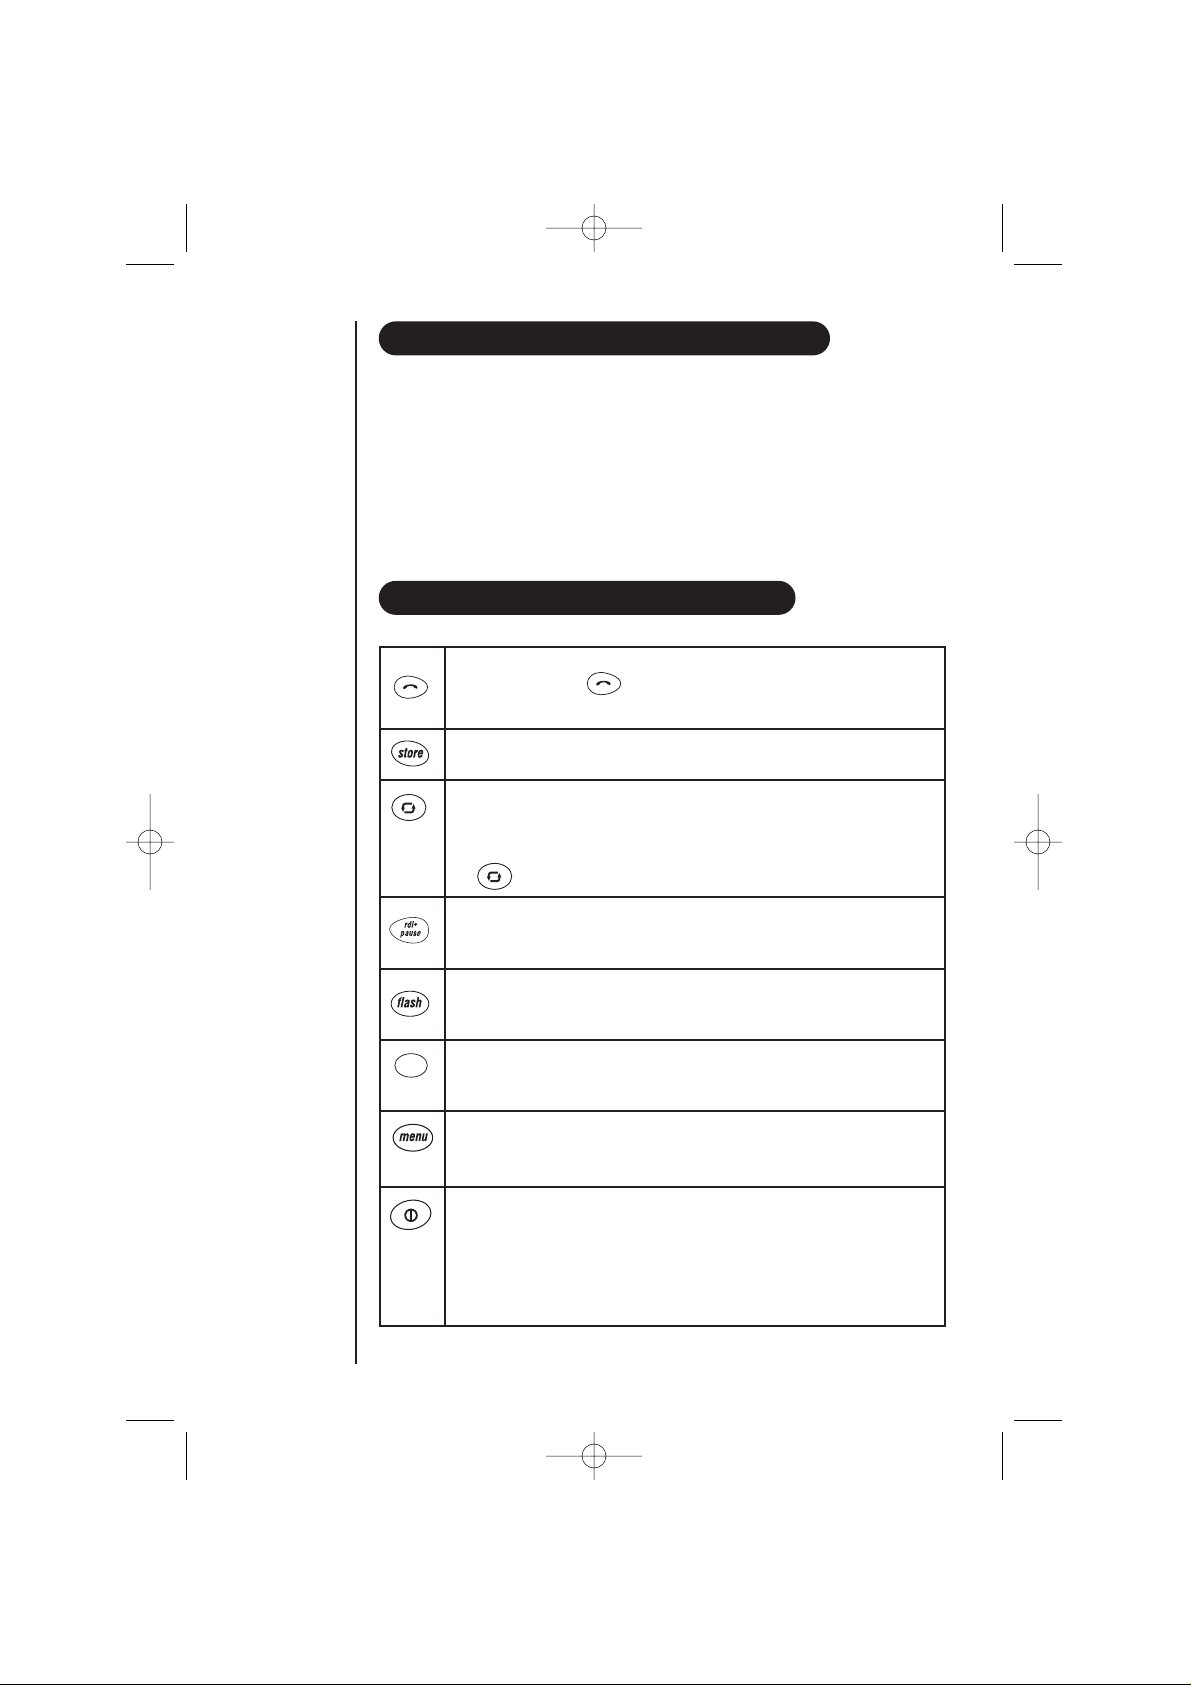
To make a call
1. Press and listen for the dial tone.
2. Dial phone number.
OR
1. Dial phone number
2. Press the key.
To hang up
Press or place the handset back on the
base unit.
To answer a call
Handset on the base unit: Remove handset from
the base and speak.
Handset off the base unit: Pick up handset, press
the key and speak.
To store a number:
• in Standby Mode, enter the telephone
number you wish to store and press .
•
NAME?
will be displayed.
• enter the name of the person with this
number in the same way that you entered the
letters of your user name (page 17).
• press key.
•
ADDRESS:XX
will be displayed.
• press key.
• the phone number is now stored in the memory.
To make a call
1. Press and listen for the dial tone.
2. Dial phone number.
OR
1. Dial phone number
2. Press the key.
To hang up
Press or place the handset back on the
base unit.
To answer a call
Handset on the base unit: Remove handset from
the base and speak.
Handset off the base unit: Pick up handset, press
the key and speak.
Keypad lock/unlock
Press
Dect 1805 Qk 2/26/02 10:12 AM Page 4
Page 5

CONTENTS
Installation & Safety ..............................................................................................................................................i
Step 1 - Installation .............................................................................................................................................ii
Step 2 - Installing the Handset Batteries ...................................................................................................iii
Step 3 - Using the phone ..................................................................................................................................iii
Base Station and Handset Display ..................................................................................................................2
Handset .................................................................................................................................................................3
Included in your Package ..................................................................................................................................3
Charging the Handset Batteries .......................................................................................................................4
Description of Handset Keys ............................................................................................................................4
Description of Displayed Symbols ................................................................................................................5
Using Your phone ..................................................................................................................................................6
Switching the Handset on and off ..................................................................................................................6
Locking and Unlocking the Keypad ...............................................................................................................6
Making an External Call ................................................................................................................................7
Making an Internal Call .................................................................................................................................9
Receiving a Call ............................................................................................................................................10
Call Transfer ..................................................................................................................................................10
Call Waiting ..................................................................................................................................................10
Page Handsets from the Base Station ..........................................................................................................10
Personalising Your Phone ...............................................................................................................................11
Dial Memories................................................................................................................................................11
Received Speech Volume................................................................................................................................12
Microphone Mute ...........................................................................................................................................12
Handset Ring Volume ...................................................................................................................................13
Handset Ring Tone ........................................................................................................................................13
Advanced Functions ............................................................................................................................................14
Handset Registration .....................................................................................................................................14
GAP Registration ...........................................................................................................................................14
Base Station Registration Key .......................................................................................................................15
Handset De-Registration ...............................................................................................................................16
PIN Code Changes ........................................................................................................................................17
Trouble Shooting .................................................................................................................................................18
Warranty ...............................................................................................................................................................19
Dect 1805 Qk 2/26/02 10:12 AM Page 5
Page 6
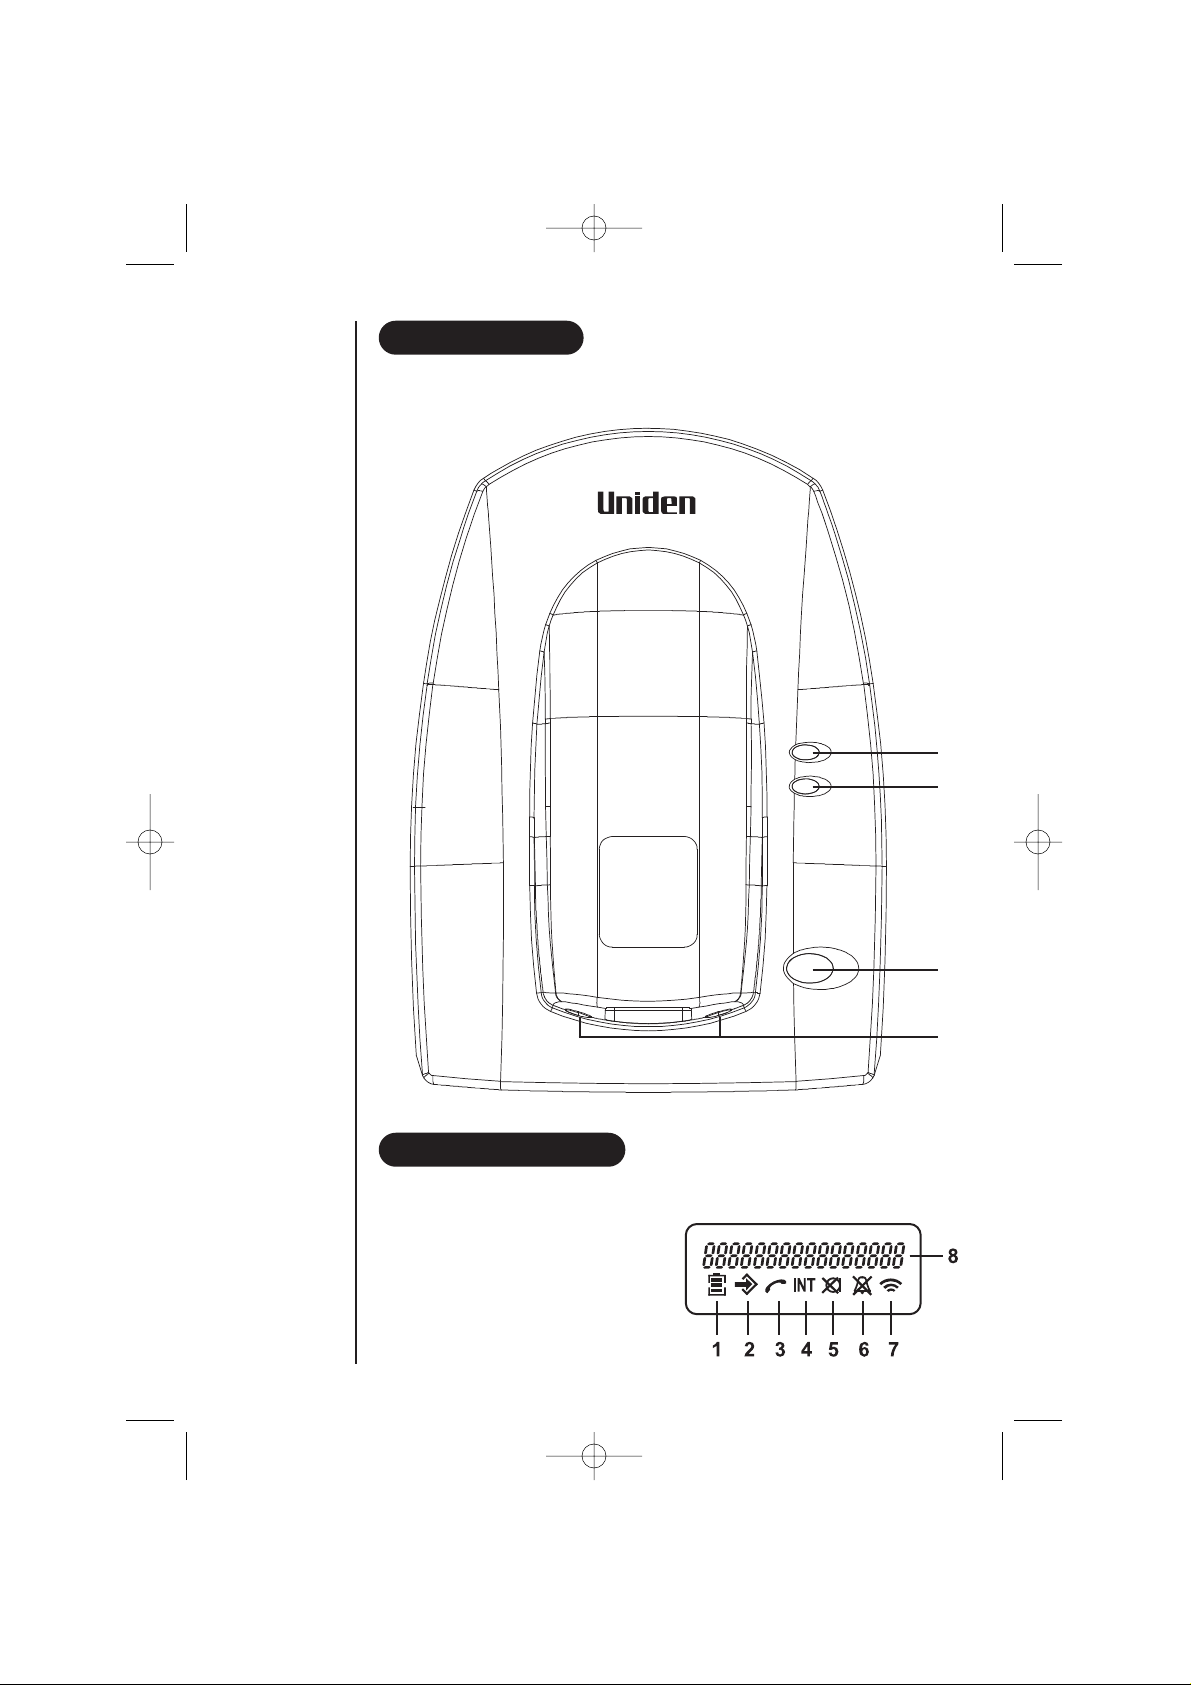
BASE STATION
1) Charge LED 2) In Use LED 3)Page key (Registration) 4)Charging contacts
HANDSET DISPLAY
- All icons displayed -
1) Battery icon 2) Menu icon
3) External Call icon 4) Internal Call icon
5) Microphone mute icon 6) Ringer Off icon
7) Range icon 8) Alphanumeric indicator
SETTING UP
2
charge
DIGITAL ENHANCED CORDLESS TELEPHONE
DECT
in use
page
1
2
3
4
Dect 1805 Qk 2/26/02 10:12 AM Page 6
Page 7
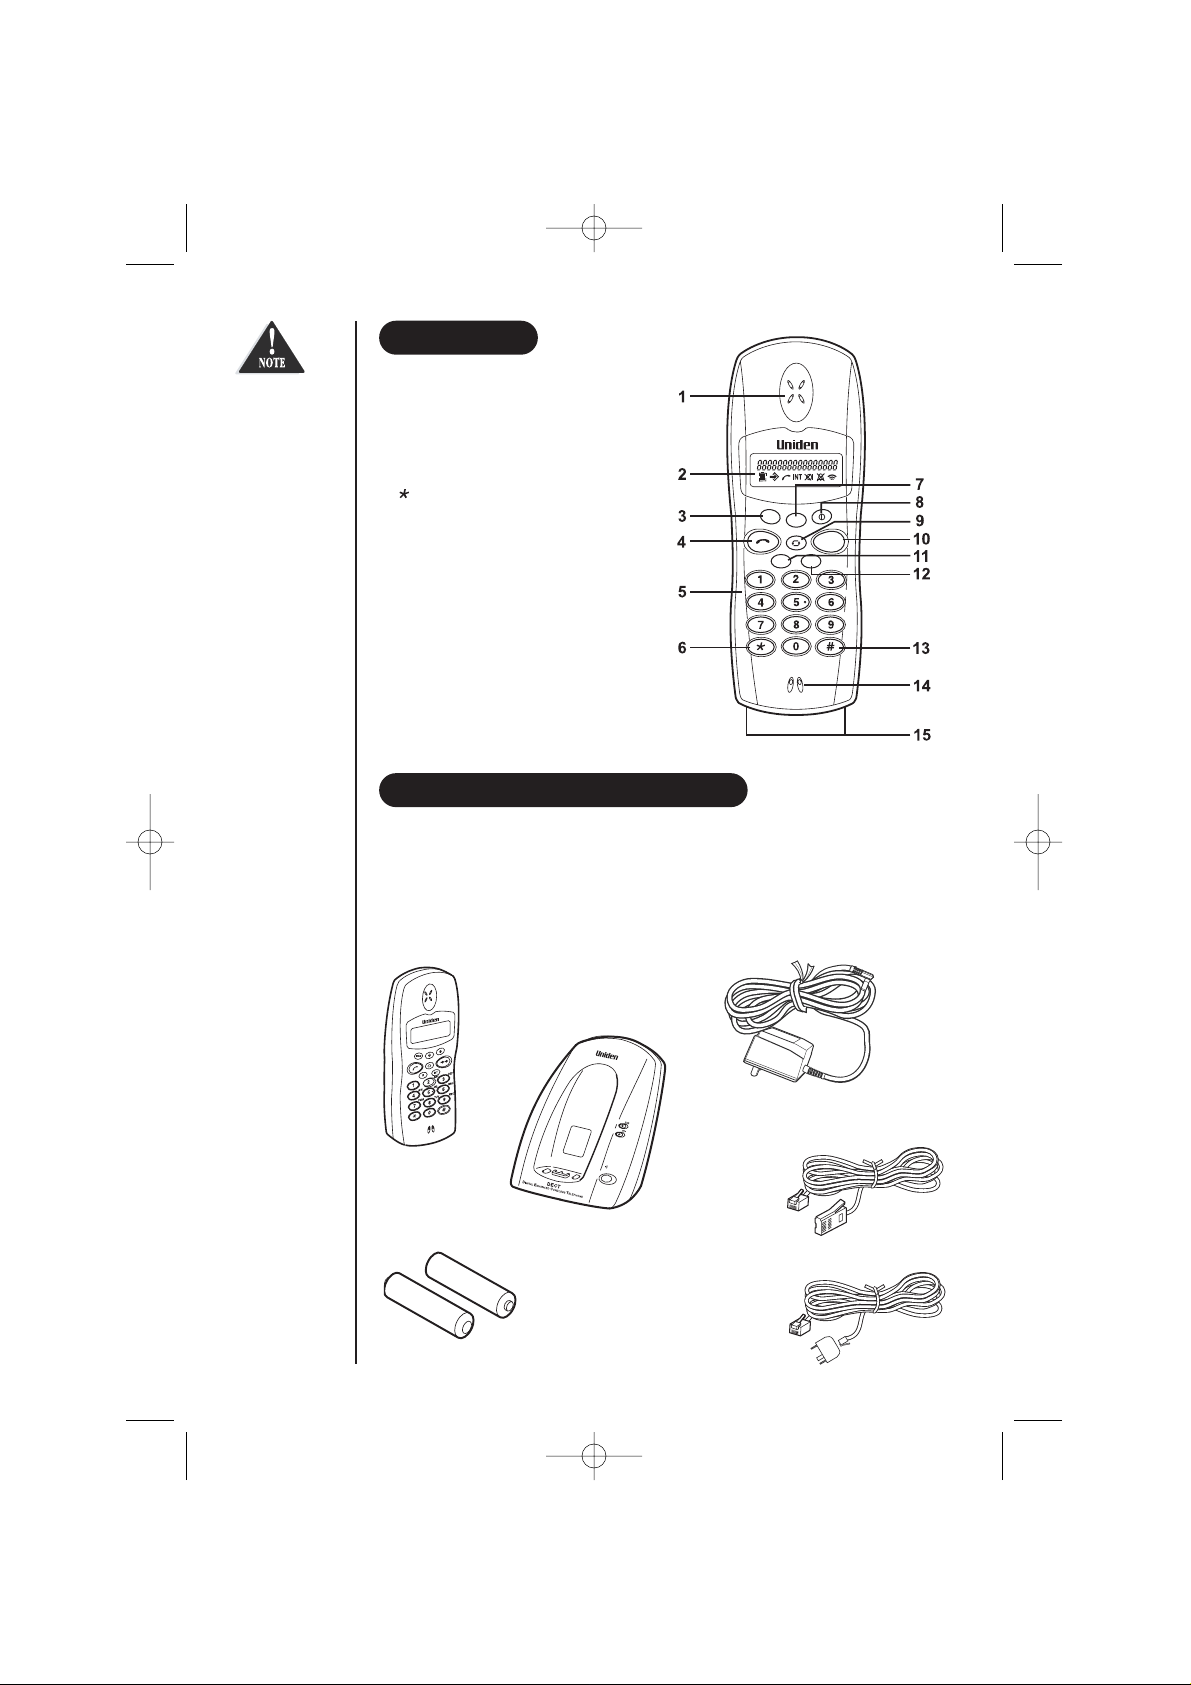
HANDSET
1) Handset earpiece
2) LCD display
3) Memory key
4) Talk key
5) Numeric keypad
6) key
7) Menu key
8) Power/Delete key
9) Up/Down key (Cycle)
10) Redial/Pause key
11) Flash key / Call Waiting
12) Internal Call key
13) # key
14) Handset microphone
15) Charging contacts
INCLUDED IN YOUR PACKAGE
Introduction
Please read this Guide before use and then save it in a convenient place
for future reference.
Whats in the Box?
Check these items have been included in the box.
SETTING UP
3
digital
store
menu
clear
rdl•
pause
flash
ghi
pqrs
tuv
wxyz
jkl
mno
def
abc
up •down
int
Handset
Rechargable Batteries
Telephone Cable
New Zealand
or
Telephone Cable
Australia
AC Adapter
Base Station
If anything is
missing, please
contact your
dealer
immediately.
Dect 1805 Qk 2/26/02 10:12 AM Page 7
Page 8
4
SETTING UP
CHARGING THE HANDSET BATTERIES
Charging of the Handset batteries takes place automatically when the Handset is placed on
the Base Station.
An LED on the side of the Base Station indicates that the Handset is charging.
When first setting up, the batteries should be charged uninterrupted for 15-20 hours; this
will ensure that they are fully charged.
In use, it is advisable to return the Handset to the Base Station to be charged at regular
intervals. After fully charging the Handset during setting up, the Handset should never
require longer than about six hours to return to its fully charged condition, e.g. overnight.
DESCRIPTION OF HANDSET KEYS
Talk Key: Pressing is equivalent to picking up a conventional
telephone.
Memory Key: Used to access Dialling Memories.
Up/Down (Cycle) Key: Some settings offer a series of options,
e.g. Five ring styles are offered. These options can be selected either by
pressing the appropriate number key or by cycling through the options using
the key.
Redial / Pause Key: Recalls and displays the last four telephone numbers
called.
Flash / Call Waiting: Used to access call waiting or to access some features
of a business PABX
Internal Call Key: If you have more than one handset registered on the
Base Station, then internal calls may be made between these handsets.
Program Mode: Used to programme speed dial numbers and
telephone settings.
Power / Delete Key: The Power / Delete Key serves three functions on
the Handset:
Power On/Off
Last Digit Delete
Program Abort
int
Dect 1805 Qk 2/26/02 10:12 AM Page 8
Page 9

5
SETTING UP
DESCRIPTION OF DISPLAYED SYMBOLS
BASE STATION
EXTERNAL CALL The External Call icon is visible when is pressed.
The icon flashes when:
there is an incoming call
a call has been dropped
another Handset is using the external line
INTERNAL CALL If you have more than one handset registered on the Basestation,
then internal calls may be made between these handsets.
BATTERY LEVEL Indicates the current battery status. When the battery is empty the
Low Battery Warning Tone will sound if it is set. Thirty seconds later
the Handset will 'close down'.
MICROPHONE The Handset microphone has been muted during a call.
MUTE
RINGER OFF The Handset ringer has been turned off.
SIGNAL RANGE Indicates signal strength to handset. All segments are flashed when
the handset i s searching for a Base station.
INT
CHARGE LED Indicates the Handset is charging.
IN USE LED Indicates that an External call is in progress.
Dect 1805 Qk 2/26/02 10:12 AM Page 9
Page 10

SWITCHING THE HANDSET ON AND OFF
To turn the handset on:
Press until the display is visible.
The Base Station number is shown on the left and the handset number shown on the right.
(These numbers may differ from those shown below.)
To turn the handset off:
Press and hold until the display goes blank.
(If the handset is off when it is returned to the Base Station cradle, it will automatically
switch back on).
LOCKING AND UNLOCKING THE KEYPAD
Locking the Handset keypad prevents accidental key presses causing dialling or programming. The only activities that can be performed whilst the keypad is locked are receipt of an
incoming call and unlocking the keypad.
Press followed by to lock the keypad.
The display will appear as below.
Repeat to unlock the keypad.
BASIC ACTIVITIES
6
LOC
--11--
11
Dect 1805 Qk 2/26/02 10:12 AM Page 10
Page 11

MAKING AN EXTERNAL CALL
Making an external call very easy -there are several styles of call:
• On-Line Dialled Calls
• Pre-Dial Calls
• Memorised Number Call
• Last Number Redial
• Caller ID Dial
On-Line Calls
Press
When the dial tone is heard, key in the number. As the number is entered it is displayed
and dialled.
Press
Press to finish the call.
Pre-dial Calls
Pre-dialling allows you to enter the telephone number before you take the outside line.
You may then check that the number is correct before dialling.
Key in the number. As the number is entered it is displayed.
Press
If a digit is entered incorrectly, use a short press of to delete it.
Press to dial the displayed number.
Press to finish the call.
Dialling a number stored in memory
Frequently dialled numbers may be stored in memory and easily dialled.
(To store numbers in the Dial Memories, see page 11.)
You may select a number to be dialled from those you have previously stored, either by
using the 2 digit directory location number or by scrolling through the memories.
BASIC ACTIVITIES
7
11 22 33
11 22 33
Dect 1805 Qk 2/26/02 10:12 AM Page 11
LOC
LOC
Page 12

8
Dialling from memory using the 2 digit directory location
Press the and enter the 2 digit directory number
01-20
that refers to the number
you wish to dial.
If the number is correct, press to dial the displayed number.
If the number you selected is the wrong memory location, you may use the
key to scroll through the memory locations, or press to exit.
Dialling from memory by scrolling stored numbers
Press
Press (Cycle) to step through the numbers you previously stored, until the number
you wish to dial is displayed.
Press and the number will be dialled.
When scrolling through the memories, if the stored number is too long to be
displayed, long key presses of and keys will reveal the digits of the
number that are not displayed.
BASIC ACTIVITIES
00 11 00 99 2277 3388 33 88 33
00 11 00 11 22 22 33 55 55 55 88 77 66
Dect 1805 Qk 2/26/02 10:12 AM Page 12
LOC
LOC
Page 13

Last Number Redial Calls
The handset stores the last four numbers called.
Press to display the last number called. Press again to display the
next number.
Press to dial the displayed number.
Caller ID Dialing(Not available on NZ Telecom Network)
The Caller ID Memory contains the telephone numbers of the last 25 calls made to the
Base Station. When a Caller ID telephone number is displayed, it can be dialled directly.
Press
(long press - greater than 2 seconds)
The CLI Store location is numbered from
01-24.
On entry, the telephone number of the
most recent caller
(01)
will be displayed.
To cycle through the 25 locations, press the Key.
Press to call the number directly.
MAKING AN INTERNAL CALL
If you have more than one handset registered on your Base Station, then internal calls can
be made between the handsets.
Press key.
Key in the number of the Handset to be called 1 to 6.
If the called Handset accepts the call, the dialled Handset number stops flashing
and the connection will be made.
All Handsets
All Handsets currently registered with the Basestation can be called simultaneously although
only one may answer.
Press the key.
Press the to call all Handsets.
When a Handset accepts the call, the star symbol will be replaced with the Handset identity.
BASIC ACTIVITIES
9
int
LOC
INT
00 11 00 11 77 66 33 55 55 55 77 66 55
11
int
In New Zealand
the Caller ID
dialing feature
is not available
on the Telecom
Network.
Dect 1805 Qk 2/26/02 10:12 AM Page 13
LOC
Page 14

RECEIVING A CALL
When a Handset receives an incoming call press .
The appropriate icon will remain illuminated for the duration of the call.
If the Handset is resting in the Base Station and the AutoTalk feature is enabled, simply
lifting the handset will connect the call.
CALL TRANSFER
If you have more than one handset registered on your Base Station, incoming external calls
can be transferred to another Handset.
After pressing to accept the call - inform the caller that you are about to transfer
the call:
Press then the number of the Handset to recieve the call.
When the other handset is answered you may speak to them first and then transfer the call
by pressing .
If the other handset does not answer, Press to return to the original caller.
An optional Dect handset is required for this feature.
CALL TRANSFER THROUGH A PABX
This telephone may not be compatible with all PABX Systems. Please contact your PABX
provider for information on transferring calls. However a common method of transferring
through a PABX is to press then the extension number you require followed by .
CALL WAITING / FLASH
If the call waiting tone sounds during a call:
Australia: Press then to switch between callers.
New Zealand: Press to switch between callers.
PAGE HANDSETS FROM THE BASE STATION
Pressing the Page key on the Base Station will cause all handsets to ring for 30 seconds.
This may be useful if you wish to locate a missing handset.
Pressing the Page button again, or pressing on a handset, will stop the paging signal.
If the Base Station Page key is pressed for longer than 4 seconds, the
Base Station will enter the registration mode.
BASIC ACTIVITIES
10
int
Dect 1805 Qk 2/26/02 10:12 AM Page 14
int
Page 15

DIAL MEMORIES
Each Handset can store up to 20 telephone numbers in Dial Memories.
Each number can be up to 24 digits long.
Storing a number in memory
Press then .
Press until an empty location (location number followed by 3 bars), is reached.
Enter the telephone number to be stored.
Confirm and exit Dial Memory mode by pressing .
Whilst entering the telephone number, an incorrectly entered digit may be removed
by a short press of (less than 2 seconds).
Changing the Number
The number stored in a particular dial memory can be overwritten or changed simply by
following the procedure for storing numbers and entering the new number over the existing
number.
Displaying long numbers
If the stored number is too long to be displayed, long key presses of the or
keys will move the displayed number left or right respectively.
USER PREFERENCES
11
00 11
LOC
00 11 00 99 2277 33 88 33 88 33
Numbers stored
in one Handset
can not be
accessed from
other Handsets
Dect 1805 Qk 2/26/02 10:12 AM Page 15
LOC
Page 16

Delete a Number from Memory
Numbers held in a Dial Memory locations can be deleted.
Press then
Press to step to the number to be deleted.
When the number to be deleted is displayed, short presses of the Power/Delete key will delete
the last digit of the number. When all digits have been deleted Press .
The number previously stored in the displayed location will be deleted.
RECEIVED SPEECH VOLUME
The volume of received speech heard in the earpiece, can be adjusted through five levels.
This must be done whilst a call is in progress.
The volume will increase for each press of .
Note that the volume will stay at the last setting after each call.
MICROPHONE MUTE
To allow the user to have a private conversation during an external call.
Press then to turn the Mic Mute on and off.
USER PREFERENCES
12
maximum
minimum
LOC
Dect 1805 Qk 2/26/02 10:12 AM Page 16
Page 17

HANDSET RING VOLUME
The Handset Ring Volume can be adjusted through five levels (0 through 4).
Press then .
The display shows the current ring volume setting; the current setting is level 2
You may step through the available settings by pressing .
Confirm the setting by pressing
Disabling the ringer
The handset ringer may be switched off by following the procedure above and selecting the
‘Zero level’ setting.
With the ringer switched off, will be shown on the display. The phone symbol will
flash when an incoming call is detected.
HANDSET RING TONE
Five Handset ring tones are available, numbered from 1 to 5.
Press then .
The display shows and sounds the current ring Style setting.
Press
The Ring Style will change (1 through 5) for each press of .
Press to store and exit .
USER PREFERENCES
13
maximum (4)
(3)
(2)
minimum (1)
off (0)
LOC
Dect 1805 Qk 2/26/02 10:12 AM Page 17
Page 18

ADVANCED FUNCTIONS
Handset Registration
Handsets need to be registered with Basestations. Each Handset can be registered with up to
four Basestations. Up to six Handsets can be registered to each Basestation.
GAP Registration
This Telephone conforms to the GAP (Generic Access Profile) standard. This means that the
Handset can be registered with basestations made by other manufacturers provided that they
also comply with the GAP requirements. Similarly other manufacturer's handsets can be
registered with the Basestation.
For the registration procedure associated with non-Uniden equipment, the relevant user
documentation should be consulted.
It should be noted that other Brand equipment might not provide the comprehensive
features available with this telephone.
Since registration of a Handset must be completed within 90 seconds, it may be
advisable to review these instructions before starting.
ADVANCED FUNCTIONS
14
Dect 1805 Qk 2/26/02 10:12 AM Page 18
Page 19

BASESTATION REGISTRATION KEY
Press and hold the Base Station Registration key for five seconds. The Talk LED on the
Base Station will flash to indicate that it is in registration mode. The user then has 90
seconds to complete the handset registration procedure.
An unregistered Handset shows the display shown below:
Press then .
The available Base Station numbers (1 to 4) are displayed.
If the handset is already registered onto a Base Station, then the number of the
Base Station will flash. If you have more than one Base Station and are registering
the handset onto a second Base Station, then you should select the first number
that is not flashing.
Select the first available Base Station number.
As confirmation, the user is prompted for the System PIN number.
The default System PIN (the PIN that the unit arrives with) is 1111 (see page 17)
Press the PIN digit keys.
Press the 4 Digit Pin number (default )
ADVANCED FUNCTIONS
- - - -
11 22 33 44
15
_ _ _
Dect 1805 Qk 2/26/02 10:12 AM Page 19
LOC
LOC
LOC
Page 20

If this is entered correctly, the Handset will start to search for the Base Station.
If the PIN is incorrect, a single low tone will be heard and another opportunity to
enter the PIN offered.
The Handset will display the Base Station RFPI. (The RFPI is a unique 10 digits number to
each Base Station and serves to indicate that a Base Station has been located.)
Press to accept the RFPI.
Finally a Handset number must be selected. Each Base Station can support up to six
Handsets. The available Handset numbers are displayed this:
Select the first available Handset number.
Press .
Note that the display shows the Base Station (left) and Handset (right) numbers:
HANDSET DE-REGISTRATION
Handsets can be de-registered from Base Stations as required.
Press .
The user is prompted for the System PIN.
The default System PIN is (see page 17)
Press the 4 digit PIN.
ADVANCED FUNCTIONS
-- 11 -- 11
INT
16
00 00 22 22 11 11 33 AA 99 88
11 22 33 44 55 66
- - - -
Dect 1805 Qk 2/26/02 10:12 AM Page 20
LOC
LOC
LOC
int
LOC
Page 21

The handset numbers already registered are displayed. In the example shown, handsets
1,2 and 6 are registered.
Press the Handset number to be de-registered. eg
Press
The selected Handset is now de-registered.
PIN CODE CHANGES
The default System PIN (the PIN that the unit arrives with) is 1111.
The System PIN can be changed from any Handset registered to a Base Station.
Press .
The user is prompted for the current System PIN.
Press the 4 digit PIN.
Press the new 4 digit PIN.
Confirm the new PIN digit keys by entering the number again.
Confirm the setting and ensure that you make a note of the new PIN number in a convenient location. Press to store and exit.
IMPORTANT NOTE The PIN number is required to program many of the
features of this product. If the PIN is changed from its factory default, and the new
number is lost, then it will not be possible to program the features that require its use.
ADVANCED FUNCTIONS
99 -- 11 22 66
INT
LOC
INT
LOC
INT
LOC
INT
17
- - - -
- - - -
- - - -
Dect 1805 Qk 2/26/02 10:12 AM Page 21
LOC
int
Page 22

SUGGESTION
• Make sure the AC adaptor is plugged into the base and
wall outlet.
• Make sure the handset is sitting correctly
in the base.
• Make sure the charging contacts on the handset and base
are clean.
• Move the handset and/or base to a different location away
from metal objects or appliances and try again.
• The handset rechargable battery may need to be
charged.
• You may be out of normal operating range. Move closer to
the base unit.
• Move the base unit so that it is centrally located in your
residence or office and not near appliances.
• Check both ends of the base telephone line cord are
firmly pushed in until they click.
• Make sure the AC adaptor is plugged into the base and
wall outlet.
• Disconnect the AC adaptor for a few minutes, then
reconnect it.
• Place the handset back on the base unit for a few seconds.
• The rechargable battery pack may be weak. Charge the
battery for 15-20 hours.
• The handset may be too far away from the base. Place the
base away from appliances or metal objects.
• Place the handset back on the base unit for a few seconds.
• You may have exceeded the Ringer Equivalence Number
(REN) limit of how many phones can be connected to the
same line. The REN total of all devices (printed on the
label on the bottom of each unit) should not exceed three (3).
Disconnect the appropriate units to lower the REN total.
• Check the rechargable battery connection inside the
battery compartment on the handset.
• The handset rechargeable battery pack may need
to be charged.
• Your handset is not registered to your base unit.
• Please refer to page 15 for re-registering instructions.
PROBLEM
The charge light
won’t come on
when the handset
is placed on
the base.
The audio sounds
weak and/or
scratchy.
Can’t make or
receive calls.
The handset
doesn’t ring or
receive a page.
No power on
handset unit
Not sub
TROUBLESHOOTING
TROUBLE SHOOTING
If your phones are not performing to your expectations, please try these simple steps
first before calling Uniden customer service.
YOUR NEW PHONE
18
Dect 1805 Qk 2/26/02 10:12 AM Page 22
Page 23

WARRANTY
19
WARRANTY
One Year Limited Warranty
Important: Evidence of original purchase is required for warranty service.
Warrantor: Uniden Australia Pty Limited A.B.N. 58 001 865 498
Uniden New Zealand Limited
ELEMENT OF WARRANTY:Uniden warrants to the original retail owner for the duration
of this warranty, its DECT1805 (herein after referred to as the Product), to be free from
defects in materials and craftsmanship with only the limitations or exclusions set out below.
WARRANTY DURATION:This warranty to the original retail owner only, shall terminate
and be of no further effect 12 months after the date of original retail sale. This warranty will
be deemed invalid if the product is; (A) Damaged or not maintained as reasonable and necessary, (B) Modified, altered or used as part of any conversion kits, subassemblies, or any
configurations not sold by Uniden, (C) Improperly installed, (D) Repaired by someone other
than an authorised Uniden Repair Agent for a defect or malfunction covered by this warranty, (E) Used in conjunction with any equipment or parts or as part of a system not manufactured by Uniden, (F) Warranty is only valid in original country of purchase.
PARTS COVERED:This warranty covers for one (1) year, the Base Unit and Handset only.
All accessories (AC Adaptor etc)are covered for 90 days only.
STATEMENT OF REMEDY:In the event that the product does not conform to this warranty at any time while this warranty is in effect, the warrantor at its discretion, will repair
the defect or replace the product and return it to you without charge for parts or service.
THIS WARRANTY DOES NOT COVER OR PROVIDE FOR THE REIMBURSEMENT OR PAYMENT OF INCIDENTAL OR CONSEQUENTIAL DAMAGES. THIS GUARANTEE IS IN ADDITION TO AND DOES NOT IN ANY WAY AFFECT YOUR RIGHTS UNDER THE CONSUMER
GUARANTEE ACT.
PROCEDURE FOR OBTAINING PERFORMANCE OR WARRANTY: In the event that
the product does not conform to this warranty, the Product should be shipped or delivered,
freight pre-paid, with evidence of original purchase (eg. a copy of the sales docket), to the
warrantor at:
UNIDEN AUSTRALIA PTY LIMITED UNIDEN NEW ZEALAND LIMITED
SERVICE DIVISION SERVICE DIVISION
345 Princes Highway, 150 Harris Road,
Rockdale NSW 2216 East Tamaki, Auckland
Ph (02) 9599 3355 Fx (02) 9599 3278 Ph (9) 273 8383 Fx (9) 274 4253
Toll Free 1300 366 895 Toll Free 0800 4 UNIDEN
4 864 336
www.uniden.com.au www.uniden.co.nz
Customers in other States should ship or deliver the Product freight pre-paid to their nearest
Uniden Authorised Repair Centre (Contact Uniden for the nearest Warranty Agent to you).
Dect 1805 Qk 2/26/02 10:12 AM Page 23
Page 24

THANK YOU
FOR PURCHASING A UNIDEN PHONE!
© 2002 Uniden Australia Pty Limited
Uniden New Zealand Limited
Printed in China
UDZZ01870ZZ
Dect 1805 Qk 2/26/02 10:12 AM Page 24
 Loading...