

Page 1
DECT 1010 QSG/OM 1 30/9/11
4. Press the number key (0 - 9) you
want to assign to this memory dial
entry. You will hear a confirmatio
tone.
3. Press MEM again.
• If you need the phone to wait before
sending the next set of numbers,
press PAUSE to insert a two-second
pause. Each pause counts as a digit.
• If you don’t press any keys for 30
seconds, the phone times out and
returns to standby.
1. When the phone is not in use,
press MEM. The TALK/BATT LOW
light flashes.
2. Use the keypad to enter the phone
number exactly as you would dial it.
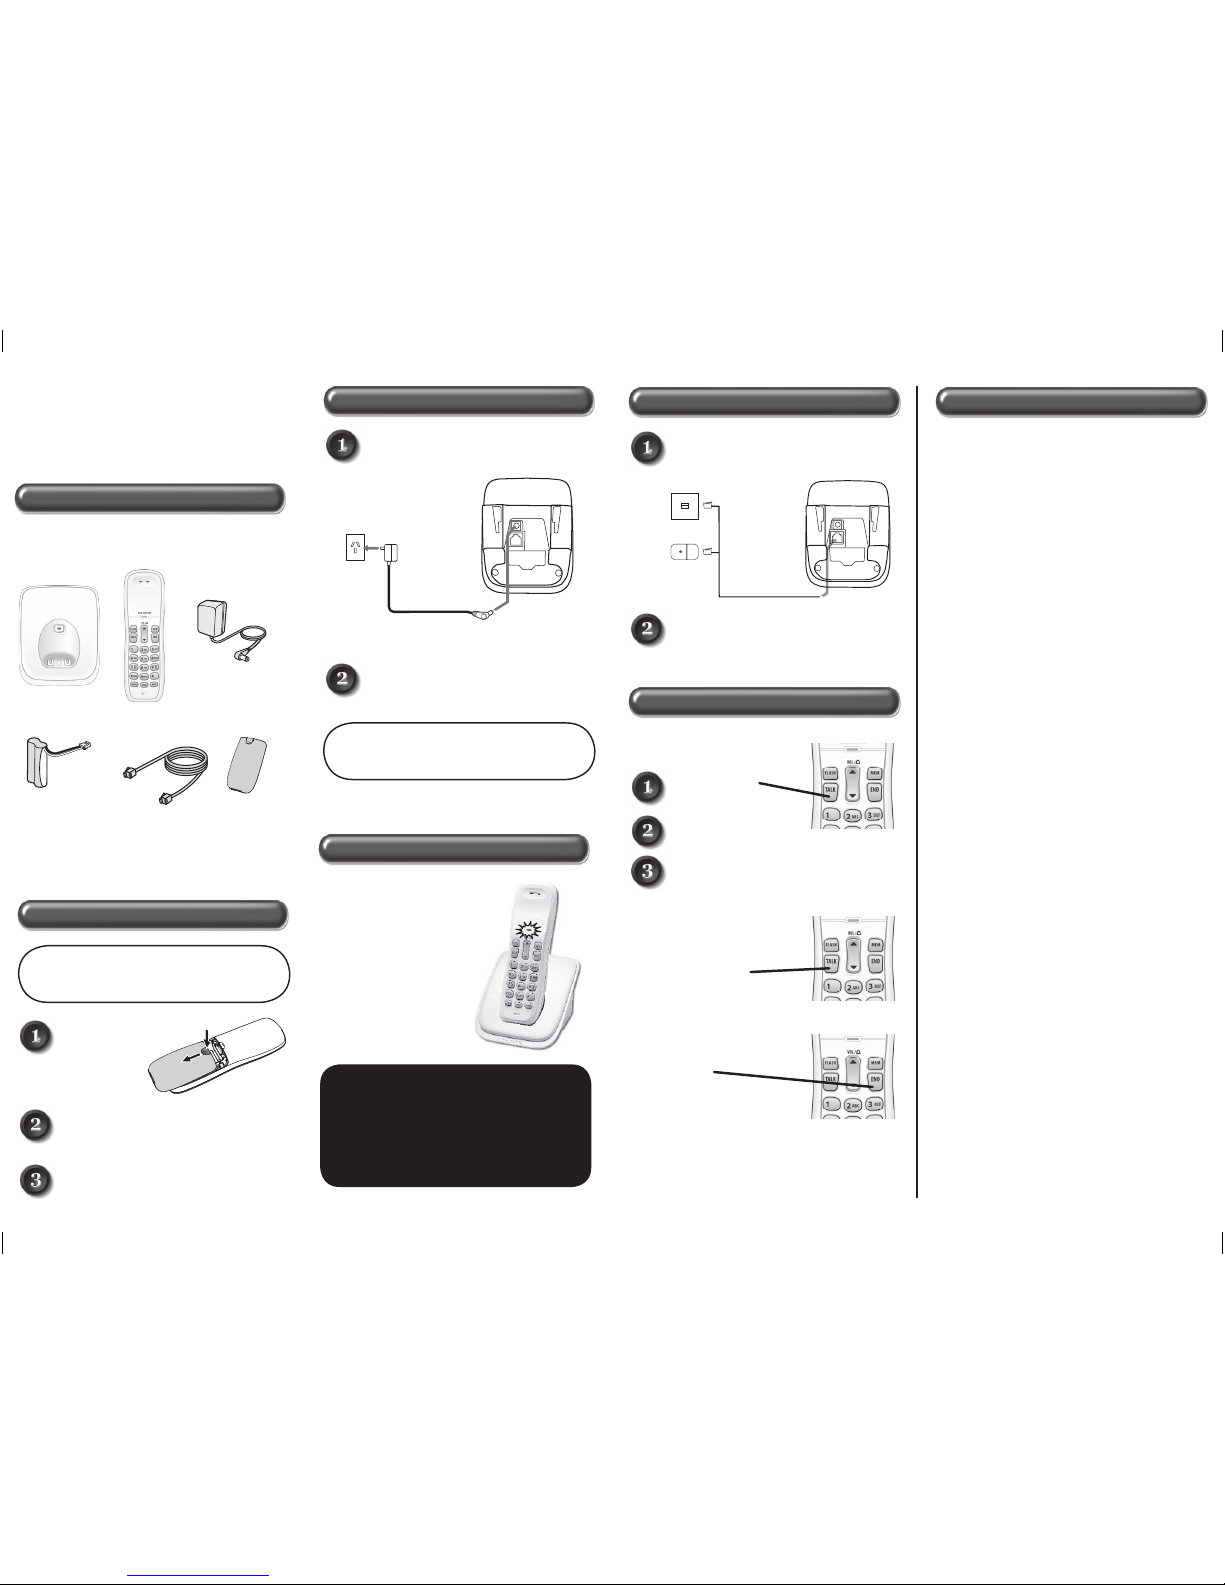
Additional Features
Ringer Tone
Earpiece Volume
Using Call Waiting
Using Memory Dial
When the phone is not in use, press UP
or DOWN to cycle through the 2 ringer
tones at low, medium, and high volume.
During a call, press UP or DOWN to
select one of the 6 volume levels.
If you subscribe to a Call Waiting service
through your telephone company then a
call waiting tone sounds while you are on
a call. To switch between calls:
For Australian model;
Press FLASH and then press 2.
For New Zealand model;
Press FLASH.
Storing numbers in memory dial
Step 6 Make & Receive Calls
To Make a Call
Listen for dial tone.
Press TALK.
Dial the desired number.
To Receive a Call
Pick up the handset
and press TALK.
To Hang Up a Call
Press END
or return the
handset to the base.
To Redial a Number
Press TALK and then press REDIAL.
Step 5 Connect to the Phone Line
Plug the other end into the
telephone wall jack.
Plug one end of the telephone
cord into the base TEL LINE jack.
New Zealand
Australia
To TEL LINE
Telephone
line cord
To telephone socket
Place the handset on
its base to charge.
Make sure that the
TALK/BATT LOW
light is on to indicate
charging.
Fully charge the battery pack by
placing the handset on the base
before using the phone (about 15
hrs). When fully charged the battery
will provide up to 7 hrs of talk time
and 6 days standby time.
Step 4 Charge the Handset
Step 3 Set up the Base
Note Use ONLY the Uniden
AC adaptor supplied with
your new phone!
Plug the AC adaptor cord to
the DC IN 9V jack.
Plug the AC adaptor to a
240V AC power outlet.
AC adaptor (supplied)
To DC IN 9V
To AC outlet
Step 2 Install Handset Battery Pack
Note Use ONLY the Uniden
battery pack supplied with
your new phone!
Remove the
cover.
Connect the battery pack
with the correct polarity.
Replace the cover.
Step 1 Check the Package Contents
Base
Handset
AC adaptor
(AAD-041S(M))
Make sure your cordless phone's
packaging includes the following items.
Rechargeable
battery pack
(BT-694m)
Telephone
cord
Battery
Cover
Optional: Wall Mount Bracket
Start Here!
Quick Start Guide / Owner’s Manual
DECT 1010
Page 2
DECT 1010 QSG/OM 2
30/9/11
Printed in Vietnam
U69UN293ZZA(0)
www.uniden.com.au
www.uniden.co.nz
UNIDEN AUSTRALIA PTY LTD
Service Division
345 Princes Highway,
Rockdale, NSW 2216
Phone number: 1300 366 895
Email: custservice@uniden.com.au
UNIDEN NEW ZEALAND LTD
Service Division
150 Harris Road, East Tamaki
Auckland 2013
Phone number: (09) 273 8377
Email: service@uniden.co.nz
One Year Limited Warranty
defect or replace the Product without any charge for
parts or service.
This warranty does not include any reimbursement
or payment of any consequential damages claimed
to arise from a Product’s failure to comply with the
warranty.
Our goods come with guarantees that cannot be
excluded under the Australian Consumer Law. You
are entitled to a replacement or refund for a major
failure and for compensation for any other reason-
ably foreseeable loss or damage. You are also
entitled to have the goods repaired or replaced if
the goods fail to be of acceptable quality and the
failure does not amount to a major failure.
This warranty is in addition to and sits alongside
your rights under either the COMPETITION AND
CONSUMER ACT 2010 (Australia) or the
CONSUMER GUARANTEES ACT (New Zealand)
as the case may be, none of which can be
excluded.
Procedure for obtaining warranty service:
Depending on the country in which the Product was
first purchased, if you believe that your Product
does not conform with this warranty, you should
deliver the Product, together with satisfactory
evidence of your original purchase (such as a
legible copy of the sales docket) to Uniden at the
addresses shown below. You should contact
Uniden regarding any compensation that may be
payable for your expenses incurred in making a
warranty claim. Prior to delivery, we recommend
that you make a backup copy of any phone
numbers, images or other data stored on your
Product, in case it is lost or damaged during
warranty service.
UNIDEN DECT 1010
Important:
Satisfactory evidence of the original purchase is
required for warranty service
Please refer to our Uniden website for any details
or warranty durations offered in addition to those
contained below.
Warrantor:
The warrantor is either Uniden Australia Pty
Limited ABN 58 001 865 498 (“Uniden Aust”) or
Uniden New Zealand Limited (“Uniden NZ”) as the
case may be.
Terms of Warranty: Uniden Aust/NZ warrants to
the original retail purchaser only that the DECT
1010 (“the Product”), will be free from defects in
materials and craftsmanship for the duration of the
warranty period, subject to the limitations and
exclusions set out below.
Warranty period: This warranty to the original
retail purchaser is only valid in the original country
of purchase for a Product first purchased either in
Australia or New Zealand and will expire one (1)
year from the date of the original retail sale.
If a warranty claim is made, this warranty will not
apply if the Product is found by Uniden to be:
A) Damaged or not maintained in a reasonable
manner or as recommended in the relevant Uniden
Owner’s Manual;
(B) Modified, altered or used as part of any conver-
sion, kits, subassemblies or any configurations not
sold by Uniden Aust or Uniden NZ;
(C) Improperly installed contrary to instructions
contained in the relevant Owner’s Manual
(D) Repaired by someone other than an authorized
Uniden Repair Agent in relation to a defect or
malfunction covered by this warranty; or
(E) Used in conjunction with any equipment, parts
or a system not manufactured by Uniden.
Parts Covered: This warranty covers the Product
and included accessories.
User-generated Data: This warranty does not
cover any claimed loss of or damage to
user-generated data (including but without limita-
tion phone numbers, addresses and images) that
may be stored on your Product.
Statement of Remedy: If the Product is found not
to conform to this warranty as stated above, the
Warrantor, at its discretion, will either repair the
Important Information
Note: When the T-coil mode
is on, the TALK/BATT LOW
light flashes during a call.
If you have any trouble with your phone
or for questions or to order genuine
Uniden parts and accessories, visit the
customer support page at the website
address at the end of this page.
Solving Problems
If you have a hearing aid equipped with
a telecoil (T-coil) feature, the interaction
between the hearing aid and digital
cordless phones can cause noise in the
handset. If you have a T-coil hearing
aid and you have problems with noise
on the line, try turning on T-coil mode.
Sometimes, broadband Internet services
that use the telephone line can interfere
with phones. One of these services−DSL
−often causes static or buzzing on
telephones. A DSL filter or telephone line
filter usually solves this problem.
The technician who installed your DSL
service might have left some filters for
you; if not, call your DSL provider or look
in any electronics store.
Installing a line filter or DSL filter
Do you use a T-coil hearing aid?
Plug the DSL filter into the telephone wall
jack and plug your phone’s telephone cord
into the filter. Make a test call to make sure
the noise is gone.
1. When the phone is not in use, press
and hold FLASH until you hear a
confirmation tone.
2. Press 1 to turn the T-coil mode on.
Press 3 to turn the T-coil mode off.
Using T-coil mode can shorten the
handset’s talk time; make sure to keep
the battery charged.
Additional Features (Cont’d)
1. When the phone is not in use, press
TALK.
2. Press MEM.
3. Press the number key assigned to the
memory dial entry you want to use.
1. When the phone is not in use, press
MEM twice.
2. Press the number key assigned to
the entry you want to erase. You
will hear a confirmation tone.
If you often have to enter a code number
during a call, you can use memory dial to
transmit the code number.
When the phone is not in use, press FIND
on the base. The handset will beep for 1
minute. To cancel, press FIND again or
press any key on the handset.
Note: When you assign a
memory dial entry to a number
key, the phone automatically
overwrites any previous entry
assigned to that key.
Note: If you press a number key
with no assigned memory dial
entry, the handset beeps, and the
phone will not dial.
2. Make your call normally. During a call,
when you hear the prompt that tells
you to enter the number, press MEM
followed by the number key assigned
to the entry you want to use.
Finding the Handset
Dialing a memory dial entry
Erasing a memory dial entry
Chain dialing
1. Store the code number (up to 20
digits) into memory dial just like a
regular entry.
 Loading...