

Uniden DCT 746M SERIES Owner's Manual

DCT 746M
SERIES
OWNER'S
MANUAL

WELCOME/FEATURES 2
TERMINOLOGY 3
CONTROLS & FUNCTIONS 4
DISPLAY AND ICONS 6
GETTING STARTED 7
Setting up the Phone 7
Expanding Your Phone 12
Register the Handset 14
Changing the Digital Security Code 15
Installing the Beltclip 15
Headset Installation 15
Main Menu Options 16
Setting Menu Options 17
BASICS 26
Using Your Phone 26
Call Waiting 28
Placing a Call on Hold 28
Redialing a Call 29
Adjusting the Ringer, Earpiece and Speaker Volume 30
Mute Microphone 31
Tone Dialing Switch-over 32
Traveling Out of Range 32
Clarity Booster 33
Privacy Mode 33
Conferencing 34
Using One Touch Voice Mail Access 34
Find Handset 36
PHONEBOOK 37
CALLER ID 45
Caller ID and CIDCW (Caller ID on Call Waiting) 45
MULTI-HANDSET FEATURES 50
Multi-Handset Features 50
Using DirectLink Mode 50
Intercom 52
Room/Baby Monitor 54
ADDITIONAL INFORMATION 55
Note on Power Sources 55
General Information 57
TROUBLESHOOTING 58
Troubleshooting 58
Liquid Damage 60
PRECAUTIONS & WARRANTY 61
I.C. NOTICE 63
INDEX 64
MEMORY LIST 65
Contents

Congratulations on your purchase of the Uniden Multi-Handset Cordless Telephone
System! This unit is different from conventional cordless telephones. When the base
unit is connected to AC power and a telephone line, it can support up to four handsets.
You can now place a fully-featured cordless handset anywhere in your home or office
where AC power is available to connect the handset chargers. Extra handsets also allow
you to establish a three-way conference call among two handsets and an outside lines.
Note: Illustrations in this manual are used for explanation purposes. Some
illustrations in this manual may differ from the actual unit.
As an Energy Star
Partner, Uniden has determined that this product or product models
meets the Energy Star guidelines for energy efficiency.
Energy Star
is a U.S. registered mark.
• 2.4GHz Frequency Hopping Spread Spectrum
• 4 Multi-Handset Expandability (DCX700 handset sold separately)
• Hands Free Speakerphone
• Caller ID/Call Waiting Deluxe (subscribe through local telephone company)
• 80 Dynamic Memory Locations (Phonebook & Caller ID)
• Trilingual Display Options (English, French and Spanish)
• Intercom or Call Transfer between Handsets
• Distinctive Ring Options
• 34 ring types - (14 animal rings, 10 ring tones and 10 melody rings)
• Hold or Mute Call
•Clarity Boost
• True Banner
• DirectLink Mode
• Voice Mail Waiting Indicator at handset
WELCOME/
FEATURES/
Welcome
Features

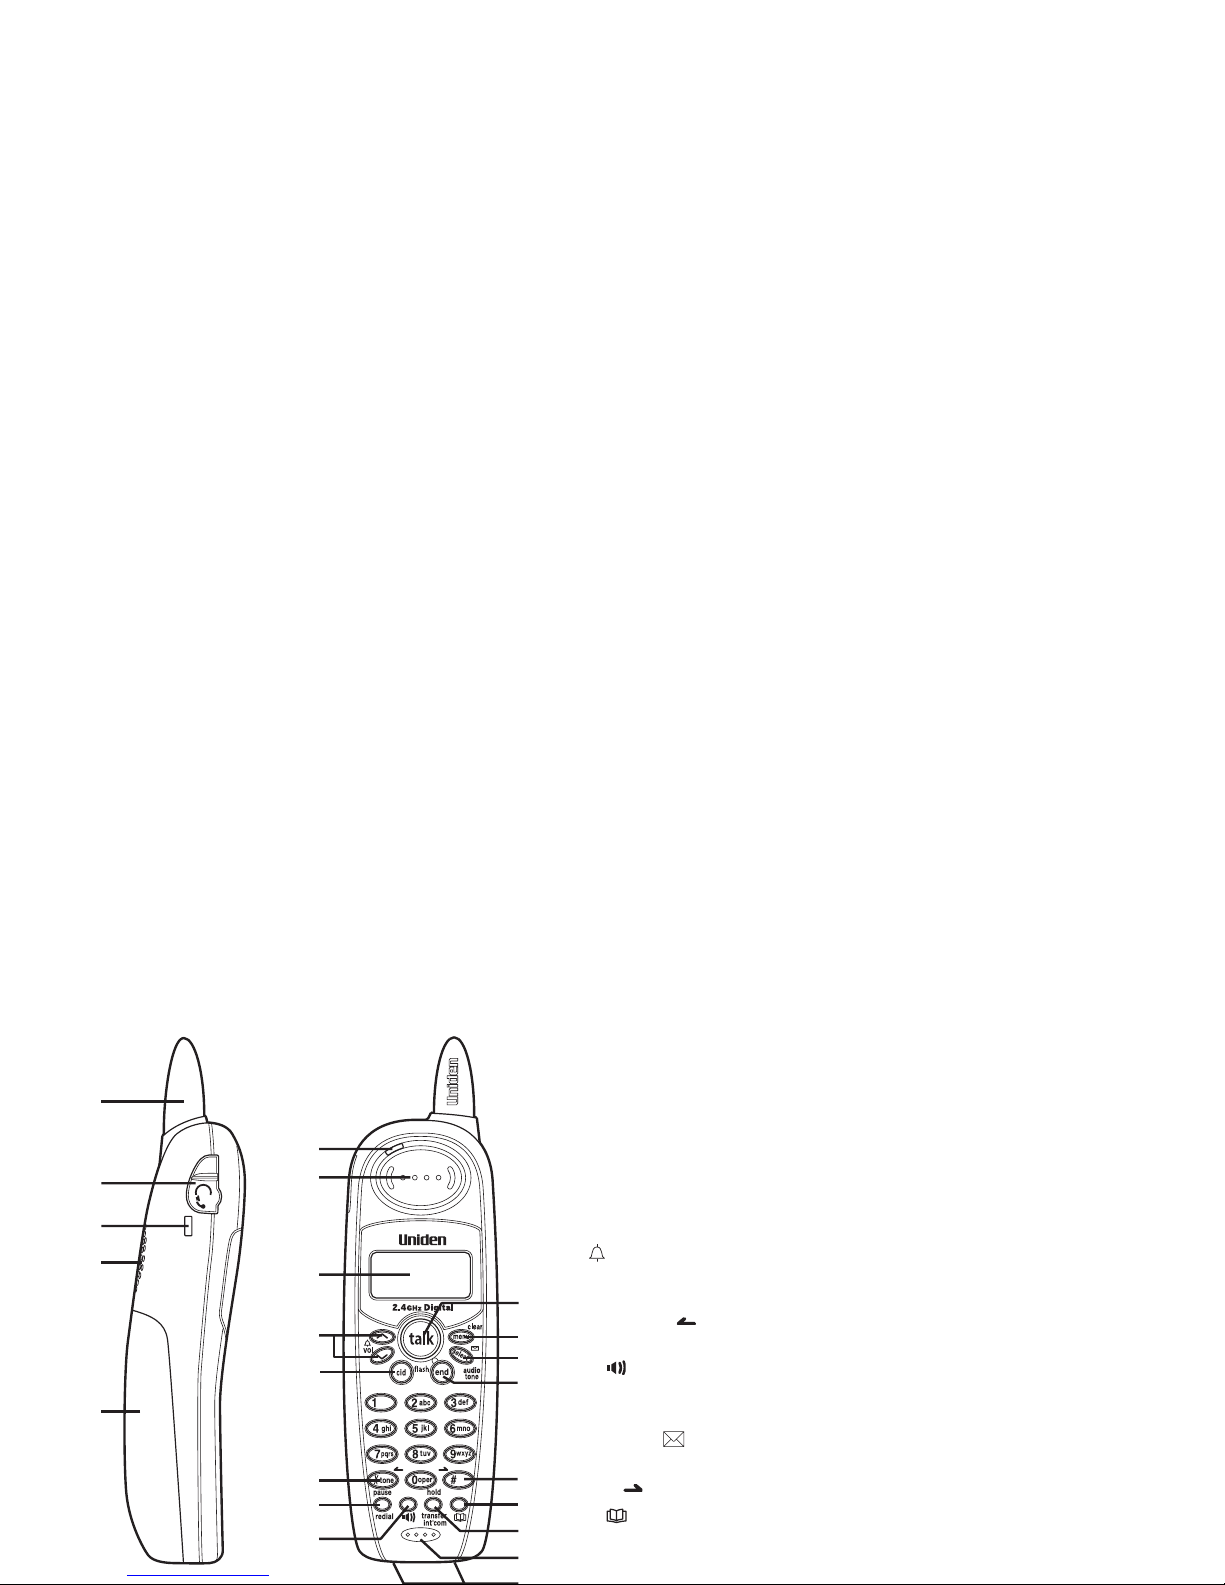
Controls & Functions
1.Handset Antenna
2.Headset Jack Cover
3.Beltclip Hole
4.Speakerphone Speaker and Ringer
5.Handset Battery Compartment
6.New Message LED
7.Handset Earpiece
8.LCD Display
9. (ring)/vol (volume) and ∧/∨ ( P. 3 0 & 1 7)
a.ringer and volume control b. scroll keys for display screen
10.cid (caller ID) (P. 47)
11.
*
/tone/ (P. 32 & 38)
12.pause/redial Key (P. 26 & 29)
13. (speaker) (P. 27)
14.talk/flash (P. 26 & 28)
15. menu/clear (P. 17 & P. 38)
16.select/ (voice mail)/audio tone (P. 17, 34 & 31)
17. end (P. 27)
18.#/ (P. 38)
19. (phonebook)(P. 37)
20.hold/transfer/int’com (intercom) (P. 28 & 52)
21.Handset Microphone
2
1
3
5
4
6
7
8
11
12
14
13
18
19
16
15
20
21
17
9
10
CONTROLS &
FUNCTIONS

24
23
26
25
27 28
23. Base Antenna
24. charge LED
25. find handset (P. 36)
26. Base Charging Contacts
27. TEL LINE Jack
28. DC IN 9V Jack
CONTROLS &
FUNCTIONS
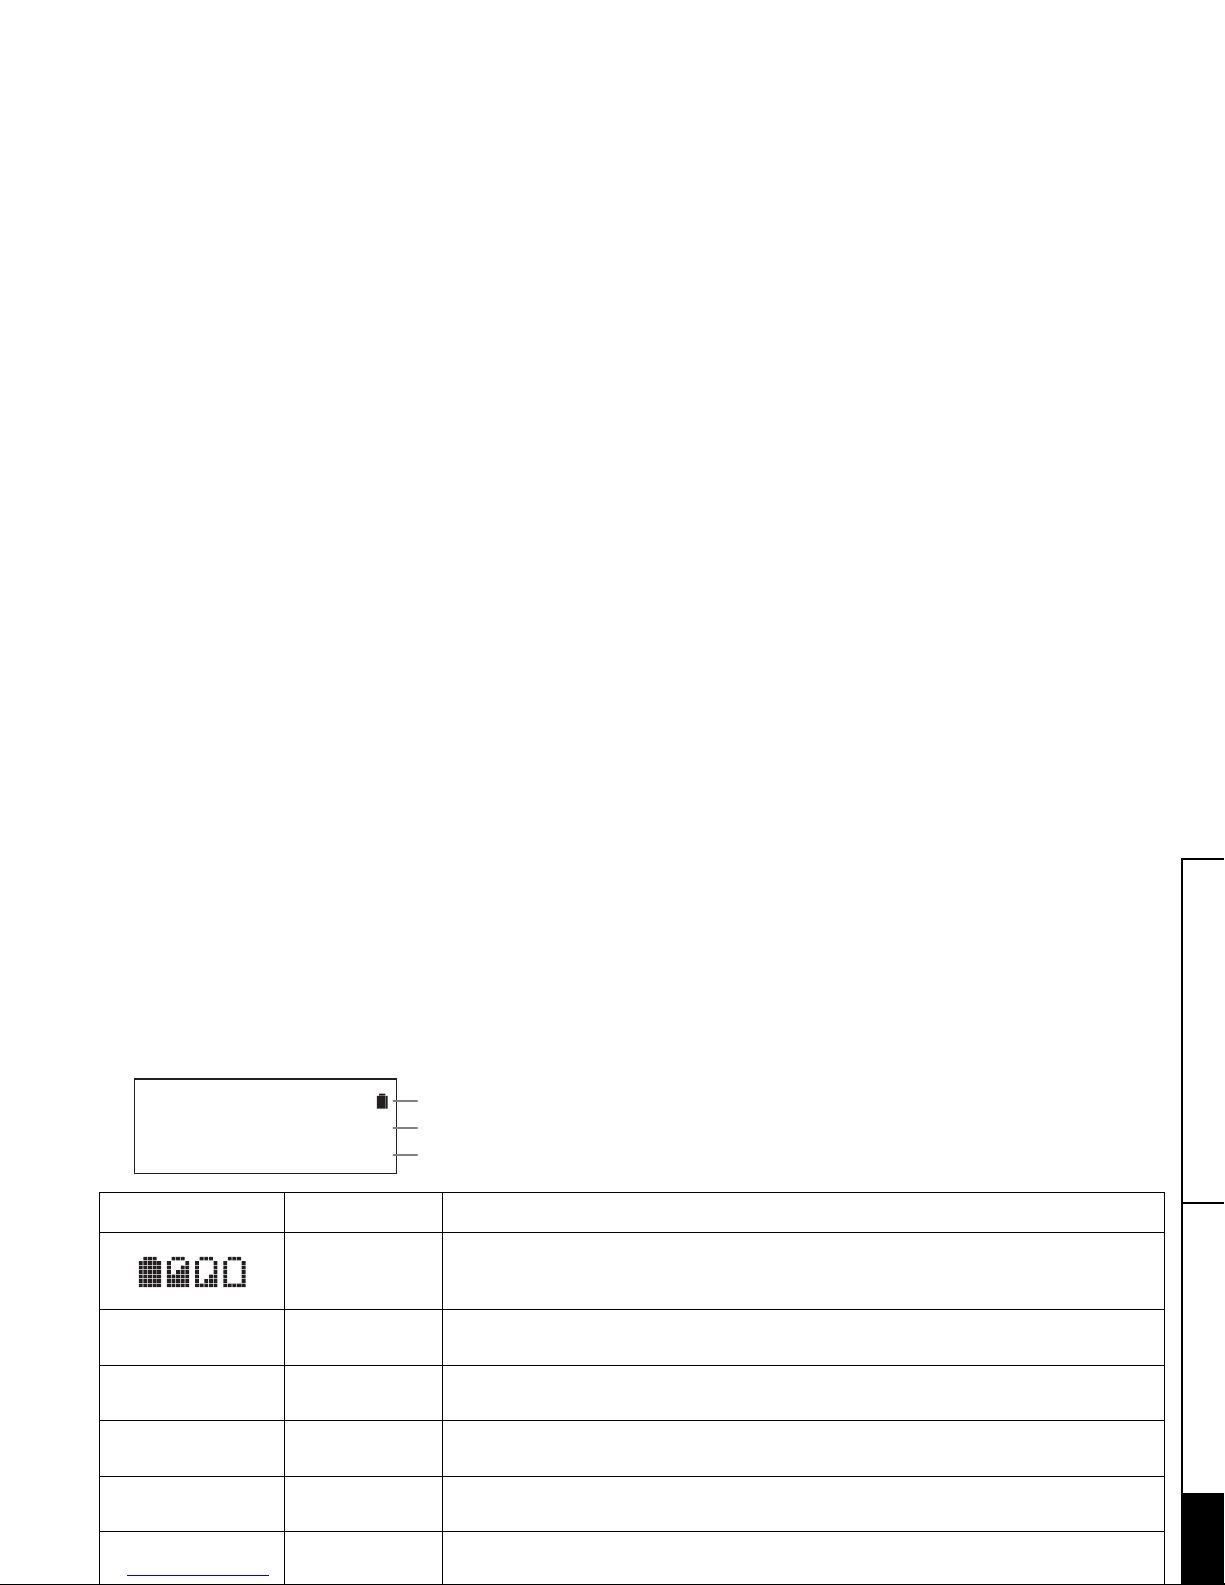
Display and Icons
Example of the standby mode display
ICON STATUS DESCRIPTION
Standby/Talk
Battery icons indicate the handset battery status. This icon cycles depending on
the battery status (full, medium, low, and empty).
Standby Ringer off icon indicates that ringer is turned off.
Talk Mute icon appears when you mute the handset.
Talk Speaker icon appears when the handset speaker phone is used.
Talk Booster icon appears when the Clarity Booster feature is in use.
Talk Privacy icon appears when the Privacy Mode is turned on.
ࠕࠗ࠙570#
*CPFUGV
0GY
Ringer off icon (when the ringer is Off) / Day of the week and time / battery icon
Handset ID and Banner
Number of new Caller ID calls received
ࠕࠗ࠙
ߦ
㨮
$
ߥ
DISPLAY AND ICONS
Setting up the Phone
Do the following steps:
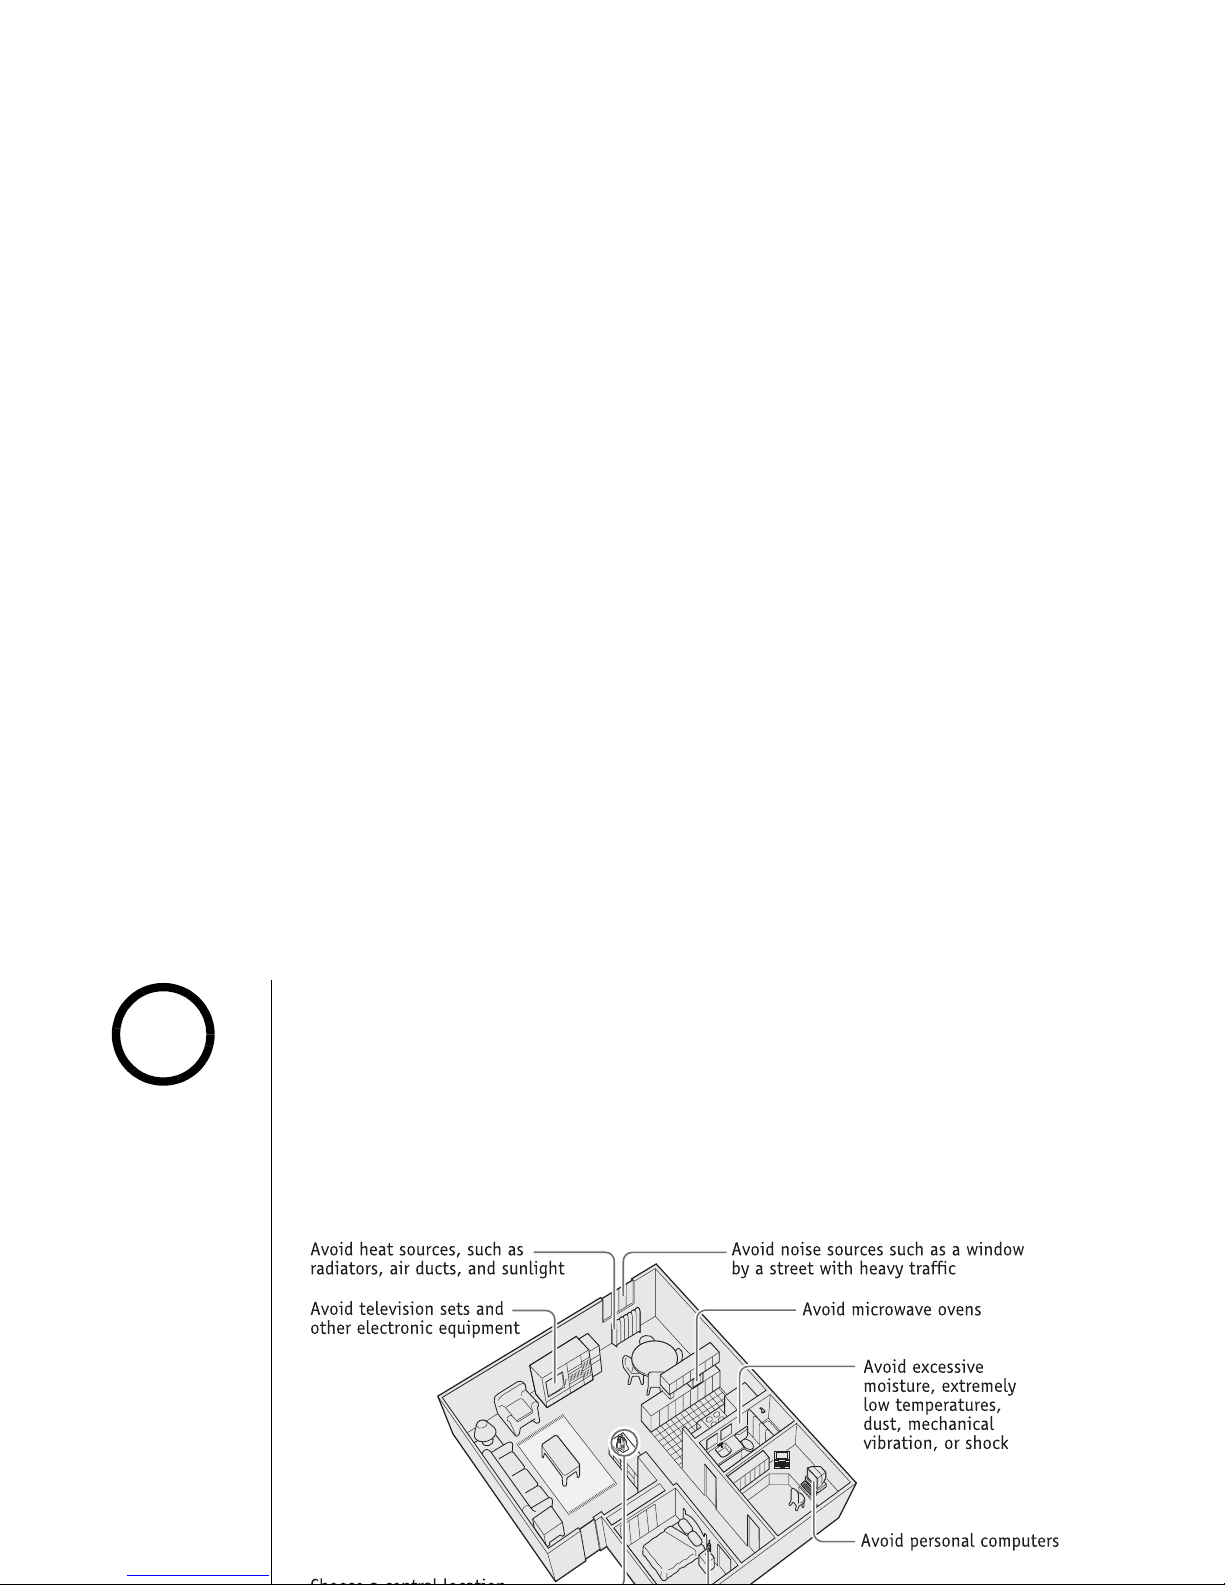
A. Choose the best location
B. Install the rechargeable battery pack into the handset
C. Connect the base unit and charge the handset
D. Mount the base unit on a wall
A. Choose the best location
Before choosing a location for your new phone, read "Installation Considerations"
on page 62. Here are some important guidelines you should consider:
If your home has
specially wired alarm
equipment connected to
phone line, be sure that
installing the system
does not disableyour
alarm equipment.
If you have questions
about what will disable
alarm equipment,
contact your telephone
company or a qualified
installer.
note
GETTING STARTED
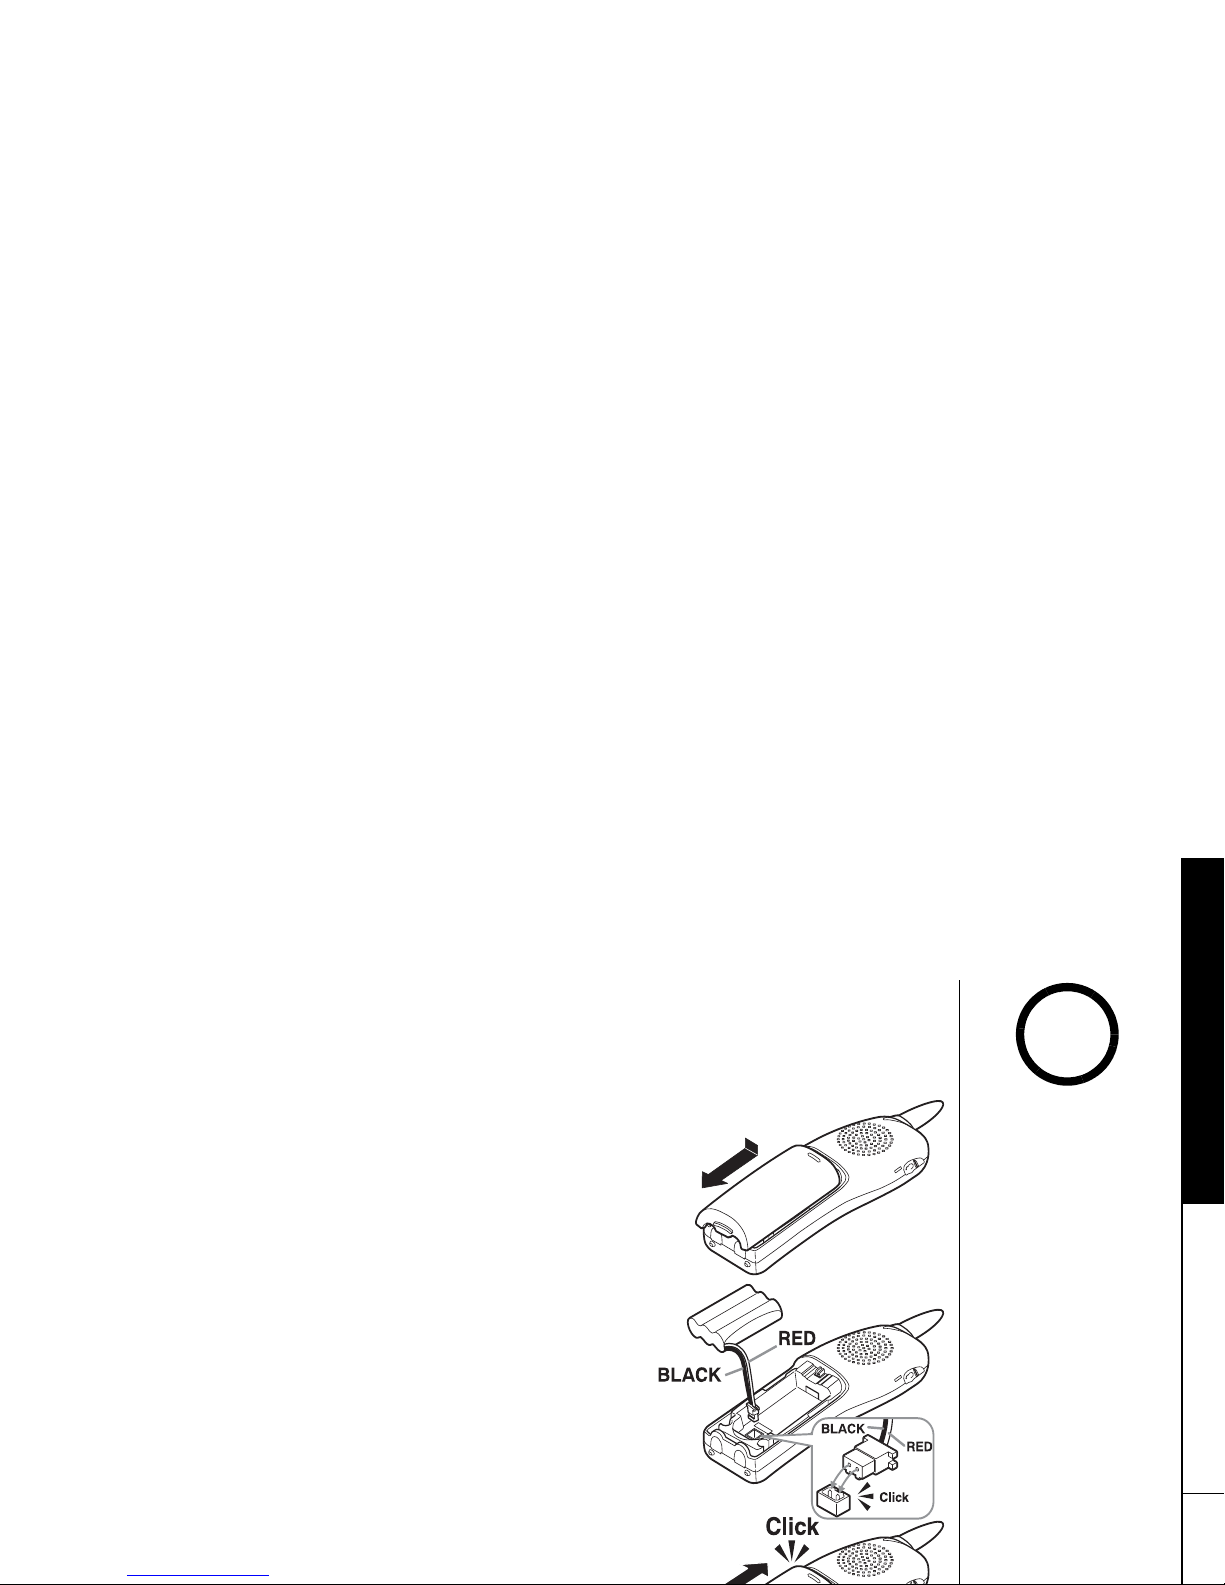
B. Install the rechargeable battery pack into the handset
The handset is powered by a rechargeable battery pack. The battery recharges
automatically when the handset is placed in the base unit.
1) Press down on the handset battery case cover (use the
finger indention for a better grip) and slide the cover
downward to remove.
2) Plug the battery connector (red & black wires) into the
jack inside the battery compartment. (The connector
notches fit into the grooves of the jack only one way).
Match the wire colors to the polarity label in the
battery compartment, connect the battery and listen for
a click to insure connection.
3) Make sure you have a good connection by gently pulling
on the battery wires. If the connection is secure, the
battery jack will remain in place.
4) Place the battery case cover back on the handset and
slide it upwards until it clicks into place.
•
Use only the Uniden
(BT-446) rechargeable
battery pack supplied
with your cordless
telephone.
•
Replacement battery
packs are also available
through the Uniden
Parts Department at
(800) 554-3988,
Monday thru Friday from
8:00 a.m. to 5:00 p.m.
or online at
www.uniden.com
note
GETTING STARTED

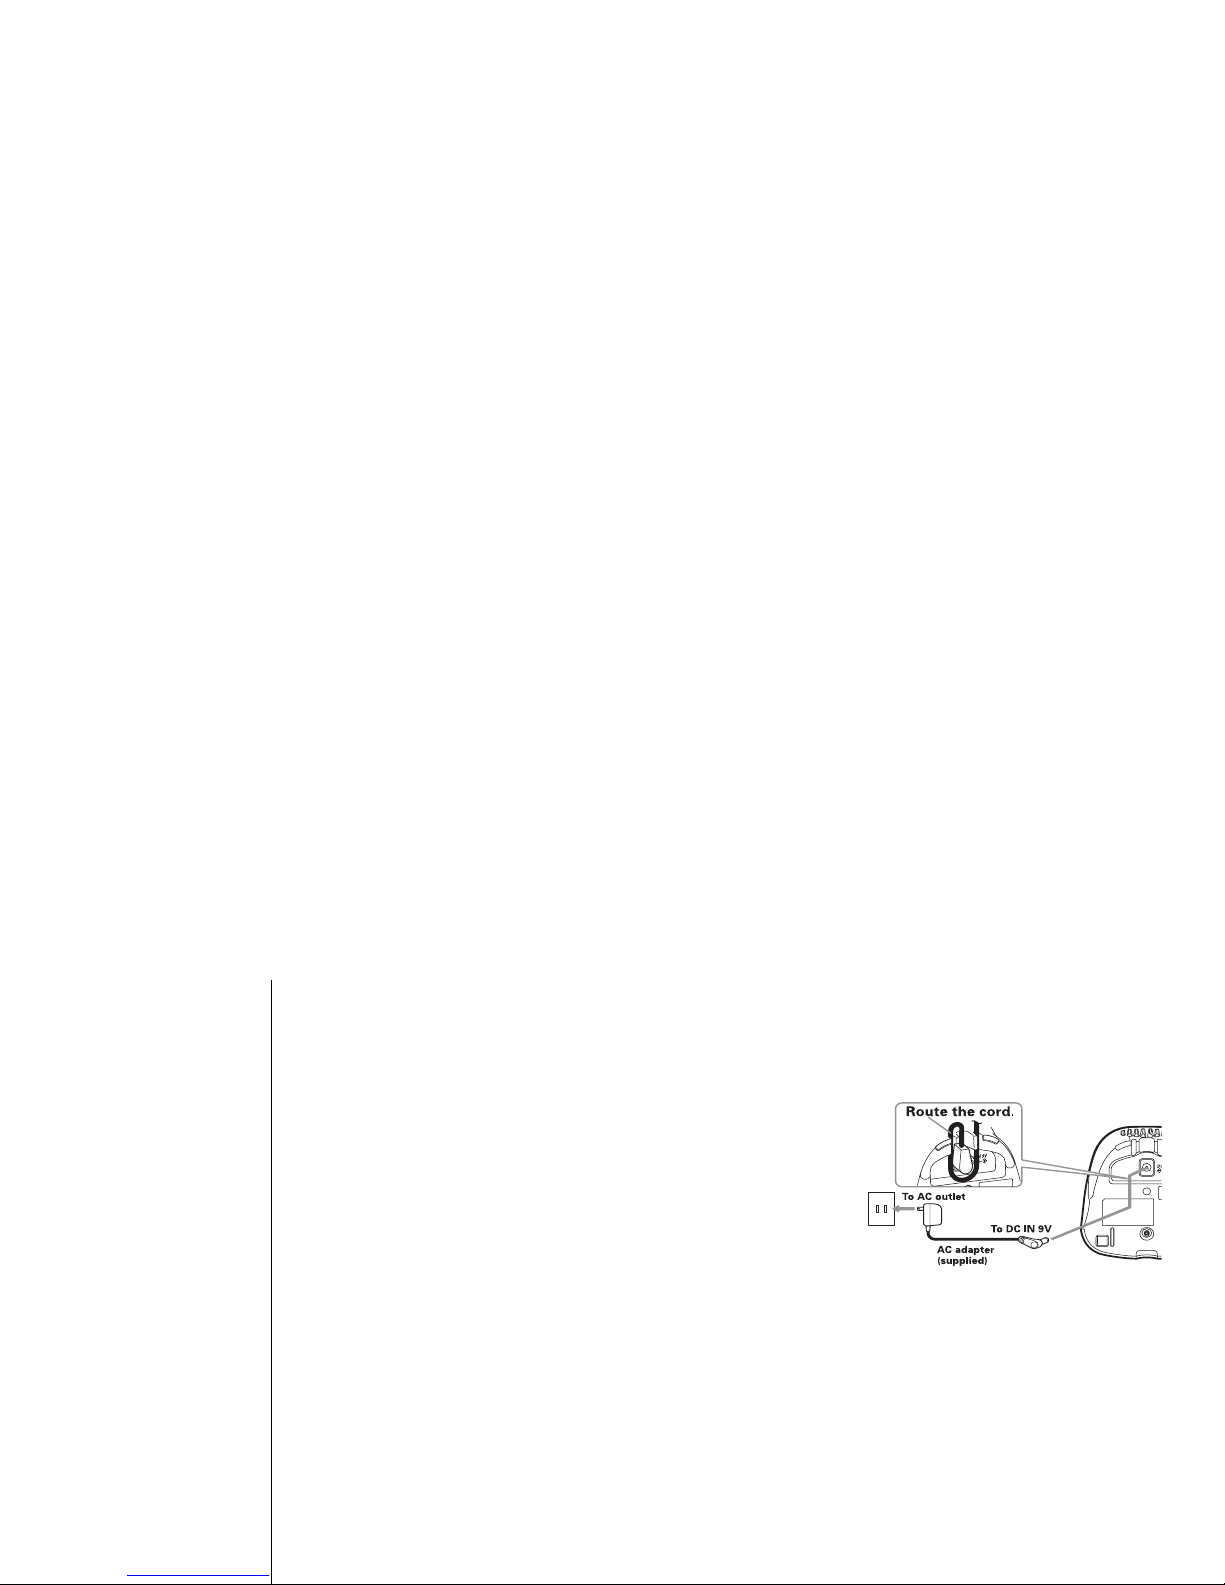
C. Connect the base unit and charge the handset
1) Connect the AC adapter to the DC
IN 9V jack and to a standard
120V AC wall outlet.
Note:
• Connect the AC adapter to a
continuous power supply (i.e., an
outlet that is not controlled by a
switch).
• Place the base unit close to the
AC outlet to avoid long extension cords.
2) Place the handset in the base unit with the keypad facing forward.
3) Make sure that the charge LED illuminates.
If the LED does not illuminate, check to see that the
AC adapter is plugged in and the handset makes
good contact with the base charging contacts.
4) Charge your handset at least 15-20 hours before
plugging into the phone line.
5) Once the handset battery pack is fully charged,
connect the telephone line cords to the TEL LINE
•Use only the supplied
AD-800 AC adapter.
Do not use any other
AC adapter.
•Do not place the power
cord where it creates a
trip hazard or where it
could become chafed
and create a fire or
electrical hazard.
note
GETTING STARTED
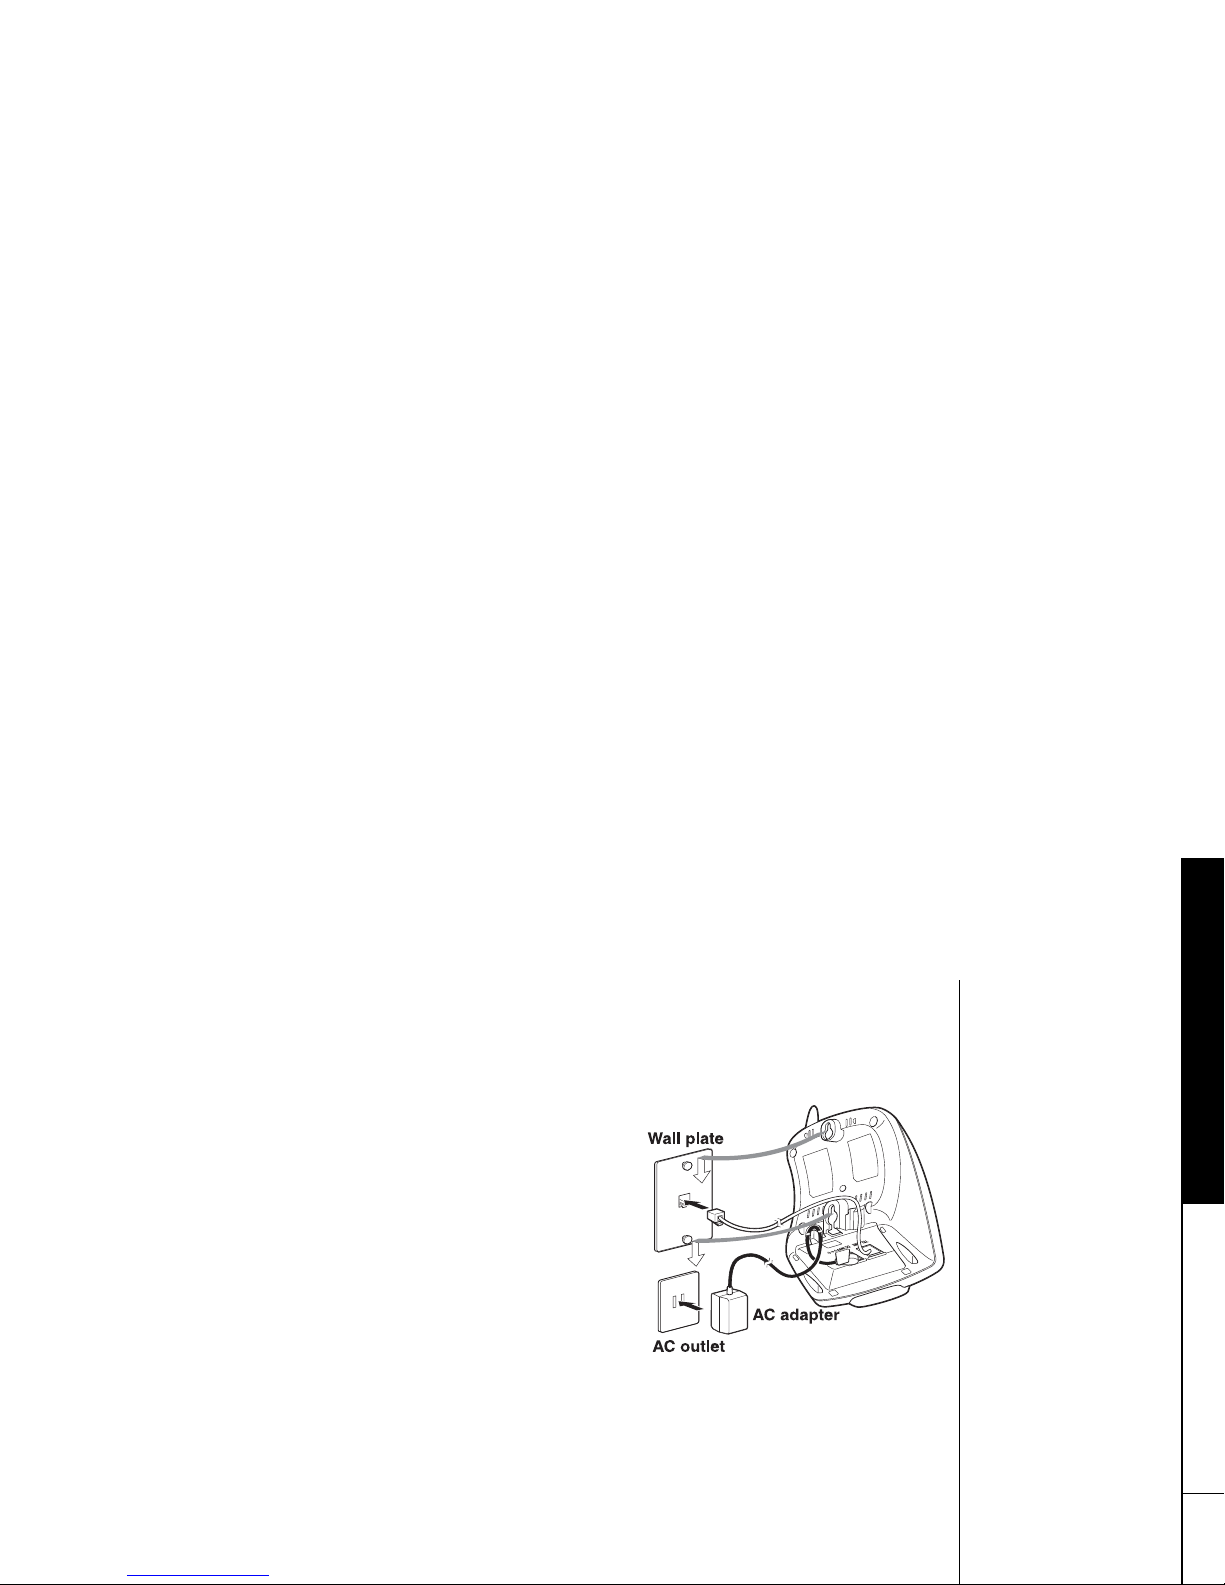
D. Mount the Base Unit on a Wall
Standard wall plate mounting
This phone can be mounted on any standard wall plate.
1) Plug the AC adapter into the DC IN 9V jack. Wrap
the AC adapter cord inside the molded wiring
channel as shown.
2) Plug the AC adapter into a standard 120V AC wall
outlet.
3) Plug the telephone line cords into the TEL LINE
jack.
4) Plug the telephone line cords into the telephone
outlets.
5) Align the mounting slots on the base with the
mounting posts on the wall. Then push in and
down until the phone is firmly seated.
GETTING STARTED

Direct wall mounting
If you don't have a standard wall plate, you can mount your phone directly to the
wall. Before doing this, consider the following:
• Avoid electrical cables, pipes, or other items behind the mounting location that could
cause a hazard when inserting screws into the wall.
• Try to mount your phone within 5 feet of a working phone jack to avoid excessive lengths.
• Make sure the wall material is capable of supporting the weight of the base and handset.
• Use #10 screws (minimum length of 1 & 3/8 inches) with anchoring devices suitable for
the wall material where the base unit will be placed.
1) Insert two mounting screws into the wall
(with their appropriate anchoring device), 3
& 15/16 inches apart. Allow about 1/8 of an
inch between the wall and screw heads for
mounting the phone.
2) Refer to steps 1 through 5 on page 10 to
mount the telephone.
GETTING STARTED
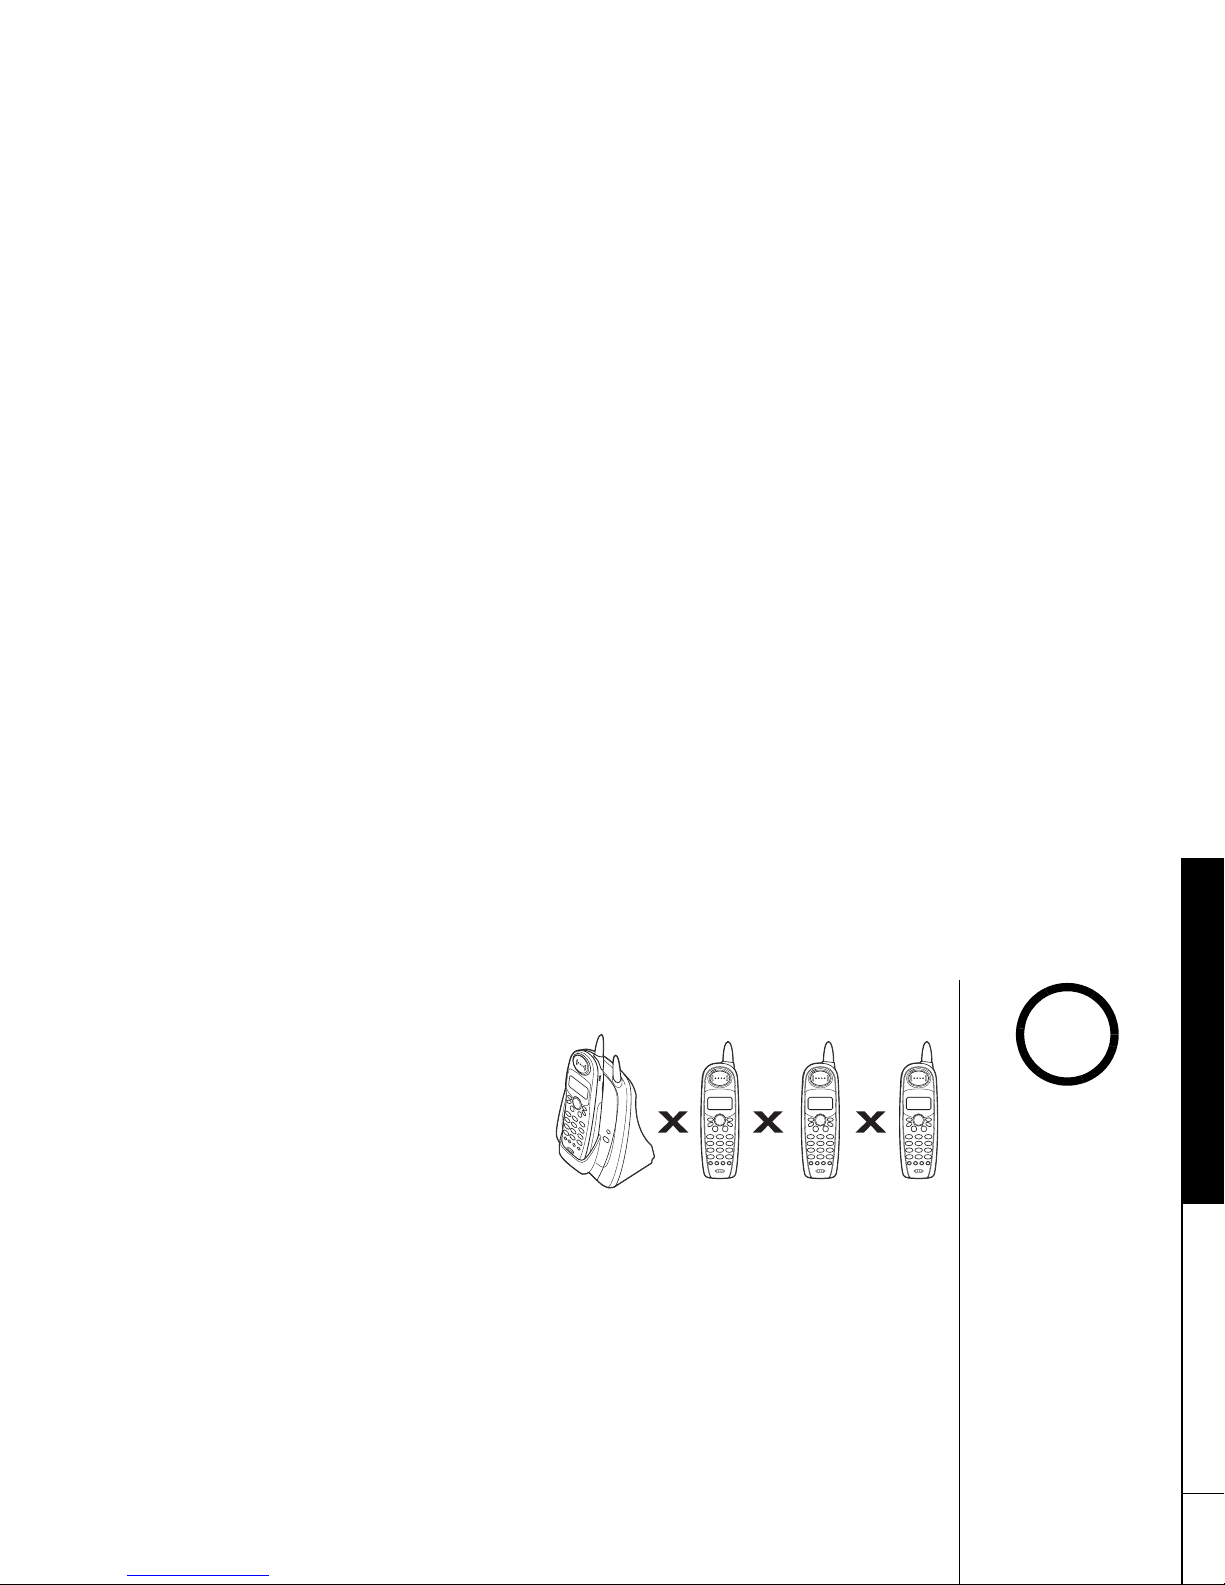
Expanding Your Phone
Four Handset Expandability
Your phone supports up to four handsets,
including any handsets supplied with your
phone. You can now place a fully-featured
cordless handset anywhere AC power is
available to connect the handset charger.
Handsets can be used in DirectLink Mode or
on an intercom call without interfering with incoming calls. It is possible to have a
three-way conference among two handsets and an outside lines. All of the handsets
ring when a call is received.
Backward / Forward Compatibility
Your phone may be compatible with other Uniden 2.4 GHz Digital Expandable
Systems. Please visit our website @ www.uniden.com <http://www.uniden.com>.
Please go to section "Register the Handset" in this owner's manual to register
additional handsets to your base.
IMPORTANT
If you purchase a
DCX700 expansion
handset, please register
the handset to the
original/main base
before use. The DCX700
will not operate until it
is registered.
If you change a global
setting in one handset,
you change that
particular setting for all
registered handsets. All
other settings (not
included under Global
Setup) must be set
separately through each
handset.
note
GETTING STARTED
Connect the expansion handset's charger
The handset is powered by a rechargeable battery pack. The battery recharges
automatically when the handset is placed in the charger.
1) Connect the AC adapter to the DC IN 9V jack and to a
standard 120V AC wall outlet.
2) Set the charger on a desk or tabletop, and place the
handset in the charger with the keypad facing forward.
3) Make sure that the charge LED illuminates.
If the LED does not illuminate, check to see that the
AC adapter is plugged in and the handset makes good
contact with the base charging contacts.
4) Charge the handset battery pack for at least 15-20
hours before using your new cordless telephone for the first time.
GETTING STARTED

Register the Handset
If you purchase an extra handset, you need to register the handset before use. Only
one handset can be registered at a time.
Handsets supplied with the phone are registered to the base by the factory. When
charged, pre-registered handsets display a handset ID number. Handsets that have
not been registered display
Models vary! Charge handset on the base for
registration or refer to Owner's Manual.
When you register an extra handset to
the base, the handset ID will be assigned.
1) Before registering the extra handset, the battery
pack MUST be charged for 15-20 hours.
2) Place the extra handset in the main base unit to
begin registration.
3) While the handset is registering,
Handset
Registering
will appear in the LCD. When
Registration Complete
is displayed, the handset has
been registered to the base. If
Registration Failed
appears, please try these steps again.
For the DCX640 expansion handset (DCT7 seriescompatible model)
1)Disconnect the AC adapter.
GETTING STARTED

Changing the Digital Security Code
The digital security code is an identification code used to connect the handset and
the base unit. Normally, setting the code is not necessary. In the rare situation that
you suspect another cordless telephone is using the same security code, you can
change the code. To change the digital security code:
1. Perform the "System Reset" options ("De-register the Handset" and "Replacing the
Base Setting") for all the handsets you have (see page 25).
2. Re-register each handset by following the steps on page 14.
Installing the Beltclip
To attach the beltclip
Insert the beltclip into the holes on each side of the
handset. Press down until it clicks.
To remove the beltclip
Pull either side of the beltclip to release the tabs from the
holes.
Headset Installation
Your phone may be used with an optional headset. To use this
GETTING STARTED

Main Menu Options
Your phone has four main menu options: DirectLink Mode, Room/Baby Monitor,
Handset Setup and Global Setup as well as submenu options.
Default Settings
The default settings set from the factory match the features that most people use.
You may not need to change them. However, there are a number of options you
must set and entries you must make in memory to take full advantage of all the
phone features. The table below lists the default settings.
Function Handset Function Handset
Edit Voice Mail
None
Language (LCD)
English
Ringer Tones
Turkey
Key touch tone
On
Distinctive Ring
On
Day & time
SUN 12:00 AM
Auto Talk
Off
CIDCW
CIDCW on/CWDX off
Anykey Answer
Off
Area Code
None
Banner
“ “
Dial Mode
Tone
Voice Mail Tone
On
For Global Setup and
System Reset, when
setting options from
the handset, make sure
the line is not in use
and the handsets are
within range of the
base.
note
GETTING STARTED

Setting Menu Options
Using the interface
Below are some tips for using the software interface on your phone.
• Press menu/clear to access the main menu.
• Use /vol/∧ or /vol/∨ to scroll through options.
• Press select/ /audio tone to make a selection.
• Press menu/clear to cancel setting and exit the
menu.
• If you do not press a key within 30 seconds, the phone will time out and exit the
menu mode. When setting Day and Time, the time-out period is extended to two
minutes.
&KTGEV.KPM/QFG
4QQO/QPKVQT
*CPFUGV5GVWR
GETTING STARTED

Handset Setup
The following submenu options must be set separately for each handset.
Selecting a Ringer Tone
Ringer tone lets you choose from 14 animal sounds, 10 melodies, or 10 ringer
tones:
You must set a separate ringer tone on each handset.
- Animal Sounds: Turkey, Bear, Boar, Crickets, Deer, Dove, Elephant, Elk, Goose, Hawk, Owl,
Quail, Tiger, Wolf
- Melodies (Beethoven's Symphony #9 [Beethoven9], For Elise [Elise], We Wish You A Merry
Christmas [Merry- Xmas], Home Sweet Home [Hm Swt Hm], Lorri Song #6 [Lorri Song],
When the Irish Eyes Are Smiling [Irish Eyes], Aura Lee, Let Me Call You Sweet Heart
[Sweetheart], Star Spangled Banner [Star Spngl], Old MacDonald [Old MacDld])
- Ringers (Flicker, Clatter, Soft Alert, Wake Up, Light Bug, Beep Boop, Tone Board, Chip
Chop, Party Clap, Reminder)
1) Press menu/clear. Select the Handset Setup menu,
and then the Ringer Tones submenu.
2) Press /vol/
∧ or /vol/∨ to move the pointer.
You will hear the ringer or melody as you scroll
through the options.
3) Press select/ /audio tone. You will hear a confirmation tone.
4KPIGT6QPGU
6WTMG[
$GCT
GETTING STARTED

Distinctive Ringer Setup
Distinctive Ringer allows you to assign a designated ring tone to a stored
phonebook number. When a call is received and the Caller ID information matches
the information in one of the phonebook memory entries, the phone uses the
distinctive ring assigned to that particular caller. You can assign distinctive rings
to multiple phonebook memory entries. Switching the setting to Distinctive Off
disables distinctive ringing: all incoming calls will have a normal ring tone.
Switching to Distinctive On activates all programmed distinctive rings.
1) Press menu/clear. Select the Handset Setup menu,
and then the Distinctive Ring submenu.
2) Press /vol/
∧ or /vol/∨ to select
On
or
Off
.
3) Press select/ /audio tone. You will hear a
confirmation tone.
Setting AutoTalk
AutoTalk allows you to answer the phone simply by removing the handset from the
cradle. You do not have to press any buttons to answer the call.
1) Press menu/clear. Select the Handset Setup menu,
and then the AutoTalk submenu.
&KUVKPEVKXG4KPI
1P
1HH
#WVQ6CNM
GETTING STARTED

Setting Anykey Answer
Anykey Answer allows you to answer the phone by pressing any number key,
*
/tone/ or #/ on the handset.
1) Press menu/clear. Select the Handset Setup menu,
and then the Anykey Answer submenu.
2) Press /vol/
∧ or /vol/∨ to select
On
or
Off
.
3) Press select/ /audio tone. You will hear a
confirmation tone.
Setting the True Banner
True Banner lets you customize the name your handset displays. The name will be
displayed on the LCD screen during Standby Mode, Intercom, Intercom Hold, Room
Monitor, and Copy Phonebook operation. The banner name will be displayed on the
receiving handset as well.
1) Press menu/clear. Select the Handset Setup menu,
and then the Banner submenu.
2) Use the number keypad (0-9),
*
/tone/ , #/ , or
#P[MG[#PUYGT
1P
1HH
$CPPGT
/QOU2JQPG
AAAAAAAAAA
GETTING STARTED
 Loading...