


Table of Contents
Table of Contents ........................................................1
Welcome .......................................................................4
Accessibility..............................................................4
Terminology.Used.in.this.Manual
Product Overview ........................................................ 6
Main.Phone.Features
Answering.System.Features
Parts.of.the.Handset
Parts.of.the.Answering.System.Base
Using the Interface ......................................................9
Reading.the.Display
Using.the.Four-way.Function.Key
Using.the.Handset.Menus
Entering.Text.from.Your.Handset
Installing the Phone ..................................................12
Choosing.the.Best.Location
Wall.Mounting.the.Base
Installing.the.Battery
Connecting.the.Base.and.Charging.the.Handset
Connecting.to.the.Phone.Line
...............................................6
.................................................7
..................................................9
.......................................... 12
...............................................13
..............................5
.....................................6
........................8
...........................10
......................................10
............................ 11
....................................12
...14
................................14
Testing.the.Connection
Changing.the.Dial.Mode
Basic Setup ................................................................ 16
Selecting.a.Language
Setting.the.Day.and.Time
Activating.Caller.ID.on.Call.Waiting.and.Call.Waiting.
Deluxe............................................................17
Activating.Personal.Ring
Activating.the.Key.Touch.Tone
Adding Accessory Handsets ....................................18
Compatible.Handsets
Charging.Accessory.Handsets
Registering.Accessory.Handsets
Resetting.Handsets
Setting Up the Phonebook ........................................21
Creating.Phonebook.Entries
Finding.a.Phonebook.Entry
Editing.an.Existing.Phonebook.Entry
Storing.Caller.ID.or.Redial.Numbers.in.the.
Phonebook.....................................................23
Deleting.Phonebook.Entries
...........................................14
.........................................15
.............................................16
.......................................16
.........................................17
................................17
.............................................18
................................19
............................19
................................................20
...................................21
....................................23
......................23
...................................24
1

Copying.Phonebook.Entries.to.Another.Handset...24
Customizing Your Phone ..........................................25
Changing.the.Handset.
Selecting.a.Ring.Tone.(Handset.Only)
Activating.AutoTalk.(Handset.only)
Activating.Any.Key.Answer.(Handset.only)
Using Your Phone ......................................................28
Making.a.Call.from.the.
Chain.dialing.from.the.Phonebook
Making.a.Call.with.Handset.Speed.Dial
Switching.to.the.Handset.Speakerphone.During.a.
Call.................................................................29
Using Caller ID and Call Waiting .............................. 30
Using.the.Caller.ID.List.
Making.a.Call.from.a.Caller.ID.Record
Deleting.Caller.ID.
Using.Call.
Using.Call.Waiting.Deluxe
Redialing a Number ...................................................32
Deleting.a.Redial.
Adjusting the Ringer, Earpiece and
Speaker Volume ................................................32
Adjusting.the.Ringer.Volume
Waiting...................................................31
Banner...............................25
....................26
.........................27
.............27
Phonebook.........................29
..........................29
..................29
..........................................30
...................30
Numbers....................................31
......................................31
Record........................................32
..................................32
Adjusting.the.Earpiece.Volume
Adjusting.the.Speaker.Volume
Adjusting.the.Audio.Tone
Using.the.Clarity.Boost.Feature
Finding a Lost Handset .............................................33
Using Hold, Conference and Transfer ..................... 34
Placing.a.Call.on.
Conferencing..........................................................34
Transferring.a.Call
Answering.a.Transferred.Call
Using Special Features ............................................. 36
Do.Not.Disturb.(All.Calls)
Muting.the.Ringer.(One.Call.Only)
Muting.the.
Privacy.
Seven-Digit.Dialing.................................................37
Using.the.DirectLink™.Communication.Feature
Using.the.
Room/Baby.Monitor
Tone.Dialing.Switch.Over
Setting Up the Answering System ........................... 42
Features..................................................................42
Using.the.Answering.System.Interface
Mode..........................................................37
Hold............................................34
..................................................35
Microphone...........................................36
Intercom..................................................39
................................................40
...............................32
................................33
........................................33
..............................33
.................................35
........................................36
..........................36
.....38
........................................41
...................43
2

Selecting.the.Language..........................................43
Setting.the.Number.of.Rings
Setting.the.Day.&.Time
Recording.a.Personal.Greeting
Selecting.a.Greeting
Deleting.Your.Personal.Greeting
Setting.the.Record.Time.(or.Announce.Only)
Activating.the.Message.Alert
Activating.Call.Screening
Setting a Security Code or Personal Identication
Number.(PIN).................................................49
Using the Answering System ................................... 50
Turning.Your.Answering.System.On.and.Off
Reviewing.Messages
Screening.Calls
Recording.a.Conversation
Recording.a.Voice.Memo
Turning.Off.the.Message.Alert.Tone
Operating the Answering System While You Are
Away from Home ..............................................53
Maintenance ...............................................................55
Specications..........................................................55
Power.Failures
Battery.Life
..............................................................55
...............................................46
.......................................................51
........................................................55
...................................44
...........................................45
..............................46
............................47
.........47
..................................48
........................................48
..........50
..............................................50
......................................52
........................................53
.......................53
Low.Battery.Alert
Battery.Replacement.and.Handling
Change.the.Batteries.Annually
Clean.the.Battery.Contacts
Troubleshooting ........................................................57
Resetting.the.Handset
Resetting.the.Handset.Without.the.Base
Changing.the.Digital.Security.Code
Traveling.Out.of.Range
Common.Issues
Liquid.Damage
Precautions! ..............................................................63
Important.Safety.Instructions.
The.FCC.Wants.You.To.Know.
Radio.Interference
Cordless.Telephone.Privacy
I.C..Notice
One Year Limited Warranty .......................................66
Index ...........................................................................67
Remote Operation Card ............................................72
At Uniden, we’ll take care of you! ............................74
.....................................................56
........................56
...............................56
.....................................57
............................................57
................58
........................58
...........................................59
......................................................59
........................................................61
.................................63
...............................64
..................................................65
...................................65
...............................................................65
3

Welcome
Thank.you.for.purchasing.a.Uniden.Multi-Handset.phone.
Note: Illustrations in this manual are used for explanation purposes. Some illustrations in this
manual may differ from the actual unit.
Uniden.is.a.registered.trademark.of.Uniden.America.Corporation..AutoStandby,.DirectLink,.IntegriSound.and.
Random.Code.are.trademarks.of.Uniden.America.
Accessibility
Uniden.provides.a.customer.service.hotline.for.accessibility.questions..If.you.have.a.disability.and.need.customer.
service.assistance.or.if.you.have.any.questions.about.how.Uniden’s.products.can.accommodate.persons.with.
disabilities,.please.call.the.accessibility.voice/TTY.line:.1-800-874-9314
Our.customer.care.hours.as.well.as.accessibility.information.can.be.found.on.our.website,.www.uniden.com,.under.
the.“Accessibility”.link..If.your.call.is.received.outside.of.our.business.hours,.you.can.leave.us.a.message.and.we.will.
call.you.back.
4

Terminology Used in this Manual
Accessory Handset
Base
CID
CW Deluxe or Call
Waiting Deluxe
CID/CW or CIDCW
Charger
This.phone.system.is.expandable:.one.
base.supports.a.total.of.four.handsets..
The.accessory.handset.is.a.handset.
that.is.compatible.with.this.model.
The.main.part.of.the.phone.that.
connects.to.your.phone.line.and.lets.
you.make.and.receive.calls.
Caller.ID.is.available.from.your.
telephone.provider..With.this.service,.
you.can.see.the.name.and.number.of.
incoming.callers.
Call.Waiting.Deluxe.is.offered.by.your.
telephone.provider..This.service.gives.
you.different.options.when.you.have.
a.waiting.call..See.Using Call Waiting
Deluxe.on.page.31.
Caller.ID.on.Call.Waiting.is.available.
from.your.telephone.provider..With.
this.service,.you.can.see.incoming.
caller.information.while.on.another.
call.
A.cradle.that.comes.with.an.accessory.
handset.and.charges.the.handset.
battery..It.connects.to.power.but.does.
not.connect.to.a.phone.line.
DirectLink
Global Settings
Standby
Station Any.handset.or.the.base.
Talk
TM
If.you.have.accessory.handsets.
on.your.system,.you.can.use.two.
handsets.as.2-way.radios.
Apply.to.registered.handsets.and.the.
base..If.you.change.something.under.
the.global.menu,.you.change.it.for.all.
registered.handsets.and.the.base..
Only.one.handset.can.change.global.
settings.at.a.time,.and.the.phone.must.
be.in.standby.
The.handset.is.not.in.use..If.it.is.off.
the.cradle,.no.line.has.been.activated..
No.dial.tone.is.present.
A.telephone.line.has.been.activated.
on.the.handset.or.the.base,.enabling.
a.dial.tone.
5

Product Overview
Main Phone Features
2.4GHz.Digital.Expandable.System.expands.up.
•
to.4.Handsets
Integrated.Digital.Answering.System
•
Caller.ID/Call.Waiting.Deluxe
•
100.shared.Phonebook.Entries/Caller.ID.
•
Numbers
DirectLink™.Two-Way.Communication
•
Room/Baby.Monitoring
•
Speakerphones.on.Base.&.Handset
•
20.Ringer.Options.(10.Tones/10.Melodies)
•
Personalized.Ring.by.Party
•
10.Speed.Dial.Numbers
•
Last.3.Number.Redial
•
Copy.Phonebook.Entries.to.Another.Handset
•
English,.Spanish.and.French.Menu.Displays
•
Call.Transfer
•
Conferencing
•
Intercom
•
Answering System Features
Digital.Tapeless.Recording
•
Up.to.12.Minutes.of.Recording.Time
•
Personal.or.Pre-recorded.Outgoing.Messages
•
English,.Spanish,.or.French.Voice.Prompts.for.
•
Menu.Setup
Day.and.Time.Announcement
•
•
Remote.Message.Retrieval
•
Toll.Saver
Conversation.Recording
•
Voice.Memo
•
Message.Alert
•
Records.Up.to.59.messages
•
6
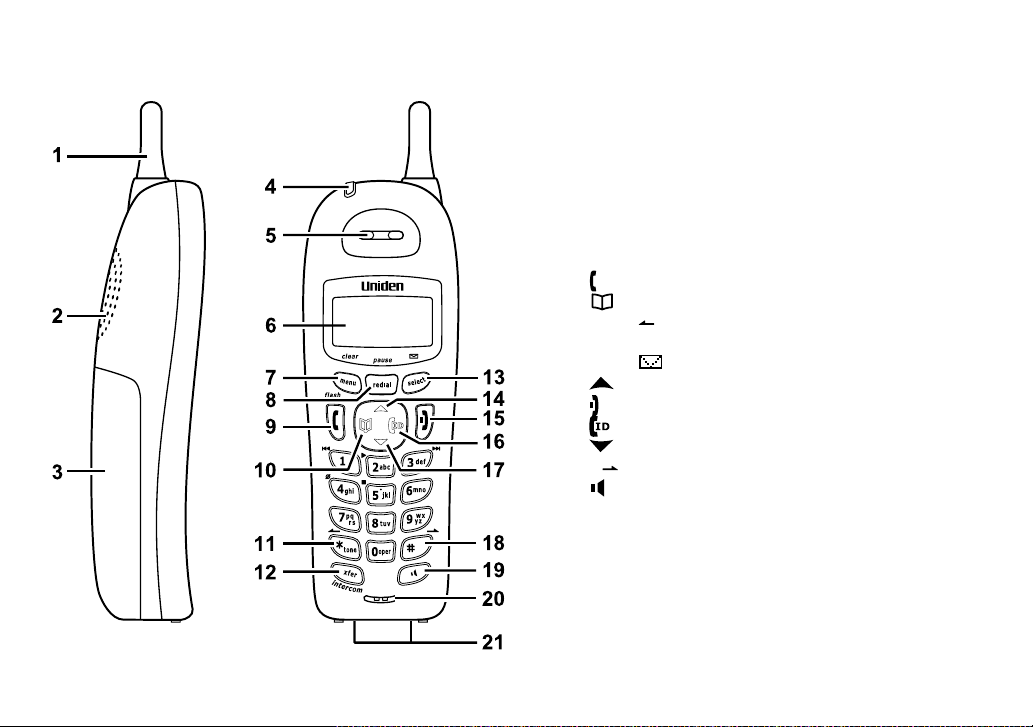
Parts of the Handset
Handset.Antenna
1.
Speakerphone.Speaker.and.Ringer
2.
Handset.Battery.Compartment
3.
New.Message.LED
4.
Handset.Earpiece
5.
LCD.Display
6.
[menu/clear].key
7.
[redial/pause] key
8.
[ /ash] key (talk/ash)
9.
[ ] key.(phonebook)
10.
[*/tone/ ] key
11.
[xfer/intercom] key
12.
[select/ ] key.(select/messages)
13.
[ ] key.(up)
14.
[ ].key.(end.call)
15.
[ ] key.(caller.ID)
16.
[ ] key.(down)
17.
[#/ ] key.(pound)
18.
[ ] key.(speaker)
19.
Handset.Microphone
20.
Handset.Charging.Contacts
21.
7

Parts of the Answering System Base
13
14
1
3 986 114
5
7
12
23
21 22
17 19
16 18 20 24
10
25 26
15
2
Base.charging.contacts
1.
charge .LED
2.
3.
Base.speaker
[greet] key.(record/
4.
greeting)
[set] key
5.
[menu/clock] key
6.
[ ] key.(delete)
7.
[ /select] key.(repeat/
8.
select).
9.
10.
11.
12.
13.
14.
Message.counter.LED
[on/off] key.(answering.
system.on/off)
[ /select] key.(skip/
select)
[ ] key.(play/stop)
Base.antenna
[ / ] key.(volume
up/down.for.speaker/.
ringer)
in use LED
15.
[nd hs] key (nd
16.
handset).
[dnd].key.(do.not.
17.
disturb)
[int’com].key.(intercom)
18.
[hold] key
19.
[mute] key
20.
[memo/call rec] key
21.
[speaker] key
22.
8
[ash] key
23.
24.
Base.microphone
25.
TEL.LINE.phone.jack
26.
DC.IN.9V.power.jack

Using the Interface
Reading the Display
The.handset.display.uses.icons.to.tell.you.the.status.of.your.phone..The.table.below.lists.the.icons.and.what.they.
mean.
Icon Status Description
The.
Standby/Talk
Standby
Talk
Talk
Talk
Talk
Talk
battery.icon.indicates.the.handset.battery.status:.
full,.medium,.low,.and.empty.
The.
ringer off.icon.indicates.that.the.ringer.is.turned.off.
mute.icon.appears.while.the.handset.microphone.is.
The.
muted.
The.
call record.icon.appears.while.recording.a.
conversation.
The.boost.icon.appears.when.the.Clarity.Boost.feature.is.
activated.
The.
speaker.icon.appears.when.the.handset.speaker.
phone.is.in.use.
The.
privacy.icon.appears.when.the.Privacy.Mode.is.
turned.on.
9

The Standby Screen
LAIDE
R
R
EBMUN A
Open.the.
phonebook
Open.the.
Caller.ID.list
Volume.up
Volume
down
Four-way
function key
LAIDE
R
R
EBMUN A
Open.the.
phonebook
Open.the.
Caller.ID.list
Volume.up
Volume
down
Four-way
function key
When.the.phone.is.in.standby,.the.handset.display.shows.the.following.items:
Ringer.status./.Day.and.time./.Battery.status
Handset.banner
Number.of.new.Caller.ID.messages.received
Using the Four-way Function Key
Your.handset.has.a.four-way.function.key.that.allows.you.to.
move.the.cursor.or.pointer.on.the.display.and.access.the.most.
commonly.used.features.at.the.touch.of.a.button..By.moving.
this.key.to.the.left,.you.open.the.phonebook..Move.the.key.to.
the.right.to.access.Caller.ID.information..To.use.this.four-way.
key,.place.your.thumb.over.the.key.on.the.handset.and.move.to.
the.four.positions.to.get.the.feel.of.how.it.moves.and.operates.
Using the Handset Menus
To.open.the.menu,.press.[menu/clear].Select.the.option.you.
want.by.pressing.the.four-way.function.key..This.will.move.the.
cursor;.the.option.currently.selected.has.a.triangle.beside.it..
Activate.the.selected.option.by.pressing.
menu.and.return.to.standby,.press.
If.you.do.not.press.a.key.within.30.seconds,.the.phone.will.time.
out.and.exit.the.menu..When.setting.the.day.and.time,.the.time-out.period.is.extended.to.two.minutes.
[ ].
[select/ ]..To.exit.the.
10

Entering Text from Your Handset
You.can.use.the.number.keypad.on.your.phone.to.enter.text.by.referring.to.the.letters.printed.on.each.number.
key. When you press the number key in a text entry eld, the phone displays the rst letter printed on the number
key..Press.the.number.key.twice.to.display.the.second.letter.and.three.times.to.display.the.third..Capital.letters.are.
displayed rst, then lower case letters, then the number on the key.
If two letters in a row use the same number key, enter the rst letter, then use [#/ ] to.move.the.cursor.to.the.next.
position.to.enter.the.second.letter..For.example,.to.enter.the.word.“Movies”:.
Press.
1.
2.
3.
4.
5.
6.
7.
8.
If.you.make.a.mistake.while.entering.a.
name,.use.
cursor.to.the.incorrect.character..Press.
[menu/clear].to.erase.the.wrong.character,.
and.then.enter.the.correct.character..
To.delete.all.characters,.press.and.hold..
[menu/clear].
[6].once.to.enter.M.
Use.
[#/ ].to.move.the.cursor.to.the.
right.
Press.
[6].six.times.to.enter.o.
Press.
[8].six.times.to.enter.v.
Press.
[4].six.times.to.enter.i.
Press [3] ve times to enter e.
Press.
[7].eight.times.to.enter.s.
Press.
[select/ ].to.end.your.text.
entry.
[*/tone/ ] or.[#/ ] to.move.the.
11

Installing the Phone
Choosing the Best Location
When.choosing.a.location.for.your.new.phone,.here.are.some.important.guidelines.you.should.consider:.
The.location.should.be.close.to.both.a.phone.jack.and.a.power.outlet.that.is.not.controlled.by.a.wall.switch.
•
The.base.and.handset.should.be.kept.away.from.sources.of.electrical.noise.such.as.motors,.microwave.
•
ovens, and uorescent lighting.
Don’t.place.the.base.in.direct.sunlight.or.subject.it.to.high.temperatures..The.battery.may.not.charge.properly..
•
For.better.reception,.place.the.base.as.high.as.possible.
•
The.base.should.be.placed.in.an.open.area.for.optimum.range.and.reception.
•
If.your.home.has.specially.wired.alarm.equipment.connected.to.a.phone.line,.be.sure.that.installing.the.
•
system.does.not.disable.your.alarm.equipment..If.you.have.questions.about.what.will.disable.alarm.
equipment, contact your telephone company or a qualied installer.
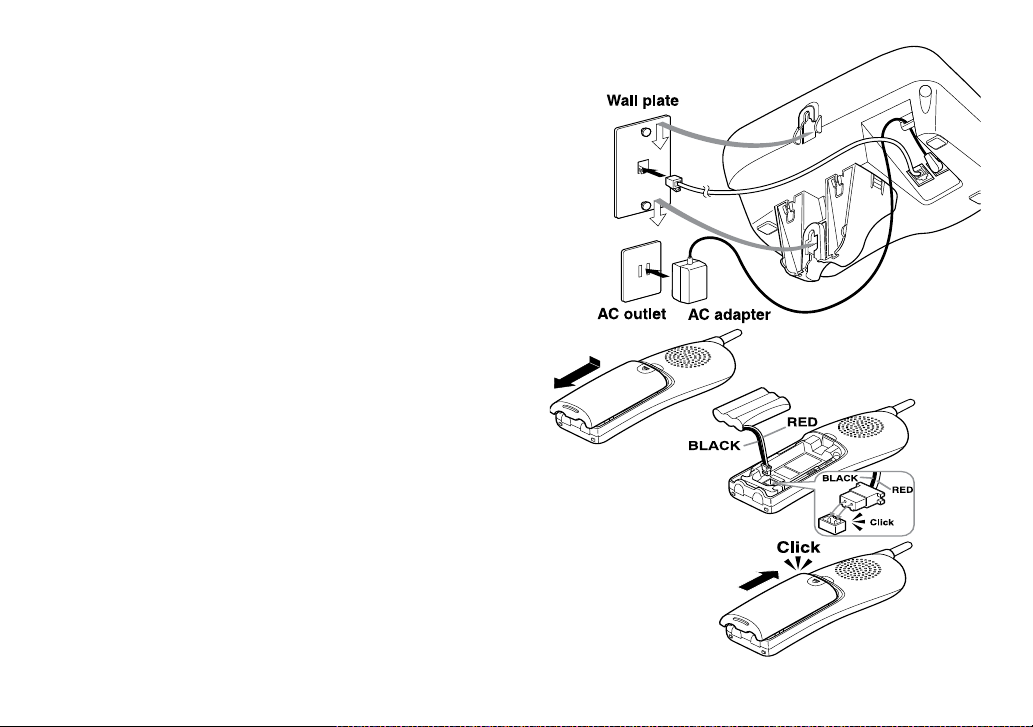
Wall Mounting the Base
This.phone.can.be.mounted.on.any.standard.wall.plate.
Snap.the.wall.mount.adapter.into.the.notches.on.the.base.top.
1.
Plug.the.AC.adapter.into.the.DC.IN.9V.jack.
2.
CAUTION: To avoid risk of re and shock, only use the Uniden
AD-800 AC adapter.
3.
Wrap.the.AC.adapter.cord.inside.the.molded.wiring.channel.as.shown.
4.
Plug.the.AC.adapter.into.a.standard.120V.AC.wall.outlet..DO.NOT.use.an.
AC.outlet.controlled.by.a.wall.switch.
12
Plug.the.telephone.line.cord.into.the.TEL.LINE.jack..
5.
6.
Plug.the.telephone.cord.into.the.telephone.jack.
7.
Align.the.mounting.slots.on.the.base.with.the.mounting.
posts.on.the.wall..Then.push.in.and.down.until.the.phone.is.
rmly seated.
Installing the Battery
Follow.the.steps.below.to.install.the.handset.battery.
1. Press in on the handset battery case cover (use the nger
indention.for.a.better.grip).and.slide.the.cover.downward.to.
remove.
2.. Place.the.battery.pack.in.the.battery.compartment.
with.the.connectors.on.the.battery.and.on.the.
compartment.aligned.
3.. Place.the.battery.case.cover.back.on.the.handset.and.
slide.it.upwards.until.it.clicks.into.place..
Note: Use only the Uniden BT-1004 rechargeable
battery pack supplied with your cordless
telephone.
13

Connecting the Base and Charging the Handset
Connect.the.AC.adapter.to.the.DC.IN.9V.jack.
1.
CAUTION: To avoid risk of re and shock,
only use the Uniden AD-800 AC adapter.
Connect.the.AC.adapter.to.a.standard.120V.AC.
2.
wall.outlet..DO.NOT.use.an.AC.outlet.controlled.by.
a.wall.switch..
Place.the.handset.in.the.base.with.the.LCD.screen.
3.
facing.forward.
Make.sure.that.the.charge.LED.illuminates..If.the.
4.
LED.does.not.illuminate,.check.to.see.that.the.AC.
adapter.is.plugged.in.and.the.handset.makes.good.
contact.with.the.charging.contacts.
Charge.your.handset.at.least.15.to.20.hours.
5.
before.plugging.into.the.phone.line.
Connecting to the Phone Line
Once.the.battery.pack.is.fully.charged,.connect.the.
telephone.cord.to.the.TEL.LINE.jack.and.to.a.telephone.
jack..
Testing the Connection
Try.making.a.call..If.your.call.does.not.connect.or.you.
cannot.get.a.dial.tone,.try.the.following.steps:
1.. Make.sure.the.AC.adapter.cord.is.securely.
connected.to.the.DC.IN.9V.jack.and.a.standard.
power.outlet.
14

Check.to.make.sure.the.battery.is.fully.charged..(If.you.don’t.see.the.“battery.full”.icon,.check.to.make.sure.
Di al M ode
Tone
Puls e
Di al M ode
Tone
Puls e
2.
the.battery.is.properly.connected).
Change.the.dial.mode.(instructions.below).
3.
Changing the Dial Mode
Your.phone.can.communicate.with.the.telephone.network.in.two.different.ways:.tone.dialing.or.pulse.dialing..These.
days,.most.phone.networks.use.a.method.called.tone.dialing,.so.your.phone.comes.programmed.for.tone.dialing..If.
your.phone.company.uses.pulse.dialing,.you.will.need.to.change.your.phone’s.dial.mode..If.you.don’t.get.a.dial.tone.
or.can’t.connect.to.the.telephone.network,.please.follow.the.steps.below.to.modify.your.phone’s.settings:
Press.
1.
2.
3.
If.you.ever.need.to.change.the.dial.mode.back.to.tone.dialing,.follow.the.
same.procedure,.but.select.TONE.in.step.2.
[menu/clear]..Select.the.GLOBAL.SETUP.menu,.and.then.
the.DIAL.MODE.submenu.
Scroll.
[ ].to.select.PULSE.
Press.
[select/ ]. You will hear a conrmation tone.
15

Basic Setup
L a ngua g e
Engl i sh
Fran ユ ais
L a ngua g e
Engl i sh
Fran ユ ais
D a y & T i m e
SU N 1 2 : 0 0 A M
[ィ / ァ / S E L E C T ]
D a y & T i m e
SU N 1 2 : 0 0 A M
[ィ / ァ / S E L E C T ]
Selecting a Language
Your.phone.supports.three.languages:.English,.French.and.Spanish..Once.you.select.a.language,.the.menus.on.the.
handset.will.display.in.that.language..The.default.language.is.English.
Press.
1.
2.
3.
Setting the Day and Time
To.change.the.day.and.time.shown.in.the.display,.follow.the.steps.listed.below..
1.
2.
3.
4.
5.
[menu/clear]..Select.the.HANDSET.SETUP.menu,.and.then.
the.LANGUAGE.submenu.
Move.the.cursor.to.choose.ENGLISH,.FRANÇAIS.(French).or.
ESPAÑOL.(Spanish).
Press.
[select/ ]. You will hear a conrmation tone.
Note: If you don’t press any keys for two minutes when
setting the day and time, the phone will exit the menu.
Press.
[menu/clear]..Select.the.GLOBAL.SETUP.menu,.and.then.
the.DAY.&.TIME.submenu.option.
Move.the.cursor.to.select.the.day.of.the.week,.and.then.press.
[select/ ].
Move.the.cursor.to.set.the.hour,.and.then.press.
Move.the.cursor.to.set.the.minute,.and.then.press.
Move.the.cursor.to.choose.AM.or.PM,.and.then.press.
[select/ ].
[select/ ].
[select/ ]. You will hear a conrmation tone.
16

Activating Caller ID on Call Waiting and Call Waiting Deluxe
C ID C W
C W On /C W D X O n
C W On /C W D X O f f
Your.phone.supports.Caller.ID.on.Call.Waiting.(CIDCW),.so.you.can.see.the.name.and.number.of.someone.who.
calls.when.you’re.already.on.the.line..Your.phone.also.supports.Call.Waiting.Deluxe.(CWDX),.which.gives.you.a.
choice.of.how.you.want.to.handle.a.waiting.call..You’ll.need.to.subscribe.to.these.features.with.your.phone.company.
before.you.can.use.them..To.let.your.phone.support.these.features,.follow.the.steps.below:
Press.
1.
2.
3.
See.
Using Call Waiting Deluxe.on.page.31.for.instructions.on.using.Call.
Waiting.Deluxe.
[menu/clear]..Select.the.GLOBAL.SETUP.menu,.and.then.
the.CIDCW.submenu.
Move.the.cursor.to.select.CW.(Call.Waiting).ON/CWDX.(Call.
Waiting.Deluxe).ON,.CW.ON/CWDX.OFF,.or.CW.OFF/CWDX.OFF.
Press.
[select/ ]. You will hear a conrmation tone.
Activating Personal Ring
You.can.assign.special.ringer.tones.to.anyone.in.your.phonebook..When.your.phone.gets.a.call,.it.looks.up.the.
Caller.ID.information.in.your.phonebook..If.you’ve.assigned.a.personal.ringer.to.that.number,.the.phone.uses.it.so.
you.know.who.is.calling..To.turn.on.personal.ringing,.follow.these.steps:
Press.
1.
2.
3.
[menu/clear]..Select.the.HANDSET.SETUP.menu,.and.then.the.PERSONAL.RING.submenu.
Move.the.cursor.to.select.ON.or.OFF.
Press.
[select/ ]. You will hear a conrmation tone.
Activating the Key Touch Tone
Key.Touch.Tone.is.the.tone.your.keypad.makes.when.keys.are.pressed..You.can.turn.this.tone.on.or.off.
Press.
1.
2.
3.
[menu/clear]..Select.the.HANDSET.SETUP.menu,.and.then.the.KEY.TOUCH.TONE.submenu.
Move.the.cursor.to.select.ON.or.OFF.
Press.
[select/ ]. You will hear a conrmation tone.
17
Adding Accessory Handsets
Your.phone.supports.up.to.four.handsets,.including.any.handsets.supplied.with.your.phone..accessory.handsets.do.
not.need.to.be.connected.to.a.phone.jack..You.can.now.place.a.fully-featured.cordless.handset.anywhere.AC.power.
is.available.to.connect.the.handset.charger..All.the.handsets.ring.when.a.call.is.received.
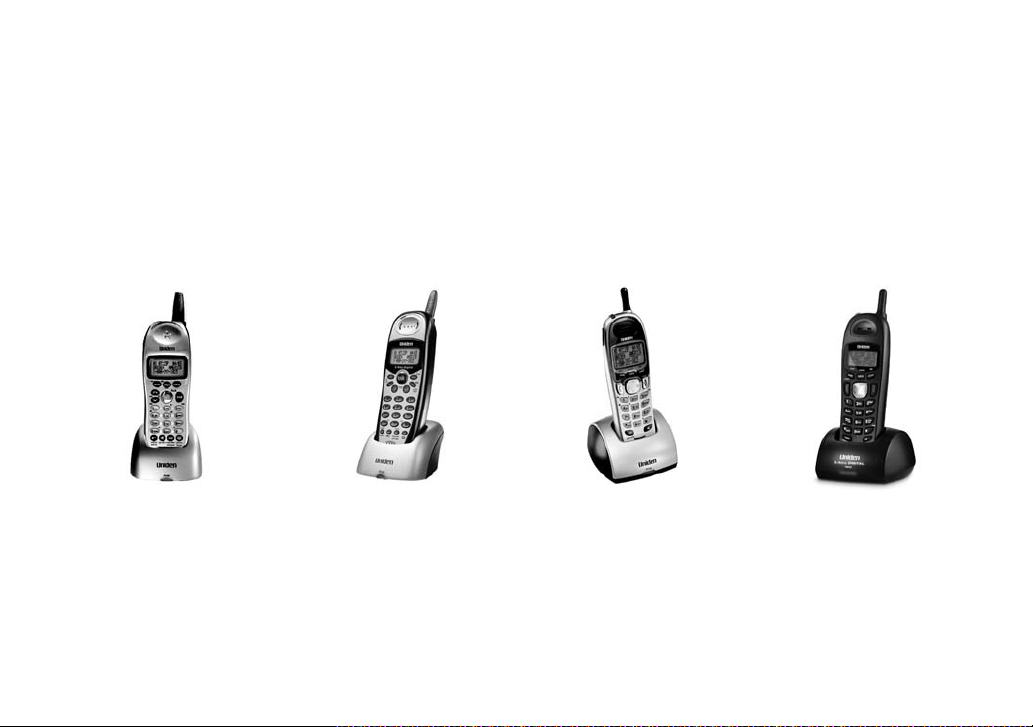
Compatible Handsets
Your.phone.is.compatible.with.the.following.Uniden.2.4.GHz.Digital.Accessory.Handsets:.DCX640,.DCX700,.
DCX730,.and.DCX750..(Please.visit.our.website.at.www.uniden.com.for.the.most.up-to-date.list.of.compatible.
handsets.).If.you.purchase.an.accessory.handset,.you.must.register.the.handset.to.the.base.before.use..Accessory.
handsets.will.not.operate.until.they.are.registered.
DCX640 DCX700 DCX750 DCX730
18

Charging Accessory Handsets
The.handset.is.powered.by.a.rechargeable.battery.pack..The.battery.recharges.automatically.when.the.handset.is.
placed.in.the.charger..
Connect.the.AC.adapter.to.the.DC.IN.9V.jack.and.to.a.120V.
1.
AC.outlet.that.is.not.controlled.by.a.wall.switch.
Caution: Use only the Uniden AD-0005 adapter.
Set.the.charger.on.a.desk.or.tabletop,.and.place.the.handset.
2.
in.the.charger.with.the.keypad.facing.forward.
Make.sure.that.the.charge.LED.illuminates..If.the.LED.does.
3.
not.illuminate,.check.to.see.that.the.AC.adapter.is.plugged.in.
and.the.handset.makes.good.contact.with.the.base.charging.
contacts.
Charge.the.handset.battery.pack.for.at.least.15-20.hours.
4.
before using your new cordless telephone for the rst time.
Registering Accessory Handsets
If.you.purchase.an.accessory.handset,.you.need.to.register.the.handset.before.use..Only.one.handset.can.be.
registered.at.a.time..Handsets.supplied.with.the.phone.are.registered.to.the.base.by.the.factory..When.charged,.preregistered.handsets.display.a.handset.ID.number..Handsets.that.have.not.been.registered.display.MODELS.VARY!.
CHARGE.HANDSET.ON.THE.BASE.FOR.REGISTRATION.OR.REFER.TO.OWNER’S.MANUAL..(If.an.accessory.
handset.has.ever.been.registered.to.a.base,.you.must.reset.the.handset.before.you.can.register.it.to.a.new.base..
See.
Resetting Handsets.on.page.20.).
When.you.register.an.accessory.handset.to.the.base,.the.handset.ID.will.be.assigned.
Note: Before registering any accessory handsets, make sure the accessory handset’s battery is fully
charged.
19

Registering DCX730 or DCX750 Handsets
W h i c h H a n ds e t?
H a n d s e t # 1
H a n d s e t # 2
W h i c h H a n ds e t?
H a n d s e t # 1
H a n d s e t # 2
To.register.DCX730.or.DCX750.handsets,.simply.place.the.accessory.
handset.in.the.base..While.the.handset.is.registering,.HANDSET.
REGISTERING.will.appear.in.the.LCD..When.REGISTRATION.
COMPLETE.is.displayed,.the.handset.has.been.registered.to.the.base..
If.REGISTRATION.FAILED.appears,.remove.the.handset.from.the.base.
and.try.again.
Registering DCX640 or DCX700 Handsets
On.the.base,.press.and.hold.[ash].until.the.CHARGE.LED.starts.
1.
to.blink.
On.the.handset,.press.and.hold.
2.
While.the.handset.is.registering,.HANDSET.REGISTERING.
3.
appears.in.the.display..When.the.display.shows.REGISTRATION.
COMPLETE,.the.handset.has.been.registered.to.the.base..If.
REGISTRATION.FAILED.appears,.please.try.these.steps.again.
[#/ ].until.you.hear.a.beep.
Resetting Handsets
If.you.want.to.register.the.handset.to.a.different.base.or.replace.a.
handset with another one, you must rst clear the registration information
from.the.base.and.the.handset..
Press.and.hold.
1.
RESET.menu.appears.
2.
Select.the.DEREGISTER.HS.submenu..WHICH.HANDSET?.appears.in.
the.display.
3.
4.
[ ].and.[ ].to.select.the.handset.ID.you.want.to.de-register,.and.
Use.
then.press.
When the phone asks you to conrm, move the cursor to select YES, and then press [select/ ]..You.will.
hear a conrmation tone.
[ ].and.[#/ ].for.at.least.5.seconds,.until.the.SYSTEM.
[select/ ]..DEREGISTER.HS.appears.
20

Note: The handset rst clears it registration information from the base and then deletes the link to
St o r e / E d i t N a m e
。
the base from its own memory. The handset will now display MODELS VARY! CHARGE HANDSET
ON THE BASE FOR REGISTRATION OR REFER TO OWNER’S MANUAL. If the handset cannot
contact the base, it will display UNAVAILABLE. If this happens, see Resetting the Handset Without
the Base on page 58. For instructions on registering the handset, see page 19.
Setting Up the Phonebook
Your.handset.can.store.up.to.100.names.and.numbers.in.your.phonebook...Your.phone.shares.memory.between.
your.phonebook.and.Caller.ID.entries..Once.you.store.100.phonebook.entries,.Caller.ID.information.will.not.be.
stored.and.will.only.display.at.time.of.new.incoming.call..When.all.the.phonebook.entries.are.full,.you.will.hear.a.
beep.and.MEMORY.FULL.appears..You.cannot.store.any.additional.names.and.numbers.unless.you.delete.some.of.
the.existing.ones.
You.can.also.use.the.phonebook.entries.or.speed.dial.memory.to.store.a.group.of.numbers.(up.to.20.digits).that.
you.may.need.to.enter.once.your.call.connects..This.is.referred.to.as.chain.dialing..See.
Phonebook.on.page.29.
Creating Phonebook Entries
To.store.names.and.numbers.in.your.phonebook,.please.follow.these.steps:
When.the.phone.is.in.standby.mode,.press.
1.
To.create.a.new.phonebook.entry,.move.the.cursor.to.select.STORE.
2.
NEW,.and.press.
Enter.the.name.for.this.entry.(STORE/EDIT.NAME)..
3.
Use.the.keypad.to.enter.a.name.for.this.entry;.the.name.can.contain.up.to.16.characters..(See.
from Your Handset.on.page.11.for.instructions.on.entering.text.).If.you.do.not.want.to.enter.a.name.for.this.
entry,.your.phone.will.store.this.entry.as.<NO.NAME>..Press.
[select/ ]..STORE/EDIT.NAME.appears.
[ ].
[select/ ] when you are nished.
Chain Dialing from the
Entering Text
21

Enter.the.number.for.this.entry.(STORE/EDIT.NO.).
Per s o n al R i n g
No S e lec t n
Fl i c k er
Per s o n al R i n g
No S e lec t n
Fl i c k er
St o r e / E di t N o .
80 0 7 3 0 3 45 6 。
S p e e d D i a l
No S e le c t n
SP D 1 : <E m p t y>
4.
Once.you.have.stored.a.name,.STORE/EDIT.NO..appears.next..Use.the.
number.keypad.to.enter.the.phone.number;.the.phone.number.can.contain.
up.to.20.digits..If.you.need.the.phone.to.pause.between.digits.when.it’s.
dialing.(for.example,.to.enter.an.extension.or.an.access.code),.press.
[redial/pause].to.insert.a.two-second.pause..You.will.see.a.P.in.the.display..You.can.also.use.more.than.one.
pause.together.if.two.seconds.is.not.long.enough..Each.pause.counts.as.one.digit..
Assign.a.personal.ring.tone.for.this.entry.(PERSONAL.RING).
5.
You.can.attach.a.special.ring.tone.to.each.phonebook.entry;.the.phone.will.
use.this.ring.tone.when.this.person.calls..Use.
of.the.20.different.ring.tone.options.(see.
Only).on.page.26.for.a.complete.list.of.ring.tones)..As.you.scroll.through.
the.tones,.you.will.hear.a.sample.of.each.tone..When.you.hear..the.ring.
tone.you.want.to.use,.press.
entry,.choose.NO.SELECTN;.the.phone.will.use.your.standard.ring.tone.setting.
Assign.this.entry.to.a.Speed.Dial.number.(SPEED.DIAL).
6.
Your.handset.has.10.speed.dial.numbers
select.the.speed.dial.number.you.want.to.assign.to.this.phonebook.entry,.
and.press.
this.entry.to.a.speed.dial.number..If.the.speed.dial.number.is.already.
assigned.to.a.phonebook.entry,.your.phone.will.overwrite.the.assigned.
speed.dial.information.
You will hear a tone conrming that the new entry has been stored, and DONE! appears in the display.
7.
[select/ ]..Choose.NO.SELECTN.if.you.do.not.want.to.assign.
[select/ ]..If.you.do.not.want.to.use.a.personal.ring.tone.for.this.phonebook.
[ ].and.[ ]..to.select.one.
Selecting a Ring Tone (Handset
.[0].to.[9]..Use.[ ].and.[ ].to.
22
 Loading...