

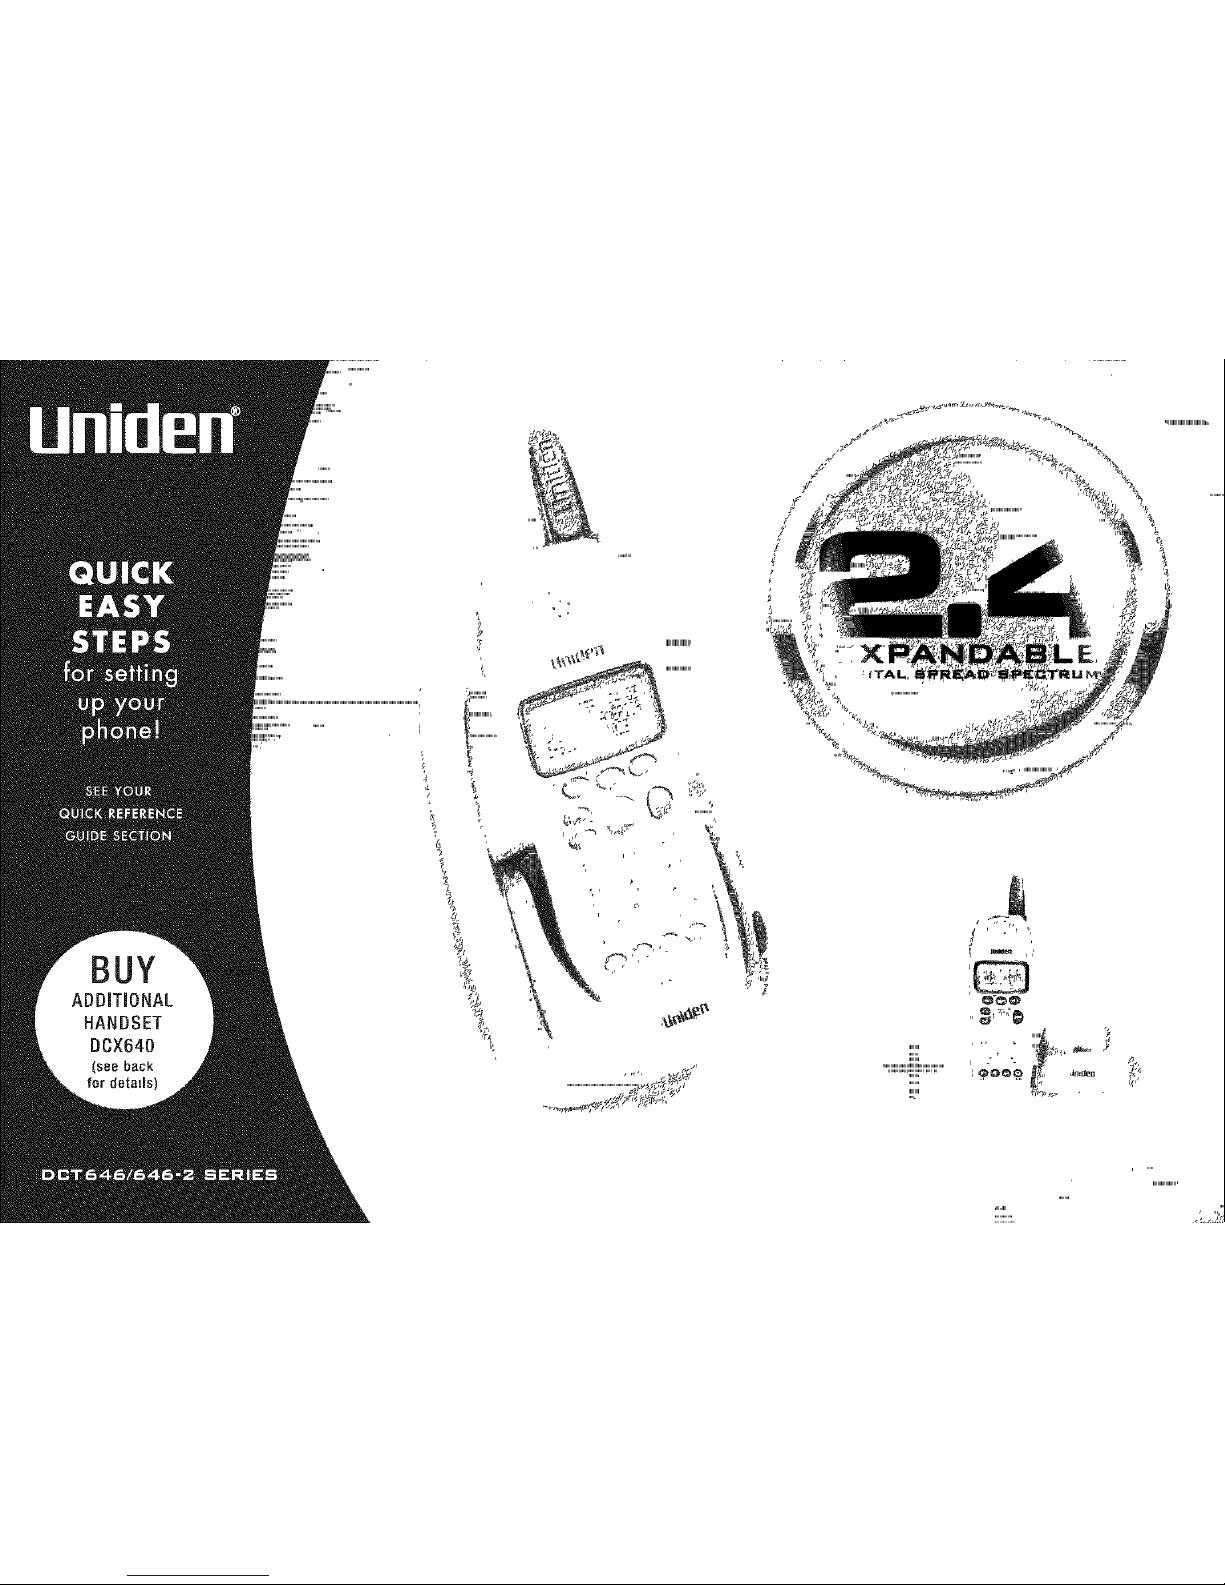
Uniden DCT646-2 Series, DCT646 Series Quick Easy Steps Manual
(see back
,,q
_ iiiiiiiiiiiiiiiiiiiii,
),,,,,,,,,,,,,,,,,,,,,,,,,,,,
__J, ,,,
,,, _, _;t?' ,,,,,,,,,,,,,,I'
J,t , _,
_r÷:©
:III::IIII.....
,,,,,,,,,,,,,,,,,,,,,
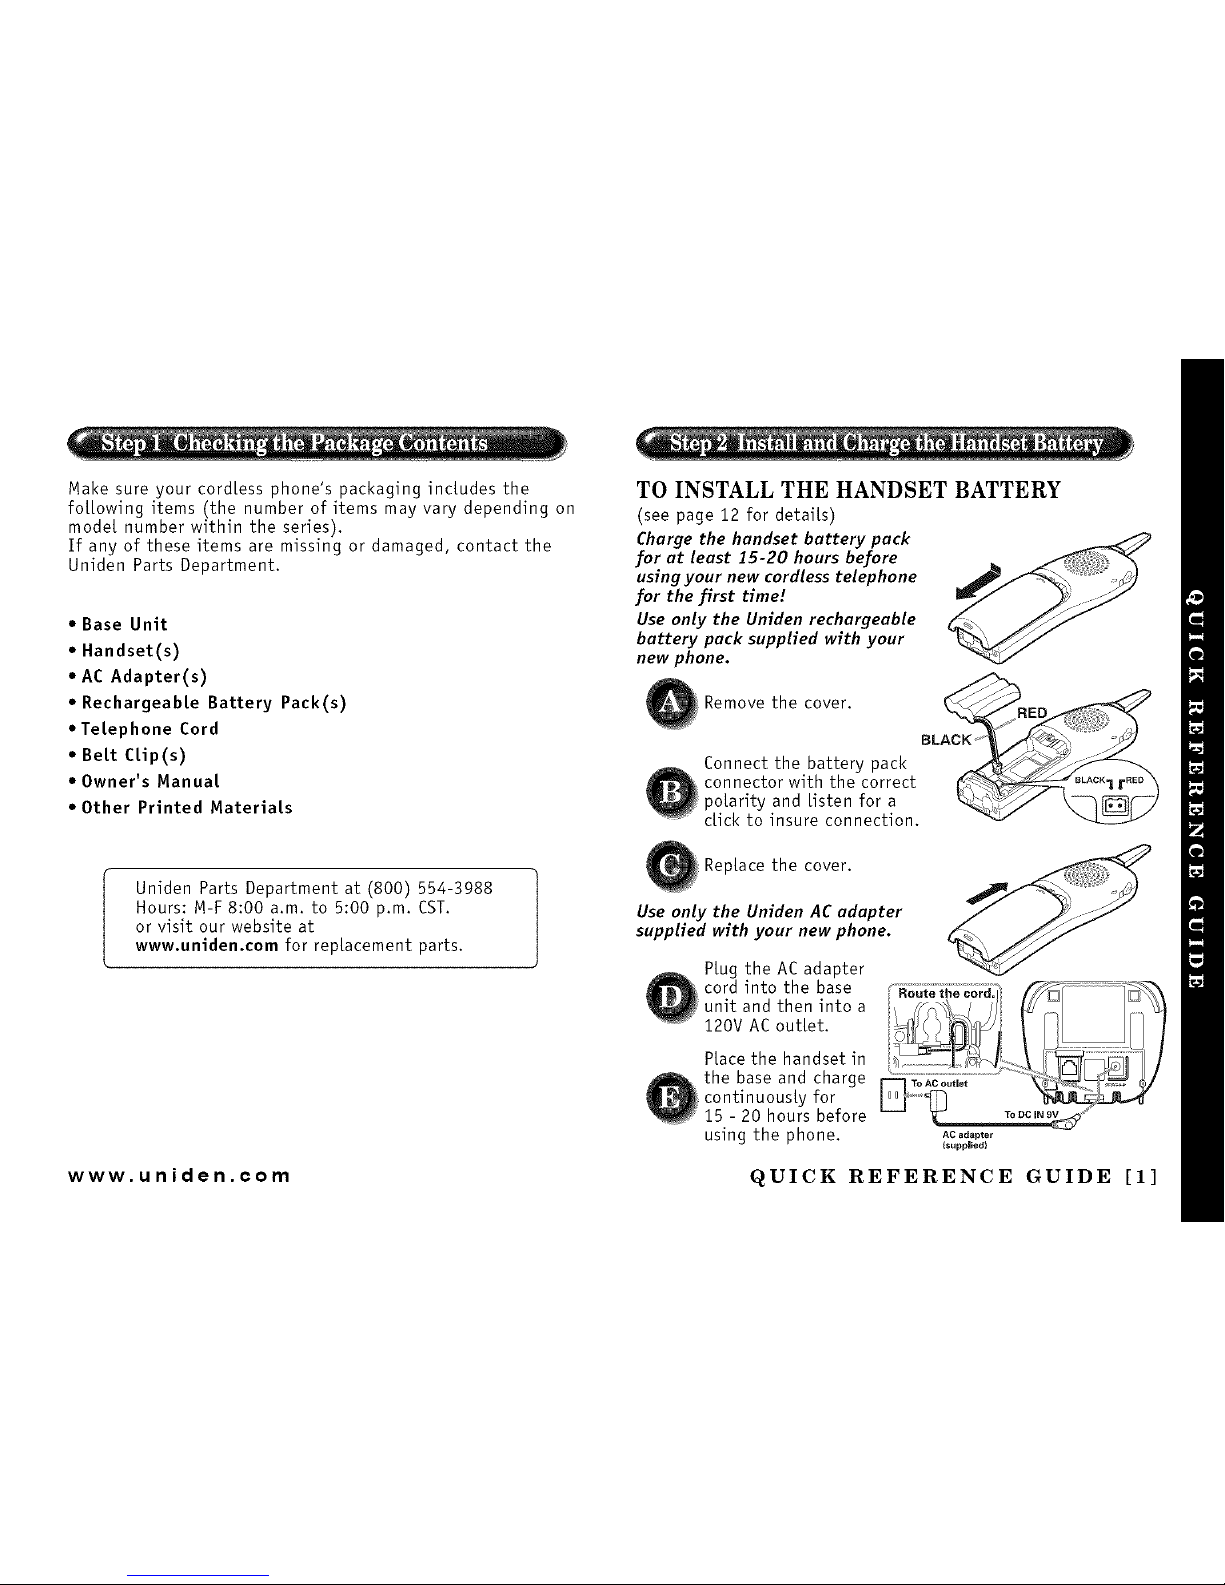
Make sure your cord[ess phone's packaging includes the
fo[[owing items (the number of items may vary depending on
mode[ number within the series).
If any of these items are missing or damaged, contact the
Uniden Parts Department.
• Base Unit
• Handset(s)
• AC Adapter(s)
• Rechargeab[e Battery Pack(s)
• Telephone Cord
• Belt Clip(s)
• Owner's Manua[
• Other Printed Materia[s
Uniden Parts Department at (800) 554-3988
Hours: M-F 8:00 a.m. to 5:00 p.m. CST.
or visit our website at
www.uniden.com for replacement parts.
TO INSTALL THE HANDSET BATTERY
(see page 12 for detaits)
Charge the handset battery pack
for at least I5-20 hours before
using your new cordless telephone
for the first time! _/_/I
Use only the Uniden rechargeahle
battery pack supplied with your
new phone.
z_
Remove the cover, z _J
Connect the battery pack BLA_,__y_,
connector with the correct
potarity and listen for a
dick to insure connection.
Replace the cover.
Use only the Uniden AC adapter
supplied with your new phone.
Ptug the AC adapter
cord into the base _ _'_r_:il
unit and thenintoa __i _/ /"[_
120V AC out[et.
Place the handset in :::
the base and charge _.o co_,_t
continuousty for _'°_ ..... _L.._
15 - 20 hours before
using the phone. ACadapter
(supplied}
www.uniden.¢om QUICK REFERENCE GUIDE [1]
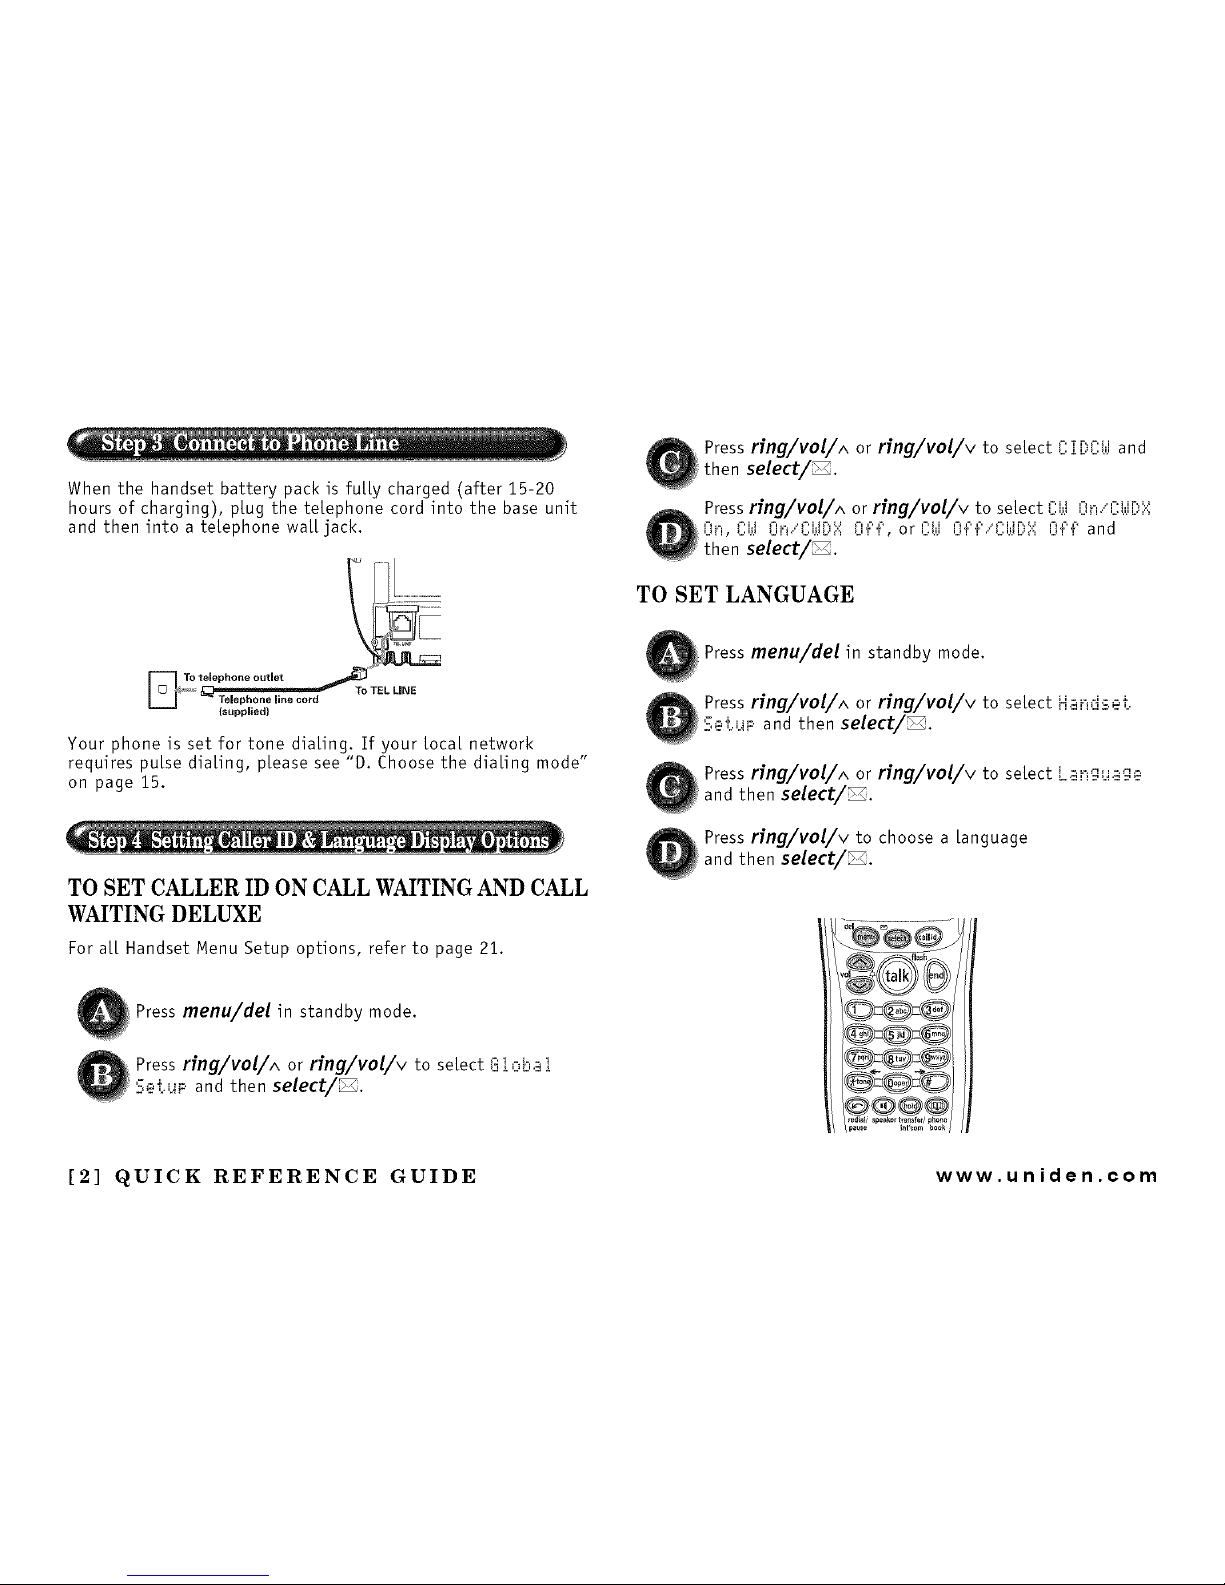
When the handset battery pack is fu[[y charged (after 15-20
hours of charging), p[ug the telephone cord into the base unit
and then into a telephone wa[[jack.
Your phone is set for tone dialing. If your focal network
requires pulse dia[ing, p[ease see "D. Choose the dia[ing mode"
on page 15.
TO SET CALLER ID ON CALLWAITING AND CALL
WAITING DELUXE
For a[[ Handset Menu Setup options, refer to page 21.
Press menu/del in standby mode.
Press rJllg//vol//A or rJllg//vol//v to select G i ,.-_,._i
V Set.ijF and then select/_.
Pressring/vol/^ or ring/vol/v to select _Z:][)_Z:_I[.i and
then select/_.
Press ring/vol/^ or ring/vol/v to select _Z:Jill_ I]__,"I]:_,i,I[)::,:_
,-,_- ,-.u ,-,_-....,-.ur.,v,-,-,'.z. or l':l.;i ljf'f'.."L:l._.IL.'.')'::ljf'" and
then select/_.
TO SET LANGUAGE
Press menu/del in standby mode.
Pressring/vol/^ or ring/vol/v to select Ha_idseti
Sef..ijp and then select/_.
Pressring/vol/^ or ring/vol/v to select Langu._ge
and then select/_.
Press rJng/vol/v to choose a language
and then select/_.
@@@@
[2] QUICK REFERENCE GUIDE www.uniden.com
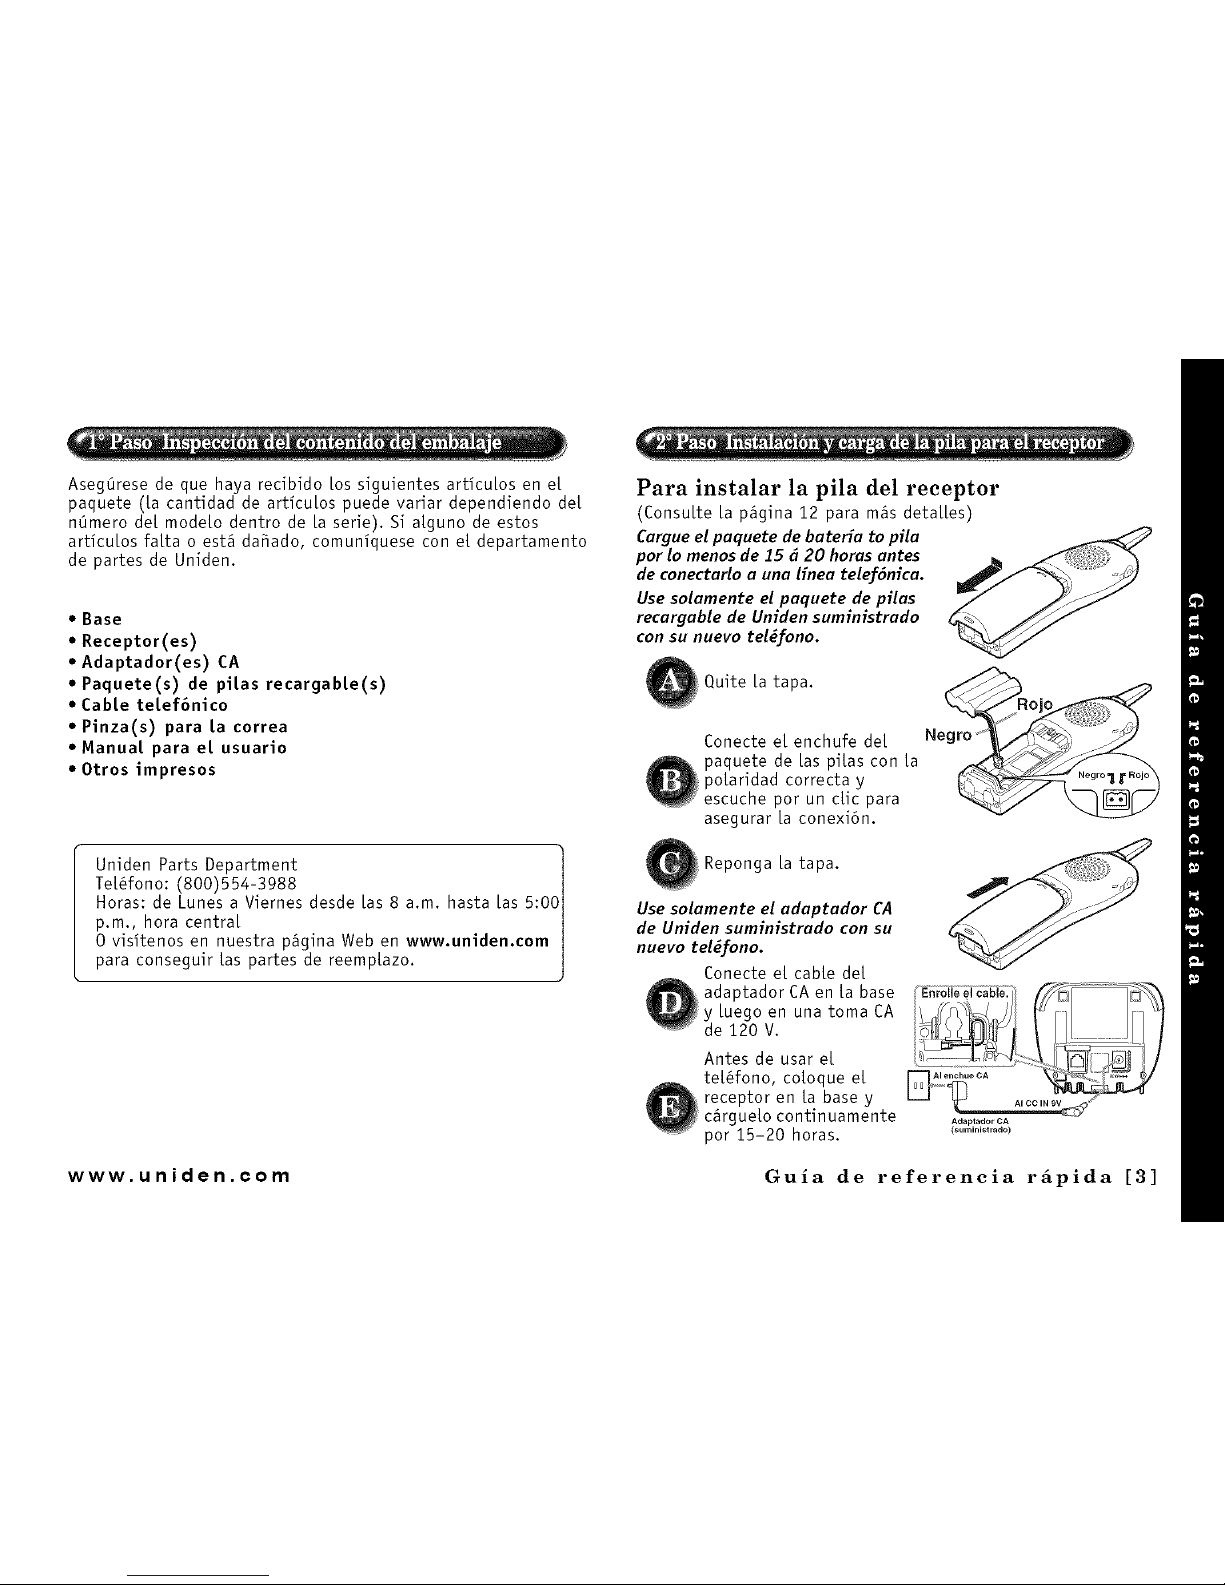
Aseg0rese de que haya recibido los siguientes articu[os en e[
paquete ([a cantidad de articu[os puede variar dependiendo de[
n0mero de[ mode[o dentro de [a serie). Si a[guno de estos
articu[os fa[ta o est_ da_ado, comuniquese con e[ departamento
de partes de Uniden.
• Base
• Receptor(es)
• Adaptador(es) CA
• Paquete(s) de pi[as recargab[e(s)
• CaMe te[ef6nico
• Pinza(s) para [a correa
• Manual para e[ usuario
• Otros impresos
1
Uniden Parts Department |
Te[_fono: (800)554-3988 |
Horas: de Lunes a Viernes desde [as 8 a.m. hasta [as 5:00|
p.m., hora centra[ |
0 visitenos en nuestra p_gina Web en www.uniden.com |
para conseguir [as partes de reemp[azo. |
)
Para instalar la pila del receptor
(Consutte [a pSgina 12 para mSs detattes)
Cargue el paquete de baterfa to pila
par lo menos de 15 6 20 boras antes
de conectarlo a una lfnea telef6nica.
Use solamente el paquete de pilas
recargable de Uniden suministrado
con su nuevo tel_fono.
Quite [a tapa. _
Conecte e[ enchufe de[ Neg__ _._
paquete de [as pitas con [a
potaridad correcta y
escuche por un ctic para
asegurar [a conexi6n.
Reponga [a tapa.
Use solamente el adaptador CA
de Uniden suministrado con su
nuevo telEfono.
Conecte e[ cabte de[
Q adaptador CA [a base
en
Yde[Ueg°120v.enuna toma CA
Antes de usar e[ :::
tet6fono, co[oque e[ F_A_ _cA •
receptor en ta base y
AIOO
c_rgue[o continuamente Adoptodo,CA
por 15-20 horas. I_mi.io.odol
www.uniden.¢om Guia de referencia r_pida [3]
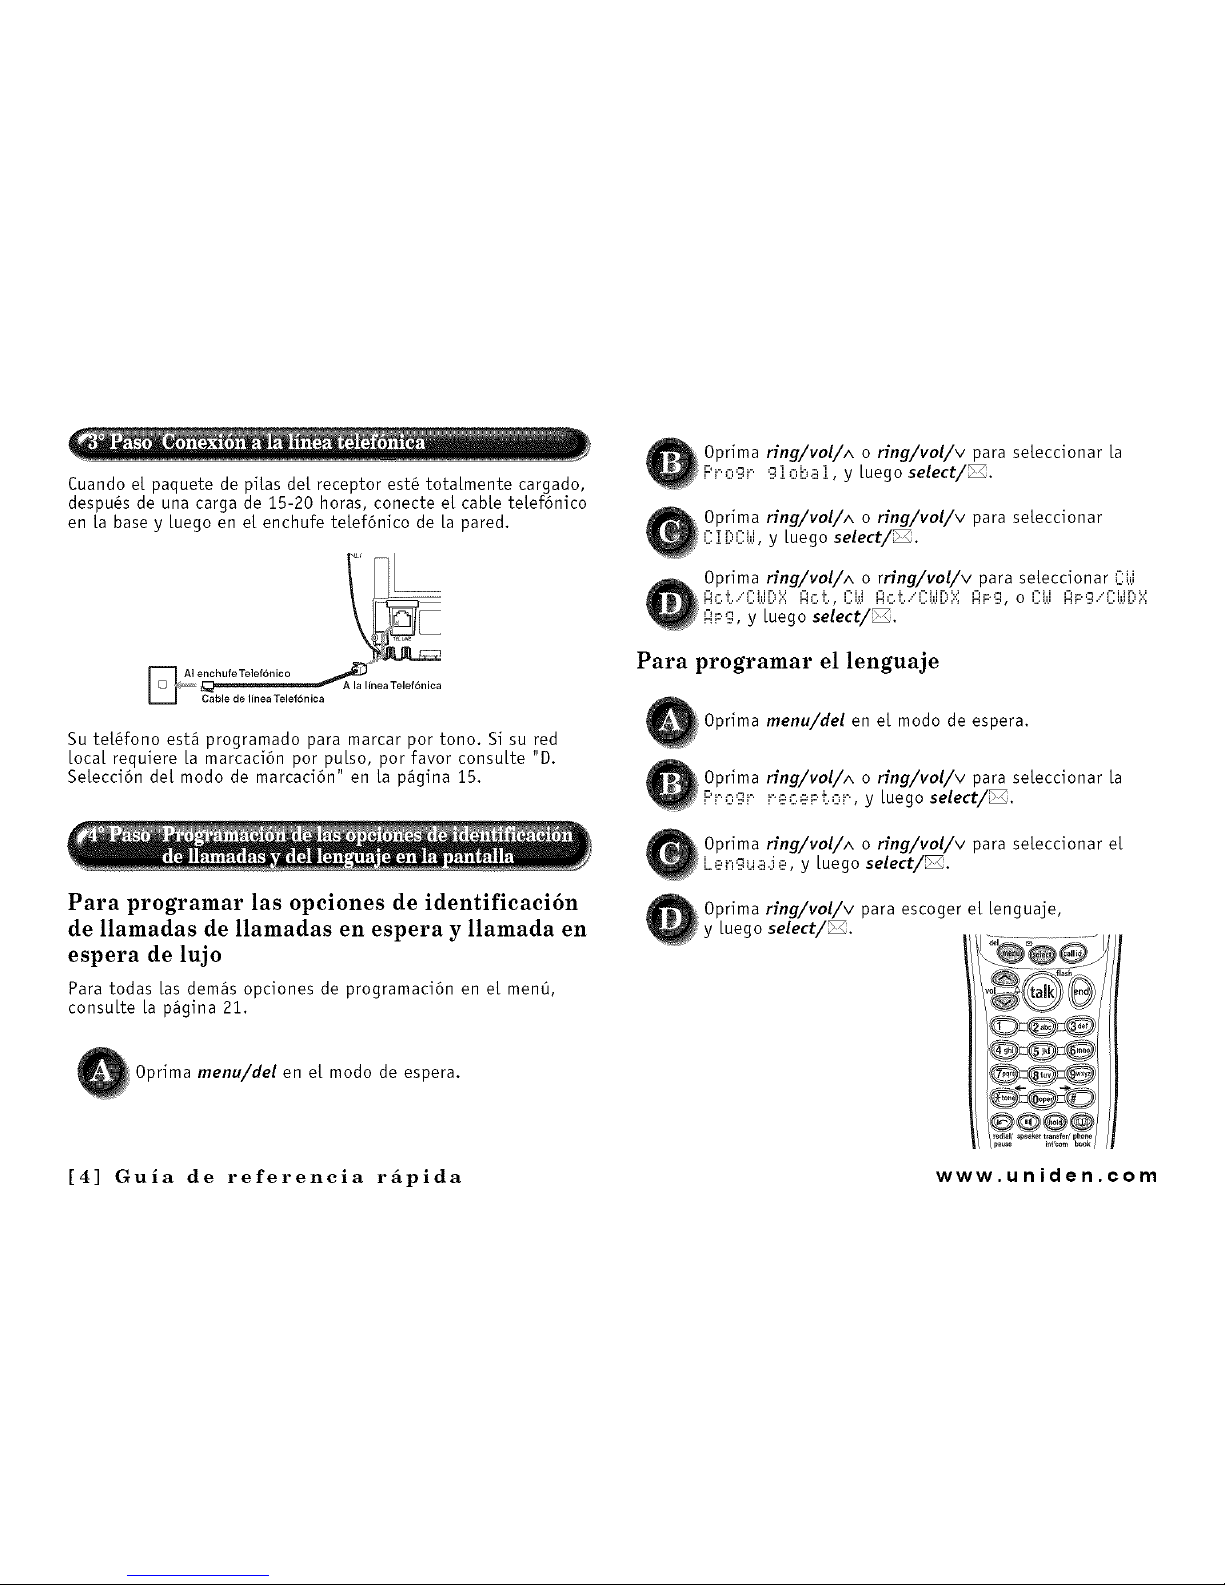
Cuando e[ paquete de pi[as de[ receptor est# tota[mente cargado,
despu#s de una carga de 15-20 horas, conecte e[ cable te[ef6nico
en [a base y [uego en e[ enchufe te[ef6nico de [a pared.
Su te[_fono est_ programado para marcar por tono. Si su red
local requiere [a marcaci6n por pu[so, por favor consu[te "D.
Se[ecci6n de[ modo de marcaci6n" en [a p_gina 15.
Para programar las opciones de identificaci6n
de llamadas de llamadas en espera y llamada en
espera de lujo
Para todas [as demos opciones de programaci6n en e[ menO,
consu[te [a p_gina 21.
O pri.ma yin,g_/.,vol,/_o ring/Ivol,/v para se[eccionar [a
r ._,_,.< .__,,_,u__,, [uego select/_.
Oprima ring/vol/A o ring/vol/v para se[eccionar
I] ] [)I]i.,i, y [uego select/_,
_ Oprima ring/roll^ o rring/vol/v para se[eccionar C:i.,i
Ac.t. y1-:i.,i[.'..% A,:.t., L:i.,.iA,:.t.YL:i.,i[.'..::.::AP g, o L:i.,i A Fg YI_-:i.,.i[:,%
AFg, y [uego select/_.
Para programar el lenguaje
Oprima menu/del en e[ modo de espera.
Oprima ring/Ivol/IA o ring/Ivol/Iv para se[eccionar [a
p r.c,gr. rec.eF.t.,:,.r., y [uego select/_.
_ Oprima ring/veil^ o ring/vol/v para se[eccionar e[
Le.rigua.Je, y [uego select/_.
Q Oprima ring/vol/v para escoger e[ [enguaje,
y [uego select/_.
menu/del en e[ modo de espera.
[4] Guia de referencia rfipida www.uniden.com

Contents
QUICK REFERENCE GUIDE
WELCOME/FEATURES/TERMINOLOGY
CONTROLS AND FUNCTIONS
DISPLAY AND ICONS
GETTING STARTED
Setting up the Phone
Mounting the Base Unit on a WaLl
About the Menu Options
Setting up the Menu
BASICS
Making and Receiving Calls
PLacing a CaLLon HoLd
RediaLing a CaLL
Adjusting the Handset Ringer, Earpiece and Speaker VoLume
Mute Microphone
Tone DiaLing Switch-over
TraveLing Out-of-Range
CLarity Booster
Privacy Mode
Find Handset
FLash and CaLLWaiting
Using One Touch Voice Mail Access
PHONEBOOK
Phonebook
Storing Phone Numbers, Names, Distinctive Rings,
and Speed Dial
Steps for Entering Names and Special Characters
Viewing the Phonebook
Making CaLLs Using the Phonebook
Speed DiaLing
Editing or Erasing a Stored Name,
Phone Number, Distinctive Ring, and Speed Dial
www.uniden.com
1 Chain DiaLing
6 CALLER ID
CaLLer ID and CIDCW (CaLLer ID on Cai[ Waiting)
8 Viewing the CaLLer ID List
10 DeLeting a CaLLer ID Message
Using the CaLLer ID Message List
11 CaLLWaiting DeLuxe Features
11 EXPANDING YOUR PHONE
16 Expanding Your Phone
18 Connecting the Charger
21 Register the Handset to the Base
28 Using the DirectLink Mode
28 Room Monitor
29 3-Way Conferencing
30 Intercom/Call Transfer Feature
31 RepLacing the Base
32 ADDITIONAL INFORMATION
32 Changing the Digital Security Code
32 InstaLling the BeLtc[ip
33 Headset Installation
33
Note on Power Sources
34 Maintenance
34 Genera[ Information
35
36 TROUBLESHOOTING
36 Liquid Damage
PRECAUTIONS & WARRANTY
36
38 I.C. NOTICE
40 INDEX
41
41 MEMORY LIST
42
43
44
44
45
46
47
48
49
49
49
50
51
51
52
52
53
54
54
54
54
55
55
56
57
59
6O
62
63
64
[5]
Welcome
Congratulations on your purchase of the Uniden Multi-Handset Cordless System telephone. This
unit is different from conventional cordless telephones. When the base unit is connected to AC
power and a telephone line, it can support up to 4 handsets. Using extra handsets, you can
establish a 3-way conference ca[[ (2 handsets and an outside line), while two other handsets are
making an intercom ca[[. You can now place a fully featured cordless handset anywhere in your
home or office where AC power is available to connect the handset chargers.
Note: Some illustrations in this manual may differ from the actual unit for
explanation purposes.
_ s an Energy Star ® Partner, Uniden has determined that this product or product
models meets the Energy Star ® guidelines for energy efficiency.
Energy Star ® is a U.S. registered mark.
Note: Energy Star ® applies to DCT646 only.
Features • 2.4GHz Frequency Hopping Spread Spectrum
• 4 Multi-Handset Expandabi[ity
• Hands Free Speakerphonein the Handset
• Ca[[ Waiting Deluxe
• Caller ID/Ca[[er ID On Ca[[ Waiting
• 100 Dynamic Memory Location (Phonebook & Caller ID)
• Trilingual Handset Display Menus (English, French, and Spanish)
• Ca[[ Transfer between Handsets
• 20 Distinctive Ring Options (10 ringer tones and 10 melody ringers)
• Mute Feature
• Hash and Pause
• 88 Channe[Auto Scan
• DirectLink TM Mode
• Voice Mail Access
• Room Monitoring Feature
• Battery Level Indicator
• Clock Display
[6] WELCOME/FEATURES/TERMINOLOGY www.uniden.¢om
ThisseriesfeaturesincludeAutoTalk TM and AutoStandby TM. AutoTa[k allows you to answer a ca[[ by just removing
the handset from the cradle so you don't have to waste time pushing buttons. AutoStandby allows you to hang up by
simply returning the handset to the cradle.
To protect you against mis-bi[[ed ca[Is, which might result from your phone being activated by other equipment, this
series has Random Code TM digital security, which automatically selects one of over approx. 130,000 digital security
codes for the handset and base.
Frequency Hopping Spread Spectrum (FHSS) technology improves ca[ling range and clarity, and eliminates cross talk.
Because it rapidly changes transmission frequencies within the 2.4GHz bandwidth, this cordless phone helps reduce
the possibility of eavesdropping.
DirectLink mode is used when you have 2 or more handsets. You can use your handsets as transceivers.
Be sure to visit our web site: www.uniden.com
Uniden ® is a registered trademark of Uniden America Corporation.
AutoTa[k, AutoStandby, DirectLink, and Random Code are trademarks of Uniden America.
Terminology
• Standby Mode - The handset is not in use and talk/flash has not been pressed.
• Tatk Mode - The handset is not in the cradle and talk/flash or speaker has been pressed enabling a dial tone.
Taik appears on the display.
www.uniden.¢om WELCOME/FEATURES/TERMINOLOGY [7]
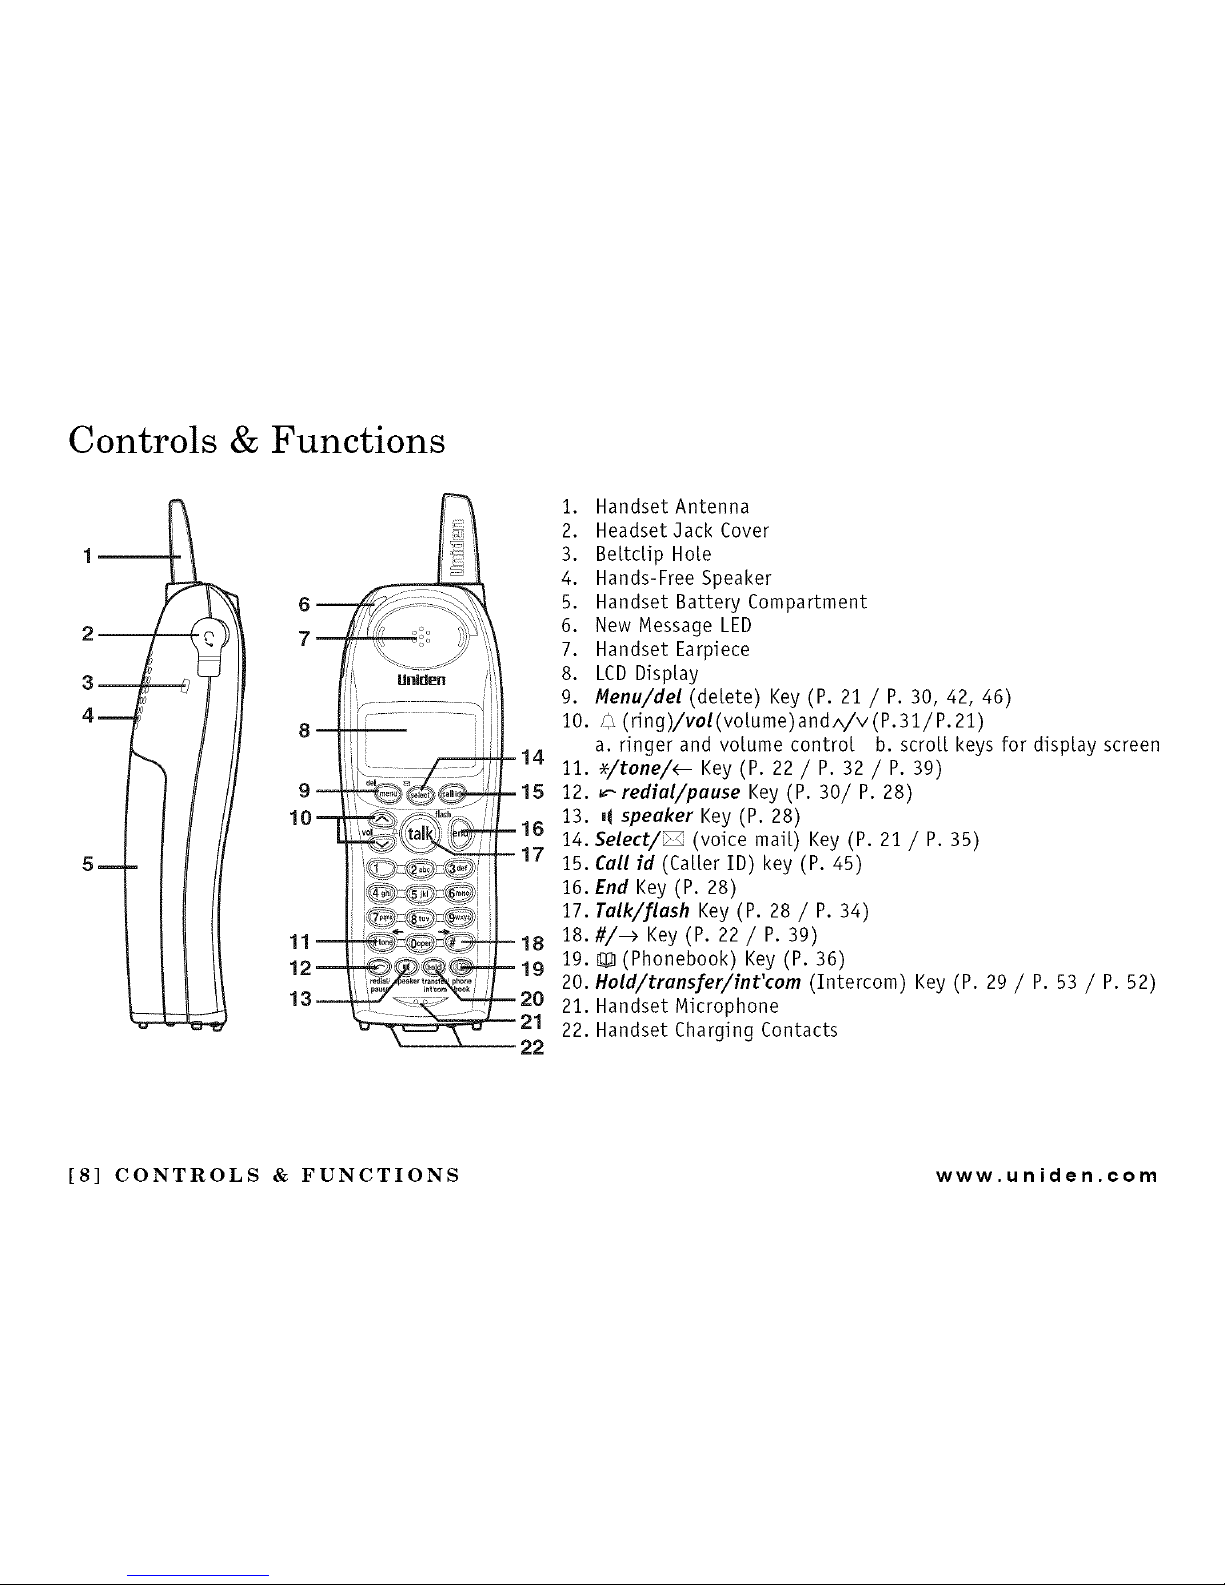
Controls & Functions
6
7
8 --
9
10
11
12
13
14
15
16
17
18
19
22
i. Handset Antenna
2. Headset Jack Cover
3. Be[tc[ip Hole
4. Hands-Free Speaker
5. Handset Battery Compartment
6. New Message LED
7. Handset Earpiece
8. LCD Display
9. Menu/del (de[ete) Key (P. 21 / P. 30, 42, 46)
10. (_ (ring)/vol(vo[ume)and^/v(P.31/P.21)
a. ringer and volume control b. scroll keys for display screen
11. _/tone/_- Key (P. 22 / P. 32 / P. 39)
12. _redial/pause Key (P. 30/P. 28)
13. _ speaker Key (P. 28)
14. Select/_ (voice mail) Key (P. 21 / P. 35)
15. Call id (Caller ID) key (P. 45)
16. End Key (P. 28)
17. Talk/flash Key (P. 28 / P. 34)
18. #/--> Key (P. 22 / P. 39)
19. _ (Phonebook) Key (P. 36)
20. Mold/transfer/int'com (Intercom) Key (P. 29 / P. 53 / P. 52)
21. Handset Microphone
22. Handset Charging Contacts
[8] CONTROLS & FUNCTIONS www.uniden.¢om
!
27
1
28
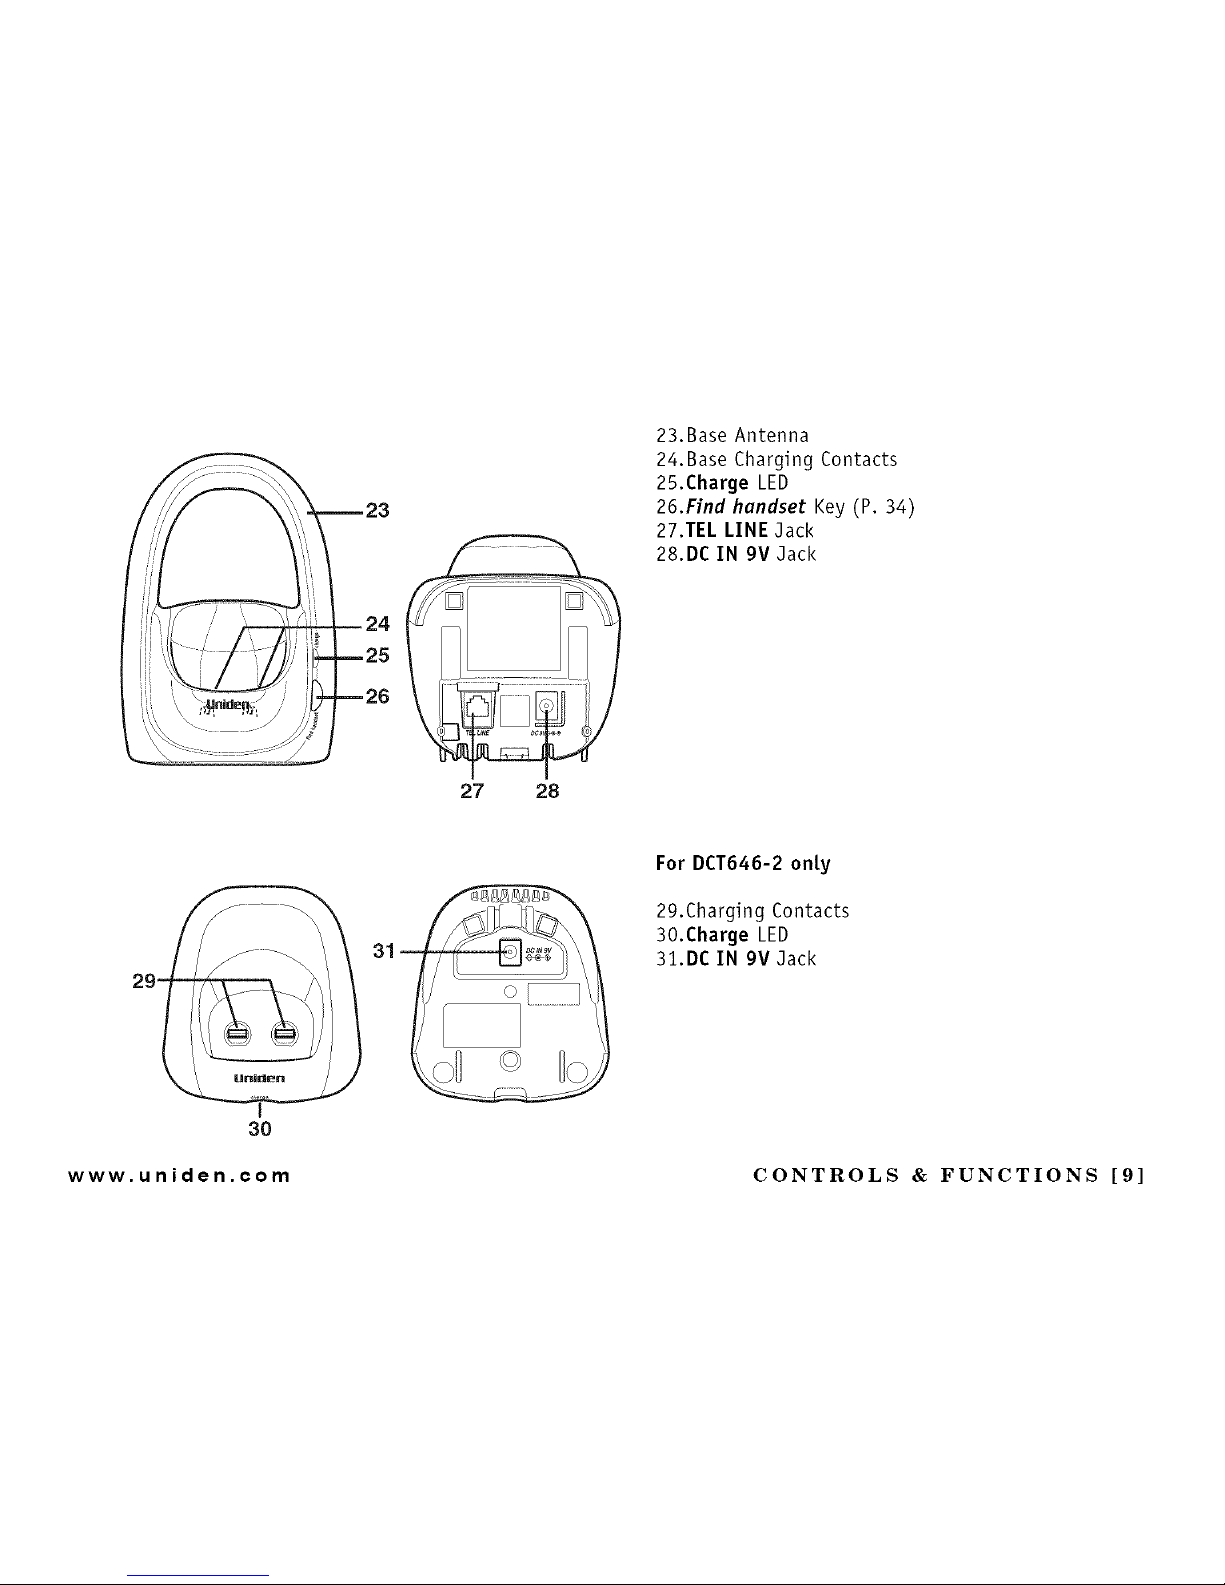
23.Base Antenna
24.Base Charging Contacts
25.Charge LED
26.Find handset Key (P. 34)
27.TEL LINE Jack
28.DC IN 9V Jack
29-
31
For DCT646-2 only
29.Charging Contacts
30.Charge LED
31.DC IN 9V Jack
30
www.uniden.com
CONTROLS & FUNCTIONS [9]
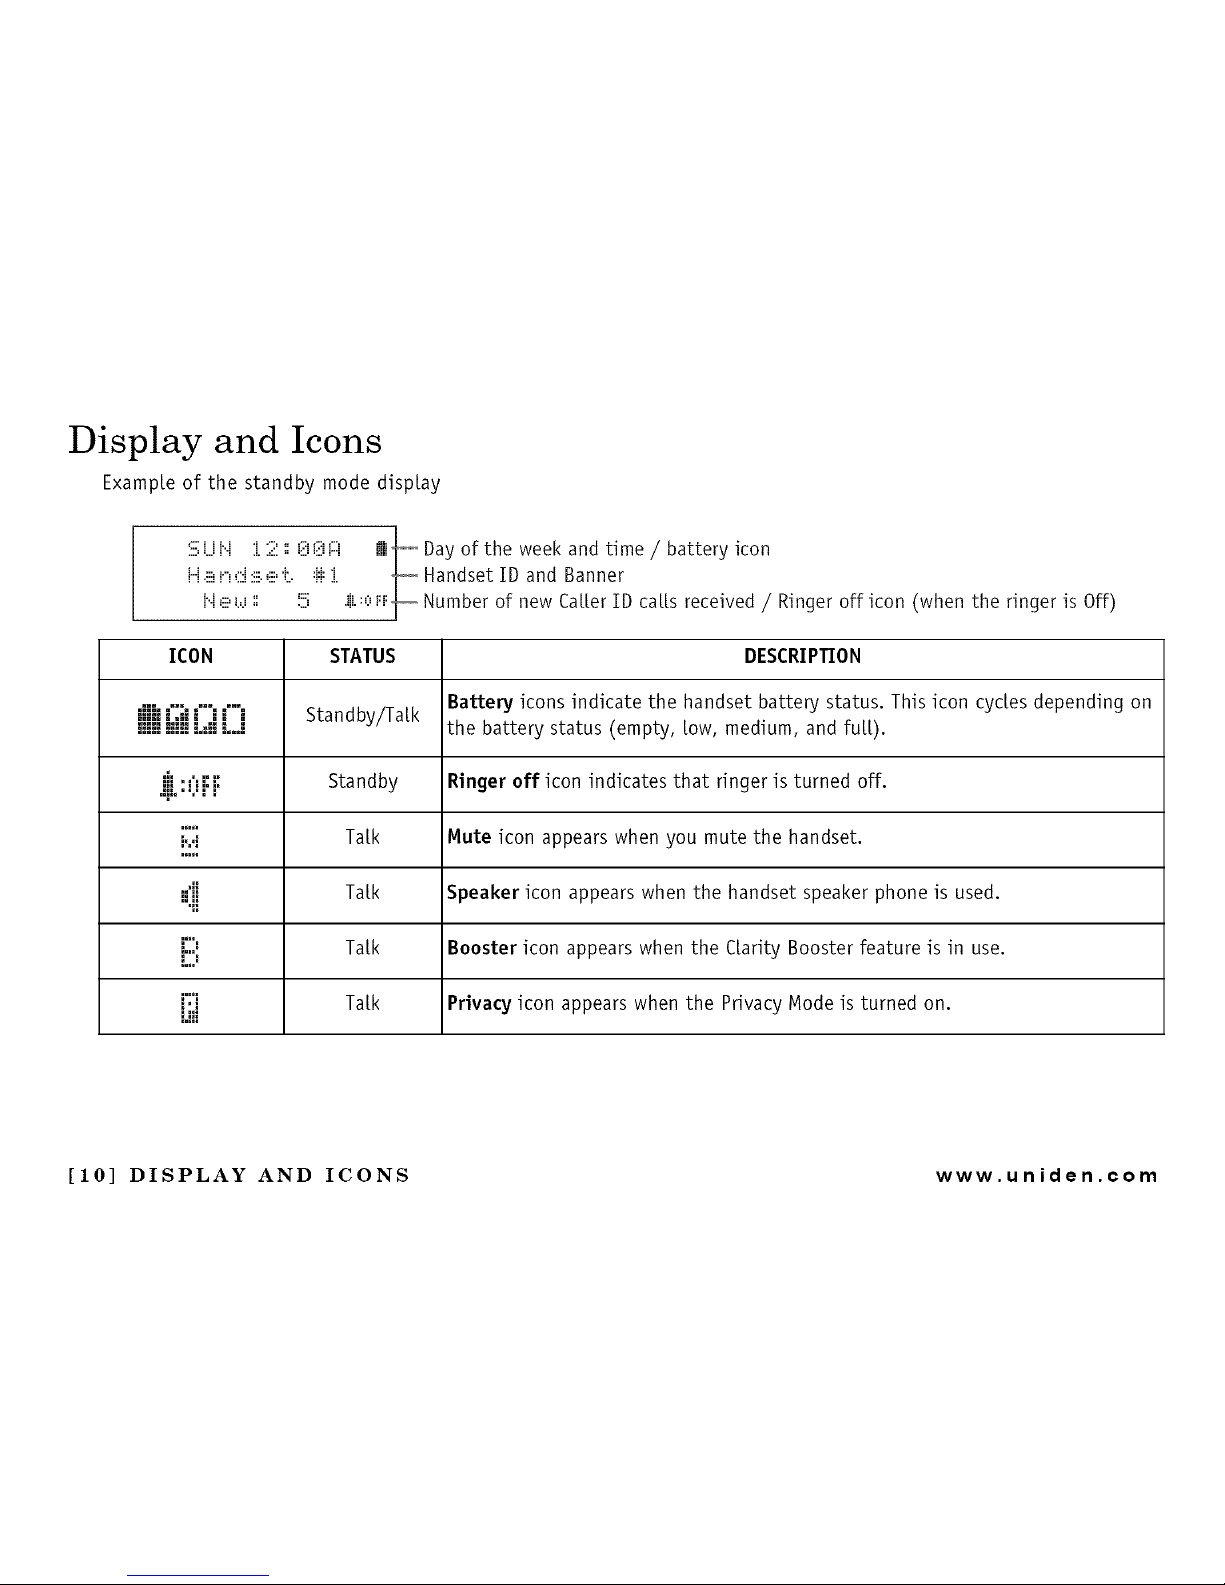
Display and Icons
Example of the standby mode display
!
:!ii;U i..i i 2 r, 0 0 i:::i Jk_ Day of the week and time / battery icon
i...ia r_,:::i2.eL. :i:i::i. _ Handset ID and Banner
/
i".i,iii,_.,._r, !5 .&:,:,H:_ Number of new Caller ID ca[Is received / Ringer off icon (when the ringer is Off)
/
ICON STATUS DESCRIPTION
Battery icons indicate the handset battery status. This icon cycles depending on
,,,::::JJJl,,::,i_il,.,,,i"),...,i"i Standby/Talk the battery status (empty, low, medium, and fuji).
.iii :Ui. i. Standby Ringer off icon indicates that ringer is turned off.
i;i:i Talk Mute icon appears when you mute the handset.
,,,,,
::'i[ Talk Speaker icon appears when the handset speaker phone is used.
"41
:.,,, Talk Booster icon appears when the Ctarity Booster feature is in use.
L, I
r:'i Talk Privacy icon appears when the Privacy lode is turned on.
UH
[10] DISPLAY AND ICONS www.uniden.¢om
Setting up the Phone
Dothe fottowing steps:
A. Choose the best location.
B. Install the rechargeable battery pack into the handset.
C. Connect the base unit.
D. Choose the dialing mode.
A. Choose the best location
Before choosing a location for your new phone, read "Installation Considerations" on
page 61. Here are some important guidelines you should consider:
Avoid heat sources, such as
radiators, air ducts, and sunlight
Avoid noise sources such as a window
by a street with heavy traffic
Avoid television sets and
other electronic equipment
Avoid microwave ovens
Avoid excessive
moisture, extremely
[ow temperatures,
dust, mechanical
vibration, or shock
Choose a centra[ location
persona[ computers
Avoid other cordless telephones
If your home has
specially wired alarm
equipment connected to
the telephone line, be
sure that installing the
system does not disable
your alarm equipment.
If you have questions
about what will disable
alarm equipment,
contact your
telephone company or
a qualified installer.
www.uniden.¢om GETTING STARTED [11]
• Use ontythe
Uniden (BT-446)
rechargeabte
battery pack
supplied with your
cordless telephone.
• Rep[acement battery
packs are a[so
avaitab[e through the
Uniden Parts
Department at (800)
554-3988, Monday
thru Friday from 8:00
a.m. to 5:00 p.m. or
ontine at
www.uniden.com
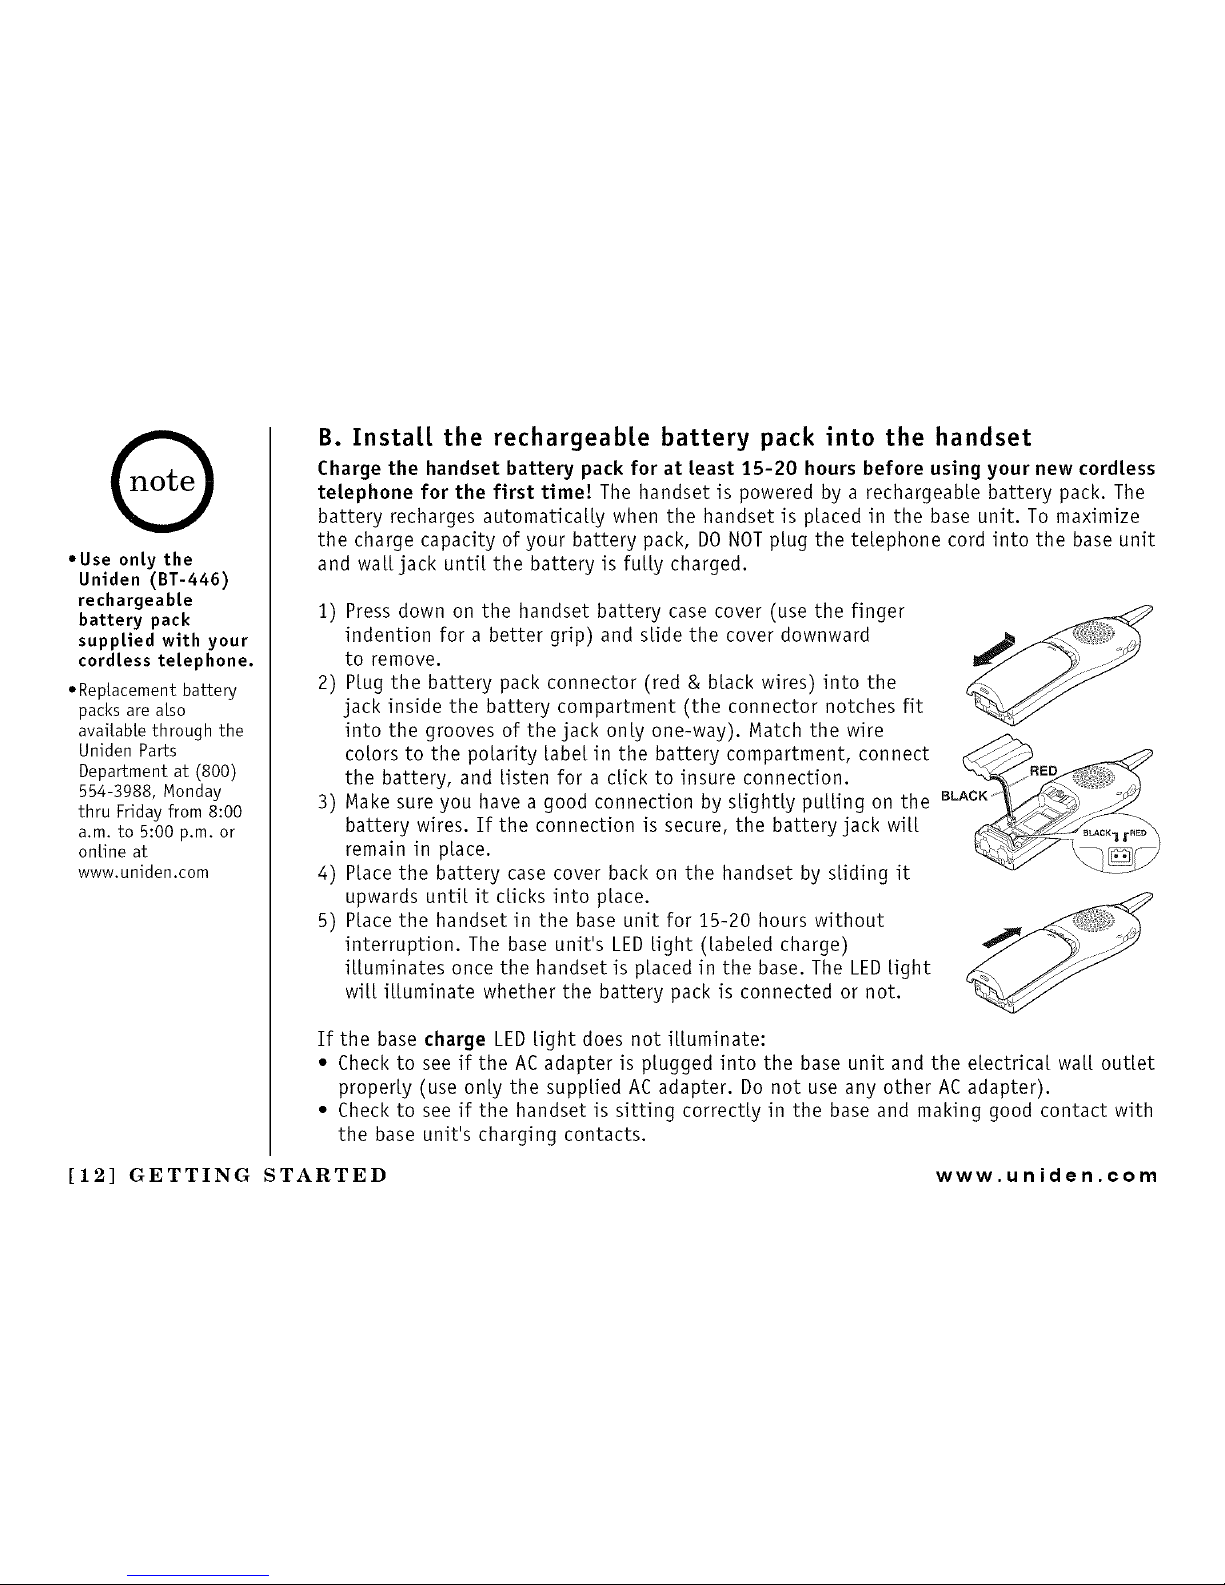
B. Instat[ the rechargeabte battery pack into the handset
Charge the handset battery pack for at {east 15-20 hours before using your new cord{ess
tetephone for the first time! The handset is powered by a rechargeabte battery pack. The
battery recharges automaticatty when the handset is ptaced in the base unit. To maximize
the charge capacity of your battery pack, DO NOT ptug the tetephone cord into the base unit
and watt jack untit the battery is furry charged.
1)
2)
Press down on the handset battery case cover (use the finger
indention for a better grip) and stide the cover downward
to remove.
Ptug the battery pack connector (red & btack wires) into the
jack inside the battery compartment (the connector notches fit
into the grooves of the jack onty one-way). Match the wire
cotors to the potarity tabet in the battery compartment, connect
the battery, and tisten for a dick to insure connection.
3) Make sure you have a good connection by stightty putting on the BLACK"
4)
s)
battery wires. If the connection is secure, the battery jack witt
remain in ptace.
Ptacethe battery case cover back on the handset by stiding it
upwards untit it dicks into ptace.
Ptacethe handset in the base unit for 15-20 hours without
interruption. The base unit's LEDtight (tabeted charge)
ittuminates once the handset is ptaced in the base. The LEDtight
witt ittuminate whether the battery pack is connected or not.
If the base charge LED tight does not ittuminate:
• Checkto see if the ACadapter is ptugged into the base unit and the etectricat watt outtet
property (use onty the supptied ACadapter. Do not use any other ACadapter).
• Checkto see if the handset is sitting correctty in the base and making good contact with
the base unit's charging contacts.
[12] GETTING STARTED www.uniden.¢om
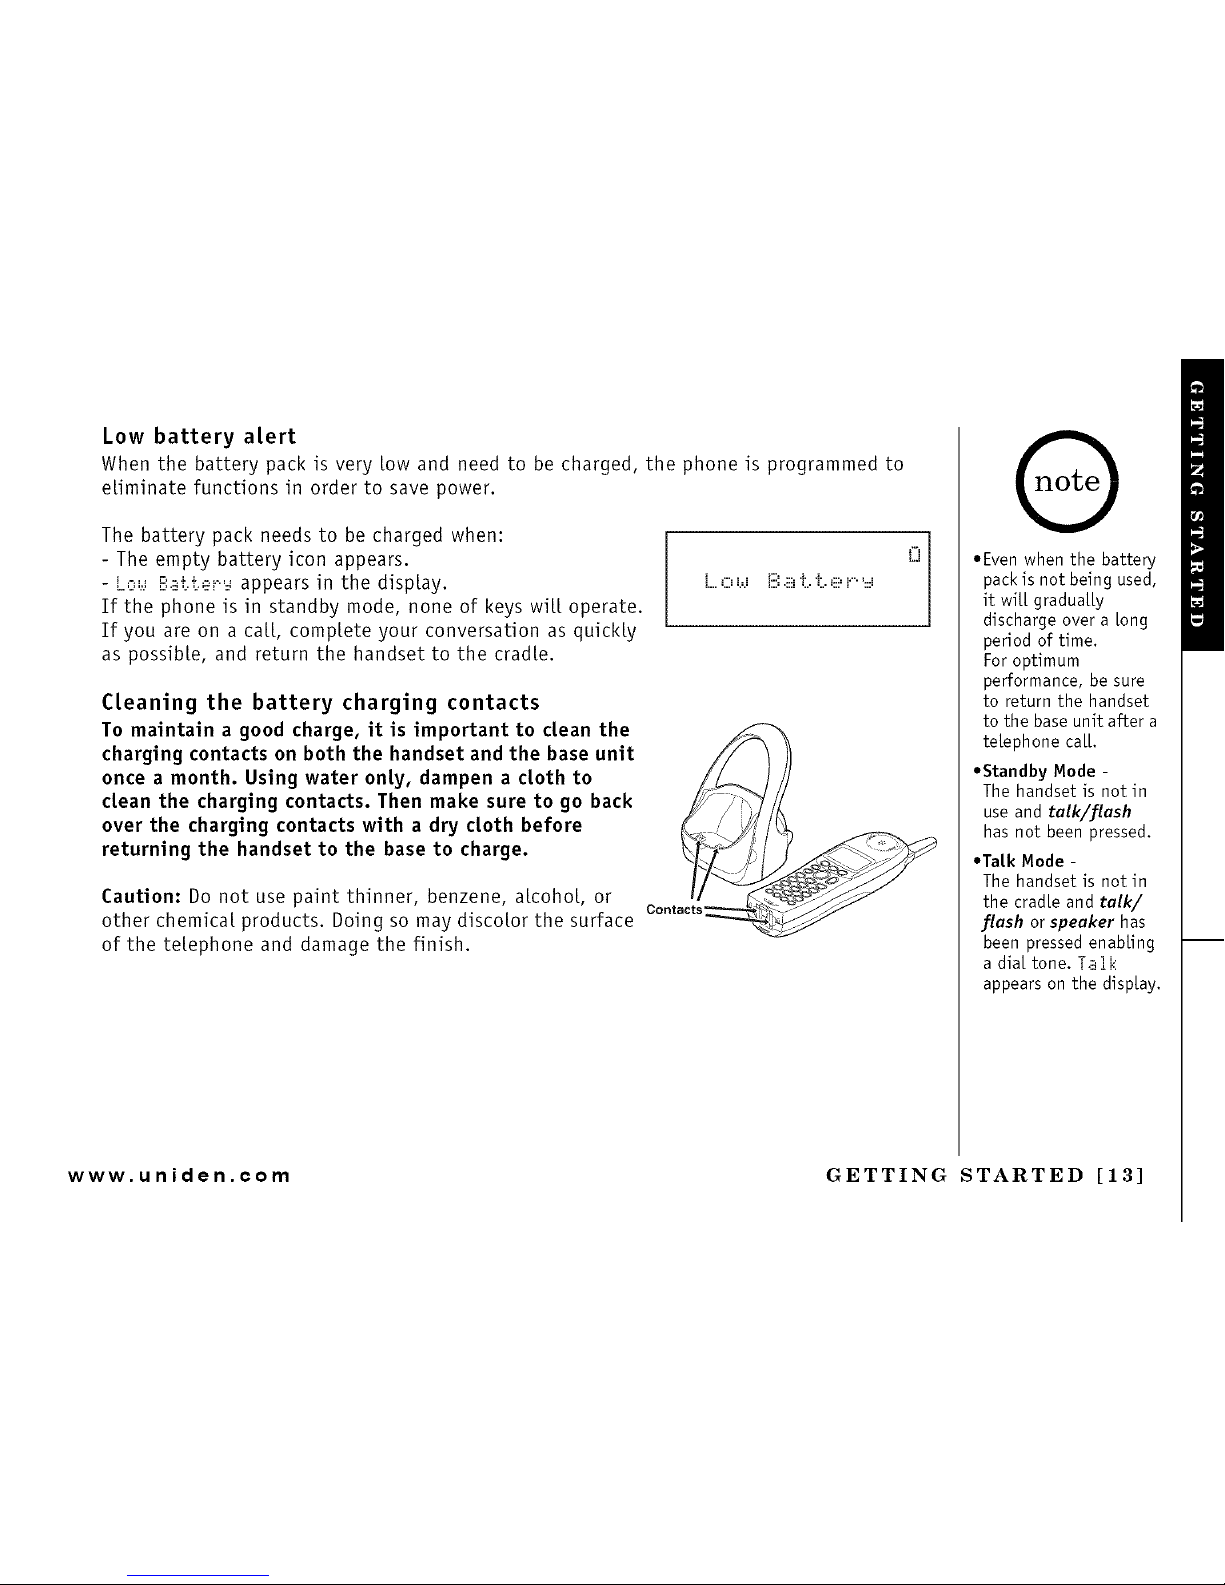
Low battery alert
When the battery pack is very low and need to be charged, the phone is programmed to
eliminate functions in order to save power.
The battery pack needs to be charged when:
- The empty battery icon appears.
- L,:,_._B_tt.eP=.4appearsin the display.
If the phone is in standby mode, none of keys will operate.
If you are on a ca[[, complete your conversation asquick[:/
as possible, and return the handset to the cradle.
L ,:::,b._Ei:aL.L.e i."::::_
0
C[eaning the battery charging contacts
To maintain a good charge, it is important to dean the
charging contacts on both the handset and the base unit
once a month. Using water only, dampen a cloth to
dean the charging contacts. Then make sure to go back
over the charging contacts with a dry cloth before
returning the handset to the base to charge.
Caution: Do not use paint thinner, benzene, alcohol, or
other chemical products. Doing so may discolor the surface
of the telephone and damage the finish.
Contacts
*Even when the battery
pack is not being used,
it will gradually
discharge over a long
period of time.
For optimum
performance, be sure
to return the handset
to the base unit after a
telephone ca[[.
*Standby Mode
The handset is not in
use and talk/flash
has not been pressed.
*Talk Mode -
The handset is not in
the cradle and talk//
flash or speaker has
been pressed enabling
adia[tone, iaLk
appears on the disp[ay.
www.uniden.com GETTING STARTED [13]
• Use only the supplied
LAD-800] AC adapter.
Do not use any other
AC adapter.
ePLace the power cord
so that it does not
create a trip hazard or
where it could
become chafed and
create a fire or
eLectricaL hazard.
C. Connect the base unit
1) Connect the AC adapter to the DC IN 9V jack and to a
standard 120V AC waLLoutlet.
2) Set the base on a desk or tabletop, and place the
handset in the base unit.
3) Make sure that the charge LEDilluminates.
If the LED does not illuminate, check to see that the AC adapter
is plugged in and the handset makes good contact with the base
charging contacts.
,Connect the AC adapter to a continuous power supply.
*PLace the base unit close to the AC outlet so that you can
unplug the AC adapter easily.
ACadapter
(supplied)
'ii
!
• After installing the battery pack in the handset, charge your handset at [east 15-20 hours
before plugging into the phone line.
4) Once the handset battery pack is fuLLy charged,
connect the telephone Line cord to the TEL LINE jack
and to a telephone outlet.
Q If your telephone outlet isn't modular, contact
your telephone company for assistance.
(supplied)
[14] GETTING STARTED www.uniden.com
D. Choose the diating mode
Most phone systems use tone dialing, which sends DTMF tones through the phone lines.
However some phone systems still use pulse dialing such as in rural areas. The default
setting is tone dialing. Depending on your dialing system, set the dial mode. To set the dial
mode, see "Setting the Dial Mode" on page 26.
• If you are not sure of your dialing system, set the unit to tone dialing. Make a trial ca[[.
If the ca[[ connects, leave the setting as is, otherwise set the unit to pulse dialing.
• If your phone system requires pulse dialing and you need to send DTMF tones in certain
situations during a ca[[, you may Switch Over to tone dialing (refer to "Tone Dialing
Switch-over" on page 32).
www.uniden.¢om GETTING STARTED [15]
(b
DONOTusean AC
out[et controt[ed by a
wa[[ switch.
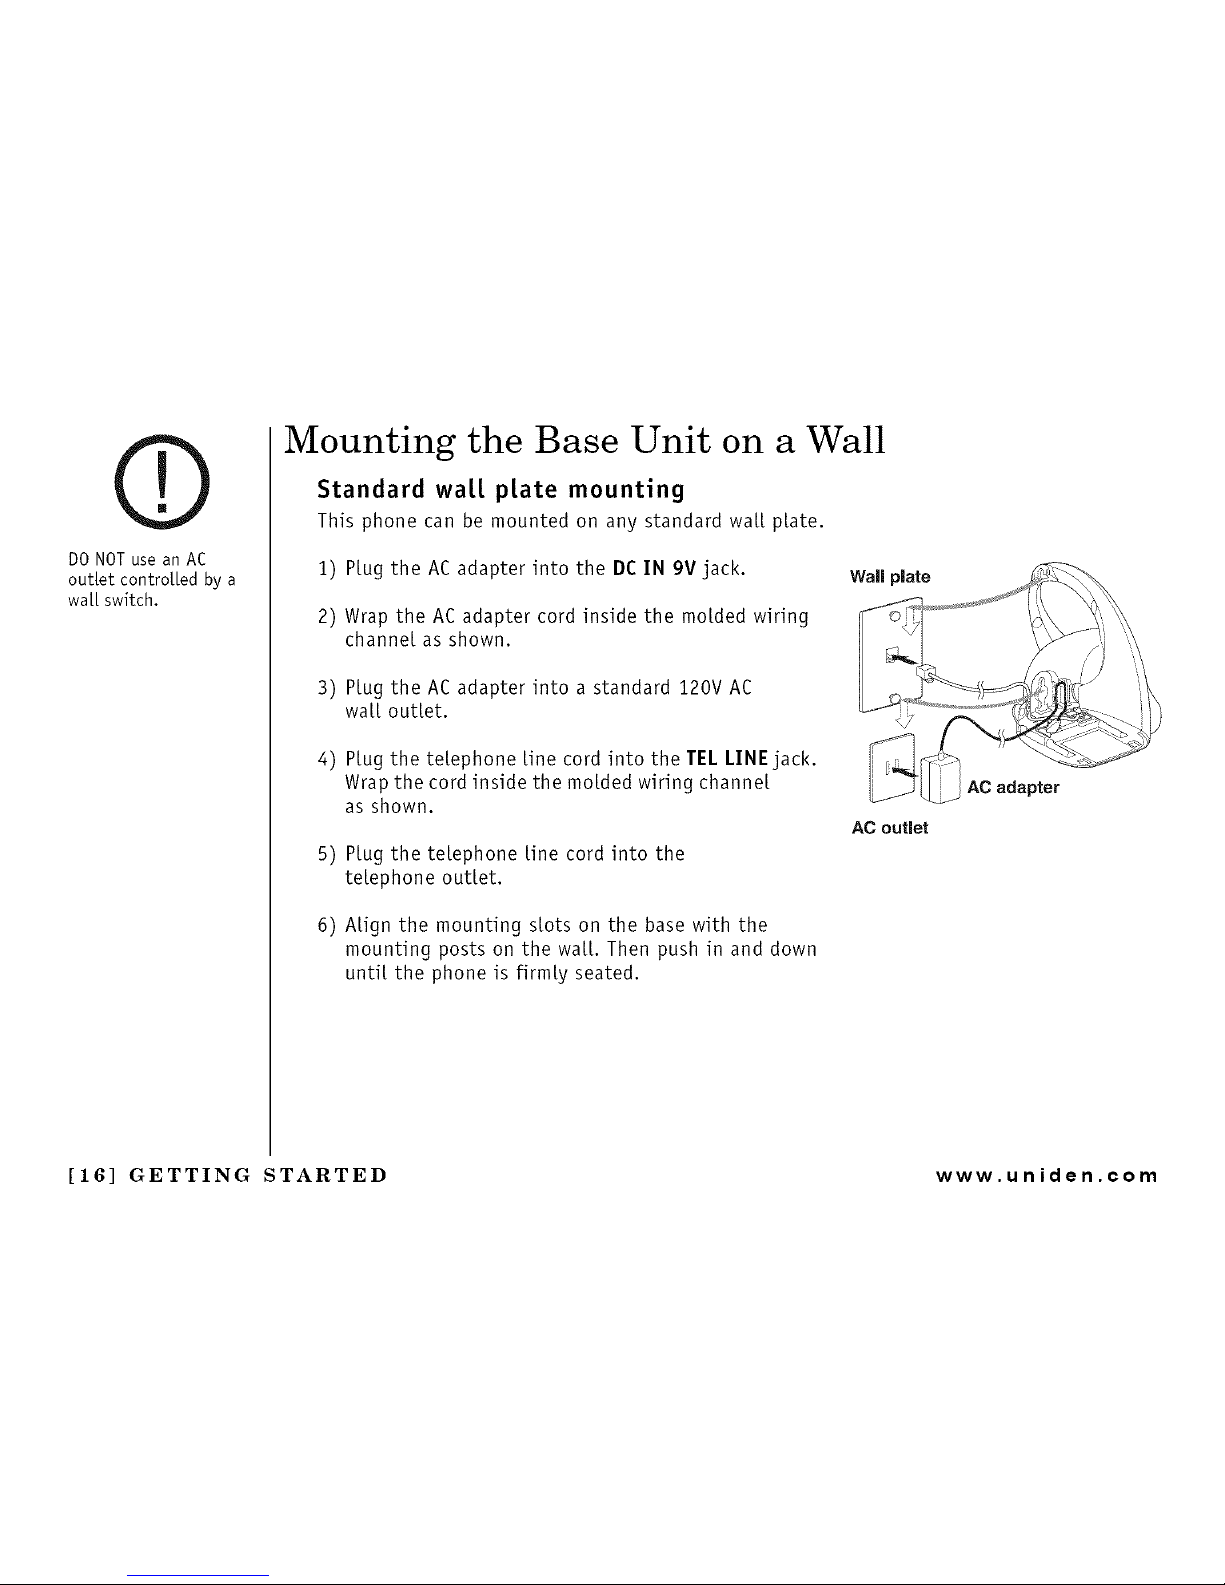
Mounting the Base Unit on a Wall
Standard watt p[ate mounting
This phone can be mounted on any standard watt prate.
1) Rug the AC adapter into the DE IN 9V jack.
2) Wrap the AC adapter cord inside the mowed wiring
charmer as shown.
Wall plate
3) Rug the AC adapter into a standard 120V AC
watt outtet.
4)
5)
Rug the tetephone fine cord into the TELLINEjack.
Wrap the cord inside the motded wiring channe[
as shown.
Rug the tetephone fine cord into the
tetephone outtet.
AC outlet
6) Atign the mounting stots on the base with the
mounting posts on the watt. Then push in and down
unti[ the phone is firmty seated.
AC adapter
[16] GETTING STARTED www.uniden.¢om
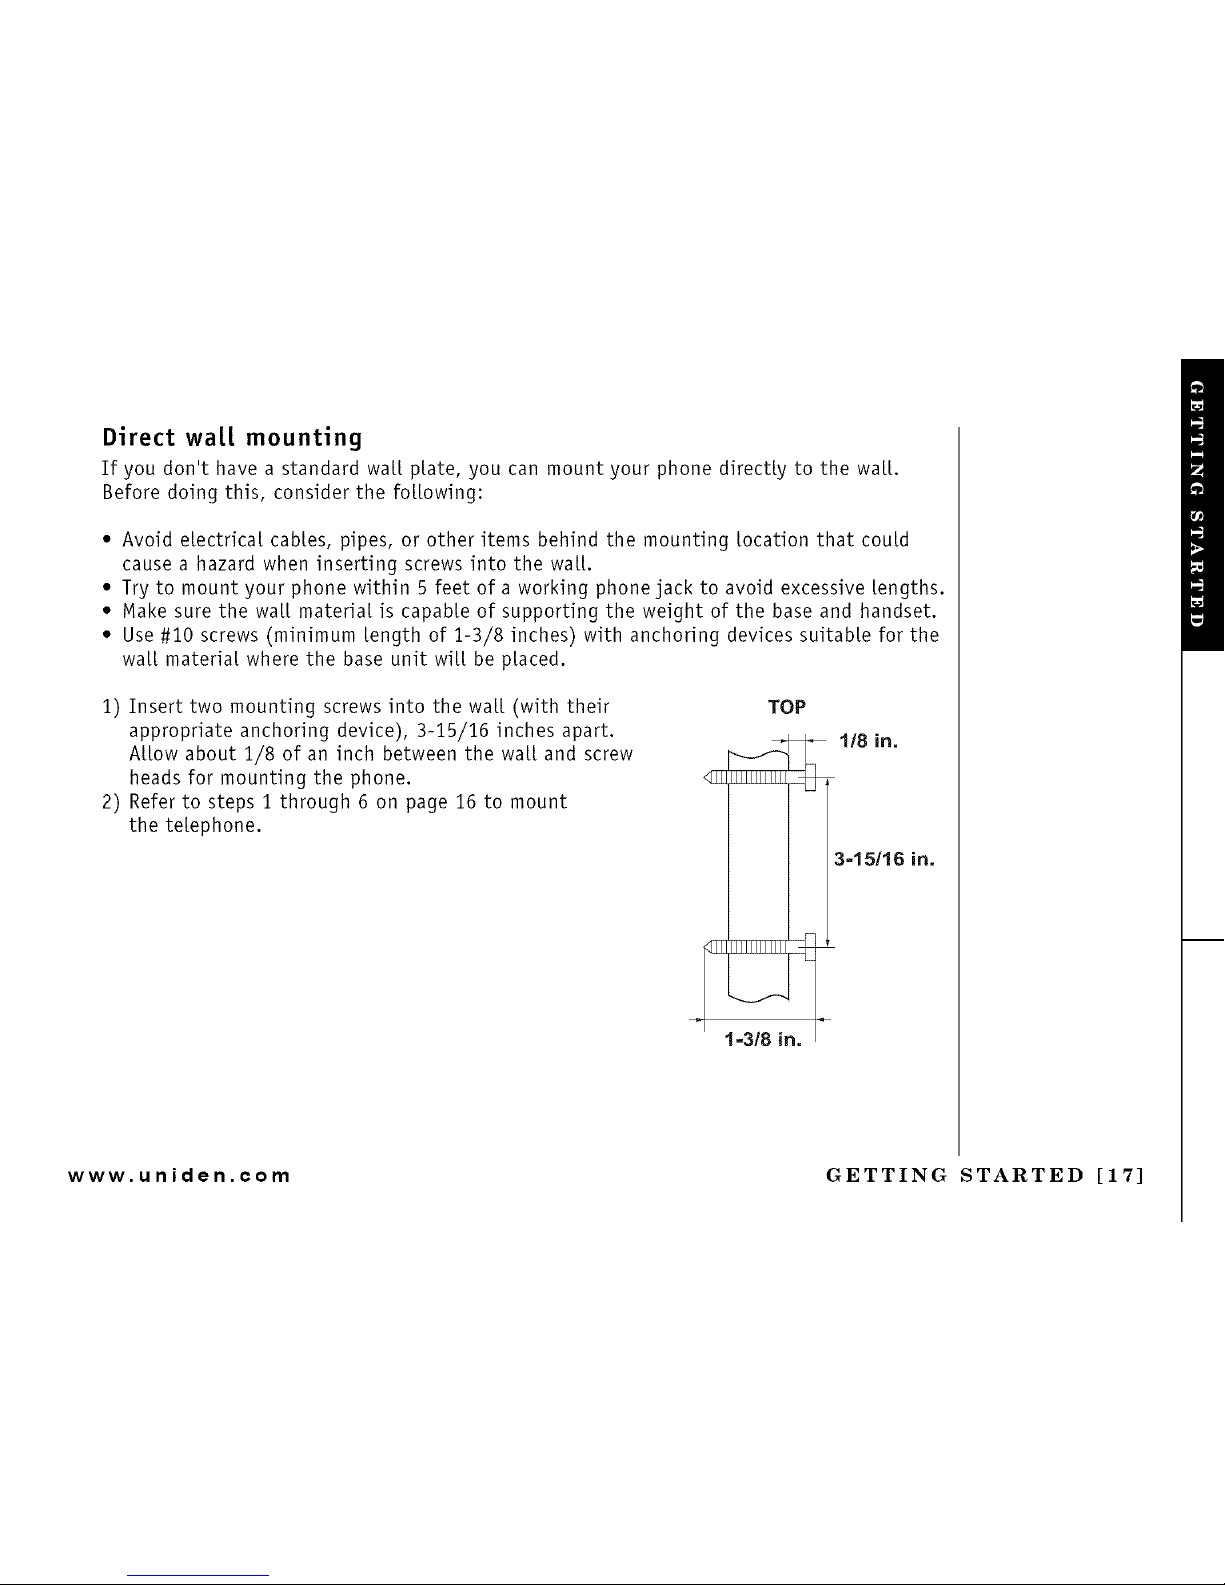
Direct wa[[ mounting
If you don't have a standard wail plate, you can mount your phone directly to the wail.
Before doing this, consider the following:
• Avoid electrical cables, pipes, or other items behind the mounting location that could
cause a hazard when inserting screws into the wail
• Try to mount your phone within 5 feet of a working phone jack to avoid excessive lengths.
• Make sure the wail materia[is capable of supporting the weight of the base and handset.
• Use#10 screws (minimum length of 1-3/8 inches) with anchoring devices suitable for the
wail material where the base unit wi[[ beplaced.
1) Insert two mounting screws into the wail (with their
appropriate anchoring device), 3-15/16 inches apart.
Allow about 1/8 of an inch between the wail and screw
heads for mounting the phone.
2) Refer to steps 1 through 6 on page 16 to mount
the telephone.
TOP
1=3/8 in.
in=
www.uniden.¢om GETTING STARTED [17]
During G[oba[ Setup and
System Reset, make sure
your cord[ess phone is
in standby mode (not in
use), and a[[ handsets
are within range of the
main base unit.
About the Menu Options
There are 5 main menu options, (DirectLink Mode, Room Monitor, Handset Setup, Gtobat
Setup and System Reset) and 16 submenu options.
Summary of Main Menu and Submenu Options
DirectLink Mode
DirectLink Mode arrows a pair of handsets to work without the base unit, for direct handset-
to-handset communication. Use them at sporting events or while shopping to stay in
contact with family members or friends. You must set the two handsets to DirectLink Mode
to utilize this feature.
Room Monitor
This feature only works if you have two or more handsets, allowing you to monitor sounds in
another room (see page 22 for setup). One handset is placed in the desired room to monitor
(acts as remote mic), and the other is placed near listener (remote speaker). This is useful
for monitoring child activities.
[18] GETTING STARTED www.uniden.¢om
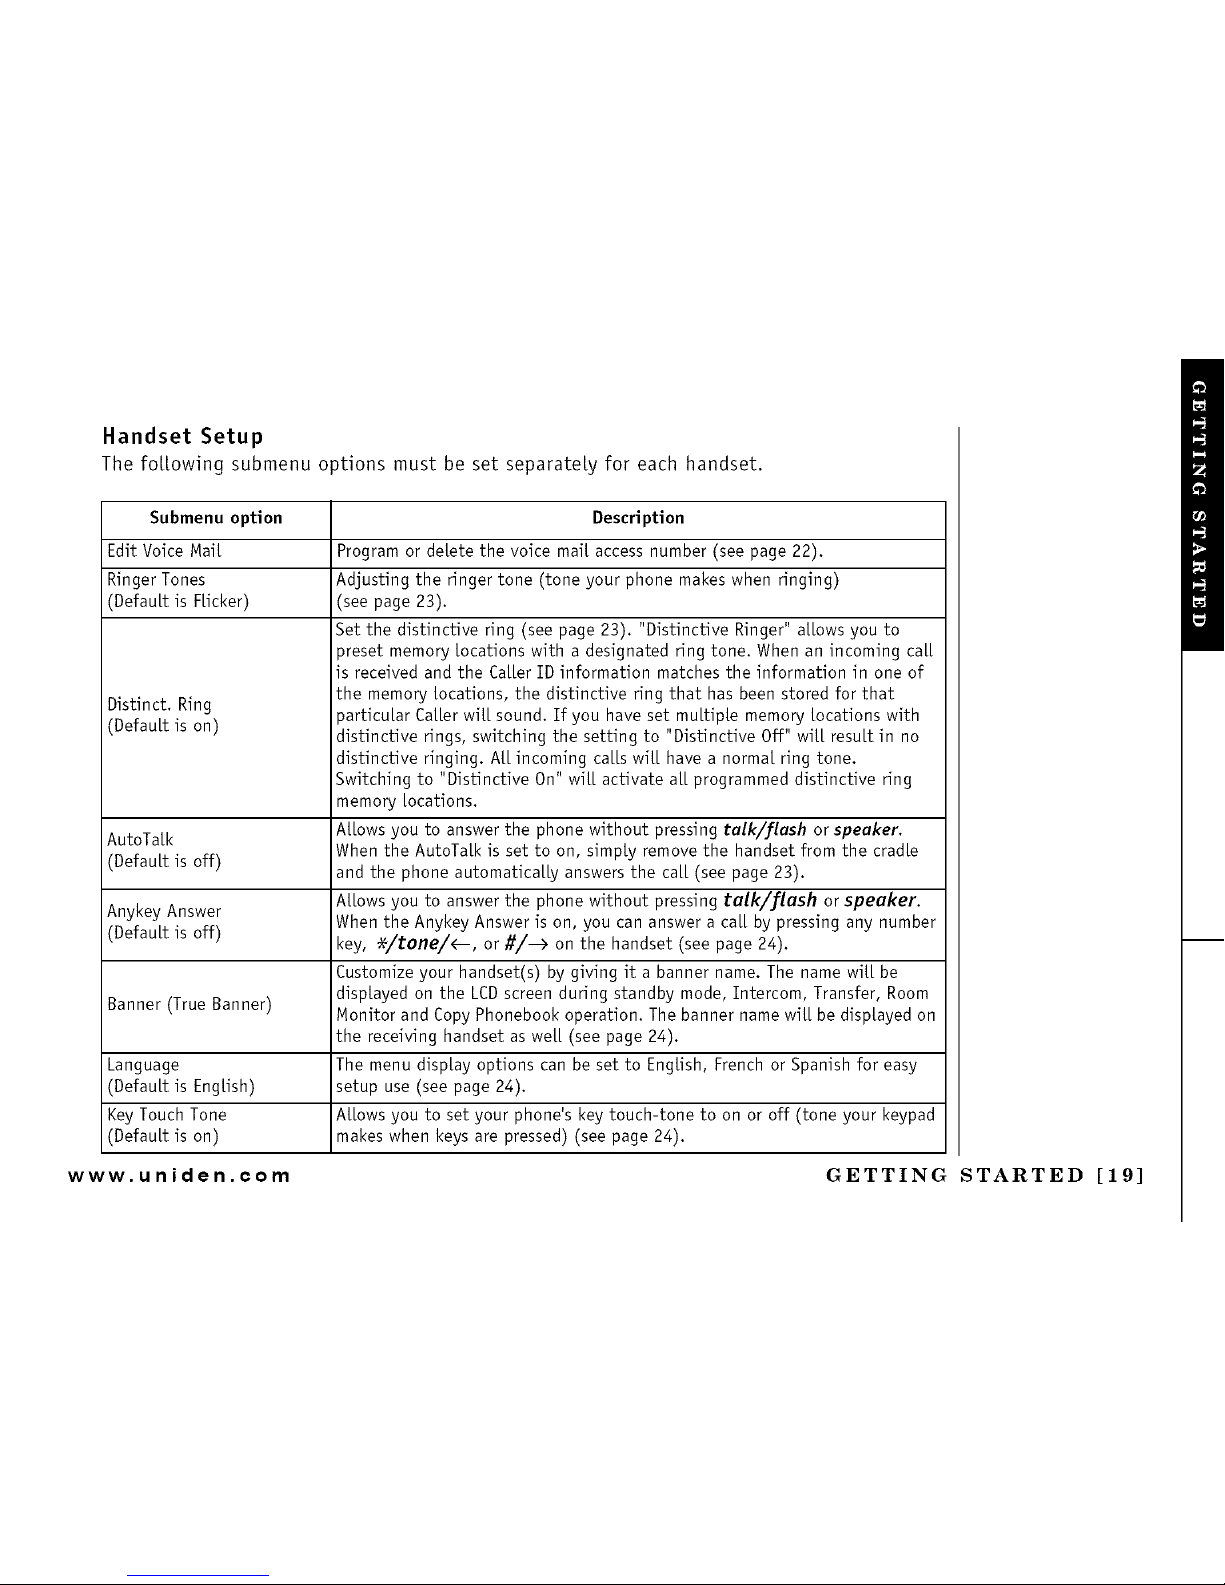
Handset Setup
The foLLowing submenu options must be set separately for each handset.
Submenu option Description
Edit Voice Malt
Ringer Tones
(DefauLt is FLicker)
Distinct. Ring
(DefauLt is on)
AutoTa[k
(DefauLt is off)
Anykey Answer
(DefauLt is off)
Banner (True Banner)
Language
(DefauLt is EngLish)
Key Touch Tone
(DefauLt is on)
Program or delete the voice malt access number (see page 22).
Adjusting the ringer tone (tone your phone makes when ringing)
(see page 23).
Set the distinctive ring (see page 23). "Distinctive Ringer" a[[ows you to
_reset memory locations with a designated ring tone. When an incoming ca[[
is received and the Ca[[er ID information matches the information in one of
the memory locations, the distinctive ring that has been stored for that
_articu[ar Ca[[er wi[[ sound. If you have set multiple memory locations with
distinctive rings, switching the setting to "Distinctive Off" wi[[ resu[t in no
distinctive ringing. AL[ incoming ca[[s wi[[ have a normal ring tone.
Switching to "Distinctive On" wi[[ activate a[[ programmed distinctive ring
memory [ocations.
Allows you to answer the phone without pressing talk/flash or speaker.
When the AutoTa[k is set to on, simply remove the handset from the cradLe
and the phone automatically answers the ca[[ (see page 23).
A[[ows you to answer the phone without pressing talk/flcish or speaker.
When the Anykey Answer is on, you can answer a ca[[ by pressing any number
key, _/tone/<--, or #/3 on the handset (see page 24).
Customize your handset(s) by giving it a banner name. The name will be
displayed on the LCDscreen during standby mode, Intercom, Transfer, Room
Monitor and Copy Phonebook operation. The banner name will be displayed on
the receiving handset as we[[ (see page 24).
The menu display options can be set to EngLish, French or Spanish for easy
setup use (see page 24).
Allows you to set your phone's key touch-tone to on or off (tone your keypad
makes when keys are pressed) (see page 24).
www.uniden.¢om GETTING STARTED [19]
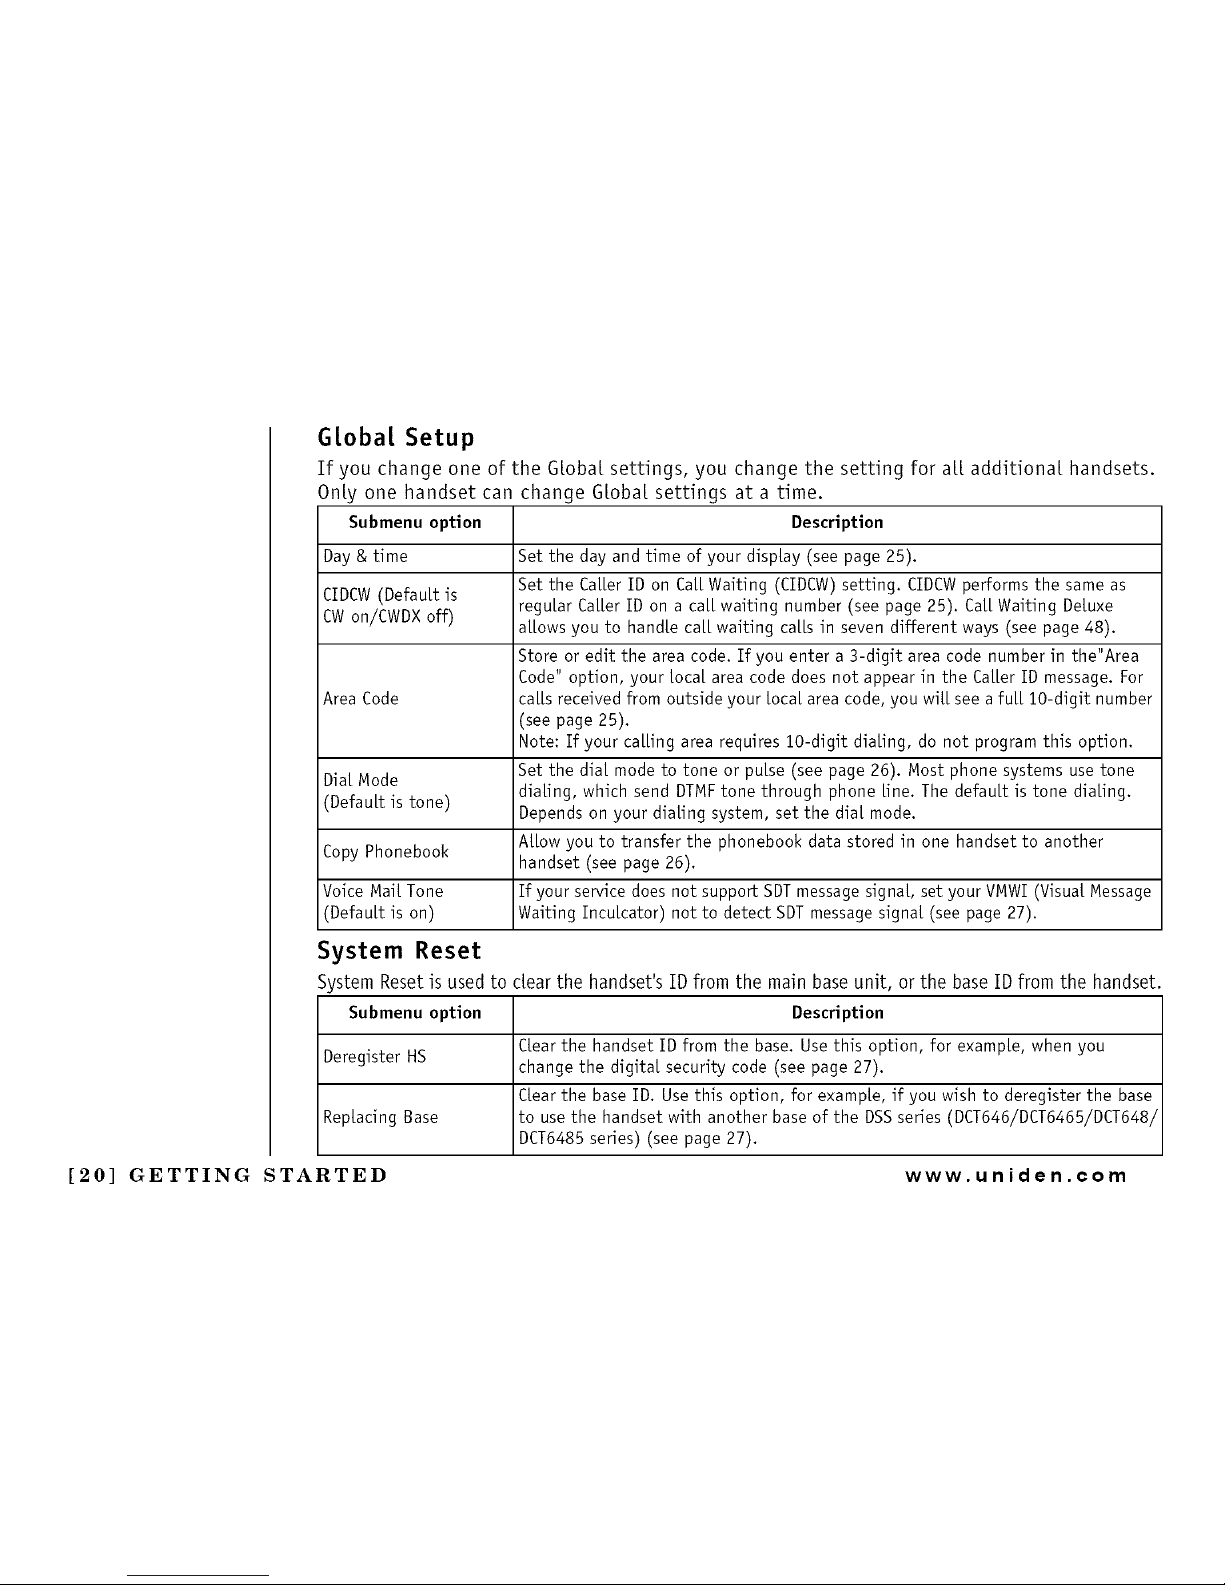
Gtoba[ Setup
If you change one of the Global settings, you change the setting for a[[ additional handsets.
Only one handset can change Global settings at a time.
Submenu option Description
Day & time Set the day and time of your disp[ay (see page 25).
ClDCW (Default is Set the Ca[[er ID on Ca[[ Waiting (CIDCW) setting. ClDCW performs the same as
CW on/CWDX off) regular Ca[[er ID on a ca[[ waiting number (see page 25). Ca[[ Waiting Deluxe
allows you to handle ca[[ waiting ca[Is in seven different ways (see page 48).
Store or edit the area code. If you enter a 3-digit area code number in the"Area
Code" option, your [oca[ area code does not appear in the Ca[[er ID message. For
Area Code ca[Is received from outside your [oca[ area code, you wit[ see a full lO-digit number
(see page 25).
Note: If your calling area requires 10-digit dialing, do not program this option.
Set the dia[ mode to tone or pulse (see page 26). Most phone systems use tone
Dial Mode
(Default is tone) dialing, which send DTMF tone through phone line. The default is tone dialing.
Depends on your dia[ing system, set the dia[ mode.
Copy Phonebook Allow you to transfer the phonebook data stored in one handset to another
handset (see page 26).
Voice Malt Tone If your service does not support SDT message signat, set your VMWl (Visuat Message
(Default is on) Waiting Inculcator) not to detect SDT message signal (see page 27).
System Reset
System Reset is used to dear the handset's ID from the main base unit, or the base ID from the handset.
Submenu option Description
C[ear the handset ID from the base. Use this option, for examp[e, when you
Deregister HS
change the digita[ security code (see page 27).
Ctear the base ID. Use this option, for example, if you wish to deregister the base
Replacing Base to use the handset with another base of the DSSseries (DCT646/DCT6465/DCT648/
DCT6485 series) (see page 27).
[20] GETTING STARTED www.uniden.mom
 Loading...