

Page 1
D3280 Series User's Guide
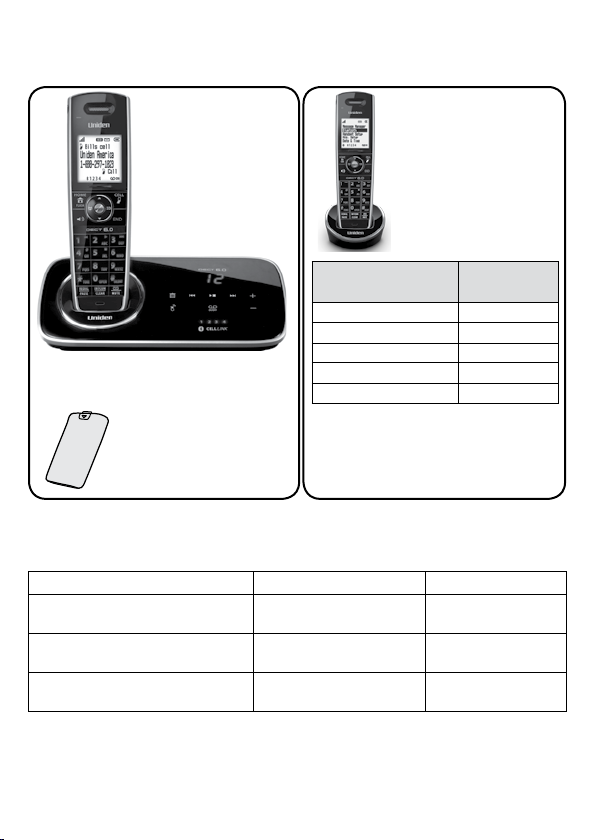
What's in the box?
D3280 base with
answering system
and cordless
handset
You will also nd:
Accessory handset
and charger
Not pictured:
Rechargeable battery
(BT-1022)
Belt clip
Battery cover
AC adapter (PS-0035)
If you purchased
model number:
You should
have:
D3280 None
D3280-2 1 of each
Battery
cover
Not pictured:
Rechargeable battery
(BT-1022)
AC adapter (PS-0034)
Telephone cord
Belt clip
...
D3280-11-11 10 of each
D3280-12-12 11 of each
* If the model number ends in R,
your package includes a DRX100
...
range extender. Refer to the
DRX100 User’s Guide for details.
If any items are missing or damaged, contact our Customer Care Line immediately.
♦
Never use damaged products!
Need help? Get answers 24/7 at our website: www.uniden.com.
♦
If You... Contact Uniden’s... Phone Number
have a question or problem Customer Care Line*
need a replacement part or an
accessory
need special assistance due to a
disability
* Duri ng regula r business hour s, Central Stand ard Time; see ou r website for deta iled busine ss hours.
© 2011 Uniden America Corp. Printed in Vietnam
Ft. Worth, Texas U01UN219BZZ(0)
Parts Department* 800-554-3988
Accessibility Help Line
817-858-2929 or
800-297-1023
800-874-9314
(voice or TTY)
Page 2

What’s in the manual?
Getting Started ........................................ 3
Installing Your Phone .................................3
Setting Up the CellLink™
Bluetooth™ Connection .........................4
Getting to Know Your Phone .................. 5
Using the Handset Menu
Using Your Phone................................... 10
.....................8
Using Your Bluetooth Connection ..... 10
Finding a Lost Handset ...........................11
Changing the Volume ..............................11
Using the Caller ID and Redial Lists .....11
Using Call Waiting ......................................13
Using an Optional Headset ....................13
Using the Phonebooks ............................13
Using Special Features .......................... 15
Silent Mode ..................................................15
Call Block .......................................................15
Multihandset Features ............................ 16
Chain Dialing ...............................................17
Voice Message Notication ....................17
Using the Answering System ............... 18
Answering System Options
(
Ans. Setup
) ............................................. 18
Personalizing the Greeting ................... 18
Accessing the Answering System ........19
Using the System While
You're Away from Home ..................... 21
Important Information ......................... 21
Solving Problems ...................................... 21
Resetting Handsets .................................. 23
Registering Handsets ..............................24
Adapter and Battery Information ....... 24
Compliance Information ........................ 24
1-Year Limited Warranty ......................... 26
Important Safety Instructions!
When using your telephone equipment, basic safety precautions should always be
followed to reduce the risk of fire, electric shock and injury to persons, including the
following:
This unit is NOT waterproof. DO NOT expose it to rain or moisture.
♦
Do not use this product near water, for example, near a bath tub, wash bowl,
♦
kitchen sink or laundr y tub, in a wet basement or near a swimming pool.
Avoid using a telephone (other than a cordless type) during an electrical storm.
♦
There may be a remote risk of electric shock from lightning.
Do not use the telephone to report a gas leak in the vicinity of the lea k.
♦
Use only the power cord and batteries indicated in this manual. Do not dispose of
♦
batteries in a f ire. They may explode. Check with local codes for possible special
disposal instructions.
Do not place the handset in any charging cradle without the battery installed and
♦
the battery cover securely in place.
SAVE THESE I NSTRUCTIO NS!
CAUTIO N! Risk of exp losion if batt ery is repla ced by an incorre ct type! Di spose of used
batte ries accordi ng to the instru ctions. Do no t open or mutil ate the batter y. Disconnec t the
batte ry before shi pping this pr oduct.
For more details, see the Important Information section.
2 - English
Page 3

GETTING STARTED
Installing Your Phone
Charge the Battery
Unpack all handsets,
1.
batter y packs,
and battery
covers. If you
need to
remove a
cover, press
in on the
notch and slide the cover down and
off.
Line up the battery connector w ith
2.
the jack inside the handset; t he
connector only fits one way.
Push the connector in until it clicks
3.
into place; tug gently on the wires
to make sure the batter y is securely
connected.
Replace t he battery cover and slide it
4.
into place.
Use an AC adapter to connect the
5.
power jack on the base to a regular
indoor (120V AC) power outlet.
Connect any chargers t he same way.
Place a handset in the base with the
6.
display facing forward. If the display
doesn’t light up, reseat t he handset or
connect the base to a different outlet.
For 2 or more handsets, place each
handset in a charger.
Charge all handsets completely
(about 15 hours) before using.
Connect the Telephone Cord
Use the telephone cord to connect the
jack on the base to a standa rd
TEL LINE
telephone wa ll jack.
Test the Connection
Talk
Home/
.
Pick up the handset and press
1.
FlasH
. The handset sounds a dial
tone, and the display shows
If you don't hear a dial tone or
–
the display says
Check Tel Line,
check the connection between
the base and the phone jack.
Make a quick test call. (Press
2.
hang up.)
If you keep hearing a dial tone,
–
end
to
change to pulse dialing.
If there’s a lot of noise, check
–
for interference (see p. 22).
Test all handsets the sa me way. If
3.
you can't get a dial tone, move the
handset closer to the base.
Changing to Pulse Dialing
Your phone uses tone dialing by default.
If your phone company uses pulse
dialing, you need to change your phone’s
dial mode.
menu/selec t
Press
1.
Setup
.
Select
2.
To send DTMF tones during a call (e.g.,
for an automated response system),
press * to temporarily switch to tone
dialing. When you hang up, the phone
automatically returns to pulse dialing.
Dial Mode
hear a confirmation tone.
and choose
then
Pulse
Global
. You’ll
Attaching the Belt Clip
Line up the holes on each side of the
handset. Insert the belt clip into the
holes on each side of the handset. Press
down until it clicks.
To remove the belt clip, pull either side
of the belt clip to release the tabs from
the holes.
English - 3
Page 4

Setting Up the CellLink™ Bluetooth™ Connection
The new D3280 with CellLink technology can connect with mobile phones t hat
support t he Bluetooth V2.0 handsfree profile.
Visit Uniden.com or contact customer ser vice for a detailed list of tested mobile
phones.
If you are not certain of the profi les supported by your Bluetooth phone or if you
♦
have dif ficulty pairing your phone to the D3280, see the manual that came with
your phone.
With the CellLink feature, you can essentially treat your cellular phone as a
♦
second line. You can use the D3280 handset to make and receive calls on your
cellular phone number, put cellular calls on hold, and transfer cal ls to other
handsets. See page 10 for more informat ion.
Bluetooth wireless devices have a maximum range of about 10 feet (3 m); the
♦
actual range will vary depending on local conditions (obstacles, batter y power,
interference, etc.).
Pair your Bluetooth phone
Pairing “introduces” two Bluetooth devices and gives them permission to connect
to each other. In most cases, once you pair a phone to the D3280, the two devices
connect automatically whenever they detect each other. (If you have to manually
reconnect each time, check the Bluetoot h settings on your cellular phone.) You can
pair your Bluetooth dev ices t hrough the D3280 handset.
menu/selec t
Press
1.
Select the
2.
into pairing mode when the handset displays
PIN: 0000
On your Bluetooth phone, start a search for other Bluetooth devices. (This
3.
process may take severa l seconds and it will be different for each mobile phone.
See your phone owner’s manual for detailed instructions.)
Your phone should discover a device called
4.
your phone asks if you want to pair wit h this device, answer yes.
If your phone prompts you for a PIN code or password to pair with the D3280,
5.
enter 00 00 (four zeroes).
When your phone accepts the Bluetooth connection, the D3280 sounds a
6.
confirmation tone. The Bluetoot h device number icon on the base and the
handset display light up.
Most cell phones automatically transfer the audio to a Bluetooth device
as soon as it pairs; if yours does not, look in your cell phone’s Bluetooth
setup for a “transfer audio” or “send audio to device” option.
to display the handset’s main menu.
Bluetooth
menu, then select the
.
Add Cell phone
Search & Select from Cellular D3280
D3280
submenu. The base goes
or
Handsfree device
. When
To test the connection
Pick up the handset from the cradle.
1.
4 - English
Page 5
Dial the number you want to call, then press
UP
REV
DOWN
FWD
FIND
HANDSET
Charging
contacts
DELETE
PLAY/STOP
ANSWER
ON/OFF
Message
counter
Bluetooth
device
number
UP
REV
DOWN
FWD
FIND
HANDSET
Charging
contacts
DELETE
PLAY/STOP
ANSWER
ON/OFF
Message
counter
Bluetooth
device
number
2.
CELL
on the handset. You may not
hear a dial tone or ringing, but t he handset display says Talk.
Make sure the call connects and you can hear clearly. (When you’re finished,
3.
press
END
to hang up.)
The D3280 remembers the pairing information for your cellular; if it loses
♦
connection with your phone for any reason (e.g., the cell phone travels out of
range, runs out of charge, etc.), the D3280 can automatically reconnect the
next time your phone becomes available.
Using the D3280 with four Bluetooth phones
The D3280 can save the pairing information for four different Bluetooth phones,
♦
but it can only use one cellular line at any given time. For example, if you pair the
D3280 to four Bluetooth phones, when you press
CELL
on the handset, the D3280
asks which phone you want to connect to.
If you are using the D3280 to ta lk on one Bluetooth phone, the D3280 will not
♦
ring if a call comes in on another phone.
You can set a different ring tone for each paired cell phone (see page 8).
♦
To pair another Bluetooth phone, just repeat the pairing procedure with the new
♦
phone. (If the paired phones interfere when you’re pairing the new one, just turn
off Bluetooth on any paired phones until you f inish pairing the the new one.)
GETTING TO KNOW YOUR PHONE
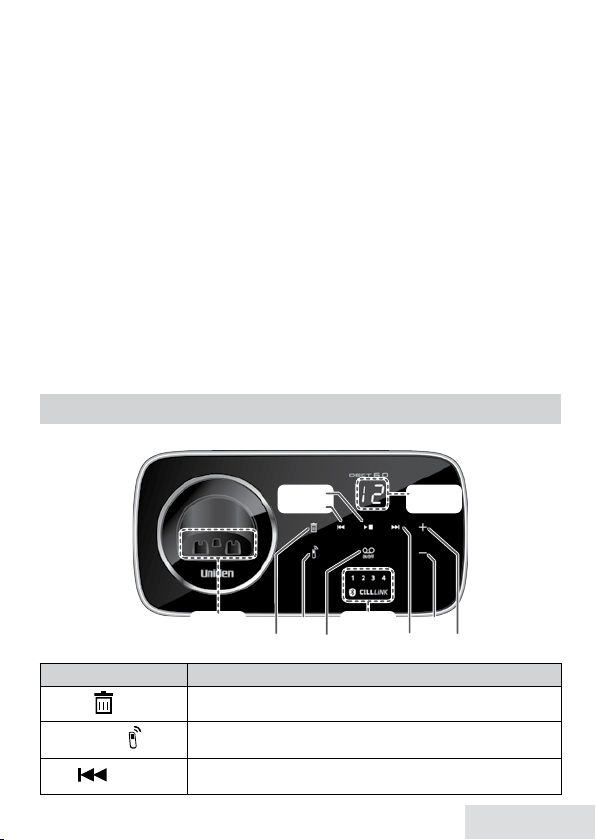
Parts of the Base
When listening to messages: delete the current message.
In standby: delete all messages.
In standby: page all handsets.
In the first 2 seconds of a message: go to the previous message.
Anytime after that: restart the current message.
Key (icon) What it does
delete ( )
Find Handset ( )
Rev ( )
English - 5
Page 6
Key (icon) What it does
12-key
dial pad
UP
PHONEBOOK
SPEAKER
DOWN
CID
REDIAL/
PAUSE
MESSAGE/
MUTE
INTERCOM/
CLEAR
CELL
HOME/
FLASH
MENU/
SELECT
END
Visual
ringer
Charging
contacts
Earpiece
Display
Microphone
Headset
jack
12-key
dial pad
UP
PHONEBOOK
SPEAKER
DOWN
CID
REDIAL/
PAUSE
MESSAGE/
MUTE
INTERCOM/
CLEAR
CELL
HOME/
FLASH
MENU/
SELECT
END
Visual
ringer
Charging
contacts
Earpiece
Display
Microphone
Headset
jack
answeR on/oFF ( )
Play/stoP ( )
Fwd ( )
down ( )
uP ( )
Bluetooth device
number
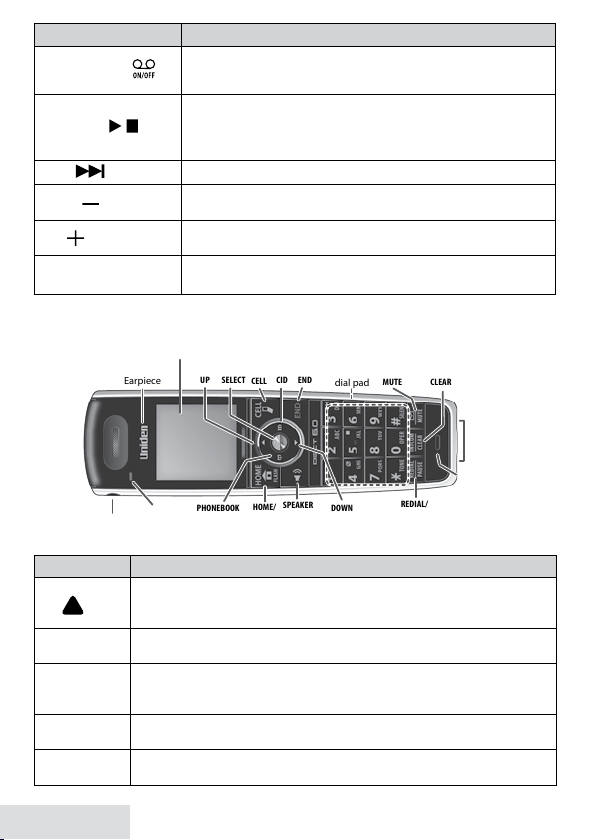
Parts of the Handset
Key (icon) What it does
In standby: increase the ringer volume.
During a call: increase the audio volume.
In any menu or list: move the cursor up one line.
In standby: open the menu.
In the menu or any list: select the highlighted item.
In standby: start a telephone call using a paired Bluetooth phone.
While a paired phone is ringing: answer the incoming call.
During a CellLink call: switch to a waiting call.
In standby: or during a call: open the Caller ID list.
When entering text: move the cursor to the right.
During a call: hang up.
In the menu or any list: exit and go to standby.
uP
( )
menu/select
cell
cid
end
6 - English
In standby: turn the answering system on and off
When the phone is ringing: ignore this call (mute the ringer).
In standby: begin message playback.
While screening calls: mute Call Screen.
While playing a message: stop playing messages.
While playing a message: skip to the next message.
In standby: decrease the ringer volume.
While playing a message: decrease the speaker volume.
In standby: increase the ringer volume.
While playing a message: increase the speaker volume.
The number indicates the Bluetooth device number
linked to the D3280.
Page 7
Key (icon) What it does
1
UP or
Time &
date
Answering
system
status
Status
icons
Handset
and CID
info
1
UP or
Time &
date
Answering
system
status
Status
icons
Handset
and CID
info
In standby: access your answering system.
( )
During a call: mute the microphone.
While the phone is ringing: ignore this call (mute the ringer).
In standby: start an intercom call.
During a call: put the call on hold and start a call transfer.
When entering text or numbers: erase the character at the cursor (press & hold
to erase all characters).
In standby: open the redial list.
When entering a phone number: insert a 2-second pause.
In standby: decrease the ringer volume.
During a call: decrease the audio volume.
In any menu or list: move the cursor down one line.
Switch a normal call to the speakerphone (and back).
In standby: start a telephone call on your land line (get a dial tone).
While the land line is ringing: answer the incoming call.
During a call: switch to a waiting call.
In standby or during a call: open the phonebook.
In the menu: go back to the previous screen.
When entering text: move the cursor to the left.
message/mute
( )
inteRcom/
cleaR
Redial/Pause
( )
down
( )
sPeakeR
Home/FlasH
PHonebook
( )
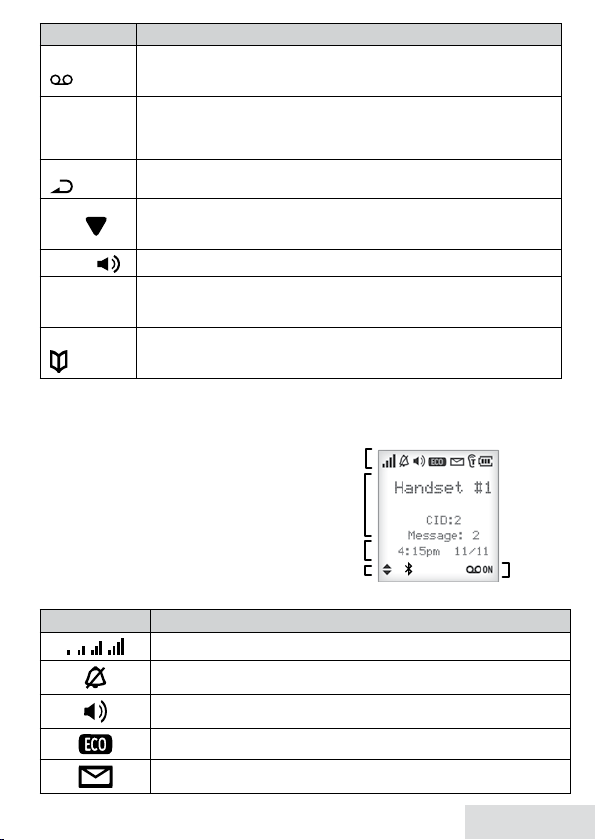
Reading the Display
The table shows possible
status icons and what they mean. Since the
icons appear based on what the phone is
doing, you won't see all the icons at the
same time
You can use the uP and
down
keys to scroll
through CID lists and phonebook entries.
You can also use the
leFt
and
jump to the next (or previous) 5 entries.
Icon What it means
The signal from the base is 1) weak through 4) strong.
The ringer is turned off and will not ring for new calls.
The speakerphone is on.
The handset is using ECO (power save) mode.
You have a voice message waiting.
RigHt
keys to
English - 7
Page 8
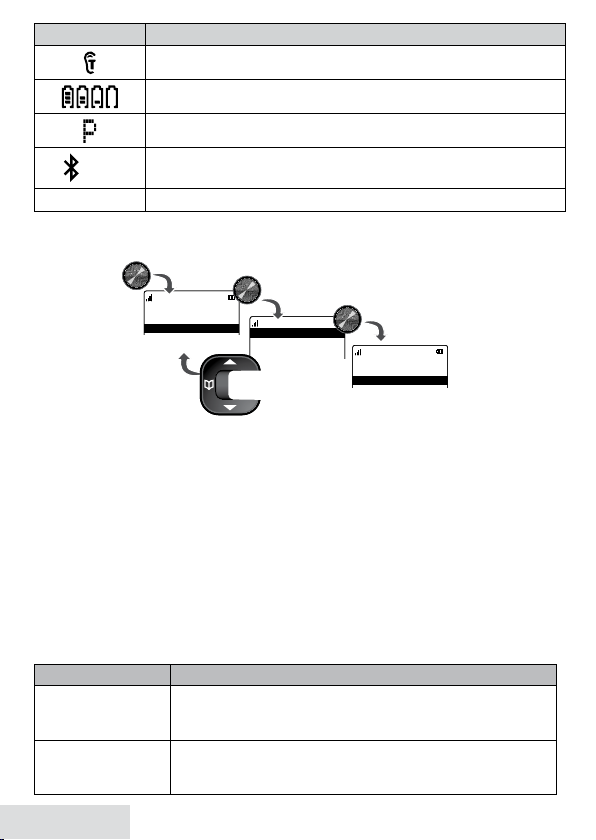
Icon What it means
Message Manager
Bluetooth
Handset Setup
T-coil
On
Off
T-coil
Ringer Tones
Personal Ring
Use UP and
DOWN
to
select a menu.
With the phone in standby, press
MENU/SELECT
to open the menu.
Press
MENU/SELECT
to
choose that option.
Press
PHONEBOOK
to
go back a screen
OR
press
END
to exit
the menu.
Message Manager
Bluetooth
Handset Setup
T-coil
On
Off
T-coil
Ringer Tones
Personal Ring
Use UP and
DOWN
to
select a menu.
With the phone in standby, press
MENU/SELECT
to open the menu.
Press
MENU/SELECT
to
choose that option.
Press
PHONEBOOK
to
go back a screen
OR
press
END
to exit
the menu.
T-coil mode is on (see p. 8).
The battery is 1) full, 2) half charged, 3) getting low or 4) empty.
Privacy Mode is on: no other handset can join the call.
1 2 3 4
[Aa] [aA]
Using the Handset Menu
Bluetooth device number linked to the D3280.
Enter 1) capital or 2) lower case letters (see p. 9).
If you don't press a ny keys for about 30 seconds, t he handset exits the menu.
During a call, use
Message Manager
Home/Fl asH
Menu
to back out of the menu without hanging up.
Message Manager displays the caller’s information for each message. You can select
a caller and play back the message (see page 19).
Bluetooth
Menu
Use the Bluetooth menu to pair a cell phone to the D3280 and select a cellular phone
if you pair more than one.
Handset Setup
You can change these settings separately for each handset.
Menu Option What it does
T-coil
Ringer Tones
8 - English
Menu
Turn on T-coil mode to reduce noise on hearing aids
equipped with a telecoil (T-coil) feature. T-coil mode
shortens talk time, so keep your battery fully charged.
Select a phone, then choose that phone’s ring tone. As
you highlight each ring tone, you hear a sample. Press
menu/select
to select.
Page 9

Menu Option What it does
Personal Ring
AutoTalk
Any Key Answer
Banner
Handset Language
Key Touch Tone
LCD Contrast
Ans. Setup
Refer to p. 18 for details on setting up your answering system.
Date & Time
Use this menu to set the clock (if you have Caller ID, the phone sets date and time
automatically). Enter the date and time (MM/DD/YY); select AM or PM. Use
move the cursor past a digit without changing it.
Global Setup
The settings on this menu affect all handsets. Only one handset at a time can change
these menu options.
Call Blocking
See p. 15 for a deta iled description of the Call Blocking feature.
Menu
Menu
Menu
Menu Option What it does
Dial Mode
Set Line Mode
VMWI Reset
Edit Voice Mail
Edit Int’l No.
Menu
Turn on personal ring so you can assign a special ring tone
to people in your phonebook. With Caller ID, this handset
uses the assigned tone when the person calls.
Have this handset answer a call when you pick it up from
the cradle (without pressing any buttons).
Have this handset answer a call when you press any key on
the 12-key dialpad.
Change the name used on the handset's display.
Change the display language.
Have the keypad sound a tone when you press a key.
Change the contrast of the display.
cid
to
Choose tone or pulse dialing (see p. 3).
Do not change this setting unless instructed to by
customer service.
Reset the Voice Message Waiting Indicator (see p. 17)
Enter, edit, or delete the access number for your voice mail
service (see p.17).
Enter, edit, or delete international numbers.
Entering Text on Your Phone
Use the 12-key dial pad any time you want to enter text into your phone (a name
♦
in the phonebook, the handset banner, etc.).
If two letters in a row use the same key, enter the f irst letter; wait for the cursor to
♦
move to the next space and enter the second letter.
English - 9
Page 10

To... Press...
move the cursor left
move the cursor right
erase the character at the cursor
erase the entire entry and hold
enter a blank space
switch between upper and lower case letters
rotate through the punctuation and symbols
PHonebook
cid
inteRcom/cleaR
#
*
0
.
.
inteRcom/cleaR
.
.
.
.
.
USING YOUR PHONE
This section explains the most common functions on the phone.
To... From the land line From the CellLink
make a call: Dial the
number, then
answer a call
hang up Press
mute the microphone
during a call
put a call on hold
return to a call on hold
switch from one line to the
other (automatic hold)
switch between the
speakerphone and
earpiece
mute the ringer for this
call only
* If only 1 cell phone is paired, it will be dialed. If more than 1 cell phone is
paired, the phone prompts you to choose one.
Using Your Bluetooth Connection
After you have paired your cell phone with t he D3280 (see p. 4), you can make and
receive calls from your cell phone through the D3280. With the phone in standby,
cell
press
to make a call through your cell phone.
Press
HOME/FLASH
SPEAKER.
Press
HOME/FLASH
SPEAKER
END
Press
MESSAGES/MUTE
or
or
.
Press
Press
or put the handset in the cradle.
. Press again to turn the
microphone back on.
Press
INTERCOM/CLEAR
. After 5 minutes on hold, the
call will be disconnected.
Press
SPEAKER
Press
Press
HOME/FLASH
CELL
SPEAKER
or
.
.* Press
.
Press
While the phone is ringing, press
the handset.
CELL*.
CELL
.
CELL
.
HOLD
.
MESSAGES/MUTE
on
10 - English
Page 11

To... From the
Bluetooth
menu, select a cell phone and
then select...
make a CellLink call
set Privacy features
Make Call
; enter the number to call.
Privacy Setup
All handsets set to
One or more handsets set to On: Only handsets set to On will
ring; other handsets do not ring but they can still receive calls.
, then set Privacy to On or
Off
: All handsets will ring (default).
Off
.
The Privac y option only affects the ring. All
handsets still get CID information and can use
the cellular phone to make and receive calls.
download phonebook
delete Bluetooth pairing
relink a cellular phone
Download PB
complete
Remove Cellular
when complete.
Connect
. The screen displays
when complete.
. The screen displays
.
Download PB
Removed Cellular
Use the same procedures on p.4 to add a new cellular phone.
Finding a Lost Handset
With the phone in standby, press
minute; to cancel, press
Find Handset
Find Handset
on the base. All handsets beep for 1
again or press any handset key.
Changing the Volume
To change the... When... Press...
earpiece or speaker volume
for each handset
base speaker volume
ringer volume for each
handset*
* If you tu rn the ringer all t he way down, tha t particu lar ringer t urns o.
you are listening to that earpiece
or speaker (playing messages,
etc.)
the phone is in standby
uP
to increase
the volume.
down
to
decrease it.
Using the Caller ID and Redial Lists
Caller ID (CID) is a service available from your telephone provider that shows the
phone number (and sometimes the caller’s name) of incoming calls. Contact your
telephone prov ider for more information.
English - 11
Page 12

Caller ID list Redial list
The phone saves the information for the last 50 incoming calls (both
landline and CellLink calls) to the CID list. An asterisk ( * ) marks any
calls received since the last time you checked the record details.
All handsets share the same CID list so only one handset can access
the list at a time.
In standby, handsets show how many calls came in since the last time
you checked the CID list.
Each handset
remembers the last 5
numbers you dialed
on it.
Only one handset can
access its redial list at
a time.
The handset does not
record which line was
used to call the number.
To… Press...
cid
open the CID list
open the redial list
scroll through the
lists
dial the highlighted
number
, then use the uP and
entries display at a time.
Redial/Pause
uP
down
In CID list:
Home/FlasH
.
to select the previous number.
to select the next number.
RigHt
to view the next 5 numbers.
leFt
to view the previous 5 numbers.
cell.
or
If you have two or more or more cellular phones paired, the
phone prompts you to choose one. Select the phone you
want and press
review current CID
record details
add other digits and
codes to the CID
number
close the lists
menu/select
end
.
once to add 1 for a toll call.
*
twice to add the International code to the CID number.
*
Press * a third time to return to normal mode.
.
For indiv idual record options, find a number and press
menu/select
down
keys to enter the list. Up to 5
.
menu/selec t
(press tw ice
from a CID entry) to display t he following options for that record:
Select... To...
Delete
Store Into PH BK
Add Call Block
Erase the number from the list.
Add the number to the phonebook. The handset prompts you
to edit the name and number and select a personal ring.
(CID list only) Add the number to the Call Block list (see p. 15).
12 - English
Page 13

Using Call Waiting
(Belt clip
hole)
(Belt clip
hole)
Call Waiting, a service available from your telephone provider, lets you receive
♦
calls whi le you are on a nother call. Caller ID on Call Waiting (CIDCW) service
displays Caller ID information for a waiting cal l.
If you get a Call Waiting call, t he phone sounds a tone and displays any CID
♦
information received from the waiting cal l. Press
cell
on a cellular phone call to switch between the current cal l and the waiting
call; each time you switch, t here is a short pause before you're connected to the
other call.
Home/Fl asH
on the land line or
Using an Optional Headset
You can use a standard 2.5 mm telephone
headset with your cordless handsets. To purchase headsets, contact the Parts
Department (see t he front cover).
To install a headset, remove t he headset jack cover and insert the headset plug
♦
into the jack.
Just make and receive calls as usual, and use your
♦
headset to talk to the caller af ter the call connects.
When you connect a headset, the handset
♦
automatically mutes the earpiece. To re-act ivate the
earpiece, just unplug t he headset.
Using the Phonebooks
You can download the phonebook (up to 1500 entries)
♦
from each paired cellular phone (up to four). You
can also store up to 200 entries in the D3280’s Home
phonebook, which is separate from any downloaded phonebooks.
Only one cordless handset can access the phonebook at a time.
♦
Downloading cellular phonebooks into your phone
Make sure your cellular phone is paired to the D3280 and is within range of the
1.
base.
With the D3280 in standby, open the menu and select
2.
Select the cel lular phone you want to download from, then select
3.
When downloading is complete, the cordless handset displays a confirmation
screen. To cancel downloading, press
Each time you download a phonebook, the D3280 overwrites any previous copy
♦
of that phonebook. The D3280 automatica lly cancels the download if it receives
an incoming call or someone tries to ma ke an outgoing call.
If the download is interrupted or canceled, the D3280 reverts to the origina l copy
♦
of the downloaded phonebook .
If you delete the pairing information for a cellular phone, the downloaded
♦
phonebook from that phone will also be deleted.
END
.
Bluetooth
.
Download PB
English - 13
.
Page 14

To... Press...
open the phonebook
scroll through the entries
jump to entries that start
with a certain letter
dial the current entry
review the current entry’s
details
save this cellular
phonebook entry to the
home phonebook
edit the current entry
delete the current entry
close the phonebook
PHonebook
View Number
down
uP
RigHt
leFt
the number key corresponding to the letter you
want.
Home/FlasH or cell.
menu/select
phonebook entry.
menu/select
selects
menu/select
Edit
menu/select
Delete
end
, then select the phone name and then
.
to scroll through the entries from A to Z.
to scroll from Z to A.
to view the next 5 listings.
to view the previous 5 listings.
after scrolling to the desired
three times (opens the menu and
Store Into PH BK
).
twice to open the menu, then select
.
twice to open the menu, then select
. To confirm, select
Yes
.
.
Adding Phonebook Entries (Home only)
With the phone in standby, open the phonebook. Select
HOME
, then
Create New.
Enter a name & number and select a personal ring.
Enter the phone number (up to 20 digits) exactly as you would dial it.
♦
If you need the phone to wait before sending t he next set of digits, press
♦
Pause
to insert a 2-second pause. You can insert multiple pauses, but each one
Redial/
counts as a digit (you’ll see P in the display).
To edit the name, press
♦
inteRcom /cleaR
Press
To edit the number, press
♦
PHoneboo k
to move the cursor back and insert a letter.
to delete a letter.
inteRcom /cleaR
to back up the cursor and delete
numbers. Re-enter the correct numbers.
Deleting All the Phonebook Entries
With the phone in standby, open the phonebook. Select the phone name and then
Delete All
. To confirm, select
Yes
.
14 - English
Page 15

USING SPECIAL FEATURES
Silent Mode
You can silence the ringers on the base and all handsets for a specific period of time;
the answering system answers any incoming calls without play ing anything through
the speaker.
With the phone in standby, press and hold # on any handset. The phone prompts
1.
you to select the number of hours (1 - 9 or
silent mode.
To confirm, press
2.
the answering system and displays
After the selected number of hours, the phone automatically exits silent mode.
3.
To exit silent mode manually, press a nd hold # again.
If the phone is in silent mode and you turn off the answering system, the
phone exits silent mode.
menu/select
or just wait about 5 seconds. The phone turns on
Call Block
If you subscribe to Caller ID, you can save phone numbers to the call block list.
When a call comes in, the phone compares the received phone number to the
numbers on t he call block list. If the phone number is on the list, the phone replaces
the caller's na me wit h
The call block list holds 20 entries, and all handsets share the same list. You can
add entries by selecting
viewed t he CID record or through t he
handset can edit the call block list at a time.)
Call Blocked
Add Call Block
and block s the call.
Call Blocking Menu Options
With the phone in standby, open the menu and select
these options:
Menu Option What it does
View Number
Create New
Private Number
Unknown Number
See the numbers on your call block list.
Add an entry to your call block list. The phone will prompt
you to enter a name & phone number.
Block all calls from numbers reported by CID as "Private."
(This does not count as one of the 20 entries.)
Block all calls from numbers reported by CID as
"Unknown." (This does not count as one of the 20 entries.)
Call Blocking Entry Options
With the phone in standby, open the cal l block list and find the entry you want.
menu/selec t
Press
to open the indiv idual entry menu. Choose one of these options:
Always On
Silent Mode On
in the CID menu that displays after you have
Call Blocking
) that you want it to stay in
on each handset.
menu (see below). (Only one
Call Blocking
. Choose one of
English - 15
Page 16

Choose this... To...
Edit
Delete
Edit this entry. The phone will prompt you to edit the name &
phone number.
Erase this entry from the list & allow calls from this number.
Multihandset Features
To use the features in this section, you need at least 2 handsets.
Your base supports a tota l of 12 cordless handsets: the one that came wit h the
♦
base and up to 11 accessory handsets. Your base also supports a total of 2 DR X100
range extenders, including a ny that came with your phone.
You must register accessory handsets to the base before using them. (Handsets
♦
that ca me packaged with the base are already registered.)
Handsets that aren’t registered display a Not Registered message. For registration
♦
instructions, see p. 24, or see the accessor y handset ma nual.
If a handset was ever registered to a base, you must reset it before it can register to
♦
a new base; see p. 23, or see the accessor y handset manual.
Conference Calling
When an outside call comes in on the land line, four handsets can join in a
♦
conference call with the outside caller.
To join a call t hat’s already in progress, just press
♦
To leave the conference call, hang up norma lly; the other handsets remain
♦
Home/Fl asH
or
sPeakeR
.
connected to the call.
Call Transfer
To... On the land line Using CellLink
inteRcom/cleaR
transfer a call
Press
want to transfer the call to (select
handsets). When the other handset accepts the call,
, then select the handset you
ALL
to page all the
you’ll be disconnected.
cancel a transfer and
leave the call on hold
return to the call Press
answer a call transfer
page
end
Press
.
1.
Home/FlasH
Press
. Press
inteRcom/cleaR
. You can speak to the
transferring handset.
To speak to the outside caller,
2.
Home/FlasH
Press
. Press
cell
cell
.
.
Privacy Mode
To activate privacy mode on a call in progress, press
menu/selec t
twice. As long as
privacy mode is on, you'll see a in the display, and no other handsets can join your
16 - English
Page 17

call. Privacy mode turns off automatically when you hang up; you can also turn it
off by pressing
menu/selec t
twice.
Intercom
Whenever t he phone is in standby, you can make an intercom call between
♦
handsets without using the phone line.
You can make an intercom call from any handset, but only two handsets can be
♦
in an intercom ca ll at any time.
If an outside call comes in during an intercom page, the phone cancels the page
♦
so you can answer t he incoming call.
If an outside call comes in during an intercom call, press
♦
Home/Fl asH
or
cell
,
depending on which line is ringing, to hang up the intercom call and answer the
outside ca ll.
To... Press...
make an intercom page
cancel a page
answer a page
end an intercom call
inteRcom/cleaR
with, or
end
.
inteRcom/cleaR
end
. Both handsets return to standby.
.Select the handset you want to talk
ALL
to page all handsets at the same time.
Home/FlasH
or
.
Chain Dialing
If you often have to enter a series of digits or a code number during a ca ll, you can
save that code number to a phonebook entry and use the phonebook to send t he
code number.
Enter the code number (up to 20 digits) into the phonebook just like a regu lar
1.
phonebook entry. Be sure to enter the code number into the phonebook exactly
as you would enter it during a call.
When you hear the prompt that tel ls you to enter the number, open the
2.
phonebook and find the entry that contains your code number.
menu/selec t
Press
3.
phonebook.
twice to send the code. If you change your mind, just close the
Voice Message Notication
If you subscribe to a voice mail service, your phone can notify you when you have
a new message. This feature suppor ts Frequency-Shift Keying (FSK) notification.
Contact your voice mail prov ider for information.
When you have new messages, the display shows a message icon. To access your
voice mail, press
message /mute
and select
Voice Mail
.
English - 17
Page 18

When you select
Access number if you have not yet set one up (see p. 9). If you have
already set one up, your phone will dial it.
After you listen to your messages, the message icon turns off. If it doesn’t, you can
reset it: With the phone in standby, open the menu and select
VMWI Reset
, then select
Voice Ma il
, you will be prompted to enter a Voice Mail
Yes
.
Global Setup
; select
USING THE ANSWERING SYSTEM
The answering system works with land-line calls only.
Answering System Options (
You can set or change the answering system options from any handset. Just open the
menu and select
Select this option... To...
Security Code
Ring Time
Record Time
Message Alert
Ans. Language
Call Screen
Ans. On/Off
Record Greeting
Greeting Options
Ans. Setup
Ans. Setup
.
Enter a 2-digit PIN so you can access your answering
system from any touch-tone phone (see p. 21).
Set the number of rings (2, 4, or 6) before the system
answers.
Toll Saver
if you have new messages or after 4 rings if you don't.
Set the amount of time (
leave a message. Choose
the system to let callers to leave a message.
Have the system beep every 15 seconds when you have
a new message. The alert stops after you listen to all your
new messages or if you press any key on the base.
Change the language of the system's voice prompts.
Turn on the call screen feature so you can hear callers as
they leave messages on the base speaker (see p. 20).
Turn your answering system on or off.
You can also press
Record an outgoing message or greeting (see below).
Switch greetings or delete your greeting (see below).
)
makes the system answer after 2 rings
1 or 4
minutes) callers have to
Announce Only
answeR on/oFF
if you don't want
on the base.
Personalizing the Greeting
Your personal outgoing message or greeting can be from 2 to 30 seconds long. If you
don’t record a greeting, the system uses a pre-recorded greeting: Hello, no one is
available to take your call. Plea se leave a message after the tone.
18 - English
Page 19

To... Follow these steps:
Message Manager
Play Messages
Voice Mail
Select Message Manager
or Play Messages.
Message Manager
Play Messages
Voice Mail
Select Message Manager
or Play Messages.
record a
personal
greeting
switch
between
greetings
delete your
greeting
Open the menu with the phone in standby. Select
1.
then
2.
Press
Record Greeting
menu/select
.
to start recording. Wait until the system says
"Record greeting" before speaking.
menu/select
3.
Press
to stop recording. The system plays back your
new greeting.
To keep the greeting, press
4.
inteRcom/cleaR
Open the menu with the phone in standby. Select
1.
then
The system plays back the current greeting. Press
2.
.
Greeting Options
end
. To delete it and try again, press
.
switch greetings.
Switch to your personal greeting, then press
the greeting is playing.
Ans. Setup
Ans. Setup
menu/select
inteRcom/cleaR
Accessing the Answering System
When the phone’s in standby, you can access the system from any handset using two
different methods: Message Manager and Play Messages. Regardless of which
method you use to get your messages, t he following conditions apply:
Only 1 handset can access the system at a time.
♦
If you do nothing for 30 seconds, the phone returns
♦
to standby.
During remote access, the phone beeps so you k now
♦
it's waiting for the next command.
During message playback, press
menu/selec t
to open the
menu for playback control.
Message Manager
Message Manager lets you view the caller’s information.
With the phone in standby, press
press uP or
down
to find the message you want to listen to. Press
message /mute
and then select
Message Manager
menu/selec t
to that message or you can scroll to the next one.
Play All Messages
Play All Messages replays all t he messages received, starting with the newest,
unheard messages and then replaying the older messages. Wit h the phone in
standby, press
messages with this mode from the base or from the handset.
message /mute
to access the
Play Messages
select ion. You can play
,
,
to
while
;
to listen
English - 19
Page 20

To... From the base From a handset
message/mute
play new
messages
Press
Play/stoP.
Press
select
Play Messages
The system announces the number of new & old messages,
then plays each new message (followed by the day and time)
and
.
in the order it was received. After the new messages play, the
system plays the old messages.
restart this
message
replay an earlier
message
skip a message Press
delete a
message
delete all
messages
play old
messages
stop playback Press
Wait at least 5 seconds after the message starts playing,
Rev.
press
press 1 (number key).
Within 2 seconds after a message starts playing,
Rev.
press
Fwd
. Select 3 (number key).
While a message is playing, press
delete
.
With the phone in standby, press
delete
; press
delete
again to confirm.
select 1 (number key).
While a message is
playing, select 4 (number
key).
Not available.
After the system plays all new messages,
Play/stoP
press
again. select 2 (number key).
Play/stoP
. Select 5 (number key).
Screening Your Calls
You can use the a nswering system for call screening. While the system takes a
message, you can listen on the base spea ker (if you turn on
Call Screen)
or from a
handset. Only one handset ca n screen calls at a time. If another handset tries to
screen calls, it beeps and returns to standby.
To... From the base From a handset
hear the caller leaving a
message
answer the call NA Press
mute the call screen
without answering*
* If you mute t he call scre en, the syste m continues ta king the me ssage: it just st ops playing t hrough the
spea ker.
Listen to the caller over
the speaker.
Play/stoP
Press
.
message/mute
Press
Press
Home/FlasH
end
.
.
or return the
handset to the cradle.
20 - English
Page 21

Using the System While You're Away from Home
You can dial in to your answering system from any touch-tone phone. Before you
can use this feature, you must program a security code.
Programming a Security Code
With the phone in standby, open the menu; select
Code
. Use the number key pad to enter a two-digit security code (01 to 99). Press
menu/selec t
when you’re finished.
Remember to make a note of your new security code!
Ans. Setup
, then select
Security
Dialing In to Your System
Call your phone number & wait until the system answers. (If the system is turned
1.
off, it answers after 10 rings & sounds a series of beeps.)
During the greeting or beeps, press 0 and immediately enter your security code.
2.
If you enter it incorrectly 3 times, the system hangs up and returns to standby.
The system announces the time, the number of messages in memor y, and a help
3.
prompt. It beeps to let you know it's waiting for a command.
When you hear beeping, enter a 2-digit command from the chart.
4.
If you don' t press
any keys for 15
seconds, the
system hangs
up and return to
standby.
01 Repeat message 05 Stop playback
01 Repeat message 05 Stop playback
02 Play message 06 Turn the system on
02 Play message 06 Turn the system on
03 Skip message 09 Turn the system off
03 Skip message 09 Turn the system off
04 Delete message 10 Hear help prompts
04 Delete message 10 Hear help prompts
IMPORTANT INFORMATION
Solving Problems
If you have any trouble with your phone, check this section first. If you need help,
call our Customer Care Line listed on t he front cover.
General problems Possible solutions
Check the telephone cord connection.
No handsets can make or
receive calls.
A handset can’t make or
receive calls.
A handset can make calls,
but it won’t ring.
A handset is not working.
Disconnect the base AC adapter for a few minutes; then
reconnect it.
Move the handset closer to the base.
Make sure the ringer is turned on.
Make sure Silent Mode is turned off (see p. 15).
Charge the battery for 15-20 hours.
Check the battery connection.
English - 21
Page 22

The phone keeps ringing
when I answer on an
extension.
You may have to change the line mode. Contact Customer
Service for instructions.
Audio issues Possible solutions
Move the handset closer to the base.
Callers sound
weak or soft.
There’s a lot of
noise or static on
the line
Keep the handset’s battery fully charged.
Increase the earpiece volume.
Check for interference from appliances (microwave ovens, TVs, etc.) or
wireless devices (baby monitors, WiFi equipment, etc.). Move the handset
or base away from the interference source.
If you use a telecoil hearing aid, turn on T-coil mode (see p. 8).
If you have any service that uses the phone line, add a DSL or telephone
line filter (see p. 23).
Caller ID problems Possible solutions
Let calls ring twice before answering.
No handsets display Caller
ID information.
Caller ID displays briefly
and then clears.
Make sure your Caller ID service is active.
You may have to change the line mode. Contact Customer
Service for instructions.
Multi-handset problems Possible solutions
I can’t transfer calls.
Two handsets can’t talk to a caller.
A handset says
Unavailable
.
I can’t register a new handset.
Reset the handset (see p. 23).
See if any handset is in Privacy Mode.
Move the handset closer to the base.
See if any handset is in Privacy Mode.
Reset the handset (see p. 23).
See if you have 12 registered handsets.
Answering system problems Possible solutions
The answering system does not
work.
The system won't record
messages.
A handset can't access the
answering system.
My outgoing message is gone.
I can’t hear the base speaker.
Messages are incomplete.
The system keeps recording when
I answer on an extension.
Make sure the answering system is on.
Make sure the base is plugged in.
See if
Record Time
Delete messages (memory may be full).
See if another handset is using the system.
Make sure the phone is in standby.
If there was a power failure, re-record your personal
outgoing message.
Make sure call screening is turned on.
Change the base speaker volume.
Increase the
Delete messages (memory may be full).
You may have to change the line mode. Contact
Customer Service for instructions.
is set to
Record Time
Announce Onl y
.
.
22 - English
Page 23

Bluetooth problems Possible solutions
Making sure your phone is in pairing mode.
Check your phone’s manual for instructions on Bluetooth
The D3280 won’t pair with
my phone.
The D3280 doesn’t ring
when my cellular phone
does.
The D3280 paired with
my phone, but I can’t hear
anything through the
handset.
device pairing.
Making sure your phone supports the Bluetooth hands-free
profile.
Checking the link order for that phone. In rare cases, some
cellular phones may not be linked as the third or fourth
cellular phone.
Making sure your phone has Bluetooth turned on.
Making sure your phone is in range of the base.
Making sure the handset’s ringer is not turned off. (The base
doesn’t ring on cellular calls.)
Adjusting the handset volume.
Setting your cellular phone to transfer the audio to
a Bluetooth device. Check your phone’s manual for
instructions on Bluetooth setup and options.
Erase the Bluetooth pairing and repair the cellular phone to
the base. To erase the Bluetooth pairing, see p. 11.
Installing a Line Filter or DSL Filter
A telephone line filter or DSL filter prevents services t hat use the phone line from
causing interference on your phone. To get a line f ilter, contact your service provider
or look in an electronics store.
Plug the filter into the telephone wa ll jack and plug the base into the filter. Make a
test call to make sure the noise is gone.
Liquid Damage
CAUTION: If the base is covered in liquid, disconnect the adapter & phone
cord from the wall before touching it.
If the liquid is only on the exterior housing of the base or handset, wipe it off and
use as normal. If you can hear liquid inside the housing:
Remove all compartment covers, and disconnect all cables and cords.
1.
If liquid is leaking from any vent or hole, turn the phone so that vent faces down.
2.
If not, place the largest vent face down.
Let dr y for at least 3 days. Check for liquid inside the phone before replacing
3.
compartment covers & reconnecting cords.
Resetting Handsets
If you have trouble with a handset or if you want to replace one, clear the
registration information from the base and the handset:
Press & hold
1.
end
and # at the same time until you see the
System Reset
menu.
English - 23
Page 24

If you still have t he base the handset is registered to, select
2.
Deregister HS
, then
select t he handset you want to reset. If you don’t have that base anymore, select
Base Unavailable
To confirm, select
3.
.
Yes
. The handset displays
Handset not registered
.
Registering Handsets
If you see a “not registered” message on a handset, you must register it to a base
before using it.
Place the handset in the base; the display should say
1.
Wait until the display says
2.
the handset; press
If you don’t hear a dial tone or the display says
Regi stration Complete
Home/Fl asH
.
Handset Registering
.
(about 30 seconds), then pick up
Regis tration Fail ed
, charge
the battery completely, then try again.
As par t of our commit ment to protecti ng our
Adapter and Battery Information
AC adapter Base Charger
Part nu mber PS-0034 PS-0035
Input volt age 120V AC, 60 Hz
Output vo ltage
Use only t he supplied AC adap ters.
Use the pro per adapter for t he base & any
charg ers.
Do not plac e the unit in direct sunl ight or subject
it to hig h temperature s.
7.8V AC @
450m A
8V AC @
300m A
Battery pack (with normal use)
Part nu mber BT-1022
Capacity 300m Ah, 2.4V DC
Talk ti me about 7 hour s
Stand by time about 7 day s
Batte ry life about 1 yea r
Replac e the batter y when the tal k or standby ti me
become s noticeably reduced. For replacements,
cal l the Parts De partment (see the fr ont cover).
When th e battery get s low, the handset beeps a nd
shows a low bat tery aler t; put the hand set in the
crad le for rechargi ng.
Rechargeable Battery Warning
is equ ipment contai ns a rechargea ble Nickel-
Meta l-Hydride (Ni-MH) battery.
Nickel is a chemic al known to t he state of Cal ifor-
nia to cause ca ncer.
Do not shor t-circuit t he battery.
e batte ries in thi s equipment may ex plode if
dispo sed of in a re.
Do not cha rge the batter ies in any cha rger other
than t he one speci ed in the owner's manua l.
Using another c harger may damage th e battery or
cause it t o explode.
envir onment and conserv ing
natur al resource s, Uniden
volunta rily par ticipates in
an RBRC ® industr y program
to colle ct and recycl e used
Ni-MH bat teries wit hin the
United St ates. Please c all
1-800 -8-BATTERY for
infor mation on Ni-MH
battery rec ycling in you r area. (RBRC ® is a
regis tered tradem ark of the Recha rgeable Batt ery
Recyc ling Corpor ation.)
Recha rgeable batt eries must be r ecycled or
dispo sed of properl y.
Warning ! The cords on thi s product and /or
access ories contai n lead, a chemic al known
to the st ate of Califor nia to cause bir th
defec ts or other re productive h arm. Wash
hands af ter handlin g.
Uniden w orks to reduc e lead content in o ur
produ cts & accessor ies.
Compliance Information
FCC Part 68 Information
is equ ipment complies w ith Part 68 o f the FCC
rule s and the requi rements adopted by the ACTA.
On the bo ttom of this equipment i s a label that
contains, a mong other inf ormation, a produ ct
identi er in the form at US: AAAEQ ##TXXX X.
If reque sted, this nu mber must be prov ided to the
phone compa ny.
An appl icable Universa l Servic e Order Codes
(USOC) ce rticat ion for the jacks u sed in
this e quipment is provided (i.e. , RJ11C) in the
packa ging with e ach piece of approve d terminal
equipme nt. A plug and jack u sed to connect t his
equipme nt to the premise s wiring a nd telephone
networ k must comply wit h the applicabl e FCC
Part 6 8 rules and re quirements adopted by t he
24 - English
Page 25

ACTA. A compl iant telephone co rd and modular
plug is prov ided with t his product. It i s designed
to be conn ected to a compat ible modular jack that
is als o compliant. S ee instal lation inst ructions
for deta ils.
e REN i s used to deter mine the number of
devic es that may be con nected to a phone l ine.
Exces sive RENs on a phone l ine may result i n
devic es not ringi ng in response to an incoming
cal l. In most but not al l areas, the sum of R ENs
should no t exceed ve (5.0). To be cert ain of the
number of devic es that may be con nected to a
line, as dete rmined by the t otal RENs, contac t the
telephon e provider. e REN for thi s product is
part of the prod uct identie r that has the for mat
US:AA AEQ##TX XXX. e digits repre sented by
## are t he REN without a deci mal point (e.g., 03
is a REN of 0.3).
If thi s equipment causes ha rm to the telephon e
networ k, the telephone c ompany will n otify you
in adva nce that tempor ary disc ontinuance of
serv ice may be requi red. But if adva nce notice
isn't prac tical, t he telephone compa ny will noti fy
the cu stomer as soon as p ossible. Als o, you will be
advis ed of your right t o le a complaint with t he
FCC if you b elieve it is nece ssary. e tele phone
company m ay make change s in its facil ities,
equipme nt, operation s or procedures t hat could
aec t the operation of the equ ipment. If th is happens the teleph one company wil l provide adva nce
notice i n order for you to make neces sary modi cation s to maintai n uninterr upted serv ice.
Please follow instr uctions for repairing, i f any
(e.g. batt ery replacement sec tion); otherw ise do
not subst itute or repai r any parts of t he device
except a s specied i n this manua l. Connect ion to
part y line service is subjec t to state taris. C ontact t he state public ut ility com mission, publ ic
serv ice commis sion or corporat ion commissio n
for infor mation. is e quipment is hear ing aid
compatible.
If you ex perience trou ble with thi s equipment,
contac t the manufac turer (see the c over of this
manua l for contact in formation) or an aut horized
agent. I f the equipment i s causing har m to the
telephon e network, the telephone c ompany may
reques t that you disconnect t he equipment un til
the probl em is resolved.
If your home has w ired alarm equ ipment connected to a phone l ine, be sure that ins talling th e
system does not disable your ala rm equipment. If
you have questi ons about what will disable alarm
equipment , contact you r telephone company or a
quali ed instal ler.
Any cha nges or modic ations to thi s product not
expressly appr oved by the manuf acturer or ot her
part y responsible f or compliance c ould void your
author ity to operate t his product.
NOTICE: According to telephone co mpany
repor ts, AC electrical su rges, typ ically resu lting
from li ghtning st rikes, are very de structi ve to
telephon e equipment conne cted to AC power
source s. To mini mize dam age from these t ypes of
surge s, a surge arre stor is recommended.
FCC Part 15 Information
is device complies w ith part 15 of t he FCC
rule s. Operation i s subject to the follow ing two
condit ions: (1) is de vice may not caus e harmfu l
inter ference, and (2) is d evice must accept
any inte rference rece ived, includ ing interfere nce
that may c ause undesi red operation . Privacy of
commun ications may not b e ensured when u sing
this p hone.
FCC PART 15.105 (b): Note: is equ ipment has
been te sted and found to c omply with the l imits
for a Clas s B digital de vice, pursuant to part 15
of the FCC R ules. ese l imits are des igned to
provide r easonable prote ction agai nst harmf ul
inter ference in a resid ential instal lation. is
equipme nt generates, uses and c an radiate r adio
freque ncy energy a nd, if not inst alled and us ed
in acco rdance with the in struction s, may cause
harm ful inter ference to radio c ommunications.
However, the re is no guara ntee that inte rference
wil l not occur in a pa rticular ins tallation. If th is
equipme nt does cause ha rmful int erference to
radio or t elevision rec eption, whic h can be determined b y turning t he equipment o an d on, the
user is e ncouraged to t ry to correct the int erference by one or mo re of the followi ng measures:
Reorie nt or relocate the r eceiving a ntenna.
Increa se the separ ation betwee n the equipment
and rec eiver.
Connect the e quipment into an ou tlet on a
circu it dierent f rom that to which t he receiver
is conne cted.
Consu lt the dealer or a n experienced rad io/TV
techn ician for help.
FCC RF Exposure Information
is product complies w ith FCC radia tion exposure li mits under t he following c onditions:
e base mu st be placed to a llow a minimu m of 20
cm (8 inche s) betwe en the antenna a nd all pers ons
duri ng normal oper ation.
e base mu st not be colloc ated or operated i n
conjunc tion with an y other antenn a or transmitter.
e hand set is designe d for body-worn oper ation
and mee ts FCC RF expo sure guidel ines when
used w ith any belt cl ip, carry ing case, or ot her
acces sory supplie d with this product . (All necessar y accessorie s are included i n the package ; any
addit ional or optiona l accessor ies are not requi red
for compli ance with t he guideli nes.) ird par ty
acces sories (unles s approved by the ma nufacture r)
should b e avoided as thes e might not comply w ith
FCC RF e xposure gu idelines.
Industry Canada (I.C.) Notice
Terminal equipment
NOTICE: is equ ipment meets the applic able
Indust ry Canada Termina l Equipment Techni cal
Speci cations. is is conrme d by the regist ration num ber. e abbreviat ion IC before the
English - 25
Page 26

regis tration numb er signies t hat regist ration was
perfor med based on a Dec laration of Conform ity
indic ating that I ndustry Ca nada techni cal specications were met . It does not imply t hat Industr y
Canada approve d the equipment .
NOTICE: e Rin ger Equivalence Number
(REN) for thi s terminal equipme nt is marked on
the equ ipment itself. e REN assig ned to each
termi nal equipment provides an in dication of
the ma ximum numbe r of termina ls allowed to be
connec ted to a telephone i nterface. e t ermination on an inter face may consis t of any combination of de vices subjec t only to the requ irement
that t he sum of the Ri nger Equiva lence Numbers
of all t he devices do es not exceed 5.
Radio equipment
e term IC b efore the radio c erticat ion number
only sig nies that Indust ry Canada techn ical
speci cations were me t. Operation is subje ct to
the fol lowing two condition s: (1) this de vice may
not caus e interferenc e, and (2) this dev ice must
accept a ny interfere nce, includi ng interferenc e
that may c ause undesi red operation of t he device.
"Priv acy of commun ications may not be e nsured
when usi ng this telephone".
1-Year Limited Warranty
Eviden ce of original p urchase is req uired for
warrant y service.
WARRA NTOR: UNI DEN AMERIC A CORPORATION ( "Uniden")
ELEM ENTS OF WARRA NTY: Uniden war rants,
for one yea r, to the origin al retail ow ner, this
Uniden Product to b e free from defe cts in materi als a nd crasma nship with on ly the limit ations or
exclusions set ou t below.
WARRA NTY DURATION : is warra nty to
the ori ginal use r shall term inate and be of no
fur ther eect 12 mo nths aer th e date of origin al
retai l sale. e wa rranty is i nvalid if th e Product
is (A) dama ged or not mainta ined as reas onable
or neces sary, (B) modied, al tered, or used
as par t of any conversion k its, subassemblies,
or any con guration s not sold by Uniden, (C)
imprope rly instal led, (D) serv iced or repaire d
by someone o ther than a n authorized Uniden
serv ice center for a def ect or malf unction covere d
by thi s warranty, (E) used in a ny conjunction
with e quipment or par ts or as part of a ny system
not manu factured by Un iden, or (F) insta lled or
programmed by anyone ot her than as d etailed by
the own er's manual for t his product.
STATEME NT OF REMEDY: In the event t hat
the product doe s not conform to th is warrant y
at any ti me while th is warrant y is in eect , warrantor w ill eithe r, at its option, repa ir or replace
the defe ctive unit a nd return it to you with out
charg e for parts, se rvice, or a ny other cost (exce pt
shippi ng and handl ing) incur red by warra ntor or
its repre sentatives i n connection w ith the per formance of t his warr anty. Warrantor, at it s option,
may repla ce the unit with a new or re furbished
26 - English
unit. THE LI MITED WARR ANTY SET FORT H
ABOVE IS T HE SOLE AND EN TIRE WARR ANTY PERTAI NING TO THE PRODUC T AND
IS IN LI EU OF AND EXCLUDE S ALL OTHER
WARRA NTIES OF AN Y NATURE WHAT SOEVER , WHETHER E XPRESS , IMPLIED OR
ARISING BY OPER ATION OF LAW, INCLUDING, BU T NOT LIMITE D TO ANY IMPLI ED
WARRA NTIES OF ME RCHANTABIL ITY OR
FITN ESS FOR A PARTICUL AR PURPOSE . THIS
WARRA NTY DOES NOT COV ER OR PROVIDE
FOR THE R EIMBURSEMEN T OR PAYMENT
OF INCIDENTAL OR C ONSEQUENTI AL DAMAGES. Some state s do not allow this exclu sion or
limi tation of incidental o r consequential da mages
so the ab ove limitat ion or exclusion may not
apply to you .
LEGA L REMEDIE S: is warra nty gives you
speci c legal rig hts, and you may also have ot her
right s which vary from st ate to state. i s warrant y is void outside th e United States of A merica
and Ca nada.
PROCEDU RE FOR OBTAINI NG PERFORMANC E OF WARRA NTY: If, aer followi ng
the in struction s in the owner's ma nual you are
cert ain that the Produc t is defective , pack the
Produc t careful ly (preferably i n its origina l packagin g). Disconnec t the batter y from the Produ ct
and sep arately sec ure the battery in it s own separate pac kaging withi n the shipping c arton. e
Produc t should include a ll parts a nd accessor ies
origi nally pack aged with t he Product. In clude
evide nce of origina l purchase a nd a note describ ing the defect that ha s caused you to ret urn it. e
Produc t should be shipp ed freight prep aid, by
traceable me ans, to warr antor at:
Uniden Americ a Service
4700 Amo n Carter Blvd .
Fort Wort h, TX 76155
As an Ene rgy Star® Part ner,
Uniden ha s determine d that this
product m eets the Energy Sta r®
guideline s for energy ec iency. Energy St ar® is a
U.S. reg istered mark .
Uniden® is a regi stered trademark of Un iden
Ameri ca Corporat ion.
e pictures in this manua l are for exampl e only.
Your phone may not lo ok exactly l ike the pictures.
 Loading...