

Page 1

Page 2

CONTENTS
Safety Information ........................i
Glossary ................................1
Introduction .............................3
Welcome ...................................3
•
Authorization Requirements....................3
•
Features....................................3
•
Included In Your Package ......................4
•
Setting Up Your Phone.....................5
Installing the Battery .........................5
•
Charging the Battery .........................5
•
Battery Low Alarm ...........................6
•
OF YOUR OWNER’S MANUAL
Antenna....................................6
•
Power .....................................6
•
Calling..................................7
Receiving a Call..............................7
•
Making a Call ...............................7
•
Ending a Call................................8
•
While Calling................................8
•
Memory Programming ...................10
•Storing Numbers and Names ..................10
•Checking Memory Status .....................10
•Calling Stored Numbers ......................11
•Clearing a Memory Location...................11
Menus - Customizing Your Phone...........12
•
The Function Menu Map......................12
•
Sound Menu ...............................13
•
Phone Settings Menu ........................18
•
Security Menu ..............................25
•
Call Timers Menu ...........................27
•
Service Settings Menu........................30
Specifications...........................32
Optional Accessories .....................33
Keys and Display....................Foldout
NOTE: Foldout the back
cover of this owner’s
manual to refer to the
“Keys and Display” page.
CONTENTSCONTENTS
i
Page 3

EXPOSURE TO RADIO FREQUENCY SIGNALS
Your wireless handheld portable telephone is a low
power radio transmitter and receiver. When it is ON, it
receives and also sends out radio frequency (RF) signals.
In August, 1996, the Federal Communications
Commission (FCC) adopted RF exposure guidelines with
safety levels for handheld wireless phones. Those
guidelines are consistent with the safety standards
previously set by both U.S. and international
standards bodies:
ANSI C95.1 (1992)
NCRP Report 86 (1986)
ICNIRP (1996)
Those standards were based on comprehensive and
periodic evaluations of the relevant scientific literature.
For example, over 120 scientists, engineers, and
FOR WIRELESS HANDHELD PHONES
physicians from universities, government health agencies,
and industry reviewed the available body of research to
develop the ANSI Standard (C95.1).
The design of your phone complies with the FCC
guidelines (and those standards).
ANTENNA CARE
Use only the supplied or an approved replacement
antenna. Unauthorized antennas, modifications, or
attachments could damage the phone and may violate
FCC regulations.
PHONE OPERATION
▼
Normal Position
Hold the phone as you would any other telephone with
the antenna pointed up and over your shoulder.
▼
For your phone to operate most efficiently:
Extend your antenna fully.
Do not touch the antenna unnecessarily when the phone
is in use. Contact with the antenna affects call quality
SAFETY INFORMATION
and may cause the phone to operate at a higher power
level than otherwise needed.
ii
Page 4

DRIVING
Check the laws and regulations on the use of wireless
telephones in the areas where you drive. Always obey
them. Also, if using your phone while driving, please:
Give full attention to driving — driving safely is your
•
first responsibility.
Use hands-free operation, if available:
•
Pull off the road and park before making or
•
answering a call if driving conditions so require.
ELECTRONIC DEVICES
Most modern electronic equipment is shielded from RF
signals. However, certain electronic equipment may not be
shielded against the RF signals from your wireless phone.
Pacemakers
▼
The Health Industry Manufacturers Association
recommends that a minimum separation of six (6”)
inches be maintained between a handheld wireless
phone and a pacemaker to avoid potential interference
with the pacemaker. These recommendations are
consistent with the independent research by and
recommendations of Wireless Technology Research.
iii
▼
Persons with pacemakers:
•
Should ALWAYS keep the phone more than six inches
from their pacemaker when the phone is turned ON.
•
Should not carry the phone in a breast pocket.
•
Should use the ear opposite the pacemaker to
minimize the potential for interference.
•
If you have any reason to suspect that interference is
taking place, turn your phone OFF immediately.
▼
Other Medical Devices
If you use any other personal medical device, consult the
manufacturer of your device to determine if they are
adequately shielded from external RF energy. Your
physician may be able to assist you in obtaining
this information.
Turn your phone OFF in health care facilities when any
regulations posted in these areas instruct you to do so.
Hospitals or health care facilities may be using equipment that
could be sensitive to external RF energy.
Page 5

VEHICLES
RF signals may affect improperly installed or inadequately
shielded electronic systems in motor vehicles. Check with
the manufacturer or its representative regarding your
vehicle. You should also consult the manufacturer of any
equipment that has been added to your vehicle.
For Vehicles Equipped with an Air Bag
▼
An air bag inflates with great force. DO NOT place
objects, including both installed or portable wireless
equipment, in the area over the air bag or in the air bag
deployment area. If in-vehicle wireless equipment is
improperly installed and the air bag inflates, serious
injury could result.
POSTED FACILITIES
Turn your phone OFF in any facility where posted notices
so require.
AIRCRAFT
FCC Regulations prohibit using your phone while in the
air. Switch OFF your phone before boarding an aircraft.
BLASTING AREAS
To avoid interfering with blasting operations, turn your
phone OFF when in a “blasting area” or in areas posted:
“Turn off two-way radio.” Obey all signs and
instructions.
POTENTIALLY EXPLOSIVE ATMOSPHERES
Turn your phone OFF when in any area with a
potentially explosive atmosphere and obey all signs and
instructions. Sparks in such areas could cause an
explosion or fire resulting in bodily injury or even death.
Areas with a potentially explosive atmosphere are often
but not always clearly marked. They include fueling
areas such as gasoline stations; below deck on boats; fuel
or chemical transfer or storage facilities; vehicles using
liquefied petroleum gas (such as propane or butane);
areas where the air contains chemicals or particles, such
as grain, dust, or metal powders; and any other area
where you would normally be advised to turn off your
vehicle engine.
iv
Page 6

WARNING!
Uniden America Corporation DOES NOT represent this
unit to be waterproof. To reduce the risk of fire, electrical
shock, or damage to the unit, DO NOT expose this unit
to rain or moisture.
The exclamation point within an equilateral triangle is
intended to alert the user to the presence of important
operating and maintenance (servicing) instructions in the
literature accompanyingthe appliance.
THE FCC WANTS YOU TO KNOW
Changes or modifications to this product not expressly
approved by Uniden, or operation of this product in any
way other than as detailed by the owner’s manual, could
void your authority to operate this product.
WIRELESS HANDHELD PHONE PRIVACY
Wireless handheld phones are radio devices. Because of
the inherent physical properties of radio waves, your
communications can be received by radio receiving
devices other than your own wireless handheld phone.
Consequently, any communications using your wireless
handheld phone may not be private.
v
IMPORTANT INFORMATION
IMPORTANT SAFETY INSTRUCTIONS
When using your wireless handheld phone, these basic
safety precautions should always be followed to reduce
the risk of fire, electrical shock, and injury to persons:
1) Read and understand all instructions.
2) Follow all warnings and instructions marked on the product.
3) If the product is connected to a battery charger, unplug it
from the wall outlet before cleaning. Use a dry cloth for
cleaning without liquid or aerosol cleaners.
4) Do not use this product near water; for example, near a
bath tub, wash bowl, kitchen sink or laundry tub, in a
wet basement, or near a swimming pool.
5) Do not place this product on an unstable cart, stand, or
table. The product may fall, causing serious damage to
the unit.
Page 7

6) Slots and openings in the product may be provided for
ventilation. To protect the product from overheating,
these openings must not be blocked or covered. This
product should never be placed near or over a radiator or
heat register.
7) This product’s battery charger should be operated only
from the type of power source indicated on the marking
label. If you are not sure of the type of power source
available, consult your dealer or local power company.
8) When using the battery charger, do not overload wall
outlets and extension cords, as this can result in the risk of
fire or electrical shock.
9) Never push objects of any kind into this product through
ventilation slots, as they may touch dangerous voltage
points or short out parts that could result in a risk of fire
or electric shock. Never spill liquid of any kind on the
product.
10)To reduce the risk of electric shock, do not disassemble
this product. Take it to qualified service personnel when
service or repair work is required. Opening or removing
covers may expose you to dangerous voltages or other
risks. Incorrect reassembly can cause electric shock when
the appliance is subsequently used.
11)Refer servicing to qualified service personnel under the
following conditions:
• When the battery charger power supply cord is
damaged or frayed.
•
If liquid has been spilled into the product.
•
If the product has been exposed to rain or water.
•
If the product does not operate normally when
following the operating instructions. (Adjust only
those controls that are covered by the operating
instructions. Improper adjustment of other controls
may result in damage and will often require extensive
repair work by a qualified technician.)
•
If the product has been dropped or damaged.
•
If the product exhibits a distinct change in
performance.
vi
Page 8

To reduce the risk of fire or injury to persons by
the battery, read and follow these instructions:
1) Use only the appropriate type and size battery pack
specified in the owner’s manual.
2) Do not dispose of the battery pack in a fire. The cell may
explode.
3) Do not open or mutilate the battery pack. Released
electrolyte is corrosive and may cause damage to the eyes
or skin. It may be toxic if swallowed.
4) Exercise care in handling the battery in order not to
short the battery with conducting materials such as
rings, bracelets, and keys. The battery or conductor may
overheat and cause burns.
5) Charge the battery pack provided with or identified for
use with this product only in accordance with the
instructions and limitations specified in the owner’s
manual provided for this product.
6) Observe proper polarity orientation between the battery
pack and battery charger.
vii
SAVE THESE INSTRUCTIONS!
BATTERY SAFETY INFORMATION
Page 9

GLOSSARY
A/B switching Switch between carriers. Refer to
page 31.
Any-Key Answer Press any key (other than ▲ or
▼) to answer an incoming call.
Refertopage19.
Call Timers Keeps count of the time (hours,
minutes and seconds) that you
have used the phone. Reset when
you want. Can be for one call,
totals calls on line 1 and/or line 2.
Refer to page 27.
Earpiece Where you hear conversations.
Refer to the back page foldout.
Emergency 911 With the phone on in standby
mode (no numbers in the display),
wxyz
press and hold for one
second. Refer to page 8.
Greeting The first message that appears
when your phone is turned on.
Refertopage21.
9
GLOSSARY
Keyguard Disables the keypad until there is
an incoming call.
Refer to page 22.
Keypad The number keys (0 through 9).
Refer to the back page foldout.
Minute Minder During your conversation, alerts
you (through the earpiece) five
seconds before each minute is over.
You can set the volume or
enable/disable the feature. Refer to
page 17.
1
Page 10

Monitor ”On hook dialing” - You hear the
conversation from the speaker on
the back instead of from the
earpiece. Since the microphone (on
the front) is disabled during
monitor, the caller can’t hear you.
This feature is great for calling a
bank or similar automated
answering system. Refer to page 9.
Mute Disables/enables the (mouthpiece)
microphone during a conversation.
Refertopage9.
Roam With the roam feature, use your
unit when you are out of the home
service area. When your cellular
phone is “roaming,”
appears in the display. Refer to the
back page foldout.
Scratchpad Temporary location for a phone
number. Refer to page 9.
Speaker On the back of your phone, it emits
sounds and tones.
Refer to the back page foldout.
ROAM
PIN Personal Identification Number.
Refer to page 26.
Standby Ready to send or receive a call.
Refertopage6.
2
Page 11

IntroductionINTRODUCTION
WELCOME
Congratulations on your purchase of the Uniden MiniCel
cellular phone. You have chosen to enter the world of
cellular telephone technology with one of the finest portable
cellular phones available today. Now you can place or
receive calls from anywhere there is cellular coverage.
Your MiniCel can go with you anywhere so that you’re
never out of touch – in your car, on the beach, at the
golf course or even just for a walk in the woods.
With the roam feature, you can use your phone when
you travel away from your own area. The many standard
features on the MiniCel make calling quick and
convenient. The easy-to-use menu functions help you
customize your MiniCel.
We’re confident you will be proud to own the MiniCel. To
make sure you understand all its convenient features,
please take the time to read this owner’s manual. It will
TO YOUR NEW MINICEL PHONE
help you use the technology and convenience of cellular
communications.
AUTHORIZATION REQUIREMENTS
INTRODUCTION
You must contact your local cellular service company to
obtain authorization and a cellular telephone number
before using your MiniCel. Fees for cellular service vary
from company to company.
FEATURES
•
50 Memory Locations
•
128K Bytes Flash Memory
•
Any Key Answer
•
One-Touch Emergency Dial
•
Speed Redial and Super Speed Redial
•
Programmable 20-Character Greeting
•
Password Protection Auto PIN
•
Battery Alarm
•
Two-Line, 20 Character LCD Display
•
Scratch Pad Memory
•
Speaker and Ringer Volume Control
•
Keyguard
•
Call Timers
•
Tone or Vibrate Alert
INTRODUCTION
3
Page 12
TIP
To get the most from your
phone, please read this
owner’s manual
thoroughly. Also, be sure
to complete and mail the
product registration form.
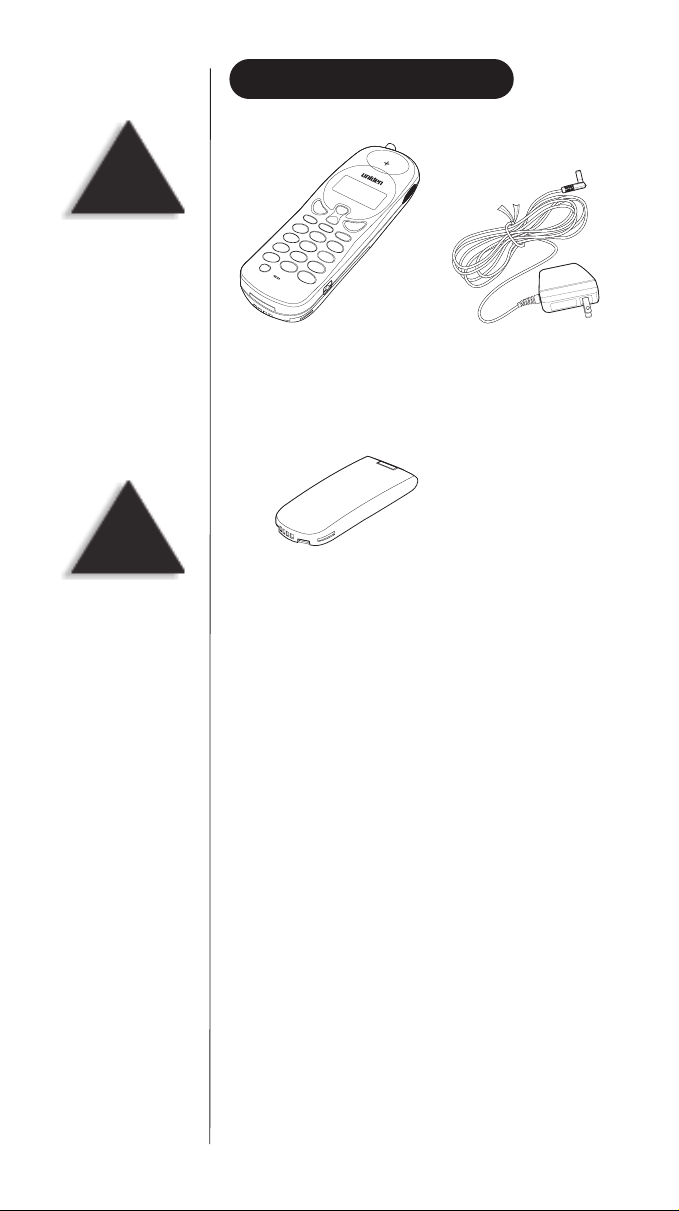
INCLUDED IN YOUR PACKAGE
Mini 200 AC Adapter and Charger
WARNING
If any of these items are
missing or damaged,
immediately contact
your place of purchase.
Rechargeable Battery
(one of the following:)
580 mAH nickel metal (MC580N)
580 mAH Lithium-ion (MC580L)
This Owner’s Manual
•
•
Precautions and Important Safety Instructions
•
Registration Card
4
Page 13
SettingUpYour PhoneSETTINGUP
INSTALLING THE BATTERY
Your MiniCel comes with either one of the following:
580 mAH nickel metal (MC580N) or
580 mAH Lithium-ion (MC580L)
850 mAH Lithium-ion (MC850L).
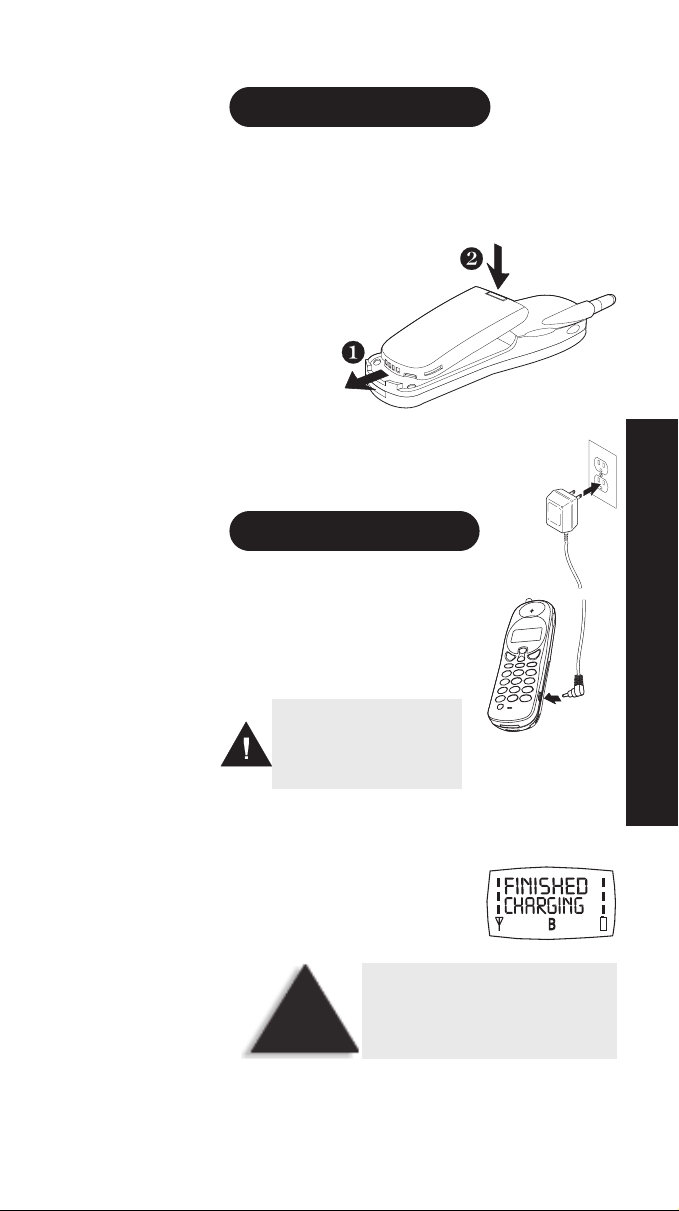
1) Line up the notches and
metal contacts on the bottom
of the battery and the base
(the back of the MiniCel).
Make sure the label
side is facing
the phone.
2) Gently press the battery top until it
clicks into place.
CHARGING THE BATTERY
1) Plug the AC adapter cord into the
input jack on the side of the phone.
2) Plug the AC adapter into a standard
120 VAC wall outlet.
Use only the Uniden AC adapter
supplied with this phone.
DO NOT use an outlet controlled
by a wall switch.
If you turn the phone on while the battery is charging,
THE BASICS OF YOUR NEW MINICEL
CHARGING will show in the display.
3) Charge the battery for 3 hours.
If the power is on when the battery
is fully charged, the display reads:
Before using your phone, fully charge
the rechargeable battery pack.
HINT
We recommend that the battery pack
charges for 3 hours.
SETTING UP
SETTING UP
5
Page 14
CAUTION
Do not touch the
antenna while you are
using the phone.
BATTERY LOW ALARM
When the battery is low, RECHARGE BATTERY shows in the
LCD display, the battery icon starts flashing, and the
battery low warning tone sounds.
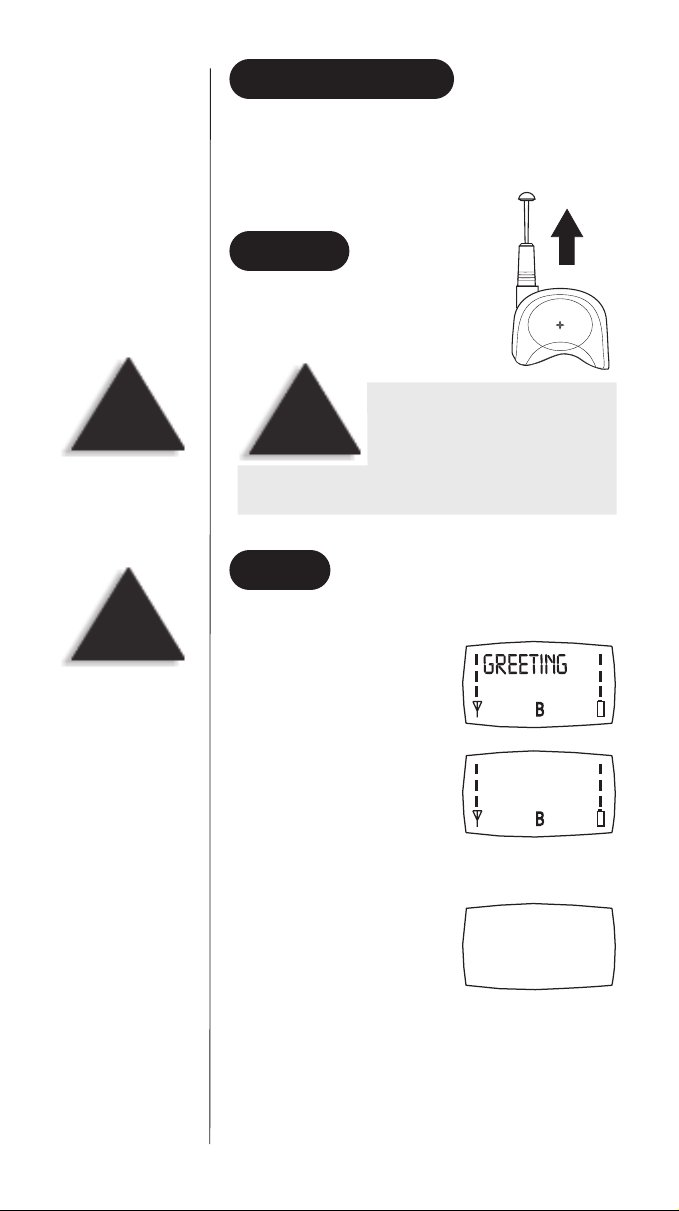
ANTENNA
Before placing or receiving a call,
gently pull the antenna up until it
clicks into place.
Do not use the phone with a damaged
antenna. Use only the supplied or
WARNING
could damage the phone, degrade the quality of the call and
violate FCC regulations.
approved antenna. Unauthorized
antennas, attachments or modifications
POWER
TIP
For the best reception,
extend the antenna
before using the phone.
6
▼ Power On
Press and hold the
end on/off
key until you hear a tone and
see the opening greeting.
Then the standby display shows:
The MiniCel is now in
standby mode.
▼
Power Off
Press and hold the
end on/off
key and the display goes blank.
Page 15

CallingCALLING
SPEED
DIAL
Press
mem
, the two-digit
memory location
number (01-50)
send
.
and
Or, press
mem
, the
one-digit number for 1
through 9, and
From the standby
display, press and hold
the one-digit number
(only for locations
1 through 8).
Caution: location 9 is for
emergency dialing only.
SUPER
SPEED
DIAL
send
.
RECEIVING A CALL
1) When someone calls your MiniCel,
the LCD backlight flashes,
the alert sounds (see page 13) or
vibrates (see page 18) and
INCOMING CALL appears.
2) If the "any key" feature (page 19) is active, press any key
other than ▲ or ▼.
send
If you have disabled the "any key" feature, press
3) The backlight stops flashing
and the icon appears in
the display.
end
4) When you finish your call, press
Absent Call Counter
▼
When you don't answer an
incoming call, the display shows
the number of unanswered call(s).
Press any key to erase the message.
.
.
MAKING A CALL
▼
Direct Dialing
1) Enter the phone number on
the keypad. To erase a digit,
clear
press
correct number. To erase all
the digits, press and hold
WITH YOUR MINICEL
send
2) Press
The icon shows in the display
while a call is in progress. If the
"current call timer" feature is on,
the counter starts (see page 27).
CALLING
and reenter the
.
clear
.
CALLING
7
Page 16

HINT
Redial From Last 10 Completed Calls
▼
1) With no digits in the display,
send
press
.
You will see the last number dialed.
To return to the blank
screen, press
endorclear
HINT
To store the number in
memory, press and hold
mem
. See page 10.
2) Press ▲or ▼ to scroll
.
through the list.
3) When you find the number that
send
you want to call, press
One-Touch Emergency Dialing
▼
.
To call 911, make sure that there are no numbers in the
wxyz
display, then press and hold for one second.
9
NOTE: This overrides the keyguard.
PIN Calling
▼
To protect from unauthorized use of some cellular or
automated systems, you can use a personal identification
number (PIN). The PIN must be programmed; see page 26.
If you enter a service area that does not require a PIN, set
the PIN feature to off.
▼
Inserting a Pause
If you need a pause to separate groups of numbers
during dialing, press and hold .
This pause counts as one digit. Entering another pause
increases the length of the pause between numbers.
ENDING A CALL
When you finish your call, press
end
.
WHILE CALLING
▼
Adjusting the Earpiece Volume
During a conversation, press either ▲ or ▼.
You can do this through the volume menu (page 14).
8
Page 17

Using the Scratch Pad
▼
Use the scratch pad to record a phone number during a
call. Then you can dial that number from the scratch pad
or enter it into a memory location.
1) During a call, enter the
number with the keypad.
2) When you are finished with
end
your call, press
.
3) To dial the number in the
send
scratch pad, press
Mute
▼
If you want to mute the microphone so the caller
•
cannot hear, press
.
menu
and .
NOTE
Since the microphone
(on the front) is disabled
during monitor, the
caller can’t hear you.
• To turn the microphone back on, press
menu
and
again.
▼
Monitor
During monitor, you hear the conversation from the
speaker on the back. The microphone is disabled. Use
this feature for calling a bank or similar automated
answering system.
•
To enable the monitor feature, press (monitor).
•
To disable the monitor feature, press (monitor).
▼
Transmitting DTMF Signal(s)
DTMF (dual tone multi-frequency) tones are transmitted
from your phone when you press a digit key during a call.
▼
Flash Signal (Signaling Tone)
send
When you press
during a call, it generates a flash
signal (signaling tone).
CALLING
9
Page 18

HINT
To exit memory mode,
press
endorclear
.
MemoryProgrammingMEMORYPROGRAMMING
STORING NUMBERS AND NAMES
The MiniCel has 50 memory locations (01 through 50).
You can also store a 10-digit description or name to
identify the phone number. There are three sources to
enter numbers into memory: the scratch pad, entered in
standby or the recall numbers list.
1) With the number in the display,
mem
press and hold
2) Enter the location number where you want to store
the number. Example: location 01
To search for an empty location, press either ▲ or ▼.
At the empty location, press
If all the locations are full, the MEMORY FULL message
appears and an error tone sounds.
If the location is occupied,
you will be prompted:
for one second.
mem
.
10
Example: you want to replace the number in memory,
press ▲ for yes.
3) If you want, you can enter a
10-character name with the
keypad. Example: HOME
4) To store the name or to finish,
mem
press
PROGRAMMING FOR YOUR PHONE
After two seconds, the display
returns to standby.
From the standby display,
press
To return to the standby display,
press either
. You will see:
CHECKING MEMORY STATUS
mem
three times.
MEMORY
mem,endorclear
.
Page 19

TIP
Put the phone numbers
that you call the most in
the first nine memory
locations. Then use
speed dial to call them.
CAUTION
Within the super speed
dial feature, location 9
is reserved for
emergency calling. If
any service provider is
available (even one the
phone isn’t registered
with), you can use the
emergency call feature.
CALLING STORED NUMBERS
Speed Dial
▼
Press
mem
, the two-digit memory location number
send
(01-50) and
Or, press
then press
Super Speed Dial
▼
.
mem
, the one-digit number for 1 through 9;
send
.
You can super speed dial from memory locations
1 through 8. Caution: location 9 is for emergency only!
1) From the standby display,
press and hold the one-digit
number (only for locations
1 through 8) until it appears
in the display.
2) The display changes to:
The call is in process.
CLEARING A MEMORY LOCATION
1) To select the location,
mem
press
location number (01 - 50).
Example: 01
and the two-digit
MEMORY PROGRAMMING
HINT
To exit memory mode,
press
endorclear
.
2) To clear the number,
press and hold
clear
.
3) Press ▲for yes (to delete).
The display returns to standby.
or
Press ▼ for no.
To return to standby,
press
end
.
11
Page 20

Menus-Customizing Your PhoneMENUS
THE FUNCTION MENU MAP
12
▼ Quick Menu Access
To quickly move through the menu levels, use the keypad.
Example: To quickly change the answer option from
any key to send only:
abc2abc2abc
2
menu
Press
,,,,and
CUSTOMIZING YOUR PHONE
MENUS
menu
.
Page 21

TIP
The alert tones come
from the speaker on the
back of the phone.
HINT
To enter a menu,
with your phone on,
press
menu
.
You will see
To select another menu,
press the ▲ (up) or
▼ (down) key.
MENU SELECT.
SOUND MENU
Alert Volume and Tone Menu
▼
You can change both the volume and tone of the alert.
To change the alert volume:
1) To go to the sound menu from
menu
standby, press
2) Press ▼.
menu
3) Press
menu
4) Press
menu
5) Press
.
.
again.
again.
MENUS
NOTE!
For a “road map”
through the menus,
refer to the Function
Menu Map on page 12.
HINT
To exit menu mode,
press
endorclear
.
6) Use the ▼or ▲ keys to increase or decrease the volume.
menu
7) Press
again. You will see:
In about two seconds, the display
returns to standby.
To change the alert tone:
1) Repeat steps 1 through 4 above.
2) Press the ▼key.
menu
3) Press
to hear tone 1.
4) Use the ▼or ▲ keys to listen to the other tones
(tone 2 through 5).
menu
5) To select a tone, press
.
In about two seconds, the display returns to standby.
13
Page 22

HINT
To move to a menu,
use either the ▲ (up)
or ▼ (down) key.
HINT
To exit menu mode,
press
endorclear
.
Earpiece Volume Menu
▼
You can adjust the volume from loud to soft.
1) To go to the sound menu from
menu
standby, press
.
2) Press ▼.
menu
3) Press
.
4) Press ▼.
menu
5) Press
.
6) Use the ▼or ▲ keys to change the earpiece volume.
menu
7) Press
again. You will see:
14
In two seconds, the display
returns to standby.
Page 23

TIP
The keypad tones comes
from the speaker on the
back of the phone.
Keypad Volume Menu
▼
When you press the keys, a tone sounds. You can adjust
the volume from loud to no sound.
1) To go to the sound menu from
menu
standby, press
.
2) Press ▼.
menu
3) Press
.
HINT
To move to a menu,
use either the ▲ (up)
or ▼ (down) key.
HINT
To exit menu mode,
press
endorclear
.
4) Press ▼.
5) Press ▼again.
menu
6) Press
.
7) Use the ▼or ▲ keys to increase or decrease the
keypad tone volume.
menu
8) Press
again.
In two seconds, the display
returns to standby.
MENUS
15
Page 24

TIP
The alert tones comes
from the speaker on the
back of the phone.
HINT
To move to a menu,
use either the ▲ (up)
or ▼ (down) key.
HINT
Speaker Volume Menu
▼
You can adjust the volume from loud to no sound.
1) To go to the sound menu from
menu
standby, press
.
2) Press ▼.
menu
3) Press
.
4) Press ▼three times to get
to the speaker menu.
menu
5) Press
.
6) Use the ▼or ▲ keys to increase or decrease the
speaker volume.
menu
7) Press
again. You will see:
To exit menu mode,
press
endorclear
.
16
In two seconds, the display
returns to standby.
Page 25

Minute Minder Menu
▼
1) To go to the sound menu from
menu
standby, press
.
2) Press ▼.
menu
3) Press
.
HINT
To move to a menu,
use either the ▲ (up)
or ▼ (down) key.
HINT
To exit menu mode,
press
endorclear
.
4) Press ▼four times to get to
the minute minder menu.
menu
5) Press
.
6) Use the ▼or ▲ keys to increase or decrease the
minute minder volume.
menu
7) Press
again. You will see:
In two seconds, the display
returns to standby.
MENUS
17
Page 26

HINT
To move to a menu,
use either the ▲ (up)
or ▼ (down) key.
HINT
To exit menu mode,
press
endorclear
.
PHONE SETTINGS MENU
Vibrate Menu
▼
You can choose between “ring” or vibrate to alert you to
an incoming call.
1) To go to the phone settings
menu from standby,
menu
press
2) Press ▼twice.
3) Press
4) Press
5) Use the ▼or ▲ keys to choose
between
RING/NO VIBRATE.
6) Press
In two seconds, the display
returns to standby.
.
menu
.
menu
again.
VIBRATE/NO RING or
menu
again. You will see:
18
Page 27

HINT
To move to a menu,
use either the ▲ (up)
or ▼ (down) key.
HINT
To exit menu mode,
press
endorclear
.
Answer Option Menu
▼
You can choose whether you want to answer a call by
pressing any key on the keypad (other than ▲or ▼)or
send
by pressing
.
1) To go to the phone settings
menu from standby,
menu
press
.
2) Press ▼twice.
menu
3) Press
.
4) Press ▼.
menu
5) Press
.
6) Use the ▼or ▲ keys to choose between
ANY KEY or SEND ONLY.
menu
7) Press
again. You will see:
MENUS
In two seconds, the display
returns to standby.
19
Page 28

HINT
To move to a menu,
use either the ▲ (up)
or ▼ (down) key.
HINT
To exit menu mode,
press
endorclear
.
Light Menu
▼
You can choose how long you want the backlight to light.
1) To go to the phone settings
menu from standby,
menu
press
.
2) Press ▼twice.
menu
3) Press
.
4) Press ▼twice.
menu
5) Press
again.
6) Use the ▼or ▲ keys to choose between
SHORT, NORMAL, LONG or OFF.
7) Press
menu
again. You will see:
20
In two seconds, the display
returns to standby.
Page 29

HINT
To move to a menu,
use either the ▲ (up)
or ▼ (down) key.
HINT
To exit menu mode,
press
endorclear
.
Change Greeting Menu
▼
The first message that appears when your phone is
turned on is the greeting.
1) To go to the phone settings
menu from standby,
menu
press
.
2) Press ▼twice.
menu
3) Press
.
4) Press ▼three times.
menu
5) Press
again.
6) You can enter up to
20-characters with
the keypad.
For example: MINICEL
MENUS
HINT
For changes, use
to move right and
to move left, then enter
the correct letter.
To enter a space, press and hold until the cursor
moves to the next space.
7) To store the greeting,
menu
press
again.
After two seconds, the display
returns to standby.
21
Page 30

QUICK
TIP
To enable/disable
keyguard in standby,
press and hold
two seconds.
menu
Enable Keyguard Menu
▼
You can protect your phone from accidental key stroke by
disabling the keypad until there is an incoming call.
1) To go to the phone settings
menu from standby,
menu
press
.
2) Press ▼twice.
for
3) Press
menu
.
4) Press ▼four times.
HINT
To exit menu mode,
press
endorclear
.
HINT
To enable keyguard from
standby display, press
and hold
menu
for two seconds.
menu
5) Press
.
6) The display switches from
KEYGUARD ENABLED to
HOLD MENU TO DISABLE.
To enable keyguard, press and hold
menu
for two seconds.
7) The phone returns to standby mode.
To disable keyguard, press and hold
menu
for two seconds.
22
Page 31

HINT
To move to a menu,
use either the ▲ (up)
or ▼ (down) key.
Headset Menu
▼
For hands-free calling, you can add an optional headset.
The headset menu has two settings: alert repeat or
auto-answer.
1) To go to the phone settings
menu from standby,
menu
press
.
2) Press ▼twice.
menu
3) Press
.
TIP
When the headset is
attached and
auto-answer is enabled,
an incoming call is
automatically answered.
TIP
The three options for
auto answer are: on,
on with speaker
or off (standby).
The two options for
alert repeat are:
one alert or three alerts.
4) Press ▼five times.
menu
5) Press
again.
6) Use the ▼or ▲ keys
to choose between
AUTO ANSWER
or ALERT REPEAT.
Our example: ALERT REPEAT.
7) Press
menu
.
8) Use the ▼or ▲ keys to select one alert or three alerts.
menu
9) Press
. In two seconds, the display returns to
standby display.
MENUS
23
Page 32

HINT
To move to a menu,
use either the ▲ (up)
or ▼ (down) key.
HINT
To exit menu mode,
press
endorclear
.
Contrast Menu
▼
You can choose how much contrast you want in the
backlight display. High increases the contrast (darker
pixels) and low decreases the contrast (lighter pixels).
1) To go to the phone settings
menu from standby,
menu
press
.
2) Press ▼twice.
menu
3) Press
.
4) Press ▼six times.
menu
5) Press
again.
6) Use the ▼or ▲ keys to choose between low to high.
The display changes as you choose different contrasts.
24
menu
7) Press
again. You will see:
In two seconds, the display
returns to standby.
Page 33

HINT
To move to a menu,
use either the ▲ (up)
or ▼ (down) key.
HINT
To exit the change
password menu,
press
end
.
SECURITY MENU
Change Password Menu
▼
1) To go to the security menu
menu
from standby, press
.
2) Press ▼three times.
menu
menu
.
again.
3) Press
4) Press
5) To change the four-digit password,
enter the current
four-digit password.
The factory pre-set password is 0123.
• You must enter the correct password within ten
seconds. If not, the CHANGE PASSWORD prompt appears.
• If you enter the wrong password, the
INCORRECT PASSWORD message appears followed by the
PASSWORD prompt. These messages will repeat until you
enter the correct password or press
6) Enter a new four-digit password.
end
.
MENUS
7) To confirm, reenter the
new password.
8) The display returns to standby.
25
Page 34

HINT
To move to a menu,
use either the ▲ (up)
or ▼ (down) key.
PIN Calling Menu
▼
To change the PIN:
1) To go to the security menu from
menu
standby, press
.
2) Press ▼three times.
menu
3) Press
.
4) Press ▼.
HINT
To exit menu mode,
press
endorclear
.
menu
menu
.
.
5) Press
6) Press
7) Enter your password. The factory
pre-set password is 0123.
8) Enter the new PIN. The factory
pre-set PIN is 0000.
menu
9) Press
again.
In two seconds, the display returns to standby.
To Turn On or Off the PIN:
1) Follow steps 1 through 4 above.
2) Press ▼.
menu
3) Press
.
4) Use the ▼or ▲ keys to choose between on or off.
menu
5) Press
again.
In two seconds, the display returns to standby.
26
Page 35

HINT
To move to a menu,
use either the ▲ (up)
or ▼ (down) key.
HINT
To exit menu mode,
press
endorclear
.
CALL TIMERS MENU
Call timers keeps count of the time (hours, minutes and
seconds) that you have used the phone. Reset when you
want. Can be for one call, totals calls on line 1 and/or
line 2.
Current Call Menu
▼
1) To go to the call timers menu from
menu
standby, press
2) Press ▼four times.
menu
3) Press
menu
4) Press
.
.
again.
MENUS
5) Use the ▼or ▲ keys to choose between
6) Press
menu
again. You will see:
In two seconds, the display returns to standby.
ON or OFF.
27
Page 36

HINT
Show Last Call Time Menu
▼
1) To go to the call timers menu from
menu
standby, press
.
To move to a menu,
use either the ▲ (up)
or ▼ (down) key.
HINT
To exit menu mode,
press
endorclear
.
2) Press ▼four times.
menu
3) Press
.
4) Press ▼.
menu
5) Press
. The length of your last
call displays.
menu
6) Press
to return to standby.
28
Page 37

HINT
All Calls Menu
▼
1) To go to the call timers menu from
menu
standby, press
.
To move to a menu,
use either the ▲ (up)
or ▼ (down) key.
HINT
To exit menu mode,
press
endorclear
.
TIP
There are two
independent timers for
each phone line.
2) Press ▼four times.
menu
3) Press
.
4) Press ▼twice.
menu
5) Press
.
6) Use the ▼ or ▲ keys to choose between SHOW TIME or RESET.
7) Press
menu
.
• If you choose SHOW TIME
you will see:
Press
menu
to return
to standby.
•
If you choose RESET, you will be prompted for your password.
When you enter the password, you will see RESET.
menu
Press
In two seconds, the display returns to standby.
again.
MENUS
29
Page 38

HINT
SERVICE SETTINGS MENU
Phone Line Menu
▼
1) To go to the service settings menu
menu
from standby, press
.
To move to a menu,
use either the ▲ (up)
or ▼ (down) key.
HINT
To exit menu mode,
press
endorclear
.
TIP
Contact your service
provider to set up line 1
and line 2.
2) Press ▼five times.
menu
menu
.
again.
3) Press
4) Press
5) Use the ▼or ▲ keys to choose
LINE 1 or LINE 2.
between
6) Press
menu
again. You will see:
In two seconds, the display
returns to standby.
30
Page 39

HINT
Network Menu
▼
1) To go to the service settings menu
menu
from standby, press
.
To move to a menu,
use either the ▲ (up)
or ▼ (down) key.
HINT
To exit menu mode,
press
endorclear
.
2) Press ▼five times.
menu
3) Press
.
4) Press ▼.
menu
menu
menu
.
SELECT or BLOCK.
SELECT.
again.
A ONLY, B ONLY,
.
5) Press
6) Use the ▼or ▲ keys to choose between
Example: choose
7) Press
8) Use the ▼or ▲ keys to choose between
HOME ONLY, PREFERRED SYSTEM, A PREFER B or B PREFER A.
9) Press
In two seconds, the display returns to standby.
MENUS
31
Page 40

SpecificationsSPECIFICATIONS
Channels: 832
Frequency Range: Transmit: 824.04 to 848.97 MHz
Receive: 869.04 to 893.97 MHz
Channel Spacing: 30 kHz
Duplex spacing: 45 MHz
Frequency Stability: +/- 2.5 ppm
OF YOUR PHONE
Receiver Sensitivity:
-116 dBm at -4°F (-20°C)
to +122°F (50°C) 3.7V +/- 10%
-113 dBm at -22°F (-30°C)
to +140°F (60°C) 3.7V +/- 10%
ERP: 0.6 W - 6.3 mW (6 levels in 4dB steps)
Modulation: Data - FSK Voice - FM (with compander)
Display: Illuminated Liquid Crystal
Power: 3.7 VDC +/- 10%
Battery Drain:
Standby: 53 mA (Typical), (approx. 11 hours)
TX: 600 mA (Typical), (approx. 1 hour)
Operating Temperature: -22°F (-30°C) to +140°F (60°C)
Battery Packs:
standard: 580 mAH Lithium-ion (MC580L)
optional:
580 mAH nickel metal hydride (MC580N)
850 mAH Lithium-ion (MC850L)
Size of Phone and Battery (with antenna stored):
5 1/2 inches (13.97 cm) H
x 1 1/3 inch (3.39 cm) W
x 1 inch (2.54 cm) D
Weight: 4.23 oz. (119.2 g)
32
Specifications, features, and availability of
optional accessories are all subject to change
without prior notice.
SPECIFICATIONS
Page 41

OptionalAccessoriesACCESSORIES
FOR YOUR PHONE
Car Power Adapter
MC2004
Rechargeable Battery
580 mAH nickel metal
hydride (MC580N)
Extended Life
Rechargeable Battery
850 mAH Lithium-ion
(MC850L)
• Leather Case with Beltclip
MC2005
Rechargeable Battery
580 mAH Lithium-ion
(MC580L)
ACCESSORIES
ACCESSORIES
33
Page 42

34
FOR YOUR PHONE
WARRANTY
ONE YEAR LIMITED WARRANTY
Important: Evidence of original purchase is
▼
required for warranty service.
WARRANTOR: UNIDEN AMERICA CORPORATION (“Uniden”)
ELEMENTS OF WARRANTY: Uniden warrants, for one year, to
the original retail owner, this Uniden Product to be free from
defects in materials and craftsmanship with only the limitations
or exclusions set out below.
WARRANTY DURATION: This warranty to the original user shall
terminate and be of no further effect 12 months after the date of
original retail sale. The warranty is invalid if the Product is (A)
damaged or not maintained as reasonable or necessary, (B)
modified, altered, or used as part of any conversion kits,
subassemblies, or any configurations not sold by Uniden, (C)
improperly installed, (D) serviced or repaired by someone other
than an authorized Uniden service center for a defect or
malfunction covered by this warranty, (E) used in any conjunction
with equipment or parts or as part of any system not manufactured
by Uniden, or (F) installed or programmed by anyone other than as
detailed by the owner’s manual for this product.
STATEMENT OF REMEDY: In the event that the product does not
conform to this warranty at any time while this warranty is in
effect, warrantor will either, at its option, repair or replace the
defective unit and return it to you without charge for parts, service,
or any other cost (except shipping and handling) incurred by
warrantor or its representatives in connection with the
performance of this warranty. Warrantor, at its option, may replace
the unit with a new or refurbished unit. THE LIMITED WARRANTY
SET FORTH ABOVE IS THE SOLE AND ENTIRE WARRANTY
PERTAINING TO THE PRODUCT AND IS IN LIEU OF AND EXCLUDES
ALL OTHER WARRANTIES OF ANY NATURE WHATSOEVER,
WHETHER EXPRESS, IMPLIED OR ARISING BY OPERATION OF LAW,
INCLUDING, BUT NOT LIMITED TO ANY IMPLIED WARRANTIES OF
MERCHANTABILITY OR FITNESS FOR A PARTICULAR PURPOSE.
THIS WARRANTY DOES NOT COVER OR PROVIDE FOR THE
REIMBURSEMENT OR PAYMENT OF INCIDENTAL OR
CONSEQUENTIAL DAMAGES. Some states do not allow this
exclusion or limitation of incidental or consequential damages so
the above limitation or exclusion may not apply to you.
LEGAL REMEDIES: This warranty gives you specific legal rights,
and you may also have other rights which vary from state to
state. This warranty is void outside the United States of America.
PROCEDURE FOR OBTAINING PERFORMANCE OF WARRANTY: If,
after following the instructions in the owner’s manual you are
certain that the Product is defective, pack the Product carefully
(preferably in its original packaging). The Product should
include all parts and accessories originally packaged with the
Product. Include evidence of original purchase and a note
describing the defect that has caused you to return it. The
Product should be shipped freight prepaid, by traceable means
to warrantor at:
Uniden America Corp.
4700 Amon Carter Blvd.
Ft. Worth, TX 76155
(800) 364-1944
8 a.m. to 5 p.m. Central, Monday through Friday
Page 43

KeysandDisplay
AND DISPLAY
Page 44

 Loading...