

Page 1

QUICK START GUIDE
Uniden 160P and 165P
Quick Start Guide for Uniden 160P and 165P
when used with 8x8 Virtual Oce
Version 2.0, May 2010
Your new Uniden 160P and 165P phone will only operate
once you have activated your 8x8 Virtual Oce account.
Page 2

QUICK START GUIDE
Uniden 160P and 165P
This Quick Start Guide assumes you have the following
items available:
• Broadband Internet service
• Computer with an Ethernet port
• CAT-5 Ethernet cable (RJ-45)
• An 8x8 Virtual Oce account
1. Check the package contents
Make sure the package contains the following items:
• UIP160P or UIP165P main base
• Cordless handset
• One AC power adapter
• Rechargeable battery pack
• One CAT-5 Ethernet cable (RJ-45)
• Belt clip
Page 3
QUICK START GUIDE
Uniden 160P and 165P
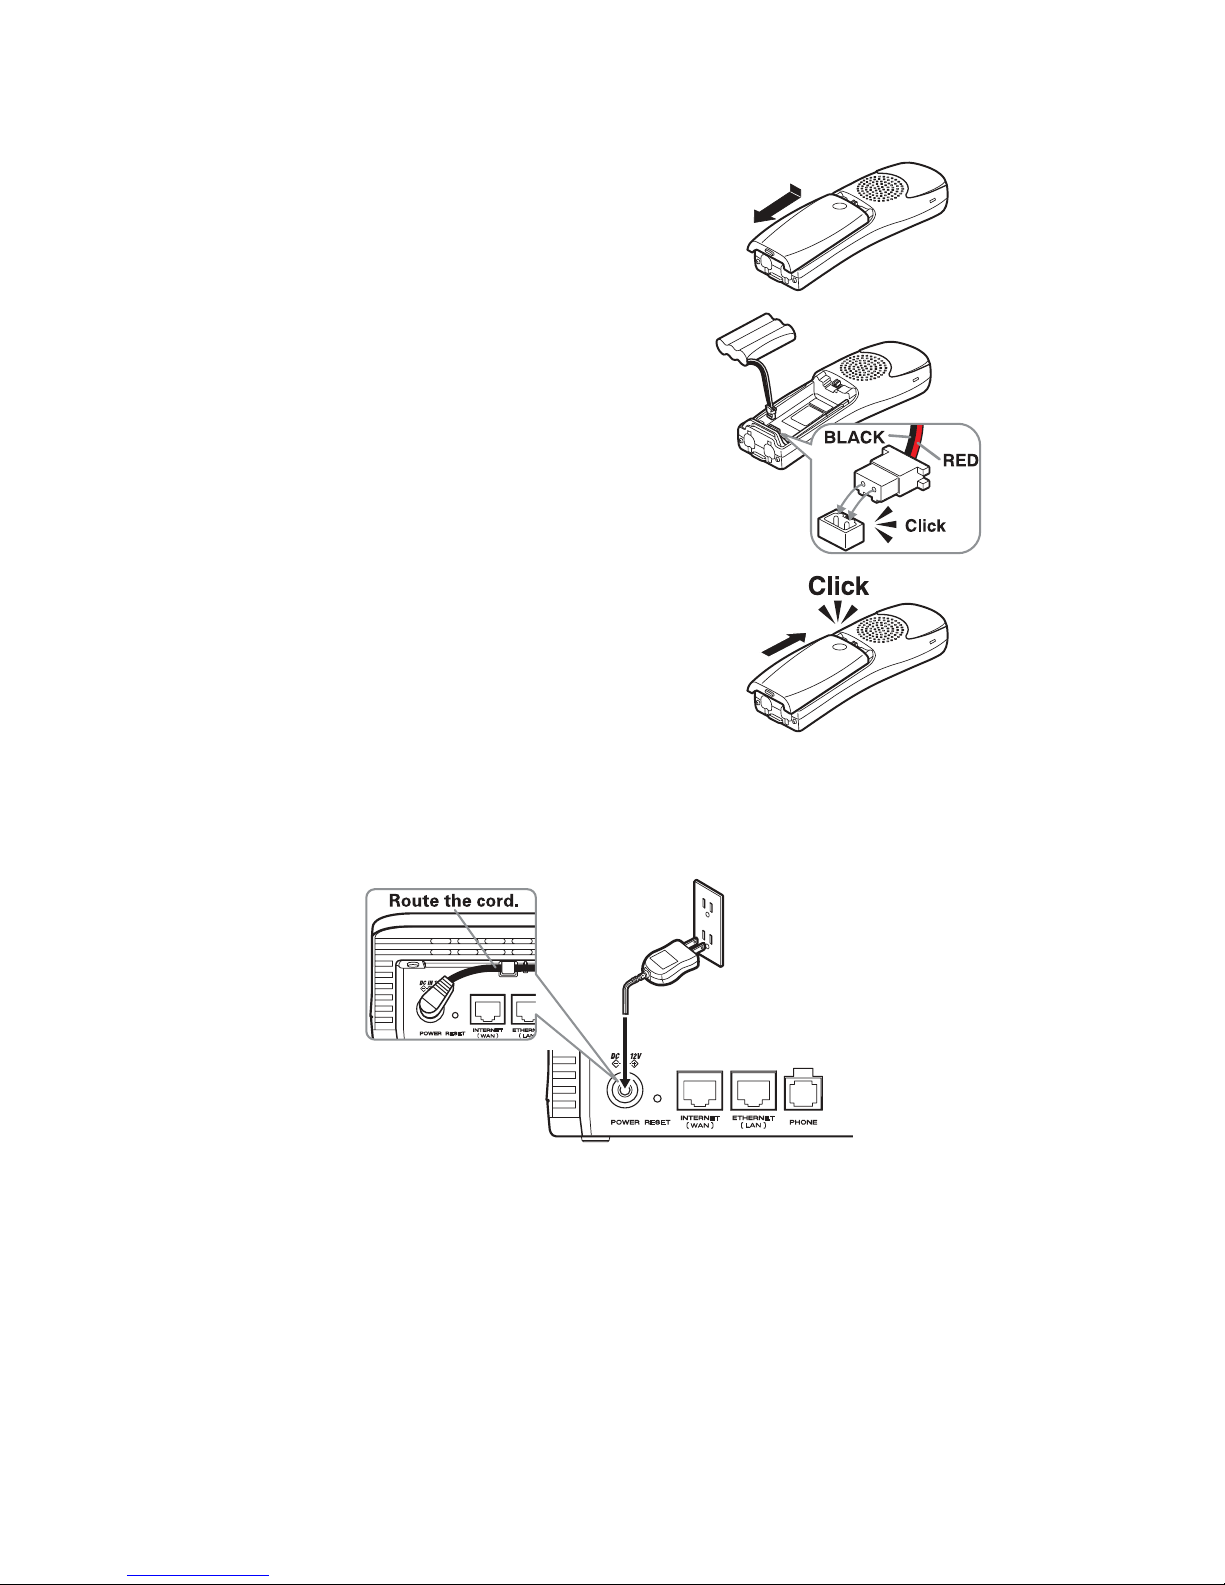
2. Install and charge the handset battery pack
a. Remove the cover.
b. Connect the battery pack, making
sure to line up the red and black wires
with the red and black markings near
the jack.
c. Replace the cover.
CAUTION: Use ONLY Uniden rechargeable battery pack BT-446.
d. Charge the cordless handset.
• Use the AC adapter to connect the port labeled POWER to a 120 Vac continuous power outlet.
• Place the handset in the base. Make sure that the charge LED illuminates. Charge the handset
for 15-20 hours.
CAUTION: Use ONLY Uniden AC adapter AD-0009.
NOTE: Fully charge the handset battery pack before connecting to the Internet (WAN).
Page 4
QUICK START GUIDE
Uniden 160P and 165P
3. Connect the UIP160P or UIP165P to your network
a. Use the included Ethernet cable to connect your broadband modem to the RJ-45 port
labeled Internet/(WAN). Recommend (If you already have a router installed, please use the
RJ-45 cable to connect from an available LAN port on your router to the WAN port on the
UIP 160P/165P instead).
b. We recommend connecting your computer directly to your existing network router or
switch. However, it is possible to connect your PC directly to the Uniden RJ-45 port
labeled Ethernet/(LAN).
c. If you want to share the line with another phone, use a telephone cord to connect a phone
to the RJ-11 port labeled Phone.
CAUTION: Do not connect the UIP160P or UIP165P port that is labeled Phone to a
regular telephone company wall jack.
d. All the LEDs will ash three times, and the pwr LED remains on. The link LED should come
back on in a few seconds.
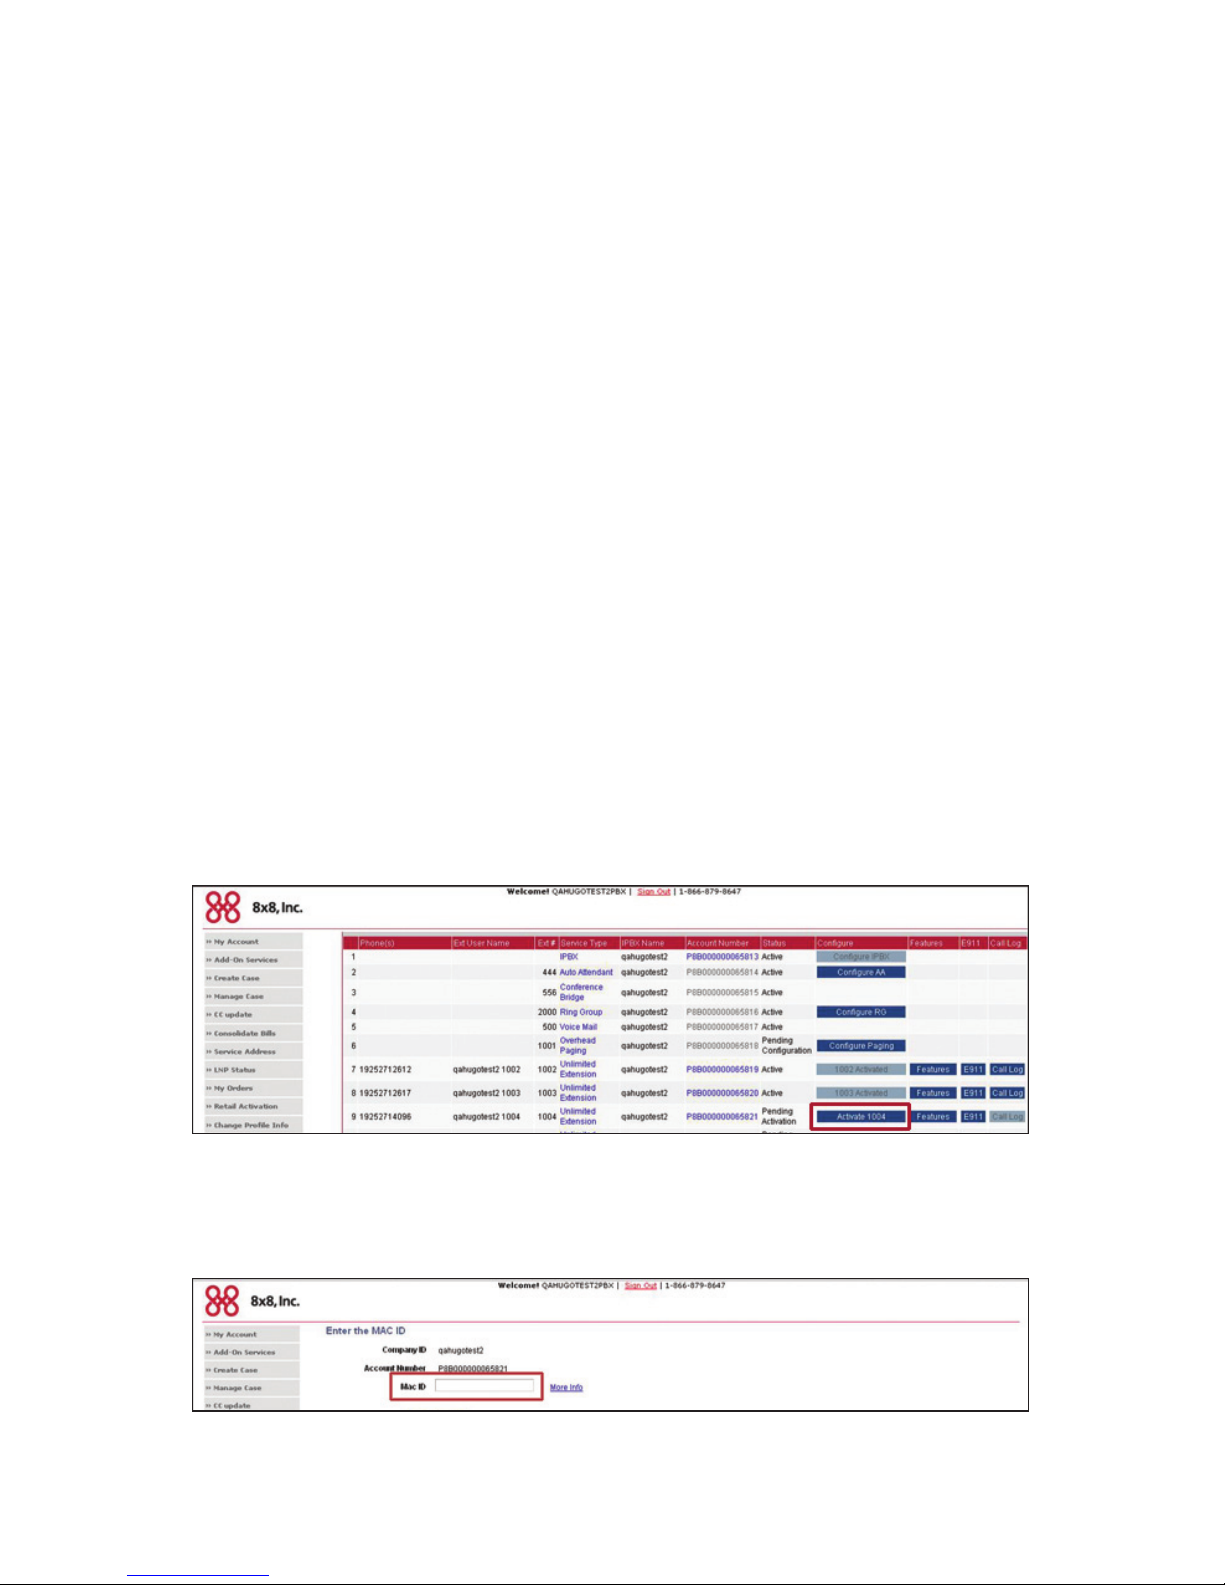
4. Activate your UIP160P or UIP165P on your 8x8 Virtual Oce Account
a. Login to your 8x8 Self Service Portal at www.8x8.com/login using your 8x8 user name
and password.
b. From the list of extensions, click on the one you want to activate.
c. Enter the MAC address of your UIP160P or UIP165P set (located on the bottom of your
set MAC: XXXXXXX) and click Submit.
For more information on activating your 8x8 Virtual Oce account also refer to your Virtual
Oce Quick Start Welcome Kit Guide for more information.
Page 5

QUICK START GUIDE
Uniden 160P and 165P
Conguring the UIP160P and UIP165P for PPPoE or static IP address
If you connected your phone directly to your broadband modem and did not get a
dial tone, you might need to congure the phone to use PPPoE (Point to Point Protocol over
Ethernet) or a static IP address to connect to your Internet service provider. If you don’t have the
conguration information, contact your service provider to determine the proper settings for a
PPPoE account or a static IP.
You might have PPPoE if...
• You use DSL to connect to the Internet.
• You enter a user name and password when you connect to the Internet.
• You use a special program (other than your web browser) to connect to the Internet.
or
You might have static IP if...
• You made arrangements with your ISP to support a web server, FTP server, bulletin board,
mailing list, or other Internet server application on your network.
• You had to congure an IP address on your PC when you rst connected to the Internet.
1. Open the conguration utility
a. Connect a computer with a web browser directly to the Ethernet (LAN) port.
b. Open a web browser window. Type http://192.168.88.1 in the address bar and
press Enter.
c. When the phone prompts you for a password, type admin (all lower case) and
press Enter.
Page 6

QUICK START GUIDE
Uniden 160P and 165P
d. The rst screen you see is the System Information screen.
e. In the menu bar at the left side of the screen, select WAN. This opens the WAN
Status screen.
2. Congure for PPPoE
a. In the menu bar at the top of the screen, select PPPoE. This opens the WAN PPPoE
Conguration screen.
Page 7

QUICK START GUIDE
Uniden 160P and 165P
b. Select Enable PPPoE, and enter the user name and password assigned to you by
your ISP.
c. If your ISP requires it, enter the service name and account name.
d. Click Save PPPoE Settings.
or
a. In the menu bar at the top of the screen, select WAN Settings. This opens the WAN
Conguration screen.
b. Select the radio button beside Specify static WAN conguration.
a. Enter your assigned IP Address, Subnet Mask, Gateway, and DNS Servers. If you wish, you
can also enter a host name and domain name.
b. Click Save WAN Settings.
3. Let the UIP160P or UIP165P reboot
You will see a dialog box telling you the UIP160P or UIP165P must reboot to activate the
settings. Wait until the LEDs ash three times and the pwr LED stays on. The link LED should
come back on in a few seconds. If does not, make sure your your broadband modem is directly
connected to the Internet/WAN port, and reboot the phone again.
4. Activate your 8x8 service
Follow the instructions provided earlier to activate your 8x8 service.
Page 8

QUICK START GUIDE
Uniden 160P and 165P
Using Your 8x8 Virtual Oce Service
The 160P / 165P Virtual Oce features are accessed with Flash and * codes.
– The Flash refers to use of the Flash Key (also the Talk Key on the handset) which sends
a short switch hook ash.
– The * refers to use of the * key in the dialing pad.
FEATURE OPERATION ON UNIDEN UIP160P / UIP165P:
Calling
Placing a Call
Extension to extension.
Enter the extension number and pick up the handset or press Speaker icon.
Outbound calls
Enter the phone number and pick up the handset or press Speaker icon.
• Local Call – (Phone Number)
• Long Distance – (Area Code) (Phone Number)
• International – 011 (Country Code) (Phone Number)
While on another call
Press Flash 1 to initiate a new call. The rst call will be automatically placed on hold.
To alternate between calls, Press Flash *.
Through Virtual Oce Online
Login into your Virtual Oce Online account, change your I’m calling from: status to Desk
Phone, click on the phone number of a contact, pick up the call from your phone and wait for the
call to connect.
Page 9

QUICK START GUIDE
Uniden 160P and 165P
Answering a Call
New call
Pick up handset or press the Speaker icon.
While on another call
Press Flash * to retrieve a new incoming call. The rst call will automatically be placed on hold.
To alternate between calls, Press Flash *
Ending a Call
Put your handset on the hook or Disconnect your headset or Press END.
Voicemail
Listen to Voicemail
Dial 555 or Dial 500 from another phone in your company or dial your phone number from any
other phone. Press # and enter your voicemail password and press # again.
Forward Voicemail
1. When listening to a voicemail, press 0 to access voicemail options.
2. Press 2 and enter an extension number to forward the voicemail to an extension.
Call Transfer
Direct “cold” Call Transfer
This transfers a call directly to a second number, you never speak to the second number.
To cold call transfer a call to a new number
1. Press Flash 5. This puts the rst caller on hold.
2. Enter the second number and then press Flash 5.
Supervised “warm” Call Transfer
This transfers the call to a second number after you rst speak privately with the
second number.
To warm transfer an existing call to a new number
1. Press Flash 1 to put the rst caller on hold.
2. Dial the second number. Talk to the second number.
3. Press Flash 4 to transfer the caller to the second number.
Page 10

QUICK START GUIDE
Uniden 160P and 165P
Hold (and Make a second call)
1. Press Flash 1 when on a call.
2. The rst call will be automatically placed on hold (and you will hear a dial tone).
3. You can place a Second Call now if you like, else just stay on hold while hearing dial tone.
4. To alternate between the two calls, Press Flash *.
5. To retrieve a held call, press *1.
Redial
Press Redial key. Scroll and select the number you wish to dial and press Talk or speaker icon.
Conf.
Conferencing allows you to join up to two callers into a conference via your phone.
When a call is already in progress
Press Flash 7 to add a party for a 3-way conference.
Press Flash 7* to drop the added party from a 3-way conference.
When calls have not yet been initiated
1. Get the rst caller on the line.
2. Follow the steps above.
Ending a conference
To end a conference, just hang up.
Call Forwarding
Call Forwarding allows you to forward your phone calls to another destination.
Turn on Call Forwarding
1. Go o hook.
2. Press *2.
3. Enter the destination phone number.
4. Hang up.
Page 11

QUICK START GUIDE
Uniden 160P and 165P
Turn o Call Forwarding
1. Go o hook.
2. Press *3.
3. Hang up.
Call Pickup
You can pickup an incoming call to a specic extension NNNN from your own extension. Dial *5
NNNN to pickup an incoming call to extension NNNN.
DND
Activating DND prevents incoming calls from ringing your phone.
Turn on DND
Press *8 to activate.
Turn o DND
Press *9 to turn it o.
Intercom (between Uniden handsets)
Intercom on the 160P and 165P allows you to communicate with your other Uniden extensions
or the base speakerphone that are sharing the same line (phone number).
Making an Intercom call
1. Press “Intcom” key to intercom with another handset.
2. Select A Handset or Select all Handsets from the Menu.
Receiving an Intercom call
1. You will hear a beep, when an intercom call comes through to you.
2. Press Talk or the Speaker icon to answer an Intercom call.
Page 12

NASDAQ: EGHT
www.8x8.com
© 2010. The 8x8, Inc. logo are registered trademarks of 8x8, Inc. 8x8, Inc. is a publicly traded company. PM302/510
Quick reference guide to function access codes
QUICK REFERENCE GUIDE TO FEATURE DIALING CODES ON UNIDEN 160P / 165P
Flash 1 Place a Call on Hold (and Make a second call if you want)
*1 Retrieve a Call from Hold
Flash * Alternate between 2 calls / Retrieve a new incoming call
Flash 5 Direct Call Transfer (aka 1-step “cold” call transfer)
Flash 4 Supervised Call transfer (a 2-step “warm” call transfer)
*5 NNNN Pick up an incoming call to a extension NNNN from your own
extension
*8 Turn DND on
*9 Turn DND o
*2 Set an “Always” Call forwarding rule
*3 Remove the “Always” Call forwarding rule
Flash 7 Add a party for a 3-way conference
Flash 7* Drop the added party from a 3-way conference
Support:
Refer to: http://www.8x8.com/Support/BusinessSupport/Documentation.aspx for additional
information.
• Customer Service, toll-free: 1.888.898.8733
• Customer Service, outside U.S.: 1.408.687.4120
 Loading...