

Unicorn DPF2401 Users Manual

Instruction Manual
for
Digital Photo Frame
Minimum System Requirements:
Hardware:
PC with Intel Pentium 4
128 MB RAM
50 MB Hard Drive Space
CD-ROM Drive
Software:
Microsoft Windows XP with internet connection
Digital Photo Frame – PC Link (included in the supplied CD)
IMPORTANT INFORMATION
DO NOT CONNECT YOUR DIGIT PHOTO FRAME TO YOUR
COMPUTER UNLESS YOU HAVE READ THOROUGH THIS
INSTRCUTION MANUAL. FAIL TO DO SO MAY RESULT IN
PRODUCT DAMAGE.
THIS IS NOT A USB STORAGE DEVICE. YOU CANNOT STORE OR
ACCESS ANY FILE IN THIS DEVICE DIRECTLY.
IMAGES FILES IN THIS DEVICE CAN NOT BE BROWSED OR
VIEWED BY PROGRAMS OTHER THAN THE ONE PROVIDED.
NEVER ATTEMPT TO FORMAT THIS DEVICE. IT MAY DAMGE THE
DEVICE PERMANENTLY.
1
1 Main Features:
Digital Photo Frame
Clock with calendar
Daily Alarm
Auto power off
1.5V AAA battery x 2
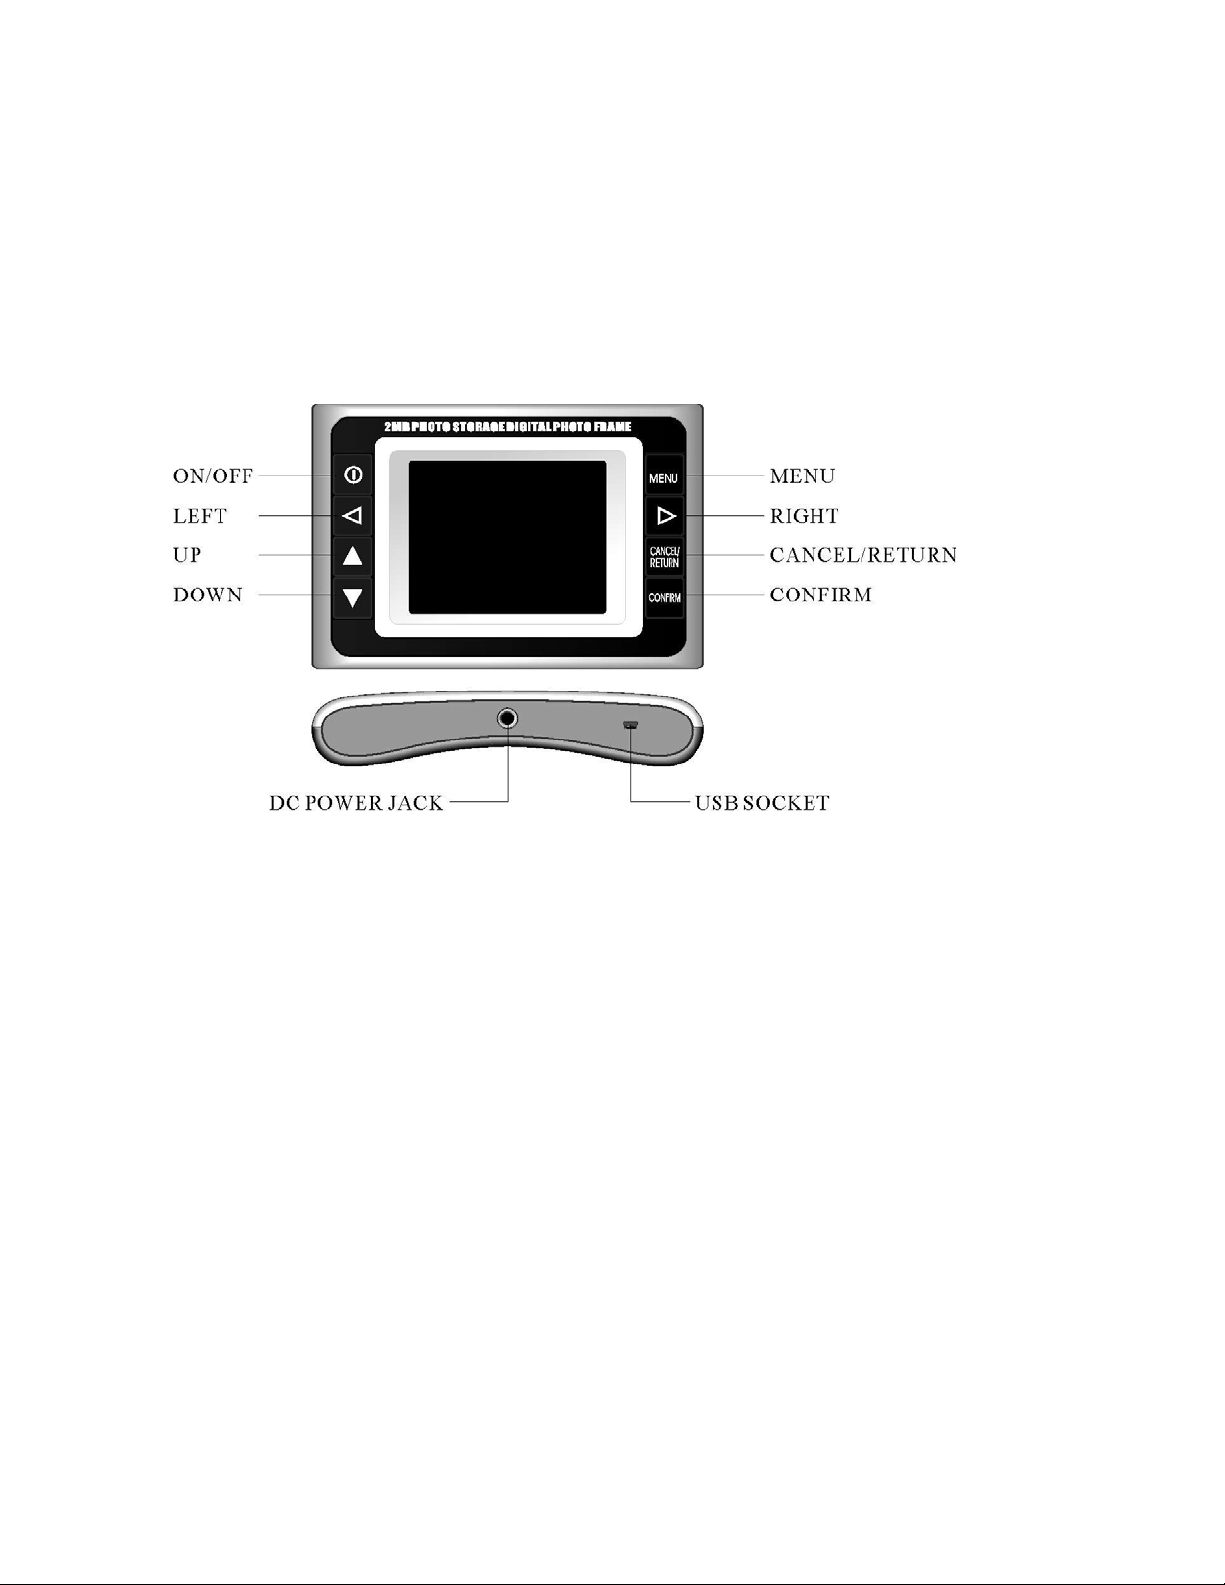
2 Keypad Layout
UP Item switch Value increase while inputting
DOWN Item switch Value decrease while inputting
LEFT Press to show previous photo in Gallery mode
RIGHT Press to show next photo in Gallery mode
MENU Press to switch among Clock, Alarm, Gallery and Setup mode
Press and hold to enter SETTING screen
ON/OFF Press and hold to turn on or off
CONFIRM Press to confirm the selection
CANCEL/RETURN Press to cancel or return previous menu
2.1 Using the Photo Frame for the First time
Remove the battery door from the back of the unit and insert new AAA batteries into
the battery compartment. LCD is turned on and then it will enter Clock mode.
Default date is 2007 Jan 1, 12:00 AM
2.2 Power ON
To turn on the device when it is power off, press and hold ON/OFF key. Press and
hold ON/OFF to turn off the unit again.
(Option: If DC power is used, auto power off function will be disabled.)
2
2.3 Mode
There are 4 modes: Clock, Alarm, Gallery and Setup.
Press MENU key to switch between each mode
Clock -> Alarm -> Gallery -> Setup
2.4 Clock
12:00
01 /JAN Mon
Time, date and week will be shown on clock mode
In case if the Alarm is turned on, a
right corner.
2.4.1 Setting Date and Time
In CLOCK mode, press and hold the CONFIRM key for 2 seconds to edit
Year digits flashing.
2007
01 / JAN
Press UP or DOWN key to select year (2000~2099)
Press CONFIRM key to confirm year. Then start set day
2007
01 / JAN
A
icon is appeared on the top
Press UP or DOWN key to select day.
Press CONFIRM key to confirm day. Then start set month
2007
01 / JAN
Press UP or DOWN key to select month.
Press CONFIRM key to confirm month. Then start set hour
12:00
01 / JAN
Press UP or DOWN key to select hour.
Press CONFIRM key to confirm hour. Then start set minute
A
3

12:00
01 / JAN
Press UP or DOWN key to select minute.
Press CONFIRM key to confirm minute. Then go back to clock mode.
A
2.5 Alarm
In CLOCK mode, press MENU key one time to enter ALARM mode.
2.5.1 Setting Alarm
Press and hold CONFIRM key for 2 seconds to edit the alarm time.
Hour digits will flash together with the AM/PM mark.
Press UP or DOWN key to select hour.
Press CONFIRM key to confirm hour. Then start set minute
12:00
01 /JAN Mon
12:00
12:00
A
A
A
12:00
Minute digits will flash.
Press UP or DOWN key to select minute.
Press CONFIRM key to confirm and back to Alarm mode.
12:00
2.5.2 Enable/disable alarm
Press RIGHT key to turn on Alarm. icon will be shown on the top
right corner to represent the Alarm function is turned on.
Press LEFT key to turn off Alarm icon will be turned off
2.5.3 Alarm tone
When Alarm in enabled and alarm time reach, Alarm tone will come out
for 1 minute. ( Beep…Beep…Beep….)
icon will be flashing
A
A
4
 Loading...