

Page 1
Wireless Doorbell with Standard or Illuminated Chime
Models Covered: 250-016 & 250-033
Pack Contents
· Blue Doorbell unit with 1 x TX15 Allen Key & 2 x Anti-tamper Screws
· Transmitter unit (with double sided sticky pad)
· Standard Door Chime Unit (complete with wall fixings)
· 2 x AA Battery
OR
· Blue Doorbell unit with 1 x TX15 Allen Key & 2 x Anti-tamper Screws
· Transmitter unit (with double sided sticky pad)
· Illuminating Door Chime Unit (complete with wall fixings)
· 2 x C Battery
Product Overview
The wireless Doorbell uses radio frequency (RF) technology to activate a separate door chime unit, with the
Doorbell acting as the transmitter (once fitted) and the door chime unit as the receiver. There are over 250 RF
channels that the Doorbell and door chime unit can operate on and the units come supplied with a standard
factory default channel setting. Channel settings can easily be changed and further details on this can be
found in the Channel Set up section.
The Doorbell has been designed to be attached to the outside of the designated entrance with the supplied
transmitter wired into it from the inside. By pressing the button on the outside Doorbell, the Doorbell transmits
the signal to the door chime receiver and the chime will activate.
Please read and follow the instructions below before attempting to activate or install your Doorbell and door
chime. It is recommended that you retain a copy of these instructions for future use.
Initial Set up Instructions
1. Check contents of pack and ensure all components listed are present. Contact your suppliers if anything
is missing.
2. Before permanently fitting the Doorbell and door chime unit into place, first test the system. Wire the
transmitter into the back of the Doorbell by attaching the positive white wire to terminal A and the grey
wire to terminal C (ensuring the correct polarity). Then activate the battery in the transmitter by removing
the battery pull out tag located on the side of the unit and then insert the supplied batteries into the door
chime (please see To fit or replace batteries below). Please note the battery in the transmitter should
be activated before inserting the batteries into the door chime. With the batteries activated, this enables
the pairing of the system. A double beep will be heard to indicate a successful pairing. At this point press
the button on the Doorbell within 30 seconds to confirm activation.
3. With a successful pairing of the two devices, you may proceed with the fitting of the Doorbell and door
chime units as described (please see Doorbell & Transmitter Fitting Instructions below). Remember
you will need to remove the wires from the Doorbell terminals A & C and reattach them to the Doorbell
when permanently fitting the device into place.
4. Should the units not pair, please remove the batteries from the door chime for 30 seconds. Then
re-insert the batteries at which point a double beep will be heard. This indicates that a successful pairing
has been achieved and the Doorbell button should be pressed within 30 seconds to confirm the
activation. If this process fails to pair the devices, please refer to the Trouble Shooting Guide and
User Hints section.
Please note the Doorbell has a built in anti-annoyance feature that restricts the activation of the device, please
read the Operation section for more details.
Page 2
Doorbell Unit
Requires 1 x CR2032 3v battery (fitted)
This aluminium vandal proof doorbell has been designed to be positioned
outdoors and works in conjunction with the indoor transmitter and door
chime provided.
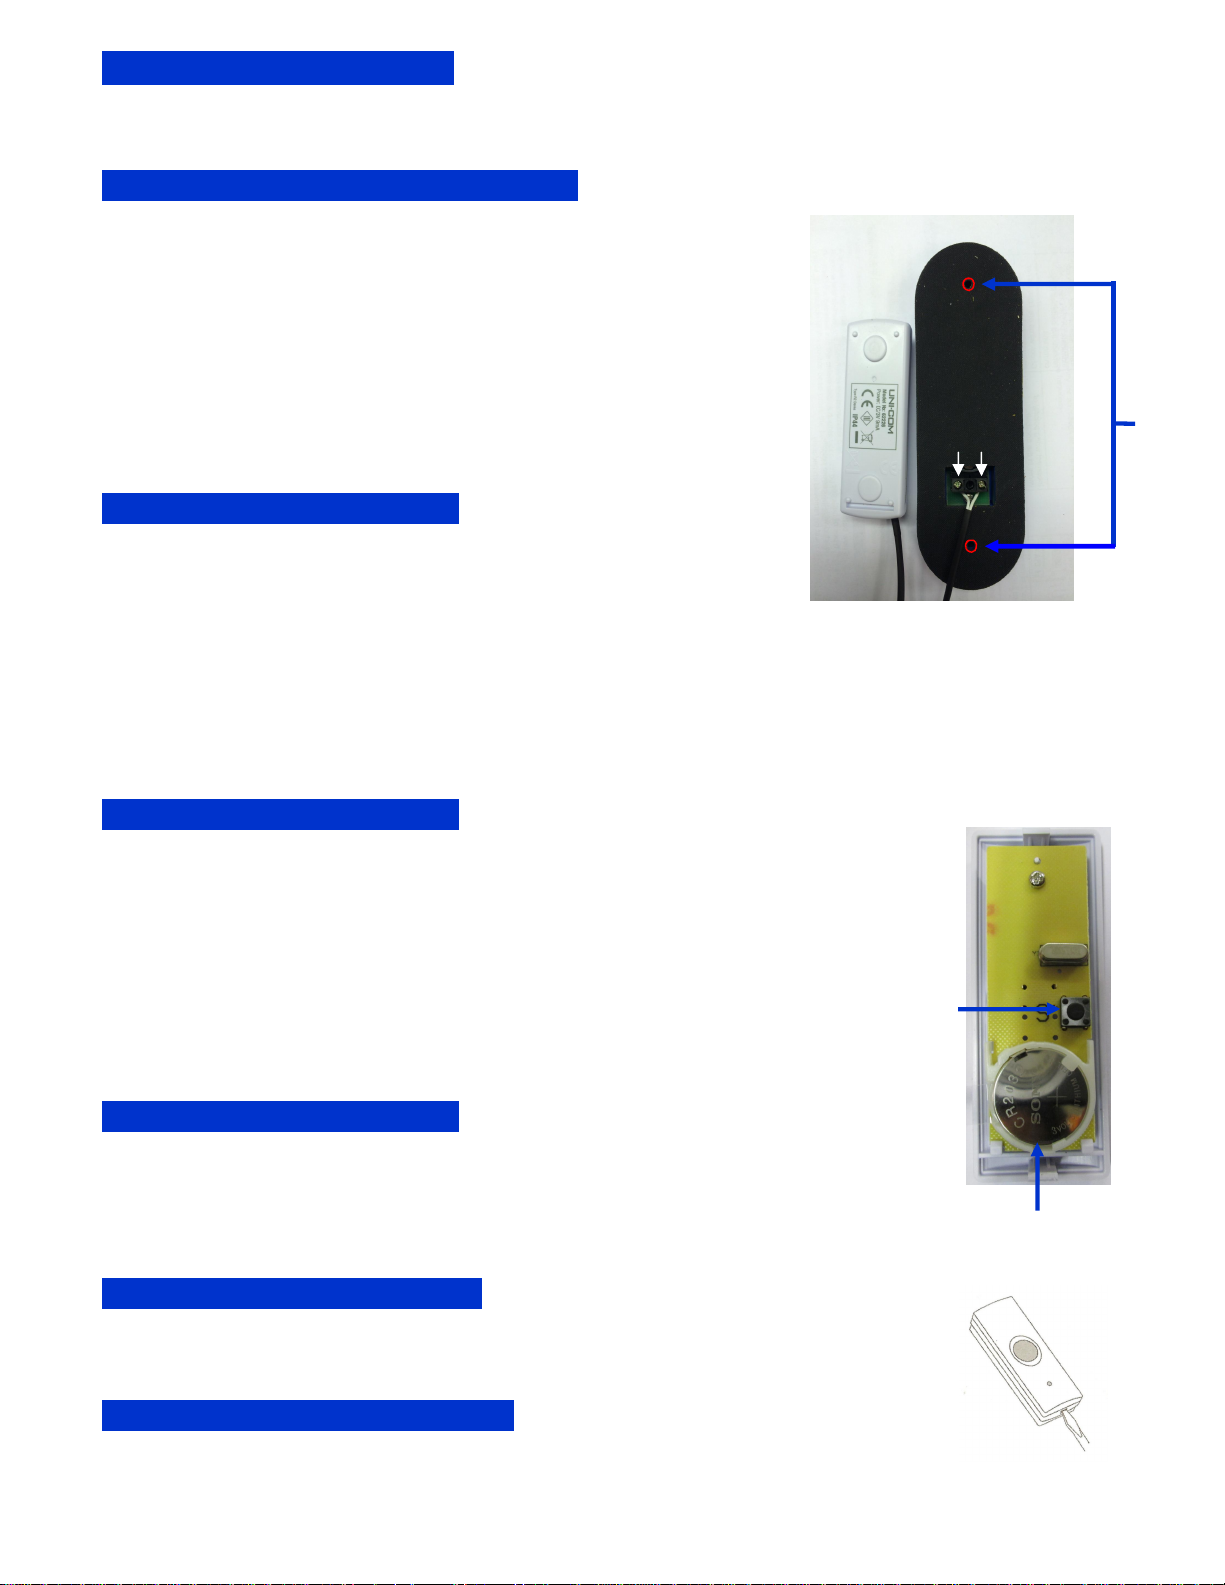
Doorbell & Transmitter Fitting Instructions
Rear View Image of Transmitter and Doorbell
· Feed the transmitter wires through the wall or door frame - drill hole if
required. If necessary extend the length of the wires to the transmitter
if they are not long enough to pass through the width of the door/
window frame to which the device is being attached.
· Fix transmitter unit indoors using the double sided sticky pad
Provided.
· Mark and drill holes (if necessary) to mount the Doorbell.
· Fit the transmitter wires to the Doorbell terminals, attaching the positive
white wire to terminal A and attach the grey wire to terminal C
(ensuring correct polarity) and using the appropriate anti-tamper
A C
screws mount the Doorbell outside.
Positioning and Fixing the Chime
It is recommended that before permanently wall mounting the
chime first test the operation of the unit in the chosen location.
The chime unit can be free standing or wall mounted with the screws
provided
1. Insert the batteries into the Door Chime Unit (see fitting instructions overleaf)
2. Position the door chime unit where is can be heard
3. Site the chime unit in the desired position
4. Drill the hole as required
5. Fit the wall plug provided and insert the screw, leaving 5mm between the wall and screw head.
6. Locate the keyhole slot on the back of the chime unit and slide downwards to fix in place.
Fixing
Holes
Tone set up
Image of Transmitter with cover removed
The tone selector is a small black button located inside the transmitter unit (shown in
diagram). To remove the cover insert a flat headed screwdriver into the locking slot and gently
twist, see figure 1. The tone is preset at factory to the ‘ding dong’ chime. If you wish to
change the tone , press and release the button until the desired tone is heard. The last one
heard is the one retained within the units memory.
1. Westminster 4. Circus Theme 7. It’s a small world
2. Ding Dong 5. Banjo on my knee 8 Dog Barking
Tone
Selector
3. Telephone 6. Twinkle Twinkle
Operation
Touch the push button once; The door chime unit will sound (and flash if illuminated version)
then stop as soon as the melody ends. For the chime to sound again, the push button must be
touched again.
Note: The doorbell unit features an anti-annoyance feature where by the unit will not
re-activate for a period of 30 to 40 seconds.
Transmitter Unit
Requires 1 x CR2032 3v battery (fitted)
To fit or replace battery: Remove the back of the case by inserting a flat headed screwdriver
into the locking slot and gently twisting, see figure 1. Insert the battery positive side up. Refit
the front of the unit.
CR2032 Battery
3V (supplied)
Transmitter Specification
Power : 1 x 3V Lithium battery (CR2032) Factory fitted
Consumption : 15mA - on / 0.003mA - Off
Figure 1
Page 3

Standard Door Chime Unit
Requires 2x1.5v batteries (supplied)
To fit or replace batteries: Slide open the battery cover, insert the batteries into the battery compartment
ensuring the battery polarities match the internal markings. Refit the battery cover.
If the chime no longer operates or the LED no longer operates on the transmitter unit, the batteries should be
replaced
Please note batteries should be inserted into the transmitter unit before the door chime unit. This enables the
pairing of the system. A double beep will be heard to indicate pairing successful. Touch the push button within 30
Specification
Consumption : 2 x 1.5v AA (MN1500) Chime Sound 80mA
Operating Temperature : -10°C to +40°C
Operating Distance : Max 80 Meters (262ft) approx line of sight
Selectable Tones : 8 Selectable melodies
Channel Set up
The unit comes from the factory on a pre-set radio frequency channel. However, should your door chime activate
intermittently for no reason at all it is possible that a similar unit is operating nearby on the same frequency.
To change the channel:
1. Remove the batteries from the chime unit
2. Remove the back of the transmitter unit case by pushing the tab on the bottom with a small flat screwdriver.
See figure 1.
3. Remove and refit the CR2032 battery
4. Snap the front cover back on
5. Refit the batteries into the chime unit. A double beep will be heard
6. Operate the doorbell to confirm the new code is working
Page 4

Illuminated Chime Product Features
The flashing door chime has 3 modes and 8 Sounds
Mode Sounds
· Chime Only ( Default)
· Chime & Flashing
· Flashing only
· Westminster · Tubular 2 · Piano
· Ding Dong · Synth 1 · Ringing Bell
· Tubular 1 · Synth 2
To change modes slide off the battery door of the chime and press ’MODE’
button to cycle through the options.
Note: The chime sound will be ding dong when cycling through modes but will
revert to your chosen sound when the Doorbell is activated.
From first use and whenever the batteries are replaced, the mode will reset to
Chime Only by default
Volume Control and Mute Function
To adjust the volume, slide off the battery door of the chime unit and turn the
dial clockwise to increase volume and anti clockwise to reduce it
The mute switch can be found on the side of the chime unit. Push the switch
down for no sound, only flashing light will operate (if set to chime & flashing).
Push the switch up to restore sound.
Low Battery \ Indicator
When batteries are getting low a red LED will illuminate behind the blue lens
Mode Code Volume
R14 or Size C
+
R14 or Size C
+
Mute
Switch
On
Off
Illuminated Chime Unit
Requires 2x1.5v C batteries (supplied)
To fit or replace batteries: Slide open the battery cover, insert the batteries into the
battery compartment ensuring the battery polarities match the internal markings. Refit
the battery cover.
If the chime no longer operates the batteries should be replaced.
Please note batteries should be inserted into the transmitter unit before the illuminated
chime unit. This enables the pairing of the system. A double beep will be heard to
indicate pairing successful. Touch the Doorbell push button within 30 seconds to confirm.
Specification
Consumption : 2 x 1.5v C (MN1400) Flashing / Sound & Light 80mA
Operating Temperature : -10°C to +40°C
Operating Distance : Max 80 Meters approx line of sight
Selectable Tones : 8 Selectable melodies
Page 5

Channel Set up
The unit comes from the factory on a pre-set radio frequency channel. However, should your chime activate
intermittently for no reason at all it is possible that a similar unit is operating nearby on the same frequency.
To change the channel:
1. Remove the batteries from the chime unit
2. Remove the back of the transmitter unit case by pushing the tab on the bottom with a small flat screwdriver.
See figure 1.
3. Remove and refit the CR2032 battery
4. Snap the front cover back onto the transmitter unit
5. Refit the batteries into the chime unit. A double beep will be heard
6. Operate the doorbell to confirm the new code is working
.
Should you need to change channels, this process can be followed many times as there are over 250 different
channels.
Additional Doorbell Units
Additional Doorbell Units can be purchased and installed at other locations i.e.. other entrances etc. They can be
adjusted to a different tone so that the source of the chime can be identified. Additional units can be obtained
from your retailer or from Pace Systems Ltd Telephone: 0800 0885861
Adding additional Doorbell to chime
1. Press the ‘CODE’ button, located on the back of the Standard chime, for 1 to 2 seconds until a beep is
heard followed by step 3 below
2. Or if issued with the Illuminated chime, slide off the battery cover and press the ‘CODE’ button, for 1 to 2
seconds until a beep is heard followed by step 3 below
3. Press the new Doorbell within 5 seconds and the chime will sound.
A maximum of 4 Doorbell’s can be paired to the same chime
If a series of beeps are heard this indicates memory is full.
To reset:
1. Remove the batteries from the chime unit for 30 seconds
2. Remove and re-insert the batteries in the transmitter unit
3. Re-insert the batteries into the chime unit. A double beep will be heard
Code
Button
Standard Door Chime Illuminated Door Chime
Code
Button
Mode Code Volume
R14 or Size C
+
R14 or Size C
+
Mute
Switch
On
Off
Page 6

Problem Possible Causes Suggested Remedy
Trouble Shooting Guide and user Hints
Chime unit does not sound
when push button is operated
Door Chime sounds without
push button being pressed
An additional bell push will not
work with existing chime
Important
The chime and transmitter unit are sensitive electronic products and the following precautions should be
followed:-
· Only use in dry conditions
· Do not expose to direct sunlight
· If leaving the push button or chime for long periods remove batteries and store safely
· Do not drop either unit or subject to excessive blows
· The operating range is up to 80M, however the range of the wireless signal will be reduced if transmitted
through a number of walls or ceilings as well as by metal door or window frames.
Unit is out of range Operate the chime unit within
the operation range (80m)
Bell Push transmitter and
Chime unit are not on the
same channel
Batteries need replacing If the LED doesn’t illuminate
Incorrect wiring polarity of
wires in the doorbell
A similar wireless product is
being used on the same
channel
Units not paired Follow steps 1 and 2 in adding
Follow channel set up
instructions
on the transmitter unit replace
the batteries in the transmitting
unit
If the LED illuminates on the
transmitter unit but does not
illuminate on the Chime unit
replace the batteries in the
chime unit
Check wires are fitted as per
instructions
Change the Channel by
follow channel set up
an additional Bell Push
Warning
· Do not mix old and new batteries
· Do not mix different types of batteries
· Batteries must be inserted with the correct polarity
· Exhausted batteries must be removed immediately
Warranty
This unit is guaranteed against faulty parts or workmanship for a period of one year from date of purchase. This
Warranty does not cover batteries, damage caused by battery leakage, damage caused by incorrect installation,
or physical damage to the casing.
This guarantee does not affect your statutory rights
www.pace-systems.co.uk
Pace Systems Limited
Tel. 0800 0885861
 Loading...