


Stella di Caffè
USER GUIDE
2
Table of contents
SAFETY ADVICES ...................................................................................................................................................................... 3
IMPORTANT NOTES ................................................................................................................................................................. 3
TURNING THE MACHINE ON .................................................................................................................................................... 4
WARMING UP ..................................................................................................................................................... 4
MACHINE WARMED UP ......................................................................................................................................... 4
DETAILED DESCRIPTION OF THE MENU .................................................................................................................................... 5
MENU NAVIGATION ................................................................................................................................................................ 6
SPECIAL MENU FUNCTIONS .................................................................................................................................................... 6
CODES ..................................................................................................................................................................................... 7
UNLOCKING A LEVEL ............................................................................................................................................. 7
CHANGING A PASSWORD ....................................................................................................................................... 7
PARAMETERS .......................................................................................................................................................................... 8
DATE & TIME .............................................................................................................................. ........................ 8
LANGUAGE ......................................................................................................................................................... 8
SOUND .............................................................................................................................................................. 8
DESKTOP BACKGROUND ........................................................................................................................................ 9
LED BAND AND KEY LIGHTING ................................................................................................................................ 10
MACHINE SETTINGS ............................................................................................................................................................... 11
GROUP SETTINGS ............................................................................................................................................... 11
Temperature settings ................................................................................................................................................................ 11
Dose Settings ............................................................................................................................................................................. 12
Pre-infusion settings.................................................................................................................................................................. 13
Self-time settings ...................................................................................................................................................................... 14
STEAM SETTINGS .............................................................................................................................. .................. 15
STEAM AIR & HOT AIR SETTINGS ........................................................................................................................... 15
FAST SETTINGS .................................................................................................................................................. 16
MISCELLANEOUS .............................................................................................................................. .................. 17
PANEL CLEANING................................................................................................................................................................... 18
DOSAMAT CONTROL BOX .............................................................................................................................. ...... 19
CONTROL BOX 2 CUPS ....................................................................................................................................... 19
CONTROL BOX 3 CUPS ........................................................................................................................................ 20
MANUAL CONTROL BOX ...................................................................................................................................... 20
CONTROL BOX STEAM AIR .............................................................................................................................. ..... 21
HOT WATER / MANUAL TAP CONTROL BOX .............................................................................................................. 21
STELLA PROGRAM FLOWCHART ............................................................................................................................................. 22
LEVEL 0: USER .................................................................................................................................................. 22
LEVEL 1: BREWER ROASTER ................................................................................................................................. 23
LEVEL 2: BARISTA .............................................................................................................................................. 24
LEVEL 3: SUPERVISOR / OWNER ........................................................................................................................... 25
LEVEL USB: ...................................................................................................................................................... 26
CLEANING AND MAINTENANCE ............................................................................................................................................. 27
DAILY .............................................................................................................................................................. 27
WEEKLY ........................................................................................................................................................... 27
OTHER ............................................................................................................................................................. 27
The Manufacturer reserves the right to change without previous notice the characteristics of the machine without previous notice for the purpose of
improving its performance.

Stella di Caffè
USER GUIDE
3
Safety advices
- This appliance is not intended for use by persons (including children) with reduced physical,
sensory or mental capabilities, or lack of experience and knowledge, unless they have been
given supervision or instruction concerning use of the appliance by a person responsible for
their safety.
- Children should be supervised to ensure that they do not play with the appliance.
- This appliance is intended to be used only for its specific purpose.
The manufacturer shall not accept any liability for damages due to improper or wrong use.
- Access to the service area is restricted to persons having safety and hygiene knowledge
with practical experience of the appliance.
- Before plugging in or unplugging the power cord, place the main switch to position “0”.
- If the power cord is damaged, it must be replaced by the manufacturer, its service agent or
similar qualified persons in order to avoid a hazard.
- For electrical safety, be sure the appliance is correctly earthed.
The manufacturer shall not accept any liability for damage due to faulty earth.
- Only a qualified technician is allowed to access the internal parts of the appliance for
maintenance and service operation.
- Be careful of hot surfaces such as: cup warmer, group heads, hot water and steam outlets.
- Do not expose oneself to steam or hot water flow.
Important notes
- This appliance is intended to be:
Placed on an horizontal and stable surface
Used in an ambient temperature between 5°C and 35°C (41°F – 95°F).
Installed to comply with the national rules that may be applicable.
Connected to a water system with pressure ranging from 1 to 8 bar
(0.1 to 0.8 Mega pascal)
- Before connecting the electrical supply, verify that the electrical network comply with the
data plate of the appliance.
- For more details about installation, adjustments and connections, please refer to the
installation guide or the technician guide.
- This appliance must not be exposed to water jet or splash.
- Be careful not to block the air inlets with towels or other items.
- If the appliance as to be stored with ambient temperature less than 5°C (41°F), the water
circuit (boiler – pipes) should be emptied.

Stella di Caffè
USER GUIDE
4
Turning the machine on
When the machine is turned on, the machine goes through a starting up procedure that allows it to check all of
the elements. The process takes approximately 45 seconds.
Never turn the machine on with the USB key inserted into the side of the machine.
Warming up
The machine begins the warming up process once the Control Parameters panel appears. Take into account
approximately 1/2 hour for the machine to reach operating temperature.
Machine warmed up
The menu is not accessible if the machine is not warmed up. Once the machine is warmed up, just press on
the screen to access the menu:

Stella di Caffè
USER GUIDE
5
Detailed Description of the Menu
Codes: allow you to access the various menu levels.
Parameters: allow you to use to set parameters: date and time, language, sound, desktop
background, units, and lighting.
Utilization: allows you to use or set parameters for the functions: rinse group, cleaning group, coffee
counters, maintenance planning, Led bar on/off, softener.
Energy economics: allows you to use or set parameters for the functions: day/night, groups
watchfulness, stop group, programming day/night.
Maintenance: allow you to use or set parameters for the functions: component test, error list, event
log, cooling, CIM (Machine card identity), and counters.
Machine settings: allow you to use or set parameters for the functions: group settings, steam
settings, Steam Air, fast settings, stop group, and miscellaneous.
Panel cleaning: allows you to deactivate the key sensitivity in order to clean the panel.
The grayed icons are inactive or locked. To use these functions, you must have:
- Either an access code of the desired level;
- Or a USB key.
Stella di Caffè
USER GUIDE
6
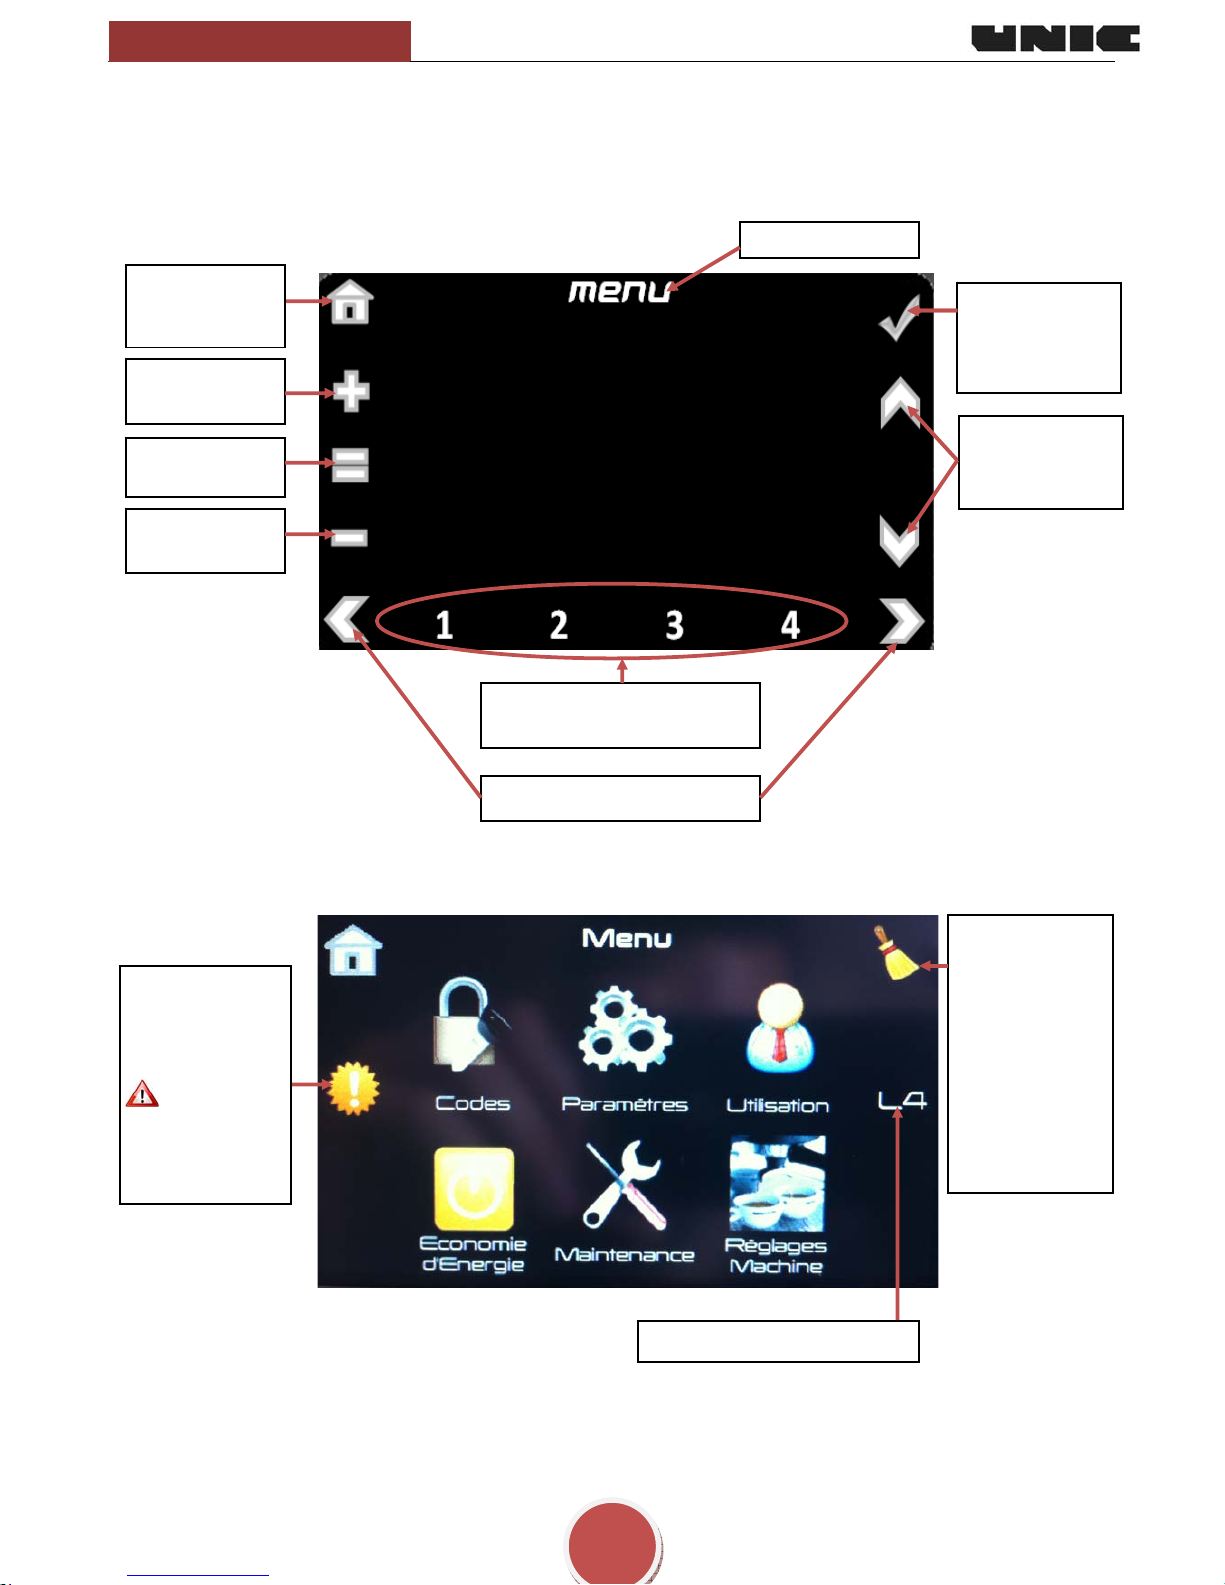
Go to another menu‘
Select a group to make a
setting for it
Menu navigation
The icons mentioned above represent all of the menu navigation functions of the STELLA.
Menu name
Return to the
previous menu
Make all values
equal
Scroll up or
down
Confirmation
after change of
a parameter
Increase one
value
Decrease one
value
Display the
history list of
error codes.
This icon only
appears when
the machine is in
default
Special menu functions
Allows you to
deactivate the
key sensitivity in
order to clean
the panel.
Press for three
seconds to
activate or
deactivate the
function.
Indicates the unlocked level

Stella di Caffè
USER GUIDE
7
Codes (level 1, 2, 3)
By default, most menus are locked. The various settings and programming options are impossible. Access to settings
is authorized by input of a code according to three access levels. For more complete information, consult the
chapter « Stella programming flowchart ».
Unlocking a level
Enter the five digit code.
Once the code is entered, return to the main menu. The icons authorized by the level are no longer grayed out.
Note: If the entered code is incorrect, an error message appears. Reenter the code.
After entering the code, additional options are now available by re-clicking on "codes."
Changing a password
(level 1, 2, 3)
To change the password of a level, it is necessary to have previously unlocked this access level.
Enter the new code for the level two times.
Leave the current level
Deactivate the automatic locking
(1 min) when the panel is
inactive.
To change the password of the
level currently being used.
By default, the
codes are the
following:
Level 1 = 11111
Level 2 = 22222
Level 3 = 33333

Stella di Caffè
USER GUIDE
8
Parameters
Date & Time (level 1, 2, 3)
Allow you to set date and time.
Language (level 1, 2, 3)
Allows you to choose the menu language.
Sound (level 1, 2, 3)
Allows you to activate or deactivate the sound and adjust the volume.
Touch the + and – keys to set the desired value.
9 When you select a value to make a setting, the color of
the value turns pink.
9 Do not forget to confirm the setting in order to save the
parameters.
Touch the + and – keys to set the desired value.
9 When you select a value to make a setting, the color of
the value turns pink.
9 Do not forget to confirm the setting in order to save the
parameters.
Touch the + and – keys to set the desired value.
9 When you select a value to make a setting, the color of
the value turns pink.
9 Do not forget to confirm the setting in order to save the
parameters.
Stella di Caffè
USER GUIDE
9
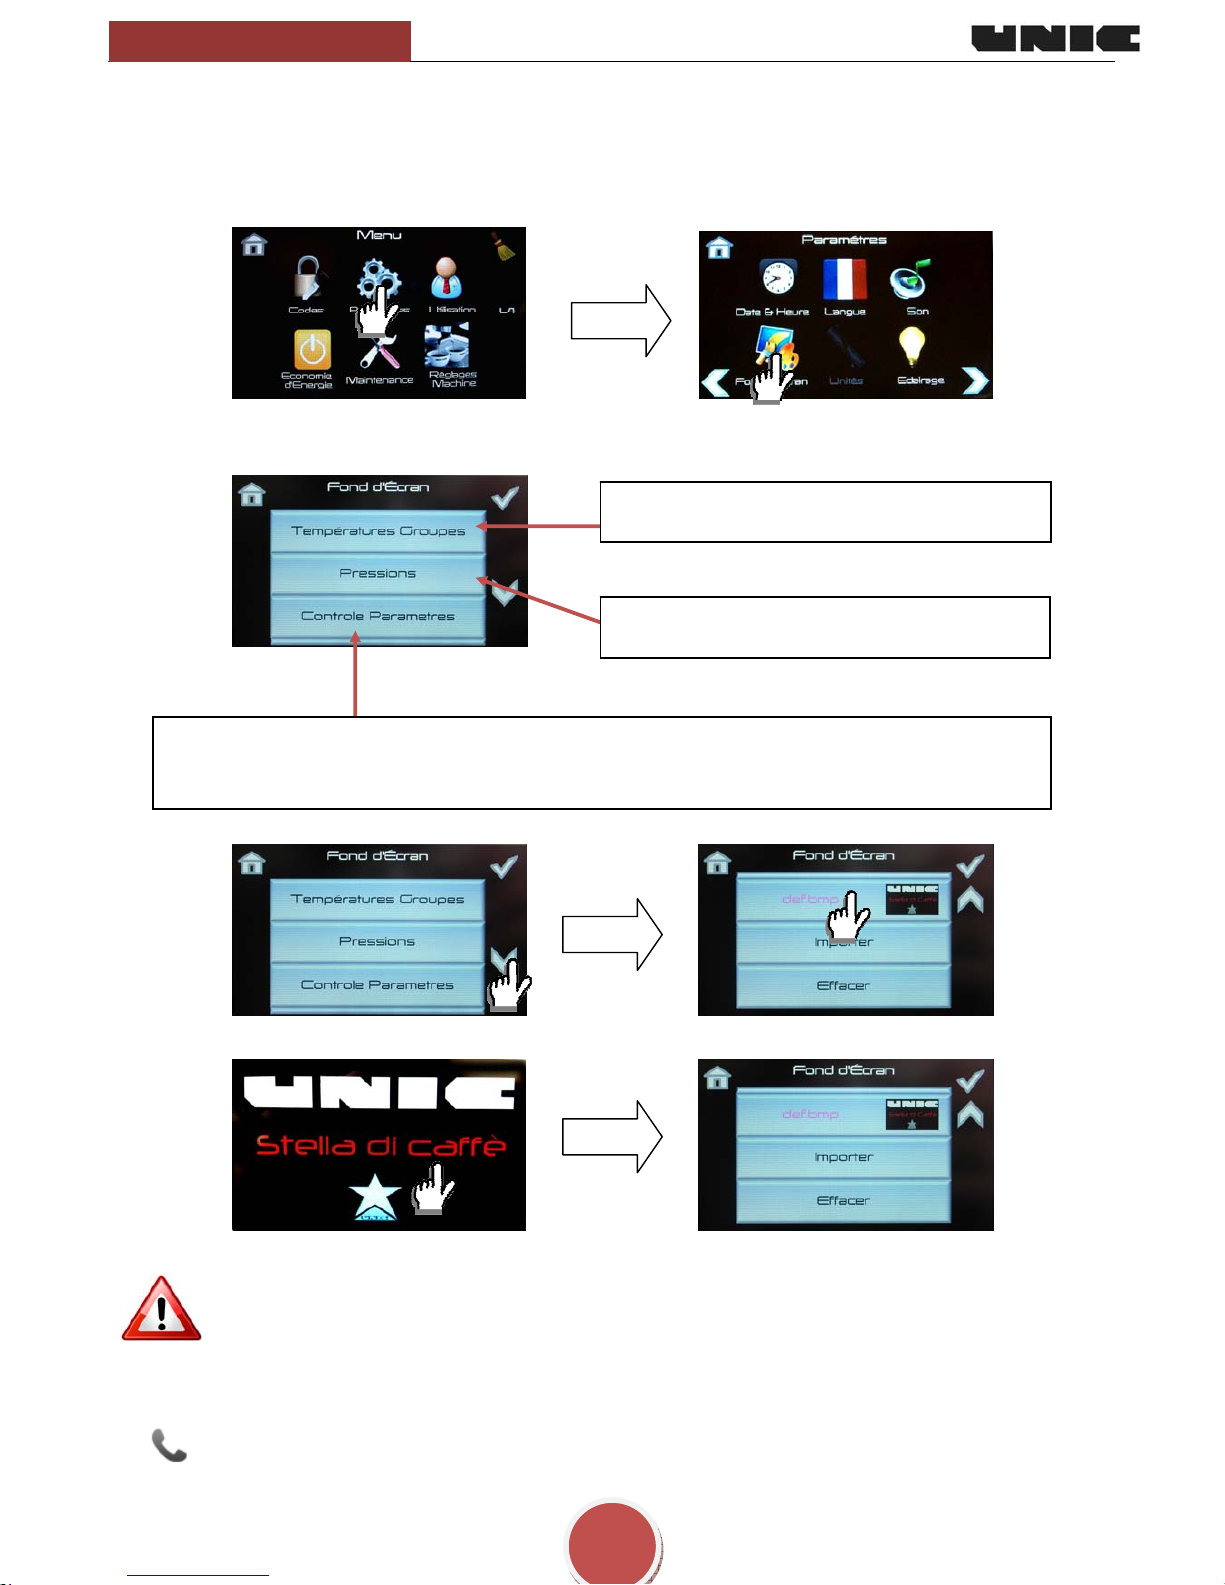
Desktop background
(level 1, 2, 3)
The desktop background allows you to attach a picture / photo or to view the machine parameters.
.
Importing a desktop background:
• Before importing a desktop backg round, the USB key must be inserted into the side of the machine.
• The USB key and its images must be correctly formatted for the machine to be able to read them.
Contact your distributor for more specific information.
View of the programmed and actual temperature
of each group.
View of the steam and pump pressure.
View of the steam and pump pressure, the temperature of each group, and the amount of water in the
steam boiler. Cursors also indicate the activation of the heating elements.
(It is the screen that appears during the starting and warming up of the machine)
To select the desktop background
To view the desktop background
9 Do not forget to confirm the setting
in order to save the parameters.

Stella di Caffè
USER GUIDE
10
Led band and key lighting (level 1, 2, 3)
Allows you to change the color of the headband and keys.
Color Value
White 0
Red 1
Yellow 40
Green 80
Cyan 120
Blue 160
Pink 220
Red 255
Setting the light intensity
of the headband
Setting the color of the
keys.
Activation / Deactivation of the scrolling of colors of the
keys and headband at the same time.
Setting the speed of the
scrolling of the colors of
the headband and keys.
(0 = unchanging color).
Setting the color of the
headband.
Touch the + and – keys to set the desired value.
9 When you select a value to make a setting, the color of the value turns pink.
9 Do not forget to confirm the setting in order to save the parameters.

Stella di Caffè
USER GUIDE
11
Machine settings (level 1, 2, 3)
Allow you to make various settings for the coffee machine: temperature, doses, pressures, etc...
Group settings
(level 1, 2, 3)
Allow you to set and view the temperature of the groups, pre-infusion, self-times, and doses:
Temperature settings (level 1, 2, 3)
Allow you to set the temperature of each group.
Programmed
temperature.
Actual temperature
(probe)
Select the group.
Touch the + and – keys to set the
desired value.
9 Do not forget to confirm the setting
in order to save the parameters.

Stella di Caffè
USER GUIDE
12
Dose Settings (level 1, 2, 3)
Allow you to set and view doses.
If the MAN key is not enabled, press above (Only for DOSAMAT machines);
Set the desired portafilter, specifically: 1C, 2C, or 3C
In this case, the two cup portafilter is set. When the desired coffee dose is reached,
Press small or large doses. stop the infusion by touching "continue/stop."
To obtain the same value for the other Deactivate the PROgramming mode
groups, press =. to save the values.
Repeat the operation to set the other volumes.
The point appears on the group display
in PROgramming mode.
Do not forget to activate the PROgramming mode.

Stella di Caffè
USER GUIDE
13
Pre-infusion settings (level 1, 2, 3)
Allow you to set the wetting time of the coffee before infusion.
Pre-inf times "Open" is the time during which the electrovalve remains open
(T1).
Pre-inf times "Closed" is the time during which the electrovalve remains closed
(T2).
When either of the two parameters is set at 0, the pre-infusion mode remains inactive. To activate the Pre-
infusion, both times must be greater than 0.
T1
Time in seconds
Electrovalve
open
Electrovalve
closed
T2
T1=T2=0= no pre-infusion
Time in seconds
Electrovalve
o
p
en
Electrovalve
closed
Touch the + and – keys to set the desired value.
Setting range: 0.1 sec à 10 sec
9 Do not forget to confirm the setting in order to save the
parameters.
Touch the + and – keys to set the desired value.
Setting range: 0.1 sec à 10 sec
9 Do not forget to confirm the setting in order to save the
p
arameters.
INFUSION

Stella di Caffè
USER GUIDE
14
Self-time settings (level 1, 2, 3)
Allow you to set the time-delay letting you prepare the cups in SELF mode, before the onset of the
automatic cycle.
Only for DOSAMAT machines.
Touch the + and – keys to set the desired value.
Setting range: 0 to 10 sec., default setting 1 cup: 0.5
second
9 Do not forget to confirm the setting in order to save
the parameters.
Go to the 2 cup setting.
Touch the + and – keys to set the desired value.
Setting range: 0 to 10 sec., default setting 2 cups: 2.5
seconds
9 Do not forget to confirm the setting in order to save
the parameters.
Go to the 3 cup setting.
Touch the + and – keys to set the desired value.
Setting range: 0 to 10 sec., default setting 2 cups: 2.5
seconds
9 Do not forget to confirm the setting in order to save
the parameters.

Stella di Caffè
USER GUIDE
15
Steam settings
(level 1, 2, 3)
Allow you to set the pressure of steam boiler.
Steam Air & hot air settings
(level 1, 2, 3)
Allow you to set the Steam air or hot water control box settings:
• the temperature at the level of the thermostatic probe of the milk (only for a machine with Steam Air)
• the steam time-delay
• the volumes of hot water
Spot pressure of the
steam boiler.
Touch the + and – keys to set the desired value.
Setting range: 0.7 Bar to 1.4 Bar, default setting 1 Bar
9 Do not forget to confirm the setting in order to save the
parameters.
9 When you select a line to make a setting, the color of
the value turns pink.
9 Touch the + and – keys to set the desired value.
9 Do not forget to confirm the setting in order to save the
parameters.
Setting range:
• Steam Air probe: 50°C to 90°C , default setting 62°C
• Steam time: 0 sec to 99 sec, default setting 10 sec
• Small water volume: 0 to 2000 ml , default setting 150 ml
• Large water volume: 0 to 2000 ml , default setting 300 ml
Stella di Caffè
USER GUIDE
16
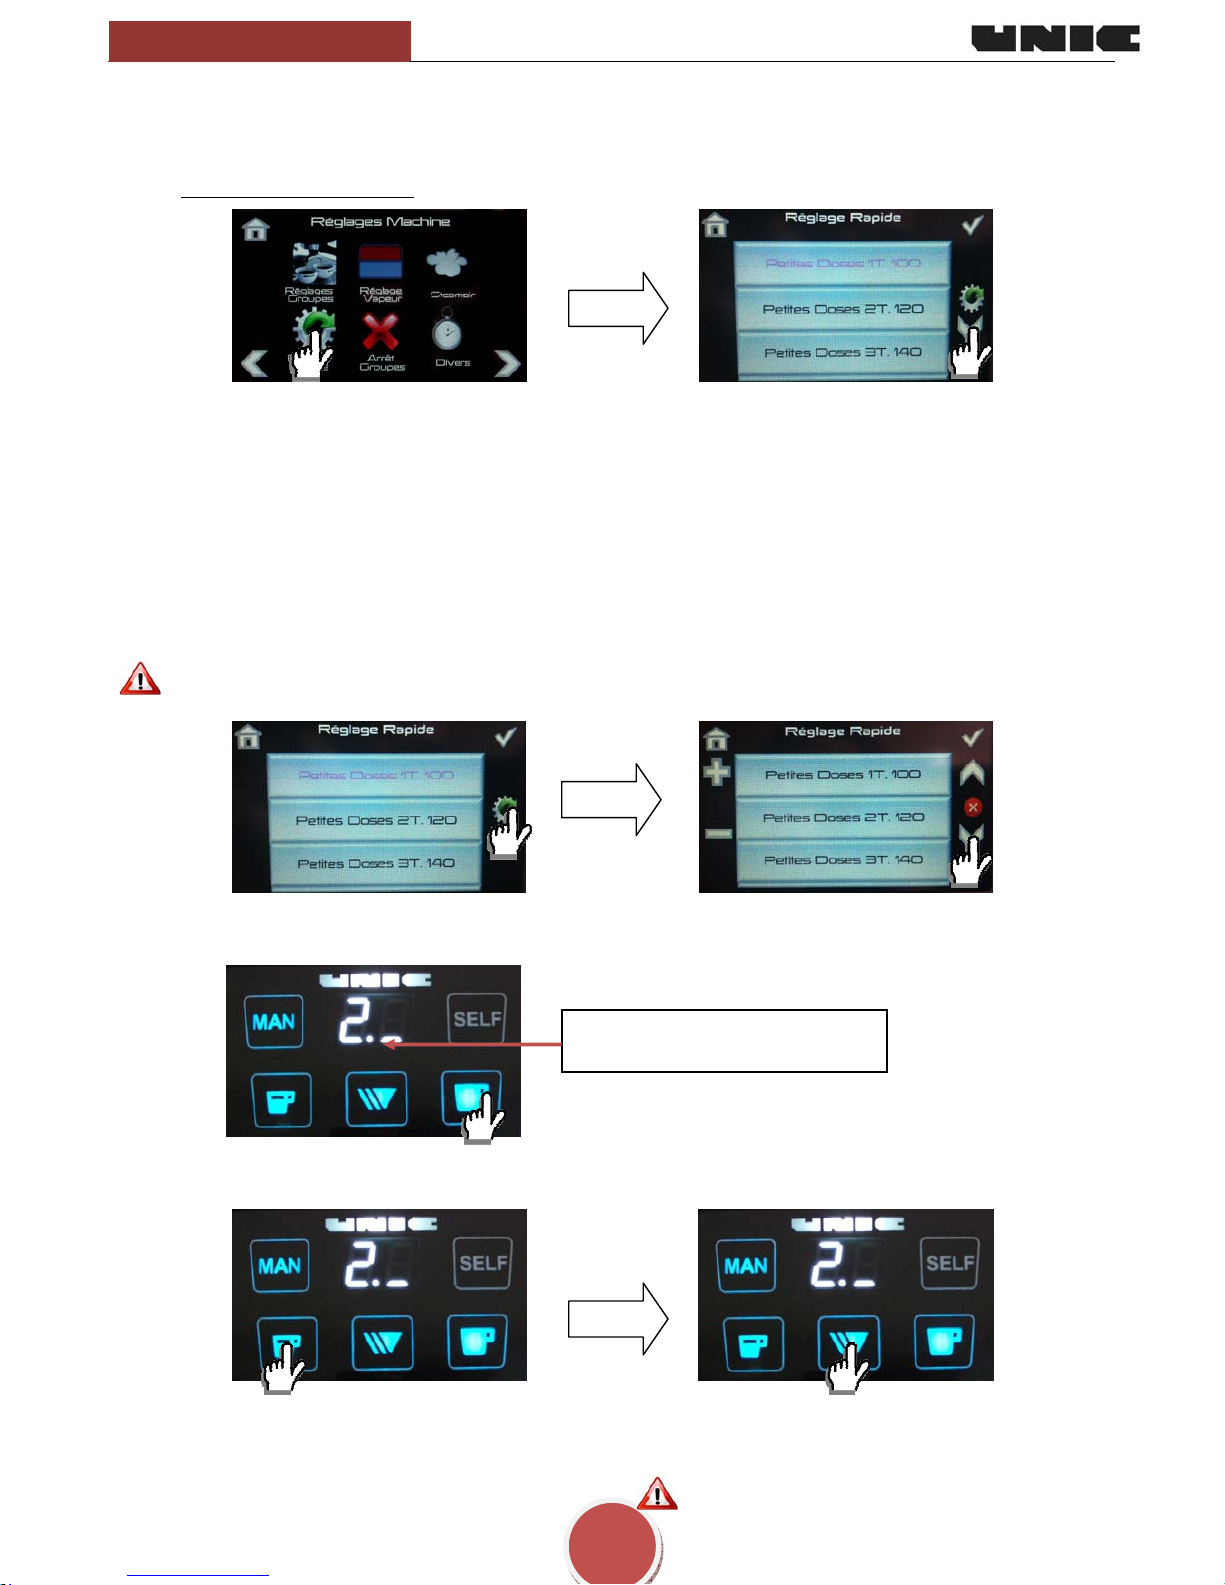
Fast Settings (level 1, 2, 3)
Allow you to set all the machine parameters on a single page. Report all the setting values of all the groups. Example:
setting group temperature at 90°C;
all the groups are set at 90°C.
Scroll through the other settings using the navigation arrows:
Small Dose 1 Cup Æ Small dose 2 Cups Æ Small dose 3 Cups ÆLarge dose 1 Cup Æ large dose
2 Cups Ælarge dose 3 Cups Æ Self-time 1 Cup ÆSelf-time 2 Cups ÆSelf-time
3 Cups ÆGroup temperature Æ Time of pre-infusion overture (T1) ÆTime of pre-infusion close
(T2) Æ pre-infusion pressure overture (P1) Æ pre-infusion pressure close (P2)
Do not forget to activate the PROgramming mode.
Set the desired portafilter.
In this case, the two cup portafilter is set.
Press small or large dose.
Repeat the operation to set the other volumes.
When the coffee dose is reached, stop the infusion by touching
"continue/stop."
Repeat the operation to set the other volumes.
Deactivate the PROgramming mode to save the values.
The point appears on the group
displays in the PROgramming mode.
Setting doses:
9 When you select a line to make a setting, the color of the value turns pink.
9 Touch the + and – keys to set the desired value.
9 Do not forget to confirm the setting in order to save the parameters.
Stella di Caffè
USER GUIDE
17
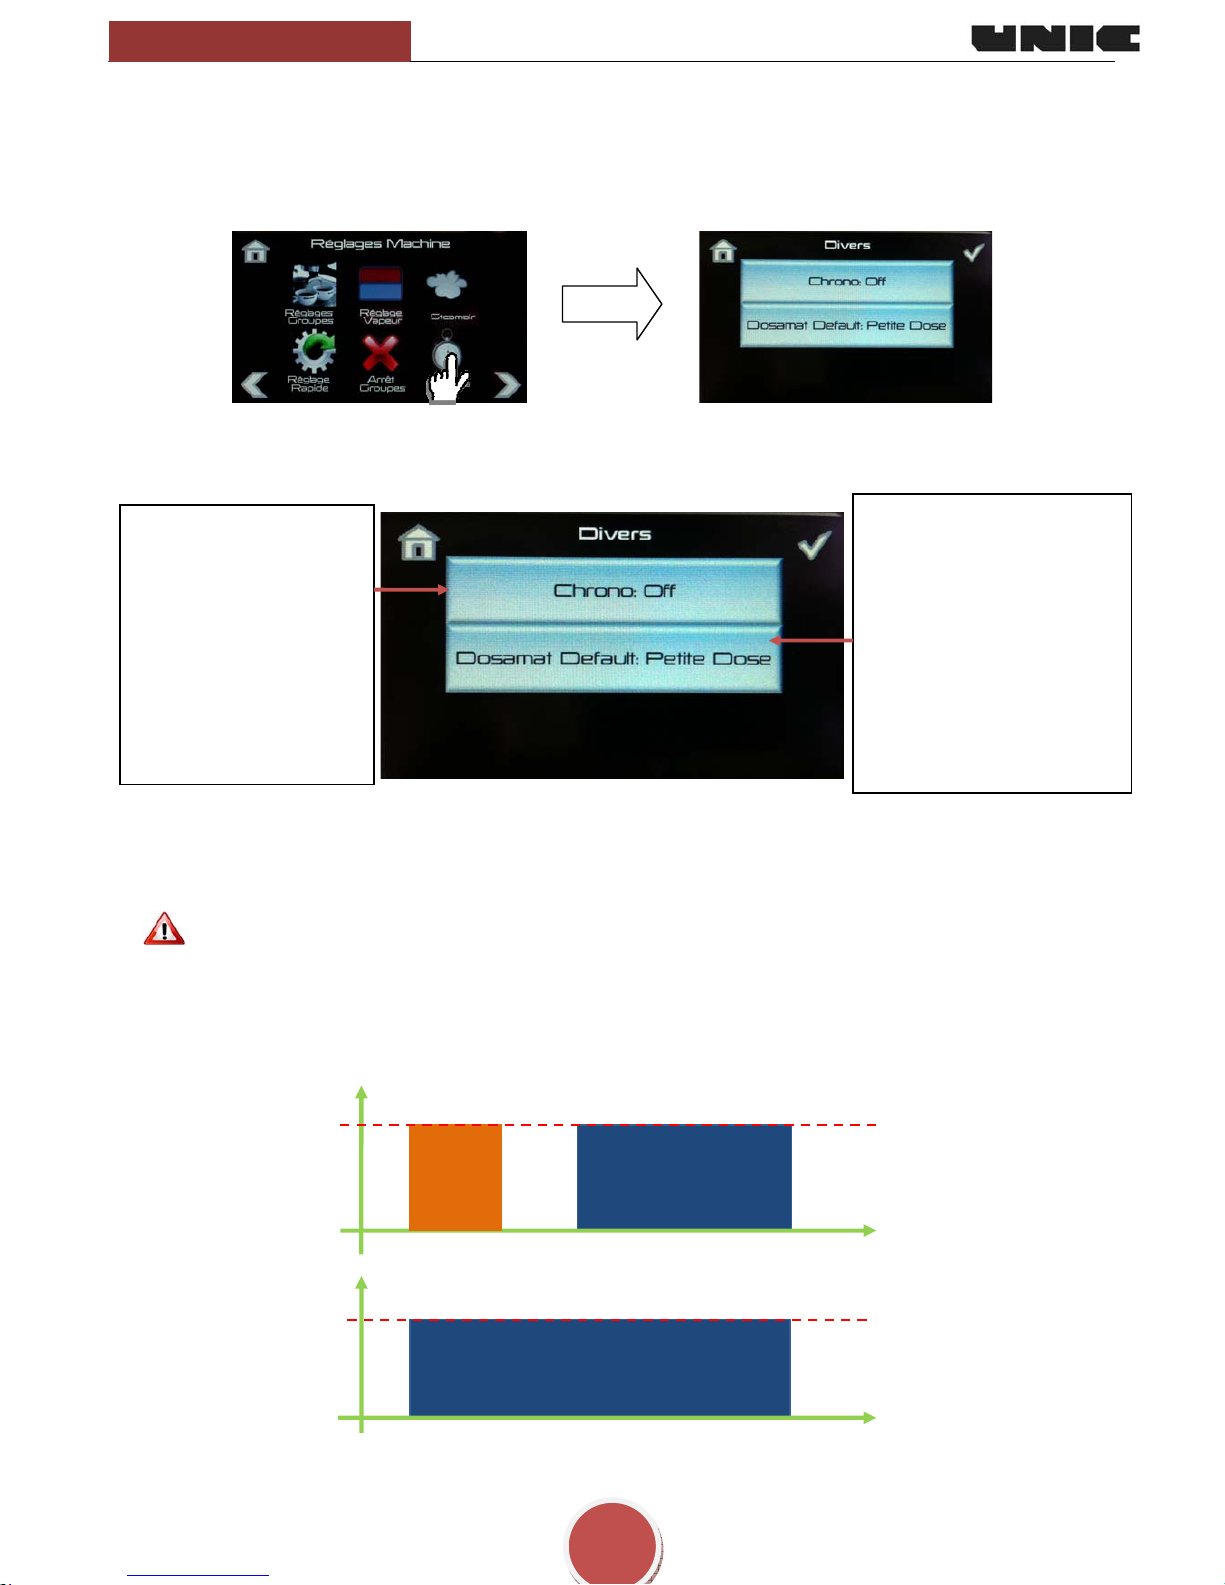
Miscellaneous (level 1, 2, 3)
Allows you to activate the chronometer function and set the dose priority at the start of a cycle: small dose, large dose,
last dose used (Only for DOSAMAT machines).
When the pre-infusion is activated, the chronometer displays two values at the end of the cycle:
• The first value represents the pre-infusion time in seconds
(T1+T2).
• The second value represents cumulative time (pre-infusion + infusion)
(T1+T2 + Ti).
In dynamic mode, the chronometer is only displayed at the end of the pre-infusion.
Setting of the
chronometers display in
the screen of each group:
CHRONO OFF =
deactivated
CHRONO ON = Activated
(visible at the end of the
cycle)
DYNAMIC CHRONO =
Activated (visible during
Setting dose priority at the
start of a cycle:
(Only for DOSAMAT
machines)
SMALL DOSE
LARGE DOSE
LAST DOSE USED
Example: if ‘small dose' is
programmed, at the end of
any cycle, the control box is
reset at small dose.
9 When you select a line to make a setting, the color of the value turns pink.
9 Press the line to change the parameters.
9 Do not forget to confirm the setting in order to save the parameters.
T1
Time in seconds
Electrovalve
open
Electrovalve
closed
T2
T1=T2=0= no pre-infusion
Time in seconds
Electrovalve
o
p
en
Electrovalve
closed

Stella di Caffè
USER GUIDE
18
Panel cleaning
The clean panel mode deactivates the sensitivity of all of the touch keys in order to allow their cleaning.
Press the icon in the form of a broom until the boxes display "nC."
When the command boxes show "nC," all of the keys are deactivated.
Press the red cross for three seconds to dea ctivate the cleaning mode and return to normal mode.
Do not clean the panel and screens with abrasive or chemical products.
• Use cold water and a microfiber cloth to clean the panel.
Stella di Caffè
USER GUIDE
19
DESCRIPTION AND FUNCTION OF KEYS
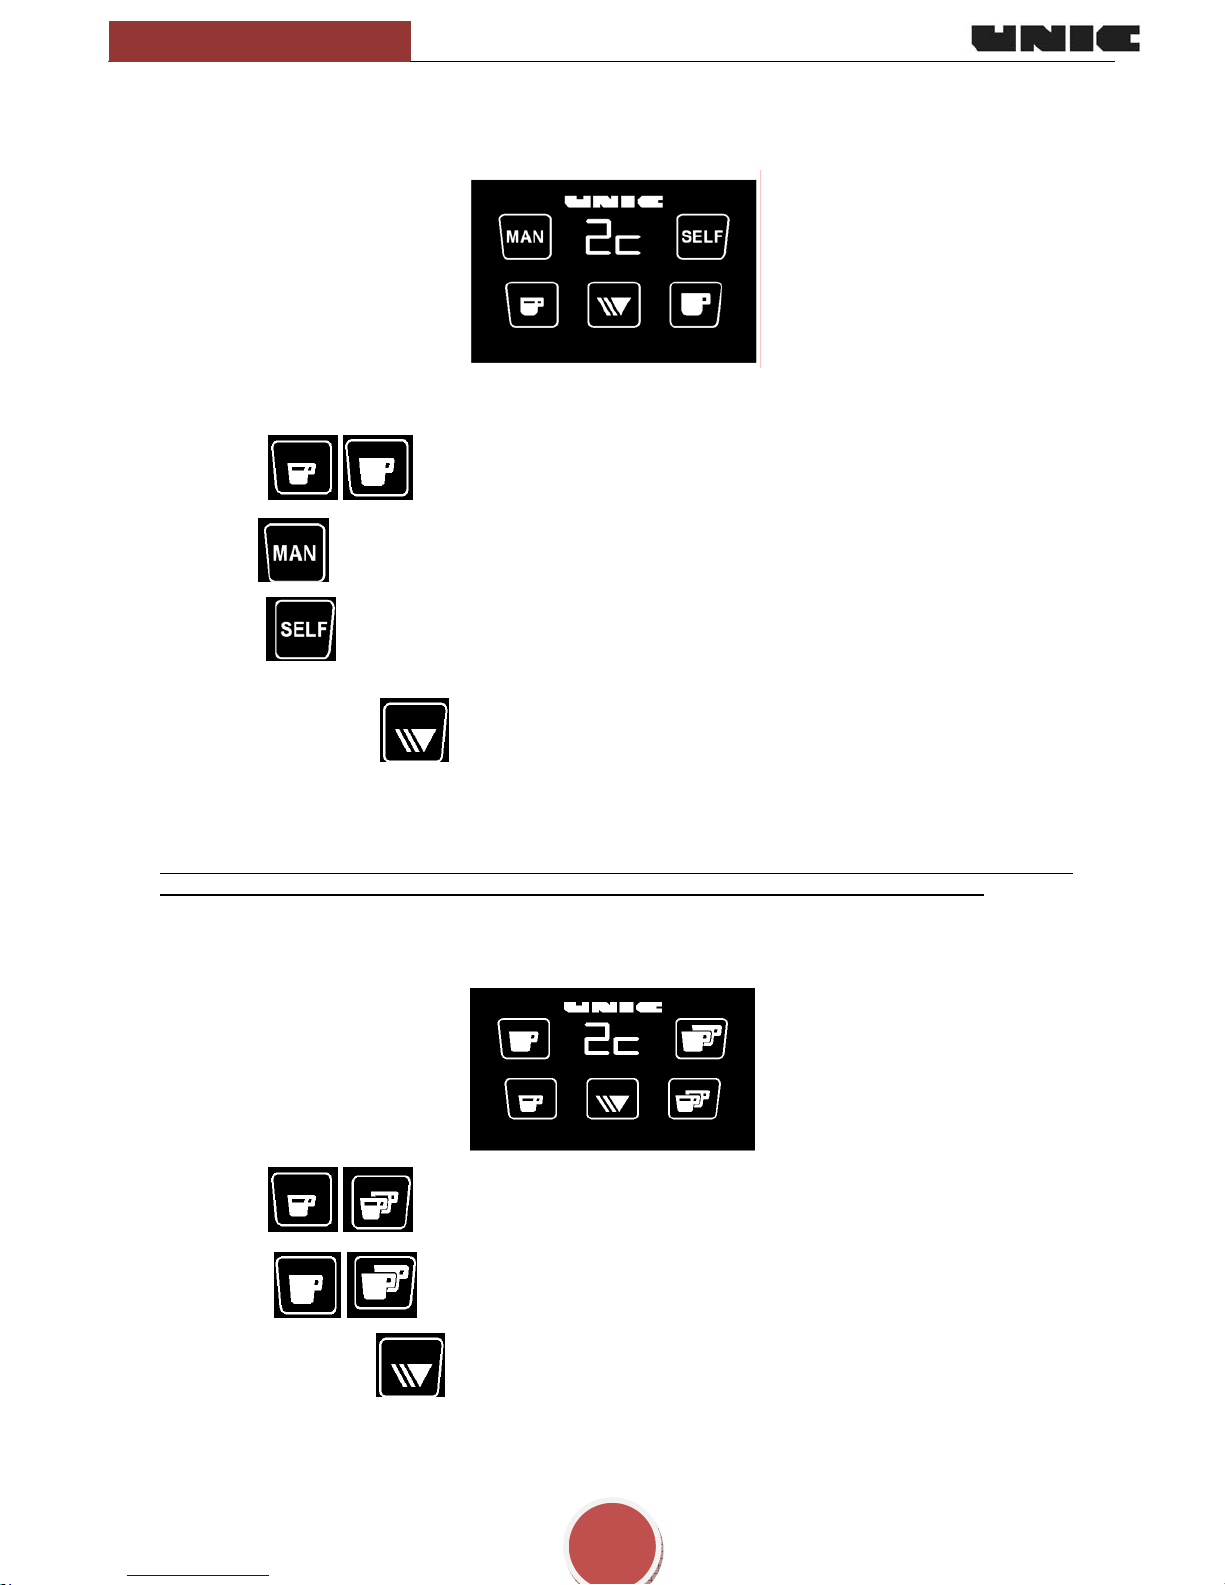
Dosamat Control Box (reference 45100)
• The numbers
1 2 3 correspond to the selected portafilter (1 cup, 2 cups, or 3 cups).
• The keys
correspond respectively to the selection: (small dose) c, or (large dose) C.
• The key
selects the manual mode: Manual start of cycle.
• The key
selects the Self-mode: The automatic start of the cycle corresponding to the selected
portafilter.
• The Continue/stop key allows you to stop a cycle in the middle and continue a cycle in progress
(non-dosed).
A short click at the end of the cycle allows you to display the infusion time for the cycle if the chronometer
function was activated.
Note: it is possible to switch from a small cup to a large cup during the cycle and vice versa; in this case, if the
change from large to small dose is made when the small dose has already passed, the cycle stops.
Control Box 2 cups
(4 doses reference: 45102)
• The keys correspond respectively to1c (1small dose) 1 and 2c (2 small doses)
•
The keys correspond respectively to1C (1 large dose) and 2C (2 large doses)
•
The continue/stop key allows you to do the following:
• stop a cycle in progress
•
continue a cycle in progress (non-dosed).
Stella di Caffè
USER GUIDE
20
• A short click at the end of the cycle also allows you to display the infusion time if the chronomet er
function was activated.
Note: it is possible to switch from a small cup to a large cup during the cycle and vice versa; in this case, if the change
from large to small dose is made when the small dose has already passed, the cycle stop s.
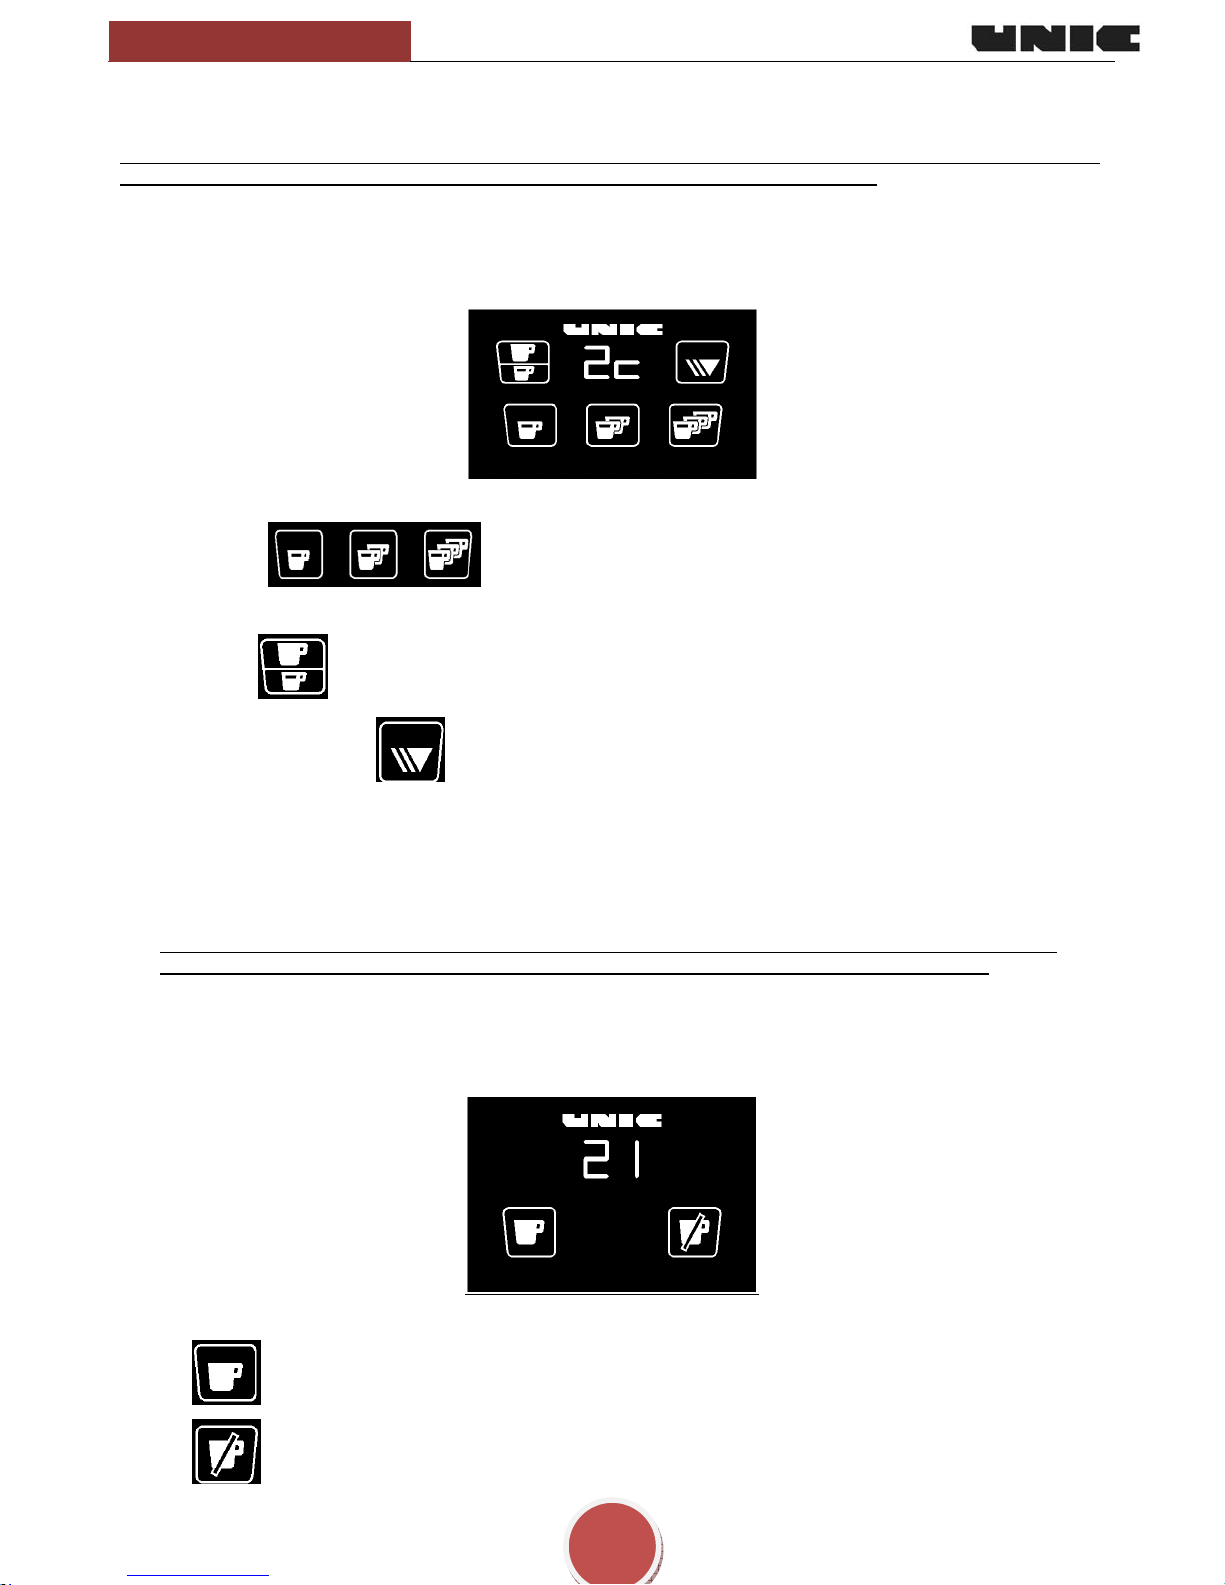
Control Box 3 cups
(6 doses reference: 45103)
• The keys
correspond respectively to numbers 1 2 3
(1 dose, 2 doses, 3 doses)
• The key allows you to select small dose c,or large dose C.
•
The continue/stop key allows you to do the following:
•
stop a cycle in progress:
• continue a cycle in progress (no n-dosed).
•
A short click at the end of the cycle also allows you to display the infusion time if the chronometer
function was activated.
Note: it is possible to switch from a small cup to large cup during the cycle and vice versa; in this case, if the
change from large to small dose is made when the small dose has already passed, the cycle stops..
Manual control box (ON/OFF reference: 45101)
• The display indicates the infusio n time.
Cycle start
Cycle stop
Stella di Caffè
USER GUIDE
21
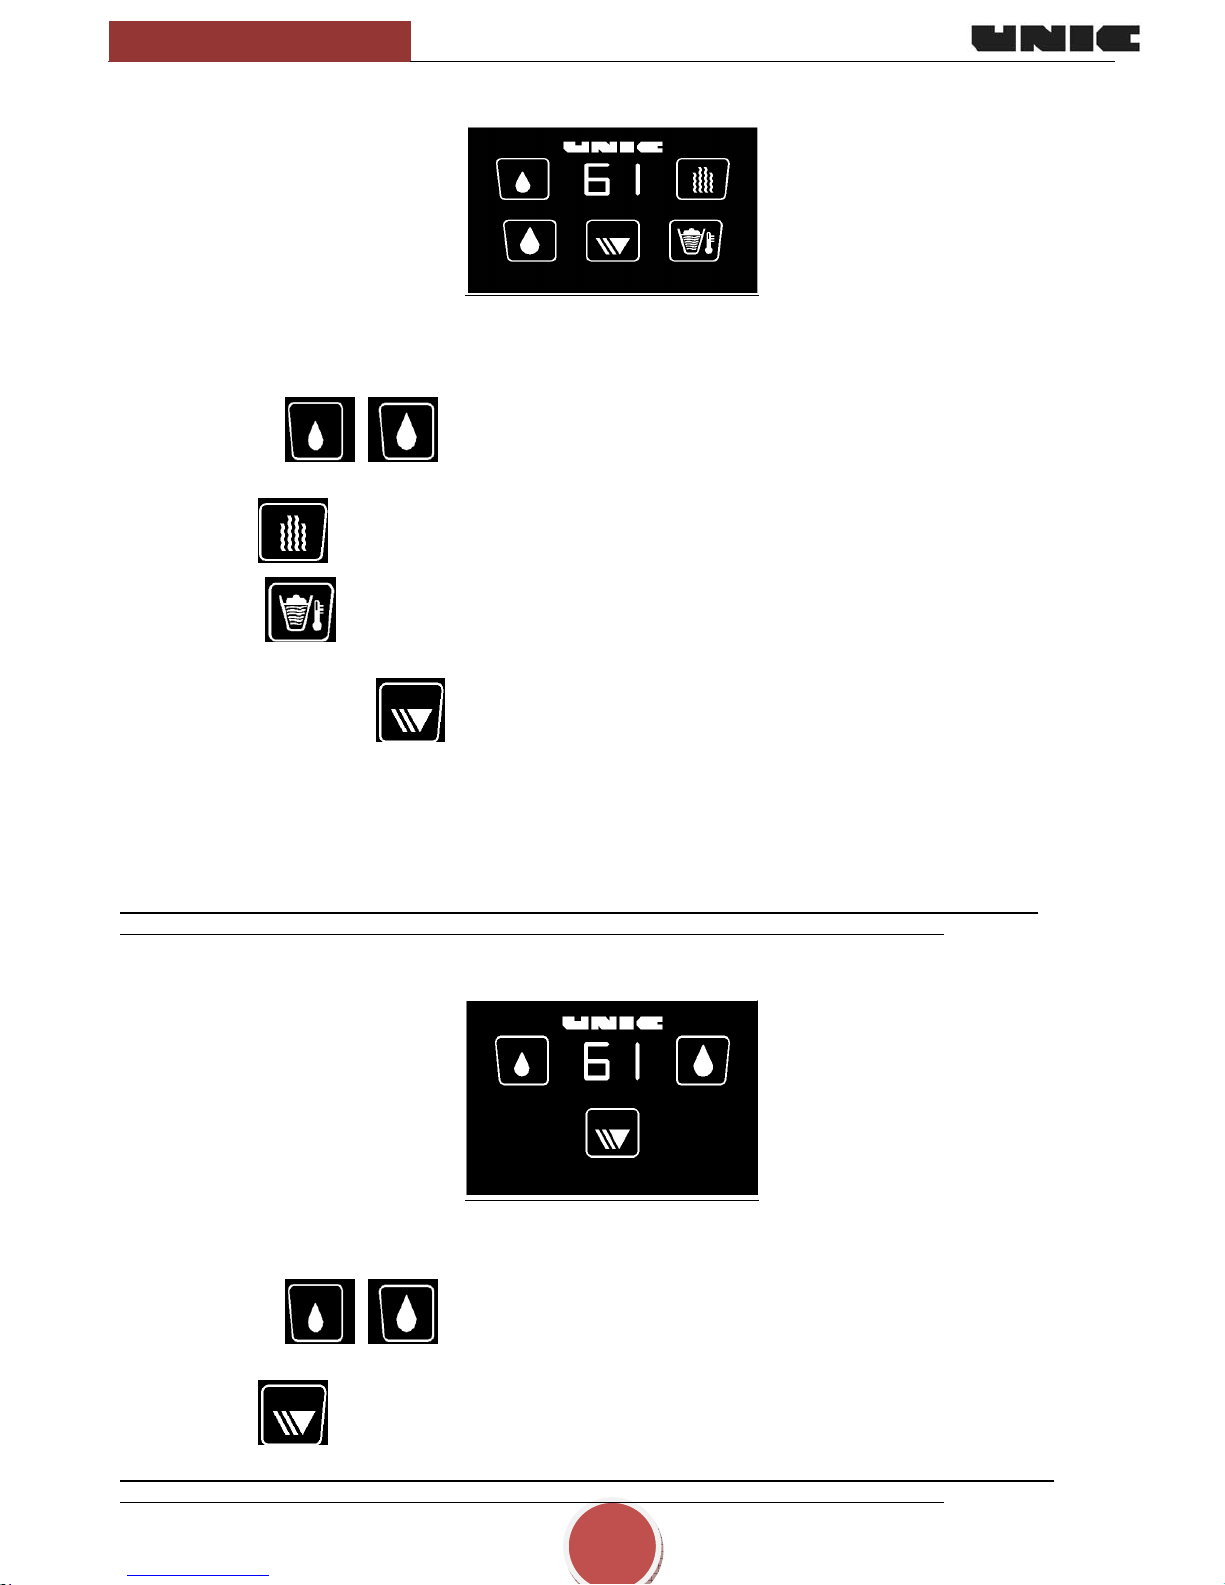
Control Box Steam Air (reference 45100)
• The display shows the breakdown of the volume of the water dose, the steam time-delay, or displays the
actual temperature of the Steam Air probe according the cycle in progress.
• In case of simultaneous cycles, the display of the Steam Air temperature has priority.
• The keys
correspond respectively to the programmed small water dose and the
programmed large water dose.
• The key
corresponds to time-delayed steam.
• The key
corresponds to the Steam Air mode (the cycle automatically stops when the programmed
temperature is reached by the probe).
• The continue/stop key allows you to do the following:
• stop a cycle in progress
• continue a cycle in progress (non-dosed).
• A short click at the end of the cycle also allows you to display the infusion time if the chronometer
function was activated.
Note: it is possible to switch from a small dose to large does during the cycle and vice versa; in this case, if the
change from large to small dose is made when the small dose has already passed, the cycle stops.
Hot water / manual tap control box (reference 45100)
• The display indicates the breakdown of the programmed water dose.
• The keys
correspond respectively to the programmed small water dose and the
programmed large water dose.
• The key stops the cycle in progress.
Note: it is possible to switch from a small dose to a large dose during the cycle and vice versa; in this case, if the
change from large to small dose is made when the small dose has already passed, the cycle stops.
Stella di Caffè
USER GUIDE
22
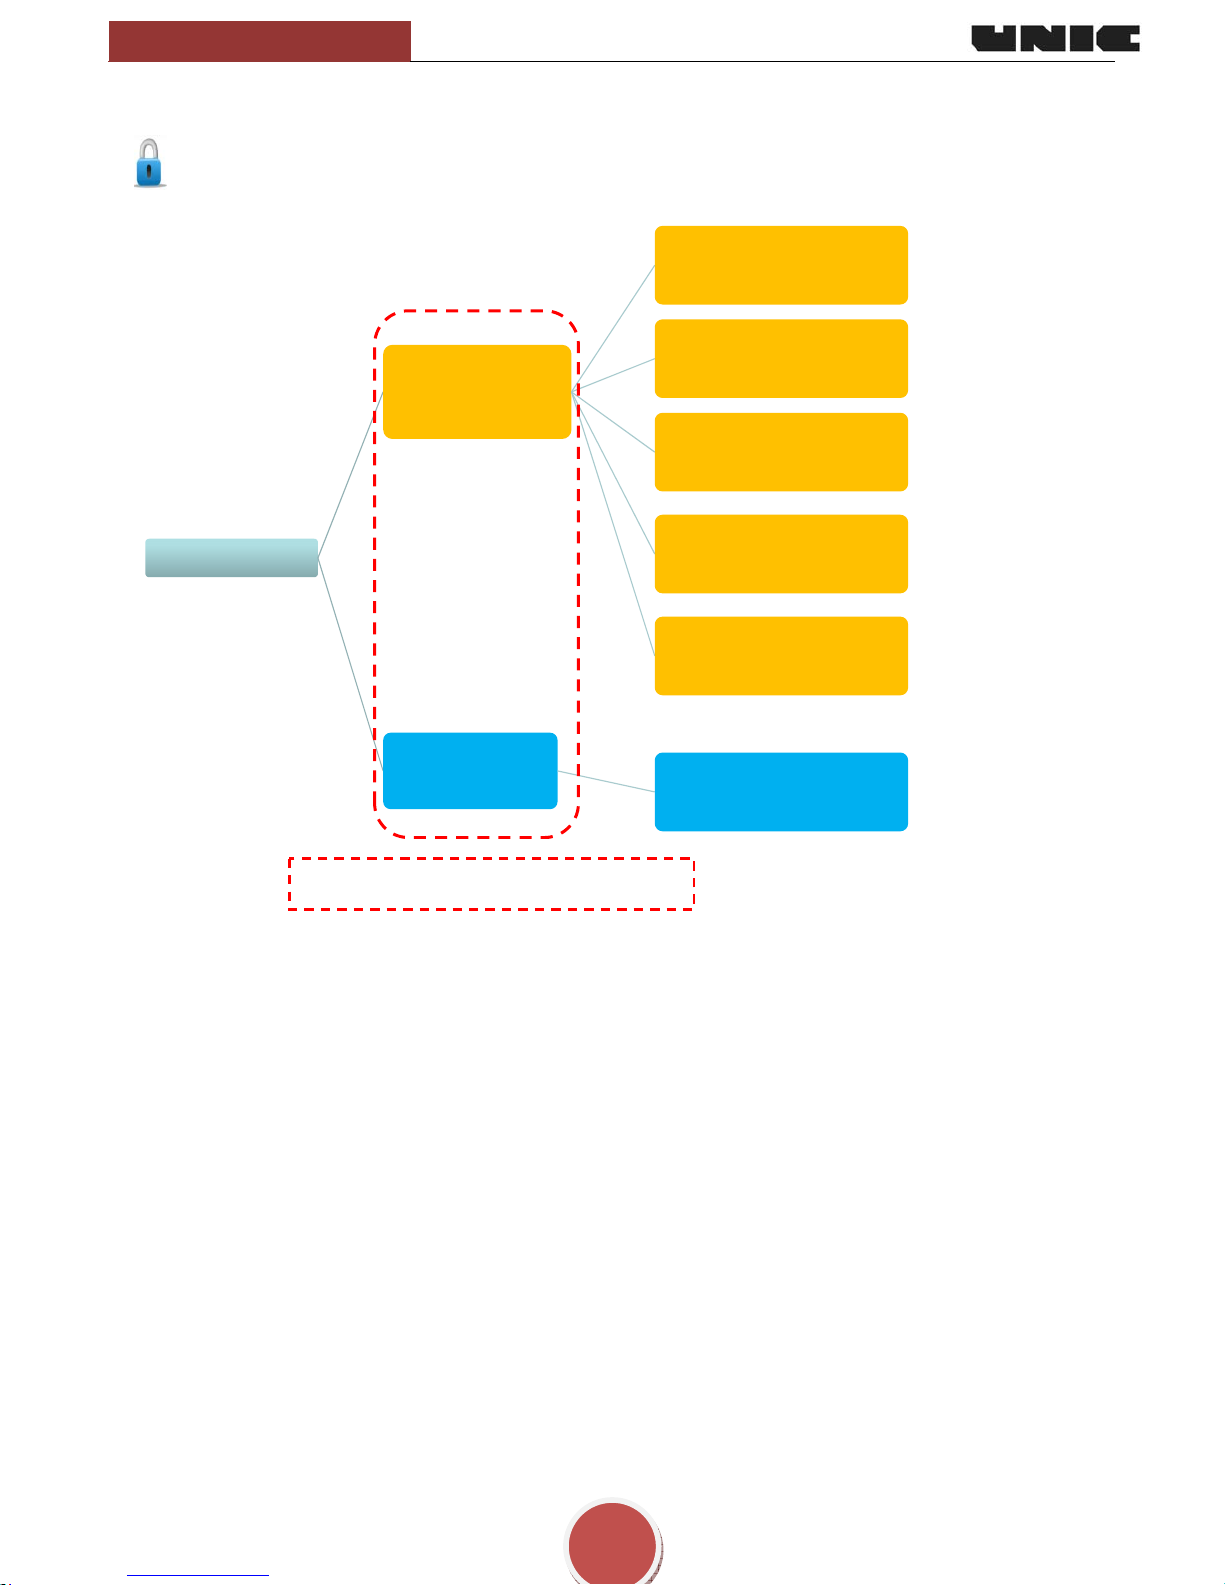
Stella program flowchart
Level 0: User
1 DESK BACK
3 CODES
4 Level choice
5 Enter code N1
6 Enter code N2
7 Enter code N3
8 Confirmation
44
UTILIZATION
45 Clean Group
The dotted lines represent the main menu.
Stella di Caffè
USER GUIDE
23
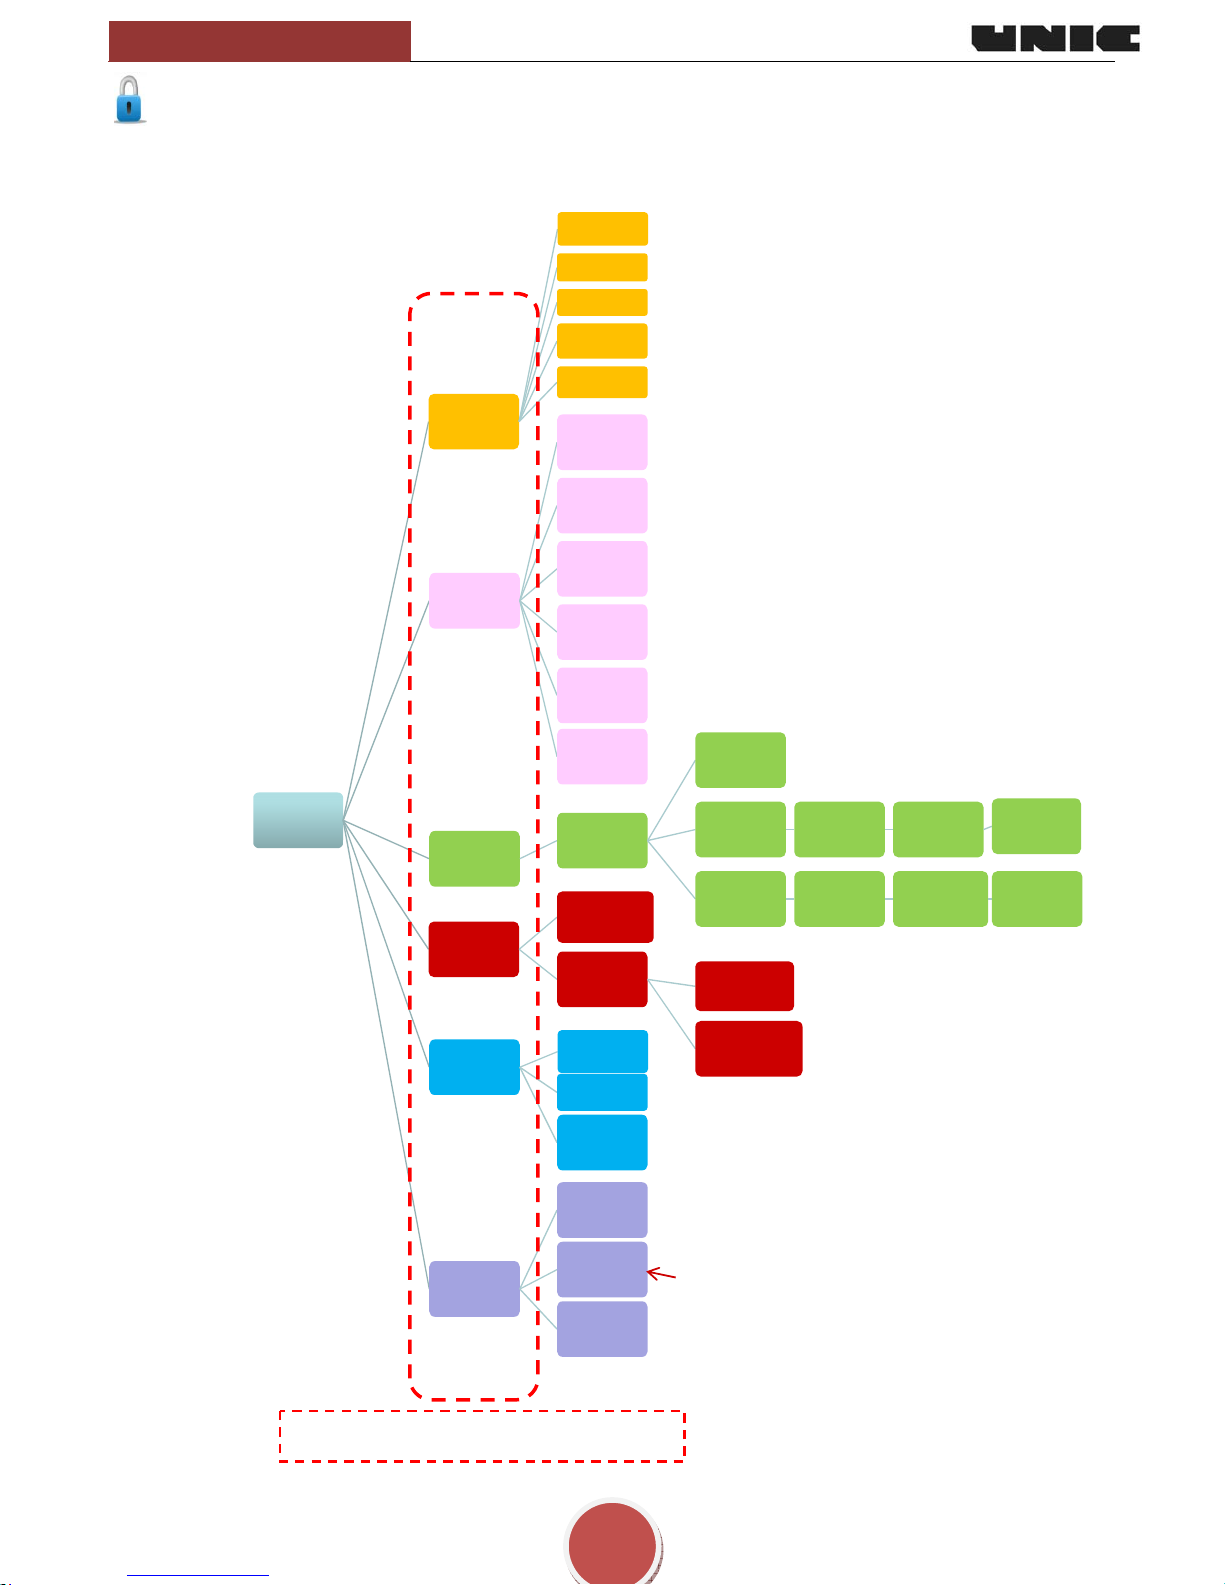
Level 1: Brewer Roaster
1 Desk Back
3 CODES
4 Level Choice
5 Enter code N1
6 Enter code N2
7 Enter code N3
8 Confirmation
9 PARAMETERS
10 Date & Time
11 lLanguag e
12 Sound
13 Desktop
Background
14 Lighti n g
15 Unit
16 MACHIN E
SETTINGS
17 Group Settings
22 Self-time
Small doses
3 1 small cup 24 2 small cups
25 3 small cups
Large doses
26 1 large cup 27 2 large cups 28 3 large cups
33 MAINTENANCE
38 counter
39 CIM Parameters
40 Info, id, sn
43 Compu ter Connection
44 UTI LIZATION
45 Clearning Group
46 Coffee Coun t er
48 Softener
49 ECONOMICS
50 Stop Group
51/52Programming
Day/Night
Day/ Night Ins ta nt
Direct access
The dotted lines represent the main menu.
Stella di Caffè
USER GUIDE
24
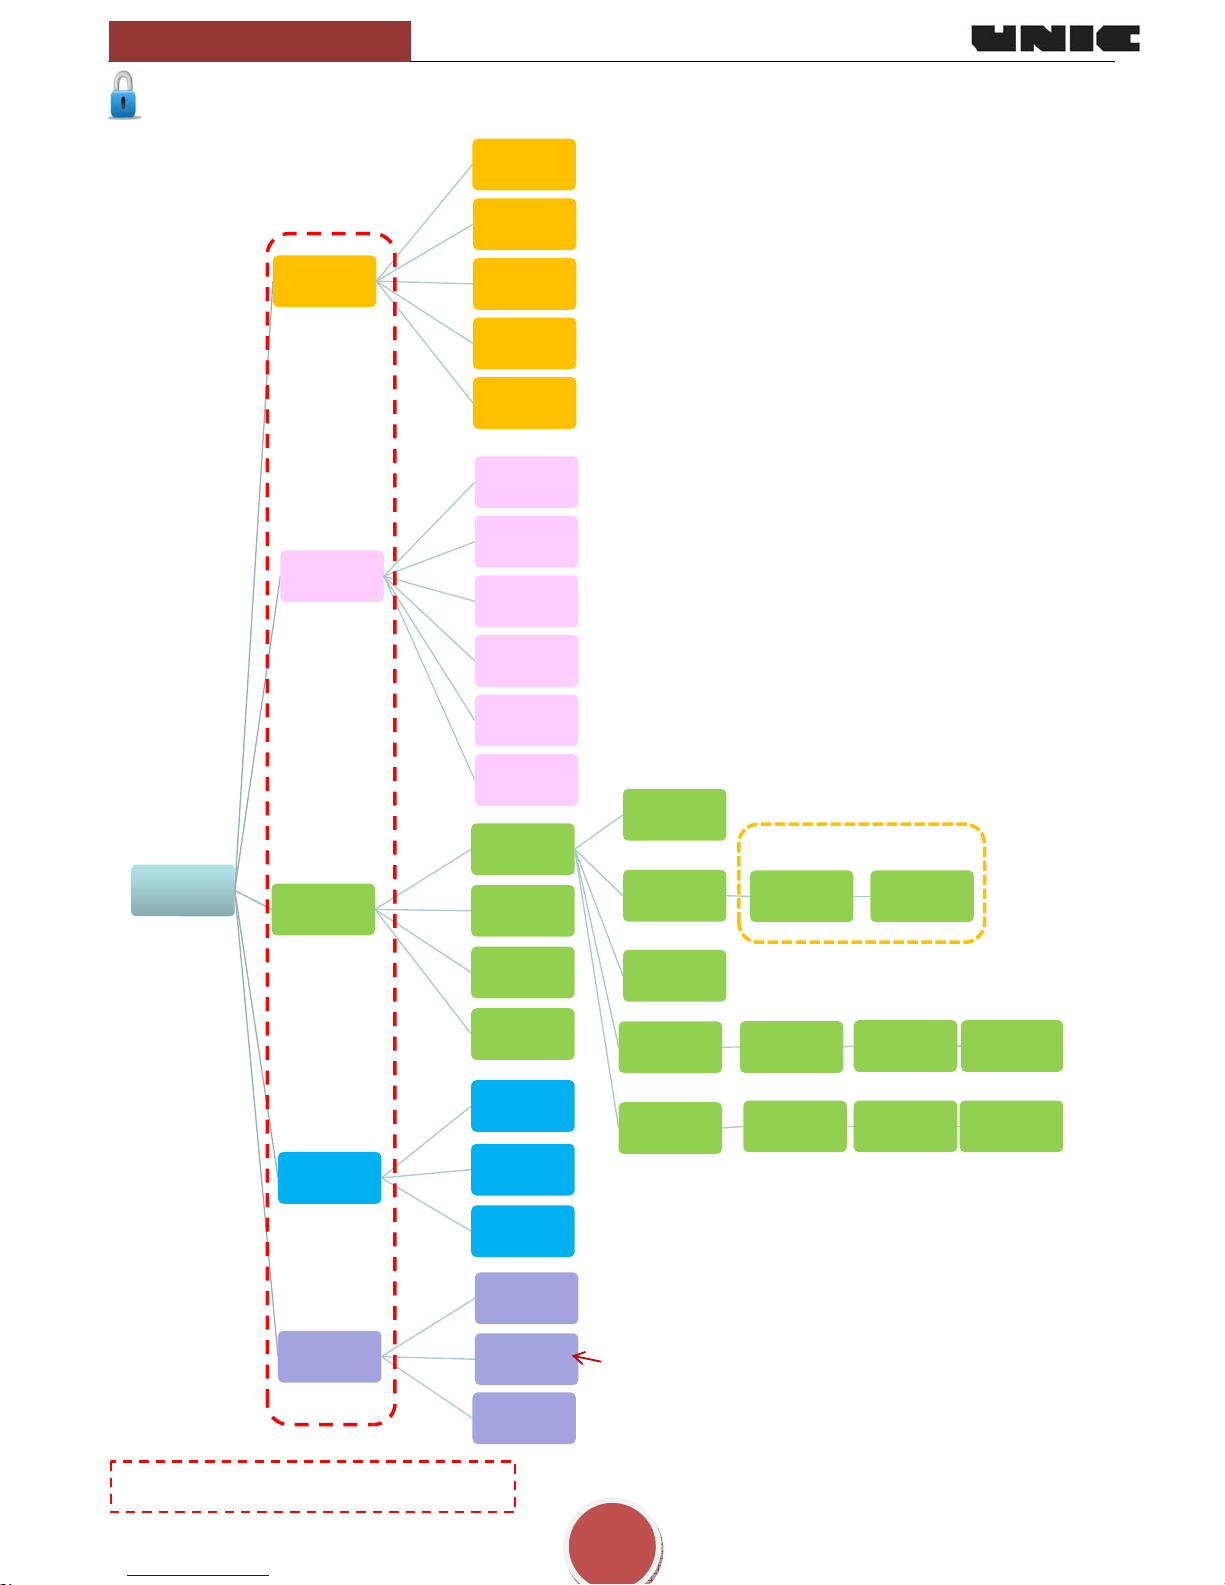
Level 2: Barista
1 DESK BACK
3 CODES
4 Level Choice
5 Enter code
N1
6 Enter code
N2
7 Enter code
N3
8 Confirmation
9
PARAMETERS
10 Date & Time
11language
12 Sound
13 Desk back
14 Lighti ng
15 units
16 MACHINE
SETTINGS
17 Group
settings
18
Temperature
Pre-infusion
20 Pre inf
electrovalve
21 pre-inf
pressure
sensor
22 Self-tim e
Small doses
23 1 small cup
24 2 small
cups
25 3 small
cups
Large doses
26 1 large cup
27 2 large
cups
28 3 large
cups
30 Chrono by
group
31 Hot wate r
steam settings
32 Air Steam
44
UTILIZATION
45 Cleaning
group
46 Coffee
counter
48 Softener
49
ECONOMICS
50 Stop Group
51/52
Programming
day/night
Instant
day/night
(If installed on the
machine)
Direct access
The dotted lines represent the main menu.
Stella di Caffè
USER GUIDE
25
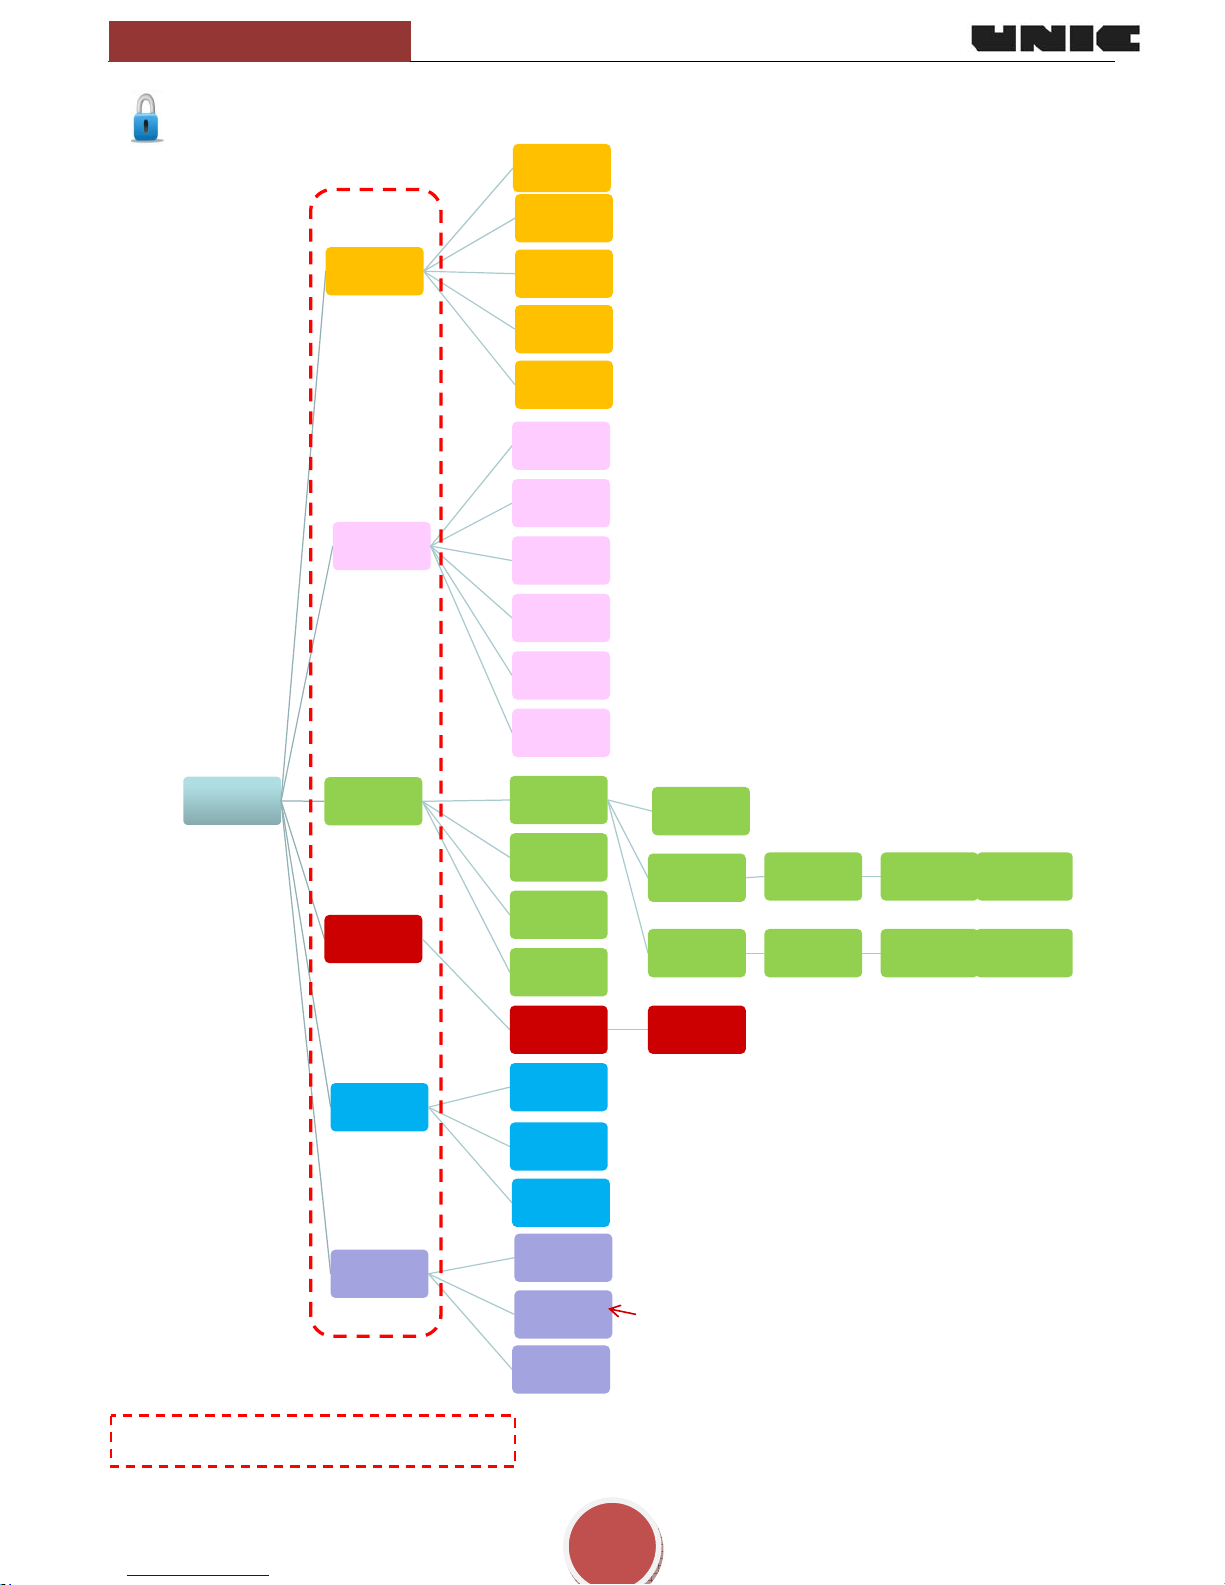
Level 3: Supervisor / Owner
1 DESK BACK
3 CODES
4 Levelchoice
5 Enter c o de N1
6 Enter c o de N2
7 Enter c o de N3
8 Confrma tio n
9 PARAMETERS
10 Date & Time
11 language
12 Sound
13 Desk back
14 Lighting
15 unit
16 MACHINE
SETTINGS
17 Group se ttings
18 Self- time
Small dos es
23 1 small cup 24 2 small cups 25 3 small cups
Large dos es 26 1 large cup 27 2 large cups 28 3 large cups
31 Hot water
steam settings
32 Steam air
29 Fast settings
33
MAINTENANCE
39 Parameters
CIM
43 Computer
connection
44 UTILIZATION
45 Clea ning
Group
46 Coffee counter
48 Softener
49 ECONOMI CS
50 Group stop
51/52
Programming
day/night
Instant day /night
Accès direct
The dotted lines represent the main menu.

Stella di Caffè
USER GUIDE
26
Level 4: Technician
1 DESK BACK
3 CODES
4 Level choice
5 Enter code N1
6 Enter code N2
7 Enter code N3
8 Confirmation
9 PARAMETERS
10 Date & Time
11 language
12 Sound
13 Desk back
14 Lighting
15 uniit
16 MACHINE
SETTINGS
17 Group settings
18 Temperature
Pre-infusion
20 Pre-infusion
electrovalve
21 Pre-infusion
pressure sensor
22 Self-time
Small doses
1 small cup 23
2 small cups 24 3 small cups 25
Large doses 1 large cup 26 2 large cups 27 3 large cups 28
30 Chrono by
group
31 H ot water
steamsettings
32 Steam Air
29 Fast settings
33
MAI NTENANCE
Componen t test
34
Error list35
Event Log 36
Cooling 37
Counters
38
CIM parameters
39
40 In fo id , s n…..
41 Machine code
access
42 Exterior
connection
43 Computer
connection
44 UT ILIZA TION
45 Cleanin g group
46 Coffee counter
47 Maintenance
planning
48 Softener
49 ECON OMICS
50 Stop group
51/52
Programming
day/niight
Instan t da y/n igh t
Direct access
The dotted lines represent the main menu.
Level USB:

Stella di Caffè
USER GUIDE
27
Cleaning and maintenance
After each use
Steam outlet tube :
After each use, clean the steam tube with a wet rag and push steam push-button for a short moment to
eliminate the small amount of liquid (milk) left inside the tube.
Daily
Before the service or after few hours of inactivity:
Dispense to the drain:
- Through each coffee head and water nozzle 0.5 liter of water.
- Through each steam nozzle some steam for 1 minute.
"BEFORE PREPARING ANY BEVERAGE"
After the service:
Filter holder:
- Empty the filter holder.
- Insert the filter holder in the unit.
- Press the continue key to rinse the filter holder.
Repeat the operation for each filter holder
Decompression circuit:
- Take a filter-holder and remove its filter.
- Place the blind filter inside the filter holder.
- Insert and tight the filter-holder in the unit.
- Turn the unit on to put the filter-holder under pressure, and then stop it. Repeat this operation
several
times, each time removing the water from the filter-holder.
Repeat the operation for each unit
Filter holder gasket:
- Insert the filter-holder into the unit without tightening it.
- Turn the unit on, at the same time tightening and loosening alternately the filter-holder in order to
create a
leak at the filter-holder gasket for cleaning.
Repeat the operation for each unit
Weekly
In addition to daily cleaning:
Filter holder:
Remove the filter and wash the filter-holder and the filter in soapy water.
Overflow tray:
Remove the overflow tray to empty it and rinse it under the tap.
Decompression circuit:
Do the daily decompression circuit cleaning adding a detergent tablet into the filter holder and do a pause
of 1 minute between 2 cycles but do not remove the water from the filter holder between 2 cycles.
Then rinse by repeating several cleaning cycles as long as necessary to eliminate any residual of
detergent with a minimum of 3 cycles
Other
Clean the body of the machine using a soft cloth and alcohol for the stainless-steel parts and a nonabrasive detergent for the painted parts.
To prevent scale, do not forget to regenerate your water softener periodically.
If descaling is necessary, the appliance has to be entrusted to manufacturer’s service agent or other
similar qualified person.

NZ9002 Rev 2.0 - 12/2011
www.unic.fr
info@unic.fr
Z.I. 4° Rue - B.P.425 - 06515 CARROS CEDEX 1 - FRANCE
Tél: (33) 04 92 08 62 60 Fax: (33) 0 4 93 29 24 23
 Loading...