

Page 1
Battery care
1. Keep your battery contact surfaces and battery compartment contacts clean
- Rub surfaces with a clean pencil eraser or rough cloth
2. Follow Instructions that came with your equipment
- Ensure proper insertion of batteries, (+) and (-) terminals are aligned correctly
3. Store batteries in a dry place at normal room temperature
- When stored at room temperature Duracell batteries are guaranteed to provide dependable life
- Refrigeration or freezing is not recommended
4. Remove batteries from a device when not expected to be in use for several months
5. Always replace batteries with the size and type specified by the manufacturer of the device
- Alkaline batteries are most often recommended
- Zinc Carbon batteries have inferior life-span and may cause inferior operation
6. Extreme heat or cold reduces battery performance
- Avoid putting battery operated devices in very warm places
- If device must be used in extreme temperatures always use alkaline
- Alkaline batteries perform better than regular carbon batteries in temperature extremes
7. Don’t mix old and new batteries or types within a device
- Mixing will reduce device performance and could cause leakage or rupture
8. Remove worn-out batteries immediately to prevent possible damage from battery leakage
9. Don’t store batteries loosely or carry them in your pocket
- Batteries can be shorted by contact with metal objects such as coins and cause leakage or rupture
10. Never dispose batteries in fire
11. Do not attempt to recharge a battery unless specifically marked “rechargeable”
Warranty and Returns
1. Warranty Statement - This express warranty is extended by Upsales Inc. a Georgia company having it offices at 4080 McGinnis
Ferry Road, Suite 1204 Alpharetta, GA 30005 to the original end user purchaser. Upsales Inc. warrants the ProScan 100 to be free of
defects in material and workmanship for a limited period of ninety (90) days from the date of sale to the original end user purchaser,
subject to the following conditions herein.
2. General Provisions - This warranty sets forth the full extent of Upsales Inc. responsibilities and consumer's exclusive
remedy regarding the Product. Upsales Inc. will, as its sole obligation under warranty, replace any Product that does not conform to
this warranty.
3. Ninety (90) Day Standard Limited Warranty - Upsales Inc. products are shipped from the factory with a standard limited warranty of
ninety (90) days on parts and labor from the date of purchase by the original end user purchaser based on proof of purchase receipt.
In the event of a defect, malfunction, or failure to conform to specifications during the warranty period, Upsales Inc. will replace the
Product (replacements are available through the retailer where the Product was purchased, only if all the components parts and original
packaging and manual are returned). This Warranty does not cover wear and tear on the covers or housing.
3. Voiding of Warranty - The warranty will be VOID if a Product is received for return or refund by your retailer and: (a) is incomplete
(i.e., boards or components are missing), or it does not include all original packaging and user manual; (b)has been opened by, or
has had work performed by, anyone other than an Upsales Inc. authorized service provider; (c) has non-conforming or non-Upsales
inc. approved housing or parts.
4. How to Receive Warranty Service - To obtain warranty service you must return the defective Product with a copy of the original
dated sales receipt to the retailer where the product was purchased, along with all the component parts and original packaging,
and user manual.
This device complies with Part 15 of the FCC Rules. Operation is subject to the following two conditions:
1. This device may not cause harmful interference, and 2. This device must accept any interference received, including interference
that may cause undesired operation.
E
C
A
R
E
M
U
L
O
V
K
C
A
B
1
4
7
E
V
A
S
Upsales, Inc.
4080 McGinnis Ferry Road, Suite 1204
Alpharetta, GA 30005
For Customer service
1-866-426-6568
www.proscanracing.com
F
M
F
F
O
TN
U
E
2
3
5
6
8
9
0
M
O
D
E
4. Enter the radio station frequency (ex. 9-5-5 for 95.5 FM) (cont. inside)
3. Press Mode until "Direct" appears on the display
2. Slide open the front cover
1. Slide the Top switch to FM
To direct dial FM radio stations:
clips into place
and pull up on the lanyard to snap the
oval holes on the ends of the lanyard
1. Insert the tabs on the belt clip into the
Attaching the Lanyard:
The ProScan 100 can tune FM radio stations by keying in the radio station frequency
ProScan 100 until your hear a snap
NOTE: To change the mode between Preset and Direct, press the mode key.
2. Press the clip firmly against the back of the
divots on the edges of the ProScan 100
- In Direct mode, the Tune Up/Down keys will scan to the next active frequency
- In Preset mode, the Tune Up/Down keys will tune to stored presets
2. Use the Tune Up and Down arrow keys to tune/scan to different frequencies
1. Slide the Top switch to FM
To play FM radio:
The ProScan 100 includes an FM radio for use at or away from the track.
1. Aligning the arms of the belt clip with the
Attaching the Belt clip:
to carry your ProScan 100.
The lanyard and belt clip are both great ways
Attaching the Lanyard / Belt clip
Playing the FM Radio
volume until released.
NOTE: Pressing and Holding the Volume will continually raise or lower the
labeled volume
1. Repeatedly press either the Up or Down arrow on the left side of the radio
To adjust the Volume:
The current volume will be indicated in the display.
Adjust the volume using the arrow keys on the left side of the ProScan 100.
Adjusting the volume
NOTE: Duracell batteries are recommended.
inside the battery compartment
orient the batteries according to the diagram
3. Insert the batteries making sure to
2. Slide open the battery door on the back of the ProScan 100
1. Slide the Top switch to the Off position
To insert the batteries:
the ProScan 100.
Batteries are required to power
Inserting the batteries
the Radio and the Track can cause hearing damage or hearing loss
NOTE: Do NOT use for extended periods at high volume. Loud noise both from
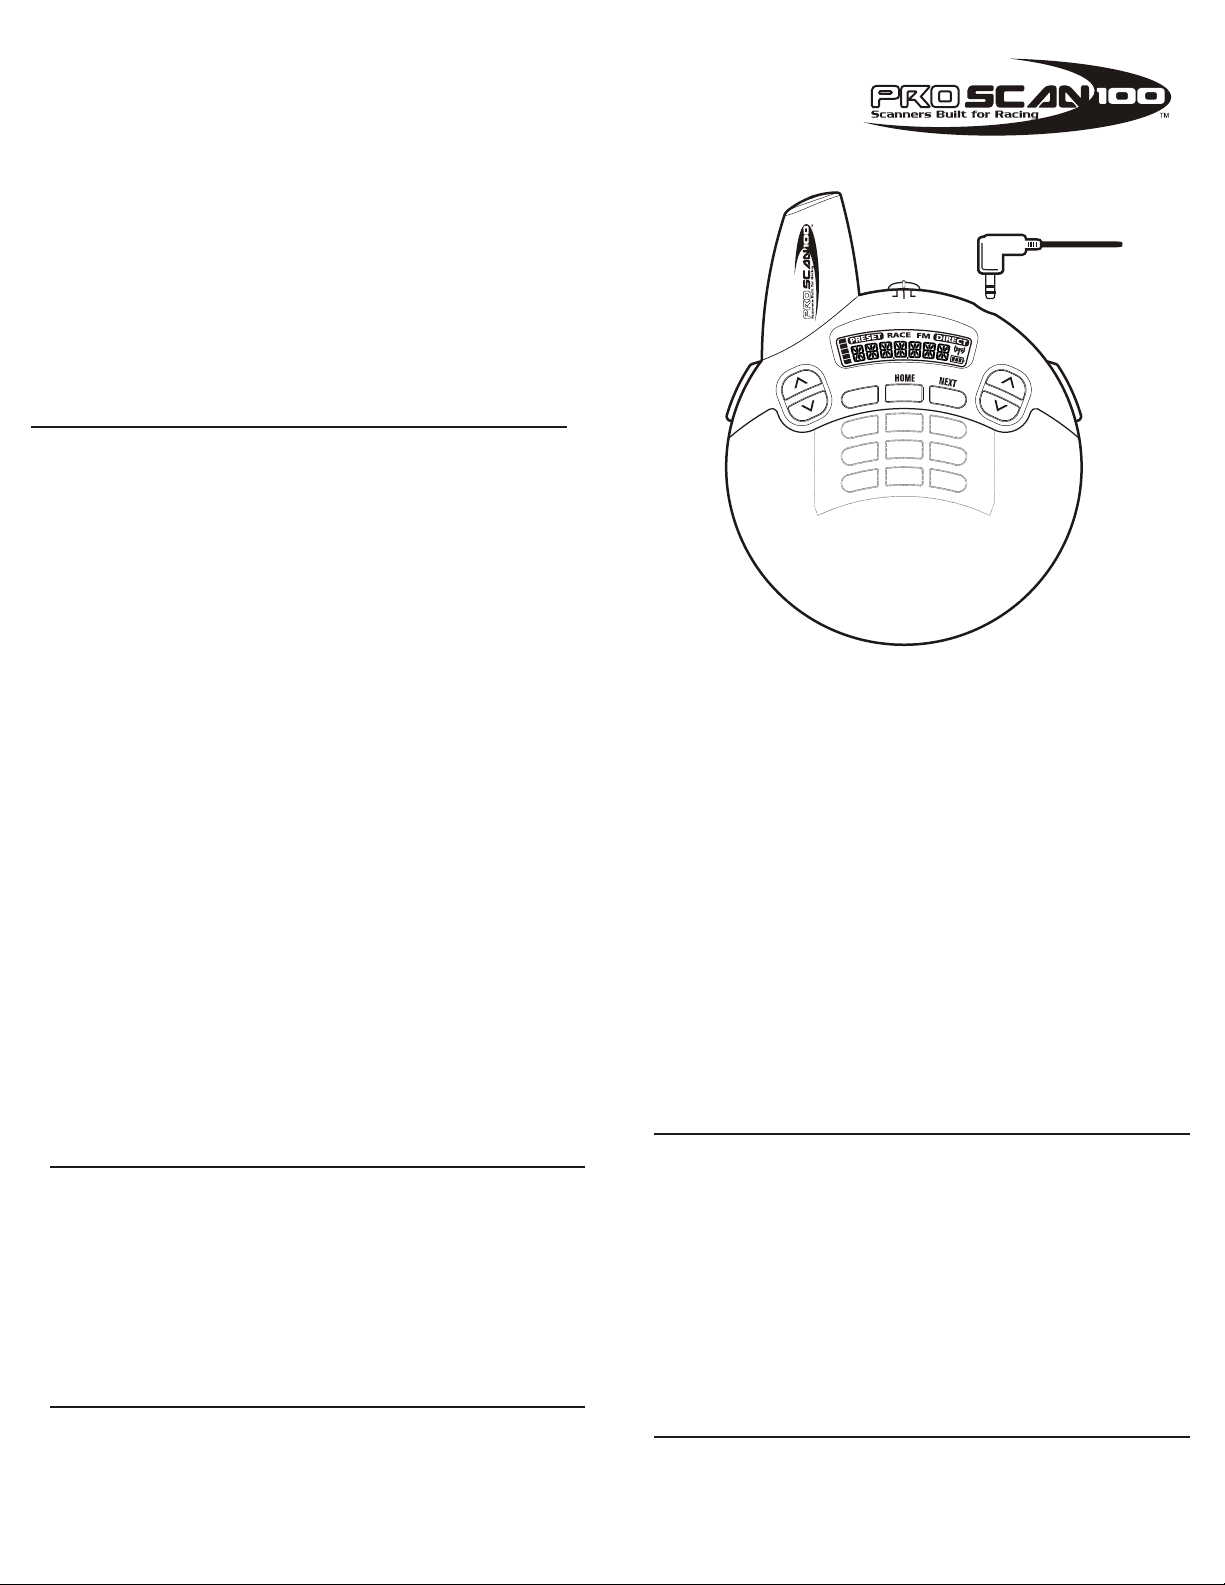
IDEA: You can use any headphones with the ProScan 100.
1. Insert the headphone plug into the headphone jack on the top right
Connecting Headphones
the ProScan 100. Please read the following instructions provided.
driver or team. This guide will walk you through the functions and operation of
best way to get into the race and stay connected while supporting your favorite
and thank you for purchasing the ProScan 100. The ProScan 100 is the
Welcome
Page 2

Storing and Selecting FM presets
To store FM presets:
1. In Direct mode, tune to the station you want to store.
2. Slide open the front cover
3. Press Save, then press the number key under which you want to store the
current radio frequency
4. To Add / Change a preset simply repeat steps 1 - 3
Deleting ALL presets
To delete all Race presets:
1. Press and hold Mode for 2 seconds. "DELETE?" will appear in the display
2. Press the Tune Down arrow key, "DEL ALL" will appear in the display
3. Press Save to confirm the deletion of all stored presets
Note: Pressing mode again will cancel the operation.
Note: You can store up to 10 preset FM radio stations.
To Select a Preset FM radio station:
1. Slide open the front cover
2. Press Mode until "Preset" appears on the display
3. Press the Number key which represents the Preset FM radio station you wish to
tune in to
Note: If the Preset is already displayed, you only need to press a number key to
tune to another preset.
Listening to Scanner
To listen to the Race Scanner:
1. Slide the Top switch to RACE
2. Use the Tune Up and Down arrow keys to tune/scan to different frequencies
- In Preset mode, the Tune Up/Down keys will tune to stored presets
- In Direct mode, the Tune Up/Down keys will scan to the next active frequency
NOTE: To change the mode between Preset and Direct, press the mode key.
The ProScan 100 can tune RACE channels by keying in the seven digit frequency
To direct dial Race channels:
1. Slide the Top switch to RACE
2. Slide open the front cover
3. Press Mode until "Direct" appears on the display
4. Enter the 7-digit frequency (ex.4-5-0-2-5-7-5 for 450.2575 MHz.)
Storing and Selecting Race presets
To store Race presets:
1. In Direct mode, tune to the frequency you want to store
2. Slide open the front cover
3. Press Save, then press any 3 digit number from 000-199 under which you want
to store the current channel and the press Save again
4. To Add / Change a preset simply repeat steps 1 - 3
Note: You can store up to 100 Race presets.
Note: A great way to use the Race presets, is to use the driver's car number as the
preset number. (example 024, 008, etc.)
Note: Once Save has been pressed, the stored preset will be permanently deleted.
Reset Factory Defaults
To Reset factory defaults:
1. Press and hold Mode for 2 seconds. "DELETE?" will appear in the display
2. Press the Tune Down arrow key until "RESET?" appears in the display
3. Press Save to confirm the return to factory defaults
Note: Pressing mode again will cancel the operation.
Note: Resetting factory defaults will delete all presets and restore the default preset
set at the factory.
Accessing History and the Home Key
To access channel history:
1. Close the front cover
2. Press the back button (1) to back up through the last 10 accessed channels
3. Press the next button (3) to advance forward through those same frequencies
Note: The ProScan100 keeps track of the last 10 accessed channels in both Race
and FM modes, using the back and next keys allow you to quickly scan to the last
10 accessed channels.
The Home key
To access the Home key (2) one touch hot key "preset":
1. Close the front cover
2. Press Home (2), and the ProScan100 returns to the predefined Home channel
Note: The ProScan100 stores a 'home' frequency for both Race and FM modes.
Changing the predefined Home key channel:
1. Slide the switch to either Race or FM depending on the Home key (2) frequency
you wish to change.
1. Tune in the channel you wish to assign to the Home key (2)
2. Make sure the cover is closed
3. Press and hold the Home key (2) for 2 seconds
To Select a ProScan100 preset:
1. Slide open the front cover
2. Press Mode until "Preset" appears on the display
3. Press the 3 digit number which represents the race frequency preset you wish
to tune in to
Note: When in Preset mode and the front cover is closed, presets are available
through the Tune Up and the Tune Down keys.
Deleting presets
To delete Race presets one at a time:
1. Press and hold Mode for 2 seconds "DELETE?" will appear in the display
2. Use the keypad to enter the preset number to be deleted
3. Press Save to confirm your entry
Note: Pressing mode again will cancel the operation.
Specifications
Channels of Operation: 1600
Number of Presets: 100
UHF Sensitivity: 0.18uV typical @10dB (S+N)/N
UHF Selectivity:
-6dB ± 6 kHz
-50dB ± 13 kHz
UHF Scan Speed: 50 ch/sec
IF Frequencies
1st IF: 21.4 MHz
2nd IF: 450 kHz
Squelch Sensitivity: 0.25uV
Antenna Impedance: 50 ohms
Audio Output Power (10% THD): 150 mW
Current Drain (squelched): 65mA
Specifications are typical; individual units might vary. Specifications are subject
to change and improvement without notice.
 Loading...