

UNIANA BALLRUNNER User Manual

BALL RUNNER
12–MAR–2019
OWNERS AND SERVICE MANUAL
UNIANA CO., LTD

BALL RUNNER
1
FOR SAFETY
IMPORTANT
The following safety instructions must be followed before using this product.
Read this manual carefully to understand the contents herein stated.
Please be sure to consult an industry specialist when setting up, moving or transporting this product.
For Setting up
•
This product should not be set up, moved or transported by anyone other than an industry
specialist.
•
When installing this product, set the 6 leg levellers evenly on the floor and make sure that the
product is installed stably in a horizontal position. Unstable installation may result in injury or
accident.
•
When installing this product, do not apply undue force on movable parts. Otherwise, injury and
accident may result, or the product may be damaged.
•
The machine for indoor use only; do not install outside.
•
Do not set the game machine up near emergency exits.
Protect the game machine from
•
Rain or moisture.
•
Direct sunlight.
•
Direct heat from air conditioning and heating equipment, etc.
•
Hazardous flammable substances.
•
Otherwise, an accident or malfunction may result.
•
Do not place containers holding chemicals or water on or near the game machine.
For Safety Reasons
•
Do not place objects near the ventilating holes.
•
Do not bend the power cord by force or place heavy objects on it.
•
Never plug or unplug the power cord with wet hands.
•
Never unplug the game machine by pulling the power cord.
•
Be sure to use indoor wiring within the specified voltage requirements.
☞ NOTE: For extension cord, use the specified rating.
•
Be sure to use the attached power cord.
•
Never plug more than one cord at a time into the electrical receptacle.
•
Do not lay the power cord across a walkway.
•
Be sure to ground this product.
•
Do not exert excessive force when moving the machine.
•
For proper ventilation, keep the game machine 100mm (4 inches) away from the walls.
•
Do not alter the system related dip switch settings.
•
If there is any abnormality such as smoke or abnormal noise being emitted from the machine,
immediately turn OFF the main power switch and unplug the power cord from the receptacle.
☞ NOTE: Using the machine in abnormal conditions could result from fire or accidents.
•
Do not connect the power cord improperly or permit dust or dirt to come in contact with the
connection.
☞ NOTE: Doing so could affect the power periodically.
•
Do not use this product anywhere other than commercial areas.
☞ NOTE: Using in a residential area or an area next to a residential area could affect signal
reception of radios, television sets, telephones, etc.
•
Do not plug or unplug the power cord with wet hands.
•
If the power cord or power plug becomes damaged, stop use immediately until the damaged is
epaired.
BALL RUNNER
2
FOR INSPECTION & CLEANING
IMPORTANT
The following operation instructions must be followed before using this product.
Read this manual carefully to understand the contents herein stated.
Please be sure to handle the product by qualified specialist only.
Before Cleaning
•
Be sure to turn OFF the main power switch and unplug the power cord from the receptacle before
inspecting or cleaning the machine.
•
When replacing parts, be sure to use parts of the correct specifications. Never use parts other
than the specified ones.
•
All maintenance should be performed by a qualified specialist only, as high voltage is present in
some areas.
•
If the sub power switch of the service panel is turned OFF without turning OFF the main power
switch of the power supply unit, some parts in the units may remain live. When opening the back
door, be sure to turn OFF the main power switch and unplug the power cord from the receptacle.
For Cleaning
•
To clean the game machine, wipe with a soft cloth dampened with a neutral non-abrasive
detergent.
☞ NOTE: Using thinner or other organic solvent or alcohol may damage the material.
☞ NOTE: Electrical shock or equipment failure could be caused by water entering the inside of
the machine.
FOR MOVING & TRANSPORTATION
Before Moving
•
Before moving the machine, be sure to turn OFF the main power switch, unplug the power cord
from the receptacle and remove the power cord from the machine.
•
Before moving to take the machine off the levellers and move it on the casters.
•
Avoid excessive force while moving the machine.
For Transportation
•
Components in the game are sensitive to vibrations and impact. Care should be used when
moving and transporting the game machine.
•
Be sure not to let the machine tip over.
* This device complies with part 15 of the FCC Rules. Operation is subject to the following two conditions:
(1) This device may not cause harmful interference, and (2) this device must accept any interference received,
including interference that may cause undesired operation.
Caution: Changes or modifications not expressly approved by the party responsible for compliance could void
the user's authority to operate the equipment.
Note: This equipment has been tested and found to comply with the limits for a Class A digital device, pursuant
to part 15 of the FCC Rules. These limits are designed to provide reasonable protection against harmful
interference when the equipment is operated in a commercial environment. This equipment generates, uses, and
can radiate radio frequency energy and, if not installed and used in accordance with the instruction manual, may
cause harmful interference to radio communications. Operation of this equipment in a residential area is likely to
cause harmful interference in which case the user will be required to correct the interference at his own expense.

BALL RUNNER
3
CONTENTS
FOR SAFETY
FOR INSPECTION & CLEANING
FOR MOVING & TRANSPORTATION
1. ABOUT GAME ……………………………………………………………………PAGE 4
1-1. GAME DESCRIPTION
1-2. DIMENSIONS
1-3. SPECIFICATION
2. NAME OF PARTS & LOCATION…………………………………………………PAGE 5
2-1. FRONT & RIGHT SIDE PARTS
2-2. BACK & PLAY FIELD PARTS
2-3. TOP MARQUEE ASSEMBLY
2-4. POWER SUPPLY VOLTAGE SELECT
3. GAME SETUP & TEST MODE………………………………………………….PAGE 9
3-1. CONTROL PANEL
3-2. SETUP MODE
3-3. TEST MODE
4. ERROR & TROUBLE SHOOTING……………………………………………PAGE 13
4-1. ERROR CODE
4-2. TROUBLESHOOTING: TICKET ERROR
4-3. TROUBLE SHOOTING: BALL RETURN ERROR (E1~E7)
4-4. TROUBLE SHOOTING: SENSOR ERROR (S1~S7, T1~T7)
4-5. TROUBLE SHOOTING: COIN MECHANISMS ERROR (C1)
5. PART LIST & WIRING DIAGRAM……………………………………...……PAGE 18
5-1. PART LIST
5-2. WIRING DIAGRAM
BALL RUNNER
4
1. ABOUT GAME
1-1. GAME DESCRIPTION
Ball Runner is a carnival theme ticket redemption game. Use quick reactions, timing and skill to hit all
green targets in time! Quickly push the balls to hit all targets to win the bonus!
How to Play
•
When the target lights up green, push the ball to hit the target.
•
If the ball hit the target correctly, the target turns blue and adds one green cell to the score
display panel.
•
If the ball hit the wrong target, the target turns red.
•
Hit all targets to win the Bonus!
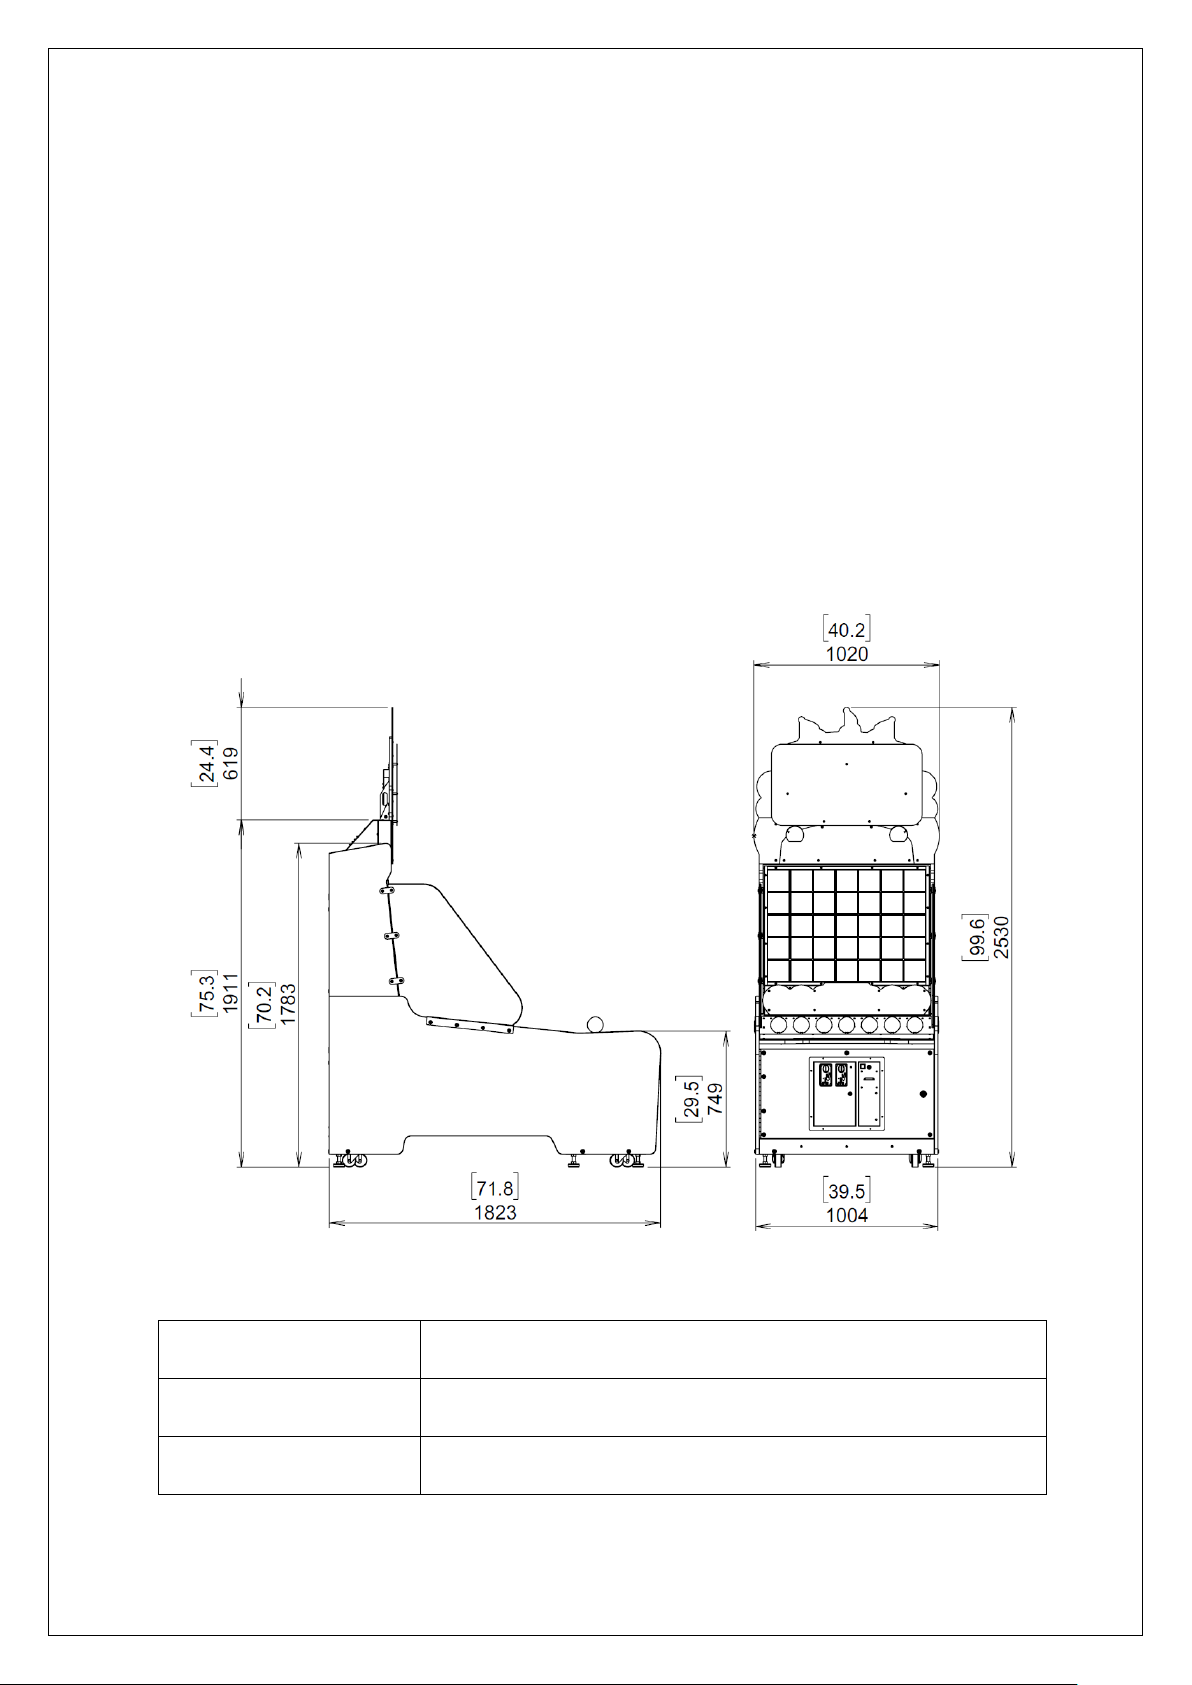
1-2. DIMENSIONS
1-3. SPECIFICATION
DIMENSION
(See above figure)
W1020 x D1823 x H2530 (mm)
W40.2 x D71.8 x H99.6 (inch)
WEIGHT
260kg (573lbs)
POWER
110V / 230V (±10%) 50/60Hz, 180W 1AMP
BALL RUNNER
5
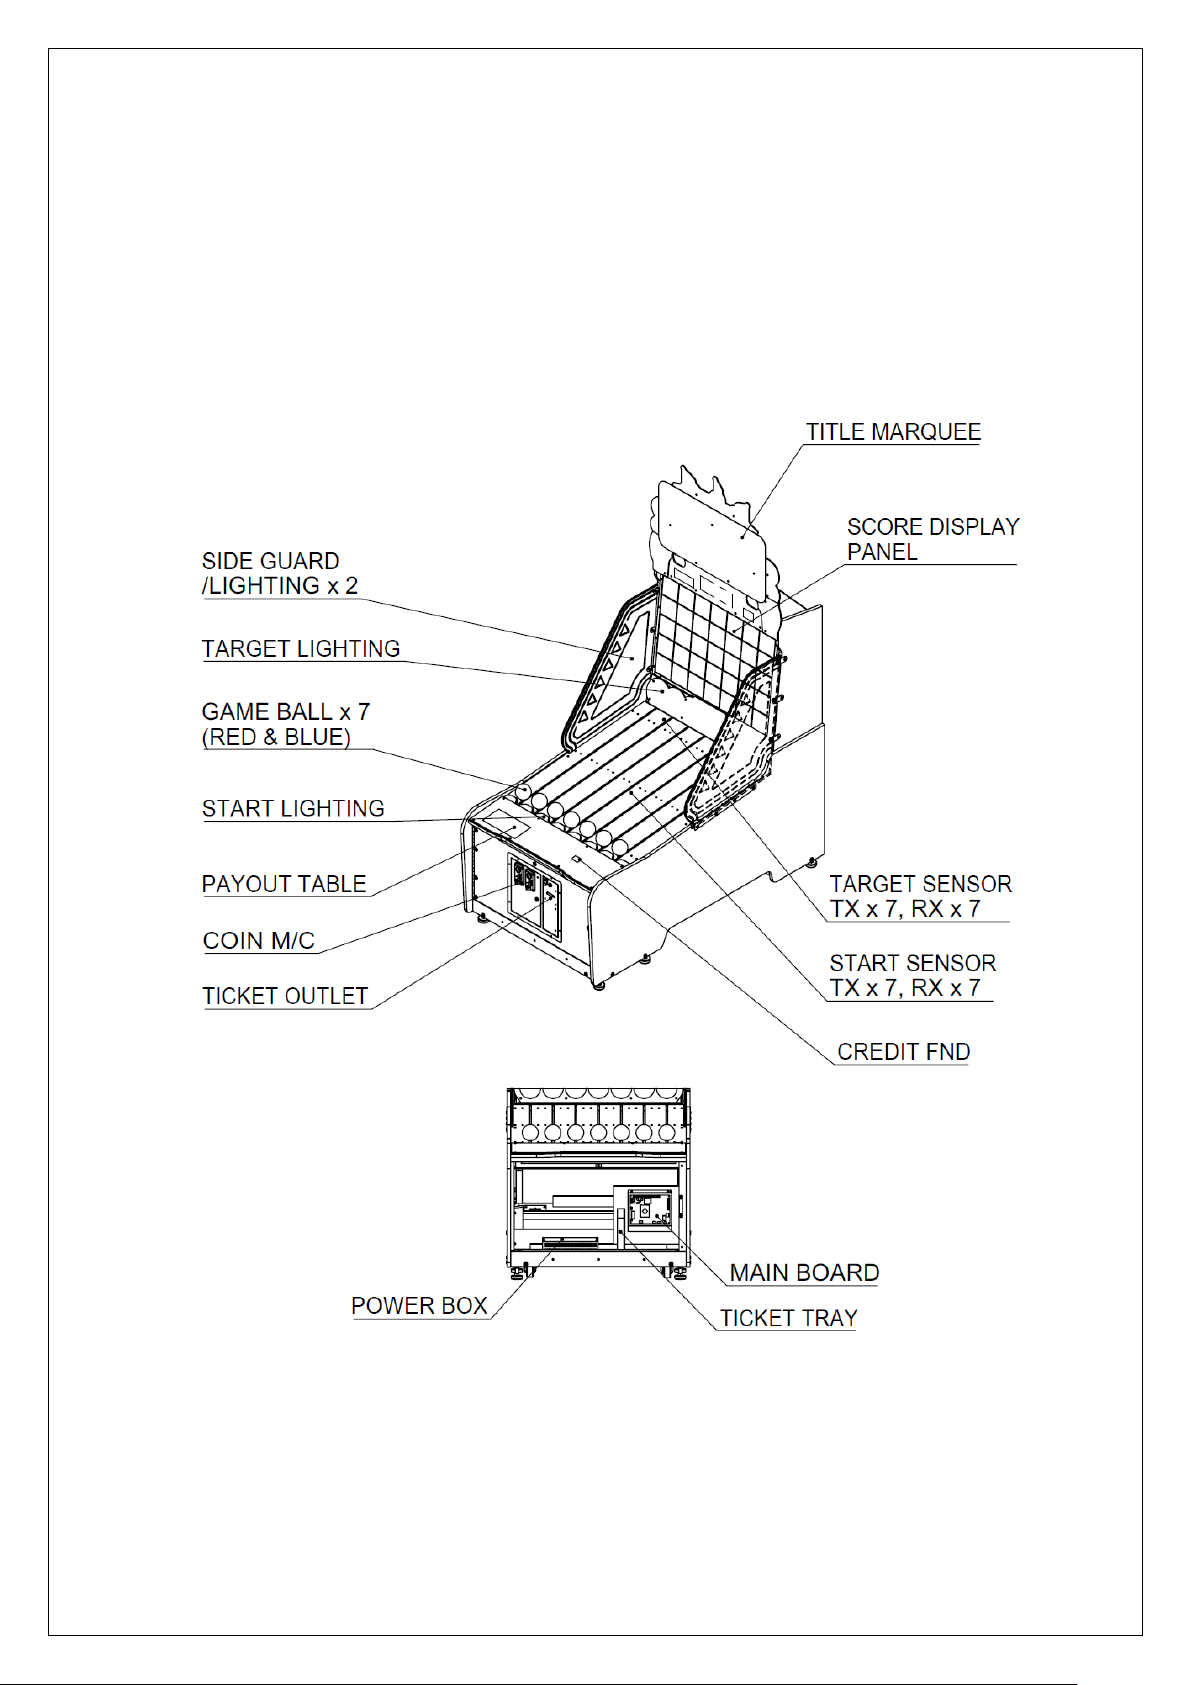
2. NAME OF PARTS & LOCATION
2-1. FRONT & RIGHT SIDE PARTS
BALL RUNNER
6
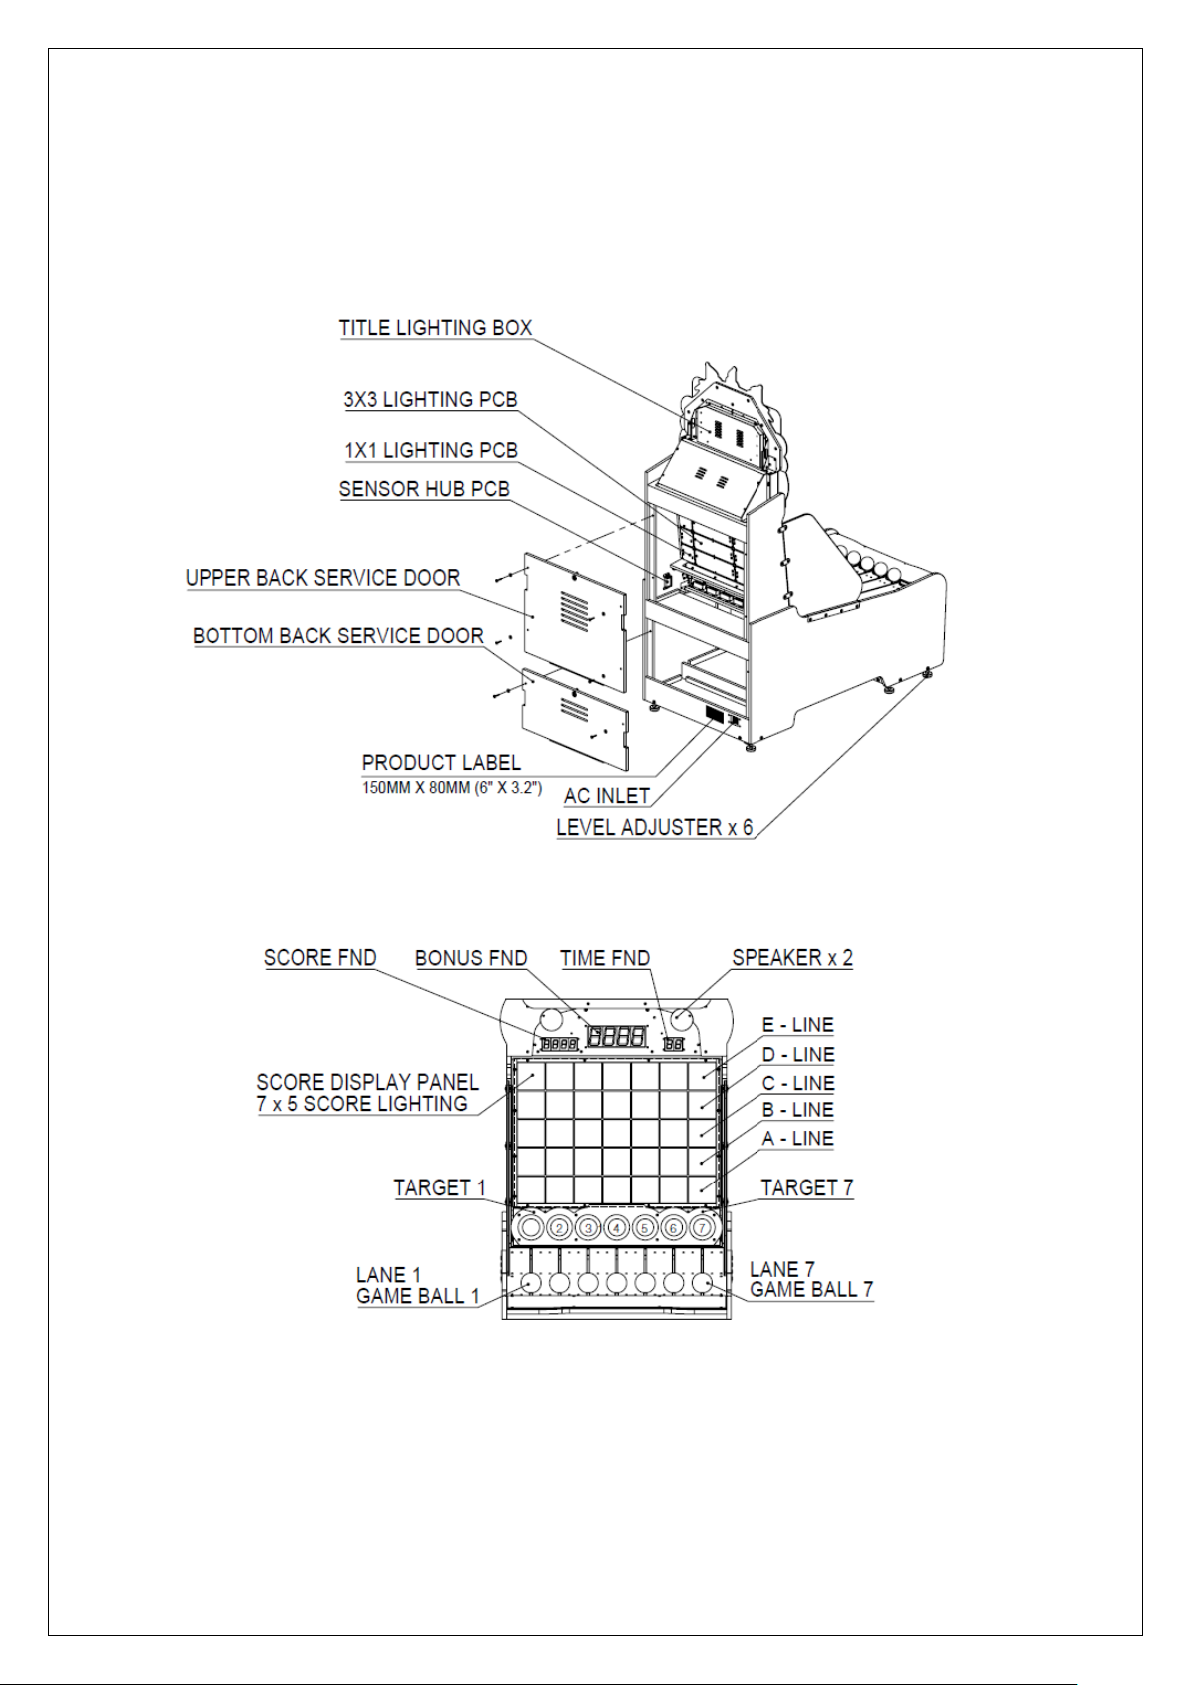
2-2. BACK & PLAY FIELD PARTS
BALL RUNNER
7
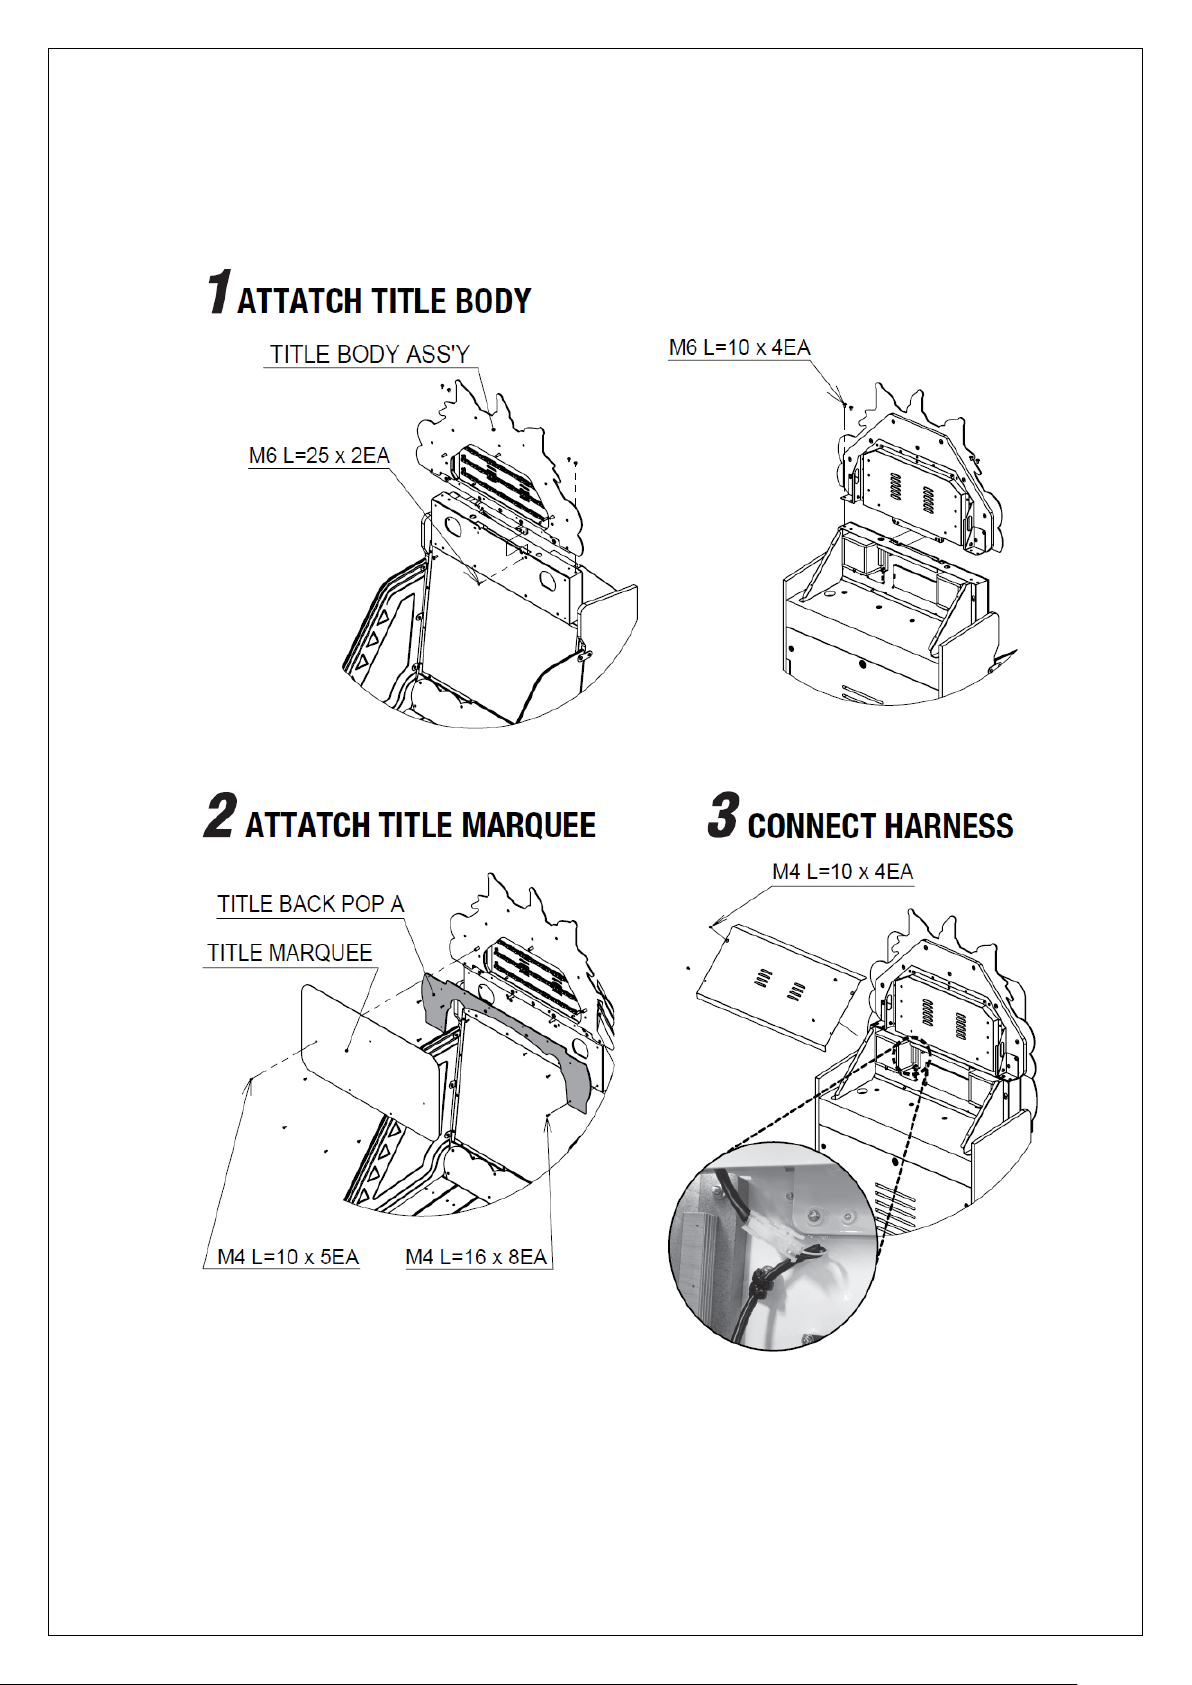
2-3. TOP MARQUEE ASSEMBLY
BALL RUNNER
8
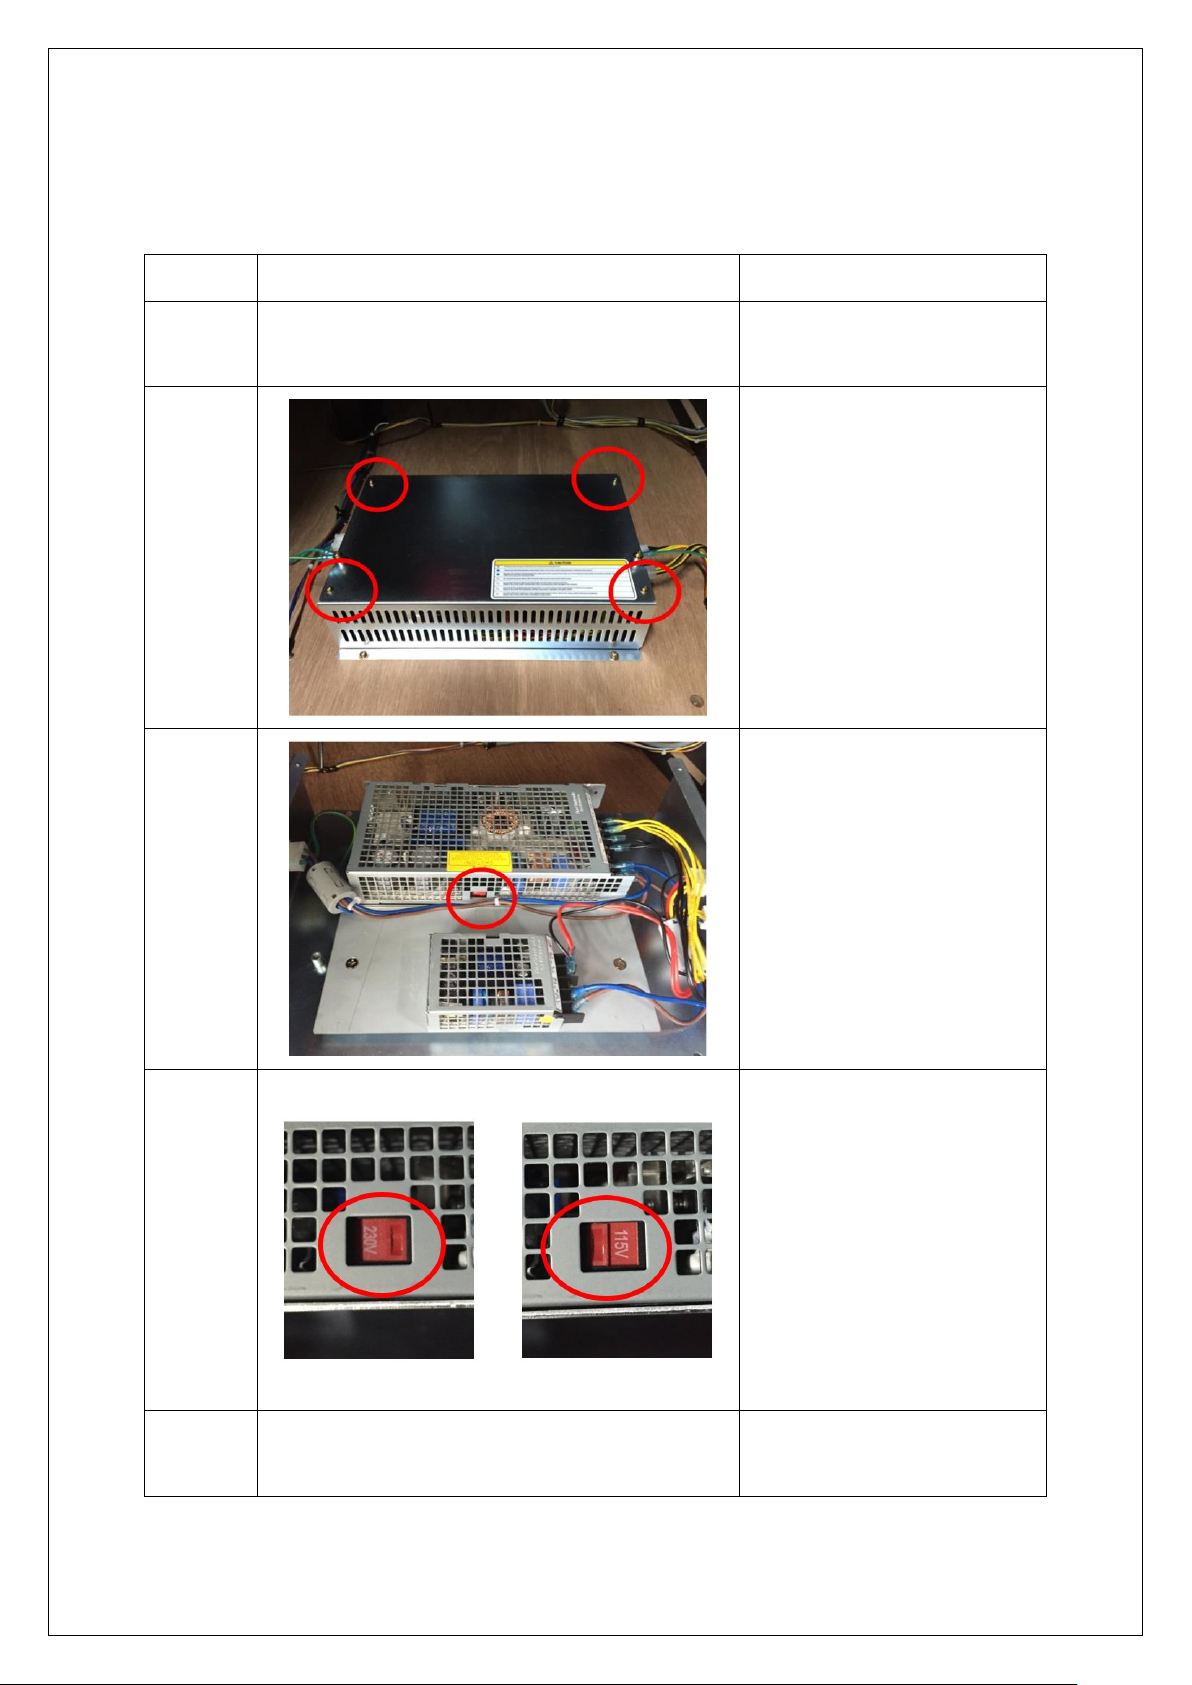
2-4. POWER SUPPLY VOLTAGE SELECT
Step
Figure
Description
1
Turn off the machine and
disconnect the power plug.
2
Remove the 4 bolts on the
power box top cover.
3
Please remove the cover and
check SMPS 12V.
4
Move and set the PSU Switch as
the local voltage.
(230V/115V)
5
Assemble in reverse order.
BALL RUNNER
9
3. GAME SETUP & TEST MODE
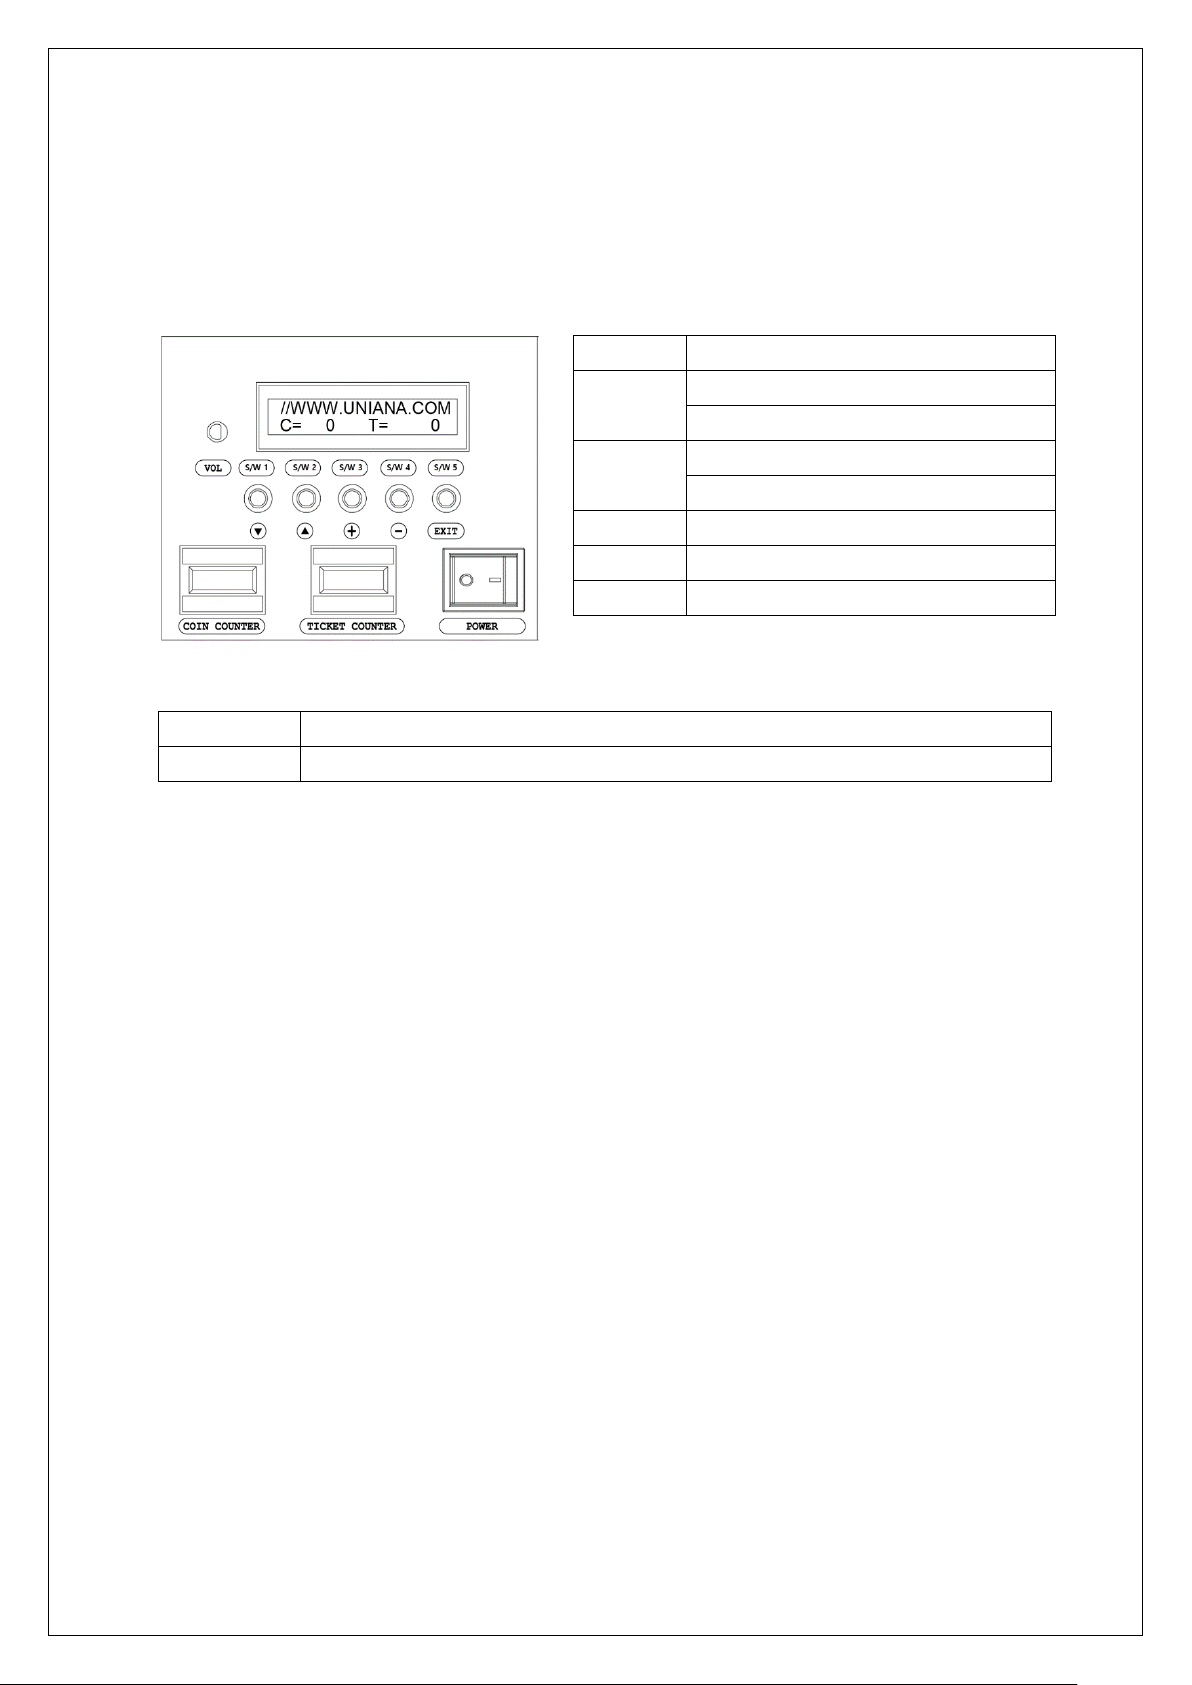
3-1. CONTROL PANEL
Control Panel Switch Function of Control Panel
VOLUME
MODULATE SOUND
S/W 1
ACCESS SETUP MODE
SELECT SETUP MODE (NEXT)
S/W 2
ACCESS TEST MODE
SELECT SETUP MODE (PREVIOUS)
S/W 3
INCREASE SETUP VALUE
S/W 4
DECREASE SETUP VALUE
S/W 5
EXIT SETUP MODE
Bookkeeping
C
NUMBER OF COINS
T
NUMBER OF DISPENSED TICKETS
•
SERVICE COIN MODE
1.
Push and hold S/W5
(EXIT) button.
2.
Push S/W3
(+) button for service coin.
☞ NOTE : Coin will not be counted on meter or in bookkeeping.
•
CLEAR CREDIT
1. Push and hold S/W5 for 5 seconds.
•
CLEAR CREDIT & BOOKEEPING
1. Turn power off.
2. Push and hold S/W5
(EXIT) button.
3.
Turn power on while holding in S/W5 (EXIT) button.
•
FACTORY RESET: CLEAR SET VALUES
1.
Turn power off.
2.
Turn power on while holding in S/W3 & S/W4
button.
3.
Keep holding in S/W3 & S/W4
button until machine is completely on.
(It may take up to 10 seconds)
BALL RUNNER
10
3-2. SETUP MODE
To access setup mode
•
Push S/W 1 (▼) button to get into setup mode.
•
Push S/W 1 (▼) button to move to next set up item.
•
Push S/W 2 (▲) button to move to previous setup item.
To change the value of item selected, follow below
•
Push S/W 3 (+) or S/W 4 (-) button to increase or decrease set up value.
•
Push S/W 1 (▼) or S/W 2 (▲) button to move to next or previous setup item.
•
Push S/W 5 (EXIT) button to enter exit mode.
▪ Push S/W 1 (▼) button to save changes and exit setup mode.
▪ Push S/W 2 (▲) button to discard changes and exit setup mode.
•
Power off and switch back on 5 seconds for the change to take effect
SETUP MODE FLOW CHART
1. CREDIT MODE
1_COIN 1_PLAY
Set up credit mode
(Default Coin 1/Credit 1)(Adjustable Free play, Coin 0~20/Credit 1~20)
- S/W 3 : Set up coin value (0~20)
- S/W 4 : Set up credit value per one coin (1~20)
☞ NOTE : Set up coin value as 0 for free play mode.
2. GAME TIME
VALUE = [30 sec]
Set up game time
(Default 30 sec)(Adjustable 25~60 sec)
☞ NOTE : Game time increase by 5 seconds. If you increase the game time, the game
level becomes very easy. For e.g. 40 sec hard play is easier than 30 sec easy mode.
3. DIFF. LEVEL
VALUE=[1.8]
Set up game difficulty level
(Default 1.8)(Adjustable 1~2.4)
- Very easy play (1.9~2.4)
- Easy play with long target lit time (1.8~1.9)
- Normal play with average target lit time (1.6~1.7)
- Hard play with the short target lit time (1.4~1.5)
- Very hard play with very short target lit time (1.2~1.3)
- Use for testing purpose only (1~1.1)
☞ NOTE : Each game level has different target lit time.
4. AUTO START
VALUE = [1]
Set a game auto start time
(Default 1 sec)(Adjustable 1~9 sec)
☞ NOTE : Game auto starts after demo play.
5. ADD BALL
VALUE = [0]
Set up additional ball targets
(Default 0)(Adjustable 0~5)
☞ NOTE : In addition to total targets(Total 35 targets per play), you can add random ball
targets.
6. BONUS TICKET
VALUE = [1000]
Set up bonus ticket value
(Default 1000)(Adjustable 0~9999)
☞ NOTE : Bonus ticket value Increase by 1.
BALL RUNNER
11
7. BONUS ADD
VALUE = [0]
Set up incremental bonus ticket value
(Default 0)(Adjustable 0~100)
☞ NOTE : Set desired incremental bonus tickets value per play.
8. BONUS MAX
VALUE = [1000]
Set up bonus maximum ticket value
(Default 1000)(Adjustable 0~9999)
☞ NOTE : e.g. when you set up the max ticket value as 500, the bonus ticket value will not
accumulate more than 500.
9. TICKET VALUE
VALUE = [1]
Set up number of tickets per score
(Default 1)(Adjustable 1~2)
☞ NOTE : Dispense one ticket per one ticket or two tickets.
10. DEMO PLAY
VALUE = [1 min]
Set up repeat time for demo play
(Default 1)(Adjustable 0~30 min)
☞ NOTE : e.g. If you set up the demo repeat time for 1 minute, the demo play will play by
1-minute cycle. Set up time value as 0 to turn off the demo play.
11. DEMO SOUND
VALUE = [ON]
Set up sound effect for demo play
(Default ON) (Turn ON/OFF).
12. BACK LIGHT
VALUE = [90]
Set up the lighting brightness of the display panel and the target
(Default 90)(Adjustable 0~100)
☞ NOTE : Brightness value increase by 10.
13. SCORE PRESET
VALUE = [3]
Set up the presets for number of tickets
(Default 4)(Adjustable 1~5)
Preset
No.1
No.2
No.3
No. 4
No. 5
Number of coins
(recommended)
2 Coins
$0.5 / £0.5
4 Coins
$1 / £1
6 Coins
$1.5 / £1.5
8 Coins
$2 / £2
12 Coins
$3 / £3
Scores
0~2990
4
10
15
20
30
3000~5990
10
20
25
50
70
6000~7990
15
30
40
75
100
8000~8990
25
40
60
100
150
Bonus
200
500
1000
1000
1500
☞ NOTE : e.g. If you set up preset no.3 and scored 4,000 points, you get 25 tickets.
14. POINTS < 3000
TICKETS = [15]
Set up the tickets value of score 0~2990
(Default 15)(Adjustable 0~9999)
15. POINTS < 6000
TICKETS = [25]
Set up the tickets value of score 3000~5990
(Default 25)( Adjustable 0~9999)
16. POINTS < 8000
TICKETS = [40]
Set up the tickets value of score 6000~7990
(Default 40)( Adjustable 0~9999)
17. POINTS < 9000
TICKETS = [60]
Set up the tickets value of score 8000~8990
(Default 60)( Adjustable 0~9999)
18. BONUS FREE
VALUE = [OFF]
Set up one more free game after the bonus win
(Default OFF)(Turn ON/OFF)
IMPORTANT
After changing setup values, you must turn OFF and turn ON the power for the new settings to take effect.
 Loading...