

Page 1

Safety Warning
This product has been manufactured to comply with international safety standards.
Please read the following safety precautions carefully.
Safety instructions and Precautions
1. MAINS SUPPLY
••••
Operate this product only from the type of power supply indicated on the marking label.
••••
Disconnect the product from the mains before you start any maintenance or installation procedures.
2. OVER LOADING
••••
Do not overload a wall outlet, extension cord or adapter as this may result in electronic fire or shock
3. LIQUIDS
••••
The product should not be exposed to liquid of any kind. In addition, no objects filled with liquid
should be placed on the product.
4. VENTILATION
••••
The slots on rear of the product must be left uncovered to allow proper airflow into the unit.
••••
Do not stack electronic equipments on top of the product.
5. ATTACHMENTS
••••
Do not use any unsupported attachments as these may be hazardous or cause damage to the
product.
6. CONNECTION TO THE TV
••••
Disconnect the product from the mains before connecting or disconnecting the cable from the TV.
Failure to do so can damage the TV.
7. LOCATION
••••
Place the product indoors to avoid exposing it to lightning, rain or sun. Do not place it near a
radiator or heat register.
8. REPLACEMENTS OF PARTS
••••
When replacement of parts is required, be sure the service technician uses replacement parts
specified by the manufacturer or those that have the same characteristics as the original part.
Unauthorized substitution may result in additional damage to the unit.
Page 2

CONTENTS
1 Before using the product 4
1.1 Package Contents 4
1.2 Front View 5
1.3 Side View 5
1.4 Rear Panel 6
1.5 Remote Control 9
2 Connections
2.1 Connect to the Antenna 10
2.2 To use the composite AV connector 10
2.3 To use HDMI connector 11
2.4 Plug in power 11
2.5 Connect to the Ethernet 11
2.6 To use optical Digital Audio 12
10
2.7 Connect a USB device
2.8 Transfer media files from your computer to player 13
2.9 To use AV Input connector 13
2.10 To use the SD card
3 Basic Operation
3.1 Browser Menu 14
3.2 Movie Playback 14
3.3 Music Playback 15
3.4 Viewing Photos 16
4 Installation (Searching for the channels)
4.1 Automatic Search 18
4.2 Manual Search 19
12
13
14
18
Page 3

5 Recording
20
5.1 Instant Recording
5.2 Scheduled Recording by manual
5.3 Scheduled Recording by EPG (Electronic Program Guide) 22
5.4 Recorded Program 23
5.5 Time Shifted Recording 24
6 File Manager
6.1 Copy or Move 25
6.2 Delete 26
7 Network Setup
7.1 Wired Setup 27
7.2 Wireless Setup (Optional)
20
21
25
27
28
8
9
10
7.3 Browsing on the network
7.4 Using Internet Radio 30
7.5 FTP Server 31
7.6 NFS Server 33
7.7 BitTorrent 37
Setup
Firmware Update
Appendix
10.1 Trouble shooting
29
39
40
49
49
50
10.2 Specification
Page 4
-
4 -
1. Before using this product
This chapter provides detailed instructions on the product and its accessories.
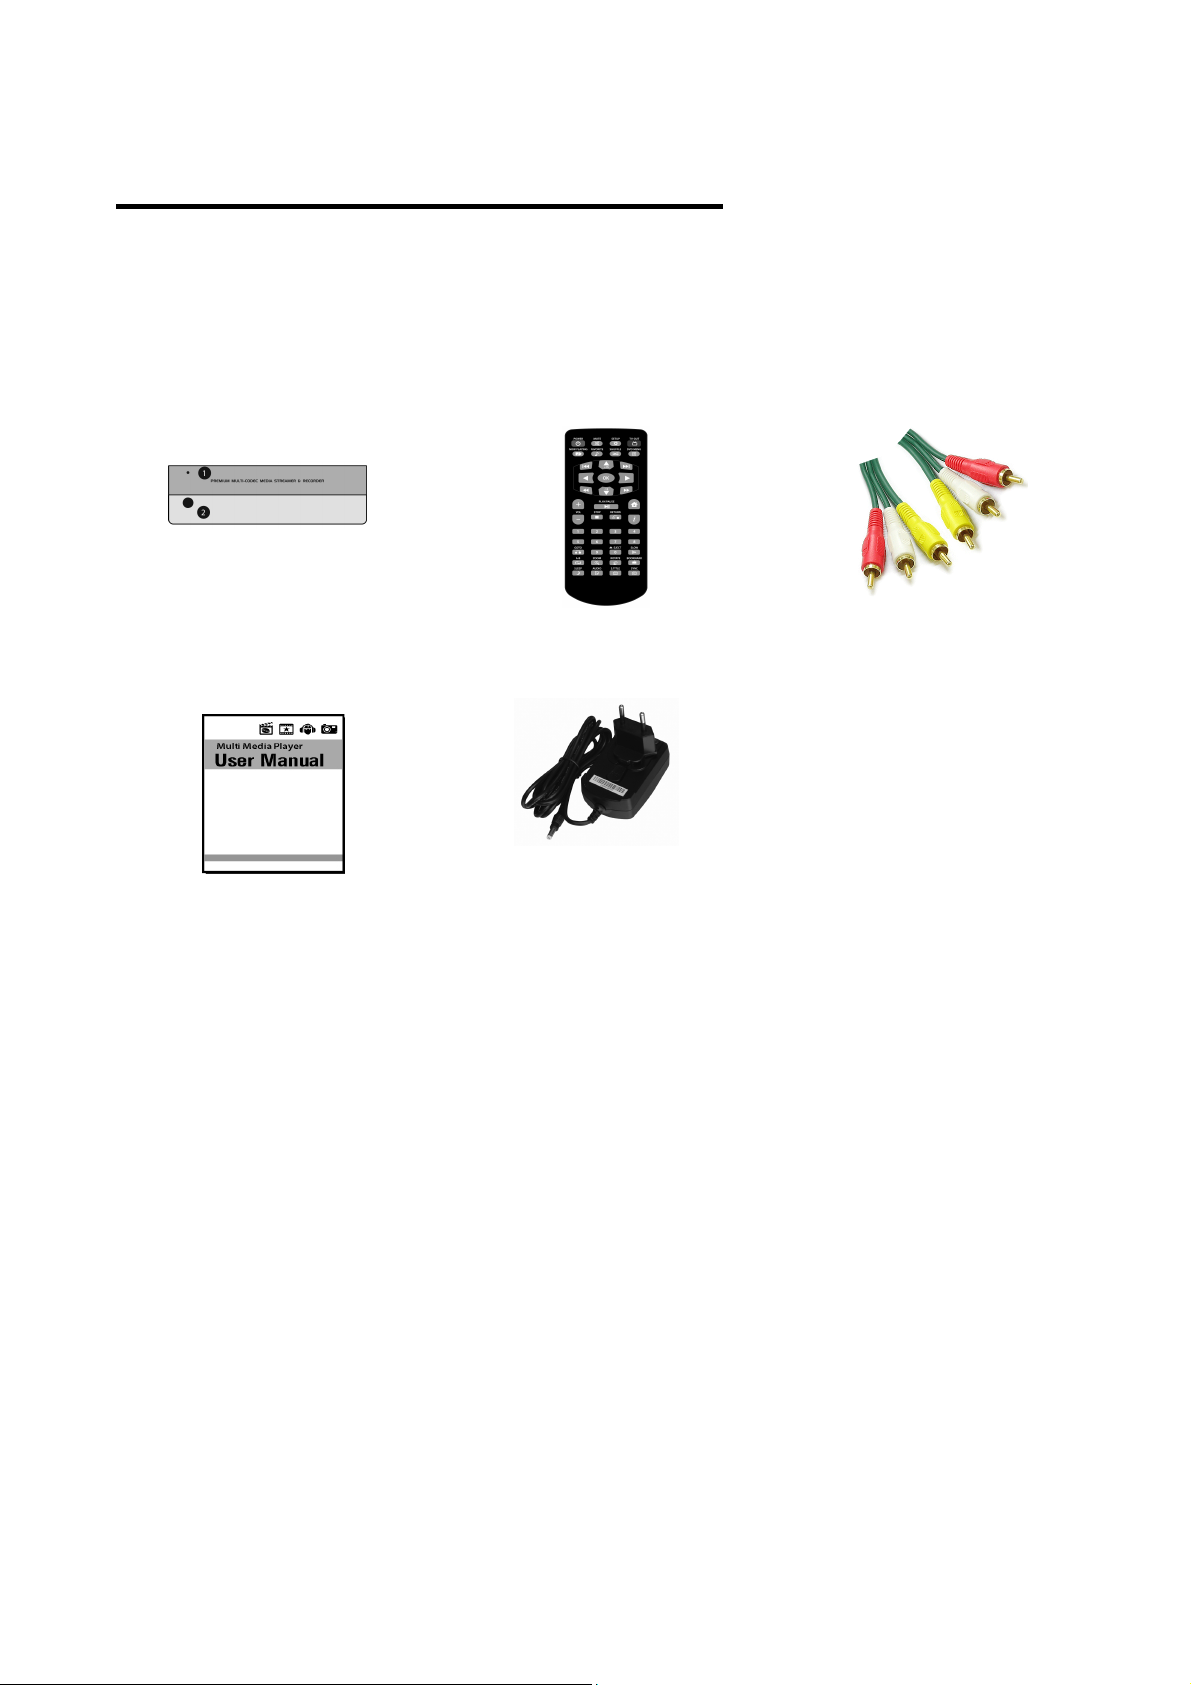
1.1 Package Contents
Check all the package contents before using the product.
cable
Recorder Remote Control Composite audio/video
Users’ Manual AC adapter
NOTE
Product contents may be subject to change.
Cables not specified above must be purchased separately.
Page 5

5
1.2 Front View
1. Power LED
The power LED on the front of the unit is on while the recorder player starts up.
2. Infrared receiver
Receives signals from the remote control. Make sure that the path between remote
control and IR is unobstructed.
Page 6
6
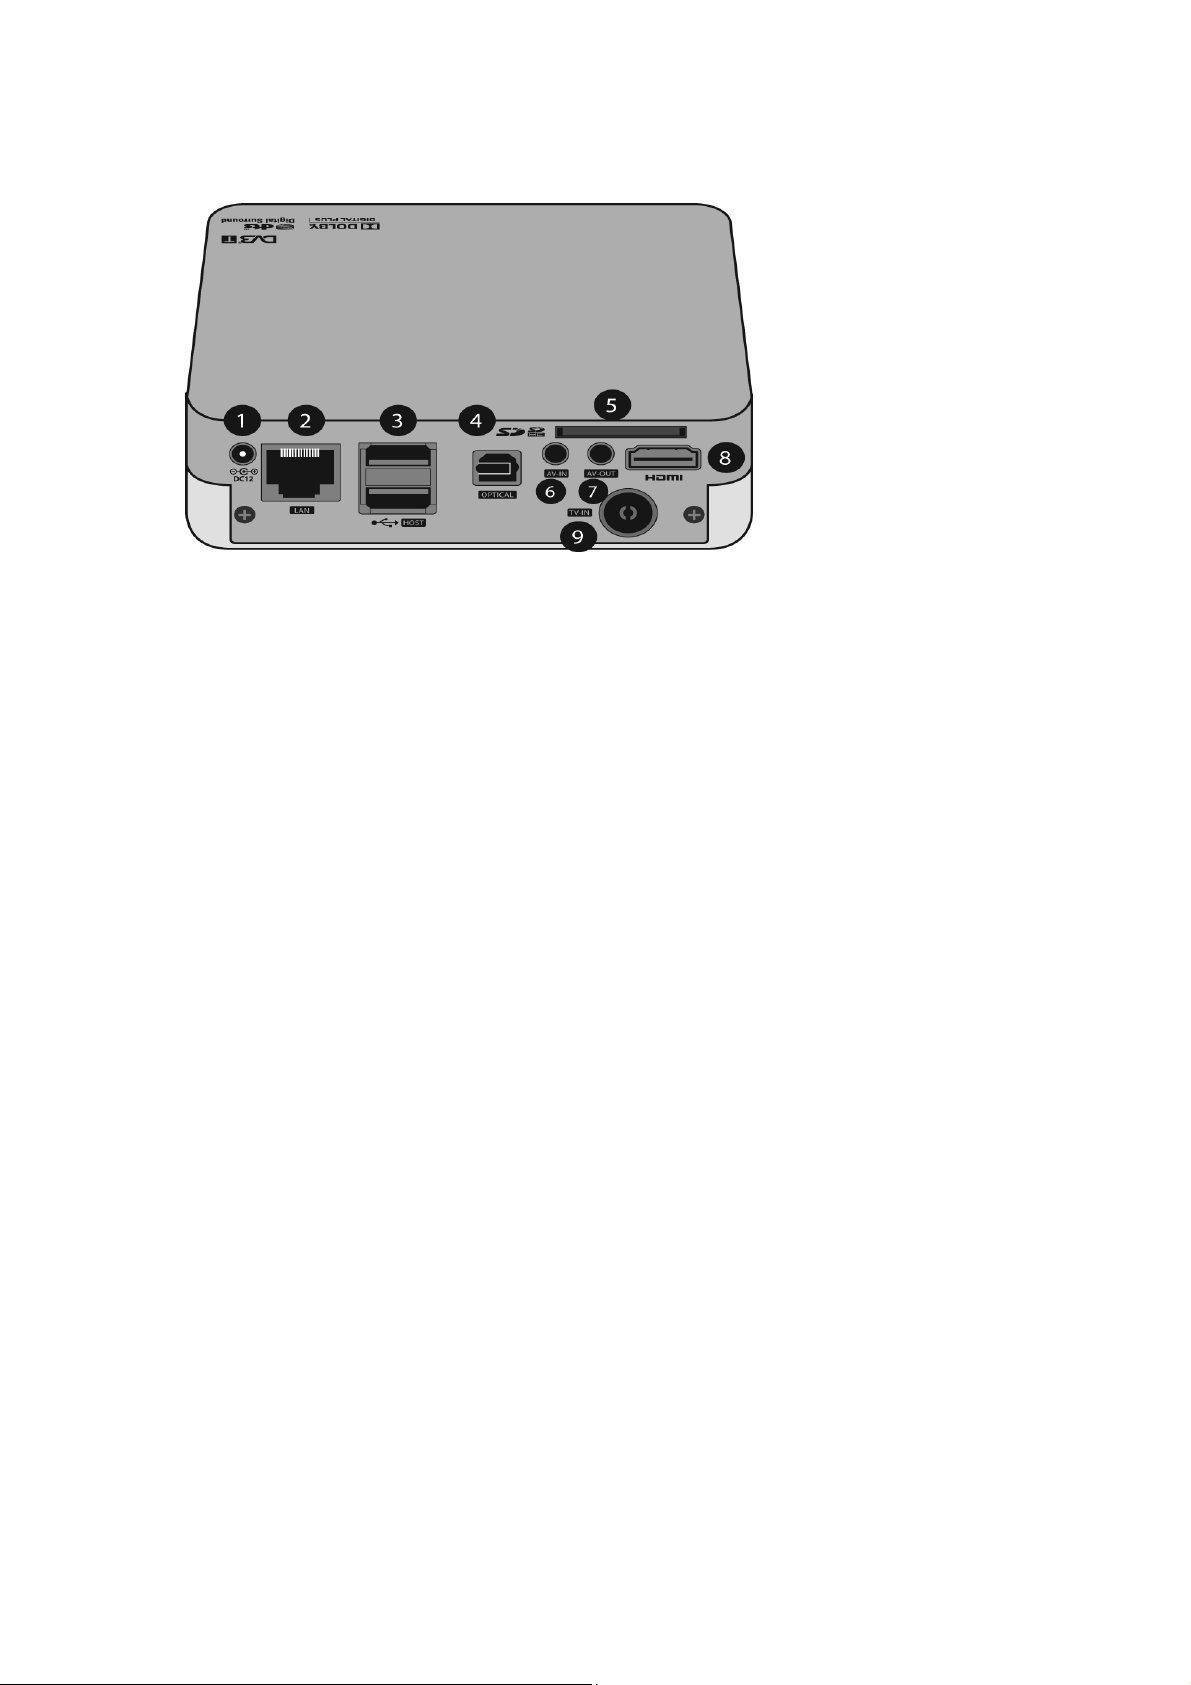
1.3 Rear Panel
1. DC12V
2. LAN(Ethernet 100Base-Tx/10Base-T)
3. USB Host Port
4. OPTICAL OUT
5. SD card slot
6. AV-IN
7. AV-OUT
8. HDMI OUT
9. ANTENNA-IN for TV Tuner(DVB-T)
Page 7

7
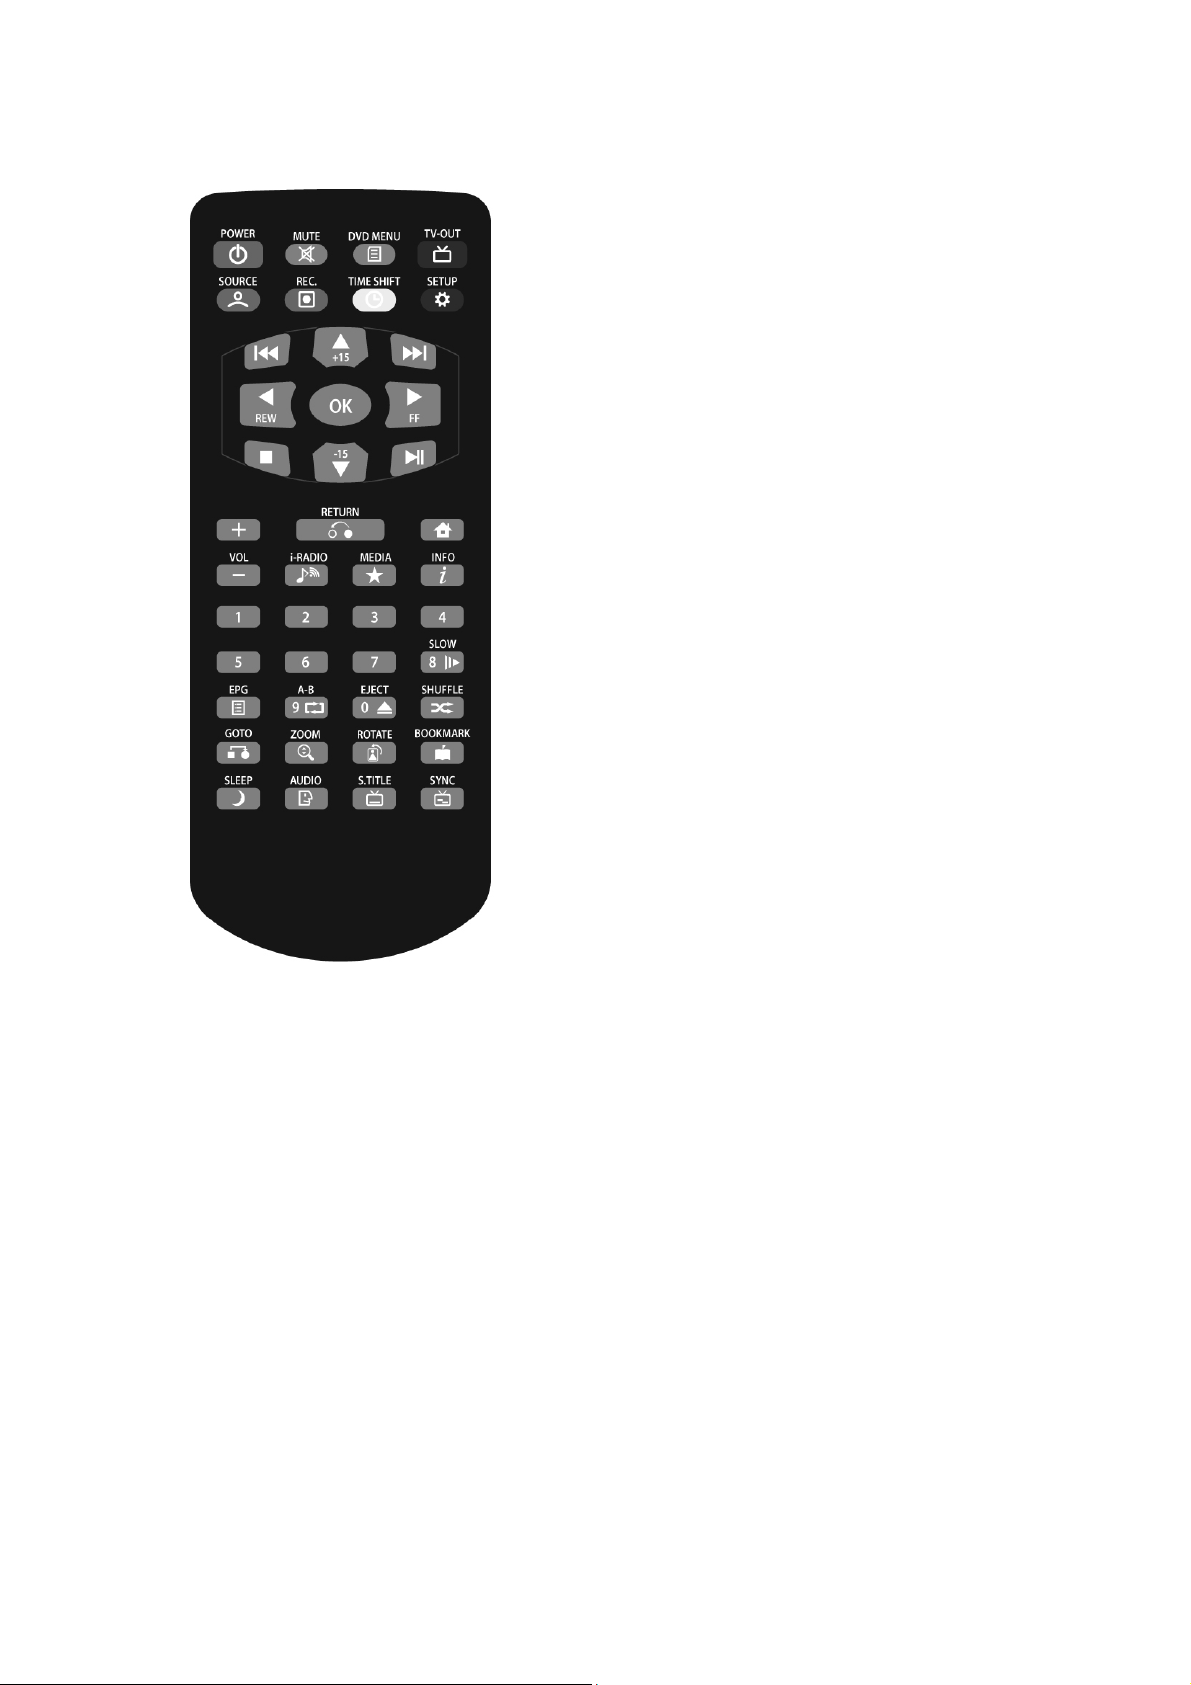
1. POWER
2. TV OUT Switch TV OUT mode.
3. SOURCE Press the button to change the input
4. REC.
-. Press the button to begin recording
-. Press the button to resume recording
-. Press the button to use instant recording function
5. TIME SHIFT
Press the button to use Time Shift function
6. SETUP
Press the button to go directly to SETUP Menu
7. MUTE Mutes the audio temporarily
8. DVD MENU Press the button to display DVD menu
signal SOURCE.
9. Number button
-. Press to change the channel.
-. Press to enter numeric changing settings.
10.
11. STOP press to stop playing a file
12.
-. Press the button to play a file
-. Press the button again to stop the current file
-. Press the button to resume playback of this file
13. VOL + / - Adjusts the audio volume
14. HOME
15. ARROW
16. OK Press the button to select a menu or confirm
17. FF / REW
Press the button to move to next or previous file
PLAY/PAUSE
the user’s action
Press the buttons to navigate the menu
-. Press the buttons to rewind/forward the play back of
Recorded file
-. Press repeatedly to select faster REW/FF speeds.
Page 8
8
18. RETURN
-. Goes back to the previous screen
-. Press the button to cancel user’s action.
19. INFO
20. EPG Press the button to display the Electronic
21. MEDIA
Select All, Movies, Music or Photo icons on Browser
22. EJECT Safely remove attached storage
23. i-Radio Goes directly to folder named Internet Radio
24. SLOW
Press the button to change the playback speed into the
25. A – B
Press the button to set the beginning and end points of
26. SHUFFLE
Press the button to display the information of
recording.
Program Guide.
menu
slow motion mode.
a section to repeat
Press the button to switch random and sequential
playback
27. ZOOM
Press the button to zoom in/out the screen
28. ROTATE
Press the button to rotate a picture by 4 angles
29. BOOK MARK
Press the button to add or delete the current position as a
bookmark
30. SLEEP
Press the button to set the timing to turn the product off
automatically
31. AUDIO Press the button to view the audio track
32. S.TITLE Press the button to view subtitle
33. SYNC Press the button to synchronize the video and
subtitle
Page 9
-
9 -
2. Connections
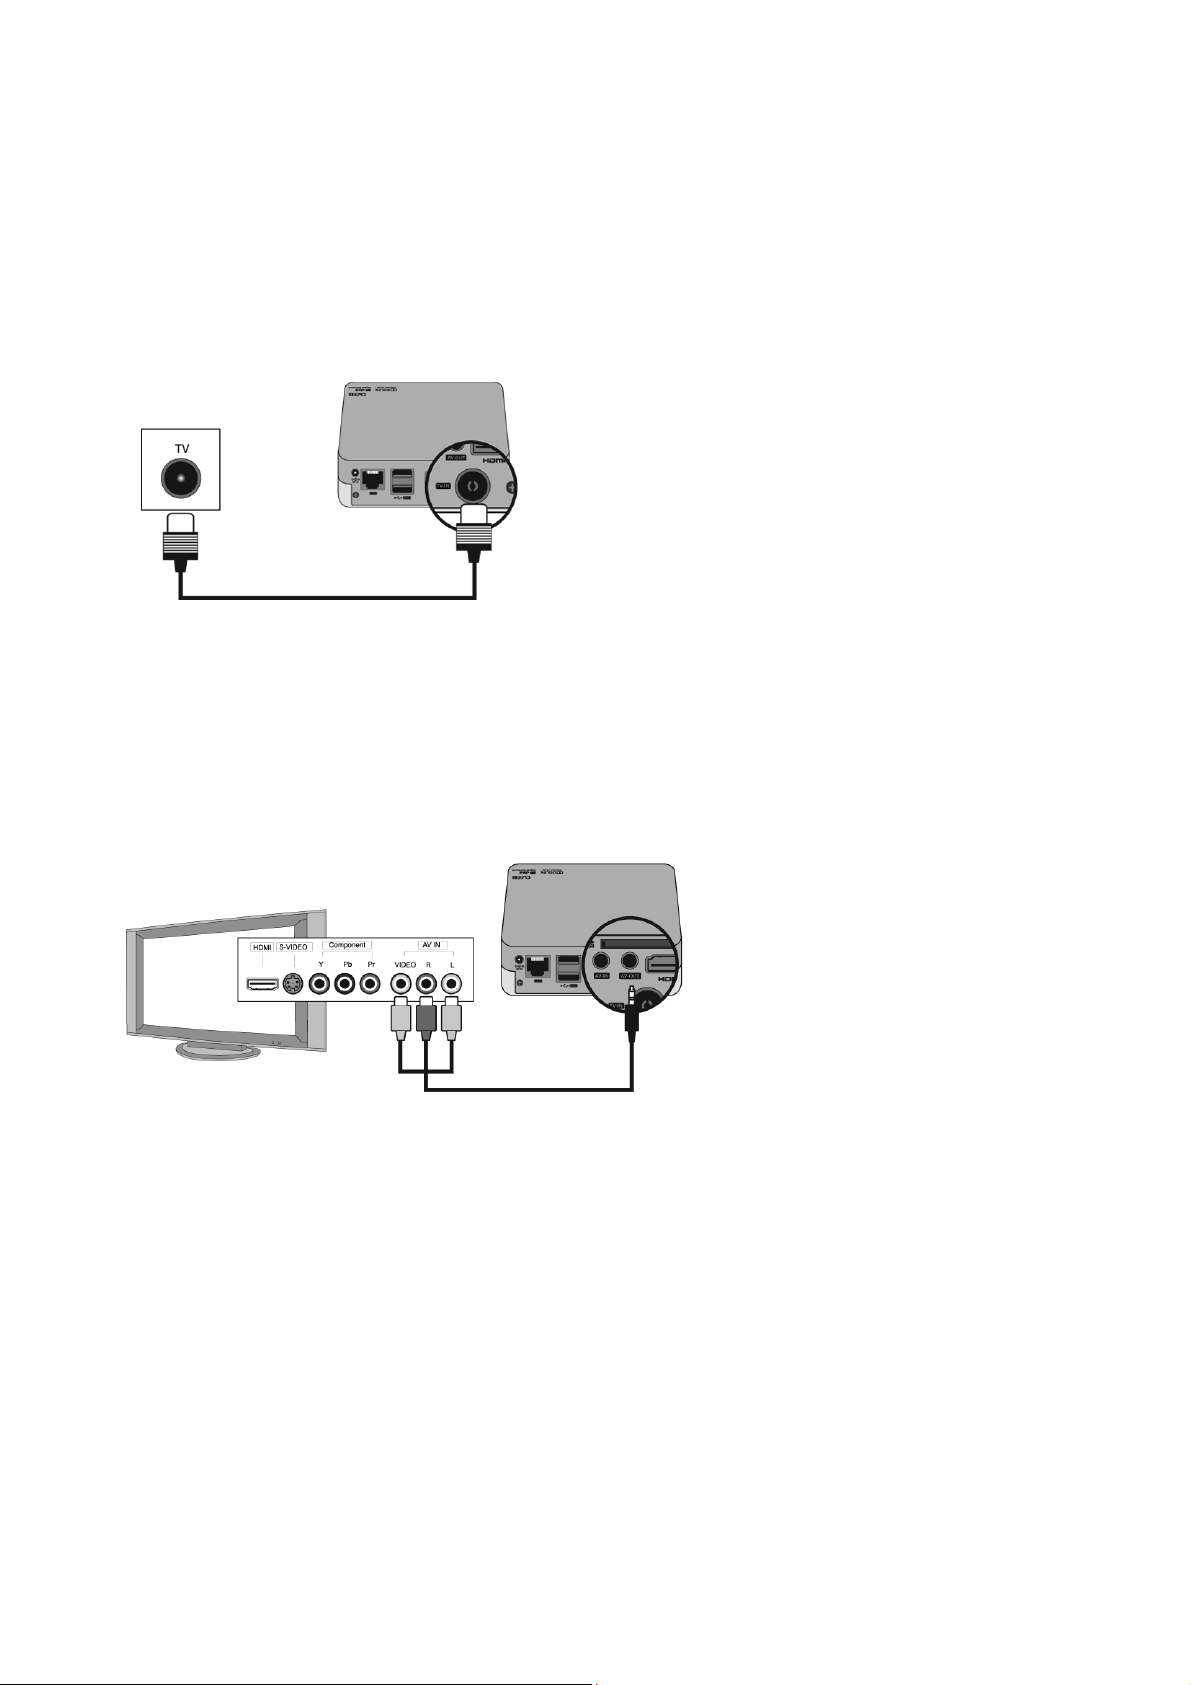
2.1 Connect to Antenna
Connect your aerial to ANTENNA-IN outlet on the rear of the player.
2.2 To use the composite AV connector
Plug the single connector into the back of the player, and the associated yellow, red and white
cables into your Video In, Audio Right and Audio Left inputs on your television.
Page 10
-
10
-
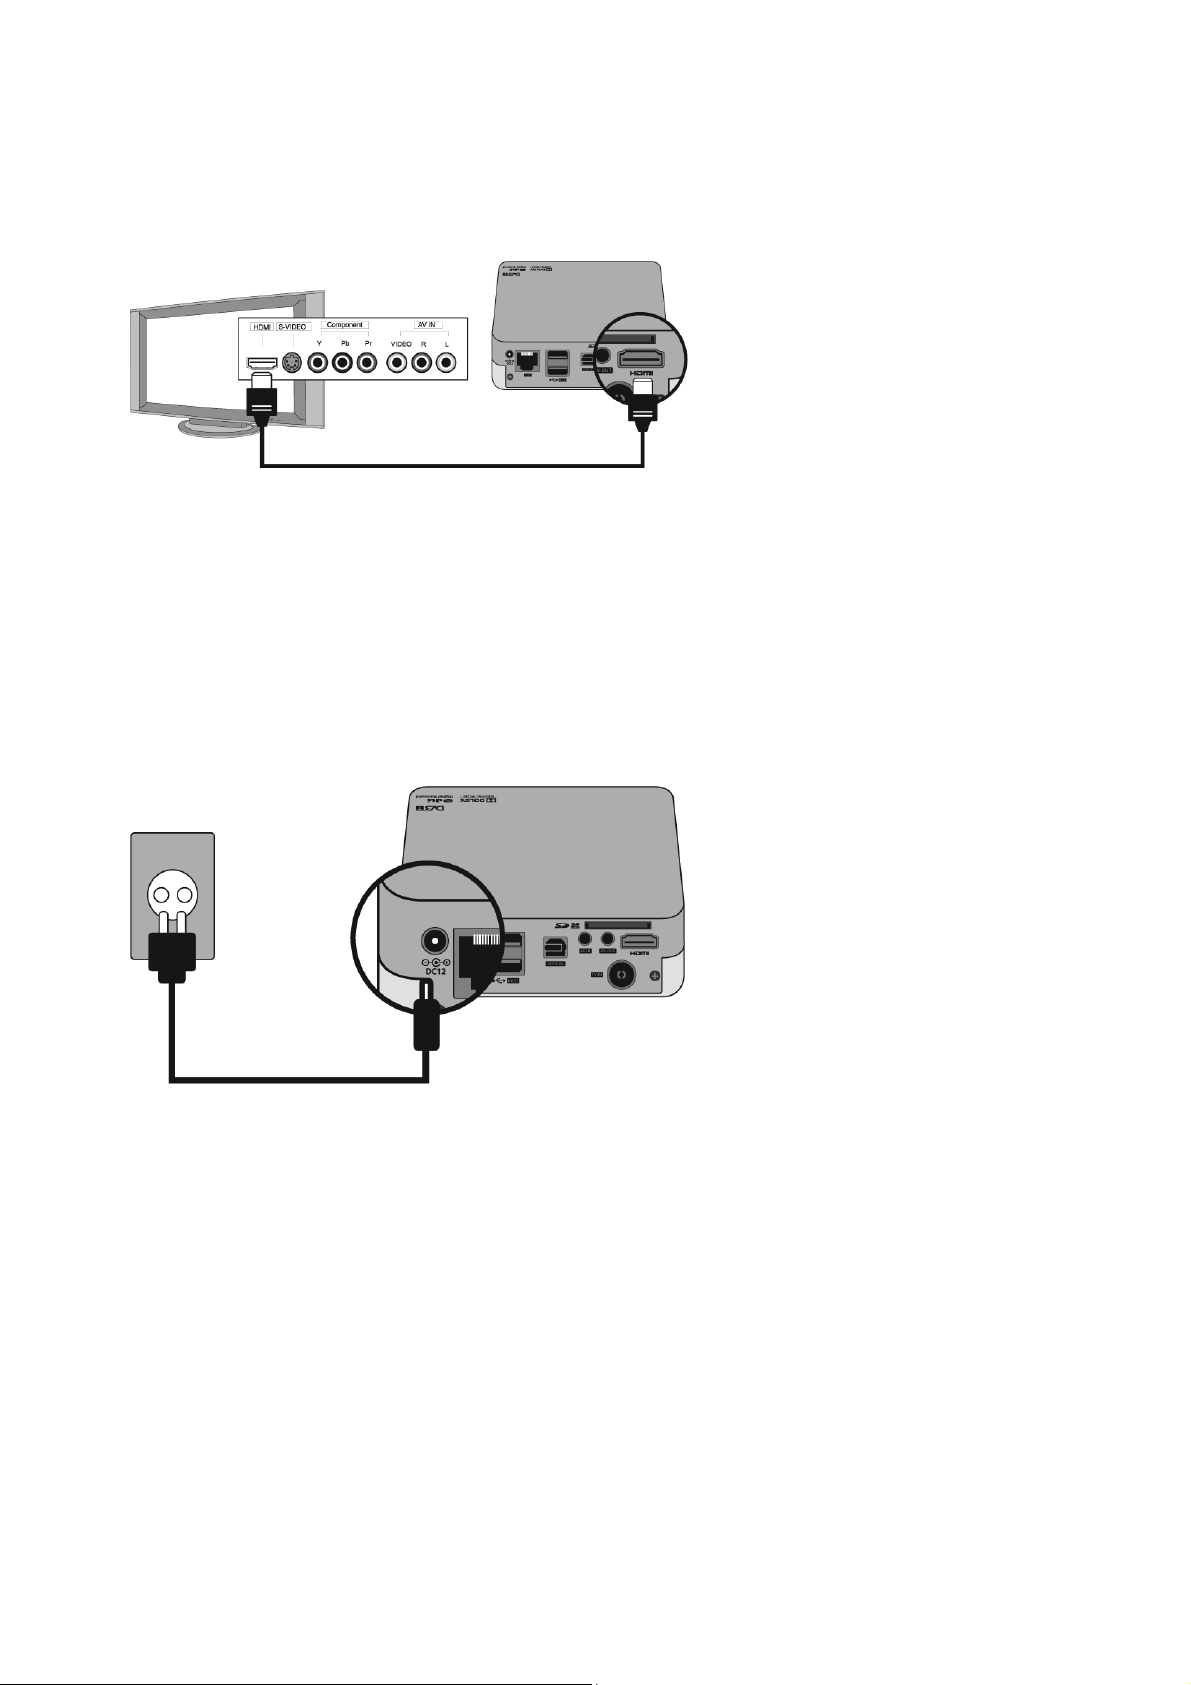
2.3 To use HDMI connector
Plug one end of the cable into the HDMI socket on the recorder player, and plug the other end into
the matching socket on your television. In this case, you do not have to make audio connection
because the HDMI connector can output stereo audio or Dolby Digital audio.
2.4 Plug in power
Connect the power cable to the player’s DC connector, and then plug the opposite end into an AC
power outlet.
Page 11

-
11 -
2.5 Connect to the Ethernet
Connect one end of the Ethernet cable into the LAN outlet on the rear of the recorder player and
the other into your computer network switch or router.
2.6 To use optical Digital Audio
Plug the optical cable into the digital optical port on your player and the other end of the optical
cable into the digital optical port on you’re a/V receiver.
Page 12
-
12
-
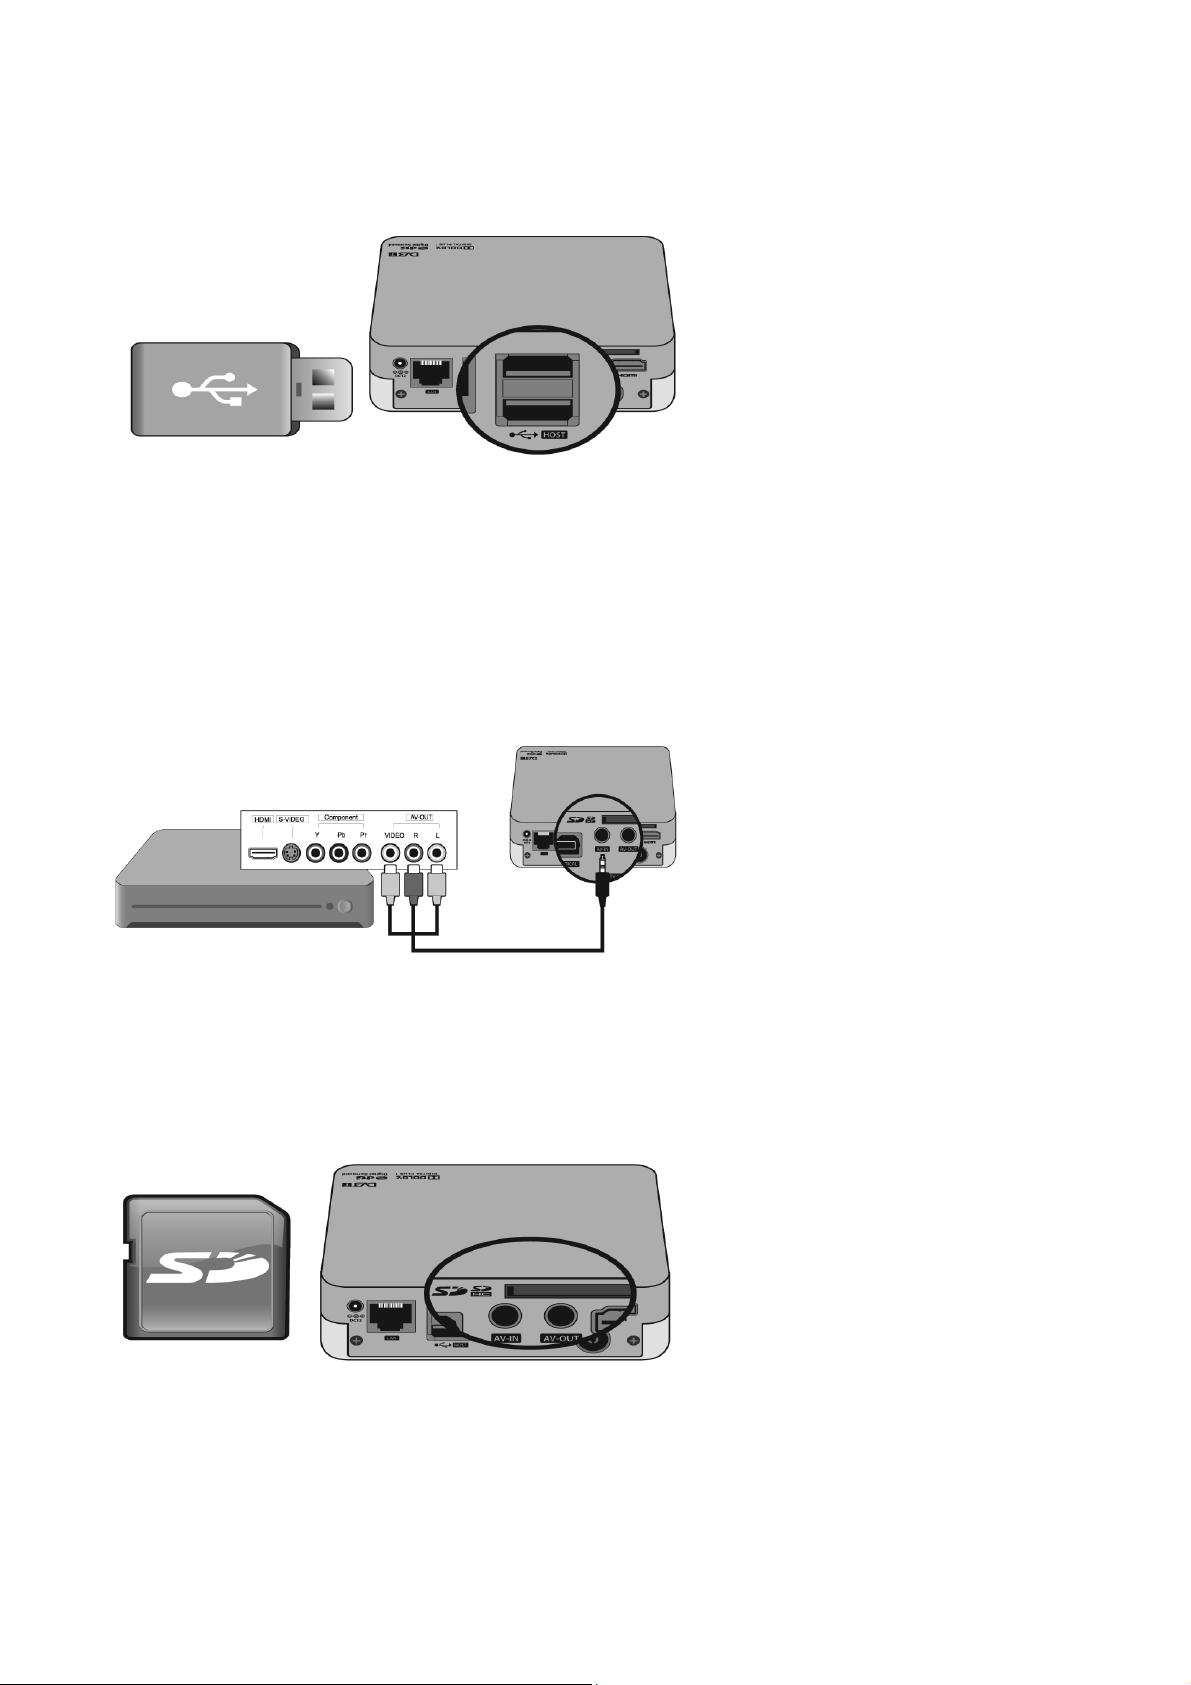
2.7 Connect a USB Device
The player has two USB ports that support playback from the USB external drives. Connect the
USB device to either of the HD media player’s USB ports.
2.9 To use AV input connector
Use the composite cable when connecting to a DVD player and other audiovisual equipment.
2.10 To use the SD card
Insert a SD card into the SD card socket of your recorder player.
Page 13

-
13
-
3. Basic Operation
3.1 Browser Menu
Home screen menu is displayed when your press HOME on the remote control. The
icons on the Browser menu (default) let you to browse your media library.
The Movies, Music and Photo icons represent files for the different media types. “All”
icon will display available media files in the current folder.
3.2 Movie Playback
• Select Movies icon by pressing MEDIA on
remote control. The screen will display
available video files.
• You can navigate video files by using
buttons to scroll through the list
• To begin playback of a single file, highlight
the file and then press OK.
Video Play Controls
Use these buttons on the remote control to control video playback.
Button Function
Stops video playback
Pause or resume video playback
Resume playback on the selected position(video scan)
Page 14

-
14
-
Using Video Repeat
Scan video (press repeatedly to select the scan speed)
Use this option to repeat the video currently playing. To set the video repeat mode :
1. During video playback, press SHUFFLE. The option appears on the top of the screen.
2. Press repeatedly until the repeat mode you want is displayed. Options include :
••••
OFF – The video file(series file) will be just repeated once.
••••
Repeat – The current video is played repeatedly until you press STOP
••••
All – All the files in the current video folder are played in sequence, and
repeatedly, until you press STOP
Displaying the Video information panel
Use this option to display the video information panel on the top of screen. To view the
Information Panel of current video, press button during the video playback.
3.3 Music Playback
• Select Music icon by pressing MEDIA on
remote control. The screen will display
available audio files.
• You can navigate audio files by using
buttons to scroll through the list.
Music Play Controls
Use these buttons on the remote control to control music playback.
Button Function
Stop audio playback
Playback audio file
Page 15
-
15
-
Scan the audio playback forward or backward
Music Shuffle Mode
Use this option to set the audio tracks in the current music folder to play in random order.
To enable music shuffle mode :
1. During music playback, press SHUFFLE.
The option opens at the top of screen.
2. Press repeatedly until the shuffle mode you
want is displayed. Options include :
••••
OFF – All the audio tracks in the current
folder are played in sequence, and once, until
you press STOP
••••
Shuffle
••••
Repeat
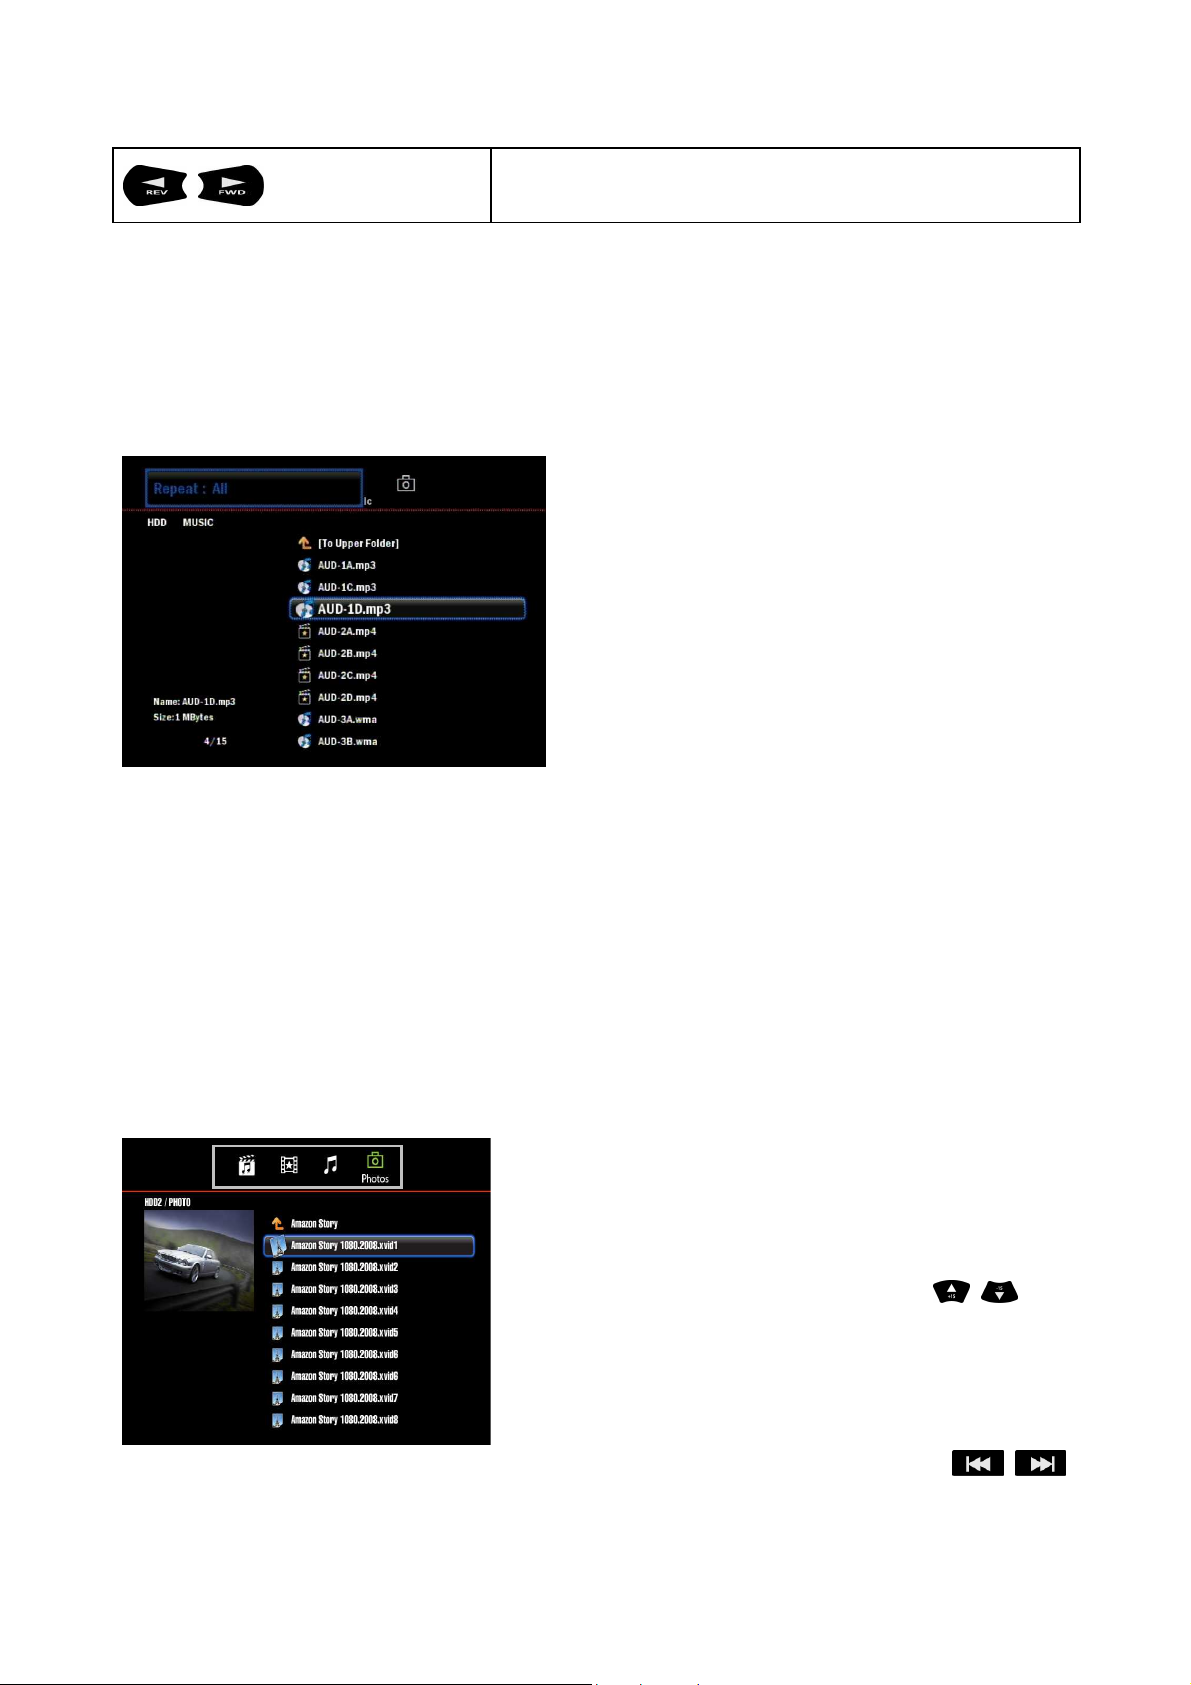
3.4 Viewing Photos
••••
All
••••
Once
• Select Photo icon by pressing MEDIA on remote
control.
• You can navigate image files by using
buttons to scroll through the list
• You can navigate previous or next 10th image file
from the one in the current list by using
buttons
Page 16

-
16
-
Photo Slideshow
This player allows you to create a slideshow using the contents of a photo folder.
To start a slide show:
1. Select the photo folder containing the image files you want in the slide show.
2. Highlight the image files in the current folder, then press PLAY/PAUSE to start the
slideshow
To listen to background music with a slideshow:
1. Select the audio files you want to accompany the slide show
2. Copy them into the photo folder you want in the slide show
To listen to background music with a slideshow, the audio files and pictures must be
included in the same folder.
Repeating a Slideshow
Use this option to set the slideshow to play in a loop sequence.
To set the slide show repeat mode:
During the slideshow, press REPEAT/SHUFFLE, then press this button repeatedly until
the repeat mode you want is displayed. Options include:
• Not repeating: The slideshow is played once
• Change status to repeat: The slideshow is played repeatedly until you press STOP
Photo Display Options
Rotating the Picture
Use this option to rotate the image clockwise. This setting does not affect the original file’s
orientation. During the photo viewing, press ROTATE, then press this button repeatedly
until the rotation you want is set.
Using Photo Zoom
Use this option to change the viewing scale of the image display. During the photo viewing, press
Page 17

-
17
-
ZOOM, and then press this button repeatedly until the scale you want is shown.
Displaying the Picture information panel
Use this option to display the Picture Information Panel on the top of the screen. This
panel shows the following information about the current picture:
• Image file name
• Image’s sequence number and the total number of
image files in the current folder
4. Installation(Searching for the channels)
This will guide you through the installation procedure to automatically search for the digital
channels. You will also run this installation after the product has been returned to the
Factory Reset.
4.1 Automatic Search
Wait while channel search continues. This may take a few minutes.
1. Select Channel Scan and then press OK
2. During the channel search, the cursor is
located at CANCEL. Therefore, if you
press OK button during the search, the
search will stop and the channels found
until then will be displayed.
3. If the search does not find any channels,
then select Channel Scan button to
search for the channels again. Make sure
that you have connected your aerial
correctly.
Page 18

-
18
-
NOTE
4. You can delete the unwanted channels
from the found channels.
If you exit the installation without fully completing the channel searching procedure, you
may not have all of the channels available. In this case, you can use channel scan menu
to search for the channels.
4.2 Manual Search
You can search channels manually by searching parameters.
1. Press HOME, press the SETUP icon and
then the screen like the left figure will be
shown.
2. Select Channel Scan, highlight MANUAL
SCAN and then press OK.
Page 19

-
19
-
3. Enter the channel to search. When
entering channel value, the appropriate
frequency value is displayed.
5. Recording
The product provides various recording modes such as instant recording and scheduled
recording. It supports standard DTV features such as EPG (Electronic Program Guide) and
Time shifting.
5.1 Instant Recording
The instant recording function records the
channel displayed currently.
1. Press the REC button to record current
channel instantly.
2. Press the REC button repeatedly until the
recording duration you want is displayed.
Options includes :
• REC OFF
• REC 30 min – 60 min – 90 min – 120 min
180 min – 240 min
Page 20

-
20
-
3. Press button to see the detailed
information about the recorded program.
4. Press button to stop recording the
current channel.
5. If you move to other channel, stops instant
recording. Do not switch channels while
recording using this function.
Note :
• Ensure that there is enough free space before recording. If the free space on the hard
disk drive is insufficient, recording will stop. Recording one hour of program may require
up to 2 or 3GB of hard disk space.
• The first partition of the local hard disk drive must be formatted in NTFS.
• The recorded program is saved in the folder named My Recordings.
5.2 Scheduled Recording by manual
You can set a service to be recorded at a specific time. Even if the player is in standby
mode, it will switch into operation mode and start recording at a specified time.
1. Press HOME, select Record Schedule
and then press OK.
2. Select Add a new schedule and press OK
to add a new timer event.
Page 21

-
21
-
3. The box like the left figure will be shown.
Set the Type, Date, Duration, Cycle,
Quality by using , , , .
4. The following message will be shown.
Select “Yes” to save the changes.
5. This player will be turned on automatically
around three minutes before the
scheduled timing.
5.3 Scheduled recording by EPG(Electronic Program Guide)
With the Electronic Program Guide (EPG), you can check the schedule of DTV service or
event, view detailed information about them. DTV EPG function is not available in analog
TV or external input device.
Press EPG button to record or see the desired service or event
General EPG Screen
Page 22

-
22
-
button, the rows in
• Shows the names of current events in a grid of rows and columns. You can check
① Service list
• Shows the list of all services currently available. As you press
the event name list will be refreshed correspondingly.
② ~ ③ Event name list
scheduled event information up to several days ahead, depending on conditions.
④ Picture window
⑤ Event name
Press to open or close EPG Screen
Press to change the service list
• Press to move EPG date forward
• Press to move EPG date backward
• Press to scroll up the event name list
Page 23

-
23
-
• Press to scroll down the event name list
Press to record the desired channel in DTV mode
5.4 Recorded program
1. Press RECORD SCHEDULE button.
2. Select STATUS by using / button.
The recorded program list will appear.
Note :
• The program being recorded will be added to the recorded program list
• The start time of scheduled recording cannot be set within the duration of scheduled
recording to start first.
Lock
Ready
Displayed when the program is being recorded. No deleting and editing is
feasible.
Displayed only if the program is reserved for recording
3. Select the desired reservation using
/ and press OK.
4. The following popup menu will appear
and you can pause scheduled recording.
Page 24

-
24
-
Note
1. Move to Delete icon.
2. After selecting reserved program using
/ , press OK.
3. The following popup menu will appear
and then press Yes.
: If the status of reserved program is set to Lock, you cannot delete the program.
1. Move to History icon.
2. Press OK by using / , to delete a
recorded program.
OK
FAIL
5.5 Time Shifted Recording
You can perform Time Shifted recording while watching the currently broadcasting TV
program. If you press the TIME SHIFT button on the remote control, the current program is
paused. And the program is resumed from that point
Note
Press the STOP button to go to the live program.
Displayed if the recording is completed successfully
Displayed if the program fails to be recorded
If you press the INFO button while watching
TV, the time bar information will be
displayed. Time bar displays the time gap
between the broadcasting point and
watching point and the amount of
temporarily saved program.
: Time shift makes the
time gap between the broadcasting (live) point and watching point.
Page 25

-
25
-
Page 26

-
26
-
6. File Manager
The File Manager feature allows you to copy or delete the files or folders from the
attached USB devices.
6.1 Copy or Move
1. Press HOME and select File Manger icon.
2. Select source storage and press OK.
3. Select the folder or file you intend copy or
move, press PLAY/PAUSE and then the
screen like left figure will be shown.
4. Press and then select destination
storage.
5. Select the preferred destination folder and
press . The message like left figure will
be shown. Select “Copy” or “Move” and
then press OK
• Item with V displayed in red indicates it is currently selected.
• Select “want to create New Folder?” to create a new folder into the destination storage.
Enter Folder Name by using , ,
,
and then select OK.
Page 27

-
27
-
6.2 Delete
1. Press HOME and select File Manger icon.
2. Select source storage and press OK.
3. Select the folders or files you want to delete,
press PLAY/PAUSE and then the screen
like left figure will be shown.
4. Press and the screen like left figure will
be shown. Select Recycle Bin icon and
then press OK.
5. The following message will be shown.
Highlight Delete and press OK.
Page 28

-
28
-
7. Network Setup
This chapter will guide you through the network settings such as wired, wireless and FTP.
7.1 Wired Setup
4.1.1 DCHP(AUTO)
If your network supports DHCP, set this option
to receive an automatic IP address and subnet
mask assignment.
1. Press HOME and select Setup icon.
2. Select Network icon and press OK.
3. Select Wired Setup and press OK.
4. Select DHCP IP and press OK
5. Select OK, press OK. A confirmation
prompt appears and select OK to save
setting.
NOTE: You may enter DNS server IP manually
depending on the router available.
4.1.2 Static IP (Manual)
Use this menu to manually configuring the IP
address, Subnet mask, Default Gateway, DNS
Server IP.
1. Select Static IP and press OK.
2. An on-screen menu opens
3. Enter IP addresses, Subnet Mask, Default
Gateway, DNS Sever (Provided by your ISP)
by using the NUMERIC (0 ~ 9) buttons and
press OK.
4. A pop will appear and press OK to apply
changes.
Page 29

-
29
-
7.2 Wireless Setup(Optional)
This section allows you to make changes to the wireless network settings.
1. Connect USB Wi-Fi adapter to USB host
port of this player.
2. Press HOME and select Setup icon.
3. Select Network icon and press OK.
4. Select Wireless Setup and press OK.
5. Select Infrastructure (AP) and press OK.
5. Select AUTO and press OK. List of Access
Points (AP) will be displayed available
within your range. Select the AP you
connect to and press OK.
6. If the security is enabled on the AP you
connect to, an on-screen keyboard will be
shown. Enter the encryption key by using
7. The following message will be shown
But, if encryption key is wrong or the AP
NOTE: If your wireless signal seems week in
some spots, place your router as close as
possible to USB module.
If you play high definition files over wireless
connection, you may experience the stutter.
/ / / and then select OK.
when the wireless connection is configured
does not match with the setting, the failure
message will be shown.
If you use an USB Wi-Fi adapter with other
USB device, it may not work properly.
Page 30

-
30
-
7.3 Browsing on the network
This section describes how to playback the multimedia files shared on the local area
network (Ethernet or WLAN). Make sure that this player is connected on the network.
1. Press HOME and select Browser icon.
This icon on this screen lets you browse
your media library.
2. Select Network icon and press OK.
3. Workgroup lists will be displayed on your
network. Locate the workgroup and all the
shared files and folders available will be
displayed on the screen.
◆ Windows XP(Win2000 server) User
To access the shared folder, enable Guest
Account.
① Double click Computer Management.
② Open “Local Users and Groups” and
expand the Users folder.
③ Double click Guest, and the Guest
Properties window will appear. Make sure
that the check mark next to account is
disabled.
4. To begin playback of the file you want,
highlight it and the press OK.
NOTE
◆ You can turn the firewall function off if
needed.
◆ It may take several minutes, to load and
play the shared media files depending on
Page 31

-
31
-
the network connection and size of shared
media files
7.4 Using Internet Radio
1. Create a folder in the hard drive by
connecting to a PC.
2. Visit the directory of community free
online radio station (e.g.
www.shoutcast.com) to enjoy internet
radio with this player
3. If you find a radio station, choose “save
target as” to save it to the folder. This
player currently supports M3U and PLS
audio formats only.
4. You can remove unnecessary items from
the PLS file by using the program such
as Word pad in your PC
5. Disconnect the player from the PC.
6. Make sure that the player is connected to
wired or wireless LAN.
7. Press HOME. To listen to the favorite
internet radio, select folder > internet
radio from Browser menu, and then
press OK.
When you press i-Radio on remote control,
it will display the station lists in the Internet
Radio folder you create.
Page 32

-
32
-
NOTE:
• LAN connection required for access to internet radio station.
• The radio station needs to be saved as M3U or PLS format to include streaming URL.
7.5 FTP Server
This menu allows you to determine how to copy, move and delete the files between PC
and this player on the network. Make sure that the network settings are correct and FTP
client program is installed on your PC to use FTP service
1. Press HOME and then select Setup icon.
Use the right navigation button to select a
Network icon, and press ENTER.
2. If the network is set to DHCP, IP addresses
(e. g. 192.168.xxx. xxx) will be assigned
automatically from router. The IP addresses
may vary, depending on your network
settings.
3. Select FTP User Name to change User
Name, and press OK. An on-screen
keyboard opens.
4. Enter User Name using / / /
button and then press OK.
5. Select FTP Password to change Password,
and then press OK. An on-screen keyboard
opens
Page 33

-
33
-
6. Enter NEW Password using / / /
default password is
0000.
button and then press OK.
7. Enter NEW Password again to confirm verify
password, and press OK.
The default FTP User Name is guest and
To use FTP service, make sure FTP client program is installed on your PC. You can
download legal FTP client software (e.g. FileZilla) and install it on your PC. The following
explains how to use FTP service by using FileZilla software
8. When you have installed FileZilla and run
this software from the installed location,
the screen like the left figure is shown.
9. To log on the FTP server, you must type
host, user name and password and define
the port number (default: 21) as shown
below.
NOTE: For the detailed use of FileZilla, refer
to the online help of the website of this
software.
10. When you log on the FTP server, the
screen on the left will be shown. The
folders and files on the player will be
shown on the right window.
11. Drag the files and drop them to the folder
directly to transfer. You can view the realtime status of file transfer as shown below.
Page 34

-
34
-
** NOTE **
1. It is needed to limit the maximum
number of connections for a single
account for the proper operation.
2. Network connection may be disabled
depending on connectivity of FTP
available during the uploading of highresolution files.
7.6 NFS Server
This player can also work as NFS server. You can download the NFS server program and
configure the following settings (Windows XP)
1. To use NFS Server, you can download the latest “Microsoft Windows Services for Unix”
software from official Microsoft website.
2. Unzip the file you downloaded and double-click on the icon labeled “setup.exe”.
3. Click Custom Installation to specify the
components that you want to install or
specify a different installation location. And
then click Next.
Page 35

-
35
-
4. Choose the components of Microsoft
Windows Services for UNIX that you want
to install. Click Server for NFS and Server
for NFS Authentication.
① This indicates that the component you
want will be installed on local drive.
② This indicates that the component will not
be available.
5. If the “User Name Mapping” page is
displayed, click Password and group files
and then click Next.
6. Setup installs Microsoft Windows Services
for UNIX. This will take a few minutes.
7. Click Finish one the “Completing the
Microsoft Windows Services for UNIX Setup
Wizard” page.
Page 36

-
36
-
8. Create the two dummy files called ““““passwd””””
and ““““group”””” in SFU folder (c:/SFU). Type
root::0:0:root::/bin/sh in dummy file
called “passwd” and root:x:0: in dummy file
called “group”
9. Run the installed Services for UNIX
Administration. Click Configuration tap.
••••
Click Browse and then enter “passwd” in
Password file path and name.
••••
Click Browse and then enter “group” in
Group file path and name
10. Click the Maps tab. Click Show User
Maps in order to map user names.
11. Click the List Windows Users and
Windows users available will be displayed.
In the Windows user box, click Windows
user name to log on the Windows.
(example: Administrator, User)
Page 37

-
37
-
12. Click the List Linux Users and click root.
13. Click Add and then user name will be
displayed in the mapped user list.
14. Click Apply to save settings
15. Right-click on the folder you want to share
and select Properties from the drop-down
menu.
16. Under the NFS Sharing tab, click Share
this folder.
17. Type your name in Share name box
(default: nfs)
Page 38

-
38
-
18. Select Read-Write under Type of access.
Make sure that “Allow root access” box is
checked
19. Press HOME and then select SETUP
icon.
20. Select NFS server IP address > NFS
Setup. Type IP address of the computer
which you installed Microsoft Windows
Services for Unix
21. Select Share name > NFS Setup. An onscreen keyboard opens. Enter the share
name of folder you configured in the PC
directly using on-screen keyboard.
22. Press HOME and then select Browser
icon. You can play the shared files by
selecting NFS icon.
NOTE:
• If multiple Windows user names are mapped to one UNIX user name, you must select
one map to be primary
• You can install other NFS server software as you desired. You can contact them on the
technical support information.
Page 39

-
39
-
7.7 BitTorrent
This player can work as BitTorrent client. You can download legal torrent files by searching
on the Internet. There are websites that provide legally sharing torrents e.g.
www.legaltorrents.com. The websites offer torrents as one method of downloading files.
■ It is recommended to format hard disk by selecting HDD format > System from Setup
menu. Otherwise, BitTorrent client may not work properly with this player.
■ Back up your valuable data before formatting the hard disk
■ 256MB Linux SWAP partition is created automatically if formatting is complete.
■ Two folders called “Download” and “Torrent” are automatically created in the first
partition of hard disk when selecting Torrent icon > File Manager menu
1. Browse the torrent files on the website and save the files (.torrent) to your PC
2. Connect the player to PC and copy the saved torrent files to “Torrent” folder of player
3. Press HOME and select File Manger icon.
Select Torrent and press OK
Page 40

-
40
-
4. The picture is displayed like the left figure.
Select a torrent file and then press “Start
Downloading” to download the content.
5. The picture like left figure indicates that
downloading of contents is finished.
6. Press HOME and then select Browser
icon. Go to “Download” > “HDD1” and
play the content of torrent file you
downloaded.
Page 41

-
41
-
7. Press HOME and select File Manager
icon. Select Torrent and press OK.
8. Select the Torrent file you downloaded
and press “Delete Torrent file” to delete
the content.
8. Setup
This chapter describes how to set up the TV, video, audio, recording and system. You can
set the options such as the parental control, time setting and firmware upgrade.
To access the
on Home menu and press the
You can easily access by pressing the
Setup
button on your remote control.
Setup
menu, select Setup
OK
button.
8. 1 TV
8.1.1 DTV Region
Page 42

-
42
-
8.1.1 DTV Region
Use this option to select your country or
location.
8.1.2 Channel Scan
AUTO
This player automatically detects all
available services in your area.
MANUAL
Manually add a new carrier by entering the
desired carrier number or frequency band
8.1.3 Channel Set
You can delete the unwanted channels from
the searched channels.
8.2 Audio
8.2.1 Night Mode
Page 43

-
43
-
8.2.1 Night Mode
◆ OFF Turns off night mode or the
comfort option
◆ ON Decreases audio output to a soft
level for nighttime listening
◆ Comfort Softens audio output only for
sudden loud portions of an
audio track
8.2.2 Digital Output
Select this option if you are using an optical
connection to output surround sound.
◆◆◆◆
HDMI LPCM Use with an HDMI connection.
Outputs audio signal with multi-channel
simulation whenever possible.
◆ HDMI RAW Use with an HDMI connection.
Outputs digital audio without decoding.
◆ Optical LPCM Use with an optical
connection. Outputs audio signal with multichannel simulation whenever possible.
◆ Optical RAW Use with an optical
connection. Outputs digital audio without
decoding.
8.3 Video
8.3.1 Aspect Ratio
Page 44

-
44
-
8.3.1 Aspect Ratio
Use this option to select the way videos are
displayed.
• Letter Box
• Pan & Scan
• 16 : 9
The default setting is 16 : 9. Make sure your
TV can support this resolution, or this default
setting can result in a distorted video display.
8.3.2 Brightness
You can use the on-screen menu to change
the brightness according to personal
preference. Adjust the brightness by pressing
/
.
8.3.3 Contrast
You can use the on-screen menu to change
the contrast according to personal preference.
Adjust the Contrast by pressing
/
.
Page 45

-
45
-
8.4 REC
8.3.4 TV Out
Use this option to select the video display
resolution and TV color encoding system.
8.4.1 Quality
Select this option to set the quality of
recorded video.
Recording Mode Bit rate Resolution(PAL) Resolution(NTSC)
HQ 9.5Mbps 720 x 576 720 x 480
SP 5.1Mbps 720 x 576 720 x 480
LP 3.5Mbps 720 x 576 720 x 480
8.4.2 Auto Chapter
Use this option to add DVD chapter marks
automatically at the certain time interval
Page 46

-
46
-
8.4.3 Permanent Time shift
The default setting is off. Leave it unchanged
when you do not use this option.
8.5 Network
This option allows you to set the network setting. For more details, please go to Chapter 7.
8.6 System
8.6.1 OSD Language
Select this option to choose OSD (On Screen
Display) language you prefer.
8.6.2 Time Setting
Select this option to set the current time.
Manual
Select Manual.
Enter YEAR /MONTH/DAY using / /
/
or NUMBER (0~9) buttons.
Page 47

-
47
-
Enter HOUR/MIN./SEC. using / /
/ or NUMBER (0~9) buttons.
④ Press OK and save changes.
Auto
Set the time automatically when you tune the
terrestrial channel for a certain period of time.
8.6.3 Parental Control
You can set parental control for each program.
You can also change your password.
NOTE
The default password is 0000. If you have
forgotten your password, please contact your
local distributor.
1) Lock System
This option allows you to activate the parental
control.
Page 48

-
48
-
2) Change Password
Enter Current Password using the
NUMBER (0-9) button.
Enter New Password using the NUMBER
(0-9) button.
Enter the New Password again to confirm
password.
3) TV Rating
Use this option to block program according to
the age level.
8.7 Photo
8.7.1 Slide Show Timing
Use this option to set the time interval
between pictures in the slideshow.
8.7.2 Slide Show Effect
Use this option to select the method to
display the next slide in a slideshow.
8.7.3 Background Music
Use this option to listen to your favorite music
with the slide show.
NOTE: Make sure that the video and audio
files be included in the same folder.
Page 49

-
49
-
9. Firmware Update
In order to maintain proper performance of the product, it is essential to have the most up-to-date
software.
Important:
power disruption during the update process can corrupt the system firmware. If the power is off
during firmware update, fatal damage may be caused to the product.
Make sure AC power adapter remains connected during the firmware update. A
Updating firmware from USB drive
Copy the latest firmware file (install.img) to a USB drive’s root directory.
Connect the USB drive to the player’s USB port.
Press HOME and select Setup icon, and
then press OK.
④
Move to System icon, and then select
Firmware Update option. Highlight System
After restarting, the system automatically enters firmware upgrade mode.
Once the update process is completed, the player will start again. Once the player
Upgrade and press OK. This will restart the
system.
restarts, the new firmware is automatically loaded.
Note:
• Other functions will not activate while firmware update takes place
• It may take 3 ~ 5 minutes to update firmware.
Page 50

-
50
-
10. Appendix
10.1 Trouble Shooting
If the product does not work properly after checking it, please contact your local dealer.
Don’t open the product. It may result in a dangerous electric shock and will invalidate your
warranty.
not work.
Bad picture or noisy sound
in the TV mode.
Problem Possible Causes What to do
Wrong connection of the
audio/video output of the
product to TV.
No or Bad signal message
appears
No batteries. Change the batteries (both). The remote control unit does
The remote control unit is
incorrectly aimed.
Bad reception of the
signal.
Connect the audio/video
output of the product to TV
correctly. No picture, no sound.
Connect the antenna cable
correctly.
Aim the remote control unit
properly to the product.
Make sure the antenna is
clean and correctly adjusted.
Page 51

-
51
-
10.2 Specification
Chipset & Tuner
Chipset
Tuner
Recording
Video Format
Audio Format
Mode
Method
Decoding(Playback)
Video Format
Codec
Audio
Codec
Photo
Format
Lossless JPEG(Progressive JPEG not supported), PNG, GIF, BMP
AAC, AC3, DTS, FLAC, M3U, OGG, RA, RM, MP3, WAV
Realtek RTD1283DD 400MHz
DVB-T HD (Analog TV is not supported)
MPEG2 main profile, MPEG4 high profile
MPEG1 Layer 2 (Stereo)
TS(Transfer Stream), HQ(720x576i,8Mbps/48KHz, 256Kbps), SP, LP
Time Shift, Instant Recording, Scheduled Recording by manual
Scheduled recording with EPG (for Digital TV)
MKV, RM, RMVB, MOV, FLV, MP4, ASF, WMV, AVI, M2TS, DAT, MPG
MPEG, M4V, ISO, IFO, VOB, TS, TP, TRP
H.264, MPEG1/2/4, VCD, SVCD, WMV9, RealVideo8/9/10(Up to 1280 x 720)
M-JPEG(640x480x30p, 840x480x10p), Resolution up to 1920 x 1080p
Dolby Digital Pus, Dolby Digital AC3 and DTS, LPCM, ADPCM, RA-cook
Subtitle
*** Although this player supports the listed formats, it might not be able to support every codec
used to create the files.
A/V & Data In/Out
Video-In / Video-Out
Audio-In
Audio-Out
SD & Micro SD
USB
LAN
OSD Language
Physical Dimension
AC/DC Adapter
SMI, SUB, IDX+SUB, SRT, SSA , ASS, DVD subtitle, Embedded in AVI
COMPOSITE / HDMI 1.3, Composite (RCA)
Input : AC100V ~ 240V 50/60Hz Output : DC12V
COMPOSITE(L/R Stereo)
Optical(Digital), Stereo(Analog)
SD & Micro SD card reader x 1EA
USB 2.0 Host x 2EA
Ethernet (100Base-Tx/10Base-T)
Wireless LAN(802.11n) : USB Dongle Type (Optional)
English, French, German, Italian, Spanish, Russian, Portuguese, Swedish,
Turkish, Greek, Arabic, Czech, Danish, Dutch, Finnish, Polish, Romanian, Hebrew
116mm(W) x 96mm(D) x 35mm(H)
* Specification may be changed without any notification
 Loading...