

Page 1

Page 2

CONTENTS
1 Introduction ·························································· 4
Multimedia Functions······························································
Kinds of format to be supported··················································
Precautions·········································································
How to handle and other precautions············································
Name of each point·································································
Contents in package·······························································
2 Preparation to use this device······································ 10
Procedure···········································································
Kinds of HDD to be installed······················································
HDD Installation····································································
Connecting to the PC································································
4
5
6
7
8
9
10
10
11
12
To create folder and to copy files·················································
Disconnecting from PC····························································
Connecting to TV with Composite(AV) cable···································
Connecting with HDMI cable ·····················································
Connecting with Coaxial connector···············································
13
14
15
16
17
3 Remote Controller & SET-UP Menu······························· 18
Structure of Remote Controller···················································
Booting Message & Main Menu··················································
Review of each Icon on Main Menu············································
SETUP Menu and How to set up·················································
VIDEO setting change·····························································
AUDIO setting change·····························································
ETC(Other) settings································································
18
19
20
21
22
23
24
Page 3

4 MULTIMEDIA FILE PLAYBACK ··································· 25
How to use BGM CREATOR(BGM ON) ········································
25
Enjoying movie file·································································
Creating DVD Library and Enjoying it············································
Enjoying Music Library····························································
Enjoying Photo Library····························································
26
33
35
36
5 Firmware update ····················································· 37
6 HDD Partition and Formatting ···································· 38
Under Window 98SE/ME environment··········································
Under Window 2000/XP/Vista environment·····································
38
42
A Troubleshooting ····················································· 46
B SPECIFICATION······················································· 49
Page 4

-
4 -
Introduction
Multimedia Functions
To playback a recorded digital HD file
As this product supports up to 1920 x 1080P, you can enjoy playing back a pre-recorded
HDTV program by a digital TV set-top box or person digital video contents taken by a HD
camcorder with fantastic displaying quality.
To support various video formats
This product supports various latest video formats such as a pre-recorded HD file(tp, trp,
ts), WMV9, WMV9 HD, MPEG4, MKV.
DVD JUKE BOX Function
As this product supports ISO and IFO file, you can store DVD titles and playback those
files just like DVD Player. You can store various DVD title and manage them forever and
easily.
Auto Playback, Bookmark and Section Repeat Functions
After one file playback is ended, the next file (different in file name only) is play-backed
automatically. If you mark a specific position of a movie during playback with
“BOOKMARK” button of remote controller, you can start from the marked position again.
The function of ‘Section Repeat’ lets you repeat a specific section. Section Repeat
function is useful for language study or enjoying sports moving pictures.
Music JUKE BOX Function
As this device supports various music files like MP3, Ogg Vorbis, WMA, AC3 and PCM,
You can store these files and enjoy them with ease. And, in case that you make playlist
by using ‘BGM CREATOR’ function, you can enjoy music files (playlisted) as
background music(BGM function) with ease and convenience.
Digital Photo Album
You can enjoy photo with this player together with your family through big screen of TV in
your living room, as it has ‘Photo with BGM(Background Music)’ functions.
Page 5

-
5 -
HDMI OUTPORT
HDMI provides unprecedented qualities to digital video and audio. You do not have to
mess around with several AV cables. It provides simple way to connect your display. It
can deliver uncompressed digital video and multi-channel digital audio.
External Mass Storage
As this device works perfectly as an external USB mass-storage for your PC through
high speed USB2.0, you can store huge data and manage it with ease.
Kinds of format to be supported
Video
Subtitle
Audio
Picture
• Even though a video file format is corresponding to the above table, a certain video file
may not be played-back properly in case that the resolution and transferring rate of the
video file is over specific value.
• Even though video file format is one of the above classification, a certain video file is not
played if the file is encoded with GMC or QPEL option.
• AVI(Audio Video Interleaved) is a container format. This means that it may contain
many different combinations of codec. So, even if this device supports most of AVI files,
but, there could be AVI files not played back properly.
HD file format(tp, trp, ts)
H.264, WMV9, WMV9 HD, MPEG 1/2/4, IFO, ISO, DAT, DivX, XVID
MKV, AVI, WMV, ISO, IFO, VOB, MPG, ASF, DAT
.SMI, .SUB, .SRT
MP3, Ogg Vorbis, WMA, AC3, PCM, DTS
JPEG, BMP, GIF, PNG
• Subtitle is supported properly in case only that the name of subtitle file is exactly same
as that of the moving picture file.
• The audio file encoded with copy protection technology is not played back properly.
• Even if this device can playback 2048 x 1352(JPEG), it may not work properly if the
JPEG size is over 1920 x 1080.
Page 6
-
6 -
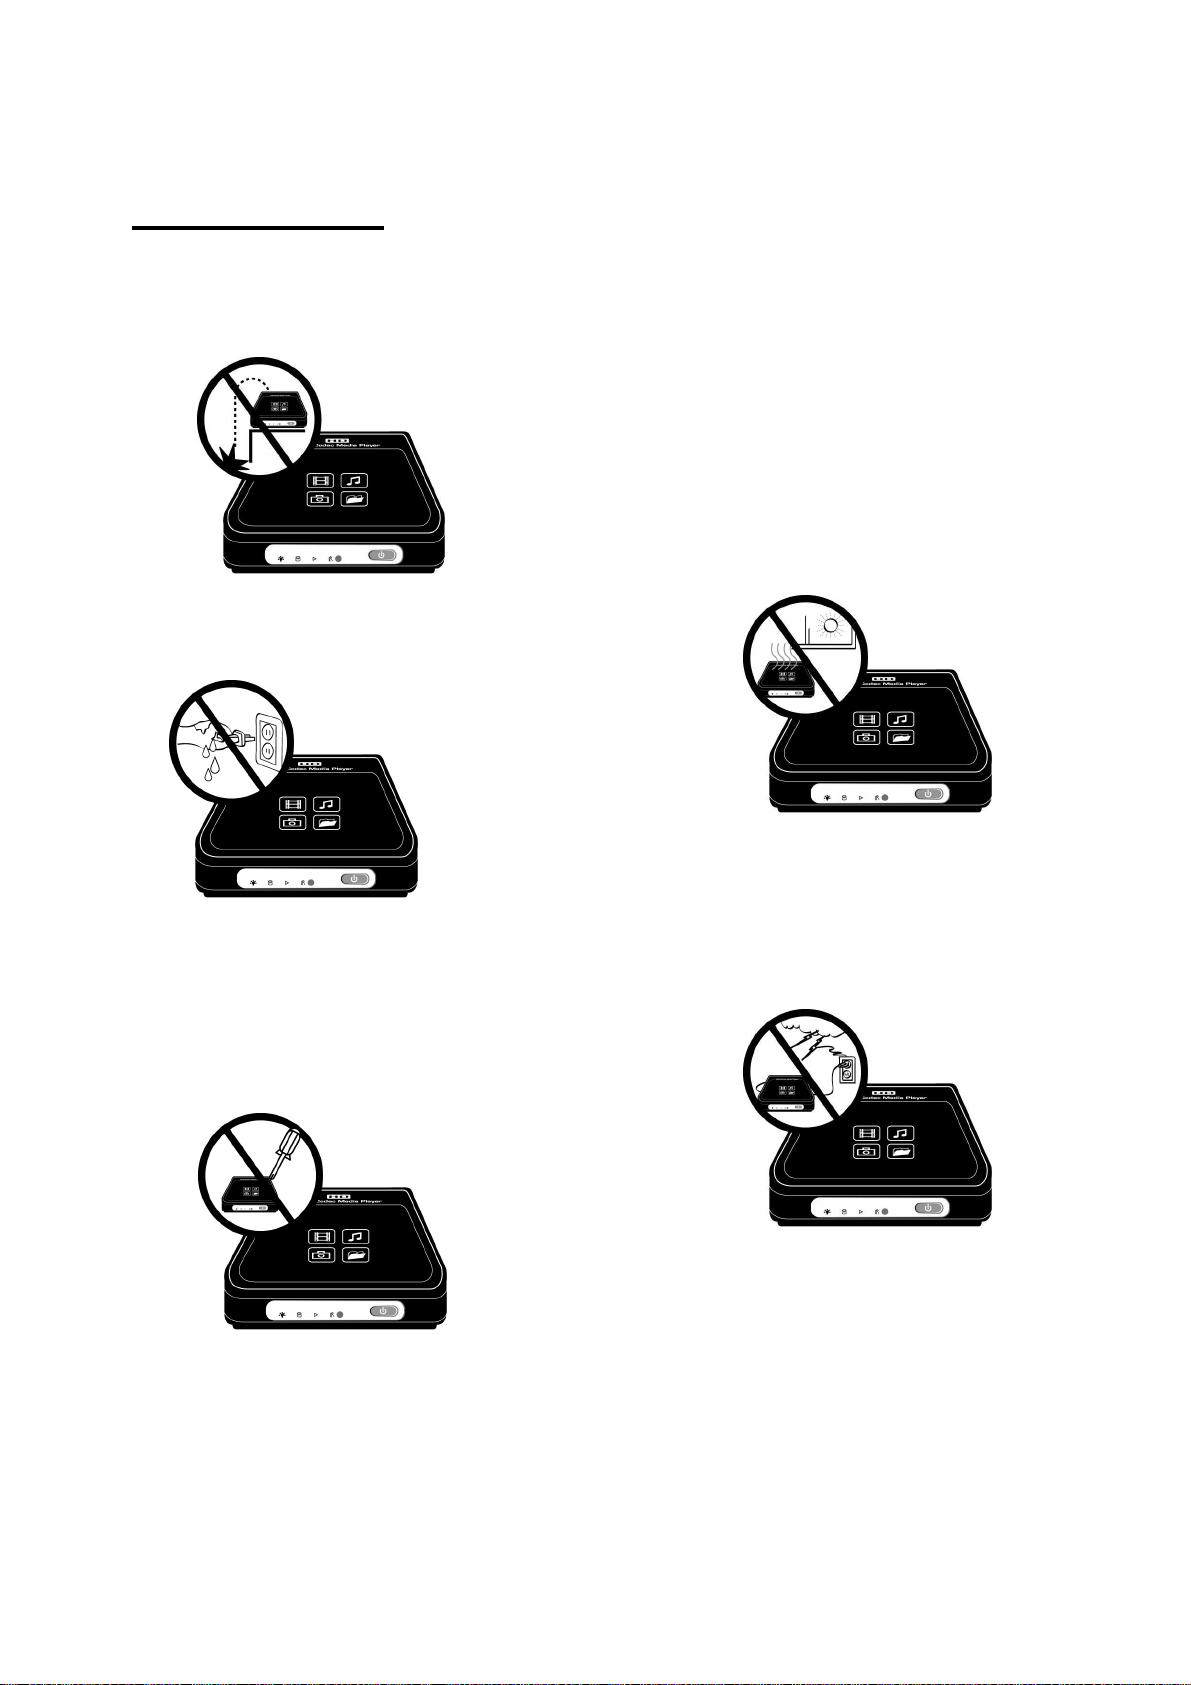
Precautions
Do not drop or give a shock. It may cause
serious damage to internal Hard Disk Drive.
Do not touch the plug of the AC power cord
with wet hands
Keep it away from high temperature, high
humidity, nearby magnetic filed and direct
sunlight.
Do not try disassembling. It may cause an
electric shock, defect or unexpected problem.
For installing or changing HDD, you may open
the door on bottom side.
Keep it unplugged during lightning storms or
when unused for long period time.
Page 7

-
7 -
How to handle and other precautions
••••
Make sure that you have to use the AC adapter only supplied together with this device
by manufacturer. If not, it may cause unexpected problem like breakdown, fire, etc.
••••
In case that this device is used or left in a completely covered and high temperature
space (like in a car) for long time, it may cause unexpected problem.
••••
In case of no use for long time, get rid of battery from remote controller.
••••
To clean the exterior of this product, soak a soft cloth in a mild detergent solution
diluted with water, tightly squeeze the cloth to remove the excess liquid, wipe the
affected area of the exterior, and finish by wiping with a dry cloth.
••••
Make sure that this player is not powered off suddenly during its working(playing-back,
file transferring, firmware upgrading, etc). In case of sudden power-off during working,
you need to check HDD with Windows utility(Scan Disk) after connecting with your PC
system.
••••
When you try disconnecting the USB cable between this product and your PC system
after finishing jobs, make sure to follow ‘USB device safety removal’ procedure.
••••
When try connecting HDD to SATA connector, be careful not to give some damage to
pins of each connector.
Page 8
-
8 -
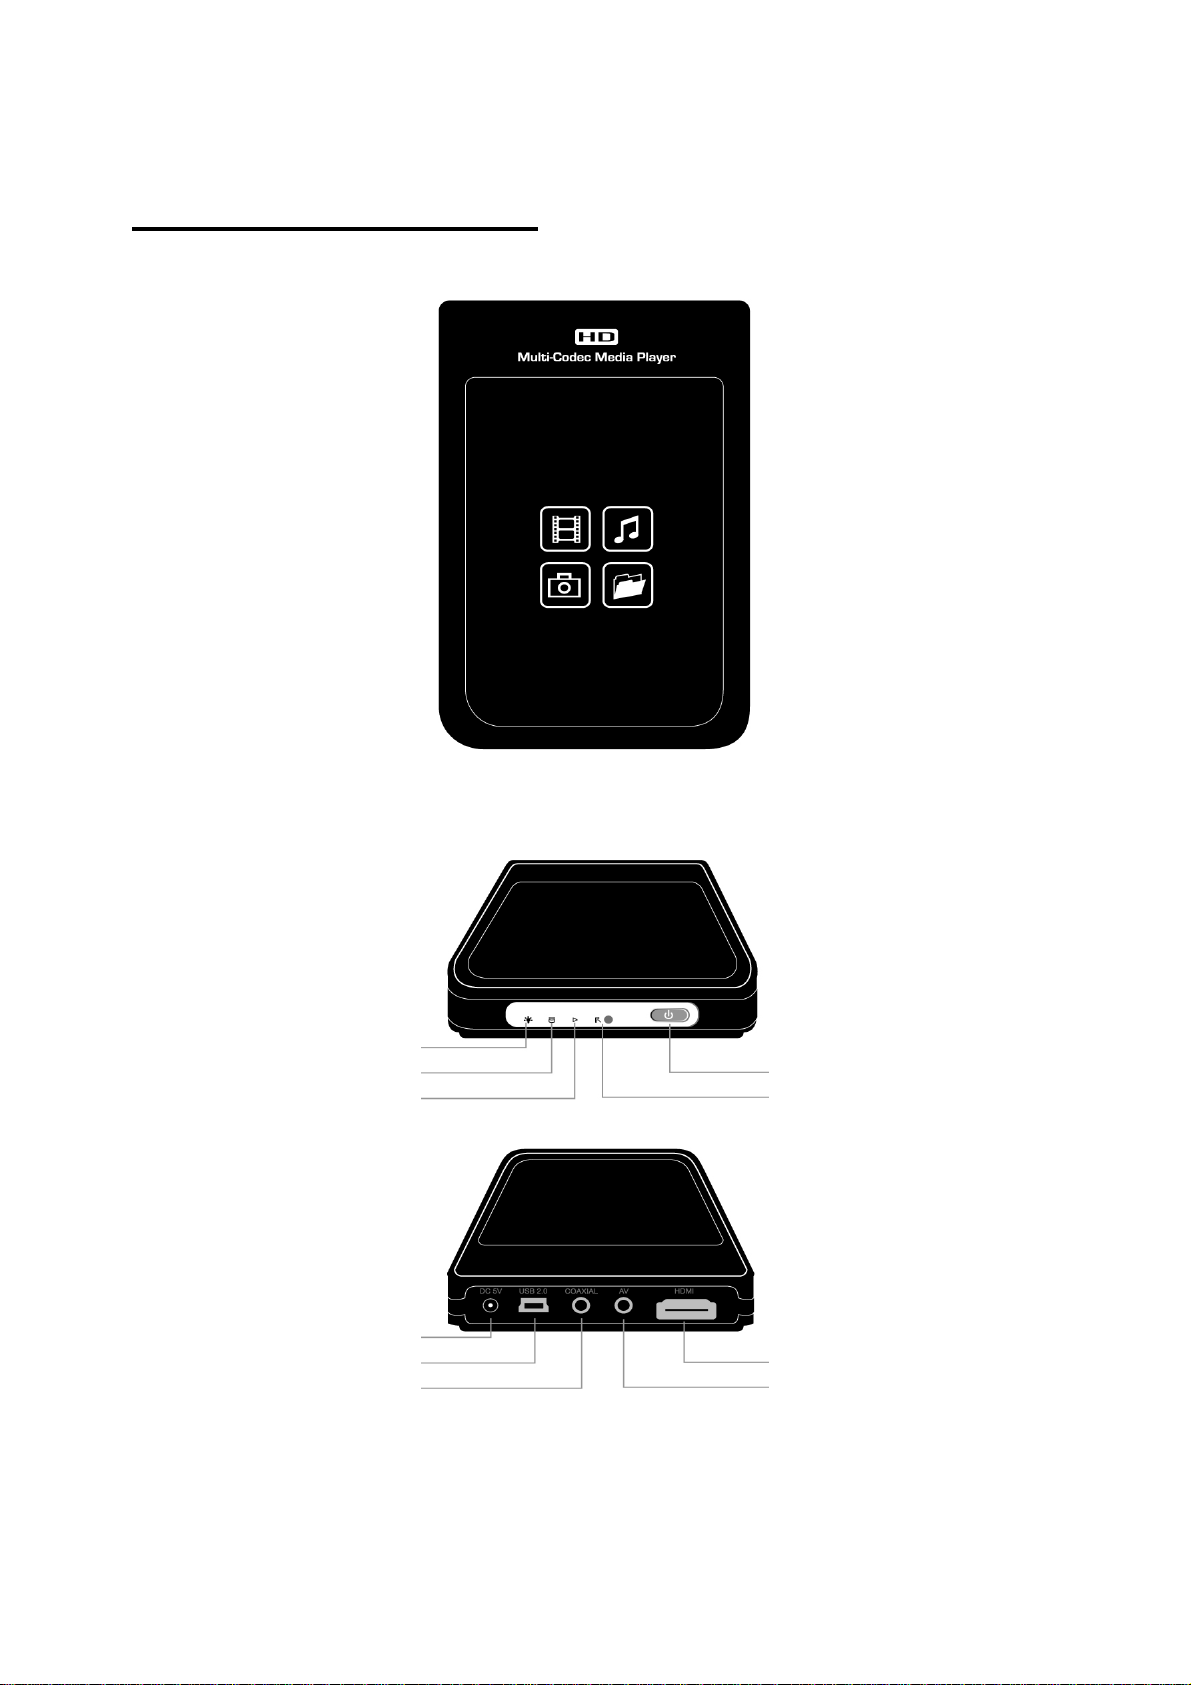
HDD LED
Name of each point
POWER LED
PLAY LED
AC IN
USB 2.0
Coaxial Connector
Power (On/Off) Button
IR Receiver
HDMI Connector
AV connector
Page 9

-
9 -
Contents in package
□ HDD Player □ Remote Controller □ User’s Manual
□ 5V DC Power Adaptor
□ Screw Driver □ Coaxial Converter
□ A to B USB Cable □ A/V Cable
Page 10

10
Preparation to use this product
Procedure
1. Make sure all the items are included with your player
2. Install HDD(Hard Disk Drive) into this player according to the procedure of HDD
installation(※ Note : HDD jumper should be set as Master)
3. Connect AC adapter to this product, and connect it to PC through USB cable
4. Turn the power on (with power button of front side, or with power button of remote
controller)
5. In case that the installed HDD is not formatted, please format it first according to
normal HDD format procedure
6. Copy media files in your PC to the HDD of this player
7. After finishing copying files, disconnect this device from your PC system
8. Connect this product to TV set and(or) to audio system
9. Power on this product and change set-up value in SET-UP menu if needed.
10. Now, you are ready to enjoy this player freely
Kinds of HDD to be installed
HDD Size HDD Type HDD Capacity HDD RPM
Any capacity
2.5” HDD
SATA
available in
market
HDD buffer
Over 4200 RPM
Memory
Over 2M
Page 11
-
11 -
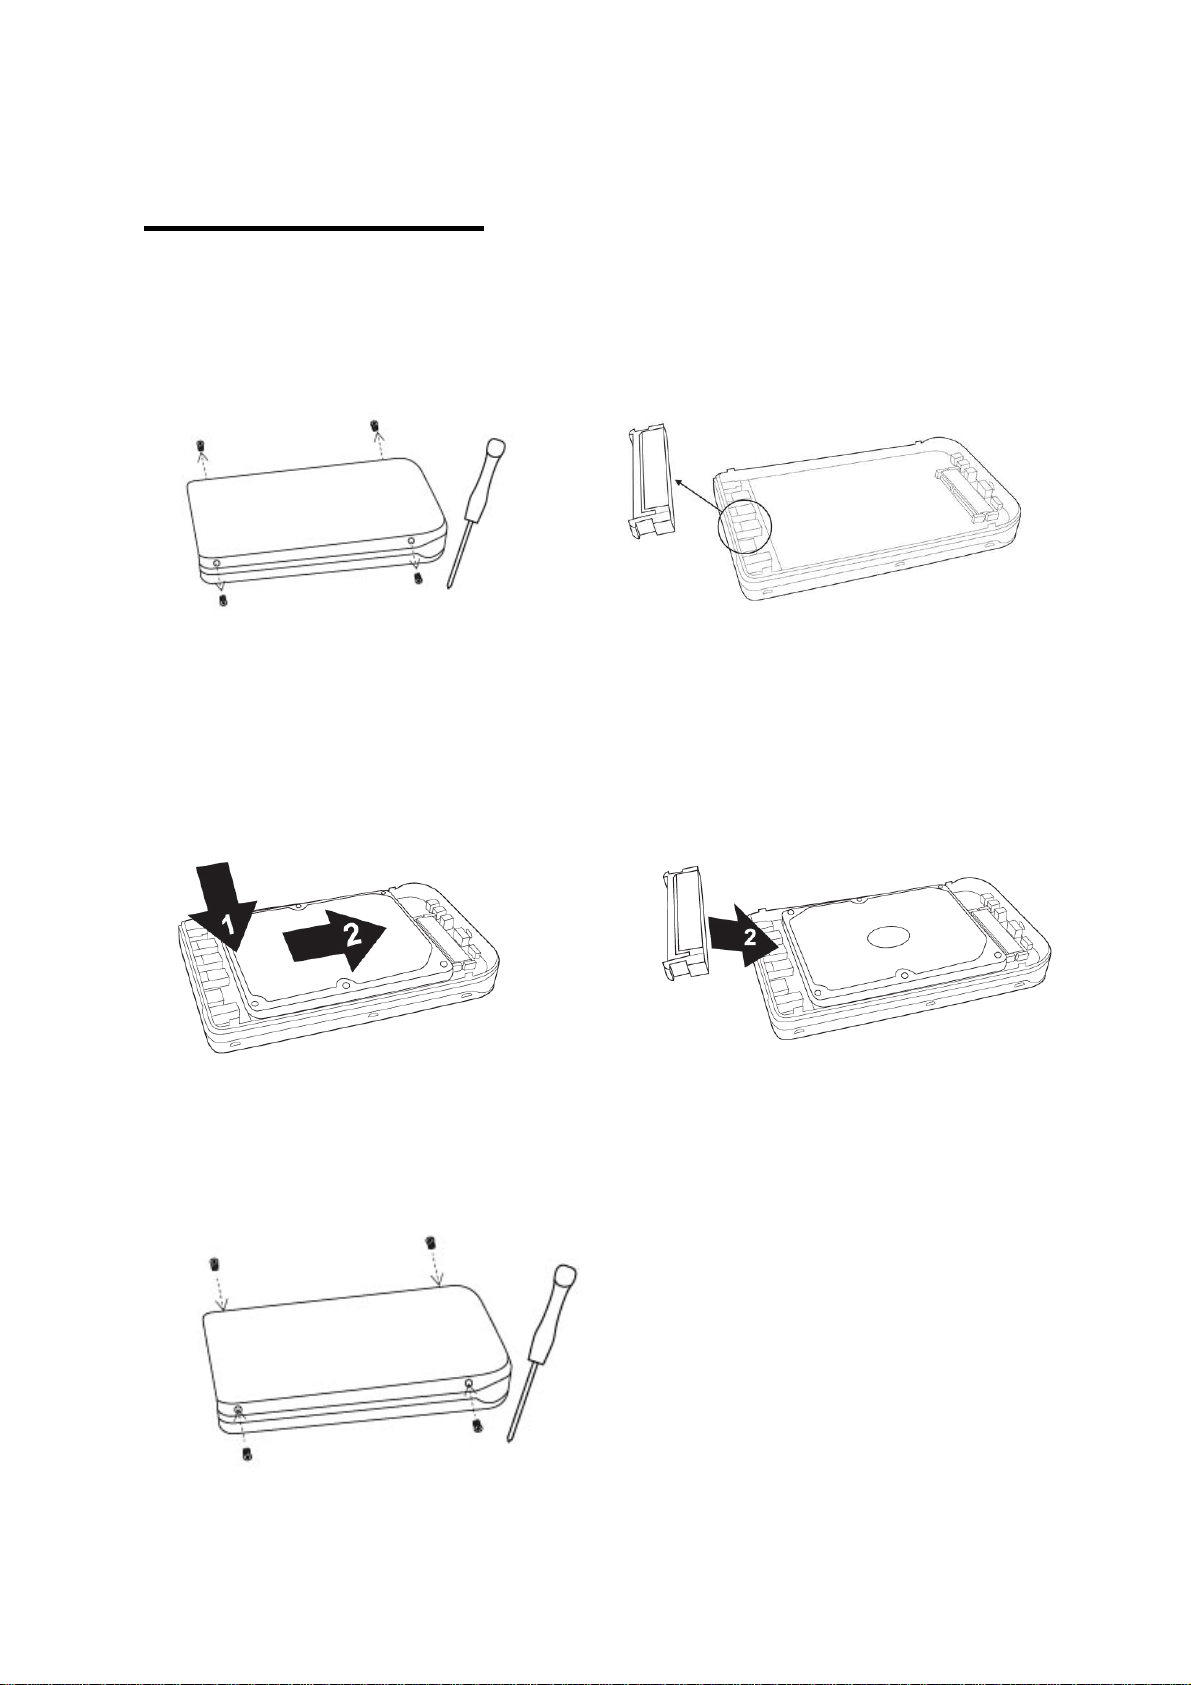
HDD Installation
1 Open the bottom cover with a screw
driver
3.
Install Hard Disk Drive into the
connector as shown in the picture.
2.
Take the Hard Disk Drive fixture away
4.
Install the Hard Disk Drive fixture again
5.
Close the bottom cover with a screw driver
Page 12
-
12 -
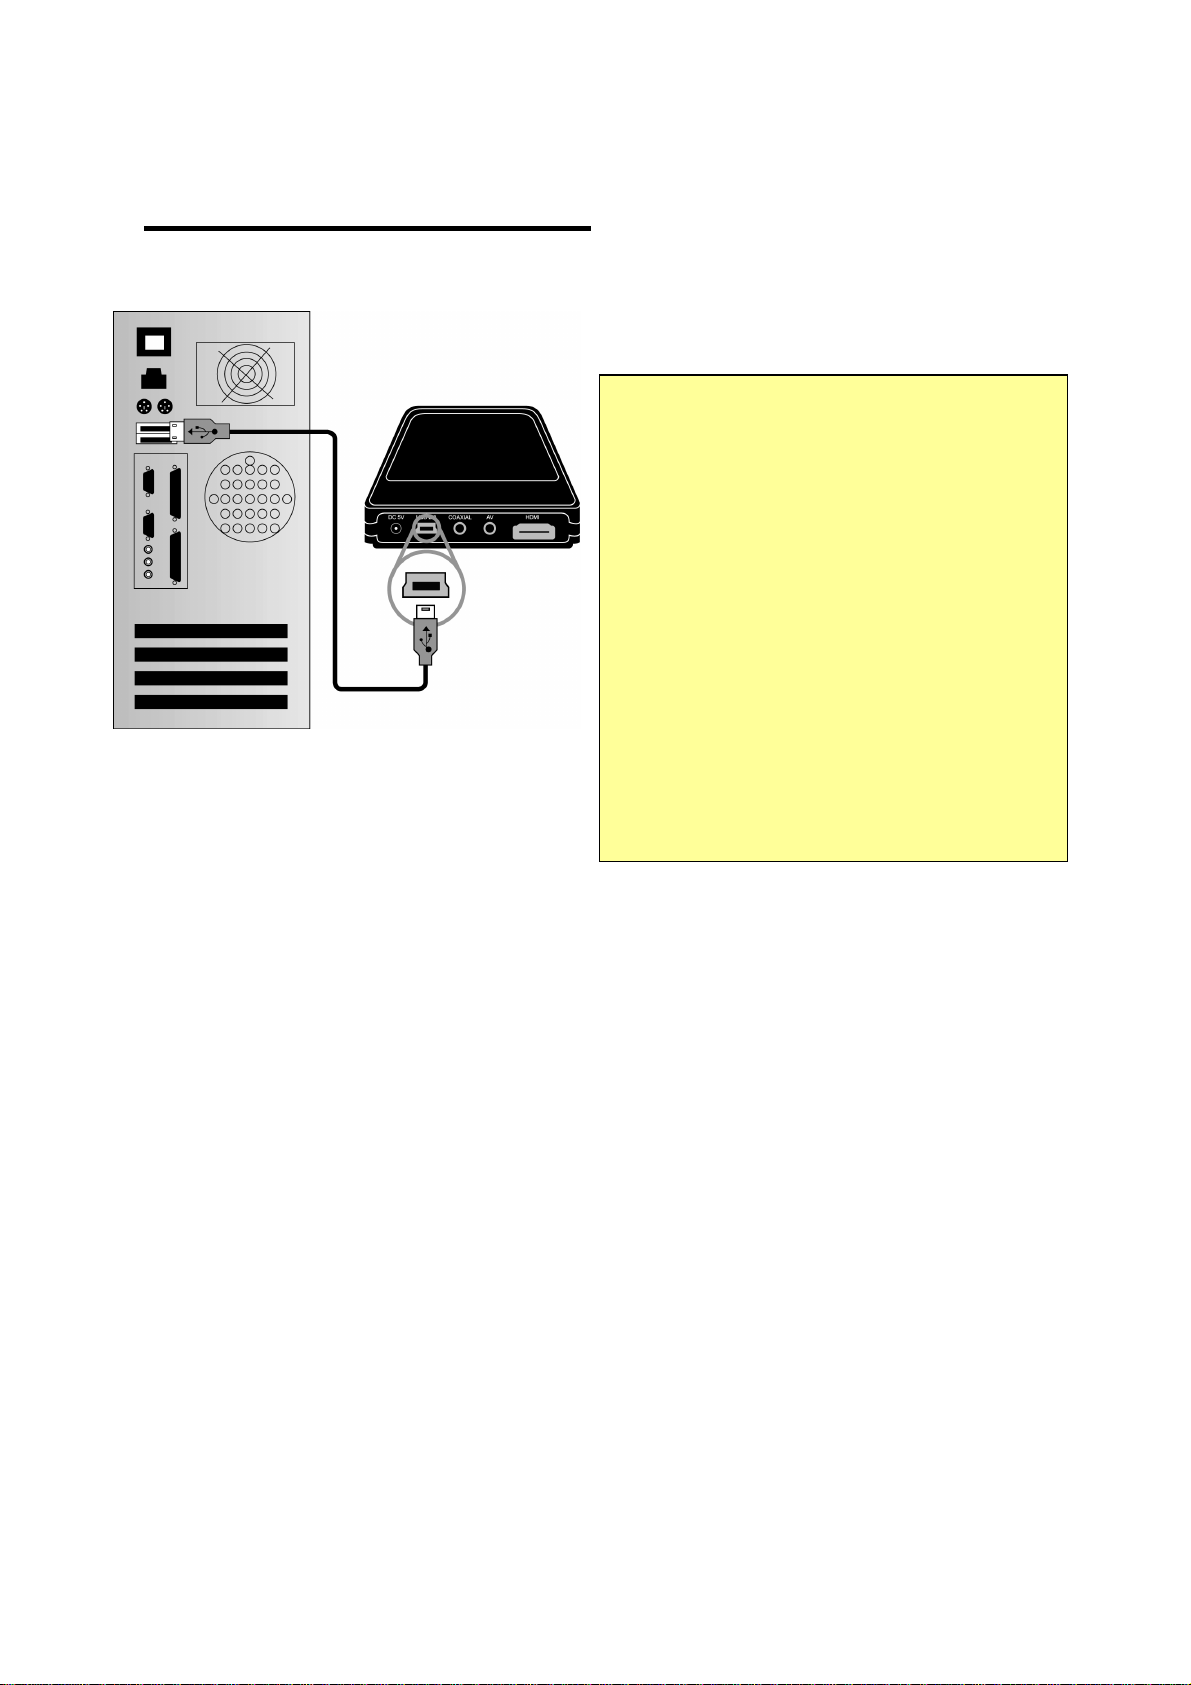
Connecting to the PC
To copy files in your PC to this player, follow below procedure.
For Windows ME/ 2000/XP/Vista Users
Recommendation
In case of data transferring from PC System
to this product through USB cable, basically
it can work properly without AC adapter
connected.
But, sometimes PC system does not supply
5V power properly through USB cable. This
may cause this device to be frozen during
data transferring.
So, we recommend that you connect AC
adapter to this device for data transferring.
1. Turn PC power on.
2. Connect this player to your PC with USB Cable. Connect it to AC adapter . And power it on.
3. Wait until your PC recognizes this player as USB mass storage.
4. Check whether this product is properly recognized as USB mass storage by clicking and
opening “My Computer” on Windows.
For Windows 98SE Users
1. Before connecting this product to your PC, you need to install Driver for Windows 98SE to your
PC.
2. After downloading it, unzip it and run the file
3. Connect this player to your PC with USB cable. And connect AC adapter to this player and
power it on. Wait until your PC recognizes this player as USB mass storage.
4.
Check whether this product is properly recognized as USB mass storage by clicking and
opening “My Computer” on Windows.
Page 13

-
13 -
To create folder and to copy files
Follow below procedure to copy folder and file from PC to this player.
• If the HDD has no partition or the HDD is not formatted, you need to do it first.
- We recommend NTFS instead of FAT32. This player supports multi partitions.
- Note : Primary partition should be over one(1)
• When you make folder in the HDD of this device, it is recommended that you make
folders like ‘MOVIE’, ‘MUSIC’, ‘PHOTO’. And, you copy files to each folder
corresponding to kind of file.
- ‘MOVIE’ folder responds to ‘MOVIE’ button of remote controller and ‘MOVIE’ icon of main
menu.
- ‘MUSIC’ folder responds to ‘MUSIC’ button of remote controller and ‘MUSIC’ icon of main
menu. And, ‘PHOTO’ folder is also same.
- You may make any name of folders freely.
• Do not store too many files into one folder.
- It is recommended that you make several sub folders and store files divisionally.
- In case that you did HDD partition with FAT32, it is recommended that you do not store over
3GB files into one folder.
• In case that file name(folder name) is too long or has so many specific characters,
blanks or period marks, the file(folder) may cause some problem.
- In this case, change or reduce file (folder) name.
• Moving picture file and subtitle file should be in same folder.
- Moving picture file and subtitle file should be in same folder. And, both files name should
be same except for ‘extension name’.
Disconnecting this product from PC
After finishing file copy, make sure that you need to follow next page procedure for
disconnecting this product from PC. Otherwise, copied files may have some damage.
Page 14
-
14 -
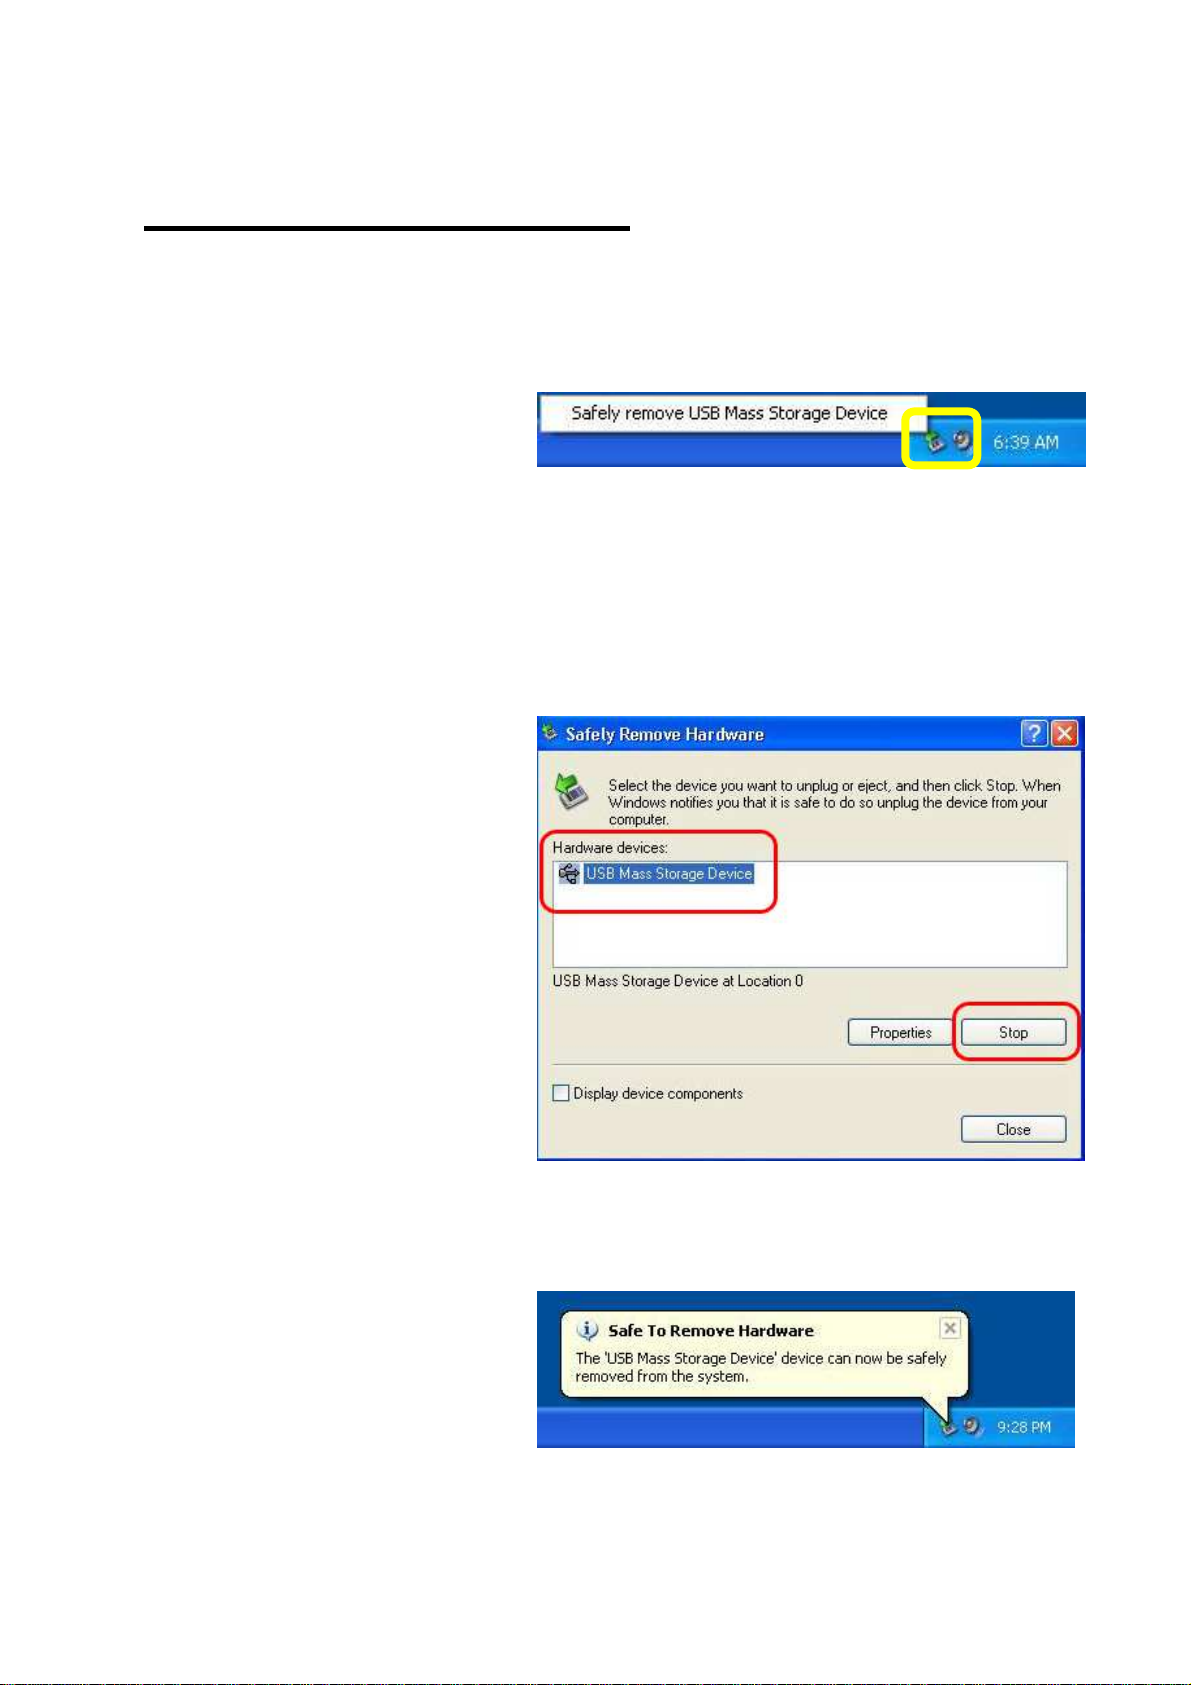
Disconnecting from PC
When try disconnecting USB cable between this player and PC,
make sure to follow below procedure.
1. Do double-click the icon of “Safely
remove USB……”.
2. Click “Stop” button after selecting
“USB Mass Storage Device”..
3. When the message like picture is
shown, disconnect USB cable
between this product and PC.
Page 15
-
15 -
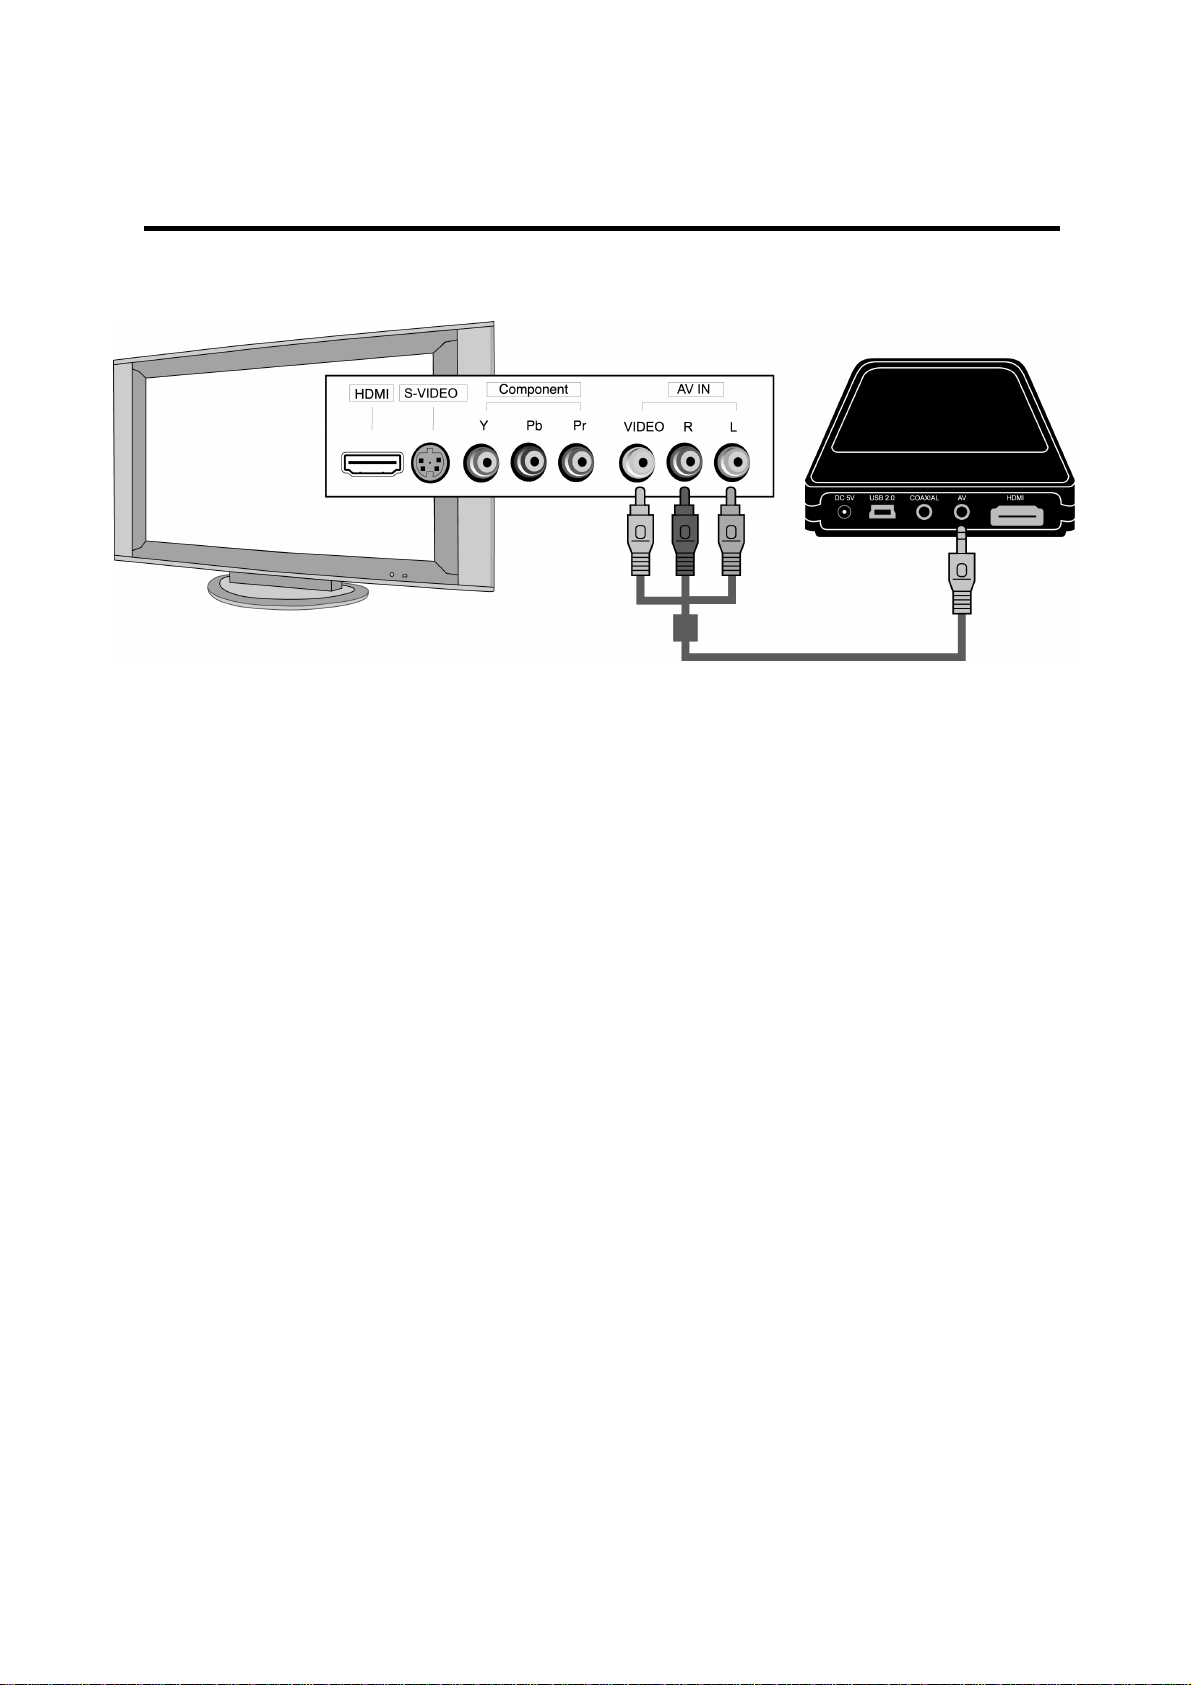
Connecting to TV with Composite(AV) cable
After powering off this product and TV, connect them like below procedure..
•••• The Composite AV cable should be connected to normal TV or Video, and it is needed for
connecting Composite video signal and 2CH audio signal simultaneously.
•••• Connect 3.5mm jack to the AV connector of this player, and connect VIDEO(Yellow) jack to the
VIDEO of TV, and connect Red jack to Sound right(R) of TV set, and connect White jack to
Sound left(White) of TV set.
•••• You may refer to cable(jack) colors and connector colors.
•••• If you want to use digital audio output(Coaxial), you don’t need to connect with Red jack(cable)
and White jack(cable).
•••• For more information, refer to user’s manual supplied by TV maker
Page 16

-
16 -
Connecting with HDMI cable
When connecting to HDTV or other high quality displaying devices,
follow the below picture.
Connecting with HDMI cable
•••• After connecting to your display with HDMI cable, Auto or each mode may be chosen in your
setting.
•••• You do not have to mess around audio cable since HDMI also supports audio
•••• You have to buy HDMI cable in a nearby shop.
Page 17

-
17 -
Connecting with Coaxial connector
If you want to enjoy high quality digital audio, connect Coaxial connector.
••••
As the audio output through Coaxial is digital signal, separate devices like DTS
Decoder(or Receiver) is needed additionally.
••••
For safety, connect cables after powering off the product and audio system.
••••
You have to purchase coaxial cable by yourselves in a nearby shop.
Page 18

-
18 -
Remote Controller & SET-UP Menu
Structure of Remote Controller
AUDIO OUT KEY
PLAY & PAUSE KEY
+15sec FWD / UP▲
REVERSE/LEFT※
OK/SELECT/PLAY
SLOW FOWARDING
PREV./NEXT FILE
MOVIE KEY
MUSIC KEY
POWER
SETUP
VOLUME
TV OUT SELECT
HOME
JUKEBOX
PHOTO
STOP
FORWARD/RIGHT
INFO/CURRENT TIME
-15sec REV./DOWN
BGM ON
MUTE
PREV./NEXT FILE
RETURN/CANCEL
SLEEP TIMER
NUMBER KEY
GOTO
CLEAR ALL(JUKEBOX)
DELETE A FILE(JUKEBOX)
DVD TITLE/MENU
ZOOM/SCROLL
BOOKMARK
POINT TO POINT
REPEAT/SHUFFLE
COLOR SETTING
DUBBING AUDIO
SUBTITLE CONTROL
SUBTILE SYNC
Page 19

-
19 -
Booting Message & Main Menu
If turning on the power of this product, it is booted up like below picture.
1. Booting Message
This picture is displayed during booting- up.
TV Out mode is originally set as PAL/Composite. If no-display on TV screen
In case of no –display.
after booting up, try changing TV Out mode by pressing TV OUT button of
remote controller.
2. Screen of Main Menu
Main Menu screen is displayed like below picture after completing booting up.
Main Menu is composed of several icons such as MOVIE, MUSIC, PHOTO, SETUP and JUKE
BOX(BGM). For explanation of each icon, refer to next page.
Page 20

-
20 -
Review of each icon on Main Menu
Main Menu has several icons like below. If you select each icon, you can see
files stored in corresponding folder or storage.
MOVIE icon
If selecting MOVIE icon, it shows all contents in MOVIE folder of the basic
HDD. It will be convenient for you to use or manage files if you make “MOVIE”
folder in the root directory of HDD in advance.
MUSIC icon
If selecting MUSIC icon, it shows all contents in MUSIC folder of the basic
HDD. It will be convenient for you to use or manage files if you make “MUSIC”
folder in the root directory of HDD in advance.
PHOTO icon
If selecting PHOTO icon, it shows all contents in PHOTO folder of the basic
HDD. It will be convenient for you to use or manage files if you make “PHOTO”
folder in the root directory of HDD in advance.
SETUP icon
If selecting SETUP icon, you can change setting value.
BGM icon
In case that you made PLAYLIST with “BGM CREATOR” function, you can
enjoy music at any time by pressing BGM button of remote controller. The title
of playing music is displayed in the box of JUKE BOX icon.
In case of no folder like MOVIE, MUSIC, PHOTO.
In case of no folder (‘MOVIE’, ‘MUSIC’, or ‘PHOTO’ ) in HDD, all files and all folders in
the root directory of HDD are shown.
Page 21

-
21 -
SETUP Menu and How to set up
If needed to change setting values before using this product, you can open
SETUP Menu like below picture by pressing SETUP button of remote controller
or Menu button.
•••• SETUP Menu is classified like VIDEO, AUDIO, ETC, EXIT. You can select each item with
Left/Right (※, ※) button of remote controller.
•••• To change setting values, if selecting main item, sub items are listed up. You can select each
item with Up/Down(▼, ▲) button.
•••• After selecting sub item, press OK button. Then, changeable setting values are displayed.
•••• Once you select one of changeable setting values with Up/Down(▼, ▲) button, press OK
button. Then, the value is saved and applied.
•••• If you want to go out without changing setting values, press RETURN button before you press
OK button for confirming any selected value. Pressing RETURN button, it makes you go to
previous step.
•••• After completing new setting, you can go back to main menu by pressing RETURN button
several times, by pressing SETUP button or selecting EXIT icon.
Page 22

-
22 -
VIDEO Setting Change
In SETUP Menu, if selecting VIDEO icon, sub items related to video are listed up
like picture.
• TV Standard
NTSC :Korea, North America
PAL : Europe and else
• TV Type
4:3 (for normal TV)
16:9(for Wide TV such as HDTV
or Plasma TV
• Display
Original (Letter Box) :
Select this option in case of playing a wide movie(16:9) with an ordinary
4:3 TV. There will be margins on the upper and lower sides of the screen.
Pan & Scan :
Select this option if you want a wide movie (16:9) to be adjusted fully to the
screen of ordinary 4:3 TV. The left/right of the movie is cut, and the margin of
top/bottom is disappeared.
Full Screen : Select this option if you want to adjust a movie fully to the
screen of TV with no consideration of original ratio. In this case, according to
the ratio of original movie, displaying size is enlarged upward/downward or to
the left/right.
• Video Out
Composite : In case of connecting with TV through Composite
HDMI (Auto or each mode) : In case of connecting to TV with HDMI cable
By pressing TV OUT button of remote controller several times, you can change
TV standard and Video Out mode in order.
Page 23

-
23 -
AUDIO setting change
In SETUP Menu, if selecting AUDIO icon, sub items related to audio are displayed
like picture..
• SPDIF
Analog : If selecting this option, all kind of
digital audio(PCM, MP3, AC3, DTS) are
decoded into analog signal. So, you can hear
sound without any separate DTS Decoder
(or Receiver).
Digital : If selecting this option, digital
signal is outputted directly without decoding
process. So, you need a separate Receiver or
Decoder to hear sound in case of using digital
audio connectors(Coaxial)
• Sound Effects
On : When power on and off this product,
sound effect comes out.
Off : No sound effect in power on/off.
• Music Play Mode
Single Play : Play only selected music file
Folder : Play all music files in same folder
Shuffle: Play all music files randomly in
same folder.
Page 24

-
24 -
ETC(Other) settings
In SETUP Menu, if selecting ETC icon, sub items are listed up like below picture.
• Slideshow Interval : To control time delay for displaying next picture file during
slideshow.
3sec, 5sec, 10sec ~ 60sec (total 9 levels)
• OSD Lang. : To change OSD languages.
• Sub. Color : To change subtitle color when playing back a moving picture.
total nine(9) kinds available.
• Sub. Size : To change size of subtitle when playing back a moving picture.
total two(2) kinds(Large/Small) available.
• User defined Background : To change the background of main menu with other picture
file that you want.
You choose a picture file in the basic HDD.
• Background Default : To use original background by canceling the user defined
background
• Factory Reset : To clear all values set by user and to initialize this product with values
set at factory.
• Firmware Update: To select firmware file and to update with new firmware.
MULTIMEDIA FILE PLAYBACK
Page 25

-
25 -
“OK”
Sele cted music icon
How to use BGM CREATOR
1. Go to BGM CREATOR
Click the “JUKEBOX” on screen or press
“JUKEBOX” button of remote controller. Then,
“JUKEBOX CREATOR” screen will be
displayed..
BGM
+
2. Make ‘PLAYLIST’
Select music file and press “OK” button. Then,
each selected file will be stored into ‘PLAYLIST’.
Not sele c ted m usic icon
3. Playback files stored in ‘PLAYLIST’.
To play selected music files, select the “PLAY ”
on screen and press “OK” button of remote
controller. And you may return to file browser
screen through “EXIT” on screen. JUKEBOX
on/off can be controlled by pressing “BGM ON”
button of remote controller. * Note : if you select
‘CLEAR’ on screen and press “OK” button, all
files in ‘PLAYLIST’ are deleted.
Page 26

-
26 -
4. Reference
JUKEBOX function can be used when you
do other jobs like Photo Slideshow or Onscreen jobs.
Enjoying movie file
1. Loading Message
Press “PLAY ” or “OK” button to start movie
file. When loading a file, this message comes out.
Depends on supported file format and size,
loading time is different
2. Fast searching
In playing a movie file, you can search the
position that you want to see by pressing “REW,
FF” button. It supports up to 32X searching.
1 press: 2X
2 press: 4X
3 press: 8X
4 press: 16X
5 press: 32X
Page 27

-
27 -
After pressing
After pressing
“
GOTO
”
3. Previous/Next file Playback
Pressing “−PAGE+” button, previous or next
movie file will be played.
“-PAGE+ “button,
Select YES or NO by
pressing
“※”, “※”button and press
“OK” button.
4
. GOTO function
In playing DVD, if you pressing “GOTO” button,
you can go to the specific position that you want.
button, input the time and
press “OK” button
XX : YY : ZZ
(H) : (M) : (S)
5. Control Volume level
In playing movie file, press “-VOLUME+” button.
Page 28

-
28 -
6. MUTE
button. The
For sound off, press “MUTE” button. To clear this
function, press “MUTE” button once again.
7. Checking information of playing file
In playing movie file, press “INFO”
playing file information will be shown..
“INFO”
st
1
press
8. Checking current playing time.
To check current playing time, press “INFO”
button two times. To clear this, press “INFO”
button once again.
“INFO”
2nd press
Page 29

-
29 -
9. Controlling subtitle position and size
In playing movie file, you can control subtitle size
and position with S.TITLE button.
1st ~5th press
10. Multi Subtitle control
If the playing movie contains multi subtitles, you
can select the subtitle that you want to see by
pressing “S.TITLE” button. To select subtitle,
press “OK” button
2nd ~ 3rd press
11. Multi Audio control
If the movie file contains multi audio, you can
select the audio that you want by pressing
“AUDIO” button.
1st ~ 2nd press
Page 30

-
30 -
12. Enlarging the screen
To enlarge screen size, press “ZOOM/SCROLL”
button and control the screen size by pressing
directional button(▲▼※※).
1st press
13. Scrolling the enlarged screen
To move enlarged screen, press “ZOOM/SCROLL”
button once again and move the enlarged screen
by pressing directional button(▲▼※※).
nd
2
14. Screen Color control
To adjust color setting, press “PICTURE”
button and control Brightness, Saturation and
press
Contrast by pressing directional button(※※).
1st ~ 3rd press
Page 31

-
31 -
15. Memorizing a specific position
BOOKMARK
In playing movie file, the current playing position
is saved by pressing “BOOKMARK” button.
16. BOOKMARK list
Pressing “BOOKMARK” button again, the latest
Bookmarked List is shown.(Max. 5 lists)
+
▲ or ▼
+
OK
17. Playback with slow speed
This product supports ‘slow playing back’ function
up to 1/32X.
1st press : 1/2X
2nd press : 1/4X
3rd press : 1/8X
4th press : 1/16X
5th press : 1/32X
Page 32

-
32 -
18. Control subtitle sync
or
SYNC
If a movie and a subtitle do not match, you can
control a subtitle by pressing
“SYNC” button.
+
※ or ※
1st press
19. Section Repeat – Set the beginning point
Press “A-B” button once to select the beginning
“A-“ point.
1st press
20. Section Repeat – Set the ending point
Press “A-B” button again to select the Ending
“-B” point. A-B section will be repeated. To clear
this setting, press “A-B” button once again.
2nd press
*Note : This function is useful for language study
enjoying sports moving picture.
Page 33

-
33 -
Creating DVD Library and Enjoying it
You can create your own virtual DVD Library by storing your private collection of
DVDs
1. How to play
As this player supports IFO and ISO file, you
can create your own DVD library by storing your
private collections of DVD
* IFO : I
nformation file commonly found on
DVDs. Such files contain navigational
information.
* ISO : One image file backup of the DVD title.
* FAT32 file system only supports up to 4GB.
* NTFS file system is unlimited.
2. DVD menu controlling
Using directional button, you can select DVD
menu from DVD menu screen.
.
3. Multi Subtitle Language Selection
In playing DVD, you can select a subtitle
language that you want by pressing “S.TITLE”
button.
Page 34

-
34 -
4. Multi Dubbing Audio Selection
In playing DVD, you can select a dubbing audio
that you want by pressing “AUDIO” button.
5. Return to DVD menu Screen
In playing a DVD, you can go to DVD menu
screen by pressing “TITLE” button. When you
play DVD again after setting, it starts from
stopped position of DVD.
6. GOTO function
In playing a movie, you can go to the specific
position that you want by pressing “GOTO”
button.
●
Volume control, color setting and media information are same as “Enjoying movie file” functions.
●
To go next or previous chapter of DVD, use “-PAGE+” button.
Page 35

-
35 -
Enjoying Music Library
This player supports MP3, Ogg Vorbis, WMA, AC3, PCM and DTS files
1. How to play
Select a files in a folder that contains music
files and push “PLAY ” button .
2. How to change Music Play Mode
In playing a music file, you can change play
mode by pressing “REPEAT/SHUFFLE” button.
1st press : Single
2nd press : Folder
3rd press : Shuffle
3. M3U and PLS file support
This product supports M3U playlist and PLS
playlist by created WINAMP. To play these files,
music files linked with M3U and PLS should be in
same HDD partition.
Page 36

-
36 -
Enjoying Photo Library
This product supports JPG, BMP, GIF and PNG files.
1. How to play.
Select a files in a folder that contains photo files
and push “PLAY ” button. Basically, all photo
files in same folder are played slideshow with 10
seconds interval. You can change slideshow time
delay setting on “ETC” section of SETUP Menu.
If you want to see one photo file only, please
push “OK” button instead of pressing “PLAY
”.
2. ZOOM / SCROLL of photo
You can enlarge the photo with direction keys of
remote controller after pushing “ZOOM/SCROLL”
button of remote controller one time.
** You can scroll the enlarged picture with
direction keys after pushing “ZOOM/SCROLL”
button once again.
Color setting function is same as “Enjoy Movie”.
Page 37

-
37 -
Firmware update
Getting the latest firmware to enjoy the added features and improved function.
1. Firstly, visit designated website or please ask the shop where you bought this device. You can
download the newest firmware and save it on your PC.
2. Please extract the compressed firmware file and copy the file into this player through USB
Cable
3. Connect this product to a TV and power it on. Click the “SETUP” button on remote controller
and go to ETC setting section of SETUP.
4. Select “Firmware update” and search the
folder where the new firmware file is saved.
*** The following screen is an example only.
The list will be different according to the
firmware you are updating ***
5. Select update file and push “OK” button on
remote controller.
6. Firmware update will start automatically
when you select “Yes” on confirmation
message box.
7. This product will power off in 10 sec
automatically after update process is
completed successfully.
8. Power on this player again, then go to “ETC” section of SETUP. Select “Factory Reset” and
press “OK” button for factory reset. And, power off this product again. After this, you can enjoy
with new firmware.
* Caution !!!
While updating, please make sure that this player is not powered off. If powered off
while updating, it has to be repaired from customer service center.
Page 38

-
38
-
HDD Partition and Formatting
Under Window 98SE/ME environment
Single partition is recommended.
Even if this device supports multi partitions, we recommend single
partition for your convenient using.
1. Open command prompt program(Start- Program MS-DOS Prompt)
2. Type “fdisk” and click enter.
Select “Y” to enable large disk support.
Page 39

-
39
-
3. Click “5” to change current fixed disk
drive.
4. Select the last Disk number that you
want to initialize.
In case of more than 2 HDDs
In case that there are several hard disk drives in your PC, the disk
number may be changed. In this case, you can select the number
corresponding to each percent(“%”).
Page 40

-
40
-
5. Select “1. Create DOS partition or
Logical DOS Drive .
6. Select “1. Create Primary DOS
Partition”.
7. Wait to be finished verifying drive
integrity until 100%.
Page 41

-
41
-
8. Select “Y” and Enter to use the
maximum available size for a Primary
DOS Partition.
9. Wait to be finished verifying drive
integrity once again and click “ESC”
two times to finish MS-DOS prompt
program.
10. Reboot your PC.
11. After restart, the new hard disk drive
will be shown on My Computer. Click
the right button of your mouse and
select “Format” to be formatted.
Page 42

-
42
-
Under Windows 2000/XP environment
1. Click the Start and go to
Control panel. Then, select
“Performance & Maintenance”
2. Select “Computer Management”
and go to “Disk Management”
3. Click the next on “The initialize and
Covert Disk Wizard” window.
Page 43

-
43
-
4. Select disk to initialize and click the
next.
5. Click the Finish on “ Completing the
initialized and convert Disk Wizard”
window.
6. Click the right button on your mouse
and select the “New Partition…”.
Page 44

-
44
-
7. Click the next.
8. Select “Primary partition” and Click
the next.
Important
This player works properly with TV in
case of Primary partition type only.
9. Specify partition size and click the
next.(10GB = 10000 MB)
Page 45

-
45
-
10. Click the next.
(Drive letter will be assigned
automatically)
11. Select file system and click the next.
(FAT32 can not be selected over 32GB
HDD).
Important
Do not check “Enable file and folder
compression.
12. Click the finish to close “The New
Partition Wizard”.
13. After setup the New Partition Wizard, the new HDD will be formatted automatically. Please
wait until 100% formatting is completed.
Page 46

-
46 -
Troubleshooting
Problems related to TV screen
1. In case of no-display on the TV screen.
Check if TV Out mode of this player is set properly with your TV. You may use TV
OUT button of remote controller. Press this button several times with 2~3sec time
interval.
Check whether you set your TV as Video input.
Check if A/V cable is connected properly and firmly.
Check whether the file that you want to play is supported by this player, or
not
2. Much noise on TV screen.
Check whether video cable is connected properly and tightly.
Check if TV Out mode is matched with your TV, or not.
In case that you connect this product to TV indirectly through DVD player or VCR,
etc, there may be some noise on TV screen. Please connect it to TV directly.
In case that there is some moisture inside of this device when you move it from
cold outside to warm inside, you need to wait for some time until it is conformed to
inside temperature.
3. In case that the size of playing picture does not fit to TV screen.
As aspect ratio is fixed, please set it properly again in the SET-UP menu..
Page 47

-
47
-
Problems related to Sound
1. In case of no-sound or much noise
Check whether stereo cable(A/V cable) is connected properly and tightly
between this product and TV set.
Check if [MUTE] button is pressed and volume level is set properly
Check whether digital audio cable is connected properly and tightly to the audio
input connectors of Home Theater System or Audio Amplifier
Try changing the value(Analog or Digital) of Audio Out on SET-UP menu
Try changing audio cable with new one.
2. In case of no-sound or bad sound quality when connected with digital audio
system
Set as ‘Digital’ on SETUP menu.
Check the status of connection and set up for digital audio system(Refer to the
manual of digital audio system)
Check whether coaxial cable is connected properly and tightly
Page 48

-
48
-
Problems related to HDD or Remote Controller
1. In case that this product does not recognize HDD
Check whether the root folder or specific folder contains too many files. In
this case, make sub folders and move some files to the sub folders to
reduce files number in specific folder.
Check whether HDD is connected with this device properly
Check whether HDD is formatted properly( It should be based on ‘Primary
partition’ and you must not check ‘file and folder compression’ option in
formatting HDD)
Check HDD jumper setting(It must be set as ‘Single’ or ‘Master’)
Try changing with new HDD(There may be some problem in HDD itself
caused by impact or damage from outside.)
2. In case that PC does not recognize this product as external USB mass
storage.
If PC is operated by Windows 98SE, you need to install the USB driver for
Windows98SE into your PC properly.
Check whether this device is powered ON.(It should be powered ON)
Try changing with new HDD(There may be some problem in HDD itself caused
by impact or damage from outside.)
3. In case that Remote Controller does not work properly.
Check if there is any obstacle between remote controller and IR Receiver of this
product
Check battery of remote controller.
Check whether the IR receiver is exposed to strong light such as direct sun light.
Page 49

-
49
-
SPECIFICATION
File Playback Format
High Definition Multimedia Player
HD file format (tp,trp ts)
Video
Audio
Picture
Subtitle
Output Connection
Video
Audio
USB Interface
HDD Type to be Used
Size
H.264, WMV9, WMV9 HD, MPEG1/2/4, IFO, ISO, DAT, DivX, XVID
MKV, AVI, WMV, ISO, IFO, VOB, MPG, ASF, DAT
MP3, Ogg Vorbis, WMA, AC3, PCM, DTS
JPEG, BMP, GIF, PNG
.SMI, .SUB, .SRT
HDMI (Audio also), Composite
Maximum Resolution: Up to 1920 x 1080P
2 Channel(stereo), Coaxial (digital)
1 x USB 2.0 Target port
2.5 inch SATA HDD for Notebook PC
File Format Support
Compatible Operating System
OS
Physical Dimension & Weight
Dimension(mm)
Power
Power Adapter Input : AC 90V ~ 250V free voltage
Certificate CE / FCC
Others Complies to RoHS
* Note : specification may be changed without any notification
NTFS, FAT32
Windows 98SE, ME, 2000, XP, Vista
Width(78mm) x Height(20mm) x Depth(134mm)
Output : DC 5V
 Loading...