

Page 1

1
Page 2

Contents
Overview .................................................................................................................................................................... 6
Xtreamer e-TRAYz Info. .......................................................................................................................................... 7
Major Functions .................................................................................................................................................................................................................. 7
Storing and Sharing Files via the e-TRAY ........................................................................................................................................................ 7
Transferring data and Forwarding links via the RapidBox ............................................................................................... 7
Syncing Folder between sysadmin via SyncFolder ........................................................................................................... 7
Downloading Entertainment data via e-Downloader/e-Torrent ..................................................................................... 7
Storing Music files and Enjoying via iTunes...................................................................................................................... 7
Website Hosting .................................................................................................................................................................. 8
USB Print Server ................................................................................................................................................................... 8
USB Copy .............................................................................................................................................................................. 8
Specification .......................................................................................................................................................................................................................... 9
Appearance ......................................................................................................................................................................................................................... 11
LED .......................................................................................................................................................................................................................................... 13
Button & Beef ................................................................................................................................................................................................................... 13
Disk Bay ................................................................................................................................................................................................................................ 14
Xtreamer e-TRAYz Settings .................................................................................................................................. 15
Basic Setup ......................................................................................................................................................................................................................... 15
Disk ................................................................................................................................................................................................................................... 15
Server name ................................................................................................................................................................................................................. 16
Administrator Information .................................................................................................................................................................................... 16
Mail Server .................................................................................................................................................................................................................... 17
Time ................................................................................................................................................................................................................................. 17
Port ................................................................................................................................................................................................................................... 18
Router .............................................................................................................................................................................................................................. 19
DDNS ............................................................................................................................................................................................................................... 20
Internet Connection ....................................................................................................................................................................................................... 21
Router Setup ................................................................................................................................................................................................................ 21
Setup Example .......................................................................................................................................................................................................... 22
Settings .................................................................................................................................................................... 26
2
Page 3

Access to e-TRAYz Home ............................................................................................................................................................................................ 26
Disk and Volume Management................................................................................................................................................................................ 26
RAID mode changing ............................................................................................................................................................................................ 26
Adding New disk ..................................................................................................................................................................................................... 28
Using as External Disk .......................................................................................................................................................................................... 31
Power ..................................................................................................................................................................................................................................... 33
Auto Shutdown ........................................................................................................................................................................................................ 33
HDD Sleep mode .................................................................................................................................................................................................... 33
Upgrade Firmware .......................................................................................................................................................................................................... 34
Current Firmware Info. .......................................................................................................................................................................................... 34
Download & Upgrade Firmware ..................................................................................................................................................................... 34
Reset ...................................................................................................................................................................................................................................... 35
Factory Reset ............................................................................................................................................................................................................. 35
Configuration Reset ............................................................................................................................................................................................... 35
Router setup using UPnP ............................................................................................................................................................................................ 36
Backup & Recovery Firmware ................................................................................................................................................................................... 39
Current Firmware Info ........................................................................................................................................................................................... 39
Backup & Recovery Firmware ........................................................................................................................................................................... 39
File Storage & Sharing .......................................................................................................................................... 41
Disk Type ............................................................................................................................................................................................................................. 41
System Folder .................................................................................................................................................................................................................... 42
e-TRAYz ................................................................................................................................................................................................................................ 43
Run e-TRAYz ............................................................................................................................................................................................................ 44
Disk Using ................................................................................................................................................................................................................... 46
Disk Disconnect ........................................................................................................................................................................................................ 47
Setting .......................................................................................................................................................................................................................... 48
Share .............................................................................................................................................................................................................................. 49
Sharing options ........................................................................................................................................................................................................ 52
Unshare ........................................................................................................................................................................................................................ 52
e-TRAYz web ...................................................................................................................................................................................................................... 53
File management ..................................................................................................................................................................................................... 54
Linkmail ........................................................................................................................................................................................................................ 56
3
Page 4

Linkcopy ....................................................................................................................................................................................................................... 57
Share .............................................................................................................................................................................................................................. 58
Sharing options ........................................................................................................................................................................................................ 62
Unshare ........................................................................................................................................................................................................................ 63
RapidBox .................................................................................................................................................................. 64
File Upload .......................................................................................................................................................................................................................... 65
Recent Upload .................................................................................................................................................................................................................. 66
Allow Guest access ......................................................................................................................................................................................................... 67
e-Downloader.......................................................................................................................................................... 68
File Download ................................................................................................................................................................................................................... 69
Extract .................................................................................................................................................................................................................................... 70
Download Option ............................................................................................................................................................................................................ 71
Completed List .................................................................................................................................................................................................................. 71
Settings ................................................................................................................................................................................................................................. 72
Download Setting ................................................................................................................................................................................................... 72
Premium Account info. ......................................................................................................................................................................................... 72
SyncFolder ............................................................................................................................................................... 74
Add Friends ........................................................................................................................................................................................................................ 74
Folder I Sync ...................................................................................................................................................................................................................... 75
Synchronize ................................................................................................................................................................................................................ 75
Sync with more friends ........................................................................................................................................................................................ 76
Remove Sync ............................................................................................................................................................................................................. 77
Getting Synced ................................................................................................................................................................................................................. 78
Getting Synced ......................................................................................................................................................................................................... 78
Sync Now .................................................................................................................................................................................................................... 80
Recent Sync Info ...................................................................................................................................................................................................... 81
Setup Sync schedule.............................................................................................................................................................................................. 81
Changing Syncfolder ............................................................................................................................................................................................. 82
Remove Sync ............................................................................................................................................................................................................. 83
e-Torrent .................................................................................................................................................................. 84
Torrent RSS ......................................................................................................................................................................................................................... 85
Viewing the list of Torrent Files ....................................................................................................................................................................... 85
4
Page 5

Torrent Site Registration...................................................................................................................................................................................... 86
Torrent Search ................................................................................................................................................................................................................... 88
Torrent Download ........................................................................................................................................................................................................... 89
File Download by using ‘Torrent RSS’ and ‘Torrent Search’ .............................................................................................................. 89
File Download by using Torrent File Registration .................................................................................................................................. 90
ETC ............................................................................................................................................................................ 91
Print Connection .............................................................................................................................................................................................................. 91
Using iTunes....................................................................................................................................................................................................................... 93
USB AutoCopy .................................................................................................................................................................................................................. 94
Appendix .................................................................................................................................................................. 95
Application .......................................................................................................................................................................................................................... 95
FAQ ......................................................................................................................................................................................................................................... 98
Troubleshooting ............................................................................................................................................................................................................. 101
5
Page 6

Overview
This USER GUIDE covers all major functions and management of Xtreamer e-TRAYz. Please refer to Online Guide for
further details.
- Online User Guide : http://www.eunicorn.co.kr/eTRAYz/manual/1.0.0/kr/user/manual.html
- Online Settings Guide : http://www.eunicorn.co.kr/eTRAYz/manual/1.0.0/kr/settings/manual.html
6
Page 7

Xtreamer e-TRAYz Info.
Major Functions
Congratulation on your purchase of Xtreamer e-TRAYz. Xtreamer e-TR AY z is specially designed for the following
purposes.
Storing and Sharing Files vie the e-TRAYz
Users can easily save and share files within the Intranet or through the Internet using ‘e-TRAYz’. Especially,
Windows users can easily use e-TRAY z ’ Disk just like Network Drive through the Internet.
Transfering data and Forwarding links via the RapidBox
Users can easily upload files onto e-TRAYz as well as to send a linkage of the file to others using RapidBox. If
guest receive permission, the guest can transfer files to e-T R AY z ’ owner without user account on login browser.
Syncing Folder between sysadmin via SyncFolder
SyncFolder allow you to sync folders and share files with other users. After registering to ‘friend’ with IP(or
domain) and setting, you and your ‘friend’ can share and sync folders each other. You can set up a Sync
Schedule and synchronize the folders synced with me by using ‘Sync Now’ button right now.
Downloading Entertainment data via e-Downloader/e-Torrent
e-Downloader allow you to download sequentially the link of files divided by several parts from file sharing sites,
such as Megaupload or Rapidshare. If you use e-Downloader function, you can download files onto e-T R AYz
without authentication at each download. By using e-To r rent, you can download media files from the Internet
through BitTorrent to Xtreamer e-TRAYz. If you have an UPnP DMA connected in the LAN, you can share the
multimedia files on XTreamer e-TRAYz .
Storing Music files and Enjoying via iTunes
You can listen to the music saved in Xtreamer e-TR AY z by using iTunes client.
7
Page 8

Website Hosting
Xtreamer e-TRAYz allows you to host website with Apache and PHP supported.
USB Print Server
You can share USB 2.0 Printers through the LAN.
USB Copy
The built-in ‘Copy’ button on the device allows instant copy of files from the USB device to Xtreamer e-T RAY z .
8
Page 9
Specification
Item Xtreamer e-TRAYz
CPU OXE8xx
System
HDD 3.5” HDD X 2
I/O Interface USB port 2.0 X 1, 1.1 X 1
Buttons Power, Reset, USB Auto-Copy
LAN
FAN Smart FAN X 1 (Auto Sensing)
Dimenstion(H X W X D) 120mm*81mm*182mm
Network
Network File Protocol CIFS, NFS, AFP
Additional Useful Protocol FTP with SSL/TLS, SSH, Secure SMTP
Client Platform
Web Browser Internet Explorer, Firefox (recommended)
Web Server Apache, MySQL, SQLite, PHP
USB function USB auto-copy, Volume Expansion, Wireless LAN, Printer Server
Multimedia
RapidBox
SyncFolder
Memory 128MB
Flash 4MB
Wireless LAN X 1 (802.11b/g/n, USB Type)
Wired LAN X 1 (Gbit)
DHCP Server YES
Dynamic DNS ***.myetrayz.net
Jumbo Frame YES
e-TRAYz Web : Windows/Linux/Mac
e-TRAYz Connector : Windows 2000, 2003, XP, Vista, Win7(32bit)
iTunes Music Server
UPnP device, Port mapping
Non-member can upload file to admin
URL Link mail & URL Link copy
Recent Event
Synch Folder I share
Synch Folder shared with me
Scheduled Synch
Friend Management
e-TRAYz Connector
e-TRAYz Disk for admin’s private space. Admin can share sub-
folders with users
Private Disk for users’ private space
Public Disk for sharing with local devices
External Disk for USB device and USB auto copy
Start on system startup
System Tray
Disk connect/disconnect
9
Page 10
Item Xtreamer e-TRAYz
e-TRAYz Disk for admin’s private space. Admin can share sub-
folders with users
Private Disk for users’ private space
Public Disk for sharing with local devices(media player, game
e-TRAYz Web File manager
Plugins Rapidshare.com, megaupload.com
e-Downloader
Settings Premium account, Download control
e-Torrent Tor rent RSS, Torrent Search, Download
RAID Level RAID 1, Linear
System Management
Language English, Korean
device, settop box etc.)
External Disk for USB device and USB auto copy
Create user account with e-mail address automatically
Multi files upload / File&Folder download
URL Link mail for Big sized file
URL Link copy
Web-based Settings
E-mail Alert
Alarm Buzzer
HDD/USB Disk Sleep mode
Scheduled Power Off
Limitations
1. e-TRAYz Connector only be supported to Windows users.
2. Each Xtreamer e-TR AYz s up p orts 1 USB printer.
10
Page 11

Appearance
11
Page 12

Article Name Location Description
LED Front Display status of system, internal hard disk, USB device and so on.
FAN Rear
Copy Rear
USB Port Rear
Reset Rear
LAN Rear
Power Port Rear The power port is where you connect the AC power adapter.
The fan is built to exhaust waste heat out of Xtreamer e-TR AY z . It
will start automatically when the server starts.
Pressing the button will copy the data from the connected USB
device to the Xtreamer e-TRAYz ’ internal HDD.
Xtreamer e-TRAYz offers 2 USB ports for adding additional external
hard drives, USB printers, USB wireless LAN or other USB devices.
This is for the reset of Network setup.
When the power switch is turned on while Reset button is pressing
for 2~3 sec, a booting initialization is done. You need to boot this
way when you reinstall software replacing internal hard disk.
The LAN port is where you connect RJ-4 cable to Xtreamer e-
TRAYz.
12
Page 13
LED
LED Color Status Description
Turned on Connected power
Power/Access BLUE
HDD A/HDD B RED
USB YELLOW
Network GREEN
Blinking Data read and write at HDD
Turned off Disconnected power
Turned on Disconnected or abnormal status of HDD A/B
Turned off At normal status of HDD A/B
Cyclic Blinking Installing software or not installed the software
Non-Cyclic
Blinking
Turned on Connected LAN cable normally
Turned Off Disconnected LAN cable
Button and Beep
Button/Beep Description
When the USB device is connected, this button is pressed for 1 sec and release, copy
Copy
Reset
Single Beep
2 Beep
starts from USB device to internal disk(External Disk – USB_copy) with a single beep.
During the copy, this button is pressed for 3 sec and released the copy stopped with
2 beep.
When this button is pressed for 3 sec, the network initialization is started with a
single beep and completed with 2 beeps.
When the power switch is turned on while Reset button is pressing for 2~3 sec, a
booting initialization is done.
When system booting is completed.
When system successfully recognizes the newly connected USB device.
When USB copy is started.
When the network initialization is started.
When USB copy is completed.
When USB copy is canceled.
When USB device is disconnected.
When the network initialization is completed.
Data read and write at USB device
13
Page 14

Disk Bay
Disk Description
HDD A The disk slit on the Front-right side. When you use only one disk, please insert here.
HDD B The disk slit on the Front-left side.
14
Page 15
Xtreamer e-TRAYz Settings
Basic Setup
After installing software, you can setup default settings using Setup Wizard. At initial setup, you must complete
all steps to use the Xtreamer e-T R AY z .
The Setup Wizard automatically runs after login, and you can change the settings at any time
Disk
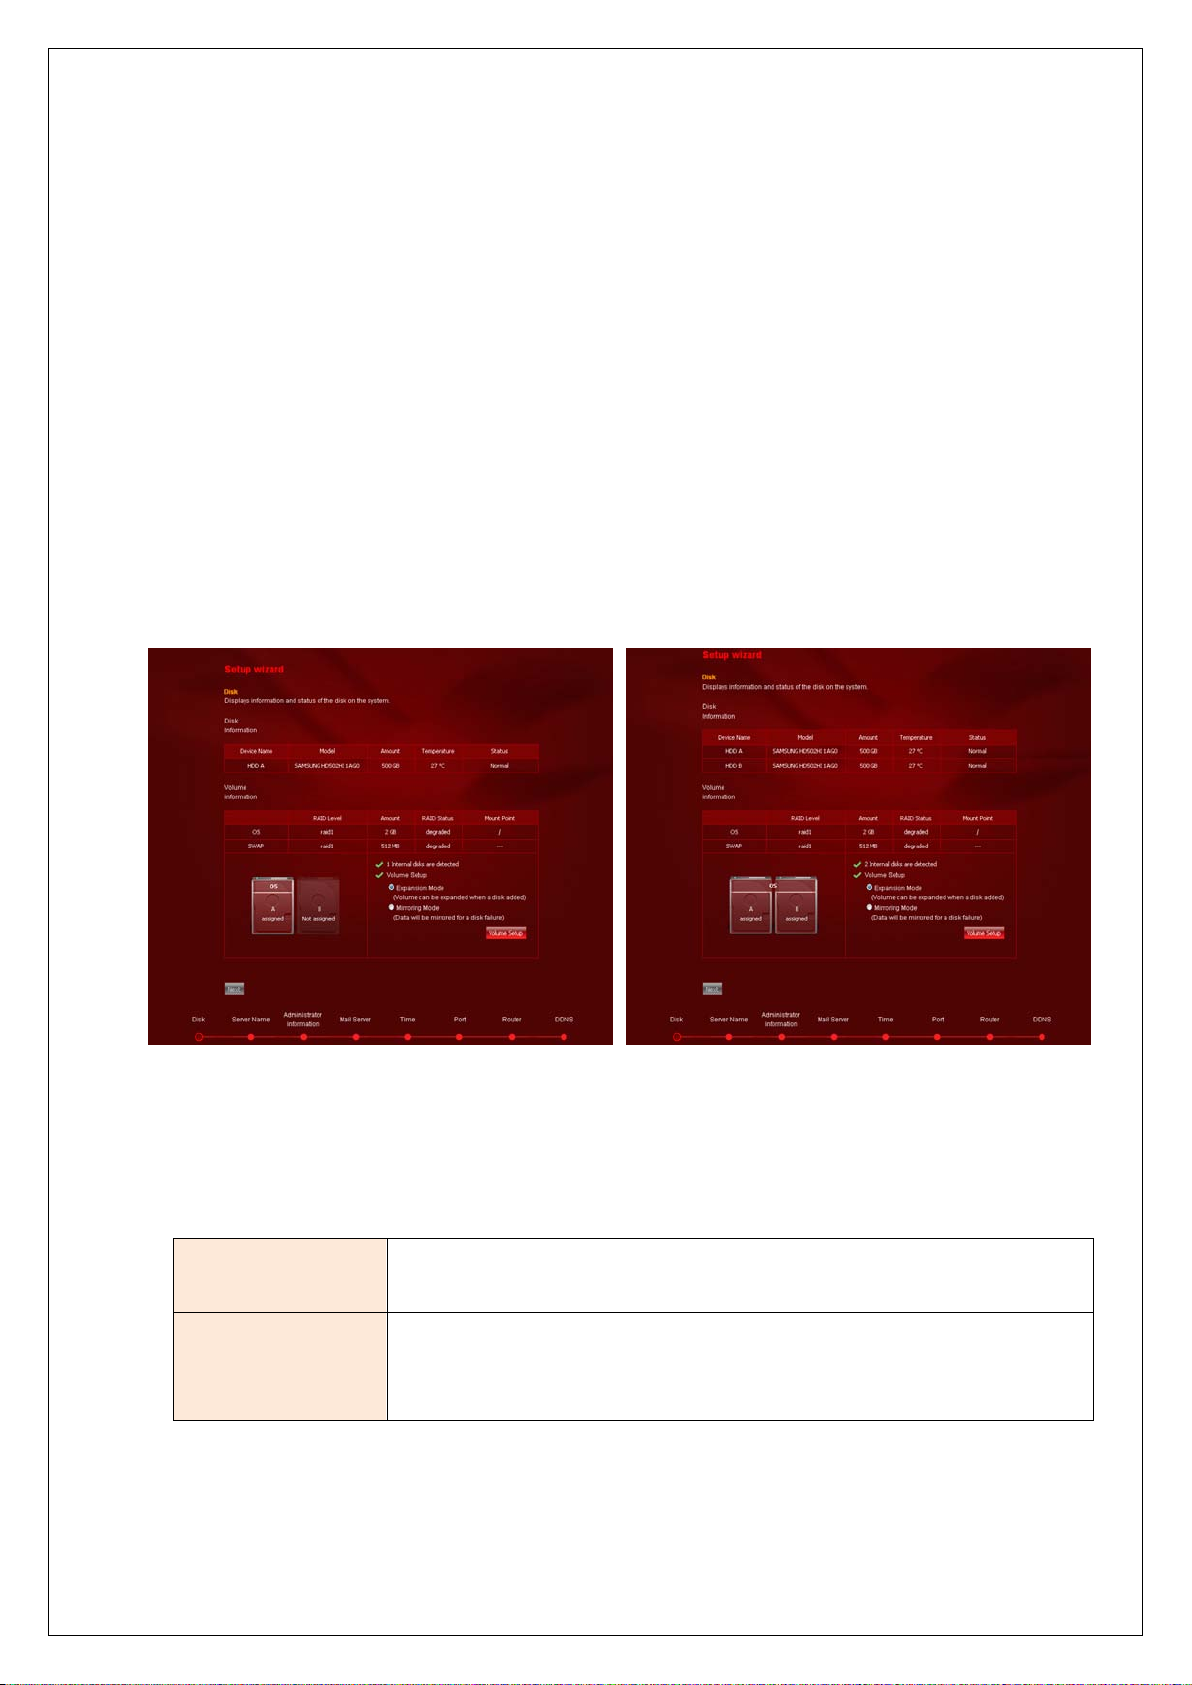
1. You can view information and status of the disk on the system and setup RAID mode.
Using 1 HDD Using 2 HDD.
2. Set RAID mode of internal hard disk as Linear or RAID 1. If security is more important than disk capacity,
choose the mirroring(RAID 1) mode, or if you want to use the maximum capacity of the disk, choose the
expansion(Linear) mode.
Expansion(Linear)
mode
Mirroring(RAID 1)
mode
3. Click ‘Volume configuration’. It may be take several minutes.
The installed disks are integrated into one big logical disk: 2 physical 1-TB disks
are treated as one 2-TB disk.
The same data is copied on two different disks. Should one disk fail due to an
error, you can still read the data from the other disk, provided that you have
selected security mode.
15
Page 16

Server Name
1. Server name is displayed when searching equipment with iTunes, network drive or UPnP. Enter alphabet,
numbers, ‘_’ or combination of those. Click ‘Apply’ button to save the set information.
Administrator Information
1. Set information of administrator. Input sysadmin's password, e-mail address and name. The ID of
Administrator cannot be changed.
2. E-mail address is required to send Linkmail, Alarm mail and etc, so it must be accurately described.
16
Page 17

Mail
1. Set mail server.
2. If mail server is not set, mail-related functions, such as Link mail or alarm mail, etc, are not activated. Please
set your mail server for useful e-T R AY z .
3. After mail setting, click ‘sending test mail’ and verify that mail sent correctly.
Time
1. Set current time and Time zone.
2. If you don't use NTP server, set date and time manually.
17
Page 18

Port
1. Set service port. You can set Web port, e-TRAYz authentication port and e-torrent port.
2. When you use router, each service port of router must be opened to access e-TRAYz through the internet.
Web port
e-TRAYz port
e-Torrent port
Setup e-TRAYz Home port and e-T R AYz ho m epage port. Default port of e-
TRAYz Home port is 8080, and of homepage is 8000.
Setup authentication port of e-TRAYz. You must enter authentication port
at connector. Default port is 13196.
Setup e-Torrent port range. It can be set from 1024 to 65535 manually. The
last port value is automatically set with (starting port + 10). Default starting
port is 6890 and the last is 6900.
18
Page 19

Router
When you use router, you need to setup router to access e-T R AYz through the internet. Before setup, connect
the e-TRAYz to router or modem with a LAN cable. Select one of the two way following.
1. Use router's UPnP function. Router that supports UPnP function must be used.
① Log in the router to activate the UPnP function.(Refer to guide of router.)
② Apply port mapping using UPnP to click ‘Go to UPnP setup’ button.
setup using UPnP] part of User manual.)
③ Connection failure to e-TRAYz from outside may occur depending on the router after port mapping
using UPnP has been completed. If this is the case, login to the router and manually setup DMZ or
port forwarding.
2. User router's port forwarding or DMZ function. Port mapping must be done manually from the router.
(Refer to [Settings] – [Router
① When using DMZ, fill IP address of Xtreamer e-TRAYz onto DMZ host space of router.
② When using port forwarding, fill IP address and port number of Xtreamer e-TRAYz onto port
forwarding page of router.
e-TRAYz Homepage port 8000
e-TRAyz Home port 8080
e-TRAYz Authentication Port 13196
e-Torrent port 6890~6900
19
Page 20

DDNS
1. DDNS is a domain to be used when logon to Xtreamer e-TRAYz from outside.
2. If DDNS is not set, mail-related functions, such as Link mail or alarm mail, etc, are not activated. Please set
your DDNS for useful e-TRAY z .
3. Problems may occur in DDNS operation if using 2 routers or using a share in private IP environment. Inquire
network administrator.
Notice.
1. At initial setup, you must complete all eight steps above to use a e-TRAYz. Even without changes on each
pages, click ‘Apply’ button to complete all of the settings.
2. When you use router, it must be set to access Xtreamer e-TRAYz via the internet.
3. For useful mail-related functions, such as Link mail or alarm mail, etc, the mail server and DDNS must be set.
20
Page 21

Internet Connection
s carried out by setting DMZ with internal IP of
Router Setup
To access Xtreamer e-TRAYz via Internet, you need to setup IP router port mapping or DMZ/Portforwarding. If
your router support UPnP function, apply port mapping using UPnP.
If not, apply DMZ or Portforwarding to router. This step can be skipped if not using the IP Sharing Router.
Not all IP routers provide this function. And also there are differences in terminologies to each router. If you
want more detail information, refer to the manual of your IP Sharing Router.
This is the function to hand over all data fed into IP router to the designated IP.
DMZ
Port Forwarding
Automatic connection to device i
the device even if IP address of router is accessed from the outside.
This is the function of mapping from external Internet to communication port of
PC connected to router. In this case, mapping on ports used in web disk is
required. Ports used in web disk are as of the following : 8000, 443, 8080, 13196
CAUTION) If DMZ function is supported, using of DMZ is recommended. Port forwarding setup is more
complicated than DMZ. If using both of these functions simultaneously, caution is required as port forwarding is
applied prior to DMZ in general.
21
Page 22

Setup Examples
Open your web browser and enter the IP address of your router. Enter
Below shows examples of three popular venders. If you have other products, refer to its manual.
D-Link Router
DMZ Setting
Virtual Server
(Port Forwarding)
Setting
1.
username (admin) and your password (leave blank).
2. Click the Advanced tab and then click on the DMZ button.
3. Select Enable and type in the IP address of the Xtreamer e-TRAYz you want to
use as DMZ host.
4. Click Apply and then Continue to save the changes.
22
Page 23

Open your web browser and enter the IP address of your router. Enter
Open your web browser and enter the IP address of your router. Enter
Linksys Router
DMZ Setting
1.
username (admin) and your password (leave blank).
2. Click the Advanced tab and then click Virtual Server button.
3. Enter the Name for your virtual service. Enter the Private IP of the Xtreamer
e-TRAYz on the LAN network that will be providing the virtual services.
Choose the Protocol type used for the virtual service.(TCP)
4. Enter the Private Port number of the service being hosted by the server
computer on the LAN.
Enter the Public Port number that users on the Internet will use to access the
virtual service. Choose the schedule of time when the virtual service will be
active.
5. Click Apply and then continue to save the changes.
1.
username and your password(leave blank).
2. Click the DMZ menu and select the Enable button on Applications/gaming
pages.
3. Enter the IP address of Xtreamer e-TRAYz you want to use as DMZ host.
4. Click Save Settings and then continue to save the changes.
23
Page 24

Virtual Server
r router. Enter
ur web browser and enter the IP address of your router. Enter
(Port Forwarding)
Setting
1. Open your web browser and enter the IP address of y ou
username and your password(leave blank).
2. Click the Applications & Gaming menu and then click the Port Range
Forwarding menu.
3. Enter the name in the Application name. (ex. e-TR AY z , e -Torrent and so on)
- Enter the beginning port number in the Start.
- Enter the ending port number in the End.
- Choose TCP from the Protocol drop-down menu.
- Enter the IP address of the server in the IP address
4. Click Save Settings and then continue to save the changes.
Netgear Router
DMZ Setting
1. Open yo
username (admin) and your password (password).
2. Click the WAN Setup menu and then click the Default DMZ Server check box.
24
Page 25

Virtual Server
Open your web browser and enter the IP address of your router. Enter
(Port Forwarding)
Setting
3. Enter the IP address of the Xtreamer e-TR AY z you want to use as DMZ host.
4. Click Apply and then Continue to save the changes.
1.
username (admin) and your password (password).
2. Click the Port Forwarding/Port Triggering menu.
3. Choose the Port Forwarding.
4. Click the Add Custom Service button.
- Enter the service name in the Service Name.
- Enter the beginning port number in the Starting Port.
- Enter the same port number in the Ending Port.
- Enter the IP address of the server computer in the Server IP Address.
5. Click Apply and then Continue to save the changes.
25
Page 26

Settings
You can manage all of your Xtreamer e-T R AYz setting at ‘Settings’ page. Each page provides comments to help
management and you can find more information with ‘Settings’ manual.
Access to e-TRAYz Home
1. Open the Web browser.
2. Enter http://Xtreamer e-TRAYz IP address(or Domain):8080/. (Domain is the DDNS which set at Setup
Wizard page. ex. eunicorn.myetrayz.net)
3. It will take you to the Login page of e-TRAYz Home.
4. Enter ID and Password. The ID for management is sysadmin.
5. Click ‘Login’ button.
6. Click ‘Settings’ icon for managing of e-TRAYz server.
Disk and Volume Management
You can add a new disk or change RAID mode at [Settings] – [System] – [Disk] page or [Setup Wizard] –[Disk]
step.
RAID mode changing
You can change the RAID mode regardless of the number of disks. Xtreamer e-TRAYz supports Linear mode and
RAID 1(mirroring) mode.
If you change the RAID mode, all data and partition information of disk are deleted, so you need to
backup first.
26
Page 27

1. Click Configuration Change button and
move to Setup wizard to change disk
button on
configuration.
Click Configuration Change
the bottom of page.
2. Choose RAID Mode changing and click
Next button.
3. Check current RAID Mode. If current RAID
mode is Linear, you can change mode to
RAID 1. Click Next button.
27
Page 28

4. Check changes again, and click OK button.
move to Setup wizard to change disk
button on
RAID changing will be started.
Adding New Disk
You can add a disk such as Additional Disk or Single Disk to current RAID configuration. If you add a disk
to current RAID configuration, all data of existing disk are remained and new disk's are deleted.
1) Add a disk to RAID : Linear -> Linear or RAID 1 -> RAID 1
1. Click Configuration Change button and
configuration.
Click Configuration Change
the bottom of page.
2. Choose Adding a New HardDisk (not
change RAID mode) and click Next
button.
* If possible, the same amount of disks
should be used for RAID 1 mode. And if
you cannot, insert larger disk to HDD B.
28
Page 29

3.
Check current RAID mode and Disk
button, the configuration
move to Setup wizard to change disk
capacity.
Click OK
changing will be started.
2) Add a disk to RAID : Linear -> RAID 1 or RAID 1 -> Linear
If you want to change RAID mode after adding a disk, first of all, add disk to current RAID configuration,
then change the RAID mode.
1. Click Configuration Change button and
configuration. Click Configuration
Change button on the bottom of page.
2. Choose Adding a New HardDisk (not
change RAID mode) and click Next
button.
* If possible, the same amount of disks
should be used for RAID 1 mode. And if
you cannot, insert larger disk to HDD B.
29
Page 30

3.
Check current RAID mode and Disk
button, the configuration
button on
capacity.
Click OK
changing will be started.
4. When the changing is over, log in again
and run Setup Wizard.
5. Click Configuration Change
the bottom of [Disk] page.
6. Choose RAID Mode changing and click
Next button.
7. Choose Linear Mode or RAID 1 Mode
and click Next button.
30
Page 31

move to Setup wizard to change disk
Adding a New HardDisk (using
Using as External Disk(not including to RAID)
You can use an additional disk as external disk. The External Disk will be added to RAID configuration later.
8. Check changes again, and click OK button.
RAID changing will be started.
1. Click Configuration Change button and
configuration. Click Configuration Change
button on the bottom of page.
2. Choose
as External Disk) and click Next button.
31
Page 32

3. Determine whether to format or not, and
and data in the disk is preserved.
click OK button.
- Using after formatting : Disk will be
formatted. All the partitions and data in
the disk will be cleaned. If your HDD is
new and not formatted, please format it
first.
- Using without formatting : Partitions
Partitions formatted by windows file
system will be mounted with read-only
privilege.
4. You can check that the disk has mounted
as External HDD.
CAUTION.
Please keep the power ON during RAID mode changing. Otherwise system or data may be damaged.
32
Page 33

Power
Auto Shutdown
Xtreamer e-TRAYz provides Auto shutdown function that it enable to turn off power automatically.
Move to [Settings] – [System] – [Power] page. Choose Auto Shutdown Activation and setup time.
HDD Sleep mode
HDD Sleep Mode allows you to turn the hard disk off while you're not using e-TRAYz. This mode can save
electrical consumption and noise of hard disk.
Move to [Settings] – [System] – [Power] page. Select time for sleep mode of internal disk and USB disk and
click Apply button.
33
Page 34

Upgrade Firmware
Xtreamer e-TRAYz loads the upgraded firmware information in the center automatically, you can download
firmware files and upgrade easily without the cumbersome process.
Move to [Settings] – [System] – [Upgrade] page.
Current Firmware Info.
Check current firmware version and recent upgrade date. Set directory for firmware download and the new files
are saved automatically when you download firmware files. Default directory for firmware download is e-T RAYz
Disk/ New_Firmware_List. Users can change download folder what they want.
Download & Upgrade Firmware
Download firmware files that are improved performance or added new features. You can upgrade firmware with
downloaded files.
For more information about firmware files, click
download firmware file. Upgrade firmware with downloaded file. You must run firmware upgrade step by step.
You can store downloaded firmware files on your PC to click file name and upgrade firmware later.
button. Click Download button on the right side and
34
Page 35

After the upgrade is complete, the system can be rebooted. After reboot, please connect again.
* Configuration information and data are preserved, so backup or recovery is not required.
Reset
System can be initialized as a factory default or all configuration values initialization.
Factory Reset
System will be initialized as a factory default. All configuration including user account will be initialized and all
data will be removed.
e-TRAYz software should be re-installed after factory reset.
Configuration Reset
Disk settings and user account information(data) are retained and the following configuration information is
initialized.
Network Setup
Port Setup Port values of all service will be initialized with the default settings.
SMTP Setup The SMTP setup is initialized.
Service Setup Configuration information for each service is initialized.
Network IP is initialized to get information from the DHCP server and when
cannot get IP address from DHCP server, IP will be set to 192.168.0.199.
35
Page 36

Router Setup using UPnP
When you use router, you need to setup router to access e-TR AY z v i a the internet. When you use the router’s
UPnP function, port can be simply set without complex setup such as DMZ or Port forwarding. * This case is
only available if you use a router which supported UPnP function.
Move to [Settings] – [Service] – [UPnP] page.
1. Activate UPnP function of the IP router. (Refer to router’s guide)
2. Activate Router port matting using UPnP of Xtreamer e-TRAYz. Check Activate router port mapping
function using UPnP and click Change Setup button.
3. Apply the port mapping by using UPnP.
36
Page 37

4. Input the desired port number in each service to be used. If you want to use the default values, you don’t
have to enter values.
5. Select the check box and click the Change Setup button. You can apply one at a time.
6. If the ‘Current state’ is Apply, the port mapping is completed successfully.
7. If the ‘Current state’ is Inconsistent and display the following message, please click the Change Setup
button once more.
37
Page 38

38
Page 39

Backup & Recovery Firmware
If you need to run firmware backup because of Disk configuration changes or etc, you can backup all of the
firmware and configuration information and restore it again. * Data backup is not supported.
Move to [Settings] – [Backup] – [Firmware Backup] page.
Current Firmware Info.
Check current firmware version and recent upgrade date. Set directory for firmware backup and the backup files
are saved automatically when you run backup the firmware. Default directory for firmware backup is e-TRAY z
Disk/ Firmware_Backup.
The Firmware Backup Folder will be create automatically when you backup.
Backup & Recovery Firmware
1. Click Backup button on the right side.
2. etrayz_Firmware version_Full(Config)_Backup_Date created.bin file is created.
39
Page 40

3. If you want to restore, click Recovery button on the right side of a file name. forget that the firmware
version of backup files and current firmware version are must be the same.
4. You can store Backup files on your PC to click file name and recover later.
5. Click Delete button if you want to delete useless backup files.
40
Page 41

File Storage & Sharing
File Storage & sharing are the most important function of Xtreamer e-T R AY z .
Users can easily save and share files within the Intranet or through the Internet using ‘e-TRAYz’. Especially, Windows
users can easily use e-TRAYz’ Disk just like Network Drive through the Internet.
Disk Type
Xtreamer e-TRAYz provides four kinds of disk types.
Disk Name Description
e-TRAYz Disk is a private space for sysadmin. Sysadmin can create new folders
and upload files freely, and also can share some folders to other users.
General user can use the folders shared by sysadmin. If sysadmin shares a
e-TRAY z D i s k
folder on his e-TRAYz Disk with 'read' or 'read/write' privilege, that folder will
be generated on e-TRAYz Disk of general user.
General user can't create new folder on e-TRAYz Disk however can
upload/download files depending on access privilege.
Public Disk
External Disk
Private Disk
Public Disk is a drive to share with other equipment in network.
Xtreamer(Media Player & Streamer) and other equipments connected to the
network can access to this drive.
Sysadmin also can share some folders on Public Disk to all users, then all users
can use them with 'read/write' permission only.
General user can use not the public disk but some folders on the Public Disk
shared by sysadmin. The Shared folders will be generated on e-TRAYz Disk of
general user.
External Disk is a drive for USB memory or USB external HDD. If there is no
USE device connected to e-TRAYz, External Disk will not be generated. Also
you can't share some folders in External Disk to other users.
General user not sysadmin can't use External Disk.
Private Disk is a dedicated folder of individual user not administrator
(sysadmin).
Individual user can upload/download files freely but can't share them with
other users.
41
Page 42

System Folder
It is a folder for personal homepage. Upload the
It is a folder which stores the new firmware files. This
Xtreamer e-TRAYz provides ‘System folder ’ which are created by default for specific features such as auto copy,
e-Downloader, RapidBox and so on. There is no right to delete at ‘e -TRAYz web’.
System Folder Location Description
RapidBox e-TRAYz Disk
www e-TRAYz Disk
Firmware_Backup e-TRAYz Disk
New_Firmware_List e-TRAYz Disk
Music(iTunes) Public Disk
It is a folder which stores the uploaded file by using
RapidBox function.
homepage files to WWW folder.
Enter "http://Domain name or IP address:8000" to see
your homepage.
It is a folder which stores the backup files for firmware.
This folder will be automatically created if you proceed
firmware backup.
folder will be automatically created if you proceed firmware
update.
It is Linked with iTunes Program. When you save music files
in this folder, them can be run directly from the iTunes
program.
It is a folder which stores the downloaded file by using
eDownloader Public Disk
eTorrent Public Disk
USB_Copy Public Disk
CAUTION)
In Windows explorer, it is possible to delete the system folder, but please be careful not to delete the system
folder.
eDownloader function.
* Administrator(sysadmin) can change the folder(download
location). Refer to [eDownloader]-[Settings].
It is a folder which stores the downloaded file by using
eTorrent function.
* Administrator(sysadmin) can change the folder(download
location). Refer to [Settings]-[Service]-[e-Torrent].
It is a folder which stores the uploaded file by using USB
Copy function.
42
Page 43

e-TRAYz
e-TRAYz supports functions to store my data on e-TRAYz server as well as to share it with others on equivalent
interface with Windows explorer at internal network environment and external internet environment.
* e-TRAYz is allowd on Windows 2000, 2003, XP, Vista, and Windows7 environments. The e-TRAYz edition
for MAC OS X will be supported later.
Since e-TRAYz is connected with local computer as like network drive, such as C:\ or D:\ hard disk drive, you
can store, move, copy, update, delete, and execute files conveniently on (or from) e-TRAYz without using FTP
program or complicated up/download.
You also can simply share files with others by creating user account conveniently to set up sharing function.
To use e-TRAYz functionality, first of all, You need to install e-TRAYz connector on my PC. You can download
e-TRAYz connector from right upper side of web login page (http://IP address:8080/).
Install the connector program accordance with the procedures. After installation, please reboot the PC and use
the Xtreamer e-TRAYz.
43
Page 44

Run e-TRAYz
TRAYz Disk to
ou can
TRAYz Connect/Disconnect window is
'After Login, auto connect
1. Double click the e-TRAYz icon created on
desktop after installation of e-TRAYz
connector.
2. Input IP address of e-
connect and password created after install,
and then click login button. (If you click
'save ID' and 'Auto Login', y
conveniently login next time.)
[When administrator account access]
3. e-
activated. In this window, e-TR AY z Disk,
and Public Disk are basically connected.
In this case, you can select drive name.
4. If there is no USB external disk, External
Disk is not connected.
5. If you click
drive', it is automatically logged in next
time without disk selection phase.
44
Page 45

[When user account access]
is basically
' button, disk
6. The ‘Private Disk’ for personal space and
the ‘e-TR AY z D i s k ’ shared by sysadmin
are connected. ‘Private Disk’
connected.
7. User can select both drive’s name.
8. If you click 'Connect
connection is completed with announcing
by connection sound.
9. It can be found that Xtreamer e-TRAYz is
connected to a network drive.
45
Page 46

Disk Using
Since e-TRAYz is connected as like network drive style, you can use it as like hard disk drive, such as C:\ or
D:\ on local computer.
NOTICE)
General users who are not e-TRAYz owner (or system administrator) can access e-TRAYz with access
authority (such as, read only or read/write) set up by owner.
When owner allows sharing a particular folder as 'read only', user can only upload file to the folder, but
not edit, download nor delete files.
46
Page 47

Disk Disconnect
Click right mouse button on the disk
You can release the disk connection as followings;
Release it on tray icon menu
1. Select Disk Connect/Disconnect menu
after clicking right mouse button on tray
icon.
2. If you click 'Connect' button after releasing
Public Disk or External Disk on check box,
the connection of disk is released.
e-TRAYz does not allow this release style for
e-TRAY z D i s k .
Release it directly on Window Explorer
1.
connected as a network drive at Explorer.
2. Select a 'Disconnect' field on menu. Then,
connection of the disk is released.
47
Page 48

Setting
Auto run when windows
If You click right mouse button of the icon and
then click 'Setting' field, environment setting
window is created.
Set up login environment
1. You can save ID account on Connector.
2. If you check 'Auto login', e-TRAYz will be
automatically logged in from next time.
3. If you check '
starts', disk will be automatically connected
from next PC booting.
When You use router, You need to maintain port
information to use e-TRAYz functions well on
Internet environment.
4. The default port numbers set up on e-TRAYz
server are that e-TRAYz Home is 8080 and
e-TRAYz is 13196.
5. When you need to apply a port number set
up on server to owner's router or you need
to use other port, you can change the port
field on 'User Port'.
48
Page 49

Share
e-TRAYz allows to connect disks on Windows as well as to share folder on the disk among users.
The folder on e-TRAYz Disk among connected disks is set up sharing authority by selecting one between 'Read'
or 'Read/Write' options.
The folder on Public Disk is set up sharing authority by 'Read/Write' option. The folder on External Disk cannot
be shared.
When the sharing is set up among users, the sharing information is sent to users via e-mail. To do well
this procedure, Mail Server (SMTP) and DDNS must be set up on e-TRAYz.
Mail server is set up on [Settings] - [System] - [Mail(SMTP)] or [Setup wizard] - [Mail]. DDNS can be set up on
[Settings] - [System] - [Network] or [Setup wizard] - [DDNS].
Sharing setup is allowed for only top level folder on each disk.
Sharing Setup on e-TRAYz Disk
1. Click right mouse button of the folder will be shared.
2. Select ‘Share’ menu on sub-menu after over the mouse on e-TRAYz menu.
3. The sharing setup window will be created.
49
Page 50

4. Set up privileges for selected folder. When
atically create user
mail included
account information and sharing
you set up it as 'Read only', other users can
not edit nor delete the folder.
When you set up it as 'Read/Write', other
users can have equivalent authority for the
folder with owner.
An unregistered user case
- Insert e-mail address related to a user who
will share folder.
- e-TRAYz will autom
account and send an e-
information.
An unregistered user case
- When a user is registered on Web browser,
user's 'Members' list is created on right side
of e-TRAYz window.
- If you click user ID on 'Members' list, the
user ID is automatically listed on 'Enter user
ID or E-mail address' field. In this case, you
can directly insert ID on this field, too.
50
Page 51

If a New user is created with e-mail, you can find
user account info.
5. e-TRAYz will send sharing information for the folder to users via e-mail.
Sharing Setup on Publick Disk
1. All users are allowed to use the shared
folder on Public Disk with 'Read/Write'
privilege.
2. To add new users, enter E-mail address,
separated by commas
.
51
Page 52

Sharing options
ou want to add new user for
' button on
lower side of option window, the confirm
' button, this
You can directly alter sharing information, such as access privileges and user setup, on Windows.
1. Click right mouse button on the shared folder will be altered.
2. After over mouse on e-TRAYz m enu, if You click 'Sharing Option' menu on sub-menu
3. 'Sharing Option' option window will be created.
4. You can see a lot of information related to
an access privileges and sharing of current
folder. When you want to release share
status for a user, click right mouse button
and then select 'Kick out' menu.
5. When y
sharing a folder, click the user's ID or insert
the ID directly. In unregistered user case,
you can set up account and sharing by
inserting their e-mail address.
Unshare
If You click 'Unshare this folder
window is created. Click 'OK
releasing is completed.
52
Page 53

e-TRAYz web
The e-TRAYz web is a functionality to store data into e-TRAYz server as well as to share data with other users by
only connecting into Xtreamer e-TRAYz via web at anytime and anywhere, without installing the e-TRAYz
Connector.
You can use this environment not only Windows but Macintosh and Linux.
You can login on e-TRAYz Home(http://Domain or IP address:8080/) and then use it by clicking 'e-TRAYz web'
icon.
This is a User Interface of e-TRAYz web.
53
Page 54

File management
nsfer capacity is 2GB in both
ou click 'OK' button on
upload is
File Upload
1. Click 'Upload' button to upload files after
moving into the directory which has files
to upload.
2. Select a transfer type
Maximum tra
types.
One by One File upload
- You can upload files by adding each file.
- Select file to upload on Explorer activated
when you click 'Search' button.
- Click 'Upload' button when you finished
files selection. When the transfer is
completed, if y
confirmation window,
completed.
Multiple Files Upload
- Upload several files by using Flash upload.
You can upload at a time, up to 20 files.
- Select files to upload on Explorer after
clicking 'Add files' button.
- File upload is processed when you click
'File upload' button. You can cancel file
uploading by clicking 'x' button at right
side of uploading file (or waiting file to
upload).
NOTICE)
If general user got access privileges as 'Read only' for shared folder from e-TRAYz owner, the user can
download file only, not upload files to the folder, change name, move file, nor delete file.
- When the upload is completed, the upload
window is automatically closed.
54
Page 55

File/Folder Download
load is
ou want to download multiple
files/folders in same time, select
1. Click file or folder to download. (Click file
name for file and triangle button for folder.)
2. If you click download menu with mouse
over on file name, the down
processed.
3. When y
files/folders and click 'Download' button on
upper end.
NOTICE)
When multiple files and folders are transfered, it is automatically compressed and then transfered.
Refer to ‘Online user manual’ for more information about ‘Create New Folder’, ‘Move File/Folder’ and so on. You
can find Online User Manual at the top of the e-T R AY z web page.
55
Page 56

Linkmail
When transmitting a large-sized file to someone else, the Linkmail function is used to forward via mail.
To send Email, mail server(SMTP) and DDNS must be set before. Refer to [Settings]-[System]-[Mail(SMTP)]
or [Setup wizard]-[Mail Server] for SMTP setup and refer to [Settings] – [System] – [Wired Network] or
[Setup Wizard] – [DDNS] for DDNS setup.
1. Click left-button of mouse and select Link
Mail menu.
2. If you want to send more than 2 files,
select check box of each file and click
[Action]-[Link Mail] button at the top.
You can attach files up to 5 at once.
3. Input email address of receiver, title and
contents. E-mail address are separated by
semicolon(;)
4. Click Send button.
5. E-Mail Receiver can download the attached
files for next 7 days.
56
Page 57

Linkcopy
Image Link : Show link with image
Video Link : Show link with video
By copying the address of the file saved on e-TRAYz, it may be pasted on the bulletin board or web page.
1. After clicking the left button of the mouse
on the file name, select the Linkcopy menu.
2. Select Link type what you want.
- Direct Link : Show link except on HTML
tag
- Download Link : Show link with download
tag(a href)
-
tag(img src)
-
tag(embed)
3. Click Link Copy button and paste it where you want with 'Ctrl + V'.
4. Links can also be copied by dragging.
57
Page 58

Share
e-TRAYz owner can create a folder on e-TR AY z D i sk 와 Public Disk, and then share the folder with other users.
How to share on ‘e-TRAYz web’ is equal to the ‘e-T RAY z ’.
General users cannot setup of sharing and can use shared folder by administrator on ‘e-TRAyz Disk’.
When the sharing is set up among users, the sharing information is sent to users via e-mail. To do well this
procedure, Mail Server (SMTP) and DDSN must be set up on e-TRAYz. Mail server is set up on [Settings] -
[System] - [Mail(SMTP)] or [Setup wizard] - [Mail] on main page, and DDNS is set up on [Settings] - [System] -
[Network] or [Setup wizard] - [DDNS].
Creation of Shared Folder
You can proceed to create a new folder and setup sharing at once at ‘e-TRAYz web’.
1. Move into 'Create Shared folder' area on right of e-TRAYz Disk or Public Disk.
2. Insert shared folder name to create. Set up privileges for shared folder. If the folder set up as 'Read only',
other users except owner of the folder can only download files on the folder.
3. Insert a lot of information related to a user who will share folder.
- A registered user case : When a user is registered on Web browser, user's 'Users' list is created on right
side of e-TRAYz window. If you click user ID on 'Users' list, the user ID is automatically listed on 'Enter user
ID or E-mail address' field. In this case, you can directly insert ID on this field, too.
- An unregistered user case : Insert e-mail address related to a user who will share folder. Then, e-TRAYz
58
Page 59

will automatically create user account and send an e-mail included account information and sharing
information.
4. Click 'Share' button, sharing setup is completed. The folder icon(
) is altered into shared folder icon( ).
5. When user account is created, confirm
window is opened.
6. e-TRAYz will send sharing information for
the folder to users via e-mail. (To send e-
mail, mail server and DDNS must be set
up before.)
59
Page 60

Setup on e-TRAYz Disk
red folder. When
TRAYz will automatically create user
mail included
account information and sharing
1. Move into 'Share this folder' area on right of e-TRAYz Disk or Public Disk.
2. Set up privileges for sha
you set up it as 'Read only', other users
except owner of the folder can download
on ly.
An unregistered user case
- Insert e-mail address related to a user who
will share folder.
- e-
account and send an e-
information.
60
Page 61

An unregistered user case
3. If a New user is created with e-mail, you
4. e-TRAYz will send sharing information for the folder to users via e-mail.
Sharing setup on Public Disk
- When a user is registered on Web browser,
user's 'Members' list is created on right side
of e-TRAYz window.
- If you click user ID on 'Members' list, the
user ID is automatically listed on 'Enter user
ID or E-mail address' field. In this case, you
can directly insert ID on this field, too.
can find user account info.
1. All users are allowed to use the shared
folder on Public Disk with 'Read/Write'
privilege.
2. To add new users, enter E-mail address,
separated by commas
.
61
Page 62

Sharing Options
' button after altering
You can change sharing information, such as access privileges and user setup.
1. Move to shared folder to change.
2. On right side of Windows, You can find that 'Sharing with' list maintains users who share this folder and
'Not sharing with' list maintains users who do not share this folder.
3. If you click 'OK
'privileges setup', altering of privileges is
completed.
When you want to release share status for
a user, click left mouse button of the user
ID and then select 'Kick out' menu.
4. When you want to add new users for
sharing a folder, click the user's ID or insert
the ID directly. In unregistered user case,
you can set up account and sharing by
inserting their e-mail address.
62
Page 63

Unshare
Click a triangle button located on right side of
the folder, and then click ‘Unshare this folder’
button.
63
Page 64

RapidBox
Rapid Box is the functions to upload a file onto my e-TRAYz as well as to send a linkage of the file to others. By
using RapidBox functions, at once, you can do a file upload and a send of link mail. A receiver of the mail can
download files during 7 days.
When you allow Rapidbox function to use for guest, the guest can upload a file to e-TRAYz without user account
on login browser.
The uploaded file via RapidBox is stored on ‘RapidBox’ folder in e-TRAYz Disk.
You can find all information related to the uploaded files via RapidBox on 'Recent upload' as well as retransfer
the files as e-mail with link.
You can login on e-TRAYz Home(http://Domain or IP address:8080/) and then use it by clicking 'RapidBox' icon.
64
Page 65

File Upload
When file transfer is finished, link
mail address to send link
nd now' button with inserting brief
message on 'Mail Message' field. Then
mail. You can set
1. Move to File Upload page and Click 'Add
files' button.
2. Select files to upload. Yo u can select at
most 20 files and its maximum capacity is
2GB.
3. When you click 'File upload' button, the
file transfer is started.
65
4.
information of uploaded files is displayed.
5. Insert a e-
information of uploaded file. You can send
the e-mail at most to 3 destinations. Click
'Se
sending is processed.
If a Mail Server(SMTP) and DDNS are not set
up, you cannot send the e-
up the Mail Server on [Settings] - [System] -
[Mail(SMTP)] pages, or on [Setup wizard] -
Page 66

[Mail Server] page. And DDNS is set up on
[Settings] - [System] -
[Network] or [Setup
wizard] - [DDNS].
6. Mail receiver can download files located on
e-TRAYz server without user account during
7 days.
Recent Upload
At Recent upload page, you can view the history of RapidBox actions.
When you click ‘Send e-mail’ button after selecting some among the list, web page is changed into e-mail
sending page. Refer to [Rapidbox] – [file upload] part of this manual for more information about sending mail.
66
Page 67

. In 'Recent upload' page, you can remove file information by clicking 'Delete' button after checking files on list.
Allow Guest access
When you allow using RapidBox for guest who does not has user account, guest can upload files at the
Rapidbox field on web login page. The uploaded files are stored on Rapidbox folder in e-TRAYz Disk.
This functionality is useful when e-TRAYz owner want to receive some files without giving user account for file
sender. If you who are e-TRAYz owner, worry about arbitrary upload from others, you can deactivate the
function.
It can be set on RapidBox page or [Settings] – [Service] – [RapidBox] page.
RapidBox : status of ‘Allow’ RapidBox : status of ‘Deny’
Web login : status of ‘Allow’ Web login : status of ‘Deny’
67
Page 68

e-Downloader
e-Downloader is a function to download sequentially the link of files divided by several parts from file sharing sites,
such as Megaupload or Rapidshare. If you use e-Downloader function, you can download files onto e-TRAYz without
authentication at each download time as well as you can enjoy media file at TV.
At first time, a file downloaded through e-Downloader is stored on 'eDownloader' folder of 'Public Disk' directory.
You can change the download folder at 'Settings' menu.
Now, e-Downloader support to download file link of Megaupload and Rapidshare sites. e-Downloader will add further
sites soon.
You can login on e-TRAYz Home(http://Domain or IP address:8080/) and then use it by clicking 'e-Downloader' icon.
68
Page 69

File Download
1. Copy the link of file to download. If you access file download sites, such as warez-bb.org, you can easily
find file information on megaupload or rapidshare sites.
2. Attach copied links information onto 'Add Links' field at bellow side of 'Download' page and then click
'Add Links' button.
3. The e-Downloader checks status of upper side file first and then downloads. The waiting time is various on
file status or policy download sites. If you want to cancel file downloading on waiting status, you can cancel
it by clicking 'Stop' button.
69
Page 70

4. The download is started from upper side file first after finishing waiting time. When a file download is
completed, download of next file is ready. The download is started after finishing waiting time.
Extract
1. Connect to e-TRAYz connector and then move to eDownloader directory on Public Disk. By using ZIP
program, uncompress (or release) number 1 file among separated files which is compressed type.
2. All compressed files are released automatically as one media file. At this time, all compressed sub-files
must be same name and existed on the directory.
70
Page 71

Download Option
1. If you click 'Stop' button on upper side, download is stopped. And then if you click 'Start' button again,
download is started beginning step again.
2. When you want to delete a list of particular files, click 'Delete' button. You can delete selected list,
completed download list, failed download list and all list.
Completed Lists
You can find completed download list all by through e-Downloader on 'Completed lists' page. You can delete
some of list or all by selecting the list. (It is deleted on the list only, but not downloaded files.)
71
Page 72

Settings
Download Setting
1. You can set up location to store downloaded file by using e-Downloader. Default downloaded location is
'Public Disk' - 'eDownloader'.
2. When you check 'Remove completed Downloads' button, if file download is completed on download page,
the list is automatically deleted.
3. When you download a file, if the file already exist on folder, you need to select one option among 'Skip',
'Overwrite', and 'Auto rename'
Premium Account info.
If you are premium member at Megaupload or Rapidshare, you register our account information on e-
Downloader site. Then, you can get a premium member’s benefits, such as a download without waiting time
supported by Megaupload or Rapidshare site.
72
Page 73

1. Click 'Add Account' on top of Windows.
2. Select a site, and insert ID and password -
Now, e-Downloader services for
Megaupload and Rapidshare site.
3. If you click 'OK' button, the registration is
completed.
73
Page 74

SyncFolder
Input IP address or Domain name of
name onto
With SyncFolder, you can sync folder to others who have a Xtreamer e-TRAYz. After Registering to 'friend' with IP(or
domain) and setting, you and your 'friends' can share and sync folders each other. You can set up a Sync Schedule
and synchronize the folders synced with me by using ‘Sync Now' button right now.
Add Friends
To use the 'SyncFolder', friends must be registered. Yo u c an register to friend with his IP address(or domain) and
can register up to 7 people
1. You can find ‘Add Friends’ field on the
right of page.
2.
friends' e-TRAYz, and friend’s
'Add friends' field. (ex. 211.126.236.21 or
xtreamer.myetrayz.net)
3. Click 'Add' button, then All friend list will
be added.
4. With mouse left-click, you can edit friend's
name or delete from the list.
74
Page 75

Folder I Sync
You can synchronize your folder to your friends. Sync folder is limited to a maximum of 10.
Synchronize
1. Click 'Folder I Sync' menu.
2. Select a folder to sync and input ‘Share
name’ field.
3. Click 'Select' button and select friends that
they sync your folder.
4. Click 'Create' button then 'folder I Sync' list will be added on the left site of the page.
75
Page 76

5. 'Folder I Sync' will behave normally to accept the others.
Sync with more friends
1. Click a sync folder you want to share with more friends and then choose 'Sync with more friends' menu.
2. You can view friends list not to shared. Select friends to share and 'OK' button.
3. Click a folder from the 'Folder I Sync' list, you can view friends list that they share and sync the folder on
the right side of the page.
76
Page 77

4. Click a friend you want to release the sync
setting and then choose 'Kick out' menu.
Remove Sync
You can not to rename or changing of directory but remove ‘Folder I Sync’
Click the folder you want to remove 'sync' and choose 'Remove Sync' menu.
77
Page 78

Getting Synced
To get synced, friends must be registered each other. Refer to 'Add Friends' in [SyncFolder] menu of this
Manual.
Getting Synced
After adding friends,
1. Click 'Refresh Sync Folder List' in 'Folder synced with me' menu.
2. Click 'Accept' button of the folder synced with me.
78
Page 79

4. The status is changing to 'On Standby'.
3. Select my folder to get synced with friend's
folder and click OK button.
79
Page 80

Sync Now
You can sync some files what you want right now.
1. Click a folder you want to sync and then
click 'Sync Now' menu.
2. Only files that are not in my folder are
listed. Select files what you want to sync.
3. Click OK button, then synchronization is
begun.
4. Progress shows the number of downloaded files and the number of total files.
80
Page 81

Recent Sync Info
1. Click the folder and then click 'Recent Sync
Info' menu.
2. You can check recent sync date and the
number of synced files.
Setup Sync schedule
You can set up a Sync Schedule of total folders synced with me.
1. Click 'Folder synced with me' menu. Click
'Set up Schedule' button at right upper
side.
81
Page 82

2. Select 'Set up Schedule' of Reserve Process
and set up frequency and time.
3. Click OK button.
4. You can see that schedule setting is
completed successfully.
Changing Syncfolder
You can change your folder which is set synchronization with your friend’s folder. Click ‘Change a folder’ menu.
82
Page 83

Remove Sync
You can't change sync name and my folder name. However, you can release setting of Sync(the list of synced
folders is remained).
If you want to delete at the list, request your friends to remove sync setting.
1. Click the folder and then click 'Remove
Sync' menu.
2. Click OK button
3. The folder is changing to initial status.
83
Page 84

e-Torrent
You can read RSS info of Torrent file or download it using e-Torrent. With e-Torrent, users can easily download media
files directly and enjoy it on TV.
The downloaded file via e-Torrent is stored on ‘eTorrent’ folder in public Disk. Yo u can change download folder
at ‘Settings’ page.
You can login on e-TRAYz Home(http://Domain or IP address:8080/) and then use it by clicking 'e-Torrent' icon.
84
Page 85

Tor r ent RSS
the most current torrent files list will be
button will regenerate the list of
Torrent RSS displays a list of Torrent files by acquiring the RSS data from the sites providing torrent files such as
Mininova and isohunt. With Torrent RSS, users can easily obtain the most recent torrent files without having to
visit numerous sites and download media files directly to e-TRAYz.
Also, users can register frequently used Torrent sites that provide files to effortlessly obtain RSS data by using
the ‘Site Registration' function.
Viewing the list of Torrent Files
1. The opening Torrent RSS menu screen will
appear if the e-Tor rent icon is clicked and
generated on the right-hand side of the
screen.
2. Reload
files.
3. When you click the arrow buttons beside of
file name, you can see more information
about each file.(It is supported only specific
site)
4. Click the specific site name from the site
list on the left to bring in the list from the
applicable site only. With the same method,
it may bring in the file list only for specific
category.
85
Page 86

5. For certain sites such as Mininova
, an
interface is provided so that users can
directly download files without having to
connect to the applicable sites. Users can
download immediately by clicking on the
‘down' button.
6. If you click on a file name from the list, you
will be linked to the download page of the
applicable site, or you can download
torrent seed file directly.
Torrent Site Registration
1. Copy the RSS url what you want to register.
2. Site registration popup window will appear
if you click on the ‘Site Management'
button located on the upper left hand side
of the screen.
86
Page 87

3.
Type in the name of the site as well as the
' button on the
bottom of the screen and refresh the
If the file list is not read from the
RSS URL address and click on ‘Add' button,
which will register the desired site on the
bottom list.
4. Click on the ‘Confirm
Torrent RSS page to verify the added site.
5.
applicable site after registering URL, check
the URL address once again.
87
Page 88

Torrent Search
upper left hand side of the screen to
You can directly search torrent files from Mininova and isohunt if you use the Torrent Search function.
1. Select the torrent site that you wish to
search for.
2. Type in the word for the desired file and
click on the ‘Search' icon.
3. A list of files will be created on the right
hand side of the page.
4. You can either click on the file names to be
connected to the download site, or directly
download the applicable files by clicking on
the ‘Down' button when allowed by the
sites.
5. You can use the ‘Recently Searched List'
from the drop down menu located on the
conveniently search for files.
88
Page 89

Torrent Download
an interface to download files directly
downloaded location on the lower left
You can download files by using 'Torrent RSS', ‘Torrent Search' and Torrent File Registration.
Current page shows the list of files that are being downloaded. File name, status, file size,
completed(downloaded size), and progress are displayed.
You can verify file information and downloaded location by clicking on a specific file name. Also you can pause,
restart, or delete a specific file.
File Download by using ‘Torrent RSS’ and ‘Torrent Search’
1. Click on the ‘Down' icon from the right
hand side of the list in case the site offers
without having to connect to the applicable
site such as Mininova.
2. A confirmation window will be displayed to
show that a file has been added to the
download list. File download will begin
when you click on the OK button.
3. You can check the progress of files that are
being downloaded from the ‘Download'
page.
4. You can verify file information such as the
date, uploader, number of peers, URL, and
hand side of the screen when you click on
a file name.
89
Page 90

File Download by using Torrent File Registration
1. Click Register File from the lower right
2. Select a torrent file that is saved in the PC
hand side of the ‘Download' page.
and click on the Ok button. You can upload
up to 20 files at once.
3. Yo u can verify the added files from the list
and the downloading progress.
4. You can verify detailed information of a file
on the bottom of the screen by clicking on
a file name from the list.
90
Page 91

ETC
TRAYz address in
Print Connection
1. Connect USB printer to USB host port of e-
TRAYz
2. In PC, Select [Start] – [Run] on window
desktop and input e-
open. (ex. \\192.168.0.10)
3. Double click network printer icon, Lp.
4. Search for network printer.
91
Page 92

5. Select Disk to select the path in which
installation CD provided by printer
manufacturer or printer driver file
downloaded from manufacturer's website is
located.
6. Install printer driver.
7. Select [Start]-[Set]-[Printer and Fax] to
check that printer has been installed with IP
of e-TRAYz .
92
Page 93

Using iTunes
You can listen to the music saved in Music(iTunes) folder of Xtreamer e-TRAYz by using iTunes client.
To use this function, you need to activate iTunes service first. And audio files must be saved at Music(iTunes)
folder of Public Disk.
1. Activate iTunes service in [Settings] – [Service] – [iTunes] menu.
2. When executing iTunes, e-TRAYz_music is displayed in share item on the left menu. This display all audio
files located in Music folder of e-TRAYz. If there is a lower folder, all files in the folder are displayed as well.
3. In case Korean or other letters break, this is a problem related to id3tag. Modification in UTF-8 type is
required by using id3tag editor. (Ex. you may download and use a Mp3tag freeware)
4. Music(iTunes) folder is updated periodically by using Update Interval that you set up in [Settings]-[Service]-
[iTunes] menu. The file list may be renewed if you click the ‘List update’ button at the bottom of the page.
93
Page 94

USB Auto copy
In case you execute USB Auto Copy, the files in USB device are backup automatically in USB_Copy folder of e-
TRAYz disk .
1. Connect The USB device to USB 2.0 Port of
e-TRAYz device. (If you connect it to USB
1.1 port, USB autocopy is not excuted.
2. Press the Copy on the back of the device
for about a second. It begins copying from
the USB device to USB_Copy folder along
with a beep sound.
3. If backup is finished, two beep sound will
be produced.
4. During the copy, this button is pressed for
6. You can see the backup folder created with combination of data and time at ‘Public Disk / USB_Copy’ folder.
3 sec and released the copy stopped with 2
beeps.
94
Page 95

Appendix
Play back any music file you want, and you can listen to the music on streaming (i.e. without downloading the
, you upload relating files with hompage on WWW folder, located in subordinated
depend, you should take precautions, and make sure you back up the existing settings before making any
Application
When you want to share audio files with iTunes.
• Store any MP3 file in the music(iTunes) folder under the open folder.
• Run the iTunes program in your computer.
• The name ‘eTRAYz-Music' will show up automatically as a shared item.
• The list of MP3 files stored in the music folder of the open folder appears.
•
whole file).
• This is possible only when my computer is in the same network environment.
If you want to share a USB printer at home or office
• Connect a USB printer to the server.
• Search the IP address of the servers on my computer and you will see a printer named ‘Lp’.
• Connect this printer.
• You need to install a Windows printer driver for this printer to connect.
• The driver comes with the Windows operating system or is provided by the printer manufacturer.
When you want to share Public Disk and USB Device with other PC or Dvix Player.
• Create a new folder in Public Disk and save files. (e-TRAY Disk cannot support this function)
• Activate CIFS ser vice at [Settings]-[Service]-[CIFS] page.
• Search the network folder for a media device with the network folder search function(ex. Divx Player..)
• A folder named ‘Xtreamer e-TRAYz’ or server name that is set at [Settings] – [System] page is found.
• You can play media files in the ‘Home’
When you want to have your personal homepage
• After you connect ‘e-TRAYz’
‘e-TRAYz Disk’.
• Rename the preexisting file named ‘index.php’ (e.g. to ‘index.php_’)
• When you enter the address(http://Xtreamer e-TRAYz IP address/) of the device, you can see you home page.
• In case you make any changes of the settings of the Apache web server or PHP, on which the existing services
changes.
95
Page 96

If you want to use a wireless LAN
Even when you installed in a single disk but want to add another disk later on, you can expand the disk with
When the IP address of the IP sharer changes, you need to up date the address with the DDNS manage of the
• Connect to a USB port a USB wireless device compatible with the product. (the upper is USB 2.0 and the lower
is USB 1.1)
• Set wireless network at [Settings] – [System] – [Wireless Network] page.
• As the wireless is slower and less stable than the wired LAN, use the latter if possible.
When you want to back up a USB flash drive
• Insert a flash drive into a USB port.
• Click the COPY button on the front for 1 second. The copy start with a single beep.
• The files in the flash drive are copied to Public Disk / USB_copy’ folde r.
• The copied files are generated with the current time and the same file names
• A single beep will ring when the copy is completed.
• If the disk is out of space, the copy failed with double beep.
• During the copy, this button is pressed for 3 sec and released the copy stopped with double beep.
If you want to expand the disk capacity with an external USB disk
• Connect a external USB disk to a USB port(The upper is USB 2.0 and the lower is USB 1.1)
• If it is connected to the upper, it is mounted on ‘USB 1’, or if it is connected to the lower, it is mounted on ‘USB
2’ in External Disk.
• Any partitions in the disk will show up as part01, ….partN, in order.
If you want to keep the data safe
• The device supports the RAID 1 mirroring mode.
• Choose the mirroring mode at the time of installation if you keep the data in the disk safe.
• The mirroring mode is only meaningful when you have two separate disks.
•
the disk manager to build a mirroring.
• In the mirroring, a single set of data is written on two disks for added safety.
• When one disk is in error, you can fetch the date from the other disk.
• However, unlike the linear (expansion) mode, the mirroring mode slows down the speed of writing on the disk
and lets you use only half the total physical disk space.
If you want to make a connection with a fixed name not IP Address
• Move to [Settings]-[System]-[Wired Network] page and find the DDNS part.
• Set any name you desire. (OOO.myetrayz.net)
• When the settings is complete, you can access with the name via internet. However, if the devices is hooked to
a IP sharer, make sure that you set DMZ or Portforwarding on the IP sharer.
•
system administrator.
96
Page 97

If you want to fine an IP address auto
A WindowsXp or higher comes with a function to find a UPnP device in the network environment. If the UPnP
web browser will start, getting the web page of this device. You can get the IP address
•
is not active, activate it.
• The name of this device is searched automatically.
• Click this device and the
from the address of the web page.
If you are Mac user.
• Using e-TRAYz We b
- The e-TRAYz web lets you upload and download files.
- It is recommended that you use Firefox for a web browser.
• Using AppleTalk
- Try connecting the server with 'aftp://the device address/your account.'
- When the authentication screen pops up, type in your account ID and password.
- Your own domain is mounted to the finder.
• Mac users cannot use a e-TRAYz client program using connector. (will support later.)
97
Page 98

FAQ
TRAYz home port has been correctly set at setting menu of connector. If you use another port not
Not possible to install by the installation CD provided or setup file?
• Check if PC and device are in the same network band. In DOS, it can be checked if Ping is possible with the IP
address of device. (For example, it is normal if response is produced after the command of ‘ping IP address’)
• Check if installation key has been correctly entered.
• Check if hard disk has been correctly mounted. (With normal status, the red LED is turned off)
Error occurred in the course of CD installation?
• Forcefully close installation programs in window admin.
• Reboot device and install again.
Installation does not proceed normally when entering installation key?
• Installation key input is case sensitive. Check for capital and small letters.
When reinstalling, installer cannot search network-attached device.
• First of all, you have to booting initialization for reinstallation. When the power switch is turned on while Reset
button is pressing for 2~3 sec, a booting initialization is done
Cannot login with e-TRAYz connector.
• Verify that IP address and port number is correct.
• Verify that IP sharer is set correcly if you use Domain using DDNS.
Cannot access to e-TRAYz Home(e-TRAYz webpage).
• Verify that program has been correctly installed.
• Verify that IP address(http://IP address:8080/) has been correctly entered. (If not enter the port number, you
cannot access e-TRAYz home.)
• Verify that IP sharer is set correcly if you use Domain using DDNS.
Does not opened sharing windows at e-TRAYz connector.
• Verify that e-
default port(8080), input the port number into Usesr port field.
.
Forgot password? : General Users
98
Page 99

• Reguest a password initialization to administrator. Administrator click user ID at [Settings] – [Privileges] – [User]
page. Initialize user’s password. New password will be set as same as ID.
Forgot password? : Administrator
• Click ‘Password initialization’ menu at the lower of password field. Enter installation key and click ‘Clear’
button. New password will be set as same as ID.
Want to know the firmware version.
• Access to e-TRAYz Home page. Firmware version is displayed at the top of screen. (ex. Ver.1.0.0)
• You can also see the version at [Settings] – [System] – [Upgrade] page too.
Can not the USB copy.
• Verify that USB disk has been correctly connected. Port for Copy function is the lower port of copy button.
• Make sure that e-TRAyz have enough capacity for USB copy.
Where is USB device connected e-TRAYz?
• The connected USB device is in the External Disk as USB1 and USB2.
Can not upload data to USB devices.
• Make sure that USB device have enough capacity.
• If a file system of USB device is NTFS, it is possible to upload or edit files to USB devie. Please use the USB
device after formatted as FAT32 or XFS.
Want to upgrade Software.
• Move to [Settings] – [System] – [Upgrade] page. You can see all the firmware files. Upgrade firmware refer to
[Settings] – [Firmware upgrade] menu of this manual.
Want to Shutdown system.
• Move to [Settings] – [System] – [Power] page. Choose ‘ShutDown’ and click ‘OK’ button.
• If you cannot access to ‘Settings’, Turn off the Power switch of device.
Can Mac or Linux users use it too?
• Mac or Linux users can use all of the Xtreamer e-TRAYz function except ‘e-TRAYz’ using e-TRAYz connector.
99
Page 100

Where can I download the connector program?
• Access to e-TR AY z Home page(http://IP address of Xtreamer e-TRAYz:8080/). Click the ‘e-TRAYz Connector’
menu at the top of page, you can download it.
Is simultaneous connection with a single ID possible?
• Simultaneous connection with a single ID is possible. However, it is not recommended for stable operation.
What is the initial ID and PW of administrator?
• The initial ID and PW are sysadmin and sysadmin. For security, please change your password after login.
100
 Loading...